kenya learner driver handbook - ntsa.go.ke private light vehicles learner's... · foreword...
TRANSCRIPT
KENYA LEARNER DRIVER HANDBOOK
1

KENYA LEARNER DRIVER HANDBOOK
For
Light and Professional Light Motor Vehicle

Kenya Learner Driver Handbook Guide for Light and Professional Light Motor Vehicle
Copyright © 2016
Compiled by NTSA
National Transport and Safety Authority Hill Park Building; Upper Hill
PO Box 3602 Nairobi 00506
Mobile: +254 09 932 000 Office: 020 663 2000
Email: [email protected] Web: www.ntsa.go.ke
Illustrations by Simon Ndonye
Published by Impact Africa

CONTENTS FOREWORD ........................................................................................................... 5 UNIT 1: INTRODUCTION TO DRIVING ................................................................. 6 UNIT 2: FUNDAMENTAL DRIVING RULES ........................................................... 7 UNIT 3: MODEL TOWN ......................................................................................... 9 UNIT 4: HUMAN FACTORS IN TRAFFIC ............................................................. 14 UNIT 5: VEHICLE CONSTRUCTIONS AND CONTROLS .................................... 21 UNIT 6: SELF - INSPECTION OF VEHICLE ......................................................... 28 UNIT 7: OBSERVATION ....................................................................................... 31 UNIT 8: VEHICLE CONTROL ............................................................................... 33 UNIT 9: COMMUNICATION ON THE ROAD ....................................................... 38 UNIT 10: SPEED MANAGEMENT ........................................................................ 43 UNIT 11: SPACE MANAGEMENT ......................................................................... 46 UNIT 12: EMERGENCY MANOEUVRES.............................................................. 48 UNIT 13: SKID CONTROL AND RECOVERY ........................................................ 50 UNIT 14: ADVERSE DRIVING CONDITIONS ........................................................ 52 UNIT 15: PREVENTIVE MAINTENANCE ............................................................. 57 UNIT 16: CONDITIONS OF CARRIAGE ............................................................... 58 UNIT 17: HAZARDOUS MATERIALS ................................................................... 59 UNIT 18: EMERGENCY PROCEDURES .............................................................. 61 UNIT 19: WORK PLANNING ................................................................................. 66 UNIT 20: CUSTOMER CARE ................................................................................ 68 UNIT 21: THE EXAMINATION .............................................................................. 71 TRAFFIC SIGNS .................................................................................................. 72 MODEL TOWN ILLUSTRATIONS ........................................................................ 80

FOREWORD
This handbook is prepared as a guide for use by drivers. It is a comprehensive information source for the rules and regulations, information
and advice that you need to drive safely on the Kenyan roads.
It is important for every learner to get adequate training and practice before being issued with a rider’s licence. You can become a safe rider through acquiring the necessary skills and understanding of the road environment, by always being alert and defensive and by accepting that the prime responsibility for your safety on the road is yours.
This book will help learners prepare for the rider licence exam and also
enable experienced riders to refresh their skills from time to time. NTSA
5

UNIT 1: INTRODUCTION TO DRIVING
Motor vehicles are an important part of our day-to-day living and provide a
means for people and goods to be transported from one location to another.
The goal of driver training is ensure that you, as the driver, are equipped with
the right knowledge of how to handle your vehicle and how to act appropriately
when using the road.
Most traffic accidents are caused by human error, however this can be easily
prevented when the driver is adequately prepared for the traffic situation. This
training also ensures that you are prepared with the necessary skills to provide
safe and efficient transport services for goods and for passengers.
6

UNIT 2: FUNDAMENTAL DRIVING RULES
The road is governed by rules and regulations that ensure order is maintained
on the roads at all times. These rules and regulations are derived from
international, regional and Kenyan law. As a road user, you should be
knowledgeable of these rules as it is the initial step in ensuring that you and
other road users are safe on the road.
These rules and regulations can be found in the following documents: • The Traffic Act
• The Highway Code
The Traffic Act The Traffic Act sets out the laws that govern the use of roads and the
expected conduct of road users. It also includes some of the penalties and
fines for road users who do not abide by these laws.
Highway Code The Highway Code is a set of information, advice, guides and mandatory rules
for all road users in Kenya. It provides guidelines for animal, pedestrians,
cyclists and motorcyclists. The purpose of the Highway Code is to promote
safety, responsible behaviour and courtesy at all times.
It is your responsibility as a road user to read the Traffic Act and Highway
Code and learn the essential rules for safe driving or riding and the general
rules of behaviour in traffic regarding safety, courtesy and responsibility.
Below are some of the traffic regulations that can also be found in the Traffic
Act and the Highway Code:
Use of the horn, when necessary, to warn other road-users • You may only use your car horn while your vehicle is moving and
you need to warn other road users of your presence
• Do not use the horn when you are stationary on the road • Do not use the horn aggressively even when the other road users
are at fault
• Do not use your horn at places where the ‘No Hooting’ sign has been
placed
• Do not use your horn and at designated areas where hooting is
always prohibited e.g. hospitals and schools
7

Give right-of-way for specific vehicles, road users or in specific
situations such as • Police cars with siren on • Emergency vehicles such as fire engines and ambulances sounding
the siren or with flashing lights
• The presidential motorcade • When asked to do so by a police officer or traffic Marshall
Pedestrian range • You should not ride or drive in areas of the road designated for
pedestrians and cyclists
Traffic Signs and Signals Traffic signs and signals are used to communicate on the road.
• There are two types of traffic signals; hand signals and light signals
• Traffic signs are used to guide, provide information and warn all road
users. Most signs fall within three broad categories although there
are exceptions. These are
Triangle: Warning Circle: Giving an order Rectangle: Informing
8

UNIT 3: MODEL TOWN
The model town board is an example of a road network on a board. It is a
simplified representation used to explain the types of roads found in major
towns of Kenya and East Africa.
The model town board has several features. These features are:
1. One way traffic road 2. Two way traffic road 3. Roundabout 4. Parking zones 5. Yellow kerbs 6. Pedestrian crossing 7. Stop sign 8. Give way sign 9. Exit from main road/Entry in to main road 10. Exit from controlled parking zone/Entry in to controlled parking zone
11. Road markings e.g directional arrows, reflectors delta marks etc.
The model town board
9

A. One Way Traffic Road (Dual Carriage Way)
• This is a road where all traffic vehicles move in one direction. A road
with white continuous or broken lines dividing the lanes into equal parts • A white continuous line means no changing lanes or overtaking • A white dotted or broken lines means you can overtake or change
lanes if the road is clear/safe
• Land or field refers to the green part on the left side of the road. A
yellow marking protects the field. This yellow marking is known as
the yellow kerb • Yellow kerb means no overlapping, no parking, no waiting and no
stopping.
• The central reserve separates one-way traffic road • In between the central reserve, there is an exit from the main road or
U-turn
• A double yellow line separates a three-lane road or streets into equal
parts. Vehicles in a street or an avenue move in one direction.
depicts no changing of lanes and it appears on a two way traffic
road with more than one lane
(Crossing Allowed)
B. Two Way Traffic Road/Single Carriageway
• This is a road where vehicles move in opposite direction. A road with
single continuous or broken yellow line at the centre dividing the road
into two equal parts • Yellow continuous line means you stick to your side or no overtaking • Yellow broken line means you can overtake if the road is clear. On a
single carriageway, all drivers need to obey the rules of roads in
Kenya (keep left unless overtaking) • There is a safe and marked area on the road known as a pedestrian
crossing where the driver needs to slow down and stop so as to
enable pedestrians to cross from one side of the road to another

10

C. Roundabout • This is a meeting point of traffic where more than two roads meet at
a point
• The function of a roundabout is to facilitate the movement of vehicles
in different directions without any obstruction or collision
Rules of the roundabout: i. No stopping ii. No changing lanes iii. No parking iv. No overtaking v. No waiting
The roundabout is divided into 3 parts. i. Traffic Island: Green part at the centre of the roundabout used to
control the movement of the vehicles.
ii. Innermost lane (Lane 4): It is the only lane that allows the driver to
go round and make a full circle or a 360° angle from a four-lane
road. The innermost lane is the only lane where a driver/rider is
allowed to make a 270° angle from a three-lane road. iii. Space (Lane 3, 2 and 1): Drives on these lanes are not allowed to
make a full circle or a 360° angle.
• You are required to keep left and move in a clockwise direction on
the roundabout
• Lanes are counted/numbered from the outermost lane to the
innermost lane
Common mistakes made when approaching the roundabout: i. Approaching the roundabout in wrong lane. ii. Leaving/exiting the roundabout in the wrong lane. iii. Changing lanes on the roundabout. iv. Incorrectly observing the traffic lights.
11

D. Parking zones The model town board has two types of parking:
i. Angle/ample/controlled parking zone. ii. Flush/parallel/uncontrolled parking zone.
Angle Parking: In angle parking, vehicles are designated to flow in one
direction. The parking area has a designated entrance and exit from both
sides. These are the rules for angle parking: i. Strictly for small cars only (Saloon). ii. Park from the farthest end (far end). iii. Park by forward gear (direct). iv. Leave/exit by reverse.
Flush parking: This kind of parking is found on the left side of road in the
direction of traffic. It has no security thus it is an uncontrolled parking zone.
The rules for flush parking are: i. All types of vehicles except tractors and trailers can park here. ii. It has an entry but you must leave space for the exit. iii. Park from the farthest end. iv. Park by reverse. v. Leave/exit by forward (direct) driving.
E.Stop Sign It is a red in colour and is an eight-sided figure (octagon) with white letters. It is positioned at a junction when joining a two-way traffic road. Traffic or vehicles are required to stop and look right, left and right again and
only proceed if the road is clear. Stop sign on a model town is represented
by a white continuous line at the junction/Exit
F. Give Way/ Yield Sign This is a red triangular shape with the apex facing downward. It has a white
border. Give way sign on a model town board is represented by a white
dotted line at the entry or junction.
Vehicles are required to slow down or stop if necessary and then only proceed
if it is safe.
RULES OF THE MODEL TOWN BOARD
• Use the shortest and most correct route without using the parking • Use the longest and most correct route without using the parking • Only use the parking zone as a route as a last option (if there is no
other route) (Further instructions on the model town are on page 78)

12

Directions on a four-lane road when approaching a roundabout
Lane 1 has two options
• Stay on lane 1, Go straight, 0°
• Turn left at 90°
Lane 2 has one option
• Go straight only, 0°
Lane 3 has two options • Stay on lane 3, go straight
• Turn right at 90°
Lane 4 has four options • Turn right at 90° • Come back at 180° • Turn left 270° • Go straight Turn 360° making a full circle and exit straight on lane four
(4) after going round the roundabout clockwise direction
Directions on a three-lane road when approaching the roundabout
The system is (2, 1, 5) Lane 1 has two options
• Go straight 0° • Turn left at 90°
Lane 2 has one option • Go straight only 0°
Lane 3 has five options • Go straight 0° • Turn right • Turn right, stay on lane 3, enter on lane 4 at 90° • Come back on lane 3, and enter 3 at 180° • Turn left on lane 3, enter on lane 3 at 270° and then shift to lane 4 on
the broken line

13

UNIT 4: HUMAN FACTORS IN TRAFFIC
Observation When using the road, pay attention to your surroundings and stay alert
whether you are walking, cycling, riding or driving a motor vehicle. Most
accidents can be avoided when road users stay attentive.
Some rules for observation include: • Keep your eyes moving. Do not just focus on one angle • Get a wide view of what is ahead and behind you. This allows you to
create enough room between you and the other road users
• When driving or riding, make use of all mirrors; the rear view and
wide view mirrors
• Pay attention to the vehicle instruments • Ensure that other road users can see you • Watch other road users and in particular for cyclists, motorcyclists
and pedestrians
• When passing parked cars, watch out for opening doors and exiting
passengers
• Give special attention to vulnerable road users such as children,
elderly people and persons with disabilities
• Give special attention to users of non- motorized transportation such
as horses, donkey carts, handcarts, bicycles and wheelchairs
Health and Safety Health refers to your physical and mental wellbeing. It is important that at all times you make choices that will not interfere with your wellbeing. Any road
user is more likely to make better judgment if they are in good health. The following are some of the issues that may interfere to ride safely
Eyesight and vision • Check your eyes. If you need spectacles to meet the required eyesight
standard, ensure that you wear them before starting any journey • It is dangerous and risky to ride with incorrected defective vision • Do not wear sunglasses or tinted helmet visors at night or in
conditions of poor visibility
Fatigue Fatigue is extreme tiredness as a result of mental or physical exertion. Do not
start a journey if you feel tired
14
The following may cause fatigue:
• Insufficient sleep or rest • An extended length of time performing the same task • Sleep disorders and other illnesses • Driving at the time of day when you are usually resting or sleeping
e.g. night driving, early morning driving
Fatigue decreases your ability to make the right decisions, to avoid
driver fatigue; • Get quality sleep before driving • Take regular breaks when driving over long distances • Eat balanced meals at regular intervals • Keep fit and healthy • Avoid driving or riding your motorcycle at night. This is when you are
likely to feel sleepy • If you feel tired, stop at a safe place and rest
Distractions Distractions in driving can be described as anything that reduces your ability to
respond as quickly as you should during an emergency. For this reasons some of these ordinary activities are prohibited for drivers.
Using hand held devices • Using a cell phone, whether talking or texting, your ability to be keen
on the road. Statistics indicate that the accident rate is significantly
reduced when motorists refrain from using hand held devices. As a
safety precaution, it is best to switch of phones so that ringing phone
is not a distraction. Alternatively, it is good to put the cell phone or
other devices out of reach for the duration of the journey. Radio
• It is fine to listen to the radio while driving but refrain from adjusting
the volume, changing CDs or Mp3’s while driving. Grooming, smoking, and eating:
• Though these may be seen as fairly simple tasks, they are distracting. Do these before or at the end of the journey.
Video devices:
• These should not ever be placed in the driver’s area of vision.
Passenger sitting in the rear can have these but the volume must always
be controlled to ensure that it is not distracting you as the driver. Communicating with passengers and other drivers:
• Any of these can cause the motorist to lose focus.
15

GPS units:
It is always best to get directions for your destination before starting the journey. A GPS unit is an electronic device used to help the driver navigate through the road to the desired destination. The driver should always set the device before starting the journey. Carbon monoxide poisoning: Carbon monoxide is an odourless gas emitted in the
exhaust fumes. It can be lethal. For this reason, it is important to always check the
exhaust system for any leakages. Never run the engine in an enclosed space and
if you feel drowsy while driving, stop the car and get out for some fresh air.
Alcohol, Drugs and Medicine • Alcohol and certain drugs will affect your ability to drive your vehicle • Do not drink and ride your motorcycle or drive.
• Some of the effects of alcohol are; i. Alcohol slows down your brain functions. This affects your ability
to respond, make decisions or react quickly
ii. Alcohol reduces your ability to judge how fast you are moving or
your distance from other cars, people or objects
iii. It gives you false confidence – you may take greater risks
because you think your driving is better than it really is
iv. It makes it harder for you to concentrate and pay attention to
various details in traffic
v. Alcohol also affects your sense of balance
• A Police Breathalyser (ALCOBLOW) can measure your Blood Alcohol
Concentration (BAC) accurately. It is an offence to refuse, or fail to
comply with, a direction of a police officer in relation to an alcohol test • Should you choose to drink alcohol, designate a non-drinking driver,
take a taxi home or use public transport
• Only accept a lift if you are certain the driver has not been drinking or
using other drugs
16

• Do not take medicine which causes drowsiness if you intend to use
the road
• Do not ride your motorcycle or drive if you are unwell
Safety Belts • All passengers must wear safety belts at all times no matter how
short the distance being travelled
• You must fasten your safety belt correctly • Use appropriate child restraints for children e.g. a booster seat is
recommended for children under 12. A booster seat is designed to
enhance safety by ensuring that vehicle seat belt fits properly).
Car seat Booster seat
Litter • DO NOT discard litter on the roads • Litter can be a hazard to you and other road users • Always dispose off litter in the dustbin before or at the end of your
journey
Road Rage and other forms of aggression • Be courteous on the road
• If another road user provokes you do not retaliate
Prevention of theft When you leave your vehicle:
• Switch off the ignition and remove the keys • When you park your vehicle ensure that it is appropriately secured to
reduce the risk of theft
17

• Lock all windows and the car boot
Limitations in Number of Passengers and Quantity of Goods Do not carry more than the legally allowed number of passengers or weight of goods. Below is a table indicating the weight and the number of passenger
allowed
Category Maximum load Maximum Load Passengers Allowed
Gross Vehicle Weight Category B (GVW) of maximum kg with Not more than seven (Light Vehicle) one light trailer passengers (not exceeding 750 kg)
Category B GVW of maximum 3, 500
Automatic Not more than seven CATEGORY B kg with one light trailer (not
(Light Vehicle passengers
exceeding 750 kg). Automatic)
Category B
GVW of maximum 3,500 Not more than seven kg with one light trailer (not
(Professional) passengers exceeding 750 kg)
• When loading the vehicle items should be as low as possible and as
close to the centre of the vehicle as possible
• Do not put items on the roof unless you have a designated luggage
compartment for this purpose.
• Do not overload the vehicle. • Check the tyre pressure to ensure that the tyres can handle the
weight of the vehicle. When tyre pressure is too high or too low the
vehicle will be unstable.
18

Safety Equipment All motorists should have certain safety equipment that could be used in
case of an emergency.
Equipment
Reflector Triangle
First aid kit
Tools Box
Fire Extinguisher
Fire Axe
Function
All motor vehicles (excluding motorcycles) should have these at all times. The reflector should be used when the motor vehicle for any given reason stops on the road. These should be placed 60 metres ahead and 60 metres behind a disabled vehicle.
A fully equipped first aid kit should have the following items - gauze dressings, triangular bandages, rolled bandages, safety pins, disposable sterile gloves, tweezers, scissors, alcohol-free cleansing wipes, sticky tape, antiseptic cream, painkillers such as paracetamol, antihistamine tablets, distilled water for cleaning wounds, eye wash and eye bath
Tools such as a jack and spanner can be used to do
minimal repair when the vehicle is disabled.
This enables the motorist to deal with fire emergencies. Ensure that the fire extinguisher is inspected regularly to ensure that it is good working condition.
In the event of a fire, the fire axe is a handy tool to
rescue passengers.
19

Equipment
Tow ropes
Spare tyre
Jumpstart Cable
Survival Gear
Function
This rope is reinforced to handle the weight of the car and
can be used to tow vehicles in case of a breakdown.
It is important to have an inflated spare tyre and restore the deflated tyre back as soon as possible This tyre should be inflated
The jumpstart cable is used to reignite the engine.
This is particularly important for motorists operating in places with
extreme conditions such as extreme cold, extreme heat and rough
terrain that is likely to damage the car. Survival gear may include
blankets, a torch, a small supply food and water.
20

UNIT 5: VEHICLE CONSTRUCTIONS AND CONTROLS
This chapter gives an overview of the light motor vehicle construction and controls. You will also learn where these parts are situated in the light vehicle
and how they function.
This is the control panel placed at the front of the vehicle or dashboard. The dashboard has instruments and controls used to run the vehicle. You should get to know the names and location of these controls. You should also know how these controls and instruments function and how to maintain them. There are slight differences in the dashboard depending on the make and model of the vehicle.
Below is a table indicating some of the components of a vehicle and their
functions
Component Function
Steering Wheel
This is used to change direction, or maintain the
one you’re driving in. Both hands should be on the steering wheel at all times except to change gears or to indicate.
Direction Indicator
Used to indicate you wish to turn -
signals turning left or right.
Gear Lever
Used to change gears.
21
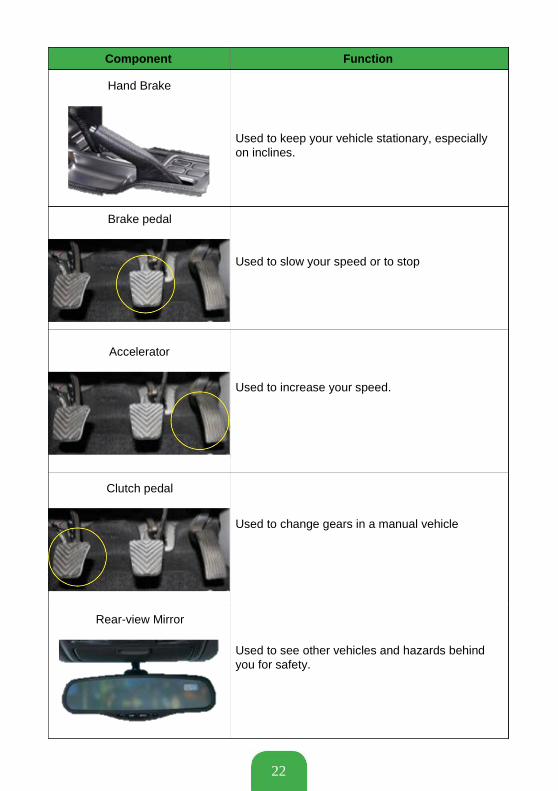
Component Function
Hand Brake
Used to keep your vehicle stationary, especially
on inclines.
Brake pedal
Used to slow your speed or to stop
Accelerator
Used to increase your speed.
Clutch pedal
Used to change gears in a manual vehicle Rear-view Mirror
Used to see other vehicles and hazards behind
you for safety.
22
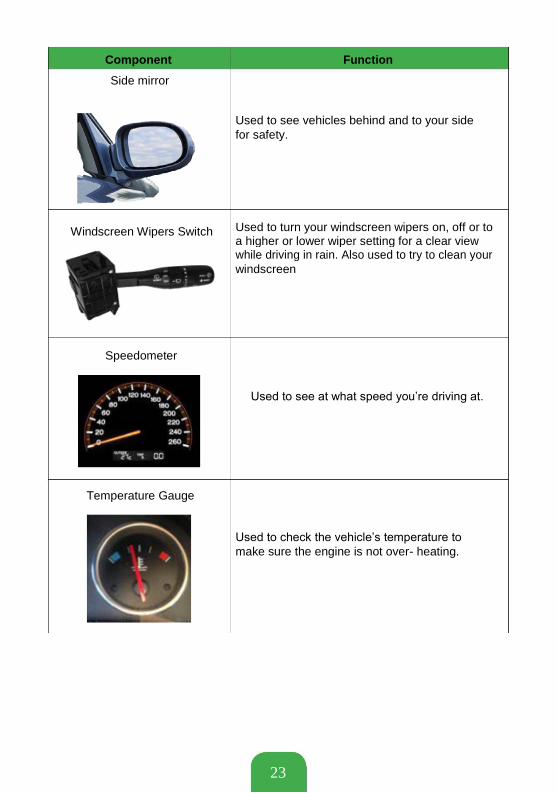
Component Function
Side mirror
Used to see vehicles behind and to your side
for safety.
Windscreen Wipers Switch Used to turn your windscreen wipers on, off or to a higher or lower wiper setting for a clear view
while driving in rain. Also used to try to clean your
windscreen
Speedometer
Used to see at what speed you’re driving at.
Temperature Gauge
Used to check the vehicle’s temperature to
make sure the engine is not over- heating.
23

Components of a light vehicle
Name Component
Engine
Ignition Switch
Accelerator, Brake and Clutch pedals
Light Vehicle body
Exhaust pipe
Gear Box
24

Name Component
Radiator
Chassis
Windscreen
Bumper bar
Light vehicle accessories:
Name Component
Air-conditioning
25

Name Component
Antilock Braking System (ABS) and Brake disc
Secondary Restrain System (SRS) Airbag
The light vehicle system
Name Component
Braking system
Steering system
Transmission

26

Name Component
Suspension System Rim and Tyres Lights and Reflectors
27

UNIT 6: SELF - INSPECTION OF VEHICLE
Before embarking on a journey, any responsible driver should ensure that the vehicle is in the right condition for the journey. Self- inspection refers to checking on different aspects of the motor vehicle to ensure that it is safe to use. Self – inspection allows the driver to know what maintenance or repair work ought to be done. Self-inspection should also be done at the end of the journey so that the driver or vehicle owner can plan for any repairs.
Self- inspection is divided into two parts. • Exterior inspection • Interior Inspection
It is also important for the driver to know the common anomalies that may
occur during long distance travel.
Exterior Inspection
This is the inspection that the driver of the vehicle undertakes before starting the journey. There are various vehicle components that should be inspected before driving off. These are
1. Tyres 2. Reflectors and lights 3. Mirrors 4. Windshield Wipers 5. Windows 6. The Body 7. Cleanliness 8. Safety Belts 9. Emergency equipment 10. Paperwork
1. Tyres Safety Check It is important that the vehicle tyres are always in good condition. When tyres are in good condition, the driver is able to brake properly and to turn corners with ease.
• Give your tyres a visual inspection before and after every journey • Small stones wedged in the tread can cause problems later • Ensure that tyre treads are in good condition. Replace aging tyres • Ensure that the tyres are securely fastened • Check the tyre pressure • Recognize the danger of underinflated and overinflated tyres. Both
are harmful to the tyre
• Ensure you have a spare tyre that is in good condition
28

2. Reflectors and Lights
• Ensure that the headlights, turn signals, and hazard lights are
operational
• Where possible, ask for assistance in checking the reverse lights
since this can only be done when the vehicle is reversing
3. Mirrors
• Make sure that all your mirrors are present, properly adjusted and
unobstructed before driving the vehicle 4. Windshield Wipers
• The windshield wipers must work at all setting
• Make sure that you have wiper fluid 5. Windows
• Check all the windows, ensure that they can open and shut without
difficulty • Ensure that the roll up handle is functional
6. The Body
• Inspect the exterior body for any damage such as dents and scratches.
7. Cleanliness • Ensure that the vehicle is clean. Make sure that the windscreen,
windows and mirrors are clean for ease of navigation
• Ensure that your vehicle interior is clean and free of clutter to
minimise distraction while driving and ensure that your passengers
are as comfortable as possible 8. Safety Belts and Car Seats
• Inspect the safety belts to ensure that they are still functional i.e. the
clasps should work correctly and the safety belts should be able to
• The safety belts should be clean • If using special child safety seats or booster seats ensure that they are
also in good condition and that when in use, they are properly secured.
9. Emergency Equipment • Ensure that your emergency equipment is still in good working order.
Emergency equipment includes the reflector triangle, a fire
extinguisher, first aid kit, tools, spare tyre and survival gear
29

10. Paperwork
• Ensure that you have all that you as the motorist have the
appropriate licence that permits you to drive the car. Additionally,
ensure that the vehicle is roadworthy and the correct registration and
vehicle insurance
Interior Inspection It is important to carry out the interior inspection to ensure that the vehicle is
mechanically sound. The following are some of the parts that should be inspected
1. Brakes 2. Steering 3. Indicators 4. Vehicle transmission 5. Oil level 6. Coolant Check 7. Battery Condition 8. Leaks 9. Naked wires
1. Brakes Ensure that the brakes are properly adjusted. To do this you may turn on the
engine and do a few manoeuvres.
2. Steering The steering wheel should have a full range of motion i.e. it should be able to
turn at 360 degrees. It should also effectively turn the front wheels.
3. Indicators Inspect all indicators to make sure that they are operational
4. Gears Ensure that the vehicle is capable of shifting into any gear
30
UNIT 7: OBSERVATION
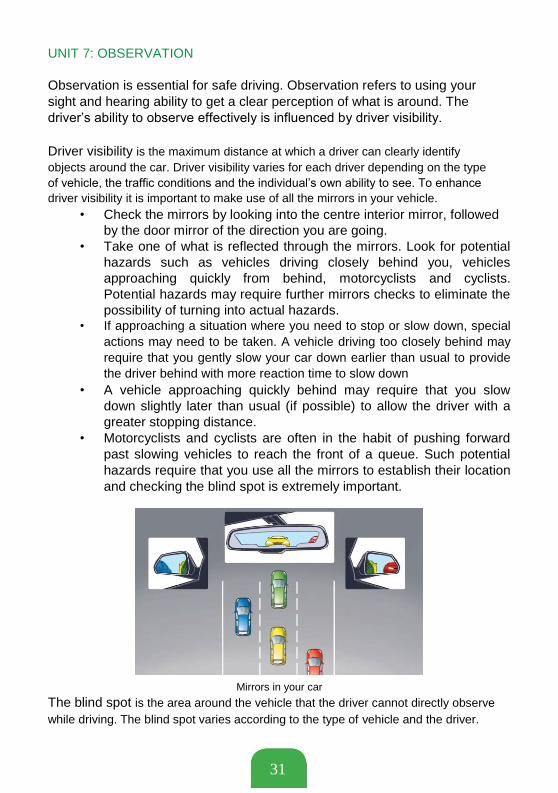
Observation is essential for safe driving. Observation refers to using your
sight and hearing ability to get a clear perception of what is around. The
driver’s ability to observe effectively is influenced by driver visibility.
Driver visibility is the maximum distance at which a driver can clearly identify
objects around the car. Driver visibility varies for each driver depending on the type
of vehicle, the traffic conditions and the individual’s own ability to see. To enhance
driver visibility it is important to make use of all the mirrors in your vehicle. • Check the mirrors by looking into the centre interior mirror, followed
by the door mirror of the direction you are going.
• Take one of what is reflected through the mirrors. Look for potential
hazards such as vehicles driving closely behind you, vehicles
approaching quickly from behind, motorcyclists and cyclists.
Potential hazards may require further mirrors checks to eliminate the
possibility of turning into actual hazards. • If approaching a situation where you need to stop or slow down, special
actions may need to be taken. A vehicle driving too closely behind may
require that you gently slow your car down earlier than usual to provide
the driver behind with more reaction time to slow down • A vehicle approaching quickly behind may require that you slow
down slightly later than usual (if possible) to allow the driver with a
greater stopping distance. • Motorcyclists and cyclists are often in the habit of pushing forward
past slowing vehicles to reach the front of a queue. Such potential
hazards require that you use all the mirrors to establish their location
and checking the blind spot is extremely important.
Mirrors in your car
The blind spot is the area around the vehicle that the driver cannot directly observe
while driving. The blind spot varies according to the type of vehicle and the driver.
31

Mirrors are placed at different parts of the vehicle to assist the driver to get a clearer view of
what is around the vehicle. The mirrors eliminate or alleviate the vehicle blind spot. • The blind spot should be checked before changing direction when: • There are motorcyclists or cyclists close by • You are overtaking on a dual carriageway • You wish to change lanes • You wish to change lanes or direction when there is a potential hazard
Types of mirrors
1. Rear View Mirror (Interior mirror) • These are made with flat glass and do not give a distorted image of
what is reflected. This makes it possible to judge the speed and
distance of following traffic • You should only adjust this mirror when the vehicle is stationary • You should be able to view the whole of the rear window in the
interior mirror
• At all times when stopping, opening doors and when entering the
main roads
2. Exterior Mirror • These are convex mirrors, which are made using curved glass • Convex mirrors give a wider field of vision but this make judging the
speed and position of following traffic more difficult
• Vehicles appear smaller and further away than they actually are. You
should adjust the exterior mirrors so that you can get the best rear
view with minimal head movements • The horizon should appear in the middle of the mirror
• Nearside Mirror. This is the one that’s closest to the kerb • Offside Mirror. This is the one closest to the inner lane marker

32

UNIT 8: VEHICLE CONTROL This section allows you to start putting your theoretical knowledge into practice.
You will be asked to demonstrate certain aspects of your theoretical training at the
manoeuvre yard. The manoeuvre yard also provides you with an opportunity to
practice and gain confidence in driving before taking the car out to the road.
These are some of the essential skills you must have before you are allowed
to proceed to the road.
Driving Preparation As a learner you should be able to make the appropriate preparations before driving the car.
These preparations include the vehicle self-inspection as explained in Unit 7 above.
Once you are certain that your vehicle safe to drive.
• Adjust your driving seat to ensure that it is suitable for you. • Adjust the mirrors if it is necessary • Check the doors to ensure that they shut properly • Fasten your seat belt and ensure that all passengers also do so • Sit in the correct driving position – your back should get adequate
support and your feet should reach the pedals
• Hold the steering wheel correctly – It should be held with both hands
in the positions illustrated below. Your hands should hold the
steering wheel naturally, not too stretched or too bent • From this position you should get a clear view of what is ahead of
and around you. You should also comfortably operate the brakes
and the accelerator • Check all the instruments at the dashboard and ensure that they are
all in good working order
• Once this is done you can turn on the ignition and start practicing
your driving skills
Car Movement and Control
1. To start the vehicle • Fully depress the clutch pedal and wait for three seconds
• Start the engine as follows
o Put the hand brake ON o Turn the ignition switch ON
o Turn the motor switch ON
o Start motor control by turning the ignition key and releasing it when the engine starts
o Step lightly on the accelerator to warm the engine
33
• Check rear view mirrors • Give the proper signal before moving • Select the appropriate gear • Increase the engine speed using the accelerator • Move the handbrake to the OFF position • Let the clutch pedal rise until the engine speed decreases slightly
under the load. Keep your feet in this position – on the clutch and accelerator pedals
2. To stop the vehicle
• Check the rear view mirrors to ensure that it is safe to stop • Signal properly to alert other road users • Remove the foot from the accelerator • Apply pressure on the foot brake and maintain it as necessary • Depress the clutch pedal as the car comes to rest and maintain the
pressure • Set the hand break at the ON position • Put the gear lever in the 1ST position • Switch off the engine • Remove your foot from the break clutch pedal and then from the
brake pedal 3. Using the gears Most vehicles have five forward gears and one reverse gear. You should know the appropriate gear speed to be used when driving. You should learn to
proficiently change from 1st to 5th gear without looking.
The neutral position is where no gear is selected. Before starting the engine,
the gear should be in neutral position.
1st Gear – This is used when moving off from a stationary position. This gear
is for travelling between 0 and 30 km/h 2nd Gear – This allows you to move faster and is also applied in slow moving
traffic because it is more economical. It is also the ideal gear for moving downhill from a stationary position.
3rd Gear - This is the appropriate gear for travelling between 35 and 70 km/h
4th Gear – This is the appropriate gear for travelling between 60 and 110 km/h. The 4th gear provides more power and speed to the engine and can be
used when overtaking another vehicle. 5th Gear - This is the appropriate gear for travelling between 80 and 110 km/h. This gear is used on highways where the speed limits are higher.
34

4. Steering the vehicle
• Hold the steering wheel correctly • To steer in a straight course position your hands in the 10-minutes-
to-2 position and aim the car in the general desired direction. Lightly
correct the vehicle’s tendency to turn from the neutral position • To avoid injury from the airbag position your hands in the 9 and 3
position
• To change direction, pull the steering down in the direction you wish
to turn. Bring it down to meet your other hand then push the steering
wheel up until the turn has been executed 5. Parking at the kerb You should always find a parking space that is legal and convenient to park.
To park you vehicle take the following steps:
• Look into your rear view mirror so that you can know what is around
you. If there are no vehicles behind you, you may slow down to get a
clearer picture of what is around you. • Locate a safe and convenient parking position • Use your indicator signals to inform other road users of your intention
to slow down and park
• Slow down the vehicle by covering the brake and the clutch • Gradually move a to a suitable distance from the kerb • Apply the brake gently and 5 metres from your intended stop, press
the clutch as to avoid stalling the car
• Stop. Apply the handbrake and select neutral to cancel the indicator • Remove feet from the pedals
Different types of parking.
Angle parking Flash parking This is not a flushin parking . There is no parking like this ; probably angle parking?

35

Flush/Parallel parking
6. Turning J-turns A J-turn is a driving manoeuvre in which a reversing vehicle turns 180
degrees and continues, facing forward, without changing direction of travel.
Only a confident driver who has had a sufficient experience driving on
different road surfaces should do this type of turn.
J-turns by reverse driving
U-turn A U-turn is a driving manoeuvre in which a forward driving vehicle turns 180
degrees and continues, facing forward, but moving in the opposite direction.
Before you make a U-turn, check to make sure that there is no sign that says you
should not. To make a U-turn safely, you must be able to see well both sides.
U-Turn by forward driving
36

7. Driving on Bends
When approaching a bend, it is important to note how sharp the bend is. Look out for road signs and markings which would indicate the type of bend you are going to encounter. Adjust your speed accordingly. If you are too fast you are more likely to skid or
lose control of your car. Surrounding trees, hedges, buildings and streetlights can
give you a good indication of how sharp the bend is if there are no road signs.
As you approach the bend, apply the MSM technique to communicate with
other road users
• Slow down and select a lower gear • Do not brake as you steer round the bend • When leaving a bend, check your mirrors and gently accelerate to
the speed appropriate for the traffic conditions 8. Driving on Hills
This requires you to anticipate what is ahead of you. While going downhill you
have a clearer view but going uphill you see less of what is ahead of you. When driving downhill, switch to a lower gear so that the engine controls some of
the braking. This protects your brakes from excessive wear and tear. It takes
longer for the vehicle to stop therefore you need a greater stopping distance.
When driving uphill, switch to a lower gear so as to maintain your speed.
9. Reversing
Use your mirrors to assist you in seeing what is behind you. When reversing,
you may tilt your head so that you can see beyond the head restraint.
Always reverse at slow speed so as to retain control of your steering. To steer the car in reverse, turn the wheel in the direction you want the rear of the car to go. Turning the wheel to the right steers the back of the car to the right. Turning the wheel to the left steers to the left.
37

UNIT 9: COMMUNICATION ON THE ROAD
Road users communicate with each other using a prescribed set of signs and signals to avoid confusion and misunderstanding on the road. This is done using hand gestures, signal lights and responding to instructions from traffic marshalls and police.
MSM technique (Mirror, Signal and Manoeuvre) The MSM technique is a simple procedure that helps drivers communicate on
the road. It is a routine that is convenient in many different situations.
The MSM technique should be used: • Before moving off • Bust before signaling • Before any change of direction including turning left or right,
overtaking other vehicles or cyclists and changing lanes • Before any changes in speed. This also includes an increase of speed
as a vehicle may be trying to overtake you as you gain speed. More
importantly however is when slowing or coming to a stop either in traffic or parking up
Mirror • Check the mirrors by looking into the center interior mirror, followed
by the door mirror of the direction you are going.
• Note of what is in the mirrors. Look for potential hazards such as
vehicles driving closely behind you, vehicles approaching quickly
from behind, motorcyclists and cyclists. Potential hazards may
require further mirrors checks to eliminate the possibility of turning
into actual hazards. • If approaching a situation where you need to stop or slow down,
special actions may need to be taken. A vehicle driving too closely
behind, may require that you gently slow your car down earlier than
usual to provide the driver behind with more reaction time to slow
down. A vehicle approaching quickly behind may require that you
slow down slightly later than usual (if possible) to allow the driver
with a greater stopping distance. • Motorcyclists and cyclists can often be in the habit of pushing
forward past slowing vehicles to reach the front of a queue. Such
potential hazards require that you use all the mirrors to establish
their location and checking the blind spot is extremely important. The
blind spot is often required after the mirror checks.
38

The blind spot should be checked before changing direction when:
1. There are motorcyclists or cyclists close by 2. You are overtaking on a dual carriageway or motorway 3. You wish to change lanes 4. You wish to change lanes or direction when any potential
hazard may be obscured by the blind spot
Signal
• Signals should be applied to the direction you intend to take. • Signals depend on what you see in your mirrors. • If you notice a potential or actual hazard located in your mirrors may
have to alter your intended route and not apply a signal. It’s therefore
important that a signal is applied immediately after the mirrors. If
there is a delay, the mirror sequence must be repeated. • Signaling must be applied in good time. Signaling too late may not
provide vehicles behind with enough time to react if you are
intending on slowing or stopping the car. Signaling too early can give
the impression you are taking a turn sooner than the actual turn you
intend, or that you are parking up, leading to confusion. If parking up,
ensure you do not signal before a junction.
Manoeuvre 1. The manoeuvre part of MSM applies at different situations such as
roundabouts, junctions, changing lanes or parking 2. You should always be prepared to alter the MSM routine depending on
circumstances. If driving in an area with potential hazards, pedestrians
or cyclists for example, you may need to check the mirrors and blind
spot once again before committing to the manoeuvre. 3. Be prepared to alter your speed or destination even at the very last
moment. Cyclists, pedestrians and other vehicles can be unpredictable
and a good driver should try to predict a potential hazard.
Signals Given by Road Users (a) Hand signals given by drivers
I intend to turn to my left or I
intend to move out to my left
I intend to turn to my right or I I intend to slow down intend to move out to my right
39

(b) Hand signals given by drivers to traffic police
I intend to move left I intend to move right I intend to go on straight
(c) Light signals given by vehicles and motorists
I want to turn left I want to turn right
Iam applying the brakes I intend to reverse
(d) Hand signals given by motorcyclists
I intend to turn to my left I intend to move out to my right I intend to slow down
40
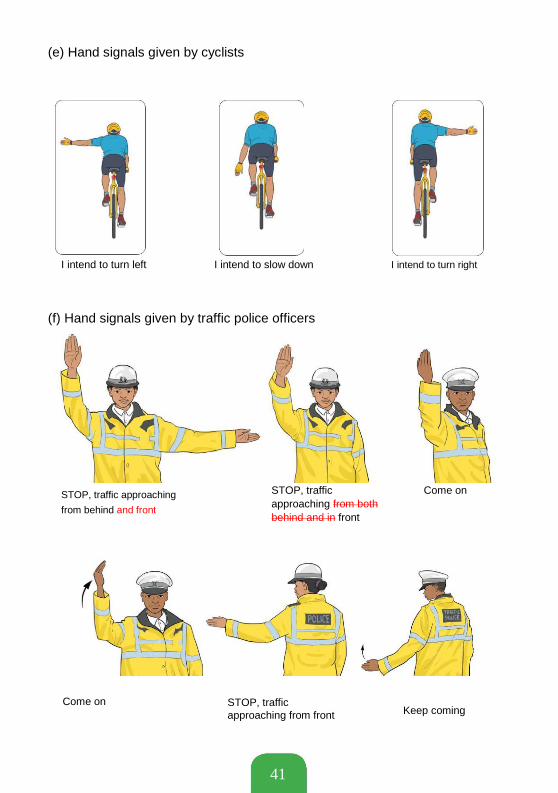
(e) Hand signals given by cyclists
I intend to turn left I intend to slow down I intend to turn right
(f) Hand signals given by traffic police officers
STOP, traffic approaching
from behind and front
Come on
STOP, traffic
approaching from both
behind and in front
STOP, traffic approaching from front
Come on
Keep coming
41

(g) Signals given by traffic marshals Barrier to stop Ready to cross All vehicles Not ready to
pedestrians pedestrians, vehicles must stop cross pedestrians
crossing must be prepared
to stop
Traffic Light Signals
A: RED means STOP B: RED and AMBER also mean STOP
They alert the driver to get ready
C: GREEN means you may go on if
the road is clear
D: AMBER means STOP at the line
A B C D
A GREEN arrow may be provided in addition to the
full green signal if movement in a certain direction is
allowed before or after the full green light phase. If the way is clear you may go, but only in the
direction shown
Traffic Signal Blackout
If traffic signal lights are not working because of an electrical power failure: • Stop at the intersection • Proceed when you know other turning and approaching vehicles,
bicycles, or pedestrians have stopped
42

UNIT 10: SPEED MANAGEMENT
A major cause of road accidents is reckless driving and over speeding. Before deciding what speed to drive at take into consideration the laws determining
the speed limits of the particular road you are using and the road conditions.
The higher the speed of a vehicle, the shorter the time a driver has to stop to avoid a crash. Overall, accidents are more severe when the driving speed is high. The choice and ability to drive at a high speed is influenced by
• The driver’s choice to make responsible or irresponsible decision on
the road
• The road conditions • Traffic and the surrounding environment • Driver’s condition and vehicle condition
It is important to remember that pedestrians face great risk when vehicles
are driven at high speeds.
How poor speed management affects driving • At high speeds it is more difficult for the driver to stay in the stable
especially when negotiating corners
• The driver will have less time to respond to poor or changing road
conditions and any changes in the weather
• The driver may not notice any new hazard warning signs or other
traffic signs • The fuel consumption may increase due to poor efficiency
Drive at a reasonable speed and within the designated speed limits.
The 4 Second Rule • The 4-second rule is a guideline that enables you to estimate the
minimum distance you should travel behind the vehicle immediately
in front in adverse weather conditions such as rain or fog. • The following distance is the distance between the driver and the
vehicle ahead. • To apply the 4-second rule, when the vehicle in front of you passes a
landmark such as a sign or a bridge, count one thousand and one, one
thousand and two, one thousand and three, one thousand and four. • If you pass the landmark before you finish counting, then you are too
close and you should increase your distance from the vehicle in front
of you

43

Keep a distance of approximately four seconds travel between you and the vehicle in front of you
Braking Distance • Braking distance is the distance the vehicle travels between hitting
the brakes and coming to a stop
• When on poor roads with wet or icy conditions, the braking distance
increases
• As the vehicle’s speed increases, so does the braking distance • If the vehicle is in poor condition due to worn out tyres, poor brakes
or overloaded, the braking distance will increase.
Thinking distance • Is the distance the vehicle travels after the driver decides to hit the
brakes and when the driver actually brakes • Thinking distance is affected by speed, driver fatigue and distractions
Stopping Distance • Is both the thinking distance and the braking distance added together.
6m 6m
15m 38m
18m 55m
21m 75m
Stopping distance

44

Braking Systems and Techniques There are different types of brakes. These are: disc brakes, drum brakes, and handbrakes.
• Brakes are located on all four wheels of the vehicle • Some vehicles have disc brakes on all four wheels while others have
drum brakes on the back wheels
• Braking pushes the weight of the vehicle forward, therefore the front
brakes of the car play a more crucial role than the rear brakes. • The handbrake applies the two rear brakes
Freewheeling Freewheeling is moving the vehicle without using power. It is also known as coasting. In driving this is a technique achieved by depressing the clutch so as
not to use the engine to move.
Drivers most frequently freewheel in the following situations
• When turning at junctions • Before making a stop • When changing gears • When keeping the gear in neutral to save petrol
Risks of Freewheeling
• Freewheeling is reduces one’s control of the vehicle because the
engine is not engaged. When the engine is engaged, the driver can
brake with more ease. • Freewheeling is also risky because there are times when the driver
needs to accelerate to prevent an accident but freewheeling prevents
the use of the accelerator. • Freewheeling increases pressure on the brakes because the engine
is not engaged in the process of slowing down the vehicle to a stop.
This results in increase wear and tear of the brakes. • Fuel consumption in freewheeling is the same as fuel consumption
for an idle engine. A small amount of fuel is needed to keep the
engine active. As such freewheeling does not save petrol.
When the driver needs to stop, progressive braking is safer than freewheeling because it reduces wear on the braking system and on the tyres and ensures
that the driver maintains control of the vehicle.
45

UNIT 11: SPACE MANAGEMENT
To drive safely, it is important to manage the space around your vehicle. You do this by controlling your speed, the position of your vehicle in the lane and communicating on the road. In order to manage your space effectively you should be aware of the different
road conditions when driving. These can be broadly divided into three categories
1. Open Condition – This is occurs in large areas where the driver can
gets a clear broad view of the road and surroundings and there are
no restrictions or obstacles blocking the view. In these conditions, it
is easy to adjust speed and change lanes.
2. Closed Conditions – In this case, there is limited space and the
driver’s view is also restricted due to various obstructions such as
trees, buildings and other vehicles blocking the view.
3. Changing Conditions - This occurs where there are changes in the
speed limit, road surface conditions, the width of the lane, visibility
influenced by the weather or the time of the day and the traffic flow.
All these are conditions that may be unpredictable or may need
specific actions by the driver. In all the above-mentioned conditions, the driver has to maintain an appropriate
space around the vehicle for safe driving. This is the space envelope.
To manage space • Drive at the same speed as the vehicles around you in traffic • Maintain a safe following distance between your vehicle and the
vehicle ahead of you (Discussed in UNIT 10 on speed management)
Space Recovery
When you realize that there is insufficient space in front of the vehicle. • Signal so that the vehicles around you know that you intend to slow
down
• Turn slowly to give yourself and other drivers more space to avoid
problems • Be aware of the size and weight of oncoming vehicles, give then room to
pass but do not reverse as this will affect the vehicles behind you • Ensure that you have sufficient space to get across or join a lane
46

Proper position to see and to be seen by other drivers
Position to ‘See and be seen’ Position the vehicle as indicated above
47

UNIT 12: EMERGENCY MANOEUVRES
When driving along the road, there driver may need to make sudden and
unexpected manoeuvres so as to avoid accidents or any imminent danger.
Emergency manoeuvres involves quick and efficient moves.
Safely performing evasive turns on the road Evasive manoeuvre driving is important in getting out of situations of danger.
Some of the skills that you should learn include making J-turns and U-turns.
This is addressed in Unit 8.
Brake failure • If your brake fails, try pumping the brake pedal to temporarily restore
hydraulic brake pressure. If this does not work, apply the parking brake (hand brake) gently but firmly while holding the release button.
• Total brake failure is rare on modern vehicles but if your brakes fail
and you manage to stop, do not drive again. Call for help from your
mechanic
Blowouts In order to drive through a tyre blowout:
• Keep a firm grip on the steering wheel. • Do not slam on the brakes. • Let your car slow down gradually. • Pull to the side of the road once you have slowed to a safe speed. • Activate your hazard lights
If your wheel goes off the pavement • Hold the steering firmly • Take your foot off the accelerator pedal to slow down, avoid heavy
braking. • When the vehicle is under control, steer towards the pavement.
If your headlights go off • Check the switch immediately • If the lights remain off, keep to the left and bring your vehicle to a
safe stop off the road. • It is dangerous and illegal to drive at night without lights
Defensive Driving Defensive driving is safe driving or cautious driving in cases where the driver
needs to be more vigilant particularly in an environment that could cause
danger. It goes beyond mastering the rules of the road and basic mechanical
skills and is taught to experienced drivers.
48

Importance of defensive driving
• It allows you to be prepared to avoid accidents • It allows you to provide more protection to yourself and/or passengers • It is enables you to save lives in situations of danger • It enables you to save money by limiting wear and tear to your • motor vehicle and any unexpected damage • It prepares you to act accordingly in adverse riding conditions • It reduces chances of being involved in a crash
Defensive driving is important when in the following condition
• Adverse weather conditions such as rain, fog or windy. In these
cases, the road surface may change and so you need to apply
different techniques to avoid danger • Different road conditions that may be difficult to manoeuvre such
rough terrain, wet surface or sloping surfaces.
Defensive driving techniques • Improving observation, anticipation and awareness consistent with
the riding speed
• Applying sound judgement of speed and distance • Don’t drive when you are tired, rest before any journey • Adjust according to weather /Road condition

49

UNIT 13: SKID CONTROL AND RECOVERY
A skid happens when the vehicle’s wheel slides out of control on a slippery
surface. Skids can involve the front, rear or all four wheels. Even careful
drivers experience skids. You lose traction and your wheels spin or lock,
usually when braking, turning or accelerating.
Causes of Skids:
• Driving faster than the road or traffic conditions allow • Sudden, hard braking. • Turning too fast or accelerating too quickly.
Types of Skidding
The Front Wheel Skid This happens when the vehicle goes off the intended course. It is caused by excess speed on entry at a corner or a bend. It also occurs during sudden
braking when negotiating a hazard.
The Rear Wheel Skid This occurs when the rear of the vehicle swings out of the line as if the vehicle
is trying to overtake at the front. It is often caused by excessive speed leading to sudden braking in a hazard situation.
Aquaplaning Driving too fast or at an excessive or inappropriate speed on a wet road causes aquaplaning. When the tyre tread cannot channel away enough water, the tyre(s) lose contact with the road and the vehicle floats on a wedge of water. Aquaplaning can be avoided by reducing speed in wet conditions. Having the correct tyre pressure and tyre tread depth will maximise your tyres’ ability to maintain their road grip. If it happens, ease off the accelerator and brakes until your speed drops sufficiently for the car tyres to make contact with the road again
50

Skid recovery
• Take your feet off the accelerator pedals • Release the brake pedal and reapply the brakes gently • Quickly turn the steering wheel in the direction you want to go • As your vehicle turns back in the correct direction, you may then need to
steer in the opposite direction so as to stay on your desired path • Continue to look at your path of travel down the road
51

UNIT 14: ADVERSE DRIVING CONDITIONS
The first step in dealing with adverse driving conditions is to be prepared by
training for these conditions and preparing the vehicle for these conditions. Ensure
that the vehicle has good tyre tread, firm brakes and streak-free wipers.
Situations that are considered adverse driving conditions are:
Night Driving In this case, the driver’s vision and visibility is greatly reduced by the absence of natural light.
• Slow down when driving at night, especially on unlit roads. • Reflective roads can mislead you to believe that you can see further
than you really can.
• Do not over drive your headlights, that is, do not go so fast that your
stopping distance is farther than you can see with your headlights.
• Give yourself enough room to make a safe stop. • When meeting oncoming vehicles with bright headlights at night, look
up and beyond and slightly to the left of the oncoming lights.
• Cut down bright lights at night by following the rule of the road for
vehicle lights.
• Use your low beam headlights within 150 metres of an oncoming
vehicle or when following a vehicle within 60 metres.
• In rural areas, switch to low beams when you come to a curve or
hilltop so you can see oncoming headlights and wont blind oncoming
drivers. If you can’t see any headlights, switch to high beams.
Extreme driving conditions • This exasperated by the combination of unfavourable weather or
poor road conditions.
• Fog • Windy condition • Heavy rain • Hot weather
• Dusty
Fog • Slow down gradually and drive at a speed which suits the condition. • Make sure the full lighting system of your vehicle is turned on: use
your low beam headlights as high beams reflect off the moisture
droplets in the fog making it harder to see. Otherwise, use fog lights
if your car has them. • Always be patient – avoid overtaking, changing lanes and crossing
traffic.
52
N/B: If visibility is decreasing rapidly, move off the road and into safe parking
area and wait for fog to lift
Rain • Rain makes the road surface slippery and reduces visibility. • Ensure your windshield wiper blades are in good condition (no
streak-ing while cleaning).
• Try to drive in clear sections of the road, look ahead and plan your
movements.
• Smooth steering, braking and accelerating will reduces your chances
of skidding.
• Leave more space between you and the vehicle ahead of you.
Stay out of puddles – a puddle can hide a large pothole that can damage your vehicle or its suspension or flatten a tyre. The spray of water could splash nearby pedestrians or drown your engine, causing it to stall. Water can also make your brakes less effective.
Under these conditions the driver has to deal with reduced visibility and
traction, steering, braking and skid control. It is best to practice how to deal
with this conditions in a safe, secluded area. The driver who knows what to do
in an emergency is more likely to stay in control.
Driving In Adverse Conditions
1. Be Cautious Get in the right frame of mind before you start driving. Travel with
another person so that the responsibility of driving is shared.
2. In the driver’s seat Adjust your seat correctly to enable you to perform manoeuvres properly.
This also reduced s the risk of injury to fingers, elbows and the chest.
Fasten your safety belt.
3. Dress appropriately Wear clothes that are comfortable and also provide freedom of movement.
Heavy garments can restrict movement behind the wheel. Stop in a safe
spot before removing a coat or gloves.
Poor visibility Keep your windshield and windows clean. Clean the inside of your windows at
least once a week. Use your defroster to keep front and rear windshields clear.
53

On a cold day, move the heat control to “hot” and let the engine warm up
before you turn on the defrosters and blowers. This will prevent moisture from
collecting on the inside of the glass.
When the glass gets foggy, open a window slightly and turn the defroster fan
to a higher speed. Use your air conditioner to reduce humidity.
Mud and dust on your headights headlights can reduce the illumination by 90
percent. Stop periodically during long trips and clean your headlights. If your
vehicle is not equipped with daytime running lights, drive with your low-beam
headlights on at all times - especially on dark or overcast days. Use low
beams and fog lights in fog.
Reduced Traction Wet roads mean poor traction. Conditions are most dangerous during the first
10 minutes of a heavy downpour as oil and debris first rise up, then wash
away. Knowing how to handle poor traction reduces the potential for
hydroplaning, skidding or getting stuck in the mud.
Getting out of a tough spot You need steady pulling and moderate power when traction is poor. The
best remedy when wheels are stuck in the mud or a soft shoulder is to apply
power slowly. • Keep the wheels pointed straight ahead so the vehicle can move in a
straight line. If you can’t go forward, try backing out, steering in the
vehicle’s tracks • With a manual transmission, start in second gear to prevent wheel
spin. Accelerate carefully, giving enough fuel to prevent the engine
from stalling and ease along gradually until traction improves • Rock your way out by using second gear in a manual transmission and
low gear in automatic transmissions. Check your owner’s manual for
recommended procedures. Move forward until the vehicle stops, then
shift into reverse and move backwards until momentum stops. Repeat
this process, moving ahead a little more each time. Use minimum power
to keep the wheels from spinning and digging in deeper • If rocking doesn’t work and wheels simply spin, find a way to create
traction. Traction mats, gravel or kitty litter work best, but you can
also use salt, burlap, branches or even the vehicle’s floor mats.
Shovel a space in front of the drive wheels and spread your
materials there. Apply power slowly, using second or low gear Steering clear of collisions You may need to take evasive action in poor weather to avoid a collision.
Steering around an obstacle is preferred to braking at speeds above 30 km/h
54

because less distance is required to steer around an object than to brake to a
stop. In wet weather, sudden braking often leads to skids.
There are two acceptable methods of emergency steering:
1. The push-pull method of steering is performed by shuffling your
hands, so that neither hand crosses over the imaginary line between
12 and 6 o’clock. Since the arms never cross, you are able to
provide continuous adjustments in either direction. 2. The fixed-hand steering method allows rapid 180-degree steering to
either direction, but it has one shortcoming. This method is confining in
that your arms may get locked together as you attempt to steer past 180 degrees, leaving you in an awkward position to make further fine
adjustments.
Braking Stopping on a slippery surface requires more distance, so increase your
following distance. Focus your attention as far ahead as possible - at least 20
to 30 seconds.
Anti-lock braking systems (ABS) are designed to prevent wheels from locking
and to retain steering control during panic braking. Sensors located at wheels
detect lock-up. The anti-lock system relieves pressure as needed, allowing all
four wheels to continue to turn while maintaining steering control.
You should use the “plant and steer” method with antilock brake systems. Do
not remove your foot from the brake or pump the pedal. If you apply pressure
and the wheels lock momentarily, you might feel the brake pedal pulse back
against your foot. This is normal. Just hold the brake pedal down and steer.
Pumping the pedal actually works against the system.
The best way to stop on a slippery surface if your vehicle doesn’t have antilock
brakes is to use threshold braking. Keep the heel of your foot on the floor and
use the ball of your foot to apply firm, steady pressure on the brake pedal to
the “threshold” of locking your brakes.
If your heel leaves the floor, the wheels could lock because control of the
brake pedal is transferred from your ankle muscles to your thigh muscles,
which are not capable of the finer control required in this situation. Under the
stress of trying to stop quickly, drivers almost inevitably use too much
pressure, resulting in locked wheels (on non-ABS-equipped vehicles). If this
happens, release pressure on the brake pedal by one or two degrees, then
immediately reapply slight pressure. Continue this technique as needed until
the vehicle comes to a stop.
55

Dealing with a crisis When visibility is so limited that you can’t see the edges of the road or other
vehicles at a safe distance, it’s time to get off the road and wait for the rain to
stop. It’s best to stop at a rest area or exit the freeway and go to a protected
area. If the roadside is your only option, pull off the road as far as you can,
preferably past the end of a guardrail. Vehicles parked at the side of the road
are frequently struck by other drivers. Respect the limitations of reduced
visibility and turn headlights off and hazard lights on to alert other drivers.
Set up the reflector triangles behind and in front of the crash site.
56

UNIT 15: PREVENTIVE MAINTENANCE
Preventive Maintenance (PM) Refers to the different types of work done to ensure that the vehicle is in good
working condition and that any problems can be detected and fixed before
they get out of hand. Preventive maintenance may include the following. • Vehicle inspection • Lubrication • Adjustment • Cleaning • Testing of certain parts
• Repair and replacing worn out parts
Driver’s obligation: As the owner and/or driver of a vehicle it is important to
carry out regular preventive maintenance as this increase the availability and
safety of the vehicle
• PM maintenance should be scheduled on a regular basis based on
the specific part of the vehicle being maintained.
• The driver of the vehicle should participate in this maintenance work
as ultimately he or she is the one who makes the decision as to
whether the vehicle is safe to drive, clean enough or if the vehicle
needs further repair or maintenance work done. • To determine how regular PM should be undertaken the driver
should also look at the vehicle manufacturer’s guidelines.
• It is important for every driver to know some of the basic steps to
take in the event that the vehicle malfunctions.
Below is a table indicating common issues and how to resolve them. 1
Problem Symptom Solution
Tyres/Steering • Puncture • Change the wheel Heavy steering • Power assisted steering fault • Seek qualified assistance Vibrations in steering • Bulge in tyre or front wheel out • Change the tyre or seek
at specific speeds of balance qualified assistance
Brakes • Incorrect adjustment • Seek qualified assistance Vehicle pulls to one • Undue wear in pads System • Seek qualified assistance
side when braking fault
Warning light shows • Low brake fluid • Check level
• Possible component failure • Seek qualified assistance
1 Taken from https://www.bahamas.gov.bs/wps/wcm/connect/7628c56e-4a22-4b61-
bb88-5ea243e87c38/A+Driver+Instructor’s+Manual+(FINAL).pdf?MOD=AJPERES) We need to
customize our own
57

Problem Symptom Solution
Lights • Bulb failure • Check and replace bulb Lamp does not light • Fuse failure Possible bulb failure • Check and replace fuse Indicator flashing • Part failure of unit • Check and replace the unit irregularly
Main/dip not lit
Engine • Fuel or electrical fault • Examine connections Misfiring or won’t run • Defective spark plugs • Seek assistance Fails to start • Out of fuel • Refuel
Starter does not • Damp in electrical system • Examine and replace if
operate • Battery flat necessary
Starter or solenoid Starter motor jammed Fan belt • Check gauge
clicks but does not loose • Change battery operate
• Fuse blown on electric cooling • Jump start Squealing noise from fan • Push start engine area
• Loss of coolant • Rock vehicle backwards Overheating Fan belt snapped forwards in gear.
• Adjust and replace and
replace fuse
• Tape hose for temporary
repair Replace belt
UNIT 16: CONDITIONS OF CARRIAGE
Conditions of carriage refer to customers’ rights and the restrictions on these
rights. It also refers to the driver’s obligation to customers and their obligations
when handling cargo. The Traffic Act provides guidelines for conditions of
carriage for different categories of goods and passengers. A commercial vehicle is a motor vehicle constructed or adapted for the carriage of
goods or burdens of any description in connection with any trade, business or
agriculture. Therefore, a light vehicle can be licenced as a commercial vehicle.
Light vehicles licenced to be Public Service Vehicles (PSV) should do the
following • Provide a statement of liability • State what fares or ticketing prices will be charged • Indicate if there are any exceptions with fare prices • Ensure that you abide by a code of conduct that customers can
easily rely on as a guideline
• Ensure that you address restricted items. Provide outlines for
customers to know what items are restricted and which are
• Lost property • Contact details of the owner or company that runs the service
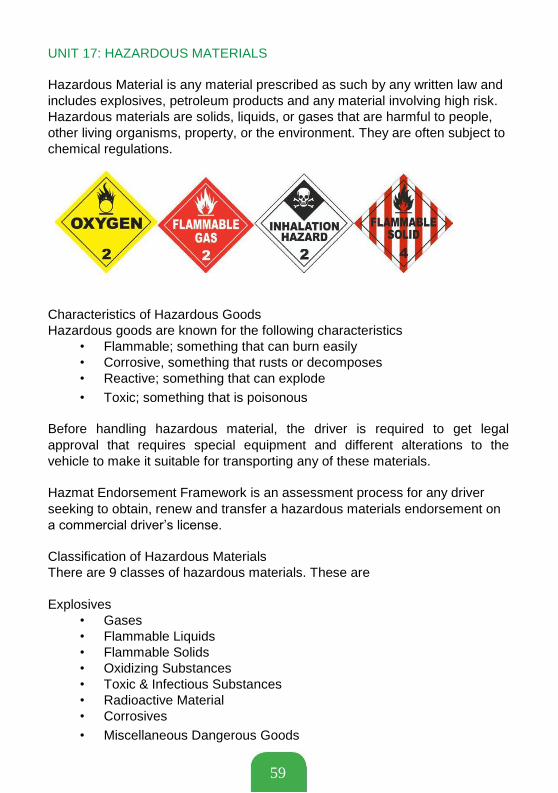
UNIT 17: HAZARDOUS MATERIALS
Hazardous Material is any material prescribed as such by any written law and
includes explosives, petroleum products and any material involving high risk.
Hazardous materials are solids, liquids, or gases that are harmful to people,
other living organisms, property, or the environment. They are often subject to
chemical regulations.
Characteristics of Hazardous Goods Hazardous goods are known for the following characteristics
• Flammable; something that can burn easily • Corrosive, something that rusts or decomposes • Reactive; something that can explode
• Toxic; something that is poisonous
Before handling hazardous material, the driver is required to get legal
approval that requires special equipment and different alterations to the
vehicle to make it suitable for transporting any of these materials.
Hazmat Endorsement Framework is an assessment process for any driver
seeking to obtain, renew and transfer a hazardous materials endorsement on
a commercial driver’s license.
Classification of Hazardous Materials There are 9 classes of hazardous materials. These are
Explosives • Gases • Flammable Liquids • Flammable Solids • Oxidizing Substances • Toxic & Infectious Substances • Radioactive Material • Corrosives
• Miscellaneous Dangerous Goods
59

Each class of hazardous material has a prescribed procedure for loading and
offloading that the driver should adhere to. In Kenya, the Kenya Bureau of Standards (KBS), National Environmental
Management Agency (NEMA) and NTSA coordinate licencing for transportation of hazardous goods.
Do not handle hazardous material unless you have the appropriate
licencing to do so.
60

UNIT 18: EMERGENCY PROCEDURES
The driver should always be prepared to handle any emergencies that may
occur within or outside the car.
Many of these situations can be avoided by ensuring that the passengers and driver take the prescribed safety precautions before embarking on the journey.
This section will address the most frequent emergencies.
Basic Responsibilities at a Scene of Crash Crashes frequently occur on the carriageway due to error or negligence by
different road users. If you are involved in an accident or if you witness an
accident, you should stop and offer assistance where possible.
These are the steps that should be taken in the event of an accident.
• Set up the reflector triangles behind and in front of the crash site.
The reflector triangles should each be 50 metres behind and ahead
the vehicle. • Call for emergency services – the police, ambulance and fire brigade
- immediately, providing full details of the incident location and any
casualties
• Move uninjured people away from the vehicles to safety. • DO NOT move injured people from their vehicles unless they are in
immediate danger from fire or explosion
• Do not remove a motorcyclist’s helmet unless it is essential to do so • Be prepared to give First Aid • Stay at the scene until the police arrive. • If you are involved in any other medical emergency on the road, you
should contact the emergency services in the same way.
• In the event of spillage, keep onlookers away from the scene of the
accident and wait for police to handle the situation
First Aid Many road crash victims suffer unnecessarily, or even die, at the scene of the crash due to inadequate care. Someone with First Aid training can often prevent a victim’s condition from worsening and may save their life. The aims of First Aid are to:
1. Preserve life 2. Prevent a casualty’s injury or illness from getting any worse
3. Promote recovery
You can get First Aid training at places such as Red Cross and St. John’s Ambulance. But even if you do not have First Aid training there are simple
things you can do to help the injured, and these are described below.
61
1. Prevent further danger and make safe First of all assess the danger to yourself, the victims and others. Make the situation safe before approaching. You do not want to become a casualty yourself. For instance, warn and control approaching vehicles to prevent a second collision. Ask other people to help you with this. If there is a danger of fire, make sure no one smokes or uses lighters or matches.
2. Emergency treatment The most important thing is to preserve life. Remember “Dr A.B.C.” This
stands for: D = Danger: Is there continuing danger to the injured? Try to make safe. Protect the
casualty and keep curious onlookers away.
R = Response: Is there any response from the casualty? – Shake the casualty
gently and talk to him. If there is no response check the airway (throat).
A = Airway: Is the airway (throat) clear? Lay the casualty on his back, tilt the head to one side, and open the mouth; check that the tongue is not blocking the throat, and use your fingers to scoop out anything (food, dirt, artificial teeth, etc.) in the mouth; then gently move the head so that the chin is up and the mouth open and check for breathing.
B = Breathing: Is the casualty breathing? Check by putting your ear close to the casualty’s mouth for at least 10 seconds to
hear and feel the breath. Look to see whether the chest is rising and falling. If
there is no breath, then immediately give artificial respiration by pinching closed
the nostrils, taking a deep breath, and breathing slowly into the casualty’s mouth
until you have emptied all the air in your lungs into his. Do this again. Check again for breathing. If there is still no breath, check for circulation.
C = Circulation: Is there a pulse? Check the pulse by placing two fingers at the neck near the
throat, and look at the casualty’s colour and pupils of the eyes. If there is no breath
or circulation, call for emergency assistance immediately before continuing. Once
help has been summoned, if you know the technique, then apply CPR (Cardio-
Pulmonary Resuscitation) combining chest compressions with artificial respirations
until expert help arrives, or the casualty starts breathing. If there is a pulse, but the
casualty is still not breathing, continue with artificial respiration (a breath every five
seconds). Do not give up - it may take some time for him to be able to breathe on his own. Once the casualty is breathing and talking again, lay him on his back and keep him warm.
62
If he is breathing but does not answer questions, put him in the recovery position. 3. Get help Expert help must be summoned as quickly as possible, normally by dialing 999. Try not to leave the casualty alone, so ask others to phone or get help and to report back that they have done so. Many people have mobile phones so there may be no need to leave the scene. It is important to give the emergency services clear information on:
• What has happened • The location of the crash; street name, known landmarks or places • Site conditions and dangers • Number of people injured and severity of injuries.You should not
end the call until you are told to do so – wait for the emergency service to confirm the details
• If help is not quickly available you may have to transport the casualty to a medical facility. Ask the advice of the Police or local people about the best place to take the casualty. Small facilities like health posts and clinics may be able to stabilize the condition of the seriously injured so that they will survive a long trip to hospital. However some may not be open 24 hours
4. Moving casualties
• Do not move any casualties unless absolutely necessary. Injured persons still in vehicles should not be removed unless there is immediate danger of fire, additional damage, or further collisions. Persons suffering obvious bone fractures or possible internal or spinal injuries should not be moved unless it is essential for their safety.
• If a casualty is unconscious but is breathing and not obviously badly injured, put them in the recovery position to prevent breathing problems
5. Bleeding and injury treatment
• A person can bleed to death in five minutes, so it is vital that you try and stop heavy loss of blood. Reassure him, and, if possible, lay him flat on the ground. Find out where the bleeding is coming from. Then check for anything in the wound and remove it if is easy to do so. Apply firm pressure over the wound, preferably using a sterile dressing from a First Aid kit or any other
• Clean padding - otherwise use your hands. If the bleeding does not reduce, press harder. You may be able to tie the padding over the wound, but be careful that you do not cut off circulation - release the pressure briefly every ten minutes. If there are no broken bones, raise a bleeding limb as high as possible to reduce the blood flow.
• If there are broken bones, fractures or dislocations it is important to stabilize the limb and avoid movement so you don’t make the injury worse. If there are burns, immediately cool the area with cold running water and then cover with a clean dressing.
63

6. Treat victims for shock
• It is also very important to recognize, prevent, and treat the symptoms of
shock, as these may cause even more serious deterioration than the
original injury. The signs are: a cold, pale, damp skin; fast or weak pulse;
rapid shallow breathing; feeling sick; yawning or sighing • The causes of shock are many, including: injury; drop in blood pressure;
and reduction in the volume of any body fluid. As well as treating the
cause, it is vital not to leave the person alone, and to make them more comfortable by:
i. laying the person down ii. loosening any tight clothing particularly round the chest and airways iii. keeping the person warm by covering with a blanket iv. talking to the person to keep them calm v. raising the legs slightly to keep blood flowing to the head. • An accident casualty should never be given anything to eat or drink. If
they are thirsty, moisten their lips with water. Never give a casualty any
medicines or apply anything but clean water and dressings to wounds
7. Put the casualty in the recovery position • This is a stable position with the casualty on their side, to prevent
choking on their tongue or vomit if unconscious.
• The head is slightly tilted back, the lower arm is out at a right angle,
the hand of the upper arm is under the cheek, the lower leg stretched
out, and the upper leg bent in a right angle as shown in the
illustration below
1 2
3 4
64

Reporting the accident
• Report the accident as soon as possible to the police • If you are hired as a driver, also report the incident to your employer • Take a photo or sketch the accident scene if you can do so safely • Record the number plate of the vehicles involved in the accident
65

UNIT 19: WORK PLANNING
Work Planning ensures that the driver and the customers both get the best out of the service provided because it allows the driver to prepare both physically and psychologically before the journey, schedule maintenance work in advance, schedule any stoppages during the journey and arrive at the intended destination on time
Preparing for the Journey (Trip Planning) If the journey involves transportation of goods, then the driver should pick up the goods and get all the appropriate documentation. This may include
• Name, address, phone and directions of the sender • Pick-up phone number • Appointment time for collecting and delivering the goods • Requirements for securing the load e.g. if it is fragile. • Other legal requirements if the goods are classified as Hazardous
Material or if the goods are being transported outside the country of
origin
Managing the trip While travelling, the following are factors will affect your how you manage
your trip 1. Distance to be travelled • The longer the distance you travel the more preparations you will
need to make. You may need a co-driver to take over from you if the
distance being travelled is long
2. Time/Traffic conditions during the journey • If you travel during peak traffic hours your journey is likely to be longer • Travelling at night or early in the morning when there is limited
visibility also affects your travel
• It is best to plan ahead and choose the most convenient travel time
for you
3. Meals • Plan ahead for where you will stop for meals • If using familiar roads then go to place you are familiar with • If you are using an unfamiliar route, it is best to plan ahead by using
maps which can assist you in planning for where to stop
4. Fatigue • Do not start a journey when you are tired • If you feel tired during the journey, stop the vehicle at a convenient stop
and get some rest and fresh air before proceeding on your journey
66

5. Adverse weather conditions • Avoid driving in adverse weather conditions • Take the right precautions if you get caught up in these conditions
Managing Time To get to the intended destination within the least possible amount of time get directions before starting the journey. You can do this by consulting maps, GPS units and other drivers. Ensure that you know alternative routes so that you have options in case of road restrictions.
Legal limits on Duty hours /Driving hours The driver is obligated to adhere to the rules in the Traffic Act. It is illegal to
force a public service driver work for more than the designated hours provided. The Traffic Act indicates that
“66A. (1) No person shall drive a public service vehicle or a commercial vehicle for more than a total of eight hours in any period of twenty-four hours. (2) Any person who contravenes or fails to comply with subsection (1) shall be
guilty of an offence and liable —…” Completing records of duty, work tickets or trip cards. After completing the journey, the driver of a public service vehicle should
pro-vide a summarized record of the trip.
67
UNIT 20: CUSTOMER CARE
A customer refers to anyone that you have to deal with in the course of riding
or driving on the road. In this case, the customer may be a pedestrian, a passenger and other motorists
The following are essential skills any driver should have: • Communication skills • Handling customer expectations • Handling customers with special needs • Knowledge of sexual harassment and other forms of discrimination
Communication Skills
Communication is the process of using words, sounds or behaviour to pass on information. Communication is necessary for all road users as it allows for shared and safe use of the road with minimal disruption. It is important to know and understand how other road users communicate so as to ensure safety and harmony along the road.
Why you need to train on communication The traffic situation brings together different types of road users – pedestrians, cyclists, riders and other motorists – and also different types of individuals with varying personalities and varying needs. As such it is not enough to know the rules of the road. It is also important to learn how to interact with different types of individuals.
The following are some elements of communication that every road user should learn:
• Patience • Attitude
• Language
Courtesy on the road Courtesy involves applying all the elements of good communication - patience,
having a positive attitude and using appropriate language. • Ensure that you get the right training and a license before you
venture out on the road
• You should always apply all road safety techniques as required
for safe driving
• Having a positive attitude enables you to complete tasks with
confidence and to respond appropriately to instructions or
signals from the authorities, road signals and other road users
68

• Take responsibility for your actions when you are on the wrong. In
the event that you are involved in an accident. Do not take the law into your own hands. Report the matter to the police
• Be visible by positioning yourself correctly on the road and signalling where necessary
• Ensure that your vehicle interior and exterior is clean, that the number plates are visible and that your passengers have comfortable seating and use their safety belts at all times
• Ensure that you store away luggage in the boot
Handling Customer Expectations The driver or rider should always prioritize their safety by ensuring that they
observe all the correct safety procedures. This section primarily addresses the
needs of customers who are paying for the service as passengers or owners of
goods that need to be transported but all these guidelines can also be applied to
private motorists and motorcycle riders who are ferrying goods or passengers.
Before embarking on any trip ensure that you: • Pick and drop off passengers or goods at the appropriate and
designated points • Provide sufficient time for passengers to board and alight from the
vehicle. Be patient, do not rush them • Assist passengers who may need help in embarking and
disembarking from the motorcycle • Address customers in respectful language so that there is less room
for misunderstanding • Be professional: This means giving clear information about the service
you provide, the charges and any other detail that would ensure that
you, the service provider, and the customer have clear expectations • Provide a helmet and reflective jacket for your passengers • Let your passengers know how to correctly position themselves on
the motorcycle • Provide appropriate sitting for all passengers. • Where possible, and in particular for the PSV, ensure that you
designate sitting for the elderly, sickly, and expectant mothers. Make arrangements for them to access seats that are most convenient for easy boarding and alighting. Give special consideration for passengers with disabilities and offer assistance where requested
• Do not carry more passengers or goods than you are legally allowed to ferry
• Know the weight restrictions related to your vehicle or motorcycle. Do not exceed this
• Ensure that you are appropriately equipped to handle the goods to
be ferried from one location to another
69

Observe Personal Hygiene
• Ensure that you are smart, sober and clean. Provide a clean
environment for both you and your passengers to work and travel
comfortably. Your personal grooming projects your level of
confidence, your attitude towards your work and it ultimately affects
how you interact with your customers • Ensure that your vehicle or motorcycle is kept clean. Ensure that
your number plates are visible and that your safety gear is also kept
clean. This allows you to communicate effectively on the road; to see
and be seen Time and Stress management skills
• Ensure that your passengers or goods are ferried within the
expected time. Where unexpected circumstances cause a delay, let
your customer know • Get sufficient rest and nutrition to that you are strong and healthy
enough to ride your motorcycle.
• Take breaks between journeys and only work within legally stipulated
hours so that you, your passengers and goods are safe from the risk
of accidents caused by fatigue
Sexual Harassment and Discrimination
Sexual Harassment
This is a form of bullying or coercion which happens when a person directly or indirectly makes unwelcome requests for sexual intercourse, sexual contact, other sexual activity, uses written or spoken language of a sexual nature, uses visual material or shows physical behaviour of sexual nature
Discrimination Occurs when you chose to treat customers favourably or unfavourably
because of their appearance, race, ethnic identity, gender or age.
• Both sexual harassment and discrimination are anti social
behaviours that discourage positive interaction on the road.
• It is important to create a working environment where vulnerable
passengers are safe and are less likely to encounter inappropriate
behaviour, language or contact. • Ensure that you have a procedure in place to deal with sexual
harassment and discrimination should you encounter it.
• When faced with sexual harassment or discrimination, speak up,
address the issue with the administrative authority and seek
assistance from the police.
70

Competitive Riding This is when motorcyclists ride abreast at unreasonable speed. No more than
2 riders are allowed to ride abreast.
Defensive riding is important when in the following condition
• Adverse weather conditions such as rain, fog or windy. In these
cases, the road surface may change and so you need to apply
different techniques to avoid danger • Different road conditions that may be difficult to manoeuvre such
rough terrain, wet surface or sloping surfaces
Defensive riding techniques
• Improving observation, anticipation and awareness consistent with
the riding speed
• Applying sound judgement of speed and distance
• Don’t drive when you are tired, rest before any journey
UNIT 21: EXAMINATION FOR DRIVERS
In order to get your riding licence, you should follow the exam
registration procedure provided for by NTSA.
Prepare adequately for both the practical and theory exam.
On the day of the exam, go to the examination centre on time to
avoid disappointment.
71

TRAFFIC SIGNS
(a) Regulatory Signs
72

73

Secondary Message Signs for use with Regulatory Signs
(b) Warning Signs
74

75

76
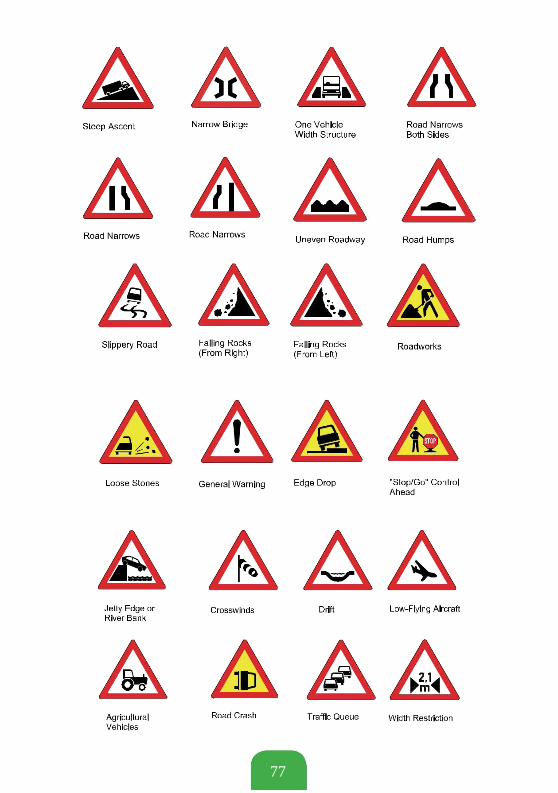
77

(c) Information Signs
No through No through No through
road on ahead road on right road on left
78

(d) Guidance Signs
Traffic Signals
79

80
Lane 1 has two options Stay on lane 1, Go straight, 0° Turn left at 90°

81
Lane 2 has one option Go straight only, 0°

82
Lane 4 has four options • Turn right at 90° • Come back at 180° • Turn left 270° • Go straight 360° after going round
the roundabout clockwise direction

83

National Transport and Safety
Authority Hill Park Building; Upper
Hill PO Box 3602 -00506 Nairobi
Mobile: +254 09 932 000 Office: 020 6632 000
Email: [email protected]
84