kin architectural manual please take the time to fully
TRANSCRIPT

www.totemacoustic.com
Kin Architectural Manual Thank you for choosing the Totem Acoustic Kin Architectural series. Please take the time to fully read this manual prior to beginning set-up. The manual will clearly guide you to achieve the best possible sound that these newly acquired Totem speakers can provide. Beyond sonic performance, Totem has given tremendous consideration to the home integrator. New construction or retro-fit, the Kin Architectural speakers are easy to install and have a supporting cast of ingenious accessories to address any situation and application. For further assistance, contact our tech support at [email protected]. UNPACKING Totem Acoustic keeps to a strict quality control regimen and all factory-sealed products leave our facility in perfect condition. If there are any damages visible or concealed that has occurred in handling it must be reported immediately to your Totem Authorized Dealer. Carefully remove the speaker(s) from the box(es). Save all custom cartons and packaging foam for future use. They are rather expensive and may come in handy for future upgrades. Contents: Each individual box contains: 1 Kin Architectural speaker, 1 stainless steel, magnetic grille, 1 transparent driver protector, 1 cutout template. Tools and items required: Drywall saw Speaker wire Wire stripper Pencil Drill Stud Finder Measuring Tape Metal hanger or 1 foot/30cm of solid core wire Fish tool Spray paint-optional
www.totemacoustic.com
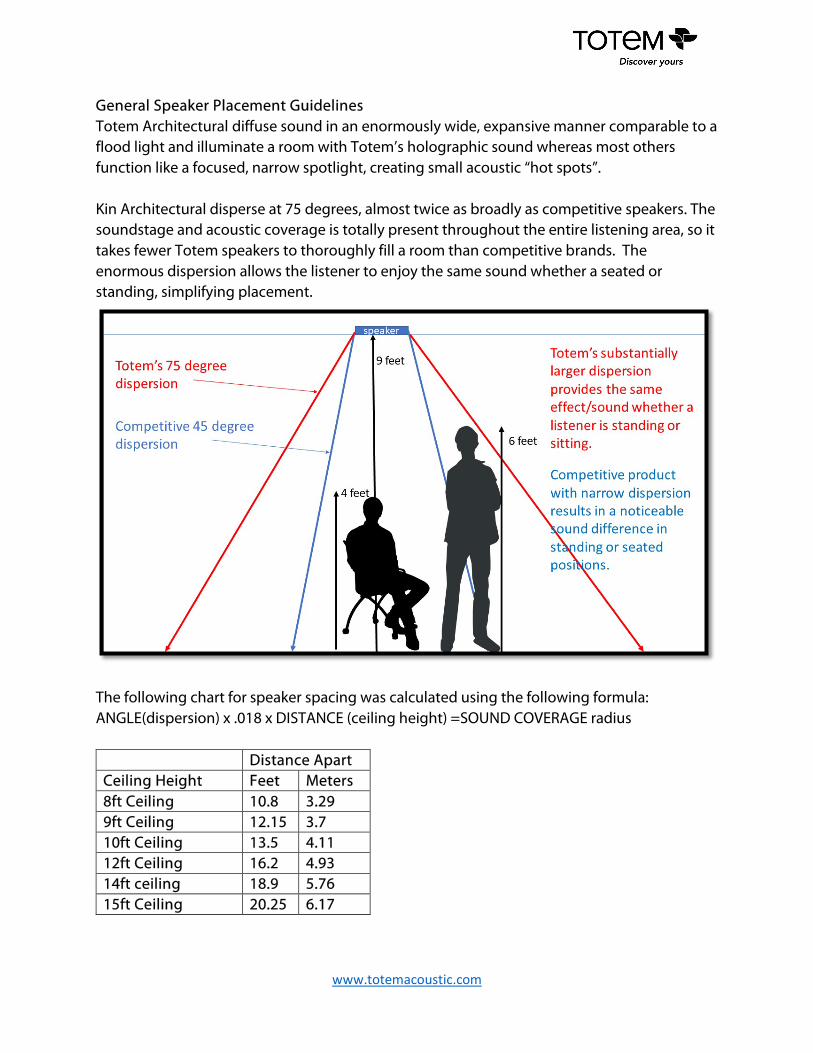
General Speaker Placement Guidelines Totem Architectural diffuse sound in an enormously wide, expansive manner comparable to a flood light and illuminate a room with Totem’s holographic sound whereas most others function like a focused, narrow spotlight, creating small acoustic “hot spots”. Kin Architectural disperse at 75 degrees, almost twice as broadly as competitive speakers. The soundstage and acoustic coverage is totally present throughout the entire listening area, so it takes fewer Totem speakers to thoroughly fill a room than competitive brands. The enormous dispersion allows the listener to enjoy the same sound whether a seated or standing, simplifying placement.
The following chart for speaker spacing was calculated using the following formula: ANGLE(dispersion) x .018 x DISTANCE (ceiling height) =SOUND COVERAGE radius
Distance Apart Ceiling Height Feet Meters 8ft Ceiling 10.8 3.29 9ft Ceiling 12.15 3.7 10ft Ceiling 13.5 4.11 12ft Ceiling 16.2 4.93 14ft ceiling 18.9 5.76 15ft Ceiling 20.25 6.17

www.totemacoustic.com
Recommended Speaker wire Length of Run Suggested Wire Gauge Up to 75 feet / 22.86 meters 16 gauge 75-200 feet / 22.86 to 60.96 meters 14 gauge Over 200 feet / over 60.96 meters 12 gauge
Precautions before Installation Check for obstructions. Use an electronic stud finder to check for ceiling joists, heating and ventilating shafts, or wall studs that may hinder cutting the required opening or the running of the cable to your desired location. In order to ensure proper hole size, attach the cutout template and drill a hole in the center of the outline. Cut approximately 1’ (30cm) of coat hanger wire and bend it to a right angle in the middle. Insert in the hole and rotate to check for wires, pipes, studs or other obstructions. General Placement Guidelines Always bear in mind that corner locations cause acoustic directionality, limit dispersion and emphasize low frequencies. Single speaker stereo applications with the IC62ST: The stereo IC62ST speaker should be centered on the ceiling, positioned over the intended listening area. If multiple IC62ST are being used within a room then they can be positioned at each third of the rooms longest dimension.

www.totemacoustic.com
Stereo Audio Applications: When a pair of Kin Architectural Series speakers are used for conventional stereo reproduction, they should be positioned at each third of the rooms longest dimension. If they are being used in conjunction with a TV, they should be placed in front and adjacent to the TV.
Multi-channel Audio Applications In a 5.1 set up, the Left, Center, and Right should be along the same plane with the Left and Right Surround in back and adjacent to the sitting area.
In a 7.1 set up, the Left, Center, and Right should be along the same plane with the Left and Right Surround parallel to the listening area, and the Surround channels in back and adjacent to the sitting area.

www.totemacoustic.com
True to both Totem and Kin heritage, all models possess our characteristic phase linearity for uncanny realism, a full range response for truly dynamic performance, and remarkably huge dispersion that facilitates placement and fills the room. They can also intermix harmoniously with any existing traditional, on-wall, or architectural Totem speaker for a variety of multi-channel options. For example, if you are using Tribe On-Wall speakers for your front three channels you can seamlessly blend Kin Architectural for your rear speakers. Installing your Speakers Once you have selected the location and determined that there is nothing hindering the initial cutout you are ready to start installing the speakers. 1-Use the provided template to trace a circle in pencil for the intended location. 2-Carefully cut out the speaker cavity with a drywall saw or similar tool. Remove the cutaway and lightly compress the insulation, if any, although the Unified Framework Shield will protect the delicate speaker components when the speaker is being inserted. The reinforced cover protects the speaker from material within walls and ceilings during the installation process and reinforces the rigidity of the framework to eliminate resonance. 3-Fish the speaker cable from the amplifier and out through the recently cut speaker cavity. Allow yourself roughly 1’ (30cm) of slack to protrude to facilitate the installation. Strip about 3/8” (1cm) off the ends of the speaker wires and connect to the speaker terminals. Note: Make sure to connect the “+” terminal on your amplifier to the “+” terminal on your speakers, and the “-” terminal on your amplifier to the “-” terminal on your speakers. Speaker cables and terminals are often color-coded as well, red for “+”, black for “-”, or indicate a “+” or “-“directly on the wire to help you make the correct connection. 4-Ensure the “Dog Ears” are in their original position, flush set within the frame, and insert the speaker in the wall or ceiling. Gradually tighten the Philips screws on the speaker frame to fix the speaker in place. The dog ears deploy smoothly and efficiently, are made of a material even more durable than the baffle, and feature stainless

www.totemacoustic.com
steel screws. They can handle strong torque settings but ideally lower torque setting should be used to prevent accidents and ensure a proper installation. Textured terminals provide extra grip on any material, guaranteeing a solid, tight installation.
5-Remove the transparent driver protector and place grille on speakers to complete the installation. Optional square grille kits are available and need to be added before the speaker is installed. Consult the SGK square grille kit manuals for installation instructions. Painting the Grilles The stainless steels grilles can be painted to suit personal tastes and match aspects of the décor. The grill incorporates a scrim-cloth to hide the drivers when installed. This scrim-cloth is adhered to the grill with a light adhesive and must be removed before painting but maintains its adhesion qualities and will reattach once painted. To remove it, gently peel from the small tab inconspicuously located along the trim. It is not necessary to paint the speaker cabinet or frame, as the grill will cover the entire baffle. Ideally the process would be done with spray paint or a spray gun set to a low setting which lessens the chance of plugging the holes. After the paint is dry, re-apply the scrim-cloth.
www.totemacoustic.com
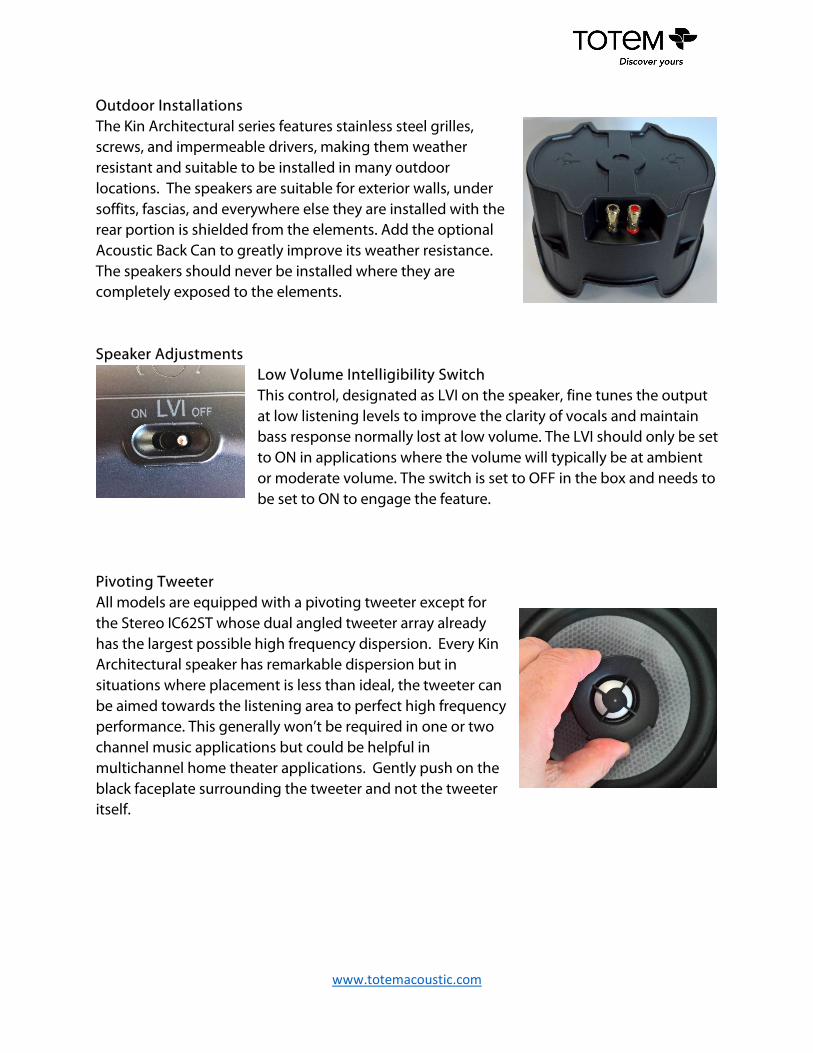
Outdoor Installations The Kin Architectural series features stainless steel grilles, screws, and impermeable drivers, making them weather resistant and suitable to be installed in many outdoor locations. The speakers are suitable for exterior walls, under soffits, fascias, and everywhere else they are installed with the rear portion is shielded from the elements. Add the optional Acoustic Back Can to greatly improve its weather resistance. The speakers should never be installed where they are completely exposed to the elements. Speaker Adjustments
Low Volume Intelligibility Switch This control, designated as LVI on the speaker, fine tunes the output at low listening levels to improve the clarity of vocals and maintain bass response normally lost at low volume. The LVI should only be set to ON in applications where the volume will typically be at ambient or moderate volume. The switch is set to OFF in the box and needs to be set to ON to engage the feature.
Pivoting Tweeter All models are equipped with a pivoting tweeter except for the Stereo IC62ST whose dual angled tweeter array already has the largest possible high frequency dispersion. Every Kin Architectural speaker has remarkable dispersion but in situations where placement is less than ideal, the tweeter can be aimed towards the listening area to perfect high frequency performance. This generally won’t be required in one or two channel music applications but could be helpful in multichannel home theater applications. Gently push on the black faceplate surrounding the tweeter and not the tweeter itself.

www.totemacoustic.com
Optional Accessories 2 Color coded Pre-Construction Kits (PCK6C, PCK8C) helpfully indicate proper speaker size to ensure installation efficiency and prevent time consuming, costly mistakes. 8” frames are green, 6” frames are red. Each rigid frame is equipped with a joist bracket that allows all speakers to be installed in a perfect line simply and flawlessly, and multiple points to connect the wings guarantees that contact with drywall is always within access. Round magnetic grilles are included but optional Square Grille Kits (SGK6, SGK8) permit cosmetic finishing touches to suit personal design tastes and match lighting and HVAC frames.
Sound isolating Acoustic Back Cans (ABC6, ABC8, ABC6ST) quickly adapt and can reduce sound from penetrating adjacent rooms by 24dB. They protect the drivers and crossover components from materials, dirt, and dust that can cause damage and degrade performance.

www.totemacoustic.com
Specifications
Spec
ifica
tion
Kin
IC82
Kin
IC81
Kin
IC62
Kin
IC62
STKi
n IC
61
Desig
n8"
In-C
eilin
g w
ith LV
I eq
ualiz
atio
n sw
itch
8" In
-Cei
ling
with
with
LVI
equa
lizat
ion
switc
h6.
5" In
-Cei
ling
with
with
LV
I equ
aliz
atio
n sw
itch
6.5"
In-C
eilin
g w
ith w
ith
LVI e
qual
izat
ion
switc
h6.
5" In
-Cei
ling
with
with
LV
I equ
aliz
atio
n sw
itch
Freq
uenc
y Re
spon
se:
38 H
z - 3
0 kH
z42
Hz -
30
kHz
46 H
z - 3
0 kH
z49
Hz -
30
kHz
50 H
z - 3
0 kH
z Re
com
men
ded
Pow
er:
20-1
50 W
20-1
20 W
20-1
10 W
20-1
00 W
20-9
0 W
Woo
fer:
8” M
HEX
Phen
olic
Ho
neyc
omb
Wov
en
Hybr
id w
oofe
r in
die-
cast
ba
sket
8" P
olyP
ropy
lene
in
stam
ped
bask
et
6.5”
MHE
X Ph
enol
ic
Hone
ycom
b W
oven
Hy
brid
woo
fer i
n di
e-ca
st
bask
et
6.5”
MHE
X Ph
enol
ic
Hone
ycom
b W
oven
Hy
brid
woo
fer i
n di
e-ca
st
bask
et6.
5" P
olyP
ropy
lene
in
stam
ped
bask
et
Twee
ter:
1” C
eram
ic c
oate
d al
umin
um d
ome
twee
ter
1” C
eram
ic c
oate
d al
umin
um d
ome
twee
ter
1” C
eram
ic c
oate
d al
umin
um d
ome
twee
ter
Dual
1”
Cera
mic
coa
ted
alum
inum
dom
e tw
eete
rs.7
5" S
oft D
ome
Impe
danc
e:8
ohm
8 oh
m8
ohm
8 oh
m8
ohm
Sens
itivi
ty d
B @
1W-1
M91
dB91
dB90
dB90
dB90
dB
Dim
ensio
ns (w
x h
x d
):27
1 x
169.
55m
m27
1 x
169.
55m
m
234
x 12
0.65
mm
/ 9
.21
x 4.
75"
With
bac
k ca
n:
157.
41 /6
.19"
234
x 12
0.65
mm
/ 9
.21
x 4.
75"
With
bac
k ca
n:
157.
41 /6
.19"
234
x 12
0.65
mm
/ 9
.21
x 4.
75"
With
bac
k ca
n:
157.
41 /6
.19"
Cuto
ut24
6.25
mm
246.
25m
m21
1mm
211m
m21
1mm
grill
e ty
pe
mag
netic
, pai
ntab
le,
virt
ually
bez
el-le
ss w
hite
m
etal
mag
netic
, pai
ntab
le,
virt
ually
bez
el-le
ss w
hite
m
etal
mag
netic
, pai
ntab
le,
virt
ually
bez
el-le
ss w
hite
m
etal
mag
netic
, pai
ntab
le,
virt
ually
bez
el-le
ss w
hite
m
etal
mag
netic
, pai
ntab
le,
virt
ually
bez
el-le
ss w
hite
m
etal
acce
ssor
ies/
optio
ns
Pre-
cons
truc
tion
brac
kets
, sq
uare
gril
les,
aco
ustic
ba
ck ca
n
Pre-
cons
truc
tion
brac
kets
, sq
uare
gril
les,
aco
ustic
ba
ck ca
n
Pre-
cons
truc
tion
brac
kets
, sq
uare
gril
les,
aco
ustic
ba
ck ca
n
Pre-
cons
truc
tion
brac
kets
, sq
uare
gril
les,
aco
ustic
ba
ck ca
n
Pre-
cons
truc
tion
brac
kets
, sq
uare
gril
les,
aco
ustic
ba
ck ca
nSp
eake
r Ter
min
als:
Sprin
g lo
aded
Gol
d Pl
ated
Sprin
g lo
aded
Gol
d Pl
ated
Sprin
g lo
aded
Gol
d Pl
ated
Sprin
g lo
aded
Gol
d Pl
ated
Sprin
g lo
aded
Gol
d Pl
ated
Max
imum
Spe
aker
Wire
Ga
uge
Acce
pted
12 g
auge
12 g
auge
12 g
auge
12 g
auge
12 g
auge

www.totemacoustic.com
TOTEM LIMITED WARRANTY Please register online at www.totemacoustic.com within two weeks of the purchase date. The Totem speakers must be purchased from a TOTEM AUTHORIZED DEALER. Keep your original bill or receipt obtained from your Totem Authorized Dealer. Retain the sturdy carton and all packing material; if needed, it will prove invaluable for damage-free transport or storage and upgrade purposes. All Totem products are created with the utmost care and quality in mind. If ever a problem should arise, Totem’s speakers are covered by a five (5) year limited warranty, (excluding subwoofers) starting from the date of purchase. The Totem limited warranty applies to products in normal home use only. The warranty is void if serial numbers have been altered or removed. The warranty is void if products show signs of abuse. The warranty is void if the speakers have been tampered with. Warning / Important technical note Please read before operating speakers. the warranty on speakers is void if the voice coils are burned or damaged as a result of overpowering or clipping. Overpowering: The volume control of most amplifiers and receivers is a logarithmic type, which means that full rated power may be reached with the volume control at as little as the halfway point. In addition, operating the loudness feature or boosting the treble or bass controls increases power output well beyond rated levels. as a result of the above factors, a 30-watt amplifier can produce distorted output levels of over 100 watt and may damage your loudspeakers. Clipping: Clipping refers to the power level at which an amplifier begins to distort a waveform by flattening its top and bottom into a square wave-shape. When fed to tweeters and/or midrange speakers, this may result in exceeding their maximum power handling capacity, causing damage to the speaker voice coil. Clipping can be identified by fuzz or distorted sound. if this is heard, lower the volume immediately to avoid damage to your system. continuous clipping will damage or burn out the speakers. The speakers require at least 75-100 hours of actual music playing time as a minimal break-in period. During this time, refrain from playing them at very loud levels. You will notice a definite gradual improvement in the cohesiveness of the music reproduction as this occurs. We reserve the right to any future change or modification without notice. For further assistance, contact your TOTEM AUTHORIZED DEALER or visit the Totem website.

www.totemacoustic.com
ABC6, ABC6ST, ABC8 Acoustic Back Can manual
Totem Acoustic Back Cans retrofit simply to Kin Architectural speakers and can reduce sound from
penetrating adjacent rooms by up to 24dB. They also protect the drivers and crossover components
from materials, dirt, and dust that can cause damage and degrade performance.
The ABC6 fits the IC61, IC62,
The ABC6ST fits the IC62ST,
The ABC8 fits the IC81, IC82.
Contents:
1 Acoustic back can
4 screws
Attaching an ABC to a Kin Architectural speaker
1. Remove the small bag containing the 4 screws and set it
aside close by. Make sure the tweeter protector is in
place on the speaker. Turn the speaker over and rest it on
a smooth, clean surface. If possible, have it rest on a rag,
towel, or similar soft material that will prevent any
scratches and effectively protect the speaker.
2. Orient the speaker
so you can see the
white arrow affixed
on the side of the
lower baffle. Line up
the identical white
arrow on the
Acoustic Back Can.

www.totemacoustic.com
3. Connect the wire lead within the
Acoustic Back Can to the inputs on the
speaker, making sure to maintain
consistency with the polarity. In the
case of the stereo IC62ST, there will be
two leads to connect.
4. With the white arrows aligned, place the Acoustic Back Can atop the speaker. It should
interlock perfectly with the speaker.
5. Insert the four screws into the receptacles of the Acoustic Back Can. Tighten them securely,
until the gasket is compressed, but do not overtighten.
6. Connect the speaker wire from the amplifier to the terminals on the Acoustic Back Can.
Step 4 Step 5 Step 6
7. Install Kin Architectural speaker as directed in the Kin Architectural or Pre-Construction Kit
manual.

www.totemacoustic.com
Totem Acoustic PCK6C and PCK8C Pre-Construction Kits
Overview
Preconstruction kits provide a clear indication of the eventual speaker location for the drywall installer.
The
screws, staples, or nails. When the opening has been cut out and the wire is accessible, the Totem Kin
Architectural speaker can then be easily installed.
Contents
Each kit consists of:
-1 Color coded ring frame- The PCK6C fits the
IC61, IC62, and IC62ST and is Green and the
PCK8C fits the IC81 and IC82, and is Red
-2 metal wings with measurement indications,
-1 Joist bracket, which allows all speakers to be
installed in a perfect line simply and flawlessly.
-1 Crescent frame extension, to provides that
portion of the frame with the width required for
a dog ear to make contact with it. If you are not
using the joist bracket then attach the
extension.
Installation
1. For standard installations, connect the Crescent Frame Extension to the ring frame.

www.totemacoustic.com
2. If installing to a joist, connect the Joist Bracket on the fully flat surface side of the ring frame,
and with the Totem logo facing towards .
3. Consider the location of the speaker and the studs, joists, and any other impediments around
the intended location. Select the wing locations that will allow them to make contact with
drywall. Insert the wing into the preferred wing channel, pushing it until they fully click into
place as the pressure tab fits into the identically shaped opening of the wing.
4. Install the PCK in the designated location with the fully flat surface facing the ceiling and the
surface where the wings were installed facing you.

www.totemacoustic.com
5. Connect the wings to the studs or joists, preferable using screws, but staples or nails suitable
to hold the overall weight is acceptable. If you are using the Joist bracket, connect it to the
joist using wood or drywall screws.
6. If the wire is accessible, feed it through the opening.
*Optional square grille kits, sold separately, permit cosmetic finishing touches to suit personal design
tastes. Acoustic Back Cans, also sold separately, can reduce sound transference to adjacent rooms by
up to 24dB.
Consult the manual for the Kin Architectural speakers for information on installing the speakers.

www.totemacoustic.com
SGK6 and SGK8 Square Grille Kit manual
Totem Square Grille Kits easily adapt to all Kin Architectural speakers to convert them from the
supplied round grille to a square grille. It must be added before the speaker is installed.
The SGK6 fits the IC61, IC62, and IC62ST
The SGK8 fits the IC81, IC82.
Contents:
1 Square Grille Frame
1 Square Grille
Attaching an ABC to a Kin Architectural speaker
1. Position the frame with the Totem logos in
each corner of the frame facing you. Place the
and the drivers should both be facing you.
2. Install the speaker as directed in the manual.
With the drill, start tightening the dog ears,
although do not fully tighten them. Once two
dog ears have been deployed to the point
tightened, put down the drill.
3. Line up the Square Grille Kit so it is square with
the wall or HVAC ceiling fixtures.
4. Fully tighten all the dog ears.
5. The Square Grille Kit can also accommodate drywall
screws so the corners can be tightened to the wall or
ceiling and provide a tighter, flusher fit if required.
Drywall screws and anchors are not included.
Anchors are not required if a Totem Pre-Construction
Kit is being used.
6. Attach the square magnetic grille, making sure it
snaps into its fitted place over the frame.