kip certified autocad driverkipnews.kip.com/_public/legacy/kiptrackguide.pdfthis is the same pin...
TRANSCRIPT

KIP Certified AutoCAD Driver
KIP TRACK ACCOUNTING SYSTEM
KIP Track Accounting System
No part of this publication may be copied, reproduced or distributed in any form without express written permission from KIP. 2014 KIP.
- 1 -
Contents Introduction ..................................................................................................................................................................... 2 System Requirements .................................................................................................................................................... 3 Installation ........................................................................................................................................................................ 3 Custom Name of the KIP Track fields ......................................................................................................................... 6 KIP Track Rules ................................................................................................................................................................. 6 Setup KIP Track Data ..................................................................................................................................................... 6 Enter and Upload KIP Track Data ............................................................................................................................... 7 Use CSV data for KIP Track ........................................................................................................................................... 7 Prompt Setup ................................................................................................................................................................... 12 Advanced Features Advanced Tab ................................................................................................................................... 12 Options Tab ...................................................................................................................................................................... 13 Command line options ............................................................................................................................................... 14 Rules to follow for creating CSV files: ....................................................................................................................... 14 KIP Copy and Scan KIP Track ..................................................................................................................................... 15 KIP Print ........................................................................................................................................................................... 15 KIP AutoCAD Driver ...................................................................................................................................................... 16 KIP PrintNET ..................................................................................................................................................................... 17 KIP Windows Driver ....................................................................................................................................................... 17 Retrieve KIP Track Data ............................................................................................................................................... 18 KIP Track Logs ................................................................................................................................................................ 19 Copying and Printing Log format ............................................................................................................................. 19 Scan to File Log............................................................................................................................................................. 22 Overall Square/Linear Count ..................................................................................................................................... 23 KIP Track Data in Excel ................................................................................................................................................ 24
Formatting the Data ..............................................................................................................................................27 Creating the Pivot Table .......................................................................................................................................30 Formatting the Table .............................................................................................................................................32
Creating A Pivot Table in Excel 2013 ........................................................................................................................ 35 Inserting a Pivot Table in Excel 2013 ......................................................................................................................35

KIP Track Accounting System
No part of this publication may be copied, reproduced or distributed in any form without express written permission from KIP. 2014 KIP.
- 2 -
Introduction
With the KIP Track Configuration application, you can take a significant step to change your document services from costs into
profits. By enabling tracking for all printing, copying and scanning jobs, it ensures all work is charged to the appropriate user,
department or project. So not only are all costs accounted for, but at the same time, can be used for accurate reimbursement from
project owners. Engineers and Architects need a way to bill back printing for particular projects or departments.
FM suppliers need a way to easily produce reports at the end of the month to review the print and scan volumes. KIP
Track features built in to every KIP printer allow companies to control costs of copying, scan-to-file and network printing
of wide format data. Configuration of data and “rules” takes place in KIP Print or at the KIP. Rules allow for “requiring”
the user to select specific data and provide a password to use the KIP Track data. All KIP software applications can utilize
one set of KIP Track data that is configured remotely then uploaded to the controller inside the KIP printer. Those KIP
Track rules and data then transfer down to the KIP suite of applications: KIP Touchscreen copy, print and scan
applications, KIP Print, KIP Color Pro and Advance (copy, print, and scan-to-file), KIP PrintNET, KIP AutoCAD Driver, KIP
RIP and the KIP Windows Driver. Usage information is automatically collected by the KIP during regular printing.
Production reports can be created from the data using the KIP Print software or via the ASCII data when it is imported
into any spreadsheet
• The KIP is the hub of the system; responsible for storing the KIP Track data and collecting the information after
printing/copying/scan-to-file is complete.
• Each KIP software component obtains the KIP Track data and uses the “rules” to allow printing.

KIP Track Accounting System
No part of this publication may be copied, reproduced or distributed in any form without express written permission from KIP. 2014 KIP.
- 3 -
System Requirements
Recommended PC Specifications:
3.0 GHz processor speed 1 GB RAM Harddisk of 100 GB or more DVD-ROM USB-connection Windows 7or Windows 8 32/64 bit OS compatible
Installation
To install the KIP Track Configuration Application please follow these steps:
1. Browse to the location the KIP Track Configuration
Application package has been saved to.
2. Run the installer by double clicking the executable.
3. The following window will open, select the Next button.
4. Select the “I accept the terms in the license agreement”.

KIP Track Accounting System
No part of this publication may be copied, reproduced or distributed in any form without express written permission from KIP. 2014 KIP.
- 4 -
5. If the default install location is acceptable select the Next
button.
Note: If a different location is to be used select the Change
button and browse to the desired location for install.
6. Select the Install button to begin the Installation.
7. Installation process will begin and display the progress.
KIP Track Accounting System
No part of this publication may be copied, reproduced or distributed in any form without express written permission from KIP. 2014 KIP.
- 5 -
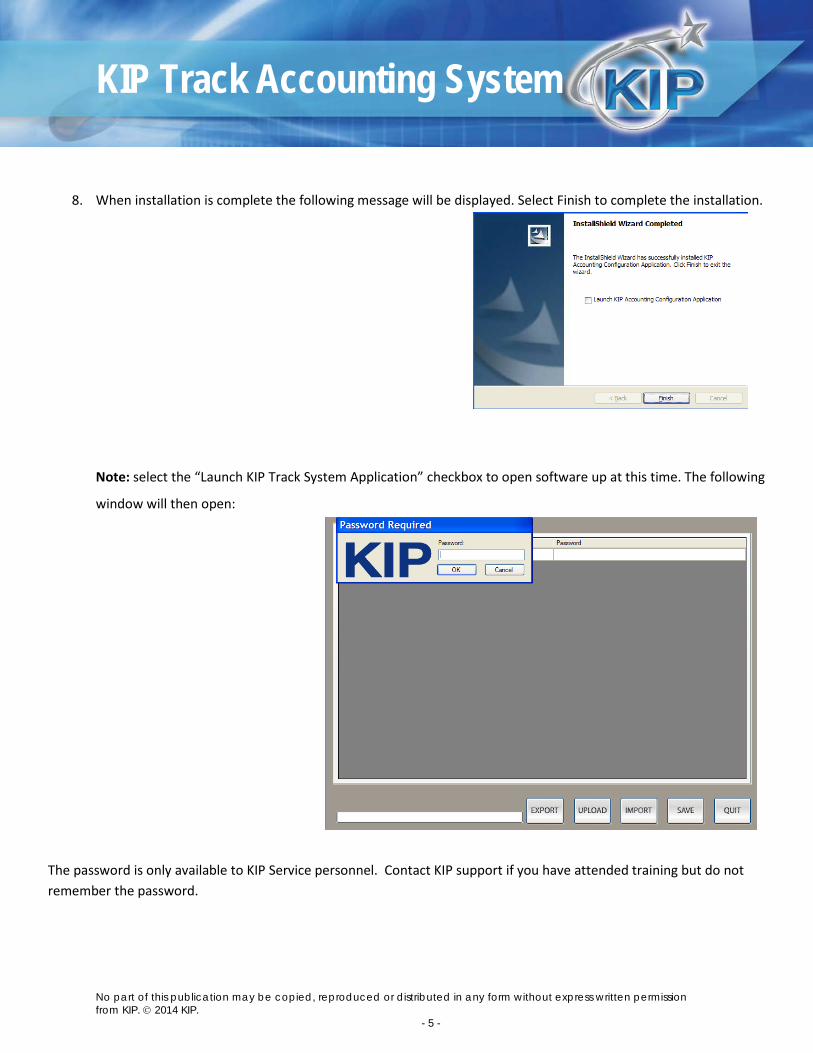
8. When installation is complete the following message will be displayed. Select Finish to complete the installation.
Note: select the “Launch KIP Track System Application” checkbox to open software up at this time. The following
window will then open:
The password is only available to KIP Service personnel. Contact KIP support if you have attended training but do not remember the password.
KIP Track Accounting System
No part of this publication may be copied, reproduced or distributed in any form without express written permission from KIP. 2014 KIP.
- 6 -
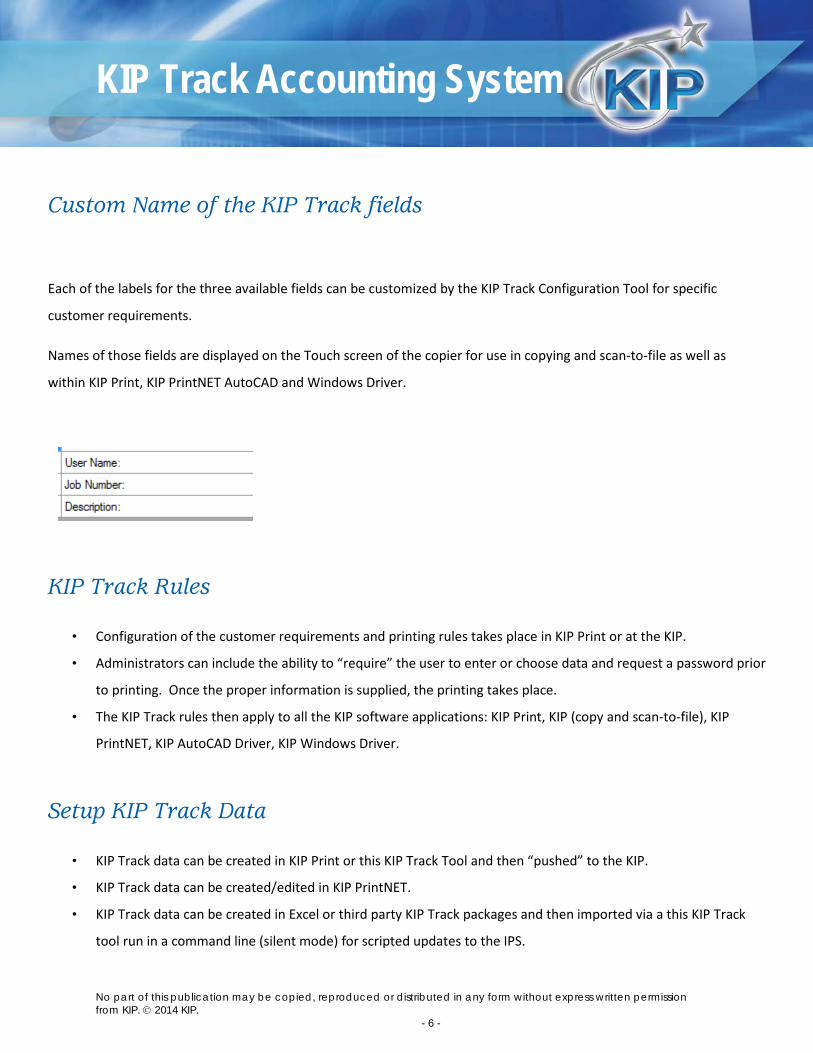
Custom Name of the KIP Track fields
Each of the labels for the three available fields can be customized by the KIP Track Configuration Tool for specific
customer requirements.
Names of those fields are displayed on the Touch screen of the copier for use in copying and scan-to-file as well as
within KIP Print, KIP PrintNET AutoCAD and Windows Driver.
KIP Track Rules
• Configuration of the customer requirements and printing rules takes place in KIP Print or at the KIP.
• Administrators can include the ability to “require” the user to enter or choose data and request a password prior
to printing. Once the proper information is supplied, the printing takes place.
• The KIP Track rules then apply to all the KIP software applications: KIP Print, KIP (copy and scan-to-file), KIP
PrintNET, KIP AutoCAD Driver, KIP Windows Driver.
Setup KIP Track Data
• KIP Track data can be created in KIP Print or this KIP Track Tool and then “pushed” to the KIP.
• KIP Track data can be created/edited in KIP PrintNET.
• KIP Track data can be created in Excel or third party KIP Track packages and then imported via a this KIP Track
tool run in a command line (silent mode) for scripted updates to the IPS.

KIP Track Accounting System
No part of this publication may be copied, reproduced or distributed in any form without express written permission from KIP. 2014 KIP.
- 7 -
Enter and Upload KIP Track Data
To add data, simply type in the ENTRY and PASSWORD columns. Press enter to store each data entry. When complete, select SAVE to store the data locally, then UPLOAD to transmit it to the IPS. If you wish update the data, be sure to exit the KIP Track tool prior to importing new or recent data as it will append it to the existing data. Exiting the tool ensures that you are starting with fresh local data or importing it from an IPS prior to editing or appending.
Use CSV data for KIP Track
It is easy to manually add KIP Track entries into KIP Print’s KIP Track fields. But what if there are hundreds or
thousands of entries to add and/or modify? KIP provides a utility called KIP Track Tool to import and export
standard CAV text data into the KIP Track fields.
Step 1: Close KIP Print if it is running. (It is required to have KIP Print installed on the same workstation that KIP
Track Tool is on.)
Step 2: Create a text file.
Use Notepad or another ASCII text editor to create a standard text file with comma-delimited KIP Track data.
Or use Microsoft Excel to create a comma separated file with a .CSV extension and then manually change this
to a .DAT file extension (once saved as .csv right click on the file and choose rename, change extension to
.dat). Note: the easiest method to review the format of the .DAT file is to first create one using the KIP Track
Tool and then use the Export function to export the .DAT file for review. It is assumed that
Field# 1 = User Name Field# 2 = Job Number Field# 3 = Description
The data format is:
(Field#),(Admin-defined Entry Name),(Admin-defined Entry Password)
Examples:
KIP Track Accounting System
No part of this publication may be copied, reproduced or distributed in any form without express written permission from KIP. 2014 KIP.
- 8 -
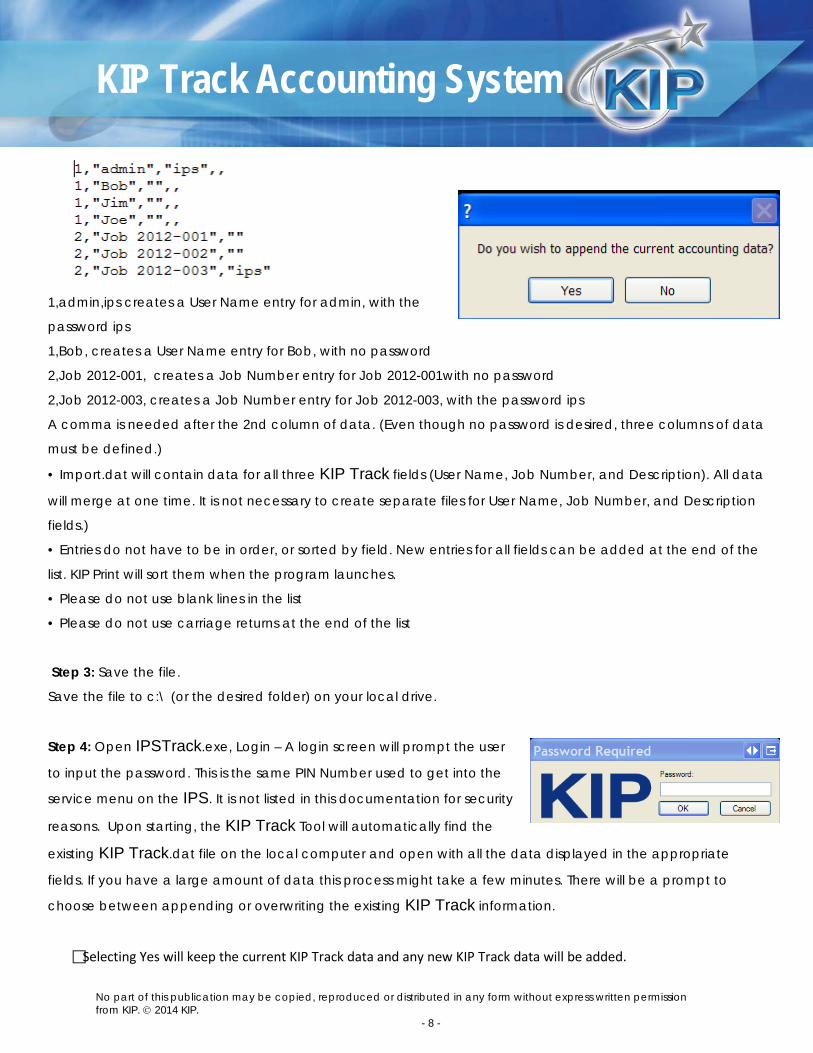
1,admin,ips creates a User Name entry for admin, with the
password ips
1,Bob, creates a User Name entry for Bob, with no password
2,Job 2012-001, creates a Job Number entry for Job 2012-001with no password
2,Job 2012-003, creates a Job Number entry for Job 2012-003, with the password ips
A comma is needed after the 2nd column of data. (Even though no password is desired, three columns of data
must be defined.)
• Import.dat will contain data for all three KIP Track fields (User Name, Job Number, and Description). All data
will merge at one time. It is not necessary to create separate files for User Name, Job Number, and Description
fields.)
• Entries do not have to be in order, or sorted by field. New entries for all fields can be added at the end of the
list. KIP Print will sort them when the program launches.
• Please do not use blank lines in the list
• Please do not use carriage returns at the end of the list
Step 3: Save the file.
Save the file to c:\ (or the desired folder) on your local drive.
Step 4: Open IPSTrack.exe, Login – A login screen will prompt the user
to input the password. This is the same PIN Number used to get into the
service menu on the IPS. It is not listed in this documentation for security
reasons. Upon starting, the KIP Track Tool will automatically find the
existing KIP Track.dat file on the local computer and open with all the data displayed in the appropriate
fields. If you have a large amount of data this process might take a few minutes. There will be a prompt to
choose between appending or overwriting the existing KIP Track information.
Selecting Yes will keep the current KIP Track data and any new KIP Track data will be added.

KIP Track Accounting System
No part of this publication may be copied, reproduced or distributed in any form without express written permission from KIP. 2014 KIP.
- 9 -
Selecting No will not preserve any existing KIP Track data.
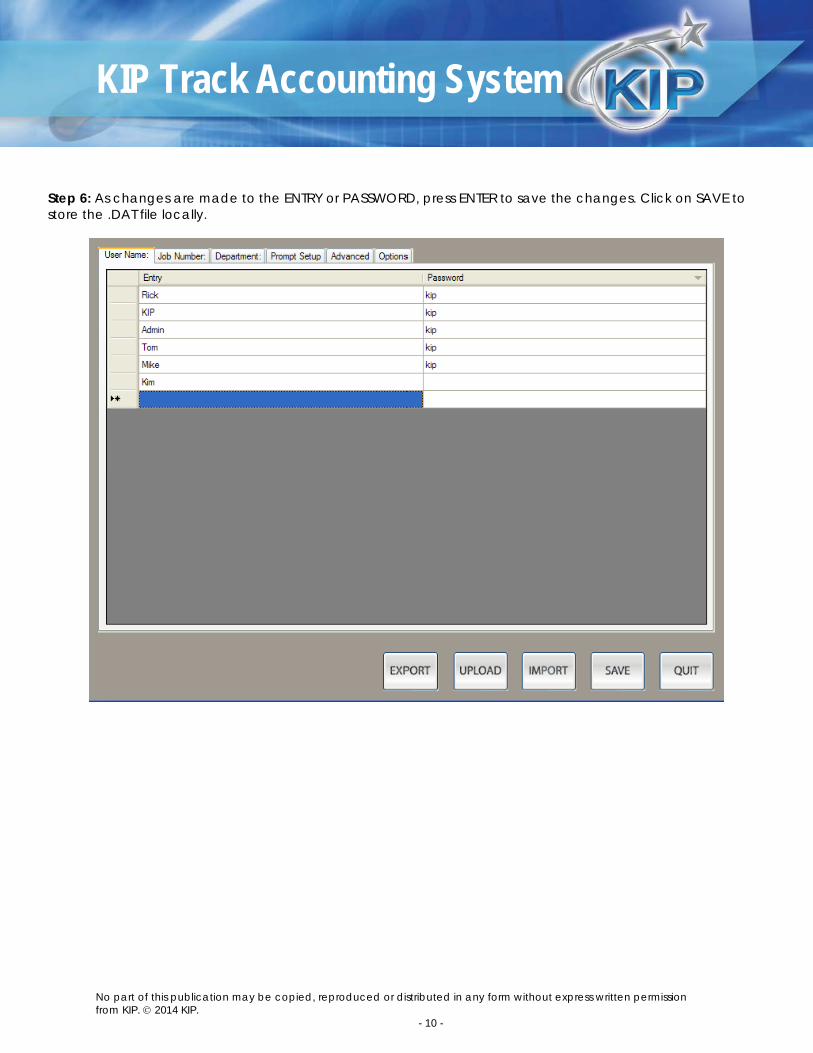
Step 5 Import button allows for Importing the data from the local PC (with KIP Print installed) or from the IP Address of
the IPS (if data currently exists). Click on the Import button and browse to the location of the KIP Track file you wish to
import or enter the IP address of the IPS.
KIP Track Accounting System
No part of this publication may be copied, reproduced or distributed in any form without express written permission from KIP. 2014 KIP.
- 10 -
Step 6: As changes are made to the ENTRY or PASSWORD, press ENTER to save the changes. Click on SAVE to store the .DAT file locally.

KIP Track Accounting System
No part of this publication may be copied, reproduced or distributed in any form without express written permission from KIP. 2014 KIP.
- 11 -
Step 7: UPLOAD the KIP Track file using one of two
methods. Click on the Upload button and type in
the IP Address of the target KIP.
Step 8: at this point the tracking data is
automatically updated. However the requirements
and pull down menu labels will not be changed
until an administrator imports this data as noted below.
On the Monochrome system select the “?” button and then log into
Service. Go to page 2 and select Import settings.
On the Color system select the Config button and then log into
Service. Go to page 2 and select the Accounting Info button.

KIP Track Accounting System
No part of this publication may be copied, reproduced or distributed in any form without express written permission from KIP. 2014 KIP.
- 12 -
Prompt Setup Here you are able to change the KIP Track requirements for each of the 3 pull down fields.
Advanced Features Advanced Tab Here you are able to change the master password along with the descriptions/labels for the 3 pull down menus.

KIP Track Accounting System
No part of this publication may be copied, reproduced or distributed in any form without express written permission from KIP. 2014 KIP.
- 13 -
Options Tab Here you are able to set up the KIP Printer to Enable a Card Reader and to Enable LDAP importing. This will look
at the system and load the necessary names and passwords etc.
Export
This will create a formatted comma separated file (CSV) on the local workstation. The filename must have a .DAT file extension to be imported later.

KIP Track Accounting System
No part of this publication may be copied, reproduced or distributed in any form without express written permission from KIP. 2014 KIP.
- 14 -
Command line options
If you wish to encrypt and transmit the KIP Track data to the IPS without using the UI, it is necessary to use a
command line to run the KIP Track which has the capability to process the .DAT, encrypt the data and transmit
it to the IPS without user intervention. Options can be specified:
-? – Help screen
-p [password] – Password (available to service personnel only)
-i [ipaddress] – the IPAddress of your IPS
-f [file location] – Comma separated file with .DAT extension to import
-a [yes or no] – use “yes” to append the data on the IPS
-A – Auto mode, if this switch is used, –i, -p, and -f must be specified. This switch will automatically open the KIP
Track software, import, save and upload to the IPS without any user intervention.
Example:
To automatically (silent command) import a file to the IPS the command line would look like this.
IPSTrack.exe –A –f “C:\ KIP Track directory\ KIP Track.dat” –p [password] –i [your printer ip address]
Rules to follow for creating CSV files:
1. Note: due to various versions of CSV files that have been used in the past, it is easiest to review the
current format of the CSV by first using the KIP Track to tool to make a few entries, SAVE the data, then
EXPORT to the data to a .DAT file.
2. Each record is one line (with exceptions)
3. Fields are separated with commas
4. Leading and trailing space-characters adjacent to comma field separators are ignored
5. Fields with embedded commas must be delimited with double-quote characters Example:(1, "John, Da
Man",Doe would be John, Da Man)
6. Fields that contain double quote characters must be surrounded by double-quotes, and the
embedded double-quotes must each be represented by a pair of consecutive double quotes.
Example:(1, "John ""Da Man""",Doe would be John “Da Man”)
7. Fields may always be delimited with double quotes
KIP Track Accounting System
No part of this publication may be copied, reproduced or distributed in any form without express written permission from KIP. 2014 KIP.
- 15 -
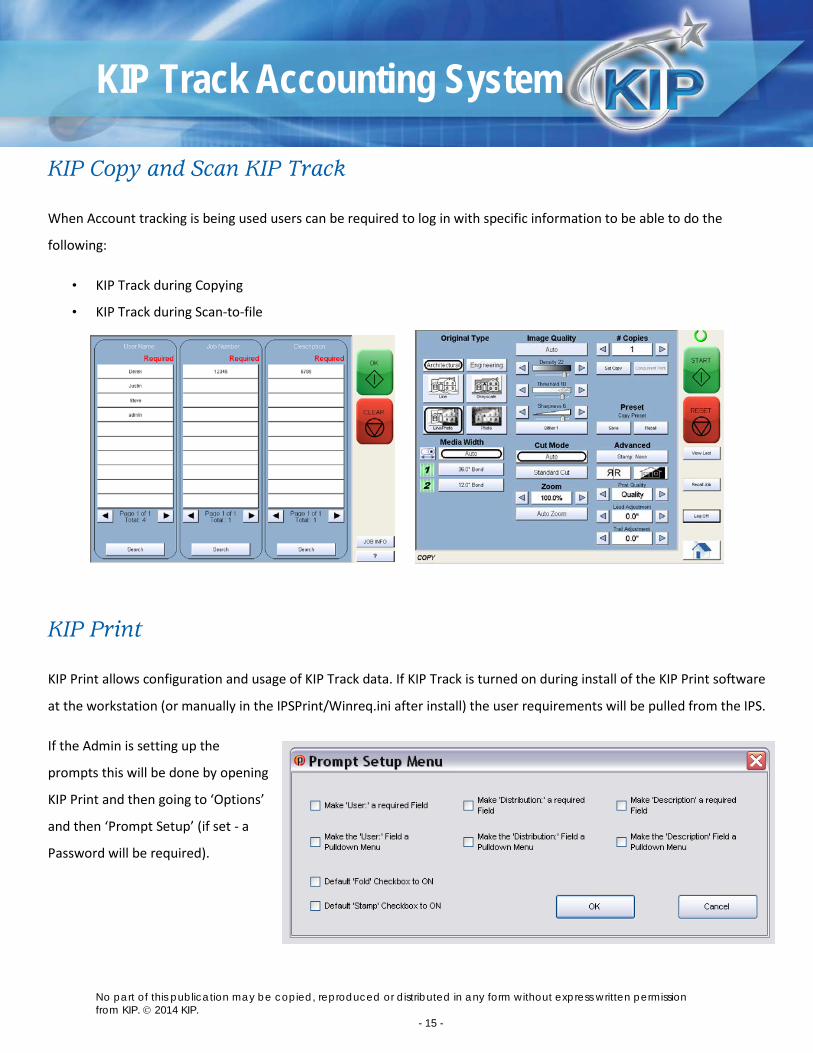
KIP Copy and Scan KIP Track
When Account tracking is being used users can be required to log in with specific information to be able to do the
following:
• KIP Track during Copying
• KIP Track during Scan-to-file
KIP Print
KIP Print allows configuration and usage of KIP Track data. If KIP Track is turned on during install of the KIP Print software
at the workstation (or manually in the IPSPrint/Winreq.ini after install) the user requirements will be pulled from the IPS.
If the Admin is setting up the
prompts this will be done by opening
KIP Print and then going to ‘Options’
and then ‘Prompt Setup’ (if set - a
Password will be required).

KIP Track Accounting System
No part of this publication may be copied, reproduced or distributed in any form without express written permission from KIP. 2014 KIP.
- 16 -
KIP AutoCAD Driver
KIP AutoCAD Driver uses the same KIP Track data and rules as KIP Print. If KIP Track is turned on during install of the KIP
AutoCAD Driver at the workstation (or manually in the properties of the driver after install) the user requirements will
be pulled from the KIP.

KIP Track Accounting System
No part of this publication may be copied, reproduced or distributed in any form without express written permission from KIP. 2014 KIP.
- 17 -
KIP PrintNET
Utilize the same KIP Track data when sending print data from KIP PrintNET to the KIP Printer. If KIP Track has been set
through the KIP Track System Application when a user opens KIP PrintNet they will be prompted to login in order to send
a
job.
KIP Windows Driver
Utilizes the same KIP Track data when sending print data from KIP Windows Driver to the KIP Printer. If KIP Track is to be
used when printing from the Windows driver the Administrator has the ability to
turn this on by logging into KIP PrintNet and then going to the Administration
tab. Once here the Administrator can enable KIP Track for the Windows Driver.
When printing from the Windows driver users will be prompted to
enter in their information in order to send the files.

KIP Track Accounting System
No part of this publication may be copied, reproduced or distributed in any form without express written permission from KIP. 2014 KIP.
- 18 -
Retrieve KIP Track Data
KIP Track data can be utilized in several different ways:
• Quick reports for Printing or Scanning can be created by KIP Print.
• Reports include: Copy, Network printing, and Scan volumes.
• Raw data can easily be downloaded and used within any spreadsheet software.
• Use KIP Cost Review Application (or Cost Calculator)
Using KIP Print:
• Under ‘Manager – Print Reports’ the noted screen appears
• Set a Date Range
• Obtain Printing Report
• Obtain Scanning Report
• Obtain Meter Reading report.
• Send report to a Windows
Printer or Notepad
• Obtain the raw data and
manipulate it in a spreadsheet.
KIP Track Accounting System
No part of this publication may be copied, reproduced or distributed in any form without express written permission from KIP. 2014 KIP.
- 19 -
KIP Track Logs
There are three separate logs on the KIP:
1. Network Printing and Copying volume.
2. Scan-to-file volume.
3. Overall Square and Linear volume.
• Each log is stored on a monthly basis
• Easily retrieved via KIP Print or through KIP PrintNet (Email Meter Read).
• Each log is ASCII data that utilizes standard comma separated values easily read by spreadsheet
software.
When importing the raw log files into Excel the column headers will be the following:
Copying and Printing Log format When reviewing the raw log data of the file named “MonoLog-MMMYY.log” or “ColorLog-MMMYY.log”, the columns represent the following:
A – KIP Job Code Name
B – Page Number
C – Total Pages
D – Set Number
E – Total Sets
F – User Name (From the User Name field in KIP software)
G - Job Number (From the Job Number in KIP software)
KIP Track Accounting System
No part of this publication may be copied, reproduced or distributed in any form without express written permission from KIP. 2014 KIP.
- 20 -
H – Description (from the Description field in KIP Software)
I – File name
J- Original Size X direction (pixels)
K- Original Size Y direction (pixels)
L – Original DPI
M- Output Size X direction (pixels)
N- Output Size Y direction (pixels)
O – Output DPI
P – Square footage (square meter for metric)
Q – Media Type
R – Media Number (used by KIP color systems)
S – Sub Media Type Number (used by KIP color systems)
T – Roll size (inches or mm)
U – Page size (if available)
V – Date/Time started
W – Date/Time finished
X – Cyan percent coverage (used by KIP color systems)
Y - Magenta percent coverage (used by KIP color systems)
Z - Yellow percent coverage (used by KIP color systems)
AA - Black percent coverage (used by both KIP mono and KIP color systems)
AB – Overall percent coverage

KIP Track Accounting System
No part of this publication may be copied, reproduced or distributed in any form without express written permission from KIP. 2014 KIP.
- 21 -
AC - Rotation – 0 – 3 in 90 degree increments.
AD – Fold (0 for no fold, 1 for yes fold)
AE - C for copy, P for Print
AF – Graphics setting of Lineart , Graphics, or Custom
AG – Quality Mode of Quality or Normal
AH - English or Metric mode (E/M)
AI – Color or Mono
AJ – application used: Touchscreen, KIP Print, KIP Windows Driver, KIP AutoCAD Driver, PrintNET, Cloud, SCP,
LPR, Caldera, EFI, Flexi

KIP Track Accounting System
No part of this publication may be copied, reproduced or distributed in any form without express written permission from KIP. 2014 KIP.
- 22 -
Scan to File Log
A – KIP Mailbox or FTP Location (file name)
B – User Name
C – Job Number
D – Type (SCAN or FTP)
E – Location (FILE or FTP site address)
F – Number of copies
G – Size in bytes
H – Dimensions (square foot or square meters)
I – Date started
J – Time started
K – Date finished
L – Time finished
M – English or Metric (E, M)
N – Description

KIP Track Accounting System
No part of this publication may be copied, reproduced or distributed in any form without express written permission from KIP. 2014 KIP.
- 23 -
Overall Square/Linear Count
A – Date the reading was taken
B – Time the reading was taken (once per hour)
C – Reading of Meter A that matches the front of printer.
D – Unit of measure of Meter A (Sq. ft/Lin ft.)
E – Reading of Meter B (KIP 8000 only)
F – Unit of measure of Meter B (Sq. ft/Lin ft.)
G – Reading of Total Run secondary meter (linear)
KIP Track Accounting System
No part of this publication may be copied, reproduced or distributed in any form without express written permission from KIP. 2014 KIP.
- 24 -
KIP Track Data in Excel
The KIP Track software provided by KIP for Data Tracking is by far the most complete in the industry.
These simple steps will allow you to take full advantage of its rich features utilizing MS Excel.
Importing the Data The KIP Log data is accessed from the IPS in one of several ways:
1. Access the desktop of the IPS and browse to D:\monpath\Logdir
2. Use the KIP Cost Review Application to Import the data and then manually access the %temp%
directory of the PC.
3. Configure PrintNET with the necessary email settings to email the log data. Eg: Use PrintNET, login as
admin, then configure the SMTP info and Monthly Meter Report details.
4. Use KIP Print to retrieve the Monochrome log data
5. First retrieve the .log file from the IPS by following these steps:
a. From Print go to “Manage”
b. Select “Print Reports”
c. Under Output select “File”
d. Save the .log file(s) for the months you would like to analyze to the desired location
e. Open Excel
f. Choose Data at the top, Import External Data, Import Data
g. Browse to the folder that contains your file
h. Change the file type option to All Files, then highlight the file you would like to see
and click Open

KIP Track Accounting System
No part of this publication may be copied, reproduced or distributed in any form without express written permission from KIP. 2014 KIP.
- 25 -
i. Make sure Delimited is selected, Start import at row is set to 1, and File origin is 437 : OEM United
States, then click Next
Ensure that Comma is the only box checked, and then click Next

KIP Track Accounting System
No part of this publication may be copied, reproduced or distributed in any form without express written permission from KIP. 2014 KIP.
- 26 -
j. Make sure that the Column data format is General, and then click Finish.
Choose Existing worksheet with field being named exactly as above…
=$A$1 and then click OK

KIP Track Accounting System
No part of this publication may be copied, reproduced or distributed in any form without express written permission from KIP. 2014 KIP.
- 27 -
k. You should see something that looks like this:
Formatting the Data
a. Right Click on Row 1 and click Insert
b. Add Column Headers according the type of data in each field
(Note, you do not have to label every field, only the ones you need)
The headers are as follows:
A – KIP Job Code Name
B – Page Number
C – Total Pages
D – Set Number
KIP Track Accounting System
No part of this publication may be copied, reproduced or distributed in any form without express written permission from KIP. 2014 KIP.
- 28 -
E – Total Sets
F – User Name (From the User Name field in KIP software)
G - Job Number (From the Job Number in KIP software)
H – Description (from the Description field in KIP Software)
I – File name
J- Original Size X direction (pixels)
K- Original Size Y direction (pixels)
L – Original DPI
M- Output Size X direction (pixels)
N- Output Size Y direction (pixels)
O – Output DPI
P – Square footage (square meter for metric)
Q – Media Type
R – Media Number (used by KIP color systems)
S – Sub Media Type Number (used by KIP color systems)
T – Roll size (inches or mm)
U – Page size (if available)
V – Date/Time started
W – Date/Time finished
X – Cyan percent coverage (used by KIP color systems)
Y - Magenta percent coverage (used by KIP color systems)

KIP Track Accounting System
No part of this publication may be copied, reproduced or distributed in any form without express written permission from KIP. 2014 KIP.
- 29 -
Z - Yellow percent coverage (used by KIP color systems)
AA - Black percent coverage (used by both KIP mono and KIP color systems)
AB – Overall percent coverage
AC - Rotation – 0 – 3 in 90 degree increments.
AD – Fold (0 for no fold, 1 for yes fold)
AE - C for copy, P for Print
AF – Graphics setting of Lineart , Graphics, or Custom
AG – Quality Mode of Quality or Normal
AH - English or Metric mode (E/M)
AI – Color or Mono
AJ – application used: Touchscreen, KIP Print, KIP Windows Driver, KIP AutoCAD Driver, PrintNET, Cloud, SCP,
LPR, Caldera, EFI, Flexi
c. You may delete columns if you do not wish
to see them here by Right Clicking on the
Column Letter at the top and choosing
Delete

KIP Track Accounting System
No part of this publication may be copied, reproduced or distributed in any form without express written permission from KIP. 2014 KIP.
- 30 -
Creating the Pivot Table
a. Choose the Data option, then click Pivot Table and Pivot Chart Report
b. Choose Microsoft Excel list or database and PivotChart report, then click Next
c. Click the box to the right, indicated by the red arrow above, then Click and Drag over all of the
data in the spreadsheet, including Column headers
d. Your results should look like this:
e. Click Next
f. Choose New worksheet and then click Finish
KIP Track Accounting System
No part of this publication may be copied, reproduced or distributed in any form without express written permission from KIP. 2014 KIP.
- 31 -
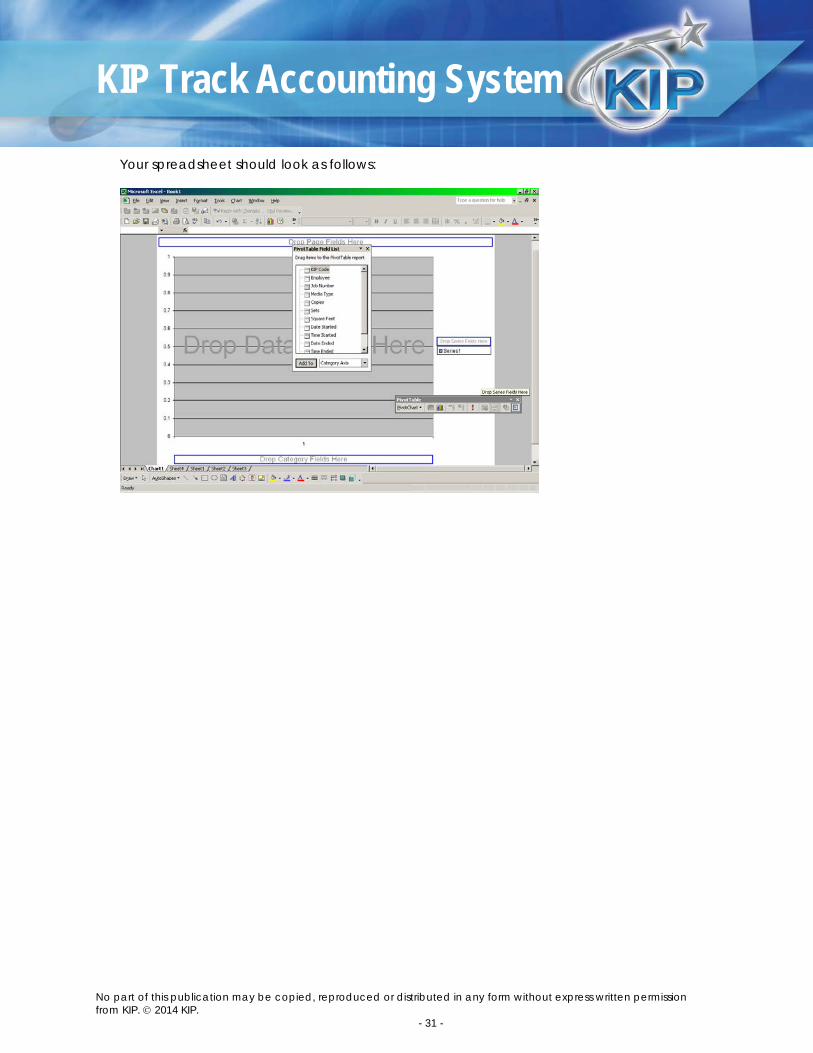
Your spreadsheet should look as follows:
KIP Track Accounting System
No part of this publication may be copied, reproduced or distributed in any form without express written permission from KIP. 2014 KIP.
- 32 -
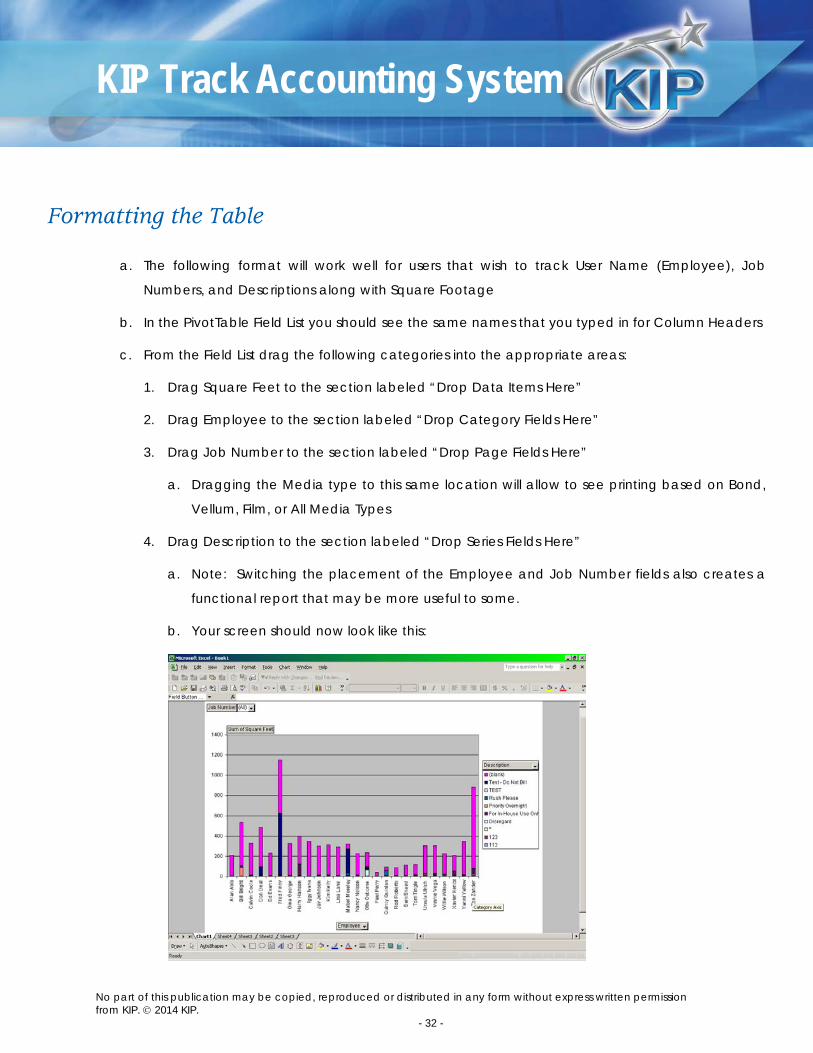
Formatting the Table
a. The following format will work well for users that wish to track User Name (Employee), Job
Numbers, and Descriptions along with Square Footage
b. In the PivotTable Field List you should see the same names that you typed in for Column Headers
c. From the Field List drag the following categories into the appropriate areas:
1. Drag Square Feet to the section labeled “Drop Data Items Here”
2. Drag Employee to the section labeled “Drop Category Fields Here”
3. Drag Job Number to the section labeled “Drop Page Fields Here”
a. Dragging the Media type to this same location will allow to see printing based on Bond,
Vellum, Film, or All Media Types
4. Drag Description to the section labeled “Drop Series Fields Here”
a. Note: Switching the placement of the Employee and Job Number fields also creates a
functional report that may be more useful to some.
b. Your screen should now look like this:

KIP Track Accounting System
No part of this publication may be copied, reproduced or distributed in any form without express written permission from KIP. 2014 KIP.
- 33 -
5. By Clicking on the Sheet4(Usually) Tab at the bottom left hand section of the screen you can
see the data presented to you in the following format:
a. It is now possible to manipulate the data by selecting individual Job Numbers, Selected
Employees, and Selected Descriptions by clicking the drop down arrows for the item you wish to
change. These are noted with Red Stars.
b. It is also possible to change the names and colors of the tabs at the bottom by double clicking
on the individual tab, or by right clicking to bring up the Tab Color option.
c. Changing what data is displayed will change the entire chart, and allow you to see only
information related to a specific Job Number, Employee, or Description. Making these changes
also affects the Chart.
d. Notice that in the above Pivot Table, it is possible to see how many square feet any given
employee printed on all Job Numbers, for all possible Descriptions; a total of the square feet for
each Description for every Employee, as well as Grand totals for all jobs.

KIP Track Accounting System
No part of this publication may be copied, reproduced or distributed in any form without express written permission from KIP. 2014 KIP.
- 34 -
e. Below you will see a Pivot Table and Chart for a specific Job Number. Notice how the chart
changes based on the changing Job Number

KIP Track Accounting System
No part of this publication may be copied, reproduced or distributed in any form without express written permission from KIP. 2014 KIP.
- 35 -
Creating A Pivot Table in Excel 2013
Inserting a Pivot Table in Excel 2013
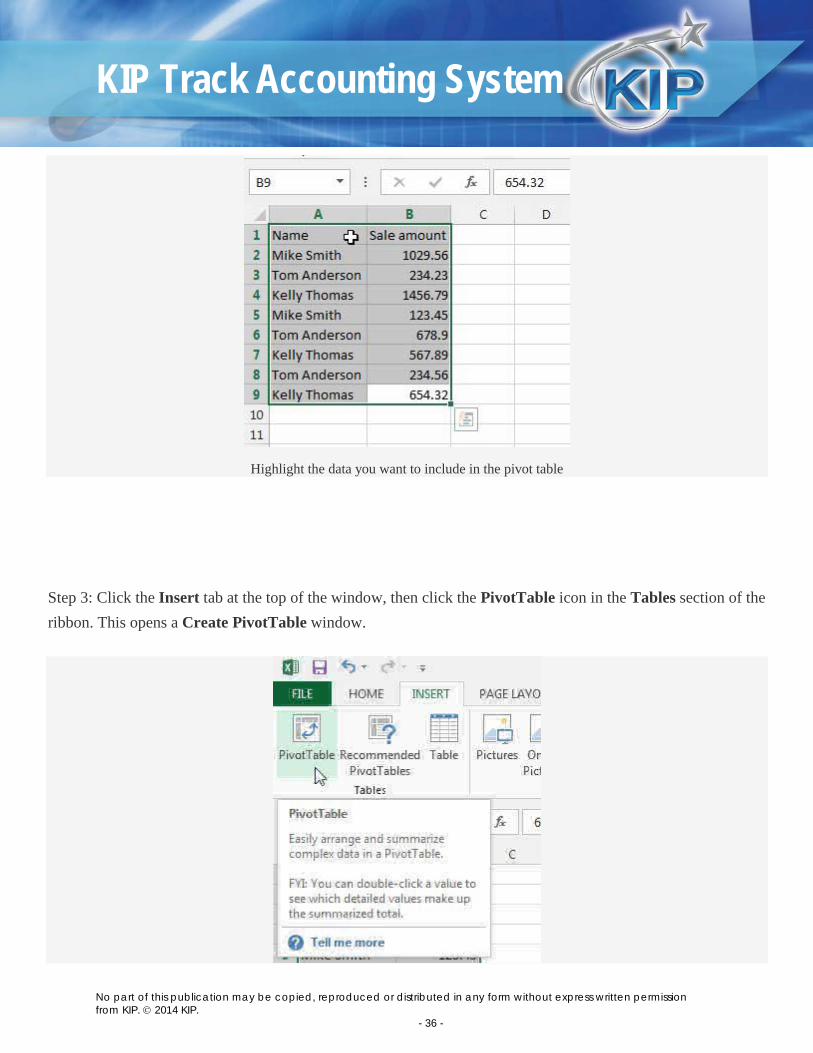
The way that I use pivot tables the most often it to quickly total amounts that are associated with different rows. For example, I have created a very simple spreadsheet below that lists sales amounts for three different members of a sales team. There is only a small amount of data in this table in an effort to keep this as simple as possible, but this same process can easily be expanded to handle much larger amounts of data, and prevent you from needing to write any formulas or macros to get the information that you want. We are going to create a simple pivot table that takes these 8 sales and combines them into a three-row report that shows the name of the salesperson and their total sales. So read below to learn how to create this type of pivot table in Excel 2013.
Step 1: Open the Excel 2013 spreadsheet that contains the data that you want to put into a pivot table.
Step 2: Use your mouse to highlight all of the data that you want to include in the pivot table.
KIP Track Accounting System
No part of this publication may be copied, reproduced or distributed in any form without express written permission from KIP. 2014 KIP.
- 36 -
Highlight the data you want to include in the pivot table
Step 3: Click the Insert tab at the top of the window, then click the PivotTable icon in the Tables section of the ribbon. This opens a Create PivotTable window.

KIP Track Accounting System
No part of this publication may be copied, reproduced or distributed in any form without express written permission from KIP. 2014 KIP.
- 37 -
Click Insert, then PivotTable
Step 4: I am going to leave these settings at their defaults, which will create a new worksheet for the pivot table. Click the OKbutton to continue.
Click the OK button
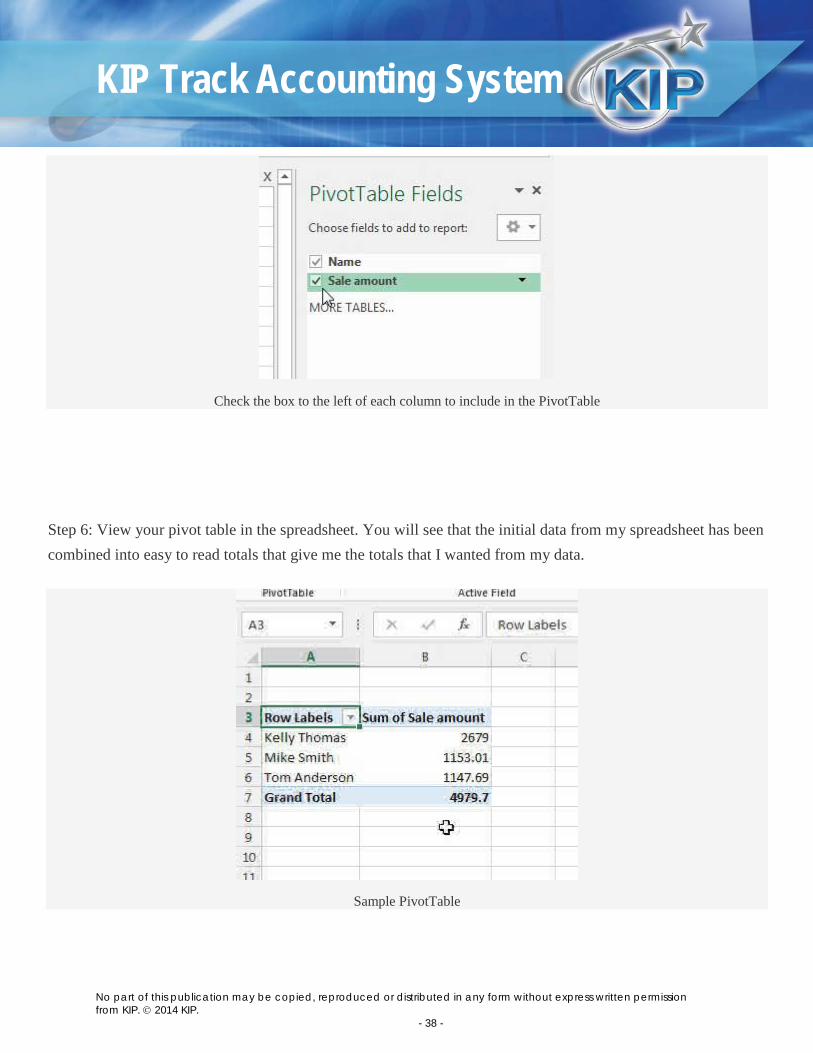
Step 5: Check the box to the left of each of your column names in the PivotTable Fields column at the right side of the window.
KIP Track Accounting System
No part of this publication may be copied, reproduced or distributed in any form without express written permission from KIP. 2014 KIP.
- 38 -
Check the box to the left of each column to include in the PivotTable
Step 6: View your pivot table in the spreadsheet. You will see that the initial data from my spreadsheet has been combined into easy to read totals that give me the totals that I wanted from my data.
Sample PivotTable

KIP Track Accounting System
No part of this publication may be copied, reproduced or distributed in any form without express written permission from KIP. 2014 KIP.
- 39 -
Now that your data is in the pivot table, you can manipulate it by double-clicking a column heading, then changing a setting on that screen. For example, if I wanted to view the number of sales instead of the total sales amount, I could change the option under Summarize value field by to Count instead of Sum.
Change your PivotTable options
Now that you have seen how a basic pivot table works, take some time to experiment with the feature to see what different types of data you can produce from your spreadsheets. Pivot tables are incredibly helpful for reducing the amount of manual addition that anyone should have to do with Excel data that can’t be easily totaled with a formula, so it can be a real time-saver.