kirchhoff’s laws. changes from circuit in lab manual. 1. the dc voltage supply to use is +5v, not...
TRANSCRIPT

Kirchhoff’s Laws

Changes from circuit in lab manual.1. The DC voltage supply to use is +5V, not +9V as
is shown in the lab manual.2. A second circuit will be constructed in which a
trim potentiometer (trim pot) replaces R1, the 8.2 k resistor.

Trim pots, for short◦A resistor whose values depends on the position
of the wiper (middle terminal – Pin 2). Used as a voltage divider
All three terminals are connected in the circuit. Used as a variable resistor
Either pins 1 and 2 or 2 and 3 are connected in the circuit.

http://www.solarbotics.com/assets/images/rt1k_t/rt10k-t-dscn3762_pl.JPG
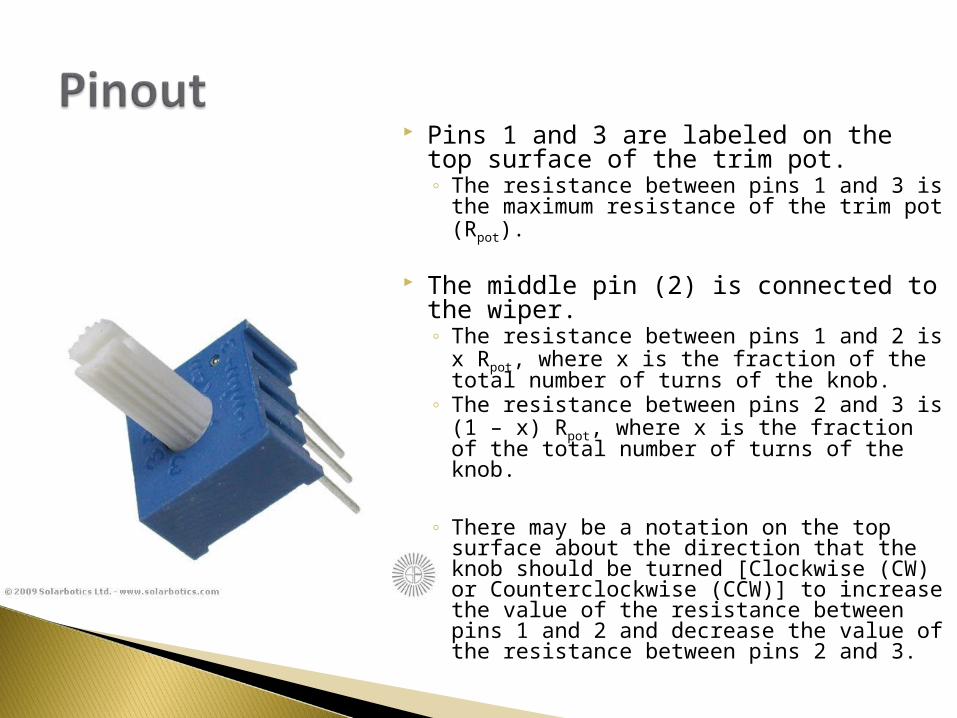
Pins 1 and 3 are labeled on the top surface of the trim pot. ◦ The resistance between pins 1 and 3 is
the maximum resistance of the trim pot (Rpot).
The middle pin (2) is connected to the wiper. ◦ The resistance between pins 1 and 2 is
x Rpot, where x is the fraction of the total number of turns of the knob.
◦ The resistance between pins 2 and 3 is (1 – x) Rpot, where x is the fraction of the total number of turns of the knob.
◦ There may be a notation on the top surface about the direction that the knob should be turned [Clockwise (CW) or Counterclockwise (CCW)] to increase the value of the resistance between pins 1 and 2 and decrease the value of the resistance between pins 2 and 3.

POT: Trim Pot
R_Var: Variable Resistor

On one surface – usually the side opposite from the pins – of the pot are markings◦The part number◦The maximum resistance of the trim pot
The value of the resistance is calculated as follows: The first two digits of the three digit number is the
number that is then multiplied by 10 raised to the third digit. For example: 102 = 10 x 102 = 1 k

When measuring the resistance of your trim pot◦Resistance between pins 1 and 3 is the maximum
resistance of the trim pot (Rpot = R13 = 10 k.
◦Resistance between pins 1 and 2 (R12 ) plus the resistance between pins 2 and 3 (R23 ) is equal to the resistance between pins 1 and 3 (R13 ).
Turning the knob on the trim pot clockwise changes the fraction of the maximum resistance that is between pins 1 and 2.
All resistance measurements should be made when the trimpot is not connected in the circuit.
231213 RRR
1x0 where12 potRxR

Perform the steps in the Analysis and Modeling sections of Procedure for Experiment 4.◦Analysis section are calculations that you perform
by hand.◦Modeling section are simulations that are
performed using PSpice.

• Download site and installation instructions for the virtual machine version of PSpice are posted at http://computing.ece.vt.edu/wiki/PSpice_FAQ.
• Instructions on running a dc simulation are posted on the course introduction module – Introduction to PSPice.
• Example circuits for Version 9.1 are posted on Resources/Technical Support: Circuit Simulation
• Find the folder called Schematics and download Example1.sch.
• Extract the folders and files from the zipped files• Launch PSpice Schematics, open one of the extracted .sch
files in Schematics, and try running a simulation.

With a variable resistor in the circuitPSpice Schematics Version 9.1

Follow the instructions in Introduction to PSpice. Layout the schematic shown below using these components: Vdc, R_var, R (twice), and gnd_earth.
Pressing control-R while the symbol for a particular component is highlighted in red rotates the component by 90o on the schematic.

Wire the components together.◦Take care to place a node at the end of the
ground when wiring it into the circuit. As a reminder, the wire should connect the ground
to the negative side (smaller of the two horizontal plates) of Vdc. However , you should not wire a connection between ground and the +5V supply on the ANDY board when you construct the circuit.
Change the values:◦Vdc should be 5V◦R2 = 4.7k◦R3 = 10k

Correct placement of dot Incorrect placement of dot
There must be a node (a dot), inserted by the program, at the end of the ground to connect it to the rest of the circuit. The simulation uses this point as 0V and calculates all currents referenced to this voltage.
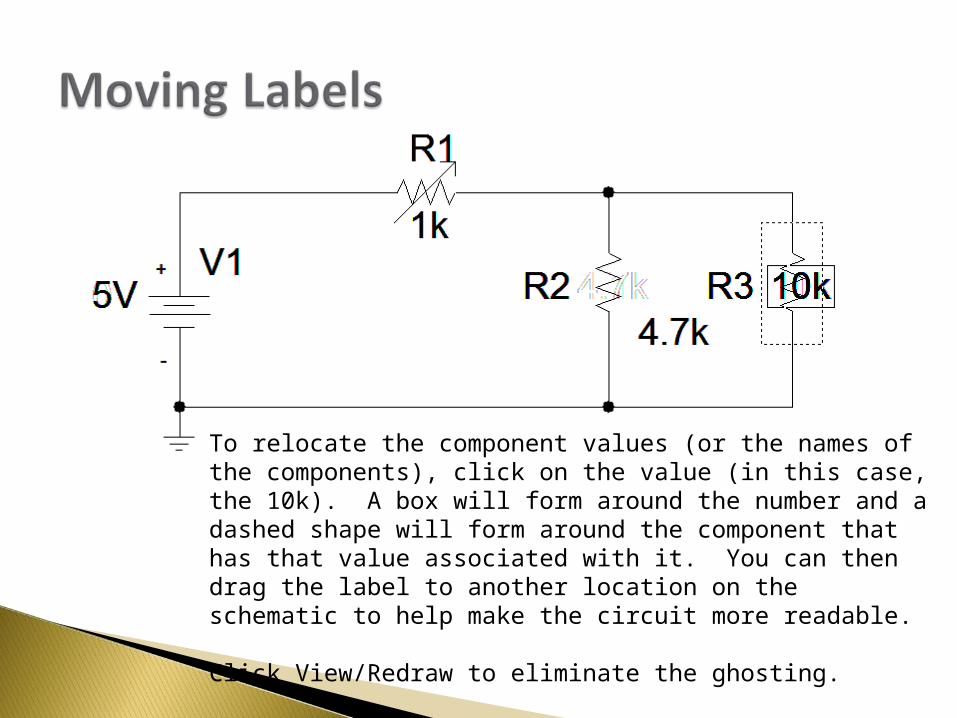
To relocate the component values (or the names of the components), click on the value (in this case, the 10k). A box will form around the number and a dashed shape will form around the component that has that value associated with it. You can then drag the label to another location on the schematic to help make the circuit more readable.
Click View/Redraw to eliminate the ghosting.
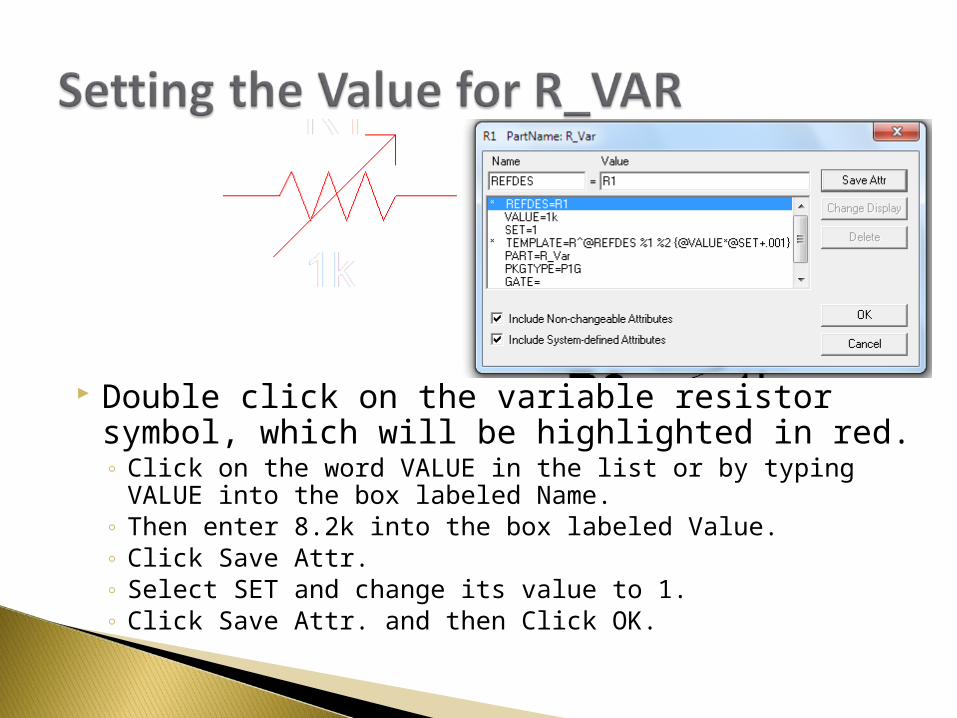
Double click on the variable resistor symbol, which will be highlighted in red.◦ Click on the word VALUE in the list or by typing VALUE
into the box labeled Name. ◦ Then enter 8.2k into the box labeled Value. ◦ Click Save Attr.◦ Select SET and change its value to 1. ◦ Click Save Attr. and then Click OK.

PSpice will not run a simulation unless your circuit is saved.
Click on Analysis/Setup or the button.◦Bias Point Detail should be clicked. If not, do so.
Click Analysis/Simulate or click on the button.
◦ If you are missing the Setup or Simulation buttons or these options under Analysis, then the installation of PSpice was faulty. Please review the instruction at http://computing.ece.vt.edu/wiki/PSpice_FAQ

The voltages are displayed automatically when you enable the display. You have to select Enable Current Display to also see the currents.

I moved the current and voltage labels so that both the components and the labels can be seen.

Should include:◦The schematic of the circuit in Experiment 4◦The voltage and currents should be displayed.
You can move the position of the displayed voltages and currents by clicking and dragging them to a new location. This should be done if any of the voltage or currents
overlap one another or hide the resistor or voltage source in the schematic.

Note that the calculation performed by PSpice Schematics is a nodal analysis.
The voltage drop across a component is the voltage calculated using Ohm’s Law, V= IR. It is the difference between node voltages.◦The first voltage (VA) is the node at which current
is entering the resistor R and the second voltage (VB) is the one at which the current I is leaving the resistor.
V = VA – VB