konica minolta tlc training
TRANSCRIPT
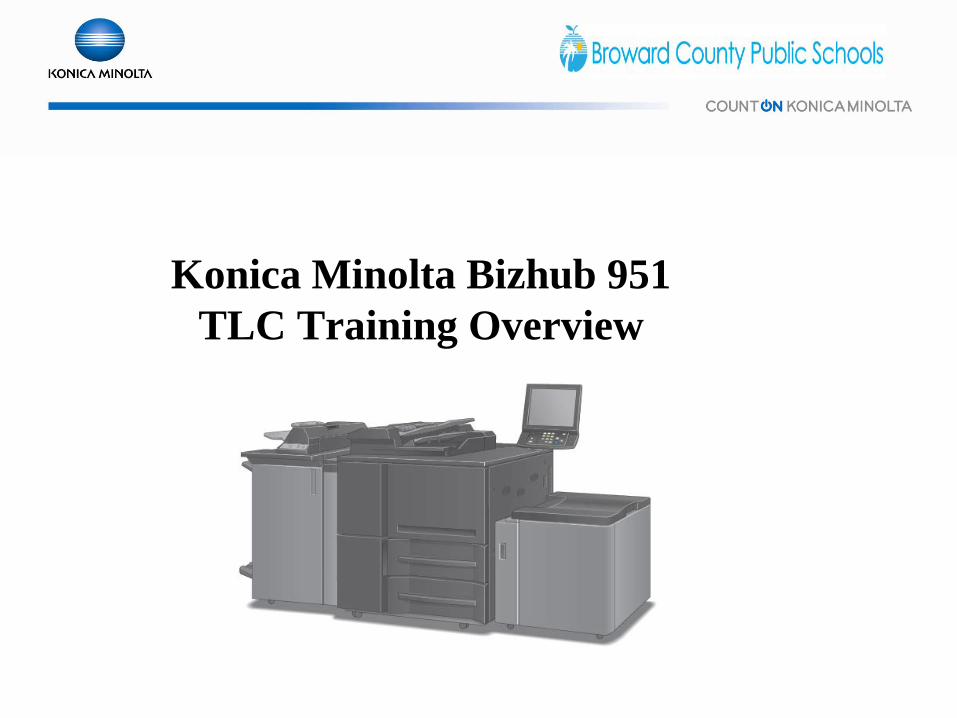
Konica Minolta Bizhub 951 TLC Training Overview

Welcome!
Konica Minolta Training Team:
• Dennys C. Blanco – PPSA/CDIA+
• Alexandra Simon
• Barbara Mullen
• Robbie Joyner
• Robert Solomon
• Colleen McNichol

Topics to be Discussed Downloading and installing the Windows PCL Driver
Downloading and installing the MAC OS PPD
Enabling Account Code tracking
Configuring User Account codes
Setting up User Boxes
Printing to User Boxes
Retrieving printed jobs stored in the User Box
Resetting User Account totals
Registering Scan to destination addresses
Printing Account Tracking report

4
Downloading and installing the Windows Driver Do a google search for Konica Minolta drivers. The first page that comes up should be the “Support and Download” page.
5
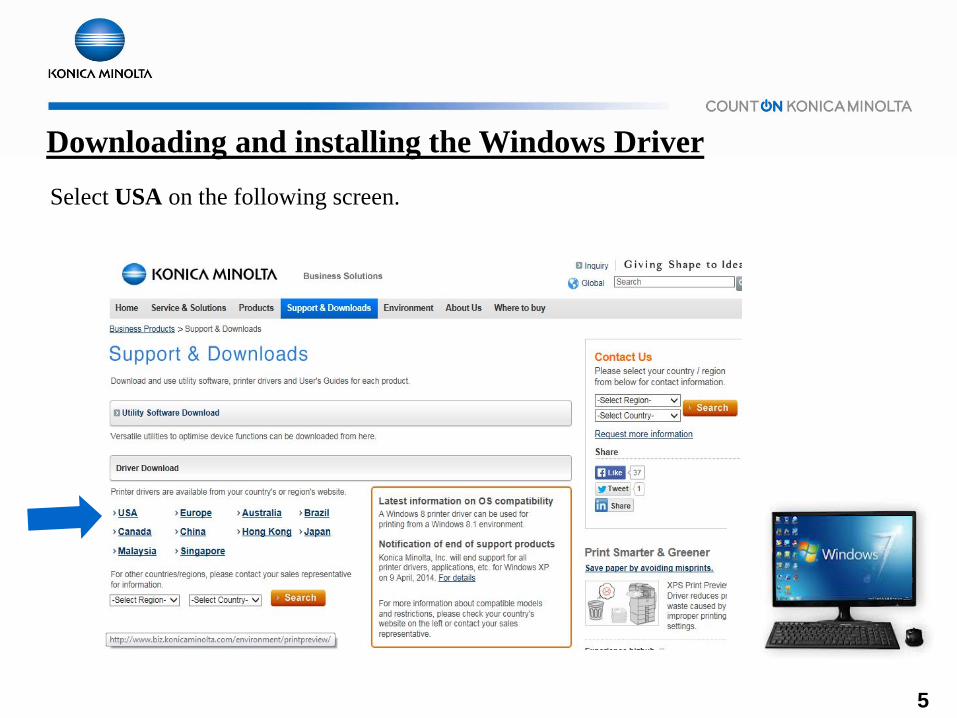
Downloading and installing the Windows Driver Select USA on the following screen.
6
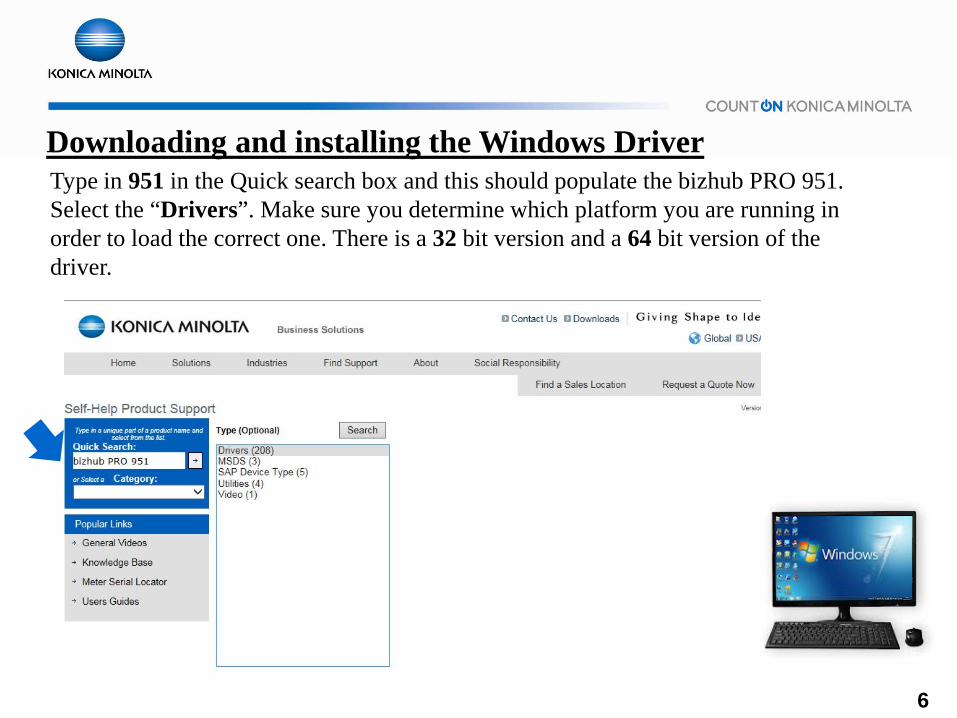
Downloading and installing the Windows Driver Type in 951 in the Quick search box and this should populate the bizhub PRO 951. Select the “Drivers”. Make sure you determine which platform you are running in order to load the correct one. There is a 32 bit version and a 64 bit version of the driver.
7
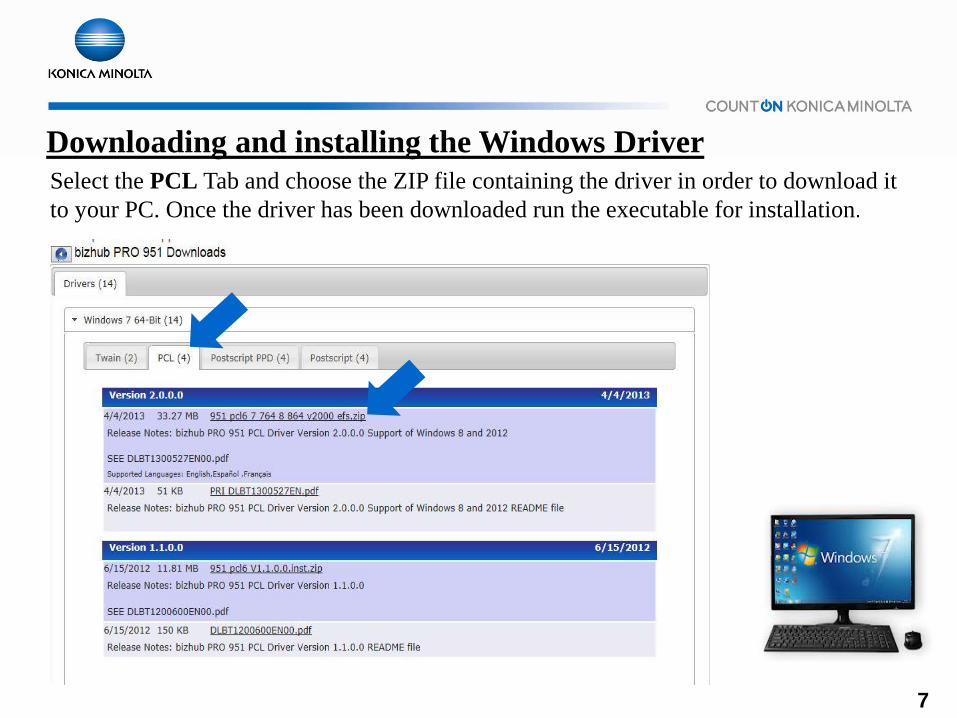
Downloading and installing the Windows Driver Select the PCL Tab and choose the ZIP file containing the driver in order to download it to your PC. Once the driver has been downloaded run the executable for installation.

8
Downloading and installing the MAC OS Driver Download and install the appropriate MAC OS drivers from the KMBS Drivers web site.
9
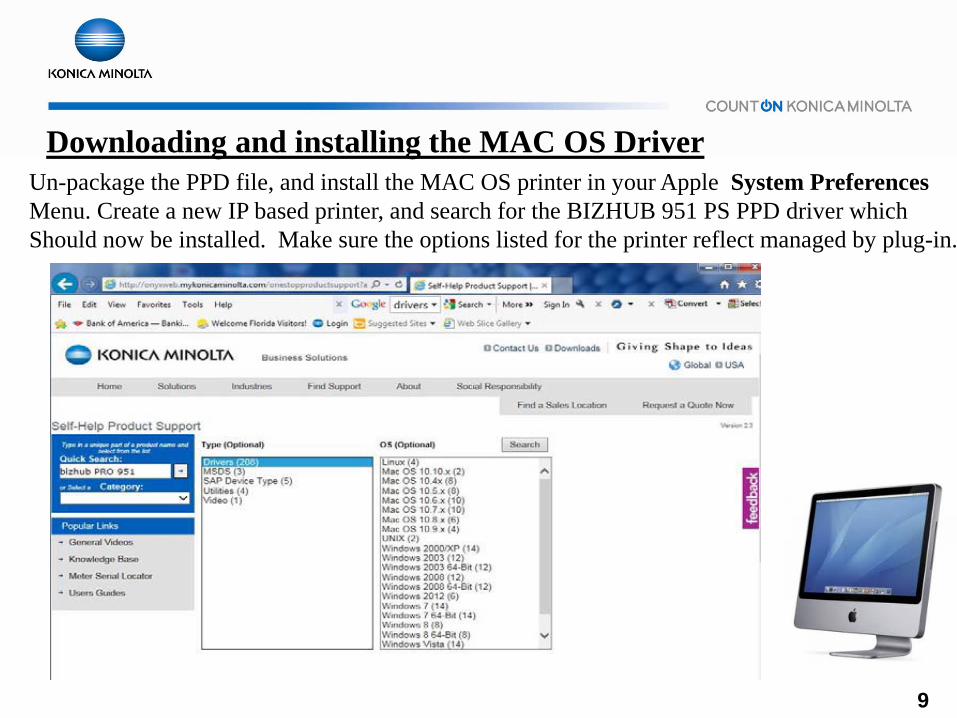
Downloading and installing the MAC OS Driver Un-package the PPD file, and install the MAC OS printer in your Apple System Preferences Menu. Create a new IP based printer, and search for the BIZHUB 951 PS PPD driver which Should now be installed. Make sure the options listed for the printer reflect managed by plug-in.
10
Enabling Account Code tracking
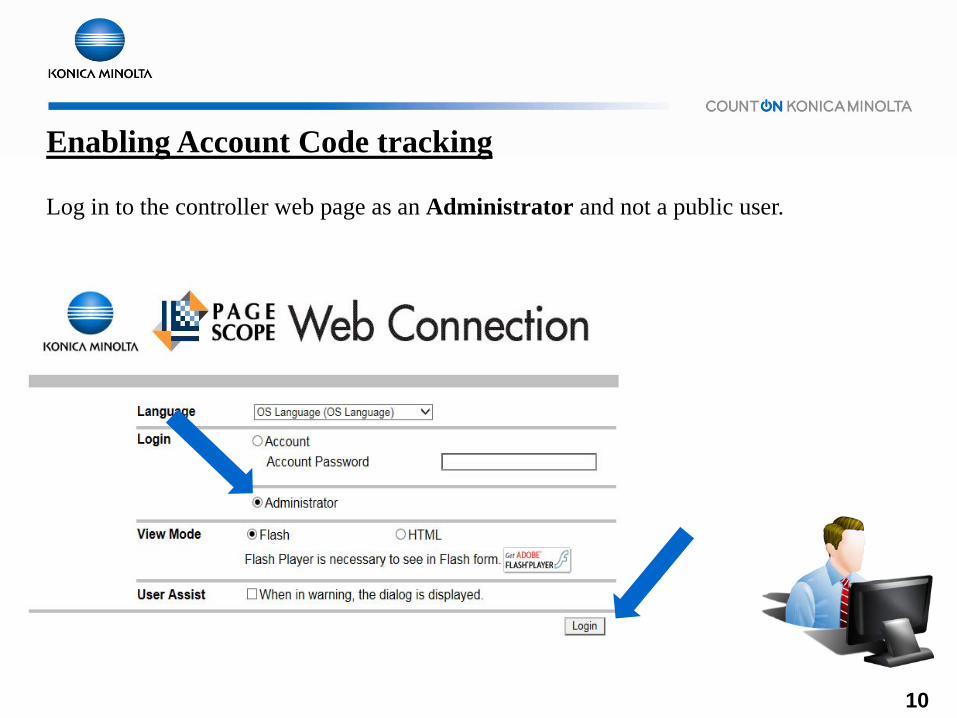
Log in to the controller web page as an Administrator and not a public user.

11
Enabling Account Code tracking
Input the Admin code for the engine which is by default “00000000”.

12
Enabling Account Code tracking Select the Security Tab. Enable the following: Account track: On Account Track Input Method: User Name and Password or Password only (Note: your selection will be based on school preference) Select OK to save.
13
Enabling Account Code tracking
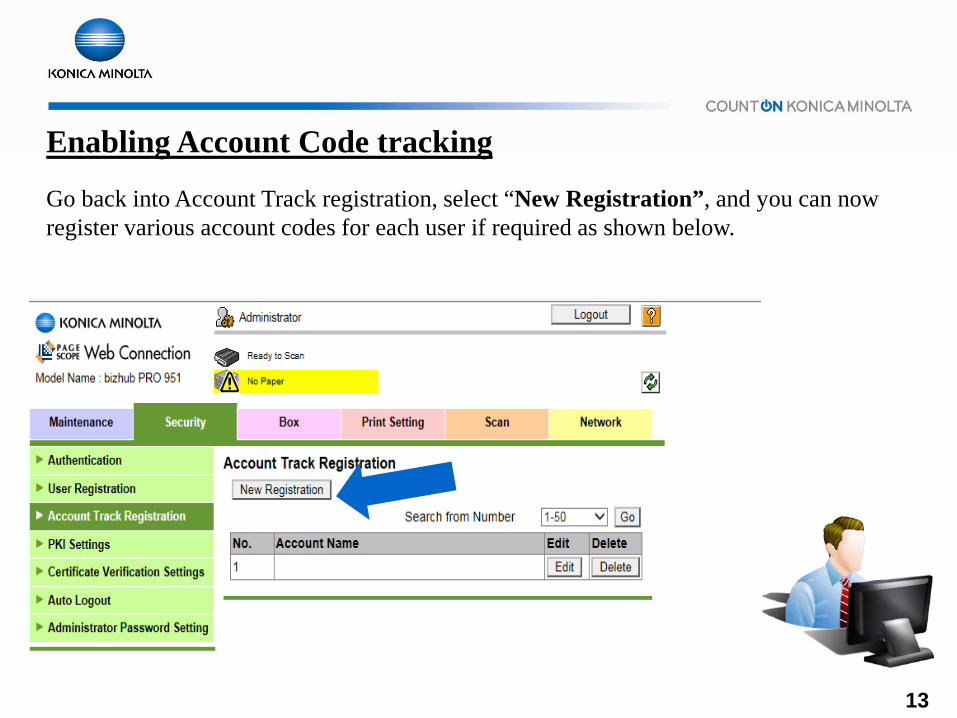
Go back into Account Track registration, select “New Registration”, and you can now register various account codes for each user if required as shown below.

14
Enabling Account Code tracking Go back into the Security Tab and Select the Account Track Registration tab and enter an account number, and provide an account password accordingly. You can also set up restrictions here as well as enabling copy allowance totals. Select OK.

15
Enabling Account Code tracking This also allows you to filter permissions for the individual users. Once completed select OK and make sure you log out of the web page.

16
Setting up User Boxes Log into the 951 Print Controller IP address through your web browser. You should get the screen shown below. Select the “Box” tab.

17
Setting up User Boxes This will take you to the following screen. Under Folder List select “Public”.
18
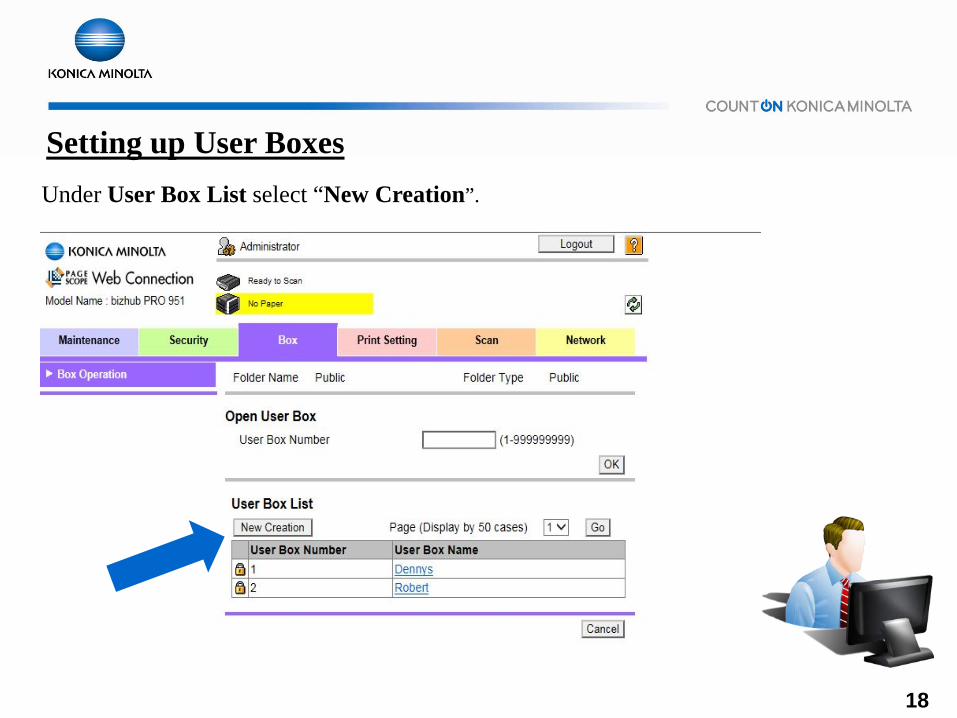
Setting up User Boxes Under User Box List select “New Creation”.

19
Setting up User Boxes At the next screen, under Create User Box, select Input Directly or you may also use Opening Number, and input assigned user box number as shown below. In addition, here you will also provide a name for the user, as well as a password, so that users can only have access to documents stored within their individual box. Once you have entered the information select “OK” to confirm the creation of the User Box.

20
Setting up User Boxes You should now see the user box you have created along with a lock symbol indicating this is a password protected user box as shown below.
21
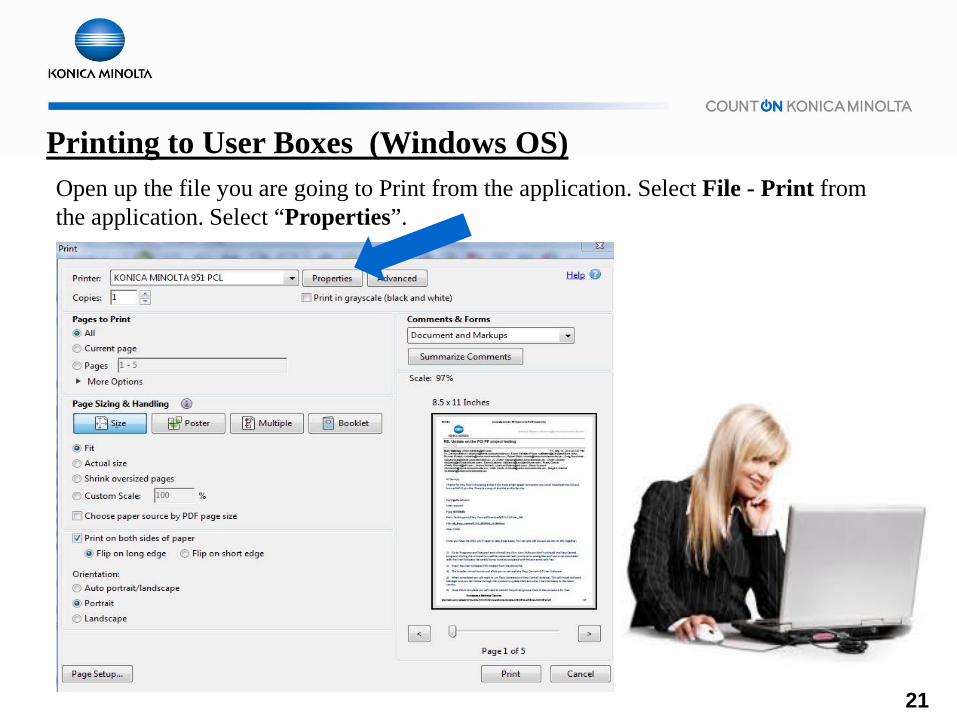
Printing to User Boxes (Windows OS) Open up the file you are going to Print from the application. Select File - Print from the application. Select “Properties”.

22
Printing to User Boxes At the next screen select the “Basic” tab.

23
Printing to User Boxes Select the Authentication / Acct. track tab.
24
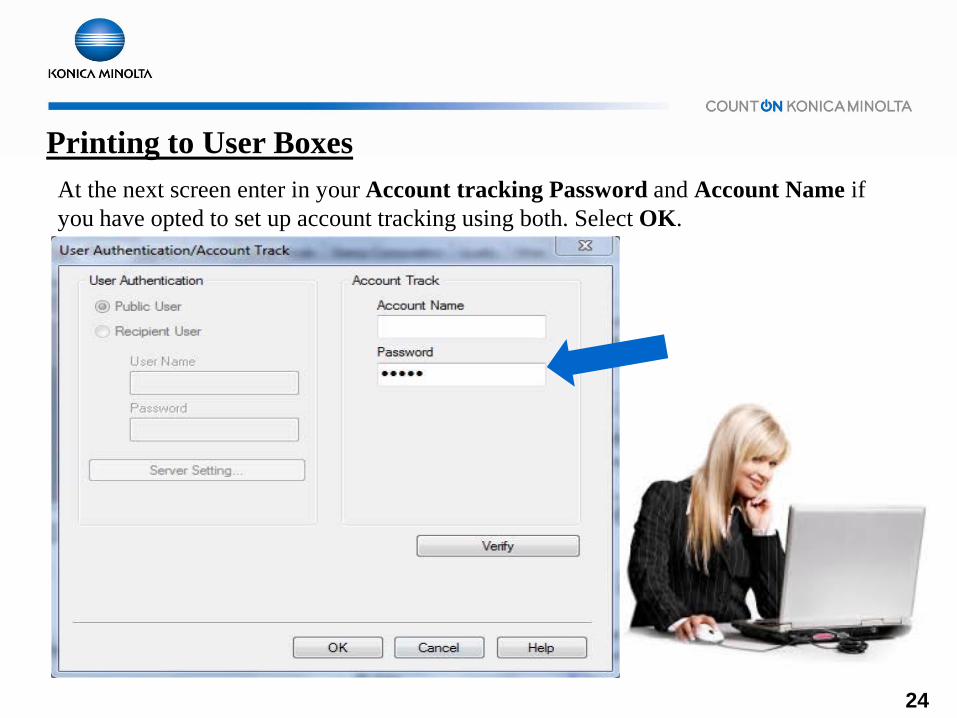
Printing to User Boxes At the next screen enter in your Account tracking Password and Account Name if you have opted to set up account tracking using both. Select OK.

25
Printing to User Boxes At the next screen under Output Method, select “Save in User Box” from the Drop down as shown below.

26
Printing to User Boxes At the next screen, select the area under File Name and name your file accordingly. In addition you will also provide your User Box Number in this location as well. Select OK.

27
Printing to User Boxes (MAC OS) Once the driver has been installed open up a document and select the 951 printers, then “File”, “Print”. You will see the screen below displayed. Then select “Printer” as shown below.
28
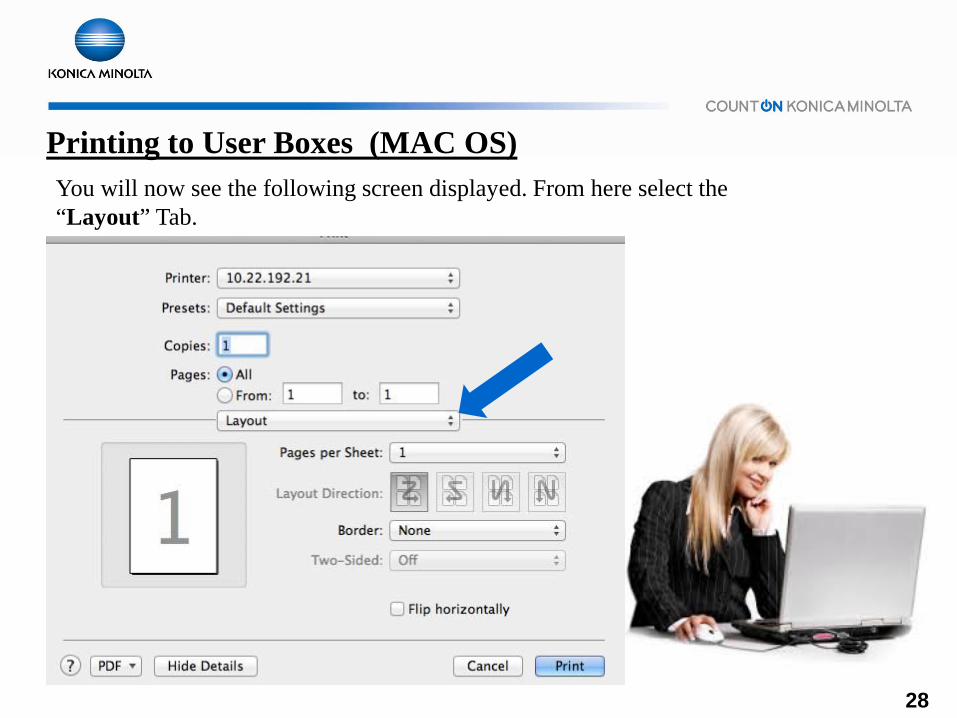
Printing to User Boxes (MAC OS) You will now see the following screen displayed. From here select the “Layout” Tab.
29
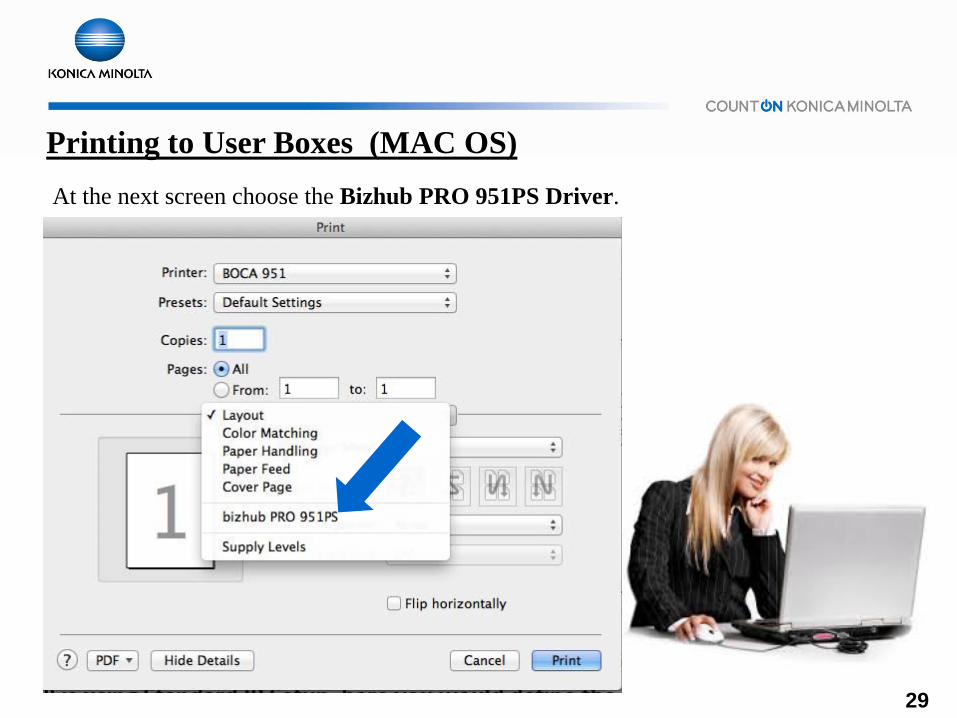
Printing to User Boxes (MAC OS) At the next screen choose the Bizhub PRO 951PS Driver.
30
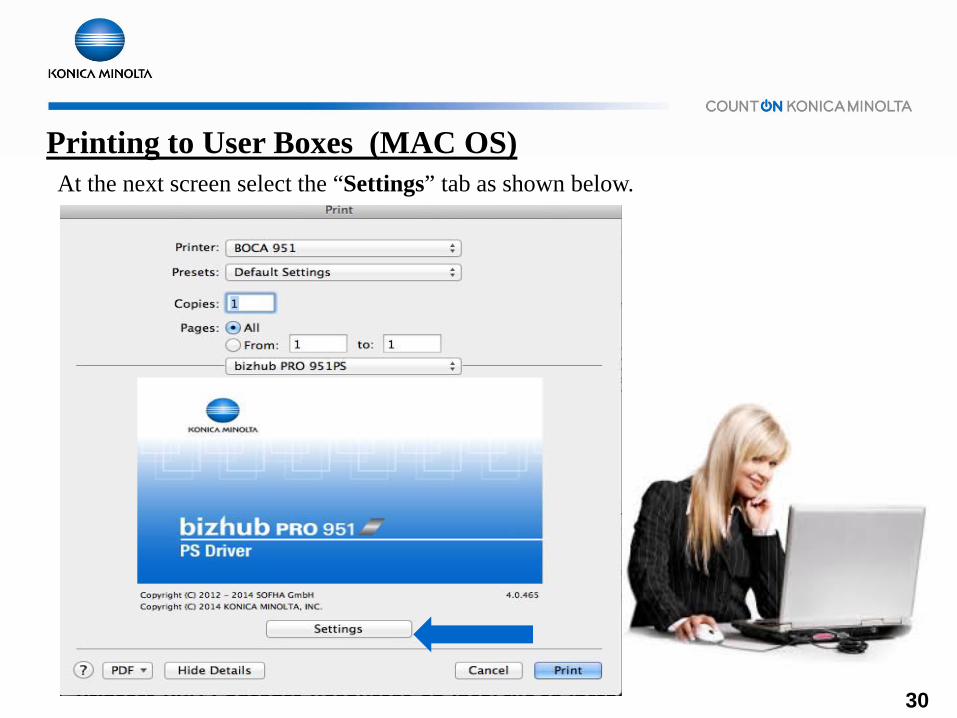
Printing to User Boxes (MAC OS) At the next screen select the “Settings” tab as shown below.
31
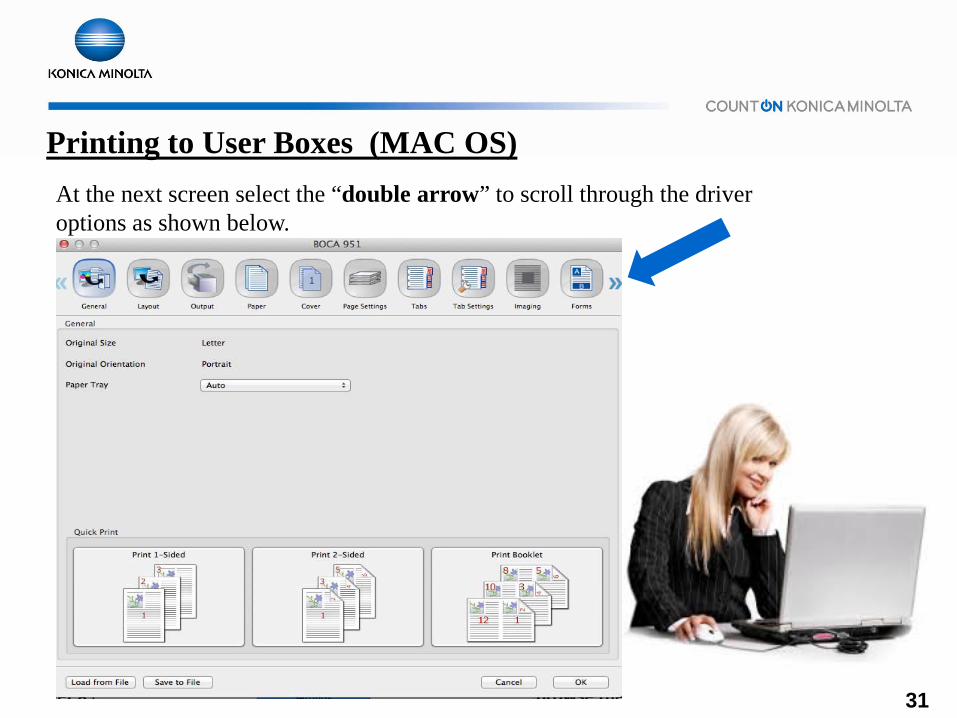
Printing to User Boxes (MAC OS) At the next screen select the “double arrow” to scroll through the driver options as shown below.
32
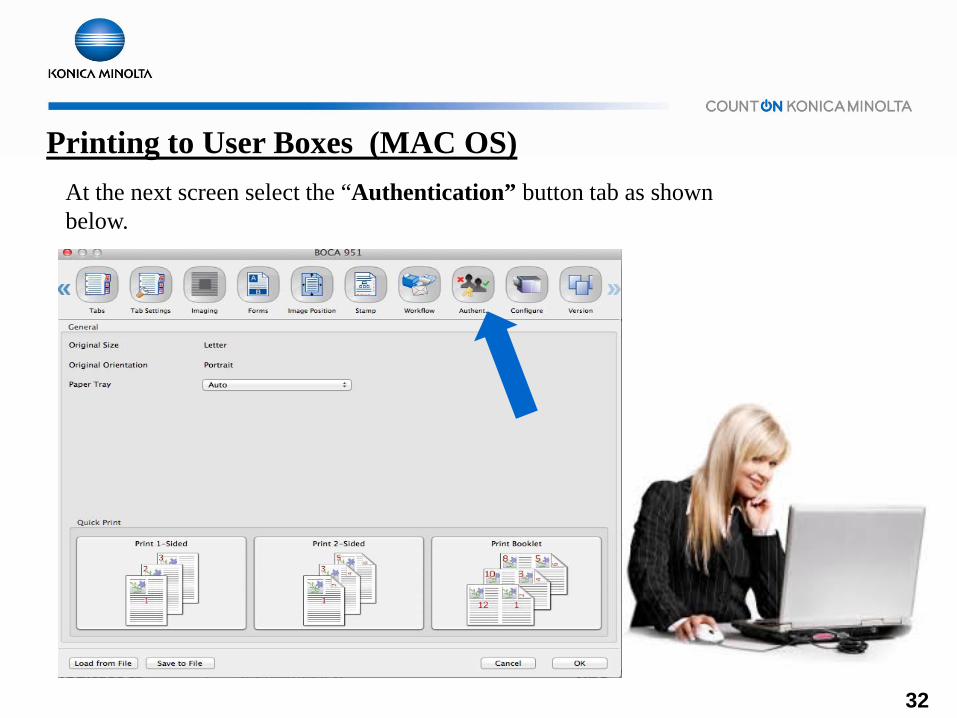
Printing to User Boxes (MAC OS) At the next screen select the “Authentication” button tab as shown below.

33
Printing to User Boxes (MAC OS) At the next screen select place a check mark in the “Account Track” box, clear out the “NO NAME” association from the Account Name area, and input your assigned account track password in the “Password” tab as shown below. If you are using an account name you will need to provide it here as well.

34
Printing to User Boxes (MAC OS) Select the “Workflow” tab as shown below.

35
Printing to User Boxes (MAC OS) Select the “Output Method” drop down and choose “Save in User Box” as shown below.
36
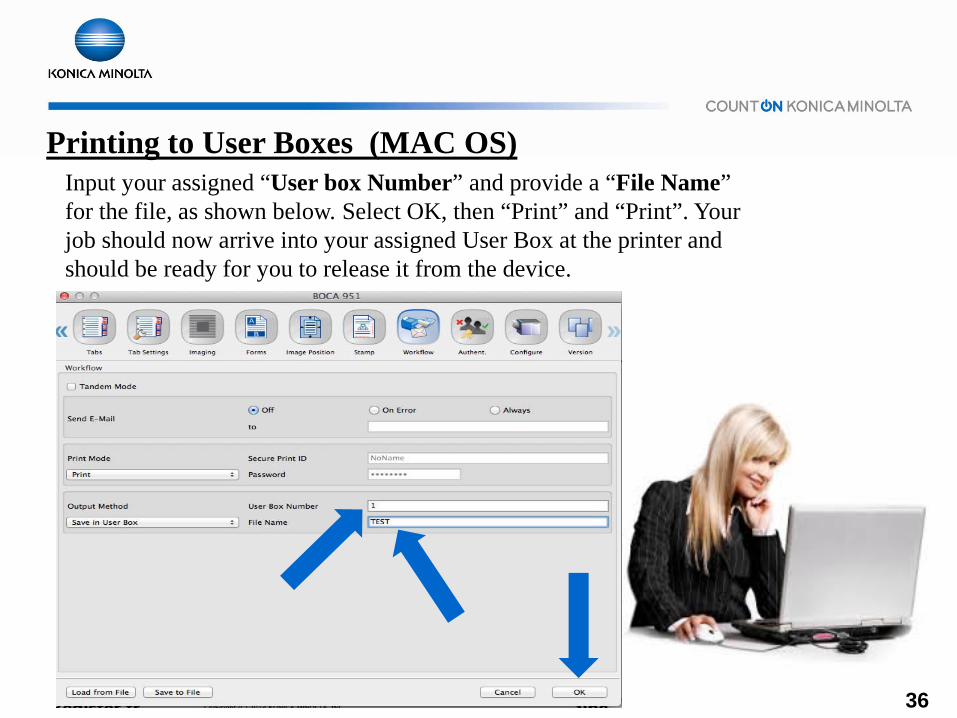
Printing to User Boxes (MAC OS) Input your assigned “User box Number” and provide a “File Name” for the file, as shown below. Select OK, then “Print” and “Print”. Your job should now arrive into your assigned User Box at the printer and should be ready for you to release it from the device.

37
Retrieving printed jobs stored in the User Box You should see the following screen displayed on the 951 once Account code tracking has been enabled. Enter in your account tracking password.

38
Retrieving printed jobs stored in the User Box At the next screen type in your account code password using the display keys shown below. Note: If you select the “Recall” tab at the top of the screen, this will take you directly to the area you need to be in, and you can bypass the default copy screen.

39
Retrieving printed jobs stored in the User Box Once the code is entered you will be able to get into the machine display panel.

40
Retrieving printed jobs stored in the User Box Select the “Recall” tab as shown below:
41
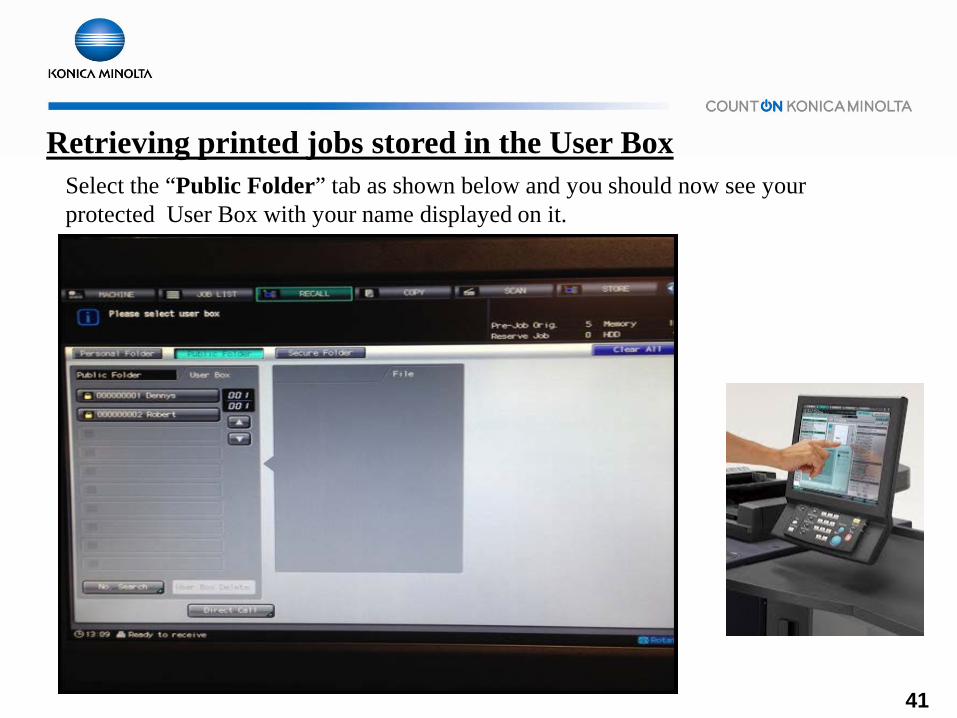
Retrieving printed jobs stored in the User Box Select the “Public Folder” tab as shown below and you should now see your protected User Box with your name displayed on it.

42
Retrieving printed jobs stored in the User Box Select your User Box, and provide your user box password.
43
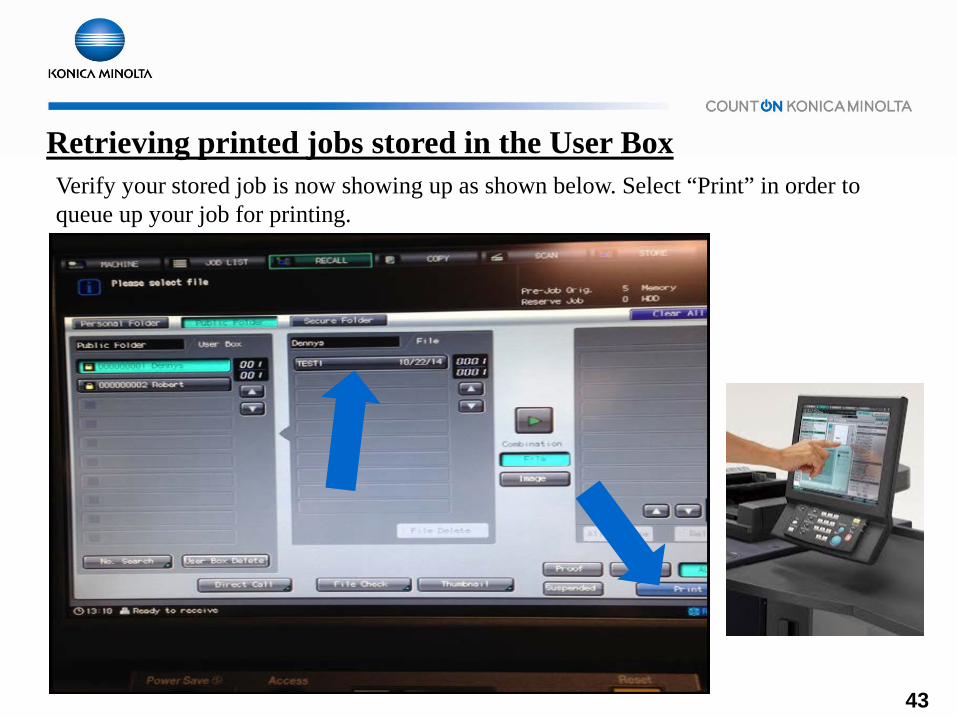
Retrieving printed jobs stored in the User Box Verify your stored job is now showing up as shown below. Select “Print” in order to queue up your job for printing.

44
Retrieving printed jobs stored in the User Box Select how many impressions you require as shown below. Then select OK, and your job will print out at the engine. If you need to provide finishing options, you can remove your job once printed, and copy it using required finishing options such as staple, double sided, etc…..

45
Re-setting Account Codes
From the operation panel select the following hard keys: a) Utility/Counter b) Administrator setting c) System Setting d) Follow instructions on screens shown on the next slides to re-set the counters

46
Re-setting Account Codes • Account Track
• Account Track Counter
Choose the account to be re-set

47
Re-setting Account Codes
To clear an individual counter, press [Clear] on the right side of [Copy Counter], [Printer Counter], or[Scan Counter]. To clear all counters, press [Clear All] at the bottom of the screen.
48
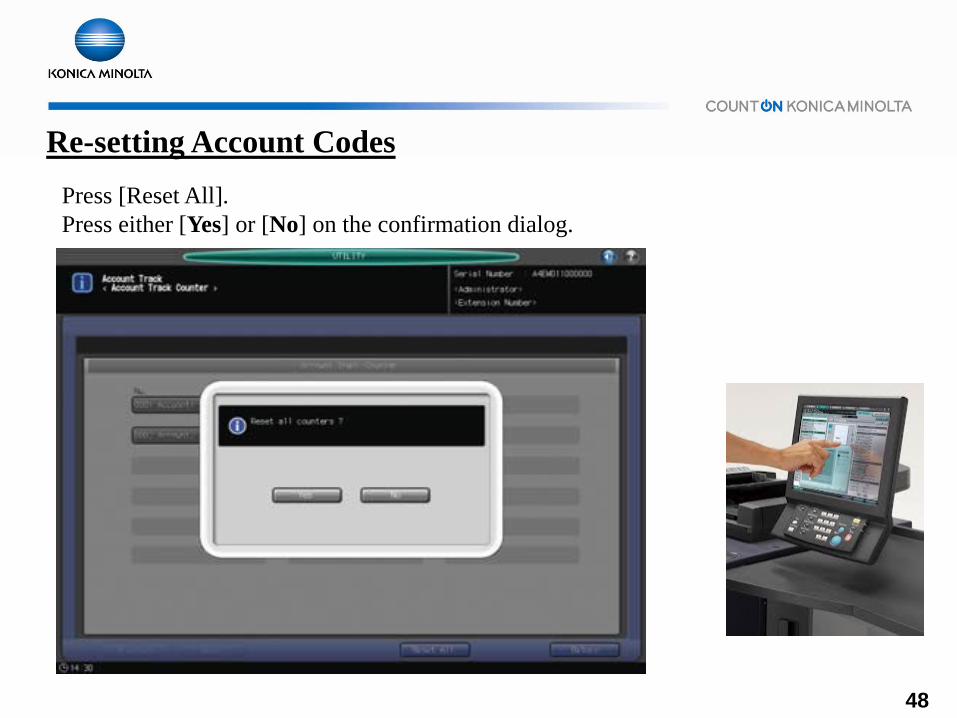
Re-setting Account Codes Press [Reset All]. Press either [Yes] or [No] on the confirmation dialog.

49
Registering Scan to destination addresses Launch a browser session and type in the Machine IP address and not the controller IP.
Click on [Machine Manager Setting].

50
Registering Scan to destination addresses The password entry dialog box will be displayed. Enter "admin" in the User Name text box, and “00000000” administrator password in the password text box, then click on [OK]. Click on [Scan transmission setting].

51
Registering Scan to destination addresses Register the User Name in the fields shown below along with their e-mail address in the “Address” box. Check the box which says “ Registered as daily use when checked”. Once completed, select “Registration”.
52
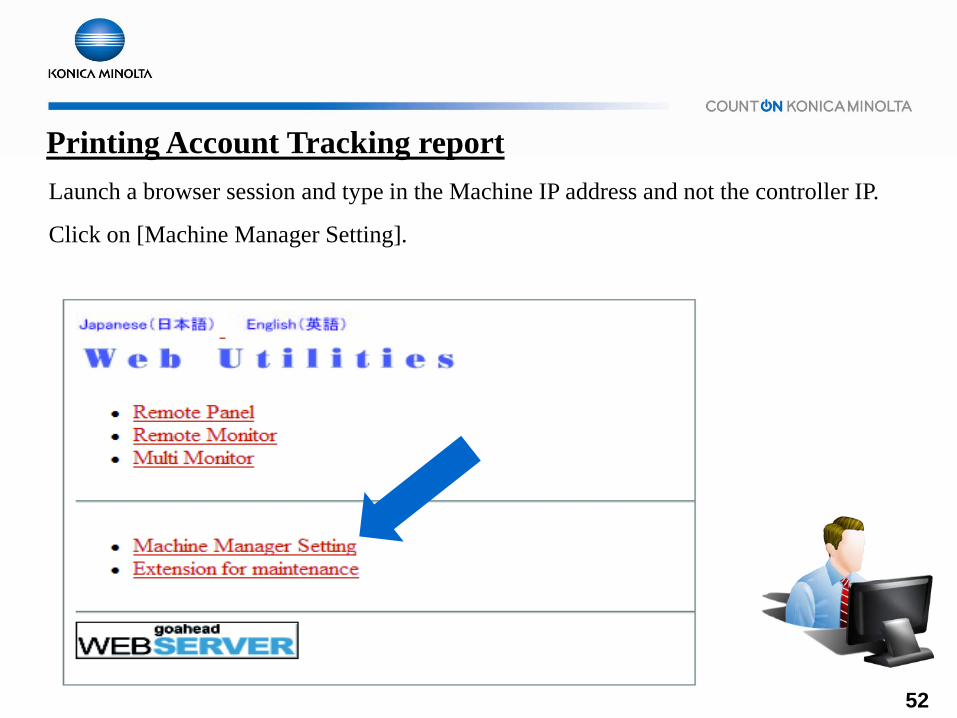
Printing Account Tracking report Launch a browser session and type in the Machine IP address and not the controller IP.
Click on [Machine Manager Setting].

53
Printing Account Tracking report The password entry dialog box will be displayed. Enter "admin" in the User Name text box, and “00000000” administrator password in the password text box, then click on [OK]. Click on [Volume Track Setting].

54
Printing Account Tracking report Select “Volume Track Data List”.

55
Printing Account Tracking report Save the Volume Track data list in a file. Click on [Save this table as a file].

56
Printing Account Tracking report Choose “Save” to save your data “Open” to print it out as a .CSV file.
57
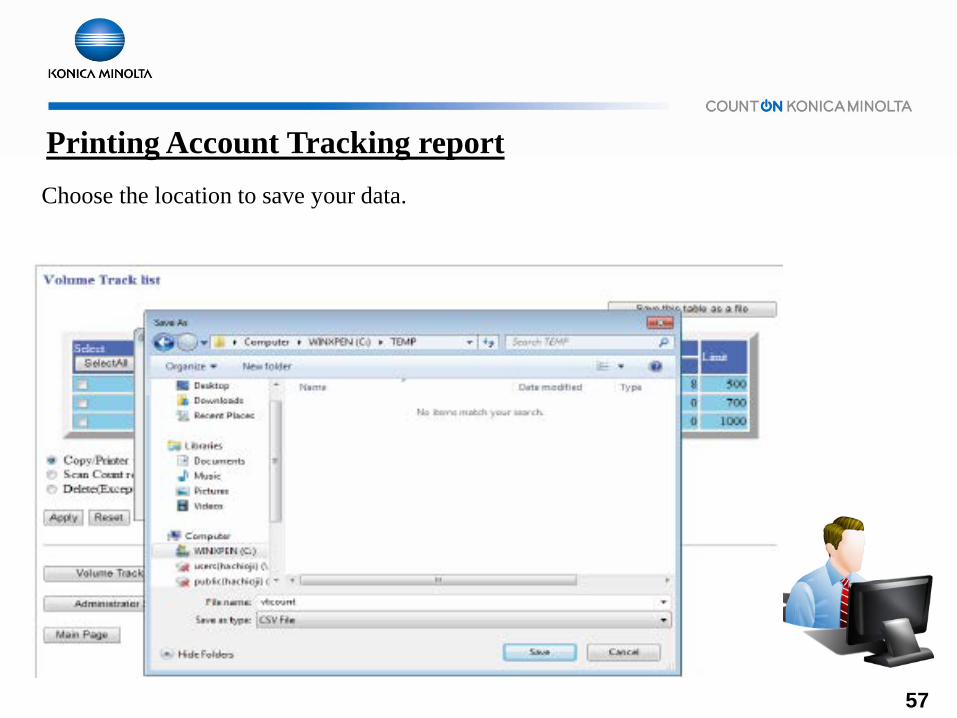
Printing Account Tracking report Choose the location to save your data.

58
Printing Account Tracking report Volume track data report sample displayed below.

59
Konica Minolta Green Planet Program
The Clean Planet Program is Konica Minolta's way of recognizing its responsibility towards the environment. From comprehensive environmental management systems to the energy and resources our products use, it ensures everything we do has awareness for the well-being of the planet.
Konica Minolta has partnered with Close the Loop Inc., leading global recyclers of imaging consumables to process returned consumables in an environmentally safe and responsible manner. All cartridges are recycled with zero waste to landfills and zero incineration. Using a state of the art material separation process, all consumables are processed, extracted and recovered for reuse. Recovered component materials are re-engineered so they can be remanufactured into useful products such as asphalt binders and colorants for plastic. • No cost to consumer • Total commitment to the environment
