krome editor om e1
DESCRIPTION
pianoTRANSCRIPT

E 1

Table of ContentsIntroduction . . . . . . . . . . . . . . . . . . . . . . . . . . . . . . . . . . . . . . . . . . . . . . . . . 1Main features. . . . . . . . . . . . . . . . . . . . . . . . . . . . . . . . . . . . . . . . . . . . . . . . . . . . . . . . . . . . . . . . . . . . . . 1
Please note before use . . . . . . . . . . . . . . . . . . . . . . . . . . . . . . . . . . . . . . . . . . . . . . . . . . . . . . . . . . . . . 1
KROME Editor and KROME Plug-In Editor operating requirements . . . . . . . . . . . . . . . . . . . 1
Installation . . . . . . . . . . . . . . . . . . . . . . . . . . . . . . . . . . . . . . . . . . . . . . . . . . 2Installation in Windows . . . . . . . . . . . . . . . . . . . . . . . . . . . . . . . . . . . . . . . . . . . . . . . . . . . . . . . . . . . . 2
Installing the Korg USB-MIDI Driver . . . . . . . . . . . . . . . . . . . . . . . . . . . . . . . . . . . . . . . . . . . . . . . . . . . . . . . . . . 2
Installing the KROME Editor/Plug-In Editor . . . . . . . . . . . . . . . . . . . . . . . . . . . . . . . . . . . . . . . . . . . . . . . . . . . 3
Installation in Mac OS X . . . . . . . . . . . . . . . . . . . . . . . . . . . . . . . . . . . . . . . . . . . . . . . . . . . . . . . . . . . . 5Installing the Korg USB-MIDI Driver . . . . . . . . . . . . . . . . . . . . . . . . . . . . . . . . . . . . . . . . . . . . . . . . . . . . . . . . . . 5
Installing the KROME Editor/Plug-In Editor . . . . . . . . . . . . . . . . . . . . . . . . . . . . . . . . . . . . . . . . . . . . . . . . . . . 5
Setup . . . . . . . . . . . . . . . . . . . . . . . . . . . . . . . . . . . . . . . . . . . . . . . . . . . . . . . . 7KROME setup . . . . . . . . . . . . . . . . . . . . . . . . . . . . . . . . . . . . . . . . . . . . . . . . . . . . . . . . . . . . . . . . . . . . . . 7
KROME Editor (stand-alone version) setup . . . . . . . . . . . . . . . . . . . . . . . . . . . . . . . . . . . . . . . . . . 7Windows XP /Windows Vista / Windows 7. . . . . . . . . . . . . . . . . . . . . . . . . . . . . . . . . . . . . . . . . . . . . . . . . . . . 7
Mac OS X . . . . . . . . . . . . . . . . . . . . . . . . . . . . . . . . . . . . . . . . . . . . . . . . . . . . . . . . . . . . . . . . . . . . . . . . . . . . . . . . . . . 7
KROME Plug-In Editor setup. . . . . . . . . . . . . . . . . . . . . . . . . . . . . . . . . . . . . . . . . . . . . . . . . . . . . . . . 8About the KROME Plug-In Editor . . . . . . . . . . . . . . . . . . . . . . . . . . . . . . . . . . . . . . . . . . . . . . . . . . . . . . . . . . . . . 8
Using an external mixer to control the KROME’s audio signal . . . . . . . . . . . . . . . . . . . . . . . . . . . . . . . . . 9
Using your host application to control the KROME’s audio signal. . . . . . . . . . . . . . . . . . . . . . . . . . . . . . 9
Host application settings . . . . . . . . . . . . . . . . . . . . . . . . . . . . . . . . . . . . . . . . . . . . . . . . . . . . . . . . . 10Apple - Logic Pro 9 . . . . . . . . . . . . . . . . . . . . . . . . . . . . . . . . . . . . . . . . . . . . . . . . . . . . . . . . . . . . . . . . . . . . . . . . . 10
Steinberg - Cubase 6.5. . . . . . . . . . . . . . . . . . . . . . . . . . . . . . . . . . . . . . . . . . . . . . . . . . . . . . . . . . . . . . . . . . . . . . 11
Ableton - Live 8 . . . . . . . . . . . . . . . . . . . . . . . . . . . . . . . . . . . . . . . . . . . . . . . . . . . . . . . . . . . . . . . . . . . . . . . . . . . . 12
MOTU - Digital Performer 7 . . . . . . . . . . . . . . . . . . . . . . . . . . . . . . . . . . . . . . . . . . . . . . . . . . . . . . . . . . . . . . . . . 13
Avid - Pro Tools 10 . . . . . . . . . . . . . . . . . . . . . . . . . . . . . . . . . . . . . . . . . . . . . . . . . . . . . . . . . . . . . . . . . . . . . . . . . 14
Cakewalk – SONAR X1 . . . . . . . . . . . . . . . . . . . . . . . . . . . . . . . . . . . . . . . . . . . . . . . . . . . . . . . . . . . . . . . . . . . . . . 16
Other host applications. . . . . . . . . . . . . . . . . . . . . . . . . . . . . . . . . . . . . . . . . . . . . . . . . . . . . . . . . . . . . . . . . . . . . 17
About MIDI timing . . . . . . . . . . . . . . . . . . . . . . . . . . . . . . . . . . . . . . . . . . . . . . . . . . . . . . . . . . . . . . . . . . . . . . . . . 17

Basic functions and operation . . . . . . . . . . . . . . . . . . . . . . . . . . . . . . . 18Start-up . . . . . . . . . . . . . . . . . . . . . . . . . . . . . . . . . . . . . . . . . . . . . . . . . . . . . . . . . . . . . . . . . . . . . . . . . . 18
KROME Editor . . . . . . . . . . . . . . . . . . . . . . . . . . . . . . . . . . . . . . . . . . . . . . . . . . . . . . . . . . . . . . . . . . . . . . . . . . . . . 18
KROME Plug-In Editor. . . . . . . . . . . . . . . . . . . . . . . . . . . . . . . . . . . . . . . . . . . . . . . . . . . . . . . . . . . . . . . . . . . . . . 18
About the Preload data . . . . . . . . . . . . . . . . . . . . . . . . . . . . . . . . . . . . . . . . . . . . . . . . . . . . . . . . . . . . . . . . . . . . 18
Items on the screen . . . . . . . . . . . . . . . . . . . . . . . . . . . . . . . . . . . . . . . . . . . . . . . . . . . . . . . . . . . . . . 19Connection indicator (KORG logo): . . . . . . . . . . . . . . . . . . . . . . . . . . . . . . . . . . . . . . . . . . . . . . . . . . . . . . . . . 19
Normal mode operating procedure . . . . . . . . . . . . . . . . . . . . . . . . . . . . . . . . . . . . . . . . . . . . . . . 21Selecting a mode . . . . . . . . . . . . . . . . . . . . . . . . . . . . . . . . . . . . . . . . . . . . . . . . . . . . . . . . . . . . . . . . . . . . . . . . . . 21
Selecting programs, combinations, and songs . . . . . . . . . . . . . . . . . . . . . . . . . . . . . . . . . . . . . . . . . . . . . . 21
Auditioning programs, and selecting a program to edit . . . . . . . . . . . . . . . . . . . . . . . . . . . . . . . . . . . . . 21
Editor operations . . . . . . . . . . . . . . . . . . . . . . . . . . . . . . . . . . . . . . . . . . . . . . . . . . . . . . . . . . . . . . . . . . . . . . . . . . 21
Selecting pages and tabs . . . . . . . . . . . . . . . . . . . . . . . . . . . . . . . . . . . . . . . . . . . . . . . . . . . . . . . . . . . . . . . . . . 23
Selecting a parameter and editing the value. . . . . . . . . . . . . . . . . . . . . . . . . . . . . . . . . . . . . . . . . . . . . . . . 23
Selecting and executing utility functions . . . . . . . . . . . . . . . . . . . . . . . . . . . . . . . . . . . . . . . . . . . . . . . . . . . 23
Writing (saving) . . . . . . . . . . . . . . . . . . . . . . . . . . . . . . . . . . . . . . . . . . . . . . . . . . . . . . . . . . . . . . . . . . . . . . . . . . . 24
Selecting a track . . . . . . . . . . . . . . . . . . . . . . . . . . . . . . . . . . . . . . . . . . . . . . . . . . . . . . . . . . . . . . . . . . . . . . . . . . . 26
Functions provided by the KROME . . . . . . . . . . . . . . . . . . . . . . . . . . . . . . . . . . . . . . . . . . . . . . . . . . . . . . . . . 27
Functions specific to the editor . . . . . . . . . . . . . . . . . . . . . . . . . . . . . . 28Utility commands . . . . . . . . . . . . . . . . . . . . . . . . . . . . . . . . . . . . . . . . . . . . . . . . . . . . . . . . . . . . . . . . 28
Software Setup (Initial settings for KROME Editor) . . . . . . . . . . . . . . . . . . . . . . . . . . . . . . . . . 30
Cautions . . . . . . . . . . . . . . . . . . . . . . . . . . . . . . . . . . . . . . . . . . . . . . . . . . . 31USB connection . . . . . . . . . . . . . . . . . . . . . . . . . . . . . . . . . . . . . . . . . . . . . . . . . . . . . . . . . . . . . . . . . . 31
• Apple, Mac, Logic pro and Audio Units are trademarks of Apple Computer, Inc., registered in the US. and other countries.
• Windows XP, Windows Vista and Windows 7 are trademarks of Microsoft Corporation.
• Cubase and VST are trademarks of Steinberg Media Technologies GmbH.
• Live is a trademark of Ableton AG.
• Digital Performer is a trademark of Mark of the Unicorn, Inc.
• Pro Tools and RTAS are registered trademarks of Avid Technology, Inc. or its subsidiaries.
• Cakewalk is a registered trademark of Cakewalk, Inc. in the United States.
• All other product and company names are trademarks or registered trademarks of their respective holders.

1
IntroductionThank you for purchasing the KORG KROME Music Workstation. To help you get the most out of your new instrument, please read this manual carefully.
Main featuresThe KROME Editor and the KROME Plug‐In Editor are applications for Macintosh or Win‐dows computers that allow you to edit the KROME’s programs, combinations, songs, drum kits, arpeggio patterns, effects, and global settings.
The KROME Editor is a stand‐alone editor.
The KROME Plug‐In Editor is an editor that is compatible with the VST, Audio Units, or RTAS plug‐in formats. It lets you use the KROME just like a plug‐in instrument from within your DAW (Digital Audio Workstation) software or other host application.
Please note before use• Copyright to all software included in this product is the property of Korg Inc.
• The license agreement for this software is provided separately. You must read the license agreement before you install this software. Your installation of this software will be taken to indicate your acceptance of this agreement.
KROME Editor and KROME Plug-In Editor operating requirements
Note: It is not possible to open and run multiple instances of the KROME Editor or KROMEPlug‐In Editor; this means that it is not possible to edit more than one KROME synthe‐sizer simultaneously.
Windows:• Computer
CPU: Pentium 4 / 1 GHz or better (Core Duo or more is recommended)Memory: 512 MB or more (1 GB or more is recommended)Monitor: 1,024 x 768 pixels, 16‐bit color or better A computer with a USB port, that satisfies the requirements of Windows XP / Windows Vista / Windows 7
• Operating system
Microsoft Windows XP Home Edition or Professional, Service Pack 3 or laterAll editions of Microsoft Windows Vista Service Pack 2 or later, Microsoft Windows 7 For the Windows 7 and Windows Vista 64 bit operating system, only a standalone version can be operated.
Macintosh:• Computer
CPU: Intel Mac, Core Duo or better is recommendedMemory: 512 MB or more (1 GB or more is recommended)Monitor: 1,024 x 768 pixels, 32,000 colors or betterAn Apple Macintosh with a USB port that satisfies the requirements of Mac OS X
• Operating system
Mac OS X version 10.5 or later
Note:KROME Plug‐In Editor must also satisfy the operating requirements of the host appli‐cation.

2
InstallationInstallation in Windows
To install the KROME Editor and the KROME Plug‐In Editor into Windows XP, Windows Vista or Windows 7 proceed as follows.
If you want to connect the KROME to your computer via USB and use the KROME Editor and the KROME Plug‐In Editor, you must install the Korg USB‐MIDI Driver.
Installing the Korg USB-MIDI Driver Note:Use the KORG USB‐MIDI Driver Tools (download required) to install the KORG USB‐
MIDI Driver. You can download the latest version from the Korg website.
1 Start the installer that you downloaded from the Korg website and follow the on‐screen instructions to install the KORG USB‐MIDI Driver Tools software on your computer.
2 To install the KORG USB‐MIDI Driver, check the installation procedure that is described in the KORG USB‐MIDI Driver Tools installation manual (HTML). To display the installation manual, select [Start] [All Programs] [KORG] [KORGUSB‐MIDI Driver Tools] [Installation Manual] from the taskbar.
3 Connect the computer USB port and the KROME USB port with a USB cable, and then turn on the power of the KROME.
When your computer first recognizes the connection to the KROME, the Windows default drivers will be automatically installed. However, this driver is not the KORG USB‐MIDI Driver and you will not be able to be use the KROME with this driver.
Note:For Window XP and Windows Vista, the installation of a driver is required for eachUSB port. If the KORG USB‐MIDI Driver is installed to an incorrect USB port and theKROME is connected, reinstall the KORG USB‐MIDI Driver in the same manner.
4 After the installation of the Windows standard driver is complete, the KORG Driver Setup Utility will start up automatically so be sure to follow the on‐screen instructions to install the KORG USB‐MIDI Driver.If the “The driver didn’t pass Windows Logo test…” message for digital signatures appears during the installation, click the [Continue] button to continue.After the installation is complete and you are asked to restart your computer, click the [Yes] button to restart your computer.
Note:To setup or uninstall the KORG USB‐MIDI Driver, refer to the installation manual.
About the KROME and USB-MIDI driver port
KEYBOARD PortUse this port to receive the KROME MIDI messages (KROME keyboard and controller data) with a computer application.
SOUND PortUse this port to send the MIDI message from the computer application to the KROME and to produce sounds with the KROME’s internal instruments.

3
Installing the KROME Editor/Plug-In Editor
1 The “KROME Editor/Plug‐In Editor Installer” will appear.
Successively select and install the Editor (Standalone), Plug‐In Editor (VST), and/or Plug‐In Editor (RTAS) as desired.
For example, if you want to install the stand‐alone version, click [Install Standalone Application].
2 The KROME Editor screen will appear. Click [Next>].
3 The “Welcome to the KROME Editor setup wizard” screen will appear. Click [Next>].
4 The “KROME Editor information” will appear. Read the displayed content, and click [Next>].
5 The “License agreement” will appear. Carefully read the contents, and if you agree, check “I accept the terms of the license agreement” and click [Next>].
6 The “Select installation folder” screen will appear. Choose the location and user(s) for which you want to install the software, and click [Next>].
7 “Verify installation” will appear. To proceed with the installation, click [Next>]. Installation will begin.

4
8 If the installation was successful, click [Close].
The “KROME Editor/Plug‐In Editor Installer” will appear.
9 Next you will install the plug‐in version(s) that you want to use. Using the procedure that’s described above, begin with step 1 and install the plug‐in version(s) that you want to use.
If you don’t want to install the VST plug‐in version or the RTAS plug‐in version, click [Exit Setup] to end the installation.
When you’ve finished installing the application(s) that you want, click [Exit Setup] to exit the installer.

5
Installation in Mac OS XTo install the KROME Editor and the KROME Plug‐In Editor into Mac OS X, use the follow‐ing procedure.
Be sure to install the KORG USB MIDI Driver (download required) when connecting the KROME to your computer via USB to use the KROME Editor and the KROME Plug‐In Editor. You can download the latest version of the driver from the Korg website.
Installing the Korg USB-MIDI Driver Use the Installer software (download required) to install the KORG USB‐MIDI Driver. You can download the latest version from the Korg website.
About the KROME and the USB port
KEYBOARD PortUse this port to receive the KROME MIDI messages (KROME keyboard and controller data) with a computer application.
SOUND PortUse this port to send the MIDI messages from the computer application to the KROME and to produce sounds with KROME’s internal instruments.
Installing the KROME Editor/Plug-In Editor
1 Double‐click [KROME Editor Installer.pkg] in the [KROME Editor] folder to start up the installer.
2 Depending on the version of your Mac’s operating system, a confirmation dialog box may appear at this point. If so, enter your password and click [OK]. When the installer starts up, the following screen will appear. Click [Continue].

6
3 “Important information” will appear. Read the contents, and click [Continue].
4 The “License agreement” will appear. Carefully read the contents, and click? [Continue]. A dialog box will ask whether you accept the terms of the license agreement. If you accept, click [Agree].
5 A screen allowing you to choose the “Installation destination” will appear. Choose the installation destination and click [Continue].
6 The “Standard Installation” dialog box will appear. Click [Install].
7 Depending on the version of your Mac’s operating system, a confirmation dialog box may appear at this point. If so, enter your password and click [OK].
8 When the installation has been successfully completed, click [Restart] to exit the installer.
You can’t connect two or more KROME units to a single computer and use them simultaneously.
Note:Under Mac OS X, the plug‐in version will also be installed in the appropriate folder.
7
SetupKROME setup
If you want to use the KROME Editor with the KROME connected to your computer via USB, you must make sure that you have finished installing and setting‐up the KORG USB‐MIDI Driver before you start up the KROME Editor.
1 Use a USB cable to connect the KROME’s USB connector to the USB port of your computer.
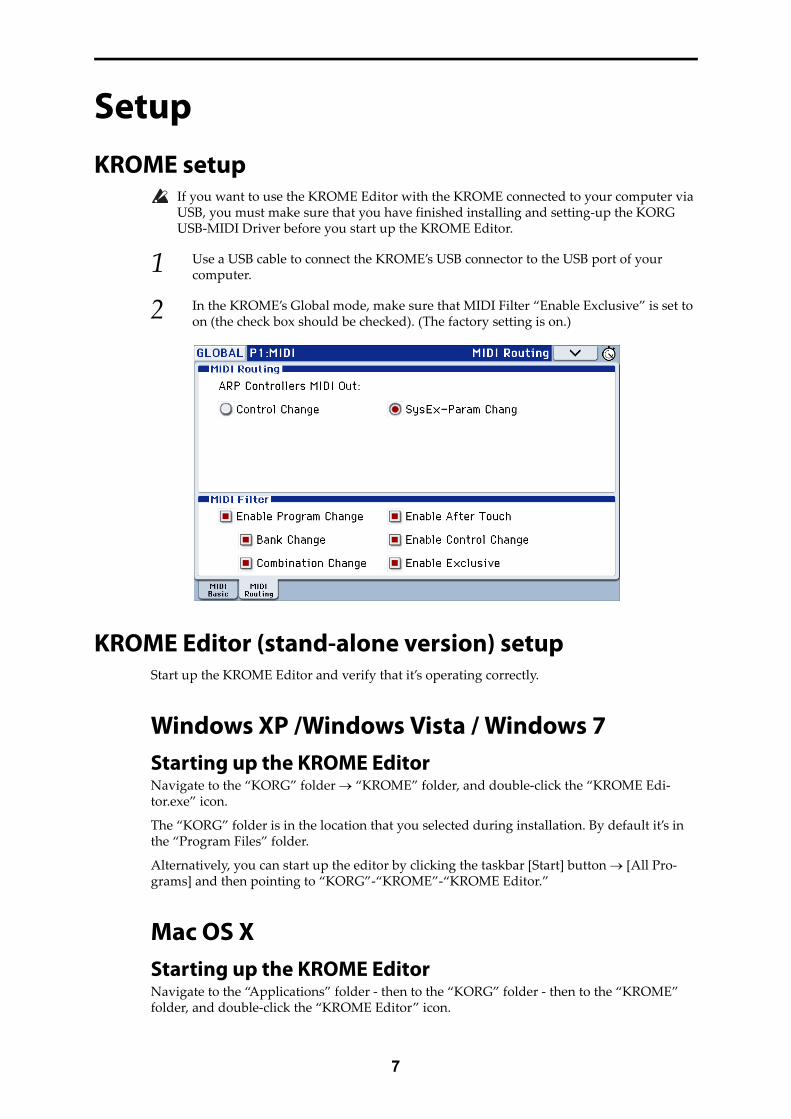
2 In the KROME’s Global mode, make sure that MIDI Filter “Enable Exclusive” is set to on (the check box should be checked). (The factory setting is on.)
KROME Editor (stand-alone version) setupStart up the KROME Editor and verify that it’s operating correctly.
Windows XP /Windows Vista / Windows 7Starting up the KROME EditorNavigate to the “KORG” folder “KROME” folder, and double‐click the “KROME Edi‐tor.exe” icon.
The “KORG” folder is in the location that you selected during installation. By default it’s in the “Program Files” folder.
Alternatively, you can start up the editor by clicking the taskbar [Start] button [All Pro‐grams] and then pointing to “KORG”‐“KROME”‐“KROME Editor.”
Mac OS XStarting up the KROME EditorNavigate to the “Applications” folder ‐ then to the “KORG” folder ‐ then to the “KROME” folder, and double‐click the “KROME Editor” icon.

8
KROME Plug-In Editor setupIf you want to use the KROME Editor with the KROME connected to your computer via USB, you must make sure that you have finished installing and setting‐up the KORG USB‐MIDI Driver before you start up the KROME Editor.
This section explains how to set up the KROME Plug‐In Editor in your host application and adjust the settings so that it will function correctly. Adjust these settings as appropriate for your system and setup.
About the KROME Plug-In Editor The KROME Plug‐In Editor sends and receives parameter data to and from the KROME. Unlike typical plug‐in instruments, the KROME Plug‐In Editor does not produce an audio signal.
Your KROME will output audio signals when the KROME Plug‐In Editor sends it MIDI mes‐sages.
If you want to send the KROME’s audio signal to an audio track in your host application and use it in conjunction with a plug‐in effect etc., refer to “Using your host application to control the KROME’s audio signal” (see p.9).
Note:Because the KROME Plug‐In Editor does not handle audio signals, you can’t insert aplug‐in effect into the channel of the track where the KROME Plug‐In Editor isinserted, or send its audio signal via a send or bus.
Audio Track(DAW's Audio In)
Instrument On Track
DAW
MIDIAUDIO
Mac / PC
AUDIO OUTPUTS
TONEGENERATOR
USB
USB
AUDIO INTERFACE
AUDIO I/OINPUTS Plug-In Editor
to Mixer or to DAW’sAudio Track
Note: Does notproduce anaudio signal.

9
Using an external mixer to control the KROME’s audio signal If you want to mix the KROME’s audio signals with the audio signals sent from your host application via your audio interface, or with audio signals from another sound module, con‐nect your gear as shown below.
Using your host application to control the KROME’s audio signal If you want to apply a plug‐in effect to the KROME’s audio signal, or if you want to control the KROME’s audio signal in your host application along with other audio tracks, connect the KROME to your audio interface and route the audio signal into your host application. Refer to the example explanations for various popular host applications on the following pages.
Note:For details on creating audio tracks, MIDI tracks, and plug‐in instrument tracks, or onhow to perform tasks and adjust settings in your host application, refer to the hostapplication’s owner’s manual.
USB
USB
RL/MONO
Powerd monitor
INPUT INPUT
KROME
Audio interface
Computer
USB
USB
RL/MONO
KROME
INPUT INPUT
Powerd monitor
Audio interface
Computer

10
Host application settingsThe following material explains how to start up the KROME Plug‐In Editor in your host application and select the appropriate settings for it to function properly. Please proceed to the specific explanation for the system you’re using.
Apple - Logic Pro 9
1 Start up Logic Pro.
2 Create a Software Instrument Track, and start up the “KROME Plug‐In Editor.”
3 To route the KROME’s audio signal into Logic Pro, create an audio track or an audio AUX track. As the I/O source for that track, select the audio interface input where you’ve connected the KROME’s audio signal.
4 If you’re routing the KROME’s audio signal to an audio track, turn the REC button on so that you can hear the audio signal. If you are routing the KROME’s audio signal to an audio AUX track, this setting is not necessary.
Software Instrument Track
Audio Track
Audio Track

11
Steinberg - Cubase 6.5
1 Start up Cubase, and open a session
2 In the VST Instruments window, start up the “KROME Plug‐In Editor.”
3 Create a MIDI track. For the output of that MIDI track, choose the “KROME Plug‐In Editor” which you started up in the VST Instruments window.
4 To route the KROME’s audio signal to Cubase, create an audio track. For the input of the track, select the audio interface input where you’ve connected the KROME’s audio signal.
5 Turn the Monitor button on so that you can hear the audio signal.

12
Ableton - Live 8
1 Start up Live, and choose “View” “Session View.”
2 From the plug‐in device browser, drag and drop the “KROME Plug‐In Editor” onto the session view. This will create a MIDI track with “KROME Plug‐In Editor” started up. Verify that “KROME Plug‐In Editor” is running in the MIDI track view.
3 Press the arm button so that the MIDI input from the external source will be sent to “KROME Plug‐In Editor.”
4 To route the KROME’s audio signal to Live, create an audio track. For the input of the audio input/output section, select the audio interface input where you’ve connected the KROME’s audio signal.
5 Set the Monitor setting to “In” so that you can hear the audio signal of the KROME.
MIDI Track
Audio Track
Audio Track

13
MOTU - Digital Performer 7
1 Start up Digital Performer.
2 Create an instrument track. Start up the “KROME Plug‐In Editor.”
3 Create a MIDI track. Choose the “KROME Plug‐In Editor” as the output of that MIDI track.
4 To route the KROME’s audio signal to Digital Performer 5, create an audio track or an AUX track. For the input of that track, select the audio interface input where you’ve connected the KROME’s audio signal.
5 If you’re routing the KROME’s audio signal to an audio track, turn the REC button on so that you can hear the audio signal.
If you are routing the KROME’s audio signal to an AUX track, this step is not necessary.
Instrument Track
Tracks Windows – MIDI Track
Tracks Windows – MIDI Track
Audio Track

14
Avid - Pro Tools 10
1 Start up Pro Tools, and open a session.
2 Create an audio track (stereo), and start up the “KROME Plug‐In Editor.”
3 Create a MIDI track. Choose the “KROME Plug‐In Editor” as the output of that MIDI track.
4 To route the KROME’s audio signal to Pro Tools LE, create an audio track or an AUX input track. For the input, select the audio interface input where you’ve connected the KROME’s audio signal.
Instrument Track
MIDI Track
Audio Track

15
5 If you’re routing the KROME’s audio signal to an audio track, turn the REC button on so that you can hear the audio signal.
If you are routing the KROME’s audio signal to an AUX input track, this setting is not necessary.
Audio Track

16
Cakewalk – SONAR X1
1 Start up SONAR X1 and open a project.
2 Select the “KROME Plug‐In Editor” on the Synthesizer Rack to create an installment track simultaneously.
3 The installment track where the KROME Plug‐In Editor was assigned is created.
4 Create an audio track to input the KROME’s audio signal to the host application. As the input of an inspector’s audio track, select the input of the audio interface where KROME’s audio signal is input.
5 To listen to the KROME audio signal that is input into the audio track, turn on the Input Monitor button of the audio track.

17
Other host applications
1 Start up your host application.
2 Start up the “KROME Plug‐In Editor” as a plug‐in instrument.
3 Create a MIDI track. Choose “KROME Plug‐In Editor” as the output of that MIDI track.
4 To route the KROME’s audio signal to your host application, create an audio track. As the input of that audio track, select the audio interface input where you’ve connected the KROME’s audio signal.
5 So that you can hear the KROME’s audio signal that is being routed to the audio track, turn the monitor button on for that audio track.
Note:The instructions given here for “Other host applications” may not necessary be appro‐priate for setting‐up all host applications. Please refer to the instructions for a hostapplication that has a similar structure to the host application you’re using, and alsorefer to the owner’s manual for the specific host application that you are using.
About MIDI timingIf you experience irregularities in MIDI timing, adjust settings so that MIDI messages are sent directly to the KROME rather than being routed through the KROME Plug‐In Editor. In this case, choose the KROME’s SOUND port as the MIDI OUT destination of the MIDI track in your host application, so that the MIDI messages will be sent directly to the KROME.
Note:For details on how to create a MIDI track and specify the MIDI OUT destination forthat MIDI track, refer to the host application’s owner’s manual.

18
Basic functions and operationStart-up
KROME Editor• From the “KORG”‐“KROME” folder, start up “KROME Editor.”
Note:When you start up the editor, the KROME’s programs and other settings can be loadedautomatically (see p.30 “Software Setup (Initial settings for KROME Editor)”).
Don’t touch the keyboard or the mouse of your computer while data is being sent or received.
WindowsAccess the “KORG” folder from the taskbar via [Start] [All Programs].
Mac OS XThe “KORG” folder is located in the “Applications” folder.
KROME Plug-In EditorFor details on starting‐up the KROME Plug‐In Editor, refer to the section for your host appli‐cation in “KROME Plug‐In Editor setup” (see p.8).
Note:When you start up the editor, the KROME’s programs and other settings can be loadedautomatically. (see p.30 “Software Setup (Initial settings for KROME Editor)”)
Don’t touch the keyboard or the mouse of your computer while data is being sent or received.
About the Preload dataStart up KROME Editor, and execute Receive All to load all data into the KROME Editor. Then save this data to a file as preload data. If you then make settings so that this data file is automatically loaded when you start up KROME Editor, the start‐up time will be shortened because you won’t need to load the data from the KROME. (see p.30 “Software Setup (Initial settings for KROME Editor)”)

19
Items on the screenA screen like the following will appear when you start up the editor. (This illustration here shows the Program mode screen.)
Connection indicator (KORG logo):This indicates the connection status between the KROME Editor/KROME Plug‐In Editor and the KROME.
LitThe KROME Editor/KROME Plug‐In Editor and the KROME are connected via MIDI.
DarkThe KROME Editor/KROME Plug‐In Editor is not connected to the KROME.
Select
Edit Pages
Tabs
Keyboard
Realtime Controls
Program (Combination/Song) Number, Name
BROWSER/UTILITY Mode
ARP/DRUM TRACK
Mode

20
Mode (COMBI, PROG, SEQ, GLOBAL)/Browser (BROWSE)/Utility (UTILITY):Here you can select the mode you want to use. You can select from: program, combination, sequencer, or global mode. The browser will display the names of the programs, combina‐tions, and songs that are in the KROME. UTILITY lets you view and execute the utility com‐mands that are available for the page you’ve selected. This is where you write (save) data.
Program (Combination/Song) Number, Name:This area shows the number and name of the program, combination, or song. Use the up/down arrows at the right side to change programs, combinations, or songs.
Edit Pages, Tabs:Use these to select the page that you want to edit.
Select:Switches the 4 knob functions of the Realtime Controls.
Realtime Controls:Here you can control the tone, volume, or arpeggiator settings depending on the control assign functions that are currently selected.
ARP / Drum Track: Here you can adjust settings for the arpeggiator function and the drum track.
Keyboard: This section consists of an 88‐note keyboard, a pitch bend wheel, and a modulation wheel.You can click the keyboard to play notes, and even play a glissando by dragging over the key‐board to the left or right. Operate the pitch bend wheel and modulation wheel by dragging them upward or downward.

21
Normal mode operating procedure
Selecting a mode• Click the button to select the corresponding mode.
COMBI: Select, play, and edit combinations.
PROG: Select, play, and edit programs.
SEQ: Select, play, and edit sequencer songs.
GLOBAL: Edit the software setup, global settings, MIDI settings, controller CC assignments, scale, category names, drum kits, and arpeggiator.
Selecting programs, combinations, and songs• Click the [BROWSE] button to display the sound list, and then select a program (or combi‐
nation or song). The items you can select will depend on the mode.
• Depending on whether you choose Category Select or Bank Select, the programs (or com‐binations) in the sound list will be arranged by category or by bank.
Auditioning programs, and selecting a program to edit
1 Click the [PROG] mode button to enter Program mode.
2 Click the [BROWSE] button to view the program list.
3 Click any program to select it. Play the keyboard of the KROME and you will hear that program.
4 When you’ve decided on a program to edit, click the [OK] button to load that program.
Editor operations
1 Select Program mode, and click the Editor Pages [PLAY] tab to access the Play page.
2 At the left side of the control surface located at the top of the screen, choose the [TONE] selector. The indications of the four knobs will be [CUTOFF], [RESONANCE], [EG INT], and [RELEASE].

22
3 In the set of tabs thatʹs located in the center of the screen, choose [Main/Mixer].
4 Use the four knobs on the control surface to vary the sound. Using the mouse to move the on‐screen knobs will have the same result as turning the four knobs on the KROME itself. For an explanation of these parameters, refer to the KROME Parameter Guide (PDF).
5 Next, choose the [ARP] selector located at the left of the control surface so that you can control the arpeggiator. Now the four knobs will control the arpeggiator.
6 Set the ARP button and the DRUM TRACK button to on, and then play the KROME keyboard to start the performance of the arpeggiator and drum track.To change the drum pattern during a performance, change the Pattern in the Drum Track section on the [Main/Mixer] tab in the center of the screen.To change the arpeggiator pattern, change the Arpeggiator Pattern on the [ARP] tab in the center of the screen.
7 While letting the arpeggiator play, move the four knobs or the knobs of the KROME itself, and notice how the arpeggio changes.
8 At the top of the Play page, you can check the current value of a typical parameter in the Program mode. This Overview displays the parameters for each section. If you click a section name (“Pitch EG” and “Filter1 EG”) of each parameter, you can automatically jump to the page/tab to edit the applicable parameter.

23
Selecting pages and tabsWhen you want to perform detailed editing, you can switch to other pages and tabs to access the desired parameters.
Global mode is divided into separate pages where you can edit drum kits, category names, and scales (temperaments). Select the desired page (or tab), and edit the settings.
• To select a page, click the tab for the desired edit page.
• To move between tabs within a page, select one of the tabs located in the center of the window.
Selecting a parameter and editing the value• Use the mouse to edit the items in the display
For example you can change the shape of the EG by using the mouse to drag the rectangles shown in the EG graphic.
Note:For details on the parameters, refer to the included “Parameter Guide” (PDF version) ofthe KROME.
Selecting and executing utility functionsThe utility functions are various commands that are available in each page. The available utility commands will differ depending on the page. These commands also let you save or load the edited or created data on your computer. These commands also let you import system exclusive data. Click the [UTILITY] button and choose a command from the menu that appears.
Note:For details on utility commands that are specific to the editor, refer to “Functions pro‐vided by the KROME” (see p.27).
1 From the [UTILITY] button, choose the command that you want to execute.
2 Adjust the necessary settings, and click OK to execute.
EditPages
Tabs
UTILITY

24
Writing (saving)If you want to keep any of the edits you have made, you must write (save) them.
This Write operation will save the edited settings on the KROME.
If you select another program or close the application before you perform the Write operation, the content you had been editing will be lost. The same applies to combinations or songs.
Global mode settings are maintained until you close the application, but your changes will be lost when you close the application. If you click the [DUMP] button located in the upper right of each page in Global mode, the current settings will be saved in the KROME. (Some pages do not have the [DUMP] button.)
As an example, here’s how to write a program that you’ve edited in Program mode.
1 Click [UTILITY] to access the utility menu.
2 From the menu list, choose [Write Program].

25
3 Specify the program name, category, and save destination, and click the [OK] button.
Note: If you execute a menu command (such as Swap Oscillator) on the KROME itself, thedata in the Editor and the data in the KROME may lose synchronization. In this case,execute a UTILITY menu command (such as Receive Current Prog) in the Editor toreceive a data dump for the current data.

26
Selecting a trackYou can select the current track in the Sequencer mode. The current track is common to each page in the Sequencer mode. To select a track, click the track number with your mouse. If the track is selected as the current track, a red border will be shown around the track.
Note:There may be pages where the current track cannot be selected. A red border appearsaround the current track on the page where the current track can be selected.

27
Functions provided by the KROME
1 Tone AdjustThis function provides an easy way to edit the sound of programs, the programs used within a combination, or the programs used by song tracks. In the KROME Editor, you can perform the same Tone Adjust operations as you can from the KROME itself.
2 Arpeggiator The arpeggiator is a function that automatically produces arpeggios (broken chords). The KROME Editor lets you edit the parameters of the KROME’s (maximum of) two arpeggiators in each mode (PROG, COMBI, SEQ), edit arpeggio patterns in GLOBAL mode, and also view the settings of the four knobs in realtime. The arpeggio pattern edit screen lets you edit the arpeggio pattern while you listen to the phrase.
3 Drum TrackThe Drum Track is a pattern sequencer dedicated to playing drum patterns. You can use it in any mode: Program, Combination, or Sequencer. In the KROME Editor you can turn the drum performance on/off, select drum patterns, select drum programs, and edit the settings of the assigned timbre – all in realtime.

28
Functions specific to the editorThese are functions that are not found on the KROME, and are available only from the editor (KROME Editor, KROME Plug‐In Editor).
Utility commands
LoadLoads editor data that was previously saved on the computer.
SaveSaves data from the editor to your computer as a file.
Note: These functions load or save the data as dedicated files for the editor application.
Receive AllReceives all data from the KROME data into the editor.
Note: The sequencer performance data of Sequencer mode is excepted.
Transmit AllTransmits all data in the editor to the KROME and writes it into internal memory.
Receive All Combi/Current Combi BankReceive All Prog/Current Prog BankReceive All SEQ/1 SEQReceive Global Data/Drum Kit/Arpeggio Pattern Receive the corresponding data from the KROME into the editor.
Transmit All Combi/Current Combi BankTransmit All Prog/Current Prog BankTransmit All SEQTransmit Global Data/Drum Kit/Arpeggio PatternTransmit the corresponding data from the editor to the KROME and writes it.
Receive Current Combi/Current Prog/1 SEQ/Current Arpeggio Pattern Receive the respective data from the KROME into the editor.
Transmit Current Combi/Current Prog/1 SEQ/Current Arpeggio PatternTransmit the respective data from the editor to the KROME.
Note: These Receive and Transmit commands use KORG SysEx MIDI Dump to send or receive data, or to synchronize the data between the KROME and the software.
Don’t touch the keyboard or the mouse of your computer while data is being sent or received. Also, don’t touch the panel switches or the keyboard of the KROME.

29
ImportLoads PCG data from the KROME into the editor.
Export Data created in the KROME Editor can be saved as PCG data for the KROME.
Save as DefaultWrites (saves) the global mode Software Setup settings of the editor as the default settings that will be used when you start up the editor.
Note: These utilities can be selected only in the editor’s global mode Software Setup page.
Select Auto Load FileIn the Software Setup tab, use “Auto Load File” to select the desired file.
Note: Refer to “Auto Load File.
All Sound OffDepending on the host application, “hung” notes may have sometime occurred while using the hostʹs functions. If this symptom occurs, please execute the “All Sound Off” command.

30
Software Setup (Initial settings for KROME Editor) Global mode Software Setup lets you specify the default settings that the KROME Editor will use when it starts up. This setting is saved when you execute the UTILITY command Save as Default, and will be remembered the next time you start up.
Total Recall & Data Sync Setting
Here you can specify the editor data that will be saved and loaded as part of the song data by your DAW software. This setting lets you save only the data you need. When the KROME Editor starts up, the types of data that you’ve checked here will also be loaded automatically from the KROME that’s connected to your computer. (In other words, this data will be syn‐chronized.) Since a data dump requires a certain amount of time, you may wish to shorten the startup time by using the Auto Load File function instead of this function, or by using the UTILITY command Load to load a previously‐saved data file into the KROME Editor.
Auto Load File
When the KROME Editor starts up, the data file you specify here will automatically be loaded into the editor. After this process is completed, the data you checked in Total Recall & Data Sync Setting will be loaded via data dump.
Local Control
This setting automatically sets the KROME’s Local Control setting to the appropriate state when you start up the editor. We recommend that you normally leave this parameter on. The KROME’s Local Control setting will be reset to its original state when you close the editor.
MIDI Settings
Here you can adjust settings for the MIDI connections between the KROME Editor and the KROME.

31
MIDI IN Port / MIDI OUT Port This selects the connection port for the KROME and the KROME Editor. The name of the MIDI port thatʹs currently connected is shown. You won’t need to change this setting if the KROME and KROME Editor are connected correctly, since the KROME Editor will search for the KROME when it starts up, and it will specify the MIDI port automatically.
Send KROME’s MIDI Out data to the host application (VST Plug-In Only)If you turn this option on, the MIDI OUT data of the KROME itself will be sent to the host application as the output of the plug‐in instrument.
Short messages are the only type of MIDI messages that can be output. If you’re using a host application that is able to receive the MIDI data sent by a plug‐in instrument, the MIDI mes‐sages generated by the KROME’s arpeggiator function can be sent to the MIDI track of a dif‐ferent software synthesizer.
CautionsUSB connection
If you lose data synchronization with the KROME when starting-up the editor, please check the following points.• If you’re using USB‐MIDI, you must use the KORG USB‐MIDI Driver. The default driver
provided by the operating system may have an extremely slow data transfer rate, or may not communicate correctly.
• If you’re using a USB hub, try connecting the KROME directly to a USB port on the compu‐ter itself to see whether it will work. You can also try removing all other connected USB devices except for the KROME itself.
When you lose data synchronization, please perform the “Receive All” or “Transmit All” function in the Editor’s “UTILITY” menu in order to synchronize the data between the editor and the hardware.

© 2012 KORG INC.
4015-2 Yanokuchi, Inagi-city, Tokyo 206-0812 Japan