kubernetes concepts
TRANSCRIPT

Kubernetes Concepts
Jun 22, 2020

Contents:
1 Prologue 1
2 Introduction 3
3 Containers 53.1 Overview . . . . . . . . . . . . . . . . . . . . . . . . . . . . . . . . . . . . . . . . . . . . . . . . . 53.2 Container building blocks . . . . . . . . . . . . . . . . . . . . . . . . . . . . . . . . . . . . . . . . 63.3 Docker . . . . . . . . . . . . . . . . . . . . . . . . . . . . . . . . . . . . . . . . . . . . . . . . . . 7
4 Containers - Practical 94.1 Use Cases . . . . . . . . . . . . . . . . . . . . . . . . . . . . . . . . . . . . . . . . . . . . . . . . . 104.2 Conclusion . . . . . . . . . . . . . . . . . . . . . . . . . . . . . . . . . . . . . . . . . . . . . . . . 11
5 Kubernetes Overview 135.1 Minikube . . . . . . . . . . . . . . . . . . . . . . . . . . . . . . . . . . . . . . . . . . . . . . . . . 145.2 Kubectl . . . . . . . . . . . . . . . . . . . . . . . . . . . . . . . . . . . . . . . . . . . . . . . . . . 145.3 Running the HTTP Server . . . . . . . . . . . . . . . . . . . . . . . . . . . . . . . . . . . . . . . . 15
6 Indices and tables 17
i

ii

CHAPTER 1
Prologue
I have been working on Kubernetes for almost a year now and started using Docker many years before that. I reallythink that containers and Kubernetes are transformative technologies in the same way that Virtualization has been adecade before.
The idea to write a guide about Kubernetes concepts came up when I started preparing for a technical talk at CatalogicSoftware (where I work). Instead of preparing usual slides and notes, I thought that writing a guide beforehand andthen giving the talk would be better.
There are many Kubernetes tutorials available on the web and the Concepts section on Kubernetes website is quitebrilliant. However, I haven’t found any systematic presentations where concepts are introduced in an incrementalfashion, starting all the way from containers and then gradually moving onto Kubernetes features. Hence, this guide.I hope developers find it useful.
If you have any comments or corrections, please send email to “draghuram at gmail.com” or open an issue (or PR) atthe github repo.
1

Kubernetes Concepts
2 Chapter 1. Prologue
CHAPTER 2
Introduction
Kubernetes is very much getting lots of love and mind share these days. Here is how kubernetes.io defines thetechnology:
Kubernetes (K8s) is an open-source system for automating deployment, scaling, and management ofcontainerized applications.
But what does it exactly mean? It is certainly not an easy technology to pick up and it really helps to understand theconcepts behind its design and implementation.
This guide is an attempt to explain the concepts in an easy to understand and incremental fashion. I do assume that thereader is reasonably familiar with Docker and container concepts though I give a high level overview in the first twochapters.
Also, all the examples and descriptions in the guide use Linux as that is the operating system I am most comfortablewith.
3
Kubernetes Concepts
4 Chapter 2. Introduction

CHAPTER 3
Containers
Kubernetes is a container orchestration platform so containers are at the heart of the technology.
3.1 Overview
Containers are isolated groups of processes running on a single host. They run directly on a host without any inter-mediate layer as opposed to Virtual Machines which require a Hypervisor to be present. This is also the reason whycontainers are referred to as a “light-weight” solution to deploy applications.
The most important point to note is the fact that container processes run directly on the host. As can be seen in thefollowing picture (source: docker.com), there is no intermediate layer between kernel and applications, as is the casewith virtualization such as vmware and VirtualBox.
5

Kubernetes Concepts
So if the container processes run directly on the host, what stops them from seeing each other or even affecting eachother? That is where the isolation aspects of the kernel comes in. Kernel has mechanisms to isolate or sandbox aprocess (or a group of processes) to the point that the processes behave as though they are running on a dedicated host.This is despite the fact that they are just normal processes on the host and they can be seen from the host just like anyother processes (given sufficient permissions).
So Containerization is essentially creating an isolated environment around a process or group of processes, limitingthem in terms of what they can see and what they can do.
Finally, it is important to understand that all containers share same running kernel. There is no isolation there andthat is another big difference between Virtual Machines and containers. A side effect of sharing the kernel is that ifthe container uses a kernel module or does something with a kernel module, there is no way to isolate it from othercontainers (with some exceptions, see Kata Containers).
3.2 Container building blocks
There are three kernel features - namespaces, cgroups, and chroot, that work together to make containers possible.Docker and other container tools mainly use these features to build container solutions.
6 Chapter 3. Containers
Kubernetes Concepts
3.2.1 chroot
chroot is a system call that changes the root directory of a process. Once that happens, the process will only be able toaccess files that are reachable from the new root directory.
3.2.2 Namespaces
Namespaces allow partitioning of virtual system resources such as PIDs and mounted file systems.
Here are some examples:
PID Isolates process ID ranges so that processes in different namespaces can have same PID.
User Isolates UID and GID numbers. Especially useful to run as root inside the container.
UTS Provides isolation for host name and domain name.
3.2.3 Control groups (cgroups)
Control groups allow partitioning of physical system resources such as CPU and memory.
They also allow limiting physical resources to a group of processes. For example, if you want to limit a process to100MB of main memory even though the host has much larger memory, you can easily do that using cgroups.
3.3 Docker
Containers existed in one form or another for very long time. E.g. Solaris Zones, lxc. But Docker brought thetechnology to mainstream due to following reasons:
• Defined a simple and portable image format
• Made it easy to build new images
• Made sharing images a breeze (Docker Hub)
Google has been using containers for long time. In fact, the initial code for cgroups has been donated by Google.Since then, namespaces were added to the mix and then “lxc” came along as a container solution.
But the real popularity in the wide developer world started after Docker came into the picture. The main reasons arethe portable image format and APIs.
For a good understanding of Docker, please see Docker Concepts.
In the next chapter, we will see a simple example of how to work with Docker containers.
3.3. Docker 7

Kubernetes Concepts
8 Chapter 3. Containers
CHAPTER 4
Containers - Practical
This section will continue the discussion of containers by focusing on practical aspects of how to build images and runthem.
We will start with a simple HTTP server and use it to demonstrate Container and Kubernetes concepts throughout theguide.
Here is a very basic example taken from Flask Quickstart:
from flask import Flask
app = Flask(__name__)
@app.route('/')def hello_world():
return 'Hello, World!'
if __name__ == '__main__':app.run(host="0.0.0.0")
As can be seen, the server is very simple and implements a single end point. Save the code in the file basicserver.py and you can then run the server as follows (command output is not shown):
$ python3 -m venv ~/venv/flask$ export PATH=~/venv/flask/bin:$PATH$ pip install flask$ python basicserver.py
The end point can be verified with curl.
$ curl http://localhost:5000Hello, World!
So our little HTTP server is up and responding to requests. Note that the server is running directly on the host.
As a next step, we will build a Docker image and run the server in a container (instead of directly running on the host).Create a file called Dockerfile in the same directory as basicserver.py with the following contents:
9
Kubernetes Concepts
FROM python:3
RUN mkdir /opt/app && \python3 -m venv /opt/venv && \/opt/venv/bin/pip install flask
COPY basicserver.py /opt/app
EXPOSE 5000/tcp
CMD ["/opt/venv/bin/python", "/opt/app/basicserver.py"]
You usually build images from existing images as we are doing here. We are using python:3 as the base image ontop of which we install our application and configure some options. In this case, we are installing Flask and copyingour application code. The “EXPOSE” directive indicates that the process in the container listens on port 5000. Finally,we specify the command to execute when some one “runs” the container.
Once we have a Dockerfile, we can build the container image and then “run” it.
# Build the container with name "basicserver" and tag "0.42"# This command must be run in the same directory that contains# "Dockerfile".$ docker build -t basicserver:0.42 .
We are now ready to “run” the container.
$ docker run -p 5000:5000 --rm -it basicserver:0.42
“-p” option is to map the container port 5000 on to the host (so that we can access it directly on “localhost”). You canmap to any available port, not just 5000. For information about other options, check Docker Run reference.
At this point, the HTTP server is running and we can access it using “curl” just like before.
$ curl http://localhost:5000Hello, World!
Note that the way we access the server hasn’t changed but we are now running it in a “container” instead of directlyon a host. Imagine you have a machine that has no Python or Flask installed. You can still run the container usingDocker and use the application. This is possible because all the required components of the server (e.g. Python andFlask) are packaged in the container image.
It is interesting to note that a container image is comparable to an “executable” file such as ELF binary while the“container” can be compared to a running process. Just like running a process involves taking an executable file andcreating a “process”, running a container takes an image and creates a “container”.
You don’t need to build images yourself in order to use containers. In many cases, you will be able to use images thatare already available at Docker Hub.
4.1 Use Cases
There are many different scenarios where you can use containers. Here are few interesting ones:
Microservices Microservices are services that implement a small and well defined interface. They are typicallyaccessed using REST. Containers are a perfect fit run microservices.
Tools If you want to run a tool but don’t want to install it on your machine, containers are the way to go. For example,I usually run Jekyll locally as follows, to check that my blog looks ok (my blog is built using Jekyll).
10 Chapter 4. Containers - Practical

Kubernetes Concepts
$ docker run -it --rm --volume=$(pwd):/srv/jekyll -it -p 4000:4000jekyll/jekyll jekyll s
Exploring Say you are running Ubuntu and you want to check something out on a Fedora machine. You can simplyrun a container with Fedora image, like so:
$ docker run -it --rm fedora bash
4.2 Conclusion
This concludes the discussion about containers in general and Docker in particular. If you want to explore further, hereare some useful resources:
• Container image spec
• Container runtime spec
• Docker Concepts
At this point, we have a Docker image for a simple and basic HTTP server and we have seen how it can be run as aDocker container. In the next chapter, we will see how we can deploy the same server in Kubernetes.
4.2. Conclusion 11

Kubernetes Concepts
12 Chapter 4. Containers - Practical
CHAPTER 5
Kubernetes Overview
In the last chapter, we built a Docker image of a simple HTTP server and ran it as a container. We are now ready toenter the world of Kubernetes and see how we can run the same server inside Kubernetes.
In a Kubernetes cluster, a “Pod” is the smallest unit that can be deployed and run. It is essentially a container or agroup of containers. We will learn more about Pods and why they support group of containers in later sections but fornow, it is sufficient to understand that a container is wrapped in a “Pod” to be run in a Kubernetes cluster.
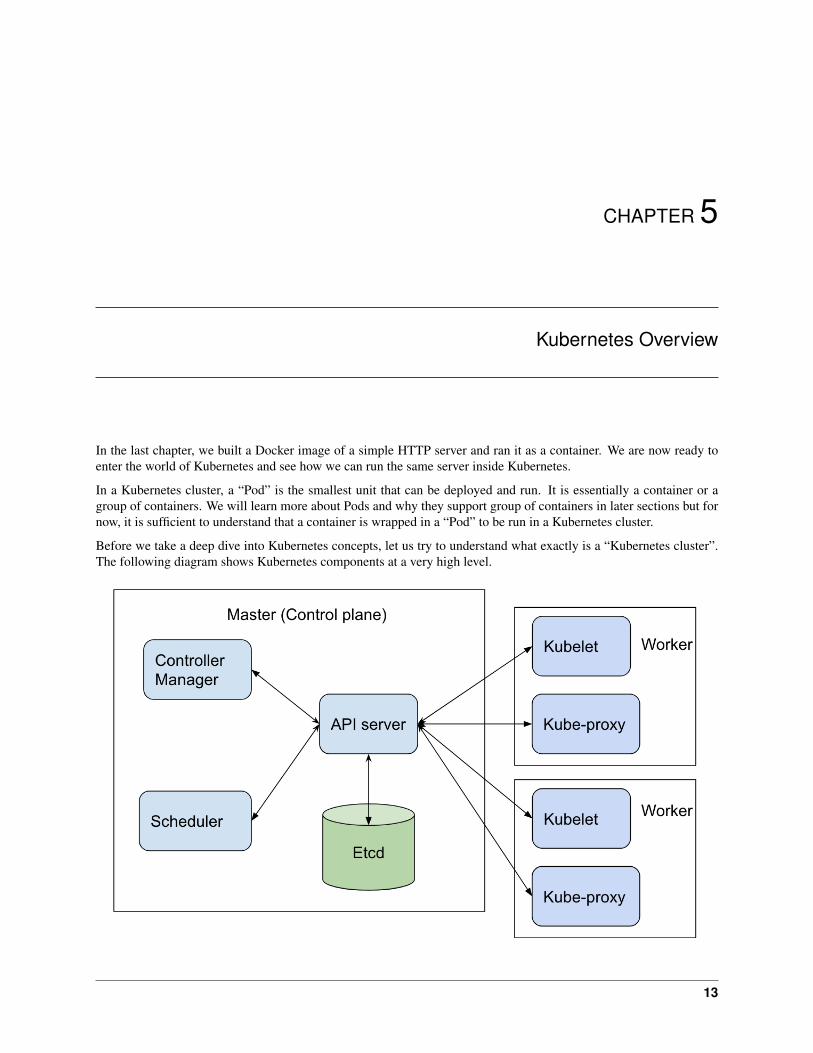
Before we take a deep dive into Kubernetes concepts, let us try to understand what exactly is a “Kubernetes cluster”.The following diagram shows Kubernetes components at a very high level.
13

Kubernetes Concepts
A very concise overview of the architecture:
• Kubernetes is a cluster solution in that it manages multiple nodes and can seamlessly run pods on any node.
• There is a master node that runs the components that “manage” the cluster. These components are typicallyreferred to as “control plane” of the cluster. Note that it is possible to have more than one master if you want tocreate highly available clusters but for our discussion, we will assume there is a single master node.
• The remaining nodes are ‘worker” nodes that run pods. The cluster components that run on the worker nodesare referred to as “Node components”.
Typically, master node is dedicated to running control plane components and workloads are not run there. But you caneasily change that and if you are using a one node cluster, you obviously need to do that.
Here is a brief description of each component in a Kubernetes cluster. We will learn more details about them in thecoming chapters.
API server API server is the front end to the cluster. It implements the Kubernetes REST API. An important point isthat the APIs are used not only by external components but internal components as well (though they may use aslightly different format of the API).
Etcd Etcd is a distributed key-value store and is used by API server to persist all resources.
Scheduler Decides which node should run a newly created pod.
Controller Manager Comprises of several different “controllers” that manage Kubernetes resources such as nodes,pods, service accounts etc.
Kubelet Runs on each node and makes sure that pods are running containers as per the spec.
kube-proxy Runs on each node. It implements the network semantics for the cluster by forwarding traffic from onenode to the other.
Now that we have a high level understanding of what Kubernetes is, we need a test environment where you can run thecommands and see the cluster in action. There are many options when it comes to setting up a test Kubernetes cluster.The easiest perhaps is to use Katacoda but my personal preference is to install minikube locally.
5.1 Minikube
Minikube creates a one node cluster that is very handy to test things locally. It can install cluster components in severaldifferent ways.
• Directly on the host itself
• Using Docker
• Using VirtualBox VM
The recommended way is to use “Docker”, like so:
$ minikube start --vm-driver docker
5.2 Kubectl
To access the cluster we just created, we need kubectl which is a command line tool to manage and control Kubernetesclusters. If you work with Kubernetes actively, you will be spending lot of time running this command so it is veryimportant and useful to master it.
14 Chapter 5. Kubernetes Overview

Kubernetes Concepts
Using kubectl, you can perform CRUD actions on all Kubernetes resources. After installing minikube and kubectl,run the following command to verify that the test setup is working:
$ kubectl -n kube-system get pod
NAME READY STATUS RESTARTS AGEcoredns-66bff467f8-mdr29 1/1 Running 0 5d19hcoredns-66bff467f8-rrxxd 1/1 Running 0 5d19hetcd-test 1/1 Running 0 5d19hkindnet-lnmg9 1/1 Running 0 5d19hkube-apiserver-test 1/1 Running 0 5d19hkube-controller-manager-test 1/1 Running 0 5d19hkube-proxy-wp5pm 1/1 Running 0 5d19hkube-scheduler-test 1/1 Running 0 5d19hstorage-provisioner 1/1 Running 0 5d19h
The command shows all the running pods in the namespace “kube-system” (more about namespaces later). You cansee some of the components we discussed earlier such as etcd and apiserver in the listing above.
5.3 Running the HTTP Server
We are now ready to run our basic HTTP server in a Kubernetes cluster.
First, we need to add the Docker image of our basic server (which we built in the last chapter) to minikube cluster wejust created:
$ minikube cache add basicserver:0.42
This step is only necessary for local images. If the image is available in Docker Hub or in some other Docker registry,we don’t need to explicitly add the image to the cache.
Let us now run the server:
$ kubectl run --image basicserver:0.42 testpodpod/testpod created
$ kubectl get podNAME READY STATUS RESTARTS AGEtestpod 1/1 Running 0 4s
We can see that the HTTP server pod is running. However, even though the server is running, it is not reachable fromoutside the cluster yet. One simple way to fix this is to have “kubectl” forward traffic from a port on the localhost tothe server inside the cluster, like so:
$ kubectl port-forward testpod 5000:5000Forwarding from 127.0.0.1:5000 -> 5000Forwarding from [::1]:5000 -> 5000
Once this forwarding is set up, we can reach the HTTP server from localhost. We can easily verify that using the samecurl command we used in the previous chapter.
$ curl http://localhost:5000Hello, World!
That’s it! We now managed to run our server in three different environments - on the host directly, as a Dockercontainer, and finally in a Kubernetes cluster. But do note that the above commands were only meant to get a pod upand running for some quick testing. They are not the recommended way to create resources in a Kubernetes cluster.
5.3. Running the HTTP Server 15

Kubernetes Concepts
In the next chapter, we will learn all about pods and some other abstractions that work with pods. In the process, wewill also learn some general concepts about Kubernetes resources and the recommended way of creating and otherwisemanaging such resources.
More content is coming soon. Stay tuned!
16 Chapter 5. Kubernetes Overview

CHAPTER 6
Indices and tables
• genindex
• modindex
• search
17