la makina - columbia universitysites.music.columbia.edu/cmc/courses/g6631/fall2012/assets/la... ·...
TRANSCRIPT

1
La MakinaMartin Matalon
Documentation and technical requirements
June 9th, 2008

2
La MakinaMartin Matalon
Patch, sound design, and documentation: David Adamcyk
Acknowledgement
La Makina is a commission from the Centre for Interdisciplinary Research in Music Media and Technology(CIRMMT) of McGill University, with financial assistance from the The Langlois Foundation for Art, Science andTechnology.
Premiere Performance
March 6th, 2008 during the MusiMars Festival in Montreal, CanadaSara Laimon, PianoKyoko Hashimoto, PianoFabrice Marandola, percussionAiyun Huang, percussion

3
Table of contents
Important Note-------------------------------------------------------------------------------------------------------- 41-Technical Requirements--------------------------------------------------------------------------------------- 42-Setup-------------------------------------------------------------------------------------------------------------- 53-The Patch--------------------------------------------------------------------------------------------------------- 9
3.1-Loading------------------------------------------------------------------------------------------------ 93.2-Initialization------------------------------------------------------------------------------------------ 113.3-dac~---------------------------------------------------------------------------------------------------- 113.4- Patch Operation-------------------------------------------------------------------------------------- 123.5-The Tracks-------------------------------------------------------------------------------------------- 133.6- Automation & Track Modes----------------------------------------------------------------------- 143.7-Click Track-------------------------------------------------------------------------------------------- 153.8-Panic--------------------------------------------------------------------------------------------------- 153.9-Suggested Use---------------------------------------------------------------------------------------- 16

4
Important NoteThis documentation assumes the reader has a basic knowledge of MaxMSP and of an audio sequencer (forexample: Logic Pro, Digital Performer, Protools, etc.)
1-Technical Requirements
The following equipment is necessary for the performance of La Makina. Should you not have access to this exactequipment, adequate substitutes may be used.
-Six self-powered speakers and cables (see diagram below for placement)-Mics: 6 Neumann 184 (two per piano, 1 for the vibraphone, 1 for the xylophone), 4 AKG C-414 (two for themarimba, 1 for the drum set, and 1 for the timpani), plus cables-1 mixer with at least 16 inputs and 6 outputs (ex: Mackie 24•8 mixer)-1 16x4 XLR snake-1 MOTU traveler firewire interface-1 8x8 1/4” snake-1 Shure wireless monitoring system with 4 belt-pack receivers and head phones (ex: Shure PSM 400) Eachperformer may want a different type of head phone, so it may be good to have a few options to test out.-1 Mac computer (ex MacBook Pro 2.16gHz, 2 gig ram) with a working copy of Max/MSP 4.6.3*. Also, it ishighly recommended to use the fastest available hard drive (7200rpm) as there are up to seven simultaneous 6channel sound files to read from disk.
*The patch has not been tested on Max 5, nor has it been tested on versions earlier than 4.6.3.

5
2-SetupThe following is a suggested setup for both the mixer and the stage placement. There is no real-time treatment inthis piece, so the microphones serve only as amplification for the live instruments. The goal is not to make theinstruments significantly louder, but rather to put the instruments in the same sonic space as the electronics,contributing to a better blend between the two.

6

7
Mic connections and stage setup from premiere performance in Montreal (March 6th, 2008 MusiMars Festival)
Percussion 1
Percussion 2
Pianos 1 (left) and 2 (right)

8
9
3-The PatchThe electronics of La Makina are a set of sound files coordinated to the performers with the help of a click
track. In order to provide the maximum amount of flexibility, the Max/MSP patch was designed to resemble anaudio sequencer, like Logic or Digital Performer. Each track (there are 18 in total) plays its own sound file and hasits own volume control, which can be automated in order to compensate for different hall acoustics, thus achievingthe best overall mix possible.
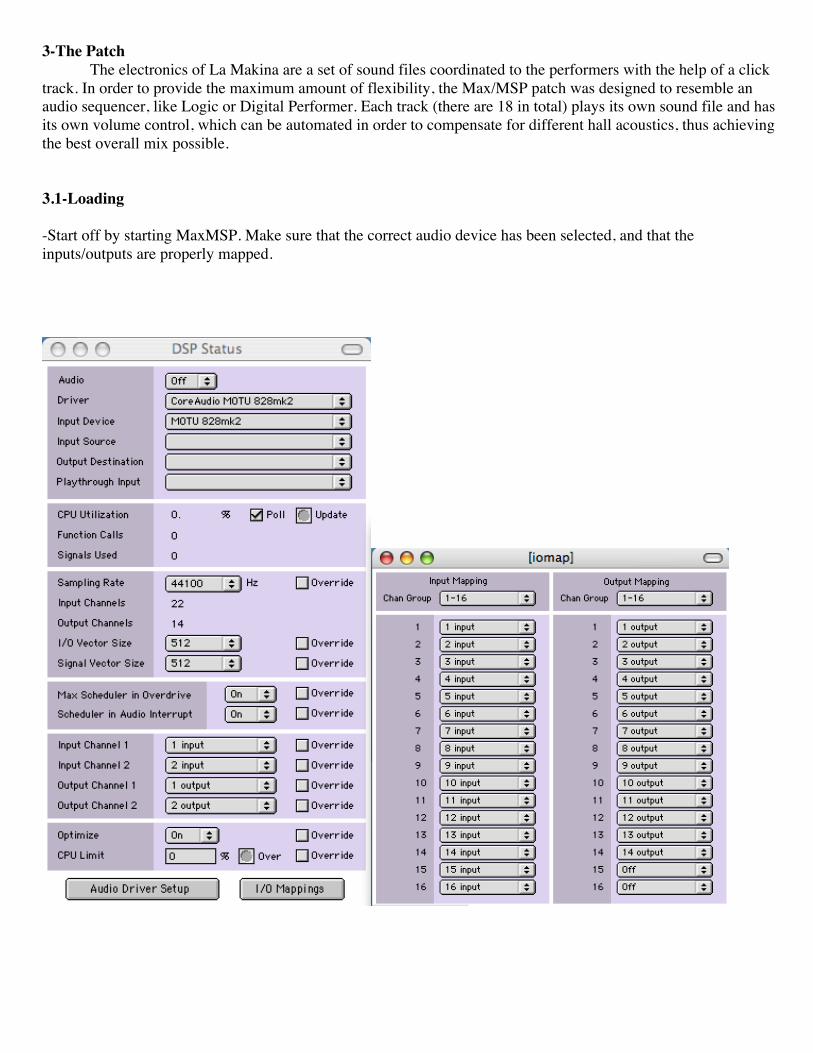
3.1-Loading
-Start off by starting MaxMSP. Make sure that the correct audio device has been selected, and that theinputs/outputs are properly mapped.

10
-Next, put the La_Makina_patch folder into your file preferences. It is best to remove any other file preferencewhich might contain either duplicates or alternate versions of the 3rd party externals. The following three 3rd partyexternals are used:
-timex.mxo-hr.div~.mxo-jmod.meter~.mxo
-Close Max then launch Max again, and open the file La_Makina (contained in the La_Makina_patch folder). Thepatch should look this:
Make sure there are no error messages in the Max window.

11
3.2- dac~
Depending on the audio interface you are using, you might need to change the dac~ output arguments. You canaccess the dac~ by clicking on the ‘engine room’ button.
3.3-InitializationOn the left hand side of the patch, in yellow and blue, you will find the initialization sequence. These are
the steps that must be done to ensure that everything will work smoothly, especially come concert time:
This initializes all the faders, reads the automation files, sets the faders to ‘read’ mode (more on thisbelow), and loads all the sound files into their respective sfplay~’s. To begin, click the yellow initialize button, andyou will see all the faders go up to 0dB. If, from some reason, you have to edit part of the initialization (which youshould not have to) you can click on the and the init patcher will come up. DON’T CHANGE ANYTHINGUNLESS YOU REALLY KNOW WHAT YOU ARE DOING!
Next click on the DSP button. On my MacBook Pro 2.16gHz Core Duo, the CPU load rises to about 15%,but I think my computer has a mental problem...On all other similar computers the CPU load rises to about 8%.
This step is more for concert time. It is just to remind you and the sound engineer to mute the mixer outsbefore doing the pre-performance speaker/routing test. If you don’t do this, then the audience will hear the test!
This is the speaker/routing test. Click on the drop-down menu and select ‘start’. A white noise pulse willbegin, progressively moving from speaker 1 to 6 (around the audience). Once you see that the mixing board iscorrectly receiving the pulse, click on the drop-down menu and select stop. During setup before the concert, youcan also select ‘more options’ from this menu. A window will appear giving a wider range of options, such asdifferent signal types, pulse on/off, auto-rotation, or individual selection of speakers.

12
This is another simple reminder to make sure that the mics on stage are working.
The last reminder: un-mute the outs on the mixer.
In a concert situation, select 0 in the ‘start at measure’ section of the patch. In rehearsals, select themeasure number where you wish to start.
FYI: Measure 0 is in fact a count-in measure for the performers. The piece actually starts at measure 1.
Self-explanatory. Hit the space bar, and the click track will start. When the ‘current measure’ box reaches1, the first sound file should play out of track 3. (Hitting space bar again will stop playback)
3.4-Patch Operation
Once the init sequence has been completed, operating the patch is very easy (it essentially corresponds tosteps 7 and 8 in the init sequence). Simply scroll up or down to the desired measure number in the ‘start atmeasure’ box, and hit the space bar to start and stop. You can also type-in the measure number from which tostart from, but remember to hit ‘enter’ before starting playback to validate your choice. You will see in the upperright hand corner of the patch, that the ‘current’ section is updated when you choose another start bar.
IMPORTANT: Please note that playback must be stopped before selecting another start measure.Also, it is important to leave a little time (~1 second) between choosing a start measure, and startingplayback. This is to make sure the sound files have enough time to load properly.

13
3.3-The TracksEach sound file has its own track. In order to provide the maximum amount of flexibility, the tracks were
designed to resemble those in an audio sequencer, like Logic or Digital Performer. Each track (there are 18 intotal) plays its own sound file, and the volume control for each track can be automated.
In addition, the track will be highlighted in dark grey when it is reading a sound file. Not all sound files play at thesame time, so this can quickly tell you which tracks are active. You can see which tracks are active at differentmoments in the piece by changing the value of the ‘start at measure’ box. Note that track 1 remains constantlyhighlighted, because it is playing the click track which runs through the entire piece. Examples:
Mute and solo
Automation mode drop-down menu
Volume fader. The dotted lines represent (from topto bottom) 0, -9 , -18, -26, and –60 dB
Value of fader in dBClear automation buttonTrack name (linked to corresponding SF player)
meters
Rough description of the contents of the sound files played on this track
14
3.4-Automation & Track ModesThe volume faders of each track can be automated. This means that, in any section of the piece and when
playback is on, you can record the way you move the faders, and these movement will then be repeatedautomatically the next time you play the same section. The automation data is saved to files located in the‘automation’ folder inside the La_Makina_patch folder. This data cannot be edited graphically. When you firstload the patch, the automation file are set to 0dB for the entirety of the piece.
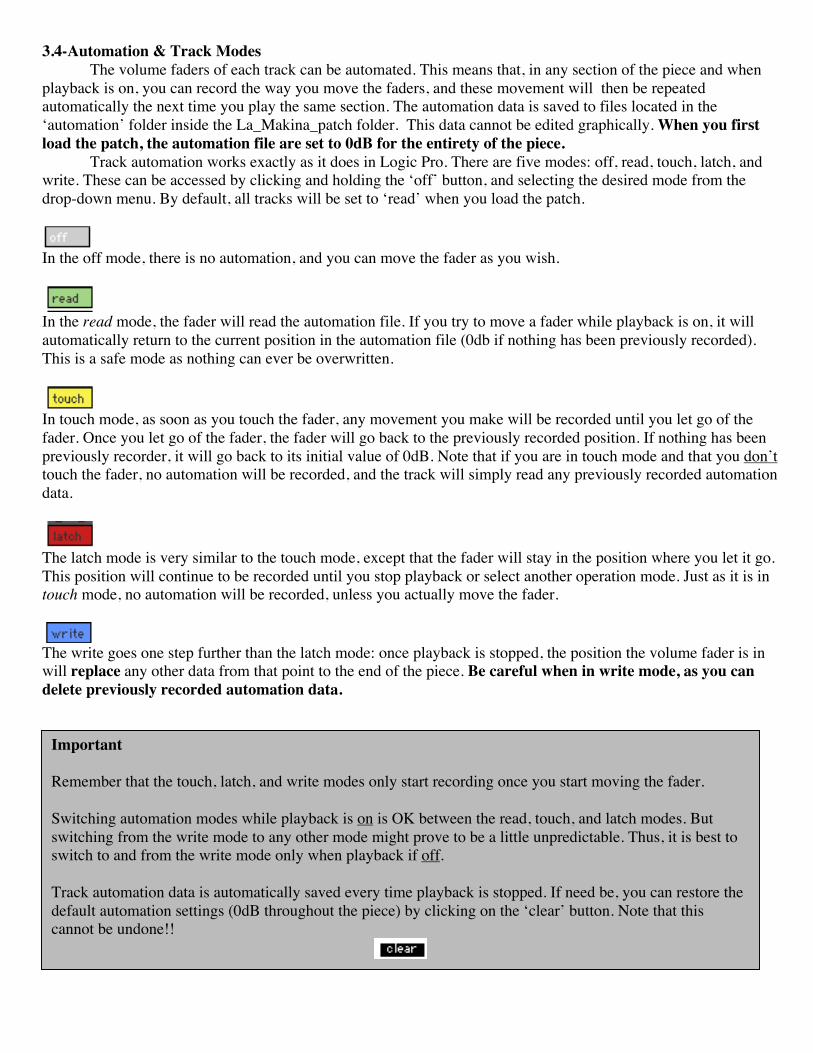
Track automation works exactly as it does in Logic Pro. There are five modes: off, read, touch, latch, andwrite. These can be accessed by clicking and holding the ‘off’ button, and selecting the desired mode from thedrop-down menu. By default, all tracks will be set to ‘read’ when you load the patch.
In the off mode, there is no automation, and you can move the fader as you wish.
In the read mode, the fader will read the automation file. If you try to move a fader while playback is on, it willautomatically return to the current position in the automation file (0db if nothing has been previously recorded).This is a safe mode as nothing can ever be overwritten.
In touch mode, as soon as you touch the fader, any movement you make will be recorded until you let go of thefader. Once you let go of the fader, the fader will go back to the previously recorded position. If nothing has beenpreviously recorder, it will go back to its initial value of 0dB. Note that if you are in touch mode and that you don’ttouch the fader, no automation will be recorded, and the track will simply read any previously recorded automationdata.
The latch mode is very similar to the touch mode, except that the fader will stay in the position where you let it go.This position will continue to be recorded until you stop playback or select another operation mode. Just as it is intouch mode, no automation will be recorded, unless you actually move the fader.
The write goes one step further than the latch mode: once playback is stopped, the position the volume fader is inwill replace any other data from that point to the end of the piece. Be careful when in write mode, as you candelete previously recorded automation data.
Important
Remember that the touch, latch, and write modes only start recording once you start moving the fader.
Switching automation modes while playback is on is OK between the read, touch, and latch modes. Butswitching from the write mode to any other mode might prove to be a little unpredictable. Thus, it is best toswitch to and from the write mode only when playback if off.
Track automation data is automatically saved every time playback is stopped. If need be, you can restore thedefault automation settings (0dB throughout the piece) by clicking on the ‘clear’ button. Note that thiscannot be undone!!

15
If ever you forget how the automation modes work, you can click on the ‘Matalon in the toaster’ image at anytime, and a help window will appear containing most of the above explanations.
3.5-Click Track (on track 1)The audio file used for the click track already has volume changes built in to make it quieter in certain
sections, and thus avoid the problem of having the audience hear the click during the concert (there are alsovolume boosts in loud sections to help the performers). These volume levels are the ones that were actually used inthe premiere performance of the piece in Montreal. So, in theory, they should/could also work in otherperformances. However, if these levels are not satisfactory, then you can change the click track file to a versionwith a constant volume, and automate the volume changes as needed using the above mentioned automationfeatures.
To change the click track file, click on the button, and then double-click on the patcher. At the top right of this patcher, simply reconnect as shown, and then double-
click the ‘loadbang’:
FYI: -Makina-Click-Adj-levels.aif ----------> click track with built-in volume changes -Makina-Click-flat.aif-------------------> click track with constant volume
3.6-PanicIn case something goes very, very wrong, you can hit the esc key on the keyboard, or click on the
button and the DSP will shut off immediately.

16
3.7-Recommendations-Familiarize yourself with the automation modes before actually starting to rehearse.-One automation strategy might be to put all the faders on write mode for the first complete reading of the piece.Once you have a basic set of levels, then switch to the touch or latch mode (depending on the situation) to makefurther refinements.