label matrix help - teklynxftp.teklynx.fr/online//docs/label matrix_help.pdf · label matrix help...
TRANSCRIPT
LABEL MATRIX® Help

Table Of Contents Introduction ..................................................................................................................................9
Help with Online Help .....................................................................................................................9
About the Help Window................................................................................................................9
Display Help using the Contents Tab ...........................................................................................9
Display Help using the Index Tab ...............................................................................................9
Display Help using the Search Tab..............................................................................................9
Searching Help ...........................................................................................................................9
Printing a Help Topic.................................................................................................................. 10
Installing and Uninstalling the Program........................................................................................... 11
System Requirements................................................................................................................ 11
Installing the Label Design Software............................................................................................ 11
Single User Installation ........................................................................................................... 11
Network Installation ............................................................................................................... 12
Uninstalling the Label Design Software ........................................................................................ 12
Exploring the Design Environment.................................................................................................. 13
The Menu Bar ........................................................................................................................... 13
Toolbars................................................................................................................................... 13
Wizards ................................................................................................................................... 13
Keyboard Shortcuts ................................................................................................................... 14
Customizing the Design Environment ............................................................................................. 15
Modifying Display Settings.......................................................................................................... 15
Changing the Interface Language................................................................................................ 15
Adding Your Own Menu Options .................................................................................................. 15
Creating, Opening, and Saving Labels............................................................................................. 17
New Label Wizard...................................................................................................................... 17
Opening an Existing Label .......................................................................................................... 17
i

LABEL MATRIX Help
Converting Old Label Files .......................................................................................................... 18
Importing a Label File ................................................................................................................ 19
Saving a Label .......................................................................................................................... 19
Label Properties........................................................................................................................... 21
Label Properties ........................................................................................................................ 21
General tab - Label Properties..................................................................................................... 21
Printer tab................................................................................................................................ 22
Page Size tab............................................................................................................................ 22
Margins tab .............................................................................................................................. 23
Multiple tab .............................................................................................................................. 23
Database tab ............................................................................................................................ 24
Counter Tab ............................................................................................................................. 25
Keyboard tab............................................................................................................................ 25
Duplicates tab........................................................................................................................... 26
Job Modifier tab ........................................................................................................................ 26
Security tab.............................................................................................................................. 27
Write Data tab .......................................................................................................................... 27
AutoPrint tab ............................................................................................................................ 28
RFID Tag tab ............................................................................................................................ 28
Data Origins ................................................................................................................................ 29
About Data Origins .................................................................................................................... 29
Data Origin - Constant ............................................................................................................... 29
Data Origin - Database .............................................................................................................. 29
Data Origin - Keyboard Input...................................................................................................... 30
Data Origin - Counter ................................................................................................................ 30
Data Origin - Copy .................................................................................................................... 30
Data Origin - Combination.......................................................................................................... 31
ii

Table Of Contents
Data Origin - Date..................................................................................................................... 31
Data Origin - Time..................................................................................................................... 33
Text & Paragraphs ....................................................................................................................... 35
Adding Text.............................................................................................................................. 35
Adding Reversed Text ................................................................................................................ 35
Text Properties ......................................................................................................................... 35
Adding a Paragraph ................................................................................................................... 35
Paragraph Properties ................................................................................................................. 36
Using the RTF Editor .................................................................................................................. 36
Bar Codes ................................................................................................................................... 39
Bar Code Types......................................................................................................................... 39
Adding a Bar Code..................................................................................................................... 41
Bar Code tab ............................................................................................................................ 42
Adding a 2D Bar Code................................................................................................................ 43
2D Bar Code Properties.............................................................................................................. 44
Linear Bar Code Symbologies...................................................................................................... 44
Linear Bar Code Symbologies................................................................................................... 44
Code 39 (3 of 9)..................................................................................................................... 45
Extended Code 39 .................................................................................................................. 46
Code 93 ................................................................................................................................ 48
Extended Code 93 .................................................................................................................. 48
Codabar ................................................................................................................................ 49
Code 128 .............................................................................................................................. 50
EAN/JAN ............................................................................................................................... 51
HIBC..................................................................................................................................... 52
Interleaved 2 of 5................................................................................................................... 52
MSI Plessey ........................................................................................................................... 52
iii
LABEL MATRIX Help
PLANET Code ......................................................................................................................... 52
UCC/EAN-128 ........................................................................................................................ 53
UPC-A................................................................................................................................... 53
UPC-E ................................................................................................................................... 54
Zip+4 POSTNET ..................................................................................................................... 55
2D Bar Code Symbologies .......................................................................................................... 56
2D Bar Code Symbologies ....................................................................................................... 56
Aztec .................................................................................................................................... 56
Aztec Mesa ............................................................................................................................ 57
Code 16K .............................................................................................................................. 58
Code 49 ................................................................................................................................ 60
Data Matrix ........................................................................................................................... 61
EAN/UCC & RSS Composites .................................................................................................... 62
PDF 417 ................................................................................................................................ 63
MaxiCode .............................................................................................................................. 64
MicroPDF............................................................................................................................... 65
QR Code................................................................................................................................ 66
TLC39 ................................................................................................................................... 67
Lines & Shapes ............................................................................................................................ 69
Adding a Line or Shape .............................................................................................................. 69
Shape Properties....................................................................................................................... 69
Adding Custom Shapes .............................................................................................................. 70
Custom Shape Properties ........................................................................................................... 70
Pictures ...................................................................................................................................... 73
Adding a Picture........................................................................................................................ 73
Picture Properties ...................................................................................................................... 73
Working with Placed Objects ......................................................................................................... 75
iv

Table Of Contents
Editing Images.......................................................................................................................... 75
Moving and Sizing Images.......................................................................................................... 75
Copy, Cut, Paste or Delete an Image ........................................................................................... 75
Rotating Images ....................................................................................................................... 76
Scaling Images ......................................................................................................................... 76
Grouping/Ungrouping Images ..................................................................................................... 76
Moving Images to the Front or Back ............................................................................................ 77
Redrawing the Label .................................................................................................................. 77
Working with Expressions ............................................................................................................. 79
About Expressions..................................................................................................................... 79
Connecting Elements in an Expression ...................................................................................... 79
Creating an Expression ........................................................................................................... 79
Using Constant Data in Expressions............................................................................................. 79
Using Database Fields in Expressions........................................................................................... 81
Using a Date Stamp in an Expression........................................................................................... 83
Using an Extended Date Function in an Expression ........................................................................ 86
Using a Time Stamp in an Expression .......................................................................................... 89
Using the Extended Time Function............................................................................................... 91
Using Punctuation and ANSI Codes in Expressions......................................................................... 93
Using Linked Files in an Expression.............................................................................................. 95
Using the Expand Sub Database Function in an Expression............................................................. 95
Using Functions in Expressions ...................................................................................................... 99
Using a Bar Code Function in an Expression.................................................................................. 99
Using a String Function in an Expression .................................................................................... 100
Using a Math Function in an Expression ..................................................................................... 100
Using a Logic Function in an Expression ..................................................................................... 100
Working with Databases ............................................................................................................. 101
v

LABEL MATRIX Help
Adding a Database .................................................................................................................. 101
Adding a Database Using Advanced Setup.................................................................................. 102
Accessing Database Records..................................................................................................... 102
Sequential Access................................................................................................................. 102
Keyed Access, Primary Key.................................................................................................... 103
Keyed Access, Unlimited Keys ................................................................................................ 103
Reanalyzing Your Database ...................................................................................................... 103
Data Grid ............................................................................................................................... 103
Printing Labels........................................................................................................................... 105
Selecting a Printer................................................................................................................... 105
Print dialog box....................................................................................................................... 105
Printing a Sample Label ........................................................................................................... 106
Printing Labels ........................................................................................................................ 107
Printing Duplicates of Each Label............................................................................................... 107
Command Line Printing............................................................................................................... 109
LMWPRINT Commands............................................................................................................. 109
Using the Standalone Print Engine............................................................................................. 114
LMWPRINT - Entering Print Commands on the Windows Run Line .................................................. 114
LMWPRINT - Entering Print Commands at a DOS Prompt.............................................................. 114
Using the LMWPRINT Icon to Open and Print a File ...................................................................... 114
LMWPRINT - Setting Up a Shortcut to Print a File ........................................................................ 114
Calling LMWPRINT From Another Program (Advanced) ................................................................. 115
Printing Labels Automatically with AutoPrint .................................................................................. 117
About AutoPrint ...................................................................................................................... 117
Prerequisites........................................................................................................................ 117
Polling Frequency ................................................................................................................. 117
Access ................................................................................................................................ 117
vi

Table Of Contents
AutoPrint - Setting Up AutoPrint................................................................................................ 117
AutoPrint - Adding Records to the Source Database..................................................................... 118
Timing ................................................................................................................................ 118
Process ............................................................................................................................... 118
Changing the Polling Frequency ................................................................................................ 119
Using AutoPrint with LMWPRINT................................................................................................ 119
LMWPRINT commands .......................................................................................................... 119
Modifying Printer Code with Job Modifier ....................................................................................... 121
About Job Modifier................................................................................................................... 121
Job Modifier Commands ........................................................................................................... 121
Target Commands ................................................................................................................ 121
Action Commands ................................................................................................................ 122
Allowable Target/Action Combinations..................................................................................... 122
Specific Parameters .............................................................................................................. 122
Adding Instructions to a Job Modifier Script ................................................................................ 123
Examples of Job Modifier Scripts ............................................................................................... 123
Writing Label Data to a Text File .................................................................................................. 125
Writing Label Data to a Text File ............................................................................................... 125
Writing Image Data .............................................................................................................. 125
Writing Variable Data............................................................................................................ 125
Displaying Label Data in Log Viewer .......................................................................................... 125
Frequently Asked Questions ........................................................................................................ 127
General.................................................................................................................................. 127
To find the source of an error or warning................................................................................. 127
Bar Codes .............................................................................................................................. 127
Databases .............................................................................................................................. 128
Printing.................................................................................................................................. 129
vii

LABEL MATRIX Help
Index ....................................................................................................................................... 131
Copyright 2004 Braton Groupe sarl. All rights reserved. TEKLYNX and LABEL MATRIX are trademarks or registered trademarks of Braton Groupe sarl or its affiliated companies. All other brands and product names are the trademarks of their respective owners.
viii

Introduction
This label design software offers a quick and easy way to design and print high quality labels, coupons, tags and forms to your laser, ink-jet, thermal, or thermal transfer printer. This program's wide range of features allows you to create a variety of bar codes, including popular two-dimensional and composite symbologies. In addition to bar codes, you can design labels using graphics, variable-sized text, paragraphs, lines and shapes. Numerous wizards prompt you through each step, from designing your label to adding a database.
Help with Online Help
About the Help Window The Help window is divided into two panes. The navigation pane is on the left and includes three tabs used to select help topics. The right side is the topic pane that displays the topic that was selected in the navigation pane.
If the navigation pane is not visible, click Show. Click Hide to display only the topic pane.
Display Help using the Contents Tab The Contents tab displays books and pages that represent the categories of information in the help system. Click on a book to display the other books and pages it contains. Click on a page to select a topic to view in the right pane.
Display Help using the Index Tab The Index tab displays a list of keywords associated with topics. To open a topic in the right pane associated with a keyword, select the word and click Display.
Display Help using the Search Tab The Search tab is used to search for words and locate topics that contain those words. Enter a word or phrase to search for and click List Topics.
Searching Help If you are unable to find the information you need by selecting topics from the Contents, you can search using the Index or Search tabs.
Use keywords to refine your search
1. In the navigation pane click on the Index tab.
2. In the Type in a keyword to find box, enter a keyword for your search, or select a keyword from the list.
3. Click Display.
Search Help by entering a phrase or question
1. In the navigation pane click on the Search tab.
2. In the Type in a keyword to find box, enter one or more words for your search.
3. Click List Topics.
4. Select the topic, then click Display.
9

LABEL MATRIX Help
Printing a Help Topic 1. From the Contents tab, select a topic so it is displayed in the right-hand pane.
2. From the Help window toolbar, click Print.
3. To print the current topic, select Print the selected topic.
4. To print all topics contained in a book, select Print the selected heading and all subtopics.
5. Select the required print options.
6. Click Print.
10

Installing and Uninstalling the Program
System Requirements The basic software and hardware requirements needed to run the label design software are similar to those of most applications running on Microsoft Windows. You will need:
• IBM-compatible, 486 or higher computer
• Microsoft Windows 95, Windows 98 SE, Windows Me, Windows NT 4.0, Windows 2000 or Windows XP
• 16 MB RAM with Windows 95 (32 MB recommended)
• 32 MB RAM with Windows 998 or Windows Me (64 MB recommended)
• 64 MB RAM with Windows NT 4.0, Windows 2000 or Windows XP (128 MB recommended)
• VGA monitor or better
• Hard drive with at least 50 MB free disk space
• CD-ROM drive
Installing the Label Design Software
Single User Installation Note: To upgrade an existing product, make sure the older version is currently installed on your system and you have the activation code for the upgrade.
1. Insert the CD. The CD's opening screen will appear. (If the CD does not automatically open, go to the Windows Start button / Run… dialog box and type <Drive Letter>:\CDSetup.exe. For example, D:\CDSetup.exe.)
2. On the opening screen of the CD, select the product to install and then click the Run/Install button. The installation wizard will begin to load.
3. The Enter Product Code screen will prompt you for the 25-character activation code provided on the back of your CD envelope or on a paper insert. The code may be entered with or without spaces or dashes. Click the Continue Install button when the code has been entered.
If the Continue Install button does not activate, the activation code is not correct.
4. Continue to follow the installation wizard until the install is complete.
Note: International versions of the software require a security key that must be installed on the PC to run the label design software.
11

LABEL MATRIX Help
Network Installation
Setting Up the Workstations
Note: It is not necessary to set up workstations if you will be running the software as a standalone system.
In this label design software, the number of concurrent users allowed is determined by the number of user licenses installed to the server. Thus, the workstation portion of the program (installed by running Workstation Setup) may be loaded on unlimited systems, but the number of users using the program at one time is limited by the number of user licenses installed.
If you purchased a multiple license version of the program, the user licenses are installed when you install the product from the CD. If you are installing add-on licenses from a disk, simply insert the license disk on the server PC. Run a:\setup.exe from the Windows Start button / Run… dialog box or the Windows Explorer, and follow the prompts to install.
Running Workstation Setup (WSSetup.exe)
Once the files from the CD have been installed to the PC functioning as the server, the server portion of the install is complete. You must now set up each workstation individually.
1. Before running Workstation Setup, ensure that the server is powered on and accessible from the workstations.
2. In order for the Workstation Setup to be able to install the setup files from the shared drive, it must have a mapped drive, not a UNC path, specifying the location of the drive.
To map a drive, right-click on the Network Neighborhood icon on the Windows Desktop and choose the Map a Network Drive… option. Choose a drive letter to use and specify the UNC path to the drive containing the program folder.
3. Specify the correct drive and path to the program folder and WSSetup.exe in the Windows Start button / Run… dialog box, or use Windows Explorer to run WSSetup.exe and follow the prompts.
4. During the installation process you must specify if you want each station to be able to run as a Design and Print station or a Print Only station. (Setting up a station as Print Only will still occupy a license during print jobs.)
5. Finish the wizard to install the files needed for the workstations to be able to run the label design software.
Note: Remember that upgrades are installed to the program folder on the server. Once you have installed the upgrade on the server, WSSetup.exe must then be run again on each workstation to upgrade the workstations.
Uninstalling the Label Design Software To remove the label design software from your PC, do one of the following:
1. From the Windows Control Panel, double-click on Add or Remove Programs.
2. Scroll to locate the label design software, select it, and then click Remove.
Note: Uninstalling will not remove the label design software's main directory as there are databases, labels, and other files that it leaves intact.
12

Exploring the Design Environment
The Menu Bar The Menu bar contains eight drop-down menus: File, Edit, View, Insert, Grid, Tools, Window and Help.
To open a menu
1. Click on a menu with the left mouse button.
2. Click on the command of your choice to select it from the menu.
Note: To access a command using the keyboard, use the hot keys. Press ALT plus the key corresponding to the letter underlined in the menu name or the command name.
Toolbars Select Toolbars from the View menu to select or de-select the toolbars you would like to display on the design screen. The toolbars available include:
Standard Toolbar
Add Image Toolbar
Alignment Toolbar
Image Formatting Toolbar
Status Bar
Errors/Warnings Toolbar
Wizards Wizards are helpful screens that take you through a process step by step, making it easier to understand by giving you hints and answering your questions on the screen. This program features several helpful wizards to make your label-making process as easy as possible.
New Label Wizard
Add Image Wizard
Add Database Wizard
Add Printer Wizard
Combination Wizard
MaxiCode Wizard
UCC/EAN-128 Wizard
13

LABEL MATRIX Help
Keyboard Shortcuts Shortcut keys allow you to preform menu functions using simple keystrokes or "hot keys." Each available shortcut key sequence is shown next to its respective function name in each menu. To execute any hot key function, enter the keystrokes listed next to the desired function.
Key Combination Function
Ctrl + N Create a new file
F3 or Ctrl + O Open a file
F2 or Ctrl + S Save a file
F6 or Ctrl + P Print
Alt + F4 or Alt + X Exit
Shift + Delete or Ctrl + X Cut
Ctrl + Insert or Ctrl + C Copy
Shift + Insert or Ctrl + V Paste
F7 Zoom out
F8 Zoom in
Shift + F4 Redraw the design screen
Alt + T Insert text
Alt + B Insert bar code
Alt + N Insert line
Alt + R Insert Rectangle
Alt + P Insert Picture
Insert Image Wizard
F1 Help
14

Customizing the Design Environment
Modifying Display Settings 1. On the Tools menu, click Setup. The Application Options dialog box appears.
2. Click the View Settings tab and select the appropriate settings.
3. Click the Set Colors tab and use the drop-down lists to set the colors for the design screen area and other design elements.
4. Click the Toolbars tab and select or de-select the toolbars to display on the design screen.
5. Click the Preferences tab and enter the appropriate values.
6. Click the Passwords tab and if desired, set up password-only access to the design screen and other components of the program.
7. Click the Directories tab and specify locations for custom shapes and pick list files.
8. Click OK.
Changing the Interface Language If you are using an International edition of the program, the user interface is available in many different languages and is easily changed.
To change the interface language
1. On the Tools menu, click Set Language. (The Set Language option appears only if you are using an International edition of the program.)
2. Select the desired language and click OK.
Note: Once you click OK, all the menus, commands and screen messages will appear in the selected language. The online Help and the standard Windows dialog boxes such as Open and Save as will remain in English.
Adding Your Own Menu Options Some editions of this program give you the ability to add up to six of your own drop-down menu options so you can quickly call up frequently used utilities like Notepad, Windows Explorer or the Windows calculator. To add your own menu items, enter lines similar to the examples below in the program's .INI file under the [Utilities] section.
[Utilities]
Utility1=c:\windows\notepad.exe,Notepad
Utility2=c:\windows\explorer.exe,Explorer
Utility3=c:\windows\calc.exe,Calculator
Any new menu options you add will appear under the label design software's Tools menu.
15


Creating, Opening, and Saving Labels
New Label Wizard The New Label Wizard takes you step by step through the process of creating a new label. You can specify any or all of the following tasks to be covered by the wizard by selecting them from the first screen of the wizard.
Select a different printer for this design
Change the page size, set up margins, and/or print multiple labels per page
Use information obtained from databases
Print duplicates of each label
Use AutoPrint functionality
To access the New Label Wizard
• Select the Create a new label option from the program's opening screen.
-OR-
• On the File menu, click New.
-OR-
• Click the New button on the Standard Toolbar.
Note: The settings that are covered by the New Label Wizard are also available from the Label Properties tabs, which can be accessed by selecting Label Properties from the File menu.
Opening an Existing Label There are several ways you can open label design files.
To open a label when you start the program
When you first start the program, the opening screen includes an option to Open a recently used label, with a listing of the label design files that have been previously opened.
• If the label's path and file name is displayed on this dialog, you can select it and click OK to open it.
• If the label design is not listed on this screen, select the Find an existing label option and navigate to the drive/folder where the label design file is located and double-click to open it.
• You can also create a shortcut on your Windows Desktop to the label design file and double-click the icon to open it. Or, from the Windows Explorer, open the folder that contains the file and double-click to open it.
17

LABEL MATRIX Help
To open a label after starting the program
Tip: The last four most recently opened labels are listed near the bottom of the File menu for easy access. As a shortcut, you can open any of these label files by selecting them from this menu.
1. On the File menu, click Open. Alternatively, you can click Open on the Standard Toolbar.
2. Navigate to the drive/folder where the label design file is located and double-click to select it.
Converting Old Label Files Depending on the edition of the software you are using and the version of the software used to create your old design files, you may be able to open your previously created label designs in this version.
Note: Be sure to back up (or copy to a new filename) any files that you want to use from an older version of this program, because you cannot change them back once they are converted. When the files are saved in this version of the program, they will be completely converted.
To convert old design files
1. Make a backup copy the old design file in case you need to go back to the original design. Keep this copy until you are sure you no longer need the original.
2. Create a new label design by selecting New from the File menu and following the New Label Wizard screens.
3. Once your label size, margins, etc. have been set up, select Design File from the Insert menu.
4. Select the name of the file you wish to convert and click OK. The label format will be inserted into the new label.
5. Save the label under a new filename.
Note that text, graphics, and bar codes may appear out of place or distorted as a result of the conversion process. In addition, yellow warning or red error lights may display on the label. The most common reasons for these errors and warnings are as follows:
• Font tables may have changed between products or printers
• Printer-specific options may have changed
• Printer drivers may have been redesigned (a printer firmware issue)
• The newer version of the program may not support the older printer firmware
• Bar codes may need to be re-adjusted (densities in particular)
• Database information may not be recognized in the newer version of the program because older databases (.DBF files) were written in dBase II format and need to be converted to a dBase III or dBase IV format file
• Newer ASCII text files used as databases are handled differently so they will need to be reanalyzed and the image variable references will need to be changed
18

Creating, Opening, and Saving Labels
Importing a Label File The Insert Design File command allows you to merge an existing label design into the current label design. This option is often used to bring older label design files into a newer version of the program.
To import an existing design file into your current label design
1. On the Insert menu, click Design File.
2. Select the name of the design file to be merged and click OK.
The selected design file will be merged into the current design. (Only images are merged, any label properties are ignored).
Saving a Label The Save command saves changes made to the current label. If the label has not been saved, the program displays the Save As dialog box for you to select a file location and name the label.
To save a new label design
1. On the File menu, click Save. Alternatively, you can click Save on the Standard Toolbar.
2. On the Save As dialog box, browse to the folder where the file will be saved.
3. Enter a file name for the label design.
4. Click Save.
Note: This program provides full read/write compatibility with label design files (QDF) created in previous versions of the software (sometimes referred to as "backwards compatibility"). To save your label in a format that can be read by older versions of the program, select the appropriate file version from the Save as Type drop-down list located on the Save As dialog box.
19


Label Properties
Label Properties The Label Properties dialog box allows you to define the page setup for your label. This includes defining the page size, margins, labels per page, default printer, and a description of the label. You can also use the Label Properties dialog box to access and modify images and variables associated with the label.
The Label Properties dialog box includes the following tabs:
General
Printer
Page Size
Margins
Multiple
Database
Counter
Keyboard
Duplicates
Job Modifier
Security
Write Data
AutoPrint
RFID Tag
To access the Label Properties tabs
• On the File menu, click Label Properties
-OR-
• Click the Label Properties button on the Standard Toolbar
-OR-
• Double-click anywhere within the white space (blank area) of the label design window
General tab - Label Properties
To access this tab: On the File menu, click Label Properties. Then click the General tab.
Description: Allows you to assign a description to your label (optional). The label description will appear on the File/Open dialog if you have selected the Enable Description check box on this dialog. It may be particularly useful to display a label description here if you have many similar labels to choose from when opening a label.
21

LABEL MATRIX Help
Printer tab
To access this tab: On the File menu, click Label Properties. Then click the Printer tab.
The Printer tab allows you to select and set up the printer to be used with the current label design file.
Default Printer: The printer to which this label normally prints. Your labels will automatically print to the default printer unless you select a different specific printer.
If you plan to print to a different printer only on occasion, keep your default printer the same and select a specific printer for this label design. If you plan to print most of your labels to a printer other than what is shown as the default printer, you will want to change your default printer.
Specific Printer: Allows you to select a different printer (other than the default printer) to print the label. If you assign a specific printer and save the label, the label will use this printer until you change it back to the default printer and save the label.
Add: Allows you to install a printer driver. If you would like to select a printer other than those appearing in the Specific Printer drop-list, you will need to install it by clicking the Add button and following the Add Printer Wizard steps.
Setup: Allows you to set printer specific options such as stock type, speed, etc. The options that appear will vary depending on the printer selected.
Note: Although your label design is not tied to a certain type of printer, slight changes may occur in your design if you switch printers.
Page Size tab
To access this tab: On the File menu, click Label Properties. Then click the Page Size tab.
The Page Size tab includes the following label setup options.
Height and Width: The Height and Width settings determine the LABEL height and width if you are printing to a thermal printer. These settings determine the PAGE height and width if you are printing to a laser, ink-jet or dot matrix printer. (If you are printing multiple labels across a page, the width is measured from the left edge of the left-most label to the right edge of the right-most label.)
Form: There are many different label forms (sometimes called "templates") provided in the program, including labels for everything from ID badges to shipping labels to inventory shelf tags. When you choose a pre-formatted form, the page size, margins, label size and number of labels per page are all set for you automatically. If you do not know the number that corresponds with the form type you are looking for, you can click on any label form in the list and a preview of the label layout will appear in the Sample box.
Save As: If you have created a label layout with setup values you plan to use often, you can save that label setup as your own customized form. Once you have specified all label setup settings, click the Save As form button. The next time you create a new label, select your form from the Form drop-list and the label layout will be set up for you automatically.
Remove: Allows you to remove a previously saved form.
Sample: Provides sample text that displays and updates as you select different settings on this tab.
22
Label Properties
Margins tab
To access this tab: On the File menu, click Label Properties. Then click the Margins tab.
The Margins tab includes the following label setup options.
Left, Right, Top and Bottom: These setting determine the margin widths and heights for your label design.
Form: There are many different label forms (sometimes called "templates") provided in the program, including labels for everything from ID badges to shipping labels to inventory shelf tags. When you choose a pre-formatted form, the page size, margins, label size and number of labels per page are all set for you automatically. If you do not know the number that corresponds with the form type you are looking for, you can click on any label form in the list and a preview of the label layout will appear in the Sample box.
Save As: If you have created a label layout with setup values you plan to use often, you can save that label setup as your own customized form. Once you have specified all label setup settings, click the Save As form button. The next time you create a new label, select your form from the Form drop-list and the label layout will be set up for you automatically.
Remove: Allows you to remove a previously saved form.
Sample: Provides sample text that displays and updates as you select different settings on this tab.
Multiple tab
To access this tab: On the File menu, click Label Properties. Then click the Multiple tab.
The Multiple tab includes the following label setup options for printing multiple labels per page.
Quantity: Enter values for the Across and Down settings to set the number of labels to print across and down on each page of labels when printing multiple labels per page.
Label Size: Enter values for the Width and Height settings to set the size of an individual label.
Start at: These settings determine the corner of the page from which to start printing (top-left, top-right, bottom-left or bottom-right) and the direction to move on the page when printing the labels. More...
The start at point and direction you specify affect how the labels are numbered on the page. For example, if you have three labels across and you start at the top-left and go right, then the top-left label will be label 1 and the top-right label will be label 3. Conversely, if you have three labels across and three down and you start at the top-right and go down, the top-right label will be label 1 and the bottom-right label will be label 3.
You can also specify the exact label at which to start printing by setting the Start On Label option, available on the Print dialog box when you are printing multiple labels per page.
Stack Printing: When printing multiple labels per page, the standard printing order is to print labels from left to right and then top to bottom to fill the page. With Stack Printing enabled, the printing order is changed so that when printing is complete, you can cut between labels on a stack of printed pages and have a resulting "stack of labels" that is in order and ready to use. More...
The stacked printing functionality is best illustrated using an example of an incrementing counter value being printed on a label. Typically, when printing multiple labels per page the counter value would increment on each label as it is printed across the page. When the page is full, the next counter value begins on the following page, and this continues to the end of the print job.
23

LABEL MATRIX Help
With Stack Printing enabled, this standard label printing order is altered to count based on the labels in a "stack" instead of the number across the page. This results in the counter value 1 printing on the first label like normal, but counter value 2 is printed on page 2 (instead of page 1 as it would with a standard print order). The counter value 2 will print in the same location (e.g., top left corner) on page 2 as counter value 1 is printed on page 1. The height of the stack is determined based on the number of labels per page and the number of labels requested.
Page Standard
(Non-Stack) Stack
1 1, 2, 3 1, 4, 7
2 4, 5, 6 2, 5, 8
3 7, 8, 9 3, 6, 9
When printing is complete, you can cut between labels on a stack of printed pages and have a resulting "stack of labels" with the counter values incrementing in order from top to bottom in the stack.
Form: There are many different label forms (sometimes called "templates") provided in the program, including labels for everything from ID badges to shipping labels to inventory shelf tags. When you choose a pre-formatted form, the page size, margins, label size and number of labels per page are all set for you automatically. If you do not know the number that corresponds with the form type you are looking for, you can click on any label form in the list and a preview of the label layout will appear in the Sample box.
Save As: If you have created a label layout with setup values you plan to use often, you can save that label setup as your own customized form. Once you have specified all label setup settings, click the Save As form button. The next time you create a new label, select your form from the Form drop-list and the label layout will be set up for you automatically.
Remove: Allows you to remove a previously saved form.
Sample: Provides a sample page layout that displays and updates as you select different settings on this tab.
Database tab
To access this tab: On the File menu, click Label Properties. Then click the Database tab.
The Database tab of the Label Properties dialog box displays for each attached database the name of the database, its location, and the number of fields and records in the database.
The Database tab includes the following options.
Add: Launches the Add Database Wizard. Use this wizard to attach a database to the label.
Remove: Displays a prompt asking you to confirm the deletion of the database that is highlighted in the list. Click Yes to detach the database from the label. (Note: If text or bar code images were created using the database file as the data origin, then those images will display with errors on the design screen.)
Properties: Displays the Database Properties dialog box, which includes the following tabs:
General tab - Allows you to change the name and description used to identify this database file within the label design program.
24

Label Properties
Fields tab - Allows you to access (and modify) the properties of fields in the selected database. To view or change the properties for a given field, select the field and click the Properties button on the Fields tab. The Field Properties dialog box that displays allows you to change the sample record that displays while you are designing the label, as well as change the minimum and maximum field length settings.
Access tab - Allows you to set up a field in the database as the key field or change/remove any key fields you have already set up for the selected database.
Reanalyze: Analyzes the selected database for the total number of records and for the field property information. You may need to reanalyze your database if the location, filename, field structure or number of fields has changed.
Counter Tab
To access this tab: On the File menu, click Label Properties. Then click the Counter tab.
The Counter tab of the Label Properties dialog box displays a list of the counters that have been set up for your label. Using the buttons on this tab you can add counters, remove counters, and view/change the properties of a counter.
The Counter tab includes the following options:
Add: Displays the Counter tab of the Variable Properties dialog box. Use this tab to add a counter to the label.
Remove: Displays a prompt asking you to confirm the deletion of the counter that is highlighted in the list. Click Yes to delete the counter from the label.
Properties: Displays the Variable Properties dialog box, which allows you to modify the selected counter variable using the following tabs:
General tab - Allows you to change the name and description used to identify the selected counter variable within the label design program.
Counter tab - Allows you to change the properties of the selected counter variable.
Keyboard tab - Allows you to set up the selected counter variable as a "verified counter" value, wherein the counter start value is entered at a keyboard prompt at print time.
Keyboard tab
To access this tab: On the File menu, click Label Properties. Then click the Keyboard tab.
The Keyboard tab of the Label Properties dialog box displays a list of the keyboard input prompts associated with the label. The prompts appear in the order they are asked when the operator prints the label.
The Keyboard tab includes the following options:
Add: Displays the Keyboard tab of the Variable Properties dialog box. Use this tab to add a keyboard input variable to the label.
Remove: Displays a prompt asking you to confirm the deletion of the keyboard input variable that is highlighted in the list. Click Yes to delete the prompt from the label.
25

LABEL MATRIX Help
Properties: Displays the Variable Properties dialog box, which allows you to modify the selected keyboard input variable using the following tabs:
General tab - Allows you to change the name and description used to identify the selected keyboard input variable within the label design program.
Keyboard tab - Allows you to change the properties of the selected keyboard input variable.
Counter tab - Allows you to set up the selected keyboard input variable as a "verified counter", wherein a counter start value is entered at a keyboard prompt at print time.
You can also use the and buttons on this tab to change the order of the keyboard input prompts.
Duplicates tab
To access this tab: On the File menu, click Label Properties. Then click the Duplicates tab.
The Duplicates tab allows you to define the number of duplicate labels to print. The number of duplicates will be in effect each time you print your label. The duplicate value (number of duplicate labels to print) can be set up as a constant or variable value using one of the available origins. Depending on the origin selected, different properties appear on this tab.
Set up the number of duplicates with one of these origins:
• Constant: The number of duplicates is entered here (on the Duplicates tab), and that value will stay the same for every print job. The default is 1, meaning only one label will be printed.
• Database: The number of duplicates is extracted from a field in a database.
• Keyboard Input: The operator is prompted for the number of duplicates at print time.
• Combination: The number of duplicates is the result of an expression, which can be written using math, string or logic functions applied to keyboard, counter or database variables using the Combination origin. (Note: This origin is not available in all editions of the program.)
• Copy: Copies an existing variable or image and uses its data origin to determine the number of duplicates to print.
Note: The duplicate value includes the original. For example, set the duplicate value to 2 if you want to print an original and one copy.
Job Modifier tab
To access this tab: On the File menu, click Label Properties. Then click the Job Modifier tab.
The Job Modifier tab includes options used to add instructions to a Job Modifier script.
Enable Job Modifier: Click this check box to enable the Job Modifier functionality for the current label design. Then select a .jms file from the drop-down list of existing scripts and click OK to apply the selected Job Modifier file to the current label design.
New: Opens the Job Modifier dialog box, which allows you to create a new script file.
Edit: Allows you to edit the selected script file and, if desired, save the script to a new or the same file name.
26

Label Properties
Delete: Deletes the currently selected script file from the list and from its directory location.
Security tab
To access this tab: On the File menu, click Label Properties. Then click the Security tab.
The Security tab options allow you to place password protection on the currently open label design file.
Enable Design Security: If password security is enabled, the user will be prompted to enter a password upon opening the label. If the user does not enter the correct password, the user will not be allowed to modify the label in any way.
Require Design Password to Print: Select this option if you want to require users to enter a password in order to print. (The user will be prompted to enter a password upon opening the label.)
Note: A password will also be required to insert a password protected label design into the currently open label (using the Insert menu Design File option).
Write Data tab
To access this tab: On the File menu, click Label Properties. Then click the Write Data tab.
Enable Writing Image Data to a File: Allows you to select a file and set up preferences for saving data associated with the objects on your label to a text file. Image data includes the name of the objects on the label, and the value of each object. The value may be populated by a constant or variable origin.
File Name: Displays the Open dialog box for you to browse to and select (or name) the file to which you want to write data for this label. Once you select a file, its path appears in the File Name text box. Note:The text file does not have to exist but you must designate a path name and file name. If the file does not exist, it is created at print time. (You can read these data files using a simple text editor, such as NotePad, or the label design software's Log Viewer tool.
Append to existing file: Adds the most recent print data to the file without deleting existing data that was generated from previous print jobs. If you clear this check box, then when you print this label, the data file is overwritten with the current print information.
Constant data too: Adds the name and value of objects that are populated by a constant origin. If you clear this check box, then data for objects that have a constant origin are not written to the text file.
Write date/time to the file: Adds to the text file the date and time that the label was printed. You will see both the field name (“Date” and “Time”) and the value (in the currently selected time format). This data is useful for tracking print activity. If you clear this check box, the date and time will not appear in the text file.
Write the user name to the file if used: If you are required to enter a user name and password when you launch the label design software, then your user name is written to the text file for the label. If you clear this check box, the user name is not written to the text file.
Enable Writing Variable Data to a File: Allows you to select a file and set up preferences for saving the variable data associated with your label to a text file. Variable data includes the names of the variables (not the objects) used in the label, and the value of each. All the variables are listed separately. For combination origins, each variable is written to the file, not just the value that is the result of the expression.
Also, all variables are included regardless of whether they are used by an object. For example, if you use a field from an attached database, the entire record appears in the data file, not just the field used in the label.
27
LABEL MATRIX Help
AutoPrint tab
To access this tab: On the File menu, click Label Properties. Then click the AutoPrint tab.
The AutoPrint feature enables you to print labels based on data that is constantly changing. It allows the automation of print jobs where data files are sent from a mainframe or an accounting or manufacturing process. AutoPrint seeks the data when available, prints, and then deletes the current file in anticipation of the next batch of data to come.
Enable AutoPrint: Click this check box to enable AutoPrint functionality for the selected database file. Note that the AutoPrint feature may only be used with one dBase or ASCII file that has been set up with sequential access. The data file you select must be a database that can be deleted as this file WILL BE DELETED after all records in that database are printed.
Advanced: Click the Advanced button to set the polling frequency and/or set the amount of time you will allow AutoPrint to sit idle before shutting down.
RFID Tag tab
To access this tab: On the File menu, click Label Properties. Then click the RFID Tag tab (available only if you are using the high-end edition of the label design software AND you have installed and selected a printer driver that supports printing to RFID tags).
The RFID Tag tab allows you to select a Radio Frequency Identification (RFID) transponder type, write protect the label, and set the starting block. The options available on this tab depend on the printer and transponder stock type selected.
Stock: Select an RFID transponder stock type. The stock types available depend on the selected printer.
Start Block: The block in which to start writing data to the tag. (Note: Depending on the stock type, certain blocks may be reserved for manufacturer's information.)
# Retries: The number of times to attempt writing data to the tag.
Write Protect: Once the data is written to the tag, it can no longer be modified or updated.
Origin: Select one of the following origins for the data to be written to the tag.
• Constant: The data is entered in the Text box on this tab.
• Database: The data is extracted from a field in a database.
• Keyboard Input: The operator is prompted for the data at print time.
• Combination: The data is the result of an expression, which can be written using math, string or logic functions applied to keyboard, counter or database variables using the Combination origin.
• Copy: Copies an existing variable or image and uses its data origin to determine the data to print.
Note: The data encoded in the tag will not visibly appear on the printed label. If you want the encoded data to also print on the label, you will need to copy the data and add it as a separate image.
28

Data Origins
About Data Origins A data origin (or data source) must be specified for all image data and variable data used to create text, paragraphs, and bar codes. The data origin is selected from the image's Data tab.
The available data origin choices include:
Constant: The information does not change from label to label.
Database: The information comes from a data file record and so it changes from label to label (variable data).
Keyboard Input: The operator is prompted for the information at print time, so different information could be entered for each label (variable data).
Counter: The information increments (counts up) or decrements (counts down) for each label, so the value changes from label to label (variable data).
Copy: The information is copied from another variable image.
Combination: Allows you to build an image by using other images already placed on a label or by creating additional variable data pieces.
Date: Stamps the print date on the label (or a different date, depending on the date format you specify).
Time: Stamps the print time on the label (or a different time, depending on the time format you specify).
Data Origin - Constant Data with a Constant data origin remains the same on every label. For example, you would want to use the Constant data origin if you are creating a basic company label containing both a Ship From Address (your company's address) and a Ship To Address. In this case, your company's address should be given a Constant data origin, because it's going to remain the same on every label printed. (The Ship To Address, however, would not work well with a Constant data origin, because you would have to delete it and add a new address for each label.)
Constant is the default data origin.
To set up an image with a Constant origin
1. Add a text or bar code image by clicking on the appropriate button at the left side of the screen (or select one of these images from the Insert menu).
2. Click on the Data tab and then select Constant from the Origin drop-down list.
3. Enter the image data in the Text box provided on the Data tab.
Data Origin - Database The Database data origin allows you to retrieve information from databases and set up that data to print on your labels. Basically, it connects a text or bar code image on the label with a field in your database. You must specify the data file to read and the field from which to print.
To set up an image with a database origin
1. Add a text or bar code image by clicking on the appropriate button at the left side of the screen (or select one of these images from the Insert menu).
29

LABEL MATRIX Help
2. Click on the Data tab and then select Database from the Origin drop-down list.
3. Click the Add button to start the Add Database Wizard and follow the screens through the process of adding a database.
Data Origin - Keyboard Input The Keyboard Input data origin allows you to prompt the operator (person printing the labels) to key in information at print time. For example, if your company ships six boxes of product per day, and you want to print shipping labels for each box. The boxes go to different stores with various addresses, but each one can use the same basic label design. Can the label design stay the same and the data change? Yes, by setting up the store address variable with a Keyboard Input data origin.
To set up an image with a Keyboard Input origin
1. Add a text or bar code image by clicking on the appropriate button at the left side of the screen (or select one of these images from the Insert menu).
2. Click on the Data tab and then select Keyboard Input from the Origin drop-down list.
3. Set the Keyboard properties now appearing on the Data tab.
4. When you have finished choosing properties for the Keyboard Input image, click the OK button to have the image placed at the location you have specified in the Position tab, or click the Place button to place the image on the label using the mouse.
Data Origin - Counter The Counter data origin enables you to add or subtract from the start value you enter by an amount you specify. You can specify that the count be unique for each set of labels, or that the count occur when labels are duplicated. Incrementing and decrementing on duplicate labels gives you the advantage of changing the Counter value while all Keyboard Input and data file values remain the same. The Counter data origin is used to create serial numbers, shelf numbers, inventory numbers, and other incrementing values commonly used on labels.
To set up an image with a Counter origin
1. Add a text or bar code image by clicking on the appropriate button at the left side of the screen (or select one of these images from the Insert menu).
2. Click on the Data tab and then select Counter from the Origin drop-down list.
3. Set the Counter properties now appearing on the Data tab.
4. When you have finished choosing properties for the Counter, click the OK button to have the image placed at the location you have specified in the Position tab, or click the Place button to place the image on the label using the mouse.
Data Origin - Copy The Copy data origin is useful if you want to use identical pieces of information in more than one place on a label. With a Copy origin, several pieces of text or bar code data can use the same variable or image data. Simply select an existing object to copy, and you'll have an exact duplicate of that value to use elsewhere on the label.
To set up an image with a Copy origin
1. Add a text or bar code image by clicking on the appropriate button at the left side of the screen (or select one of these images from the Insert menu).
30

Data Origins
2. Click on the Data tab and then select Copy from the Origin drop-down list.
3. Select either Variables or Images, depending the object you want to copy.
4. From the list that appears, select the object to copy.
Data Origin - Combination Some editions of the program feature a Combination data origin that allows you to set up text or bar code images in a variety of ways. The Combination origin allows you to create one image by combining several variable images (like Keyboard, Counter or Database origin images) from the label design. You can also set up calculations and use functions to formulate data from those variable images. Combination images are based on "expressions" which are entered on the Combination properties screen.
To combine several images into one Combination image using the Combination Wizard
1. Specify Combination as the image origin type from the Data tab.
2. Click the Use Wizard button on this screen to let the Combination Wizard guide you through the setup. The Combination Wizard steps you through the process of adding a combined image to your label; it helps you build an expression. As long as the Add another data origin to combined image option is checked, you can select and set up data origins to add to the expression.
3. When you are finished building your expression, de-select the Add another... option to gray out all choices and click Next to view your completed expression. If you decide at this point that you want to change any part of the expression, click the Back button located at the bottom of the dialog to go back and make changes.
Note: The Combination Wizard can help you combine other images into one Combination image, but it does not allow you to add functions to your expression.
To use bar code, string, math or logic functions in your Combination expression, you can either use the Other button on the Combination properties screen or you can type your expression directly into the Expression box.
Data Origin - Date The Date data origin allows you to print the date on the label. Days may be added to or subtracted from the current date for uses such as an expiration date for perishable goods, or for an estimated start date.
The Format drop-down list allows you to choose a date setting from one of the commonly used formats listed. You can also select any commonly used format and then overwrite (or customize) the format with your chosen settings based on the table of options below.
Date Setting Output Description
D$ SUNDAY uppercase day of week (DOW)
d$ Sunday upper/lowercase DOW
DD$ SU 2 char uppercase DOW
dd$ Su 2 char upper/lowercase DOW
31

LABEL MATRIX Help
(2 to 30 chars available)
DDDDDDDDDDD$ SUNDAY 11 char DOW (5 trailing spaces)
ddddddddddd$ Sunday 11 char DOW (5 trailing spaces)
D and d 1 date of month (non lead zero)
DD 01 2 char date of month (lead zero)
dd 1 2 char date of month (lead space)
DDD 224 days from begin of year (lead zero)
ddd 224 days from begin of year (lead space)
DDDDD and ddddd 33482 days from 1/1/1900
(5 to 9 chars available)
W and w 1 day of week (Sun=1, Sat=7)
WW 34 weeks from begin of year (lead zero)
ww 34 weeks from begin of year (lead space)
WWW and www 783 weeks from 1/1/1900 (last 3 digits)
WWWW and wwww 4783 weeks from 1/1/1900
(4 to 9 chars available)
WWWWWWWWW 000004783 weeks from 1/1/1900 (lead zero)
wwwwwwwww 4783 weeks from 1/1/1900 (lead space)
M$ SEPTEMBER uppercase month
m$ September upper/lowercase month
MM$ SE 2 char uppercase month
mm$ Se 2 char upper/lowercase month
(2 to 30 chars available)
MMMMMMMMMMM$ SEPTEMBER 11 char month (2 trailing spaces)
32

Data Origins
mmmmmmmmmmm$ September 11 char month (2 trailing spaces)
M and m 9 month digit (non lead zero)
MM 09 2 char month digit (lead zero)
mm 9 2 char month digit (lead space)
MMM 009 3 char month digit (lead zero)
mmm 9 3 char month digit (lead space)
MMMM and mmmm 1101 months since 1/1/1900
MMMMM 01101 5 char months from 1900 (lead zero)
mmmmm 1101 5 char months from 1900 (lead space)
(5 to 9 chars available)
MMMMMMMMM 000001101 9 char months from 1900 (lead zero)
mmmmmmmmm 1101 9 char months from 1900 (lead space)
YY and yy 91 2 digit year
Y and y 1991 full year
YYY and yyy 991 last 3 digits of year
(3 to 9 chars available)
YYYYYYYYY 000001991 full year (leading zero)
yyyyyyyyy 1991 full year (leading space)
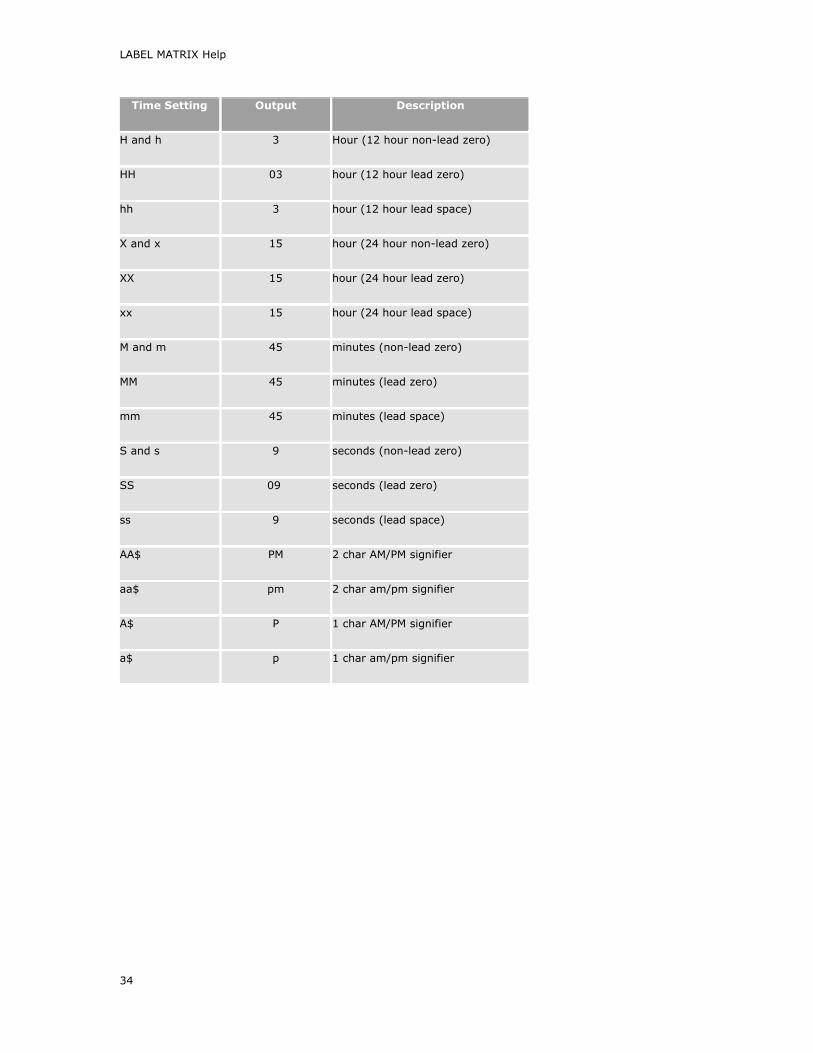
Data Origin - Time The Time data origin allows you to print the time of printing on the label.
The Format drop-down list allows you to choose a time setting from one of the commonly used formats listed. You can also select any format and then overwrite (or customize) the format with your chosen settings based on the table of options below.
33
LABEL MATRIX Help
Time Setting Output Description
H and h 3 Hour (12 hour non-lead zero)
HH 03 hour (12 hour lead zero)
hh 3 hour (12 hour lead space)
X and x 15 hour (24 hour non-lead zero)
XX 15 hour (24 hour lead zero)
xx 15 hour (24 hour lead space)
M and m 45 minutes (non-lead zero)
MM 45 minutes (lead zero)
mm 45 minutes (lead space)
S and s 9 seconds (non-lead zero)
SS 09 seconds (lead zero)
ss 9 seconds (lead space)
AA$ PM 2 char AM/PM signifier
aa$ pm 2 char am/pm signifier
A$ P 1 char AM/PM signifier
a$ p 1 char am/pm signifier
34
Text & Paragraphs
Adding Text 1. Do one of the following:
• On the Insert menu, click Text.
-OR-
• Click Add Text on the Add Image Toolbar.
3. From the Origin drop-down list, select the data origin appropriate for your text. Depending on the origin selected, different properties will appear.
4. If desired, change other text properties such as font, color, and position.
5. When you have finished setting properties for your text, you can click OK to have the text placed at the position you have specified or click Place to place the text using the mouse.
Adding Reversed Text 1. Add a text image to your label.
2. On the Text Properties Color tab, select black for the background color and white for the foreground color.
Note: On some printers a background (or filled rectangle) must also be added to print reversed text. Simply add a rectangle and check the Filled option. Then proceed to add the reverse image.
Text Properties This program gives you a wide variety of options for text creation, formatting, and placement. These options are set using the following Text Properties tabs:
Data tab
Font tab
Color tab
Position tab
General tab
To access the Text Properties tabs
• For an existing text image, double-click on the image.
• For a new text image, click the Add Text button or select the Text option from the Insert menu.
Adding a Paragraph 1. Do one of the following:
• On the Insert menu, click Paragraph.
35

LABEL MATRIX Help
-OR-
• Click Add Paragraph on the Add Image Toolbar.
3. From the Origin drop-down list, select the data origin appropriate for your text. Depending on the origin selected, different properties will appear.
4. If desired, change other paragraph properties such as font, color, position and text wrapping.
5. When you have finished choosing properties for your paragraph, you can click OK to have the paragraph placed at the position you have specified or click Place to place the paragraph using the mouse.
Note: If there are too many lines of text to fit in the paragraph area you defined, the lines outside the area are not printed. To adjust the paragraph so all of your lines of text fit, you can reduce the font size or increase the rectangular area size by clicking on an image handle and dragging it to make the area larger.
Paragraph Properties This program gives you a wide variety of options for paragraph creation, formatting, and placement. These options are set using the following Paragraph Properties tabs:
Data tab
Font tab
Color tab
Position tab
General tab
PowerWrap tab
To access the Paragraph Properties tabs
• For an existing paragraph image, double-click on the image.
• For a new paragraph image, select Paragraph from the Insert menu. Alternatively, you can
click Add Paragraph on the Add Image Toolbar.
Using the RTF Editor The program's RTF (Rich Text Format) Editor allows you to create, edit and save RTF files within the program. The RTF Editor allows you to select Windows fonts and/or thermal printer fonts (only attributes supported by the given font will be allowed). You can also format text using the Bold, Underline, Italic, Superscript, Subscript, Font, Text Color, and Background Color options available in the RTF Editor's Font menu. This powerful formatting ability is well-suited for nutrition labels, food product labels, chemical and safety warning labels, etc.
Note: If desired, you can cut, copy and paste data between the RTF Editor and other Windows applications. (The format of the data is dependent on the abilities of the receiving Windows application and how it accepts data from the clipboard.) This ability can save you significant time if, for example, your label text already exists in a Microsoft Word document. To add that text to your label, save the text as an .RTF file in Word and then you can open and edit the text in the RTF Editor.
To add an RTF-enabled image to the label
1. Add a paragraph image with a Constant or Combination data origin.
36

Text & Paragraphs
2. On the Paragraph Properties Data tab, click the Enable Rich Text Format check box and then click the Edit RTF button.
3. Now in the RTF Editor, type the desired text and format it using the options in the RTF Editor's Font menu.
4. When finished, select Exit from the RTF Editor's File menu and click Yes when asked whether to save the text.
5. Now back on the Data tab, the formatted RTF text will appear in the Sample box and the source text with its hidden RTF codes will appear in the Text box. Click OK or Place to add the formatted text to the label.
To edit an RTF-enabled image
1. Double-click on the image and click the Edit RTF button on the Data tab to open the RTF Editor.
2. Edit the text as desired using the options in the RTF Editor's Font menu.
Note: When entering the RTF Editor from the Data tab you will be limited to editing the selected text image (you must select RTF Editor from the Tools menu in order to create, open, and save other RTF files).
37


Bar Codes
Bar Code Types The type of bar code you choose depends on the kind of information you want encoded, the printing space available, the degree of readability needed, and the scanning equipment you use. If you are designing compliance labels, the label specification should indicate the type of bar code required for the application.
Note: Not all printers support all bar code types. This program will print all bar codes no matter the printer type, however if a printer does not support a particular bar code that bar code will be sent to the printer as a graphic (which may significantly slow down printing).
The following tables show the available bar codes and a summary of the information each can encode.
† U=Uppercase, L=Lowercase, D=Digits, C=Control Characters
†† Based on a .010 inch print head dot (100 dpi) and no ink spread
Linear Bar Code Type
Input Length
Encodes †
Elements per Character
Characters per Inch ††
Codabar 2 to 50 D 11 9
Code 39 (3 of 9) 2 to 50 U-D 15 6.7
Extended 39 2 to 50 U-L-D-C 30 3.3
Code 93 2 to 50 U-D 9 11
Extended 93 2 to 50 U-L-D-C 18 5.6
Code 128 Auto 2 to 50 U-L-D-C 11 9
Code 128 A 2 to 50 U-D-C 11 9
Code 128 B 2 to 50 U-L-D 11 9
Code 128 C 2 to 50 D 5.5 18
EAN/JAN-13 12, 14 or 17 D 7 14
EAN/JAN-8 7, 9 or 12 D 7 14
HIBC 2 to 50 U-D 15 6.7
Interleaved 2 of 5 2 to 50 D 9 11
39

LABEL MATRIX Help
MSI Plessey 2 to 50 D 12 8
UCC-128 19 D 5.5 18
UPC-A 11, 13 or 16 D 7 14
UPC-E1 (6 digit) 6, 8 or 11 D 4 25
UPC-E (11 digit) 11, 13 or 16 D 4 25
UPC-E0 (6 digit) 6, 8 or 11 D 4 25
Zip+4 POSTNET 5, 9 or 11 D 5 4.2
PLANET Code 12 (11 plus a check digit)
D 5 4.2
2D Bar Code Type
Input Length Encodes † Elements per Character
Characters per Inch ††
Aztec 2 to 3067 Chars
2 to 3832 Digits
U-L-D-C NA NA
Aztec Mesa 2 to 854 Chars
2 to 1066 Digits
U-L-D-C NA NA
Code 16K Auto 7 to 154 U-L-D-C 11 9
Code 16K A 7 to 77 U-D-C 11 9
Code 16K B 7 to 77 U-L-D 11 9
Code 16K C 14 to 154 D 5.5 18
Code 49 9 to 81 U-L-D-C 16 6.2
Data Matrix 1 to 500 U-L-D-C NA NA
EAN/UCC-128 Composite – A
Linear up to 48
Composite up to 338
U-L-D
(Composite)
NA NA
40

Bar Codes
EAN/UCC-128 Composite - C
Linear up to 48
Composite up to 2361
U-L-D
(Composite)
NA NA
EAN/UPC Composite
Linear up to 12
Composite up to 338
U-L-D
(Composite)
NA NA
MicroPDF417 2 to 250 alphanumeric, 2 to
366 numeric
U-L-D-C NA NA
PDF 417 up to 2000 U-L-D-C 4 up to 500
QR Code 7366 numeric U-L-D NA NA
RSS-14 Composite Linear up to 13
Composite up to 338
U-L-D
(Composite)
NA NA
TLC39 Linear 6
Composite 2 to 250 alphanumeric, 2 to 366 numeric
D NA NA
UPS MaxiCode 15 to 99 U-D NA NA
Adding a Bar Code You can follow the steps below to add a bar code to your label design (with the exception of the UCC/EAN-128 bar code, which has a special wizard to help you).
To add a bar code to your label design
1. Do one of the following:
• On the Insert menu, click Bar Code.
-OR-
• Click Add Bar Code on the Add Image Toolbar.
2. From the Origin drop-down list, select the data origin appropriate for your bar code. Depending on the origin selected, different properties will appear.
3. Once you have set up the data to be used for your bar code, click on the Bar Code tab. Choose a bar code type from the Type drop-down list. The settings that appear on this screen will vary depending on the bar code type you select.
41

LABEL MATRIX Help
4. If desired, change other image properties using the Font, Color and Position tabs.
5. When you have finished setting properties for your bar code, you can place it on the label by clicking the Place button and positioning it using the mouse OR click OK to have the program place the bar code on the label according to the settings specified on the Position tab.
Note: Many variables (printer, scanning equipment, etc.) affect how well each bar code symbology works. For best results, always check to ensure you have the latest specifications and requirements for any symbology. It is also recommended to seek the support of all parties involved with the label's use (shipper, receiver, carrier), as each may have their own requirements.
Bar Code tab
To access this tab: Add a bar code or edit an existing bar code. Then click the Bar Code tab.
The settings on the Bar Code tab allow you to select a bar code type and configure its settings to fit your application.
Note: The settings that display on this tab depend on the type of bar code symbology selected. For information on bar code-specific settings, see the topic pertaining to the particular bar code type.
Type: Allows you to choose from many types of bar codes that can be added to your label design.
Note: Many variables (paper stock, printer, scanning equipment, etc.) affect how well each bar code symbology works. For best results, always check to ensure you have the latest specifications and requirements for any symbology. It is also recommended to seek the support of all parties involved with the label's use (shipper, receiver, carrier), as each may have their own requirements.
Height: Determines the height of your bar code image in inches or centimeters, with accuracy to 0.001 inch or centimeter (rounded at print time to your printer's dots per inch).
Density: Enter your own density setting or choose from one of six pre-set densities. If you enter a density value that your printer is incapable of printing, the program rounds it to the nearest printer dot. The displayed density values are based on the resolution of your printer. For example, a 200 dpi resolution printer generates images by combining dots that are roughly .005 inches (5 mil) square. Bar codes work the same way; acceptable densities change by .005-inch increments.
Checksum: Enables you to choose from optional checksums for the type of bar code selected. View table of checksums options...
The following table summarizes the available bar code checksum options.
Bar Code Type Required
Checksums Optional
Checksums Prints in Text
UPC-A mod 10 Yes
UPC-E (6 dgt) mod 10 No
UPC-E (11 dgt) mod 10 No
EAN/JAN-13 mod 10 Yes
EAN/JAN-8 mod 10 Yes
Code 39 mod 43 Yes
Extended 3 of 9 mod 43 Yes
HIBC mod 43 Yes
Code 93 mod 43 Yes
Extended 93 mod 43 Yes
42

Bar Codes
Interleaved 2 of 5 mod 10 Yes
Code 128 mod 103 No
UCC-128 mod 103 mod 10 mod 10
Codabar mod 10, mod 16 Yes
MSI Plessey mod 10 2 mod 10, mod 11/mod 10
First
Zip+4 POSTNET mod 10 NA
Text Where: Specify where you would like the human readable text to be placed in relation to your bar code image.
Ratio: Specify whether the bar code image should be printed with a wide-to-narrow bar ratio of 2 to 1, 2.5 to 1, or 3 to 1. For example, a ratio of 3 to 1 prints the narrow bars at the density specified, and the wide bars three times as wide.
Supplement: Used for UPC and EAN bar codes to specify whether the bar code includes a 2- or 5-digit supplement. When selected, the normal input string length increases by two for 2-digit supplements and five for 5-digit supplements.
Data Identifier: Allows you to enter a prefix that identifies the data in the bar code. Many compliance label specifications require a data identifier or prefix to appear in bar-coded data, but not in the human-readable interpretation. One example is the AIAG label format.
Sample: Displays a sample bar code of the type you specify and updates as you select different settings on this tab.
Adding a 2D Bar Code You can follow the steps below to add a 2D bar code to your label design (with the exception of the MaxiCode 2D bar code, which has special wizard to help you).
To add a 2D bar code to your label design
1. Do one of the following:
• On the Insert menu, click 2D Bar Code.
-OR-
• Click Add 2D Bar Code on the Add Image Toolbar.
2. From the Origin drop-down list, select the data origin appropriate for your bar code. Depending on the origin selected, different properties will appear.
3. Once you have set up the data to be used for your 2D bar code, click on the 2D Bar Code tab. Choose a bar code type from the Type drop-down list. The settings that appear on this screen will vary depending on the bar code type you select.
4. If desired, change other image properties using the Font, Color and Position tabs.
5. When you have finished setting properties for your 2D bar code, you can place it on the label by clicking the Place button and positioning it using the mouse OR click OK to have the program place the bar code on the label according to the settings specified on the Position tab.
43

LABEL MATRIX Help
Note: Many variables (printer, scanning equipment, etc.) affect how well each bar code symbology works. For best results, always check to ensure you have the latest specifications and requirements for any symbology. It is also recommended to seek the support of all parties involved with the label's use (shipper, receiver, carrier), as each may have their own requirements.
2D Bar Code Properties This program gives you a wide variety of options for 2D bar code creation, formatting, and placement. These options are set using the following 2D Bar Code Properties tabs:
Data tab
2D Bar Code tab
Font tab
Color tab
Position tab
General tab
To access the Bar Code Properties tabs
• For an existing 2D bar code image, double-click on the image.
• For a new 2D bar code image, click the Add 2-Dimensional Bar Code button or select the 2D Bar Code option from the Insert menu.
Linear Bar Code Symbologies
Linear Bar Code Symbologies The linear (also called one-dimensional or 1D) bar code symbologies represent the traditional type of bar code that's made up of a series of varying-width parallel bars and spaces. Linear bar code types vary greatly in the type of data they can encode. For example, certain bar code types can encode only numeric data, others can encode numbers and alphabetic characters, while still others can encode numbers, letters and some punctuation characters.
Bar codes are made up of machine readable and human readable parts. The black and white striped pattern is, of course, the machine readable portion. The human readable part of a bar code is the series of letters and/or numbers printed above or below the striped bar pattern. The machine readable and human readable parts of a bar code are shown in the following graphic.
44

Bar Codes
Linear Bar Codes
3 of 9 (Code 39)
Extended 39
Code 93
Extended 93
Codabar
Code 128
EAN/JAN-8 and -13
EAN/JAN-8 M&S
HIBC
Interleaved 2 of 5
MSI Plessey
PLANET
UCC/EAN-128
UPC-A
UPC-E
Zip+4 POSTNET
Code 39 (3 of 9)
The Code 39 bar code (also called "3 of 9") is probably the most commonly used bar code, and it is a standard for many government bar code specifications. This bar code encodes numbers, uppercase letters, and some punctuation.
The list of valid characters for the Code 39 bar code includes:
• Capital letters A to Z
• Numbers 0 to 9
• The space character
• Symbols -. $ / +%
The input string is printed as it is read except for lowercase letters, which are converted to uppercase. Any spaces are bar coded, as are other valid characters.
The checksum options for the Code 39 bar code include None or Mod 43.
45

LABEL MATRIX Help
Extended Code 39
The Extended Code 39 bar code supports every character in the ASCII character set except for ASCII 0 and those characters above ASCII 127. This enables full support of uppercase and lowercase letters, as well as control codes.
The program actually generates two characters for each non-Code 39 input string character when the Extended Code 39 mode is enabled. (See the table below for the two-character combination for each Extended Code 39 character.)
The program uses the single character whenever a standard Code 39 character is found to save on the width of the bar code. The Extended Code 39 bar code can get very wide with very few characters because of the double character method of encoding.
The checksum options for the Extended Code 39 bar code include: None or Mod 43.
46

Bar Codes
47

LABEL MATRIX Help
Code 93
The Code 93 bar code is a more compact version of Code 39, but it is not quite as easy for bar code readers to read because of the way it is encoded. Code 93 derives its name from the fact that every character is constructed from nine elements arranged into three bars with their adjacent spaces.
The checksum for the Code 93 bar code is automatically set to 2 Mod 47s.
Extended Code 93
The Extended Code 93 bar code uses Code 93 to encode the entire 128 ASCII character set by using combinations of control characters and basic data characters. The table below shows the character set that the Extended Code 93 supports.
The checksum for the Extended Code 93 is automatically set to 2 Mod 47s.
48

Bar Codes
Codabar
The Codabar bar code is a variable length bar code that can print numeric values and some punctuation characters. This bar code is useful for encoding dollar figures and mathematical figures because a decimal point, plus sign and minus sign can be encoded.
49

LABEL MATRIX Help
The Codabar bar code can encode the following 16 characters:
• Numbers: 0123456789
• Symbols: - $ : / . +
The Codabar bar code must begin and end with one of four special start/stop characters, A, B, C, or D. If the input string does not begin and end with one of these characters, the program automatically inserts the 'A' character at the beginning and/or the end of the bar code. This enables you to use this bar code with normal numeric data, which is the bar code's primary use.
The checksum options for the Codabar bar code include None, Mod 16 or Mod 10.
Code 128
The Code 128 bar code is a variable length symbology that can encode numeric, upper and lower case alphabetic characters (the full 128 ASCII character set), punctuation, special function and control data characters. It also enables numeric data to be compressed into double the normal density by encoding two digits per encoded character.
Code 128 Character Sets
Code 128 is available in four different character code subsets which allow the bar code to be optimized for size:
Code 128 Auto automatically determines which character code subsets will result in the smallest bar code. One of the code subsets described below is initially selected as the first encoded character. As the data is encoded, the code subset is changed within the bar code as necessary to reduce the bar code size. The checksum for the Code 128 Auto is automatically set to Mod 10.
Code 128 A includes all of the standard upper case alphanumeric keyboard characters plus the control and special characters. The checksum for the Code 128 A is automatically set to Mod 103.
Code 128 B includes all of the standard upper and lower case alphanumeric keyboard characters and special characters. The checksum for the Code 128 B is automatically set to Mod 103.
Code 128 C includes the set of 100 numeric data character pairs from 00 through 99 inclusive, as well as special characters. This enables double-density numeric digits (two digits per bar coded character) to be encoded. Data encoded in a Code 128 C must contain an even number of characters. If the data contains an odd number of characters, a zero (0) will be inserted at the beginning of the bar code. The checksum for the Code 128 C is automatically set to Mod 103.
Special Function Control Codes
Code 128 also has five special non-data function characters. These can be bar coded by the program by using the following decimal ASCII values in your input string:
50

Bar Codes
Control Code Decimal ASCII Value To
Use
SHIFT 128
FNC 1 129
FNC 2 130
FNC 3 131
FNC 4 132
EAN/JAN EAN/JAN is used for products that are manufactured or sold outside the United States. The country origin is an integral part of the EAN/JAN specification.
EAN/JAN-8
The EAN/JAN-8 is a shorter and smaller bar code used for non-United States applications. It is composed of two country code numbers, five numeric data characters, and a checksum number. The checksum number is automatically generated, making the input string a total of seven numbers for the standard EAN/JAN-8, nine for a bar code with a 2-digit supplement, and 12 for a bar code with a 5-digit supplement.
The checksum for the EAN/JAN-8 is automatically set to Mod 10.
EAN-8 M&S
A variation of the EAN-8 bar code is the EAN-8 M&S code. EAN-8 M&S is a standard EAN-8 code with the letters M and S in the human readable.
EAN/JAN-13
EAN/JAN-13 is used to encode 13 characters. The first two characters are numbers that identify the country of origin, the next 10 characters are data characters, and the last character is the checksum character.
The checksum for the EAN/JAN-13 is automatically set to Mod 10.
51

LABEL MATRIX Help
HIBC
The Health Industry Bar Code (HIBC) is a modified Code 39 bar code, using all of the characters of Code 39. The program automatically inserts the required "+" character after the start character.
The checksum for the HIBC is automatically set to Mod 43 for this bar code (added to the end of the bar code before the stop character).
Interleaved 2 of 5
The Interleaved 2 of 5 (also called "Code 25") is a numeric-only bar code used in many types of industrial and warehouse applications. The data can be of any length, but it must contain an even number of characters (if not, the program will automatically add a leading zero).
Each data character is composed of 5 elements, either 5 bars or 5 spaces. Of these 5 elements, two are wide and three are narrow. Adjacent characters are interleaved, alternating the spaces from once character with the bars of the other.
The checksum options for the Interleaved 2 of 5 bar code include None or Mod 10. Remember that if the checksum is added, the input string needs to be odd (the checksum adds one character, making it even). If you have an even number of characters with the checksum enabled, it will be wider than without the checksum.
MSI Plessey
The MSI Plessey is a numeric-only bar code that can encode 2 to 30 numbers. MSI Plessey is a self-clocking bar code used most often by grocery stores for shelf labels.
This bar code has a required Mod 10 checksum. You can also set an additional 2 Mod 10 or Mod 11/Mod 10 checksum, which would then be added to the bar code before the required Mod 10 checksum.
PLANET Code The PLANET Code is the inverse of the Zip+4 POSTNET (or POSTNET) bar code, reversing long bars for short and short for long. PLANET Codes have the same dimensional requirements as POSTNET bar codes. The PLANET Code is used along with the POSTNET bar code as part of the "Confirm" letter-tracking program created by the USPS.
PLANET Code is a 12-digit bar code with the following structure:
• The first two digits represent the service you want (21=Origin Confirm or 22=Destination Confirm).
52

Bar Codes
• The next 9 digits identify the mailpiece.
• The 12th digit is a checksum digit that helps USPS detect errors.
UCC/EAN-128
UCC/EAN-128 is a variation of the Code 128 symbology. The distinguishing feature of the UCC/EAN-128 is its Application Identifier (AI) prefix. An AI is a numeric two, three, or four digit prefix that defines the structure of the data that follows it. For example, the AI for the SSCC-18 is (00), which means that every time a (00) AI precedes the data in the UCC/EAN-128, you know that the data is formatted for the SSCC-18.
When you select the UCC/EAN-128 bar code type (on the Bar Code tab), the UCC/EAN-128 Template drop-down list appears. This list allows you to enter a format for the human readable text of the bar code. You can define the appearance of the text and specify the number of characters to be encoded in the bar code. The '9' character is used to specify the position of numerical data. The underscore '_' character is used to specify the position of the Mod 10 checksum (if it applies).
You can also use the wizard to create a UCC/EAN-128 bar code. The UCC/EAN-128 wizard takes you step by step through the process of selecting an AI and creating a UCC/EAN-128 bar code.
The UCC/EAN-128 bar code symbology includes:
• A start code (a start character A, B, or C and a FNC1 character)
• The data (the AI and the data fields)
• A Mod 103 checksum (in the bar code, not in the human readable)
• A stop character
All UCC/EAN-128 symbologies use a required Mod 103 checksum (not in human readable form). You can also set an additional Mod 103 or Mod 10 and Mod 103 checksum, which is used with some UCC/EAN-128 symbologies (any additional checksum(s) are included in the human readable).
For more information on UCC/EAN-128 standards, see the Uniform Code Council web site at http://www.uc-council.org/.
UPC-A
The Universal Product Code version A (UPC-A) bar code encodes only numeric information. UPC-A is the standard code for items that are for sale to the public in the United States.
The UPC-A designates the manufacturer and product within one bar code, and encodes the following 12 numeric digits:
53

LABEL MATRIX Help
1 = number system digit
2-6 = the manufacturer's ID number, given by the appropriate registering body
7-11 = represent the product
12 = a Mod 10 checksum digit based on the preceding 11 digits (added automatically by the software)
The UPC-A supports 2-digit or 5-digit supplements, which increase the amount of information contained within the bar codes. These supplements add either two or five digits in a second, smaller bar code following the primary bar code.
The number system digit is normally printed in human-readable form to the left of the printed symbol. This number is always the first digit entered as the data. Remember that if you do not completely fill the data field with all of the numbers, the program fills the bar code with leading zeros. If this happens, you always end up with a number system character of "0".
The uses of each number system are described in the following table.
Number System Specific Use
0, 7 Product UPC codes
2 Random weight items which are symbol marked at the store level
3 National Drug Code and National Health-Related Items
4 For use without code format restriction and with checksum
5 For use on coupons
1, 6, 8, 9 Reserved
UPC-E
The Universal Product Code version E (UPC-E) bar code is a compressed version of UPC-A, often used in the retail industry to identify small items. Because of the technique used to compress the UPC-E, it is sometimes also referred to as the "zero suppression version."
The UPC-E data must contain seven numeric digits, with the 8th digit being a checksum digit that is automatically calculated by the software.
Like the UPC-A, the UPC-E also supports both 2- and 5-digit supplements, which increase the amount of information contained within the bar codes. These supplements add either two or five digits in a second, smaller bar code following the primary bar code.
This program supports three forms of UPC-E:
UPC-E System 0 allows you to enter six numbers and the program will create a bar code with those same digits for system number 0.
UPC-E System 1 gives you the same six numbers for system number 1.
54

Bar Codes
UPC-E11 requires you to perform the zero-suppression checks described below to ensure that the bar code works properly. Note that you can send any 11-digit string and all correct ones are bar coded.
Zero Suppression
The UPC-E bar code is often referred to as a zero-suppressed version of the UPC-A bar code. This version compresses the 11 numbers and the checksum into six numbers. Only bar codes with a number system character of 0 or 1 can be encoded into the zero-suppressed version. With the UPC-E bar code, the original 10 data characters (without the system code) must have at least four zeros in certain positions.
The first five characters are the manufacturer number and the last five characters are the product number.
• If the manufacturer number ends in 000, 100, or 200, there are 1000 numbers between 00000 and 00999 available for the product number. The six characters come from the first two characters of the manufacturer number, followed by the last three characters of the item number, then the third character of the manufacturer number.
• If the manufacturer number ends in 300, 400, 500, 600, 700, 800, or 900, there are 100 item numbers between 00000 and 00099 available. The six characters come from the first three characters of the manufacturer number, followed by the last two characters of the item number, then "3".
• If the manufacturer number ends in 10, 20, 30, 40, 50, 60, 70, 80, or 90, there are 10 item numbers between 00000 and 00009 available. The six characters come from the first four characters of the manufacturer number, followed by the last character of the item number, then "4".
• If the manufacturer number does not end in zero, then five item numbers between 00005 and 00009 are available. The six characters come from all five of the manufacturer identification numbers, then the last character of the item number.
Zip+4 POSTNET
The Zip+4 Postal Code (Postnet) bar code is a symbology used by postal processing centers to direct mail from place-to-place using automated equipment.
The Postnet bar code is used by the U.S. Postal Service (USPS) for high-speed mail sorting. Postnet bar codes are placed on envelopes or postcards in one of two positions: on the lower right below the address or above the address. Use of this bar code on United States mail can save from 8% to 20% on postage costs. Contact your local post office for more information on correct placement of the bar code and the discount rate schedule.
The Postnet bar code is made up of evenly spaced tall and short bars. There are 5, 9 or 11 digits plus a correction digit encoded into every Postnet. The correction digit is used by a post office bar code reader to identify reading errors. Each numeric digit is represented by five bars. Two of these are tall and the other three are short. The tall bar represents a binary one (1) and the short bar represents a binary zero (0).
The 9-digit Postnet (the most commonly used) consists of 50 bars representing the digits of the Zip+4 code and the correction digit, plus a framing bar at each end of the string for a total of 52 bars. The 5-digit type of code consists of 32 bars, and the 11-digit code has 62 bars.
Note: The 11-digit code is known as the delivery point bar code (DPBC). A DPBC is formed by adding 10 bars to the Zip+4 code to represent the last two characters of the primary street address or the last two characters of the post office box number.
55

LABEL MATRIX Help
The Postnet bar code can be used along with the PLANET Code as part of the "Confirm" letter-tracking program created by the USPS.
2D Bar Code Symbologies
2D Bar Code Symbologies Two-dimensional (2D) bar codes are capable of encoding a large amount of data into a very small space. They are useful for labeling small parts, products and packages.
The 2D bar codes can be stacked codes, matrix codes, or composites.
• Stacked codes are arranged in horizontal layers to create a multi-row bar code. Code 49 is an example of a stacked code.
• Matrix codes are made up of a pattern of cells that can be square, hexagonal or circular in shape. MaxiCode is an example of a matrix code.
• Composites are two different codes (usually one is linear and the other is 2D) that contain linked data and are printed in close proximity to each other. EAN-UCC Composite is an example of a composite code.
Note: If your printer does not support a particular bar code that you have in your label, the bar code will be sent to the printer as a graphic (requiring more printer memory) and thus will print significantly slower.
2D Bar Codes
Aztec
Aztec Mesa
Code 16K
Code 49
Data Matrix
EAN/UCC & RSS Composites
PDF417
MaxiCode
MicroPDF
QR Code
TLC39
Aztec
Aztec Code is a general purpose two-dimensional (2D) matrix symbology, used mainly for small item marking. A 2D imaging device such as a CCD camera is necessary to scan the symbology.
The Aztec Code is created with a string of data. There is no special format to the string and all characters and digits may be used. Depending on the amount of data in the string, it will produce either a "Compact" or "Full Range" symbol.
56

Bar Codes
The Compact symbol displays two concentric square rings in the center of the symbol, and the Full Range symbol displays three concentric square rings in the center of the symbol. Together the two formats create a sequence of 33 distinct symbol sizes, capable of encoding small to large data messages.
No human readable is usually present.
Aztec Properties
The following properties are specific to the Aztec Code. Other general 2D bar code properties can also be accessed from the 2D Bar Code tab.
Reader Initialization Symbol: Allows the bar code reader to decode menu symbols (Reader Initialization Symbols) if supported by the reader. The symbols deliver initialization or configuration information to the bar code reader.
Aztec Mesa
The Aztec Mesa Code is a rearrangement of the Aztec Code. It incorporates a "linear host" symbol where the Aztec Mesa portion lies on top and also possibly below the host symbol. The Mesa portion is commonly known as the "2D supplemental field," and together with the linear host the entire symbol makes up a "composite" bar code.
Aztec Mesas can be attached to any of the following linear host symbols. (All linear host symbols will follow their own unique specifications for correct encoding.)
• EAN/JAN-13
• Code 128 Auto
• Code 39
• Code 93
• Interleaved 2 of 5*
* Also available as in Interleaved 2 of 5 with Barrier, which prints a "barrier" pattern along the top and bottom of the symbol to prevent short reads.
Format for Input String
The required input string for the Aztec Mesa begins with the data for the linear host, followed by a pipe character "|", followed by the data for the Mesa portion. The pipe character is used to separate the linear data from the Mesa data. Example...
Example:
123456789|This is a test
The data at the beginning of the string will be encoded into the chosen linear host and the "This is a test" data after the | symbol will be encoded as the composite portion .
The format for the input data depends on the data origin selected:
57

LABEL MATRIX Help
• Constant: When adding an Aztec Mesa bar code symbol with a Constant data origin, from the Data tab enter the linear input in the Text box and enter the composite input in the Composite Text box. The pipe separator will be automatically inserted between the two components.
• Keyboard Input: If you are adding an Aztec Mesa bar code with a Keyboard Input data origin, the entire continuous string of text and separator must be input at the prompt at print time. Note that you must manually enter the separator pipe between the two data strings.
• Combination: If you use the Combination data origin to create your Aztec Mesa bar code, from the Data tab you can type an expression directly in the Expression box (e.g., "1234" + "|" + "abcd") or use other variable images on the label that contain the data (e.g., Counter 1 + "|" + [Database1.partnum]).
When creating your expression, note that if the separator pipe is not contained within a variable image you are using, then you will need to manually type the separator pipe directly in the Expression box within double quotation marks, separating the linear and composite data. You can also add the separator pipe within your expression by clicking the Other button (on the Combination properties screen), selecting the Special Character option, and then selecting the ANSI value 124.
Aztec Mesa Properties
The following properties are specific to the Aztec Mesa Code. Other general 2D bar code properties can also be accessed from the 2D Bar Code tab.
Linear Host: Select a linear bar code type to serve as the "host" for your Aztec Mesa Code.
Reader Initialization Symbol: Allows the bar code reader to decode menu symbols (Reader Initialization Symbols) if supported by the reader. The symbols deliver initialization or configuration information to the bar code reader.
Barrier Bar: Incorporates a barrier bar pattern that is used with some linear hosts to help with readability.
Symmetry: Divides the Mesa proportionally to display on the top and bottom of the linear host symbol.
Code 16K
The Code 16K bar code is a two-dimensional (2D) multiple-row symbology that can encode the full ASCII character set below ASCII 128. It uses existing UPC and Code 128 character set patterns. Up to 77 full ASCII characters or 154 numeric characters can be encoded. These characters are encoded into 2 to 16 rows. Each row is divided by a separator bar. The top and bottom of the symbol also have separator bars that extend to the ends of the minimum quiet zones.
The Code 16K bar code has three forms of error detection. Parity is checked for each character, start and stop characters are used to identify each row, and two checksum characters are always appended to the end of the bar code.
Code 16K Character Sets
58

Bar Codes
Code 16K is available in four different character code subsets: Auto, subset A, subset B, or subset C. The availability of the codes depends on which subset mode you are encoding. The start, stop, and mode switching codes are automatically controlled by the program. These are used appropriately when the Code 16K Auto mode is selected. When using this mode, the program automatically optimizes the code to give the smallest size.
This program also supports the three subsets of Code 16K directly, without the auto switching capability.
Available Code 16K character sets include:
Code 16K Auto: When the Auto subset is selected, if the bar code has four or more consecutive numbers, the numbers are encoded in double-density mode. This means that two numbers are encoded into one character width, making the size of the bar code smaller. When using this subset, the program automatically optimizes the code to give the smallest size.
Code 16K A: If Code 16K A is selected, you can encode punctuation, digits, uppercase letters, and control codes below the space character.
Code 16K B: If Code 16K B is selected, you can also encode lowercase letters, but you cannot encode control codes below the space character.
Code 16K C: If Code 16K C is selected, only digits can be encoded. This is the mode that prints digits in double-density compressed mode. When selecting Code 16K C, if you have an odd number of digits, the program automatically uses the starting mode of Code Set C with an implied Shift B. This means that the first digit will be encoded in single density and all the rest will be in double density. If your input string contains less than seven full ASCII characters or 14 numeric characters, the program automatically appends enough pad characters to print the two rows that are the minimum requirement for the symbol.
Special Function Control Codes
Code 16K has 11 special function control codes that some readers recognize. These can be bar coded by the program by using the following decimal ASCII values in your input string:
Control Code Decimal ASCII Value To
Use
SHIFT 128 (hex 80)
FNC 1 129 (hex 81)
FNC 2 130 (hex 82)
FNC 3 131 (hex 83)
FNC 4 132 (hex 84)
PAD 133 (hex 85)
SHFT 2A 134 (hex 86)
SHFT 2B 135 (hex 87)
SHFT 2C 136 (hex 88)
SHFT 3B 137 (hex 89)
SHFT 3C 138 (hex 90)
59
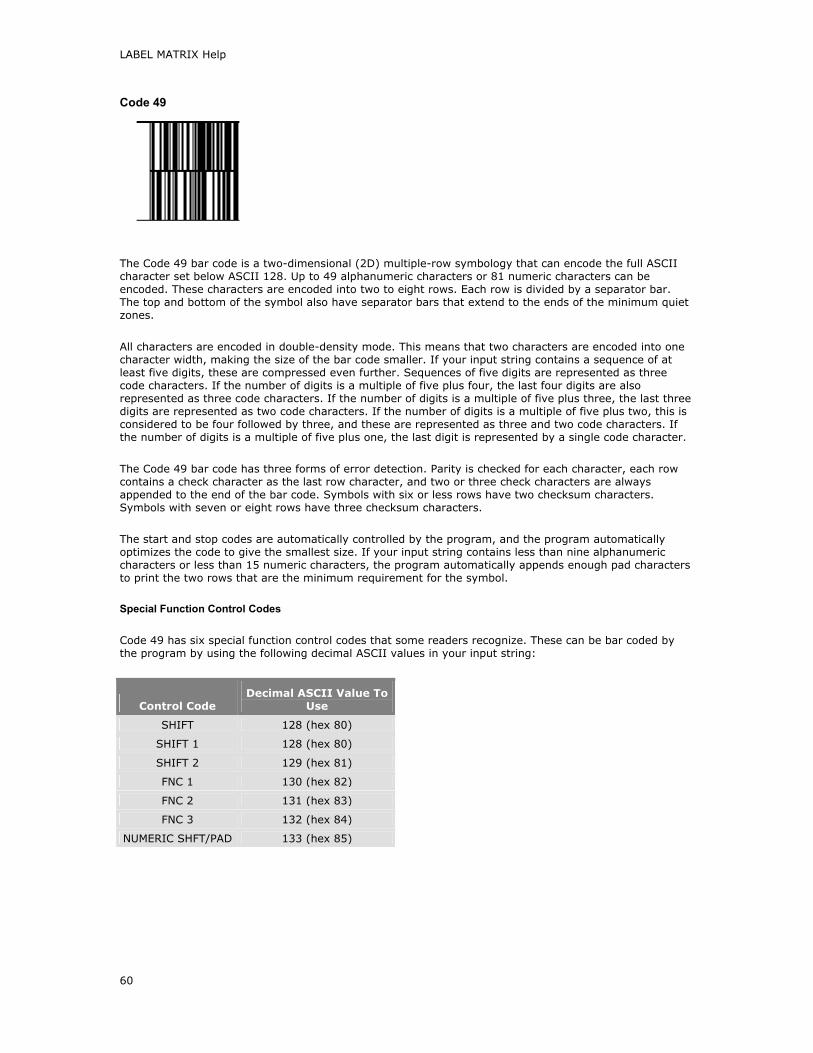
LABEL MATRIX Help
Code 49
The Code 49 bar code is a two-dimensional (2D) multiple-row symbology that can encode the full ASCII character set below ASCII 128. Up to 49 alphanumeric characters or 81 numeric characters can be encoded. These characters are encoded into two to eight rows. Each row is divided by a separator bar. The top and bottom of the symbol also have separator bars that extend to the ends of the minimum quiet zones.
All characters are encoded in double-density mode. This means that two characters are encoded into one character width, making the size of the bar code smaller. If your input string contains a sequence of at least five digits, these are compressed even further. Sequences of five digits are represented as three code characters. If the number of digits is a multiple of five plus four, the last four digits are also represented as three code characters. If the number of digits is a multiple of five plus three, the last three digits are represented as two code characters. If the number of digits is a multiple of five plus two, this is considered to be four followed by three, and these are represented as three and two code characters. If the number of digits is a multiple of five plus one, the last digit is represented by a single code character.
The Code 49 bar code has three forms of error detection. Parity is checked for each character, each row contains a check character as the last row character, and two or three check characters are always appended to the end of the bar code. Symbols with six or less rows have two checksum characters. Symbols with seven or eight rows have three checksum characters.
The start and stop codes are automatically controlled by the program, and the program automatically optimizes the code to give the smallest size. If your input string contains less than nine alphanumeric characters or less than 15 numeric characters, the program automatically appends enough pad characters to print the two rows that are the minimum requirement for the symbol.
Special Function Control Codes
Code 49 has six special function control codes that some readers recognize. These can be bar coded by the program by using the following decimal ASCII values in your input string:
Control Code Decimal ASCII Value To
Use
SHIFT 128 (hex 80)
SHIFT 1 128 (hex 80)
SHIFT 2 129 (hex 81)
FNC 1 130 (hex 82)
FNC 2 131 (hex 83)
FNC 3 132 (hex 84)
NUMERIC SHFT/PAD 133 (hex 85)
60

Bar Codes
Data Matrix
Data Matrix is a two-dimensional (2D) matrix symbology used mainly for small part marking and tracking in the manufacturing and health care industries. Because of the Data Matrix symbol's small physical size, low print contrast requirement (20%), and ease of reading, it has become widely accepted for identification of microelectronics, silicon wafers, and pharmaceutical products. It is also frequently used to verify part identification, orientation, and positioning in automated manufacturing and process-control systems.
The Data Matrix code is extremely flexible in terms of physical size and information capacity. It consists of a cellular matrix of square modules that can encode large amounts of text and data. Data Matrix codes can only be read by certain types of 2D scanners that are specially programmed to do so.
Error Correction
The Data Matrix code also has superior error correcting capabilities, called Error Correction Codes (ECC). ECC 200 is the newest and most standard version of Data Matrix error correction. It supports advanced encoding and error checking with Reed Solomon error correction algorithms. These algorithms allow the recognition of bar codes that are up to 60% damaged. So even if part of the symbol is damaged, all data encoded throughout the symbol can often still be read, maintaining extreme integrity.
Error Correction Code
Overhead
000 (none) 0%
010 25%
040 33%
050 (low) 25%
060 50%
070 33%
080 (med) 33%
090 67%
100 50%
110 75%
120 50%
130 67%
140 (high) 75%
Data Matrix Properties
The following properties are specific to the Data Matrix symbology. Other general 2D bar code properties can also be accessed from the 2D Bar Code tab.
Character Set: Allows a data codification format to be selected. Each format defines a character set, a data compression ratio, as well as an input mask for the messages to be encoded.
Error Correction: This program allows you to select the desired ECC level. Note that using higher error correction creates a matrix with more squares (more overhead, thus a larger bar code). Consideration
61

LABEL MATRIX Help
must be given to the camera field of view when determining the size of cells and amount of error correction to use.
Border Width: Determines the width of the border on the left and bottom of the bar code, with the default being 1. (Note: ECC 200 has a fixed border width.)
Rectangle Symbol: Allows the matrix bar code to be printed in a rectangular shape vs. the standard square shape.
EAN/UCC & RSS Composites
The EAN/UCC Composite Symbology and RSS-14 Composite Symbology consist of a linear symbol component and a stacked-linear 2D symbol. The 2D symbol is a variant of the Micro PDF symbol for the UCC-128 CC-A/B composite, and a PDF417 symbol for the others. The 2D component is printed above the linear symbol at a specified location relative to the linear symbol. The published specifications for the specific linear symbols apply.
The Composite Symbology encodes digits, uppercase and lowercase letters, and 20 selected punctuation characters. The selected punctuation characters are:
. , ? < > ! % : ; & ( ) - _ " * ' = + /
Format for Input String
The required input string for the EAN/UCC Composite begins with the linear input (primary data), followed by a pipe character "|", followed by the composite input (secondary data). The pipe character is used to separate the linear data from the composite data. Example...
Example:
1234567890|This is the Composite Symbology
The linear symbol will contain "1234567890" and the composite symbol will contain "This is the Composite Symbology". When scanned, the output will read, "1234567890This is the Composite Symbology" in one continuous string with the separator.
The format for the input data depends on the data origin selected:
• Constant: When adding a EAN/UCC Composite symbol with a Constant data origin, from the Data tab enter the linear input in the Text box and enter the composite input in the Composite Text box. The pipe separator will be automatically inserted between the two components.
• Keyboard Input: If you are adding a EAN/UCC Composite with a Keyboard Input data origin, the entire continuous string of text and separator must be input at the prompt at print time. Note that you must manually enter the separator pipe between the two data strings.
• Combination: If you use the Combination data origin to create your EAN/UCC Composite, from the Data tab you can type an expression directly in the Expression box (e.g., "1234" + "|" + "abcd") or use other variable images on the label that contain the data (e.g., Counter 1 + "|" + [Database1.partnum]).
62
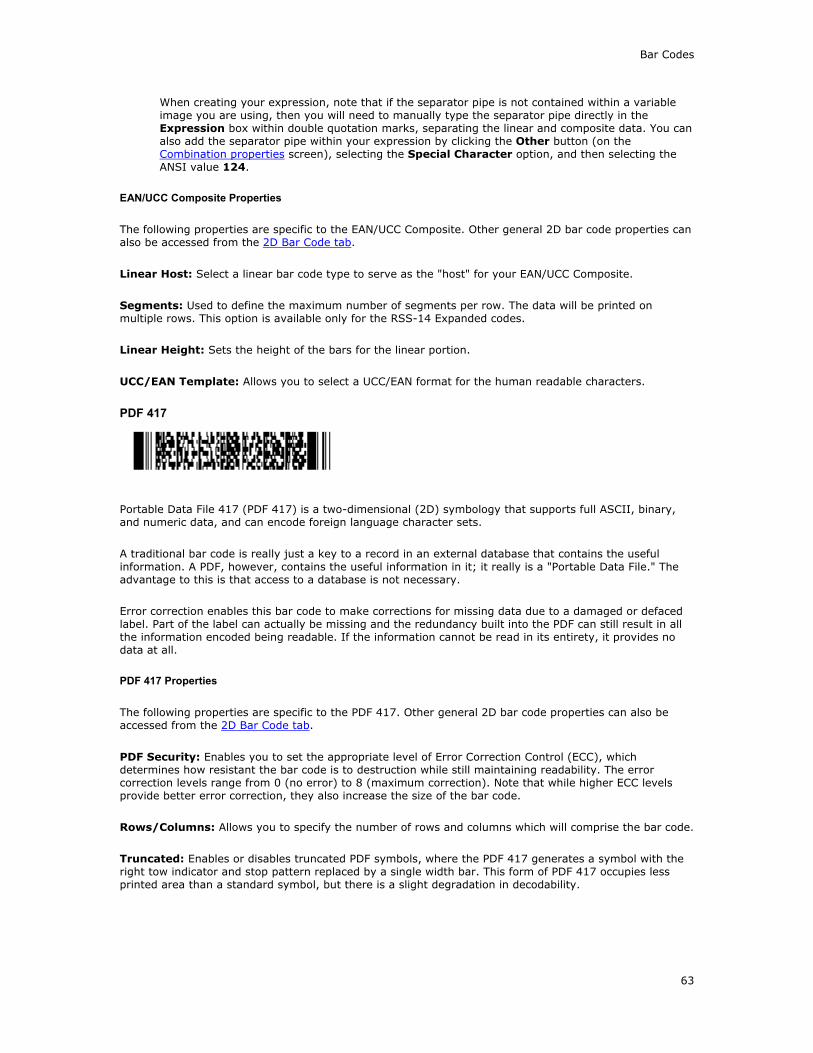
Bar Codes
When creating your expression, note that if the separator pipe is not contained within a variable image you are using, then you will need to manually type the separator pipe directly in the Expression box within double quotation marks, separating the linear and composite data. You can also add the separator pipe within your expression by clicking the Other button (on the Combination properties screen), selecting the Special Character option, and then selecting the ANSI value 124.
EAN/UCC Composite Properties
The following properties are specific to the EAN/UCC Composite. Other general 2D bar code properties can also be accessed from the 2D Bar Code tab.
Linear Host: Select a linear bar code type to serve as the "host" for your EAN/UCC Composite.
Segments: Used to define the maximum number of segments per row. The data will be printed on multiple rows. This option is available only for the RSS-14 Expanded codes.
Linear Height: Sets the height of the bars for the linear portion.
UCC/EAN Template: Allows you to select a UCC/EAN format for the human readable characters.
PDF 417
Portable Data File 417 (PDF 417) is a two-dimensional (2D) symbology that supports full ASCII, binary, and numeric data, and can encode foreign language character sets.
A traditional bar code is really just a key to a record in an external database that contains the useful information. A PDF, however, contains the useful information in it; it really is a "Portable Data File." The advantage to this is that access to a database is not necessary.
Error correction enables this bar code to make corrections for missing data due to a damaged or defaced label. Part of the label can actually be missing and the redundancy built into the PDF can still result in all the information encoded being readable. If the information cannot be read in its entirety, it provides no data at all.
PDF 417 Properties
The following properties are specific to the PDF 417. Other general 2D bar code properties can also be accessed from the 2D Bar Code tab.
PDF Security: Enables you to set the appropriate level of Error Correction Control (ECC), which determines how resistant the bar code is to destruction while still maintaining readability. The error correction levels range from 0 (no error) to 8 (maximum correction). Note that while higher ECC levels provide better error correction, they also increase the size of the bar code.
Rows/Columns: Allows you to specify the number of rows and columns which will comprise the bar code.
Truncated: Enables or disables truncated PDF symbols, where the PDF 417 generates a symbol with the right tow indicator and stop pattern replaced by a single width bar. This form of PDF 417 occupies less printed area than a standard symbol, but there is a slight degradation in decodability.
63

LABEL MATRIX Help
MaxiCode
MaxiCode is a fixed size, two-dimensional (2D) matrix symbology developed by United Parcel Service of America, Inc. (UPS). MaxiCode has been adopted by AIM and ANSI as the recommended symbology for sortation and tracking. MaxiCode 2D bar code symbologies are made up of many different properties (Postal Code, Country Code, Tracking Number, etc.) that must follow specific requirements for their data and length.
Note: The following information on MaxiCode data was provided by UPS. For illustration purposes, the following example uses MaxiCode for a domestic UPS shipment. MaxiCode can be used for many different applications and purposes, however, and required fields in the optional data may differ when used with carriers other than UPS or with non-shipping label applications.
The MaxiCode Wizard provides a separate screen for each of the MaxiCode properties, as listed in the following table.
Property
Required Format Additional Notes
Postal Code alphanumeric 5, 6, or 9 characters
Three different lengths are acceptable for the Postal Code: 5 characters for U.S. Zip Codes, 6 characters for International Postal Codes, or 9 characters for extended U.S. Zip Codes. Shorter codes must be filled in with spaces behind the data.
Country Code numeric 3 digits
The Country Code shall conform with ISO 3166 or codes updated by the maintenance agency for ISO 3166. The Country Code for the United States is 840.
Class of Service numeric 3 digits
The 3-digit Class of Service field contains the appropriate service indicator with a leading zero added (e.g., UPS NEXT DAY AIR = 001).
Tracking Number alphanumeric 10 or 11 characters
When IZ is used as the tracking number, the Tracking Number field within the MaxiCode is 10 characters, consisting of a 2-character data identifier, a 7-digit
64

Bar Codes
reference number, and a 1-digit check digit. When a PTN is used as the tracking number, the entire 11-character PTN is encoded in this field.
UPS Shipper Number alphanumeric 6 characters
Julian Day of Pickup numeric 3 digits
Shipment ID Number
alphanumeric 1-30 characters
Package n/x numeric 1-3 digits
Package n of x total packages. For example, if you have package 2 of 10 total packages, you would enter 2/10.
Weight (lb.) numeric 1-3 digits
Round up to the next pound.
Address Validation alphanumeric 1 character
Y or N. Accomplished by comparing the complete destination address to a certified U.S. Postal Service database.
Ship to Street Address
alphanumeric 1-35 characters
Ship to City alphanumeric 1-20 characters
Truncate city names to a maximum of 20 characters.
Ship to State alphanumeric 2 characters
MaxiCode Data Format
As you use the wizard to enter fields and build your MaxiCode, you'll notice that several short codes have also been added to your expression. These codes are required for the MaxiCode format and will be automatically added for you by the program. If you would like detailed information on these codes, or if you want to format your own MaxiCode data, contact UPS.
MicroPDF
65

LABEL MATRIX Help
MicroPDF is a two-dimensional (2D) multi-row symbology based on the PDF417 and is used for small area applications. One example of its application is in conjunction with the PDF417 symbol in the manufacturing industry.
This symbol is capable of encoding up to 150 alphanumeric characters. A limited set of symbol sizes is available, together with a fixed level of error correction for each symbol size.
MicroPDF Properties
The following properties are specific to the MicroPDF. Other general 2D bar code properties can also be accessed from the 2D Bar Code tab.
Mode: Sets the symbol width by specifying the number of data columns (1-4) and a variable number of rows.
X:Y Ratio: Sets the ratio of width (X) to height (Y); used along with the Mode setting to determine the size of the bar code.
Code 128: Transmits the symbol’s data as if it were encoded in a Code 128 symbol. Options include the following:
• Emulation off: No emulation (default setting).
• Linked C1: Linear symbology printed below the MicroPDF symbol is ‘linked’ to the data of the MicroPDF symbol. The reader will not transmit the data unless the linear symbol is also found and decoded within the scanner’s field of view.
• Unlinked C1: Linear symbology is not linked to the data in the MicroPDF symbol.
• C0: Data is transmitted exactly as encoded.
• C2: The first two digits or single alpha character of the data represents an Application Indicator followed by an implied FNC1 character.
Reader Initialization Symbol: Allows the bar code reader to decode menu symbols (Reader Initialization Symbols) if supported by the reader. The symbols deliver initialization or configuration information to the bar code reader.
Disable Macro Character Substitution: Disables the means of abbreviating an industry-specific header and trailer in one symbol character, which reduces the number of symbol characters needed to encode data in a symbol using certain structured formats.
QR Code Note: This bar code type is not available in all editions of the software.
Quick Response Code (QR Code) is a two-dimensional (2D) matrix symbology consisting of an array of dark and light square cells. It has position detection patterns on three of its four corners, which making omni-directional ultra fast reading possible. A 2D imaging device such as a CCD camera is necessary to scan the symbology.
QR Code is capable of handling numeric, alphanumeric, and byte data. Up to 7,366 characters (numeric data) can be encoded using this symbol.
QR Code Properties
The following properties are specific to the QR Code. Other general 2D bar code properties can also be accessed from the 2D Bar Code tab.
66

Bar Codes
Model: Model 1 meets the requirements of the original QR Code specifications. Model 2 is an extension of the specifications of Model 1.
Error Correction: QR Code is designed with selectable levels of error correction. Data can be restored even if a part of the symbol has become dirty or been damaged.
TLC39 Note: This bar code type is not available in all editions of the software.
TCIF Linked Code 39 (TLC39) is a two-dimensional (2D) composite symbology published by the Alliance for Telecommunications Industry Solutions' (ATIS) Telecommunications Industry Forum (TCIF). The TLC39 code is a combination of the Code 39 and Micro PDF symbols — it provides a transition between the current coding standard, based on Code 39, and the one that will replace it in the future, the bi-dimensional MicroPDF code.
The linear portion encodes a six-digit Equipment Catalog Item (ECI) number, used to look up the full 10-character Common Language Equipment (CLEI) code.
The Micro PDF portion is used to encode supplementary data, such as the serial number, and other optional data elements.
Format for Input String
The required input string for the TLC39 begins with the linear data, followed by a pipe character "|", followed by the data for the Micro PDF portion. The pipe character is used to separate the linear data from the Micro PDF data.
The format for the input data depends on the data origin selected:
• Constant: When adding a TLC39 with a Constant data origin, from the Data tab enter the linear input in the Text box and enter the Micro PDF data in the Composite Text box. The pipe separator will be automatically inserted between the two components.
• Keyboard Input: If you are adding a TLC39 with a Keyboard Input data origin, the entire continuous string of text and separator must be input at the prompt at print time. Note that you must manually enter the separator pipe between the two data strings.
• Combination: If you use the Combination data origin to create your TLC39, from the Data tab you can type an expression directly in the Expression box (e.g., "123456" + "|" + "ABCD1234567890") or use other variable images on the label that contain the data (e.g., [Database1.ECINumber] + "|" + [Database1.SerialNumber]).
When creating your expression, note that if the separator pipe is not contained within a variable image you are using, then you will need to manually type the separator pipe directly in the Expression box within double quotation marks, separating the linear and Micro PDF data. You can also add the separator pipe within your expression by clicking the Other button (on the Combination properties screen), selecting the Special Character option, and then selecting the ANSI value 124.
TLC39 Properties
The following properties are specific to the TLC39. Other general 2D bar code properties can also be accessed from the 2D Bar Code tab.
Mode: Sets the number of data columns (4) and a variable number of rows.
X:Y Ratio: Sets the ratio of width (X) to height (Y); used along with the Mode setting to determine the size of the bar code.
67

LABEL MATRIX Help
Code 128: Transmits the symbol’s data as if it were encoded in a Code 128 symbol. Options include the following:
• Emulation off: No emulation (default setting).
• Linked C1: Linear symbology printed below the TLC39 symbol is ‘linked’ to the data of the TLC39 symbol. The reader will not transmit the data unless the linear symbol is also found and decoded within the scanner’s field of view.
• Unlinked C1: Linear symbology is not linked to the data in the TLC39 symbol.
• C0: Data is transmitted exactly as encoded.
• C2: The first two digits or single alpha character of the data represents an Application Indicator followed by an implied FNC1 character.
Linear Height: Sets the height of the bars for the linear portion.
Disable Macro Character Substitution: Disables the means of abbreviating an industry-specific header and trailer in one symbol character, which reduces the number of symbol characters needed to encode data in a symbol using certain structured formats.
68

Lines & Shapes
Adding a Line or Shape Note: Depending on your printer, shapes may be sent to your printer as graphics and when images print as graphics the print speed is much slower.
1. Do one of the following:
• On the Insert menu, click Shapes, and then use the submenu to select the appropriate shape type.
-OR-
• Click Add a Shape on the Add Image Toolbar, and then use the submenu to select the appropriate shape type.
The shape's properties tabs will appear.
2. Click on the Position tab and then do one of the following:
• If you want the shape to be hollow, select one of the default line thickness settings (Thin, Medium or Thick) or use a different thickness setting by entering your own value.
• If you want the shape to be filled, click the Fill check box.
3. If desired, change other shape properties such as color and description by clicking on the appropriate tabs.
4. When you have finished choosing properties for your shape, you can click OK to have the shape placed at the position you have specified or click Place to place the shape using the mouse.
5. Once the image has been added to the label you can easily change its size. Simply click on the image to select it, then click on one of its image "handles" and drag to size it.
Note: When adding a shape as instructed above, it will snap to the Snap Value set on the Tools menu View Settings tab. To ignore the Snap Value setting so the endpoints of your image can be placed at any point on the label, hold down CTRL as you drag to create the image. If you are adding a straight line, you can press and hold down the SHIFT key while drawing the line to ensure that it is straight.
Shape Properties This program gives you a wide variety of options for creating and positioning lines and shapes. These options are set using the following Shape Properties tabs:
General tab
Lines
Color tab
Position tab
Shapes
Color tab
Position tab
69

LABEL MATRIX Help
To access the Shape Properties tabs
• For an existing shape image, double-click on the image.
• For a new shape image, click the Add a Shape button or select the Shapes option from the Insert menu and then use the submenu to select the appropriate shape type.
Adding Custom Shapes Note: Depending on your printer, shapes may be sent to your printer as graphics and when images print as graphics the print speed is much slower.
1. Do one of the following:
• On the Insert menu, click Shapes, and then select Custom Shape from the submenu.
-OR-
• Click Add a Shape on the Add Image Toolbar, and then select Custom Shape
from the submenu.
The Custom Shape Properties tabs will appear.
2. On the Custom Shape tab, click on the Shape Category drop-down list and select the category for the type of shape you would like to add. For example, if you are looking for a hammer, click Tools. All the available shapes for the selected category appear.
3. Scroll through the displayed shapes and click the shape you want.
4. If desired, change other custom shape properties such as color, position, and description.
5. When you have finished choosing properties for your shape, you can click OK to have the shape placed at the position you have specified or click Place to place the shape using the mouse.
6. Once the image has been added to the label you can easily change its size. Simply click on the image to select it, then click on one of its image "handles" and drag to size it.
Note: When adding a shape as instructed above, it will snap to the Snap Value set on the Tools menu View Settings tab. To ignore the Snap Value setting so the endpoints of your image can be placed at any point on the label, hold down CTRL as you drag to create the image.
Custom Shape Properties This program gives you many options for adding, sizing and positioning custom shapes. These options are set using the following Custom Shape Properties tabs:
Custom Shape tab
Color tab
Position tab
General tab
70

Lines & Shapes
To access the Custom Shape Properties tabs
• For an existing custom shape, double-click on the image.
• For a new custom shape, click Add a Shape on the Add Image Toolbar and then use the
submenu to select Custom Shape .
71


Pictures
Adding a Picture 1. Do one of the following:
• On the Insert menu, click Picture.
-OR-
• Click Add Picture on the Add Image Toolbar.
3. Choose one of the picture file origins.
Embedded - The "Embedded" picture origin saves the actual picture or graphic image as part of the label design. This method of graphic storage should be used if the path for your original graphic file may change at some point, or if you do not have limited storage space for your label designs.
Linked File - The "Linked File" picture origin saves a reference to a selected picture filename; it does not store the actual image as part of the design. Use this origin if you have limited storage space for your label designs. Be sure to note, however, that if you use this origin for your files and then decide to move those files, you will have to edit every label design to change its path.
Database - The "Database" picture origin enables you to specify a field in the database file that determines the directory path and filename for the selected picture image.
Keyboard Prompt - The "Keyboard Prompt" picture origin enables you to specify the directory path and filename for the selected picture image at the time of printing.
4. Click the File button and select the graphic file to add to the label design. This program can load black and white or color graphics and supports many graphic file types including popular formats such as BMP, JPG, PCX, and TIF.
Note: The TIF graphic format varies depending on the program used to create the file. If you are unable to insert and/or print a TIF graphic, try converting it to another graphic file format like PCX or BMP.
4. If desired, change other picture properties such as color, position, and description.
5. When you have finished choosing properties for your picture, you can click OK to have the picture placed at the position you have specified or click Place to place the picture using the mouse.
Note: Because some printers handle graphic images better than others, graphic images may slow your printing operation significantly.
Picture Properties This program gives you many options for adding, sizing and positioning pictures. These options are set using the following Picture Properties tabs:
Picture tab
Color tab
Position tab
General tab
73

LABEL MATRIX Help
To access the Picture Properties tabs
• For an existing picture image, double-click on the image.
• For a new picture image, click Picture on the Insert menu. Alternatively, you can click Add
Picture on the Add Image Toolbar.
74

Working with Placed Objects
Editing Images Editing an image's properties
Moving images to the front or back
Grouping and ungrouping images
Scaling images
Aligning images
Finding images
Replacing images
Rotating images
Moving and Sizing Images
To move an image
1. Use the mouse to place the cursor on the selected image (but not over the handles).
2. Click the left mouse button and drag to move the image to the desired location.
To size an image
1. Click once on the image to select it.
2. Use the mouse to place the cursor on the handles that border the selected image.
3. Click the left mouse button on one of the image handles and drag it to the desired size.
4. To size the image while keeping the aspect ratio of the height and width the same, click on an image handle in one of the four corners of the image (so the cursor is at a diagonal) and drag to the desired size.
Copy, Cut, Paste or Delete an Image Select the image/object and then perform one of the following actions:
To Do this
Copy an object On the Edit menu click Copy or right-click on the object and select Copy or press CTRL + C.
Cut an object On the Edit menu click Cut or right-click on the object and select Cut or press CTRL + X.
75

LABEL MATRIX Help
Paste an object On the Edit menu click Paste or right-click on the object and select Paste or press CTRL + V.
Delete an object Press the Delete key.
Rotating Images The Rotate command allows you to rotate the selected image(s) or all images in the design area.
To rotate images on a label
1. Click on the image(s) you want to rotate. To select more than one image at once, hold down the SHIFT key while clicking on the images.
2. On the Edit menu, click Rotate. Alternatively, you can right-click on the image and select Rotate.
3. Select one of the following rotation options:
• All Images: Changes the orientation of the label on your screen and on the print media. The display shows the orientation of the printed label. For example, to print labels upside down, rotate all images 180 degrees.
• Selected Images: Use this command to rotate the orientation of selected images. The display shows how images will print. This command does not affect the orientation of the label.
4. Choose a rotation setting from the Rotate by drop-down menu.
5. Click OK.
Scaling Images The Scale command allows you to size the selected image or images by the percentage you specify. Specifying a percentage of 100 percent leaves the image unchanged; 50 percent cuts the image size in half; 200 percent doubles the image size, etc.
To scale selected images or all images in the design area
1. Click on the image(s) you want to scale. To select more than one image at once, hold down the SHIFT key while clicking on the images.
2. On the Edit menu, click Scale. Alternatively, you can right-click on the image and select Scale.
3. Specify if you want to scale All Images or Selected Images.
4. Select a value from the Scale Factor drop-down list or use a different scale factor percentage by entering your own value.
5. Click the OK button.
Grouping/Ungrouping Images When editing images you can save time and effort by grouping several images together and working with them as though they were a single element. For example, you can rotate all images in a group as a single unit instead of clicking on each image and rotating each one separately. You can also create groups within groups to help you build complex images.
76
Working with Placed Objects
To select several images at once
• Hold down the SHIFT key and click on each image you want to select.
OR
• Hold down the left mouse button while dragging to draw a box that encloses the images you want to select.
To group images
1. Select the images that you want to group together.
2. On the Edit menu, click Group. Alternatively, you can right-click and select Group.
To ungroup images
1. Select the group of images that you want to ungroup by clicking the left mouse button on the grouping.
2. On the Edit menu, click Ungroup. Alternatively, you can right-click and select Ungroup.
Moving Images to the Front or Back
To move a selected image in front of all other images
• Right-click on the image and select Pull to Front. Alternatively, you can select the image and then select Pull To Front from the Edit menu. The image that is pulled to the front is the last item printed.
To move a selected image to the back of all other images
• Right-click on the image and select Drop to Back. Alternatively, you can select the image and then select Drop To Back from the Edit menu. The image that is dropped to the back is the first item printed.
Redrawing the Label The Redraw command refreshes the view of the label design screen. This redrawing of the label is sometimes necessary if a design function causes an image to appear distorted or incomplete.
To redraw the label on the design screen
• On the View menu, click Redraw.
77


Working with Expressions
About Expressions An expression is a formula that consists of various parts, the result of which produces a value that populates a text or bar code object on a label. The parts that comprise an expression can include constant data, variable data, and database fields. Spaces, paragraph breaks and special characters can also be included in an expression, along with math, string and logic functions.
Expressions are composed in the Data tab of the Text or Bar Code Properties dialog box. When you select the Combination origin, the Data tab displays a list of variables currently attached to the label, a text box for creating an expression, and a sample box that displays the result of the expression (that is, the value or sample value that will appear in the label).
Connecting Elements in an Expression • Use a plus sign (+) to connect separate elements of an expression.
• Use a space enclosed in quotation marks (“ ”) to insert a space between elements. Instead of typing these characters, you can insert a space from the Expression Piece dialog box by selecting Space and clicking OK.
• Use “\r\n” to insert a line return (paragraph break) between elements. Instead of typing these characters, you can insert a line return from the Expression Piece dialog box by selecting Paragraph Break and clicking OK.
Creating an Expression The method you use to create your expression will depend on the type of elements you want to include.
Constant Data
Punctuation and ANSI Codes
Database Fields
Bar Code Functions
String Functions
Math Functions
Logic Functions
Linked File
Date Stamp
Offset (Extended) Date
Time Stamp
Offset (Extended) Time
Referenced (Expanded) Subdatabase
Using Constant Data in Expressions Constant data is data that does not change from label to label; it is not variable. It is typically typed as it should appear in the label. In combination expressions, you must enclose constant data in double quotation marks ("").
View an example of constant data in an expression...
79

LABEL MATRIX Help
Note: When typing constant data, some punctuation and special characters (ANSI character set) must be preceded with a backslash (\).
The following table shows examples of constant data formatting.
Expression Result
"Ship To:" Ship To:
"Use a single backslash \\ mark" Use a single backslash \ mark
"Use a \" mark" Use a " mark
Note: When combining constant data with other data in an expression, remember to use the required connecting elements.
To use constant data in an expression
• On the Data tab, select Combination as the origin and then click in the Expression box to place the cursor at the desired location within the expression. Type your constant data directly in the Expression box. Be sure to enclose the constant data in double quotation marks ("").
OR
80

Working with Expressions
• On the Data tab, select Combination as the origin and then click in the Expression box to place the cursor at the desired location within the expression. Click Other, click Constant, and then click OK. Type your constant data and click OK. (Note: Do not include quotation marks; they will be inserted automatically.)
Note: When using the Expression Piece dialog box to add constant data to an expression, the quotation marks and any line returns will be added automatically.
Using Database Fields in Expressions You can use database fields in expressions if you attach a database to your label design.
When a database is attached, you can select Combination as the origin for a text or bar code image and all the fields from the database file will automatically appear in the variables list of the Data tab. These database variables are available for use in expressions.
The syntax of a database variable is very specific. Each database has a file name and a list of fields, each having a unique name. A dot (period) separates the file name and field name; and square brackets surround the entire reference. For example, [sample2.name] represents the current value of the Name field from the SAMPLE2 database. Unlike constant data, database variables should not be enclosed in quotation marks.
To use a database variable in an expression
• Click in the Expression box to place the cursor at the desired location within the expression. Select (highlight) the desired field in the variables list, and then click Use to insert the selected database variable at the cursor location.
OR
• Type the database variable name in the appropriate location within the Expression box using the required syntax (e.g., [sample2.address]).
View an example of a database field used in an expression...
81

LABEL MATRIX Help
View an example of several database fields used in an expression along with other data...
82

Working with Expressions
Note: When combining a database variable with other data in an expression, remember to use the required connecting elements.
The following table shows examples of expressions using database variables.
Expression Result
[sample2.NAME] ABC COMPANY
[sample2.NAME] + "\r\n" + [sample2.ADDRESS] + "\r\n" + [sample2.CITY]
ABC COMPANY
600 OAK STREET
HOMETOWN
"Part number" + " " + [sample2.PARTNO] + " " + "weighs" + " " + [sample2.WEIGHT]
Part number 12345 weighs 28#
Using a Date Stamp in an Expression The Date function allows you to use a date stamp in a combination expression. The Date function inserts the current date based on the system clock using the date format of your choosing.
View table of valid date formats...
Date Setting Output Description
83

LABEL MATRIX Help
D$ SUNDAY uppercase day of week (DOW)
d$ Sunday upper/lowercase DOW
DD$ SU 2 char uppercase DOW
dd$ Su 2 char upper/lowercase DOW
(2 to 30 chars available)
DDDDDDDDDDD$ SUNDAY 11 char DOW (5 trailing spaces)
ddddddddddd$ Sunday 11 char DOW (5 trailing spaces)
D and d 1 date of month (non lead zero)
DD 01 2 char date of month (lead zero)
dd 1 2 char date of month (lead space)
DDD 224 days from begin of year (lead zero)
ddd 224 days from begin of year (lead space)
DDDDD and ddddd 33482 days from 1/1/1900
(5 to 9 chars available)
W and w 1 day of week (Sun=1, Sat=7)
WW 34 weeks from begin of year (lead zero)
ww 34 weeks from begin of year (lead space)
WWW and www 783 weeks from 1/1/1900 (last 3 digits)
WWWW and wwww 4783 weeks from 1/1/1900
(4 to 9 chars available)
WWWWWWWWW 000004783 weeks from 1/1/1900 (lead zero)
wwwwwwwww 4783 weeks from 1/1/1900 (lead space)
M$ SEPTEMBER uppercase month
m$ September upper/lowercase month
84
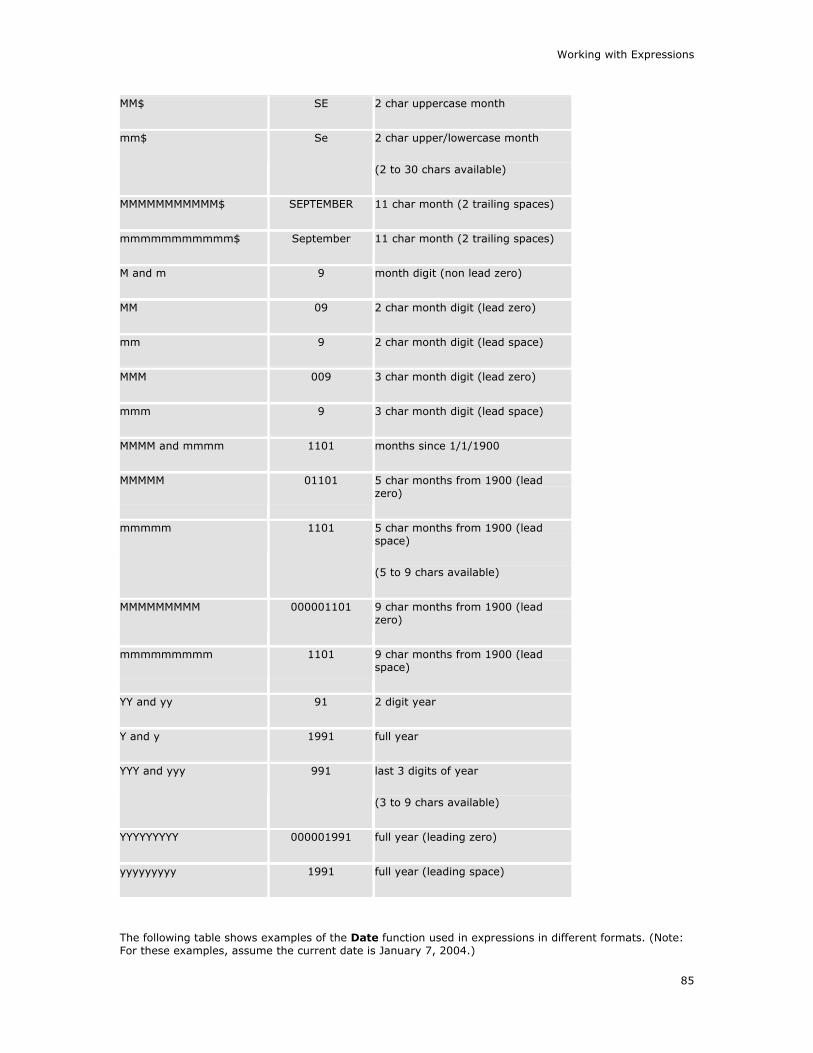
Working with Expressions
MM$ SE 2 char uppercase month
mm$ Se 2 char upper/lowercase month
(2 to 30 chars available)
MMMMMMMMMMM$ SEPTEMBER 11 char month (2 trailing spaces)
mmmmmmmmmmm$ September 11 char month (2 trailing spaces)
M and m 9 month digit (non lead zero)
MM 09 2 char month digit (lead zero)
mm 9 2 char month digit (lead space)
MMM 009 3 char month digit (lead zero)
mmm 9 3 char month digit (lead space)
MMMM and mmmm 1101 months since 1/1/1900
MMMMM 01101 5 char months from 1900 (lead zero)
mmmmm 1101 5 char months from 1900 (lead space)
(5 to 9 chars available)
MMMMMMMMM 000001101 9 char months from 1900 (lead zero)
mmmmmmmmm 1101 9 char months from 1900 (lead space)
YY and yy 91 2 digit year
Y and y 1991 full year
YYY and yyy 991 last 3 digits of year
(3 to 9 chars available)
YYYYYYYYY 000001991 full year (leading zero)
yyyyyyyyy 1991 full year (leading space)
The following table shows examples of the Date function used in expressions in different formats. (Note: For these examples, assume the current date is January 7, 2004.)
85

LABEL MATRIX Help
Expression Result
Date("MM/DD/Y") 01/07/2004
Date("m$ dd, y") January 7, 2004
Date("DD M$ Y") 07 JANUARY 2004
If desired, you can also add a custom date stamp that offsets the current date by a certain interval (often used for expiration dates) using the Extended Date function.
Note: When combining a date stamp with other data in an expression, remember to use the required connecting elements.
To use a date stamp in an expression
• On the Data tab, select Combination as the origin and then click in the Expression box to place the cursor at the desired location within the expression. Type Date() directly in the Expression box. Type the appropriate date format code inside the parentheses and enclosed in double quotation marks (e.g., Date("m$ dd, y").
OR
• On the Data tab, select Combination as the origin and then click in the Expression box to place the cursor at the desired location within the expression. Click Other, click Date, and then click OK. Click Date again, and click OK. Type the appropriate date format code inside the parentheses and enclosed in double quotation marks (e.g., Date("m$ dd, y").
Using an Extended Date Function in an Expression The Extended Date function allows you to customize a date stamp by offsetting the date by a certain interval and use this customized date in a combination expression. The Extended Date function offsets the current date based on the system clock using either the default date format or a different format of your choosing.
When used in an expression, the Extended Date function must be written using the following parameters:
ExDate("date format", offset data, "+/- date interval", adjust for Daylight Saving Time)
Example: ExDate("MM/DD/YY", 10, "+d", 0)
• "date format" - Specifies the date format to use. This parameter must be enclosed within parentheses. View table of valid date formats...
Date Setting Output Description
D$ SUNDAY uppercase day of week (DOW)
d$ Sunday upper/lowercase DOW
DD$ SU 2 char uppercase DOW
86

Working with Expressions
dd$ Su 2 char upper/lowercase DOW
(2 to 30 chars available)
DDDDDDDDDDD$ SUNDAY 11 char DOW (5 trailing spaces)
ddddddddddd$ Sunday 11 char DOW (5 trailing spaces)
D and d 1 date of month (non lead zero)
DD 01 2 char date of month (lead zero)
dd 1 2 char date of month (lead space)
DDD 224 days from begin of year (lead zero)
ddd 224 days from begin of year (lead space)
DDDDD and ddddd 33482 days from 1/1/1900
(5 to 9 chars available)
W and w 1 day of week (Sun=1, Sat=7)
WW 34 weeks from begin of year (lead zero)
ww 34 weeks from begin of year (lead space)
WWW and www 783 weeks from 1/1/1900 (last 3 digits)
WWWW and wwww 4783 weeks from 1/1/1900
(4 to 9 chars available)
WWWWWWWWW 000004783 weeks from 1/1/1900 (lead zero)
wwwwwwwww 4783 weeks from 1/1/1900 (lead space)
M$ SEPTEMBER uppercase month
m$ September upper/lowercase month
MM$ SE 2 char uppercase month
mm$ Se 2 char upper/lowercase month
(2 to 30 chars available)
87
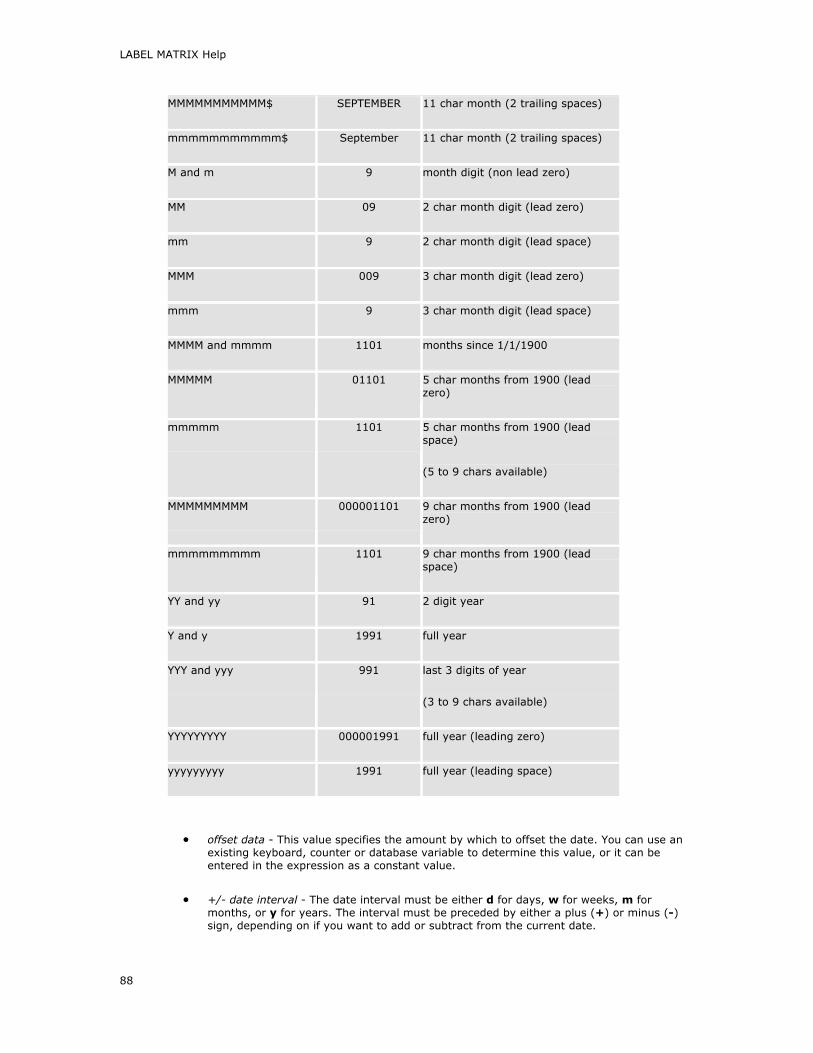
LABEL MATRIX Help
MMMMMMMMMMM$ SEPTEMBER 11 char month (2 trailing spaces)
mmmmmmmmmmm$ September 11 char month (2 trailing spaces)
M and m 9 month digit (non lead zero)
MM 09 2 char month digit (lead zero)
mm 9 2 char month digit (lead space)
MMM 009 3 char month digit (lead zero)
mmm 9 3 char month digit (lead space)
MMMM and mmmm 1101 months since 1/1/1900
MMMMM 01101 5 char months from 1900 (lead zero)
mmmmm 1101 5 char months from 1900 (lead space)
(5 to 9 chars available)
MMMMMMMMM 000001101 9 char months from 1900 (lead zero)
mmmmmmmmm 1101 9 char months from 1900 (lead space)
YY and yy 91 2 digit year
Y and y 1991 full year
YYY and yyy 991 last 3 digits of year
(3 to 9 chars available)
YYYYYYYYY 000001991 full year (leading zero)
yyyyyyyyy 1991 full year (leading space)
• offset data - This value specifies the amount by which to offset the date. You can use an existing keyboard, counter or database variable to determine this value, or it can be entered in the expression as a constant value.
• +/- date interval - The date interval must be either d for days, w for weeks, m for months, or y for years. The interval must be preceded by either a plus (+) or minus (-) sign, depending on if you want to add or subtract from the current date.
88

Working with Expressions
• adjust for Daylight Saving Time - Enter a 1 if you want the date to adjust for Daylight Saving Time. Enter a 0 if you do not want to adjust for it. If you do not specify a value for this parameter, by default the extended date will adjust (1) for Daylight Saving Time.
The following table shows examples of the Extended Date function used in expressions in different formats. (Note: For these examples, assume the current date is October 30, 2002, Keyboard 1 = 10, and [DB.Field] = 3.)
Expression Result
ExDate("m$ dd, y", 1, "+m") November 30, 2002 (1 month after the current date)
ExDate("MM/DD/YY", [DB.Field], "-w") 10/09/02 (3 weeks before the current date)
ExDate("MM/DD/Y", Keyboard 1, "+d") 11/09/2002 (10 days after the current date)
ExDate("DD M$ Y", 120, "+d", 0) 27 FEBRUARY 2003 (120 days after the current date, with no adjustment for Daylight
Saving Time)
Note: When combining a date stamp with other data in an expression, remember to use the required connecting elements.
To use the Extended Date function in an expression
• On the Data tab, select Combination as the origin and then click in the Expression box to place the cursor at the desired location within the expression. Type your Extended Date function directly in the Expression box, with the appropriate parameters enclosed within the parentheses (e.g., ExDate("m$ dd, y", 1, "+m")).
OR
• On the Data tab, select Combination as the origin and then click in the Expression box to place the cursor at the desired location within the expression. Click Other, click Date, and then click OK. Click Extended Date, and then click OK. The program will insert a sample Extended Date function into the Expression box. Replace the sample values with your own parameters, using the sample as a template (e.g., ExDate("m$ dd, y", 1, "+m", 1)).
Using a Time Stamp in an Expression The Time function allows you to use a time stamp in a combination expression. The Time function inserts the current time based on the system clock using either the default time format (e.g., 11:42 PM) or a different format of your choosing.
View table of valid time formats...
Time Setting Output Description
H and h 3 Hour (12 hour non-lead zero)
HH 03 hour (12 hour lead zero)
89

LABEL MATRIX Help
hh 3 hour (12 hour lead space)
X and x 15 hour (24 hour non-lead zero)
XX 15 hour (24 hour lead zero)
xx 15 hour (24 hour lead space)
M and m 45 minutes (non-lead zero)
MM 45 minutes (lead zero)
mm 45 minutes (lead space)
S and s 9 seconds (non-lead zero)
SS 09 seconds (lead zero)
ss 9 seconds (lead space)
AA$ PM 2 char AM/PM signifier
aa$ pm 2 char am/pm signifier
A$ P 1 char AM/PM signifier
a$ p 1 char am/pm signifier
The following table shows examples of the Time function used in expressions in different formats. (Note: For these examples, assume the current time is 11:42:15 PM.)
Expression Result
Time("H:MM AA$") 11:42 PM
Time("HH:MM aa$") 11:42 pm
Time("XX:MM:SS") 11:42:15
Time("XX:MM:SS A$") 11:42:15 P
If desired, you can also add a custom time stamp that offsets the current time by a certain interval using the Extended Time function.
Note: When combining a time stamp with other data in an expression, remember to use the required connecting elements.
90

Working with Expressions
To use a time stamp in an expression
• On the Data tab, select Combination as the origin and then click in the Expression box to place the cursor at the desired location within the expression. Type the Time function directly in the Expression box, entering the appropriate format code inside the parentheses and enclosed in double quotation marks (e.g., Time("m$ dd, y")).
OR
• On the Data tab, select Combination as the origin and then click in the Expression box to place the cursor at the desired location within the expression. Click Other, click Time, and then click OK. Click Time again, and click OK. The program will insert a sample Time function into the Expression box. If desired, replace the default format code with a different format of your choosing. Be sure to type the code within the parentheses and enclosed in double quotation marks (e.g., Time("H:MM A$")).
Using the Extended Time Function The Extended Time function allows you to customize a time stamp by offsetting the time by a certain interval and use this customized time in a combination expression. The Extended Time function offsets the current time based on the system clock using either the default time format or a different format of your choosing.
When used in an expression, the Extended Time function must be written using the following parameters:
ExTime("time format", offset data, "+/- time interval", adjust for Daylight Saving Time)
Example: ExTime(XX:MM:SS", 10, "+m", 0)
• "time format" - Specifies the time format to use. This parameter must be enclosed within parentheses. You can use the default format of "H:MM AA$" (i.e., 11:42 PM) or enter a different format of your choosing. View table of valid time formats...
Time Setting Output Description
H and h 3 Hour (12 hour non-lead zero)
HH 03 hour (12 hour lead zero)
hh 3 hour (12 hour lead space)
X and x 15 hour (24 hour non-lead zero)
XX 15 hour (24 hour lead zero)
xx 15 hour (24 hour lead space)
M and m 45 minutes (non-lead zero)
MM 45 minutes (lead zero)
mm 45 minutes (lead space)
91

LABEL MATRIX Help
S and s 9 seconds (non-lead zero)
SS 09 seconds (lead zero)
ss 9 seconds (lead space)
AA$ PM 2 char AM/PM signifier
aa$ pm 2 char am/pm signifier
A$ P 1 char AM/PM signifier
a$ p 1 char am/pm signifier
• offset time - This value specifies the amount by which to offset the time. You can use an existing keyboard, counter or database variable to determine this value, or it can be entered in the expression as a constant value.
• "+/- time interval" - The time interval must be either s for seconds, m for minutes, or h for hours. The interval must be preceded by either a plus (+) or minus (-) sign, depending on if you want to add or subtract from the current time.
• adjust for Daylight Saving Time - Enter a 1 if you want the time to adjust for Daylight Saving Time. Enter a 0 if you do not want to adjust for it. If you do not specify a value for this parameter, by default the extended time will adjust (1) for Daylight Saving Time.
The following table shows examples of the Extended Time function used in expressions in different formats. (Note: For these examples, assume the current time is 11:42:15 PM on October 26, 2002 (Daylight Saving Time ends on October 27, 2002), Keyboard 1 = 10 and [DB.Field] = 3.)
Expression Result
ExTime("XX:MM:SS", 30, "+s") 11:42:45 PM (30 seconds after the current
time)
ExTime("H:MM AA$", [DB.Field], "+m") 11:45 PM (3 minutes after the current
time)
ExTime("HH:MM:SS AA$", Keyboard 1, "+h", 1)
08:42:15 AM (10 hours after the current time, with adjustment for
Daylight Saving Time)
ExTime("HH:MM:SS AA$", Keyboard 1, "+h", 0)
09:42:15 AM (10 hours after the current
time, with no adjustment for Daylight Saving Time)
Note: When combining a time stamp with other data in an expression, remember to use the required connecting elements.
92

Working with Expressions
To use the Extended Time function in an expression
• On the Data tab, select Combination as the origin and then click in the Expression box to place the cursor at the desired location within the expression. Type your Extended Time function directly in the Expression box, with the appropriate parameters enclosed within the parentheses (e.g., ExTime("HH:MM:SS AA$", 8, "+h")).
OR
• On the Data tab, select Combination as the origin and then click in the Expression box to place the cursor at the desired location within the expression. Click Other, click Time, and then click OK. Click Extended Time, and then click OK. The program will insert a sample Extended Time function into the Expression box. Replace the sample values with your own parameters, using the sample as a template (e.g., ExTime("H:MM AA$", 8, "+h", 0)).
Using Punctuation and ANSI Codes in Expressions You can use punctuation and symbols that are associated with ANSI characters in expressions.
Certain punctuation marks and special characters must be preceded with a backslash (\). This table shows how the backslash can be used.
Expression Result
\\ A single backslash (\)
\" A double quotation mark (")
\x## (Any ANSI character entered in hexadecimal)
\r\n A return (ANSI 13) and a line feed (ANSI 10), which results in a paragraph break
View an example of a paragraph break used in an expression...
93

LABEL MATRIX Help
Note: Remember that any constant data used in an expression must be enclosed within double quotation marks and must be combined with other data using required connecting elements.
To use special characters (ANSI codes) in an expression
Note: When using the Expression Piece dialog box to add constant data to an expression, the quotation marks and any line returns will be added automatically.
1. Add a text or bar code image and select Combination as the origin.
2. On the Data tab, click Other. The Expression Piece dialog box appears.
3. Click Special Character and then click OK.
4. Scroll through the list of ANSI codes to locate the character you want to enter; select the character and click OK.
On the Data tab, the ANSI code appears in the Expression box and the special character appears in the Sample box.
For example, if you click ANSI: 35 (\x23) = #, then “\x23” appears in the Expression box and # appears in the Sample box.
94

Working with Expressions
Using Linked Files in an Expression The Linked File function allows you to you to place information within a combination expression by linking to a text file (.TXT), Rich Text Format (.RTF) file, or ASCII (.ASC) file. The Linked File function can be used to access the file name directly, or to access a database field that references the path and file name.
The following is an example of an expression you could use to access a text file directly:
LinkFile("c:\lmw32\test.txt")
The following is an example of an expression you could use to access a text file from a database field:
LinkFile([Testdata.TXTFILE])
Note: Only a "link" to the file will be stored with the label design; the data from the linked file will be incorporated into the image only when the label is displayed or printed.
To insert a link to a text file within an expression
1. Add a text or bar code image and select Combination as the origin.
2. On the Data tab, click Other.
3. In the Expression Piece dialog box, click Linked File, and then click OK.
4. Select the text file you want to link to, and click Open.
On the Data tab, the expression appears in the Expression box and the result of the expression appears in the Sample box.
5. Click OK or Place to add the image to your label.
Using the Expand Sub Database Function in an Expression The Expand Sub Database function can be used in a combination expression to set up a field in one database to cross reference another database in order to assemble data from multiple records into a single image.
In order to cross reference another database, you will need to set up or specify values for the following:
• Main Database - An attached database file that contains one or more fields that cross reference another database file (the sub database) attached to the label.
• Sub Database - An attached database file that is cross referenced by a field (the master field) in the main database.
• Master Field - A field in the main database that is formatted to cross reference a sub database file. The master field format must be comma delimited, with or without quotes, and it must contain the name of the sub database file followed by a list of one or more key code fields (used to find records in the named sub database file).
• Key Code Field - The field that identifies the record to be retrieved from the sub database.
• Data Field - A field that identifies the data to be retrieved from the sub database.
95
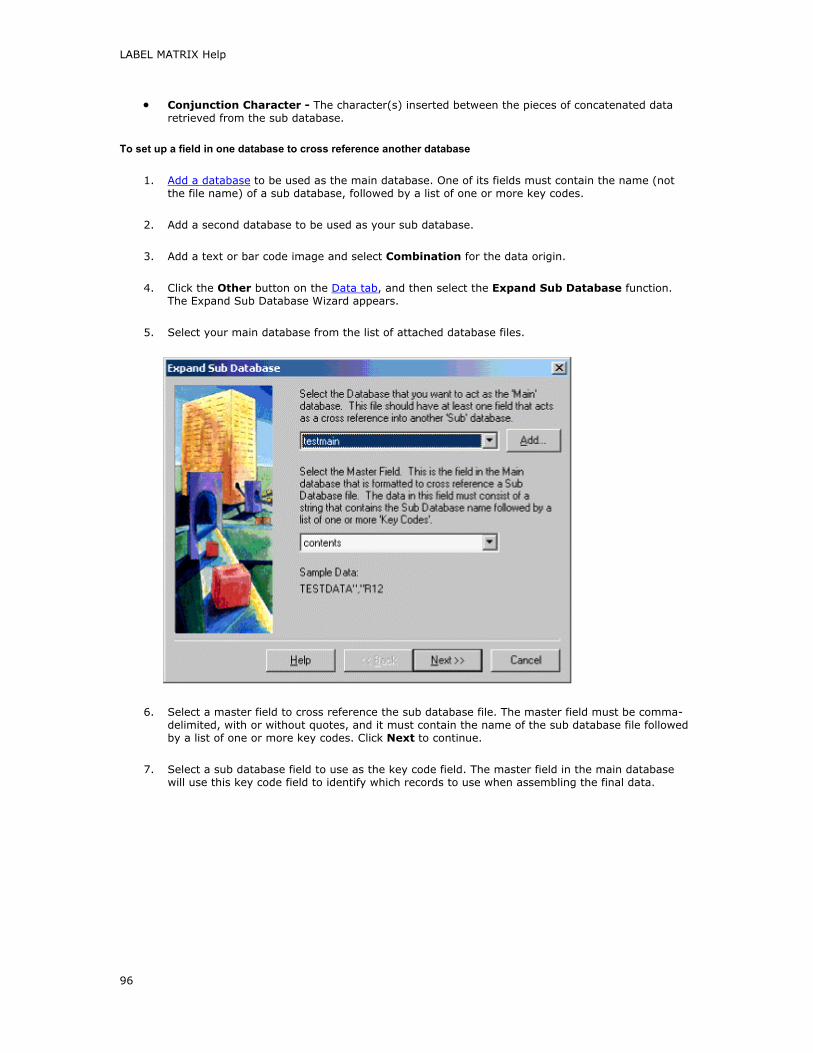
LABEL MATRIX Help
• Conjunction Character - The character(s) inserted between the pieces of concatenated data retrieved from the sub database.
To set up a field in one database to cross reference another database
1. Add a database to be used as the main database. One of its fields must contain the name (not the file name) of a sub database, followed by a list of one or more key codes.
2. Add a second database to be used as your sub database.
3. Add a text or bar code image and select Combination for the data origin.
4. Click the Other button on the Data tab, and then select the Expand Sub Database function. The Expand Sub Database Wizard appears.
5. Select your main database from the list of attached database files.
6. Select a master field to cross reference the sub database file. The master field must be comma-delimited, with or without quotes, and it must contain the name of the sub database file followed by a list of one or more key codes. Click Next to continue.
7. Select a sub database field to use as the key code field. The master field in the main database will use this key code field to identify which records to use when assembling the final data.
96

Working with Expressions
8. Select the sub database field you want to use as the data field. This field will be used to identify the data to appear in your combination image.
9. Select or type the character(s) you would like to appear between each of the concatenated strings.
10. Click Finish to return to the Data tab and view the combination expression.
97

LABEL MATRIX Help
View an example of the Expand Sub Database function used in an expression...
The following example shows how the main database and sub database relate to each other when the Expand Sub Database function is applied.
In this example, MAIN is the name of the main database file, MASTER is the name of the master field in the main database, SUB is the name of the sub database file, KEY is the name of the key code field in the Sub Database, and DATA is the name of the data field in the sub database.
The function is set up in the Expression box as:
ExpSubDB([MAIN.MASTER],"KEY","DATA","--")
Note: The KEY and DATA fields were added to this expression as constant data (merely typed in parentheses), but these field references could have any data origin (database, keyboard input, etc.).
MAIN.MASTER contains the data:
"SUB, a245, a255, a234"
"SUB, a285, a465, a255"
The SUB database contain fields KEY and DATA with the following data:
KEY,DATA
a234,do not breathe when open
a245,Dangerous materials
a285,Health hazard
a255,avoid exposure to skin
a465,contains lethal toxins
The data for Label #1 would expand to:
Dangerous materials--avoid exposure to skin--do not breath when open
The data for Label #2 would expand to:
Health hazard--contains lethal toxins--avoid exposure to skin
98

Using Functions in Expressions
Using a Bar Code Function in an Expression When you add a bar code to your label, if that bar code has a required checksum, the label design software will automatically include that checksum in the bar code. However, there may be times when you want the checksum of a bar code to appear as a text image on your label, or possibly your bar code specification calls for a non-standard checksum — in these instances you can use a Bar Code Function in a combination expression to calculate a checksum.
The following table shows the checksum functions that are available in the label design software.
Checksum Function Bar Code
Check10UPC UPC
Check10EAN EAN
Check10Int25 INT 2 OF 5
Check10UCC UCC-128
Check10Codabar CODABAR
Check10MSI MSI PLESSEY
Check16 CODABAR
Check43 3 OF 9
2Check47 CODE 93
2Check10 MSI PLESSEY
Check11Check10 MSI PLESSEY
Check10Quelle
Check11_3Suisses
Note: Check10Quelle is also known as MOD10 LUHN or MOD10 Double Add Double.
To add a checksum to a label as a separate text image
1. Add a text object that uses the Combination origin.
2. In the Data tab, click Other.
3. In the Expression Piece dialog box, click Bar Code Function.
4. Select the appropriate bar code function, and then click OK.
5. Do one of the following:
• If you want to add only the checksum without the text string, click Just Check Digit and then click OK.
• If you want to add a checksum that includes the text string along with the checksum, click Append Check Digit and then click OK.
On the Data tab, the expression appears in the Expression box and the result of the expression appears in the Sample box.
6. Click OK or Place to add the image to your label.
99

LABEL MATRIX Help
Note: If desired, you can type a bar code function directly in the Expression box on the Data tab instead of using the Other button to add the function.
Using a String Function in an Expression 1. Add a text or bar code image that uses the Combination origin.
2. In the Data tab, click Other.
3. In the Expression Piece dialog box, click String Function. A list of string functions appears.
4. Select the appropriate string function, and then click OK.
5. The program will insert a sample function into the Expression box. Replace the sample values with your own parameters, using the sample as a template.
6. Check the output in the Sample box, and click OK to place the image on your label.
Note: If desired, you can type a string function directly in the Expression box on the Data tab instead of using the Other button to add the function.
Using a Math Function in an Expression 1. Add a text or bar code image that uses the Combination origin.
2. In the Data tab, click Other.
3. In the Expression Piece dialog box, click Math Function. A list of math functions appears.
4. Select the appropriate math function, and then click OK.
5. The program will insert a sample function into the Expression box. Replace the sample values with your own parameters, using the sample as a template.
6. Check the output in the Sample box, and click OK to place the image on your label.
Note: If desired, you can type a math function directly in the Expression box on the Data tab instead of using the Other button to add the function.
Using a Logic Function in an Expression 1. Add a text or bar code image that uses the Combination origin.
2. In the Data tab, click Other.
3. In the Expression Piece dialog box, click Logic Function. A list of logic functions appears.
4. Select the appropriate logic function, and then click OK.
5. The program will insert a sample function into the Expression box. Replace the sample values with your own parameters, using the sample as a template.
6. Check the output in the Sample box, and click OK to place the image on your label.
Note: If desired, you can type a logic function directly in the Expression box on the Data tab instead of using the Other button to add the function.
100

Working with Databases
Adding a Database This program allows you to set up your label design to read information from a database file at print time. It can interface with many different types of database files to integrate that data into your labels. If your program can produce an ASCII Text file or any of the following file types, then the program can connect to the data to print labels.
• Microsoft Access • Oracle 7
• Microsoft Excel • Oracle Lite
• dBase • SQL Server
• Text • SQL Anywhere
• FoxPro • Lotus Approach
• Visual FoxPro • Lotus Notes
• Paradox
To add a database file to your label design
1. To start the Add Database Wizard, do one of the following:
• From the New Label Wizard, choose the Use information obtained from databases option and click the Add button on the next screen.
• From the Label Properties tab dialog, click on the Database tab. The Database tab lists any database files that have already been attached, but you can also attach a new database file by clicking the Add button.
• On the Insert menu, click Database File.
• Select Database as the data origin for a text or bar code image and then click the Add button.
2. Depending on the edition of the software you are using, the Normal Setup/Advanced Setup screen may appear. Select the Normal Setup option, then click Next.
Note: You may need to use advanced database setup if you need to select an OLE DB provider, specify an ODBC data source, use SQL statements, or set up a username and password on a database with security. Some text files and FoxPro/dBase files may also require advanced setup to read data correctly if the fields are truncated.
3. Click the File button and select a database file to use with the label, then click Open.
4. The filename appears in the text box. Click Next.
101
LABEL MATRIX Help
5. The program will analyze the database to find out the total number of records, the sample field information, and field properties such as the type and min/max lengths. (If you are using a large database you may stop the analyzation process at any time by clicking the Stop button.) After the drivers are scanned, a list of analyzed records appears. Click Next.
6. Select and set up a method of accessing the database information: Sequential Access, Keyed Access/Primary Key, or Keyed Access/Unlimited Keys.
7. If desired, assign a name and description to the database. This name will not change the database file name, but will merely be used as a descriptive name that allows you to easily reference the database within this program.
8. Click Finish to end the Add Database Wizard.
Adding a Database Using Advanced Setup You may need to use Advanced Setup to add a database if you plan to select an OLE DB provider, specify an ODBC data source, use SQL statements, or set up a username and password on a database with security. Some text files and FoxPro/dBase files may also require Advanced Setup to read data correctly if the fields are truncated.
To add a database using Advanced Setup
1. Add a text or bar code image and select Database as its data origin.
2. Click the Add button to start the Add Database Wizard.
3. Select the Advanced Setup option.
The following advanced database setup options are available when you select the Advanced Setup option from the first screen of the Add Database Wizard.
Selecting an OLE DB Provider
Providing a Username and Password
Specifying an ODBC Driver
Customizing an SQL Select Statement
Accessing Database Records The label design software provides three methods for accessing records in a database. The method you choose will depend on whether you want all the records in the database to print (sequential access) or you want to limit the records to those that match certain data (“keys”) that you specify.
You can define a database access method in the Add Database Wizard while adding a database to the label. If you have already attached a database to the label, you can define the key access in the Database Properties dialog box (accessible from the Label Properties Database tab).
Sequential Access With sequential access, printing usually begins at the first record in the file and prints the records in succession. Use sequential access when you want to print every record in the database (for example, if you want to print the names of all company employees)
102

Working with Databases
Keyed Access, Primary Key This method allows you to randomly access any record in the database based on a primary key (a key field that you specify). The key, depending on its key origin, can contain a value that is constant, entered at the time of printing, or derived from a field in another database. The key field selected determines which records in the database are accessed. Use keyed access when you want to access a specific group of records, not the entire database.
For example, if you have a company database of employees containing records that have Name, Title, and Department fields, and you want to print nametags for individuals in a certain department, you can define a primary key for the Department field. The value you enter for the key (e.g., Sales, Marketing, Support or other department that appears in the database) determines which records are accessed.
Keyed Access, Unlimited Keys This method allows you to randomly access any record in the database based on the values of several keys, with each key assigned to a field in the database. Each key, depending on its key origin, can contain a value that is constant, entered at the time of printing, or derived from a field in another database. You can define multiple keys and assign keys to as many database fields as you need to narrow the search for database records to print.
For example, if you have a company database of employees you could assign a key with a value (such as Sales) to the Department field, and a key with a value (such as Managers) to the Title field. By doing so you could access records and print nametags for managers in the Sales department, and not anyone else.
Reanalyzing Your Database The Reanalyze function allows you to analyze your database for the total number of records and for updated field property information. To reanalyze an attached database file, go to the Label Properties Database tab, select the appropriate database file, and click the Reanalyze button.
Reasons for reanalyzing your database:
• You may need to reanalyze your database if you used either Normal Setup or Advanced Setup to add your database and one or more of the following changed: the location, filename, field structure (i.e., fields set up as numeric, character, etc.), or number of fields. If any of these changes occur, then the database drivers may no longer be able to understand the database setup and so you may be prompted to reanalyze your database.
• If you used Normal Setup to add your database and then the contents of the database changed, you may need to reanalyze in order to access the changed data. Another solution for this problem is to use Advanced Setup to add the database – then the structure will be analyzed by the driver during setup and the data will be able to change as needed without having to reanalyze.
Data Grid The Data Grid is available if you have attached a database file to your label. When selected, the Data Grid appears in the lower portion of the design window.
The Data Grid displays a scroll list of records for the selected database file, and allows you to select specific records for printing or display in your label.
By using the Data Grid Toolbar at the top of the Data Grid, you can search, sort, and filter records, or type in a specific record number to display. As you select a new record in the Data Grid, the text or bar code image that pulls data from that record will update "live" on the design screen.
To view database records in the Data Grid
1. On the Grid menu, click Data Grid. Alternatively, you can click the Data Grid button. (The Data Grid option is available only if you have attached a database file to the label).
103

LABEL MATRIX Help
2. If you have more than one database attached to the label, select the desired database file from the drop-down list located on the left side of the Data Grid Toolbar.
Note: All keyed access files will appear sequentially in the Data Grid scroll list.
104

Printing Labels
Selecting a Printer One of the first steps in the process of designing a label is to select the printer you will use for printing labels. The printer model selected determines what options are available as well as the label’s size limitations—not all printers share the same characteristics.
To select a printer for your label design
1. On the File menu, click Printer Setup.
2. Select a printer from the list of attached printers.
If your printer does not appear in the drop-down list, click the Add button to install a printer using the Add Printer Wizard (Windows printers must be added through the Windows Control Panel).
3. Click OK to return to the design window.
Print dialog box
To access this dialog box: On the File menu, click Print.
The options that appear on the Print dialog box will vary depending on the variables (such as counters) and page setup defined for your label.
All: The labels will print continuously until the print job is finished. If the label contains images that retrieve information from a database file, then printing will start with the first record in the file and print a label for every record in the database.
Pages: If printing multiple labels per page, this option allows you to specify the total number of pages to print. When you enter a value for Total pages setting, a value for Total labels appears automatically based on the number of labels per page.
Labels: The number of labels to print. The way this setting works varies depending on the type of images (constant, variable or database) on your label:
• If all images on the label are constant, this will be the number of copies of the label.
• If the label uses variable images such as counters or keyboard input values, this is the number of unique labels that will print.
• If the label contains images that retrieve information from a database file, then the From and To boxes appear for you to select a range of database records to print.
• If you have a database file attached to your label and currently have the Data Grid displayed on the screen, you can print the labels for those records that you have selected (highlighted) in the Data Grid.
Note: The Labels value does not include any duplicates you have set up for the label. So, for example, if you have duplicates set to 2 and you enter a Labels value of 3, the program will print 2 duplicates of each of the 3 labels, for a total of 6 labels printed (basically multiplying the value entered for the Labels setting by the value set on the Label Properties Duplicates tab).
105

LABEL MATRIX Help
Selected: If you have a database file attached to your label and currently have the Data Grid displayed on the screen, you can print the labels for those records that you have selected (highlighted) in the Data Grid.
Sample: Allows you to print just one label or one page of labels so you can test communications or check the appearance of the printed label.
Start On Label: This option appears if you are printing multiple labels per page. The position of the printed label will depend on the direction in which your labels are printed (as defined in the Multiple tab of the Label Properties dialog box). For example, if you have three labels across and have set up the label direction to start at the top-left and go right, and if you Start On Label 3, it will print in the top-right label.
Reverse Pages: Reverses the order of pages in a print job. For example, if printing 10 pages of labels, normally pages 1-10 would be printed in order with page 1 printed first. With Reverse Pages selected, however, the print job is reversed so that instead of page 1 printing first, page 10 would print first and printing would continue until all pages are printed, with page 1 printing last.
Print to File: Instead of sending the label to a printer, Print to File prints the contents to a text (.txt) file that you can name and save. This option is used mostly for troubleshooting purposes, to verify the exact label information being sent by the program.
Printer: Allows you to select a printer from the list of printers that have been added through the label design software or through Windows.
Left Offset: Allows you to offset the position of the label on the label media, in relation to the left edge of the media.
Top Offset: Allows you to offset the position of the label on the label media, in relation to the top edge of the media.
Setup: Displays the printer properties dialog box for the selected printer.
Printing a Sample Label Print Sample allows you to print just one label or one page of labels. By doing so you can test communications and check the output of a printed label.
If the label or page that is printed contains keyboard input, counter, or database values, the sample values will be used to act as placeholders for the actual image data. Printing sample labels does not cause counters to increment or database values to change.
To print a sample label
• On the File menu, click Print Sample. Alternatively, you can click Print Sample on the Standard Toolbar.
The Printing box appears briefly during processing, and then the sample is printed.
106

Printing Labels
Printing Labels
To preview a label before printing
• Click Print Preview to see how the label in the design window will look when it is printed.
To print a test label
• Click Print Sample to print just one label or one page of labels to test communications and check the output of a printed label.
To print your labels
1. Select Print from the File menu. Alternatively, you can click Print on the Standard Toolbar.
2. Set the options on the Print dialog box as appropriate for your print job.
3. Click OK.
Printing Duplicates of Each Label You can define the number of duplicate labels to print when you set up your label design. The number of duplicates will be in effect each time you print your label.
To set up a duplicate value while going through the New Label Wizard
1. Check the Print duplicates of each label option on the first screen of the wizard.
2. Select an origin for the duplicate value.
Set up the number of duplicates with one of these origins:
• Constant: The number of duplicates is entered here (on the Duplicates tab), and that value will stay the same for every print job. The default is 1, meaning only one label will be printed.
• Database: The number of duplicates is extracted from a field in a database.
• Keyboard Input: The operator is prompted for the number of duplicates at print time.
• Combination: The number of duplicates is the result of an expression, which can be written using math, string or logic functions applied to keyboard, counter or database variables using the Combination origin. (Note: This origin is not available in all editions of the program.)
• Copy: Copies an existing variable or image and uses its data origin to determine the number of duplicates to print.
3. Set up your duplicate value as appropriate for the origin you selected.
To set up your duplicate value after you have exited the New Label Wizard
107

LABEL MATRIX Help
1. One the File menu, click Label Properties.
2. Click the Duplicates tab.
3. Select an origin for the duplicate value.
Set up the number of duplicates with one of these origins:
• Constant: The number of duplicates is entered here (on the Duplicates tab), and that value will stay the same for every print job. The default is 1, meaning only one label will be printed.
• Database: The number of duplicates is extracted from a field in a database.
• Keyboard Input: The operator is prompted for the number of duplicates at print time.
• Combination: The number of duplicates is the result of an expression, which can be written using math, string or logic functions applied to keyboard, counter or database variables using the Combination origin. (Note: This origin is not available in all editions of the program.)
• Copy: Copies an existing variable or image and uses its data origin to determine the number of duplicates to print.
4. Set up your duplicate value as appropriate for the origin you selected.
108

Command Line Printing
LMWPRINT Commands Filename of Label to Print (/L=<filename>)
The /L= command tells LMWPRINT which label to print by loading the file that matches the name you enter for the <filename> parameter. The full filename must be entered correctly or the file will not load. If you enter the filename without including the file extension, the QDF file extension is automatically appended to the filename.
Example: LMWPRINT /L=product1.qdf This command line will print the label which has product1.qdf as its filename.
Number of Labels to Print (/C=<label count>)
The /C= command tells LMWPRINT the number of unique labels to print.
Example: LMWPRINT /L=shipto.qdf /C=50 This command line will print 50 labels for the file having the shipto.qdf filename.
Start On Label (/R=<label number>)
The /R= command tells LMWPRINT the exact label from which you would like to start printing when you have multiple labels on the page. This number must be between 1 and the total number of labels on the page.
The label number you should enter here will depend on the direction in which your labels are counted on the Label Properties Multiple tab. For example, if you have three labels across and you've set up the label direction to start at the top-left and go right, then if you tell the program to print starting on label 3 it will start on the top-right label. Conversely, if you have three labels across and you've set up the label direction to start at the top-right and go left, then if you tell the program to print starting on label 3 it will start on the top-left label.
Example: LMWPRINT /L=shipto.qdf /R=3 This command line will tell the program to print starting with the third label.
Number of Pages to Print (/P=<page count>)
The /P= command tells LMWPRINT the number of pages to print. The <Page Count> parameter given for this command must be a numeric value.
Example: LMWPRINT /L=customer.qdf /P=25 This command line will print 25 pages of the label with the customer.qdf filename.
Number of Duplicate Labels to Print (/D=<dupe count>)
The /D= command tells LMWPRINT the number of duplicate labels to print. The <Dupe Count> parameter given for this command overrides any Constant duplicate label settings in the design file (it will NOT override database or Keyboard origin duplicate settings).
Example: LMWPRINT /L=office.qdf /C=50 /D=2
109

LABEL MATRIX Help
This command line will print a label with the office.qdf filename and print 50 labels with two duplicates of each label (for a total of 100 labels).
Number of Records to Skip (/S=<record count>)
The /S= command tells LMWPRINT how many records to skip if the file is pulling values from a sequential database. This command is useful if you have a database with a large number of records and have to stop the print job when you are only part way through the records. Using the /S= command, you can resume the print job right where you left off. The <Record Count> parameter must be a numeric value.
Example: LMWPRINT /L=control.qdf /D=3 /S=15 This command line will print the label with the control.qdf filename, print three duplicates of each label, and skip records 1-15 of the database when printing.
Bypass Password (/E=<username,password>)
The /E= command tells LMWPRINT to bypass any user input required (if the label setup requires a password) to allow automatic label processing. If you are required to enter a username and password in the program and you do not include the /E= command, the program will display a dialog asking you to enter a username and password.
Example: LMWPRINT /L=ex2.qdf /E=PSmith,golfball This command line will print the label having the ex2.qdf filename, enter your username as PSmith, and enter your password as golfball.
Lock File (/F=<path\lock file name>) or (/FL=<path\lock file name>)
The /F= command tells LMWPRINT to use a temporary "lock file" that will be deleted when the print job is finished. The /F= command can be used with front-end applications to handle timing issues when multiple LMWPRINT jobs are sent to the printer. Basically, the lock file is used by a front-end or third-party application to tell when we finish printing. The /F= passes in a file that we delete when the printing is complete. The front-end application can then continue to look for the existence of this file and as long as it is there we should still be printing. For example, if the jobs are sent too quickly, data from the front-end may not be available for them, or the printer may still be busy with the first job and then the second job does not print because the printer was tied up.
The /FL= command serves the same purpose as /F=, but /FL= also opens the file so that the front-end application can try to delete the file until it succeeds, which means that the print job has either finished printing or errored out and released the file. The purpose is to be able to tell that the printing is complete if the print engine errors out and does delete the file.
View steps for implementing the /F= (or /FL) command...
To implement the /F= (or /FL) command
1. Via your front-end application, create a temporary file, which we will call the "lock file." The lock file can be any physical file on the computer and can have any filename. The important point to note is that LMWPRINT will delete this file when the print job is done.
2. Set up your front-end application to check for the presence of the lock file. When the file is no longer present you can then start up the next print job in your application. For example, you could set up a program loop that keeps checking for the file and as long as it finds it there, you know the print job has not been completed. Once the print job is finished and the file is deleted, you are ready to send another print job.
110

Command Line Printing
3. Add the /F=<path\lock file name> command switch to your LMWPRINT batch file or call it from your front-end application.
Example: LMWPRINT /L=ex2.qdf /F=C:\lock.txt This command line will tell LMWPRINT to print a label with the ex2.qdf filename and use a lock file called lock.txt that will be copied to the root of the C: drive.
Note: We cannot provide support for your front-end applications or for writing/configuring these applications.
Replace Datafile (/File=<internalName,path\datafileName>)
The /File= LMWPRINT command allows you to replace an attached database file with a database file of the same format. It is important to note the difference in the two parameters required for this command: The first parameter, internalName, is the name of the database being replaced. This is NOT the actual filename, but the name you give the database in the program (normally entered on the last screen of the Add Database Wizard and can be viewed in the NAME column of the Database tab in the Label Properties tab dialog). The second parameter, path\datafileName, is the filename of the new database file. The format of this database file MUST be the same as that of the file being replaced. (As always, be sure to specify the label that the database is attached to by using the /L= command.)
Example: LMWPRINT /L=send.qdf /File=customer1,cust2.dbf You could enter this command line to print a label with the send.qdf filename, and replace the customer1 dBase format database (currently attached to the send.qdf label) with the cust2.dbf database at print time. View examples for databases with multiple tables and for working with table names with spaces in them...
If you have a database with multiple tables (Access and Excel files may have table names associated with them in addition to the filename) you can replace just the database filename OR leave the database name alone and change just the table name OR you can change both the database filename and the table name. To change the table name, enclose it in brackets "[ ]". Here are some examples:
/FILE=internalName,path\dataFilename
/FILE=internalName,path\dataFilename[tableName]
/FILE=internalName,[tableName]
If you have a file or table name with a space in it, you will need to put quotes around everything after FILE= or it will not work. For example:
/FILE="internal Name,path\filename"
/FILE="internalName,path\filename[table Name]"
/FILE="internalName,[table Name]"
111

LABEL MATRIX Help
Wait for Next Print Job (/W)
The /W command tells LMWPRINT to wait for you after printing so you can continue with another print job without having to open the program again. With no /W command specified, LMWPRINT will close after the final label prints. Subsequent calls to the LMWPRINT program do not need the /W command unless the /Q command was used on the command line to close the program.
Example: LMWPRINT /L=class.qdf /P=50 /S=10 /W This command line will tell LMWPRINT to print a label with the class.qdf filename, print 50 pages of labels, skip the first 10 records of the database, and keep the print program open after the print job so you can set up another print job.
Log Error Messages to a File or Ignore Them (/G=<logfilename> or /G)
The /G command lets you specify a log file name for error messages. If this command is used, it will write error messages to the log file instead of popping up message dialogs requiring you to click OK. If the /G command is used without any parameters, it will ignore the error messages completely. The /G command needs to be supplied for each print job in which you want to send any error messages to a file.
Example: LMWPRINT /L=quantity.qdf /C=75 /G=logfile.txt This command line will tell LMWPRINT to print 75 of the quantity.qdf label and send any error messages to the logfile.txt log file.
Suppress Print Status/Cancel Dialog (/N)
The /N command tells LMWPRINT to suppress the dialog which normally indicates which page is printing and allows you to cancel the print job. The /N command needs to be supplied for each print job in which you want to suppress the print status/cancel dialog.
Example: LMWPRINT /L=class.qdf /P=30 /N This command line will tell LMWPRINT to print a label with the class.qdf filename, print 30 pages of labels, and suppress the print status/cancel dialog for this print job.
Close LMWPRINT Program (/Q)
The /Q command closes LMWPRINT and removes it from memory. When the original print job is started with the /W command, this is the only way to close down LMWPRINT, as there is not a dialog associated with it. This command can be sent alone on the command line or on the last call to print a label.
Example: LMWPRINT /L=rlabel.qdf /W LMWPRINT /L=slabel.qdf /D=2 LMWPRINT /Q The first command line in the example will tell LMWPRINT to print the label design called rlabel.qdf and the program will remain active in memory, waiting for the next command line. The second command line will tell LMWPRINT to print the label design called slabel.qdf with two duplicates of each label. The final command line will close the LMWPRINT program and remove it from memory.
Minimize the Print Engine (/M)
The /M command starts LMWPRINT in a minimized state, waiting for you to activate it and select a label to print.
112

Command Line Printing
Redirect Printed Output to a Port or Printer Path (/O)
For Printing Using Standard Serial or Parallel Ports
The /O LMWPRINT command will redirect printed output to a specified port. It allows changing of the port for the printer that was selected for the label design. The printer type and name must be the same for the printer on the newly selected port as the one selected in the label design. This command works best when you have two printers of the same model attached to your computer and wish to direct the print job to one printer or the other. For example, you can set up your label design for almost any Windows printer and then specify the proper one to print to at print time.
Example: LMWPRINT /L=zlabel.qdf /O=LPT1: This command line will tell LMWPRINT to print a label called zlabel.qdf to the printer on the LPT1: port. For Printing Using TCP/IP or UNC Ports The /O command becomes slightly more complex when printing using TCP/IP or UNC ports because it is more difficult for the program to determine what type of port is being requested. For this reason, when using these types of ports, an extra letter must be used in the command to distinguish the port type. The syntax is as follows:
Property
/O Command Port Type
/OS=COM? Serial port
/OP=LPT? Parallel port
/ON=\\UNC Path\Path UNC port
/OI=123.45.678.9 TCP/IP port
/OF=file pathname Print to file
Printer Name (/X)
With the /X LMWPRINT command, you are able to further refine the selected printer by passing in both the /X and the /O commands. /X is processed first so that we know the new printer to look for and then the /O would tell us the new port to which it is attached. This would be used when you have two or more printers of the same kind, same name, etc. on different ports and want to send to a particular one of them. In that case you need to send the name of the printer (assuming the printer is different than when the label was designed) so we know what printer to look for and then the /O command so we know which one to use. If you do not match both the /X and /O, the printer that was used during the design time will not be changed.
Run Separate Instance of Print Engine (/Y)
The /Y LMWPRINT command changes the way print jobs are processed. Without using this command, if you send one print job and then send a second job, the program will wait for the first job to finish and will then use the same "instance" of LMWPRINT that is already open to run the second job. When you use the /Y= command, a second "instance" of LMWPRINT will open to run the second job, allowing you to run jobs to different ports simultaneously rather than waiting for
113

LABEL MATRIX Help
the first job to finish. The number of print jobs that can be run simultaneously depends on how many licenses exist.
Using the Standalone Print Engine Some editions of this program allow you to initiate on-demand print jobs virtually anywhere at any time by specifying special commands and parameters. This flexible printing capability is possible via a separate printing engine called LMWPRINT.
The LMWPRINT print engine can be used in a variety of ways:
Using the LMWPRINT Icon to Open and Print a File
Entering Print Commands on the Windows Run Line
Entering Print Commands at a DOS Prompt
Setting Up a Shortcut to Print a File
Calling LMWPRINT From Another Program (Advanced)
LMWPRINT - Entering Print Commands on the Windows Run Line 1. Click the Start button on the taskbar and select Run.
2. Type the appropriate path to call the LMWPRINT engine (i.e. c:\ lmw32\ lmwprint) plus the /L= command followed by the appropriate filename (i.e. /L=sample.qdf). If desired, type additional commands to customize your print job further (i.e. print four duplicate labels using the /D=4 command). So a complete command line entry might look something like this:
c:\ lmw32\ lmwprint /L=sample.qdf /D=4
3. Press ENTER to run the LMWPRINT engine with the commands and parameters you've specified.
LMWPRINT - Entering Print Commands at a DOS Prompt 1. At a DOS prompt, type the appropriate path to call the LMWPRINT engine (i.e. c:\ lmw32\
lmwprint) plus the /L= command followed by the appropriate filename (i.e. /L=shipping.qdf). If desired, type additional commands to customize your print job further (i.e. print 10 labels using the /C=10 command). So a complete command line entry might look something like this:
c:\ lmw32\ lmwprint /L=shipping.qdf /C=10
2. Press ENTER to run the LMWPRINT engine with the commands and parameters you've specified.
Using the LMWPRINT Icon to Open and Print a File 1. Locate the LMWPRINT icon (it will be in the same program group where the main program is
installed) and double-click on it with your mouse. The LMWPRINT introduction screen appears.
2. Select the Find another label to print option and press ENTER. The Open dialog box appears.
3. Select the label file you would like to print and click OK.
LMWPRINT - Setting Up a Shortcut to Print a File 1. Right-click anywhere on the Windows desktop, select New and then select Shortcut.
2. Type the LMWPRINT location and name of the design file to which you want to create a shortcut (i.e. c:\ lmw32\ lmwprint /L=label2.qdf).
114

Command Line Printing
Calling LMWPRINT From Another Program (Advanced) LMWPRINT is an executable file, and therefore, it is possible to call LMWPRINT from other programs. However, it is important to note that every program has a different way of passing command lines.
Some editions of this program also allow you to pass parameters to LMWPRINT using Dynamic Data Exchange (DDE) for the purpose of printing pre-designed labels from your own programs. DDE allows you to send messages between applications that share data and uses shared memory to exchange data between applications. To view the parameters that are available to be passed to LMWPRINT using DDE, see LMWPRINT Commands.
Note: We cannot provide support for front-end applications or for writing/configuring these applications to work with LMWPRINT.
115


Printing Labels Automatically with AutoPrint
About AutoPrint AutoPrint allows you to set up automatic printing of a label that uses an attached database.
This function is useful for printing labels based on data that is constantly changing, such as data sent from a mainframe or from an accounting or manufacturing process. AutoPrint automates these types of print jobs by looking for the database and, when available, printing labels for all the records in the database, and then deleting the current database in anticipation of the next batch of data to come.
Note: Another application must write data to a file. The label design software does not perform this action.
Prerequisites
Polling frequency
Accessing AutoPrint
Prerequisites The AutoPrint feature can be associated with a label that has only one dBase or ASCII file with sequential access attached. The data file you select must be a database that can be deleted because this file will be deleted after all records in the database are printed.
If you are using AutoPrint in conjunction with the standalone print engine (LMWPRINT), you must launch LMWPRINT first in order to run AutoPrint.
Polling Frequency AutoPrint will “poll” or query a target location for the data file. It looks for the database in the location where it was when the label was designed. If it is there, it prints a label for each record. When it is done printing, it then deletes the control database (so be sure to choose a database that can be deleted).
Then it waits until the database is re-created. When the database is created, it resumes printing until all records in the database are printed and once again deletes the database.
This cycle continues until you click Cancel on the Polling dialog box or—depending on which option is selected—it keeps polling until a specified time, for a specified number of hours, or until printing has ceased for a specified amount of time.
To change the polling frequency...
Access You can access AutoPrint from the AutoPrint tab of the Label Properties dialog box.
Access polling properties by clicking the Advanced button on the AutoPrint tab of the Label Properties dialog box.
AutoPrint - Setting Up AutoPrint Note: AutoPrint may only be used with one dBase or ASCII file with sequential access. The data file you select must be a database that can be deleted as this file WILL BE DELETED after all records in that database are printed.
To set up files for automatic printing
Note: If you are using AutoPrint in conjunction with LMWPRINT, the program's print engine, note that LMWPRINT must first be launched in order to run AutoPrint.
117

LABEL MATRIX Help
1. First, create a database. This database will be deleted after the print job. Your database program must create a new database using the same name and location as this database in order for AutoPrint to recognize and launch the next print job.
2. Open your label design file.
3. Attach the database to the label design using sequential access.
4. On the File menu, click Label Properties, and then click the AutoPrint tab.
5. Select the database that will signal the start of the print job, and that can be deleted at the end of the print job.
6. Select the Enable AutoPrint check box, and then click Advanced.
7. Set the options on the Advanced AutoPrint Properties dialog box as appropriate for your application, and click OK to return to the label design window.
8. Design your label by adding text and/or bar code images to the label, and associating selected objects with the Database origin, and with the fields in the database that should populate them.
9. Save the label design.
10. On the File menu, click Print.
Note: Alternatively, you can use AutoPrint in conjunction with LMWPRINT and initialize the first print job from the standalone print engine.
11. On the Print dialog box, click All, and then click OK.
A dialog box appears on the desktop indicating that AutoPrint is working. (This box cannot be minimized, but you can drag it to the bottom of the screen.)
AutoPrint prints a label for all the records in the database, and then deletes the database. AutoPrint searches for the same database file name and, upon finding it, initializes the next print job automatically.
AutoPrint - Adding Records to the Source Database
Timing When using the AutoPrint function, you can add records to the source database if you do it in between the times that AutoPrint is set to poll the database.
The program you use to create the database file should attempt to open the file with exclusive access and create the file if it does not exist. If it cannot open it, it should attempt to open it again after a short delay, as AutoPrint may be processing the contents of the file.
Keep trying to open the file until it is opened or until some predetermined time-out time is reached. (AutoPrint processes the file faster than the printer prints, so normally you should be able to access the file rather quickly.)
Process With the file open, proceed to add as many records as you like and then close the file. The program will print the contents of the file, after it is closed, the next time it checks for the existence of the file.
If the file is on a network and there are several programs adding records to the file, follow the same instructions given above, but try to close the file as quickly as possible so that the other programs will not have to wait too long before they can access the file.
118

Printing Labels Automatically with AutoPrint
Changing the Polling Frequency When AutoPrint functionality is enabled, AutoPrint will "poll" or query a target location for the data file. It looks for the database in the location where it was when the label was designed. If it is there, it prints a label for each record. When it is done printing, it then deletes that database (so be sure to choose a database that can be deleted). Then it waits until the database is created once again. When the database is created, it then resumes printing until all records in the database are printed and once again deletes the database. This cycle continues until you click the Cancel button on the polling dialog, or depending on which option is selected, it will keep polling until a specified time, for a specified number of hours, or until printing has ceased for a specified amount of time.
To change the polling frequency and/or enable a specific period of time to wait before shutting down
1. Click the Advanced button on the AutoPrint tab to bring up the Advanced AutoPrint Properties dialog box.
2. By default, AutoPrint will query the target location every 30 seconds. If you would like it to check for the presence of the database more or less often than every 30 seconds, you can change this time interval setting in the Windows lmw32.ini file under [Options]. For example:
[Options]
Auto Print Interval = 5
(where 5 is the number of seconds to wait before checking for the existence of the data file again)
Using AutoPrint with LMWPRINT You can use the LMWPRINT standalone print engine to initiate automatic label printing without having to launch the label design software.
LMWPRINT must first be launched in order to run AutoPrint. Once the AutoPrint options have been configured, launch LMWPRINT to begin the process.
Note: LMWPRINT occupies a license. If you plan to use the label design software while LMWPRINT is open, you must have a license for each instance of each program.
LMWPRINT commands These are the commands you can use with LMWPRINT to activate and configure the AutoPrint functionality:
/A1=x Turn AutoPrint On(1) or Off(0)
/A3 Poll continuously
/A4=xx Poll until a certain time (1-24)
/A5=xxx Poll for a given number of Hours (0-168)
/A6=xxx Number of minutes of idle time (0-999)
/A8=xx Number of backup files (0-10)
119


Modifying Printer Code with Job Modifier
About Job Modifier The Job Modifier utility provides a means for directly modifying the printer code for a label.
Using the Job Modifier utility, you can delete and insert lines of printer code, or modify lines using a search and replace routine. The scripts you create can be saved to a file (.jms extension) for use with any label format that uses the same printer.
Job Modifier scripts (.jms files) are printer specific and must be used only with the printer make and model for which they were originally created. The label design software does not automatically convert JMS files to work with other printers.
IMPORTANT: The Job Modifier utility is an advanced feature intended for use by those who are very familiar with the printer code for each printer. Understanding the printer code is your responsibility; the label design software manufacturer does not provide support in this area.
Job Modifier Commands There are two types of Job Modifier commands — Target commands and Action commands. The Target commands specify where in the print job the action is to occur, and the Action commands specify what to do once the Target area has been reached.
Note: The underscore character is a necessary part of each command.
Target Commands
Action Commands
Allowable Target/Action Combinations
Specific Parameters
Target Commands line_number(N)
Specifies the line number (N) on which the action will be performed.
line_starting_with("X")
Specifies the starting string (X) of the line on which the action will be performed. The action will be applied only to the first line that starts with the string. The string (X) can contain as many characters as necessary to clearly define the target.
lines_starting_with("X")
Specifies the starting string (X) of the lines on which the action will be performed. The action will be applied to all the lines that start with the string. The string (X) can contain as many characters as necessary to clearly define the target.
all
Specifies that the action will be performed on all the lines in the print job.
end
Specifies that the action will be performed after the last line of the print job.
line_containing("string")
121

LABEL MATRIX Help
Specifies that the action will be performed on the first line that contains the value entered for “string”.
lines_containing("string")
Specifies that the action will be performed on all the lines that contain the value entered for “string”.
Action Commands delete_line
Removes the entire line specified by the Target.
insert_line("ABC")
Adds the line ABC before the line specified by the Target. ABC can be any combination of characters that constitute a complete printer command.
append("ABC")
Attaches the string ABC to the end of the line specified by the Target.
insert("ABC")
Inserts the string ABC at the beginning of the line specified by the Target.
replace("ABC","DEF")
Replaces the ABC section of the line specified by the Target with DEF. Both ABC and DEF can be as long as required to make the desired change. Use this Action to insert individual characters into a line. For example: replace("helo","hello")
Allowable Target/Action Combinations Each Target string can only be used with certain Actions. This table lists acceptable combinations.
Target Supported Actions
line_number delete_line, insert_line append, insert, replace
line_starting_with delete_line, insert_line append, insert, replace
lines_starting_with delete_line, insert_line append, insert, replace
line_containing delete_line, insert_line append, insert, replace
lines_containing delete_line, insert_line append, insert, replace
all replace
end insert_line
Specific Parameters For Targets and Actions, you must manually enter specific values after the commands are inserted into the editing window. To enter values in the editing window, click once to insert the cursor in the command, and then type the required information.
122

Modifying Printer Code with Job Modifier
When entering specific values, follow these guidelines:
• Alphanumeric strings must be enclosed in quotation marks ("Hello"), but numbers may be entered without quotes.
• Field names already specified on the label can be used to include variable information in the Targets and Actions. Enter the exact name, without quotes, given to the field on the label.
• Any valid linked expression can be entered, without quotes, to specify the Target.
• Special command characters, such as SOH or STX, can be included in the script by placing them in angle brackets; for example, <SOH>. Add these command characters as separate fields in a longer string (e.g., <SOH>+123+BOB+"Hello").
• Different values can be combined into a single expression by connecting them with a plus sign ( + ).
Adding Instructions to a Job Modifier Script A Job Modifier script contains instructions that require certain Job Modifier commands. Specifically, they require a Target and an Action. The Target tells the utility where to place the new instruction; the Action tells it what to do at that location. A colon separates the two strings. A script may contain multiple instructions, each with a Target and an Action.
To add instructions to a Job Modifier script
1. On the File menu, click Label Properties, and then click on the Job Modifier tab.
2. Do one of the following:
• To create a new script file, click New.
• To edit an existing script file, select the .jms file from the drop-down list and click Edit.
The Job Modifier dialog box appears.
3. Select a Target command from the Target drop-down list of commands.
4. Select an Action command from the Action drop-down list of commands.
5. Click Insert to move the Target and Action commands into the editing window.
6. Click in the editing window to add the specifics to the commands (e.g., specifying line numbers, text to replace, and so on).
7. If desired, click Save or Save As to save the contents of the script to a .jms file.
Examples of Job Modifier Scripts The following examples are provided to show how you can add instructions to a Job Modifier script.
all:replace("BX2,2","BX3,3")
will find every occurrence of BX2,2 in the print job and change it to BX3,3.
123

LABEL MATRIX Help
To add these instructions from the Job Modifier screen:
1. Click on the Target drop-down list and click all.
2. Click on the Action drop-down list and click replace().
3. Click the Insert button. The Target and Action commands appear in the script editing window.
4. In the script editing window, click between the two parentheses ( ) and type "BX2,2","BX3,3" including the quotes.
line_starting_with(<stx>+"M"):delete_line
finds the first line that starts with the ASCII code STX followed by an M character and removes the entire line from the print job. Such commands must be enclosed in the angle brackets < > to be correctly recognized by the utility, or their ASCII code number must be placed into a CHR(NN) string (e.g., STX = CHR(02) ). Refer to an ASCII code chart for specific string equivalents.
To add these instructions from the Job Modifier screen:
1. Click on the Target drop-down list and click line_starting_with().
2. Click on the Action drop-down list and click delete_line.
3. Click the Insert button. The Target and Action commands appear in the script editing window.
4. In the script editing window, click between the two parentheses ( ) and type <stx>+"M" including the quotes.
end:insert_line("This will be added to the end of the file")
will append the specified string after the last line of the print job.
To add these instructions from the Job Modifier screen:
1. Click on the Target drop-down list and click end.
2. Click on the Action drop-down list and click insert_line().
3. Click the Insert button. The Target and Action commands appear in the script editing window.
4. In the script editing window, click between the two parentheses ( ) and type "This line will be added to the end of the file" including the quotes.
124
Writing Label Data to a Text File
Writing Label Data to a Text File You can set up label properties so that when a label is printed, its data is written to a comma-delimited text file that you define.
Writing Image Data Keep in mind the following points when writing image data to a file:
• If the label contains variable images, the data written to the text file matches what appears on the label.
• If a text object has a combination origin, the data written to the text file is the result of the combination expression, not the separate parts of the expression.
• If several objects use the same variable field, the variable field will be listed once for each image. For example, for a text image and a bar code image (Text3 and Bar Code1) that both use the Date1 variable with a value of 3/24/04, the image data is something like this: “Text1” “7/29/03”; “Bar Code1” “7/29/03”
Writing Variable Data Keep in mind the following points when writing variable data to a file:
• All the variable fields are listed separately, including those that are used in combinations. The data file lists the separate parts of the expression instead of the result.
• All variables are written to the data file, even those that are not used by an object. For example, for database objects, the entire record is written to the data file, not just the data for the field that was assigned to an object.
• Each variable is listed only once, even if it is used by multiple objects on the label.
To write label data to a text file
1. Open your pre-designed label in the label design software.
2. On the File menu, click Label Properties, and then click the Write Data tab.
3. Depending on the type of data on your label and the information that you would like to write to a text file, click the Enable Writing Image Data to a File check box and/or the Enable Writing Variable Data to a File check box.
4. Set the options on the Write Data tab as appropriate for your application.
5. Click OK to return to the design window.
6. Print the desired quantity of labels.
Label data is written to the text file when you print the label.
Displaying Label Data in Log Viewer When you enable the Write Data feature, the label design software generates text files that record the label data being printed. You can view these data files with a simple text editor, such as Notepad, or you can display them in Log Viewer, which provides a grid similar to that used to display databases.
125

LABEL MATRIX Help
To display log files in Log Viewer
1. On the Tools menu, click Log Viewer.
2. Now in Log Viewer, select Open Log File from the File menu.
3. Locate and select the log file (i.e., LABEL.RPT), and click Open.
The report appears in Log Viewer.
126

Frequently Asked Questions
General What are the little yellow and red lights that appear on my design screen?
The program displays a warning (yellow) or error (red) light in the upper left corner of images with warnings or errors.
To find the source of an error or warning 1. Use the mouse to position your cursor over the warning/error lights to display helpful information
about the problem. The information will appear in the status window at the bottom of the screen.
2. Double-click your mouse on the warning/error light OR position your cursor over the light and press ENTER. The program will take you directly to the appropriate dialog box to fix the error or warning.
Why does my PC lock up or display a memory error when I try to run the program?
The following are possible reasons for this problem and recommendations for how to fix it:
Additional programs are running in the background. Having other applications minimized or running in the background can use memory that is needed to run the label program. To free up the memory, close all additional applications that are not needed to make as much memory as possible available.
There is not enough total memory installed on the system. Considering the memory that this program requires, along with the memory needed to run Windows, you should be using a minimum of 16 MB RAM on Windows 95, 32 MB RAM on Windows 98, or 64 MB RAM on NT 4.0, Windows 2000 or Windows XP. If you are running this program on a system that does not meet these memory requirements, the results can be unpredictable.
Certain applications continue to take up memory, even after they have been closed. To determine if this could be causing the problem, simply restart Windows and make sure that this program is the first application opened. If the memory error does not occur, this was most likely the problem.
Bar Codes Why do bar codes change for different printers?
Each vertical bar and space in a bar code MUST be spaced exactly the same to read correctly. The program prints bar codes so the minimum element width is one print head pin width (dot) for the printer that you are using. Bar codes are printed as close as possible to the optimum density based on the printer pin width. The appearance of the bar code changes between printers because the vertical and horizontal dots per inch are not the same on all printers.
Why can't my bar code reader read my bar codes?
Many bar code readers cannot read high-density bar codes. If you have selected a high-density bar code, try using a medium- or low-density bar code. Choosing a lower density makes the bar code more readable. Another problem that can occur with the free format layout of the program is that images can be too close to the bar code. There should be nothing on top of the bar code. Bar codes require white space to the left and right of each bar code. A safe amount of white space is 20 times the density of the bar code (the number of mils divided by 1000). For example, a medium-density bar code of 15 mils would require 0.3 inches (.015 x 20) of white space to the left and right of the bar code. The minimum amount of white space is 12 times the density for most bar codes. It is also possible that your bar code reader is
127

LABEL MATRIX Help
not set up to read the type of bar code that you printed. Check the instruction manual that came with the reader to see how to set it up correctly.
Why does my bar code appear wavy when printed on a dot matrix printer?
This is caused by the print head not starting in exactly the same position as the previous pass. The program has no direct control over this, however, by changing the Quality, Overstrike, Bidirectional Printing, and Resolution options in the Printer Setup dialog, you should be able to obtain an acceptable bar code.
How do I create a bar code in Automotive Industry Action Group (AIAG) format?
Add a bar code (typically a 3 of 9 bar code) with the desired data origin. On the Bar Code tab, enter a data identifier. This is generally one letter (such as P) that will not display in the human readable portion of the bar code but will be present when the bar code is scanned. Next, select a Text Where setting (typically set to Above Left for AIAG bar codes). Your specifications may contain additional rules regarding the proper density, ratio and bar code height to use; choose the appropriate settings on the Bar Code tab. Finally, select the Font tab and make any necessary adjustments to the human readable text font. For example, if your AIAG specifications call for text that is .5" high, that would correspond to about a 36 pt. font (each font point is 1/72" high).
For more information on AIAG bar code specifications, see the Automotive Industry Action Group Web site at http://www.aiag.org/.
How do I place a data identifier within a bar code without having it appear in the human-readable text?
One way to do this is to type in a data identifier on the Bar Code tab when creating your bar code image. A second way is to add the human-readable text as a separate text image (remember the image's variable name). Next, add the bar code with a Combinationdata origin. In the Expression box on the Data tab, type in the data identifier within quotation marks. Then from the list of variable images on the Data tab, select the variable name which corresponds to the bar code and click the Use button. This will build an expression with a data identifier and copy the human-readable text image.
Can I change the size or font of the human-readable text that appears above/below my bar codes?
Yes. When adding a bar code, you can use the options on the Font tab to set the font and the point size for the human-readable text.
Databases When trying to attach a database, I receive the message "No compatible database drivers found."
If the "No compatible database drivers found" message appears when you try to bring up a database file, it is most likely because you need to select an OLE DB database provider and set up a data source.
A decimal point keeps showing up in my database fields, but I do not want a decimal point. How do I fix this?
Microsoft database drivers will occasionally bring in a numeric field and add a decimal to it. For example, in the program's sample database file, EX1.DBF, the NUMBER field contains the value 123, but on the label, it will print 123.0. A way to trick the driver into removing the decimal value is to perform the integer ADD function on it. To do so, set up the image with a Combination data origin. In the Expression box on the Data tab, type ADD( . Then highlight the database field reference from the variables list in the upper window. Click on the Use button to copy the database reference to the Expression box. After the database reference, type ,0) . This will add a zero to the field and convert it to an integer with no decimal places. Example: ADD( [EX1.NUMBER],0)
128

Frequently Asked Questions
Printing Why do I see the program generating my label but not printing?
Did you select the correct printer port when choosing the attached printer? Did you have only one printer attached and have the printer port set to File? Another common problem is that serial port parameters do not match up with the way the printer is configured.
I cannot get my serial printer to print from the program. What should I check?
Find out the serial setting for your printer. There is usually a way to print out a configuration page that will tell you this information, or you may have to look through some menu or DIP switch settings on the printer. (For example, on Zebra printers you can hold in the Cancel button while powering up the printer to obtain a printout of this information). Refer to your printer manual for more information about this, as all printers are different. You will need to determine the printer's BAUD RATE, PARITY, DATA BITS, STOP BITS, and protocol or HANDSHAKING. The printer will not always have all of these settings, but it should have some of them. (If a particular setting is not specified, then it is usually acceptable to use the default setting).
Set up the printer in the software so the correct COM port is used (normally COM1 or COM2). This will be found by choosing Printer Setup from the File menu, then clicking on the Connection button. Make sure that the BAUD RATE, DATA BITS, STOP BITS, and PARITY match the printer settings by clicking on the Settings tab. Then, set the parameters to match those of your printer. In most cased, the HANDSHAKING or FLOW CONTROL on both the printer and the Control Panel should be set to XON/XOFF.
Make sure you have a NULL MODEM cable if your printer requires this (most serial printers do). Or, if you are using a standard RS232 cable, you can attach a NULL MODEM ADAPTER to the printer. This special kind of cable (or adapter) crosses pins 2 and 3 and allows the printer to talk to the computer. Often when you print to the printer the software will act like it printed the label, but nothing will print. This typically indicates you need a NULL MODEM cable. You can purchase a NULL MODEM ADAPTER from any computer supply store.
If you are still unable to print, try isolating the problem by trying a different cable, or COM port (if possible), or try hooking up a different printer.
My labels are printing, but the print speed is very slow. How can I speed up my print jobs?
There are a number of possible reasons for slow print speeds, but in most cases it is due to one or more of the following three problems.
You are not using a printer driver that was supplied with this label design program. The drivers installed with this program enable you to maximize your bar code label printer's capabilities. By providing access to the printer's resident fonts, these drivers make the most efficient use of the memory available, and thereby greatly increase the print speed and efficiency. If the printer driver you are using is located in the Windows Printers folder, then it is NOT a driver that was installed with the program. The drivers installed with this label design software are proprietary to this program and are never installed to the Windows Printers folder. To select one of the program's drivers, in the label design software, select Printer Setup from the File menu and click the Add button. Then follow the Add Printer Wizard to select a driver that was supplied with this program.
You are not using a printer resident font. If you are using a thermal printer (vs. a laser or dot matrix printer, etc.) and would like to print an amount of labels at a tolerable speed, you should select a printer resident font. These fonts are designated in the program's font drop-down list with a little printer symbol next to them. These printer resident fonts will appear in your font list in the program only if you are using the program's supplied printer driver for this printer. If you are, then the program will use the fonts from the printer for optimal print speed. Printer resident fonts are stored inside the memory of the printer, rather than downloaded or sent to the printer as a bitmap (as with TrueType fonts). For this reason, the text can be generated by the printer much faster than a downloaded or bitmapped piece of text.
You are trying to print color graphics to a printer that does not support color graphics. If you are printing to a thermal/thermal transfer printer, note that color (non-monochrome) graphics will cause labels to print very slowly because they require a lot of memory from the printer and end up causing a large file size for
129

LABEL MATRIX Help
the label file. The only option is to open the graphic in a separate graphics program and convert it to a monochrome (black and white) graphic and resave it. Unfortunately, this may cause the graphic to look less attractive when printed because when the graphic had color it used gray scaling to make those effects, but converting it to monochrome strips out the gray scaling (which is necessary because gray scaling is not supported by most thermal printers).
Why do I get the messages "Printer Not Ready" and/or "Printer Not Connected Properly" when I try to print?
All of the setup options for the printer you are using must match those of the printer. The most common reason for these messages is that the cable is not attached to the correct printer port on the back of the computer.
Another possibility is that some serial printers require a null modem attached to the cable. To find out if your printer requires a null modem, refer to your printer manual.
A third possibility may be that Windows is detecting another device (such as a mouse or a modem) connected to the port. You may need to free up that port in order for Windows to recognize your printer.
130

Index
. graphics.................................................. 73
.ASC files ...................................................95 paragraphs ............................................. 35
.INI file......................................................15 shapes.................................................... 69
.JMS files ..........................................121, 123 text........................................................ 35
.RPT files ................................................. 125 Adding ...................................................... 41
.RTF files ...................................................95 Adding records for AutoPrint ...................... 118
.TXT files ...................................................95 Advanced database setup .......................... 102
1 AI ............................................................. 53
1D bar codes..............................................44 AIAG bar code.......................................... 127
2 ANSI characters in expressions..................... 93
2 of 5 bar code ...........................................52 application identifier.................................... 53
2Check10...................................................99 Application options...................................... 15
2Check47...................................................99 ASCII files ................................................. 95
2D bar codes...................................43, 44, 56 Automatic printing from a source database . 117, 118
3 AutoPrint ............................. 28, 117, 118, 119
3 of 9 ........................................................45 AutoPrint tab.............................................. 28
A Aztec Code ................................................ 56
Accessing database records........................ 102
Aztec Mesa ................................................ 57 Add Counter variable...................................25
B Add Database Wizard ...........................24, 101
Back-most image........................................ 77 Add Keyboard Input variable ........................25
Bar Code tab.............................................. 42 Adding
Bar codes 2D bar codes ...........................................43
2D ......................................................... 56 bar codes ................................................41
adding.................................................... 41 custom shapes.........................................70
checksum functions.................................. 99 databases ......................................101, 102
composite ............................................... 56
131

LABEL MATRIX Help
Code 25 .................................................... 52 linear......................................................44
Code 39 .................................................... 45 types ......................................................39
Code 49 .................................................... 60 Bar codes...................................................41
Code 93 .................................................... 48 Box ...........................................................69
C Combination data origin
Change Keyboard Input prompt order............25 example ................................................. 31
Changes to database ................................. 103 expressions............................................. 31
Check digit........................................... 42, 99 properties ............................................... 31
Check10Codabar.........................................99 wizard .................................................... 31
Check10EAN...............................................99 Combination data origin .............................. 31
Check10Int25.............................................99 Combination Wizard .................................... 31
Check10MSI ...............................................99 Combine fields ........................................... 31
Check10Quelle............................................99 Command line calls for AutoPrint ................ 119
Check10UCC ..............................................99 Command line calls to LMWPRINT ............... 115
Check10UPC...............................................99 Command line printing ....................... 109, 114
Check11_3Suisses ......................................99 Commands for Job Modifier ........................ 121
Check11Check10 ........................................99 Composite bar codes................................... 62
Check16 ....................................................99 Conditional functions................................. 100
Check43 ....................................................99 Constant data in expressions........................ 79
Checksum............................................ 42, 99 Constant data origin.................................... 29
Checksum functions ....................................99 Converting old design files ........................... 18
Choosing a Data Origin ................................29 Copies of each label .............................26, 107
Circle.........................................................69 Copy ......................................................... 75
Clip art ......................................................70 Copy data origin ......................................... 30
Codabar.....................................................49 Counter data origin ..................................... 30
Code 128 ...................................................50 Counter tab ............................................... 25
Code 16K...................................................58 Cross-referencing a second database ............ 95
132

Index
Date data origin ......................................... 31 Custom date...............................................86
Date format ..........................................83, 86 Custom shapes
Date functions.......................................83, 86 adding ....................................................70
Date stamp................................................ 83 properties ...............................................70
DDE ........................................................ 115 Custom shapes ...........................................70
Decimal points ......................................... 127 Custom time ..............................................91
Decrementing numbers ............................... 30 Cut ...........................................................75
D Default printer............................................ 22
Data entered at print time............................30 Delete an object ......................................... 75
Data grid ................................................. 103 Delivery Point Bar Code............................... 55
Data identifier .....................................42, 127 Density...................................................... 42
Data Matrix ................................................61 Description for label .................................... 21
Data origins ...............................................29 Diamond.................................................... 69
Database Direction for printing ................................... 23
access methods ..................................... 102 Display settings .......................................... 15
adding .............................................24, 101 DPBC ........................................................ 55
advanced setup...................................... 102 Drop to back .............................................. 77
data grid ............................................... 103 Drop-down menus ...................................... 13
data origin ..............................................29 Duplicate labels ...................................26, 107
problems............................................... 103 Duplicates tab ............................................ 26
E properties ...............................................24
EAN Composite bar codes ............................ 62 reanalyzing ......................................24, 103
EAN/JAN.................................................... 51 viewing records...................................... 103
EAN/UCC & RSS Composite bar codes ........... 62 Database data origin ...................................29
Editing Database fields in expressions ......................81
images ................................................... 75 Database tab..............................................24
Editing ...................................................... 75 Date...............................................31, 83, 86
133

LABEL MATRIX Help
adding.................................................... 73 Ellipse .......................................................69
properties ............................................... 73 Enable AutoPrint .........................................28
Graphics .................................................... 73 Enable Job Modifier .....................................26
Grid ........................................................ 103 Enable rich text format ................................36
Group images............................................. 76 Errors...................................................... 127
H ExDate ......................................................86
Hardware requirements ............................... 11 Expand subdatabase in an expression............95
Healthcare bar code .................................... 52 Expression box ...........................................31
Height ....................................................... 42 Expressions...31, 79, 81, 83, 86, 89, 91, 93, 95, 99, 100
Height of label............................................ 22 Extended Code 39.......................................46
Help topics............................................. 9, 10 Extended Code 93.......................................48
HIBC......................................................... 52 Extended date ............................................86
HIBCC ....................................................... 53 Extended time ............................................91
Hot keys.................................................... 14 ExTime ......................................................91
Human readable text..............................42, 44 F
I FAQ......................................................... 127
Images...................................................... 75 Fixed data..................................................29
Import design file ....................................... 19 Form ................................................... 22, 23
Incrementing numbers ................................ 30 Format for date ...............................31, 83, 86
Insert design file......................................... 19 Format for time ...............................33, 89, 91
Install the software ..................................... 11 Formulas ............................................. 31, 79
Interface language...................................... 15 Frequently asked questions ........................ 127
Interleaved 2 of 5 ....................................... 52 Front-most image .......................................77
International edition.................................... 15 Functions ................79, 83, 86, 89, 91, 99, 100
Inverted text.............................................. 35 G
J General tab - Label Properties ......................21
Job Modifier ................................ 26, 121, 123 Graphics
134

Index
Labels down............................................... 23 Job Modifier commands ............................. 121
Labels to print .......................................... 105 Job Modifier tab ..........................................26
K Language for interface ................................ 15
Keyboard input data origin ...........................30 Left offset ................................................ 105
Keyboard input prompt order .......................25 Line .......................................................... 69
Keyboard shortcuts .....................................14 Linear bar codes ......................................... 44
Keyboard tab..............................................25 Linked files in expressions ........................... 95
Keyed database access .............................. 102 LMWPRINT
L calling from another program .................. 115
Label copies ........................................26, 107 commands ............................................ 109
Label description.........................................21 entering commands at a DOS prompt....... 114
Label duplicates...................................26, 107 entering commands from Run line............ 114
Label height ...............................................22 setting a shortcut to print a file................ 114
Label Properties..........................................21 using icon to open and print a file ............ 114
Label sample ............................................ 106 LMWPRINT........................................ 109, 114
Label security .............................................27 LMWPRINT/using with AutoPrint ................. 119
Label setup ................................................21 Log data .................................................... 27
Label size...................................................23 Log Viewer............................................... 125
Label stack.................................................23 Logic functions ......................................... 100
Label template...................................... 22, 23 M
Label width ................................................22 Margins ..................................................... 23
Labels Margins tab................................................ 23
opening ..................................................17 Mathematical functions.............................. 100
printing................................................. 107 Matrix codes .............................................. 56
properties ...............................................21 MaxiCode................................................... 64
saving ....................................................19 Memory errors ......................................... 127
Labels across..............................................23 Menu Bar................................................... 13
135

LABEL MATRIX Help
Options ..................................................... 15 Menus
Order of Keyboard Input prompts ................. 25 adding your own menu options ..................15
P opening ..................................................13
Page size ................................................... 22 Menus .......................................................13
Page Size tab ............................................. 22 Merge label designs.....................................19
Pages to print........................................... 105 MicroPDF417 ..............................................65
Paragraphs Modify printer code ............................121, 123
adding.................................................... 35 Move image to front or back.........................77
properties ............................................... 36 Moving images ...........................................75
Paragraphs ................................................ 35 MSI Plessey................................................52
Passwords ................................................. 27 Multi-dimensional codes...............................56
Paste ........................................................ 75 Multiple labels .....................................26, 107
PDF417 ..................................................... 63 Multiple labels per page ...............................23
Pictures Multiple tab ................................................23
N adding.................................................... 73
properties ............................................... 73 New Label Wizard .......................................17
Pictures ..................................................... 73 Normal database setup.............................. 101
Planet code ................................................ 52 Number of labels..................................26, 107
O Plessey...................................................... 52
Octagon.....................................................69 Polling frequency for AutoPrint ................... 119
ODBC ...................................................... 102 Portable Data File 417 ................................. 63
Offset ...................................................... 105 Postal code ................................................ 55
Old labels...................................................18 POSTNET ................................................... 55
OLE DB.................................................... 102 Preformatted label template....................22, 23
One-dimensional bar codes ..........................44 Previous versions........................................ 18
Online Help ............................................ 9, 10 Primary key database access...................... 102
Opening a label ..........................................17 Print automation....................................... 117
136

Index
text........................................................ 35 Print direction.............................................23
Properties .................................................. 21 Print sample label ..................................... 106
Pull To front ............................................... 77 Print stack of labels .....................................23
Punctuation in expressions........................... 93 Print to file ............................................... 105
Q Printer
QR Code .................................................... 66 adding ....................................................22
Quantity of labels ....................................... 23 selection ............................................... 105
Quick Response Code .................................. 66 setup......................................................22
R Printer code ......................................121, 123
Radio frequency identification....................... 28 Printer tab .................................................22
Ratio ......................................................... 42 Printing
Reanalyze database .................................... 24 automating............................................ 117
Reanalyzing Your Database........................ 103 command line printing ............................ 114
rectangle ................................................... 69 duplicate labels ...................................... 107
Redraw...................................................... 77 options ................................................. 105
Referenced database................................... 95 problems............................................... 127
Refresh label .............................................. 77 range ................................................... 105
Remove a database .................................... 24 Printing.................................................... 107
Remove Counter variable............................. 25 Printing start point ......................................23
Remove Keyboard Input variable .................. 25 Printing/automating .................................. 117
Reports ................................................... 125 Prompted fields...........................................30
Requirements............................................. 11 Properties
Reverse pages.......................................... 105 2D bar codes ...........................................44
Reversed text............................................. 35 labels .....................................................21
RFID Tags.................................................. 28 paragraphs..............................................36
Rich text format ....................................36, 95 pictures ..................................................73
Rotate images ............................................ 76 shapes....................................................69
137

LABEL MATRIX Help
Sheets of labels .......................................... 23 RSS Composite bar codes ............................62
Shortcut keys............................................. 14 RTF Editor..................................................36
S Show errors & warnings............................. 127
Sample label .....................................105, 106 Sizing
Saving a label.............................................19 images ..............................................75, 76
Scale.........................................................76 Sizing........................................................ 75
Scaling images up or down in size.................76 Software installation ................................... 11
SCC-14......................................................53 Software requirements ................................ 11
Scripts..............................................121, 123 Special characters in expressions.................. 93
Security Specific printer ........................................... 22
label security ...........................................27 SSCC-18.................................................... 53
Security tab ...............................................27 Stack printing............................................. 23
Selecting a different printer........................ 105 Stacked codes ............................................ 56
Selecting images.........................................76 Standalone print engine...................... 109, 114
Sequential database access........................ 102 Start block................................................. 28
Serial numbers ...........................................30 Start on label ........................................... 105
Serial printing problems............................. 127 Start point for printing ................................ 23
Set language ..............................................15 String functions ........................................ 100
Settings Sub database ............................................. 95
label properties........................................21 Supplement ............................................... 42
page size ................................................22 System requirements .................................. 11
T Settings.....................................................21
Tags ......................................................... 28 Shapes
TCIF Linked Code 39 ................................... 67 adding ....................................................69
Telecommunications bar code....................... 67 custom ...................................................70
Template for label format .......................22, 23 properties ...............................................69
Test printing ............................................ 106 Shapes ......................................................69
138
Index
Unlimited key database access ................... 102 Text
UPC Composite bar codes ............................ 62 adding ....................................................35
UPC-A ....................................................... 53 properties ...............................................35
UPC-E ....................................................... 54 Text ..........................................................35
UPS MaxiCode ............................................ 64 Text files....................................................95
Utilities...................................................... 15 Text Where ................................................42
V Time ..............................................33, 89, 91
Variable properties...................................... 25 Time data origin .........................................33
View Time format ......................................... 89, 91
redrawing the label .................................. 77 Time functions...................................... 89, 91
View ......................................................... 77 TLC39........................................................67
View database records .............................. 103 Toolbars ....................................................13
View log files............................................ 125 Top offset ................................................ 105
W Transponders .............................................28
Warnings ................................................. 127 Troubleshooting........................................ 127
Watched file............................................. 117 Types of bar codes
When printed fields ..................................... 30 linear......................................................44
Width of label............................................. 22 two-dimensional ......................................56
Wizards ..................................................... 13 Types of bar codes ......................................39
Write Data tab............................................ 27 U
Write data to a file .................................... 125 UCC/EAN-128.............................................53
Write to file................................................ 27 Unchanging data.........................................29
Writing expressions..................................... 79 Ungroup images .........................................76
Z Uninstall the software..................................12
Zip+4 POSTNET.......................................... 55 Universal Product Code.......................... 53, 54
139