labelstation user’s manual
TRANSCRIPT
- 1 - LabelStation Set Up Manual 2005
Contents 1. GETTING STARTED
1.1. Unpacking your LabelStation
1.2. Equipment Checklist
1.3. Getting to Know your LabelStation 1.3.1. Fig.1. LabelStation Printer External View 1.3.2. Fig.2. LabelStation Printer Internal View 1.3.3. Fig.3. LabelStation Printer External Rear View 1.3.4. Fig.4. LabelStation Printer External Label Roll Mount
2. INSTALLING THE LABELSTATION SOFTWARE
2.1. Installation Requirements
2.2. Installing the software
2.3. Software Configuration
2.4. Technical Support & Troubleshooting 3. CONNECTING YOUR LABELSTATION
3.1. LabelStation to PC Connection 3.1.1. Fig.5. LabelStation Printer External Rear View
3.2. Loading Die Cut Labels (including wire markers)
3.2.1. Fig.6. Installing label supply roll into LabelStation Printer 3.2.2. Fig.7. Feeding Labels through the LabelStation feed guides
3.3. Loading Continuous Rolls (including heatshrink tubing)
3.3.1. Fig.8. Installing the supply roll into LabelStation Printer 3.3.2. Fig.9. Feeding continuous material through the LabelStation feed guides
3.4. Loading Print Ribbons
3.4.1. Fig.10. Installing the Print Ribbon into the LabelStation printer. 3.4.2. Fig.11. The LabelStation printer with the ribbon installed correctly.
4. DESIGNING & PRINTING
4.1. Introduction 4.2. Printing Die Cut Labels
4.3. Printing Continuous Rolls 4.4. Printing from Windows Software
- 2 - LabelStation Set Up Manual 2005
5. LABELSTATION SPECIFICATIONS
5.1. Advanced Features 5.1.1. External Label Roll Mount
5.1.1.1. Fig.12. Installation of the External Roll Mount
5.1.2. Self-Peeling Function 5.1.2.1. Fig.13. Setting up the printer for the self-peeling function 5.1.2.2. Fig.14. Printer ready for Self-Peeling Function
5.1.3. Memory Module
5.1.3.1. Fig.15. Installation of Memory Module
5.2. Problem Solving 5.2.1. Troubleshooting Guide 5.2.2. Error Messages 5.2.3. Power-on Utilities
5.3. Specifications
5.3.1. Specifications 5.3.2. Options 5.3.3. Supplies
5.4. Compliance
5.5. Warranty Information
5.5.1. Thermal Print Head 5.5.2. Warranty Service Procedures 5.5.3. General Warranty Provisions 5.5.4. Limitation of Liability
- 3 - LabelStation Set Up Manual 2005
1. GETTING STARTED
1.1. Unpacking your LabelStation
The printer has been specially packaged to withstand damage in the shipping process. However, upon receiving the LabelStation printer, carefully inspect the package and the device. In case of evident damage, contact Advanced Labelling Systems directly to specify the nature and extent of the damage. Please retain the packaging materials in case you need to reship the printer.
1.2. Equipment Checklist
• LabelStation printer • Ribbon paper core • Ribbon supply/rewind spindle (2 pcs.) • Label supply roll spindle • External label roll mount spindle • Power supply • Power cord • Parallel interface cable • Installation guide • Label design software CD-ROM
If any parts are missing, please contact the customer service department of Advanced Labelling Systems – 01202 683212 Separately purchased items may also be included, please check these items against your order or delivery note. These additional items may include:
• Continuous Rolls, Die Cut Labels, Cable Markers • Print Ribbon (this is usually fitted to your printer prior to dispatch). • Memory module • Cutter Unit (this is usually fitted to your printer prior to dispatch). • Portable mini keyboard • LabelStation Industrial Symbols CD-ROM
- 4 - LabelStation Set Up Manual 2005
1.3. Getting to Know your LabelStation
This section shows the various parts of the LabelStation printer. We recommend that you familiarize yourself with these parts.
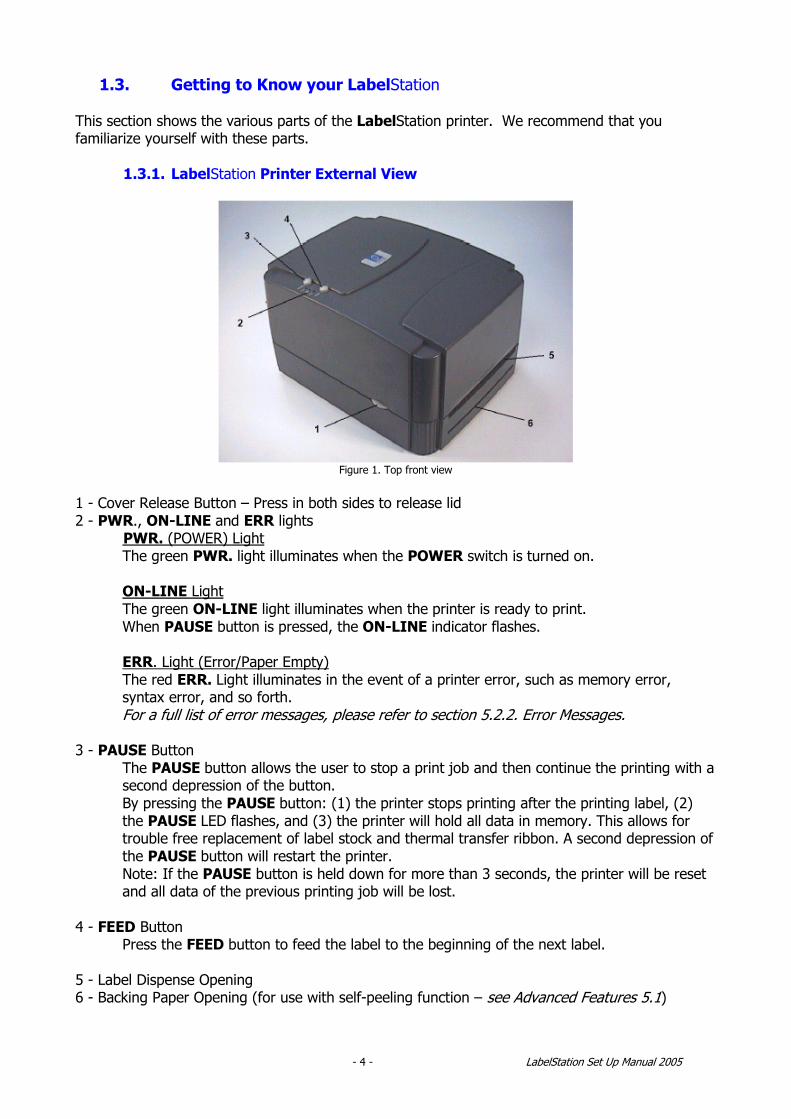
1.3.1. LabelStation Printer External View
Figure 1. Top front view
1 - Cover Release Button – Press in both sides to release lid 2 - PWR., ON-LINE and ERR lights
PWR. (POWER) LightThe green PWR. light illuminates when the POWER switch is turned on. ON-LINE LightThe green ON-LINE light illuminates when the printer is ready to print. When PAUSE button is pressed, the ON-LINE indicator flashes. ERR. Light (Error/Paper Empty)The red ERR. Light illuminates in the event of a printer error, such as memory error, syntax error, and so forth. For a full list of error messages, please refer to section 5.2.2. Error Messages.
3 - PAUSE Button
The PAUSE button allows the user to stop a print job and then continue the printing with a second depression of the button. By pressing the PAUSE button: (1) the printer stops printing after the printing label, (2) the PAUSE LED flashes, and (3) the printer will hold all data in memory. This allows for trouble free replacement of label stock and thermal transfer ribbon. A second depression of the PAUSE button will restart the printer. Note: If the PAUSE button is held down for more than 3 seconds, the printer will be reset and all data of the previous printing job will be lost.
4 - FEED Button
Press the FEED button to feed the label to the beginning of the next label. 5 - Label Dispense Opening 6 - Backing Paper Opening (for use with self-peeling function – see Advanced Features 5.1)
- 5 - LabelStation Set Up Manual 2005
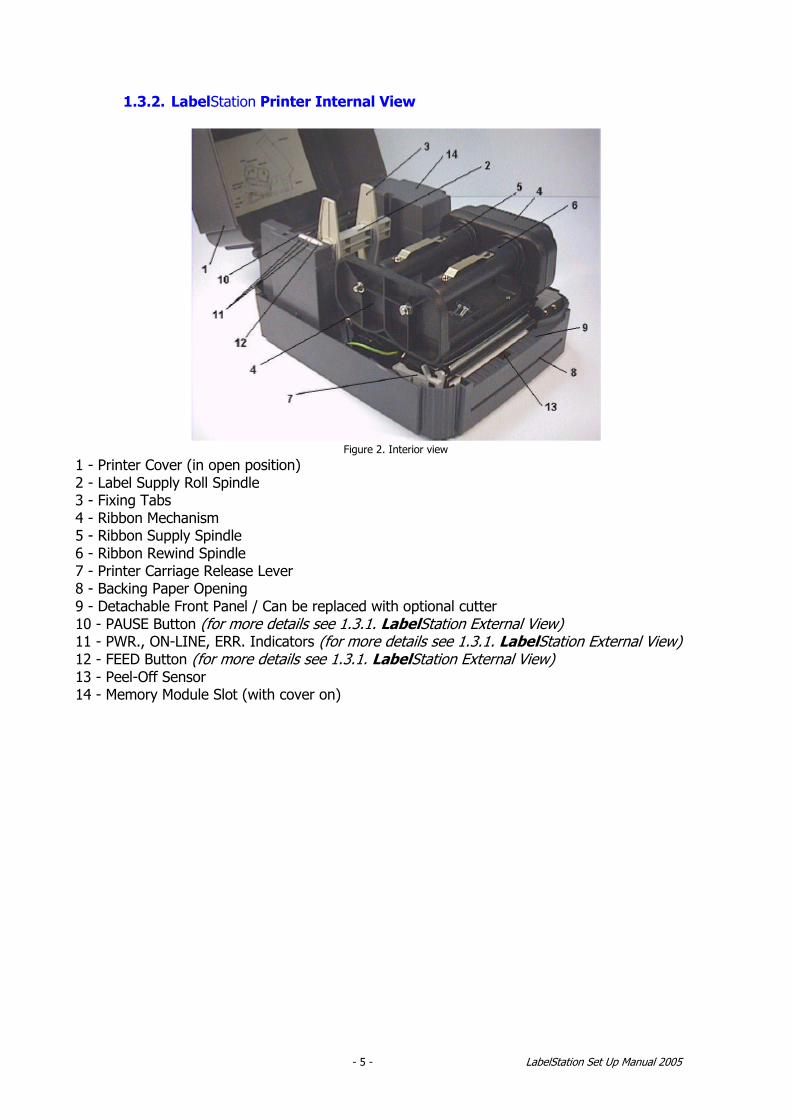
1.3.2. LabelStation Printer Internal View
Figure 2. Interior view
1 - Printer Cover (in open position) 2 - Label Supply Roll Spindle 3 - Fixing Tabs 4 - Ribbon Mechanism 5 - Ribbon Supply Spindle 6 - Ribbon Rewind Spindle 7 - Printer Carriage Release Lever 8 - Backing Paper Opening 9 - Detachable Front Panel / Can be replaced with optional cutter 10 - PAUSE Button (for more details see 1.3.1. LabelStation External View) 11 - PWR., ON-LINE, ERR. Indicators (for more details see 1.3.1. LabelStation External View) 12 - FEED Button (for more details see 1.3.1. LabelStation External View) 13 - Peel-Off Sensor 14 - Memory Module Slot (with cover on)
- 6 - LabelStation Set Up Manual 2005
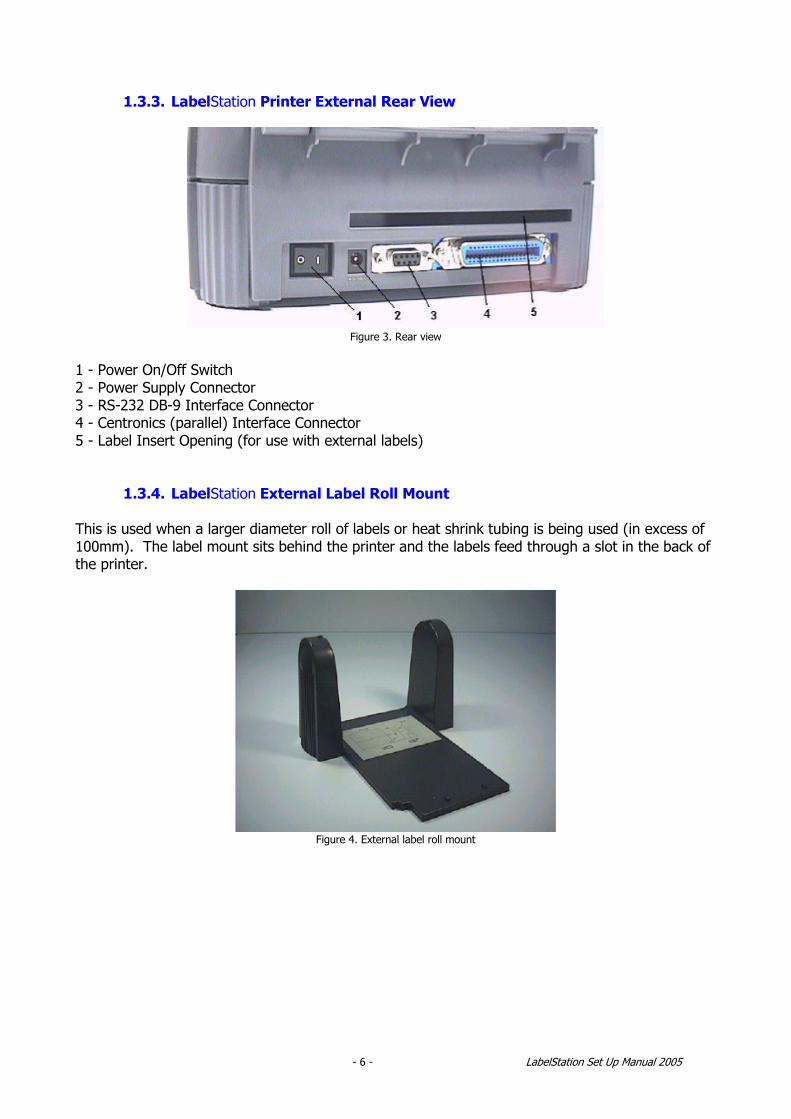
1.3.3. LabelStation Printer External Rear View
Figure 3. Rear view
1 - Power On/Off Switch 2 - Power Supply Connector 3 - RS-232 DB-9 Interface Connector 4 - Centronics (parallel) Interface Connector 5 - Label Insert Opening (for use with external labels)
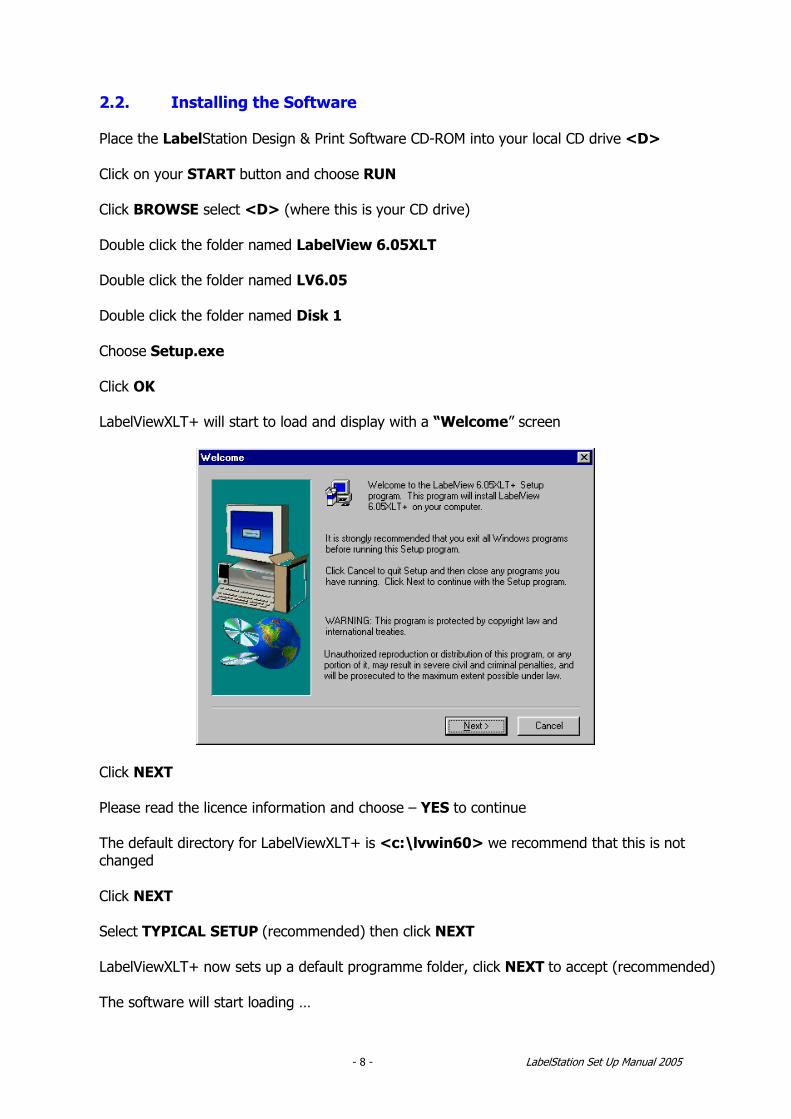
1.3.4. LabelStation External Label Roll Mount This is used when a larger diameter roll of labels or heat shrink tubing is being used (in excess of 100mm). The label mount sits behind the printer and the labels feed through a slot in the back of the printer.
Figure 4. External label roll mount

- 7 - LabelStation Set Up Manual 2005
2. INSTALLING THE LABELSTATION SOFTWARE
2.1. Installation Requirements The LabelStation systems include a user-friendly design and print package called LabelView XLT+. This is a commercially available, well-proven package, which will help you get the best from your LabelStation printer. This set-up guide will help you install and configure the software in a minimum of time. Note: The Quick Set-up Guide assumes the following: -
• Your P.C. is running Windows 95/98/ME/NT/2000/XP. • C is your local hard disk. • D is your local CD drive. • LPT1 is your local parallel printer port. • You have approx. 30mb HD space free. • You have full network rights.
We currently do not support Apple Mac or Linux Operating Systems. The LabelStation system is not supported as a networkable product.
- 8 - LabelStation Set Up Manual 2005
2.2. Installing the Software
• Place the LabelStation Design & Print Software CD-ROM into your local CD drive <D>
• Click on your START button and choose RUN
• Click BROWSE select <D> (where this is your CD drive) • Double click the folder named LabelView 6.05XLT
• Double click the folder named LV6.05
• Double click the folder named Disk 1
• Choose Setup.exe
• Click OK
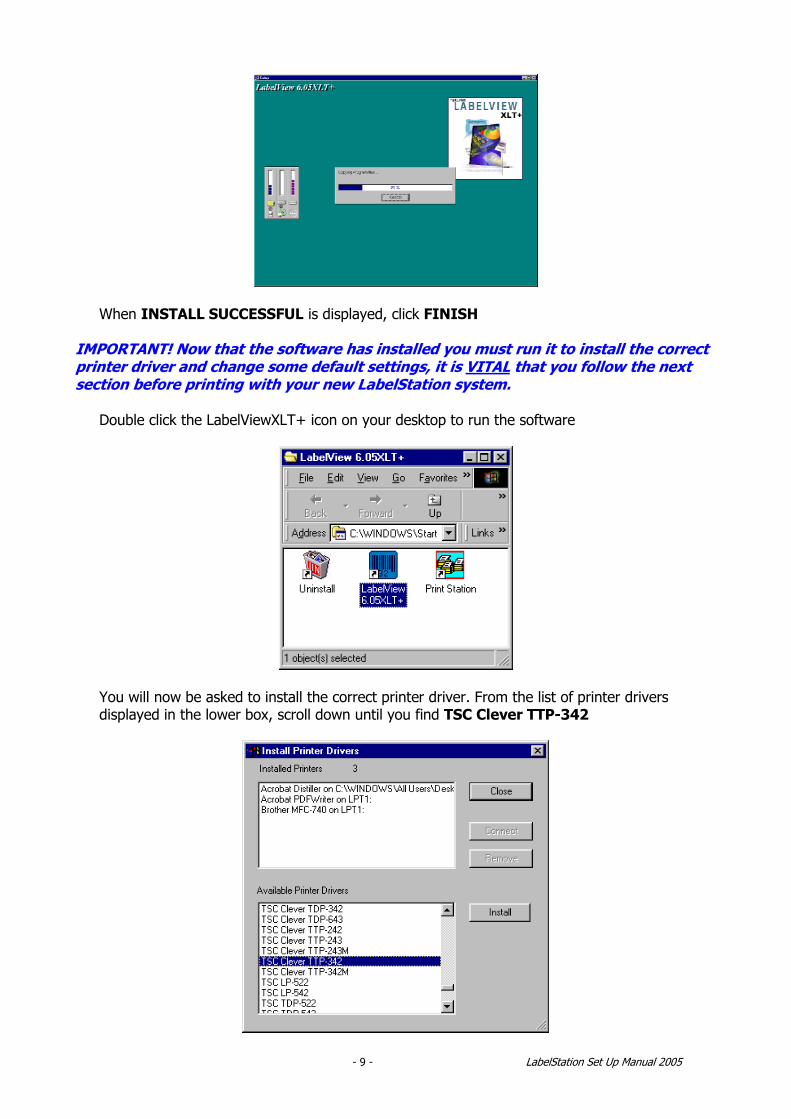
• LabelViewXLT+ will start to load and display with a “Welcome” screen
• Click NEXT • Please read the licence information and choose – YES to continue • The default directory for LabelViewXLT+ is <c:\lvwin60> we recommend that this is not
changed • Click NEXT
• Select TYPICAL SETUP (recommended) then click NEXT
• LabelViewXLT+ now sets up a default programme folder, click NEXT to accept (recommended) • The software will start loading …
- 9 - LabelStation Set Up Manual 2005
• When INSTALL SUCCESSFUL is displayed, click FINISH
IMPORTANT! Now that the software has installed you must run it to install the correct printer driver and change some default settings, it is VITAL that you follow the next section before printing with your new LabelStation system. • Double click the LabelViewXLT+ icon on your desktop to run the software
• You will now be asked to install the correct printer driver. From the list of printer drivers displayed in the lower box, scroll down until you find TSC Clever TTP-342
- 10 - LabelStation Set Up Manual 2005
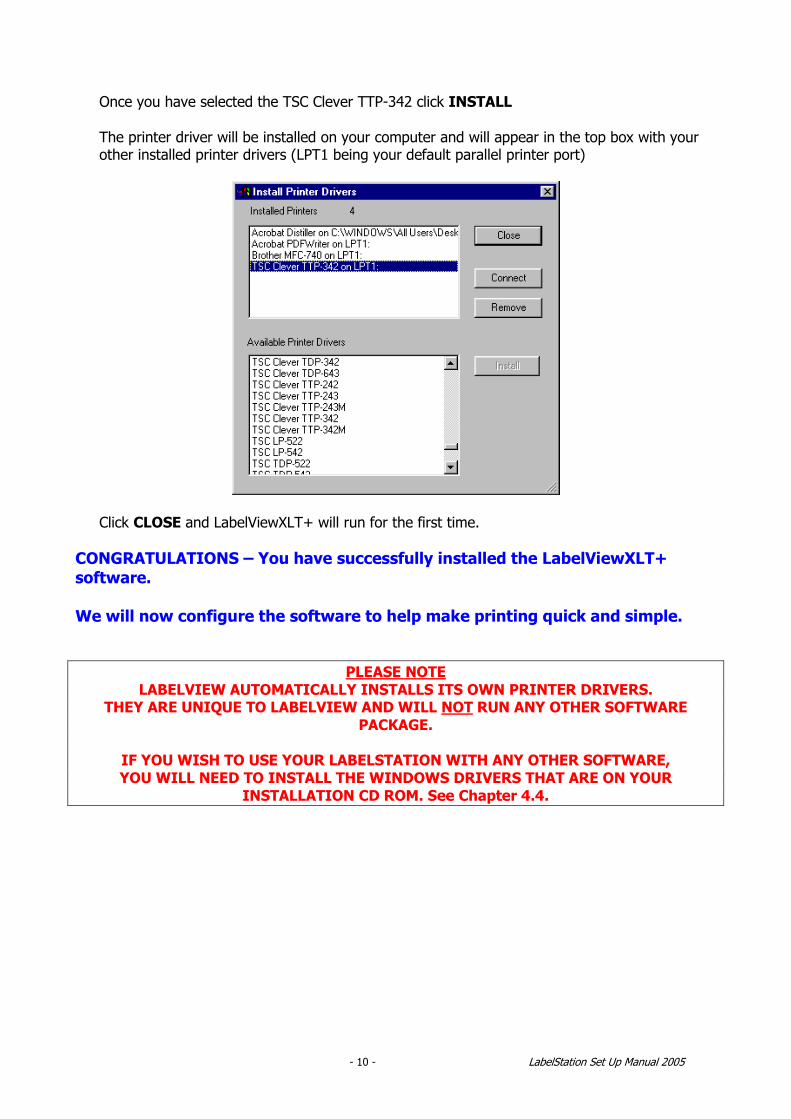
• Once you have selected the TSC Clever TTP-342 click INSTALL
• The printer driver will be installed on your computer and will appear in the top box with your other installed printer drivers (LPT1 being your default parallel printer port)
• Click CLOSE and LabelViewXLT+ will run for the first time. CONGRATULATIONS – You have successfully installed the LabelViewXLT+ software. We will now configure the software to help make printing quick and simple.
PLEASE NOTE LABELVIEW AUTOMATICALLY INSTALLS ITS OWN PRINTER DRIVERS.
THEY ARE UNIQUE TO LABELVIEW AND WILL NOT RUN ANY OTHER SOFTWARE PACKAGE.
IF YOU WISH TO USE YOUR LABELSTATION WITH ANY OTHER SOFTWARE, YOU WILL NEED TO INSTALL THE WINDOWS DRIVERS THAT ARE ON YOUR
INSTALLATION CD ROM. See Chapter 4.4.
- 11 - LabelStation Set Up Manual 2005
2.3. Software Configuration
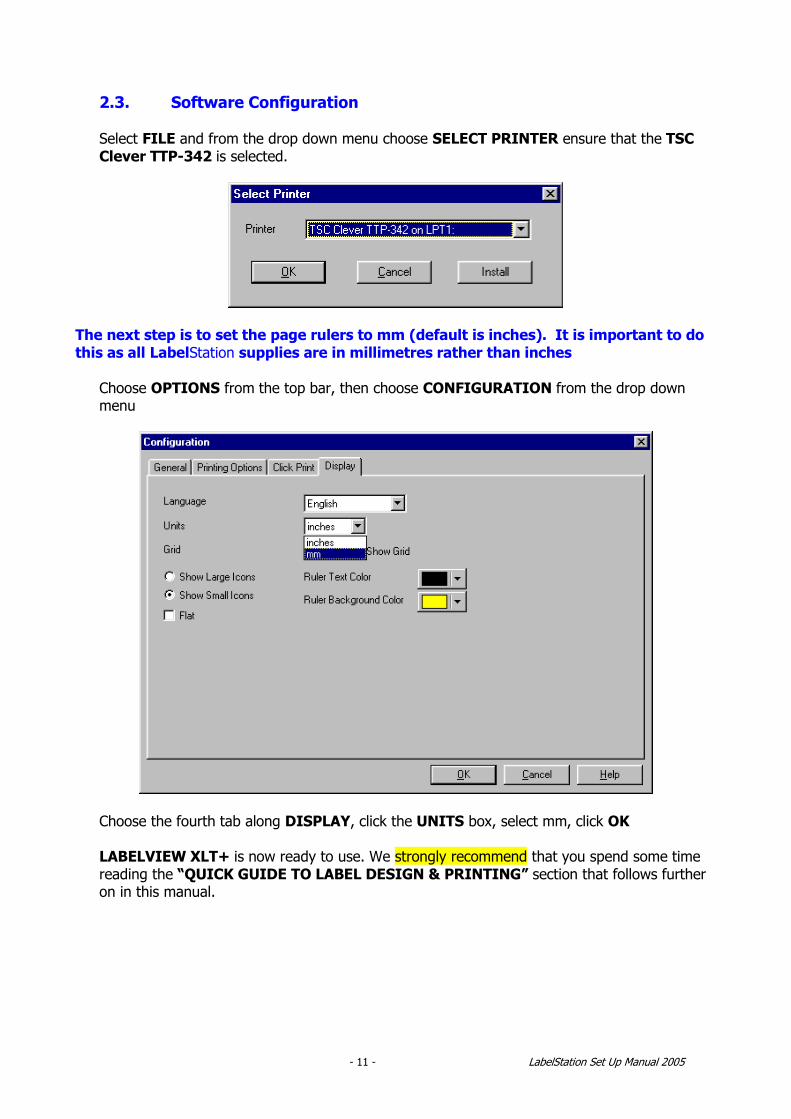
• Select FILE and from the drop down menu choose SELECT PRINTER ensure that the TSC
Clever TTP-342 is selected.
The next step is to set the page rulers to mm (default is inches). It is important to do this as all LabelStation supplies are in millimetres rather than inches • Choose OPTIONS from the top bar, then choose CONFIGURATION from the drop down
menu
• Choose the fourth tab along DISPLAY, click the UNITS box, select mm, click OK • LABELVIEW XLT+ is now ready to use. We strongly recommend that you spend some time
reading the “QUICK GUIDE TO LABEL DESIGN & PRINTING” section that follows further on in this manual.
- 12 - LabelStation Set Up Manual 2005
2.4. Technical Support & Trouble Shooting
Our technical support is free and your sales contact will be pleased to help if you need assistance with your printer or software. Tech Support Line 01202 683212 We recommend that all new users read the QUICK GUIDE TO LABEL DESIGN & PRINTING as many of the support calls made by new users relate to topics covered in this guide. Before you call for support please check the following: -
• Your print ribbon is installed correctly. • Your label media is fed correctly (under the green sensor). • Your PC is running Windows 95/98/ME/NT/2000/XP • Your printer is connected to your LPT1 (or other local parallel port). • You are using the power supply that came with LabelStation printer. • The printer is switched on. • You have the correct printer driver selected.
- 13 - LabelStation Set Up Manual 2005
3. CONNECTING YOUR LABELSTATION
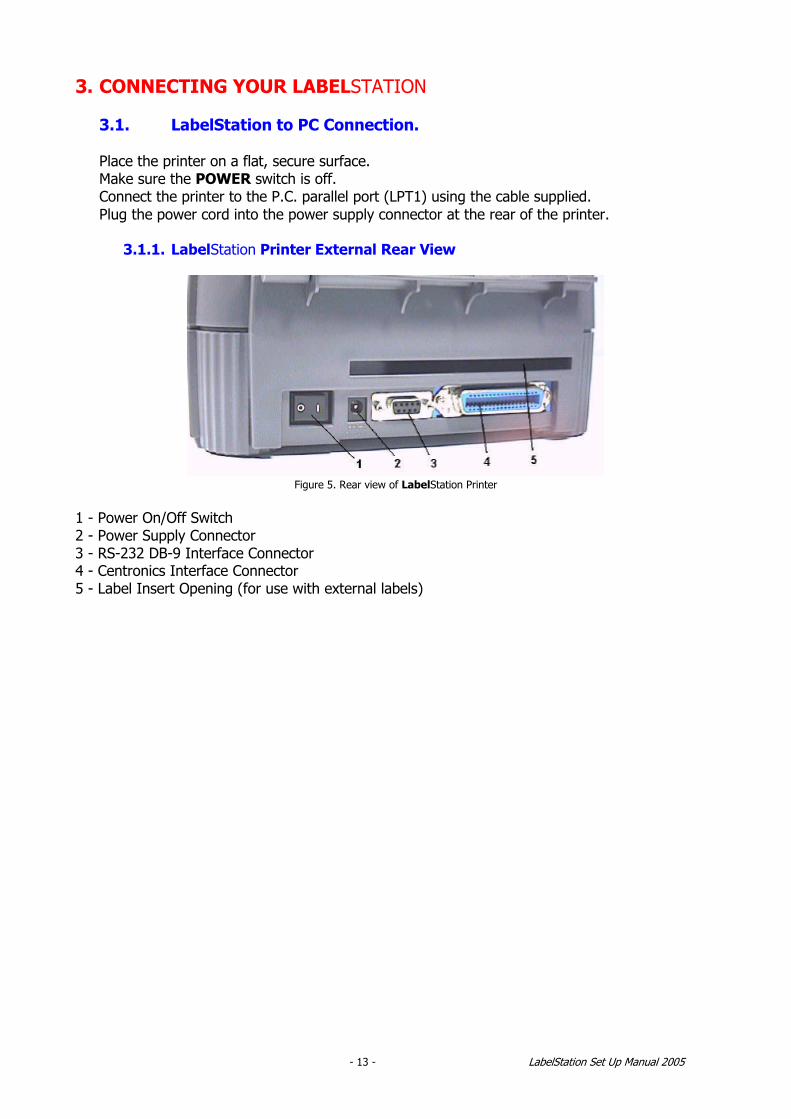
3.1. LabelStation to PC Connection. • Place the printer on a flat, secure surface. • Make sure the POWER switch is off. • Connect the printer to the P.C. parallel port (LPT1) using the cable supplied. • Plug the power cord into the power supply connector at the rear of the printer.
3.1.1. LabelStation Printer External Rear View
Figure 5. Rear view of LabelStation Printer
1 - Power On/Off Switch 2 - Power Supply Connector 3 - RS-232 DB-9 Interface Connector 4 - Centronics Interface Connector 5 - Label Insert Opening (for use with external labels)
- 14 - LabelStation Set Up Manual 2005
3.2. Loading Die Cut Labels (including Wire Markers)
• Turn off the printer and open the printer cover • Disengage the printer carriage by pulling the grey printer carriage release lever on the left side
of the platen (see figure 6).• Slide the label supply roll spindle through the core of a label roll and attach the fixing tabs onto
the spindle. • Place the label roll into the label roll mount. Feed the label under the carriage and over the
platen (see figure 7).
NOTE - ENSURE THAT THE LABEL MEDIA IS UNDERNEATH THE GREEN SENSOR • Adjust the label guide to fit the width of the media (do not close too tightly). • Engage the printer carriage; ensure both sides are locked down. • Wind the label roll on until it becomes adequately taut. If you are loading a new size of die cut label we recommend re-calibrating the gap sensor as below: - This utility is used to calibrate the sensitivity of gap sensor. Users may have to calibrate the gap sensor for two reasons: • The media is being changed to a new type. • Initialize the printer. Note: The ERR. LED may flash if gap sensor is not calibrated properly. Please follow the steps below to calibrate gap sensor: • Turn off the printer power and install blank labels (without any logo or character) on printer. • Hold down the PAUSE button then turn on printer power. • Release PAUSE button when the printer feeds labels. • When the printer stops and two green lights are on, the printer is now ready to print
• When the printer is out of ribbon or media, the ON-LINE light will not illuminate and the ERR. light will flash.
• Reload the ribbon or media without turning off the printer power.
- 15 - LabelStation Set Up Manual 2005
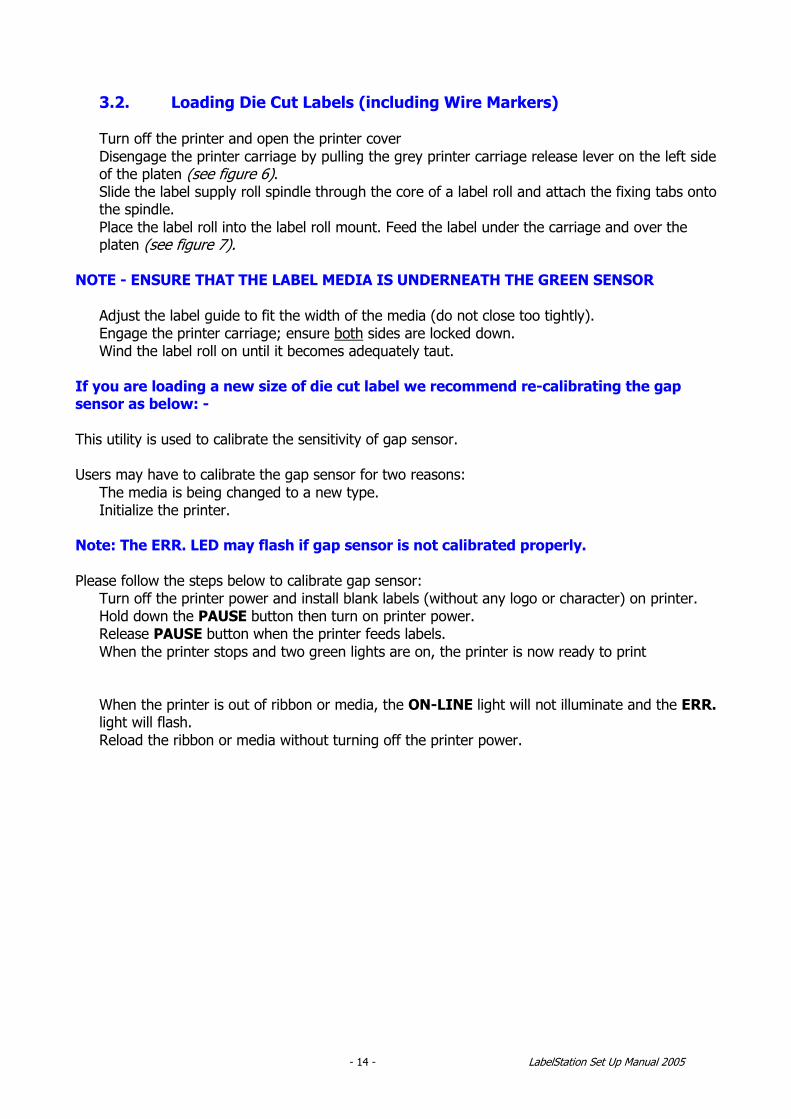
3.2.1. Installing label supply roll into LabelStation Printer
Figure 6. Inserting label supply roll into label roll mount
1 - Label Supply Roll Spindle 2 - Label Roll Mount 3 - Label Roll 4 - Fixing Tabs
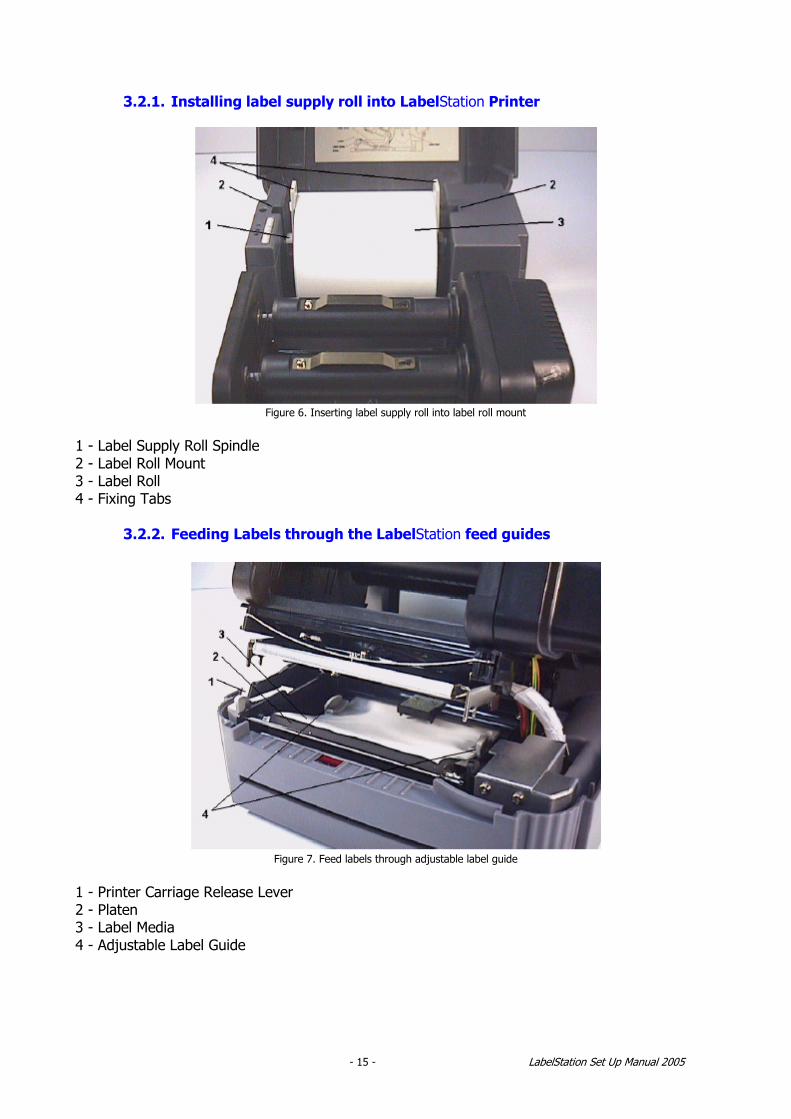
3.2.2. Feeding Labels through the LabelStation feed guides
Figure 7. Feed labels through adjustable label guide
1 - Printer Carriage Release Lever 2 - Platen 3 - Label Media 4 - Adjustable Label Guide
- 16 - LabelStation Set Up Manual 2005
3.3. Loading Continuous Rolls (including Heatshrink Tubing) • Turn the printer off and open the printer cover • Disengage the printer carriage by pulling the grey printer carriage release lever on the left side
of the platen (see figure 8).• Slide the label supply roll spindle through the core of a label roll and attach the fixing tabs onto
the spindle. • Place the label roll into the label roll mount. Feed the label under the carriage and over the
platen (see figure 9).
NOTE - ENSURE THAT THE LABEL MEDIA IS UNDERNEATH THE GREEN SENSOR
• Adjust the label guide to fit the width of the media (do not close to tightly). • Engage the printer carriage; ensure both sides are locked down. • Wind the label roll until it becomes adequately taut. • Turn the printer on and the PWR. & ON-LINE Light will illuminate. • When the printer is out of ribbon or media, the ON-LINE LED will not illuminate and the ERR.
LED will flash. • Reload the ribbon or media without turning off the printer power.
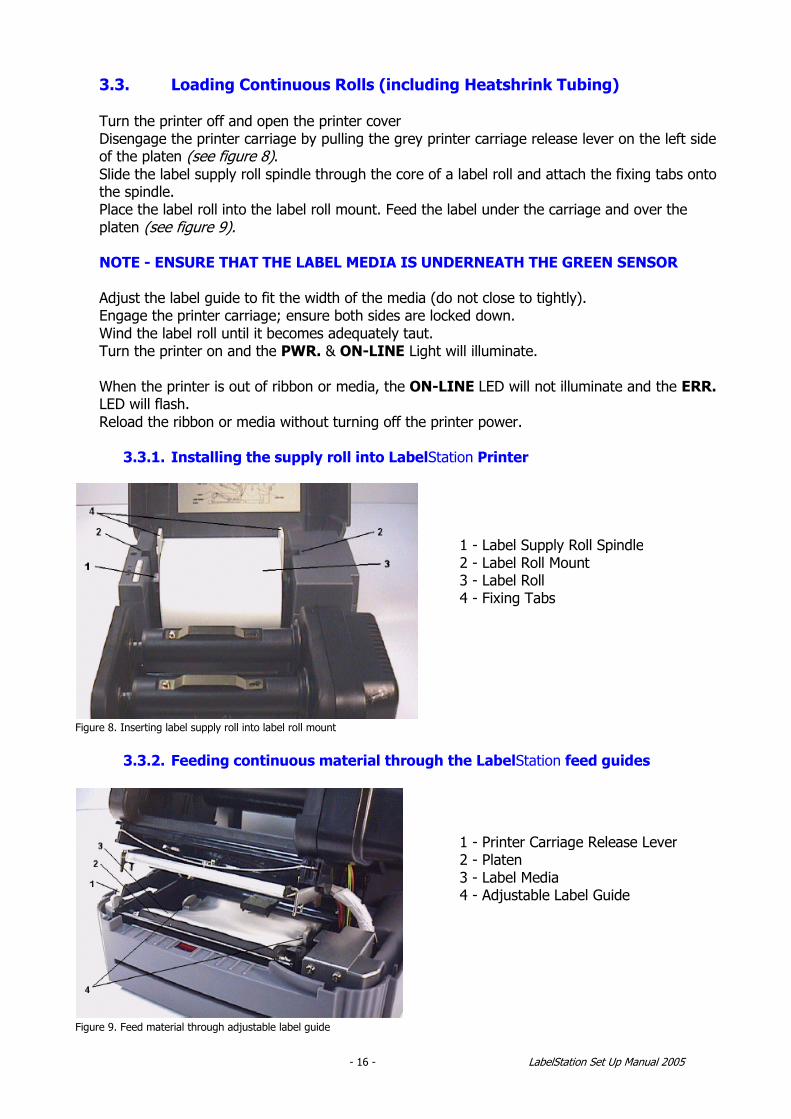
3.3.1. Installing the supply roll into LabelStation Printer
Figure 8. Inserting label supply roll into label roll mount
3.3.2. Feeding continuous material through the LabelStation feed guides
Figure 9. Feed material through adjustable label guide
1 - Label Supply Roll Spindle2 - Label Roll Mount 3 - Label Roll 4 - Fixing Tabs
1 - Printer Carriage Release Lever2 - Platen 3 - Label Media 4 - Adjustable Label Guide
- 17 - LabelStation Set Up Manual 2005
3.4. Loading Print Ribbons
• Place an empty paper core on the ribbon rewind spindle. • Install the ribbon on the ribbon supply spindle. • Disengage the printer carriage. • Pull the ribbon leader to the front from beneath the printer carriage. Attach the ribbon leader
to the ribbon rewind paper core. • Rotate the ribbon rewind roller until the roller is thoroughly covered by the black section of the
ribbon. • Engage the printer carriage.
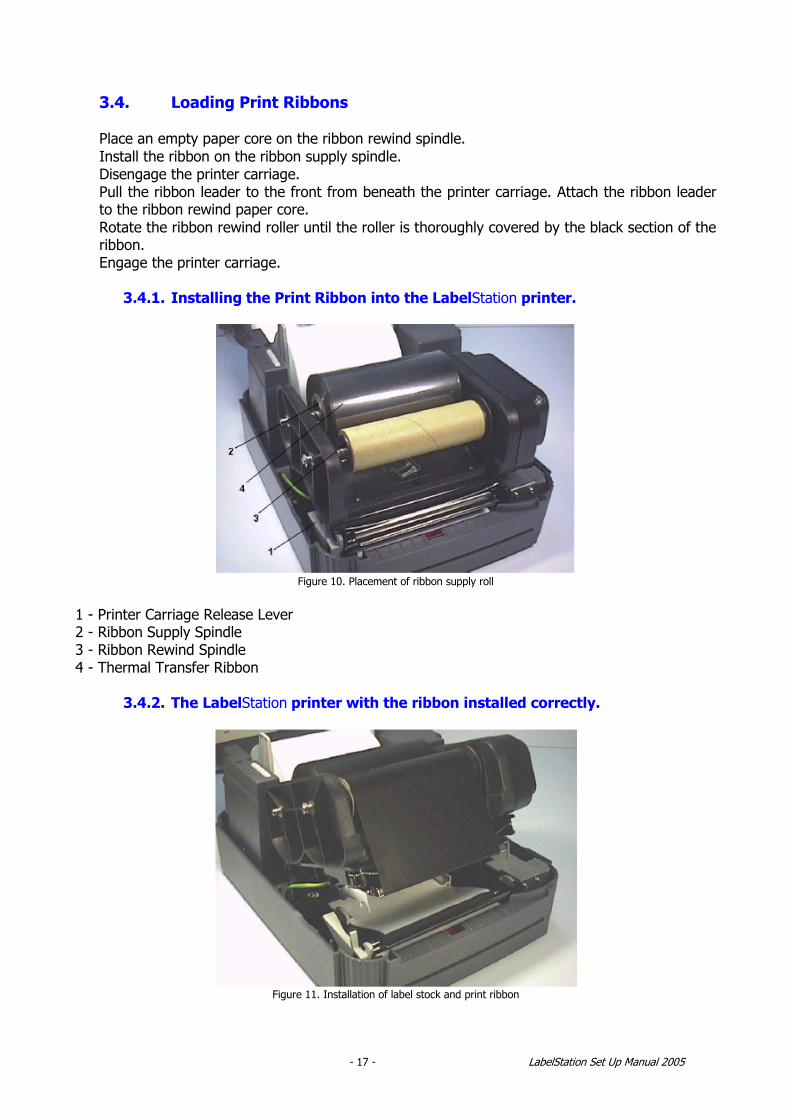
3.4.1. Installing the Print Ribbon into the LabelStation printer.
Figure 10. Placement of ribbon supply roll
1 - Printer Carriage Release Lever 2 - Ribbon Supply Spindle 3 - Ribbon Rewind Spindle 4 - Thermal Transfer Ribbon
3.4.2. The LabelStation printer with the ribbon installed correctly.
Figure 11. Installation of label stock and print ribbon
- 18 - LabelStation Set Up Manual 2005
4. DESIGNING & PRINTING
4.1. Introduction The LabelViewXLT+ software is very easy to use and is similar in operation to most other Windows based programmes. NOTE: This quick guide is not a LabelViewXLT+ user manual, it is designed to help you get up and running in the minimum of time. A full LabelView XLT+ user guide is found by running the software and pressing F1 or HELP > HELP. We recommend that you become familiar with the user guide.
There are a few very important points that you will need to know about when using LabelViewXLT+ to design and print label, signs and stickers. This Quick Guide aims to cover these as simply as possible. Software set-up is critical, it is very important that when designing your label you must set certain parameters so that the software can give the correct information to the printer. This falls into three main areas: - • Type of media being used in the LabelStation Printer
You must tell the software what type of media you are using – it could be die cut labels which use a 3mm vertical gap between each one, or it may be a roll of continuous material for signs & stickers.
• Label size The printer needs to know the label size for obvious reasons!
• Cutter settings (only applies if this optional item is installed on your printer) If you have ordered the optional label cutter, you will need to tell the printer when to cut the labels. Your choice is after each label has been printed, at the end of the print run or never.
IMPORTANT NOTE: If your set-up is incorrect, your labels will not print or your LabelStation printer will error.
PRINTING FROM WINDOWS SOFTWARE
The LabelStation will print from most Windows Software.
You will need to install the Windows drivers as the printer drivers for LabelView are unique to LabelView and will not work with any other software.
Please refer to Chapter 4.4 for instructions.
- 19 - LabelStation Set Up Manual 2005
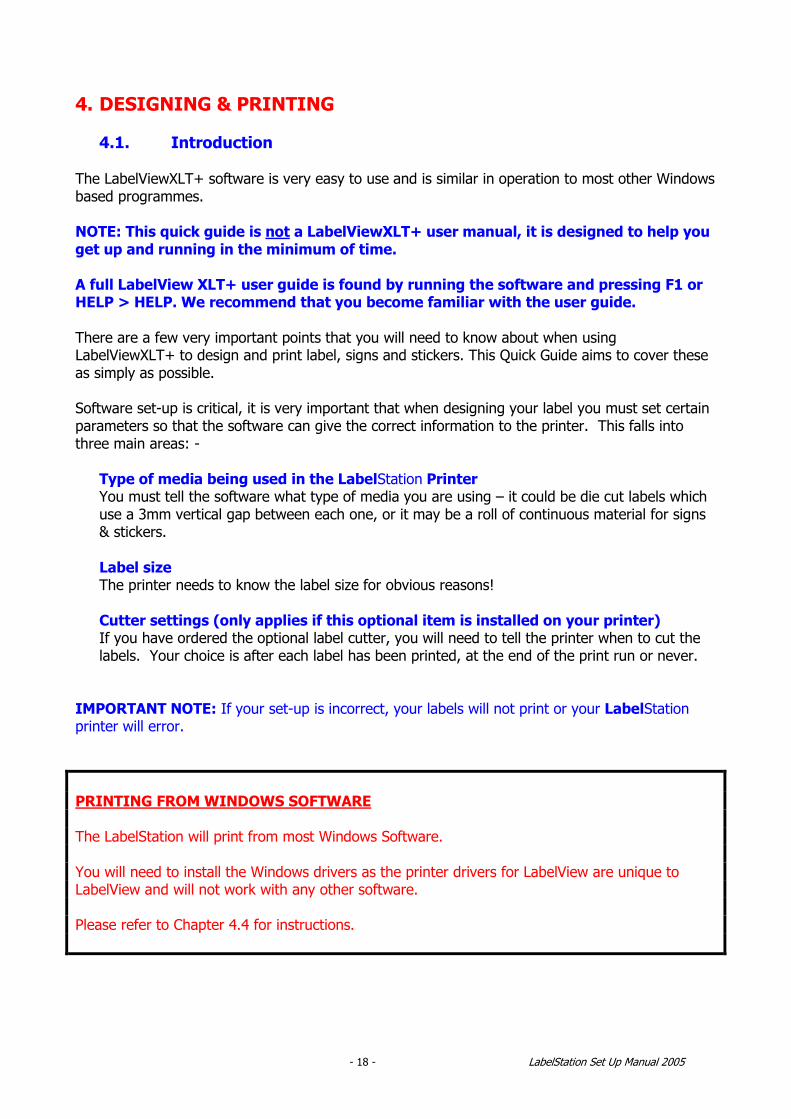
4.2. Printing Die Cut Labels Setting up LabelView XLT+ to print DIE CUT labels on a roll - The following guide illustrates the steps to creating a brand new label design. This is a model for all die cut labels (including self-laminating wire markers). NOTE: We will assume that the label size being used is 50mm x 25mm • Check that the correct printer is selected, choose FILE then SELECT PRINTER, which should
display the TSC Clever TTP-342
• Choose FILE and then NEW the Label Set-up box will be displayed
• Enter label Width as 50mm • Enter label Height as 25mm • Left Margin is not required • Vertical Gap is 3mm (between labels) • Labels Across is 1 • Horizontal Gap is 0
Print Speed - The speed at which the label is printed. Reducing the Print Speed will usually increase the print quality. Both print speed and temperature determine print quality. Temperature - The temperature at which the label is printed. Increasing the Temperature will make the printing darker, but can cause a blotchy appearance around the printed images. Different label materials require different speed & temp settings adjust at the time of printing for best results.
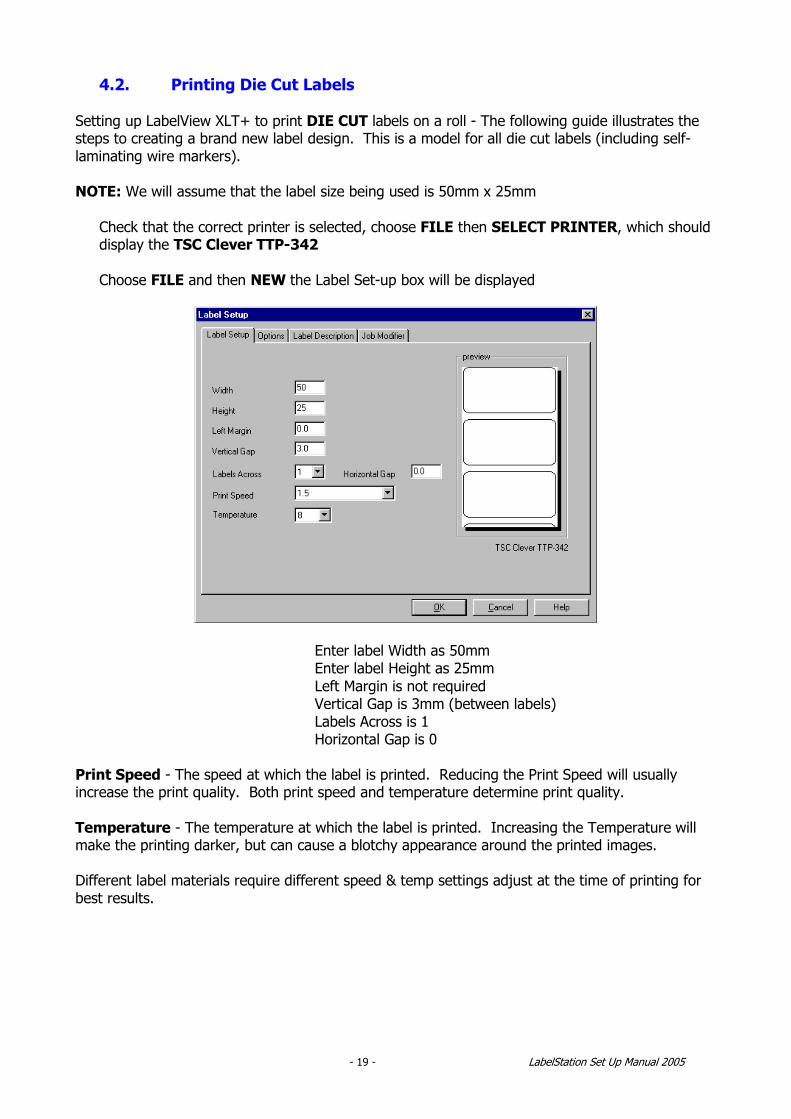
• You must now select the OPTIONS tab
• Print Rotation – Leave as normal • Label Offset – 0.0 • Sensor type – Vertical Gap (must be selected when using die cut labels on a roll, the printer
uses this instruction to register the start/stop point of the labels) • Cut - Set to Don’t Cut if you have no cutter assembly on your printer
• Set to At End Of Batch if you want each print job to be cut off at the end of the print run • Set to At Fixed Interval if you want to cut off a fixed number of labels from the print run
Other options on this screen can be disregarded. Now click OK to return to your label design screen – you can now add text, barcodes, graphics etc to your labels. PLEASE NOTE: IF YOUR LABELS HAVE A BLACK MARK ON THE REVERSE OF THE LABEL - YOU NEED TO CHANGE THE SENSOR TYPE TO BLACK MARK. MAKE SURE YOU SET THE LABEL SIZE TO THE MEASUREMENT BETWEEN THE TWO BLACK MARKS ON THE LABEL REVERSE AND THE GAP AS THE WIDTH OF THE BLACK MARK.
- 20 - LabelStation Set Up Manual 2005
- 21 - LabelStation Set Up Manual 2005
4.3. Printing using Continuous Rolls
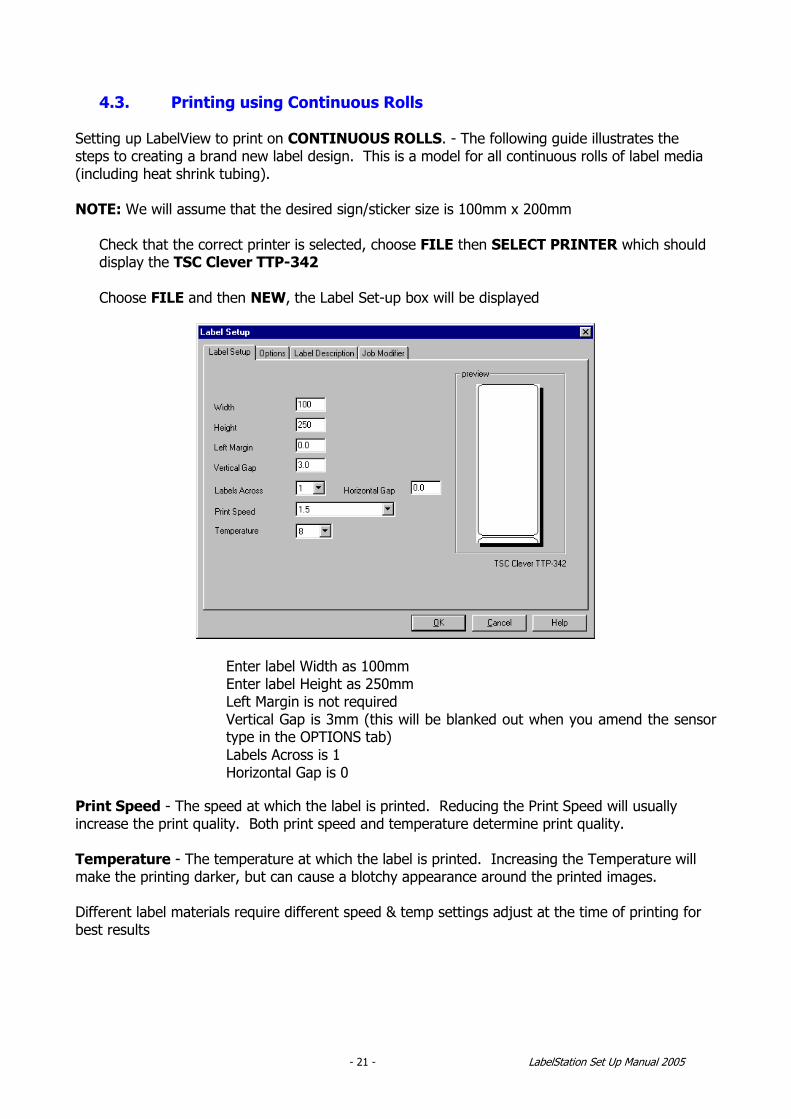
Setting up LabelView to print on CONTINUOUS ROLLS. - The following guide illustrates the steps to creating a brand new label design. This is a model for all continuous rolls of label media (including heat shrink tubing). NOTE: We will assume that the desired sign/sticker size is 100mm x 200mm • Check that the correct printer is selected, choose FILE then SELECT PRINTER which should
display the TSC Clever TTP-342 • Choose FILE and then NEW, the Label Set-up box will be displayed
• Enter label Width as 100mm • Enter label Height as 250mm • Left Margin is not required • Vertical Gap is 3mm (this will be blanked out when you amend the sensor
type in the OPTIONS tab) • Labels Across is 1 • Horizontal Gap is 0
Print Speed - The speed at which the label is printed. Reducing the Print Speed will usually increase the print quality. Both print speed and temperature determine print quality. Temperature - The temperature at which the label is printed. Increasing the Temperature will make the printing darker, but can cause a blotchy appearance around the printed images. Different label materials require different speed & temp settings adjust at the time of printing for best results

- 22 - LabelStation Set Up Manual 2005
• You must now select the OPTIONS tab
• Print Rotation – Leave as normal • Label Offset – 0.0 • Sensor type – CONTINUOUS – This option is critical and must be selected when using
continuous rolls. This stops the printer looking for a gap in the media. If this is not correctly selected the printer will error.
• Cut - Set to Don’t Cut if you have no cutter assembly on your printer • Set to At End Of Batch if you want each print job to be cut off at the end of the print run • Set to At Fixed Interval if you want to cut off a fixed number of labels from the print run
Other options on this screen can be disregarded. • Now click OK to return to your label design screen – you can now add text, barcodes, graphics
etc to your labels. IMPORTANT NOTE: When using a continuous roll of media and displaying a long label on screen you will find it useful to rotate the page from a portrait layout to a landscape layout. This will make designing and adding information to your design easier. To rotate your page on screen click the yellow box with the black arrow in the top left corner of the screen where the rulers meet. Each click will rotate the page through 90 degrees.
- 23 - LabelStation Set Up Manual 2005
4.4. Printing from Windows Software • Place the LabelStation Design & Print Software CD-ROM into your local CD drive <D>
• Click on your START button and choose RUN
• Click BROWSE select <D> (where this is your CD drive) • Double click the folder named Extra Drivers
• Choose TSC_6.8.3
• Click OK
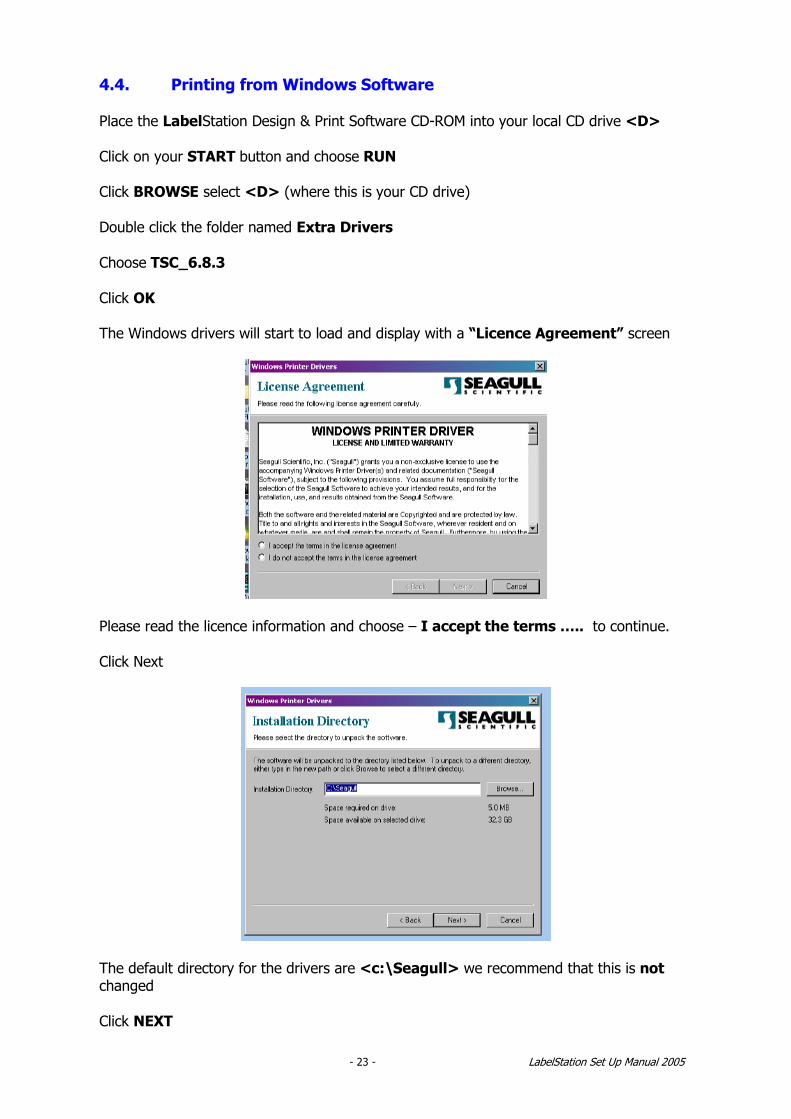
• The Windows drivers will start to load and display with a “Licence Agreement” screen
• Please read the licence information and choose – I accept the terms ….. to continue. • Click Next
• The default directory for the drivers are <c:\Seagull> we recommend that this is not changed
• Click NEXT
- 24 - LabelStation Set Up Manual 2005
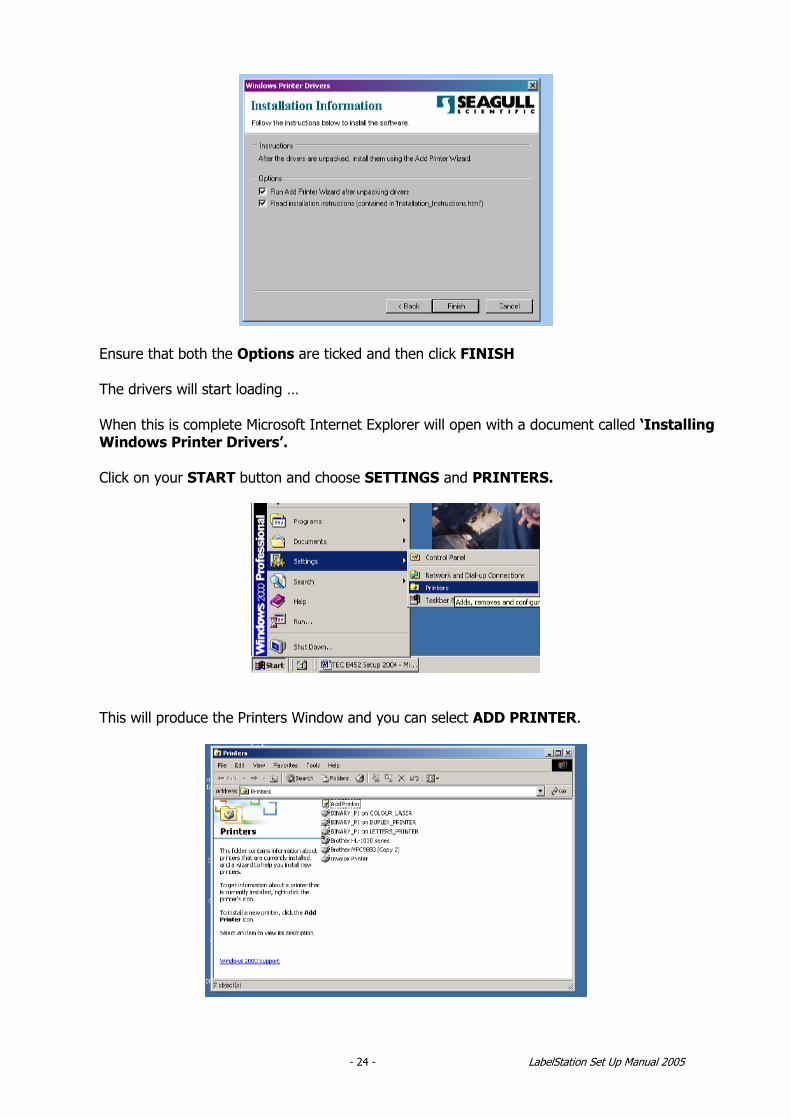
• Ensure that both the Options are ticked and then click FINISH
• The drivers will start loading … • When this is complete Microsoft Internet Explorer will open with a document called ‘Installing
Windows Printer Drivers’.
• Click on your START button and choose SETTINGS and PRINTERS.
• This will produce the Printers Window and you can select ADD PRINTER.
- 25 - LabelStation Set Up Manual 2005
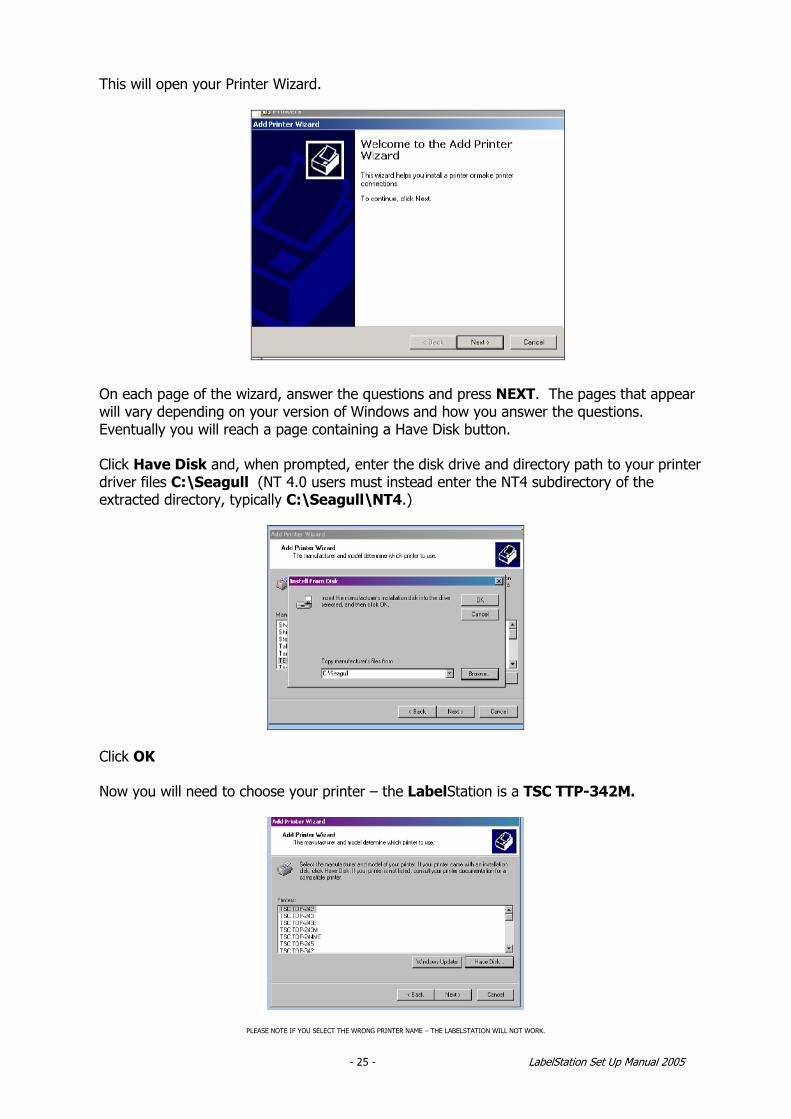
• This will open your Printer Wizard.
• On each page of the wizard, answer the questions and press NEXT. The pages that appear will vary depending on your version of Windows and how you answer the questions. Eventually you will reach a page containing a Have Disk button.
• Click Have Disk and, when prompted, enter the disk drive and directory path to your printer driver files C:\Seagull (NT 4.0 users must instead enter the NT4 subdirectory of the extracted directory, typically C:\Seagull\NT4.)
• Click OK
• Now you will need to choose your printer – the LabelStation is a TSC TTP-342M.
PLEASE NOTE IF YOU SELECT THE WRONG PRINTER NAME – THE LABELSTATION WILL NOT WORK.
- 26 - LabelStation Set Up Manual 2005
• Continue with the Add Printer wizard, except for the test page procedure.
• Select No when asked if you want to print a test page. (Since the Windows test page procedure assumes you have a laser, ink-jet, or dot matrix printer that can print out a full page, it is very unlikely that you will be able to properly print it to your thermal label printer.)
• Now click FINISH.
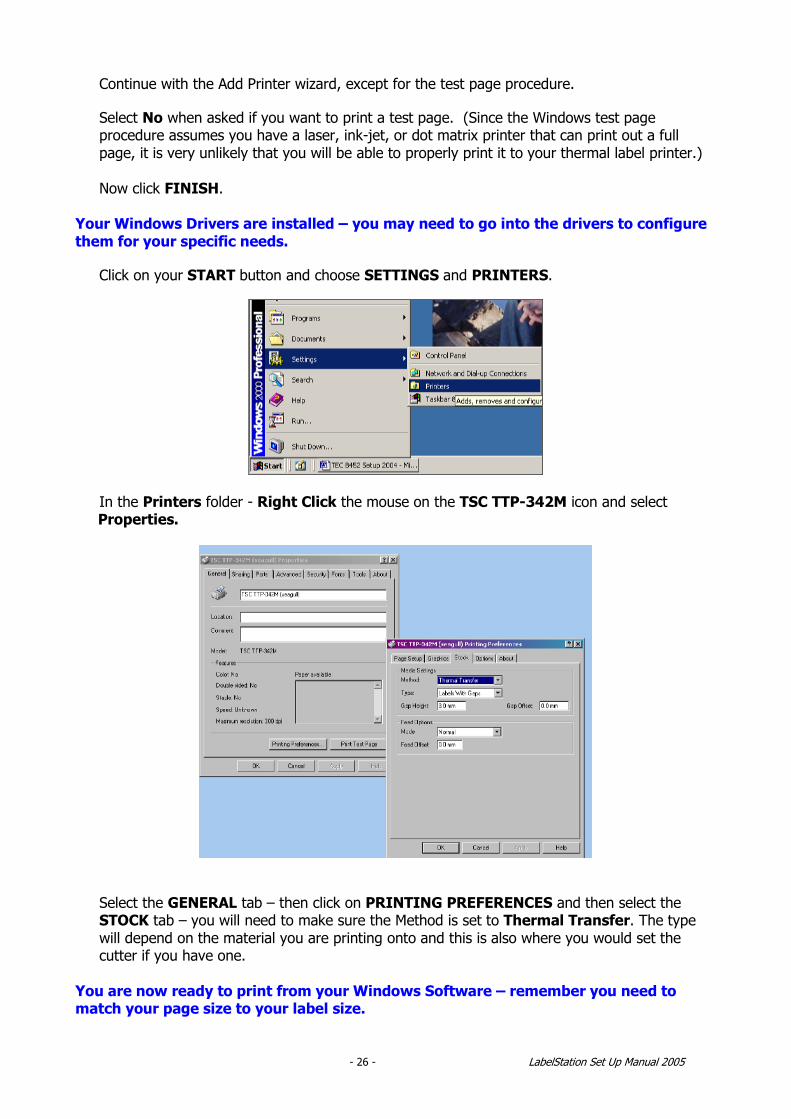
Your Windows Drivers are installed – you may need to go into the drivers to configure them for your specific needs. • Click on your START button and choose SETTINGS and PRINTERS.
• In the Printers folder - Right Click the mouse on the TSC TTP-342M icon and select Properties.
• Select the GENERAL tab – then click on PRINTING PREFERENCES and then select the STOCK tab – you will need to make sure the Method is set to Thermal Transfer. The type will depend on the material you are printing onto and this is also where you would set the cutter if you have one.
You are now ready to print from your Windows Software – remember you need to match your page size to your label size.
- 27 - LabelStation Set Up Manual 2005
5. LABELSTATION SPECIFICATIONS
5.1. Advanced Features
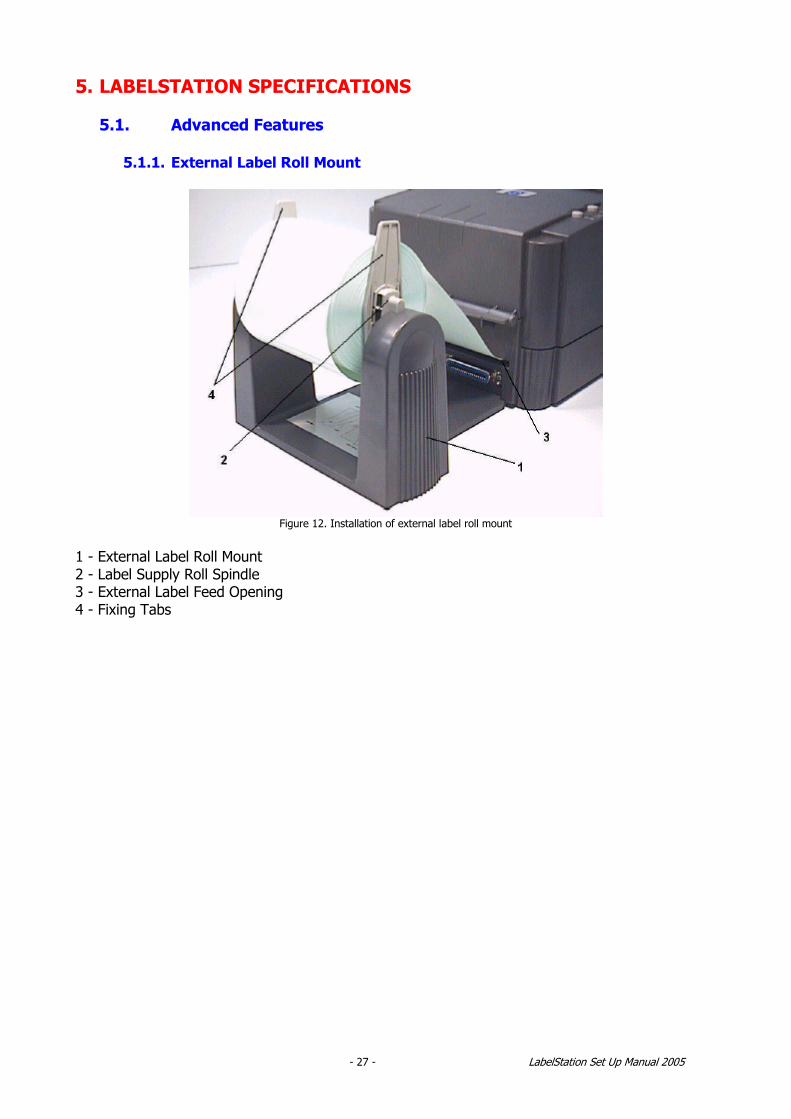
5.1.1. External Label Roll Mount
Figure 12. Installation of external label roll mount
1 - External Label Roll Mount 2 - Label Supply Roll Spindle 3 - External Label Feed Opening 4 - Fixing Tabs
- 28 - LabelStation Set Up Manual 2005
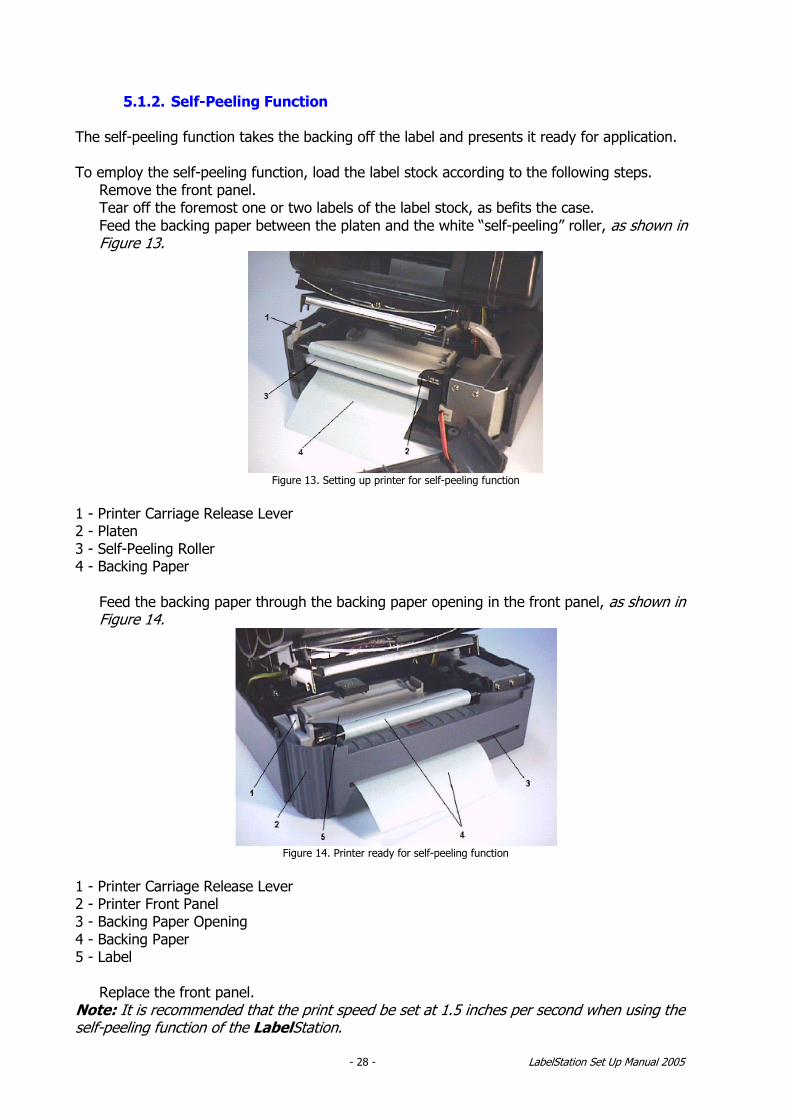
5.1.2. Self-Peeling Function
The self-peeling function takes the backing off the label and presents it ready for application. To employ the self-peeling function, load the label stock according to the following steps. • Remove the front panel. • Tear off the foremost one or two labels of the label stock, as befits the case. • Feed the backing paper between the platen and the white “self-peeling” roller, as shown in
Figure 13.
Figure 13. Setting up printer for self-peeling function
1 - Printer Carriage Release Lever 2 - Platen 3 - Self-Peeling Roller 4 - Backing Paper
• Feed the backing paper through the backing paper opening in the front panel, as shown in
Figure 14.
Figure 14. Printer ready for self-peeling function
1 - Printer Carriage Release Lever 2 - Printer Front Panel 3 - Backing Paper Opening 4 - Backing Paper 5 - Label • Replace the front panel. Note: It is recommended that the print speed be set at 1.5 inches per second when using the self-peeling function of the LabelStation.
- 29 - LabelStation Set Up Manual 2005
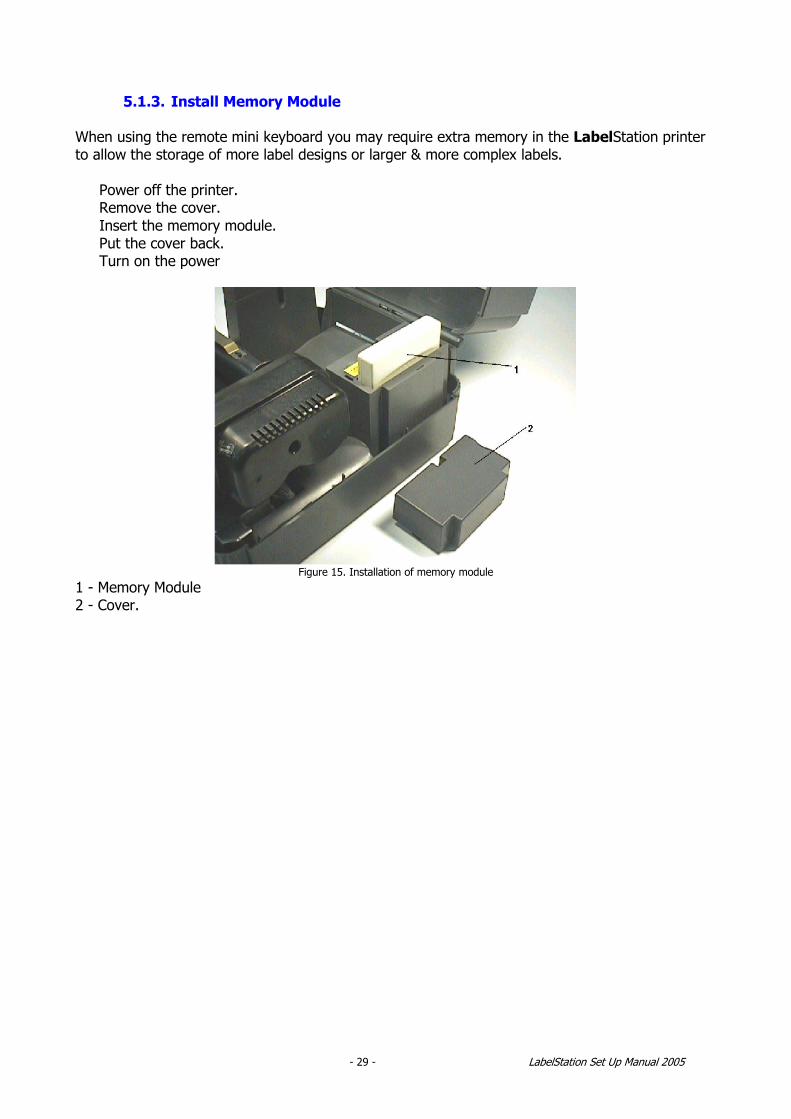
5.1.3. Install Memory Module
When using the remote mini keyboard you may require extra memory in the LabelStation printer to allow the storage of more label designs or larger & more complex labels. • Power off the printer. • Remove the cover. • Insert the memory module. • Put the cover back. • Turn on the power
Figure 15. Installation of memory module
1 - Memory Module 2 - Cover.
- 30 - LabelStation Set Up Manual 2005
5.2. TROUBLESHOOTING
5.2.1. Troubleshooting Guide
The following guide lists some of the most common problems that may be encountered when operating the LabelStation printer. If the printer still does not function after all suggested solutions have been invoked, please contact Advanced Labelling Systems on 01202 683212. Emailed requests for support should be directed to [email protected] Problem - Ribbon does not advance or rewind Solution - Check print head is locked down fully.
Check that ribbon is securely attached to the ribbon take-up spool. Problem - Poor print quality Solution - Clean the thermal print head.
Check ribbon is fitted correctly. Adjust the print density setting. Ribbon and media are not compatible.
Problem - Power indicator does not illuminate Solution - Check the power cord, see whether it is properly connected. Problem - ON-LINE indicator is off Solution - Out of paper or out of ribbon
Calibrate the sensitivity of gap sensor – see section 3.2. Problem - ERR. Light is on Solution - Wrong sensor type selected in software
Wrong media installed in printer Rewind ribbon paper core is not installed Problem with your label design
Problem - Continuous feeding when printing labels Solution - Calibrate the gap sensor – see section 3.2.
Wrong media being used Wrong sensor type selected in software
Our technical support is available to you during working hours, please to call with any problems you may have. Tech Support Line – 01202 683212

- 31 - LabelStation Set Up Manual 2005
5.2.2. Error Messages
Syntax Error • The command format is incorrect. • The serial port setting is incorrect. Out of Range • Numeric input is too large to be processed. • The input string is too long to be stored. • The size of the text or bar code exceeds that of the label. Download Error • The download file format is incorrect. • There is not enough memory to store the file. Stack Overflow • A mathematical expression is too complicated. Divide it into several expressions. • The nested routine is too deep. Memory Error • Too many variables defined. RS-232 Error • The serial port setting is incorrect. File Not Found • Cannot open the file specified. Download the file again. Type Mismatch • Variable type mismatch. Gap Not Found • Cannot detect label gap. Calibrate the label again. Clock Access Error • Cannot read from / write to the real time clock.
- 32 - LabelStation Set Up Manual 2005
5.2.3. Power-on Utilities
There are three power-on utilities to set up and test LabelStation hardware. Pressing the FEED or PAUSE button and turning on the printer power simultaneously activates these utilities. The utilities are listed as below:
• Self-test • Gap sensor calibration • Printer initialization
Self-Test Utility
To initiate the self test mode, • Install the label first. • Depress the FEED button while turning on the printer power. The printer will calibrate the
label length. If the label gap is not detected within 7", the printer stops feeding labels and the media is treated as continuous paper. In self-test, a check pattern is used to check the performance of the thermal print head.
• Do not release the FEED button until the printer feeds labels. The printer performs the following items:
• Calibrate label pitch • Print out thermal print head check pattern • Print out the internal settings • Enter dump mode
Following the check pattern, the printer prints internal settings as listed below: • Printer model and firmware version • Mileage • Flash times • Check sum • Serial port setting • Code page setting • Country code setting • Print speed setting • Print density setting • Label size setting • Gap (Bline) width and offset setting • Backing paper transparence • File list • Memory available When the self-test is completed, the printer enters the dump mode. Please turn the printer's power off and then on to resume normal printing.
- 33 - LabelStation Set Up Manual 2005
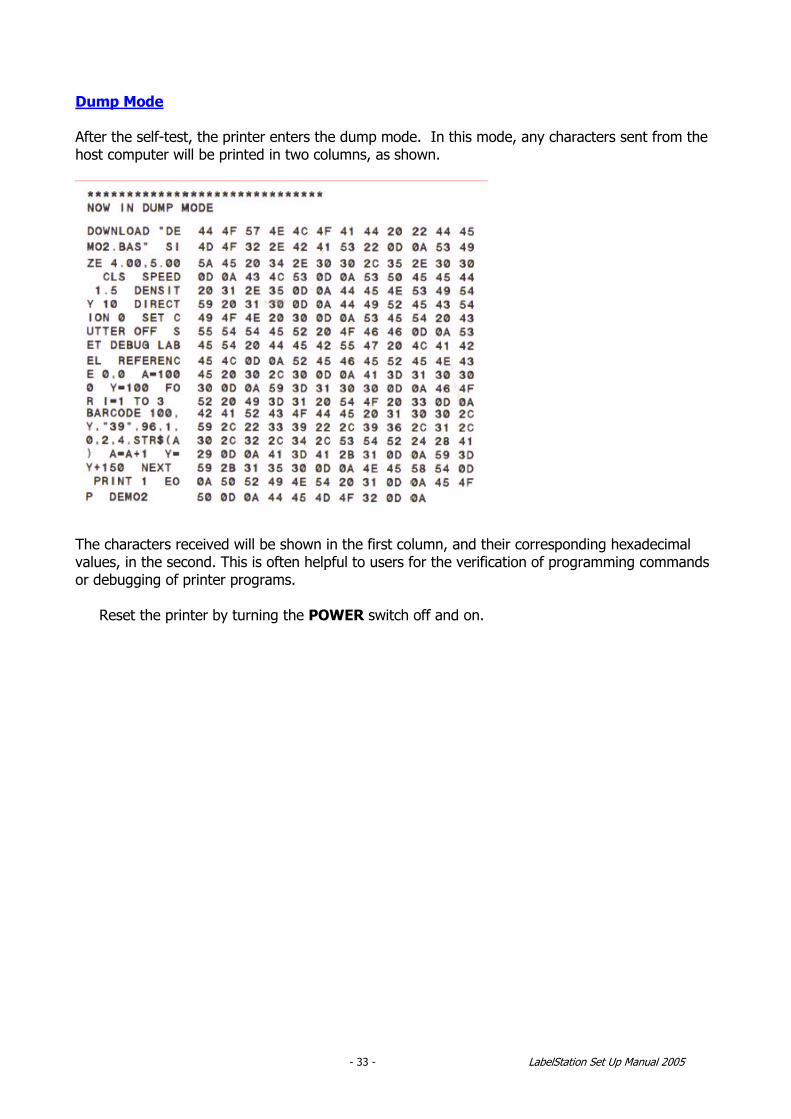
Dump Mode
After the self-test, the printer enters the dump mode. In this mode, any characters sent from the host computer will be printed in two columns, as shown.
The characters received will be shown in the first column, and their corresponding hexadecimal values, in the second. This is often helpful to users for the verification of programming commands or debugging of printer programs. • Reset the printer by turning the POWER switch off and on.
- 34 - LabelStation Set Up Manual 2005
Gap Sensor Calibration Utility
This utility is used to calibrate the sensitivity of gap sensor. Users may have to calibrate the gap sensor for two reasons: • The media is being changed to a new type. • Initialize the printer. Note: The ERR. LED may flash if gap sensor is not calibrated properly. Please follow the steps below to calibrate gap sensor: • Turn off the printer power and install blank labels (without any logo or character) on printer. • Hold down the PAUSE button then turn on printer power. • Release PAUSE button when the printer feeds labels. • When the printer stops and two green LED’s light are on, the printer is now ready to print Printer Initialization
Printer initialization clears all downloaded files resident in flash memory, and sets printer parameters to default values. Parameter Default Values
• MILEAGE Automatic • FLASH TIMES Automatic • CHECK SUM Automatic • SERIAL PORT 96,N, 8,1 • CODE PAGE 437 (8 bit), USA (7 bit) • COUNTRY CODE 001 • SPEED 2.0”/sec • DENSITY 09 • SIZE 4, 2.5" • GAP (BLINE) 0.12, 0 • TRANSPARANCY 05,05,05
Please follow the steps below to initialize the printer: • Turn off the printer power. • Hold down the PAUSE and FEED buttons and turn on the printer power. • Do not release the buttons until the three lights flash in turn. Note: When printer initialization is done, please calibrate the gap sensor again – see above
- 35 - LabelStation Set Up Manual 2005
5.3. SPECIFICATIONS AND WARRANTIES
5.3.1. Specifications
PrinterType: Thermal transfer printing only Print speed: Selectable speeds of 1, 1.5 or 2.0 inches per second Resolution: 300 DPI (12 dots per mm) Font styles: Any Windows TrueType Font when P.C. driven.
Printer fonts only when using remote keyboard, expandable vertically and horizontally up to 8x.
Bar codes: Code 39, Code 93, Code 128 UCC, Code 128 (Subsets A, B and C), Codabar, Interleaved 2 of 5, EAN-8, EAN-13, UPC-A, UPC-E, EAN and UPC with 2 or 5 digit add-on, Postnet 2D bar codes: Maxicode, PDF-417, DataMatrix
Graphics: Mono PCX format (recommended) Indicators and ButtonsIndicators: PWR., ON-LINE, ERR. Buttons: POWER, PAUSE, FEED, Note: The functions of buttons and LED’s can be redefined by commands. Communication InterfaceInterface: Parallel LPT Char Set: ANSI ASCII character set Power RequirementsIn voltage: Switching power, 110-240 VAC, 50-60 Hz Outvoltage: 24 VDC Fuse: 2A maximum Note: Use only the LabelStation power supply; failure to do so could cause serious damage to the LabelStation printer. EnvironmentOperating temperature: 40°F to 104°F (5°C to 40°C) Storage temperature: 14°F to 140°F (-10°C to 60°C) Humidity: 10% to 95% non-condensing Ventilation: Free air movement Printer BodyDimensions: 6.14"H x 9.13"W x 11.34"D
(15.6 cm H x 23.2 cm W x 28.8 cm D) Weight: LabelStation Printer: 6.0 lbs. (2.7 kg)
- 36 - LabelStation Set Up Manual 2005
5.3.2. Options
A number of different options may be added to the LabelStation printer for even greater convenience and versatility. The available options include: • Industrial Graphics CD-ROM • Expandable FLASH memory module • Cutter for guillotining labels or sign vinyl’s • Portable LCD keyboard
5.3.3. Supplies Label Stock, Signage Media, and Cable Markers LabelStation is capable of printing on a wide range of media. Refer to the supplies price list for specifications of compatible label media. Print RibbonsOur print ribbons have been designed for optimum print performance with our range of label media. As a guide Industrial Print Ribbons are long life & highly durable when used with the appropriate media. General Purpose Print Ribbons are ideal for paper labels and printing on polyesters or vinyls where no long-term performance is required. We cannot guarantee the performance the LabelStation System with non-approved supplies.
5.4. Compliance’s CE, FCC, UL, CUL, TÜV-GS, CNS
- 37 - LabelStation Set Up Manual 2005
5.5. Warranty Information
Advanced Labelling Systems warrants to the customer, that under normal use and service, the LabelStation printer (with the exception of the print head) purchased hereunder shall be free from defects in material and workmanship for a period of one year, from the date of shipment by Advanced Labelling Systems. Expendable items or parts such as labels & ribbons are not covered by this warranty. This warranty does not cover equipment or parts, which have been misused, altered, neglected, carelessly handled, or used for purposes other than those for which the printer was manufactured. This warranty also does not cover loss, damages resulting from accident, or damages resulting from unauthorised service.
5.5.1. Thermal Print Head The warranty of the thermal print head is limited to ninety days (90) from the date of shipment to buyer. The warranty does not cover thermal print heads, which have been misused, altered, neglected, handled carelessly, or damaged due to improper cleaning or unauthorised repairs.
5.5.2. Warranty Service Procedures If a defect should occur during the warranty period, the defective unit must be returned, freight and insurance prepaid, in a suitable protective shipping container to Advanced Labelling Systems. Include a contact name, action required and a detailed description of the problem and examples when possible. Advanced Labelling Systems shall not be responsible for any loss or damages incurred during shipping or any loss due to the printer being unavailable for use.
5.5.3. General Warranty Provisions Advanced Labelling Systems makes no warranty as to the design, capability, capacity, or suitability of any of its hardware, supplies or software. Software is licensed on an “as is” basis without warranty. Except and to the extent expressly provided in this warranty and in lieu of all other warranties, expressed or implied, including, but not limited to any warranties of merchantability or fitness for a particular product. Purchaser shall be solely responsible for the selection, use, efficiency and suitability of Advanced Labelling Systems products.
5.5.4. Limitation of Liability In no event shall Advanced Labelling Systems be liable to the purchaser for any indirect, special, or consequential damages or lost profits arising out of or relating to Advanced Labelling Systems products, or if the performance or a breach thereof, even if Advanced Labelling Systems has been advised of the possibility thereof. Advanced Labelling Systems liability, if any, to the purchaser or to the customers of purchaser hereunder shall in no event exceed the total amounts paid to Advanced Labelling Systems hereunder by the purchaser for a defective product. In no event shall Advanced Labelling Systems be liable to the purchaser for any damages resulting from or related to any failure or delay of Advanced Labelling Systems in the delivery or installation of the computer hardware, supplies, or software in the performance of any services. The remedies set forth here are the sole and exclusive remedies available to any person for any damages of any kind and nature including incidental, consequential, or special, whether arising from warranty (including implied warranties), contract, negligence, tort or otherwise. In the event that any implied warranties (including but not limited to the implied warranties of merchantability and fitness for a particular purpose) are found to exist, such warranties are limited in duration to the period of the warranties.