labelview 2014 administrator's guide
TRANSCRIPT

TEKLYNX®LABELVIEW
A D M I N I S T R A T O R ’ S G U I D E
™

Administrator’s Guide
DOC-OEMLV2014-AG-US-24/12/13

The information in this manual is not binding and may bemodified without prior notice.
Supply of the software described in this manual issubject to a user license. The software may not be used,copied or reproduced on any medium whatsoever, except inaccordance with this license.
No portion of this manual may be copied, reproduced ortransmitted by any means whatsoever, for purposes otherthan the personal use of the buyer, unless writtenpermission is obtained from Teklynx Newco SAS.
©2014 Teklynx Newco SAS,All rights reserved.

Table of Contents
Chapter 1: Introduction . . . . . . . . . . . . . . . . . . . . . . . . . . . . . . . . . . . . . . . 1-1
Welcome. . . . . . . . . . . . . . . . . . . . . . . . . . . . . . . . . . . . . . . . . . . . . . . . . . . . 1-1What is this guide . . . . . . . . . . . . . . . . . . . . . . . . . . . . . . . . . . . . . . . . . . . . . 1-1Who should read this guide . . . . . . . . . . . . . . . . . . . . . . . . . . . . . . . . . . . . . 1-1Product description. . . . . . . . . . . . . . . . . . . . . . . . . . . . . . . . . . . . . . . . . . . . 1-2System requirements . . . . . . . . . . . . . . . . . . . . . . . . . . . . . . . . . . . . . . . . . . 1-2
Chapter 2: Installing the Software . . . . . . . . . . . . . . . . . . . . . . . . . . . . . . 2-3
Functional description. . . . . . . . . . . . . . . . . . . . . . . . . . . . . . . . . . . . . . . . . . 2-3Installation procedure . . . . . . . . . . . . . . . . . . . . . . . . . . . . . . . . . . . . . . . . . . 2-4
Before you start . . . . . . . . . . . . . . . . . . . . . . . . . . . . . . . . . . . . . . . . . . . 2-4Network Manager . . . . . . . . . . . . . . . . . . . . . . . . . . . . . . . . . . . . . . . . . 2-4Installing the Network and Users Utilities . . . . . . . . . . . . . . . . . . . . . . . 2-4Configuration . . . . . . . . . . . . . . . . . . . . . . . . . . . . . . . . . . . . . . . . . . . . . 2-5Starting the License Manager . . . . . . . . . . . . . . . . . . . . . . . . . . . . . . . . 2-6Installing the software on the workstations . . . . . . . . . . . . . . . . . . . . . . 2-7
License protection . . . . . . . . . . . . . . . . . . . . . . . . . . . . . . . . . . . . . . . . . . . 2-8Hardware Key connection . . . . . . . . . . . . . . . . . . . . . . . . . . . . . . . . . . . 2-8Error messages when launching the software . . . . . . . . . . . . . . . . . . . 2-10Installing the driver key manually . . . . . . . . . . . . . . . . . . . . . . . . . . . . . 2-10Software key protection . . . . . . . . . . . . . . . . . . . . . . . . . . . . . . . . . . . . 2-10To activate the software key . . . . . . . . . . . . . . . . . . . . . . . . . . . . . . . . 2-11
Chapter 3: Network Use. . . . . . . . . . . . . . . . . . . . . . . . . . . . . . . . . . . . . . 3-15
Managing users . . . . . . . . . . . . . . . . . . . . . . . . . . . . . . . . . . . . . . . . . . . . . 3-15Service Control . . . . . . . . . . . . . . . . . . . . . . . . . . . . . . . . . . . . . . . . . . 3-15Maximum number of users . . . . . . . . . . . . . . . . . . . . . . . . . . . . . . . . . 3-18
Managing shared resources. . . . . . . . . . . . . . . . . . . . . . . . . . . . . . . . . . . . 3-19Shared document files . . . . . . . . . . . . . . . . . . . . . . . . . . . . . . . . . . . . . 3-19Shared data . . . . . . . . . . . . . . . . . . . . . . . . . . . . . . . . . . . . . . . . . . . . . 3-19Shared printing logfile . . . . . . . . . . . . . . . . . . . . . . . . . . . . . . . . . . . . . 3-19

ii Administrator’s guide
Shared file timeout period . . . . . . . . . . . . . . . . . . . . . . . . . . . . . . . . . . 3-20Printing . . . . . . . . . . . . . . . . . . . . . . . . . . . . . . . . . . . . . . . . . . . . . . . . . 3-20
Notes for the network administrator . . . . . . . . . . . . . . . . . . . . . . . . . . . . . . 3-21

About this manual
Typographical conventions
This manual distinguishes between different types ofinformation using the following conventions:
• Terms taken from the interface itself, such as commands,appear in bold.
• Keys appear in small caps, for example: Press the SHIFT
key.
• Numbered lists indicate that there is a procedure to follow.
• When the conjunction -or- appears next to a paragraph, itmeans there is the option of a different procedure forcarrying out a given task.
• When a menu command contains submenus, the menuname, followed by the command to select, appears in bold.Thus, “Go to File > Open” means go to the File menu, thenthe Open command.
This symbol highlights important information on how a particular command or procedure works.
Following this symbol, you will find hints and tipsfor optimizing tasks, speeding up commands, andother helpful information.

iv Administrator’s Guide

C H A P T E R 1
Introduction
Welcome!TEKLYNX label design and integration software provides
an easy-to-use, user-friendly solution for printing bar codelabels and tags to meet compliance standards in anyindustry.
What is this guide?This guide provides information to help you understand
how to manage your labeling software in the context of anenterprise environment.
Who should read this guide?This Administrator’s Guide is for IT personnel (system
and network administrators) who are responsible formanaging the deployment of software applications,specifically on the Microsoft Windows platform.

Chapter 1 - 2 Administrator’s Guide
Product descriptionYour product includes the following components:
• A DVD for the installation
• Complete documentation
• A license agreement and registration card
• A protection key, either electronic (software key) or hardkey (dongle)
System requirementsThe configuration required for the software to run properly isthe same as most applications running on Windows:
• One of the 32- or 64-bit Windows® operating Windows:XP, Vista, 7, 8, 8.1, Server 2003, Server 2008 or Server2012.
• Computer with 1GB of free RAM (depending on thesystem).
• A hard drive with at least 500 MB free disk space(depending on the installation options).
• CPU: 2 Ghz minimum.
• Video card : DirectX 9 minimum.• Administrator rights to the computer during the installation procedure.
• System must have access to the Internet or have adedicated USB port.
NoteThe ReleaseUS.html file contains the latest information on the software. This information supersedes the information contained in this manual.
C H A P T E R 2
Installing the Software
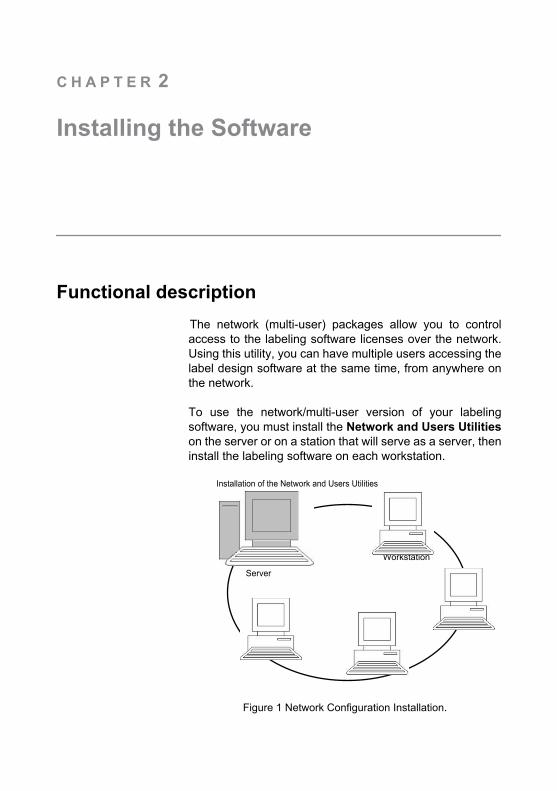
Functional descriptionThe network (multi-user) packages allow you to controlaccess to the labeling software licenses over the network.Using this utility, you can have multiple users accessing thelabel design software at the same time, from anywhere onthe network.
To use the network/multi-user version of your labelingsoftware, you must install the Network and Users Utilitieson the server or on a station that will serve as a server, theninstall the labeling software on each workstation.
Figure 1 Network Configuration Installation.
Installation of the Network and Users Utilities
Server
Workstation
Workstation
Chapter 2 - 4 Administrator’s Guide
Installation procedureBefore you start Before you can install the software, the network
administrator must first define the structure of the networkfor the group of users, specifically:
• Define the license server on which the Network andUsers Utilities and the dongle will be installed.
• Define the client workstations that will use the labelingsoftware.
Network Manager
The Network and Users Utilities let you define the networkconfiguration of your labeling software. Network Managerincludes:
• The Network License Manager (License Service)
• Network Settings Wizard, which helps you define thenetwork configuration.
Installing the Network and Users Utilities
Before installing the labeling software on all the workstationsthat will use it, you must first install the License Service utilityon the server to configure the network.To install the Network and Users Utilities on the server:
1 Insert the DVD in the appropriate drive.
The Installation window is displayed.
If the DVD does not run automatically, go to Windowsexplorer and expand the letter of the DVD drive. Doubleclick index.hta.
2 Select Network and Users Utilities, which includesLicense Service. Then, click the Install button.
3 Follow the instructions on the screen.
4 If you want to define settings for your networkconfiguration, start the Network Settings Wizard on theserver. If you do not modify the configuration, eachworkstation will have its own settings.

Installing the Software Chapter 2 - 5
Configuration All the necessary tools to configure the network version areavailable from the Network toolbar, which can be accessedfrom:
For Windows versions older than Windows 8: Start >Programs > Teklynx Network Utilities and selecting
Share the TKDongle folder with full control, using TKDongle as the share name. The default access path for this folder is
For XP:C:\DocumentsandSettings\AllUsers\ ApplicationData\ TKI\ LicenseManager\TKDongle
For Vista, 7, 8, 8.1, Server 2008 and Server 2012: C:\ProgramData\TKI\LicenseManager\ TKDongle)
RIGHT CLICK > Properties > Sharing tab and Permissions button.
For administrators: Users wanting Write Access to the Network license must be given the rights by:
1. Sharing the TKDongle folder and authorizing the user:
For XP:C:\DocumentsandSettings\AllUsers\ ApplicationData\ TKI\ LicenseManager\TKDongle
For Vista, 7, 8, 8.1, Server 2008 and Server 2012: C:\ProgramData\TKI\LicenseManager\TKDongle)
Right-click > Properties > Sharing tab and Permissions button.
2. Give Write Access to the user on the Security tab of the TKDongle properties.

Chapter 2 - 6 Administrator’s Guide
Network Toolbar.
For Windows 8 and 8.1 users: Access the search tool. Toaccess and use the search tool, open the Charms menu bypressing Win [Windows key] + C on your keyboard or byswiping in the top-right or bottom-right corner. Once theCharms menu pops open, click/tap the Search button. TypeTeklynx Network Utilities.
The Network Settings Wizard helps you define the settingsfor your network version.
1 Start the Network Settings Wizard.
2 Select a settings mode: Generic, By user or By station.
• Generic: All users will use the same settings on all workstations. (user.ini).• By user: Each user can access his or her own settingson any workstation. (user name.ini).• By station: Each workstation has its own settings (station.ini).
3 Specify the location in which you want to store thesesettings. If you want to share these settings between variousworkstations, specify a network path accessible to allworkstations. (for example TKDongle).
4 Specify the location in which you want to store the shareddata (variables, lists, printing logfile, etc.). Be sure all usershave appropriate access on these folders.
Starting the License Service
Before installing the labeling software on all workstations,you must be sure the License Service is started.
The License Service was installed as a service calledSLicense. You do not need to manually start it. In fact,SLicense starts when the workstation is turned on and runsas a background task as long as the workstation is on.
If you installed the Service License as software keyprotected, you must activate the license before it willstart automatically.

Installing the Software Chapter 2 - 7
To start the Service Controller
• Click the icon on the Network toolbar-or- Double-click the SLICENSECTRL.EXE file.
Installing the software on the workstations
The labeling software must be installed on all theworkstations on which it will be used.
To install the software on a workstation
1 Insert the DVD for the installation in the appropriate drive.
The Installation window is displayed.
If the DVD does not run automatically, Go to Windows explorer and expand the letter of the DVD drive. Double click on index.hta.
2 Select the product to be installed, click the Install button,and follow the instructions on the screen.
3 Start the labeling software. The Activation Wizard isdisplayed. Click Try to launch the software. A message isdisplayed to inform you that no dongle has been found. ClickYes to start the software.
4 From the Tools menu, choose Network Administration.
5 Enable Use Network License.
6 Click Modify to select the server on which the LicenseManager and dongle are installed.
- or -
Click Browse to automatically search for the server onwhich the License Service is installed.
If the network settings have already been configured, amessage asking if you want to use the current networkconfiguration is displayed.
7 If you want to modify or configure the network settings,

Chapter 2 - 8 Administrator’s Guide
click the Network Settings Wizard button .
8 Click OK.
9 Restart the program.
License protection Your software can be protected using a software key (anelectronic code) or a hardware key (a dongle).
Without a protection key, the program will run in “evaluation”mode. You will not be able to save and print your labels.
• The dongle is a small electronic device that you plug intoyour PC’s parallel or USB port before launching thesoftware. • The software key is an electronic code that is requestedby the Activation Wizard when you launch the software forthe first time or as long as you have not activated thesoftware.
You must first install the software and then activate orconnect the protection key to your computer.
Hardware Key protection
The protection key must be installed on the computer onwhich the License Service is installed. A single protectionkey, pre-programmed with the number of licensespurchased, is included with the network version of yoursoftware.
The dongle must be installed before the License Servicecan be started.
If you have purchased a software with a dongle, you canchoose between a USB or parallel port dongle.
If the server is changed, you will have to update allof the workstations. In this case, start the labelingsoftware and choose Tools > NetworkAdministration. Disable and re-enable the UseNetwork License option.

Installing the Software Chapter 2 - 9
Connecting the parallel key
Figure 2 Connecting the dongle to the parallel port on your PC
Connecting the USB key
Figure 3 Connecting the dongle to the USB port of your PC
When you use a USB key and have multiple USB ports, itdoes not matter which port you use. If you do not have anavailable USB port, you can use a USB expander hub. USBdevices are hot-swappable, meaning you can plug andunplug them at any time without restarting the PC.
NoteDrivers can be installed while the application is running. However, you must restart your labeling software for the changes to take effect.
If you need to use a printer on the same parallelport, simply plug it into the software protection key.In this case, it might be necessary to turn theprinter on in order for the software protection keyto be recognized.

Chapter 2 - 10 Administrator’s Guide
Error messages when launching the software
If you receive an error message when launching thesoftware, please check the following items:
• Administrative rights. You must have local administrativerights on your PC for the key installation to workproperly. If you do not have these access rights, you willsee an error message when launching the software, andyou will have to manually install the drivers.
• Driver installation. If you had trouble during installation orif you receive an error message when launching thesoftware, you will have to manually install the drivers.
• The key. If you receive an error message when launchingthe software, check that the connected key works withyour software.
• Driver update. If you receive an error message whenlaunching the software, your driver may not be updated.To update your driver, download the new version from http://www.aladdin.com/support/hasp/enduser.aspx
Installing the driver key manually
To manually install the key driver:
1 Go to Windows explorer.
2 For Windows XP and Server 2003:Enter C:\Program Files\TKI\[software version]\Common\Tools\Dongle\ then type the following command: \HaspDinst.exe -i
For Windows 7, 8 , 8.1 Server 2008 and Server 2012, 64-bit machines: Enter C:\Program Files (x86)\Common Files\TKI\Dongle\ then type the following command: \HaspDinst.exe -i
For 32-bit machines:Enter C:\Program Files \Common Files\TKI\Dongle\ then type the following command: \HaspDinst.exe -i
Note
It is recommended that you close your labeling software and other applications before installing your driver.

Installing the Software Chapter 2 - 11
Software key protection
Once you have installed the labeling software, theActivation Wizard will be launched, taking you step-by-step through the software key protection process.
To activate the software key
1 In the Activation Wizard, select Activate.
There are four possible activation methods: Onlineactivation, Using a USB key, Using a smartphone andUsing our website.
NoteIf you have an Internet connection on the computer where the software is installed, online activation is automatically selected.
Online activation
Some enterprise networks are protected by a proxy server.In this case, there is an extra step which allows you to enterthe IP address and connect to the Internet.
1 Enter the Serial number and the password provided withthe product and click Next.
2 Enter or edit your information in the User Registrationform. Click Next.
3 Click Finish.
NoteIf you do not have an Internet connection on the computer where the software is installed but you have access to another computer with an Internet connection, you can activate the product using a USB key.
Using a USB key
1. Enter the Serial number and the password providedwith the product and click Next.
2. Select Using a USB key.

Chapter 2 - 12 Administrator’s Guide
3. Select the media to be used for activation (USB key orexternal hard disk or network drives) and click Next. Filesfor activation will be copied onto the selected media.
4. USB devices only: Unplug the removable media and plugit into the computer connected to Internet.
5. On the computer connected to the Internet, double-clickUSBWizard.exe (which can be found on the root of themedia). This will start the Activation wizard.
6. Select the license(s) to activate and click Next.
7. Enter or edit your information in the User Registrationform. Click Next.
A message will inform you that the activation informationfor the selected license(s) has been successfullyretrieved.
8. USB devices only: Unplug the removable media fromthis computer and plug it back into the computer wherethe software is installed.
9. On the computer where the software is installed, double-click USBWizard.exe again (the file can be found on theroot of the media).
The wizard will display the license that can be activated onthe computer where the software is installed.
10. Click Next.11.
Click Finish.
If any problems were encountered, a message will informyou that the activation has failed and an error will bedisplayed.
NoteIf you do not have access to a computer with an Internet connection, you can activate the product using a smartphone.

Installing the Software Chapter 2 - 13
Using a smartphone
A barcode scanner application is required to read thebarcode which allows you to activate your software using asmartphone. You can download this from your applicationstore / market. This activation mode uses an Internetconnection on your smartphone.
1 Enter the Serial number and Password provided with thesoftware and click Next.
2 .Select Using a smartphone.
3 Input your information in the User Registration form. Clickon Next.
4 A barcode appears. Move the cursor over the barcode tozoom in.
5 Open your barcode scanner application on your smartphone.
6 Scan the barcode with your smartphone.
7 Click Continue or open the browser on the phone.
8 The Software Activation website is displayed. This allowsyou to register and activate your software. All fields mustbe filled in.
9 Click Submit.The Validation code and Installation code aredisplayed at the bottom of the Software Activation websitepage. Please scroll down if necessary.
10 Enter the Validation code and Installation code in thewizard (using uppercase characters).
11 Click Next.
12 Click Finish.

Chapter 2 - 14 Administrator’s Guide
Using our website
1. Enter the Serial number and Password provided withthe software and click Next.
2. Select Using our website.
3. The link provided on this screen (http://www.teklynx.eu/nsp/) can be reached from a different computer withInternet access. You or someone else with an Internetconnection can connect to our website to complete theactivation. The Serial Number and Password (providedwith the product) and the User Code (displayed in thewizard) will be required in order to use this service.
4. Enter the license user's information in the UserRegistration form displayed on our website. Click Next.
5. Click Submit.
6. The Validation code and Installation code aredisplayed on our website. Enter these in the wizard (usinguppercase characters) and click Next.
7. Click Finish.

C H A P T E R 3
Network Use
Managing users
License Service Controller
The License Service is installed as a service. This service,referred to as SLicense, is enabled automatically when theserver is turned on.
The License Service Controller module, namedSLicenseCtrl.exe, is used to control how the servicefunctions and to change the standard behavior of theLicense Service. You can, for example:
• Start or stop the service
• Display the list of users connected to the labelingsoftware
Description of the License Service Controller window
• To start License Service Controller, click on the icon on theNetwork toolbar.
Once started and the window is enabled, the LicenseService Controller window is displayed as follows:

Chapter 3 - 14 Administrator’s Guide
Figure 1 Main Service Control window
The License Service Controller window displays the list ofusers. This list permanently displays the login name of thosecurrently using the labeling software.

Network Use Chapter 3 - 15
The License Server Controller window toolbar contains thefollowing buttons:
The Indicator Panel
The Indicator panel displays the current status of theservice.
Button Function
Stops the service.
Starts the service.
Refreshes the display: The list of users may notbe updated in certain cases, such as if aworkstation crashes. To reset a workstation,press CTRL+ALT+DEL.
Accesses the Service Control Settings window.This button is only available when the service isstopped.
Displays the About window. This windowdisplays the version number of the program.
Indicator = Red: Theservice is stopped.
Indicator = Orange:The service is startingup.
Indicator = Green: Theservice is enabled.

Chapter 3 - 16 Administrator’s Guide
The Settings dialog box
To access the Settings window:
• Click .The Settings window is displayed.
Figure 2 Settings window
To change the settings
If SLicense.exe was not installed in the [DONGLE] folder, youmust specify the access path to the license file.
1 Enter the new access path to the license file, or click theBrowse button.
2 If you want to allow the service to be stopped while usersare still logged on, select the Enable stopping while usersare connected option.
3 If you want to change the display language of the LicenseService Controller, select the desired language from theLanguage list.
4 If you want to change the tolerance period in case of

Network Use Chapter 3 - 17
network disconnection, enter the desiderated value inminutes (max. 480 minutes).
By default there is no tolerance (0 minute). If the network isdisconnected, the labeling software stops working.
Note: The tolerance period begins after about 6 minutes ofconnection to the server.
However, you can modify this tolerance. You can defineanother value, in minutes (Max. 480 minutes), that will allowyou to continue using your labeling software even if thenetwork is disconnected.
Note: The user token will be locked during that period oftolerance.
5 Click OK to update the changes.
Changing the behavior of the service
By default, the service is started automatically when theworkstation is turned on. However, you can change thebehavior of the service in the Services window in theWindows Control Panel. For more information, refer to thedocumentation supplied by Microsoft.
Changing the service startup type
1 Select SLicense from the list of services.
2 Click Startup.
3 Enable the desired startup type. SLicense is configured tostart automatically by default.
Selecting a user account
1 Select the user account in the Log on as field.
2 Type and confirm the password and click OK in the Service window.

Chapter 3 - 18 Administrator’s Guide
Maximum number of users
In case you installed the License Service on a Windows®workstation your network version is limited to a maximumnumber of users. This means that a 10-user license allowsyou to start 10 sessions of the labeling softwaresimultaneously. If an eleventh user tries to log on, an errormessage is displayed indicating that the maximum numberof users has been reached. He or she must wait until one ofthe connected users logs off.
To increase the simultaneous connections, you have toinstall the License Service on a Windows® Server.
Troubleshooting
Two types of error messages can be displayed. The tablebelow lists possible problems and describes thetroubleshooting procedure.
Message Solution
Protection key not found
- The key is not connected.- The dongle is connected to the wrongport (serial port, for example).- A printer is connected to the dongleand is switched off.- The product has not been activated.
License Service cannot create the license file
The license file could not be created inthe [TKDongle] folder. This may meanthat a user on the station on whichLicense Service was started does nothave the access rights required to writeto this folder. The network administratormust assign the required access rights(read, write, delete, and modify, ifapplicable).

Network Use Chapter 3 - 19
Managing shared resources
Shared document files
A document can only be opened by one user in read/writemode. If the same document is opened by other users, it isopened in read-only mode. This means that only the firstuser can modify and save the document.
To provide security for the work of the group, the openingmode for documents can be defined in the Tools >Configuration > Document tab, by selecting the Opendocuments as «read only» mode by default option.
Shared data The Network Settings Wizard is used to configure datasharing for variables, lists of values, and the printing logfile.
To share data, you must specify a path and folder on thenetwork in step 3 of the wizard.
Shared printing logfile
If you selected the generic settings mode in the Network Settings Wizard, the printing logfile (which is veryuseful for tracking all print jobs) can be configured in theprinting logfile window.
To share the printing logfile with all workstations, you mustfirst generate the log file on one of the workstations.
To generate a printing logfile
1 Go to Tools > Logfile.
2 Enter the access path to the folder in which shared datais saved and a file name for the printing logfile, then select atext editor.
3 Enable your options on the Options tab. For more
Note: The document can be printed from read-onlymode.

Chapter 3 - 20 Administrator’s Guide
information on the printing logfile, refer to the online Helpsystem.
NoteAs with shared variables, if multiple users are working on the same file, only one printing logfile is created and it tracks all print jobs for each user. However, a user can generate a personal file.
Shared file timeout period
When a shared file, such as a file of shared variables, isopened by a user, it cannot be accessed by other users.Others users must wait until it becomes available beforeediting it. After a timeout period (defined by you), a messageis displayed asking the user if he or she wants to continuewaiting or cancel the request.
To define the timeout period:
1 Go to Tools > Configuration.
2 Click the Others tab.
3 Type a value in the Shared files access timeout (ms) field.
Printing A flashing colored indicator indicates the status of thecurrent print job in the Print Status windows. This status isonly displayed if you display the Print window in the labelingsoftware.
• Green: The data is being printed.
• Orange: A user is currently using a shared resource(printer or variable).
• Red: Error.
To display the print dialog box:
1 Go to Tools > Configuration and click the Printing tab.
2 Disable the Hide Cancel Print dialog box option.
Network Use Chapter 3 - 21
Notes for the network administratorThis section describes folders on the server andworkstations, and the required access rights.
Folders on the serverDuring installation, the [TKDONGLE] folder is created. It isimportant for each user to have read/write access to theshared TKDONGLE folder.
NoteUsers must be given, at minimum, read/write access to all available folders in the default folders list (Tools > Configuration> Default folders).

www.teklynx.com | www.teklynx.eu
Copyright 2014 Teklynx Newco SAS. All rights reserved.