laboratory 1 – introduction to the arduino boardsusers.utcluj.ro/~rdanescu/dmp-lab01.pdf ·...
TRANSCRIPT

Design with Microprocessors (DMP) – Lab. 1
1
Laboratory 1 – Introduction to the Arduino boards
The set of Arduino development tools include µC (microcontroller) boards, accessories (peripheral
modules, components etc.) and open source software tools which allows users to implement
projects using a high-level unified approach, which is µC-model independent. The Arduino boards
are mainly equipped with AVR (Atmel) MicroController Units (MCUs), but there are variants equipped with ARM or x86 MCUs. Besides the genuine versions of the Arduino boards there are a
lot of third party ones (XDRuino, Freeduino, Funduino etc.) which are low cost and fully compatible (although their reliability could be questionable).
The board used for the lab is Arduino Mega 2560, featuring the 8-bit Atmel ATMega 2560 MCU (8
bit due to the size of the internal registers). The board gives you access to 54 digital pins of the
MCU for I/O operations and 16 pins for analog signals reading. Some pins can have multiple
functions (i.e. providing additional communication facilities: UART, SPI, I2C etc.) – see the printed
material on your desks. The MCU operates at a 16 MHz clock. The board can be power through the
USB interface (common usage) or through an external power source at 7 … 12 DC V (minimum
current of 0.25A). The second option is necessary to power current hungry peripherals (i.e. motors,
GSM shields etc.)
1. Using the Arduino development board – first example
For a safer usage the board is mounted on an acrylic base along with the breadboard.
For the beginning you should load the most basic example “Blink”, available in the installation
directory of the Arduino IDE (usually C:\Program Files\Arduino\examples\01.Basics\Blink). Copy
the “Blink” folder in your working folder (compulsory in D:\Studenti\Grupa30xxx, otherwise it
will be periodically DELETED). Check that after the copy operation you have for the “Blink”
folder and its contained “blink.ino” file write permissions! (not Read Only).

Design with Microprocessors (DMP) – Lab. 1
2
Rule: every Arduino project (even if it has only one source file) should be placed in a folder with
the same name as the source file (Ex: D:\Studenti\Grupa30xxx\Nume_Prenume\Blink\Blink.ino).
After these preparations are done, launch the Arduino IDE either by double-clicking on the *.ino file or by launching the IDE from the start menu/shortcut followed by an explicit Open operation on
the *.ino file. The program window should look like this:
If the IDE does not start, the cause may be a missing association between the IDE and the .ino file
type. You can start the program from the Start Menu / Programs, and then use the File/Open menu
command to open the source file.
At this point you can connect the Arduino Mega 2560 board to the PC through the USB cable. The
operating system may ask you for the installation of a driver (in that case specify the following
path: “C:\Program Files\Arduino\drivers”). If you encounter difficulties, or you do not have enough user rights, ask the professor for help.
If the driver is correctly installed and the board is functioning (a green LED on the board is on) you
can go ahead.
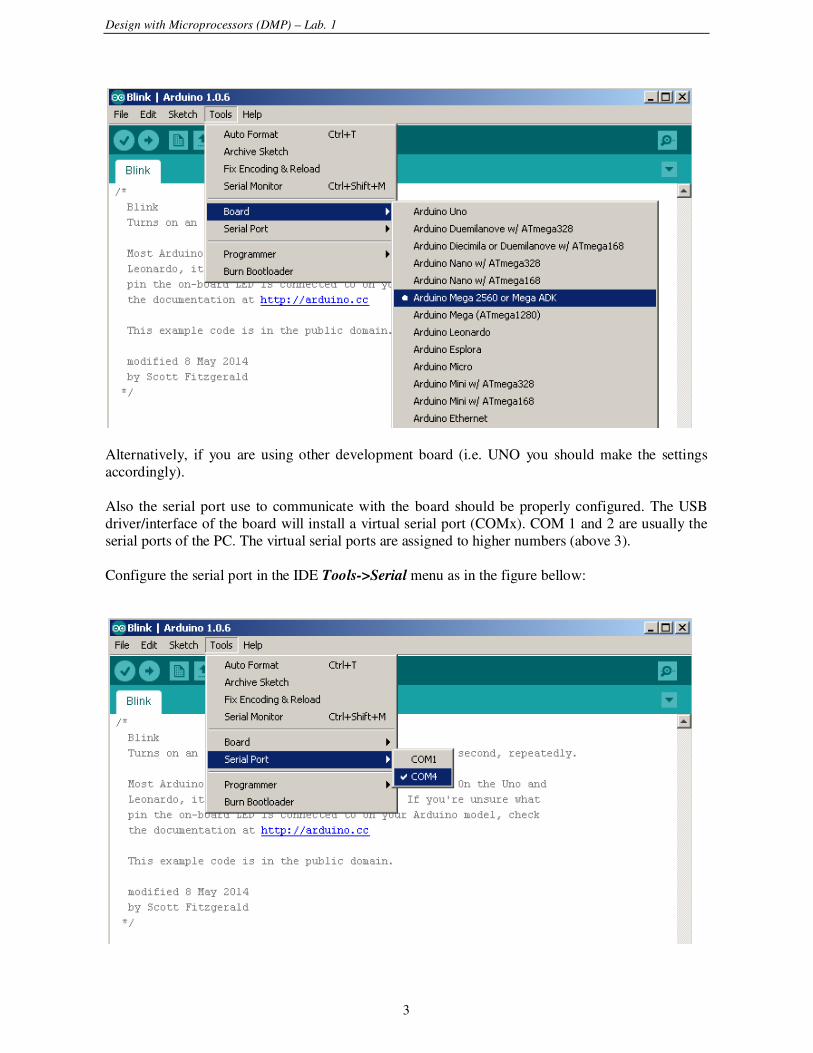
Before programming the board, you should check if the IDE is configured properly in the menu
Tools->Board:
Design with Microprocessors (DMP) – Lab. 1
3
Alternatively, if you are using other development board (i.e. UNO you should make the settings
accordingly).
Also the serial port use to communicate with the board should be properly configured. The USB
driver/interface of the board will install a virtual serial port (COMx). COM 1 and 2 are usually the
serial ports of the PC. The virtual serial ports are assigned to higher numbers (above 3).
Configure the serial port in the IDE Tools->Serial menu as in the figure bellow:

Design with Microprocessors (DMP) – Lab. 1
After the configuration is complete, you can compile & upload the first example using the button
“Upload” (as shown in the figure below). If all the steps were completed successfully, the binary
program will run on the board by blinking the on-board LED (which is connected to the digital pin
13.
2-nd example: digital input pins and the serial interface
As basic input device we’ll use the button block shown below:
The module has 5 pins:
- GND pin
- 4 data pins (K1, K2, K3 and K4), indicating the button status (logic 0 = button pressed)
The button names appear on the pins, and near each button.
The general solutions for connecting a button to a microcontroller are shown below. The first
schematic shows the use of a Pull-Down resistor, and the second schematic shows the use of a Pull-
Up resistor.
We shall focus on the use of Pull-Up resistors, as they are more common. The operation principles
for the two types of resistors are similar, the difference being that the pull up resistors are connected to 5V (VCC), while the pull down resistors are connected to the ground (GND). When using a pull-
up resistor, and the button is not pressed, the value of the input pin D is HIGH, or logic 1. A small
current flows between VCC and the input pin. When the button is pressed, the input pin is
connected directly to the ground, and the current flows through the resistor to the ground, while the
input pin reads LOW, or logic 0. If no resistor is used, pressing the button would connect VCC
directly to GND, resulting in a short-circuit (which is not desirable, and may be dangerous).
The button block does not have pull-up (or pull down) resistors. This means that, in order to use it,
we have to either:
- Attach external resistors to each button pin
- We use the pull-up resistors of the microcontroller
In this lab work we’ll use the internal resistors of the microcontroller on the Arduino board. These
resistors are activated by using the INPUT_PULLUP pin configuration option.
Design with Microprocessors (DMP) – Lab. 1
5
As visualization output, the serial interface will be used (allows to monitor the output of the Arduino board on the PC). All the connections between the peripheral modules, breadboard
and MCu board will be done with the USB cable disconnected from the PC !!!
To connect the button block to the Arduino board, the breadboard will be used: - The 4 data pins will be connected to the digital pins 4, 5, 6, 7of the Arduino board
- GND pin of the button module will be connected to the GND of the Arduino board
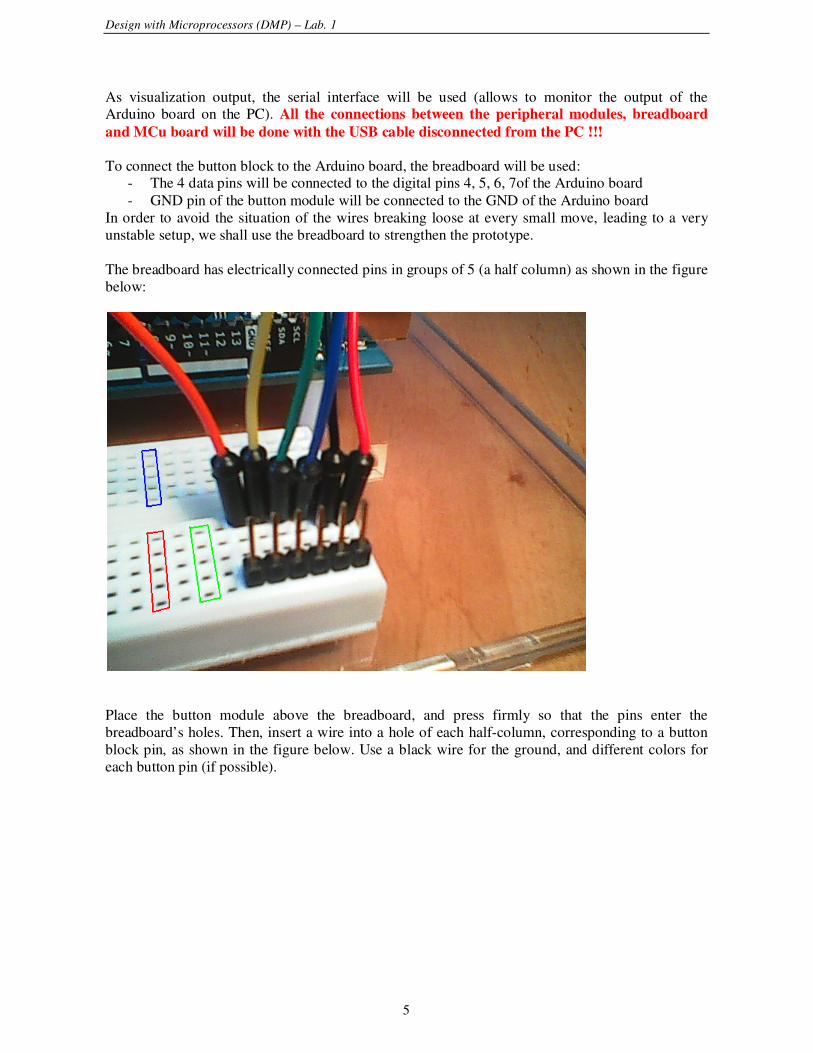
In order to avoid the situation of the wires breaking loose at every small move, leading to a very
unstable setup, we shall use the breadboard to strengthen the prototype.
The breadboard has electrically connected pins in groups of 5 (a half column) as shown in the figure
below:
Place the button module above the breadboard, and press firmly so that the pins enter the
breadboard’s holes. Then, insert a wire into a hole of each half-column, corresponding to a button
block pin, as shown in the figure below. Use a black wire for the ground, and different colors for
each button pin (if possible).

Design with Microprocessors (DMP) – Lab. 1
6
The other ends of the wires will be connected to the Arduino board:
- The signal wires (for the button pins) to the digital pins 4, 5, 6, 7:
- The black wire to the ground (GND)
Now the physical setup is ready. In the following, open the Arduino IDE and create a new program
(File->New), which will contain the following code:
// Read status of buttons and send it to the PC over the serial connection
// Variables for reading the status of the buttons connected to the
digital pins 4, 5, 6, 7
int b1;
int b2;
int b3;
int b4;
// variable for the transmitted status (as a decimal number)
int stat = 0;
void setup() {
// configure digital pins as inputs
pinMode(4, INPUT_PULLUP);
pinMode(5, INPUT_PULLUP);
pinMode(6, INPUT_PULLUP);
pinMode(7, INPUT_PULLUP);

Design with Microprocessors (DMP) – Lab. 1
7
// activate serial communication for displaying the result on the PC
Serial.begin(9600);
}
void loop() {
// read BTNs status
b1 = digitalRead(4);
b2 = digitalRead(5);
b3 = digitalRead(6);
b4 = digitalRead(7);
// combine the bits in a decimal number (stat)
stat = 10000 + b4 * 1000 + b3 * 100 + b2 * 10 + b1;
//transmit status
Serial.println(stat);
// delay 0.5 sec
delay(500);
}
Connect the Arduino board to the PC and “Upload” the program. To visualize the result, open the
“Serial Monitor” utility from the Tools->Serial Monitor menu. At every 0.5 sec the value of the stat
variable will be displayed as a 5 digit number (1XXXX), the list significant 4 digits being the status
of the buttons. When a button is pressed, its corresponding digit turns from 1 to 0.
Attention: The Serial Monitor utility should be closed before disconnecting the Arduino
board form the PC. Otherwise, it is possible the hang the virtual serial port in a blocked status
and further communication with the board will be anymore possible only by restarting the
PC.
3-rd example: the use of the LED Pmod as an output device. The use of ports.
For this example, we’ll use a block of LEDs. This module has 7 pins, one being the ground and the
other 6 are signals for the 6 LEDs (a logic 1 means the LED is lit). The LEDs have current limiting
resistors to prevent damage.
Design with Microprocessors (DMP) – Lab. 1
8
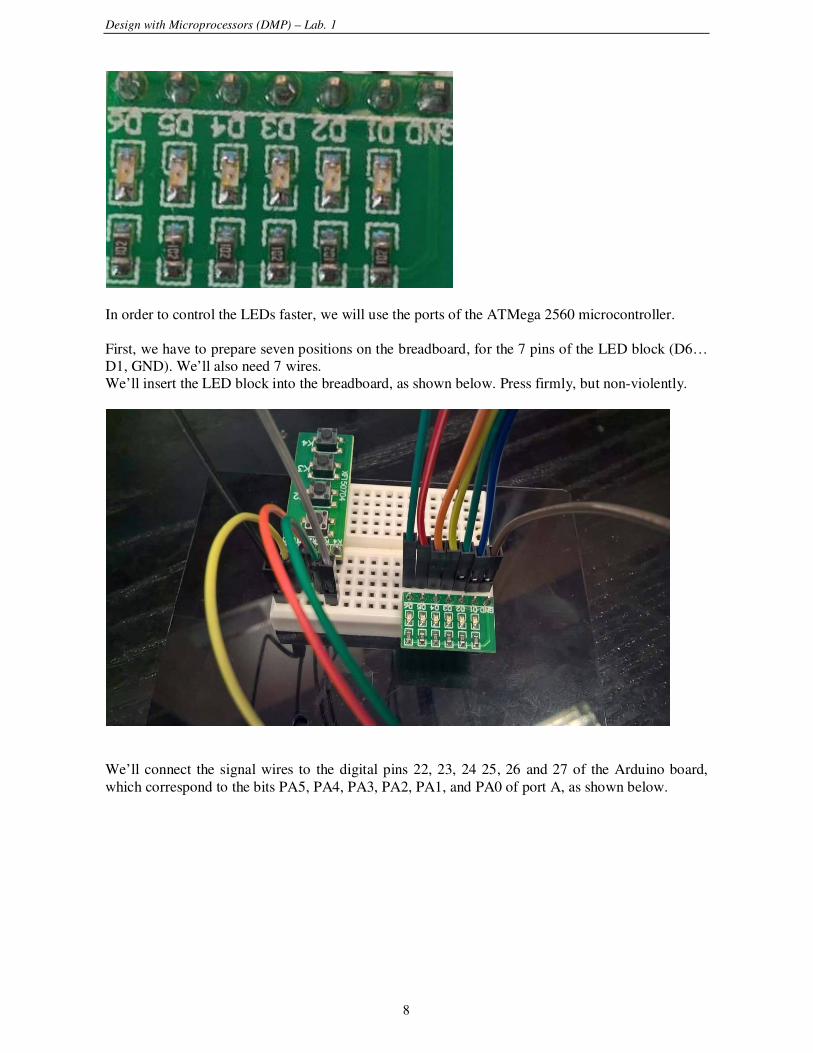
In order to control the LEDs faster, we will use the ports of the ATMega 2560 microcontroller.
First, we have to prepare seven positions on the breadboard, for the 7 pins of the LED block (D6…
D1, GND). We’ll also need 7 wires.
We’ll insert the LED block into the breadboard, as shown below. Press firmly, but non-violently.
We’ll connect the signal wires to the digital pins 22, 23, 24 25, 26 and 27 of the Arduino board,
which correspond to the bits PA5, PA4, PA3, PA2, PA1, and PA0 of port A, as shown below.

Design with Microprocessors (DMP) – Lab. 1
9
The correspondence between the Arduino board pins and the ATMega 2560 MCU pins (ports) is described in the “ATmega2560-Arduino Pin Mapping” document
http://arduino.cc/en/Hacking/PinMapping2560 or in the first figure or in the printed schematic).
For port A, we have:
PA7 ( AD7 ) Digital pin 29
PA6 ( AD6 ) Digital pin 28
PA5 ( AD5 ) Digital pin 27
PA4 ( AD4 ) Digital pin 26
PA3 ( AD3 ) Digital pin 25
PA2 ( AD2 ) Digital pin 24
PA1 ( AD1 ) Digital pin 23
PA0 ( AD0 ) Digital pin 22
We shall also re-use the buttons set up in the previous example.
Note:
In the future, when we may use multiple components, we will try to identify common signals,
and group them on the breadboard in a single column. In our example, the ground signals for
the two modules can be grouped, and a single ground wire used.
After creating the physical setup, create a new Arduino project and add the following code:
// Read status of buttons and display it on LEDs connected to PORTA
// Variables for reading the status of the buttons connected to the
//digital pins 4, 5, 6, 7
int b1;
int b2;

Design with Microprocessors (DMP) – Lab. 1
10
int b3;
int b4;
// variable for the LED status
unsigned char stat = 0;
void setup() {
// configure digital pins as inputs
pinMode(4, INPUT_PULLUP);
pinMode(5, INPUT_PULLUP);
pinMode(6, INPUT_PULLUP);
pinMode(7, INPUT_PULLUP);
// activate PORTA, as output,
DDRA = 0b11111111;
}
void loop() {
// read BTNs status
b1 = digitalRead(4);
b2 = digitalRead(5);
b3 = digitalRead(6);
b4 = digitalRead(7);
// combine result: each LED is controlled by a button. Some buttons are
//duplicated
stat = (b4<<5) | (b3<<4) | (b4<<3) | (b3<<2) | (b2<<1) | b1;
// Display status on the LEDs connected to port A
PORTA = stat;
// delay 50 ms
delay(50);
}
Individual work:
1. Compute the value of the pull-up resistor, if you choose to use an external one, and the maximum current intensity should be limited to 1 mA.
2. Run examples 1 and 2. 3. Modify example 2, in order to transmit to the PC various information according to the pressed
button. Ex: one button press will transmit the number of ms from the start of the program (call
milis() function), another button press you can transmit the number of sec (millis()/1000), another
button wil transmit a text etc.
4. Run example3.
5. Modify example 3 in order to display some animations on the LEDs (1 walking LED lit-on from
right-left or left-right). The walking direction depends on the status of one button.
Additional references: http://users.utcluj.ro/~rdanescu/teaching_pmp.html
“ATmega2560-Arduino Pin Mapping” document http://arduino.cc/en/Hacking/PinMapping2560