laboratory exercise #8: restriction digest of uncut dna · web viewin this lab, you will perform...
TRANSCRIPT

Laboratory Exercise #8: Restriction Digest of Uncut DNA
Required materials
Common workstationRestriction Digest & Analysis of Lambda DNA kitAgarose50X TAE Running BufferLaboratory tapeP20 Micropipette & pipette tips1.5 mL microfuge tubes10X DNA loading gelHindIII enzymePstI enzymeEcoRI enzymeLambda DNA (uncut)DNA ladderBio-Rad Fast Blast DNA Stain
Equipment neededWater bathMicrowave oven37°C water bathCentrifugeHorizontal gel electrophoresis boxes & traysPower supplies
Introduction
In this lab, you will perform the HindIII, PstI and EcoRI restriction digests that you used in the previous lab. Uncut lambda DNA will be used as your DNA sample. Once the digest is complete, you separate your fragments via agarose gel electrophoresis and compare you digest results to that of the pre-cut samples from last class.
Restriction enzymes perform optimally in specific environments. These environments Figure 7.1 Restriction buffer compositions for some
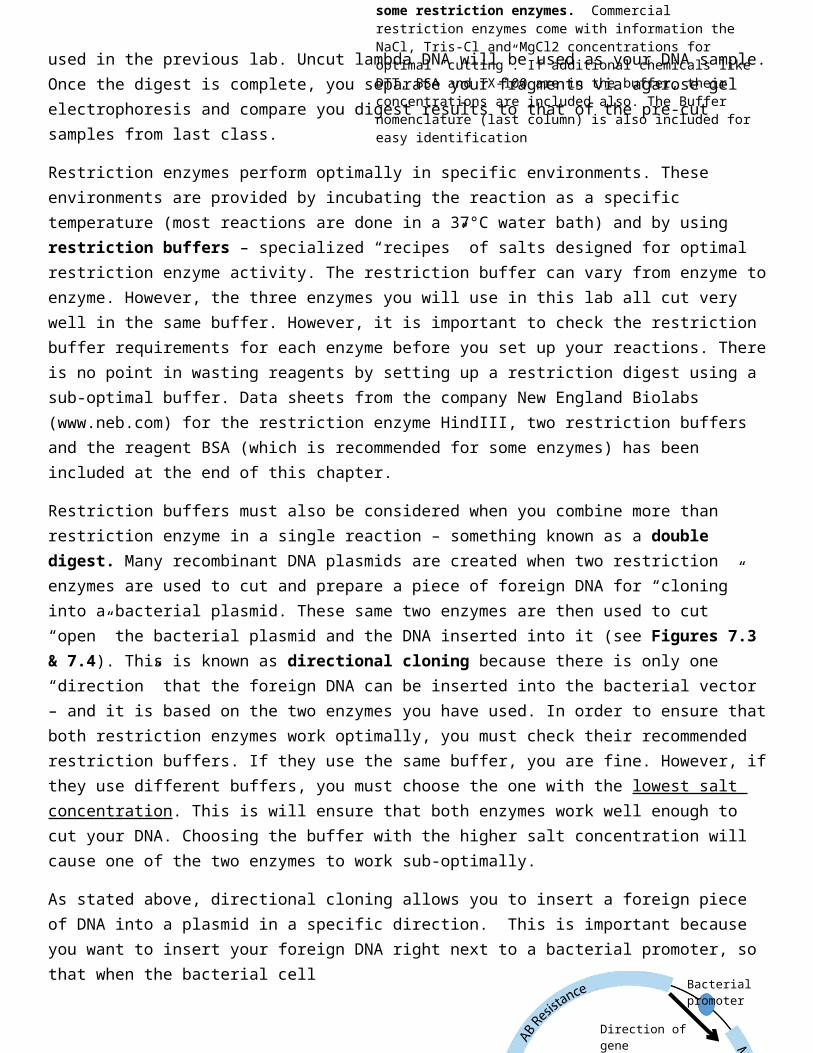
restriction enzymes. Commercial restriction enzymes come with information the NaCl, Tris-Cl and MgCl2 concentrations for optimal “cutting”. If additional chemicals like DTT, BSA and TX-100 are in the buffer,
are provided by incubating the reaction as a specific temperature (most reactions are done in a 37°C water bath) and by using restriction buffers – specialized “recipes” of salts designed for optimal restriction enzyme activity. The restriction buffer can vary from enzyme to enzyme. However, the three enzymes you will use in this lab all cut very well in the same buffer. However, it is important to check the restriction buffer requirements for each enzyme before you set up your reactions. There is no point in wasting reagents by setting up a restriction digest using a sub-optimal buffer. Data sheets from the company New England Biolabs (www.neb.com) for the restriction enzyme HindIII, two restriction buffers and the reagent BSA (which is recommended for some enzymes) has been included at the end of this chapter.
Restriction buffers must also be considered when you combine more than restriction enzyme in a single reaction – something known as a double digest. Many recombinant DNA plasmids are created when two restriction enzymes are used to cut and prepare a piece of foreign DNA for “cloning” into a bacterial plasmid. These same two enzymes are then used to cut “open” the bacterial plasmid and the DNA inserted into it (see Figures 7.3 & 7.4). This is known as directional cloning because there is only one “direction” that the foreign DNA can be inserted into the bacterial vector – and it is based on the two enzymes you have used. In order to ensure that both restriction enzymes work optimally, you must check their recommended restriction buffers. If they use the same buffer, you are fine. However, if they use different buffers, you must choose the one with the lowest salt concentration. This is will ensure that both enzymes work well enough to cut your DNA. Choosing the buffer with the higher salt concentration will cause one of the two enzymes to work sub-optimally.
As stated above, directional cloning allows you to insert a foreign piece of DNA into a plasmid in a specific direction. This is important because you want to insert your foreign DNA right next to a bacterial promoter, so that when the bacterial cell transcribes its DNA into RNA, it will transcribe yours. This also means when the bacterial cell translates its RNA into protein, it will do the same for your foreign RNA. The end result of your directional cloning is the expression of normal bacterial genes as proteins plus the foreign one you have inserted. Without directional cloning, you would not be assured of the direction your foreign gene was inserted. If you assume the gene can be inserted in two ways (i.e. forwards and backwards), this would mean that 50% of your recombinant plasmids would be structured “backwards” and wouldn’t give protein expression.
In directional cloning, plasmids known as cloning vectors contain an aggregation of multiple, unique restriction sites built into the plasmid’s DNA sequence. This site is called a multi-cloning site/MCS or
Figure 7.1 Restriction buffer compositions for some restriction enzymes. Commercial restriction enzymes come with information the NaCl, Tris-Cl and MgCl2 concentrations for optimal “cutting”. If additional chemicals like DTT, BSA and TX-100 are in the buffer,
Bacterial promoter
Direction of gene expression
Figure 7.2: Schematic of a basic cloning plasmid. Commercial plasmids are constructed with a multi-cloning site (MCS) comprised of multiple restriction sites within the same region of the plasmid. This MSC is located next to a bacterial promoter. When foreign genes are inserted into this MCS after cutting with restriction enzymes, the bacterial promoter “drives” expression of this gene along with its own endogenous genes. Foreign protein expression results. The plasmid also has a gene for antibiotic resistance to allow for selection of the bacteria transformed with this plasmid.

polylinker. The MCS is downstream of a strong bacterial promoter. Figure 7.2 show the basic plan of a typical cloning vector.
Figure 7.3 and 7.4 shows how directional cloning works. In Figure 7.3, both the foreign DNA and plasmid are cut with the same restriction enzymes. The cut DNA and plasmid are mixed together and ligation takes place. In Figure 7.4, directional cloning and the restriction sites are shown.
Figure 7.4: Restriction enzyme sites upon directional cloning using HindIII and KpnI. Note the “sticky” ends made by these two enzymes, allowing for directional cloning.
Figure 7.3: Schematic of directional cloning. Foreign genes are cut with a unique combination of restriction enzymes (EcoRI and NotI) to prepare their ends for cloning. The cloning vector is cut with the same enzymes. The digested foreign gene (yellow bar) and cloning vector are combined and the foreign gene ligated into the cloning vector to produce a recombinant plasmid. The inserted gene is located downstream of the bacterial CMV promoter (purple region). This promoter will drive expression of this foreign gene.
Figure 7.5: Restriction enzyme sites upon digestion with a restriction enzyme that produces “blunt” ends.

Directional cloning is possible because restriction enzymes produce “sticky ends”. Because of this, there is only one way a gene can be inserted. However, some restriction enzymes produce “blunt” ends. Cloning with these enzymes is like flipping a coin – there is a 50% chance, you gene is cloned in “backwards” (Figure 7.5).
If time permits, you professor may have you do not only a single restriction digest, but a double digest using a combination of the restriction enzymes provided in the lab.
Lab materials
Common workstationP20 micropipettes Pipet tips1.5 microfuge tubes & foam holders250 mL Erlenmeyer flasks
Graduated cylindersPermanent markersUncut lambda DNARestriction enzymes – HindIII, EcoRI, PstI
Restriction Buffer10X DNA loading dyeDNA ladder

Weighing workstationElectronic balances & weigh boats
Electrophoresis workstationAgarose powder50X TAEAgarose gel electrophoresis set-up
a. Gel boxb. Gel trayc. Gel comb
Laboratory tape Power supplyMillimeter rulerLarge reagent bottles for leftover 1X TAEHeat resistant gloves
Gel staining station100X Fast Blast DNA stainGel staining & de-staining traysDNA ladderSpatulas
Pre-lab activities
Record the purpose of this activity in your notebook.
Using the provided genetic information on lambda DNA and the results from your last lab exercise, make a schematic drawing in your notebook of the restriction digest that you will perform. Include a basic drawing of the lambda phage genome, the approximate areas where each enzyme will cut and the predicted DNA fragment sizes you would see after cutting lambda DNA with either HindIII, PstI or EcoRI.
Consult the lambda phage genome map again and identify the exact positions where each restriction enzyme will cut the DNA and write these locations in your notebook along with each restriction enzyme sequence. Based on these locations, calculate the exact sizes of the resulting DNA fragments following EcoRI, HindIII and PstI digestion and note them in your notebook.
Calculate and record the expected number of fragments and their sizes if you were to perform a double digest using PstI and HindIII, HindIII and EcoRI and PstI and EcoRI.
READ THE PROTOCOL. Be sure you understand what each step in this protocol is for.
Protocol
A. Restriction Digest
1. Obtain 4 empty microfuge tubes. Label the tubes L, P, E, and H. Place them in the foam holder.
L = uncut lambda DNAH = HindIII digestE = EcoRI digestP = PstI digest
2. Obtain a P20, a box of 1-200 uL pipette tips and an aliquot of uncut lambda DNA. Set the P20 to 4.0 uL and pipette 4.0 uL of uncut lambda DNA into each of your four tubes. If you are careful with the pipette tip and do not touch it to anything, you may use the same tip for all four tubes. Discard the tip when you are done. Return the lambda DNA aliquot to the ice at the common workstation
3. Obtain an aliquot of restriction buffer and add 5 uL of restriction buffer to each of your four tubes. You MUST change tips between each sample to prevent contamination of the restriction buffer sample. Return the non-contaminated restriction buffer to the common station. If you think you have contaminated the tube, give the tube to your professor.
4. Obtain ONE restriction enzyme aliquot from the ice at the common workstation. Pipette 1.0 uL of this chosen restriction enzyme into the sample with a clean pipette tip. If you have chosen PstI, pipette 1.0 uL into the tube labelled P. Discard the tip and return the non-contaminated restriction enzyme aliquot to the common workstation’s ice bucket. If you think you have contaminated the tube, give the tube to your professor.
5. Repeat the procedure for the HindIII enzyme and H tube and the EcoRI enzyme and E tube. 6. Do NOT add enzyme to the U/uncut lambda tube.
The table below outlines what your reaction tubes should contain.
Tube (10 uL total volume)
Lambda DNA Restriction Buffer
PstI HindIII EcoRI
P 4.0 uL 5.0 uL 1.0 uL ----- -----
E 4.0 uL 5.0 uL ----- ----- 1.0 uL
H 4.0 uL 5.0 uL ----- 1.0 uL -----
U 4.0 uL 5.0 uL ----- ----- -----
D (choose only two enzymes)
4.0 uL 5.0 uL 0.5 uL 0.5 uL 0.5 uL
HINT: making a table like this in your lab notebook and filling it in as your go is a good way to set up reactions with multiple reagents and not get confused.
7. Make sure each tube is tightly capped. “Flick” spin your samples to ensure all reagents are at the bottom of the tube. Be sure to make sure the centrifuge is balanced before you spin!

8. Place the reactions (still in the foam holder) into the 37°C water bath. If not enough time permits, these reactions may be placed at 4°C (in a refrigerator) until next class.
9. Let incubate at 37°C for 30 minutes. 10. If time permits, obtain a new empty microfuge tube and label it D for double digest. Obtain a P20
micropipette and pipette 4.0 uL of uncut lambda DNA into this tube and add 5.0 uL of restriction buffer
11. Choose two restriction enzymes and pipette 0.5 uL of each of your two chosen enzymes into your microfuge tube. Make sure you change pipette tips for each enzyme to prevent contamination.
12. While your reactions are incubating, prepare a 1% agarose gel as you did in previous labs. Consult your lab notebook and this manual for guidance.
13. When the restriction digests are done, remove them from the water bath and pipette 2.0 uL of DNA loading dye into each of the tubes using new tips for each sample.
14. Run the gel or place the samples in the foam holder at the common bench for storage until next class.
B. Running the Gel – See Lab #6 for reference
1. From the common station, obtain a horizontal gel tank, lid, agarose gel tray, comb and power supply and bring it to your lab bench. Prepare the gel and place it into the electrophoresis chamber and fill with 1X TAE buffer.
Note: if there isn’t any 1X TAE Buffer left over from the previous lab, dilute your 50X TAE stock. Pour any remaining 1X TAE buffer into the provided reagent bottles for future use.
2. Using a P20 pipette, pipette 10 uL of DNA ladder into lane 1 of the gel (i.e. the first lane).
3. Using a fresh pipette tip for each sample, pipette 10 uL from the L, H, E and P tubes into lanes 2, 3, 4 and 5 of the gel.
4. Place the lid on the electrophoresis tank and connect it to the power supply. Make sure the leads are connected correctly and that your DNA will migrate through the gel to the red anode in the tank.
5. Set the power supply to a constant voltage of 100V and electrophorese for 30 minutes.
6. When complete, turn off the power supply, disconnect the leads and remove the lid from the tank.
7. Wearing gloves, carefully remove the gel in its tray.
C. Staining the gel – See Lab #6 for reference
1. Obtain a staining tray and two destaining trays from the common station.
2. Wearing gloves, slide the gel out of the tray and into a staining tray.

3. Pour approximately 100 mL of 100X Fast Blast DNA stain into the tray. Your gel should be completely immersed by the staining solution.
4. Stain the gels for 2 to 3 minutes – but NO MORE than 3 minutes.
Note: this stain can be reused so DO NOT DISCARD.
5. Using the spatula, transfer the stained gel into a destaining tray. Add 500 mL of clean, warm tap water to the destaining tray and gently shake the gel for about 10 seconds to rinse off the Fast Blast Stain.
6. Using the spatula, transfer the stained gel into a second destaining tray. Add 500 mL of clean, warm tap water to the destaining tray and gently shake the gel for 5 minutes. If a rocking platform is available, place the destaining tray on the platform and set it so that it rocks back and forth gently. If no rocking platform is available, gently shake the tray by hand for a few seconds every minute.
7. While you are washing the gel in the 2nd destaining tray, discard the rinse water from the 1st destaining tray. Using the spatula, transfer the gel back to the 1st destaining tray and repeat the wash step with another 500 mL of warm tap water.
8. Examine the gels. The bands will appear fuzzy after the 2nd wash but will sharpen over the next 10 to 15 minutes.
9. Take a picture of your gel, print it out and paste it into your lab notebook.
*** With a funnel, pour the leftover Fast Blast Stain into the provided bottle. This stain can be used up to 7 times.
Interpretation of Results – Lab Notebook
1. With a permanent marker, label your lanes as L, H, E and P in the picture you have pasted into your notebook.
2. Identify and label the lane containing the DNA ladder. Identify and label the fragment sizes in your notebook. Your professor will have a print out of the ladder you have used and the sizes of the fragments.
3. Compare your fragments to the fragments in the DNA ladder and estimate the fragment sizes produced by each restriction enzyme. Record your fragment sizes in your lab notebook. Your professor will have a print out of lambda DNA cut with some well-known restriction enzymes and the DNA gel that results. Compare it to what you have generated.
4. Draw your gel and the DNA fragments in your lab notebook. Label your drawing. Include your fragment sizes in your notebook.
5. Using a millimeter ruler, your destained gel or your picture, measure the actual distance that each gel fragment travelled from their origin in the wells (measure from the bottom edge of the well). Create a table that allows you to record these distances and your estimated fragment lengths. Refer to the table given to you in the previous lab.

6. How did your digest compare to the results you obtained in the previous lab?
7. If you performed a double digest, did your fragment sizes correspond to what you calculated in the pre-lab activity?