laboratory manual for ac electrical circuits
TRANSCRIPT

Laboratory Manual
for
AC Electrical Circuits
by
James M. Fiore

Laboratory Manual for AC Electrical Circuits 2
This Laboratory Manual for AC Electrical Circuits, by James M. Fiore is copyrighted under the terms of a Creative Commons license:
This work is freely redistributable for non-commercial use, share-alike with attribution
Published by James M. Fiore via dissidents
For more information or feedback, contact: James Fiore, Professor STEM Center Mohawk Valley Community College 1101 Sherman Drive Utica, NY 13501 [email protected] or via www.dissidents.com

Laboratory Manual for AC Electrical Circuits 3
Introduction This manual is intended for use in an AC electrical circuits course and is appropriate for two and four year electrical engineering technology curriculums. The manual contains sufficient exercises for a typical 15 week course using a two to three hour practicum period. The topics range from introductory RL and RC circuits and oscilloscope orientation through series-parallel circuits, superposition, Thevenin’s Theorem, Maximum Power Transfer Theorem, and concludes with series and parallel resonance. For equipment, each lab station should include a dual channel oscilloscope (preferably digital), a function generator and a quality DMM. The exercise covering Superposition requires two function generators. For components, a selection of standard value ¼ watt carbon film resistors ranging from a few ohms to a few megohms is required along with a selection of film capacitors up to 2.2 µF, and 1 mH and 10 mH inductors. A decade resistance box may also be useful. Each exercise begins with an Objective and a Theory Overview. The Equipment List follows with space provided for serial numbers and measured values of components. Schematics are presented next along with the step-by-step procedure. All data tables are grouped together, typically with columns for the theoretical and experimental results, along with a column for the percent deviations between them. Finally, a group of appropriate questions are presented. For those with longer scheduled lab times, a useful addition is to simulate the circuit(s) with a SPICE-based tool such as Multisim or PSpice, and compare those results to the theoretical and experimental results as well. A companion manual for DC electrical circuits is also available. Other manuals in this series include Linear Electronics (diodes, bipolar transistors and FETs), Computer Programming with Python, and Embedded Controllers Using C and Arduino.
A Note from the Author This work was borne out of the frustration of finding a lab manual that covered all of the appropriate material at sufficient depth while remaining readable and affordable for the students. It is used at Mohawk Valley Community College in Utica, NY, for our ABET accredited AAS program in Electrical Engineering Technology. I am indebted to my students, co-workers and the MVCC family for their support and encouragement of this project. While it would have been possible to seek a traditional publisher for this work, as a long-time supporter and contributor to freeware and shareware computer software, I have decided instead to release this using a Creative Commons non-commercial, share-alike license. I encourage others to make use of this manual for their own work and to build upon it. If you do add to this effort, I would appreciate a notification.
“Violence is the last refuge of the incompetent.”
- Isaac Asimov
Laboratory Manual for AC Electrical Circuits 4
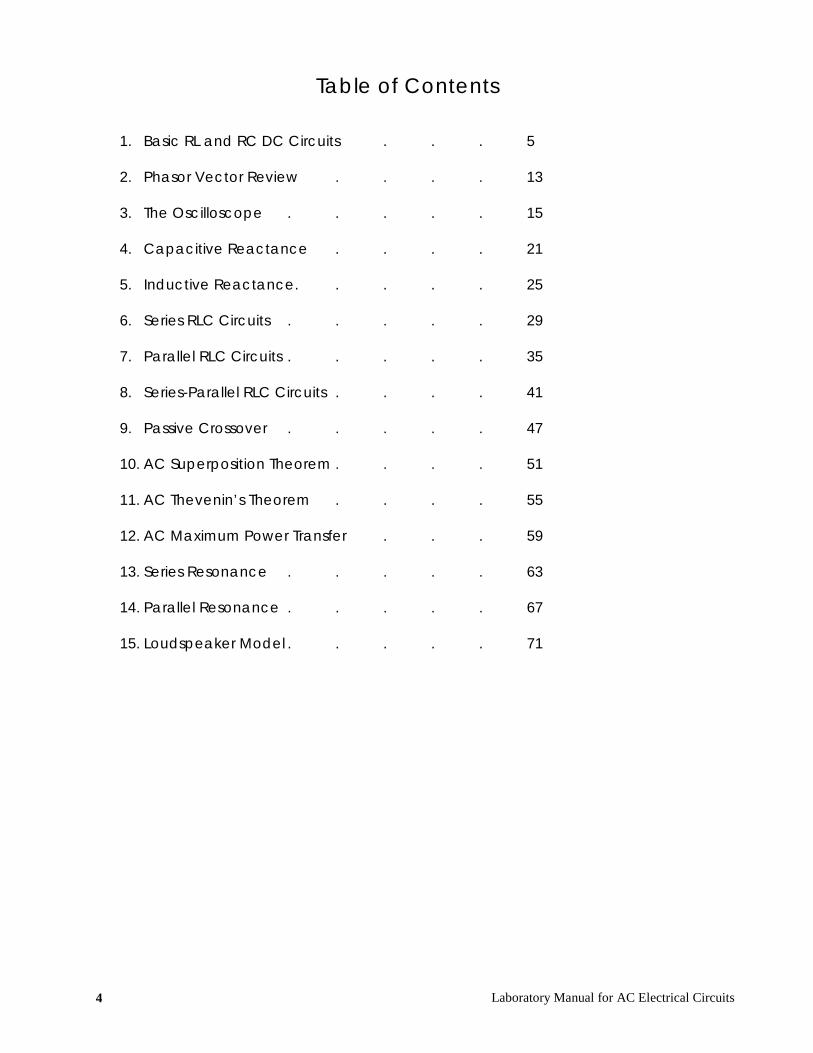
Table of Contents
1. Basic RL and RC DC Circuits . . . 5
2. Phasor Vector Review . . . . 13
3. The Oscilloscope . . . . . 15
4. Capacitive Reactance . . . . 21
5. Inductive Reactance. . . . . 25
6. Series RLC Circuits . . . . . 29
7. Parallel RLC Circuits . . . . . 35
8. Series-Parallel RLC Circuits . . . . 41
9. Passive Crossover . . . . . 47
10. AC Superposition Theorem . . . . 51
11. AC Thevenin’s Theorem . . . . 55
12. AC Maximum Power Transfer . . . 59
13. Series Resonance . . . . . 63
14. Parallel Resonance . . . . . 67
15. Loudspeaker Model . . . . . 71

Laboratory Manual for AC Electrical Circuits 5
1 Basic RL and RC DC Circuits Objective In this exercise, the DC steady state response of simple RL and RC circuits is examined. The transient behavior of RC circuits is also tested.
Theory Overview The DC steady state response of RL and RC circuits are essential opposite of each other: that is, once steady state is reached, capacitors behave as open circuits while inductors behave as short circuits. In practicality, steady state is reached after five time constants. The time constant for an RC circuit is simply the effective capacitance times the effective resistance, τ = RC. In the inductive case, the time constant is the effective inductance divided by the effective resistance, τ = L/R.
Equipment (1) DC power supply model:________________ srn:__________________ (1) DMM model:________________ srn:__________________ (1) Stop watch
Components (1) 1 µF actual:__________________ (1) 470 µF actual:__________________ (1) 10 mH actual:__________________ (1) 10 kΩ actual:__________________ (1) 47 kΩ actual:__________________

Laboratory Manual for AC Electrical Circuits 6
Schematics
Figure 1.1
Figure 1.2
Procedure RL Circuit 1. Using figure 1.1 with E=10V, R=47k, and L=10 mH, calculate the time constant and record it in
Table 1.1. Also, calculate and record the expected steady state inductor voltage in Table 1.2. 2. Set the power supply to 10 V but do not hook it up to the remainder of the circuit. After connecting
the resistor and inductor, connect the DMM across the inductor set to read DC voltage (20 volt scale). 3. Connect the power supply to the circuit. The circuit should reach steady state very quickly, in much
less than one second. Record the experimental inductor voltage in Table 1.2. Also, compute and record the percent deviation between experimental and theory in Table 1.2.
RC Circuit 4. Using figure 1.2 with E=10V, R1=47k, R2=10k and C=1 µF, calculate the time constant and record it
in Table 1.3. Also, calculate and record the expected steady state capacitor voltage in Table 1.4.

Laboratory Manual for AC Electrical Circuits 7
5. Set the power supply to 10 V but do not hook it up to the remainder of the circuit. After connecting the resistors and capacitor, connect the DMM across the capacitor set to read DC voltage (20 volt scale).
6. Connect the power supply to the circuit. The circuit should reach steady state quickly, in under one
second. Record the experimental capacitor voltage in Table 1.4. Also, compute and record the percent deviation between experimental and theory in Table 1.4.
RC Circuit (long time constant) 7. Using figure 1.2 with E=10V, R1=47k, R2=10k and C=470 µF, calculate the time constant and record
it in Table 1.5. Also, calculate and record the expected steady state capacitor voltage in Table 1.5. 8. Set the power supply to standby, and after waiting a moment for the capacitor to discharge, remove
the capacitor and replace it with the 470 µF. Connect the DMM across the capacitor set to read DC voltage (20 volt scale).
9. Energize the circuit and record the capacitor voltage every 10 seconds as shown in Table 1.6. This is
the charge phase. 10. Remove the power supply from the circuit and record the capacitor voltage every 10 seconds as
shown in Table 1.7. This is the discharge phase. 11. Using the data from Tables 1.6 and 1.7, create two plots of capacitor voltage versus time and compare
them to the theoretical plots found in the text.
Data Tables
Table 1.1
τ

Laboratory Manual for AC Electrical Circuits 8
Table 1.2
Table 1.3
Table 1.4
Table 1.5
VL Theory VL Experimental Deviation
τ
VC Theory VC Experimental Deviation
τ
VC Theory

Laboratory Manual for AC Electrical Circuits 9
Time (sec) Voltage
0
10
20
30
40
50
60
70
80
90
100
110
120
Table 1.6

Laboratory Manual for AC Electrical Circuits 10
Time (sec) Voltage
0
10
20
30
40
50
60
70
80
90
100
110
120
Table 1.7

Laboratory Manual for AC Electrical Circuits 11
Questions 1. What is a reasonable approximation for an inductor at DC steady state? 2. What is a reasonable approximation for a capacitor at DC steady state? 3. How can a reasonable approximation for time-to-steady state of an RC circuit be computed? 4. In general, what sorts of shapes do the charge and discharge voltages of DC RC circuits follow?

Laboratory Manual for AC Electrical Circuits 12

Laboratory Manual for AC Electrical Circuits 13
2 Phasor and Vector Review Objective The proper manipulation and representation of vectors is paramount for AC circuit analysis. Addition, subtraction, multiplication and division of vectors in both rectangular and polar forms are examined in both algebraic and graphical forms. Representations of waveforms using both phasor and time domain graphs are also examined.
Procedure
Perform the following operations, including phasor diagrams where appropriate. 1. (6+j10) + (8-j2) 2. (2+j5) – (10-j4) 3. 10∟0 + 20∟90 4. 10∟45 + 2∟-30 5. 20∟10 - 5∟75 6. (10+j20) * (5+j5) 7. (2+j10) / (.5+j2) 8. 10∟0 * 10∟90 9. 10∟45 * 10∟-45 10. 10∟90 / 5∟10 11. 10∟90 / 40∟-40 12. 1 / 200∟90 Draw the following expressions as time domain graphs. 13. v = 10 sin 2π100t 14. v = 20 sin 2π1000t + 45° 15. v = 5 + 6 sin 2π100t Write the expressions for the following descriptions. 16. A 10 volt peak sine wave at 20 Hz 17. A 5 peak to peak sine wave at 100 Hz with a -1 VDC offset 18. A 10 volt RMS sine wave at 1 kHz lagging by 40 degrees 19. A 20 volt peak sine wave at 10 kHz leading by 20 degrees with a 5 VDC offset

Laboratory Manual for AC Electrical Circuits 14

Laboratory Manual for AC Electrical Circuits 15
3 The Oscilloscope Objective This exercise is of a particularly practical nature, namely, introducing the use of the oscilloscope. The various input scaling, coupling, and triggering settings are examined along with a few specialty features.
Theory Overview The oscilloscope (or simply scope, for short) is arguably the single most useful piece of test equipment in an electronics laboratory. The primary purpose of the oscilloscope is to plot a voltage versus time although it can also be used to plot one voltage versus another voltage, and in some cases, to plot voltage versus frequency. Oscilloscopes are capable of measuring both AC and DC waveforms, and unlike typical DMMs, can measure AC waveforms of very high frequency (typically 100 MHz or more versus an upper limit of around 1 kHz for a general purpose DMM). While the modern digital oscilloscope on the surface appears much like its analog ancestors, the internal circuitry is far more complicated and the instrument affords much greater flexibility in measurement. Modern digital oscilloscopes typically include measurement aides such as horizontal and vertical cursors or bars, as well as direct readouts of characteristics such as waveform amplitude and frequency. At a minimum, modern oscilloscopes offer two input measurement channels although four and eight channel instruments are increasing in popularity. Unlike handheld DMMs, most oscilloscopes measure voltages with respect to ground, that is, the inputs are not floating and thus the black, or ground, lead is always connected to the circuit ground or common node. This is an extremely important point as failure to remember this may lead to the inadvertent short circuiting of components during measurement. The standard accepted method of measuring a non-ground referenced potential is to use two probes, one tied to each node of interest, and then setting the oscilloscope to subtract the two channels rather than display each separately. Note that this technique is not required if the oscilloscope has floating inputs (for example, in a handheld oscilloscope). Further, while it is possible to measure non-ground referenced signals by floating the oscilloscope itself through defeating the ground pin on the power cord, this is a safety violation and should not be done.

Laboratory Manual for AC Electrical Circuits 16
Equipment (1) DC Power Supply model:________________ srn:__________________ (1) AC Function Generator model:________________ srn:__________________ (1) Oscilloscope, Tektronix TDS 3000 series model:________________ srn:__________________
Components (1) 10 kΩ actual:__________________ (1) 33 kΩ actual:__________________
Schematics and Diagrams
Figure 3.1
Figure 3.2

Laboratory Manual for AC Electrical Circuits 17
Procedure 1. Figure 3.1 is an outline of the main face of a Tektronix TDS 3000 series oscilloscope. Compare this
to the bench oscilloscope and identify the following elements: • Channel one and two BNC input connectors. • Trigger BNC input connector. • Channel one and two select buttons. • Horizontal Sensitivity (or Scale) and Position knobs. • Vertical Sensitivity (or Scale) and Position knobs. • Trigger Level knob. • Quick Menu button. • Print/Save button. • Autoset button.
2. Note the numerous buttons along the bottom and side of the display screen. These buttons are
context-sensitive and their function will depend on the mode of operation of the oscilloscope. Power up the oscilloscope and select the Quick Menu button. Notice that the functions are listed next to the buttons. This is a very useful menu and serves as a good starting point for most experiment setups. Note that the main display is similar to a sheet of graph paper. Each square will have an appropriate scaling factor or weighting, for example, 1 volt per division vertically or 2 milliseconds per division horizontally. Waveform voltages and timings may be determined directly from the display by using these scales.
3. Select the channel one and two buttons (yellow and blue) and also select the Autoset button. (Autoset
tries to create reasonable settings based on the input signal and is useful as a sort of “panic button”). There should now be two horizontal lines on the display, one yellow and one blue. They may be moved via the Position knob. The Position knob moves the currently selected input (select the channel buttons alternately to toggle back and forth between the two inputs). The Vertical and Horizontal Scale knobs behave in a similar fashion and do not include calibration markings. That is because the settings for these knobs show up on the main display. Adjust the Scale knobs and note how the corresponding values in the display change. Voltages are in a 1/2/5 scale sequence while Time is in a 1/2/4 scale sequence.
4. One of the more important fundamental settings on an oscilloscope is the Input Coupling. This is
controlled via one of the bottom row buttons. There are three choices: Ground removes the input thus showing a zero reference, AC allows only AC signals through thus blocking DC, and DC allows all signals through (it does not prevent AC).
5. Set the channel one Vertical Scale to 5 volts per division. Set the channel two Scale to 2 volts per
division. Set the Time (Horizontal) Scale to 1 millisecond per division. Finally, set the input Coupling to Ground for both input channels and align the blue and yellow display lines to the center line of the display via the Vertical Position knob.

Laboratory Manual for AC Electrical Circuits 18
6. Build the circuit of figure 3.2 using E=10V, R1=10k and R2=33k. Connect a probe from the channel
one input to the power supply (red or tip to plus, black clip to ground). Connect a second probe from channel two to R2 (again, red or tip to the high side of the resistor and the black clip to ground).
7. Switch both inputs to DC coupling. The yellow and blue lines should have deflected upward. Channel
one should be raised two divisions (2 divisions at 5 volts per division yields the 10 volt source). Using this method, determine the voltage across R2 (remember, input two should have been set for 2 volts per division). Calculate the expected voltage across R2 using measured resistor values and compare the two in Table 3.1. Note that it is not possible to achieve extremely high precision using this method (e.g., four or more digits). Indeed, a DMM may prove more useful for direct measurement of DC potentials.
8. Select AC Coupling for the two inputs. The flat DC lines should drop back to zero. This is because
AC Coupling blocks DC. This will be useful for measuring the AC component of a combined AC/DC signal, such as might be seen in an audio amplifier. Set the input coupling for both channels back to DC.
9. Replace the DC power supply with the function generator. Set the function generator for a one volt
peak sine wave at 1 kHz and apply it to the resistor network. The display should now show two small sine waves. Adjust the Vertical Scale settings for the two inputs so that the waves take up the majority of the display. If the display is very blurry with the sine waves appearing to jump about side to side, the Trigger Level may need to be adjusted. Also, adjust the Time Scale so that only one or two cycles of the wave may be seen. Using the Scale settings, determine the two voltages (following the method of step 7) as well as the waveform’s period and compare them to the values expected via theory, recording the results in Tables 3.2 and 3.3.
10. To find the voltage across R1, the channel two voltage (VR2) may be subtracted from channel one (E
source) via the Math function. Use the red button to select the Math function and create the appropriate expression from the menu (ch1 – ch2). This display shows up in red. To remove a waveform, select it and then select Off. Remove the math waveform before proceeding to the next step.
11. One of the more useful aspects of the oscilloscope is the ability to show the actual waveshape. This
may be used, for example, as a means of determining distortion in an amplifier. Change the waveshape on the function generator to a square wave, triangle, or other shape and note how the oscilloscope responds. Note that the oscilloscope will also show a DC component, if any, as the AC signal being offset or “riding on the DC”. Adjust the function generator to add a DC offset to the signal and note how the oscilloscope display shifts. Return the function generator back to a sine wave and remove any DC offset.
12. It is often useful to take precise differential measurement on a waveform. For this, the bars or cursors
are useful. Select the Cursor button toward the top of the oscilloscope. From the menu on the display,

Laboratory Manual for AC Electrical Circuits 19
select Vertical Bars. Two vertical bars will appear on the display (it is possible that one or both could be positioned off the main display). They may be moved left and right via the function knob (next to the Cursor button). The Select button toggles between the two cursors. A read out of the bar values will appear in the upper portion of the display. They indicate the positions of the cursors, i.e. the location where they cross the waveform. Vertical Bars are very useful for obtaining time information as well as amplitudes at specific points along the wave. A similar function is the Horizontal Bars which are particularly useful for determining amplitudes. Try the Horizontal Bars by selecting them via the Cursor button again.
13. For some waveforms parameters, automatic readings are available. These are accessed via the Meas
(Measurement) button. Select Meas and page through the various options. Select Frequency. Note that a small readout of the frequency will now appear on the display. Up to four measurements are possible simultaneously. Important: There are specific limits on the proper usage of these measurements. If the guidelines are not followed, erroneous values may result. Always perform an approximation via the Scale factor and divisions method even when using an automatic measurement!
Data Tables
VR2 Scale (V/Div) Number of Divisions Voltage Oscilloscope
Theory X X
Table 3.1
Scale (V/Div) Number of Divisions Voltage E Oscilloscope
E Theory X X VR2 Oscilloscope
VR2 Theory X X
Table 3.2
Scale (S/Div) Number of Divisions
Period Frequency
E Oscilloscope E Theory X X
Table 3.3

Laboratory Manual for AC Electrical Circuits 20

Laboratory Manual for AC Electrical Circuits 21
4 Capacitive Reactance Objective Capacitive reactance will be examined in this exercise. In particular, its relationship to capacitance and frequency will be investigated, including a plot of capacitive reactance versus frequency.
Theory Overview The current – voltage characteristic of a capacitor is unlike that of typical resistors. While resistors show a constant resistance value over a wide range of frequencies, the equivalent ohmic value for a capacitor, known as capacitive reactance, is inversely proportional to frequency. The capacitive reactance may be computed via the formula:
fCjXcπ21
−=
The magnitude of capacitive reactance may be determined experimentally by feeding a capacitor a known current, measuring the resulting voltage, and dividing the two, following Ohm’s Law. This process may be repeated a across a range of frequencies in order to obtain a plot of capacitive reactance versus frequency. An AC current source may be approximated by placing a large resistance in series with an AC voltage, the resistance being considerably larger than the maximum reactance expected. Equipment (1) AC Function Generator model:________________ srn:__________________ (1) Oscilloscope model:________________ srn:__________________
Components (1) 1 µF actual:__________________ (1) 2.2 µF actual:__________________ (1) 10 kΩ actual:__________________

Laboratory Manual for AC Electrical Circuits 22
Schematics
Figure 4.1
Procedure Current Source 1. Using figure 4.1 with Vin=10Vp-p and R=10k, and assuming that the reactance of the capacitor is
much smaller than 10k and can be ignored, determine the circulating current using measured component values and record in Table 4.1.
Measuring Reactance 2. Build the circuit of figure 4.1 using R=10k, and C=1 µF. Place one probe across the generator and
another across the capacitor. Set the generator to a 200 Hz sine wave and 10 Vp-p. Make sure that the Bandwidth Limit of the oscilloscope is engaged for both channels. This will reduce the signal noise and make for more accurate readings.
3. Calculate the theoretical value of Xc using the measured capacitor value and record in Table 4.2. 4. Record the peak-to-peak capacitor voltage and record in Table 4.2. 5. Using the source current from Table 4.1 and the measured capacitor voltage, determine the
experimental reactance and record it in Table 4.2. Also compute and record the deviation. 6. Repeat steps three through five for the remaining frequencies of Table 4.2. 7. Replace the 1 µF capacitor with the 2.2 µF unit and repeat steps two through six, recording results in
Table 4.3. 8. Using the data of Tables 4.2 and 4.3, create plots of capacitive reactance versus frequency.

Laboratory Manual for AC Electrical Circuits 23
Data Tables
isource
Table 4.1
Frequency XC Theory VC Exp XC Exp % Dev
200
400
600
800
1.0 k
1.2 k
1.6 k
2.0 k
Table 4.2

Laboratory Manual for AC Electrical Circuits 24
Frequency XC Theory VC Exp XC Exp % Dev
200
400
600
800
1.0 k
1.2 k
1.6 k
2.0 k
Table 4.3
Questions 1. What is the relationship between capacitive reactance and frequency? 2. What is the relationship between capacitive reactance and capacitance? 3. If the experiment had been repeated with frequencies 10 times higher than those in Table 4.2, what
would the resulting plots look like? 4. If the experiment had been repeated with frequencies 10 times lower than those in Table 4.2, what
effect would that have on the experiment?

Laboratory Manual for AC Electrical Circuits 25
5 Inductive Reactance Objective Inductive reactance will be examined in this exercise. In particular, its relationship to inductance and frequency will be investigated, including a plot of inductive reactance versus frequency.
Theory Overview The current – voltage characteristic of an inductor is unlike that of typical resistors. While resistors show a constant resistance value over a wide range of frequencies, the equivalent ohmic value for an inductor, known as inductive reactance, is directly proportional to frequency. The inductive reactance may be computed via the formula:
fLjXL π2= The magnitude of inductive reactance may be determined experimentally by feeding an inductor a known current, measuring the resulting voltage, and dividing the two, following Ohm’s Law. This process may be repeated a across a range of frequencies in order to obtain a plot of inductive reactance versus frequency. An AC current source may be approximated by placing a large resistance in series with an AC voltage, the resistance being considerably larger than the maximum reactance expected. Equipment (1) AC Function Generator model:________________ srn:__________________ (1) Oscilloscope model:________________ srn:__________________ (1) DMM model:________________ srn:__________________
Components (1) 1 mH actual:__________________ (1) 10 mH actual:__________________ (1) 10 kΩ actual:__________________
Laboratory Manual for AC Electrical Circuits 26
Schematics
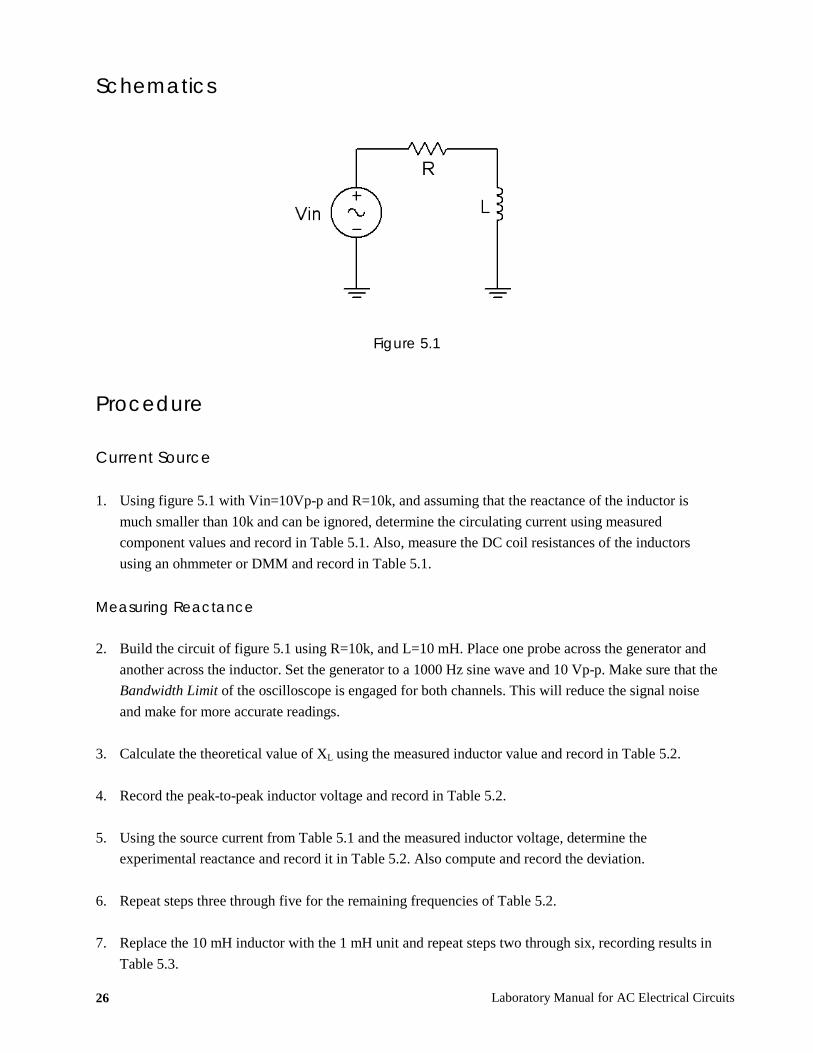
Figure 5.1
Procedure Current Source 1. Using figure 5.1 with Vin=10Vp-p and R=10k, and assuming that the reactance of the inductor is
much smaller than 10k and can be ignored, determine the circulating current using measured component values and record in Table 5.1. Also, measure the DC coil resistances of the inductors using an ohmmeter or DMM and record in Table 5.1.
Measuring Reactance 2. Build the circuit of figure 5.1 using R=10k, and L=10 mH. Place one probe across the generator and
another across the inductor. Set the generator to a 1000 Hz sine wave and 10 Vp-p. Make sure that the Bandwidth Limit of the oscilloscope is engaged for both channels. This will reduce the signal noise and make for more accurate readings.
3. Calculate the theoretical value of XL using the measured inductor value and record in Table 5.2. 4. Record the peak-to-peak inductor voltage and record in Table 5.2. 5. Using the source current from Table 5.1 and the measured inductor voltage, determine the
experimental reactance and record it in Table 5.2. Also compute and record the deviation. 6. Repeat steps three through five for the remaining frequencies of Table 5.2. 7. Replace the 10 mH inductor with the 1 mH unit and repeat steps two through six, recording results in
Table 5.3.

Laboratory Manual for AC Electrical Circuits 27
8. Using the data of Tables 5.2 and 5.3, create plots of inductive reactance versus frequency.
Data Tables
isource
Rcoil of 10 mH
Rcoil of 1 mH
Table 5.1
Frequency XL Theory VL Exp XL Exp % Dev
1 k
2 k
3 k
4 k
5 k
6 k
8 k
10 k
Table 5.2

Laboratory Manual for AC Electrical Circuits 28
Frequency XL Theory VL Exp XL Exp % Dev
10 k
20 k
30 k
40 k
50 k
60 k
80 k
100 k
Table 5.3
Questions 1. What is the relationship between inductive reactance and frequency? 2. What is the relationship between inductive reactance and inductance? 3. If the 10 mH trial had been repeated with frequencies 10 times higher than those in Table 5.2, what
effect would that have on the experiment? 4. Do the coil resistances have any effect on the plots?

Laboratory Manual for AC Electrical Circuits 29
6 Series R, L, C Circuits Objective This exercise examines the voltage and current relationships in series R, L, C networks. Of particular importance is the phase of the various components and how Kirchhoff’s Voltage Law is extended for AC circuits. Both time domain and phasor plots of the voltages are generated.
Theory Overview Each element has a unique phase response: for resistors, the voltage is always in phase with the current, for capacitors the voltage always lags the current by 90 degrees, and for inductors the voltage always leads the current by 90 degrees. Consequently, a series combination of R, L, and C components will yield a complex impedance with a phase angle between +90 and -90 degrees. Due to the phase response, Kirchhoff’s Voltage Law must be computed using vector (phasor) sums rather than simply relying on the magnitudes. Indeed, all computations of this nature, such as a voltage divider, must be computed using vectors.
Equipment (1) AC Function Generator model:________________ srn:__________________ (1) Oscilloscope model:________________ srn:__________________
Components (1) 10 nF actual:__________________ (1) 10 mH actual:__________________ (1) 1 kΩ actual:__________________

Laboratory Manual for AC Electrical Circuits 30
Schematics
Figure 6.1 Figure 6.2
Figure 6.3
Procedure RC Circuit 1. Using Figure 6.1 with Vin=1 Vp-p sine at 10 kHz, R=1 kΩ, and C=10 nF, determine the theoretical
capacitive reactance and circuit impedance, and record the results in Table 6.1. Using the voltage divider rule, compute the resistor and capacitor voltages and record them in Table 6.2.
2. Build the circuit of Figure 6.1 using R=1 kΩ, and C=10 nF. Place one probe across the generator and
another across the capacitor. Set the generator to a 10k Hz sine wave and 1 Vp-p. Make sure that the Bandwidth Limit of the oscilloscope is engaged for both channels. This will reduce the signal noise and make for more accurate readings.
3. Measure the voltage across the capacitor and record in Table 6.2. Along with the magnitude, be sure
to record the time deviation between VC and the input signal (from which the phase may be determined). Using the Math function, measure and record the voltage and time delay for the resistor (Vin – VC). Compute the phase angle and record these values in Table 6.2.
4. Take a snapshot of the oscilloscope displaying Vin, VC, and VR. 5. Compute the deviations between the theoretical and experimental values of Table 6.2 and record the
results in the final columns of Table 6.2. Based on the experimental values, determine the

Laboratory Manual for AC Electrical Circuits 31
experimental Z and XC values via Ohm’s Law (i=VR/R, XC=VC/i, Z=Vin/i) and record back in Table 6.1 along with the deviations.
6. Create a phasor plot showing Vin, VC, and VR. Include both the time domain display from step 4 and
the phasor plot with the technical report. RL Circuit 7. Replace the capacitor with the 10 mH inductor (i.e. Figure 6.2), and repeat steps 1 through 6 in like
manner, using Tables 6.3 and 6.4. RLC Circuit 8. Using Figure 6.3 with both the 10 nF capacitor and 10 mH inductor, repeat steps 1 through 6 in like
manner, using Tables 6.5 and 6.6. Unfortunately, it will be impossible to see the voltage of all three components simultaneously with the source voltage using a two channel oscilloscope. To obtain proper readings, place the first probe at the input and the second probe across the capacitor in order to see the phase and magnitude of VC. Then, swap C and L (placing the second probe across the inductor) to see VL, and finally, swap L and R (with the second probe across R) in order see VR.
Data Tables RC Circuit
Theory Experimental % Deviation
XC
Z Magnitude
Z θ
Table 6.1
Theory Mag Theory θ Exp Mag Exp Delay Exp θ % Dev Mag % Dev θ
VC
VR
Table 6.2

Laboratory Manual for AC Electrical Circuits 32
RL Circuit
Theory Experimental % Deviation
XL
Z Magnitude
Z θ
Table 6.3
Theory Mag Theory θ Exp Mag Exp Delay Exp θ % Dev Mag % Dev θ
VL
VR
Table 6.4
RLC Circuit
Theory Experimental % Deviation
XC
XL
Z Magnitude
Z θ
Table 6.5
Theory Mag Theory θ Exp Mag Exp Delay Exp θ % Dev Mag % Dev θ
VC
VL
VR
Table 6.6

Laboratory Manual for AC Electrical Circuits 33
Questions 1. What is the phase relationship between R, L, and C components in a series AC circuit? 2. Based on measurements, does Kirchhoff’s Voltage Law apply to the three tested circuits (show
work)? 3. In general, how would the phasor diagram of Figure 6.1 change if the frequency was raised? 4. In general, how would the phasor diagram of Figure 6.2 change if the frequency was lowered?

Laboratory Manual for AC Electrical Circuits 34
Laboratory Manual for AC Electrical Circuits 35
7 Parallel R, L, C Circuits Objective This exercise examines the voltage and current relationships in parallel R, L, C networks. Of particular importance is the phase of the various components and how Kirchhoff’s Current Law is extended for AC circuits. Both time domain and phasor plots of the currents are generated. A technique to measure current using a current sense resistor will also be explored.
Theory Overview Recall that for resistors, the voltage is always in phase with the current, for capacitors the voltage always lags the current by 90 degrees, and for inductors the voltage always leads the current by 90 degrees. Because each element has a unique phase response between +90 and -90 degrees, a parallel combination of R, L, and C components will yield a complex impedance with a phase angle between +90 and -90 degrees. Due to the phase response, Kirchhoff’s Current Law must be computed using vector (phasor) sums rather than simply relying on the magnitudes. Indeed, all computations of this nature, such as a current divider, must be computed using vectors.
Equipment (1) AC Function Generator model:________________ srn:__________________ (1) Oscilloscope model:________________ srn:__________________
Components (1) 10 nF actual:__________________ (1) 10 mH actual:__________________ (1) 1 kΩ actual:__________________ (3) 10 Ω actual:__________________ actual:__________________ actual:__________________

Laboratory Manual for AC Electrical Circuits 36
Schematics
Figure 7.1 Figure 7.2
Figure 7.3
Procedure RC Circuit 1. Using Figure 7.1 with a 10 V p-p 10 kHz source, R=1 kΩ, and C=10 nF, determine the theoretical
capacitive reactance and circuit impedance, and record the results in Table 7.1. Using the current divider rule, compute the resistor and capacitor currents and record them in Table 7.2.
2. Build the circuit of Figure 7.1 using R=1 kΩ, and C=10 nF. A common method to measure current
using the oscilloscope is to place a small current sense resistor in line with the current of interest. If the resistor is much smaller than the surrounding reactances it will have a minimal effect on the current. Because the voltage and current of the resistor are always in phase with each other, the relative phase of the current in question must be the same as that of the sensing resistor’s voltage. Each of the three circuit currents will be measured separately and with respect to the source in order to determine relative phase. To measure the total current, place a 10 Ω resistor between ground and the bottom connection of the parallel components. Set the generator to a 10k Hz sine wave and 10 Vp-p. Make sure that the Bandwidth Limit of the oscilloscope is engaged for both channels. This will reduce the signal noise and make for more accurate readings.
3. Place probe one across the generator and probe two across the sense resistor. Measure the voltage
across the sense resistor, calculate the corresponding total current via Ohm’s Law and record in Table

Laboratory Manual for AC Electrical Circuits 37
7.2. Along with the magnitude, be sure to record the time deviation between the sense waveform and the input signal (from which the phase may be determined eventually).
4. Remove the sense resistor and place one 10 Ω resistor between the capacitor and ground to serve as
the capacitor current sense. Place a second 10 Ω resistor between the resistor and ground to sense the resistor current. Leave probe one at the generator and move probe two across the sense resistor in the resistor branch. Repeat the process to obtain its current, recording the magnitude and phase angle in Table 7.2. Finally, move probe two so that it is across the capacitor’s sense resistor. Measure and record the appropriate values in Table 7.2.
5. Move probe one to the resistor’s sense resistor and leave probe two at the capacitor’s sense resistor.
Save a picture of the oscilloscope displaying the voltage waveforms representing iR, iC and iin (i.e., the Math waveform computed from iR + iC).
6. Compute the deviations between the theoretical and experimental values of Table 7.2 and record the
results in the final columns of Table 7.2. Based on the experimental values, determine the experimental Z and XC values via Ohm’s Law (XC=VC/iC, Z=Vin/iin) and record back in Table 7.1 along with the deviations.
7. Create a phasor plot showing iin, iC, and iR. Include both the time domain display from step 4 and the
phasor plot with the technical report. RL Circuit 8. Replace the capacitor with the 10 mH inductor (i.e. Figure 7.2), and repeat steps 1 through 7 in like
manner, using Tables 7.3 and 7.4. RLC Circuit 9. Using Figure 7.3 with both the 10 nF capacitor and 10 mH inductor (and a third sense resistor), repeat
steps 1 through 7 in like manner, using Tables 7.5 and 7.6. Note that it will not be possible to see all four waveforms simultaneously in step 5.

Laboratory Manual for AC Electrical Circuits 38
Data Tables RC Circuit
Theory Experimental % Deviation
XC
Z Magnitude
Z θ
Table 7.1
Theory Mag Theory θ Exp Mag Exp Delay Exp θ % Dev Mag % Dev θ
iC
iR
iin
Table 7.2
RL Circuit
Theory Experimental % Deviation
XL
Z Magnitude
Z θ
Table 7.3
Theory Mag Theory θ Exp Mag Exp Delay Exp θ % Dev Mag % Dev θ
iL
iR
iin
Table 7.4

Laboratory Manual for AC Electrical Circuits 39
RLC Circuit
Theory Experimental % Deviation
XC
XL
Z Magnitude
Z θ
Table 7.5
Theory Mag Theory θ Exp Mag Exp Delay Exp θ % Dev Mag % Dev θ
iC
iL
iR
iin
Table 7.6
Questions 1. What is the phase relationship between R, L, and C components in a parallel AC circuit? 2. Based on measurements, does Kirchhoff’s Current Law apply to the three tested circuits (show
work)? 3. In general, how would the phasor diagram of Figure 7.1 change if the frequency was raised? 4. In general, how would the phasor diagram of Figure 7.2 change if the frequency was lowered?

Laboratory Manual for AC Electrical Circuits 40

Laboratory Manual for AC Electrical Circuits 41
8 Series-Parallel R, L, C Circuits Objective This exercise examines the voltage and current relationships in series-parallel R, L, C networks. Often series-parallel circuits may be analyzed along the lines of the simpler series-only or parallel-only circuits, but where each “element” may comprise a complex impedance rather than a singular R, L, or C component. Both Kirchhoff’s Current Law and Kirchhoff’s Voltage Law may be applied to these circuits. In this exercise, both time domain and phasor plots of the voltages and currents are generated.
Theory Overview Many complex R, L, C networks may be analyzed by reducing them to simpler series or parallel circuits, perhaps through an iterative process in more involved instances. In this analysis each series or parallel element is in fact a complex impedance made up of a series or parallel combination of other components and thus producing a phase angle between +90 and -90 degrees. Consequently, the simple “all right angles” phasor diagrams found for basic series and parallel circuits may be replaced with more general phasor diagrams with non-right angles. In spite of this, both Kirchhoff’s Current Law and Kirchhoff’s Voltage Law must still be satisfied for the entire circuit, as well as any sub-circuits or branches.
Equipment (1) AC Function Generator model:________________ srn:__________________ (1) Oscilloscope model:________________ srn:__________________
Components (1) 10 nF actual:__________________ (1) 10 mH actual:__________________ (1) 1 kΩ actual:__________________ (2) 10 Ω actual:__________________

Laboratory Manual for AC Electrical Circuits 42
Schematics
Figure 8.1 Figure 8.2
Procedure Circuit 1 1. Using Figure 8.1 with a 10 kHz sine wave at 10 Vp-p source, R=1 kΩ, L=10 mH, and C=10 nF,
determine the theoretical inductive and capacitive reactances, parallel branch reactance and total circuit impedance, and record the results in Table 8.1. Using Ohm’s Law and the voltage divider rule compute the capacitor and inductor-resistor voltages along with the input current and record them in Table 8.2.
2. Build the circuit of Figure 8.1 using R=1 kΩ, L=10 mH, and C=10 nF. Set the generator to a 10k Hz
sine wave and 10 Vp-p. Make sure that the Bandwidth Limit of the oscilloscope is engaged for both channels. This will reduce the signal noise and make for more accurate readings.
3. Place probe one across the generator and probe two across the parallel inductor-resistor branch. Using
the Math function, the capacitor voltage may be found by subtracting the probe two voltage from that of probe one. Also, the input current may be found by dividing the capacitor’s voltage by its reactance. Measure the parallel branch voltage and capacitor voltage, both magnitude and phase, and record in Table 8.2. Compute the input current and record in Table 8.2.
4. Take a picture of the three voltage waveforms. 5. Compute the deviations between the theoretical and experimental values of Table 8.2 and record the
results in the final columns of Table 8.2. Based on the experimental values, determine the experimental total Z and parallel branch Z values via Ohm’s Law (e.g., ZT=Vin/iin) and record back in Table 8.1 along with the deviations.

Laboratory Manual for AC Electrical Circuits 43
6. Create a phasor plot showing Vin, VLR, and VC. Include both the time domain display from step 4 and the phasor plot with the technical report.
Circuit 2 7. Using Figure 8.2 with a 10k Hz sine wave at 10 Vp-p, R=1 kΩ, L=10 mH, and C=10 nF, determine
the theoretical inductive and capacitive reactances, series branch impedance and total circuit impedance, and record the results in Table 8.3. Using Ohm’s Law compute the capacitor and inductor-resistor currents along with the input current and record them in Table 8.4.
8. Build the circuit of Figure 8.2 using R=1 kΩ, L=10 mH, and C=10 nF. Insert a 10Ω current sense
resistor at the bottom of the LR leg and another at the bottom of the capacitor leg. Set the generator to a 10k Hz sine wave and 10 Vp-p. Make sure that the Bandwidth Limit of the oscilloscope is engaged for both channels. This will reduce the signal noise and make for more accurate readings.
9. Place probe one across the generator and probe two across the inductor-resistor branch sense resistor.
The inductor-resistor current may be found by dividing the probe two voltage by the sense resistor. The capacitor current is found in a similar manner using its current sense resistor. Record both magnitude and phase of the two currents in Table 8.4.
10. Take a picture of the Vin and iLR sense waveforms and also of the Vin and iC sense waveforms. 11. To measure the input current, remove the two sense resistors and place one of them so that it is
between ground and the bottom junction of the resistor and capacitor. Move probe two to this sense resistor and measure the voltage. From this, compute the total current and record both magnitude and phase in Table 8.4.
12. Take a picture of the Vin and iin sense waveforms. 13. Compute the deviations between the theoretical and experimental values of Table 8.4 and record the
results in the final columns of Table 8.4. Based on the experimental values, determine the experimental total Z and series branch Z values and record back in Table 8.3 along with the deviations.
14. Create a phasor plot showing iin, iLR, and iC. Include both the time domain displays from steps 10 &
12 and the phasor plot with the technical report.
Multisim 15. Build the circuit of Figure 8.1 in Multisim. Using Transient Analysis, determine the voltage across
the inductor and compare the magnitude and phase to the theoretical and measured values recorded in Table 8.2.

Laboratory Manual for AC Electrical Circuits 44
Data Tables Circuit 1
Theory Experimental % Deviation
XC
XL
R || XL
ZT Magnitude
ZT θ
Table 8.1
Theory Mag Theory θ Exp Mag Exp Delay Exp θ % Dev Mag % Dev θ
VLR
VC
iin
Table 8.2
Circuit 2
Theory Experimental % Deviation
XC
XL
R + XL
ZT Magnitude
ZT θ
Table 8.3

Laboratory Manual for AC Electrical Circuits 45
Theory Mag Theory θ Exp Mag Exp Delay Exp θ % Dev Mag % Dev θ
iLR
iC
iin
Table 8.4
Questions 1. Is the phase relationship between circuit voltages or currents in a series-parallel AC circuit
necessarily a right-angle relationship? 2. Based on measurements, do KVL and KCL apply to the tested circuits (show work)? 3. In general, how would the phasor diagram of Figure 8.1 change if the frequency was raised? 4. In general, how would the phasor diagram of Figure 8.2 change if the frequency was lowered?

Laboratory Manual for AC Electrical Circuits 46

Laboratory Manual for AC Electrical Circuits 47
9 Passive Crossover Objective The frequency response of a simple two-way LC passive crossover is investigated. One output should attenuate signals above the crossover frequency while the other output should attenuate signals below the crossover frequency.
Theory Overview In order to span the range of audible tones with accuracy, low distortion, and reasonable volume levels, loudspeaker systems are typically comprised of two or more transducers, each designed to cover only a portion of the frequency spectrum. As the spectrum is broken up into multiple segments, a circuit is needed to “steer” the proper signals to the appropriate transducers. Failure to do so may result in distortion or damage to the transducers. As inductors and capacitors exhibit a reactance that is a function of frequency, they are ideal candidates for this job. In this exercise, a simple two-way crossover is examined. It has one output for the high frequency transducer (tweeter) and for the low frequency transducer (woofer). In order to reduce the size of the components in this exercise, the impedance has been scaled upward by a factor of nearly 100. In place of the transducers, two resistive loads are used. This has the added advantage of not producing any sound in the lab! While real-world crossovers tend to be more complex than the one in this exercise, it will suffice to show the basic operation. Equipment (1) AC Function Generator model:________________ srn:__________________ (1) Oscilloscope model:________________ srn:__________________
Components (1) .25 µF actual:__________________ (1) 100 mH actual:__________________ (2) 620 Ω actual:__________________

Laboratory Manual for AC Electrical Circuits 48
Schematics
Figure 9.1
Procedure 1. The circuit of Figure 9.1 can be thought of as a pair of frequency dependent voltage dividers. XL
increases with frequency, thus attenuating high frequency signals reaching R2. Similarly, XC increases with a decrease in frequency, thus attenuating low frequency signals reaching R1. (R2 takes the place of the woofer while R1 takes the place of the tweeter). The crossover frequency is the frequency where R1=XC and R2=XL (normally the same frequency for both). Using C=.25 µF, L=100 mH, and R1=R2=620, determine the crossover frequencies and record in Table 9.1.
2. Using the voltage divider rule and Vin=1 Vp-p, determine and record the theoretical voltage at output
one (R1) for each frequency listed in Table 9.2. Be sure to include both magnitude and phase. 3. Build the circuit of figure 9.1 using R1=R2=620, L= 100 mH, and C=.25 µF. Place one probe across
the generator and another across output one (R1). Set the generator to a 50 Hz sine wave and 1 Vp-p. Make sure that the Bandwidth Limit of the oscilloscope is engaged for both channels. This will reduce the signal noise and make for more accurate readings.
4. Measure and magnitude and phase shift of the output with respect to the input and record in Table
9.2. Repeat the measurements for the remaining frequencies in the table. 5. Repeat Steps two through four using the second output (R2) and Table 9.3. 6. On a single graph plot the magnitude response of both outputs with respect to frequency. On a
separate graph plot the phase response of both outputs with respect to frequency.

Laboratory Manual for AC Electrical Circuits 49
Data Tables
ftweeter
fwoofer
Table 9.1
Output One
Frequency V1 Mag Theory V1 θ Theory V1 Mag Exp V1 θ Exp
50
70
100
200
500
1k
2k
5k
10k
15k
20k
Table 9.2

Laboratory Manual for AC Electrical Circuits 50
Output Two
Frequency V2 Mag Theory V2 θ Theory V2 Mag Exp V2 θ Exp
50
70
100
200
500
1k
2k
5k
10k
15k
20k
Table 9.3
Questions 1. Are the responses of the two outputs symmetrical? Do they need to be? 2. What is the maximum attenuation at the frequency extremes for the two outputs? 3. How might the attenuation be increased?

Laboratory Manual for AC Electrical Circuits 51
10 AC Superposition Objective This exercise examines the analysis of multi-source AC circuits using the Superposition Theorem. In particular, sources with differing frequencies will be used to illustrate the contributions of each source to the combined result.
Theory Overview The Superposition Theorem can be used to analyze multi-source AC linear bilateral networks. Each source is considered in turn, with the remaining sources replaced by their internal impedance, and appropriate series-parallel analysis techniques employed. The resulting signals are then summed to produce the combined output signal. To see this process more clearly, the exercise will utilize two sources operating at different frequencies. Note that as each source has a different frequency, the inductor and capacitor appear as different reactances to the two sources.
Equipment (2) AC Function Generators model:________________ srn:__________________ model:________________ srn:__________________ (1) Oscilloscope model:________________ srn:__________________
Components (1) .1 µF actual:__________________ (1) 10 mH actual:__________________ (1) 1k Ω actual:__________________ (1) 50 Ω actual:__________________

Laboratory Manual for AC Electrical Circuits 52
Schematics
Figure 10.1
Procedure 1. Typical function generators have a 50 Ω internal impedance. These are not shown in the circuit of
Figure 10.1. To test the Superposition Theorem, sources E1 and E2 will be examined separately and then together.
Source One Only
2. Consider the circuit of Figure 10.1 with C=.1 µF, L=10 mH, R=1kΩ and using only source E1=1 volt peak-peak at 1 kHz, with source E2 replaced by its internal impedance of 50 Ω. Using standard series-parallel techniques, calculate the voltages across E1, R, and E2. Remember to include the 50 Ω internal impedances in the calculations. Record the results in Table 10.1.
3. Build the circuit of Figure 10.1 using C=.1 µF, L=10 mH, and R=1kΩ. Replace E2 with a 50 Ω
resistor to represent its internal impedance. Set E1 to 1 volt peak-peak at 1 kHz. Make sure that the Bandwidth Limit of the oscilloscope is engaged for both channels. This will reduce the signal noise and make for more accurate readings. Place probe one across E1 and probe two across R. Measure the voltages across E1 and R, and record in Table 10.1. Record a copy of the scope image. Move probe two across E2 (the 50 Ω), measure and record this voltage in Table 10.1.
Source Two Only
4. Consider the circuit of Figure 10.1 using only source E2=1 volt peak-peak at 10 kHz, with source E1 replaced by its internal impedance of 50 Ω. Using standard series-parallel techniques, calculate the voltages across E1, R, and E2. Remember to include the 50 Ω internal impedances in the calculations. Record the results in Table 10.2.

Laboratory Manual for AC Electrical Circuits 53
5. Replace the 50 Ω with source E2 and set it to 1 volt peak-peak at 10 kHz. Replace E1 with a 50 Ω resistor to represent its internal impedance. Place probe one across E2 and probe two across R. Measure the voltages across E2 and R, and record in Table 10.2. Record a copy of the scope image. Move probe two across E1 (the 50 Ω), measure and record this voltage in Table 10.2.
Sources One and Two
6. Consider the circuit of Figure 10.1 using both sources, E1=1 volt peak-peak at 1 kHz and E2=1 volt peak-peak at 10 kHz. Add the calculated voltages across E1, R, and E2 from Tables 10.1 and 10.2. Record the results in Table 10.3. Make a note of the expected maxima and minima of these waves and sketch how the combination should appear on the scope
7. Replace the 50 Ω with source E1and set it to 1 volt peak-peak at 1 kHz. Both sources should now be
active. Place probe one across E1 and probe two across R. Measure the voltages across E1 and R, and record in Table 10.3. Record a copy of the scope image. Move probe two across E2, measure and record this voltage in Table 10.3.
Multisim 8. Build the circuit of Figure 10.1 in Multisim. Using Transient Analysis, determine the voltage across
the resistor and compare it to the theoretical and measured values recorded in Table 10.3. Be sure to include the 50 Ω source resistances in the simulation.
Data Tables Source One Only
Theory Experimental % Deviation
E1
E2
VR
Table 10.1

Laboratory Manual for AC Electrical Circuits 54
Source Two Only
Theory Experimental % Deviation
E1
E2
VR
Table 10.2
Sources One and Two
Theory Experimental % Deviation
E1
E2
VR
Table 10.3
Questions 1. Why must the sources be replaced with a 50 Ω resistor instead of being shorted? 2. Do the expected maxima and minima from step 6 match what is measured in step 7? 3. Does one source tend to dominate the 1k Ω resistor voltage or do both sources contribute in nearly
equal amounts? Will this always be the case?

Laboratory Manual for AC Electrical Circuits 55
11 AC Thevenin’s Theorem Objective Thevenin’s Theorem will be examined for the AC case. The Thevenin source voltage and Thevenin impedance will be determined experimentally and compared to theory. Loads will be examined when driven by both an arbitrary circuit and that circuit’s Thevenin equivalent to determine if the resulting load potentials are indeed identical. Both resistive and complex loads will be examined as well as well source impedances that are inductive or capacitive. Theory Overview Thevenin’s Theorem states that any linear two port network can be replaced by a single voltage source with series impedance. While the theorem is applicable to any number of voltage and current sources, this exercise will only examine single source circuits for the sake of simplicity. The Thevenin voltage is the open circuit output voltage. This may be determined experimentally by isolating the portion to be Thevenized and simply placing an oscilloscope at its output terminals. The Thevenin impedance is found by replacing all sources with their internal impedance and then applying appropriate series-parallel impedance simplification rules. If an impedance meter is available, an easy method of doing this in the lab is to replace the sources with appropriate impedance values and apply the impedance meter to the output terminals of the circuit portion under investigation. Equipment (1) AC Function Generator model:________________ srn:__________________ (1) Oscilloscope model:________________ srn:__________________ (1) Variable Frequency Impedance Meter model:________________ srn:__________________ (1) Decade Resistance Box model:________________ srn:__________________
Components (1) .1 µF actual:__________________ (1) .47 µF actual:__________________ (1) 10 mH actual:__________________ (1) 50 Ω actual:__________________ (1) 1.0 kΩ actual:__________________ (1) 1.5 kΩ actual:__________________ (1) 2.2 kΩ actual:__________________

Laboratory Manual for AC Electrical Circuits 56
Schematics
Figure 11.1 Figure 11.2
Figure 11.3
Procedure 1. For the circuit of figure 11.1, calculate the voltage across the 1 kΩ load using R1=1.5 kΩ, R2=2.2
kΩ, and C=.47 µF, with a 1 volt peak 1 kHz source. Record this value in Table 11.1. Also calculate the expected Thevenin voltage and Thevenin impedance. Record these values in Table 11.2.
2. Build the circuit of figure 11.1 using R1=1.5 kΩ, R2=2.2 kΩ, Rload=1 kΩ and C=.47 µF. Set the
generator to a 1 kHz sine wave at 1 Vpeak. Make sure that the Bandwidth Limit of the oscilloscope is engaged. This will reduce the signal noise and make for more accurate readings. Measure the load voltage and record in Table 11.1.
3. Remove the load and measure the unloaded output voltage. This is the experimental Thevenin
voltage. Record it in Table 11.2. 4. Replace the voltage source with a 50 Ω resistor to represent its internal impedance. Set the impedance
meter to 1 kHz and measure the resulting impedance at the open load terminals. This is the

Laboratory Manual for AC Electrical Circuits 57
experimental Thevenin impedance. Record these values in Table 11.2 and compare with the theoretical values.
5. Using the decade resistance box and capacitor, build the Thevenin equivalent circuit of figure 11.2
and apply the 1 kΩ load resistor. Measure the load voltage and record in Table 11.1. Compare with the values of the original (non-Thevenized) circuit and determine the deviation between the original and Thevenized circuits.
6. To verify that Thevenin’s Theorem also works with an inductive source and a complex load, repeat
steps 1 through 5 in like manner. Use figure 11.3 with R1=1.5 kΩ, R2=2.2 kΩ, L=10 mH, Rload=1 kΩ with Cload=.1 µF. Set the generator to a 10 kHz sine wave at 1 Vpeak. Record results in Tables 11.3 and 11.4.
Data Tables
Vload Theory
Vload Original
Vload Thevenin
% Deviation
Table 11.1
Theory Experimental % Deviation
EThevenin
ZThevenin
Table 11.2
Vload Theory
Vload Original
Vload Thevenin
% Deviation
Table 11.3

Laboratory Manual for AC Electrical Circuits 58
Theory Experimental % Deviation
EThevenin
ZThevenin
Table 11.4
Questions 1. How does the AC version of Thevenin’s Theorem compare with the DC version? 2. Would the Thevenin equivalent circuits be altered if the source frequency was changed? If so, why? 3. Based on the results of this exercise, would you expect Norton’s Theorem for AC to behave similarly
to its DC case?

Laboratory Manual for AC Electrical Circuits 59
12 AC Maximum Power Transfer Objective In this exercise, maximum power transfer to the load will be examined for the AC case. Both the load’s resistive and reactive components will be independently varied to discover their effect of load power and determine the values required for maximum load power.
Theory Overview In the DC case, maximum power transfer is achieved by setting the load resistance equal to the source’s internal resistance. This is not true for the AC case. Instead, the load should be set to complex conjugate of the source impedance, the complex conjugate having the same magnitude as the original but with the opposite sign for the angle. By using the complex conjugate, the load and source reactive components will cancel out leaving a purely resistive circuit similar to the DC case. When calculating the true load power, care must be taken to remember that the load voltage appears across a complex load impedance. Only the real portion of this voltage appears across the resistive component, and only the resistive component dissipates power. Equipment (1) AC Function Generator model:________________ srn:__________________ (1) Oscilloscope model:________________ srn:__________________ (1) Decade Resistance Box model:________________ srn:__________________ (1) Impedance Meter model:________________ srn:__________________
Components (1) 10 mH actual:__________________ (1) 1k Ω actual:__________________ (1) 50 Ω actual:__________________ (1) .1 µF actual:__________________ (1) 47 nF actual:__________________ (1) 33 nF actual:__________________ (1) 22 nF actual:__________________ (1) 10 nF actual:__________________ Assorted capacitors in the 1 nF region

Laboratory Manual for AC Electrical Circuits 60
Schematics
Figure 12.1
Procedure 1. Build the circuit of figure 12.1 using R=1 kΩ and L= 10 mH, but leaving off the load components.
Replace the generator with a 50 Ω resistor and determine the effective source impedance at 10 kHz using the impedance meter. Record this value in Table 12.1, including both magnitude and phase. Determine the load impedance which should achieve maximum power transfer according to the theorem and record in Table 12.1. Finally, determine values for Rload and Cload to achieve this load impedance and record in Table 12.1, also copying the resistance value to the first Rload entry of Table 12.2.
Testing Rload 2. Replace the 50 Ω resistor with the generator. Insert the decade resistance box in the position of Rload
and set it to the value calculated in Table 12.1. For Cload, use the value calculated in Table 12.1. Use multiple capacitors if necessary to achieve a close value. Set the generator to 10 volt peak at 10 kHz, making sure that the amplitude is measured on the oscilloscope with the generator loaded by the circuit. Make sure that the Bandwidth Limit of the oscilloscope is engaged for the channel. This will reduce the signal noise and make for more accurate readings.
3. Measure the magnitude of the load voltage and record in Table 12.2. Also compute the expected load
voltage from theory and the load power based on the measured load voltage and record in Table 12.2. Repeat these measurements and calculations for the remaining load resistance values in the table.

Laboratory Manual for AC Electrical Circuits 61
Testing Cload 4. Return the decade box to the value calculated in Table 12.1. For Cload, insert the first capacitor listed
in Table 12.3. Repeat step four for each load capacitance in Table 12.3, calculating and recording the required results using Table 12.3.
5. Generate a plot of Pload with respect to Rload and another of Pload with respect to Cload.
Data Tables
Zsource
Zload
Rload
Cload
Table 12.1
Variable Rload
Rload Vload Theory Vload Exp Pload Exp
100
400
600
800
1.2 k
1.8 k
3 k
10 k
Table 12.2

Laboratory Manual for AC Electrical Circuits 62
Variable Cload
Cload Vload Theory Vload Exp Pload Exp
1 nF
3.3 nF
10 nF
33 nF
47 nF
.1 µF
Table 12.3
Questions 1. In general, given a certain source impedance, what load impedance will achieve maximum load
power? 2. Will achieving maximum load power also achieve maximum efficiency? Explain. 3. If the experiment was repeated using a frequency of 5 kHz, how would the graphs change, if at all?

Laboratory Manual for AC Electrical Circuits 63
13 Series Resonance Objective This exercise investigates the voltage relationships in a series resonant circuit. Of primary importance are the establishment of the resonant frequency and the quality factor, or Q, of the circuit with relation to the values of the R, L, and C components.
Theory Overview A series resonant circuit consists of a resistor, a capacitor, and an inductor in a simple loop. At some frequency the capacitive and inductive reactances will be of the same magnitude, and as they are 180 degrees in opposition, they effectively nullify each other. This leaves the circuit purely resistive, the source “seeing” only the resistive element. Consequently, the current will be at a maximum at the resonant frequency. At any higher or lower frequency, a net reactance (the difference between XL and XC) must be added to the resistor value, producing a higher impedance and thus, a lower current. As this is a simple series loop, the resistor’s voltage will be proportional to the current. Consequently, the resistor voltage should be a maximum at the resonant frequency and decrease as the frequency is either increased or decreased. At resonance, the resistor value sets the maximal current and consequently has a major effect on the voltages developed across the capacitor and inductor as well as the “tightness” of the voltage versus frequency curve: The smaller the resistance, the tighter the curve and the higher the voltage seen across the capacitor and inductor. The Q of the circuit can be defined as the ratio of the resonant reactance to the circuit resistance, Q=X/R, which also corresponds to the ratio of the resonant frequency to the circuit bandwidth, Q=F0/BW.
Equipment (1) AC Function Generator model:________________ srn:__________________ (1) Oscilloscope model:________________ srn:__________________
Components (1) 10 nF actual:__________________ (1) 10 mH actual:__________________ (1) 47 Ω actual:__________________ (1) 470 Ω actual:__________________

Laboratory Manual for AC Electrical Circuits 64
Schematics
Figure 13.1
Procedure Low Q Circuit 1. Using Figure 13.1 with R=470Ω, L= 10 mH, and C=10 nF, determine the theoretical resonance
frequency and Q, and record the results in Table 13.1. Based on these values determine the upper and lower frequencies defining the bandwidth, f1 and f2, and record them in Table 13.1.
2. Build the circuit of Figure 13.1 using R=470Ω, L=10 mH and C=10 nF. Place a probe across the
resistor. Set the output of the generator to a 1 V p-p sine wave. Set the frequency to the theoretical resonance frequency of Table 13.1. Make sure that the Bandwidth Limit of the oscilloscope is engaged for both channels. This will reduce the signal noise and make for more accurate readings.
3. Adjust the frequency in small amounts, up and down, until the maximum voltage is found. This is the
experimental resonance frequency. Record it in Table 13.1. Note the amplitude (it should be approximately equal to the source voltage of 1 V p-p). Sweep the frequency above and below the resonance frequency until the experimental f1 and f2 are found. These will occur at a voltage amplitude of approximately .707 times the resonant voltage (i.e., the half-power points). Record these frequencies in Table 13.1. Also, determine and record the experimental Q based on the experimental f0, f1, and f2.
4. Transcribe the experimental frequencies of Table 13.1 to the top three entries of Table 13.2. For all of
the frequencies in Table 13.2, measure and record the voltage across the resistor. Also measure and record the inductor and capacitor voltages. Note that the inductor and capacitor will have to be swapped with the resistor position in order to maintain proper ground reference with the oscilloscope.
5. Based on the data from Table 13.2, plot VR, VC, and VL as a function of frequency. 6. Change R to 47Ω and repeat steps 1 through 5 but using Tables 13.3 and 13.4 for high Q.
Laboratory Manual for AC Electrical Circuits 65
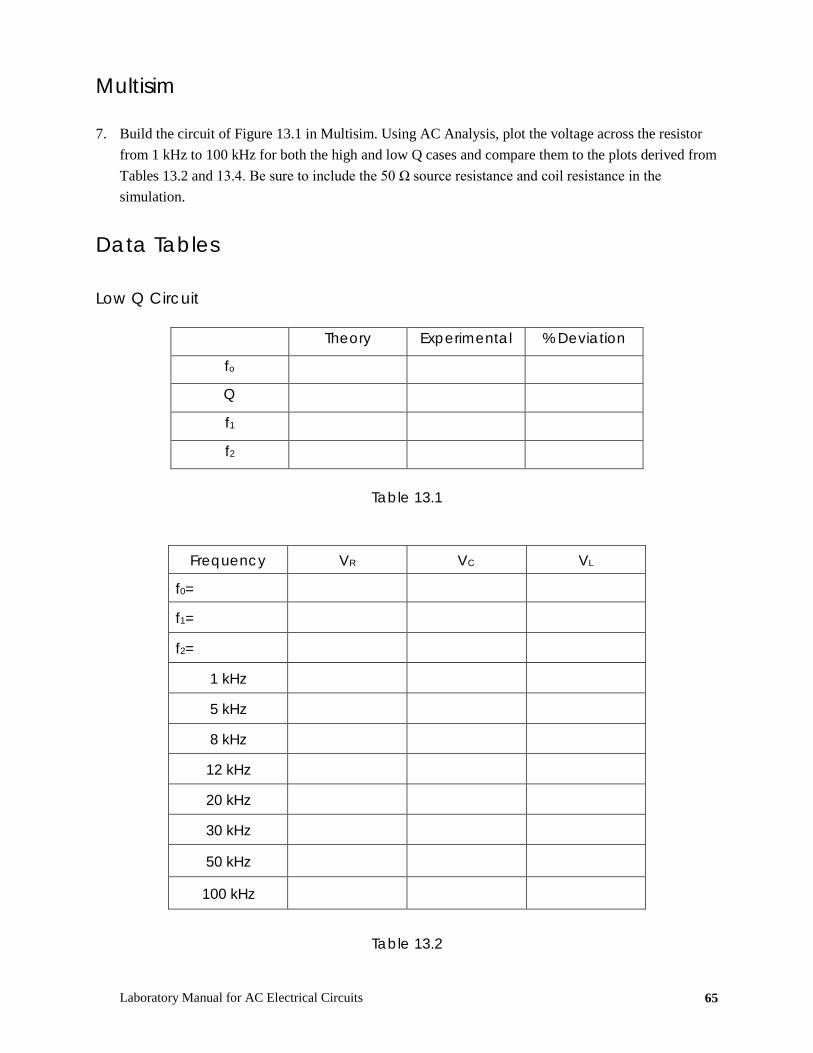
Multisim 7. Build the circuit of Figure 13.1 in Multisim. Using AC Analysis, plot the voltage across the resistor
from 1 kHz to 100 kHz for both the high and low Q cases and compare them to the plots derived from Tables 13.2 and 13.4. Be sure to include the 50 Ω source resistance and coil resistance in the simulation.
Data Tables Low Q Circuit
Theory Experimental % Deviation
fo
Q
f1
f2
Table 13.1
Frequency VR VC VL
f0=
f1=
f2=
1 kHz
5 kHz
8 kHz
12 kHz
20 kHz
30 kHz
50 kHz
100 kHz
Table 13.2

Laboratory Manual for AC Electrical Circuits 66
High Q Circuit
Theory Experimental % Deviation
fo
Q
f1
f2
Table 13.3
Frequency VR VC VL
f0=
f1=
f2=
1 kHz
5 kHz
8 kHz
12 kHz
20 kHz
30 kHz
50 kHz
100 kHz
Table 13.4
Questions 1. What is the effect of changing resistance on Q? 2. Are the VC and VL curves the same as the VR curves? If not, why? 3. In practical terms, what sets the limit on how high Q may be?

Laboratory Manual for AC Electrical Circuits 67
14 Parallel Resonance Objective This exercise investigates the voltage relationships in a parallel resonant circuit. Of primary importance are the establishment of the resonant frequency and the quality factor, or Q, of the circuit with relation to the values of the R, L, and C components.
Theory Overview A parallel resonant circuit consists of a resistor, a capacitor, and an inductor in parallel, typically driven by a current source. At some frequency the capacitive and inductive reactances will be of the same magnitude, and as they are 180 degrees in opposition, they effectively nullify each other. This leaves the circuit purely resistive, the source “seeing” only the resistive element. At any lower or higher frequency the inductive or capacitive reactance will shunt the resistance. The result is a maximum impedance magnitude at resonance, and thus, a maximum voltage. Any resistance value in series (such as the inductor’s coil resistance) should be transformed into a parallel resistance in order to gauge its effect on the system voltage. The combined parallel resistance sets the Q of the circuit and can be defined as the ratio of the combined resistance to the resonant reactance, Q=R/X, which also corresponds to the ratio of the resonant frequency to the circuit bandwidth, Q=f0/BW.
Equipment (1) AC Function Generator model:________________ srn:__________________ (1) Oscilloscope model:________________ srn:__________________
Components (1) 10 nF actual:__________________ (1) 10 mH actual:__________________ (1) 2.2 kΩ actual:__________________ (1) 10 kΩ actual:__________________ (1) 100 kΩ actual:__________________

Laboratory Manual for AC Electrical Circuits 68
Schematics
Figure 14.1
Procedure
1. Using Figure 14.1 with Rs=100 kΩ, Rp=2.2 kΩ, L=10 mH, Rcoil=7Ω and C=10 nF, determine the theoretical resonance frequency and Q, and record the results in Table 14.1. Based on these values determine the upper and lower frequencies defining the bandwidth, f1 and f2, and record them in Table 14.1 also.
2. Build the circuit of Figure 14.1 using Rs=100 kΩ, Rp=2.2 kΩ, L=10 mH and C=10 nF. Set the output
of the generator to a 10 V p-p sine wave at the theoretical resonant frequency. The large value of Rs associated with the voltage source will make it appear as a current source of approximately .1 mA p-p, assuming the parallel branch impedance is much less than Rs. Place a probe across the parallel branch. Set the frequency to the theoretical resonance frequency of Table 14.1. Make sure that the Bandwidth Limit of the oscilloscope is engaged for both channels. This will reduce the signal noise and make for more accurate readings.
3. Adjust the frequency in small amounts, up and down, until the maximum voltage is found. This is the
experimental resonant frequency. Record it in Table 14.1. Note the amplitude. Sweep the frequency above and below the resonance frequency until the experimental f1 and f2 are found. These will occur at a voltage amplitude of approximately .707 times the resonant voltage (i.e., the half-power points). Record these frequencies in Table 14.1. Also, determine and record the experimental Q based on the experimental f0, f1, and f2.
4. Transcribe the experimental frequencies of Table 14.1 to the top three entries of Table 14.2. For all of
the frequencies in Table 14.2, measure and record the voltage across the parallel branch. 5. Based on the data from Table 14.2, plot the parallel branch voltage as a function of frequency. 6. Change R to 10 kΩ and repeat steps 1 through 5 but using Tables 14.3 and 14.4.

Laboratory Manual for AC Electrical Circuits 69
Data Tables Low Q Circuit
Theory Experimental % Deviation
f0
Q
f1
f2
Table 14.1
Frequency VParallel
f0=
f1=
f2=
1 kHz
5 kHz
8 kHz
12 kHz
20 kHz
30 kHz
50 kHz
100 kHz
Table 14.2

Laboratory Manual for AC Electrical Circuits 70
High Q Circuit
Theory Experimental % Deviation
f0
Q
f1
f2
Table 14.3
Frequency VParallel
f0=
f1=
f2=
1 kHz
5 kHz
8 kHz
12 kHz
20 kHz
30 kHz
50 kHz
100 kHz
Table 14.4
Questions 1. What is the effect of changing resistance on Q? 2. Are f1 and f2 spaced symmetrically around f0? 3. In practical terms, what sets the limit on how high Q may be?

Laboratory Manual for AC Electrical Circuits 71
15 A Loudspeaker Impedance Model Objective This exercise investigates the impedance magnitude and phase of typical dynamic moving voice coil loudspeakers. The impedance is dominated by the voice coil resistance at DC, by the mechanical resonant system which produces a parallel resonant equivalent in the bass region, and finally by the voice coil inductance at the highest frequencies.
Theory Overview Loudspeakers are typically specified with a nominal impedance of four or eight ohms, although other values are possible. The actual impedance of a typical loudspeaker can vary widely from this rating. This exercise examines the impedance of two different permanent magnet-voice coil type transducers with respect to frequency. Both amplitude and phase are important to consider. Devices of this type normally exhibit a resonant peak in the bass end and a gradual rise in magnitude as frequency increases. The phase angle is at times capacitive, inductive, and also resistive. Typical loudspeaker impedance is not nearly as consistent as simple resistors. The resulting complex impedance can present a much more challenging load for an audio amplifier than a simple ideal eight ohm resistance.
Equipment (1) AC Function Generator model:________________ srn:__________________ (1) Oscilloscope model:________________ srn:__________________ (1) DMM model:________________ srn:__________________
Components (1) 1 kΩ actual:__________________ (1) 6” or larger woofer (1) 4” general purpose loudspeaker

Laboratory Manual for AC Electrical Circuits 72
Schematic
Figure 15.1
Procedure
1. Figure 15.1 shows a typical model of a dynamic moving voice coil loudspeaker mounted on an infinite baffle1. Rvc and Lvc represent the resistance and inductance of the of the voice coil. Lces represents the driver compliance (i.e., springiness of suspension and air), Cmes represents the driver’s mass, and Res represents the frictional losses of the suspension. At DC, the impedance will equal Rvc. At high frequencies Lvc will dominate the response. The parallel resonant portion will create an impedance peak in the bass. This is normally referred to as the free air resonance of the driver, or fs.
2. Using the woofer, measure the DC resistance using the DMM and record the value in Table 15.1. 3. In order to measure both the magnitude and phase of the impedance across frequency, it is desirable
to drive the loudspeaker with a fixed current source. By measuring the voltage across the loudspeaker with an oscilloscope, both amplitude and time delay can be measured, and thus both magnitude and phase of impedance can be calculated. A current source may be approximated by placing a large resistor in series with the function generator. If the resistance value is many times greater than the loudspeaker impedance, the loudspeaker may be ignored to a first approximation. Therefore, virtually all of the generator voltage drops across the series resistor. For this exercise, a 1 k Ohm value will suffice. For all measurements, simply place a 1 k Ohm resistor in series with the generator and the loudspeaker under test. Place oscilloscope probes at both ends of the resistor (i.e., input signal and loudspeaker signal). Make sure that the Bandwidth Limit of the oscilloscope is engaged for both channels. This will reduce the signal noise and make for more accurate readings.
4. Hook up the woofer between the resistor and ground. Make sure that the woofer is magnet-side down,
with the cone facing up, and unobstructed. 1 Adapted from R.H.Small, Direct-Radiator Loudspeaker System Analysis, Journal of the Audio Engineering Society, June 1972

Laboratory Manual for AC Electrical Circuits 73
5. First, find the resonant frequency. To do this, set the output of the generator to approximately 100 Hz, sine wave, and 10 volts peak. Adjust the frequency in small amounts, up and down, until the maximum voltage is found. This is the experimental free air resonant frequency. Record it in Table 15.1. Note the amplitude. Sweep the frequency above and below the resonant frequency until the experimental f1 and f2 are found. These will occur at a voltage amplitude of approximately .707 times the resonant voltage (i.e., the half-power points). Record these frequencies in Table 15.2. Copy the three frequencies to the first three entries of Table 15.3.
6. For the frequencies in Table 15.3 determine the amplitude and time delay at the loudspeaker and
compute the phase shift. Be sure to include whether the loudspeaker signal is leading (+) or lagging (-) the source.
7. Swap the woofer with the general purpose loudspeaker and repeat steps 2 through 6 using Tables 15.4
through 15.6. Plot the magnitude and phase of each device on semi-log paper. Also, try to estimate values for the schematic model of Figure 15.1.
Data Tables
Rvc
Table 15.1
Frequency Voltage
fs
f1
f2
Table 15.2

Laboratory Manual for AC Electrical Circuits 74
Frequency Amplitude Delay Time Phase Shift
fs=
f1=
f2=
20 Hz
25 Hz
30 Hz
40 Hz
50 Hz
60 Hz
75 Hz
100 Hz
200 Hz
500 Hz
1 kHz
Table 15.3
Rvc
Table 15.4

Laboratory Manual for AC Electrical Circuits 75
Frequency Voltage
fs
f1
f2
Table 15.5
Frequency Amplitude Delay Time Phase Shift
fs=
80 Hz
120 Hz
150 Hz
170 Hz
200 Hz
500 Hz
1 kHz
3 kHz
Table 15.6
Questions 1. Is the resulting impedance always resistive? 2. Is the resulting impedance always inductive? 3. How do the two curves compare?