lad weather sensor master ii lad020 instruction manuallad-weather.com/manuals/lad20im-en.pdftrue...
TRANSCRIPT

I n s t r u c t i o n M a n u a l
lad-weather.com
L A D W E AT H E R o f f i c i a l s i t e
2 3
I n d e x
3
4
5
6
7
8
9
10
11
12
13
14
15
16
17
18
19
20
21
22
23
24
25
26
27
Basic operations
Modes introduction
Modes introduction
Current time mode (TIME) : General guide
Current time mode (TIME) : General guide
Current tiem mode (TIME) : Set up
Compass mode (COMP) : General guide
Compass mode (COMP) : Direction and Bearing
Compass mode (COMP) : Declination
Compass mode (COMP) : Calibration
Barometer mode (BARO) : General guide
Barometer mode (BARO) : Set up
Altimeter mode (ALTI) : General guide
Altimeter mode (ALTI) : Set up
Altimeter data mode (ALTI DATA) : General guide
Chronograph mode (CHRO) : General guide
Chronograph mode (CHRO) : Lap time
Chronograph data mode (CHRO DATA) : General guide
Alarm mode (ALRM) : General guide
Alarm mode (ALRM) : Set up
Timer mode (TIMER) : General guide
Timer mode (TIMER) : Set up
Pedometer mode (PEDO) : General guide
Pedometer mode (PEDO) : Set up
Battery replacement and other maintenance
A - 1
A - 2
A - 3
B - 1
B - 2
B - 3
C - 1
C - 2
C - 3
C - 4
D - 1
D - 2
E - 1
E - 2
F - 1
G - 1
G - 2
H - 1
I - 1
I - 2
J - 1
J - 2
K - 1
K - 2
L - 1
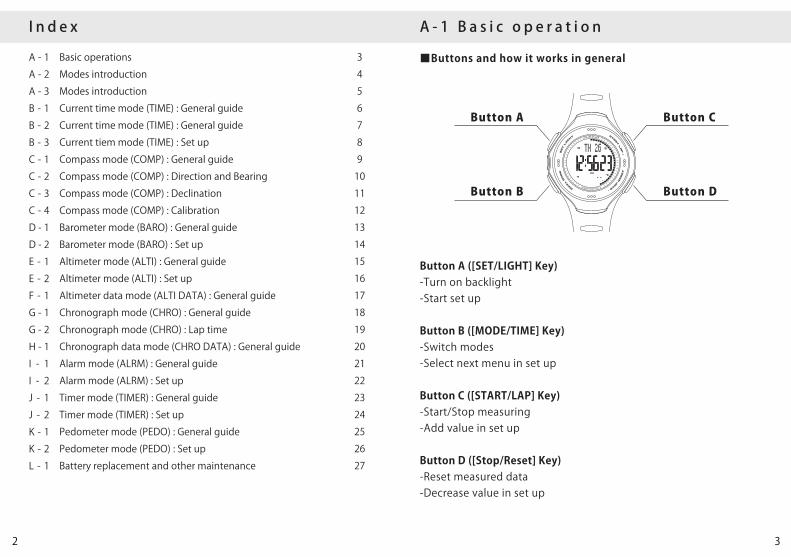
A - 1 B a s i c o p e r a t i o n
■Buttons and how it works in general
Button A ([SET/LIGHT] Key)-Turn on backlight-Start set up
Button B ([MODE/TIME] Key)-Switch modes-Select next menu in set up
Button C ([START/LAP] Key)-Start/Stop measuring-Add value in set up
Button D ([Stop/Reset] Key)-Reset measured data-Decrease value in set up
Button A
Button B
Button C
Button DSENSOR MASTER Ⅱ
LAD WEATHER
SET L
IG
HT
- ST
OP R
ES
ET
STA
RT L
AP
+

4 5
A - 2 M o d e s i n t r o d u c t i o n
■Introduction of 10 Modes and How to switchThis watch has 10 modes.Each time you press button B, mode switches in order of below.
Current time mode (Page 6-)[TIME] appears on the screen.Current time, calendar, weather forecast and temperature are shown.
Compass mode (Page 9-)[COMP] appears on the screen.Compass related information is shown.
Barometer mode (Page 13-)[BARO] appears on the screen.Current barometric pressure and history of 30 hours are shown.
Altimeter mode (Page 15-)[ALTI] appears on the screen.Current altitude and history of 8 hours are shown.
Altimeter data mode (Page 17)[ALTI DATA] appears on the screen.Maximum altitude and accumulated altitude are shown.
Chronograph mode (Page 18-)[CHRO] appears on the screen.You can use Chronograph with accuracy of 1/100 seconds.
Chronograph data mode (Page 20)[CHRO DATA] appears on the screen.You can check data of chronograph.
A - 3 M o d e s i n t r o d u c t i o n
Alarm mode (Page 21-)[ALRM] appears on the screen.You can use alarm.
Timer mode (Page 23-)[TIMER] appears on the screen.You can use timer.
Pedometer mode (Page 25-)[PEDO] appears on the screen.You can measure steps, calories, speed and distance.
Current time mode Compass mode Barometer mode Altimeter mode
Chronograph modeChronograph datamode
Alarm modeTimer mode
Altimeter datamode
Pedometer mode
*Hold button B to go back to current time mode directly.
B
D
BB B
B
B
BBB
B
B B
C

6 7
B - 1 Current time mode (TIME): General guide
Temperature
■Dual timeHold button C in current time mode, to start dual time mode.T2 appears at upper left on the screen to indicate time zone 2 is displayed.Hold button C again, to go back to time zone 1.
■Lock current time modePress button D while holding button C, to lock current time mode.Icon [ ] indicates to be locked.
Time zone 2 indicator
Lock icon appears here.
While locked, any key cannot switch mode from current time mode.Press button D while holding button C again, to unlock this.
■Information on the screen
Calendar, Weather forcast
Current time
B - 2 Current time mode (TIME): General guide
*Icon does not show current weather.*This forecast is based on current barometric pressure and its history. If you move a lot in short term, forecast will not be much accurate.*This forecast cannot correspond dramatical change in short term.
■Weather forecastIn current time mode, one of 4 icons shows weather forecast.
Weather forecast iconSunny Sunny with cloud Cloudy Rainy
■Shortcut keys for Compass and BarometerPress button C in current time mode, to choose Compass mode (Page 9).Press button D in current time mode, to choose Barometer mode (Page 13).If you switch mode in this way, you can go back to current time mode by pressing button B once.
Comapss mode
Barometer mode
Current time mode
B
C
B
D

8 9
B - 3 C u r r e n t t im e mod e ( T IM E ) : S e t u p
■How to Set upTo start set up, hold button A in current time mode.Screen shows 'ADJUST HOLd' at first, and then goes to set up.Press button C to add value, and button D to decrease.By holding either button can change value quickly.Each time you press button B, you can switch to the next menu.
Press button A to save and finish set up immediately.
*Press either button C or D to switch Time zone, 24-Hour/12-Hour, and Unit for altitude.MR stands for meter, and FT stands for feet.*Press either button C or D to reset second to 00. (You only can set second to 00.)*If you don't press any button for more than 30 seconds, it automatically goes back to current time mode.
Time Zone Hour Minute Second
Year Month Day 24-Hour/12-Hour
Unit for altitude Set up finished
C - 1 Compass mode (COMP): General Guide
■IdleIf you leave it on compass mode for more than 1 minute, this watch starts idling.While idling, Direction or Azimuth will not be shown.Press either button C or D to recover to compass mode.
■Direction and AzimuthScreen shows Direction and Azimuth on compass mode.Azimuth here means the angle formed between North and the direction this watch is heading.Please refer to the next page for more information.
■Information on the screen
North indicator
Idle
Cautions about Compass-As ordinary azimuth magnet, this watch shows magnetic north, which is slightly different from real north. Please refer to the page 11 to calibrate this difference.
-To maintain compass accuracy, please set up compass time to time. (Please refer to page 12 regarding compass set up.)
-To maintain compass accuracy, please do not use this watch under such conditions below:1. Near some Magnetic products, metal products, or Electric appliances2. In some vehicle, or ferro-concrete buildings
-When you put off this watch, please do not leave it near magnets or magnetic objects (such as Mobile phones, Speakers, or PCs).
Direction
Azimuth
Current time
10 11
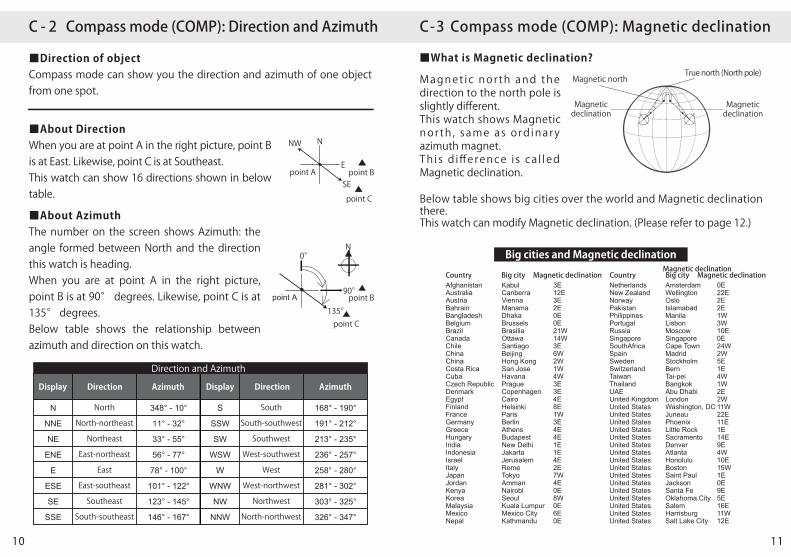
C - 2 Compass mode (COMP): Direction and Azimuth
■Direction of objectCompass mode can show you the direction and azimuth of one object from one spot.
point A
N
E
SE
NW
point B
point C
■About DirectionWhen you are at point A in the right picture, point B is at East. Likewise, point C is at Southeast.This watch can show 16 directions shown in below table.
■About AzimuthThe number on the screen shows Azimuth: the angle formed between North and the direction this watch is heading.When you are at point A in the right picture, point B is at 90° degrees. Likewise, point C is at 135° degrees.Below table shows the relationship between azimuth and direction on this watch.
90°
135°
0°
point C
point A point B
N
N
NE
E
SE
SSE
ESE
ENE
NNE
North
Northeast
East
Southeast
South-southeast
East-southeast
East-northeast
North-northeast 11° - 32°
33° - 55°
56° - 77°
78° - 100°
101° - 122°
123° - 145°
146° - 167°
348° - 10°
SSW
WNW
NNW
S
SW
W
NW
WSW
South-southwest
North-northwest
South
Southwest
Northwest
West-northwest
West-southwest
West
168° - 190°
191° - 212°
213° - 235°
236° - 257°
258° - 280°
281° - 302°
303° - 325°
326° - 347°
Display Direction Azimuth
Direction and Azimuth
Display Direction Azimuth
Magnet ic nor th and the direction to the north pole is slightly different.This watch shows Magnetic nor th , same as o rd inary azimuth magnet.Th i s d ifference i s ca l led Magnetic declination.
C-3 Compass mode (COMP): Magnetic declination
Below table shows big cities over the world and Magnetic declination there.This watch can modify Magnetic declination. (Please refer to page 12.)
Big cities and Magnetic declination
Magnetic north
Magnetic declination
Magneticdeclination
True north (North pole)
Magneticdeclination
Italy
AfghanistanAustraliaAustriaBahrainBangladeshBelgiumBrazilCanadaChileChinaChinaCosta RicaCubaCzech RepublicDenmarkEgyptFinlandFranceGermanyGreeceHungaryIndiaIndonesiaIsrael
JapanJordanKenyaKoreaMalaysiaMexicoNepal
KabulCanberraViennaManamaDhakaBrusselsBrasiliaOttawaSantiagoBeijingHong KongSan JoseHavanaPragueCopenhagenCairoHelsinkiParisBerlinAthensBudapestNew DelhiJakartaJerusalemRomeTokyoAmmanNairoblSeoulKuala LumpurMexico CityKathmandu
3E12E3E2E0E0E21W14W3E6W2W1W4W3E3E4E8E1W3E4E4E1E1E4E2E7W4E0E8W0E6E0E
Country Big city Magnetic declinationNetherlandsNew ZealandNorwayPakistanPhilippinesPortugalRussiaSingaporeSouthAfricaSpainSwedenSwitzerlandTaiwanThailandUAEUnited KingdomUnited StatesUnited StatesUnited StatesUnited StatesUnited StatesUnited StatesUnited StatesUnited StatesUnited StatesUnited StatesUnited StatesUnited StatesUnited StatesUnited StatesUnited StatesUnited States
AmsterdamWellingtonOsloIslamabadManilaLisbonMoscowSingaporeCape TownMadridStockholmBernTai-peiBangkokAbu DhabiLondonWashington, DCJuneauPhoenixLittle RockSacramentoDenverAtlantaHonoluluBostonSaint PaulJacksonSanta FeOklahoma CitySalemHarrisburgSalt Lake City
0E22E2E2E1W3W10E0E24W2W5E1E4W1W2E2W11W22E11E1E14E9E4W10E15W1E0E9E5E16E11W12E
■What is Magnetic declination?
Country Big city Magnetic declination

1312
C-4 Compass mode (COMP): Set up
■When to set upYou may need to set up compass at such situations.-After changing battery-After you travel far away from last set up-When you doubt compass is working properly*If you don't set up compass for a long time, compass may be inaccurate.
■How to set upTo start set up, hold button C in compass mode.Screen shows 'CAL HOLd' at first, and then goes to set up.While screen shows 'CAL' and pointer turns around, keep the watch straight to the ground and turn it clockwise.After the pointer turns around once, set up of Magnetic declination starts automatically.For example in Washington DC, U.S. please set to 11W.Press button B to save and finish set up.
Set up finish Magnetic declination Keep horizontary and
turn clockwise
Compass mode Starting set up Set up
marker
B
C
■Information on the screen
■History of barometerThis watch can record barometric pressure of past 30 hours, and show it as a chart.You can check the tendency of barometric pressure with it.
D - 1 Barometer mode (BARO): General guide
Now30 hours ago
Barometric pressure
Pressure is going up.
Pressure is getting down.
Barometer chart
Current pressure
Current time

14 15
D - 2 B a r om e t e r m o d e ( B A R O ) : S e t u p
■How to set up barometerTo start set up, hold button A in barometer mode.Screen shows 'ADJUST HOLd' at first, and then goes to set up.Press button C to add value, and button D to decrease.By holding either button can change value quickly.Each time you press button B, you can switch to the next menu.
Weather icon Pressure at sea-level
Press button B at the last menu to save and finish set up.*Weather icon changes each time you press either button C or D. (Please refer to page 7 to see weather icons.)*Please set up barometer carefully. This function affects other functions of this watch.
E - 1 A l t imeter mode (ALTI ) : Genera l gu ide
■Information on the screen
■Altitude historyThis watch can record altitude of past 8 hours, and show it as a chart.
■How to save altitude dataHold button C in altimeter mode to save data.Screen shows 'STORE DATA' at first, and then records current altitude and time.Recorded data is stored on Altimeter data mode. (Please refer to page 17.)
Altitude data recording Record completed
Now8 hours ago
Altitude
*If 'FULL DATA' is displayed when holding button C, 10 altitude data is already recorded.Please delete altitude data to save another data.(Please refer to page 17.)
Altimeter chart
Current altitude
Current time

16 17
E - 2 A l t i m e t e r m o d e ( A L T I ) : S e t u p
■How to set up altimeterTo start set up, hold button A in barometer mode.Screen shows 'CAL HOLd' at first, and then goes to set up.Press button C to add value, and button D to decrease.By holding either button can change value quickly.Press button B to save and finish set up.
Setting up altimeter
*Please set up altimeter carefully. This function affects other functions of this watch.
F-1 Altimeter data mode (ALTI DATA): General guide
■Information on the screen
■Data you can seeSummary shows Maximum altitude (MAX) and Accumulated altitude (ACC).Each data (DATA 01-10) shows the altitude and time at the moment of recorded.
■Switching dataEach time you press either button C or D, screen shows the data in below order.
Data 01 Data 02
Data 03Data 04Data 10
Summary
■Delete altitude dataChoose the data you want to delete, and then hold button A to delete it.Screen shows 'CLEAR DATA' at first, and then deletes.
M a x i m um a l t i t u d e / Accumulated a l t i tude / T ime s t amp (Hour and Minute)
Time stamp (Date)
D
C
D
C
D
C
D
C
CD CD

18 19
G-1 Chronograph mode (CHRO): General guide
■Information on the screen
■Chronograph modeThis mode works as stopwatch.Before start to measure, '00:00,00' appears in the middle.
■How to usePress button C to start chronograph.Press button D to stop.Press button C to resume chronograph again.When it is stopped, press button D to reset it.
Lap time
Total time
Lap number
■How to save chronograph dataHold button A while chronograph is stopped, to save data.Screen shows 'NEXT HOLd' at first, and then records chronograph data.Recorded data is stored on Chronograph data mode. (Please refer to page 20.)
If 'FULL DATA' is displayed when holding button A, 5 chronograph data is already recorded.Please delete chronograph data to save another data.(Please refer to page 20.)*To check split time in detail, you need to save chronograph data.
5 data is alreadyrecorded.
G-2 Chronograph mode (CHRO): Split time
■How to use lap timeLap time helps you to split the measured time at a certain length.This watch can take up to 10 lap times.While chronograph is working, press button C to record lap time.
Lap number and time will appear for 3 seconds, and then it automatically goes back to main time.Press button D to stop chronograph, as in page 18.
LAP 01

20 21
H-1 Chronograph data mode (CHRO DATA): General guide
■Information on the screen
■Switching dataEach time you press button C, Lap number goes forward.Each time you press button D, Run number goes forward.
■Delete chronograph dataChoose the data you want to delete, and then hold button A to delete it.Screen shows 'CLEAR DATA' at first, and then deletes.
RUN 05
LAP 01 Best time Average timeRUN 01
Best time Average timeLAP 02RUN 02
Lap number
Lap time
Total time
C C C
C C C
D
D
I - 1 A l a rm mode ( A LRM ) : G ene r a l g u i d e
■Information on the screen
■Alarm modeYou can set 2 alarms (AL-1, AL-2).AL-1 and AL-2 works individually.
■How to usePress button D to switch AL-1/AL-2.
AL-1 AL-2
Press button C to switch ON/OFF.Icon [ ] shows alarm is ON.
Alarm indicator
Alarm time
ON/OFF

22 23
I - 2 A l a r m m o d e ( A L RM ) : S e t u p
■How to set up alarmChoose either AL-1/AL-2, and hold button A.Screen shows 'ADJUST HOLd' at first, and then start set up.Press button C to add value, and button D to decrease.By holding either button can change value quickly.Each time you press button B, you can switch to the next menu.
Press button A to save and finish set up.
*Time zone here (TIME-1/TIME-2) correspond to the Time zone in Current time mode.*Either button C or D turn ON/OFF Chime and Beep sound.Indicator [ ] shows Chime and Beep sound is ON.*After set up either alarm, that alarm will be automatically ON.*If you don't press any button for more than 30 seconds, it automatically goes back to alarm mode
Hour Minute Time zone ON/OFF Chime andBeep sound
J - 1 T ime r mode ( T IMER ) : Gene r a l gu ide
■Information on the screen
■Timer mode In timer mode, this watch counts down the time you set.You can set up to 99:59,59.Every time you set up timer, that time will be recorded for your next use.
■How to use*Please refer to page 24 to see how to set up.Press button C to start timer.Press button C again to stop timer.Press button D while timer is stopped, to reset timer (It will reset to the last setting).When timer reaches 0, alarm will sound.Any button will stop this sound.This timer counts up, after timer reaches 0.Press button C to stop this count up.Press button D while count up is stopped, to reset timer.
Total time
Timer
Current time
24 25
J - 2 T i m e r m o d e ( T I M E R ) : S e t u p
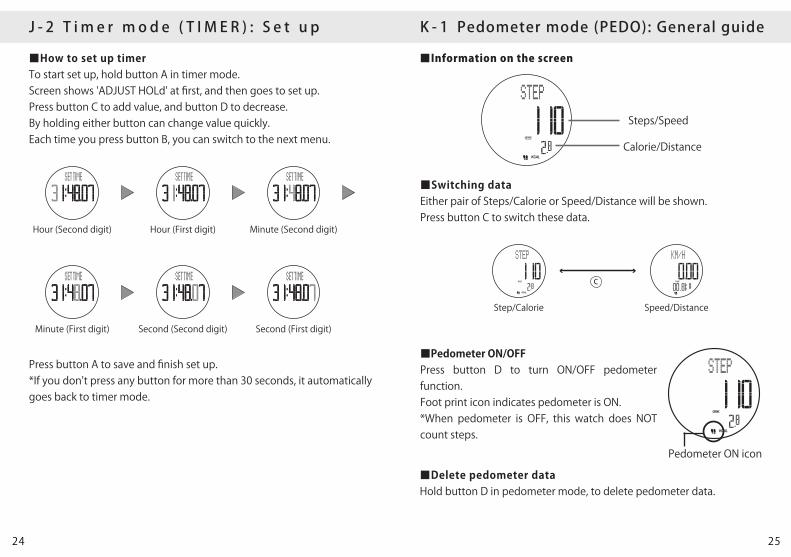
■How to set up timerTo start set up, hold button A in timer mode.Screen shows 'ADJUST HOLd' at first, and then goes to set up.Press button C to add value, and button D to decrease.By holding either button can change value quickly.Each time you press button B, you can switch to the next menu.
Minute (First digit) Second (Second digit) Second (First digit)
Press button A to save and finish set up.*If you don't press any button for more than 30 seconds, it automatically goes back to timer mode.
Hour (Second digit) Hour (First digit) Minute (Second digit)
K - 1 Pedometer mode (PEDO): General guide
■Information on the screen
KCAL
■Switching dataEither pair of Steps/Calorie or Speed/Distance will be shown.Press button C to switch these data.
KCAL
Step/Calorie Speed/Distance
■Pedometer ON/OFF Press button D to turn ON/OFF pedometer function.Foot print icon indicates pedometer is ON.*When pedometer is OFF, this watch does NOT count steps. KCAL
Pedometer ON icon
■Delete pedometer dataHold button D in pedometer mode, to delete pedometer data.
Steps/Speed
Calorie/Distance
C

26 27
K - 2 P e d om e t e r m o d e ( P E D O ) : S e t u p
■How to set up pedometerTo start set up, hold button A in pedometer mode.Screen shows 'ADJUST HOLd' at first, and then goes to set up.Press button C to add value, and button D to decrease.By holding either button can change value quickly.Each time you press button B, you can switch to the next menu.
Press button A to save and finish set up.*If you don't press any button for more than 30 seconds, it automatically goes back to pedometer mode.
Height Weight Gender Age
Stride(Length of one step)
Target steps
■How to know the length of your stepPlease count how many steps you need to walk certain distance.Example: 10 steps to walk 6.24 meters = Your stride is 62 cm.To get data more accurate, you may need to set it more accurate.
L - 1 M a i n t e n a n c e
■Battery and its replacement
■Remarks about maintenance-Do not disassemble this watch.-Do not give too much shock on this watch.-Do not drop this watch to the ground or floor.-Do not put chemical liquid on this watch, such as gasoline, acetone or alcohol.-Keep this watch away from being wet, or under much humid.-Do not leave this watch with dead battery. It may cause battery leak or other damage to this watch. Please have the battery replace immediately.-If you don't use it for a long time, please put the battery off from this watch.-The battery taken out from this watch must be kept away from little child/baby. In case he/she swallows the battery, please consult a doctor immediately.-Do not use this watch under much magnetic field or much electricity.-Do not put this watch into water. If it gets wet, wipe out immediately with clean and dry cloth.
-Battery icon [ ] shows the remains of the battery.-Please ask watch/clock shop around you, to replace the battery. This watch uses sensor which is easily damaged. Please do not open this watch and replace the battery by yourself.If you do it by yourself and watch is damaged, we don't offer any warranty.