lathe stand - wilkerdos.com
TRANSCRIPT
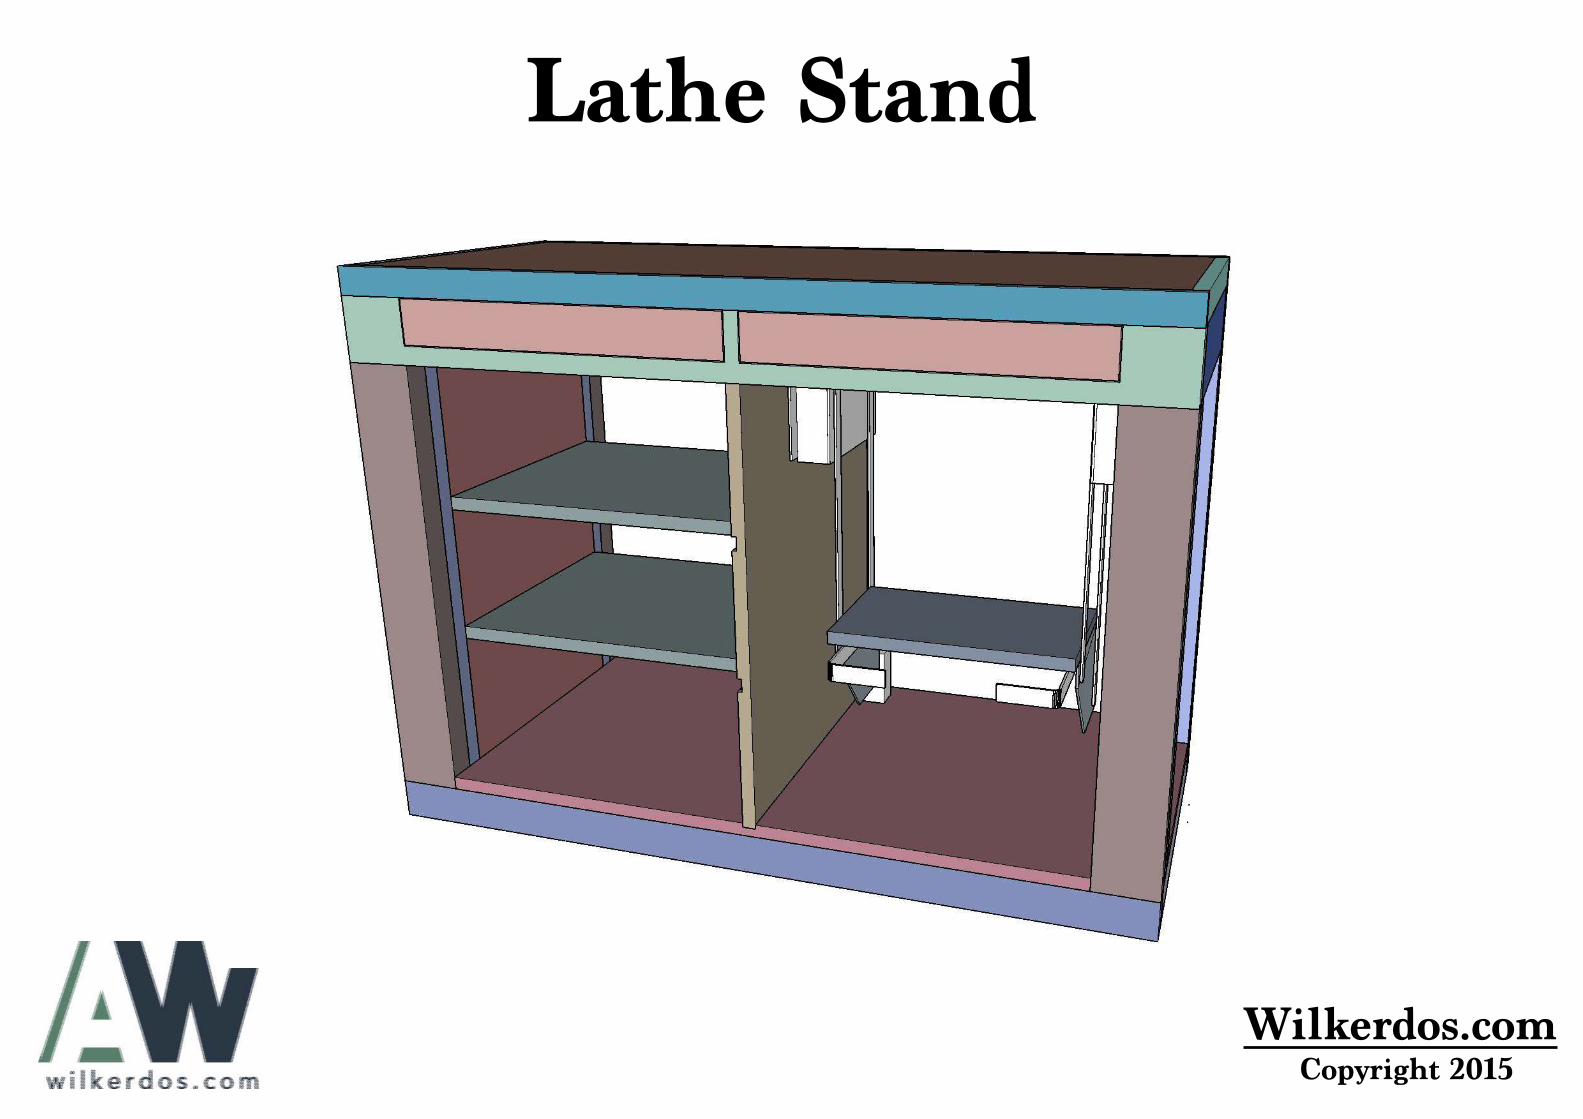
Lathe Stand
Wilkerdos.com Copyright 2015
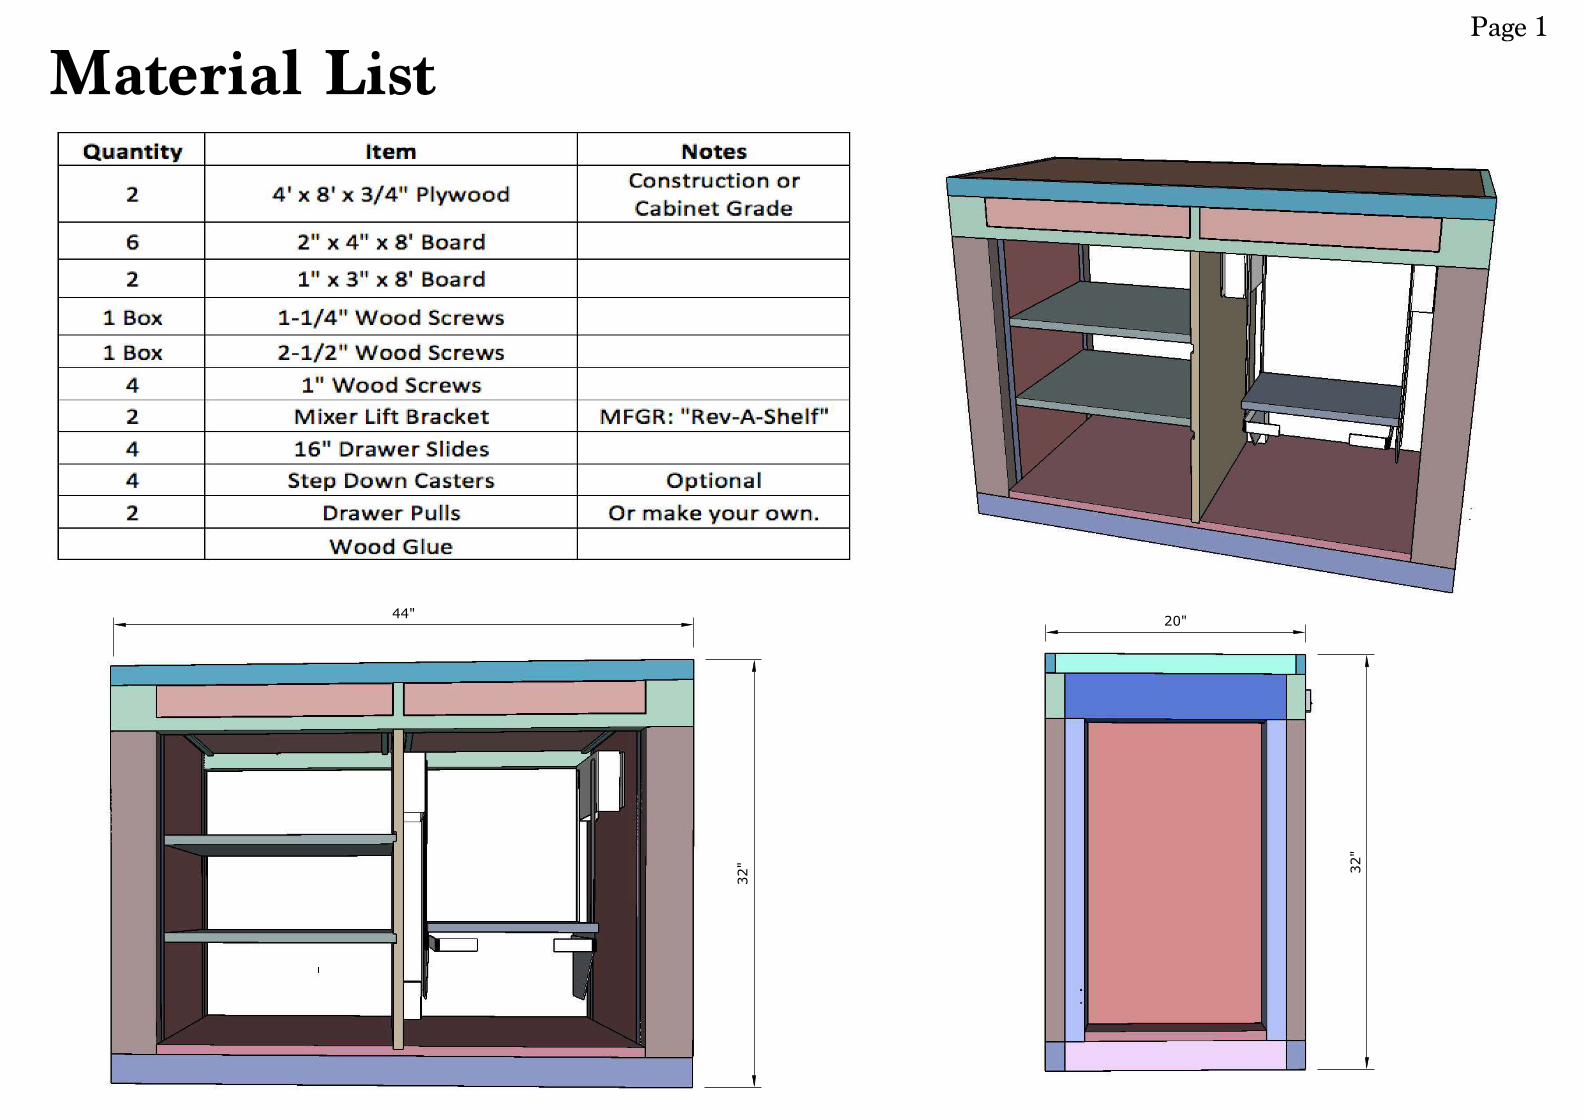
Page 1 Material List
32"
44" 20"
32"
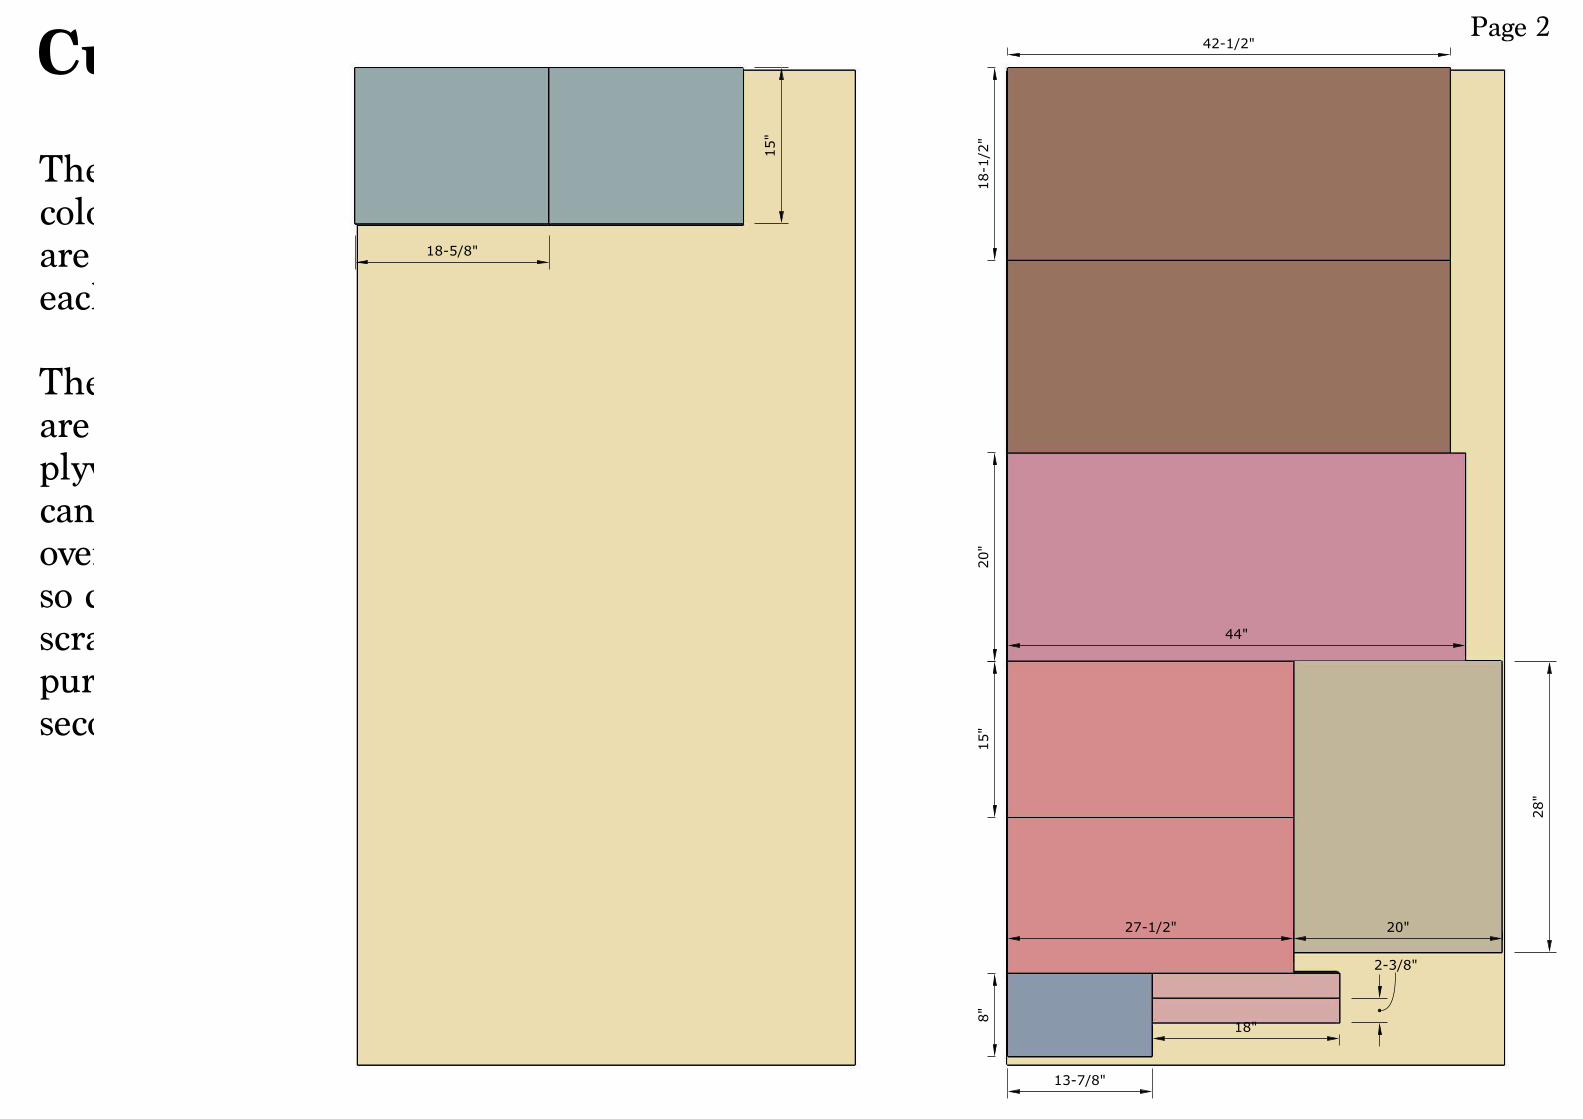
Cut List
The pieces colored the same are identical to each other.
These two sheets are the 3/4” plywood. As you can see it take just over 1 full sheet so check your scrap bins before purchasing the second sheet.
18-5/8"
15"
42-1/2"
18-1/2"
20"
15"
8"
13-7/8"
27-1/2" 20"
28"
44"
18"
2-3/8"
Page 2

Cut List
The pieces colored the same are identical to each other.
I made my trim from 1x select pine however you could use 2x4s instead. 1/2” Plywood
1/4” Plywood2x4s1xs
44"
18-1/2"
1-1/2"
1-1/2"
44"
24-3/4"
17"
30-1/2"
44"
17"
2-1/4" 2-1/4"
16-3/16"
17-1/4"
2-1/4"
2-1/4"
17"
16-11/16"
Page 3

Page 4
Make the Legs
Cut the 4 legs. There are 2 matching sets of legs that have a rabbet cut in on the inside corner, this will accept the side boards later on. Do not make all four identical! Two are identical then the other two are a mirror image of it. All the other dimensions are the same.
The rabbet can be cut with a dado stack at a table saw, multiple passes with a single blade, or with a router.
The rabbit measures 1/2” wide by 3/4” deep.
30-1/2"
3-1/2"
1-1/2"
1/2"
3/4"
1-1/2”
Qty: 2Qty: 2
End View End View
3-1/2"
30-1/2"
1-1/2"
1-1/2”
1/2"
3-1/2”3/4"
3-1/2”
2-1/4"
2-1/4"
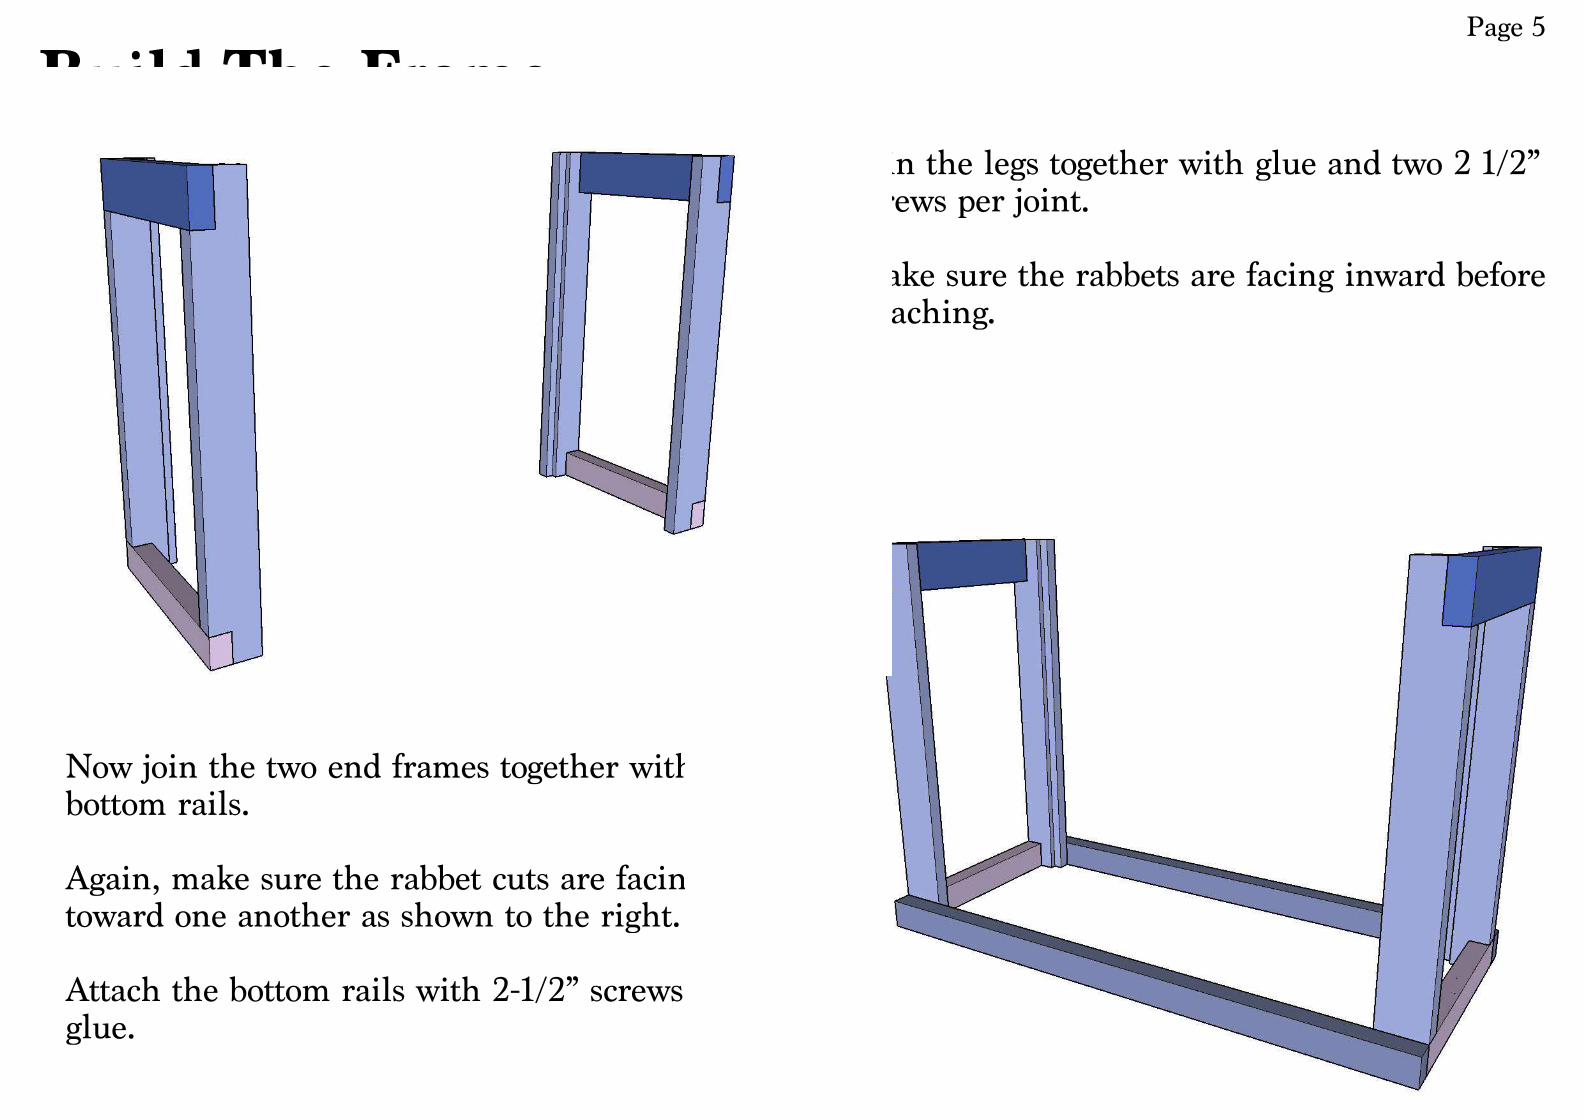
Build The FramePage 5
Join the legs together with glue and two 2 1/2” screws per joint.
Make sure the rabbets are facing inward before attaching.
Now join the two end frames together with the bottom rails.
Again, make sure the rabbet cuts are facing in toward one another as shown to the right.
Attach the bottom rails with 2-1/2” screws and wood glue.
Build the FramePage 6
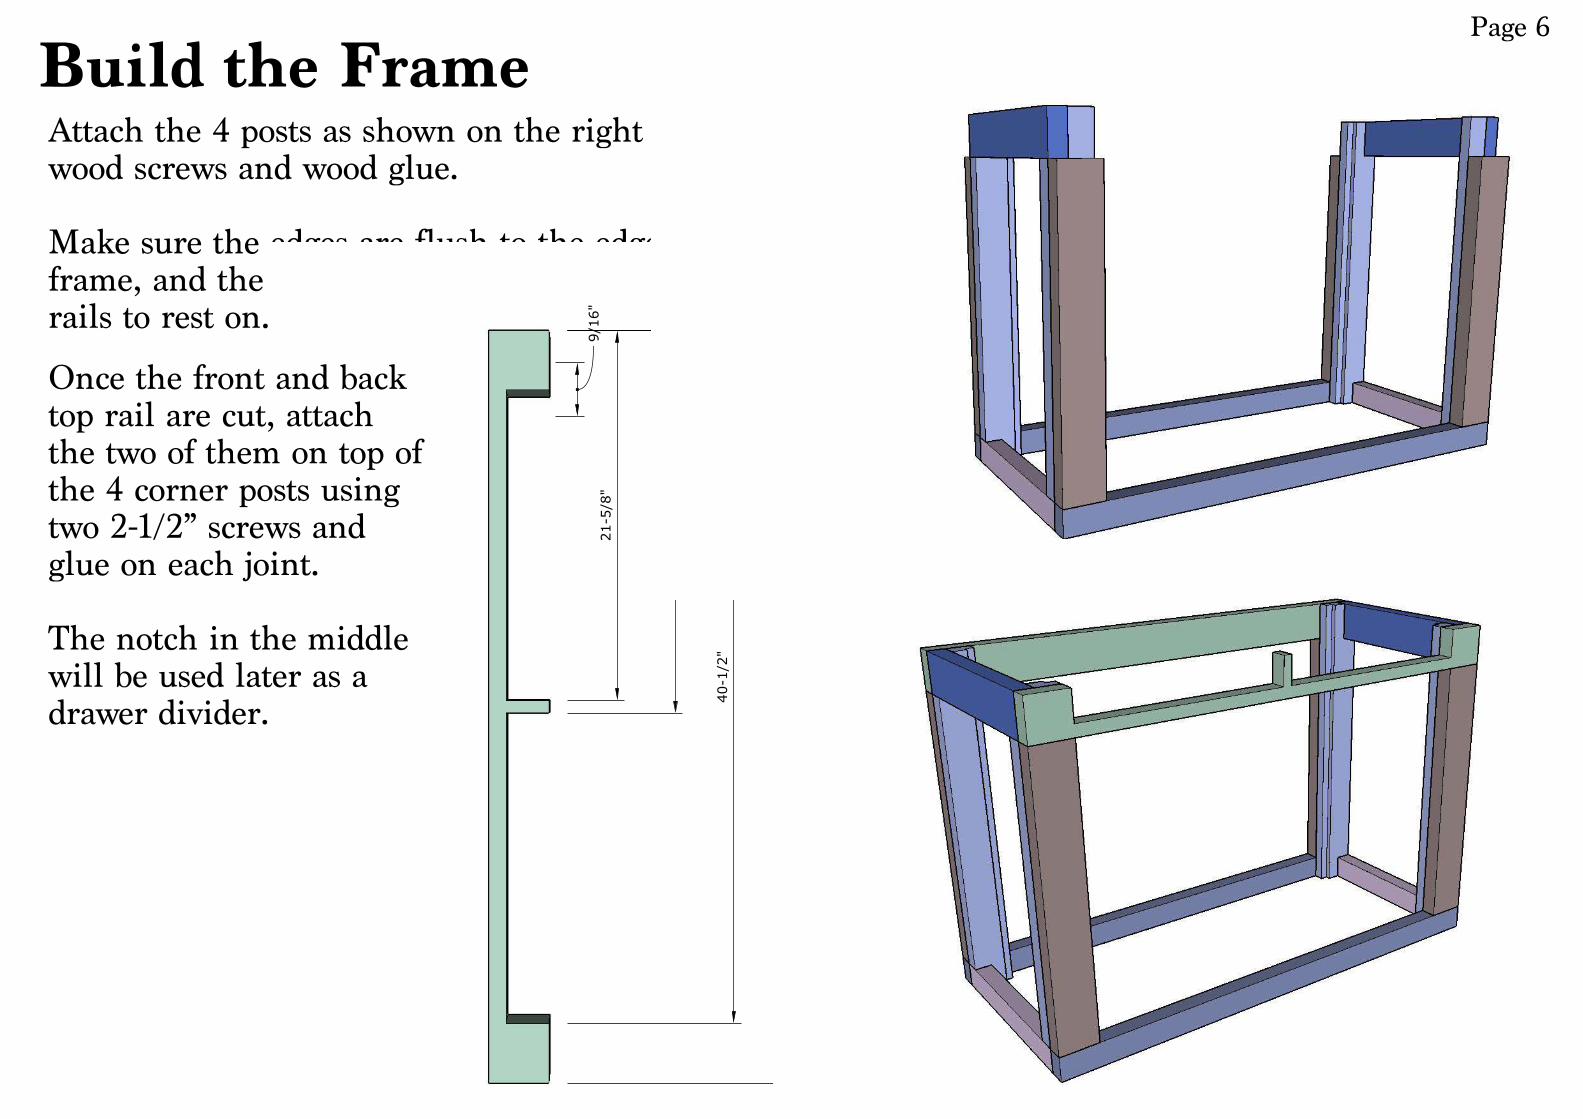
Attach the 4 posts as shown on the right using six 2-1/2” wood screws and wood glue.
Make sure the edges are flush to the edges of the end frame, and the ends have a nice square cut for the top rails to rest on.
9/16"
21-5/8"
22-3/8"
40-1/2"
44"
Once the front and back top rail are cut, attach the two of them on top of the 4 corner posts using two 2-1/2” screws and glue on each joint.
The notch in the middle will be used later as a drawer divider.
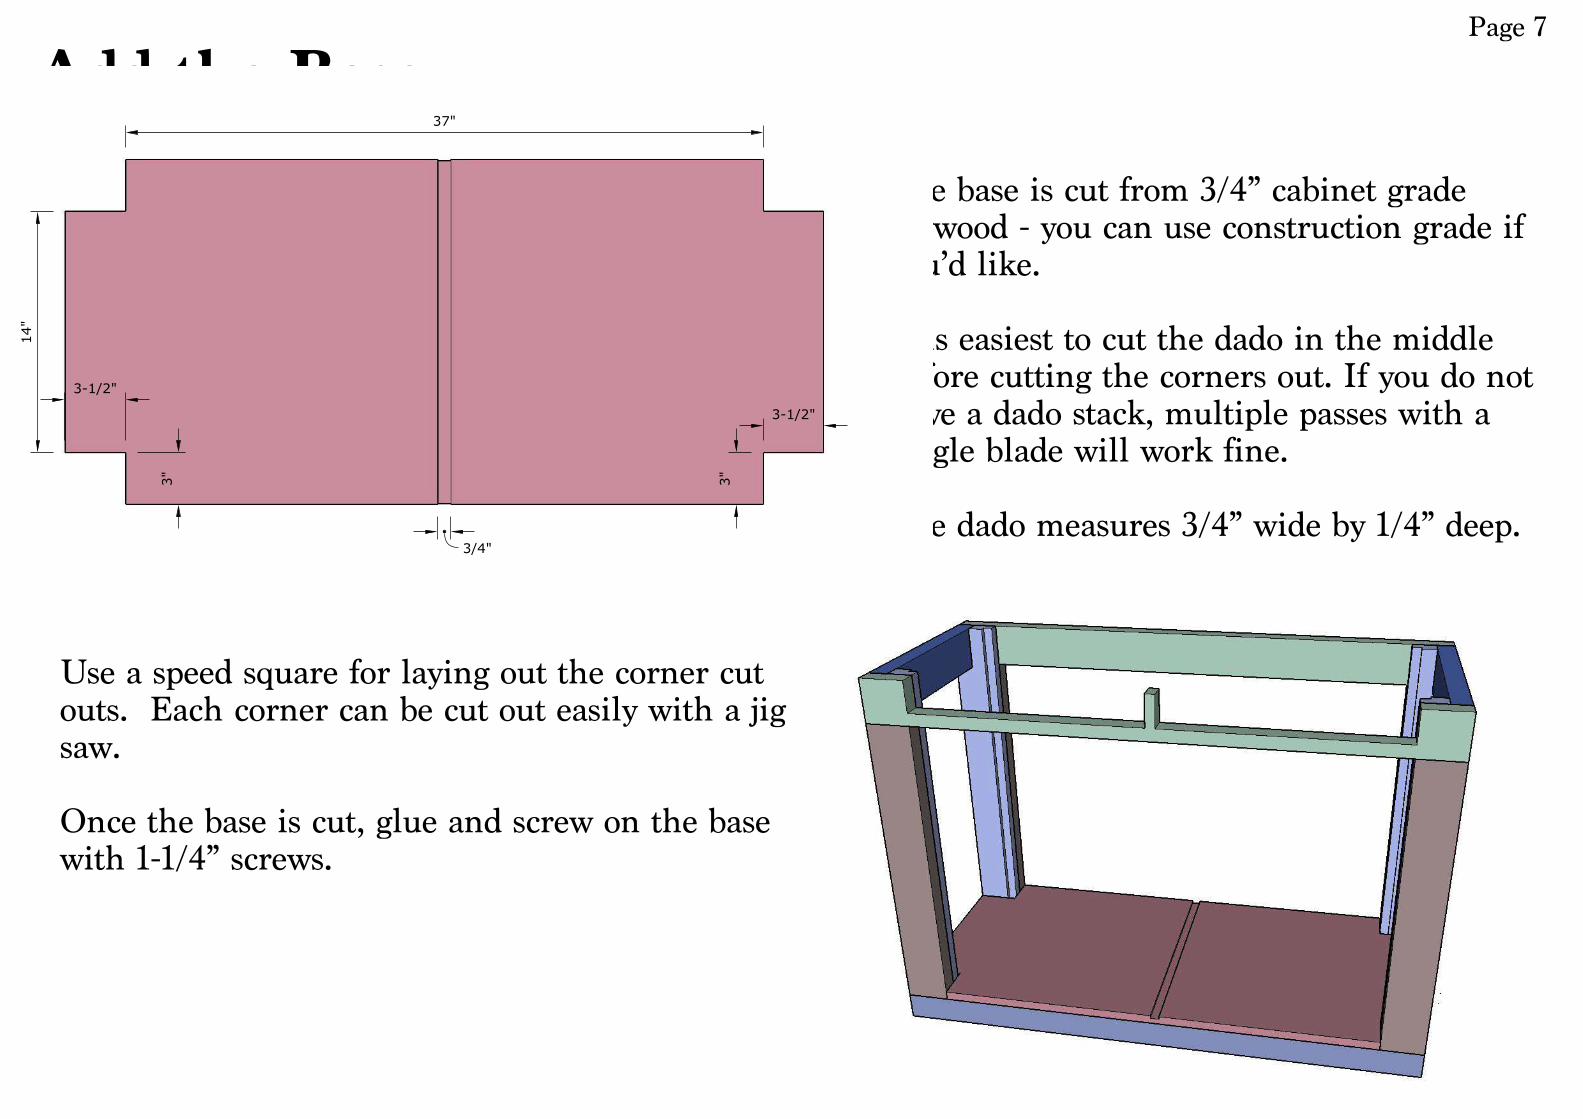
Add the Base
The base is cut from 3/4” cabinet grade plywood - you can use construction grade if you’d like.
It is easiest to cut the dado in the middle before cutting the corners out. If you do not have a dado stack, multiple passes with a single blade will work fine.
The dado measures 3/4” wide by 1/4” deep.
Page 7
Use a speed square for laying out the corner cut outs. Each corner can be cut out easily with a jig saw.
Once the base is cut, glue and screw on the base with 1-1/4” screws.
3-1/2"
3"
3/4"
3"
3-1/2"
14"
37"

Add End PanelsOnce the two side panels are cut to size, cut the dados in the board that will go on the left of the stand. Slide the panels into the rabbets that are cut into the legs.
Like the base, the two side panels are made 3/4” material and the dados are 3/4” wide by 1/4” deep.
Use glue and 1-1/4” screws to attach the side panels.
Pre-drill all screw holes to avoid splitting.
Page 8
11-1/4"
19"
27-1/2"
3/4"
3/4"
15"
27-1/2"
15"

Cut Dados / Attach Center DivderPage 9
3-3/4"
11-1/2"
19-1/4"
28"
3/4"
3/4"
1-1/2"
The center divider can now be cut to size and positioned between the front and rear top rails.
Just like before, the dados measure 3/4” x 1/4”.
The center panel is 1/4” taller than the side panels and will later seat into a dado in the top.
First apply glue to the base dado then align the panel in place.
Slowly tilt the center divider up toward vertical. The last couple of inches will require some persuasion with a wooden mallet. The center panel is completely installed when the bottom is fully seated in the base board dado and the panel is plumb.

Insert ShelvingPage 10
Insert the shelving by slightly tilting the center divider to the right and slipping in the shelving material.
Once the panels are both snug in the dados in the side panel, reposition the center panel to the vertical position.
Another option would be to cut in dados that go the full depth of the cabinet. However, I set mine back so my knees wouldn’t be knocking into them.
I took the easy route when cutting in the dados on the center divider and just used my table saw to go fully across the board. However, this leaves some of the dado exposed when the shelves are set in place. To avoid this completely you could cut these two dados with a router so you can stop the cut where the shelves end.
Or you can do like I did and fill in this extra length of dado with a scrap piece of plywood. I cut a 1/4” deep piece at the table saw then glued it in place and cut it flush with the edge.
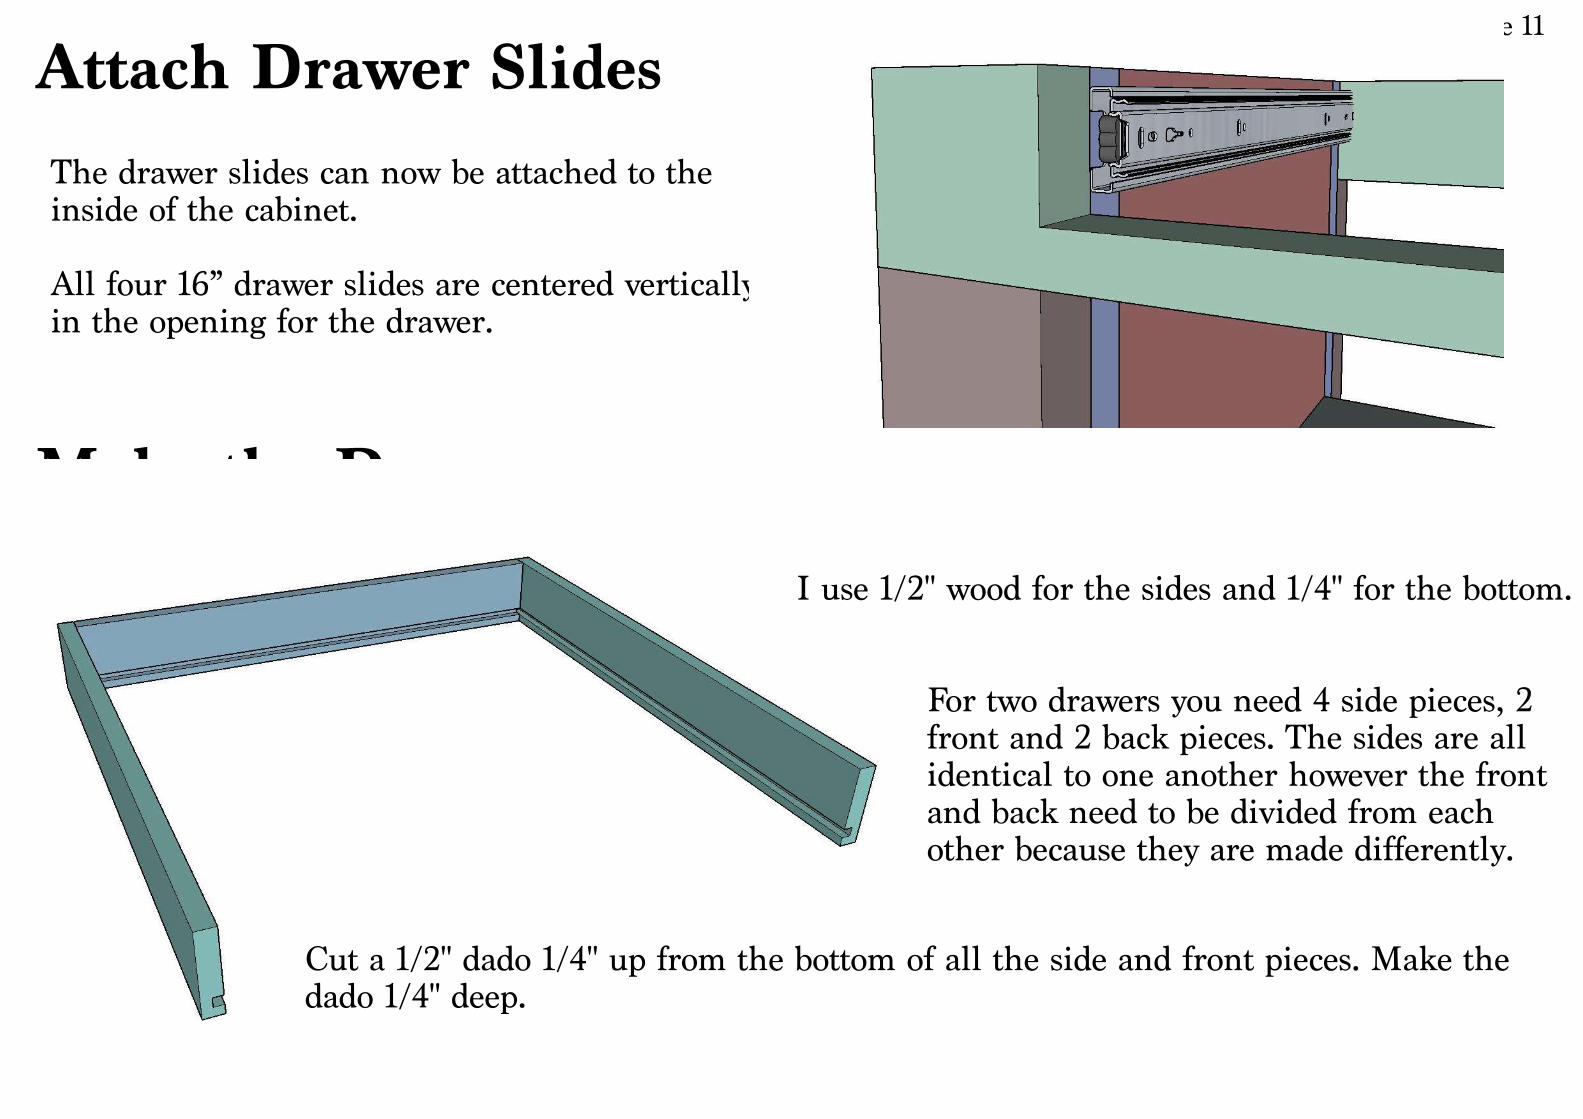
Attach Drawer SlidesPage 11
The drawer slides can now be attached to the inside of the cabinet.
All four 16” drawer slides are centered vertically in the opening for the drawer.
Make the Drawers
I use 1/2" wood for the sides and 1/4" for the bottom.
For two drawers you need 4 side pieces, 2 front and 2 back pieces. The sides are all identical to one another however the front and back need to be divided from each other because they are made differently.
Cut a 1/2" dado 1/4" up from the bottom of all the side and front pieces. Make the dado 1/4" deep.

Page 12
Use glue and 1 1/4" brad nails to attach the front and back pieces to the sides. When you are attaching the back, make sure not to cover up the dado slot on the sides. It needs to be flush with the top of the sides, not the bottom.
Next cut the bottoms of the drawers, if you haven't already, and slide them into place.
Repeat the same steps to make a second drawer. Then attach both drawers to the sliders.
Make the Drawers
Back view of the drawer

Attach the Top Page 13
The top is made from two pieces of 3/4” material sandwiched on top of one another to add a bit of weight and stability to the lathe stand.
The bottom piece gets a dado cut in as shown to the right. Secure the bottom piece with 1-1/4” wood screws and wood glue.
To position these boards correctly, use what will be the front edge trim as a reference. Set the trim in place so that it’s flush on the left and right then butt the plywood top up to it.
The top piece is the exact same size but does not include a dado.
Ensure the edges are flush on the top and bottom pieces.
Once the “bottom” piece is secured, attach the top using the same 1-1/2” screws.20-7/8"
42-1/2"
3/4"
18-1/2"

Add Top TrimPage 14
I used 1” select pine for my trim just because it’s what I had in my shop. You could use anything anything though, even a ripped 2x4, which is what I have listed on the cut list.
Attach the four trim pieces to the top as shown.
All trim pieces are held in place with 1-1/4” screws and wood glue.
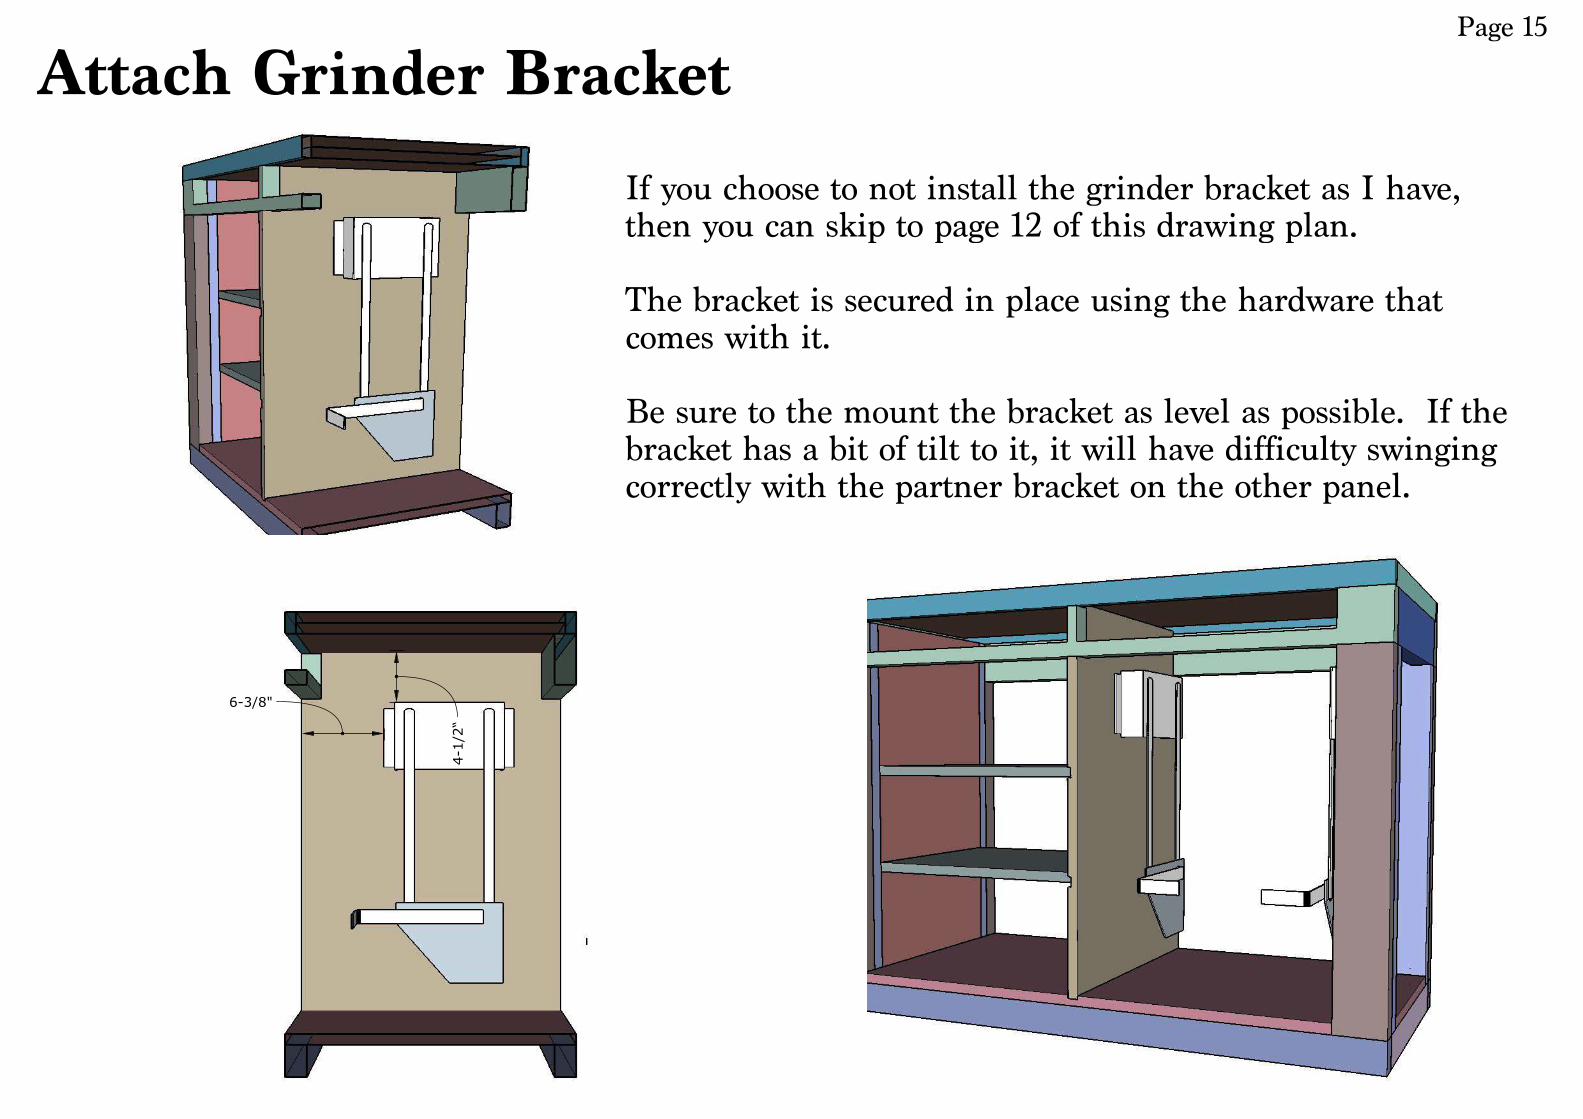
Attach Grinder BracketPage 15
If you choose to not install the grinder bracket as I have, then you can skip to page 12 of this drawing plan.
The bracket is secured in place using the hardware that comes with it.
Be sure to the mount the bracket as level as possible. If the bracket has a bit of tilt to it, it will have difficulty swinging correctly with the partner bracket on the other panel.
4-1/2“
6-3/8"

Attach Grinder BracketPage 16
The second bracket gets that exact same treatment as the first.
Note: The position of the brackets are specific to the foot print of my grinder. If you are mounting a different grinder or tool then you may need to adjust the position of the bracket.
6-3/8"
4-1/2”

Attach the Grinder PlatformPage 17
The grinder platform is made from 3/4” plywood.
My grinder is 10-1/2” deep so I decided to make the platform 1” deeper then the grinder. This portion is somewhat flexible according to your grinder.
The platform is secured in place with the supplied hardware which comes from the bracket supplier
These brackets do not stop when they are hanging vertical, but instead go past slightly. To prevent them from sticking out the back of my bench, I placed a hard stop on the bottom back where I wanted the bracket to come to a rest at.
I attached these with two 2” screws.
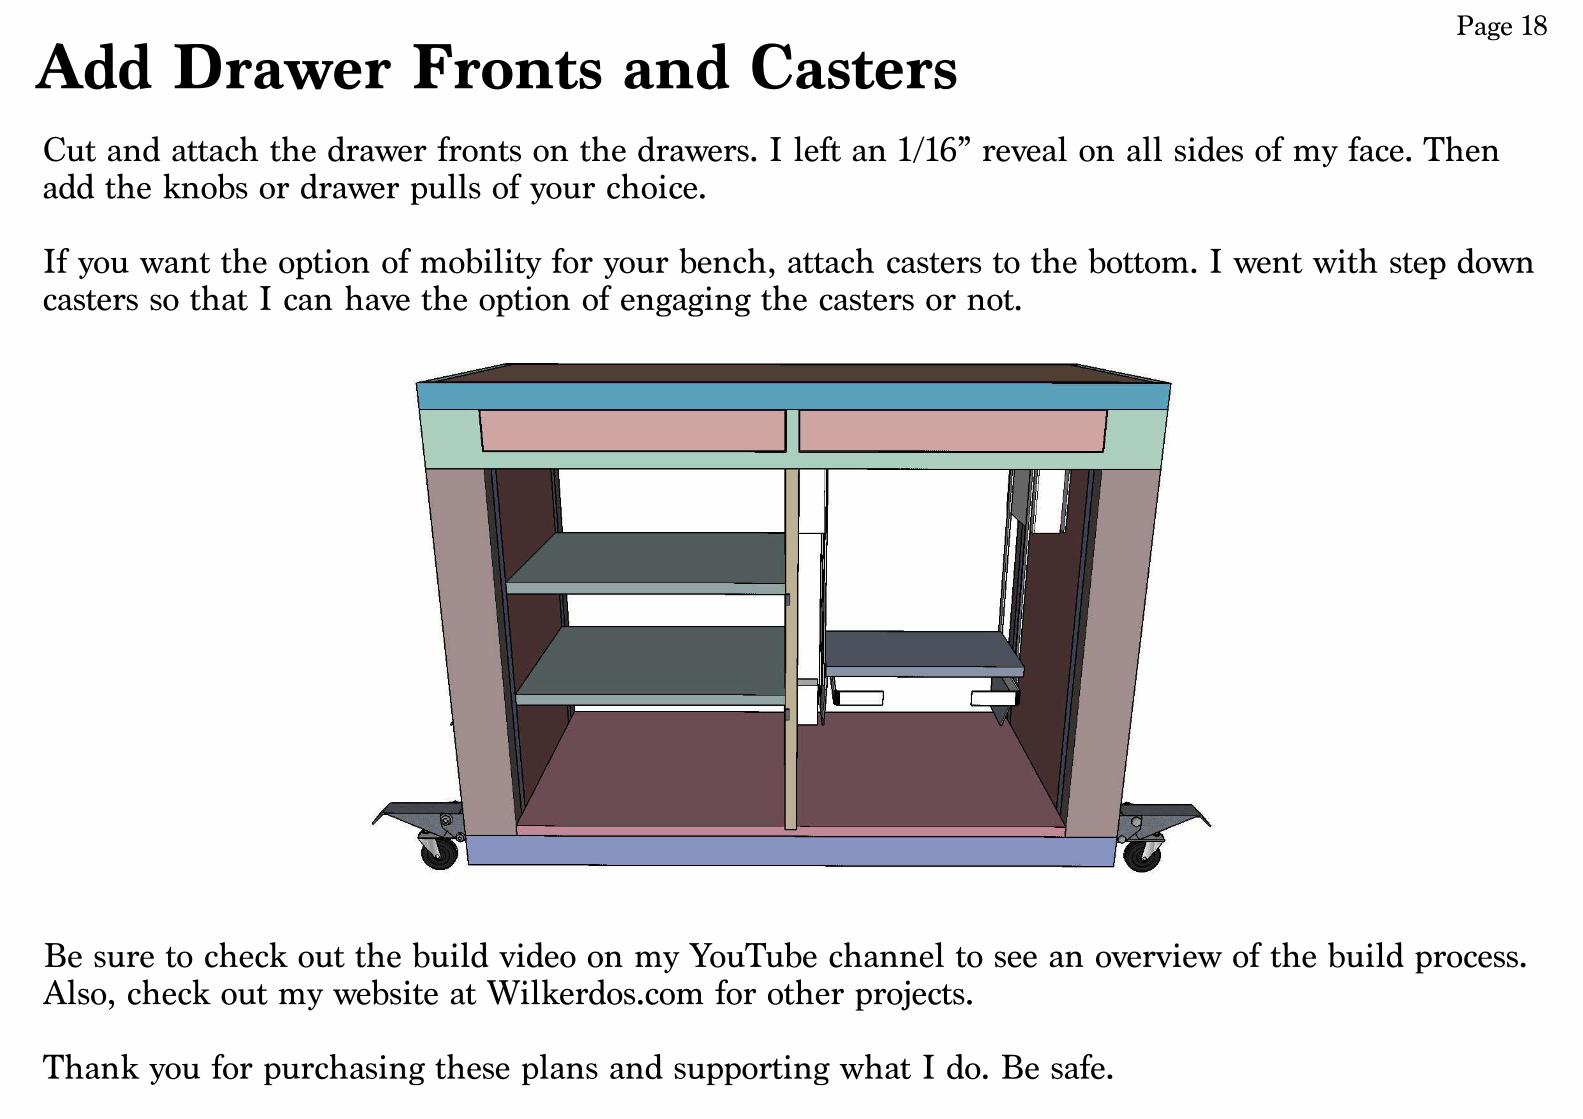
Add Drawer Fronts and CastersPage 18
Cut and attach the drawer fronts on the drawers. I left an 1/16” reveal on all sides of my face. Then add the knobs or drawer pulls of your choice.
If you want the option of mobility for your bench, attach casters to the bottom. I went with step down casters so that I can have the option of engaging the casters or not.
Be sure to check out the build video on my YouTube channel to see an overview of the build process. Also, check out my website at Wilkerdos.com for other projects.
Thank you for purchasing these plans and supporting what I do. Be safe.