laura's passport readme - mycommpasss passport template guide.pdf!|!jan!2015!!! !...
TRANSCRIPT

www.mycommpass.com | Jan 2015
My Communication Passport Template
Introduction
Welcome to My Communication Passport Template! Laura’s Communication Passport is designed with an emphasis on explaining to the reader why Laura does what she does, and how those supporting her can bring out her best. Because of Laura’s specific case, there is a strong theme of drawing relations between events that happen in the environment (e.g. new people, loud voices, parties); events that happen in her body (e.g. stomach pain, headaches); and the effect they have on her abilities and behavior. Another important aspect for us is that the Passport gives explicit details of what to do and what not to do when it comes to Laura’s care. This means that if there has been a mistake or an incident, a meeting can be established and we can see what happened in relation to what should have happened. This way, the Passport provides a strong benchmark which all those involved with Laura’s care can be held to. A lot of work goes in to making a Communication Passport and we know it’s a daunting task, especially starting from scratch! With that in mind, one of the main differences between our Passport template and the original is that we’ve put in examples of things you might want to say, and asked questions that you might want to think about when creating your own. We are all familiar with the overwhelming feeling of a blank page! There is likely to be so much information you want to get across that you don’t know where to start. By using coloured boxes and textboxes that already have some information in them, we really hope that we can take that initial difficult step away and get you stuck straight in. Below will be a guide to how to edit the template. The template was created in Microsoft PowerPoint for Mac 2011 (Version 14.4.3) and so the screenshots you will see will be from this edition. I hope there won’t be too much difference between what I show here and what you will see on your screen. Lastly, it should be said that you might not want all the pages we have provided a template for; equally you may wish to add your own specific pages. Feel free to use as much or as little as suits your own needs. We hope that you will be able to start with what we’ve put together, and grow and adapt your own Passports.

www.mycommpass.com | Jan 2015
Please do let us know how you get on or if you have any questions! We would love to see what you’ve made; you never know what things other people might find useful! Best of luck, -‐-‐ Jenny [email protected]
Template Guide This guide will go through each page and give comments that might be helpful as you edit the template to make it your own.
1. Front Page The front page is very simple, but here we can discuss two things that you will definitely need to know to edit the rest of the Passport: changing text & replacing images. Our front page consists of four items:
• Communication Passport title
• Name title
• Passport picture frame
• Picture place holder

www.mycommpass.com | Jan 2015
You probably want to keep the top title, but the second one you can change to your own name, so that everyone knows whose Passport it is. Here might be a good time to bring up that this guide, and the template itself, speaks as though it is talking to the person that the Passport is about. There are several reasons for this, but the biggest is because we write Laura’s Passport as though Laura herself were writing it. We want the reader to remember that these are the words she would be saying if she could say them. It also helps us to really think about how she is experiencing the world when we are thinking of what to say and how to say it to the reader. So when the template asks ‘you’ a question, it is asking the person whom the Passport belongs to; we recommend writing from an ‘I’ perspective. For example see Figure 1.
Figure 1. Left -‐ My Diagnosis page template: The writing is addressed to you, but make sure that you replace the sentences with answers that come from an 'I' perspective, like that seen on the right. Right -‐ My Diagnosis page taken from Laura's Passport.

www.mycommpass.com | Jan 2015
Changing text is super easy. Just click on the text, you will see the textbox become active and the cursor will change from an arrow to a blinking text cursor.
Changing pictures is similarly straightforward. Where you see the ‘insert picture here’ image, right click on the image to bring up a menu. Select ‘Change picture’ and the program will bring up your regular file browser for you to select the picture you want to replace the placeholder with; see Figure 2. For the front page we recommend a happy close-‐up! Alternatively, if at any time you see the ‘insert picture here’ placeholder and do not want a picture, you can delete it by clicking on the image then pressing delete or backspace. For example, you might decide you do not want the Passport picture frame.
Figure 2. Replacing pictures

www.mycommpass.com | Jan 2015
2. Inside the Cover This is a simple page to welcome the reader to your passport and to let them know why you want them to read it. Some options are to replace the main title, replace the main text; replace the photo; remove the watermark.
3. Contents Even though this is at the beginning of your document, you might want to leave it till last to write – incase you change your mind about what you are putting in the main document. Some options are to replace the main text (currently structured in a ‘Bulleted List’ – usually found somewhere in the top toolbar, see Figure 3); replace the title; remove the watermark.
Figure 3. Bulleted List is the recommended Contents structure, but there are other options available.
4. Emergency Contact Information Page Here is an example of pages getting a bit more complex. The template has one title, 4 contact text boxes, 2 background blue boxes, 1 black-‐outline box, 1 ‘Medication’ heading textbox, 4 ‘medication’ textboxes, 4 background red boxes, 1 ‘Allergies’ textbox, and 1 red-‐cross picture. It is unlikely that these numbers will be right for you, so this will be the first page you really get to play around with to make something your own.

www.mycommpass.com | Jan 2015
You will find that you can adjust the sizes of the coloured boxes, and black-‐outline box by clicking and dragging on their sides. Additionally, you might find it useful to duplicate items that are already there. For example, if you want another contact text box, click on the box to select it (make sure it is the box that is selected and not the text), then go to File -‐> Duplicate; see Figure 4.
Figure 4. Once an item is selected it can be easily duplicated.
This is a really useful tool, so if there is a keyboard shortcut and you know how to use it, I’d recommend it! If for some reason the Duplicate option isn’t there, you can Copy and Paste any item also, see Figure 5.
Figure 5. Copy and pasting is also a useful set of tools.

www.mycommpass.com | Jan 2015
Once a box has been Duplicated or Copied and Pasted, it can be dragged into position. You might also find that you want to adjust the font sizes. This can usually be done from the options at the top of the program window (if you don’t see it, try View -‐> Ribbon; alternatively you can change the font by going to Format -‐> Font…).
Tip!
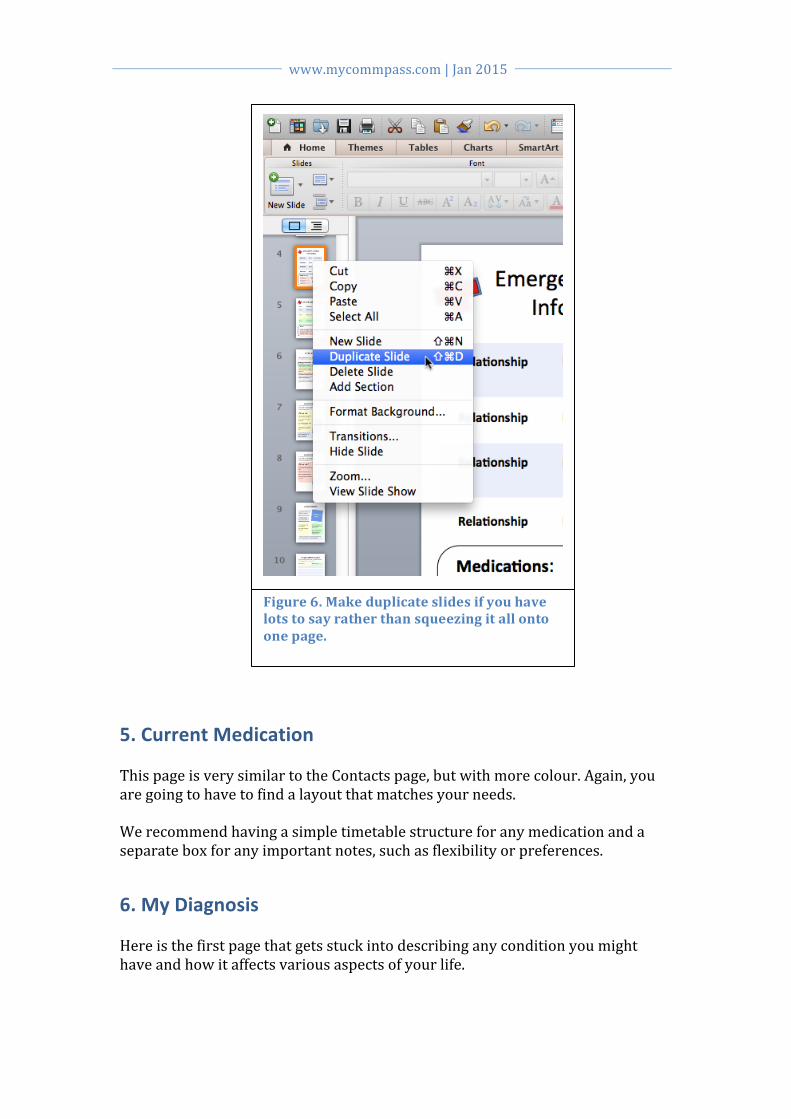
This is relevant to all the pages you create. If you find that there is too much information to fit on one page, don’t try to squish it all in! Keep your layout easy on the eye, with spaces and large fonts; if necessary create a second similar page that can carry the same information. This is easily done by right-‐clicking on the page you want to duplicate from the left-‐hand-‐side viewer (if you don’t have a left-‐hand-‐side slide viewer, make sure Normal is ticked in View -‐> Normal). From the pop-‐up menu select Duplicate Slide, see Figure 6, and a copy of the selected slide will appear below/after the original.
www.mycommpass.com | Jan 2015
5. Current Medication This page is very similar to the Contacts page, but with more colour. Again, you are going to have to find a layout that matches your needs. We recommend having a simple timetable structure for any medication and a separate box for any important notes, such as flexibility or preferences.
6. My Diagnosis Here is the first page that gets stuck into describing any condition you might have and how it affects various aspects of your life.
Figure 6. Make duplicate slides if you have lots to say rather than squeezing it all onto one page.

www.mycommpass.com | Jan 2015
One of the things that we have found helpful is separating information by having coloured boxes, frames, and bold text. In this section, we decided to separate out the way Laura’s condition affects her by describing the effect on her cognitive skills, speech & language skills, behaviour, and physical health.
7. Communication Given this is a Communication Passport, Communication pages take up a good chunk of the document. Starting with the positives, we wanted to give examples of positive communication strategies that we want people to use with Laura. Be explicit if you can, make more pages if you need them! The ‘Please don’t’ section is particularly useful for correcting common mistakes that people make when trying to communicate with you. These might be subtle (e.g. tone of voice, body language), practical (e.g. don’t interrupt), or abstract (e.g. allowing more control over decisions).
8. Verbal Communications Not everyone will have expressions that don’t mean what they normally do, but Laura does – so we’ve included this option. New text boxes will have to be added to this slide. Remember to change the introduction to this page if you are using it!
9. Keeping me safe This page has a lot going on, and is based off of a much earlier version of Laura’s Passport. Like the other pages, the boxes (text and image) can be moved, deleted, edited. Safety has been a big concern for us, so we’ve had to make sure this page stands out amongst the others.
10. Sensory Profile In these pages we’ve written an explanation about why we think Sensory Profiles are so essential to the Communication Passport. Feel free to adjust these pages any way you wish.

www.mycommpass.com | Jan 2015
It’s worth mentioning that in this section there is an example of having a caption beneath one of the pictures. This was done by inserting a Rectangle, then formatting it to have a white fill and black line, see Figure 7.
11. Things I Like In addition to the textboxes, coloured boxes, and picture placeholders, there are some stars and circles added to this page to make it a bit more fun. Feel free to play around with these, remove them, or make your own! One of Laura’s favourite activities is dressing up. So on this page, she was dressed up as a witch for Halloween. The stars and circles worked well with her newly discovered magical abilities.
Figure 7. Create captions for your pictures by inserting a Rectangle, formatting it, then adding your text.

www.mycommpass.com | Jan 2015
12. Things I Don’t Like You might notice that on this page the picture placeholder emoticon is not as happy as the others. When you see this placeholder it means to suggest you might want to show us what an unhappy or anxious you looks like. We try to keep these occurrences to a minimum, no one wants to see unhappy faces! But it is important that those looking after you recognize what your expressions and postures mean.
13. Behaviour Support Plan The Behaviour Support Plan pages break the trend of asking you questions. They are written exactly as they are in Laura’s because we want you to know about the traffic light system and to emphasise that challenging behaviour usually has a function. These pages are integral to Laura’s Passport. They might not be necessary for you and your needs, so it’s ok to not use them. But we’ve left them here incase they will be helpful to you. The phases pages themselves are in question format – so that you can make your own plan based on the traffic light system. Give yourself more room by removing the Tips box and text when you are ready. For additional information on the traffic light system and creating a Behaviour Support Plan check out The Challenging Behaviour Foundation website: http://www.challengingbehaviour.org.uk http://www.challengingbehaviour.org.uk/learning-‐disability-‐files/03-‐-‐-‐Positive-‐Behaviour-‐Support-‐Planning-‐Part-‐3-‐web-‐2014.pdf
14. Diet and Eating By this point I think you are probably pretty good at making these pages by now! You might not need this page, but never underestimate the power of our stomachs. Have you ever heard the expression ‘hangry’? It’s the word used to describe people’s emotion when their temper is short due to being hungry – ‘hungry’ + ‘angry’ = ‘hangry.’ The simplest things can cause difficult behaviour!

www.mycommpass.com | Jan 2015
Figure 8. I need one of these t-‐shirts. https://www.etsy.com/uk/listing/184725268/im-‐sorry-‐for-‐what-‐i-‐said-‐when-‐i-‐was
15. Personal Care & Hygiene Nothing new here. Coloured boxes, text boxes, bold fonts. We have tried to make it clear that having a disorder doesn’t mean Laura is entitled to anything less than the respect and dignity we all deserve – this means making sure personal care and hygiene are handled discretely and appropriately.

www.mycommpass.com | Jan 2015
16. My Family This page can be a lot of fun! Time to get the photo albums out and pick some pictures that are important to you. It might be nice to give a sentence or two about what you and the pictured family member or friend get up to.
17. End Page The end page is the same set-‐up as the inner cover page. It’s an opportunity to say thanks and end with a smile. It’s also a chance to have the last word about what it is you want your life to be like. At the end of the day, the Communication Passport is about letting those working with you learn all about you and your needs and wants. Often people can get caught up in their own expectations of what they want for you and from you. The Passport is a place where you can lay down what it is that is important to you, how it is you would like your life to be, and how support workers can help you achieve those goals. I hope this guide hasn’t been too long or confusing. Hopefully you will get what you need out of the template. Best of luck!