laying out three-tab shingles - fine homebuilding
TRANSCRIPT

Establishing the overhang. Contrary to manufacturers'recommendations, the author overhangs roof shingles
Laying Out Three-Tab ShinglesSpend a little time measuring and striking lines, and the rest is fairly easy
by John Carroll
any roofers take pride in the fact that theycan shingle a house without the benefit of mea-sured lines. It can't be denied that such peopleinstall leak-proof roofs that look pretty good fromthe ground. Unfortunately, their eyeballed roofsoften have wavy, inconsistent courses; and whenviewed from atop the house, they look simplyunprofessional. When I finish a roof, I enjoy look-ing at straight courses, and I don't begrudge my-self the half-hour or so it took to measure andstrike lines. More than that, I'm convinced that Irecover the time invested in laying out the roof as1 nail down shingle after shingle without worry-ing about the courses getting wavy or crooked.
For the sake of simplicity, I'll limit my discus-sion to the ubiquitous three-tab asphalt roof shin-gle, scorned by aesthetes but found on housesfrom the Carolinas to California.
On a rectangular roof without dormers, valleysor other obstructions, there are three basic layoutsteps: establishing the overhang, striking thebond lines and striking the horizontal lines.
Establishing the shingle overhang—Beforeshingling a roof, it is essential to know how farthe shingles will overhang the bottom (or eaves)and sides (or rakes) of the roof deck. Ideally, alltrim has been installed along the roof edges, andif used, metal drip edge is also in place. In thesecases I leave a 1-in. overhang along the eavesand the rakes of the roof (drawing above). Mostshingle manufacturers recommend a in. to
in. overhang, presumably to reduce the chanceof the wind snagging the edge of the roof.
Unfortunately, eaves and rakes (especiallythose on older houses) often diverge more than
Basics of asphalt-roofing layout. The authoroverhangs the asphalt shingles 7 in. on both the rake andthe eaves. Before nailing down any shingles, he strikes two
vertical bond lines and a series of horizontal lines to ensurethat the tabs and the courses will line up neatly. After thelayout is finished, nailing on the shingles is a breeze.
7 in. on both rakes and eaves. Longer overhangs accountsfor possible discrepancies in the straightness of the trim.
Running; straight courses. The author alignsshingles using a gauged roofing hammer andvertical bond lines.
M

Reestablishing the starter courseWhen shingling around a dormer or otherobstruction on the roof deck that interrupts thestarter course, run shingles to a point past theobstruction, then strike a new set of bond lines usingthe end of a shingle as a reference point. Measurefrom the shingle over to the right-side rake andtranscribe this measurement (X) to a point lower onthe roof. Strike a line to connect the point and theshingle edge above. Then strike another line 6 in. tothe left. Remember that the top shingle of the startercourse always starts on the right-hand bond line.
If either of these measurements is slightly more than a full-footincrement ( in. or less), move bond lines to the left 7 in. to 3 in.
Striking the horizontal lines. To mark the horizontal line foryour starter course, hold your rule or tape so that it overhangs thedrip edge by 1 in. Make a mark at 12 in. on both ends of the roofdeck and strike a connecting line. The top of the starter-courseshingles will be laid to this line. Then measure in 10-in, incrementsup the roof deck, starting from your starter-course line.These lines show where to lay the top edge of everyother course. Intermediate courses are lined upusing a gauged roofing hammer.
Nail the first courseabove the obstructionhigh on the shingle, within2 in. of the top, so that theshingle course below it canslip underneath.
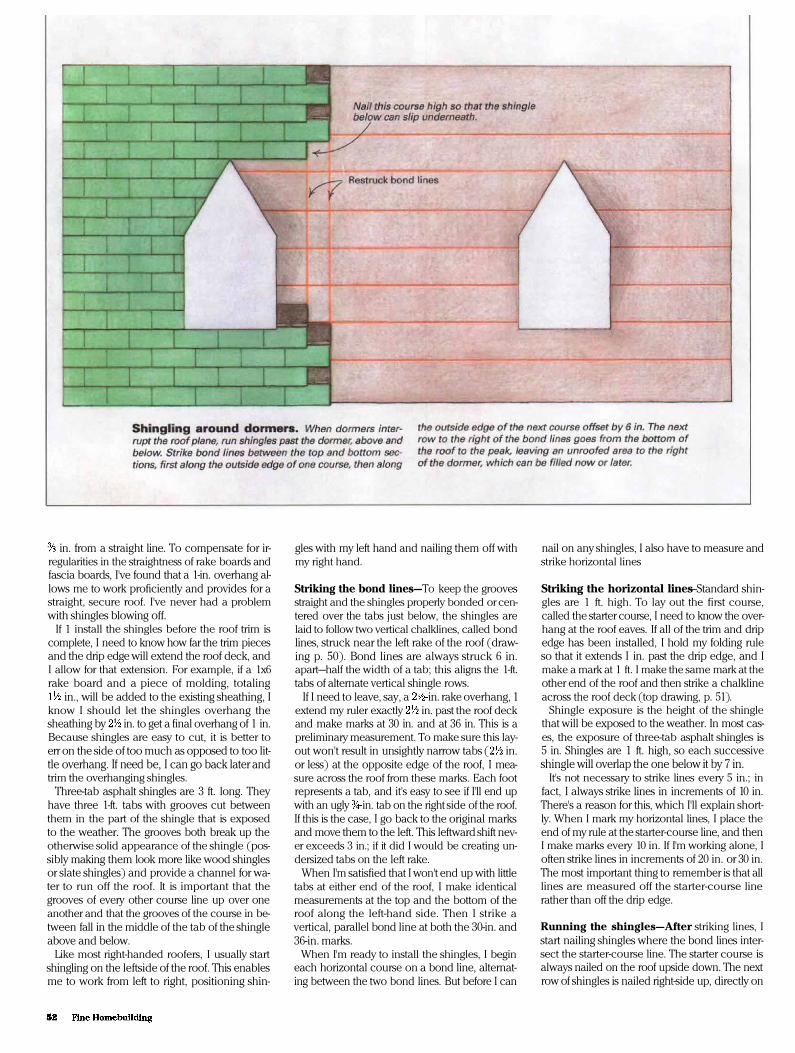
Shingling around dormers. When dormers inter-rupt the roof plane, run shingles past the dormer, above andbelow. Strike bond lines between the top and bottom sec-tions, first along the outside edge of one course, then along
the outside edge of the next course offset by 6 in. The nextrow to the right of the bond lines goes from the bottom ofthe roof to the peak, leaving an unroofed area to the rightof the dormer, which can be filled now or later.
in. from a straight line. To compensate for ir-regularities in the straightness of rake boards andfascia boards, I've found that a 1-in. overhang al-lows me to work proficiently and provides for astraight, secure roof. I've never had a problemwith shingles blowing off.
If 1 install the shingles before the roof trim iscomplete, I need to know how far the trim piecesand the drip edge will extend the roof deck, andI allow for that extension. For example, if a 1x6rake board and a piece of molding, totaling
in., will be added to the existing sheathing, Iknow I should let the shingles overhang thesheathing by in. to get a final overhang of 1 in.Because shingles are easy to cut, it is better toerr on the side of too much as opposed to too lit-tle overhang. If need be, I can go back later andtrim the overhanging shingles.
Three-tab asphalt shingles are 3 ft. long. Theyhave three 1-ft. tabs with grooves cut betweenthem in the part of the shingle that is exposedto the weather. The grooves both break up theotherwise solid appearance of the shingle (pos-sibly making them look more like wood shinglesor slate shingles) and provide a channel for wa-ter to run off the roof. It is important that thegrooves of every other course line up over oneanother and that the grooves of the course in be-tween fall in the middle of the tab of the shingleabove and below.
Like most right-handed roofers, I usually startshingling on the leftside of the roof. This enablesme to work from left to right, positioning shin-
gles with my left hand and nailing them off withmy right hand.
Striking the bond lines—To keep the groovesstraight and the shingles properly bonded or cen-tered over the tabs just below, the shingles arelaid to follow two vertical chalklines, called bondlines, struck near the left rake of the roof (draw-ing p. 50). Bond lines are always struck 6 in.apart—half the width of a tab; this aligns the 1-ft.tabs of alternate vertical shingle rows.
If I need to leave, say, a in. rake overhang, 1extend my ruler exactly in. past the roof deckand make marks at 30 in. and at 36 in. This is apreliminary measurement. To make sure this lay-out won't result in unsightly narrow tabs ( in.or less) at the opposite edge of the roof, I mea-sure across the roof from these marks. Each footrepresents a tab, and it's easy to see if I'll end upwith an ugly in. tab on the right side of the roof.If this is the case, I go back to the original marksand move them to the left. This leftward shift nev-er exceeds 3 in.; if it did I would be creating un-dersized tabs on the left rake.
When I'm satisfied that I won't end up with littletabs at either end of the roof, I make identicalmeasurements at the top and the bottom of theroof along the left-hand side. Then I strike avertical, parallel bond line at both the 30-in. and36-in. marks.
When I'm ready to install the shingles, I begineach horizontal course on a bond line, alternat-ing between the two bond lines. But before I can
nail on any shingles, I also have to measure andstrike horizontal lines
Striking the horizontal lines—Standard shin-gles are 1 ft. high. To lay out the first course,called the starter course, I need to know the over-hang at the roof eaves. If all of the trim and dripedge has been installed, I hold my folding ruleso that it extends I in. past the drip edge, and Imake a mark at 1 ft. I make the same mark at theother end of the roof and then strike a chalklineacross the roof deck (top drawing, p. 51).
Shingle exposure is the height of the shinglethat will be exposed to the weather. In most cas-es, the exposure of three-tab asphalt shingles is5 in. Shingles are 1 ft. high, so each successiveshingle will overlap the one below it by 7 in.
It's not necessary to strike lines every 5 in.; infact, I always strike lines in increments of 10 in.There's a reason for this, which I'll explain short-ly. When I mark my horizontal lines, I place theend of my rule at the starter-course line, and thenI make marks every 10 in. If I'm working alone, Ioften strike lines in increments of 20 in. or 30 in.The most important thing to remember is that alllines are measured off the starter-course linerather than off the drip edge.
Running the shingles—After striking lines, Istart nailing shingles where the bond lines inter-sect the starter-course line. The starter course isalways nailed on the roof upside down. The nextrow of shingles is nailed right-side up, directly on

If there's no Starter course. On the far side of an in-tersecting roof or dormer, run top shingles to the right rake,then transcribe measurements and strike bond lines.Measure down by extending a folding rule so that the 12-in.mark is on the bottom of the first shingle in the top section.
The shingle is 12 in. high, so the zero point of the ruler iseven with the top of that shingle. Mark every W in. to thebottom of the roof. The bond returns to its starting pointevery 10 in., so every shingle that hits a 10-in. mark lines upwith the tabs of first shingle in the top section.
top of the starter course. The reason for this is tocover the metal drip edge that would otherwisebe exposed to the weather by the grooves in theright-side up second course.
I always begin the upside-down starter courseon the left-hand bond line. The next course goesdirectly on top of the first and begins on the right-hand bond line. Because the lines above thestarter course are marked in increments of 10 in.,every other shingle hits a horizontal line, andevery shingle that hits a horizontal line also hits aright-hand bond line (including the exposedstarter). I follow this routine religiously becausethe consistency is very useful on complex roofs,as we shall see.
Horizontal, diagonal or vertical shingling?—A neat, professional roof can be installed by run-ning shingles horizontally, diagonally or straightup the roof. Running each course horizontallyacross the roof is the simplest method and isusually preferred by amateurs. Running the shin-gles diagonally across the roof so that they looksort of like a staircase is often recommended byshingle manufacturers because of the possibilitythat the shingle color might vary from bundle tobundle. The thought is that the variegations willbe less noticeable if the different colors are rundiagonally rather than straight up or straightacross a roof.
Like many roofers, however, I prefer to run ver-tical rows straight up the roof. I do this for tworeasons. First of all, I find it less strenuous be-
cause it does not require as much reaching andmoving about. Secondly, on hot days I find it tobe more comfortable because I'm sitting orkneeling on shingles I've just laid. These are a lotcooler than those that have had a chance to soakup the sun. I've never had a complaint about theblend of colors on any of the roofs I've installed. Ihave noticed, though, that an off-color bundlelooks equally bad whether it runs straight up theroof or diagonally.
For those who choose to run shingles vertically,here is one caution: You have to leave the farright-hand nail out of every other course (the onethat hits the right-hand bond line). This allowsthe shingles in the next row to slip into place. I al-ways use four nails to the shingle in the recom-mended pattern. To do this 1 have to lift the tab ofevery other shingle in the preceding row.
Using a gauged hammer—As mentioned pre-viously, I often strike horizontal lines every 20 in.or 30 in. To keep in-between courses straight, Iuse an Estwing gauged roofing hammer (EstwingMfg. Co., 2647 8th St., Rockford, Ill. 61109-1190;815-397-9521). This hatchetlike hammer has asteel knob bolted through its blade exactly 5 in.from the face of the hammer head (photo p. 50).After following the struck horizontal line withone shingle, I line up the next three courses (ifI'm using 20-in. increments) with my hammer.The steel knob, or gauge, hooks onto the bottomof the shingle in the previous row, and the bot-tom of the next shingle sits on the hammer head.
Laying out complicated roofs—So far I've lim-ited this discussion to a straight, rectangular sec-tion of roof. Roof planes come in a variety ofshapes and sizes, however, and they are apt to beintersected by chimneys, dormers and adjoiningroofs. Shingling around these obstructions com-plicates the job, but by adhering to a consistent10-in, layout scheme and using a few simple tech-niques, it's easy to keep the courses straight andcorrectly bonded.
To go around a pair of dormers (drawing facingpage), I lay out the bond lines and the horizontalcourses as previously described. Some of the hor-izontal lines are interrupted by the dormers andhave to be measured and marked separately oneach side of the dormers. When I start roofing, Irun a row of shingles all the way up the left rakeand work toward the right until I come to the leftside of the first dormer. I continue to shingle thearea below the dormer until I'm past the dormer.At this point I move back to the left side of thedormer, cut and fit shingles along the dormerwall, install flashing and weave the first valleycreated by the dormer's roof.
There is now a short row of shingles runningfrom the top of the valley to the ridge of the mainroof. I carry these courses to the right until theyline up with the courses below. To permit thecourses that will be installed below these shin-gles to slide into place, I nail the first course highon the shingle, within 2 in. of the top edge. I strikebond lines between the top and bottom sections,holding the string first along the outside edge of
one course, then along the outside edge of thenext course that is offset by 6 in. The next row ofshingles goes from the bottom of the roof to theridge, leaving an unroofed area to the right ofthe dormer. This area can be filled in now or lat-er, according to the temperament of the roofer. Ilike to complete this section as I go along.
This process is repeated around the seconddormer; I shingle past the dormer at the top andthe bottom, strike bonds lines through and fill in.
Reestablishing the starter course—Whenlarge dormers or intersecting roofs interrupt thebottom section of a roof plane, it is impossible tostrike through (bottom drawing, p. 51). So afterrunning shingles across the top of the roof, nail-
ing the first course high until I've cleared the en-tire obstruction, I measure the distance from theend of one of the right bond shingles to the rightedge of the roof deck. I transcribe this measure-ment to the bottom of the roof, make anothermark 6 in. to the left and strike bond lines. Then Imeasure and strike my 10-in. horizontal lines.
I'm now ready to run shingles from the bottomof the roof up the bond lines. But the question is,on which bond line do I start? If I pick the wrongone, I'll end up with adjoining courses where allthe tabs line up rather than being offset by 6 in.—a roofing abomination. Fortunately, I've strucklines every 10 in., and I've started, as I always do,with the exposed starter shingle on the rightbond line. I know every shingle that hits a hori-
zontal line also hits a right bond line. I put theinverted shingle of the starter course on the leftbond line and cover it with the exposed startercourse on the right bond line. As I run up thebond lines, I notice that every shingle that hits ahorizontal line also hits a right bond line. I knowthe bond will work out perfectly.
When there's no starter course—Sometimesthere's no starter course on the far side of an in-tersecting roof or dormer (drawing p. 53). If so,after I run the top section of shingles over to therake, I measure and strike bonds in the usualmanner. Let's say that I have not struck any hori-zontal lines in the triangular section created bythe intersecting roof. How would 1 measuredown, and what bond line would I start on? Tomeasure down, I extend my folding rule andlay it on the roof deck so that the 12-in. mark ison the bottom of the first shingle in the top sec-tion. The shingle is 12-in. high, so this puts thezero point of the rule even with the top of thatshingle. Now I mark at every multiple of 10, i. e.,20 in., 30 in., etc., until I get to the bottom of thetriangular section of roof. Because the bond re-turns to its starting point every 10 in. (or everyother course), I know that the grooves of everycourse that hits a 10-in. multiple will line up withthe grooves of the first shingle in the top section.I make sure it does.
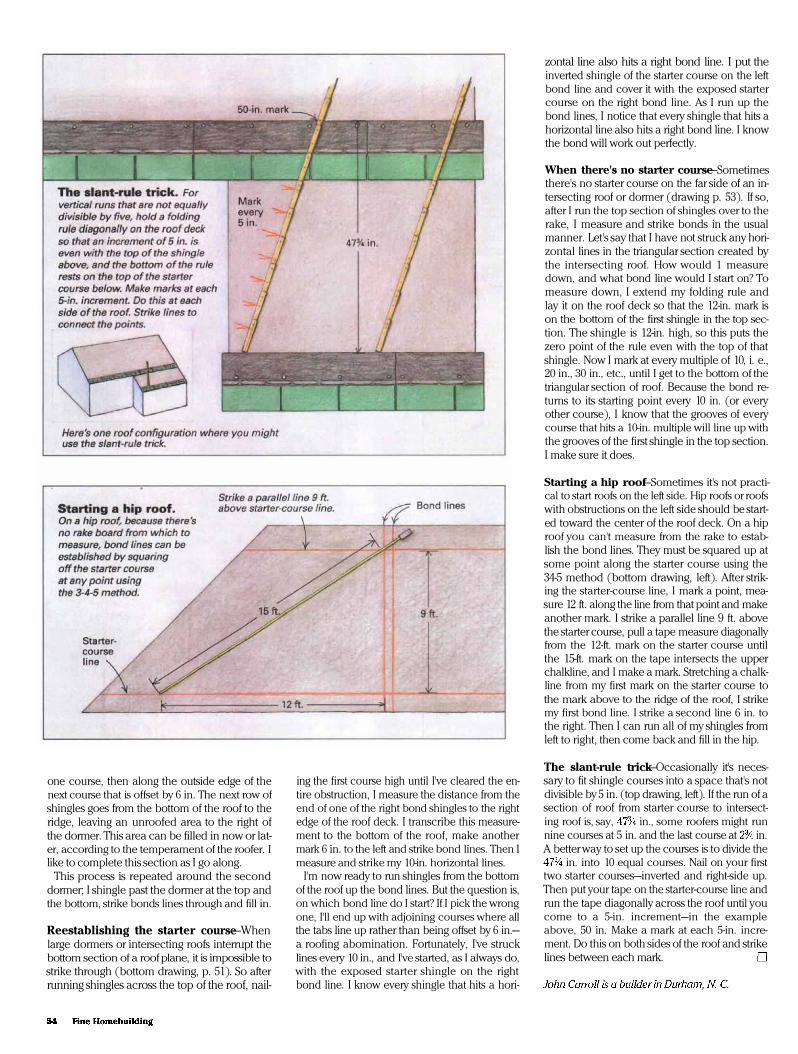
Starting a hip roof—Sometimes it's not practi-cal to start roofs on the left side. Hip roofs or roofswith obstructions on the left side should be start-ed toward the center of the roof deck. On a hiproof you can't measure from the rake to estab-lish the bond lines. They must be squared up atsome point along the starter course using the34-5 method (bottom drawing, left). After strik-ing the starter-course line, I mark a point, mea-sure 12 ft. along the line from that point and makeanother mark. I strike a parallel line 9 ft. abovethe starter course, pull a tape measure diagonallyfrom the 12-ft. mark on the starter course untilthe 15-ft. mark on the tape intersects the upperchalkline, and I make a mark. Stretching a chalk-line from my first mark on the starter course tothe mark above to the ridge of the roof, I strikemy first bond line. I strike a second line 6 in. tothe right. Then I can run all of my shingles fromleft to right, then come back and fill in the hip.
The slant-rule trick—Occasionally it's neces-sary to fit shingle courses into a space that's notdivisible by 5 in. (top drawing, left). If the run of asection of roof from starter course to intersect-ing roof is, say, in., some roofers might runnine courses at 5 in. and the last course at in.A better way to set up the courses is to divide the
in. into 10 equal courses. Nail on your firsttwo starter courses—inverted and right-side up.Then put your tape on the starter-course line andrun the tape diagonally across the roof until youcome to a 5-in. increment—in the exampleabove, 50 in. Make a mark at each 5-in. incre-ment. Do this on both sides of the roof and strikelines between each mark.
The slant-rule trick. Forvertical runs that are not equallydivisible by five, hold a foldingrule diagonally on the roof deckso that an increment of 5 in. iseven with the top of the shingleabove, and the bottom of the rulerests on the top of the startercourse below. Make marks at each5-in. increment. Do this at eachside of the roof. Strike lines toconnect the points.
Starting a hip roof.On a hip roof, because there'sno rake board from which tomeasure, bond lines can beestablished by squaringoff the starter courseat any point usingthe 3-4-5 method.