layout and imposition r4 › ... › designmerge-multiup-imposition.pdf · 2017-01-19 ·...
TRANSCRIPT

Layout & Imposition Options New, standard features of DesignMerge Pro! The latest release of DesignMerge Pro now includes a new set of Layout and Imposition features that can be used to streamline your Multi-‐Up and PDF processing. This document describes the new “Multi-‐up Imposition” feature.
Multi-Up Imposition… This feature allows you to instantly create multi-‐up layouts that can be processed using DesignMerge Pro. When you use the Imposition feature, you will be able to preview your imposed content, allowing you to confirm the imposed content is exactly where you want it. You can even modify the imposed layout if you wish before you print, and of course you can merge the document to produce variable data output using DesignMerge Pro. Additionally, you can use the Imposition feature to create reusable imposition templates that can be opened and utilized for any number of jobs.
Sample Files for Multi-up Imposition There are two sample files that will be utilized for the Multi-‐up Imposition tutorial. Each is described below:
Sample 1 – Duplex Postcard This tutorial uses the sample document (“Postcard.indd”) and sample database (“Postcard.txt”). You may be familiar with these tutorials if you previously went through Tutorial #2 (Postcard), which is one of the standard DesignMerge tutorials. A copy of these files has been included in the Imposition Tutorial Files folder. Below are pictures of the two pages that are in this Postcard document:
First Page Second Page
This sample document already contains variable links to merge one record at a time; in other words, this is a variable 1-‐up document. Additionally, if you have already reviewed Tutorial #2, then you know that the two text frames on the first page are tagged by CopyFit, and the _BARCODE_USPS_IM_ Keyword Link is assigned to text on the second page.

Postcard Document – Size and Bleed This document has been set up with the following Width, Height, and Bleed settings, shown below in inches and also in points:
Sample 2 – Name Tags The second tutorial uses another sample document (“NameTag.indd”) and sample database (“NameTag.txt”) that are provided in the Imposition Tutorial Files folder. Below is a picture of the one page that is in this document:
This sample document already contains variable links to merge one record at a time; in other words, this is a variable 1-‐up document. Additionally, the variable text frame is tagged by CopyFit to ensure the variable names will fit in this text frame and also to ensure this line will not wrap.

Name Tags Document – Size and Bleed This document has been set up with the following Width, Height, and Bleed settings, shown below in inches and also in points:
Creating a Multi-Up Imposition You can use the Multi-‐Up Imposition feature to quickly and easily impose content from a one-‐up document. In this first tutorial, we will demonstrate how to fully impose a file in a single step. To impose the 2-‐page, 1-‐up sample document (“Postcard.indd”), follow the steps below:
1) First, create a new document to receive the imposed content.
The first step in the process is to create a new, blank document that represents the overall paper size that you wish to print. This new document will receive the imposed content from the one-‐up document that you will select later on. The blank document you create can be no more than 2 pages in length (allowing for either a Simplex, or a Duplex imposition).
For this example, create a new 2-‐page, Tabloid Size document with a Landscape Orientation, a Margin of .25 inches (18 pts) and no Bleed or Slug. The settings for the sample document are shown below in inches on the left, and points on the right:

2) Open the Multi-Up Imposition dialog.
Open the DesignMerge menu and select Options > Layout and Imposition > Multi-Up Imposition to access the Multi-Up Imposition dialog, shown in the picture below:
3) Choose to impose a file.
In the Job Settings/Document section, select Impose Selected File from the Action menu, shown circled in the picture below:

You may notice that there are a few other actions in this menu (Create Imposition Template and Populate Imposition Template). Both of these actions will be discussed in the next section, which covers the Name Tags example.
4) Select which Page will receive the imposed content.
If the document you created to receive the imposed content contains only one page, the default setting is Apply to Page 1.
For a 2-‐page document, the default setting is Apply to All Pages. However, you may choose to place imposed content on just one of the two pages, Page 1 or Page 2.
For this example, keep the default setting Apply to All Pages.
5) Select a document for the imposition.
Select any 1-‐page or 2-‐page InDesign document that contains the content you wish to impose.
The file name of the document that you last selected will be displayed on the dialog. To select a different document, click the button.
For this example, select the document “Postcard.indd” that is inside the Imposition Tutorial Files folder.
Your dialog settings should now look like those in the picture below:
6) Select Trim Size settings.
The Trim Size settings, including the Bleed amount, will be automatically set to match those of the document you selected in the previous step (please see the Designing a One-up Document section for details about best practices for creating one-‐up documents with bleed). If you wish, you can modify any of these amounts.
Note: if you click Get Dimensions and select a different document than the one selected in the previous step, this will change which document will be imposed, as well as modify the Trim Size settings to match those of the document you just selected.
For this example, keep the Trim Size settings that are set by default for the “Postcard.indd” document, shown in the picture below:
7) Select Crop Marks settings.
Choose which type of marks, if any, you wish to Place in the document, Where to place the marks, and enter amounts for their Length, Offset, and Weight.

For this example, select the settings shown in the picture below:
8) In the Imposition Settings section, modify the Layout settings.
In this section you can indicate how may “ups” to create by specifying the maximum number of columns (Max Columns) and rows (Max Rows). The Fill Sheet option will automatically apply the maximum number that can fit in the current document.
The Horizontal Gap and Vertical Gap amounts are originally set to 0. If you prefer a Horizontal or Vertical Gap or both be applied, you can enter a different amount.
If you wish, you may also apply a Rotation to the imposition. The rotation value specified here will apply to all of the imposed ups that are placed onto the page.
For this example, select Fill Sheet for both Max Columns and Max Rows, enter 0 pt (0 in) for the Horizontal Gap and Vertical Gap, and select None for the Rotation, as shown in the picture below:
9) Select Sequencing settings.
This section allows you to set the “Sequencing” for each “up”, very much like you may have done manually using the built-‐in DesignMerge Sequencing features. You first indicate a Frame Order. The Frame Order determines the Sequencing Order that will be automatically applied to Variable Links during the imposition process. Note that once the content has been imposed, you will still be able to use the DesignMerge Sequence Page Items and Change Sequence Number features whenever you prefer to apply a different Sequence Order.
Also, if you are setting up both pages of a 2-‐page document that is designed to be printed duplex (as in the Postcard example), select a Duplex Mode. The Duplex Mode determines both the Sequencing Order and the Rotation (if required) of the content for the second (duplex) page. This is designed to ensure that the sequencing on the back page is adjusted to correctly “back up” to the corresponding sequence on the front page when the document is printed duplex. For those of you that have had to do this type of thing manually in DesignMerge, we think you will appreciate the power of this feature! Choose the Duplex Mode that is appropriate for the Duplex feature on your digital press.
For examples, below are pictures of a 2-‐up, 2-‐page document demonstrating the Orientation and Sequence Orders that each Duplex Mode will apply when Frame Order is set to Left to Right, Top to Bottom:
Duplex Mode: None

First Page Second Page
Duplex Mode: Normal (Long-Edge Binding)
First Page Second Page
Duplex Mode: Tumble (Short-Edge Binding)
First Page Second Page
For the Postcard example, select the settings shown in the picture below:
10) When ready, click the Impose File button.
The imposition process will proceed. First, a set of Imposition Frames™ will be added according to the settings that you specified. Then, each of these Imposition Frames will be populated with content from the document you chose to impose. The process is repeated for each page specified, adjusting the position, sequence, and rotation as necessary.
For example, when you are imposing content from the 2-‐page Postcard tutorial document onto a 2-‐page imposition document, applying the settings presented in this set of steps, then the content from the first page of the Postcard document will be automatically imposed on the first page, as shown in the picture below:

Also, content from the second page of the Postcard document will be imposed on the second page, as shown in the picture below:
11) This document is complete and ready to be merged by DesignMerge!
Your document is now imposed and sequenced and ready to be merged. For this example, save this 4-‐up document in the “Postcard” Tutorial Files folder. This will ensure that DesignMerge will be able to find all required fixed and variable image files when merging the document. Note the sample database “Postcard.txt” is also in the “Postcard” Tutorial Files folder.
Next, open the DesignMerge (Merge) dialog, and run a Preview Test to preview content being merged in this multi-‐up document.

For the Preview Test, you can select either Step by 4 or Cut & Stack for the Records Sequence Mode, whichever you prefer.
To avoid content oversetting during this Preview, remember to select the CopyFit option and choose Set 1, or choose Tagged Boxes Only if your version of the Postcard document has boxes already tagged by CopyFit.
For example, below are pictures of the settings to select to run a “Step by 4” Preview Test and to run a “Cut & Stack” Preview Test:
Note: the resulting imposed document is a standard InDesign document that has been prepared for use with DesignMerge. As such, you can change the content of this document as you wish. For example, you can change the position or rotation of its content. You can also edit the content, including adding or removing variables. Additionally, you can apply the DesignMerge Sequence Page Items or Change Sequence Number features to change the Sequence Order of the variables.
For a Duplex job, if the printer is not backing up properly the matching content on the back with the correct content on the front, you have a few options. Option 1: You can re-sequence the items on the second page using the DesignMerge sequencing options. Option 2: You can re-impose only the back page of the document, specifying a different sequencing order. Option 3: You ca re-do the whole thing, specifying a different selection for the Duplex Mode setting, choosing the Mode that is appropriate for the Duplex feature on your digital press.
See DesignMerge Tutorial #1 (The Basics) to review how to run a Preview Test, as well as to review how to place variable links in a document. See Tutorial #3 (ID Badges) to review sequencing variable links, including how to apply the Sequence Page Items or Change Sequence Number features and how to run a Step by Step or Cut & Stack merge session. See Tutorial #2 (Postcard) to review using CopyFit.
If you are imposing content from a 2-page document onto only one page in your imposition document, then before proceeding a dialog will prompt you to choose the page whose content you wish to impose. An example is shown in the picture below:
Working with Imposition Templates The main concept behind the Multi-‐Up Imposition feature of DesignMerge is based on the use of a unique and trademarked concept called an Imposition Frame™. These are specially designated frames that are created by the Imposition process, and serve to identify where on a document page to place content that is read from a separate InDesign document. The Imposition Frames also hold a “Sequence”, which designates the desired DesignMerge sequence value to use when content is imported into the frame.
Once Imposition Frames have been created in an InDesign document, we refer to these documents as “Imposition Templates”. The idea with Imposition Templates is that once created, they can be customized, opened, and re-‐used at any time. This unique feature allows the user to further refine and modify their Imposition Templates. As an example, the user may wish to rotate a selection of the Imposition Frames and position them elsewhere on the page. This can be useful for applications that need to maximize paper usage (this will be demonstrated in the next Name Badge tutorial). You can also add color bars, or any other type of design elements you wish to the templates.
To use an Imposition Template, you open it and then choose “Populate Imposition Template” as the action to perform. After selecting the document to be imported, the content will be matched with the existing Imposition Frames, sequenced, and rotated as needed.
Note that in the previous tutorial, you performed an “Impose Selected File” action. This action effectively performs both the “Create Imposition Template” and “Populate Imposition Template” actions at one time! In this next tutorial, you will learn how to use Imposition Templates to create a custom template designed to maximize paper usage. Then you will learn how to impose content onto the new, custom template.
Creating an Imposition Template As described earlier, the DesignMerge Multi-‐Up Imposition feature lets you set up a document for use as an Imposition Template. You can then use this template to impose content whenever you wish. This can be particularly helpful if you would like to set up a custom Imposition Template.
For this example, we will create an Imposition Template designed to impose a 4 in. x 3 in. (288 pt x 216 pt) document with .125 in. (9 pt) Bleed on a Letter Size document. Normally, using your average, standard imposition systems, a user might only able to fit only 3 “ups” on this page size. However, in this example you will see that by using the DesignMerge Multi-‐Up Imposition Template feature, which allows us to rotate some of the frames, we will be able to fit 5 ups on this page. To do this, we will demonstrate how to use the Create Imposition Template feature on the same document, twice in a row!
Stage One of This Example – Create an Imposition Template
To create an Imposition Template, follow the steps below:
1) First create a new document.
As in the previous example, you first need to create a blank InDesign document that represents the overall “paper size” you wish to print. For an example, below is a picture showing New Document settings to create a 1-‐page Letter Size document with a Portrait Orientation and a Margin of .125 inches (9 pts). For this tutorial, go ahead and create a document of this size.

2) Open the Multi-Up Imposition dialog.
To display the Multi-Up Imposition dialog, open the DesignMerge menu and select Options > Layout and Imposition > Multi-Up Imposition. The Multi-‐up Imposition dialog will be displayed, retaining the values from your last session.
3) Choose to create an Imposition Template.
In the Job Settings/Document section, select Create New Imposition Template from the Action menu, shown circled in the picture below:
4) Select which Page will receive the imposed content.
If the document contains only one page, the default setting is Apply to Page 1. For a 2-‐page document, the default setting is Apply to All Pages. However, you may choose to place imposed content on just one of the two pages, Page 1 or Page 2.
For this example, keep the default setting Apply to Page 1.
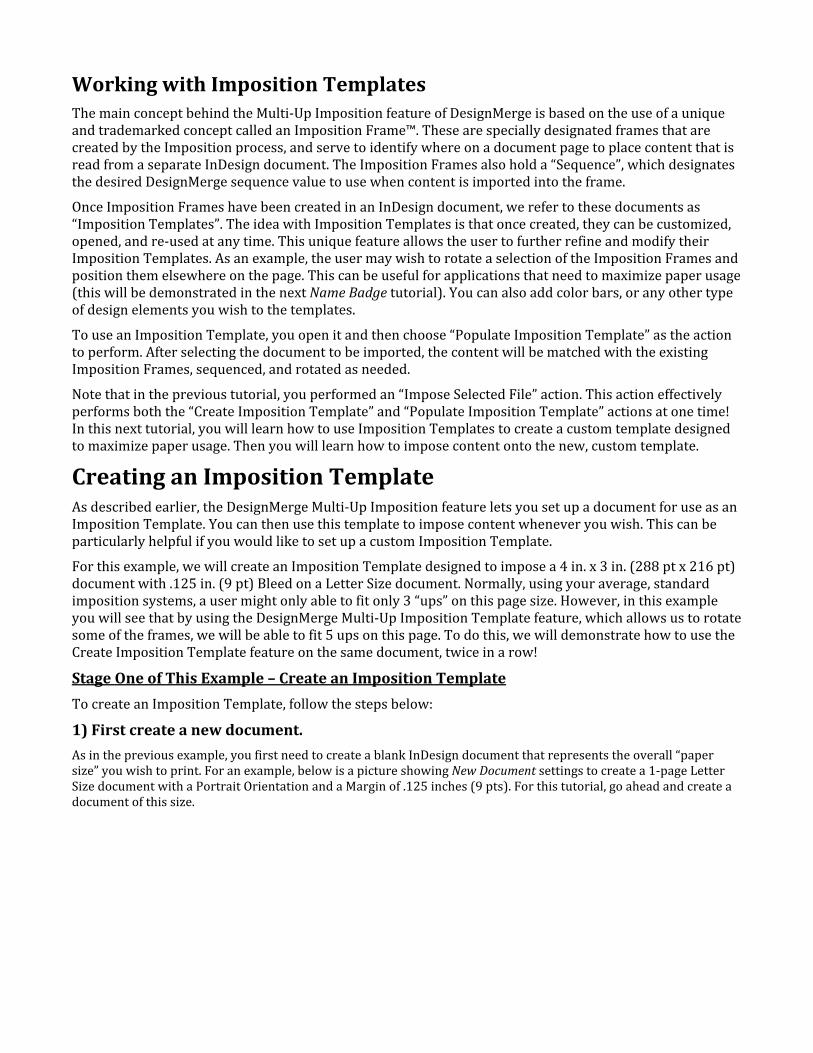
5) Select Trim Size settings.
Trim Size settings will be automatically set to whatever settings were last applied.
To set a different Trim Size for an Imposition Template, you can manually enter your preferred Width, Height and Bleed amounts. Or, you can click Get Dimensions and select a document that has the dimensions you wish to use for this template.
For this example, click the Get Dimensions button and select the “NameTag.indd” document that is inside the “Imposition Tutorial Files” folder. This will set the Trim Size and Bleed amounts to match those of this InDesign document, as shown in the picture below:
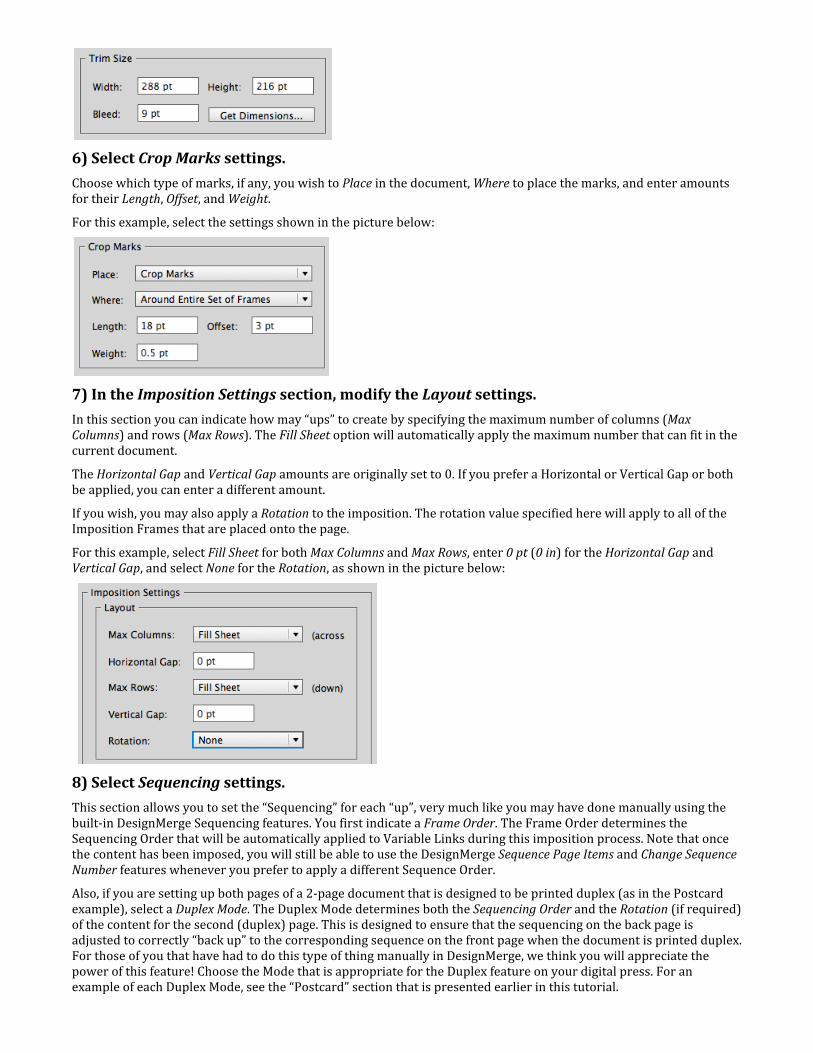
6) Select Crop Marks settings.
Choose which type of marks, if any, you wish to Place in the document, Where to place the marks, and enter amounts for their Length, Offset, and Weight.
For this example, select the settings shown in the picture below:
7) In the Imposition Settings section, modify the Layout settings.
In this section you can indicate how may “ups” to create by specifying the maximum number of columns (Max Columns) and rows (Max Rows). The Fill Sheet option will automatically apply the maximum number that can fit in the current document.
The Horizontal Gap and Vertical Gap amounts are originally set to 0. If you prefer a Horizontal or Vertical Gap or both be applied, you can enter a different amount.
If you wish, you may also apply a Rotation to the imposition. The rotation value specified here will apply to all of the Imposition Frames that are placed onto the page.
For this example, select Fill Sheet for both Max Columns and Max Rows, enter 0 pt (0 in) for the Horizontal Gap and Vertical Gap, and select None for the Rotation, as shown in the picture below:
8) Select Sequencing settings.
This section allows you to set the “Sequencing” for each “up”, very much like you may have done manually using the built-‐in DesignMerge Sequencing features. You first indicate a Frame Order. The Frame Order determines the Sequencing Order that will be automatically applied to Variable Links during this imposition process. Note that once the content has been imposed, you will still be able to use the DesignMerge Sequence Page Items and Change Sequence Number features whenever you prefer to apply a different Sequence Order.
Also, if you are setting up both pages of a 2-‐page document that is designed to be printed duplex (as in the Postcard example), select a Duplex Mode. The Duplex Mode determines both the Sequencing Order and the Rotation (if required) of the content for the second (duplex) page. This is designed to ensure that the sequencing on the back page is adjusted to correctly “back up” to the corresponding sequence on the front page when the document is printed duplex. For those of you that have had to do this type of thing manually in DesignMerge, we think you will appreciate the power of this feature! Choose the Mode that is appropriate for the Duplex feature on your digital press. For an example of each Duplex Mode, see the “Postcard” section that is presented earlier in this tutorial.

For this example, select Top to Bottom, Left to Right for the Frame Order, and you can ignore the Duplex Mode setting which will not be applied since this is a 1-‐page document, as shown in the picture below:
9) When ready, click Create Template button.
After clicking the Create Template button, a set of Imposition Frames will be added to the document according to the settings that you specified.
Each Frame will display a label indicating its Frame Sequence/Merge Order. These labels are non-‐printing and can be hidden whenever you wish by hiding frame edges. If you prefer your Imposition Frames not display a label, you can change your Multi-Up Imposition Preferences, as described later in this tutorial.
Additionally, two layers will be added to the document. The Crop Marks layer contains the Imposition Marks. The Imposition Frames layer contains the Imposition Frames.
For example, below is a picture of the page after applying the settings presented in this set of steps:
As you can see, the maximum number of ups created by the process is three, as you would expect in most Imposition systems. In the next section, we will show you how to get a couple more ups out of this template!
10) Save the document.
This document is now ready for you to populate its Imposition Frames with content whenever you wish, as described in the “Populate Imposition Frames” section later in this tutorial. Note you may prefer to save the document as an InDesign Template file so that any time you open the file, InDesign will automatically open a copy of the file instead, leaving the original file unchanged and available for reuse.
For this example, save this file as an InDesign document because we are going to add more Imposition Frames to it in the next set of steps.
Stage Two of This Example – Add More Imposition Frames (and rotate them)
In reviewing the imposed document, notice that, if we move the current three Imposition Frames over a bit to the left side of the page, this page will have enough space on the right side for a couple of rotated Imposition Frames.

To place the additional, rotated Imposition Frames in this document, you have a couple of options:
Option A – Manual Process: You can manually copy/paste and rotate the existing Imposition Frames, and position them wherever you want on the page. Then, you can use the DesignMerge Sequence Page Items or Change Sequence Number features to change the sequencing for all of the Imposition Frames on the page.
Option B – Automated Process: You can use the Multi-‐up Imposition feature again, on the same document, to automate the creation of additional, rotated Imposition Frames. For an example of this approach, please follow the steps below.
1) First, group all of the existing content together.
Grouping the content on the page will allow us to more easily keep all of the Imposition Frames and Marks in alignment, for example, when we move them to a new position on this page.
To group this content, first click on the InDesign Selection tool (the pointer tool). Then, open the InDesign Edit menu and choose Select All. Finally, open the InDesign Object menu and select Group. All items on the page are now grouped together.
Note: by grouping the items together, this automatically moves the all content to the Crop Marks Layer where it can remain for now. When we ungroup the items later on, the Imposition Frames will return automatically to the Imposition Frames layer.
2) Align this group of content to the Left Margin.
Now that we have everything grouped, we are going to move the objects over to the left. One easy way to do this is to select the group by clicking once on the group with the InDesign Selection tool (or optionally, open the InDesign Edit menu and choose Select All).
Next, display your InDesign Control window if it not already showing. To do this, open the InDesign Window menu and select Control.
On the Control window, set the Reference Point to the Top Left corner by clicking on that square, shown circled in the picture below, and then enter 9 pt (or .125 in) for the X coordinate:

Press the Return/Enter key on your keyboard (or click anywhere on the document page) and the group will be aligned with the left margin edge of the page.
As you can see in the picture below, there is now enough empty space on the right side of the page to add a couple of rotated Imposition Frames:

3) Open the Multi-Up Imposition dialog.
Next we are going to add a couple more Imposition Frames to this layout, so we start again by opening the Multi-‐Up Imposition dialog. To display the Multi-Up Imposition dialog, open the DesignMerge menu and select Options > Layout and Imposition > Multi-Up Imposition.
4) Choose to create an Imposition Template.
In the Job Settings/Document section, select Create New Imposition Template from the Action menu, shown circled in the picture below (note: this should still be selected from the previous session):
5) Select which Page will receive the imposed content.
For this example, keep the default setting Apply to Page 1.
6) Select Trim Size settings.

For this example, keep the previous settings, shown in the picture below:
7) Select Crop Marks settings.
For this example, keep the previous settings, shown in the picture below:
8) For the Imposition Settings, select Layout settings.
For this example, select 1 Column for Max Columns and 2 Rows for Max Rows (this will add two more Imposition Frames to the current document).
Enter 0 pt (0 in) for the Horizontal Gap and Vertical Gap.
Select -90 degrees for the Rotation. This will rotate both of the Imposition Frames so they will fit within the open area on the right side of document. Enter the settings as shown in the picture below:
9) Select Sequencing settings.
For this example, select Top to Bottom, Left to Right for the Frame Order, and you can ignore the Duplex Mode setting which will not be applied since this is a 1-‐page document, as shown in the picture below:
10) When ready, click the Create Template button.
In this example, two new Imposition Frames will be added to the document according to the settings that you selected. Each Frame will by default display a label indicating its Frame Order. Additionally, the new Imposition Marks are placed on the Crop Marks layer and the new Imposition Frames are placed on the Imposition Frames layer.
For example, below is a picture of the page after applying the settings presented in this set of steps:

11) Align the new content to the Right Margin.
Now we want to nudge the new frames and marks over to the right so they fill in the empty space. To align this new content, first select the new Frames and their Marks. To do this, select the InDesign Selection tool, and then do a Select All to select all items on the page. Then Shift-‐Click on the group of the three Frames on the left side of the page to remove that group from your selection. This should leave selected only the two new frames and their marks. You can now group the new content together to more easily keep all of these objects aligned correctly while moving the content (open the InDesign Object menu and select Group).
Leaving the new group selected, on the Control window, set the Reference Point to the Top Right corner by clicking on that square, shown circled in the picture below, and then enter 603 pt (or .125 in) for the X coordinate, also shown circled in the picture below:

Press the Return/Enter key on your keyboard (or click anywhere on the document page) and the group will be aligned with the left margin edge of the page. Note: You can also drag the frames to the new position, or nudge them over with the arrows keys. Totally up to you! Somehow you just need to position those new frames and marks in the open position on the right.
You now have 5 Imposition Frames on the page. Their labels indicate their Frame Order. The 3 on the left are in Frame Order Seq-1 through Seq-3 and the two on the left are in Frame Order Seq-1 through Seq-2, as shown in the picture below:

12) Ungroup everything on this page.
To ungroup everything, click the InDesign Selection tool and choose Select All. Then, open the InDesign Object menu and select Ungroup. This should ungroup all of the items, and return the Imposition Frames to the Imposition Frames layer. The Marks should remain on the Crop Marks layer.
13) You are now ready to re-sequence the Imposition Frames.
Since we added two Imposition Frames to an existing Imposition Template, we now want to re-‐sequence all of the frames to ensure they are in a consecutive and unique order. This is required for use with DesignMerge software.
First, confirm that no objects are selected in the document. Then open the DesignMerge menu and select Sequence Page Items. For this example, select the settings shown in the picture below:
14) When ready, click the OK button.
DesignMerge will quickly re-‐sequence the Imposition Frames, ensuring that each frame now has a unique sequence value (which will be displayed in the small label that is visible above each frame). The Imposition Frames will be resequenced Seq-1 through Seq-5, as shown in the picture below:

15) Save this 5-up Imposition Template Document.
This document is now ready for you to populate its Imposition Frames with content whenever you wish, as described in the “Populate Imposition Frames” section later in this tutorial. Note you may prefer to save the document at this point as an InDesign Template file so that any time you open the file, InDesign will automatically open a copy of the file instead, leaving the original file unchanged and available for reuse.
For this example, save the document where you can easily find it to use in the next section of this tutorial where you will populate this Imposition Template with content.
Populate an Imposition Template Once you have set up an Imposition Template, then you can use the template to impose content whenever you wish. Populating an Imposition Template lets you preview your imposed content, allowing you to confirm the imposition is set up the way you prefer before you produce the imposed variable data output. To populate an Imposition Template, follow the steps below:
1) First, open a copy of an Imposition Template.
You will normally prefer to open a copy of an Imposition Template so that you can use the original version of the template again in the future.
For this example, open a copy of the 5-‐up Imposition Template that you created in the previous set of steps.
2) Open the Multi-Up Imposition dialog.
To display the Multi-Up Imposition dialog, open the DesignMerge menu and select Options > Layout and Imposition > Multi-Up Imposition.
3) Choose to populate an Imposition Template.
In the Job Settings/Document section, select Populate Imposition Template from the Action menu, as shown circled in the picture below:

4) Next, select which Page to populate.
In this example, since you are populating a 1-‐page imposition template, Apply to Page 1 is automatically selected. If you were populating a 2-‐page imposition template, then you could choose to apply to All Pages, or to apply to only Page 1 or Page 2.
5) Then, select the 1-page or 2-page document that you want to populate this Imposition Template.
The Document settings display the file name of the document that you last selected. To select a different document, click the button.
For this example, select the “NameTag.indd” document that is inside the “Imposition Tutorial Files” folder. You will then see the file name “NameTag.indd” in the Document box. Your dialog should look like the picture below:
6) When ready, click the Populate Template button.
The Imposition feature will populate each Imposition Frame in the document with content from the selected document, as shown in the picture below:

If any Frames were rotated, as in this example, the content will be rotated as well. Additionally, Variable Links will be automatically resequenced to match the Sequence of its receiving Imposition Frame. The Imposition Frames that receive the content are automatically removed after being populated. If you prefer the Imposition Frames remain in the document, change your Multi-Up Imposition Preferences, as described later in this Tutorial.
Note that if you were populating a 2-‐page imposition template with content from a 2-‐page document, then the content from the first page of the selected document will be automatically placed in each Imposition Frame on the first page of the template, and content from the second page will be automatically placed in each Imposition Frame on the second page.
Also, if you were populating only one page of an Imposition Template with content from a 2-‐page document, then a dialog would prompt you to choose the page whose content you wish to place on that one page in the Imposition Template. An example is shown in the picture below:
11) This document is complete and ready to be merged by DesignMerge!
Your document is now imposed and sequenced and ready to be merged. For this example, save this 5-‐up document in the “Imposition Tutorial Files” folder. This will ensure that DesignMerge will be able to find all required files when merging the document. Note the sample database “NameTag.txt” is also in the “Imposition Tutorial Files” folder.
Next, open the DesignMerge (Merge) dialog, and run a Preview Test to preview content being merged in this multi-‐up document.

For the Preview Test, you can select either Step by 5 or Cut & Stack for the Records Sequence Mode, whichever you prefer.
To avoid content oversetting during this Preview, remember to select the CopyFit option and choose Tagged Boxes Only since the imposed Name Tags have a text frame tagged by CopyFit.
For example, below are pictures of the settings to select to run a “Step by 5” Preview Test and to run a “Cut & Stack” Preview Test:
Note: the resulting imposed document is a standard InDesign document that has been prepared for use with DesignMerge. As such, you can change the content of this document as you wish. For example, you can change the position or rotation of its content. You can also edit the content, including adding or removing variables. Additionally, you can apply the DesignMerge Sequence Page Items or Change Sequence Number features to change the Sequence Order of the variables.
See Tutorial #1 (The Basics) to review how to run a Preview Test, as well as to review how to place variable links in a document. See Tutorial #3 (ID Badges) to review sequencing variable links, including how to apply the Sequence Page Items or Change Sequence Number features and how to run a Step by Step or Cut & Stack merge session. See Tutorial #2 (Postcard) to review using CopyFit.
Designing a One-up Document (with bleed) This section talks about best practices for designing the one-‐up documents that are intended to be imposed later on. In short, the dimensions of the one-‐up document should match the final Trim Size for the file. Additionally, if any bleed is required, that should be specified as a part of the document setup (either at the time you create the document, or later by choosing the Document Setup… item from under the InDesign File menu).
When you are creating a one-‐up document that contains bleed, there are several common scenarios that are utilized by designers. Each scenario is described in some detail below:
Scenario 1 – Document Setup Includes Bleed: This is the recommended approach to designing one-‐up documents to be used with the DesignMerge Multi-‐Up Imposition feature. With this approach, the one-‐up document is created such that the document size matches the final Trim Size, and if any bleed is desired, this will be specified as a part of the Document Setup. The bleed amount can be specified at the time the document is created, or the bleed can be added to the document later on by choosing the Document Setup… item from under the InDesign File menu. Using this approach, if you select the file to be imported using the Select Document or Get Dimensions buttons on the Multi-‐Up Imposition dialog, the Trim Size and Bleed

Amount assigned to the document will be read automatically and used to populate those settings in the dialog window.
Scenario 2 – Bleed Added Using Oversized Frames: Some designers may prefer to design the one-‐up document at actual trim size, with no specific bleed value entered in the document setup. In such case, if a bleed is desired, the designer may create an “oversize” version of some frames that extend beyond the defined document edges, thereby effectively creating their own arbitrary bleed. With documents of this type, the Trim Size will be read correctly using the Select Document or Get Dimensions buttons, however, the user is responsible for entering the desired Bleed Amount manually (since it cannot be read from the document). Generally, this should not present much of an issue as long as the user knows the desired bleed amount to use and enters it into the settings. Of course, the designer can always add a bleed value to the document by simply choosing the Document Setup… item from under the InDesign File menu, which is the preferred and most reliable approach.
Scenario 3 – Document Size Includes Full Bleed Amount: For some jobs, the designer may actually create the document such that the document size (which would normally be the trim size) includes the bleed amount as well. In this scenario, when you select the file using the Select Document or Get Dimensions buttons, the Trim Size value that is imported into the dialog settings will technically already reflect the Trim Size plus Bleed. So you have a couple of options here: a) you an adjust the settings manually, enter the desired Trim Size and Bleed Values for the job, or b) you can turn off the Adjust Frame size by specified Bleed value setting in the Preferences, and just enter the Bleed Value. With this Preference setting off, Imposition Frames are created at the exact dimensions of the Trim Size (they are not adjusted for bleed). The only advantage this presents to the end user is that they do not need to re-‐calculate the Trim Size (but they do still need to enter the bleed amount). The bleed marks will be positioned as always at the corners of the Imposition Frame, and the actual Trim Size (where the crop marks are positioned) is calculated by indenting by the specified Bleed Amount value. So this approach is kind of a different way of thinking about the process, but it will work if you want to use it!
Multi-Up Imposition Preferences There are several preferences available for the Multi-‐Up Imposition feature. To access these preferences, open the DesignMerge menu and select Options > Layout and Imposition > Multi-Up Imposition.
This opens the Multi-Up Imposition dialog where you will see two Tabs: Setup and Preferences. Click the Preferences tab to see your Multi-‐Up Imposition Preferences, shown in the picture below:
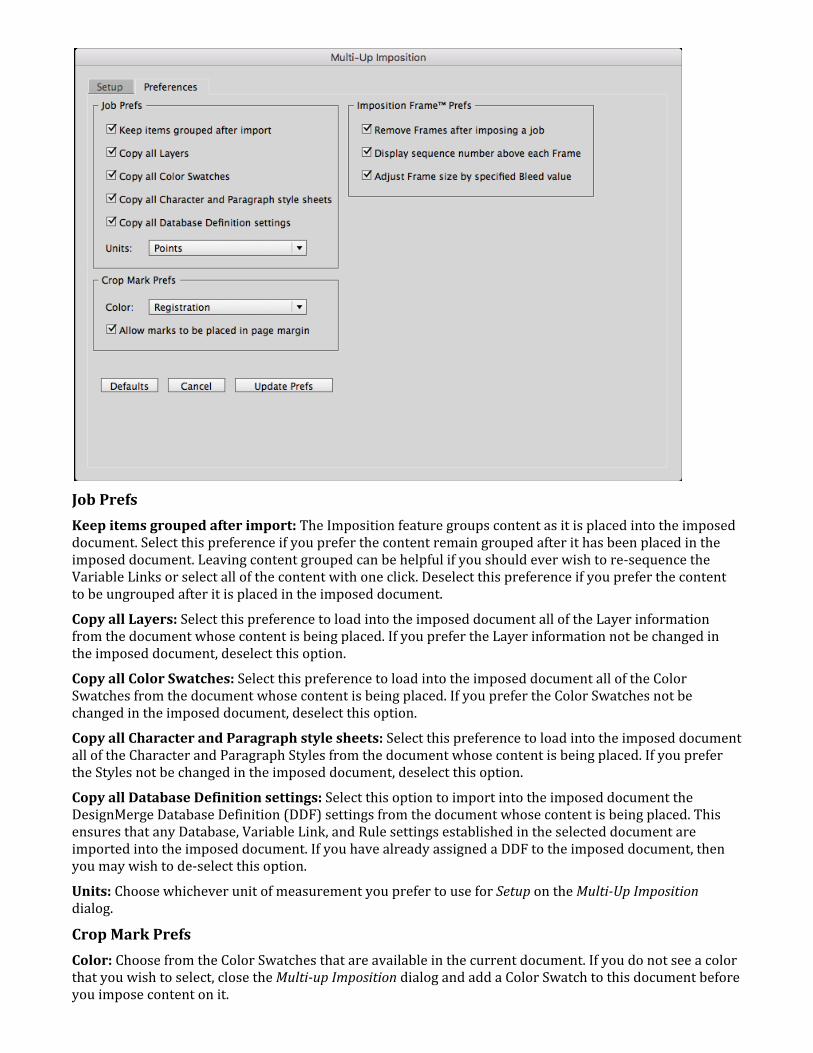
Job Prefs
Keep items grouped after import: The Imposition feature groups content as it is placed into the imposed document. Select this preference if you prefer the content remain grouped after it has been placed in the imposed document. Leaving content grouped can be helpful if you should ever wish to re-‐sequence the Variable Links or select all of the content with one click. Deselect this preference if you prefer the content to be ungrouped after it is placed in the imposed document.
Copy all Layers: Select this preference to load into the imposed document all of the Layer information from the document whose content is being placed. If you prefer the Layer information not be changed in the imposed document, deselect this option.
Copy all Color Swatches: Select this preference to load into the imposed document all of the Color Swatches from the document whose content is being placed. If you prefer the Color Swatches not be changed in the imposed document, deselect this option.
Copy all Character and Paragraph style sheets: Select this preference to load into the imposed document all of the Character and Paragraph Styles from the document whose content is being placed. If you prefer the Styles not be changed in the imposed document, deselect this option.
Copy all Database Definition settings: Select this option to import into the imposed document the DesignMerge Database Definition (DDF) settings from the document whose content is being placed. This ensures that any Database, Variable Link, and Rule settings established in the selected document are imported into the imposed document. If you have already assigned a DDF to the imposed document, then you may wish to de-‐select this option.
Units: Choose whichever unit of measurement you prefer to use for Setup on the Multi-Up Imposition dialog.
Crop Mark Prefs
Color: Choose from the Color Swatches that are available in the current document. If you do not see a color that you wish to select, close the Multi-up Imposition dialog and add a Color Swatch to this document before you impose content on it.

Allow marks to be placed in page margin: Select this option to allow Crop Marks and Bleed Marks to be placed within the margin area of a page when content is imposed in a document (note that the content itself is never placed into the margin). Doing so may allow more Rows/Columns of content to be placed in an imposed document. Deselect this option if you prefer marks be restricted only to the page area.
Imposition Frame™ Prefs
Remove Frames after imposing a job: Select this option to have the original Imposition Frames automatically removed after the document has been imposed. Deselect this option if you prefer the Imposition Frames remain in the imposed document.
Display sequence number above each Frame: By default, an Imposition Frame displays a non-‐printing “tab” indicating the frame’s assigned sequencing order. This number determines which Sequence Number will be applied to Variable Links in the content that populates a frame. Deselect this preference if you prefer not to see this information displayed on an Imposition Frame.
Adjust Frame size by specified Bleed value: This setting indicates that the Trim Size you specified does not already include the Bleed Amount (note: the tooltip for this can be kind of confusing. Please see the “Designing for Bleed” section for a more detailed explanation).
Help and Support To access the Online Support Center, open the DesignMerge menu and select Help > Online Support Center. Besides providing information about support, this site allows you to open support tickets, view your past and current support tickets, and access a helpful knowledgebase of articles that provide answers to frequently asked questions.
You can also access Help specific to this Imposition feature by clicking the Help button on the Multi-Up Imposition dialog.