ld the curtain ! think outside the curtain wall tool in...
TRANSCRIPT

UnfoTool
Philip Cha AB200outside thunfold thehow to usshowcase
LearninAt the en
• Expla
• List t
• Expla
• Crea
About tPhilip Cis respoadminisin the usunder a proficienPhilip hoand is aprofessibeen an
Email: pc
ld the Cin Auto
an – Lake|Fla
6 You hahe box, the curtae tricks of how tse curtain walls e some of the re
ng Objectivnd of this clas
ain how to us
the pros and c
ain how neste
ate your own d
the SpeakeChan currentlonsible for distrates all Rese of Revit. Sfull-service
ncy. olds a Bache
a LEED Accrional. Philip n active spea
chan@lakefla
: http://www.l
Curtainodesk®
ato Architects
ave probably usain wall systemto strategically pto generate qu
real-world proje
ves s, you will be
se curtain wal
cons of curta
ed family wor
design eleme
er ly is the BIMirecting the uevit templateSince 2007, contract; the
elor of Archiredited Profehas spoken
aker at the lo
ato.com
inkedin.com/p
! Think® Revit®
s
sed the curtain m can become yplan and createuantity count scect samples of h
able to:
l as an altern
in wall tool
rks in curtain w
ents
M Manager ausage of BIMes and conte
Lake|Flato e office supp
itecture and essional. He
at the Autodocal Revit us
pub/philip-cha
k Outsid®
wall tool the wayour favorite toe your own cuschedules with dhow we have u
ative solution
wall
t Lake|FlatoM in the officnts, and conhas used Reports this sin
Environmenis also an A
desk Universser group.
an-leed-ap/16
de the C
ay it is meant toool in Autodesk stom families fodifferent categoused the tool.
n
Architects ice. He develonducts continevit to documngle platform
ntal Design fAutodesk Rersity Virtual s
6/845/640
Curtain
o be used. HowRevit software
or curtain walls. ries of families.
in San Antonops, maintainued educatment all proj
m to ensure m
from Universevit Architectsession in 20
n Wall
wever, if you thie. In this class, w
We will show y. We will also
nio, Texas. Pins and tion for the sjects executemaximum sta
sity of Houstture certified010 and has
ink we will you
Philip
staff ed aff
ton d s

Unfold the Curtain! Think Outside the Curtain Wall Tool in Autodesk® Revit®
2
Introduction This class will focus on the use of traditional Curtain Wall System and Slope Glazing tool in Revit. Since both of them use the same set of rules to define the system, for modeling wall and roof respectively, the techniques showcased in this class could be interchangeable in some cases.
Curtain wall accessed from “Wall” command.
Slope glazing roof accessed from “Roof” command

Unfold the Curtain! Think Outside the Curtain Wall Tool in Autodesk® Revit®
3
Curtain Wall is a system family that is considered to be a “wall” in Revit; therefore, it behaves like one. Under the Curtain Wall properties, there are instance parameters that control physical dimensions as well as justification of the “grids”; type parameters that define the overall “structure”.
Unfold the Curtain! Think Outside the Curtain Wall Tool in Autodesk® Revit®
4
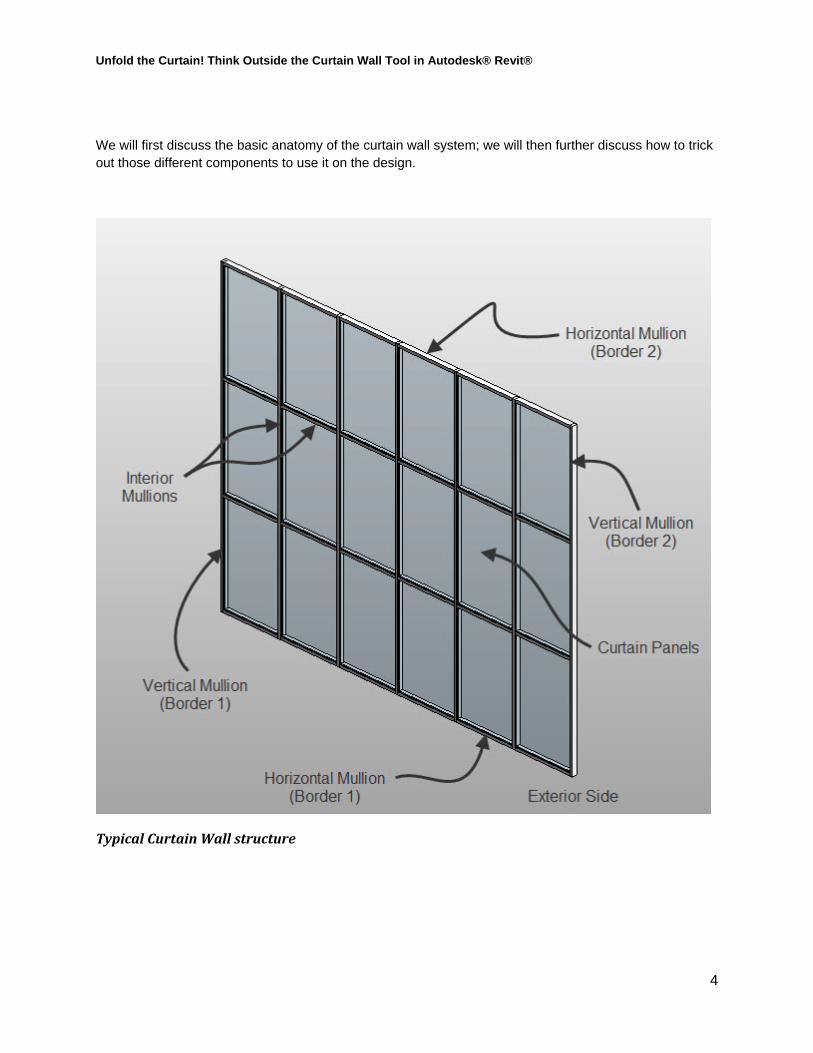
We will first discuss the basic anatomy of the curtain wall system; we will then further discuss how to trick out those different components to use it on the design.
Typical Curtain Wall structure
Unfold the Curtain! Think Outside the Curtain Wall Tool in Autodesk® Revit®
5
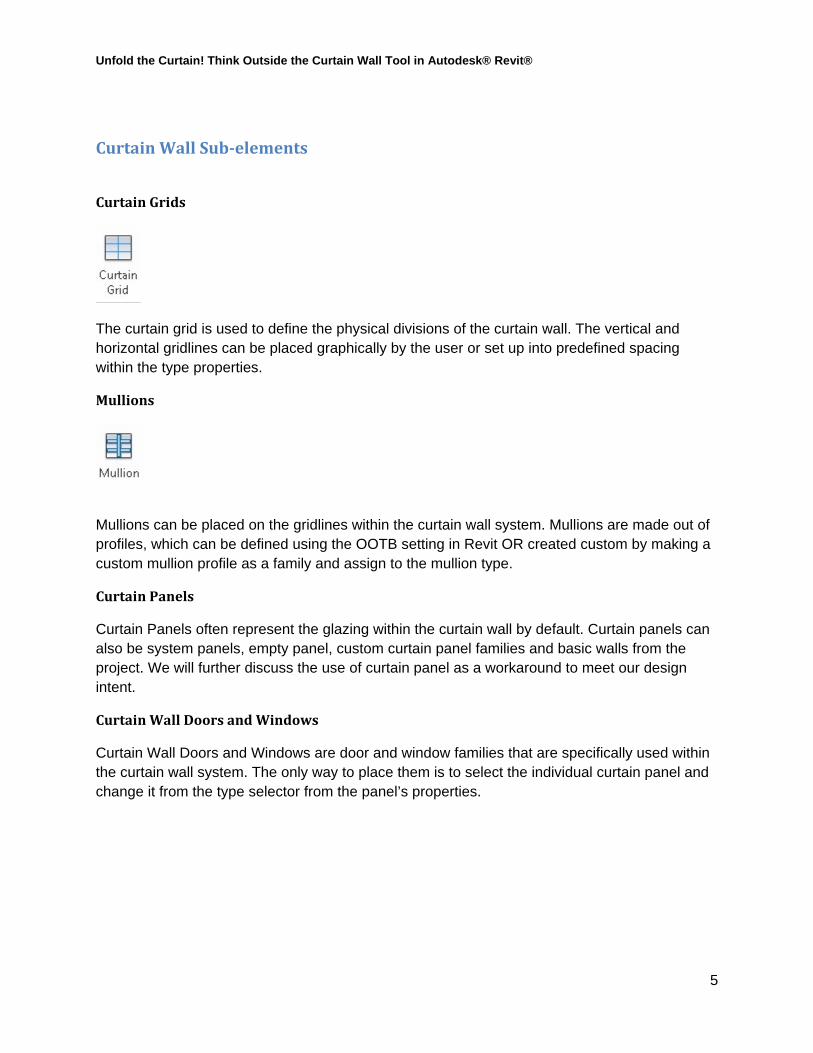
Curtain Wall Sub-elements
Curtain Grids
The curtain grid is used to define the physical divisions of the curtain wall. The vertical and horizontal gridlines can be placed graphically by the user or set up into predefined spacing within the type properties.
Mullions
Mullions can be placed on the gridlines within the curtain wall system. Mullions are made out of profiles, which can be defined using the OOTB setting in Revit OR created custom by making a custom mullion profile as a family and assign to the mullion type.
Curtain Panels
Curtain Panels often represent the glazing within the curtain wall by default. Curtain panels can also be system panels, empty panel, custom curtain panel families and basic walls from the project. We will further discuss the use of curtain panel as a workaround to meet our design intent.
Curtain Wall Doors and Windows
Curtain Wall Doors and Windows are door and window families that are specifically used within the curtain wall system. The only way to place them is to select the individual curtain panel and change it from the type selector from the panel’s properties.
Unfold the Curtain! Think Outside the Curtain Wall Tool in Autodesk® Revit®
6
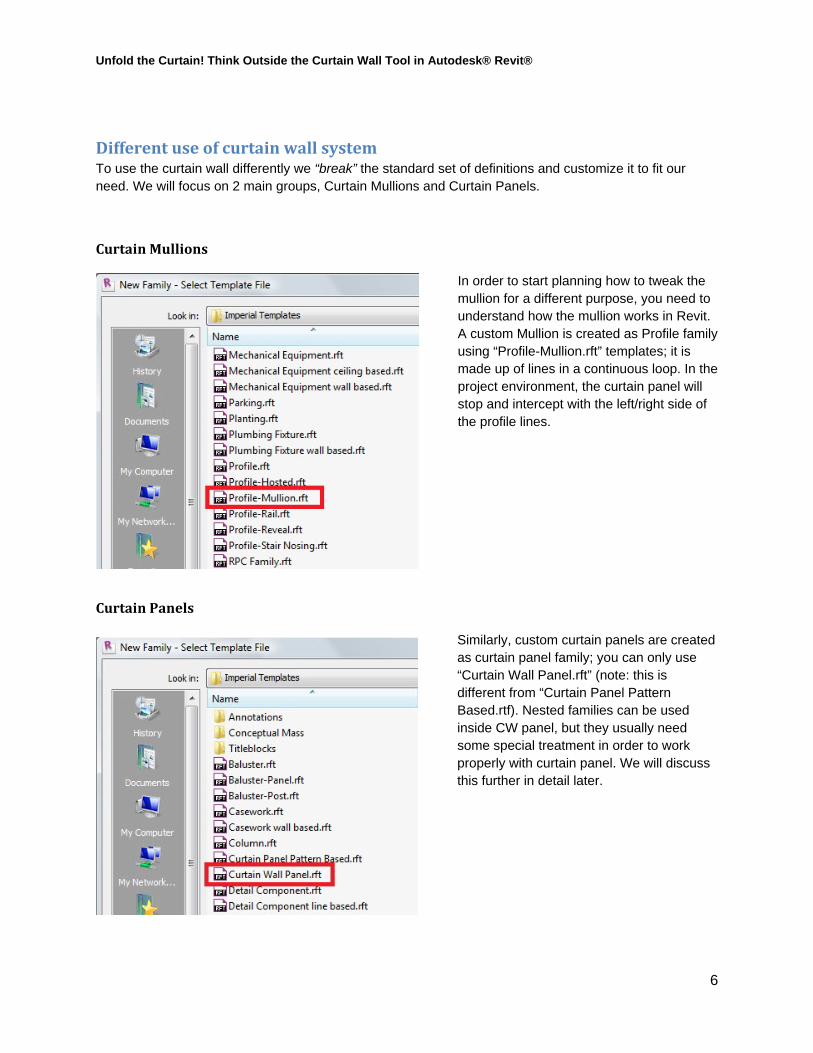
Different use of curtain wall system To use the curtain wall differently we “break” the standard set of definitions and customize it to fit our need. We will focus on 2 main groups, Curtain Mullions and Curtain Panels.
Curtain Mullions
In order to start planning how to tweak the mullion for a different purpose, you need to understand how the mullion works in Revit. A custom Mullion is created as Profile family using “Profile-Mullion.rft” templates; it is made up of lines in a continuous loop. In the project environment, the curtain panel will stop and intercept with the left/right side of the profile lines.
Curtain Panels
Similarly, custom curtain panels are created as curtain panel family; you can only use “Curtain Wall Panel.rft” (note: this is different from “Curtain Panel Pattern Based.rtf). Nested families can be used inside CW panel, but they usually need some special treatment in order to work properly with curtain panel. We will discuss this further in detail later.

Unfold the Curtain! Think Outside the Curtain Wall Tool in Autodesk® Revit®
7
Tilt-up wall panel system
Tilt-up wall system using Curtain Wall.
Any basic wall can be used in a curtain wall panel in any Curtain Wall system type. One of the advantages of using the curtain wall as tilt-up wall panel is you can use any of the typical wall hosted doors and windows. There is no need to create curtain wall doors and windows.
.
First, duplicate an existing wall type and set the new wall as a concrete wall type. In this case, I set it as 7 1/4” thick for the tilt-up panel.

Unfold the Curtain! Think Outside the Curtain Wall Tool in Autodesk® Revit®
8
Next, create a new profile mullion family that looks like this. (See image) Use it as Vertical Mullions for Interior Type later
Set (Basic wall: Concrete Tilt-up Panel – 7 1/4”) as Curtain Panel. Leave all the Border mullion type as “none”. Then set the custom mullion (Tilt-up Wall Grout – 7.25”) as Vertical Mullions - Interior Type
Unfold the Curtain! Think Outside the Curtain Wall Tool in Autodesk® Revit®
9
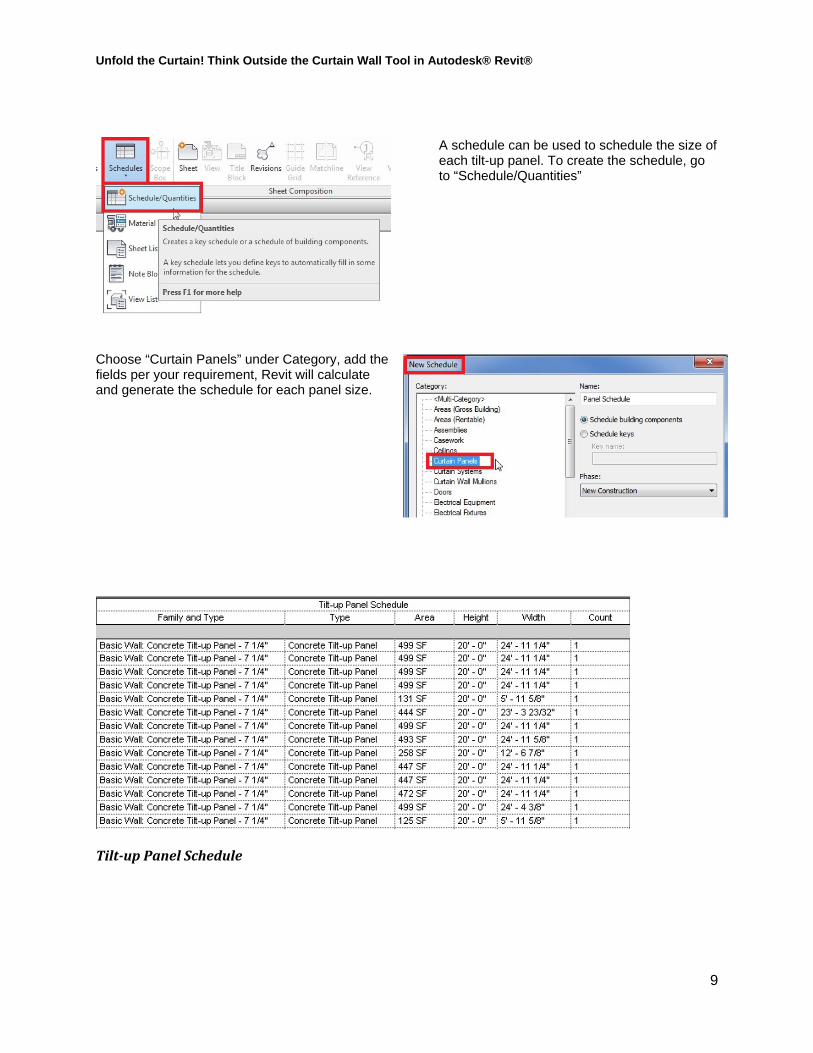
A schedule can be used to schedule the size of each tilt-up panel. To create the schedule, go to “Schedule/Quantities”
Choose “Curtain Panels” under Category, add the fields per your requirement, Revit will calculate and generate the schedule for each panel size.
Tilt-up Panel Schedule
Unfold the Curtain! Think Outside the Curtain Wall Tool in Autodesk® Revit®
10
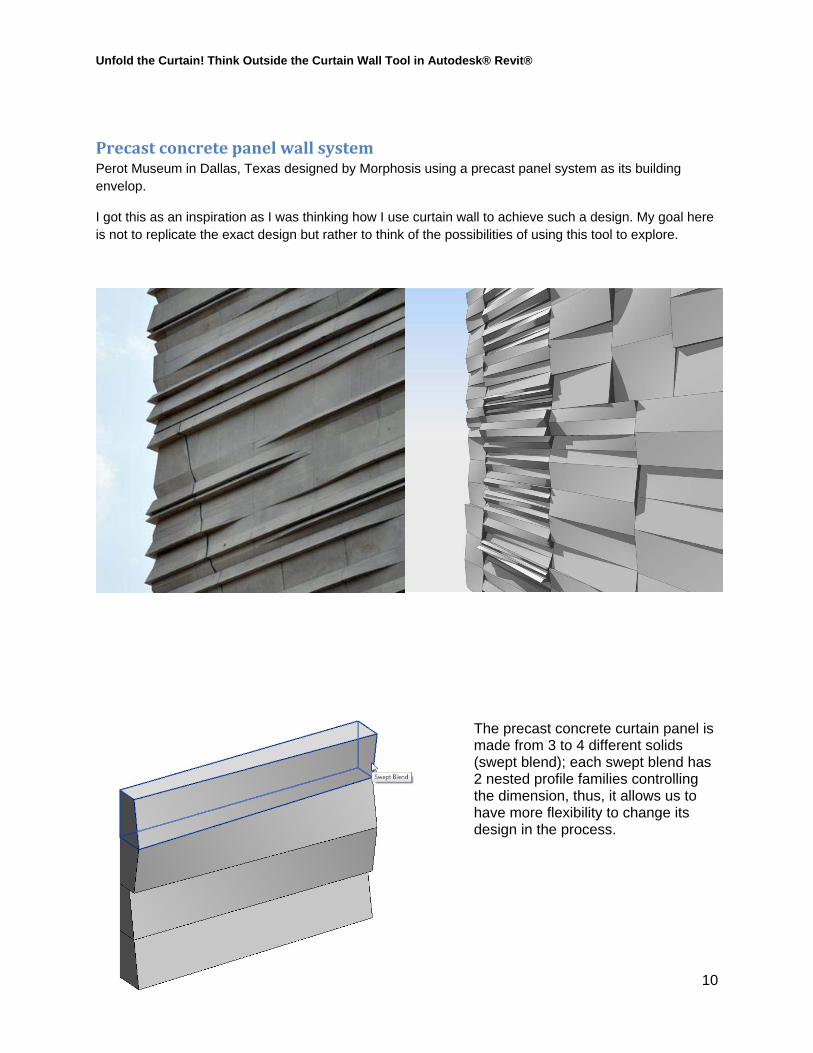
Precast concrete panel wall system Perot Museum in Dallas, Texas designed by Morphosis using a precast panel system as its building envelop.
I got this as an inspiration as I was thinking how I use curtain wall to achieve such a design. My goal here is not to replicate the exact design but rather to think of the possibilities of using this tool to explore.
The precast concrete curtain panel is made from 3 to 4 different solids (swept blend); each swept blend has 2 nested profile families controlling the dimension, thus, it allows us to have more flexibility to change its design in the process.

Unfold the Curtain! Think Outside the Curtain Wall Tool in Autodesk® Revit®
11
These tapered shapes (on left) are set as profile families; they are then nested to the curtain panel to create the swept blend forms One can now link the “D” and “H” parameter to the Curtain panel (Host) so the taper forms can be driven in the project.
Nested profile families
Swept blend form using nested profile families

Unfold the Curtain! Think Outside the Curtain Wall Tool in Autodesk® Revit®
12
A “Material Takeoff” schedule can be used this time to generate the quantity of the concrete needed for the precast concrete.
Similarly, choose “Curtain Panels” under Category.
Choose the fields under “Material” for “Area” as well as “Volume”

Unfold the Curtain! Think Outside the Curtain Wall Tool in Autodesk® Revit®
13
Curtain Mullion as (Corrugated Panel) Design Elements A curtain mullion in Revit is made from a profile. If using system profile, the shape is always a rectangle; however, when making your own custom mullion, you will be able to do so much more with this tool.
Custom mullion profile as corrugated panel
At Lake|Flato, we use corrugated panels often as a design element. We often use different profile shapes and different ratios of perforation for screening as well.
Corrugated perforated panel at Arizona State University
(Render Image in Revit®)
Unfold the Curtain! Think Outside the Curtain Wall Tool in Autodesk® Revit®
14
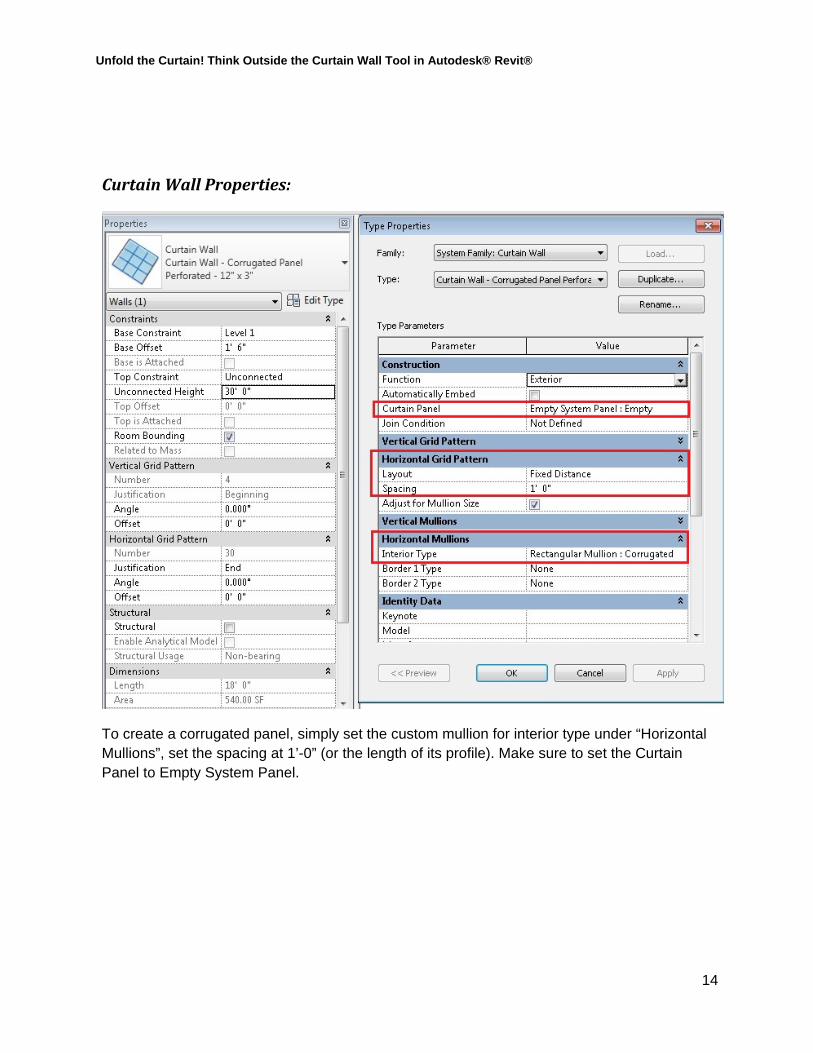
Curtain Wall Properties:
To create a corrugated panel, simply set the custom mullion for interior type under “Horizontal Mullions”, set the spacing at 1’-0” (or the length of its profile). Make sure to set the Curtain Panel to Empty System Panel.
Unfold the Curtain! Think Outside the Curtain Wall Tool in Autodesk® Revit®
15
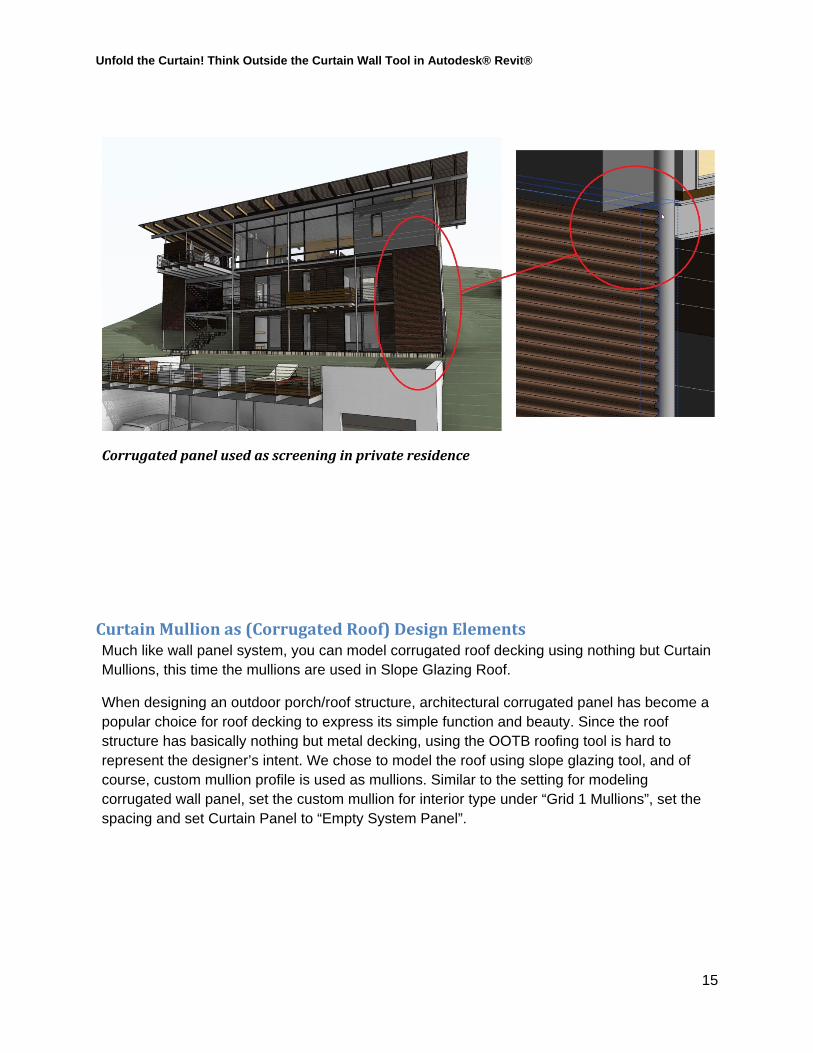
Corrugated panel used as screening in private residence
Curtain Mullion as (Corrugated Roof) Design Elements Much like wall panel system, you can model corrugated roof decking using nothing but Curtain Mullions, this time the mullions are used in Slope Glazing Roof.
When designing an outdoor porch/roof structure, architectural corrugated panel has become a popular choice for roof decking to express its simple function and beauty. Since the roof structure has basically nothing but metal decking, using the OOTB roofing tool is hard to represent the designer’s intent. We chose to model the roof using slope glazing tool, and of course, custom mullion profile is used as mullions. Similar to the setting for modeling corrugated wall panel, set the custom mullion for interior type under “Grid 1 Mullions”, set the spacing and set Curtain Panel to “Empty System Panel”.

Unfold the Curtain! Think Outside the Curtain Wall Tool in Autodesk® Revit®
16
Slope Glazing Type Properties Setting
Open metal structure truly expressed as corrugated roofing

Unfold the Curtain! Think Outside the Curtain Wall Tool in Autodesk® Revit®
17
Standing seam roof created with basic roof and slope glazing tool
Curtain Mullion as vertical seam modeling standing seam roof

Unfold the Curtain! Think Outside the Curtain Wall Tool in Autodesk® Revit®
18
Custom Millwork When designing kitchen and bathroom millwork layout, it is always a challenge for custom home design. Using casework family doesn’t always allow us to have the freedom to do custom millwork. For any custom cabinet design, we would need to create new casework family. Even using in-place family, it is not efficient at all to design and document in Revit
However, we can create custom “Curtain Panel” as a “Kit of Parts” for Cabinet modular; they can be used within the Curtain Wall System to create kitchen and bathroom millwork
To create custom millwork, simply draw the Curtain Wall first, set up the height, then use curtain grid to draw out the layout the way you desire. Once you are done, you can pick the default panel and swap it to whatever cabinet panel family you like.
Unfold the Curtain! Think Outside the Curtain Wall Tool in Autodesk® Revit®
19
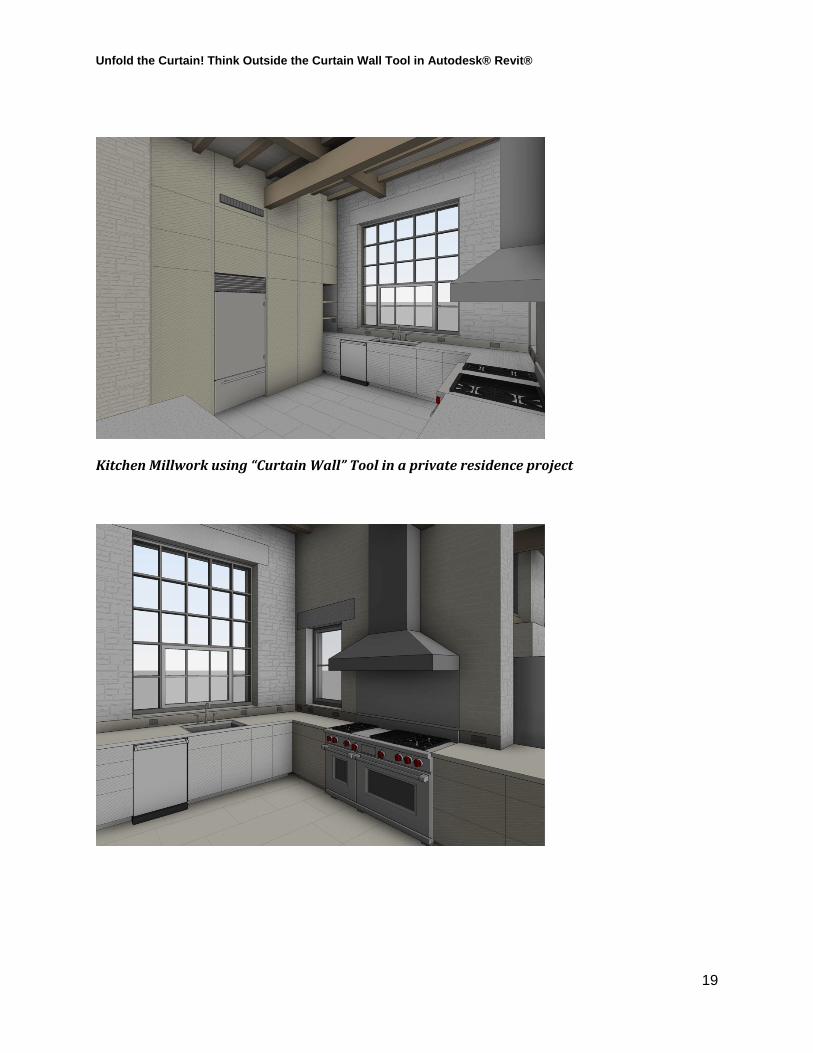
Kitchen Millwork using “Curtain Wall” Tool in a private residence project
Unfold the Curtain! Think Outside the Curtain Wall Tool in Autodesk® Revit®
20
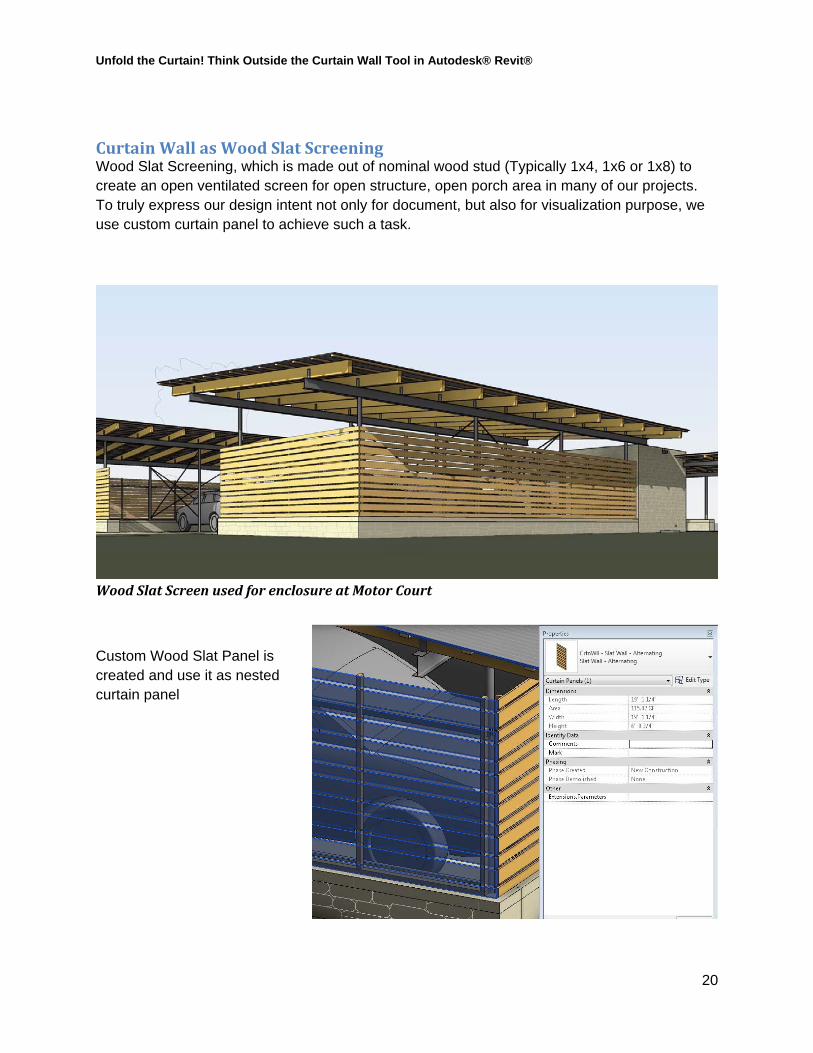
Curtain Wall as Wood Slat Screening Wood Slat Screening, which is made out of nominal wood stud (Typically 1x4, 1x6 or 1x8) to create an open ventilated screen for open structure, open porch area in many of our projects. To truly express our design intent not only for document, but also for visualization purpose, we use custom curtain panel to achieve such a task.
Wood Slat Screen used for enclosure at Motor Court
Custom Wood Slat Panel is created and use it as nested curtain panel

Unfold the Curtain! Think Outside the Curtain Wall Tool in Autodesk® Revit®
21
Nested Array Panel is used in Curtain Panel family so it can self-adjust the overall size in the project.
Multiple parameters that control the slat size and spacing requirement
Unfold the Curtain! Think Outside the Curtain Wall Tool in Autodesk® Revit®
22
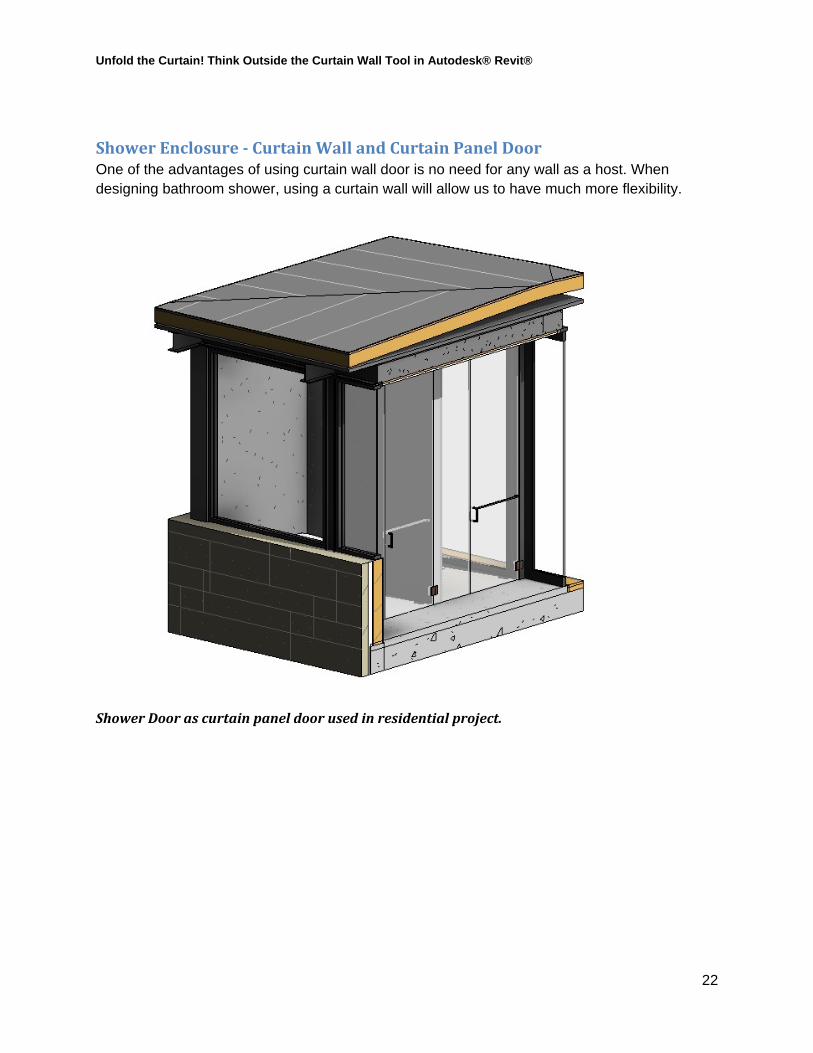
Shower Enclosure - Curtain Wall and Curtain Panel Door One of the advantages of using curtain wall door is no need for any wall as a host. When designing bathroom shower, using a curtain wall will allow us to have much more flexibility.
Shower Door as curtain panel door used in residential project.

Unfold the Curtain! Think Outside the Curtain Wall Tool in Autodesk® Revit®
23
Nested families are used to create door hardware for the shower door

Unfold the Curtain! Think Outside the Curtain Wall Tool in Autodesk® Revit®
24
Snow and Snowflake Using Nested families
Snow and Snowflake done via Curtain Panel
Greeting card image done in Revit (No Photoshop!)
Unfold the Curtain! Think Outside the Curtain Wall Tool in Autodesk® Revit®
25
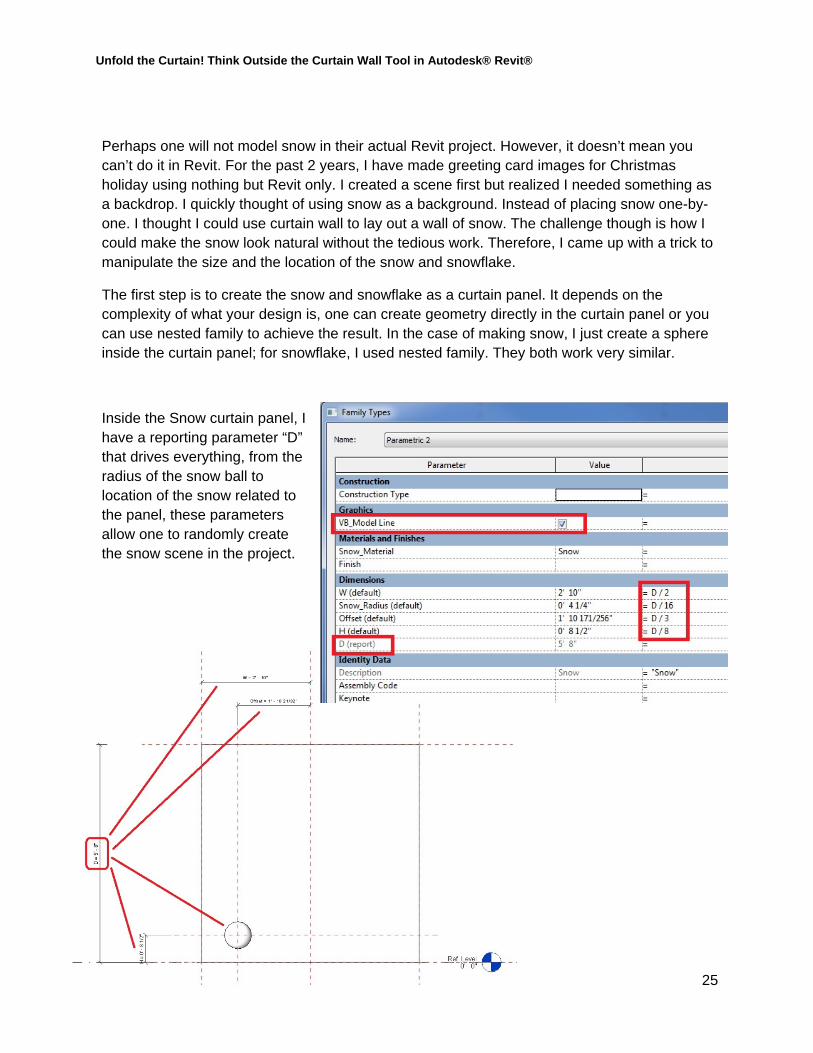
Perhaps one will not model snow in their actual Revit project. However, it doesn’t mean you can’t do it in Revit. For the past 2 years, I have made greeting card images for Christmas holiday using nothing but Revit only. I created a scene first but realized I needed something as a backdrop. I quickly thought of using snow as a background. Instead of placing snow one-by-one. I thought I could use curtain wall to lay out a wall of snow. The challenge though is how I could make the snow look natural without the tedious work. Therefore, I came up with a trick to manipulate the size and the location of the snow and snowflake.
The first step is to create the snow and snowflake as a curtain panel. It depends on the complexity of what your design is, one can create geometry directly in the curtain panel or you can use nested family to achieve the result. In the case of making snow, I just create a sphere inside the curtain panel; for snowflake, I used nested family. They both work very similar.
Inside the Snow curtain panel, I have a reporting parameter “D” that drives everything, from the radius of the snow ball to location of the snow related to the panel, these parameters allow one to randomly create the snow scene in the project.

Unfold the Curtain! Think Outside the Curtain Wall Tool in Autodesk® Revit®
26

Unfold the Curtain! Think Outside the Curtain Wall Tool in Autodesk® Revit®
27
Best practice when using Curtain Wall for different use
Disallow Join
It is always a good idea to have the end point of the curtain wall set to “disallow join” to prevent the wall from connecting/cleaning up to the adjacent wall. (e.g. cabinet)
Profile
Rule of thumb:
When drawing linework for a profile, it has to be a continuous boundary, no double loop is allowed.
Tips: You can always leave a tiny gap in a double loop in order to comply this rule.

Unfold the Curtain! Think Outside the Curtain Wall Tool in Autodesk® Revit®
28
Room Bounding
Since Revit still treats Curtain Wall as a wall; the wall will be room bounding by default. It is best to un-check the box “Room Bounding” to avoid inaccurate room area data in schedule.
Edit Profile
Curtain Wall can be “Edit Profile” to change its’ overall shape. Revit most likely will allow any custom curtain panel to stay its shape with “Edit Profile” as long as the changes are rectangular. Any curve or diagonal “sketch” line around the curtain panel will default it back to system glazed
panel. Recently, Revit made a subtle improvement which allows us to get around this limitation. We will further discuss this trick toward the end of the class.
Unfold the Curtain! Think Outside the Curtain Wall Tool in Autodesk® Revit®
29
Conclusion It is important to understand when one decided to use curtain wall system as an alternative design solution. They need to evaluate the pros and cons of this approach to see if it will fit the overall project team’s goal during the course of the project.
• Understand how the curtain wall system is composed (i.e. what is Curtain Panel vs. Mullion)
• Is the grid repetitive or manually defined? • Understand the limitation of Curtain Panel and Mullion and know how to get around it • Understand how nested families are used when nesting into the Curtain Panel family
Remember: The only limit is your imagination: Be creative and experiment!
Thank you!