learn to train - english... · • use proper progressions or drill variations to minimize fear of...
TRANSCRIPT

Learn to Train
Softball

Learn to Train Softball
September 2017
Introduction and Overview 2Effective Teaching Model 3Key Questions to Consider when Planning a Practice 5Preamble 6How The Practice Plan Format Relates to the LTPD 7SPECIAL OLYMPICS SOFTBALL – PRACTICE PLAN #1 8SPECIAL OLYMPICS SOFTBALL - PRACTICE PLAN #2 11SPECIAL OLYMPICS SOFTBALL – PRACTICE PLAN #3 15SPECIAL OLYMPICS SOFTBALL – PRACTICE PLAN #4 18SPECIAL OLYMPICS SOFTBALL – PRACTICE PLAN #5 21SPECIAL OLYMPICS SOFTBALL - PRACTICE PLAN #6 25SPECIAL OLYMPICS SOFTBALL – PRACTICE PLAN #7 28SPECIAL OLYMPICS SOFTBALL – PRACTICE PLAN #8 31SPECIAL OLYMPICS SOFTBALL – PRACTICE PLAN #9 34SPECIAL OLYMPICS SOFTBALL – PRACTICE PLAN #10 37SPECIAL OLYMPICS SOFTBALL – PRACTICE PLAN #11 40Appendix A: Key Teaching Points for Softball Skills 43Appendix B: Dynamic Warm-up 53Appendix C: Cool Down/Static Stretching/Flexibility Training 62Acknowledgements 69
INTRODUCTION AND OVERVIEW

INTRODUCTION AND OVERVIEW
2L2T
The “Learn to Train” Softball resource provides sport specific training for athletes with an intellectual disability. The Learn to Train program has been created to be the next step in the athlete development pathway and is designed to act as a continuation for those athletes aged 13-18 who have graduated from the FUNdamentals program and/or are new to Special Olympics programming.
This program focuses on developing sport-specific skills that will help transition athletes into community programs while introducing sport specific techniques, skills and events. Learning to Train is considered to be a transition point in LTAD. Athletes may choose to stay at this stage for an extended period of time before progressing to the next stage, which could be Active for Life or Training to Train. If the choice is Training to Train, an increased commitment will be necessary. Should participants choose to move to Active for Life, they have all the necessary fundamental motor skills to be able enjoy a variety of activities.
Although the following lesson plans were developed to be turn-key, they are designed as an introduction to the sport of softball. If you as a coach are looking to gain the skills and confidence to run a full-time softball program, Softball Canada has a number of coaching programs that will provide you with the necessary coaching tools, resources and knowledge. For more information on coaching courses please visit Softball Canada’s website (https://www.softball.ca/ ) and look under the “Coaching” tab.
222TL2T

EFFECTIVE TEACHING MODEL (Reference: p. 1.2 – U14 Softball Canada manual)
Teaching is one of the primary functions of a coach. The more effective you are as a teacher, the quicker your players will acquire new skills and knowledge, and consequently, the better your team will perform. It’s to your team’s advantage to continually improve your teaching skills. The word “IDEAS” will help you remember the steps of effective teaching.
I – INTRODUCE
• Name the drill. This will help your players remember the drill and more quickly organize themselves.• Explain or question your players about when the skill or tactic is used and why it is important.• Be brief. You want to get your players active as soon as possible.• Speak clearly and use age appropriate terminology/language.• Make eye contact with your players to ensure understanding.• Use a formation where all players can hear the explanation and see the demonstration with minimal distractions (i.e. if your practice diamond is beside a playground, the coach should face the playground with the players in front of you so your players won’t be distracted by kids playing in the playground).
D – DEMONSTRATE
• Spend no more than 25% of the allocated drill time demonstrating the skill to be used in a drill or to demonstrate the actual drill.• Demonstrate the skill correctly. If you can’t demonstrate the skill correctly, have a player who can or invite another adult to demonstrate. Children learn best by seeing a model performing and trying to imitate what they see. This method of teaching by showing the whole action is called Shaping.• Demonstrate the whole skill 3 or 4 times from different angles. Maybe once in slow motion, if possible.• If the drill is complicated, walk through the drill once before going full motion so players understand it.• If the skill is complicated, consider teaching the skill using Chaining or breaking the skill down into smaller pieces. For example, when teaching pitching you may teach using backward chaining. You begin by teaching the wrist snap, then the arm action, then add the hips and legs until you are teaching the full pitching motion.• Reinforce the 1-2 teaching points for the skill that you want your players to focus on. This way you will not overload your players with too many technical thoughts. E – EXPLAIN
• Usually done while demonstrating the skill or drill.• Keep the explanation brief so players can get moving quickly. Spend less than 10% of the time explaining the skill or drill.• Focus on 1-2 key teaching points per skill at a time so players can focus on those points.• Use simple terms and age-appropriate language.• Be enthusiastic.• Ask your players questions to confirm understanding. If your players seem unsure, you might ask him/her to explain the skill back.• Create cue cards with the important teaching points that you can reference when explaining the skill to ensure you do not miss something important.
3L2T 3L2T

A – ACTIVITY
• Spend at least 65% of the time with your athletes being active and performing the skill. Move immediately from the demonstration/explanation to the activity.• Maximize the activity time. Make sure ALL your players are active. If you have sufficient equipment and supervision, create extra stations so players are active. Avoid line ups or players standing around.• Make sure safety precautions are taken especially when teaching hitting.• Ask permission to touch a player if it is necessary to physically guide the player through the skill.• Make sure players are doing the activity correctly, then get into position to observe so you can give feedback. Use parent helpers during drills if possible so you can move around the players and provide feedback on their technique.• Encourage skill discovery.• Be prepared (written practice plan), creative and enthusiastic.• Use formations that ensure safety and effective/efficient drills.• Use proper progressions or drill variations to minimize fear of failure and ensuring success most of the time.• Stop and correct common errors if necessary.• Drills and activities should be changed frequently within a practice to avoid boredom but repeated over consecutive practices to ensure players are progressing.
S – SUPPLY FEEDBACK
• Use the “compliment sandwich” approach for feedback. Start with a positive, add what and how to improve (constructive negative), then finish with a positive.• Be specific when correcting a skill (i.e. “You rotated you hips well”, not just “good job”).• Use words or cues that are age-appropriate.• Give feedback on only 1 thing at a time and then give more time to practice it.• Avoid too many interruptions or too much feedback. The more you talk, the less they can practice.• Observe and evaluate. Use bandwidth feedback by only providing feedback when the performance is outside an acceptable range of correctness (i.e. the performance is more than 25% worse than the acceptable target result).• Be specific and constructive as well as visual (diagram, video, demonstration)• Use patience and encouragement in order to realize improvement.• Be positive and provide realistic, practical opportunities to develop skills.
42T 4L2T

L2T
KEY QUESTIONS TO CONSIDER WHEN PLANNING A PRACTICE
Figure 1.0 – My Practice Plan (Modified from Coaching Association of Canada (2007) – Competition – Introduction Practice Planning Module)
5L2T

PREAMBLEThe key to preparing and conducting any practice regardless of age is to understand the team and the individual needs of your players. The key focus of all practices should be to make the practice a fun, active and worthwhile learning experience.
Some general suggestions when you plan a practice for this age and ability group are:
• Keep the explanation/demonstration time for skills short• Some players may find it easier to mimic the entire skill as opposed to using the chaining method of teaching a skill • Present skills in all modalities ensuring you cover a number of senses• Use small groups in circuit training format when teaching new skills • Develop routines particularly in warm-up activities and in your practice organization. This will aid in developing focus and expected behaviours • Be consistent and show enthusiasm
6L2T

HOW THE PRACTICE PLAN FORMAT RELATES TO THE LONG
TERM PARTICIPANT DEVELOPMENT (LTPD)
WARM-UP – This phase of the practice is used to warm-up the muscles to be used during the practice as well as develop and train the athletic abilities of SPEED, STRENGTH, SUPPLENESS, (flexibility) STAMINA, and the ancillary capacities of AGILITY, COORDINATION AND BALANCE.
The warm-up should also include the repeated training and practice of Basic Softball Skills, throwing/receiving, fielding (groundballs and fly balls), base running, and batting.
Key components of the warm-up are:
• Dynamic Warm-Up: For the first 3 practices the coach will lead the warm-up to familiarize the players with the activities to be completed and the routines. Starting at Practice #4, players can start to lead the warm-ups if they are comfortable with the exercises.
• CRASH Drills: CRASH stands for Conditioning, Reaction, Agility, Speed and Hitting. These activities not only warm-up the players but they improve the players’ physical capacities and are softball-specific to mimic actions used within the game. These activities reinforce key teaching points for various softball skills/tactics and provide another learning opportunity as well as provide for a higher number of repetitions of skills.
• Everydays: These are brief activities using a set routine that players learn at the beginning of the season and can be completed without a great deal of supervision by the coach. The activities mimic the movements of the main part (may even be the same activity, but at lower intensity). For example, the skills of throwing and fielding underpin all defensive skills. It is important to reinforce proper technique for these skills at every practice and during every warm-up.
MAIN PART – This phase of the practice is used to train, consolidate and enhance the skills, tactics, and strategies of the game of softball. Integrated throughout the practice are the affective values and life skills, modelled by the coaching staff; teamwork, positive attitude, respect for the game and all its participants, positive communication, co-operation, problem solving, interacting, self-confidence, leadership and mental focus as required.
Game simulation activities are also part of this phase.
WRAP-UP COOL DOWN – This phase will allow for further development of the athletic abilities and affective values through fun activities and static stretching routines.
Note: Timing of exercises and drills have been provided. This may vary depending on skill and comfort level of your athletes. You as a coach will have to determine when to move onto the next drill.
7L2T

Special Olympics Softball:Practice Plan #1
L

SPECIAL OLYMPICS SOFTBALL PRACTICE PLAN #1
LOCATION: DATE: # OF ATHLETES:
SUPPORT STAFF:
PRACTICE OBJECTIVES: 1. To introduce coaches and players and begin team bonding2. To establish warm-up routines, practice routines, and behaviour expectations3. To introduce/ review, and evaluate basic softball skills for future groupings
INTRODUCTION (10 MIN): Gather players and coaches for introductions and explain the objectives of the practice. Cover the expected behaviour at practice (such as being on time, how to address the coaches etc.).
EQUIPMENT: -BALLS, CONES, BASES, BATS.
WARM-UP (10 MIN): Line players along the outfield foul line; Place a cone 15m from line. Coach to demonstrate and lead the dynamic warm-up routine. See Appendix B for full description of each movement.DYNAMIC STRETCH ROUTINE:- 20 stride jumps - Butt kicks to cone and return- High knees- Lunge and twist- Side lunge- Backward-moving toe touch- InchwormAthletes then remain on the line to do• Horizontal arm swing (3-4 times)• Shoulder rotations, forward and backward
CRASH DRILL (15 MIN): Divide players into two (2) groups of 6. Set up two (2) stations supervised by coaches. Group 1 is set up on the diamond. Starting at Home plate each player in turn swings an imaginary bat and then runs through first base, and jogs back to the line of players waiting their turn. Take time here to explain the rules regarding the safety base (orange). -see Appendix A for key teaching points - Leaving the batter’s box and Running to 1st base. After each player has 3-4 tries, prepare to rotate to the next station. (time the athlete’s runs for future comparison.)
Group 2- SQUARE RUNNING DRILL: set-up cones in a 10m square. Players start in bottom left corner run up to 1st cone then side shuffle to the right to the 2nd cone, turn and skip to the 3rd corner and then side shuffle to the left back to the starting point. Repeat 3-4 times around. Switch groups after 10 minutes.
9L2T

WATER BREAK (5 MIN)
MAIN PART (45 MIN)
Part 1:Objective: to introduce/review the basic skills of receiving and overhand throwing techniques (in a large group)Group players for instruction. Explain and demonstrate the receiving mechanics found in Appendix A. Have players mimic your movements of the hands and glove position for how to properly receive a thrown ball. (5 MIN).
Regroup players and explain and demonstrate the proper overhand throwing mechanics. See Appendix A for key teaching points. Break the skill into component parts and have the athletes go through the motions without the ball and provide individual feedback as required. (15 MIN).
Have players partner up and position themselves 10-15m apart and practice throwing overhand and receiving the ball (play catch). Provide feedback as required. (5 MIN).
Part 2:Objective: to teach ground ball fielding and Fly ball fielding mechanics. (20 MIN).- Divide team into 2 groups, set 1 group at each station
Station 1: Review ground ball fielding techniques. See Appendix A. Fielding. In partners 5m apart they roll balls to each other and practice the fielding technique. Coach provides feedback.
Station 2: –Review fly ball fielding see- Appendix A fly balls. Have players line up 5m away from the coach. The coach tosses fly balls and provides feedback on their technique.
**Groups switch stations after 10 min.
WRAP-UP ACTIVITY (5 MIN)
Relay race – TAKE IT BACKGroup players into three (3) teams.A ball is placed in a circle 15m from the start line.On go, the first player gets the ball and returns to the line giving the ball to the next player in line who then runs and returns the ball to the circle. They then return and tag the next player who races out to retrieve the ball. Continue until all players have made their run. The team that finishes first wins. Regroup players and do once again.
COOL DOWN/CONCLUSION (5-10 MIN): Introduce some of the cool down static stretches – see Appendix. C Gather players (same place you began your practice and provide feedback to the group on the practice, answer questions, and schedule next practice time and date.
10L2T

6
The “Learn to Train” Softball resource provides sport specific training for athletes with an intellectual disability. The Learn to Train program has been created to be the next step in the athlete development pathway and is designed to act as a continuation for those athletes aged 13-18 who have graduated from the FUNdamentals program and/or are new to Special Olympics programming.
This program focuses on developing sport-specific skills that will help transition athletes into community programs while introducing sport specific techniques, skills and events. Learning to Train is considered to be a transition point in LTAD. Athletes may choose to stay at this stage for an extended period of time before progressing to the next stage, which could be Active for Life or Training to Train. If the choice is Training to Train, an increased commitment will be necessary. Should participants choose to move to Active for Life, they have all the necessary fundamental motor skills to be able enjoy a variety of activities.
Although the following lesson plans were developed to be turn-key, they are designed as an introduction to the sport of softball. If you as a coach are looking to gain the skills and confidence to run a full-time softball program, Softball Canada has a number of coaching programs that will provide you with the necessary coaching tools, resources and knowledge. For more information on coaching courses please visit Softball Canada’s website (https://www.softball.ca/ ) and look under the “Coaching” tab.
L2T
Special Olympics Softball:Practice Plan #2
L T

EFFECTIVE TEACHING MODEL (Reference: p. 1.2 – U14 Softball Canada manual)
Teaching is one of the primary functions of a coach. The more effective you are as a teacher, the quicker your players will acquire new skills and knowledge, and consequently, the better your team will perform. It’s to your team’s advantage to continually improve your teaching skills. The word “IDEAS” will help you remember the steps of effective teaching.
I – INTRODUCE
• Name the drill. This will help your players remember the drill and more quickly organize themselves.• Explain or question your players about when the skill or tactic is used and why it is important.• Be brief. You want to get your players active as soon as possible.• Speak clearly and use age appropriate terminology/language.• Make eye contact with your players to ensure understanding.• Use a formation where all players can hear the explanation and see the demonstration with minimal distractions (i.e. if your practice diamond is beside a playground, the coach should face the playground with the players in front of you so your players won’t be distracted by kids playing in the playground).
D – DEMONSTRATE
• Spend no more than 25% of the allocated drill time demonstrating the skill to be used in a drill or to demonstrate the actual drill.• Demonstrate the skill correctly. If you can’t demonstrate the skill correctly, have a player who can or invite another adult to demonstrate. Children learn best by seeing a model performing and trying to imitate what they see. This method of teaching by showing the whole action is called Shaping.• Demonstrate the whole skill 3 or 4 times from different angles. Maybe once in slow motion, if possible.• If the drill is complicated, walk through the drill once before going full motion so players understand it.• If the skill is complicated, consider teaching the skill using Chaining or breaking the skill down into smaller pieces. For example, when teaching pitching you may teach using backward chaining. You begin by teaching the wrist snap, then the arm action, then add the hips and legs until you are teaching the full pitching motion.• Reinforce the 1-2 teaching points for the skill that you want your players to focus on. This way you will not overload your players with too many technical thoughts. E – EXPLAIN
• Usually done while demonstrating the skill or drill.• Keep the explanation brief so players can get moving quickly. Spend less than 10% of the time explaining the skill or drill.• Focus on 1-2 key teaching points per skill at a time so players can focus on those points.• Use simple terms and age-appropriate language.• Be enthusiastic.• Ask your players questions to confirm understanding. If your players seem unsure, you might ask him/her to explain the skill back.• Create cue cards with the important teaching points that you can reference when explaining the skill to ensure you do not miss something important.
Special Olympics Softball:Practice Plan #2
SPECIAL OLYMPICS SOFTBALL PRACTICE PLAN #2
LOCATION: DATE: # OF ATHLETES:
SUPPORT STAFF:
PRACTICE OBJECTIVES: 1. To consolidate warm-up routines; 2. To introduce “everydays”, throwing and receiving, and fielding; warm-ups. 3. Introduce new throwing and fielding drills and train basic skills. 4. Introduce the defensive principals of Location, Adjustment, Coverage, and Jurisdiction.
INTRODUCTION (5 MIN): Gather players as in pp#1. Explain the practice objectives (what you intend on accomplishing during practice).
WARM-UP (10 MIN): DYNAMIC STRETCH ROUTINE see Practice Plan # 1 for set up and appendix B for movement
CRASH DRILLS: 3 GROUPS, 3 STATIONS; 5 MIN per STATION
EQUIPMENT NEEDED: bases, cones. Station 1: review how to run from Home after swinging an imaginary bat and round the bag at 1st, and stop (jam) in a good athletic, balanced position looking to the ball. (5 MIN). ries, prepare to rotate to the next station. (time the athlete’s runs for future comparison.)
Station 2:- CONE FIELDING: Review ground ball fielding technique and shuffle step; see Appendix A for Key teaching points and technique.
Set-up: place 2 cones 2-3m apart. Players one at a time, on coach’s command, assume the ready position. They take position in the middle of the 2 cones about 1m deeper. The coach is positioned 3M from the player facing them. The coach then indicates by pointing to either cone and the player performs a shuffle step to the cone and pretends to field a ball, and freezes (2sec.) in the overhand throw K position pointing at target. 4-5 rounds per player. (5 MIN).
Station 3:- LEAD OFF AND JAM- modified for slo-pitch lead off rule and fast pitch lead off rule. (5 MIN).
Place two throw down home plates on the field 3m apart, one behind the other. Players take position like at the start of a race two-point stance with back foot in contact with the bag and head looking at the pitcher and following the ball flight to home plate. Have player run between bases focusing on getting a good start.
12L2T

EVERYDAY THROWING PROGRESSIONS; see Apendix D. “Throwing and Receiving Everdays:”
For key teaching points and description of movements (as it is the first time for these progressions it may take 15min but generally will be a 10min activity).
MAIN PART 1 (18 MIN): Set up 3 stations, 4 players per group; STATION 1 on the infield, STATION 2 on the outfield, STATION 3 on a skinned part of the foul area.
1. Introduce triangle throwing drill - 3 players form a large triangle on the infield 15m apart. 1st player rolls the ball to the 2nd player who fields the ball and throws it to player 3 who then rolls it to player1 and the drill continues. Start bouncing the ball as players become familiar with the routine. Change directions, shorten distances to 5-6m and toss the ball underhand., * -see Appendix A for underhand toss and backhand toss throwing technique. (re-enforce proper fielding, throwing mechanics and footwork to line up target.) TIME 6 MIN.
2. Introduce “Football Drill” for fly ball fielding on the run. Set-up; Player with a ball takes a position 3m in front of the coach; player tosses ball to the coach and assumes an outfield ready position. The coach then points left or right and player pivots on the foot in the direction the coach points and begins to run on a 45 angle back looking over their shoulder at the coach. The coach tosses a fly ball leading them in that direction; the player gets to the ball and either gets under it to make the catch or receives it on the run. KEY TEACHING POINT- do not run with the glove arm extended and do not back pedal.
3. Introduce Cross-step fielding - Coach faces players, one at a time the coach rolls a ball 2-4 steps to their right or left. Introduce cross step movement used to field ground balls that go further to your left or right than a shuffle step will get you there. - See Appendix A for key points and description of movement. Repeat 2-3 times in each direction/ player.
13L2T

L2T
KEY QUESTIONS TO CONSIDER WHEN PLANNING A PRACTICE
Figure 1.0 – My Practice Plan (Modified from Coaching Association of Canada (2007) – Competition – Introduction Practice Planning Module)
MAIN PART 2: HITTING DRILLS (20 MIN); In a large group introduce and/or review swing mechanics. Start with bat selection, try and encourage players to use a light a bat as they will be able to swing faster. Teach Grip, through to the Swing follow through. See Appendix A for key points and descriptions.
BATTING CIRCUIT DRILLS: Divide players and set up 3 stations (1 coach / station)
- 1) Use slow motion shadow swings; (go through motion of full swing at an imaginary ball). Athletes should focus on ready position, stance and swing (Appendix A.)
- 2) Hitting the Pool noodle; Coach holds pool noodle at different positions in the strike zone and player swings to hit the noodle
- 3) Hitting ball off tee into net or fence (use waffle balls or hockey balls.) *** Hints – set up hitting T slightly ahead of their front foot in their ready stance.; - Each player takes 10 swings (2 sets of 5 swings) at each station before rotating to the next station. Go around circuit 3 times; time permitting
**SAFETY – be sure there is ample room between players swinging bats (helmets should be worn)
EQUIPMENT NEEDED : BATS, POOL NOODLE, BATTING T, NET (FENCE), HOCKEY BALLS OR WHIFFLE BALLS, HELMETS.
GAME SIMULATION: SCRUB (30 MIN)
Objectives -
- to practice hitting a slow-pitched ball - make defensive plays to make outs
To introduce the Defensive Principals of Location (the positions on the field), players are placed in the defensive positions on the field and shown the appropriate area in which to stand and are told the number of that position Rt. Field is #9 – CF#8 LFTF#7 – SS #6 – 3RD BASE #5 - 2ND BASE #4 – 1ST BASE #3 – PITCHER #2- CATCHER #1 add position #10 for slow pitch (Rover).
As rotations are made, enter the defence at the #9 or #10 position and all players move down to the next # and position as next player enters the #9 or #10 spot.
Start with 3-4 batters, as they complete their 3rd at bat they are subbed into the defence at #9 or #10 and all players rotate down 1 number to the next position until they reach #1 catcher then they take their place in the batting order.
Note: If athletes have previous experience in softball the coach can stop periodically and introduce the Defensive Principals of ADJUSTMENT, (positioning on the field to defend batter’s tendencies and situations); COVERAGE, - teach responsibilities to back-up plays (coverage) against wild throws and missed balls. TEACH; the 3B’s of defence readiness. * On any batted ball as a member of the defence you are either moving to field the BALL going to cover an uncovered BASE, or moving to a position to provide BACK-UP coverage against a miss played ball or errant throws.
WRAP-UP COOL DOWN, CONCLUSION (10 MIN) –same as Practice Plan #1
14L2T

10L2T
Bocce Session 2:Movements—Body Positions for Throwing
PREAMBLEThe key to preparing and conducting any practice regardless of age is to understand the team and the individual needs of your players. The key focus of all practices should be to make the practice a fun, active and worthwhile learning experience.
Some general suggestions when you plan a practice for this age and ability group are:
• Keep the explanation/demonstration time for skills short• Some players may find it easier to mimic the entire skill as opposed to using the chaining method of teaching a skill • Present skills in all modalities ensuring you cover a number of senses• Use small groups in circuit training format when teaching new skills • Develop routines particularly in warm-up activities and in your practice organization. This will aid in developing focus and expected behaviours • Be consistent and show enthusiasm
Special Olympics Softball:Practice Plan #3
L T

11L2T
Bocce Session 2:Movements—Body Positions for Throwing
HOW THE PRACTICE PLAN FORMAT RELATES TO THE LONG
TERM PARTICIPANT DEVELOPMENT (LTPD)
WARM-UP – This phase of the practice is used to warm-up the muscles to be used during the practice as well as develop and train the athletic abilities of SPEED, STRENGTH, SUPPLENESS, (flexibility) STAMINA, and the ancillary capacities of AGILITY, COORDINATION AND BALANCE.
The warm-up should also include the repeated training and practice of Basic Softball Skills, throwing/receiving, fielding (groundballs and fly balls), base running, and batting.
Key components of the warm-up are:
• Dynamic Warm-Up: For the first 3 practices the coach will lead the warm-up to familiarize the players with the activities to be completed and the routines. Starting at Practice #4, players can start to lead the warm-ups if they are comfortable with the exercises.
• CRASH Drills: CRASH stands for Conditioning, Reaction, Agility, Speed and Hitting. These activities not only warm-up the players but they improve the players’ physical capacities and are softball-specific to mimic actions used within the game. These activities reinforce key teaching points for various softball skills/tactics and provide another learning opportunity as well as provide for a higher number of repetitions of skills.
• Everydays: These are brief activities using a set routine that players learn at the beginning of the season and can be completed without a great deal of supervision by the coach. The activities mimic the movements of the main part (may even be the same activity, but at lower intensity). For example, the skills of throwing and fielding underpin all defensive skills. It is important to reinforce proper technique for these skills at every practice and during every warm-up.
MAIN PART – This phase of the practice is used to train, consolidate and enhance the skills, tactics, and strategies of the game of softball. Integrated throughout the practice are the affective values and life skills, modelled by the coaching staff; teamwork, positive attitude, respect for the game and all its participants, positive communication, co-operation, problem solving, interacting, self-confidence, leadership and mental focus as required.
Game simulation activities are also part of this phase.
WRAP-UP COOL DOWN – This phase will allow for further development of the athletic abilities and affective values through fun activities and static stretching routines.
Note: Timing of exercises and drills have been provided. This may vary depending on skill and comfort level of your athletes. You as a coach will have to determine when to move onto the next drill.
Special Olympics Softball:Practice Plan #3
SPECIAL OLYMPICS SOFTBALL PRACTICE PLAN #3
LOCATION: DATE: # OF ATHLETES:
SUPPORT STAFF:
PRACTICE OBJECTIVES: 1. To consolidate warm-up routines 2. Practice basic skills and tactics. 3. Teach positional responsibilities, and defensive principles of Location, Coverage, and Adjustment to make plays and get outs in simulated game situations.
INTRODUCTION (5 MIN): See Practice Plan #2
EQUIPMENT NEEDED: BALLS, BASES, BATS, CONES
WARM-UP (10 MIN): DYNAMIC STRETCH ROUTINE see Practice Plan # 1 for set up and appendix B for teaching points.
CRASH DRILLS: 3 STATIONS, 4 PER GROUP (Group by ability if necessary)
Station 1: Cone Fielding: shuffle and Cross step - see set-up and description as per Practice Plan #2
Station 2:- Tag up at 3rd. – set-up group at 3rd base with coach positioned in the coach’s box slightly up the 3rd base line towards home. On the coach’s verbal signal player starts to run home, the coach quickly points to the sky indicating a fly ball has been hit and yells “tag – up”. The player returns to the base and assumes a sprint start with the back foot tagging the base and focuses on the coach. The coach then signals by dropping his arm and yelling “GO” indicating the ball has been caught by the outfielder; the player then runs quickly toward Home. Repeat 3-4 times for each player in turn. (Teach Tag-up rule at this station.
Station 3:- Retreat slide (dive back) Player assumes a jam position 3 steps from the base; on the coach’s command “get back” the player dives to the corner of the bag with arm extended. –set up on outfield grass.
Players have 4-5 opportunities at each station then rotate.
EVERYDAYS- Throwing/receiving “Everydays”, Large group- seeAppendix D. Throwing and receiving progressions. Large group, partners. (10 MIN).
16L2T

12L2T
Divide into 2 groups (possibly by ability to modify the intensity of the drills)
FIELDING GROUND BALLS: in partners, bounce balls back and forth to practice fielding ground balls in contained area. (5 MIN).
FIELDING FLY BALLS (5 MIN): Zig-Zag (Ins and outs drill). Set-up on outfield grass. Player faces the coach and assumes outfield ready position. The coach holds up ball and points right then left etc. Player pivots and runs in the direction the coach points the ball, looking over their shoulder at the coach. The coach yells “ball” and tosses fly ball in last pointed direction. Player catches ball and returns to line for his next chance.
Players spend 5-7 MIN at each station then rotate.
MAIN PART: (10 MIN): Introduce 4 corners throwing drill. Set-up 4 cones in 15m-20m square. Divide playersinto equal numbers in lines at each corner. Player with the ball throws the ball to the first player in the line to the left and goes to the end of the line, next in line moves up and prepares to receive the ball from the player from the right. You can advance the drill by having players follow their throw and run to the end of the next line; change direction of throw, add a 2nd ball, count completed throws to establish team record.
GAME SIMULATION (20-30 MIN): Set-up players in all defensive positions and have remaining players put on helmets and take positions on the bases as sent to by the coach. Coach sets the number of outs, hits the ball and players make the correct play as the situation dictates. COACH: reviews all defensive principals and base running do’s and don’ts (ie. coaching when the runners should and shouldn’t run to the next base).
Note: for Advanced players, the coach can review the tactics used to get runners out, and the 3B’s of Defensive responsibility.Rotate players to various positions and in and out of the game as runners.
***Situational practice of skills, tactics of defence and teamwork are such an important part of the game, this kind of situational game simulation will be contained in most practices.
WRAP-UP (5 MIN): Relay – Bat Tag Relay – group players into three (3) teams of 4 players. Set the starting line and end line 15-20m apart (using 3 cones). Each team has a bat, on coach’s command “GO” 1st player runs with bat around their cone then back to pick up the next player. They then both hold the bat and continue the course picking up the 3rd and 4th players in turn. After all players have run to the cone holding the bat cooperatively and returned to the start line the relay continues, this time dropping off each player, starting with the first until all players are back at the original starting line. Switch teams and do it again.
COOLDOWN STRETCHES AND CONCLUSION (5 MIN): see Practice Plan #2.
17L2T

6L2T
Special Olympics Softball:Practice Plan #4
L

Special Olympics Softball:Practice Plan #4
SPECIAL OLYMPICS SOFTBALL PRACTICE PLAN #4
LOCATION: DATE: # OF ATHLETES:
SUPPORT STAFF:
PRACTICE OBJECTIVES: 1. Consolidate practice routines2. Consolidate Basic Skills3. Practice swing mechanics 4. Face live pitching in SCRUB game.
INTRODUCTION: as in previous practices 5min.
WARM-UPS (10 MIN): DYNAMIC STRETCH ROUTINE: see Practice Plan #1 and Appendix B for teaching points.
CRASH DRILLS: Three (3) stations, 4 players per group rotate stations every 5 min. EQUIPMENT: pool noodles 2; bases, bats, balls.
Station 1: Pool Noodle swings (In partners, take turns holding noodle and swinging like a softball bat; change every 6 swings. (5 MIN).
Station 2: Running from home after fake swing, round 1st all the way to stand-up at 2nd base and jog back to line. (5 MIN).
Station 3: “Drop step and Chase Drill”: Focus on practicing footwork while going back on a fly ball. The player faces the coach and in turn drop steps right or left, pivots and runs straight back in line glancing over the shoulder, in good running position. The coach yells “ball” and tosses a fly ball for the player to catch. Player catches the ball (or retrieves it) and then jogs back to line **HINT - (drill works best if each player has their own ball for the drill) (5 MIN).
EVERYDAYS (15 MIN): THROWING PROGRESSIONS AND RECEIVING: 4 CORNER DRILL.
See Appendix D: Throwing and Receiving Progressions. (large group partners); Practice Plan #3 for set-up. Narrow the distance to 6m and review underhand toss and teach backhand toss. – see Appendix A for key teaching points, Underhand Toss and Backhand Toss. Time 15 min. EQUIPMENT – balls, cones.
15L2T 19L2T

15L2T
MAIN PART – Divide players into two (2) groups of 4-6 players to practice fielding ground balls hit by the coach. Once fielded they throw the ball to a receiver positioned by the coach who flips the ball to the coach to hit to the next player in line. Rotate receivers after several rounds. TIME 10 MIN Group 2: 4-6 players field fly balls hit by coach in the outfield, and return throw to a receiver positioned by the coach (change receivers after several rounds). HINT: have players call mine when they move to make the catch. Remind player about keeping their heads up and safety. TIME 10 MIN.Switch groups after 10 min.
EQUIPMENT: Balls, bats.Game Simulation SCRUB: (20 MIN) - SET-UP, see Practice Plan #2 for description and set-up.
EQUIPMENT: balls ,bases, bats.
WRAP-UP RELAY (5 MIN): Bat relay, with addition of up and back, balancing the bat in the palm of your hand. Each time the player losses control or must touch the bat with the other hand they must stop and do 5 push-ups before continuing the race
COOL DOWN STRETCHES and CONCLUSION (10 MIN): - same as Practice Plan#1
20L2T

16L2T 6L2T
Special Olympics Softball:Practice Plan #5
L

17L2T
Special Olympics Softball:Practice Plan #5
SPECIAL OLYMPICS SOFTBALL PRACTICE PLAN #5
LOCATION: DATE: # OF ATHLETES:
SUPPORT STAFF:
PRACTICE OBJECTIVES: 1. Consolidate all practice and warm-up routines. 2. Practice softball skills and introduce new tactics 3. Teach positional skills and responsibilities for 1st and 3rd base 4. Teach long throws, picking up a dead ball at the fence, and setting up to throw to a target.
INTRODUCTION: as in previous practices 5min.
WARM-UPS (10 MIN): DYNAMIC STRETCH ROUTINE: see Practice Plan #1 and Appendix B for teaching points.
CRASH DRILLS: Three (3) stations, 4 players per group
Station 1: Square Drill – see Practice Plan #1 Crash for set-up and instructions/teaching points.
Station 2: Run out of batter’s box after swinging a fake bat, and run through first base; then gain control quickly and return to the base. ” NEVER TURN YOUR BACK ON A LIVE BALL” –see- Appendix A for key teaching points.
Station 3: Cone Fielding for shuffle step and cross over footwork, fielding ground balls. –see Practice Plan #2 Crash; for set-up and drill description add additional cones left & right out 4-5m from the centre of the square to practice the cross step movement –see Appendix A for cross over step teaching points.
EQUIPMENT- cones, balls, bases.
EVERYDAYS: THROWING PROGRESSIONS (partners and large group)
See Appendix D throwing and receiving progressions.
22L2T
18L2T 10L2T
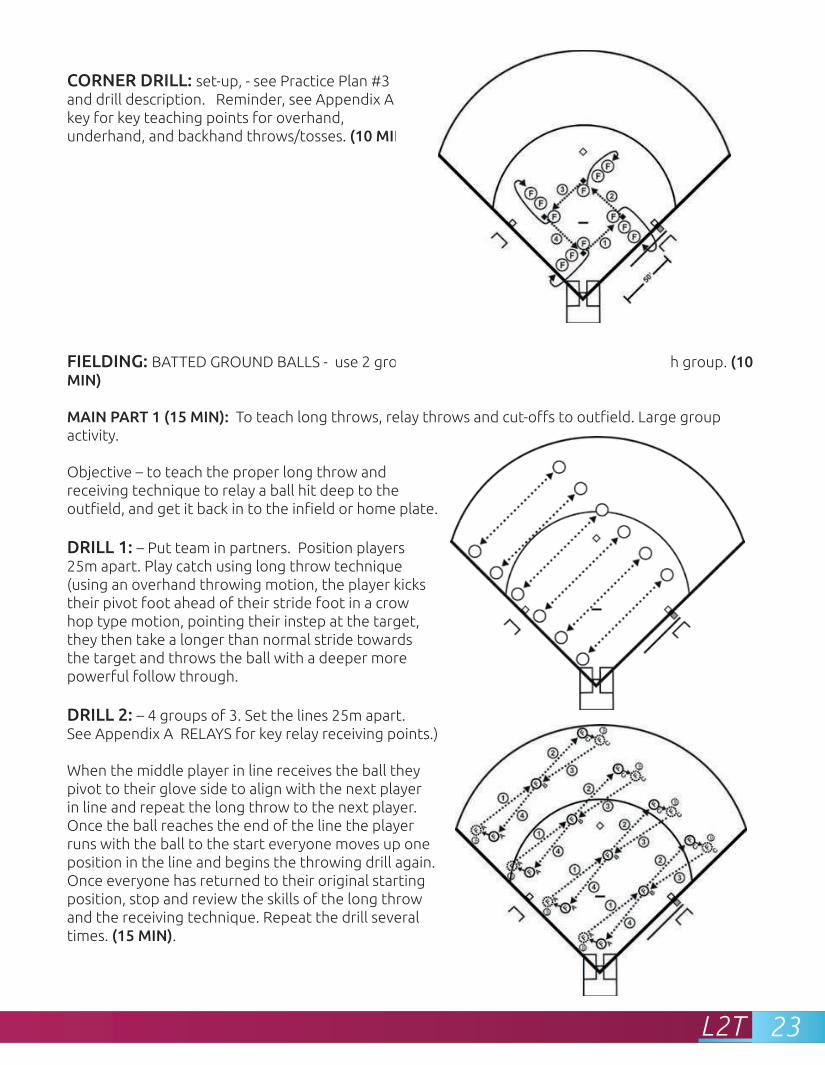
CORNER DRILL: set-up, - see Practice Plan #3 and drill description. Reminder, see Appendix A key for key teaching points for overhand, underhand, and backhand throws/tosses. (10 MIN).
FIELDING: BATTED GROUND BALLS - use 2 groups of 6 and 2 coaches to hit balls to each group. (10 MIN)
MAIN PART 1 (15 MIN): To teach long throws, relay throws and cut-offs to outfield. Large group activity.
Objective – to teach the proper long throw and receiving technique to relay a ball hit deep to the outfield, and get it back in to the infield or home plate.
DRILL 1: – Put team in partners. Position players 25m apart. Play catch using long throw technique(using an overhand throwing motion, the player kicks their pivot foot ahead of their stride foot in a crow hop type motion, pointing their instep at the target, they then take a longer than normal stride towards the target and throws the ball with a deeper more powerful follow through.
DRILL 2: – 4 groups of 3. Set the lines 25m apart. See Appendix A RELAYS for key relay receiving points.)
When the middle player in line receives the ball they pivot to their glove side to align with the next player in line and repeat the long throw to the next player. Once the ball reaches the end of the line the player runs with the ball to the start everyone moves up one position in the line and begins the throwing drill again. Once everyone has returned to their original starting position, stop and review the skills of the long throw and the receiving technique. Repeat the drill several times. (15 MIN).
23L2T

19L2T
MAIN PART 2 (20 MIN) - Divide players into two (2) groups of 6.
Group 1: review how to field a slow roller.
Key Points – stand over ball scoop using both hands, straddle ball with instep of pivot foot and front shoulder pointed towards target. Transfer ball to throwing hand as you rise slightly transferring weight to the back foot(pivot) complete overhand throw to 1st base and others to 2nd and 3rd.Use an under hand toss to home. Try charging slow rollers, using same techniques. (10 MIN).
Group 2: Outfield fly ball/ground ball fielding –see Appendix A for teaching points and technique. (10 MIN).
COACH: bats fly balls and ground balls to players in the field and they return the ball with throw to designated player. Introduce concept of HURRY throw to the plate from the outfield, when and why to use it.
Teaching points; Athletes should stay low to charge the ball, and field ball outside of stride foot. As you receive the ball kick your pivot foot, ahead of your stride foot, (crow hop) as you bring the ball to your throwing hand and point instep at the target, then stride toward the target with the stride foot. – see Appendix A “Do or Die Throws” for key teaching points. Encourage players to call fly balls. (10 MIN).
GAME SIMULATION PLAY (15 MIN): -see set-up in Practice Plan 3# Game Simulation.
WRAP-UP: “Bring it back relay” (5 MIN): see Practice Plan #1 Wrap-up instructions.Static Stretch Routines, and Conclusion (10 MIN).
24L2T

20L2T 16L2T 6L2T
Special Olympics Softball:Practice Plan #6

21L2T
Special Olympics Softball:Practice Plan #6
SPECIAL OLYMPICS SOFTBALL PRACTICE PLAN #6
LOCATION: DATE: # OF ATHLETES:
SUPPORT STAFF:
PRACTICE OBJECTIVES: 1. To consolidate basic skills and routines, 2. To practice base running skills and reading signals, 3. Develop good swing mechanics 4. To teach infield/outfield game simulation tactics, 5. To practice hitting live pitching.
INRODUCTION (5 MIN): as previous practices
EQUIPMENT: balls, bases, bats, cones, whiffle balls/hockey balls
DYNAMIC WARM-UPS (10 MIN): see Practice Plan #1 for set-up and Appendix B, for description of each movement.
CRASH: 3 STATIONS, 4-5 PLAYERS/ STATION. (20 MIN)
Station 1: Practice lead off and jam from a base. – see Practice Plan #2 for set-up.
Station 2: Base running 2nd to home: players start at 2nd base, coach positions themselves in the coach’s box at 3rd base, on command, player runs toward 3rd and looks to coach for signal to stop at 3rd or round the bag and run home. 3-4 tries/player. Coaches should switch up whether they hold or send the runner so athletes will get used to looking or listening for the coach’s signal.
Station 3: Cone fielding going back on a 45 degree to catch fly ball –see Practice Plan# 3 for set-up “Drop step and chase Drill” Practice Plan#4
TOTAL TIME for crash 5 min./ station;
EVERYDAYS (10 MIN): Throwing and receiving (large group, partners) see Appendix D for progressions.
26L2T

10L2T
Large group (10 MIN)– 4 corners drill with ground ball fielding and throwing, see Practice Plan #3 forset-up and instructions. You may want to reduce the square to 4-5 m and repeat using under hand and back hand tosses.
MAIN PART A: BATTING CIRCUIT – divide players and setup 3 stations around the diamond.
Station 1: Pool noodle swings. 3 sets of 5 swings. (5 MIN).
Station 2: Hit waffle ball or hockey balls off T into net or fence.3 sets 5 swings. (5 MIN).
Station 3: Soft toss from the side and athletes hit balls into net or fence (if using net hit real balls if hitting into screen use waffle balls). Set-up: The batter takes stance at a throw down plate, coach takes position to the side and slightly behind batter and tosses balls out in front of the plate, batter hits ball into net. Each player takes 3 sets of 5 swings. (5 MIN).
MAIN PART B (20 MIN): RUN DOWNS: defense & offence, - see Appendix, A for Key teaching points.
Teach Dart throw technique to all players (Appendix A).
Drill 1: In partners 5m apart. Perform Dart throw while playing catch; (5 MIN).
Drill 2: Divide players into 3 groups of 4 in lines facing each other 15m apart; place a cone at the midway point; the first player runs to cone and performs a Dart throw to the first person in the opposite line, and then continues to the end of the opposite line, player receiving the ball then runs with ball held in good dart throw position and throws the ball to the first person in the opposite line, when they reach the cone. Continue until all players have gone through 2 rotations and end up in their starting position. (5 MIN).
To advance the drill, have the player pretend to tag a sliding runner before making their return trip.
To teach the offensive base running skill to be used when caught in a rundown replace the cone with base runner who attempts to avoid the tag as the player with the ball chases them. (5 MIN).
*BASE RUNNERS SHOULD WEAR HELMET FOR SAFETY.
GAME SIMULATION (15 MIN): Play SCRUB as previously taught, have players pitch when they reach the #2 position (coach should teach pitching (slow pitch techniques) to each player in turn. Coach reviews tactics used to get outs and the 3 B’s of defense as may be necessary.
WRAP-UP, COOL DOWN STRETCHES, and CONCLUSION (10 MIN).
27L2T

23L2T
Special Olympics Softball:Practice Plan #7
L

24L2T
MAIN PART – Divide players into two (2) groups of 4-6 players to practice fielding ground balls hit by the coach. Once fielded they throw the ball to a receiver positioned by the coach who flips the ball to the coach to hit to the next player in line. Rotate receivers after several rounds. TIME 10 MIN Group 2: 4-6 players field fly balls hit by coach in the outfield, and return throw to a receiver positioned by the coach (change receivers after several rounds). HINT: have players call mine when they move to make the catch. Remind player about keeping their heads up and safety. TIME 10 MIN.Switch groups after 10 min.
EQUIPMENT: Balls, bats.Game Simulation SCRUB: (20 MIN) - SET-UP, see Practice Plan #2 for description and set-up.
EQUIPMENT: balls ,bases, bats.
WRAP-UP RELAY (5 MIN): Bat relay, with addition of up and back, balancing the bat in the palm of your hand. Each time the player losses control or must touch the bat with the other hand they must stop and do 5 push-ups before continuing the race
COOL DOWN STRETCHES and CONCLUSION (10 MIN): - same as Practice Plan#1
Special Olympics Softball:Practice Plan #7
SPECIAL OLYMPICS SOFTBALL PRACTICE PLAN #7
LOCATION: DATE: # OF ATHLETES:
SUPPORT STAFF:
PRACTICE OBJECTIVES: 1. To practice tactics and strategies in Game Simulations, 2. To train basic skills of throwing, fielding, base running and hitting, 3. To enhance team bonding.
INRODUCTION (5 MIN): as at all practices.
EQUIPMENT: balls, bases, cones, bats, helmets
DYNAMIC WARM-UPS (10 MIN): see Practice Plan #1 for set-up and Appendix B, for description of each movement.
CRASH: 3 stations 4 players / station.
Station 1: Cone Fielding – see- Practice Plan #5 for set-up and drill description. (5 MIN).
Station 2: “Get up and Go” – player assumes a position on the ground as if they have just dived back to a base; on the coach’s command “GO” the player gets to their feet and runs 5 hard steps toward the next base, then jogs back to the line to be ready for their next attempt. 3-4 attempts / player (5 MIN).
Station 3: see Practice Plan #3, for set-up and drill description. Zig – Zag (in and outs drill) (5 MIN).
EVERYDAYS (10 MIN): 4 Corner throwing drill (large group) – see –Practice Plan #3 Main Part for set-up and drill description. Coaches can shorten the distance to 5m if they want to practiceunderhand & backhand tosses.
29L2T

25L2T
Ground Ball Fielding Drill (10 MIN)– 2 groups of 6 players. Spread out, one coach hits ground balls to each group. Position groups on the infield so as not to interfere with each other. The coach hits ground balls to each player. They return ball by throwing overhand to a designated receiver positioned beside the coach (rotate receivers)
DRILL 1: Review how to receive a throw at a base for a force out. A player assumes a position at a base and gets ready to receive the throw by placing their throwing hand foot on the base and stretching to receive the ball with their glove hand. Player should not stretch until they see the flight of the throw. (10 MIN)
DRILL 2: Use bases as 4 corners and do the 4 Corner Throwing Drill as they practice receiving the ball for a force out. Change up the drill by switching directions of the throw. (10 MIN).
GAME SIMULATION (15 MIN): - see Practice Plan #3, Game Simulation for set-up and drill description.
WRAP –UP: ACTIVTY – “TEAM TAG”
This drill will involve your entire team placed inside the 4 bases of the infield. You will mark off the base paths by placing cones half way between each base. The coach designates two players as “it” & they should wear helmets for identification.
DRILL DESCRIPTION – Coach yells “GO” and the two helmet heads sprint and try to tag as many players as they can. Players cannot leave the coned area of the infield to avoid being tagged. All tagged players must leave the infield and stand along the fence or in designated area.
To make this a very competitive activity split your players into groups of 2 and time how long it takes each pair to tag all the other teammates. This activity will be a very good conditioning drill that’s not only fun, but also works on the quick cuts that happen in softball. (10-15 MIN).
COOL DOWN: STATIC STRETCH ROUTINES and conclusion. (10 MIN).
30L2T

Special Olympics Softball:Practice Plan #8
L2T

27L2T
Special Olympics Softball:Practice Plan #8
SPECIAL OLYMPICS SOFTBALL PRACTICE PLAN #8
LOCATION: DATE: # OF ATHLETES:
SUPPORT STAFF:
PRACTICE OBJECTIVES: 1. To train positional skills and responsibilities. 2. To consolidate basic skills through established routines.3. To review team defensive principals, and introduce principle of Jurisdiction. 4. To practice tactics and skills to make outs.
INRODUCTION (5 MIN): As in all previous practices.
EQUIPMENT: balls, bases, bats, cones, pool noodles, batting T.
WARM-UPS: DYNAMIC STRETCH ROUTINE – see previous practices for routines. Coaches should try and add variety to the dynamic stretches or let athletes lead the routine
CRASH (20 MINS): 3 stations, 4 players / group.
Station 1: Base running 2nd to home. As in Practice Plan #6 players start at 2nd base, coach positions themselves in the coach’s box at 3rd base, on command, player runs toward 3rd and looks to coach for signal to stop at 3rd or round the bag and run home. 3-4 tries/player. Coaches should switch up whether they hold or send the runner so athletes will get used to looking or listening for the coach’s signal.
Station 2: Square Drill – As in Practice Plan #1 set-up cones in a 10m square. Players start in bottom left corner run up to 1st cone then side shuffle to the right to the 2nd cone, turn and skip to the 3rd corner and then side shuffle to the left back to the starting point. Repeat 3-4 times around.
Station 3: Cone Fielding – As in Practice Plan #5 place 2 cones 2-3m apart. Players one at a time, on coach’s command, assume the ready position. They take position in the middle of the 2 cones about 1m deeper. The coach is positioned 3M from the player facing them. The coach then indicates by pointing to either cone and the player performs a shuffle step to the cone and pretends to field a ball, and freezes (2sec.) in the overhand throw K position pointing at target. 4-5 rounds per player
TIME 5 MIN / station.
EVERYDAYS:
1: Throwing and receiving. (partners; large group) – see Appendix, E for set-up and teaching points. (10 MIN)
32L2T

APPENDIX B: RESOURCES
28L2T
2) Triangle Fielding Drill: - Form groups of 3 players who stand in a triangle formation on the skinned areaof the infield (foul territory can also be used) 12m between corners.
First player throws a ground ball to the player on their right, player fields the ball and throws overhand to the player on their right. The player that receives the throw, rolls a ground ball to the next player on their right. Continue around the triangle.
If possible, ground balls should progress as athletes get the hang of the drill – - directly at the fielder – - one step to the left or right of the fielder (shuffle step)- 2-3 steps to the fielder’s right or left forcing the use of a cross step to field the ball
Half way through the drill change direction and go to the left. (10 MIN).
HINT - have extra balls handy so time is not wasted chasing errant throws and missed balls.
MAIN PART (30 MIN): - Infield/outfield game simulation drill: Place players in all (9 or 10 defensive positions; The Coach will call out various game situations (number of outs, runners on base) and then hit the ball to the defense.
Game situations can include – nobody on base; a runner at 1st; runners on 1st and 2nd, runner on 2nd; runner on 3rd; runners at 2nd and 3rd; bases loaded.
The coach will review the tactics and strategies to be practiced (getting the lead runner, getting the closest out, force plays at all bases, cutting off run with infield, relays and cut-offs) and the defensive principles of location, coverage, adjustment. Introduce the defensive principle of jurisdiction (who is in the best position to catch pop flys in the infield and outfield). Remind players to call fly balls. ** Players not playing defence will act as runners with helmets on.
Rotate players into defence and to different positions.
WRAP-UP (10 MIN) – Glove Balance relay – group players into teams of 4-5 players
Relay 1: Player runs/walks up to cones and returns balancing their glove on their head (if the player losescontrol of the glove, or has to touch with their hand they must stop and do 5 push-ups, then continue. When the player returns, the next player goes. Coach can be creative on other challenges within the relay.
Relay 2: Do the same again only the players must walk backwards. Switch team mates and repeat the relays.
COOL DOWN (10 MIN): Stretch routine and conclusion
33L2T

Special Olympics Softball:Practice Plan #9
L T

Special Olympics Softball:Practice Plan #9
21L2T
SPECIAL OLYMPICS SOFTBALL PRACTICE PLAN #9
LOCATION: DATE: # OF ATHLETES:
SUPPORT STAFF:
PRACTICE OBJECTIVES: 1. Practice team play tactics and strategies. 2. Teach bent leg slide. 3. Practice swing mechanics. 4. Consolidate basic skills.
INRODUCTION (5 MIN): as previous practices
EQUIPMENT: lls, bases, bats, helmets, batting T’s, net or screen, whiffle balls, (1 doz. Softball sized, and 1 doz. Golf ball sized, if possible), cones, pool noodle.
WARM-UPS: DYNAMIC STRETCH ROUTINE – see previous practices for routines. Coaches should try and add variety to the dynamic stretches or let athletes lead the routine
CRASH DRILL (20 MIN): Teach Bent leg slide to large group. – see Appendix A for teaching points and progressions. Divide players into two groups of 6 with 2 coaches per group to act as supporters on the skinned area of the infield. Place a base 15m in front of each group have them go through the progressions as they work up to a full sprint to execute the bent leg slide into the base. **ALL PLAYERS SHOULD WEAR HELMETS WHEN PERFORMING THE SLIDE.
WATER BREAK (5 MIN).
EVERYDAY (15 MIN): Throwing progressions with partners see Appendix D for set up and descriptionof progressions.
MAIN PART A (15 MIN): – “Backhand Fielding Drill” – In partners, players 5m apart face opposite each other. Coach demonstrates glove position to field a ground ball with a backhand (fingers pointed down, thumb closest to the body) Players take turns rolling the ball to their partners on the backhand side just outside their backhand side foot; then within one cross-over step to the backhand; then 2-3 steps to the backhand side; player fields the ball and throws it back to their partner. After 5 ground balls to each location, players switch rolls.
35L2T

10L2T
MAIN PART B: –3 Station Batting Circuit:
Station 1: Hitting whiffle balls off a single T into the screen. Set T slightly in front of batter’s front foot of their stance. A coach places whiffle ball on the T. Have two players shag balls as they bounce off screen (ensure safety). One player (on deck; practices slow swings while waiting their turn). Rotate batters after 5 swings. Each batter has 3 sets of 5 swings. Then group rotates to next station. Equipment needed 1 T, 5 Whiffle balls.
Station 2: Batter takes stance at throw down base. Coach acts as the tosser (pitcher) pitching golf ball sized whiffle balls from 5m in front of batter, 3 players act as shaggers retrieving hit balls for the coach (ensure safety). The batter takes 8-10 swings then players rotate taking turns as batters and shaggers. 2-3 sets of 8-10 swings each. Equipment needed; throw down plate , 12 golf size whiffle balls.
Station 3: Pool Noodle swings. Batter stands in batter’s box at Home plate, the coach holds the pool noodle slightly in front of home plate in various strike positions (low outside, high inside etc.). Batter swings to hit the pool noodle. This allows athletes to prepare to hit softballs all over the strike zone. Other players perform slow motion swings while waiting their turn at bat. 3 sets of 6 swings each Equipment needed 1 bat/player ,1 pool noodle.
TIME 8-10 MIN / STATION
WRAP-UP (5 MIN): Drill – “LAST ROUND UP” set-up –All players lay on their stomach in a circle (facing in, 1-2m between players). On coaches command a chosen player gets up and runs left jumping over each player in turn until they complete the circle run and assume their original position in the circle. The next player on the left then jumps up and does their run in the same fashion. Stop when all players have completed their run. Repeat going to the right.
COOL DOWN STRETCHES and conclusion. (5-10 MIN)
36L2T

Special Olympics Softball:Practice Plan #10
L

Special Olympics Softball:Practice Plan #10
SPECIAL OLYMPICS SOFTBALL PRACTICE PLAN #10
LOCATION: DATE: # OF ATHLETES:
SUPPORT STAFF:
PRACTICE OBJECTIVES: 1. Practice basic skills and tactics. 2. Enhance team bonding. 3. Bat vs. Live pitching
INRODUCTION (5 MIN): As in all previous practices.
WARM-UPS: DYNAMIC STRETCH ROUTINE – see previous practices for routines. Coaches should try and add variety to the dynamic stretches or let athletes lead the routine
CRASH (20 MINS): 4 stations
Station 1: “Tag up and Go”, from 2nd base. Coach stands in coach’s box at 3rd base; Player jumps off base as coach points up to indicate ball has been hit to the outfield; Player returns to base taking a sprint start and focuses on the coach for signal to run when ball is caught; Coach signals verbally and by dropping their arm to run; player runs quickly to 3rd base. 3 reps./player.
Station 2: Cone Fielding. Set cones 5m apart, player assumes ready position between cones and coach give visual cue to perform a cross step left or right to field an imaginary ball. 3 -4 reps./player – see – Appendix A for Key teaching points for fielding and cross step movement.
Station 3: Retreat slide (dive back); Player assumes jam position 3 steps from base; On coaches signal player dives back to touch the corner of the bag closest to the outfield. 3-4 reps./player.
Station 4: Pool Noodle Swings. Player swings at pool noodle held by coach at various positions in the strike zone. 2 sets of 5 swings /player.
TIME 5 MIN / station.
34L2T 38L2T

34L2T
APPENDIX B: RESOURCESEVERDAYS (10 MIN): - 4 Corner drill – See Practice Plan #3 for set-up and descriptions.
Triangle Drill (10 MIN): See Practice Plan #8 for set-up and for drill description.
GAME SIMULATION: Play SCRUB (30 MIN)- see- Practice Plan #2 for game description. And teaching points.
WRAP-UP RELAY (5 MIN): “Take it Back” –see- Practice Plan #1 for relay descriptions.
COOL DOWN (5 MIN) : Stretches and conclusion
39L2T

Special Olympics Softball:Practice Plan #11
L

Special Olympics Softball:Practice Plan #11
SPECIAL OLYMPICS SOFTBALL PRACTICE PLAN #11
LOCATION: DATE: # OF ATHLETES:
SUPPORT STAFF:
PRACTICE OBJECTIVES: 1. To practice basic skills and tactics. 2. To establish pitching practice and pre game warm-up routines. 3. To enhance team bonding.
INRODUCTION (5 MIN): As in previous practices.
EQUIPMENT NEEDED: - bats, balls, bases, helmets, cones, throw down plate.
WARM-UPS: DYNAMIC STRETCH ROUTINE – see previous practices for routines. Coaches should try and add variety to the dynamic stretches or let athletes lead the routine
EVERDAYS:
1) Have team partner up and play catch; first from 10m; then expand to 15-20 m. (5 MIN).2) 4 Corner Drill – see Practice Plan #3 &5 for set-up and drill description.
Divide team into infielders, outfielders, & pitcher and catcher to be used to start a game.
Infielders will position themselves on the skinned area of the infield behind 1st or 3rd base approx. 20m from the coach (standing in foul territory) who will hit ground balls to each player.
Outfielders will move to the outfield (in right or left field). A coach from foul territory will bat fly balls and ground balls, in turn, who throw them back to a designated receiver.
The starting pitcher and catcher will practice pitching in a designated safe area in preparation for the game. Use throw down home plate or mat for target (10 MIN).
Gather team in huddle for last minute instructions and ground rules, give team cheer and break to play the game.
ALL OF THE ABOVE ACTIVITIES (from dynamic stretch to team huddle act as a pre-game warm-up preparation.) TOTAL TIME 35-40 MIN.
37L2T 41L2T

37L2T
For the purpose of this practice #11. “Play Home Run Derby” (30 MIN).
Drill Description:· Set up the playing area: - Place one set of cones 15’ deeper than normal cut out infield.· - Place another set of cones at ~150-175’ from Home Plate.· Set up one batter, one player on-deck and three hitting stations with 2 players at each station. The extra players will act as shaggers.· Shaggers are stationed anywhere in the infield or outfield.· The on-deck batter will be working on their on-deck swing routine to warm-up.· Each batter takes 5 swings and keeps their score (another Coach should record score and act as judge if needed).· A Coach pitches (front toss) from behind a screen from 20-25’ using light flite type balls. The first swing is practice. The batter then has 5 swings (fair or foul).· The batter will score points as follows: - A swinging strike is counted as 0 pts. - A ball landing on the first bounce before the first set of cones is worth 3 pts. - A ball landing on the first bounce past the first set of cones is worth 5 pts. - A ball that bounces only once as it bounds over the last set of cones is worth 7pts. - A ball that lands for the first time behind the last set of cones is worth 10 pts and is called a Home Run.· If a shagger catches a line drive, the batter scores 2 less points based on where the shagger was standing when they caught the ball: - If the shagger was before the 1st set of cones, the batter would score 1 point (3-2=1). - If the shagger was between the 1st and 2nd set of cones, the batter would score 3 points (5-2=3). - If the shagger was past the 2nd set of cones, the batter would score 8 pts (10-2=8).· A foul ball receives 2 less points than it would have received if it landed in fair territory: - If the ball first bounces before the 1st set of cones, the batter would score 1 point (3-2=1). - If the ball first bounces in foul territory between the 1st and 2nd set of cones, the batter would score 2 pts (5-3 = 2 pts). - If the ball first bounces past the 2nd set of cones, the batter would score 8 pts (10-2=8 pts).
WRAP-UP (5 MIN): BAT RELAY see Practice Plan #3 for set-up and instructions.
COOL DOWN (10 MIN) : Stretches and conclusion
42L2T

38L2T
Special Olympics Softball:Appendix A- Key Teaching Points for Softball Skills
L T

Special Olympics Softball:Appendix A- Key Teaching Points for Softball Skills
APPENDIX A:KEY TEACHING POINTS FOR SOFTBALL SKILLS
COACHING TIP:
• Make up cue cards with the key teaching points for each skill.• Laminate the cue cards and put a hole in the corner and carry using a lanyard.• Keep these cue cards with you for quick reference to ensure you have covered all the key points with your players during drills.
RECEIVINGMechanics:• Stand in an athletic and balanced position to receive a throw: - Weight on the balls of the feet - Knees slightly bent - Feet staggered with the non-throwing foot slightly forward - Glove and throwing hand out in front of body• Give a target to the thrower in centre of the body• Use two hands to receive the throw• Hands and glove work like the face of a clock (pinkies and thumbs) - When the ball is below the belly button, the pinkies should be together until just past the mid-line of the body the glove must turn over - When the ball is above the belly button, the thumbs should be together• Move body so that the ball is caught on the throwing hand side to aid in a quick transfer to the throw• When ball contacts the glove, the hands and elbows should give (Soft Hands)• As you absorb, bring the ball and glove to the throwing shoulder
THROWINGGrip:• 2, 3, or 4 fingers (whichever is most comfortable depending on the size of the player’s hand)• Hold the ball in the fingers, not in the palm• The fingers should cross the seams of the ball where the knuckles closest to the fingertips are• Hold the ball firmly but not so hard that the wrist and arm become stiffThrowing Mechanics:• Pre-Stride - Point instep of back foot (pivot foot) at target - Weight on the pivot foot• Stride - Step with foot opposite throwing hand (stride foot) - Step straight towards target• Body Rotation - Rotate trunk approximately 90 degrees away from target - Strong push off the back foot - Unwind in sequence: hips, shoulders, arm, wrist, fingers
44L2T
• Arm Position/Action - Arm high with elbow at least parallel with shoulder - Concentrate on keeping arm high and having players come over the top (elbow leads and forearm and hand follow in sequence) - Pull non-throwing arm forcefully backward towards body and downward• Wrist Action - Wrist under the ball at release - Hand snaps forward as ball is released• Follow Through - Shoulder and arm continue forward rotation - Point throwing arm shoulder at target to complete motion - Allow pivot foot leg to swing forward naturallyBasic Throwing Rules:• Throw to a specific target• Try to achieve reverse rotation on ball (6 o’clock – 12 o’clock rotation)Underhand Toss• Ensure the ball is visible to the receiver• Create a floating toss (no spin on ball) by locking the wrist• Step with the same foot, same armBackhand Toss • Stay low• Bring elbow up to shoulder height• Extend elbow• Thumb should be pointing down on release
FIELDINGReady Position:• Taken on every pitch by fielders• Infielder - Feet slightly wider than shoulder width apart with weight evenly distributed - Stride foot slightly ahead - Knees well bent, butt low - Head up, eyes on batter - Body relaxed ready to move in any direction - Hands low, glove near ground - Elbows out in front of knees - Weight forward spread along entire foot• Outfielder - Feet shoulder width apart with weight evenly distributed - Stride foot slightly ahead - Knees bent with slight bend at hip - Head up, eyes on batter - Body relaxed ready to move in any direction - Hands and glove about belt height - Weight forward spread along entire foot
45L2T

Footwork:Side Shuffle Step• Used to cover short distances• Feet do not cross• Body kept low during side shuffle step (body does not rise up)• Move ball side foot first then slide back foot back under the body returning feet to about shoulder width apart and remaining in an athletic stance• Repeat if necessary to get body centred behind ballCross-Over Step• Used to cover long distances• Step in direction of ball with ball side foot first.• Pivot on foot closest to the ball as you cross-over with foot furthest away from the ball• Turn shoulders 90 degrees from starting point• Body kept low during cross-over step (body does not rise up)• Square up shoulders to the ball if possible• Create basket with glove to field ballFielding Technique:Ground Balls• Infielders - Hands well out in front of body (past the toes) and the touching the ground - Glove wide open facing ball - Feet slightly wider than shoulder width apart - Stride foot slightly ahead - Ball fielded from ground up - Absorb ball (soft hand ) by giving with elbows into the body - Use both hands• Outfielders - Regular Ground Ball - Move around the ball so coming into the ball on a straight line towards target - Hands well out in front of body (past the toes) and the touching ground - Glove wide open facing ball - Feet slightly wider than shoulder width apart - Stride foot slightly ahead - Ball fielded from ground up - Absorb ball (soft hands) by giving with elbows into the body - Use both hands - Do or Die Throw Ground Ball - Move around the ball so coming into the ball on a straight line towards target - Catch ball on glove hand side with stride foot beside glove - Push glove out to ball to catch it - Bring glove/ball up to throwing shoulder as player hops and plants pivot foot with instep facing the target to make throw (crop hop)Fly Balls:• Get to ball as quickly as possible. Do not run with glove arm extended and do not back pedal (run backwards)• Set up under ball and stride into ball to catch• Catch ball above the head over the throwing shoulder with shoulders in line with target.• Catch ball with two hands watching it into the glove the entire way• Soften the impact of the ball with the giving of the elbows and hands
46L2T

Fly Balls at the Fence:• Judge where the ball will come down and get to the fence as quickly as possible. It is both easier and safer to get to the fence and move away than to get to the fence and attempt to make a catch.• Place hand closest to fence on the fence and gauge how much room there is to make the catch: - If ball is on or over the fence - And the bare hand is on the fence, keep hand on the fence and jump up to catch the ball. - And the glove hand is on the fence, jump as high as possible to catch the ball with the glove. - If ball is off of the fence, step away from the fence and make a two-handed catch.• Keep in mind if there were baserunners and know where to throw the ball once the catch is made.
HITTINGGrip:• Hold the bat in the fingers not the palm• Align the middle knuckles (door knocking knuckles) of both hands to prevent locking wrists• Types of grip: - Long Grip - Hands together near at end of bat - Less control, more power - Choke Grip - Hands together about 3-5 inches from end of bat - More control, less power - Split Grip - Bottom hand at end of bat and top hand 2-5 inches from bottom handStance:• Parallel - Both feet equidistant from plate - Compact swing, with power• Closed - Front foot closer to plate - More power potential, harder to hit fast pitching - Easier to hit to opposite field• Open - Back foot closer to plate - Better vision of ball - More control, less powerLocation in Batter’s Box:• Back of the batter’s box - Longer reaction time - Better view of both plate and ball• Front of batter’s box - Easier to hit breaking pitches - Can’t see both plate and ball• Neutral (lined up with Home Plate) - Pitch will break but not too much - Can see both plate and ball - Sufficient reaction time
47L2T

Ready Position:• Feet - A bit wider than shoulder width apart - Weight on balls of feet - Weight distributed evenly between both feet• Knees - Slightly bent for stability - Inside the feet• Body - Bent slightly forward at hips• Arms - Relaxed - Forearms form an “A” or upside down “V”• Hands - At height of back shoulder - At top of strike zone - Comfortable, relaxed grip (not tight)• Head - Positioned so both eyes can see pitcher and eyes are level - Eyes fixed on pitcher’s release point (hip) - Watch the ball to the point of contact (or the catcher’s glove if a ball)Swing:• Trigger (Pre-Stride) - Weight shift to inside edge of back foot - Front shoulder & hip rotate inward toward catcher• Forward Stride - Stride towards the pitcher - Should be short and controlled (compact) - Front foot planted at no more than 45° open - Head & eyes remain steady• Hip Rotation - Follows, but is part of, the stride - After hard push from back foot, weight transferred against front foot as hips begin to rotate - Arms and hands kept back• Shoulder/Arm/Wrist Action - Rotate shoulders after hips start to rotate - Bring hands inside ball with wrists cocked - At bat-ball contact point, extend arms into hitting zone with top hand palm pointing to the ground and bottom hand palm pointing up - Snap bat with wrists• Follow Through - Top hand “rolls over” bottom hand after contact - Complete the swing - Shoulders continue to rotate - Bat ends up behind body and above shoulder height with chin on back shoulder
48L2T

BASERUNNINGLeaving the batter's box:• First step taken with foot farthest from pitcher• Drop the bat, do not throw itRunning to first base:• Do not watch the ball• Run through first base at full speed• Do not lunge• Touch the part of the base closest to home plate• Do not slide, unless avoiding a tag• Gain control quickly by taking shorter steps and sinking the hips down• Turn to the infield to return to the base• Never turn away from the ball. Keep eyes on the ball even when returning to the baseStarting from a base:• Rolling Start/Rocker Start - Lead foot is in contact with the base - Step taken by back foot before the release of ball - Time step for when the pitcher’s arm is at the 12 o’clock position - This start creates momentum• Track Start - Back foot is on the base - Front foot extended in front of base - Knees bent, ready to sprint when pitcher releases ballLeading off after a pitch:• Time step for when the pitcher’s arm is at the 12 o’clock position • Jam and return to the base quickly if ball is not hit• Do not turn your back on the ballRounding a base• Make a short loop before reaching the base• Lean inward as much as possible when turning• Touch the inside corner of the base with inside leg (left leg) if possible• Maintain your stride
SLIDINGDetermining the Sliding Leg• Have players sit cross-legged• Leg tucked under is usually sliding legFinish Position• Sliding leg bent 90 degrees, tucked under other leg• Other leg extended, slightly bent• Extended leg foot is 4-6 inches off ground• Base is contacted with extended leg• Weight of slider is back• Chin is tucked into to the chest• Arms thrown above headDistance• Start slide about one and a half body lengths from base
49L2T

General Tips:• Ensure players are wearing a helmet even in practice.• Build confidence by starting easy and progressing gradually• Use support people until slider is confident• Practise sliding on wet grass, in a sand pit or in a gymnasium• Use unfastened bases to start with• Teach sliding to players in socks or bare feetSliding Teaching Progressions:• Determine the bent or tucked leg - Have players form a circle around the Coach. - Have the players sit down cross legged. - They will naturally tuck one leg underneath their body which will be the natural slide leg.• Demonstrate the finish position - Slide leg straight but not locked - Bent leg tucked - Arms thrown above head - Chin tucked into chest.• Finish position with movement - Using a volunteer player who is lying in the finish position, the Coach will grasp their foot and pull them to simulate the movement of the slide.• Standing in Finish position - While standing, get the players to get into the Finish Position. - Be sure they throw their hands back over their head and tuck their chin on their chest.• Sliding with Support - With the aid of two strong coaches, have them hold the slider’s arms and gently lower them into the Finish Position• Sliding with Support while Jogging - Same as above but do a slow jog first from about 10 meters. - Instead of two adults supporting slider, you can use two adults holding a broom stick or bat that the slider grabs to lower themselves to the ground.• Sliding with Support while Sprinting - Same as above but from a sprint• Bent Leg Slide while Jogging without aid• Bent Leg Slide while Sprinting without aid
COACHING TIP:
• Have players slide without shoes• Teach sliding on wet grass
PITCHING –SLOW PITCHPitching Mechanics:• Grip The pitcher grips the ball with the index, middle, and ring fingers spaced slightly apart across one seam and the thumb underneath on the opposite seam. The little finger is on the opposite side of the ball from the thumb. The pitcher should grip the ball with their fingers, not the palm; there should space between the ball and the palm.
50L2T

• Grip The pitcher grips the ball with the index, middle, and ring fingers spaced slightly apart across one seam and the thumb underneath on the opposite seam. The little finger is on the opposite side of the ball from the thumb. The pitcher should grip the ball with their fingers, not the palm; there should space between the ball and the palm.• StanceThe pitcher grips the ball with the index, middle, and ring fingers spaced slightly apart across one seam and the thumb underneath on the opposite seam. The little finger is on the opposite side of the ball from the thumb. The pitcher should grip the ball with their fingers, not the palm; there should space between the ball and the palm.The heel of the pitching-arm foot should be on the rubber and the toes of the glove-side foot on or slightly behind the rubber in a comfortable position, with the weight on the back foot. The pitcher should face the batter and must come to a complete stop, with the ball in front of their body for a full second, before starting the delivery (see figure 8.8a).• Windup, Step, and Release The pitcher starts the delivery by swinging the pitching arm down, back, and then forward in a smooth path while the glove arm remains down and slightly out to the side of the body. • The throwing-arm motion is an easy, semicircular movement as opposed to a fast, whip-like throw. At its highest point in the backswing, the pitching arm is about parallel to the ground, with the palm facing down. When the pitcher brings the ball back, they shift their weight to their pitching-arm leg and step forward with the glove-side leg as they release the ball in front of their body. The ball is tossed upward, and must follow an arc of at least 6 feet and no higher than 12 feet from the ground. • Follow-Through After releasing the ball, the pitching arm continues forward, with the hand ending high and the arm close to the pitcher’s ear. Immediately after the follow-through, the pitcher takes several steps back for protection and fielding purposes and assumes the ready position to field any ball hit her way.
CATCHINGPosition in the Catcher’s Box:• Wait for batter to get set• Take note of their swing• Position about one bat length behind back foot of batter• Do not reach out to catch the ball. Let the ball come to you.Giving the Signal:• Squat with heels off ground• Hide signal from opposition using glove below knee of same side• Align knees with edges of home plate• Give the signal deep and against thighGiving the Target (no runners):• Same as when giving signal except: - Feet staggered with more forward lean of trunk - Glove to side of leg to hide signal from opposing coach - Throwing hand hidden behind back or lower legGiving the Target (with runners on base or two strike count):• Receiving position changes to allow for a quicker throw - Feet more spread apart - Heels on ground - Feet staggered with pivot foot farther back - Knees bent according to height of target - Throwing hand hidden behind back or lower leg
51L2T

RUN DOWNSDefense:• Dart throw or Snap throw (elbow and wrist only, from ear)• Keep ball visible to defensive teammate• Run hard at baserunner to force them to decide which direction to run• Be a half step to your throwing side so baserunner is not in the way of the throw to your partner (i.e. and deflects the ball away).• As soon as you see the number on the baserunner’s back, you want to make the throw because the runner has committed to a direction to run.• Goal is to not need to make a throw, or at most, make one throw to get runner out.• Best case scenario is an out. Worst case is baserunner is safe at original base (i.e. does not advance).• Better to give one good fake rather than 10 small fakes• Defensive player movement - Peel - Once the defensive player throws the ball, they will peel off and return to the base they came from to act as a back-up to the next defensive player or - Follow Your Throw - Once the defensive player throws the ball, they will take a clearing step to get off the base path and then follow their throw to the base they threw to. They will act as a back-up in case of an errant throw or replace the defensive player when they follow their throw.Offense:• Baserunner caught in a rundown should stay in the rundown as long as possible so runners behind them can advance as far as possible.• Look for a defensive player without the ball to run into to get an obstruction call against the defensive team.
RELAYS• The relay starts with a strong accurate throw from the outfielder• The outfielder should try to throw the ball to the relay person’s glove at about head height.• The relay person: - Gives a big target with both arms in the air and calls for the ball. - Stands at a 45 degree angle to the glove side. - Pivots towards glove and throws quickly relaying the ball to the next target.
52L2T

APPENDIX A:KEY TEACHING POINTS FOR SOFTBALL SKILLS
COACHING TIP:
• Make up cue cards with the key teaching points for each skill.• Laminate the cue cards and put a hole in the corner and carry using a lanyard.• Keep these cue cards with you for quick reference to ensure you have covered all the key points with your players during drills.
RECEIVINGMechanics:• Stand in an athletic and balanced position to receive a throw: - Weight on the balls of the feet - Knees slightly bent - Feet staggered with the non-throwing foot slightly forward - Glove and throwing hand out in front of body• Give a target to the thrower in centre of the body• Use two hands to receive the throw• Hands and glove work like the face of a clock (pinkies and thumbs) - When the ball is below the belly button, the pinkies should be together until just past the mid-line of the body the glove must turn over - When the ball is above the belly button, the thumbs should be together• Move body so that the ball is caught on the throwing hand side to aid in a quick transfer to the throw• When ball contacts the glove, the hands and elbows should give (Soft Hands)• As you absorb, bring the ball and glove to the throwing shoulder
THROWINGGrip:• 2, 3, or 4 fingers (whichever is most comfortable depending on the size of the player’s hand)• Hold the ball in the fingers, not in the palm• The fingers should cross the seams of the ball where the knuckles closest to the fingertips are• Hold the ball firmly but not so hard that the wrist and arm become stiffThrowing Mechanics:• Pre-Stride - Point instep of back foot (pivot foot) at target - Weight on the pivot foot• Stride - Step with foot opposite throwing hand (stride foot) - Step straight towards target• Body Rotation - Rotate trunk approximately 90 degrees away from target - Strong push off the back foot - Unwind in sequence: hips, shoulders, arm, wrist, fingers
38L2T
Special Olympics Softball:Appendix B- Dynamic Warm-up
L

• Arm Position/Action - Arm high with elbow at least parallel with shoulder - Concentrate on keeping arm high and having players come over the top (elbow leads and forearm and hand follow in sequence) - Pull non-throwing arm forcefully backward towards body and downward• Wrist Action - Wrist under the ball at release - Hand snaps forward as ball is released• Follow Through - Shoulder and arm continue forward rotation - Point throwing arm shoulder at target to complete motion - Allow pivot foot leg to swing forward naturallyBasic Throwing Rules:• Throw to a specific target• Try to achieve reverse rotation on ball (6 o’clock – 12 o’clock rotation)Underhand Toss• Ensure the ball is visible to the receiver• Create a floating toss (no spin on ball) by locking the wrist• Step with the same foot, same armBackhand Toss • Stay low• Bring elbow up to shoulder height• Extend elbow• Thumb should be pointing down on release
FIELDINGReady Position:• Taken on every pitch by fielders• Infielder - Feet slightly wider than shoulder width apart with weight evenly distributed - Stride foot slightly ahead - Knees well bent, butt low - Head up, eyes on batter - Body relaxed ready to move in any direction - Hands low, glove near ground - Elbows out in front of knees - Weight forward spread along entire foot• Outfielder - Feet shoulder width apart with weight evenly distributed - Stride foot slightly ahead - Knees bent with slight bend at hip - Head up, eyes on batter - Body relaxed ready to move in any direction - Hands and glove about belt height - Weight forward spread along entire foot
APPENDIX B:DYNAMIC WARM-UP
A dynamic warm-up is 10+ minutes of activity that prepares athletes physically and mentally for practice or competition. Athletes should do dynamic warm-ups before each practice or competition because they:• Improve performance• Reduce the risk of injuryDynamic warm-ups have several advantages over traditional static stretching. Effective dynamic warm-ups:• Increase heart rate more effectively• Increase muscle temperature• Improve force-generating capacity• Train neural pathways used in the athlete’s sport• Provide the working muscles with energy from the energy systems used in the athlete’s sport• Improve mental preparation• Help reduce the risk of injuryAn effective dynamic warm-up has three components• Active exercise. Active exercise gradually raises the heart rate, increases muscle temperature, and improve range of motion.• Dynamic stretching and body awareness. The athlete activates muscles through a large range of motion, gains a better sense of balance, and develops body control.• Sport-specific drills. These prepare the athlete mentally and physically for participation in his or her sport.An effective dynamic warm-up is specific to the sport• An effective dynamic warm-up uses the same muscle groups as the sport. Example: Cycling does not increase muscle temperature in the upper body, so it would not be an appropriate warm-up for a pitcher.• An effective dynamic warm-up trains the neural pathways required in the sport. Example: While running uses the same muscle groups as cycling, the order in which the muscles are recruited is very different, so running would not be the best warm-up option for a cyclist.• An effective dynamic warm-up uses the same energy systems as the athlete’s sport. Example: Softball relies primarily on ATP-CP energy system to provide energy to the working muscles, whereas long-distance running requires mainly oxidative sources. The softball player’s warm-up should therefore include shorter, more intense bouts of activity interspersed with rest periods to mimic a typical play in softball.
An effective dynamic warm-up prepares the athlete for sport without causing fatigue• Effective warm-ups and fatigue have the opposite effect on certain aspects of performance:
• Decreases the ability to generate maximum force
• Decreases the maximum velocity of contraction
• Decreases the maximum rate of force development
• Increases the time needed to “turn the muscle on” and “turn the muscle off”
• Increases the risk of injury
• Increase the ability to generate maximum force
• Increase the maximum velocity of contraction
• Increase the maximum rate of force development
• Decrease the time needed to “turn the muscle on” and “turn the muscle off”
• Decrease the risk of injury
Warm-ups... Fatigue...
54L2T

Footwork:Side Shuffle Step• Used to cover short distances• Feet do not cross• Body kept low during side shuffle step (body does not rise up)• Move ball side foot first then slide back foot back under the body returning feet to about shoulder width apart and remaining in an athletic stance• Repeat if necessary to get body centred behind ballCross-Over Step• Used to cover long distances• Step in direction of ball with ball side foot first.• Pivot on foot closest to the ball as you cross-over with foot furthest away from the ball• Turn shoulders 90 degrees from starting point• Body kept low during cross-over step (body does not rise up)• Square up shoulders to the ball if possible• Create basket with glove to field ballFielding Technique:Ground Balls• Infielders - Hands well out in front of body (past the toes) and the touching the ground - Glove wide open facing ball - Feet slightly wider than shoulder width apart - Stride foot slightly ahead - Ball fielded from ground up - Absorb ball (soft hand ) by giving with elbows into the body - Use both hands• Outfielders - Regular Ground Ball - Move around the ball so coming into the ball on a straight line towards target - Hands well out in front of body (past the toes) and the touching ground - Glove wide open facing ball - Feet slightly wider than shoulder width apart - Stride foot slightly ahead - Ball fielded from ground up - Absorb ball (soft hands) by giving with elbows into the body - Use both hands - Do or Die Throw Ground Ball - Move around the ball so coming into the ball on a straight line towards target - Catch ball on glove hand side with stride foot beside glove - Push glove out to ball to catch it - Bring glove/ball up to throwing shoulder as player hops and plants pivot foot with instep facing the target to make throw (crop hop)Fly Balls:• Get to ball as quickly as possible. Do not run with glove arm extended and do not back pedal (run backwards)• Set up under ball and stride into ball to catch• Catch ball above the head over the throwing shoulder with shoulders in line with target.• Catch ball with two hands watching it into the glove the entire way• Soften the impact of the ball with the giving of the elbows and hands
• Decreases the ability to generate maximum force
• Decreases the maximum velocity of contraction
• Decreases the maximum rate of force development
• Increases the time needed to “turn the muscle on” and “turn the muscle off”
• Increases the risk of injury
• Three variables determine the effectiveness of a dynamic warm-up: - The intensity of the warm-up activities - The duration of the warm-up - The length of time between the end of the warm-up and participation in the event • If you alter one of these three variables, you must adjust the other two to produce the same results. For example, if you increase the intensity of the warm-up, you must either shorten the warm-up or provide more recovery time after the warm-up. And some variables may be easier to change than others. For example, the warm-up’s duration and the length of time before the game may be set by the league or umpires. In such cases, you must adjust the intensity of the warm-up to match the other two variables.
Youth softball team
Warm-up before a game
20 minutes
10 minutes
• 5 minutes of jogging or fun games (tag)
• Increase intensity gradually
• Mimic movement patterns in softball
• Practise the skills at a lower intensity
• Make it fun!
Complete two reps of each drill listed below, covering 40 metres on each rep; jog lightly back to the starting position between each rep:
• A walks/A skips
• B walks/B skips
• C walks/C skips
• Walking deadlifts
• Spider man
• Walking lunges
• Walking lunges with trunk rotation
• Side lunges
• Side lunges with pivot
• Kareoka (grapevine)
• Bounding with forward and lateral movement
• Sprints
• Backward sprints
• CRASH drills
• Partner throwing (gradual increase in distance)
• Partner fielding
• Baserunning drills
• Hitting drills (tee work, side toss, front toss and/or live pitching)
Athletes:
Event:
Duration:
Time between warm-up and event:
Active warm-up (5 minutes):
Dynamic stretching and body awareness (5 minutes):
Sport-specific skills (10 minutes):
Softball Example
55L2T

Fly Balls at the Fence:• Judge where the ball will come down and get to the fence as quickly as possible. It is both easier and safer to get to the fence and move away than to get to the fence and attempt to make a catch.• Place hand closest to fence on the fence and gauge how much room there is to make the catch: - If ball is on or over the fence - And the bare hand is on the fence, keep hand on the fence and jump up to catch the ball. - And the glove hand is on the fence, jump as high as possible to catch the ball with the glove. - If ball is off of the fence, step away from the fence and make a two-handed catch.• Keep in mind if there were baserunners and know where to throw the ball once the catch is made.
HITTINGGrip:• Hold the bat in the fingers not the palm• Align the middle knuckles (door knocking knuckles) of both hands to prevent locking wrists• Types of grip: - Long Grip - Hands together near at end of bat - Less control, more power - Choke Grip - Hands together about 3-5 inches from end of bat - More control, less power - Split Grip - Bottom hand at end of bat and top hand 2-5 inches from bottom handStance:• Parallel - Both feet equidistant from plate - Compact swing, with power• Closed - Front foot closer to plate - More power potential, harder to hit fast pitching - Easier to hit to opposite field• Open - Back foot closer to plate - Better vision of ball - More control, less powerLocation in Batter’s Box:• Back of the batter’s box - Longer reaction time - Better view of both plate and ball• Front of batter’s box - Easier to hit breaking pitches - Can’t see both plate and ball• Neutral (lined up with Home Plate) - Pitch will break but not too much - Can see both plate and ball - Sufficient reaction time
Youth softball team
Warm-up before a game
20 minutes
10 minutes
• 5 minutes of jogging or fun games (tag)
• Increase intensity gradually
• Mimic movement patterns in softball
• Practise the skills at a lower intensity
• Make it fun!
Complete two reps of each drill listed below, covering 40 metres on each rep; jog lightly back to the starting position between each rep:
• A walks/A skips
• B walks/B skips
• C walks/C skips
• Walking deadlifts
• Spider man
• Walking lunges
• Walking lunges with trunk rotation
• Side lunges
• Side lunges with pivot
• Kareoka (grapevine)
• Bounding with forward and lateral movement
• Sprints
• Backward sprints
• CRASH drills
• Partner throwing (gradual increase in distance)
• Partner fielding
• Baserunning drills
• Hitting drills (tee work, side toss, front toss and/or live pitching)
DYNAMIC WARM-UP FOR SOFTBALL
Goal: This dynamic warm-up is designed to get the body ready to perform. It will get the athlete warmed up, loose, and fired up. In addition, it will improve their balance, mobility, and overall flexibility. This should be done before every game, practice, and workout.
Instructions:• Perform all movements for 20 to 30 seconds, with minimal rest between sets/exercises.• Keep all movements smooth; avoid jerky or uneven movements which can strain your muscles.
• Stand upright, arms at your sides, with palms facing forward, feet comfortably side by side.• Jump and spread your legs slightly wider than shoulder width and while bringing both arms together over your head; land with feet spread.• Jump again, bringing feet back together and hands down to your sides.• Repeat.
• Hold arms pointing outward, feet a comfortable stance apart.• Smoothly swing your arms across your body at shoulder level into a self hug position.• Swing arms back out, extending fully.• Repeat.
• Rotate shoulders slowly and smoothly—up, forward, down and back.• Repeat.• Reverse direction—up, back, down, forward.• Repeat.
• Bring your hands to your shoulders and raise your elbows to shoulder level, as if showing off your biceps.• Smoothly move your elbows toward each other, touching gently.• Swing elbows back out to your sides.• Repeat.
Exercise & Diagram Instructions Jumping Jacks
Horizontal Arm Swing
Horizontal Elbow Swing
Shoulder Rotation
or “Self-Hug”
56L2T

Ready Position:• Feet - A bit wider than shoulder width apart - Weight on balls of feet - Weight distributed evenly between both feet• Knees - Slightly bent for stability - Inside the feet• Body - Bent slightly forward at hips• Arms - Relaxed - Forearms form an “A” or upside down “V”• Hands - At height of back shoulder - At top of strike zone - Comfortable, relaxed grip (not tight)• Head - Positioned so both eyes can see pitcher and eyes are level - Eyes fixed on pitcher’s release point (hip) - Watch the ball to the point of contact (or the catcher’s glove if a ball)Swing:• Trigger (Pre-Stride) - Weight shift to inside edge of back foot - Front shoulder & hip rotate inward toward catcher• Forward Stride - Stride towards the pitcher - Should be short and controlled (compact) - Front foot planted at no more than 45° open - Head & eyes remain steady• Hip Rotation - Follows, but is part of, the stride - After hard push from back foot, weight transferred against front foot as hips begin to rotate - Arms and hands kept back• Shoulder/Arm/Wrist Action - Rotate shoulders after hips start to rotate - Bring hands inside ball with wrists cocked - At bat-ball contact point, extend arms into hitting zone with top hand palm pointing to the ground and bottom hand palm pointing up - Snap bat with wrists• Follow Through - Top hand “rolls over” bottom hand after contact - Complete the swing - Shoulders continue to rotate - Bat ends up behind body and above shoulder height with chin on back shoulder
• Start in an athletic stance and bend forward at your hips (not your waist).• Drive your right arm out and past your left knee while swinging your left arm as high as possible behind you. • Rotate your trunk to reach out your left arm toward your right knee, raising your right arm as high as possible behind you.• Repeat, alternating sides.
• Lie flat on your back with your arms stretched out to the sides with palms facing upward.• Slowly lift your right leg straight up, then roll over to your left side as close to your left hand as you can, keeping your right leg in line with your left arm.• Roll back, lifting right leg up in air again.• Slowly bring back down.• Lift left leg in air and do the same on your right side.• Repeat, alternating sides.
• Lie on your stomach with arms out to the side with the palms facing down.• Lift left leg off the ground, knee bent.• Try to bring left leg to meet your right hand, making sure to roll out and open up your hips.• Repeat, alternating sides.
• Give yourself a clear path across a room or field for this exercise.• Bend at the hips; bring your hands to the ground while keeping your legs straight.• As you touch the floor, slowly crawl forward using your hands (“hand walk”) without moving your feet, and go as far forward as you can, keeping your legs straight.• Variation: Perform a push-up once in this position.• Now, keeping legs straight, walk your feet forward, weight on the balls of your feet (“toe walk”) while keeping your hands stationary.• Repeat, inching forward
• Start with feet spread more than shoulder width apart.• Toes should be pointing outward, and your knees are pointing in the same direction. • Put your hands behind your head.• Slowly squat by bending both knees until your knees are at a 90-degree angle. • Slowly return to standing position.• Repeat.
Exercise & Diagram Instructions Bent Over Arm Swing
Iron Cross
Inchworm
Scorpion
Cowboy Squats
57L2T

BASERUNNINGLeaving the batter's box:• First step taken with foot farthest from pitcher• Drop the bat, do not throw itRunning to first base:• Do not watch the ball• Run through first base at full speed• Do not lunge• Touch the part of the base closest to home plate• Do not slide, unless avoiding a tag• Gain control quickly by taking shorter steps and sinking the hips down• Turn to the infield to return to the base• Never turn away from the ball. Keep eyes on the ball even when returning to the baseStarting from a base:• Rolling Start/Rocker Start - Lead foot is in contact with the base - Step taken by back foot before the release of ball - Time step for when the pitcher’s arm is at the 12 o’clock position - This start creates momentum• Track Start - Back foot is on the base - Front foot extended in front of base - Knees bent, ready to sprint when pitcher releases ballLeading off after a pitch:• Time step for when the pitcher’s arm is at the 12 o’clock position • Jam and return to the base quickly if ball is not hit• Do not turn your back on the ballRounding a base• Make a short loop before reaching the base• Lean inward as much as possible when turning• Touch the inside corner of the base with inside leg (left leg) if possible• Maintain your stride
SLIDINGDetermining the Sliding Leg• Have players sit cross-legged• Leg tucked under is usually sliding legFinish Position• Sliding leg bent 90 degrees, tucked under other leg• Other leg extended, slightly bent• Extended leg foot is 4-6 inches off ground• Base is contacted with extended leg• Weight of slider is back• Chin is tucked into to the chest• Arms thrown above headDistance• Start slide about one and a half body lengths from base
• Stand straight.• Lift right foot off the floor, then slowly bend forward, extending right leg straight out behind you while bending 90 degrees (forming a “T”).• Touch left foot on floor with right hand.• Keeping extended leg straight, slowly lower it to floor slightly behind you.• Move backward to shift your weight onto right leg and raise left leg behind you.• Lower yourself into “T” position and touch right foot on floor with left hand.• Repeat, continuing backward movement.
• Start in standing position with feet slightly further apart than shoulder width.• Begin bending right knee and lean toward your right side, pushing your buttocks out behind you.• Lower yourself to where your thigh is now parallel to the ground. Raise both arms in front of you at chest level. (Important: make sure your right knee does not extend beyond your toes.) Slowly shift your weight back to your original position.• Repeat in opposite direction.
• Stand upright, feet slightly apart.• Step left foot forward and bend front knee until thigh is parallel to the ground. This requires a lunging step to bend without the knee extending beyond the toes. Keep knee and ankle aligned pointing forward at all times.• As you descend, rotate your body toward your bent knee (when left knee is bent, rotate trunk to your left).• Lift your weight from your right foot behind you, and bring it forward to resume normal standing position.• Repeat same movement, using right foot to step forward.
Note: This exercise may also be performed in a stationary position by returning to your original position and alternating the movement.
• Stand upright, feet slightly apart.• Take lunging step forward with left leg, bending front knee and lowering your hip. • Bend forward and touch your left elbow to the instep of your left foot.• Make sure that knee and ankle are aligned forward with the toes as you do the specified movement.• Bring right foot forward, resuming upright position, slightly behind where you began.
Note: This exercise may also be performed in a stationary position by returning to your original position and alternating the movement.
Exercise & Diagram Instructions
Backward-Moving Toe Touch
Side Lunge
Lunge and Twist
Deep Lunge and Reach
58L2T

General Tips:• Ensure players are wearing a helmet even in practice.• Build confidence by starting easy and progressing gradually• Use support people until slider is confident• Practise sliding on wet grass, in a sand pit or in a gymnasium• Use unfastened bases to start with• Teach sliding to players in socks or bare feetSliding Teaching Progressions:• Determine the bent or tucked leg - Have players form a circle around the Coach. - Have the players sit down cross legged. - They will naturally tuck one leg underneath their body which will be the natural slide leg.• Demonstrate the finish position - Slide leg straight but not locked - Bent leg tucked - Arms thrown above head - Chin tucked into chest.• Finish position with movement - Using a volunteer player who is lying in the finish position, the Coach will grasp their foot and pull them to simulate the movement of the slide.• Standing in Finish position - While standing, get the players to get into the Finish Position. - Be sure they throw their hands back over their head and tuck their chin on their chest.• Sliding with Support - With the aid of two strong coaches, have them hold the slider’s arms and gently lower them into the Finish Position• Sliding with Support while Jogging - Same as above but do a slow jog first from about 10 meters. - Instead of two adults supporting slider, you can use two adults holding a broom stick or bat that the slider grabs to lower themselves to the ground.• Sliding with Support while Sprinting - Same as above but from a sprint• Bent Leg Slide while Jogging without aid• Bent Leg Slide while Sprinting without aid
COACHING TIP:
• Have players slide without shoes• Teach sliding on wet grass
PITCHING –SLOW PITCHPitching Mechanics:• Grip The pitcher grips the ball with the index, middle, and ring fingers spaced slightly apart across one seam and the thumb underneath on the opposite seam. The little finger is on the opposite side of the ball from the thumb. The pitcher should grip the ball with their fingers, not the palm; there should space between the ball and the palm.
• Stand up right, feet slightly apart.• Hop onto left foot, lifting right knee high, so thigh is parallel to the ground with your feet flexed, and landing on the ball of your left foot.• Hop onto right foot, lifting left knee high and repeat, shifting weight back and forth in a high-stepping jog. Keep elbows bent at a 90-degree angle at all times, swinging them as if in a normal running position, keeping upper arms close to body and hands no higher than nose level.• Repeat at a running pace, moving quickly and smoothly.
• Stand upright, feet slightly apart.• Run forward, keeping your knees low. Bend your knees until your heel reaches your buttocks. Run forward, maintaining this movement, making sure to land on the balls of your feet.• Keep elbows bent at a 90-degree angle at all times, swinging them as if in a normal running position, keeping upper arms close to body and hands no higher than nose level.• Repeat at a running pace, moving quickly and smoothly.
Exercise & Diagram Instructions
High Knees
Butt Kicks
59L2T

• Grip The pitcher grips the ball with the index, middle, and ring fingers spaced slightly apart across one seam and the thumb underneath on the opposite seam. The little finger is on the opposite side of the ball from the thumb. The pitcher should grip the ball with their fingers, not the palm; there should space between the ball and the palm.• StanceThe pitcher grips the ball with the index, middle, and ring fingers spaced slightly apart across one seam and the thumb underneath on the opposite seam. The little finger is on the opposite side of the ball from the thumb. The pitcher should grip the ball with their fingers, not the palm; there should space between the ball and the palm.The heel of the pitching-arm foot should be on the rubber and the toes of the glove-side foot on or slightly behind the rubber in a comfortable position, with the weight on the back foot. The pitcher should face the batter and must come to a complete stop, with the ball in front of their body for a full second, before starting the delivery (see figure 8.8a).• Windup, Step, and Release The pitcher starts the delivery by swinging the pitching arm down, back, and then forward in a smooth path while the glove arm remains down and slightly out to the side of the body. • The throwing-arm motion is an easy, semicircular movement as opposed to a fast, whip-like throw. At its highest point in the backswing, the pitching arm is about parallel to the ground, with the palm facing down. When the pitcher brings the ball back, they shift their weight to their pitching-arm leg and step forward with the glove-side leg as they release the ball in front of their body. The ball is tossed upward, and must follow an arc of at least 6 feet and no higher than 12 feet from the ground. • Follow-Through After releasing the ball, the pitching arm continues forward, with the hand ending high and the arm close to the pitcher’s ear. Immediately after the follow-through, the pitcher takes several steps back for protection and fielding purposes and assumes the ready position to field any ball hit her way.
CATCHINGPosition in the Catcher’s Box:• Wait for batter to get set• Take note of their swing• Position about one bat length behind back foot of batter• Do not reach out to catch the ball. Let the ball come to you.Giving the Signal:• Squat with heels off ground• Hide signal from opposition using glove below knee of same side• Align knees with edges of home plate• Give the signal deep and against thighGiving the Target (no runners):• Same as when giving signal except: - Feet staggered with more forward lean of trunk - Glove to side of leg to hide signal from opposing coach - Throwing hand hidden behind back or lower legGiving the Target (with runners on base or two strike count):• Receiving position changes to allow for a quicker throw - Feet more spread apart - Heels on ground - Feet staggered with pivot foot farther back - Knees bent according to height of target - Throwing hand hidden behind back or lower leg
THE COOL-DOWN
An effective cool-down can speed up recovery following practice or competition, as it increases the rate at which the byproducts of exercise are removed from the working muscles. The accumulation of these byproducts can contribute to fatigue, but low-intensity exercise can help accelerate recovery by decreasing the concentration of these byproducts.
Accelerating recovery can have major effects on performance and injury prevention:
• The gains made in the rest period following a workout may be greater.• The ability to perform in future events may improve.• The ability to train harder during subsequent workouts may improve.• The risk of injury may decrease, as fatigue predisposes the athlete to injury.
PRINCIPLES OF AN EFFECTIVE COOL-DOWN
• The cool-down should consist of low-intensity aerobic exercise at 30-45% of VO2 max or heart rate reserve.• The cool-down should use muscle groups similar to those used in the athlete’s sport.• The cool-down should provide opportunities to slow down skills and focus on technique.
WHAT ABOUT STATIC STRETCHING?
• There’s no high-quality evidence to suggest that static stretching before or after sport activity reduces the risk of injury.• So why would I use static stretching? - To improve sport performance in sports in which range of motion is important. - Example: Pitchers improve their pitching mechanics when they improve their range of motion and may also be able to generate more power which increases the speed of their pitches. - To return muscles to their pre-exercise length. In sports that include many repetitive movements, muscles that are contracted repeatedly may become shorter over time. While this may benefit the specific skill being repeated, it may cause performance in other skills to suffer. - Example: In softball, the catcher is in a crouched position for extended periods of time which may cause one of the quadriceps muscles to become shorter as the muscle adapts to a flexed-hip position. This means the muscle is an optimal length during crouching, but baserunning performance may suffer because the muscle is no longer the optimal length for running. Catchers are encouraged to stretch their quadriceps muscles and hip flexors. - To maintain or improve posture. Good posture minimizes the incidence of chronic injuries in the extremities. Static stretching over time helps minimize sciatica and thoracic outlet syndrome (a reduction of the space through which the blood vessels and nerves supplying the legs and arms pass), both of which are related to overuse injuries in the extremities. Improving posture often takes weeks or months of diligence. Muscles that are repeatedly contracted and become shorter over time can have a significant negative effect on posture. - Example: As described above, frequent crouching can cause the hip flexors of catchers to shorten, as can the defensive or receiving positions in softball. Shortened hip flexors in turn contribute to an anterior rotation of the pelvis. This rotation may increase the risk of lower-back, pelvis, and hamstring injuries.
60L2T

RUN DOWNSDefense:• Dart throw or Snap throw (elbow and wrist only, from ear)• Keep ball visible to defensive teammate• Run hard at baserunner to force them to decide which direction to run• Be a half step to your throwing side so baserunner is not in the way of the throw to your partner (i.e. and deflects the ball away).• As soon as you see the number on the baserunner’s back, you want to make the throw because the runner has committed to a direction to run.• Goal is to not need to make a throw, or at most, make one throw to get runner out.• Best case scenario is an out. Worst case is baserunner is safe at original base (i.e. does not advance).• Better to give one good fake rather than 10 small fakes• Defensive player movement - Peel - Once the defensive player throws the ball, they will peel off and return to the base they came from to act as a back-up to the next defensive player or - Follow Your Throw - Once the defensive player throws the ball, they will take a clearing step to get off the base path and then follow their throw to the base they threw to. They will act as a back-up in case of an errant throw or replace the defensive player when they follow their throw.Offense:• Baserunner caught in a rundown should stay in the rundown as long as possible so runners behind them can advance as far as possible.• Look for a defensive player without the ball to run into to get an obstruction call against the defensive team.
RELAYS• The relay starts with a strong accurate throw from the outfielder• The outfielder should try to throw the ball to the relay person’s glove at about head height.• The relay person: - Gives a big target with both arms in the air and calls for the ball. - Stands at a 45 degree angle to the glove side. - Pivots towards glove and throws quickly relaying the ball to the next target.
• How do I effectively use static stretching? - Static stretching should take place when the muscles are warm (usually after a practice or event). - Static stretching should not take place as part of a warm-up in sports in which high-velocity or high-force muscle contractions are needed, because performance may suffer. - It is important to balance opposing muscle groups when stretching and to balance both sides of the body. - Athletes should feel only a mild stretch at the start of the stretch but should then feel a gradual release or elongation of the muscle. - The number of repetitions and the duration of each stretch depends on the reason for doing the stretch. For example: • To increase range of motion: performs three (3) 30-second repetitions. • To return muscles to their pre-exercise lengths: perform one (1) 30-second repetition. • To improve posture: perform (one) 1 progressive stretch that lasts up to 120 seconds.
61L2T

38L2T
Special Olympics Softball:Appendix C- Cool-Down/Static Stretching/Flexibility Training
L

APPENDIX B:DYNAMIC WARM-UP
A dynamic warm-up is 10+ minutes of activity that prepares athletes physically and mentally for practice or competition. Athletes should do dynamic warm-ups before each practice or competition because they:• Improve performance• Reduce the risk of injuryDynamic warm-ups have several advantages over traditional static stretching. Effective dynamic warm-ups:• Increase heart rate more effectively• Increase muscle temperature• Improve force-generating capacity• Train neural pathways used in the athlete’s sport• Provide the working muscles with energy from the energy systems used in the athlete’s sport• Improve mental preparation• Help reduce the risk of injuryAn effective dynamic warm-up has three components• Active exercise. Active exercise gradually raises the heart rate, increases muscle temperature, and improve range of motion.• Dynamic stretching and body awareness. The athlete activates muscles through a large range of motion, gains a better sense of balance, and develops body control.• Sport-specific drills. These prepare the athlete mentally and physically for participation in his or her sport.An effective dynamic warm-up is specific to the sport• An effective dynamic warm-up uses the same muscle groups as the sport. Example: Cycling does not increase muscle temperature in the upper body, so it would not be an appropriate warm-up for a pitcher.• An effective dynamic warm-up trains the neural pathways required in the sport. Example: While running uses the same muscle groups as cycling, the order in which the muscles are recruited is very different, so running would not be the best warm-up option for a cyclist.• An effective dynamic warm-up uses the same energy systems as the athlete’s sport. Example: Softball relies primarily on ATP-CP energy system to provide energy to the working muscles, whereas long-distance running requires mainly oxidative sources. The softball player’s warm-up should therefore include shorter, more intense bouts of activity interspersed with rest periods to mimic a typical play in softball.
An effective dynamic warm-up prepares the athlete for sport without causing fatigue• Effective warm-ups and fatigue have the opposite effect on certain aspects of performance:
• Decreases the ability to generate maximum force
• Decreases the maximum velocity of contraction
• Decreases the maximum rate of force development
• Increases the time needed to “turn the muscle on” and “turn the muscle off”
• Increases the risk of injury
• Increase the ability to generate maximum force
• Increase the maximum velocity of contraction
• Increase the maximum rate of force development
• Decrease the time needed to “turn the muscle on” and “turn the muscle off”
• Decrease the risk of injury
APPENDIX C:COOL-DOWN/STATIC STRETCHING/
FLEXIBILITY TRAININGInstructions:• Hold each exercise for 30 to 45 seconds.• Stretching should be done slowly and smoothly, and is most efficient when performed after a good warm-up as part of a flexibility program or at the end of every game, practice, or workout as part of the cool-down.
• Lie down on your back.• Grab your knee with your hands and stretch it toward your chest. • Hold. Release.• Repeat, alternating legs.
• Lie flat on your back.• Without tensing and keeping your back on the ground, bring your left knee up and cross your right foot atop your left knee (forming a number 4).• Grab your left leg behind the knee and pull toward chest, stretching the right buttock.• Hold position, keeping your back firmly on the ground at all times and muscles loose and relaxed.
• Lie comfortably on your back with legs extended flat. Stretch your arms out to your sides.• Raise your right leg without bending the knee.• Keeping your right hand flat on the floor, twist your body to the left, touching your right foot with your left hand. If you can, grab your right foot with your left hand while keeping your right leg straight. • Hold position.• Repeat, using other leg.
• Lie facing the mat with elbows bent and hands flat on the mat by your chest.• Slowly push up on your hands, extending your shoulders and lifting your upper body off the mat, hyperextending your back.• Hold position.
Exercise & Diagram Instructions Low Back Stretch
Buttock Stretch
Lying Abdominal Stretch(Cobra Pose)
Lying Cross-over IT Band Stretch
63L2T

• Decreases the ability to generate maximum force
• Decreases the maximum velocity of contraction
• Decreases the maximum rate of force development
• Increases the time needed to “turn the muscle on” and “turn the muscle off”
• Increases the risk of injury
• Three variables determine the effectiveness of a dynamic warm-up: - The intensity of the warm-up activities - The duration of the warm-up - The length of time between the end of the warm-up and participation in the event • If you alter one of these three variables, you must adjust the other two to produce the same results. For example, if you increase the intensity of the warm-up, you must either shorten the warm-up or provide more recovery time after the warm-up. And some variables may be easier to change than others. For example, the warm-up’s duration and the length of time before the game may be set by the league or umpires. In such cases, you must adjust the intensity of the warm-up to match the other two variables.
64L2T
• Start in a plank pose by lying face down on the mat, then lifting your upper body away from the mat, fully extending your arms like a push-up, keeping arms straight.• Step right foot forward between your hands, keeping left leg still extended behind you.• Maintain a straight line from the upper back to the Achilles’ heel.• Keep hips low and make sure the knee does not extend beyond your toes. Hold.• Repeat using other leg.
• Tuck feet beneath buttocks, keeping knees together.• Clasp your hands behind your body.• While in this deep kneeling position, bend forward, lowering your body to the floor.• Hold position.
• Sit on the floor, legs extended.• Slow rotate your trunk to left side.• Place your right hand by your left buttocks for stability.• Hold position.
• Sit with legs together and extended.• Without flexing the knee, bend forward and try to touch your feet with your hands.• Hold position.
• Sit with legs together and extended in front of you.• Flex left knee, lifting your left foot over your right knee and place left foot on the ground.• Place your right hand on the outside of your left knee; support yourself with your left hand comfortably behind you.• Hold position.
• Repeat using other knee. • Sit on a flat surface, knees bent and the soles of your feet pressed against each other.• Keeping your feet as close to the body as possible, gently press down with your hands on the inside of your thighs.• Hold position.
Exercise & Diagram Instructions
Hip Stretch
Iron Cross
Sitting Lower Body Twist
Quadriceps and Back Stretch
Hamstring Stretch
Inner Thigh Stretch
Lower Body and Glute Stretch

DYNAMIC WARM-UP FOR SOFTBALL
Goal: This dynamic warm-up is designed to get the body ready to perform. It will get the athlete warmed up, loose, and fired up. In addition, it will improve their balance, mobility, and overall flexibility. This should be done before every game, practice, and workout.
Instructions:• Perform all movements for 20 to 30 seconds, with minimal rest between sets/exercises.• Keep all movements smooth; avoid jerky or uneven movements which can strain your muscles.
65L2T
• Stand straight, with a small platform inches above the floor in front of your feet.• Step onto the platform with the balls of your feet, leaving your insteps and heels suspended in the air. Support yourself by holding onto something stable.• Slowly lower your heels.• Hold position.
• Stand by a wall or any stable equipment.• With one hand on the wall, flex the opposite knee, pulling foot with other hand toward the buttocks.• Hold position.
• Stand with one shoulder by the wall. Place that hand against the wall for balance.• Lift the foot closest to the wall and swing leg behind other leg, stretching your hips.• Hold position.
• You may sit or stand doing this stretch• Flex both elbows.• Place one hand behind your body and the other bent back over your shoulder. • Grab hands and hold position.• Repeat, alternating arms.
• You may sit or stand doing this stretch.• Flex right elbow and position it above head with hand pointing down toward the small of your back.• Pull elbow back with left hand toward back of head.• Hold position.• Repeat, alternating arms.
Exercise & Diagram Instructions
Standing Hamstring Stretch
Calf and Heel Stretch
Abductor Stretch
Rotator Cuff Stretch
Triceps Stretch

• Start in an athletic stance and bend forward at your hips (not your waist).• Drive your right arm out and past your left knee while swinging your left arm as high as possible behind you. • Rotate your trunk to reach out your left arm toward your right knee, raising your right arm as high as possible behind you.• Repeat, alternating sides.
• Lie flat on your back with your arms stretched out to the sides with palms facing upward.• Slowly lift your right leg straight up, then roll over to your left side as close to your left hand as you can, keeping your right leg in line with your left arm.• Roll back, lifting right leg up in air again.• Slowly bring back down.• Lift left leg in air and do the same on your right side.• Repeat, alternating sides.
• Lie on your stomach with arms out to the side with the palms facing down.• Lift left leg off the ground, knee bent.• Try to bring left leg to meet your right hand, making sure to roll out and open up your hips.• Repeat, alternating sides.
• Give yourself a clear path across a room or field for this exercise.• Bend at the hips; bring your hands to the ground while keeping your legs straight.• As you touch the floor, slowly crawl forward using your hands (“hand walk”) without moving your feet, and go as far forward as you can, keeping your legs straight.• Variation: Perform a push-up once in this position.• Now, keeping legs straight, walk your feet forward, weight on the balls of your feet (“toe walk”) while keeping your hands stationary.• Repeat, inching forward
• Start with feet spread more than shoulder width apart.• Toes should be pointing outward, and your knees are pointing in the same direction. • Put your hands behind your head.• Slowly squat by bending both knees until your knees are at a 90-degree angle. • Slowly return to standing position.• Repeat.
• You may sit or stand doing this stretch.• Raise your arm to shoulder level and position it across the body.• Pull elbow with free hand towards the chest.• Hold position.• Repeat, alternating arms.
• On a flat surface place forearm with palm facing upward in a supinated position and hanging free (such as off the end of a table).• Use your other hand to pull fingers downward gently to hyperextend hand.• Hold position.
• Lie on your back on stability ball.• Arch/hyperextend your back and relax.• Hold position.
• Rest the side of your body on the stability ball.• Keep feet on the floor at all times. You may flex the lower knee for more stability.• Extend arms over head without resting them on the ball.• Bend and lean to one side.• Hold position.
Exercise & Diagram Instructions Shoulder Girdle Stretch
Forearm Stretch
Oblique Stretch Using Stability Ball
Abdominal Stretch Using Stability Ball
66L2T

• Stand straight.• Lift right foot off the floor, then slowly bend forward, extending right leg straight out behind you while bending 90 degrees (forming a “T”).• Touch left foot on floor with right hand.• Keeping extended leg straight, slowly lower it to floor slightly behind you.• Move backward to shift your weight onto right leg and raise left leg behind you.• Lower yourself into “T” position and touch right foot on floor with left hand.• Repeat, continuing backward movement.
• Start in standing position with feet slightly further apart than shoulder width.• Begin bending right knee and lean toward your right side, pushing your buttocks out behind you.• Lower yourself to where your thigh is now parallel to the ground. Raise both arms in front of you at chest level. (Important: make sure your right knee does not extend beyond your toes.) Slowly shift your weight back to your original position.• Repeat in opposite direction.
• Stand upright, feet slightly apart.• Step left foot forward and bend front knee until thigh is parallel to the ground. This requires a lunging step to bend without the knee extending beyond the toes. Keep knee and ankle aligned pointing forward at all times.• As you descend, rotate your body toward your bent knee (when left knee is bent, rotate trunk to your left).• Lift your weight from your right foot behind you, and bring it forward to resume normal standing position.• Repeat same movement, using right foot to step forward.
Note: This exercise may also be performed in a stationary position by returning to your original position and alternating the movement.
• Stand upright, feet slightly apart.• Take lunging step forward with left leg, bending front knee and lowering your hip. • Bend forward and touch your left elbow to the instep of your left foot.• Make sure that knee and ankle are aligned forward with the toes as you do the specified movement.• Bring right foot forward, resuming upright position, slightly behind where you began.
Note: This exercise may also be performed in a stationary position by returning to your original position and alternating the movement.
67L2T
Throwing/Receiving Everydays
Players will complete the following throwing progressions with a partner and a ball:
• Wrist snaps - Players stand 4-6’ apart• - Players hold throwing arm elbow in their hand or glove• - Using wrist flexion only, players throw ball to their partner with 6 o’clock/12 o’clock rotation on the ball• 2 foot stationary throwing position or One Knee Drill - The Coach can choose to use either drill for this progression. The purpose is to isolate the arm action. - 2 foot stationary throwing position - Partners stand 10-12’ apart with feet about shoulder width apart and facing forward - Using only trunk rotation and an arm circle, the player lightly throws the ball to their partner. - Players should exaggerated the follow-through down to their opposite knee or - One Knee Drill - Partners should be positioned 15-20’ apart (distance is also dependant on arm strength and accuracy). - In this progression, the player kneels down on the leg that his/her throwing-hand is on (i.e. if the player throws with his/her right hand, he/she would kneel down on the right leg). - Using only trunk rotation and an arm circle, the player lightly throws the ball to their partner. - Players should exaggerated the follow-through down to their opposite knee• K position - Partners stand 12-15’ apart - Player stands with back or pivot foot perpendicular to the direction of the throw and taking a walking stride places front foot in the stride position with foot at a 45° angle. Their arms are out to the side and at shoulder height (K Position) - Using trunk rotation and an arm circle, the player lightly throws the ball to their partner. - Players should exaggerated the follow-through down to their opposite knee• K position with step or stride - Partners stand 15-20’ apart - Player begins with feet together and perpendicular to the direction of the throw with their arms out to the side and at shoulder height (K Position). - The player will then step or stride so the front foot lands with the foot at 45 degree angle and the back or pivot foot is still perpendicular to the direction of the throw. - Using a step or stride, trunk rotation and an arm circle, the player lightly throws the ball to their partner. - Players should exaggerated the follow-through down to their opposite knee and bring the pivot foot forward toward the target so both feet are in line.

68L2T
• Pre-stride into K position - Partners stand 15-20’ apart. - Player begins with feet together and facing target. - The player will transfer weight to the pivot foot (throwing side foot) and pivot so pivot foot is perpendicular to target and then take a step or stride with the front foot. - The front foot lands with the foot at 45° angle. - As the front foot lands, the players places arms out to the side and at shoulder height (K Position). - Using a step or stride, trunk rotation and an arm circle, the player lightly throws the ball to their partner. - Players should exaggerated the follow-through down to their opposite knee and bring the pivot foot forward toward the target so both feet are in line.• Full motion - Partners stand 20-30’ apart. - Player begins with feet together and facing target. - The player will transfer weight to the pivot foot (throwing side foot) and pivot so pivot foot is perpendicular to target and then take a step or stride with the front foot. - The front foot lands with the foot at 45° angle. - Using a step or stride, trunk rotation and an arm circle, the player throws the ball to their partner. - Players should exaggerated the follow-through down to their opposite knee and bring the pivot foot forward toward the target so both feet are in line.• Dart Throw Drill - Partners stand 30-40’ apart and will simulate throws for a rundown situation. - Player with ball shall sprint towards their partner keeping the ball visible to the receiver at all times. - The player’s elbow should be at shoulder height with the ball near the ear. - To throw the ball to the receiver, the player will extend their elbow and snap their wrist (like throwing a dart). - The receiver will catch the ball and sprint towards their partner and perform the same dart throw.• Quick Exchange Drill - Partners stand about 40-50’ apart. - First player throws ball to partner. - Receiver moves their feet to catch the ball in front of throwing shoulder with throwing hand close to retrieve the ball out of the glove. - Receiver moves ball into position as quickly as possible to throw the ball back to their partner. - Continue back and forth for 30 seconds counting each catch made by the partners.

Thank you!
Special Olympics Canada would like to thank Softball Canada (www.softball.ca) for providing access to their coaching manuals and expertise in the field. Their willingness to work collaboratively made the development of this guide possible and ensure that it was developmentally appropriate and valuable to Special Olympics coaches. In addition, a thank you to Dave Bourne, MCD, Softball Canada for his leadership and development of this resource.
We acknowledge the financial support of the Government of Canada
THE COOL-DOWN
An effective cool-down can speed up recovery following practice or competition, as it increases the rate at which the byproducts of exercise are removed from the working muscles. The accumulation of these byproducts can contribute to fatigue, but low-intensity exercise can help accelerate recovery by decreasing the concentration of these byproducts.
Accelerating recovery can have major effects on performance and injury prevention:
• The gains made in the rest period following a workout may be greater.• The ability to perform in future events may improve.• The ability to train harder during subsequent workouts may improve.• The risk of injury may decrease, as fatigue predisposes the athlete to injury.
PRINCIPLES OF AN EFFECTIVE COOL-DOWN
• The cool-down should consist of low-intensity aerobic exercise at 30-45% of VO2 max or heart rate reserve.• The cool-down should use muscle groups similar to those used in the athlete’s sport.• The cool-down should provide opportunities to slow down skills and focus on technique.
WHAT ABOUT STATIC STRETCHING?
• There’s no high-quality evidence to suggest that static stretching before or after sport activity reduces the risk of injury.• So why would I use static stretching? - To improve sport performance in sports in which range of motion is important. - Example: Pitchers improve their pitching mechanics when they improve their range of motion and may also be able to generate more power which increases the speed of their pitches. - To return muscles to their pre-exercise length. In sports that include many repetitive movements, muscles that are contracted repeatedly may become shorter over time. While this may benefit the specific skill being repeated, it may cause performance in other skills to suffer. - Example: In softball, the catcher is in a crouched position for extended periods of time which may cause one of the quadriceps muscles to become shorter as the muscle adapts to a flexed-hip position. This means the muscle is an optimal length during crouching, but baserunning performance may suffer because the muscle is no longer the optimal length for running. Catchers are encouraged to stretch their quadriceps muscles and hip flexors. - To maintain or improve posture. Good posture minimizes the incidence of chronic injuries in the extremities. Static stretching over time helps minimize sciatica and thoracic outlet syndrome (a reduction of the space through which the blood vessels and nerves supplying the legs and arms pass), both of which are related to overuse injuries in the extremities. Improving posture often takes weeks or months of diligence. Muscles that are repeatedly contracted and become shorter over time can have a significant negative effect on posture. - Example: As described above, frequent crouching can cause the hip flexors of catchers to shorten, as can the defensive or receiving positions in softball. Shortened hip flexors in turn contribute to an anterior rotation of the pelvis. This rotation may increase the risk of lower-back, pelvis, and hamstring injuries.