learn to weave - ashford · we make a range of table looms. the four and eight shaft looms are...
TRANSCRIPT

Learn to weave on the Table Loom
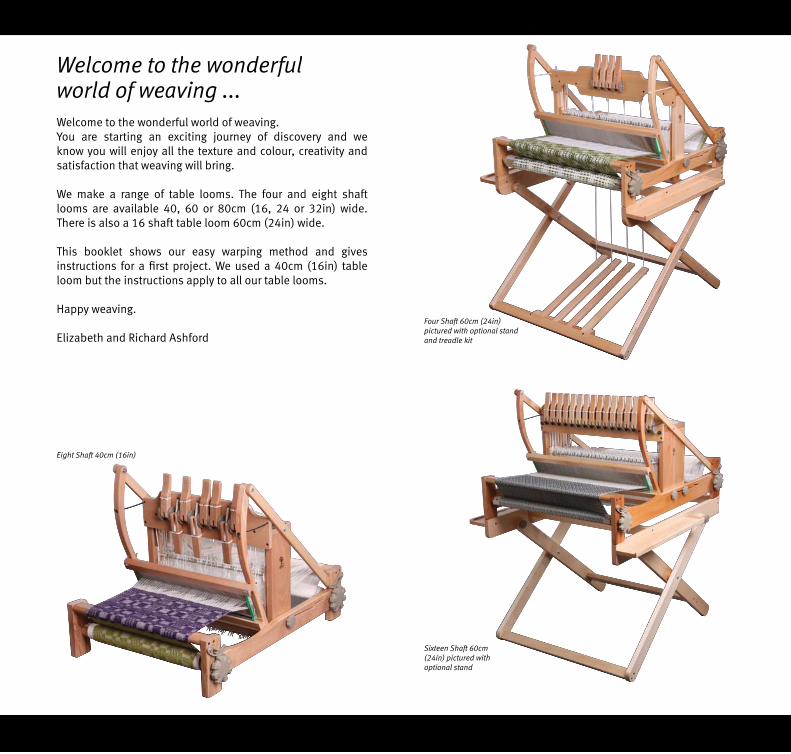
Welcome to the wonderful world of weaving ...Welcome to the wonderful world of weaving. You are starting an exciting journey of discovery and we know you will enjoy all the texture and colour, creativity and satisfaction that weaving will bring.
We make a range of table looms. The four and eight shaft looms are available 40, 60 or 80cm (16, 24 or 32in) wide. There is also a 16 shaft table loom 60cm (24in) wide.
This booklet shows our easy warping method and gives instructions for a first project. We used a 40cm (16in) table loom but the instructions apply to all our table looms.
Happy weaving.
Elizabeth and Richard Ashford
Four Shaft 60cm (24in) pictured with optional stand and treadle kit
Sixteen Shaft 60cm (24in) pictured with optional stand
Eight Shaft 40cm (16in)

Before you begin your first project on the table loom, here is a glossary of weaving terms you will need to know to get started.
Beaming Winding the warp under tension onto the back roller.
Beater Frame holding the reed. Beats the weft thread into place.
Cross Sticks Sticks used to keep the warp threads in the correct order while warping the loom.
Dent Space in the reed.
Dpi Dents per inch in the reed.
Draft Instructions for threading and weaving.
Drawdown Diagram of woven cloth resulting from the weaving draft.
Draw-in Amount the fabric narrows while weaving.
End One warp thread.
Epi Ends per inch in the sett.
Heddle Holder of a warp thread. One warp thread is threaded in a heddle.
Loom Waste Length of warp that cannot be woven at the beginning and end of weaving.
Pick Single weft row.
Raddle Used to evenly spread the warp threads to the desired weaving width before beaming the warp.
Raddle Cross Made at half-inch (13mm) intervals for counting the warp threads while winding the warp.
Reed Frame holding thin metal strips set evenly apart called dents. Used to spread the warp to the desired weaving width.
Sett The number of warp threads for each inch of weaving. A balanced plain weave (also called tabby) has the same number of warp and weft threads for each square of weaving. To find the sett, wind the warp
and weft around a ruler or yarn gauge for one inch (25mm). The number of times the warp yarn wraps around the ruler is the correct sett.
Shafts(Harnesses) Frames which hold the heddles. Shaft one is the shaft closest (front) to the weaver.
Shed Opening formed in the warp to allow the shuttle to pass.
Shuttle Holds the weft yarn.
Sleying Threading the warp ends through the reed.
Threading Cross Made while winding the warp. Keeps the warp ends in the correct order for threading.
Warp The lengthwise threads held under tension on the loom between the front and back roller.
Warping Frame Wooden frame with pegs set in at regular intervals. Used for preparing the warp yarn.
Warping the Loom The process of transferring the warp threads to the loom.
Weft Passes over and under the warp threads to form the woven fabric.
Warp
Weft
Glossary
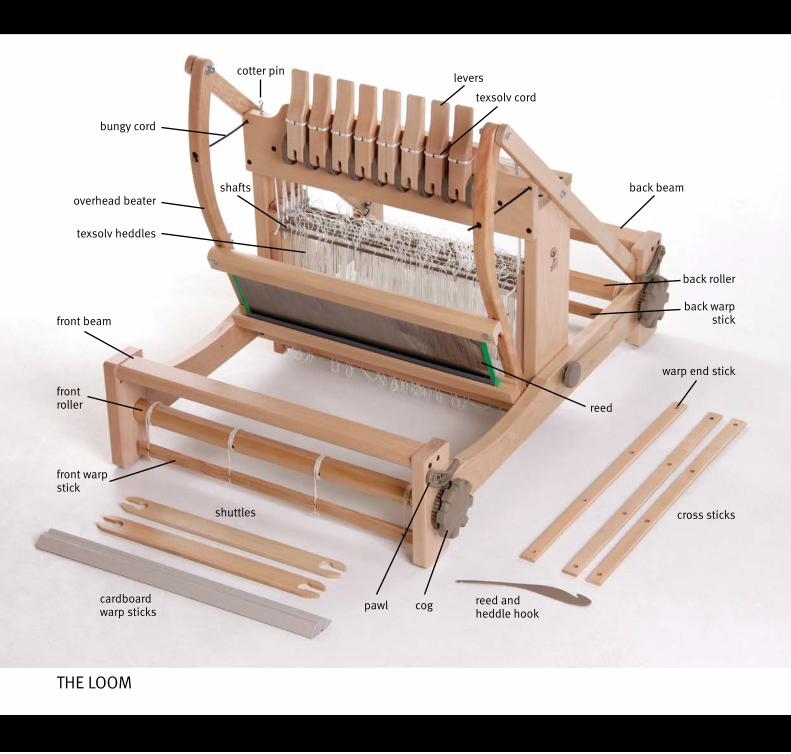
reed and heddle hook
reedfront roller
shuttles
texsolv heddles
front beam
shafts back beamoverhead beater
bungy cord
levers
texsolv cord
cotter pin
cog
warp end stick
cross sticks
front warp stick
THE LOOM
back roller
back warp stick
pawlcardboardwarp sticks

Reading the Draft for the dish towels.
Pattern drafts are made of four parts:1. Threading draft2. Shafts3. Liftings4. Drawdown
1. Threading DraftThis shows the order in which the warp is threaded through the heddle eyes. Threading drafts are read from right to left. For this project, the first warp thread will be threaded through the heddle on shaft one. Two pattern repeats are shown. The bracket above shows how many times to repeat each section.
2. Shafts Show which shaft to use when threading and lifting.
3. LiftingsThis is the order the shafts will be lifted for each weft pick. For this project the first shafts lifted are one, three, five and seven by pushing levers one, three, five and seven down.
4. DrawdownThe diagram of the woven cloth produced by the threading and shaft liftings. ltwtl.dtx page 1
Heddle Counts by Shaft Number:
Shaft 1 2 3 4 5 6 7 8Count 3 5 5 6 6 6 6 3
1. Threading Draft
2. Shafts
3. Liftings4. Drawdown
87654 3 2
1 2 3 4 5 6 7 8
x 11
Plain weave
Pattern weave

YOUR FIRST PROJECT – A SET OF 4 DISH TOWELS
You will need:Warping frameLoom – Eight shaft loom Reed – 10 dpi (10 ends per 2.5cm)Tape measureWarp sticksCross sticksRaddle KitThreading hookReed hookStringScrap yarnShuttle ScissorsWarp and weft yarn – Ashford Cotton 5/2 (100% cotton; 848m/927yds; 200gms/7oz), Bleached White 300gm (101/2oz), Twilight Grey 60gm (2.1oz) and Black 110gm (3.8oz).
Here’s how:Sett – 20 ends per inch (8 ends per cm) No. of ends: 320Warp length: 3.8yds (3.5m)Width in reed: 16in (40cm) Finished size (hemmed and washed): 4 x 14½ x 24in (37 x 61cm)
Weave Structure: Twill
Winding the Warp
Warp Colour OrderUsing a warping frame wind on the warping threads in the following sequence:
Remember: Each trip from the start peg to the end peg and back again will be two warp ends.
1. Wind 20 ends Black2. Wind 20 ends Grey3. Wind 100 ends White4. Wind 40 ends Grey5. Wind 100 ends White6. Wind 20 ends Grey7. Wind 20 ends Black
A B
Y
X
CD
Start peg
End peg
Threading cross
Raddle cross *
* The raddle cross will be made after each group of 10 threads.
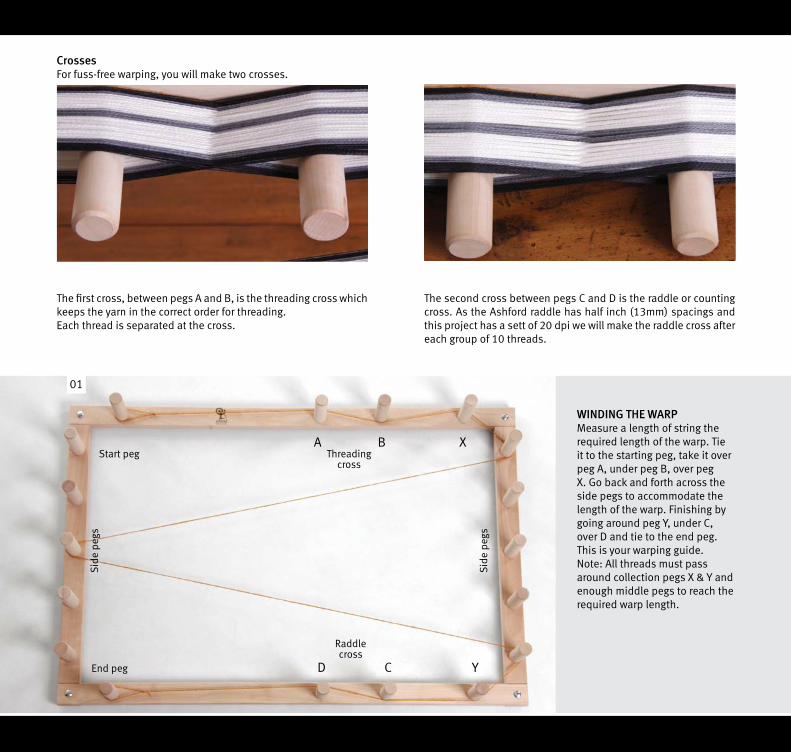
CrossesFor fuss-free warping, you will make two crosses.
The first cross, between pegs A and B, is the threading cross which keeps the yarn in the correct order for threading.Each thread is separated at the cross.
The second cross between pegs C and D is the raddle or counting cross. As the Ashford raddle has half inch (13mm) spacings and this project has a sett of 20 dpi we will make the raddle cross after each group of 10 threads.
WINDING THE WARPMeasure a length of string the required length of the warp. Tie it to the starting peg, take it over peg A, under peg B, over peg X. Go back and forth across the side pegs to accommodate the length of the warp. Finishing by going around peg Y, under C, over D and tie to the end peg. This is your warping guide. Note: All threads must pass around collection pegs X & Y and enough middle pegs to reach the required warp length.
01
A B
Y
X
CD
Start peg
End peg
Threading cross
Raddle cross
Sid
e pe
gs
Sid
e pe
gs

02
A B D C
D C
03
04 05
Place the yarn at your feet and begin winding your warp following your warping colour guide, remembering to take the yarn over A and under B (when returning pass the yarn over B and under A). This makes the threading cross. Continue around X and the side pegs, down and around Y.
Take the yarn under C, over D and around the end peg. As the raddle cross is in groups of 10, return over D and under C for 10 threads (5 return trips). The eleventh thread will go over C, under D, around the end peg, back under D and over C. Now follow the warp colour order on the previous page.
RADDLE CROSSAs you wind, it is very important to keep an even tension on your yarn. After each group of ten ends make a cross between pegs D and C
Push the warp to the base of the pegs from time to time. If the yarn needs to be joined or you are starting a new colour, always tie on at the start peg.
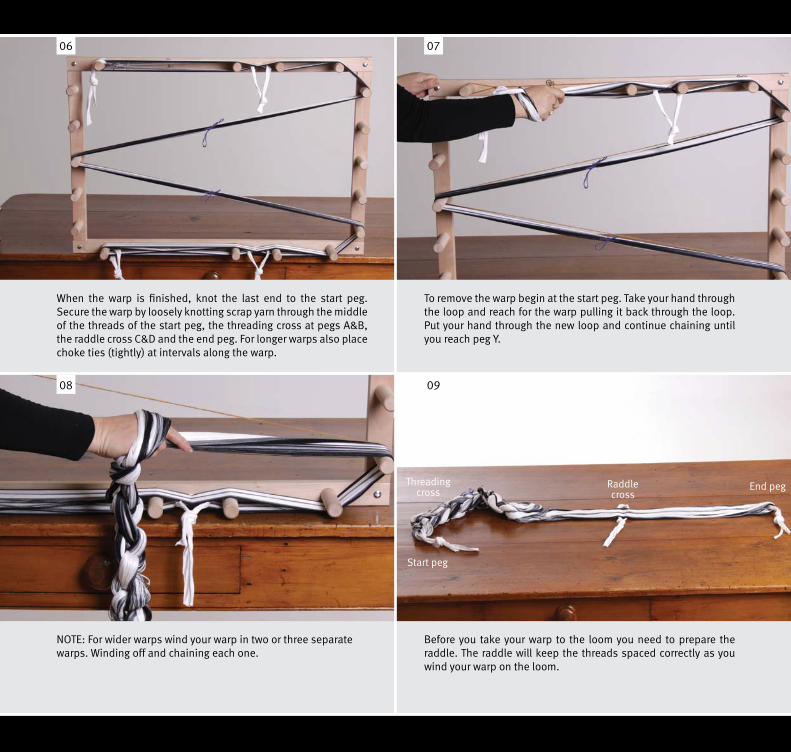
When the warp is finished, knot the last end to the start peg. Secure the warp by loosely knotting scrap yarn through the middle of the threads of the start peg, the threading cross at pegs A&B, the raddle cross C&D and the end peg. For longer warps also place choke ties (tightly) at intervals along the warp.
To remove the warp begin at the start peg. Take your hand through the loop and reach for the warp pulling it back through the loop. Put your hand through the new loop and continue chaining until you reach peg Y.
06 07
Before you take your warp to the loom you need to prepare the raddle. The raddle will keep the threads spaced correctly as you wind your warp on the loom.
08
Start peg
End pegThreading cross
Raddle cross
09
NOTE: For wider warps wind your warp in two or three separate warps. Winding off and chaining each one.

Insert one cross stick through each side of the raddle cross. WARPING THE LOOMPlace a heavy object on the end of the warp, or ask a friend to hold.
Secure the two sticks with the metal rings included in the raddle kit. Remove the cross tie.
10 11
12 11
Holding the warp up with the cross sticks place the raddle on the table underneath the raddle cross.
13

Place the warp end stick through the end of the warp. Remove the tie.
Remove the ring from one end of the cross stick. Slide each group of threads off the cross stick and into the raddle. The raddle used has 32 spaces, and as we have 32 groups we are starting at the end space.
If your project is narrower, count the spaces from the centre pin to ensure the warp is evenly placed on the raddle. The centre pin is marked. Secure the warp with rubber bands.
Take the raddle with warp to the loom and secure the raddle to the back beam as shown. Take the beginning of the warp through the castle and let it hang over the front beam.
14 15
16 17

CHECK THE DIRECTION YOU ARE ROLLING THE WARP ON. IT MUST GO IN THE DIRECTION SHOWN BY THE ARROWS.
20 21
18 19
Slide warp end stick into loops on back warp stick of loom (refer to the assembly instructions for how to attach back warp stick). Secure each end with a rubber band.
Spread the warp out to the same width as the threads in the raddle. Remove the reed and beater top rail.
BEAMING THE WARPEnsure the rear pawl is in the ratchet. Holding the warp under tension with one hand, wind on until the end stick has wrapped around the back roller. Check that the ties securing the raddle are not caught around the roller.

Wind on until the threading cross arrives behind the castle. To remove the raddle, hold the warp up slightly, remove the rubber bands and the ties.
Continue beaming, inserting a cardboard warp stick at each revolution of the roller to separate the warp layers and allow the warp to beam even and smoothly.
Place a cardboard warp stick across the roller.
22 23
24 25

Drop the raddle down from the warp.
Attach ‘helping hands’ (stretchy cord included in the raddle kit) to the loom. On each side go from the front beam, through the castle, around the back beam, back through the castle and tie at the front beam (see A).
To support the cross sticks, use the helping hands, crossed in a figure eight.
Place the cross sticks into the cross.
A A
26 27
28 29

Secure both ends of the cross sticks with the metal rings. Remove the threading cross tie.
THREADING THE LOOMPush the heddles to the centre of the loom. NOTE: We moved some heddles from shafts one and eight to the other shafts. Always check how many heddles are needed on each shaft BEFORE you begin.
Take the warp through the castle to the left of the heddles. Tie the warp threads with a piece of scrap yarn using a larks head knot. Secure the scrap yarn to the front beam. Remove the tie from the end of the warp and cut the loops.
30 31
32 33
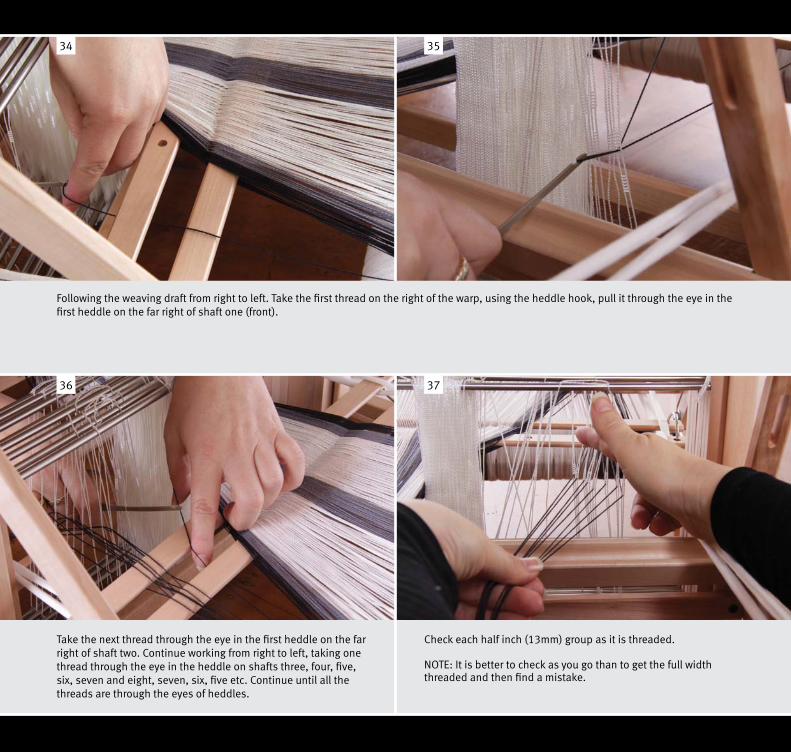
Check each half inch (13mm) group as it is threaded.
NOTE: It is better to check as you go than to get the full width threaded and then find a mistake.
Following the weaving draft from right to left. Take the first thread on the right of the warp, using the heddle hook, pull it through the eye in the first heddle on the far right of shaft one (front).
Take the next thread through the eye in the first heddle on the far right of shaft two. Continue working from right to left, taking one thread through the eye in the heddle on shafts three, four, five, six, seven and eight, seven, six, five etc. Continue until all the threads are through the eyes of heddles.
34 35
36 37
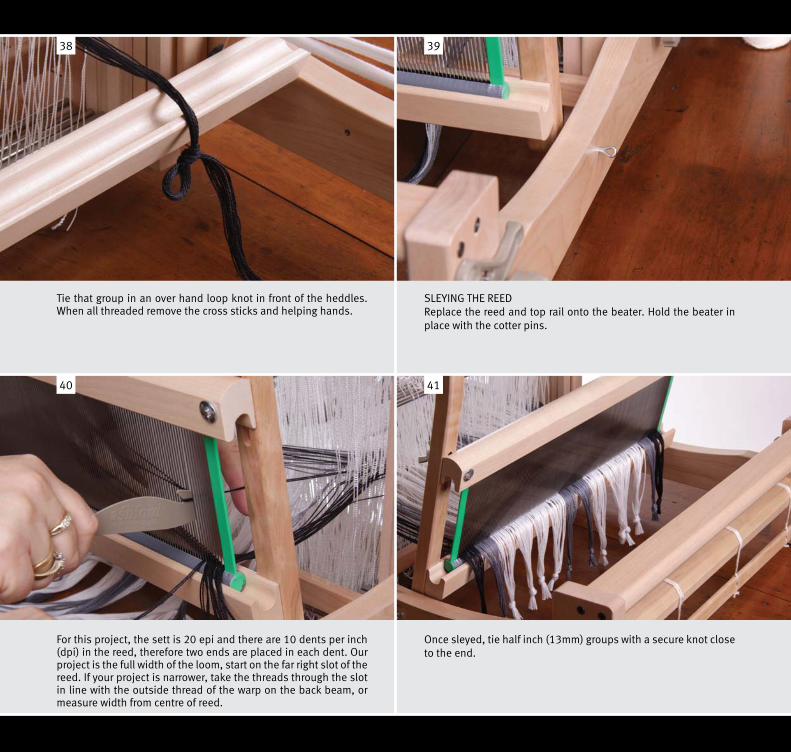
For this project, the sett is 20 epi and there are 10 dents per inch (dpi) in the reed, therefore two ends are placed in each dent. Our project is the full width of the loom, start on the far right slot of the reed. If your project is narrower, take the threads through the slot in line with the outside thread of the warp on the back beam, or measure width from centre of reed.
Tie that group in an over hand loop knot in front of the heddles. When all threaded remove the cross sticks and helping hands.
SLEYING THE REEDReplace the reed and top rail onto the beater. Hold the beater in place with the cotter pins.
Once sleyed, tie half inch (13mm) groups with a secure knot close to the end.
38 39
40 41
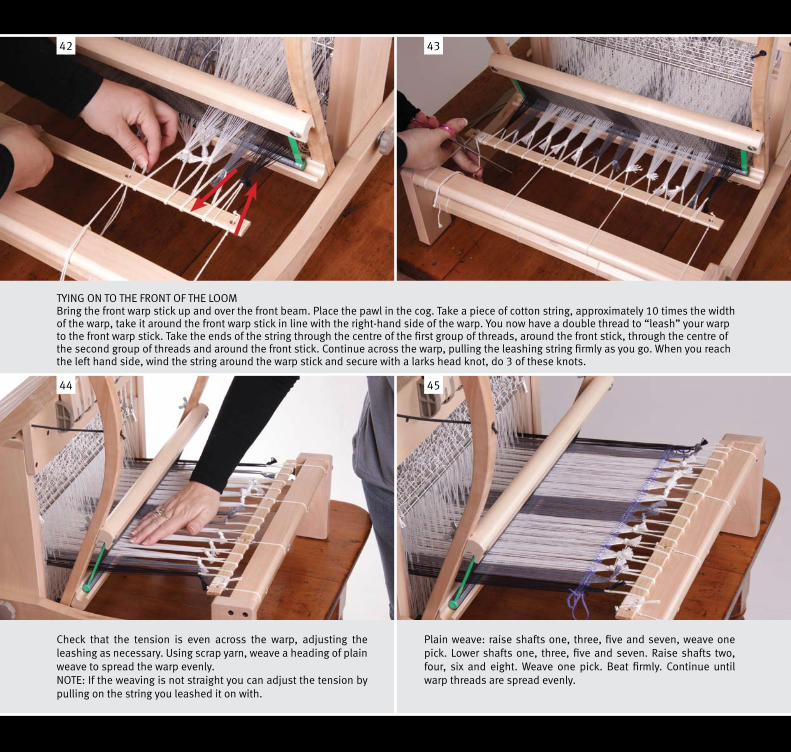
TYING ON TO THE FRONT OF THE LOOMBring the front warp stick up and over the front beam. Place the pawl in the cog. Take a piece of cotton string, approximately 10 times the width of the warp, take it around the front warp stick in line with the right-hand side of the warp. You now have a double thread to “leash” your warp to the front warp stick. Take the ends of the string through the centre of the first group of threads, around the front stick, through the centre of the second group of threads and around the front stick. Continue across the warp, pulling the leashing string firmly as you go. When you reach the left hand side, wind the string around the warp stick and secure with a larks head knot, do 3 of these knots.
Plain weave: raise shafts one, three, five and seven, weave one pick. Lower shafts one, three, five and seven. Raise shafts two, four, six and eight. Weave one pick. Beat firmly. Continue until warp threads are spread evenly.
Check that the tension is even across the warp, adjusting the leashing as necessary. Using scrap yarn, weave a heading of plain weave to spread the warp evenly.NOTE: If the weaving is not straight you can adjust the tension by pulling on the string you leashed it on with.
42 43
44 45

WEAVINGWind a shuttle with 5/2 Cotton, Black. Begin weaving the runner following the lifting sequence in the weaving draft.Weave the hem in plain weave. Raise shafts one, three, five and seven and enter the shuttle from right to left. Leaving the weft yarn at a 30° angle and 1in (2.5cm) of weft yarn hanging out at the beginning of the pick. Lower all shafts. Raise shafts two, four, six and eight. Beat weft into place with reed. Tuck the tail end of the thread from the first row into this row. Pass the shuttle from left to right.
Lower shaft two, four,six and eight. Raise shafts one, three, five and seven. Beat. Continue with this sequence for 1in (2.5cm). Now weave the pattern. Raise shafts one, two, four, five and six, weave one pick. Lower these shafts and raise shafts two, three, five, six and seven, beat previous weft into place, then weave one pick, continue as per pattern. When you reach the last row on the draft begin at the first row of the pattern again. Weave 2in (5cm) of black, 2in (5cm) of grey, 16in (40cm) white, 2in (5cm) grey and 2in (5cm) black. Weave 1in (2.5cm) in plain weave for the hem. This is one towel woven. Raise shafts one, three, five and seven, place a cardboard warp stick in the shed, lower one, three, five and seven. Raise shafts two, four, six and eight, place another cardboard warp stick. This is your spacer between the towels. Begin weaving again. Weave hem, then pattern, then hem. As the weaving progresses you will have to advance the warp. With all shafts lowered (neutral) release the pawl from the back cog and wind the warp forward by turning the front handle until the last pick is about 2in (5cm) from the front beam. Tighten the tension. As you roll the weaving around you will need to place a strip of cardboard in to cover the knots so they will not poke up through your weaving causing bumps that may affect the tension.
46 47
48

36
38 39
Off the loom Washed fabricFINISHINGWhen weaving is removed from the loom and before it is washed, darn in all the loose ends. All weaving should be washed so the threads open up and fill the spaces, changing the interwoven threads into fabric.
49 50
When the weaving is finished cut from the loom. Remove the heading yarn and using a sewing machine, or by hand, hem under ½in (13mm) at the ends of each towel. Wash in warm, soapy water, dry lying flat and press while still slightly damp.

HELPFUL HINTSTying Knots When you tie any knot during weaving you may need to undo it again at some stage. Always tie a knot that you can undo easily.
Beating Always beat gently. Sometimes the work will look a little open. Remember, the work is under tension on the loom and will come together when taken off. Also, the washing process will close the gaps a little.
FIXING A BROKEN WARP THREADTake a piece of the yarn you used for the warp, make it the same length as your warp. From the back of the loom, thread the yarn through the heddle eye and reed dent (where the broken thread was) . Attach it to the weaving in a figure eight around a pin placed approximately 1in (2.5cm) from the edge of the weaving. Hang the end of the yarn over the back beam with a small weight. Resume weaving. * Remove pin before the weaving is wound around the front beam, otherwise it will catch on subsequent layers.Carefully trim end near cloth when fabric removed from loom.
TENSION*The key to successful weaving is to wind the warp on the back roller with an even tension. This takes practice.
*Be kind to yourself, your threads and your loom.
*Be sure each side is rolling on with the same tension.
*Place cardboard sticks between each layer as the warp is rolled on. This prevents the threads pulling through the previous layer.
*Check both selvedges roll on with even tension.
*At first it is useful to have the assistance of a friend.
*When you are on your own take the warp in one hand, put the index finger through and down the centre to divide the warp, use the second finger and thumb to spread the warp away from centre and hold the warp under fourth and fifth fingers, then bring the warp down on the front beam to tension. Wind on with the other hand. This technique is suitable for looms no wider than 60cm (24in).
*Tie or leash to front stick. With the back of your hand check for even tension across the warp. Adjust if necessary.
* If the warp is correctly wound on the loom, little tension is necessary. If excessive loom tension is required to even the warp tension we recommend you unwind the warp, feeding it back through the reed and wind on again, following the advice above. When wound correctly the warp tension is even and light.
ASSEMBLY CHECKCheck there is a 0.5mm gap between the screw that attaches the pawl and the wood.
Check your handles are attached correctly.

ASHFORD LOOMS AND ACCESSORIESAshford Table Looms are available with four or eight shafts, 40, 60 or 80cm (16, 24 or 32in) wide. There is also a 16 shaft Table Loom 60cm (24in) wide.
Recommended AccessoriesRaddle Kit – for even warp distribution with ½inch spacing, 40, 60 or 80cm (16, 24 or 32in) wide.
Warping Frame – holds 11m (37ft) of warp. Includes clamps.
Warping Mill - holds 15m (50ft) of warp.
Other AccessoriesLoom Stand and Treadle Kit - strong stand with two shelves and a four shaft treadle kit for direct tie-up.
Hobby Bench – four seat heights and roomy storage compartment.
Second Back Beam – second back roller and beam.
Shuttles – stick or boat shuttles in various sizes.
Bobbins and Bobbin Winders.
Reeds - stainless steel reeds for different setts or yarns: 6, 8, 10, 12 and 16dpi. Fringe Twister - for quick and easy finishing of ends.
Second Back Beam
Warping Frame
Warping Mill
Hobby Bench
Boat Shuttles and Bobbins
Shuttles
Raddle Kit Bobbin Winders
Fringe Twister

The Ashford Book of Rigid Heddle Weaving
By Rowena Hart
The Ashford Book of Dyeing
By Ann Milner
Other Ashford books available
The Ashford Book of Weaving for the Four Shaft Loom
By Anne FieldISBN: 1-8774270-1-2
The Ashford Book of Carding
By Jo ReeveISBN: 978-1-877427-00-8
The Ashford Book of Weaving for Knitters
By Rowena HartISBN: 0-9582631-5-9
The Ashford Book of Rigid Heddle Weaving
By Rowena HartISBN: 0-4730843-7-6
The Ashford Book of Spinning
By Anne FieldISBN: 0-9087049-4-1
The Ashford Book of Textures & Towels
By Elsa KroghISBN: 1-8772511-5-1
The Ashford Book of Projects for the Eight
Shaft LoomBy Elsa Krogh
ISBN: 0-9582631-4-0
Dyeing_contents_v10.indd 148 8/23/2007 10:43:52 AM
The Ashford Book of Projects for the Eight Shaft Loom
By Elsa Krogh
Books avai lable f rom Ashford
The Ashford Book of CardingBy Jo Reeve
The Ashford Book of Hand Spinning
By Jo Reeve
Learn to weave on the
Rigid Heddle
Learn to Weave on the Rigid Heddle Loom Booklet
Learn to weave on the
Inkle Loom
Learn to Weave on the Inkle Loom Booklet
Learn to weave on the Knitters Loom
Learn to Weave on the Knitters Loom Booklet
Learn to weave on the
Inklette Loom
Learn to Weave on the Inkette Loom Booklet
Learn to Spin Booklet
Learn to weave on the
SampleIt Loom
Learn to Weave on the SampleIt Loom Booklet
The Ashford Book of Weaving Patterns from Four to Eight Shafts
By Elsa Krogh
The Ashford Book of Needle Felting
By Barbara Allen

Ashford Handicrafts LimitedFactory and Showroom: 415 West Street P O Box 474, Ashburton, New Zealand Telephone: +64 3 308 9087Facsimile: +64 3 308 8664 Email: [email protected]: www.ashford.co.nz
For more information, helpful hints and inspiration we recommend The Ashford Book of Projects for the Eight Shaft Loom and The Ashford Book of Weaving Patterns from Four to Eight Shafts by Elsa Krogh.
9 418647 243130
LTWTL_En
3005
2016
V2