learning ionic - sample chapter
TRANSCRIPT

C o m m u n i t y E x p e r i e n c e D i s t i l l e d
Build real-time and hybrid mobile applications with Ionic
Learning IonicArvind Ravulavaru
Learning IonicWith this book, you will learn hybrid mobile application development using Ionic. This book uses Cordova 5.0.0, Ionic CLI 1.5.0, and Ionic 1.0.0 to explain the concepts and build apps.To begin with, the book helps you understand where Ionic fi ts in today's world. Then, you will dive deep into Ionic CSS components and Ionic-AngularJS directives and services. You will also examine theming Ionic apps using the built-in SCSS setup.Next, you will learn to build an Ionic client for a secure REST API, where you will implement user authentication and token-based development. Cordova and ngCordova will be explored, and you will learn how you can integrate device-specifi c features such as a camera and Geolocation with an Ionic app. We will wrap up the book by building a messaging app, which deals with talking to Firebase (a real-time data store), as well as device features.By the end of this book, you will be able to develop a hybrid mobile application from start to fi nish, and generate device-specifi c installers.
Who this book is written forThis book is intended for those who want to learn how to build hybrid mobile applications using Ionic. It is also ideal for people who want to explore theming for Ionic apps. Prior knowledge of AngularJS is essential to complete this book successfully.
$ 44.99 US£ 28.99 UK
Prices do not include local sales tax or VAT where applicable
Arvind Ravulavaru
What you will learn from this book
Learn how a hybrid mobile application works
Familiarize yourself with Cordova and see how it fi ts into hybrid mobile application development
Seamlessly work with Ionic CSS components and Ionic-Angular JavaScript components such as directives and services
Learn how to theme Ionic apps as well as customize components using Ionic SCSS support
Develop an app that builds a client for a secure REST API using Ionic and AngularJS
Develop a real-time chat app using Firebase that consumes ngCordova
Learn how to generate a device-specifi c installer for an Ionic app using Ionic CLI as well as Ionic cloud services
Learning IonicForeword by Mike Hartington – Core Team Member, Ionic
P U B L I S H I N GP U B L I S H I N G
community experience dist i l led
Visit www.PacktPub.com for books, eBooks, code, downloads, and PacktLib.
Free Sample
In this package, you will find: The author biography
A preview chapter from the book, Chapter 2 'Welcome to Ionic'
A synopsis of the book’s content
More information on Learning Ionic

About the Author
Arvind Ravulavaru is a full-stack consultant with over 6 years of experience in software development. For the last 2 years, he has been working extensively on JavaScript, both on the server side and the client side. Prior to that, Arvind worked on big data analytics, cloud provisioning, and orchestration. He has good exposure to various databases and has also developed and architected an application that was built using Java and ASP.NET.
A year and a half ago, Arvind started a blog titled The Jackal of JavaScript (http://thejackalofjavascript.com), where he writes about developing full-stack applications using JavaScript alone as the server-side and client-side programming language. He has written articles on various topics, such as DNA analysis, sentiment analysis with JavaScript, programming Raspberry Pi with JavaScript, and building a node-webkit and a WebRTC-based video chat client, to name a few.
Apart from this, Arvind provides training, empowering companies with the latest and greatest technology available in the market. He also conducts start up workshops, where he teaches rapid prototyping with today's amazing tool stack. Arvind also provides information on how to take ideas to the market in a very short span of time.
He always looks for ways to contribute to the open source community, making this world a better place for developers. As a consultant, Arvind always tries to power amazing business ideas with awesome technology solutions (language-agnostic), moving the human race up the evolution chain.
Arvind recently started his own company in Hyderabad, where he is building products in the Internet of Things space. The aim of the company is to build IoT products for the world at an affordable price so that everyone can enjoy technology that powers lives.
You can reach Arvind on his blog at http://thejackalofjavascript.com.
Arvind has also reviewed Data-oriented Development with AngularJS, Manoj Waikar, Packt Publishing.
[ vii ]
PrefaceBuild mobile hybrid applications with ease using Ionic. Be it simple apps that integrate REST API endpoints or complicated apps that involve native features, Ionic provides a simple API to work with them.
With a basic knowledge of HTML, CSS, and a decent knowledge of AngularJS, one can easily convert a million-dollar idea into an app with a few lines of code.
In this book, we will explore how you can do this.
What this book coversChapter 1, Ionic – Powered by AngularJS, introduces you to the power of AngularJS. This is why it is considered a good framework for a hybrid framework, such as Ionic.
Chapter 2, Welcome to Ionic, talks about the Mobile Hybrid framework: Cordova. It shows how Ionic fi ts into the bigger picture. This chapter also shows you how to install the required software for the development of the Ionic framework.
Chapter 3, Ionic CSS Components and Navigation, tells you how to use Ionic as a CSS framework for your mobile web applications. This chapter also talks about how to integrate Ionic CSS only components with AngularJS, apart from routing in Ionic apps.
Chapter 4, Ionic and SCSS, explores how to theme Ionic apps with the help of built-in SCSS support.
Chapter 5, Ionic Directives and Services, provides information on how to use Ionic's built-in directives and services, which helps to quickly bring your application to life.

Preface
[ viii ]
Chapter 6, Building a Bookstore App, deals with how you can leverage the knowledge you have gained so far in building an Ionic client for a secured REST API. This chapter walks you through the itsy-bitsy pieces that are needed to develop Ionic apps that will simply consume REST API endpoints.
Chapter 7, Cordova and ngCordova, talks about how you can easily integrate device features, such as camera and Bluetooth, with the help of Cordova and ngCordova in your Ionic apps.
Chapter 8, Building a Messaging App, shows you how you can use all the knowledge that you have gained so far to build a messaging app, where users can register, log in, and chat with each other and share pictures and locations.
Chapter 9, Releasing the Ionic App, focuses on how to generate installers for the apps that you have built with Cordova and Ionic using the Ionic CLI and the PhoneGap build.
Appendix, Additional Topics and Tips, discusses how to effi ciently use the Ionic CLI and Ionic cloud services to build, deploy, and manage your Ionic applications.
What you need for this bookTo start building Ionic apps, you need to have a basic knowledge of HTML, CSS, JavaScript, and AngularJS. A good knowledge of mobile application development, device native features, and Cordova is preferred.
You will need Node.js, Cordova CLI, and Ionic CLI installed to work with Ionic. If you are planning to add theming support and other third-party libraries, you will need Git and Bower. If you want to work with device features, such as camera or Bluetooth, you need to have their mobile OS set up on your machine.
Who this book is forThis book is intended for those who want to learn how to build hybrid mobile applications using Ionic. It is also ideal for people who want to work with theming Ionic apps, integrating with the REST API, and learning more about device features, such as camera or Bluetooth, using ngCordova.
Prior knowledge of AngularJS is essential to complete this book successfully.
[ 19 ]
Welcome to IonicIn the previous chapter, we saw a couple of key AngularJS features, namely the directives and services. In this chapter, we will understand the big picture of mobile hybrid apps, set up the required software to develop Ionic apps, and fi nally scaffold a few apps.
The topics covered in this chapter are as follows:
• Mobile Hybrid Architecture• What is Apache Cordova?• What is Ionic?• Setting up the tools needed to develop and run Ionic apps• Working with Ionic templates• The Yeoman Ionic Generator
Mobile Hybrid ArchitectureBefore we start working with Ionic, we need to understand the bigger picture of the Mobile Hybrid platform.
The concept is pretty simple. Almost every mobile operating system (also called Platform when working with Cordova) has an API to develop apps. This API consists of a component named Web View. A Web View is typically a browser that runs inside the scope of a mobile application. This browser runs the HTML, CSS, and JS codes. This means that you can build a web page using the preceding technologies and then execute it inside your app.
Welcome to Ionic
[ 20 ]
You can use the same knowledge of web development to build native-hybrid mobile apps (here, native refers to installing the platform-specifi c format fi le on the device after it has been packaged along with the assets), for instance:
• Android uses Android Application Package (.apk)• iOS uses iPhone Application Archive (.ipa)• Windows Phone uses Application Package (.xap)
The package/installer consists of a piece of native code that initializes the web page and a bunch of assets needed to show the web page content.
This setup of showing a web page inside the mobile app container that consists of your application business logic is called as a Hybrid App.
What is Apache Cordova?In simple terms, Cordova is the piece of software that stitches the web application and the native application together. The Apache Cordova website states that:
"Apache Cordova is a platform for building native mobile applications using HTML, CSS and JavaScript."
Apache Cordova does not just stitch the web app with the native app, but it also provides a set of APIs written in JavaScript to interact with the native features of the device. Yes, you can use JavaScript to access your camera, take a picture, and send it in an e-mail. Sounds exciting, right?
Chapter 2
[ 21 ]
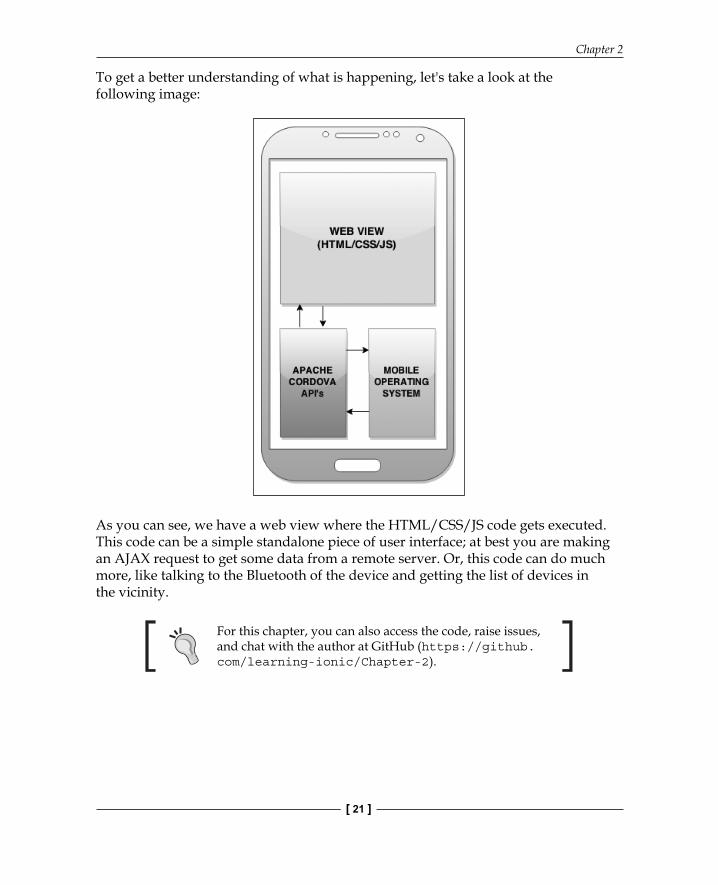
To get a better understanding of what is happening, let's take a look at the following image:
As you can see, we have a web view where the HTML/CSS/JS code gets executed. This code can be a simple standalone piece of user interface; at best you are making an AJAX request to get some data from a remote server. Or, this code can do much more, like talking to the Bluetooth of the device and getting the list of devices in the vicinity.
For this chapter, you can also access the code, raise issues, and chat with the author at GitHub (https://github.com/learning-ionic/Chapter-2).
Welcome to Ionic
[ 22 ]
In the latter case, Cordova has a bunch of APIs that interface with the web view using JavaScript and then talk to the device in its native language (for example, Java for Android), thus providing a bridge between them. For instance, if you would like to know more from the JavaScript about the device in which your app is running, all you need to do is write the following code inside the JS fi le:
var platform = device.platform;
After installing the device plugin, you can also access the UUID, model, OS version, and the Cordova version of the device from inside the web view using JavaScript as follows:
var uuid = device.uuid;var model = device.model;var version = device.version;var Cordova = device.Cordova;
We will deal more with Cordova plugins in Chapter 7, Cordova and ngCordova.
The preceding explanation was to give you an idea of how Mobile Hybrid apps are structured and how you can use device features from the web view using JavaScript.
Cordova does not convert the HTML, CSS, and JS code to an OS-specifi c binary code. All it does is wrap the HTML, CSS, and JS code and execute it inside a web view.
So, you must have guessed by now that Ionic is the framework with which we build the HTML/CSS/JS code that runs in the web view and talks with Cordova to access device specifi c APIs.
What is Ionic?Ionic is a beautiful, open source, front-end SDK for developing hybrid mobile apps with HTML5. Ionic provides mobile-optimized HTML, CSS, and JS components, as well as gestures and tools for building highly interactive apps.
Ionic is performance effi cient with its minimal DOM manipulation and hardware-accelerated transitions as compared to other frameworks in this league. Ionic uses AngularJS as its JavaScript framework.
With the power of AngularJS inside a framework like Ionic, the possibilities are unlimited (you can use any AngularJS component inside Ionic as long as it makes sense in a mobile app). Ionic has a very good integration with Cordova's device API. This means that you can access device APIs using a library like ngCordova and integrate it with the beautiful user interface components of Ionic.
Chapter 2
[ 23 ]
Ionic has its own Command Line Interface (CLI) to scaffold, develop, and deploy Ionic apps. Before we start working with the Ionic CLI, we need to set up a few pieces of software.
Software setupNow we are going to set up all the required software needed to develop and run an Ionic app smoothly.
Install Node.jsSince Ionic uses Node.js for its CLI as well as for the build tasks, we will fi rst install the same as follows:
1. Navigate to https://nodejs.org/.2. Click on the Install button on the homepage and an installer for your OS will
automatically be downloaded. Or you can navigate to https://nodejs.org/download/ and download a specifi c copy.
3. Install Node.js by executing the downloaded installer.
To verify that Node.js has been successfully installed, open a new Terminal (*nix systems) or Prompt (Windows systems) and run the following command:
node -v
Now you should see the version of Node.js. Now execute the following command:
npm -v
You should see the npm version:
npm is a Node Package Manager that we will be using to download various dependencies for our Ionic Project.
You need Node.js only during the development. The version specifi ed in the preceding image is only for illustration. You may have the same version or the latest version of the software. This applies to all the images that show the software version in this chapter.

Welcome to Ionic
[ 24 ]
Install GitGit is a free and open source distributed version control system designed to handle everything from small to very large projects with speed and effi ciency. In our case, we will be using a package manager named Bower, which uses Git to download the required libraries. Also, the Ionic CLI uses Git to download the project templates.
To install Git, navigate to http://git-scm.com/downloads and download the installer for your platform. Once you have successfully installed it, you can navigate to your terminal/prompt and run the following command:
git --version
You should see the following output:
Install BowerWe are going to use Bower (http://bower.io/) to manage our application library dependencies. Bower is a package manager similar to npm but a linear/fl at version of it. This kind of package manager is more suitable for downloading the assets needed for web development.
Bower is built on top of Node.js. To install Bower globally from the terminal/prompt you need to run the following command:
npm install bower -g
We are installing a node module named Bower globally. Hence, the –g fl ag. On *nix systems, you may need to use sudo to run this command:
sudo npm install bower –g
If you need sudo for running the preceding command, please recheck your npm installation. Refer to http://competa.com/blog/2014/12/how-to-run-npm-without-sudo/ for more information on sudo less npm global installs.

Chapter 2
[ 25 ]
Once Bower is successfully installed, you can verify the same by running the following command:
bower -v
Install GulpNext, we are going to install Gulp (http://gulpjs.com/), which is a build system that is developed on top of Node.js. Automating a lot of monotonous, tedious tasks can be taken care of by Gulp.
For instance, when your web project is ready to go live, you would want to minify the CSS, JS, and HTML, optimize the images for the Web, and push the code to your production environment; in that case, Gulp would be your go-to tool.
There are a lot of plugins in Gulp that automate most of your monotonous tasks, and it is heavily driven by the open source community. In Ionic, we will be using Gulp primarily to convert SCSS code to CSS. We use the SCSS code to customize the Ionic visual elements. We will talk more about that in Chapter 4, Ionic and SCSS.
To install gulp globally run the following command:
npm install gulp -g
For *nix systems, run this:
sudo npm install gulp -g
Once Gulp is successfully installed, you can verify the same by running this command:
gulp -v
Install Sublime TextThis is a totally optional installation. Everyone has their own preferred text editor. After running around many text editors, I fell in love with Sublime Text, purely for its simplicity and the number of Plug and Play packages.
Welcome to Ionic
[ 26 ]
If you would like to give this editor a try, you can navigate to http://www.sublimetext.com/3 to download Sublime Text 3.
Install Cordova and Ionic CLIFinally, to complete the Ionic setup, we will install the Ionic CLI. Ionic CLI is a wrapper around the Cordova CLI with some additional features.
All the code examples in this book use Cordova version 5.0.0, Ionic CLI version 1.5.0, and Ionic version 1.0.0 (uranium-unicorn).
To install the Ionic CLI run the following command:
npm install [email protected] [email protected] -g
To verify the install run the following command:
cordova –v
You can also run this:
ionic –v
To get a feel of what Ionic CLI is packed with, run:
ionic
Chapter 2
[ 27 ]
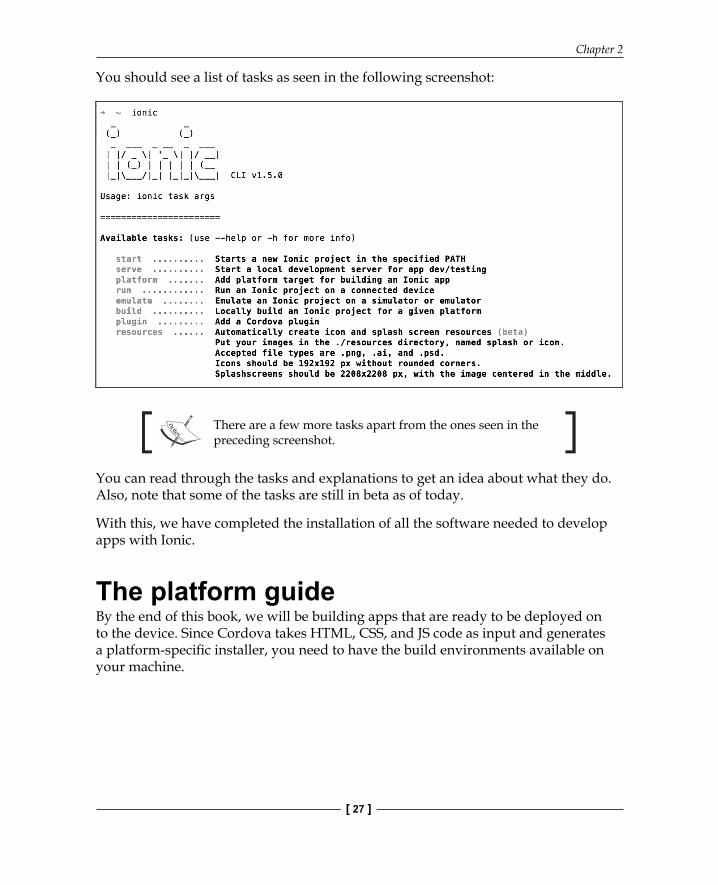
You should see a list of tasks as seen in the following screenshot:
There are a few more tasks apart from the ones seen in the preceding screenshot.
You can read through the tasks and explanations to get an idea about what they do. Also, note that some of the tasks are still in beta as of today.
With this, we have completed the installation of all the software needed to develop apps with Ionic.
The platform guideBy the end of this book, we will be building apps that are ready to be deployed on to the device. Since Cordova takes HTML, CSS, and JS code as input and generates a platform-specifi c installer, you need to have the build environments available on your machine.

Welcome to Ionic
[ 28 ]
Android users can follow the instructions on the Android Platform Guide at http://cordova.apache.org/docs/en/edge/guide_platforms_android_index.md.html#Android%20Platform%20Guide to set up SDK on your local machine.iOS users can follow the instructions from the iOS Platform Guide at http://cordova.apache.org/docs/en/edge/guide_platforms_ios_index.md.html#iOS%20Platform%20Guide to set up SDK on your local machine.You would need an OSX environment to develop iOS apps.
As of today, Ionic supports only Android 4.0+ (although, it works on 2.3 as well) and iOS 6+ mobile platforms. But Cordova supports a few more.
You can check out the other supported platforms here: http://cordova.apache.org/docs/en/edge/guide_platforms_index.md.html#Platform%20Guides.
Hello IonicNow that we are done with the software setup, we will scaffold a few Ionic apps.
Ionic has three main/go-to templates using which we can quickly start developing apps:
• Blank: This is a blank Ionic project with one page• Tabs: This is a sample app that is built using Ionic tabs• Side menu: This is a sample app that is built to consume side menu
driven navigation
To understand the basics of scaffolding, we will start with the blank template.
To keep our learning process clean, we will create a folder structure to work with Ionic projects. Create a folder named ionicApps, and then create a folder inside it called chapter2.
Next, open a new terminal/prompt and change the directory (cd) to the ionicApps folder and from there to chapter2 folder. Now run the following command:
ionic start -a "Example 1" -i app.example.one example1 blank
Chapter 2
[ 29 ]
In the preceding command:
• -a "Example 1": This is the human-readable name of the app• –i app.example.one: This is the app ID/reverse domain name• example1: This is the name of the folder• blank: This is the name of the template
Refer to the Appendix, Additional Topics and Tips, to know more about the Ionic start task.
The Ionic CLI is very verbose when it comes to performing tasks. As you can see from the terminal/prompt, while the project is getting created a lot of information is printed.
To start off, a new blank project is downloaded and saved to the example1 folder. Next, the ionic-app-base is downloaded from the ionic-app-base GitHub repo, https://github.com/driftyco/ionic-app-base. Post that, ionic-starter-template is downloaded from the ionic-starter-template GitHub repo at https://github.com/driftyco/ionic-starter-blank.
After that, the confi g fi le is updated with the app name and ID. Next, a script runs and fi ve Cordova plugins are downloaded:
• org.apache.cordova.device (https://gitHub.com/apache/cordova-plugin-device): This is used to get device information, as we have seen earlier in this chapter
• org.apache.cordova.console (https://gitHub.com/apache/cordova-plugin-console): This plugin is meant to ensure that console.log() is as useful as it can be
• cordova-plugin-whitelist (https://github.com/apache/cordova-plugin-whitelist): This plugin implements a whitelist policy for navigating the application web view on Cordova 4.0
• cordova-plugin-splashscreen (https://github.com/apache/cordova-plugin-splashscreen): This plugin shows and hides a splash screen during the application launch
• com.ionic.keyboard (https://gitHub.com/driftyco/ionic-plugins-keyboard): This is the keyboard plugin providing functions to make interaction with the keyboard easier, and fires events to indicate whether the keyboard will hide/show
Welcome to Ionic
[ 30 ]
All this information is then added to the package.json fi le and a new ionic.project fi le is created.
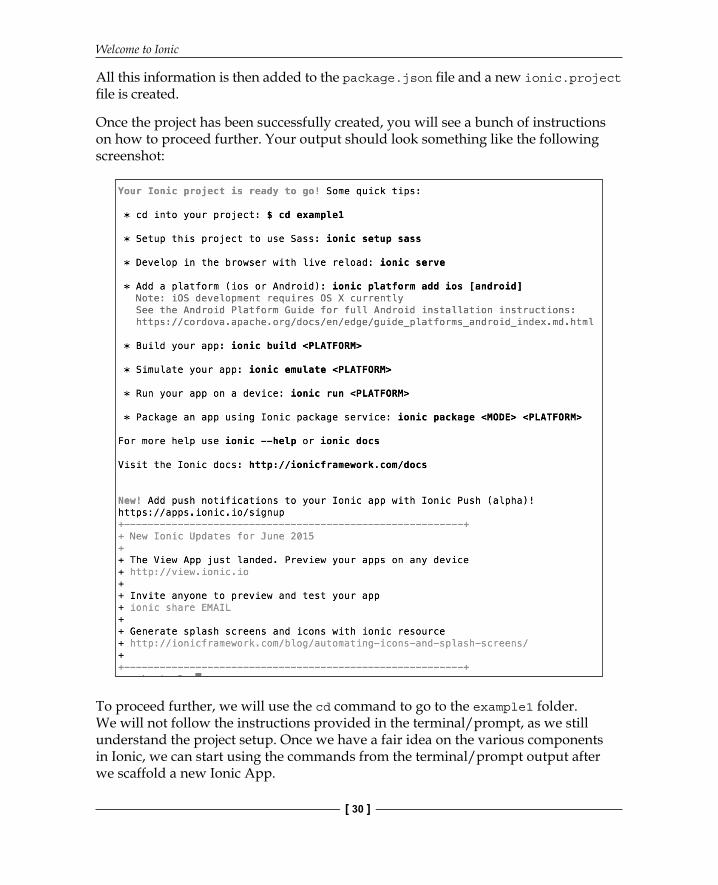
Once the project has been successfully created, you will see a bunch of instructions on how to proceed further. Your output should look something like the following screenshot:
To proceed further, we will use the cd command to go to the example1 folder. We will not follow the instructions provided in the terminal/prompt, as we still understand the project setup. Once we have a fair idea on the various components in Ionic, we can start using the commands from the terminal/prompt output after we scaffold a new Ionic App.
Chapter 2
[ 31 ]
Once we have changed directory to example1 folder, we will serve the app by giving the following command:
ionic serve
This will start a new dev server on port 8100, and then launch the app in your default browser. I highly recommend setting Google Chrome or Mozilla Firefox as your default browser while working with Ionic.
When the browser launches, you should see the blank template.
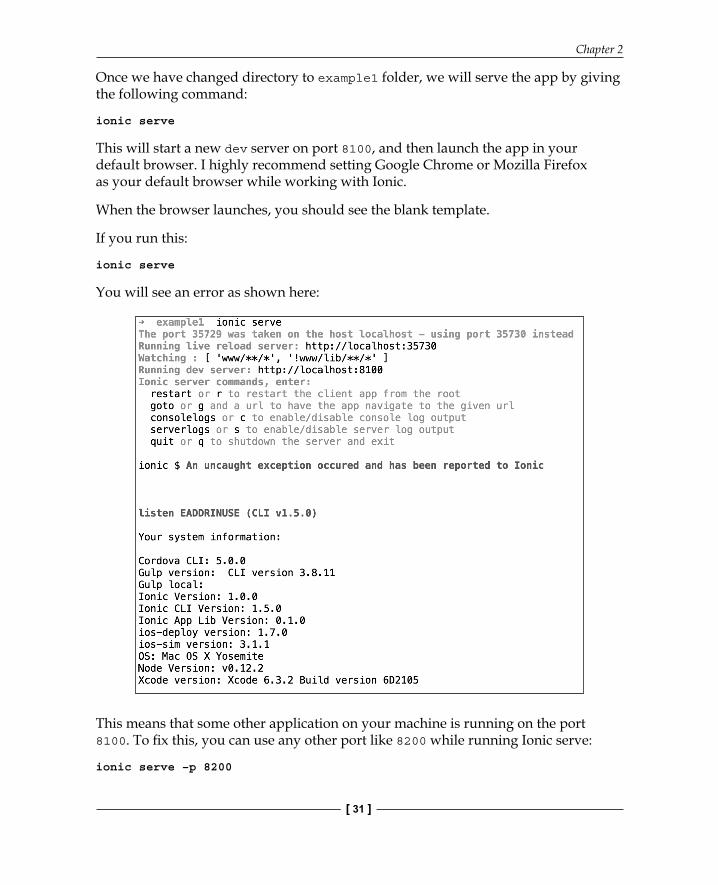
If you run this:
ionic serve
You will see an error as shown here:
This means that some other application on your machine is running on the port 8100. To fi x this, you can use any other port like 8200 while running Ionic serve:
ionic serve –p 8200

Welcome to Ionic
[ 32 ]
Once the application is successfully launched and we have seen the output in the browser, we will navigate back to the terminal/prompt and we should see something like the following screenshot:
As mentioned earlier, Ionic CLI tasks are pretty verbose. They will not leave you hanging. You can see that while the Ionic server command is running, you can type R and hit Enter and the application restarts. Similarly, you can press C to enable or disable printing browser JavaScript logs to the terminal/prompt.
Once you are done running the application, press Q and hit Enter to stop the server. You can do the same by pressing Ctrl + C from the keyboard.
The browser developer tools setupBefore we proceed further, I would recommend setting up the developer tools in your browser in the following format.
Google ChromeOnce the Ionic app is launched, open the developer tools by pressing Cmd + Opt + I on Mac and Ctrl + Shift + I on Windows/Linux. Then click on the last but one icon in the top row, next to the close button as seen in the following screenshot:
Chapter 2
[ 33 ]
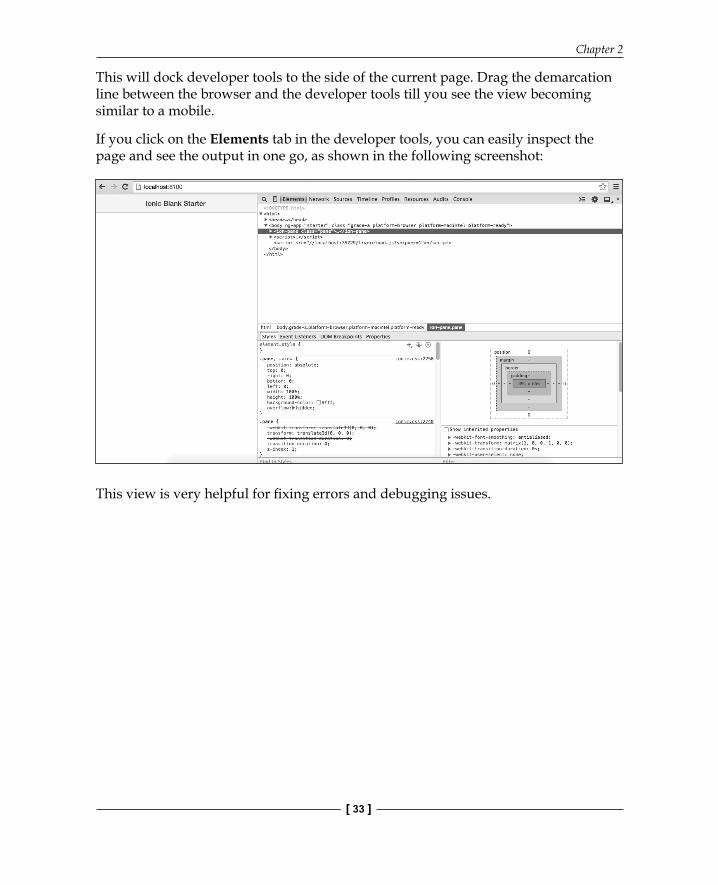
This will dock developer tools to the side of the current page. Drag the demarcation line between the browser and the developer tools till you see the view becoming similar to a mobile.
If you click on the Elements tab in the developer tools, you can easily inspect the page and see the output in one go, as shown in the following screenshot:
This view is very helpful for fi xing errors and debugging issues.

Welcome to Ionic
[ 34 ]
Mozilla FirefoxIf you are a Mozilla Firefox fan, you can achieve the same result as above as well. Once the Ionic app is launched, open developer tools (not Firebug, Firefox's native development tools) by pressing Cmd + Opt + I on Mac and Ctrl + Shift + I on Windows/Linux. Then click on the Dock to side of browser window icon, as shown in the following screenshot:
Now, you can drag the demarcation line to achieve the same result as we have seen in Chrome:

Chapter 2
[ 35 ]
The Ionic project structureSo far, we have scaffolded a blank Ionic app and launched it in a browser. Now, we will walk through the scaffolded project structure.
To quickly remind you, we know that the Ionic sits inside the Cordova application. So before we go to the Ionic code, we will talk about the Cordova wrapper.
If you open the chapter2 example1 folder in your text editor, you should see the following folder structure at the root of the project:
.
├── bower.json
├── config.xml
├── gulpfile.js
├── hooks
├── ionic.project
├── package.json
├── plugins
├── scss
└── www
Here is a quick explanation of each of the items:
• bower.json: This consists of the dependencies loaded via Bower. In future, we will install other Bower packages to be used along with our app. All the information regarding the same will be available here.
• config.xml: This file consists of all the meta information needed by Cordova while converting your Ionic app to a platform-specific installer. If you open config.xml, you will see a bunch of XML tags that describes your project. We will take a look at this file in detail again.
• gulpfile.js: This file consists of the build tasks that we would be using while developing the Ionic app.
• ionic.project: This file consists of the information regarding the Ionic app.

Welcome to Ionic
[ 36 ]
• hooks: This folder consists of scripts that get executed when a particular Cordova task is performed. A Cordova task can be any of the following: after_platform_add (after a new platform is added), after_plugin_add (after a new plugin is added), before_emulate (before emulation begins), after_run (before the app run), and so on. Each task is placed inside a folder named after the Cordova task. If you open the hooks folder, you will see an after_prepare folder and a README.md file. Inside the after_prepare folder, you will find a script file named 010_add_platform_class.js. This will get executed after the prepare task of Cordova is executed. All that this task does is add a class to the <body> tag, which is the same name as the platform on which the app is running. This would help us in styling the app better, based on the platform. You can find a list of tasks that you can hook into from the README.md file present inside the hooks folder.
• plugins: This folder consists of all the plugins added to the project. We will be adding a few more plugins later on, and you can see them reflected here.
• scss: This folder consists of the base scss file which we will be overwriting to customize the styles of the Ionic components. More on this in Chapter 4, Ionic and SCSS.
• www: This folder consists of the Ionic code. Anything you write inside this folder is intended to land inside the web view. This is where we will be spending most of our time.
The confi g.xml fi leThe config.xml fi le is a platform agnostic confi guration fi le. As mentioned earlier, this fi le consists of all the information needed by Cordova to convert the code in the www folder to the platform-specifi c installer.
Setting up of the config.xml fi le is based on the W3C's Packaged Web Apps (Widgets) specifi cation (http://www.w3.org/TR/widgets/) and extended to specify core Cordova API features, plugins, and platform-specifi c settings. There are two types of confi gurations that you can add to this fi le. One is global, that is, common to all devices, and the other is specifi c to the platform.
If you open config.xml in your text editor, the fi rst tag you encounter is the XML root tag. Next, you can see the widget tag:
<widget id="app.example.one" version="0.0.1" xmlns="http://www.w3.org/ns/widgets" xmlns:cdv="http://cordova.apache.org/ns/1.0">

Chapter 2
[ 37 ]
The id specifi ed above is the reverse domain name of your app, which we provided while scaffolding. Other specifi cations are defi ned inside the widget tag as its children. The children tags include the app name (that gets displayed below the app icon when installed on the device), app description, and author details.
It also consists of the confi guration that needs to be adhered to while converting code in the www folder to a native installer.
The content tag defi nes the starting page of the application. The access tag defi nes the URLs that are allowed to load in the app. By default, it loads all the URLs. The preference tag sets the various options as name value pairs. For instance, DisallowOverscroll describes if there should be any visual feedback when the user scrolls past the beginning or end of the document.
You can read more about platform-specifi c confi gurations at the following links:
• Android: http://docs.phonegap.com/en/4.0.0/guide_platforms_android_config.md.html#Android%20Configuration
• iOS: http:/docs.phonegap.com/en/4.0.0/guide_platforms_ios_config.md.html#iOS%20Configuration
The importance for the platform-specific configurations and global configuration is same. You can read more about global configuration at http://docs.phonegap.com/en/4.0.0/config_ref_index.md.html#The%20config.xml%20File
The www folderAs mentioned earlier, this folder consists of our Ionic app, the HTML, CSS, and JS codes. If you open the www folder, you will fi nd the following fi le structure:
.
├── css
│ └── style.css
├── img
│ └── ionic.png
├── index.html
├── js
│ └── app.js
└── lib
└── ionic
Welcome to Ionic
[ 38 ]
├── css
├── fonts
├── js
├── scss
└── version.json
Let's look at each of these in detail:
• index.html: This is the application startup file. If you remember, in config.xml, we pointed the src on the content tag to this file. Since we are using AngularJS as our JavaScript framework, this file would ideally act as the base/first page for the Single Page Application (SPA). If you open index.html, you can see that the body tag has the ng-app attribute which points to the starter module defined inside the js/app.js file.
• css: This folder consists of styles that are specific to our app.• img: This folder consists of images that are specific to our app.• js: This folder consists of the JavaScript code specific to our app. This is
where we write the AngularJS code. If you open the app.js file present inside this folder, you can see that an AngularJS module is set up, passing in Ionic as a dependency.
• lib: This folder is where all the packages would be placed when we run bower install. When we scaffold the app, this folder comes along with it, loaded with Ionic files. If you want to download the assets again along with its dependencies, you can use the cd command to go to the example1 folder from your terminal/prompt and run the following command:bower install
You will see that four more folders get downloaded. These are a part of the dependencies listed in the ionic-bower package, present in bower.json file, located at the root of the project.Ideally, we would not be using these libraries explicitly in our app. Rather, we would use the Ionic bundle which is built on top of these libraries.
This completes our tour of the blank template. Before we scaffold the next template, let us take a quick peek at the www/js/app.js fi le.

Chapter 2
[ 39 ]
As you can see, we are creating a new AngularJS module with the name starter, and then we are injecting ionic as a dependency.
The $ionicPlatform service is injected as a dependency to the run method. This service is used to detect the current platform, as well as handle the hardware buttons on (Android) devices. In the current context, we are using the $ionicPlatform.ready method to be notifi ed when the device is ready for us to perform operations on it.
It is a good practice, or rather a necessity in some cases, to include all your code inside the $ionicPlatform.ready method. This way, your code executes only when the entire app is initialized.
So far you must have worked on AngularJS code related to the Web. But when you are dealing with Ionic, you would be working with scripts related to device features as well, inside the AngularJS code. Ionic provides us services to make these things happen in a more organized fashion. Hence, we went through the concept of custom services in Chapter 1, Ionic – Powered by AngularJS, and we will be going through Ionic Services in depth in Chapter 5, Ionic Directives and Services.
Scaffolding the tabs templateTo get a good feel of the Ionic CLI and the project structure, we will scaffold the other two starter templates as well. First we will scaffold the tabs template.
Using the cd command go back to the chapter2 folder and run the following command:
ionic start -a "Example 2" -i app.example.two example2 tabs
As you can see, the tabs project is scaffolded inside the example2 folder. Using the cd command go to the example2 folder and execute the following command:
ionic serve

Welcome to Ionic
[ 40 ]
You should see the tabbed interface app built using Ionic as seen in the following screenshot:
The tabs are located at the bottom of the page. We will talk more about customizations in Chapter 3, Ionic CSS Components and Navigation and Chapter 5, Ionic Directives and Services.
If you go back to the example2 folder and analyze the project structure, everything would be the same except for the contents of the www folder.
This time, you will see a new folder named templates. This folder will consist of partial pages associated with each AngularJS route. And if you open the js folder, you will fi nd two new fi les:
• controller.js: This consists of the AngularJS controller code• services.js: This consists of the AngularJS service code
Now you can get a good idea of how Ionic is integrated with AngularJS, and how all the components go hand-in-hand. When we deal with a few more pieces of Ionic, this structure will make a lot of sense.
Chapter 2
[ 41 ]
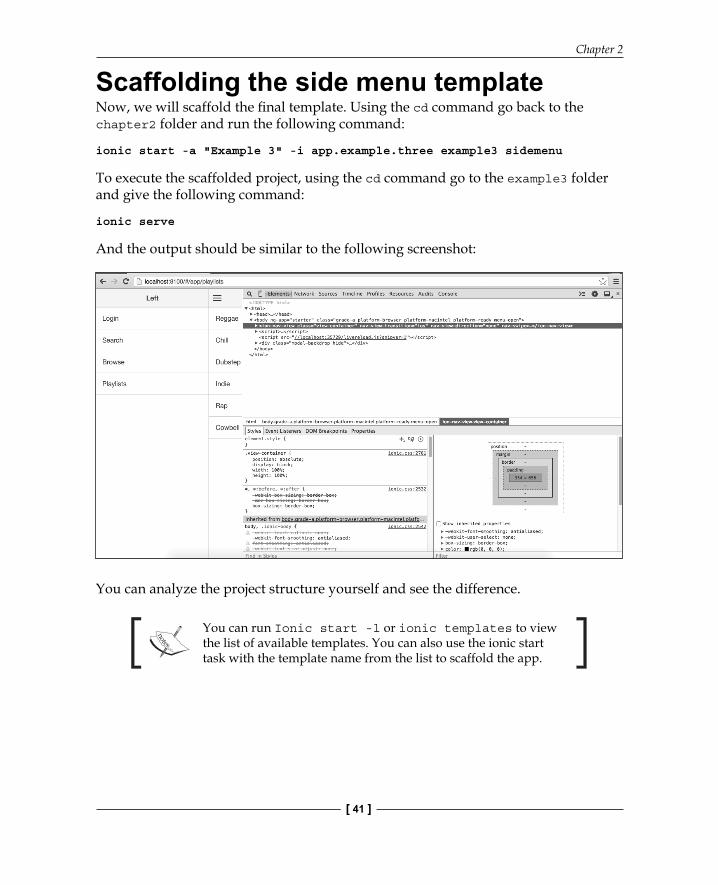
Scaffolding the side menu templateNow, we will scaffold the fi nal template. Using the cd command go back to the chapter2 folder and run the following command:
ionic start -a "Example 3" -i app.example.three example3 sidemenu
To execute the scaffolded project, using the cd command go to the example3 folder and give the following command:
ionic serve
And the output should be similar to the following screenshot:
You can analyze the project structure yourself and see the difference.
You can run Ionic start -l or ionic templates to view the list of available templates. You can also use the ionic start task with the template name from the list to scaffold the app.
Welcome to Ionic
[ 42 ]
generator-ionicI feel that the Ionic CLI is pretty good, but it does not have a workfl ow associated with it. When I say workfl ow, I mean a demarcation between the development code and production code. In the project scaffolded by the Ionic CLI, the www folder hosts both the development code and production code. This will become an issue very fast when your app starts growing.
This is where generator-ionic proves to be invaluable. The generator-ionic is a Yeoman generator that is used to scaffold Ionic projects. If you did not already know this, Yeoman is a scaffolding tool that uses Grunt, Bower, and Yo to scaffold apps. Of late, they've started supporting gulp as well.
Why Yeoman?Unlike the IDEs for other languages, JavaScript or web development does not have a unifi ed development environment, where a user would navigate to File | New | AngularJS project or File | New | HTML5 project. This is where Yeoman fi ts in.
Ionic has its own CLI to scaffold apps. But for other frameworks, which do not have a generator, Yeoman provides base generators.
You can know more about Yeoman at http://yeoman.io/ and to search for a Yeoman generator, you can navigate to http://yeoman.io/generators/.
There are other generators available for Ionic, but I prefer generator-ionic (https://gitHub.com/diegonetto/generator-ionic) for its workfl ow and features.
Installing generator-ionicBefore we install generator-ionic, we need to install yo, grunt, and grunt-cli globally. To do this, run the following command:
npm install yo grunt grunt-cli -g
Grunt is another build tool similar to Gulp. The main difference between Grunt and Gulp is that, Grunt is a confi guration-over-code build tool, whereas gulp is a code-over-confi guration build tool.
Chapter 2
[ 43 ]
You can read more about Grunt at http://gruntjs.com/.You can fi nd the presentation from my talk on Gulp versus Grunt at http://arvindr21.github.io/building-n-Scaffolding for some more insights into them.
Next, we will install generator-ionic globally:
npm install generator-ionic –g
Packages which are installed with a –g fl ag need to be installed only once. You need not install them again and again for each usage.
Now, we can scaffold a new Ionic project using generator-ionic. Using the cd command go back to the chapter2 folder and create a new folder inside it named example4. Run the following command:
yo ionic example
Unlike the Ionic CLI, you need to answer a few questions on how you would like to scaffold your app. You can answer the questions as shown below:
? Would you like to use Sass with Compass (requires Ruby)?
N
? Which Cordova plugins would you like to include?
org.apache.cordova.device
org.apache.cordova.console
com.ionic.keyboard
? Which starter template would you like to use?
Tabs
Yeoman will go ahead and download all the stuff needed for the project to run. Once the Yeoman scaffolding is complete, you can navigate to the example4 folder. As you can see, there are a lot more fi les and folders present in this folder.
You can read more about the complete project structure at https://gitHub.com/diegonetto/generator-ionic#project-structure.

Welcome to Ionic
[ 44 ]
The key differences between the Ionic CLI scaffolded app and the generator-ionic scaffolded app are as follows:
• app: unlike the Ionic CLI scaffolded app, we will carry out the development not inside the www folder but inside the app folder. This was the code demarcation that I was referring to. We develop inside the app folder and run a build script that takes care of cleaning up the files and putting them inside the www folder, ready for production use.
• hooks: If you open the hooks folder, you can find four more scripts.• Gruntfile.js: Unlike the Ionic CLI, generator-ionic uses Grunt to manage
tasks. If you feel that there are too many things to learn, I recommend you follow the Ionic CLI scaffolded app over generator-ionic and Gulp over Grunt.
If you are using generator-ionic to scaffold your app, do not work inside the www folder. When you run the build command, the contents of this folder will be deleted and recreated from the app folder.You can check out the workfl ow commands that you can use to run the app from https://gitHub.com/diegonetto/generator-ionic#workflow-commands.All the Ionic CLI methods are wrapped with the grunt command. So, for instance, when you want to execute Ionic serve, you will run grunt serve when using generator-ionic.
So, let's serve the scaffolded app by running the following command:
grunt serve
You should see the same output that you have seen for the tabs app when we scaffolded it with the Ionic CLI.
Three more reasons that made me choose generator-ionic over Ionic CLI is the out-of-the-box support for:
• Code hinting (https://github.com/diegonetto/generator-ionic#grunt-jshint)
• Testing with Karma (testing framework) and code coverage using Istanbul (https://github.com/diegonetto/generator-ionic#grunt-karma)
• Ripple emulator (https://github.com/diegonetto/generator-ionic#grunt-ripple)
Chapter 2
[ 45 ]
The main reason I am demonstrating generator-ionic is to introduce you to the workfl ow so that you can adapt to it when your app becomes bigger. Again, this is a personal preference and you may like to work with the Ionic CLI itself.
You can play around with other Ionic generators as well and see which you are comfortable with.
SummaryIn this chapter, you gained some knowledge on mobile hybrid architecture. You also learned how a Hybrid app works. We saw how Cordova stitches the HTML, CSS, and JS code to be executed inside the web view of the app. Then, we installed the required software to develop Ionic apps locally. We scaffolded a blank template using the Ionic CLI and analyzed the project structure. Later on, we scaffolded the other two templates and observed the difference. We also installed generator-ionic and scaffolded a sample app, and observed the difference between a generator-ionic and Ionic CLI scaffolded app.
You can also refer to Ionic slides at http://ionicframework.com/present-ionic/slides for some more information.
In the next chapter, we will understand Ionic CSS components and the router. This will help us in building interesting user interfaces and multipage applications using the Ionic API.

Where to buy this book You can buy Learning Ionic from the Packt Publishing website.
Alternatively, you can buy the book from Amazon, BN.com, Computer Manuals and most internet
book retailers.
Click here for ordering and shipping details.
www.PacktPub.com
Stay Connected:
Get more information Learning Ionic