learning management system administrator guide · create a new e-learning course..... 44 edit an...
TRANSCRIPT

Administrator Guide
Cisco Collaborative Knowledge Learning Management System
Cisco Collaborative Knowledge employs an agile development methodology that provides continuous updates to the platform. Our documentation is part of the development process and is revised as software updates occur. Any discrepancies between the platform and the current version of the documentation are temporary, and will be corrected on a regular cycle.
© 2016 Cisco and/or its affiliates. All rights reserved. This document is Cisco Public Information. 051216V5.1
2
Table of ContentsCisco Collaborative Knowledge Learning Management System Overview .......................................................................4
About the Cisco Collaborative Knowledge Learning Management System Administrator Guide ...............................5
Conventions Used in This Guide ...............................................5
Access the Cisco Collaborative Knowledge Learning Management System .................................................................6
The Landing Page .....................................................................7
Category Management .............................................................8Create a New Parent Category .................................................9
Create a New Child Category .................................................11
Catalog Management .............................................................13
Manage the Catalog ................................................................14
Create a New Instructor-Led Course .....................................18
Add a New Session for an Instructor-Led Course .................22
View a Session of an Instructor-Led Course ......................28
Edit a Session of an Instructor-Led Course ........................29
Delete a Session of an Instructor-Led Course ....................31
Create a New WebEx Course .................................................32
Add a New Session for a WebEx Course ...............................35
View a Session of a WebEx Course ....................................40
Edit a Session of a WebEx Course ......................................41
Delete a Session of a WebEx Course ..................................43
Create a New E-Learning Course ...........................................44
Edit an E-Learning Course ...................................................51
Delete an E-Learning Course ..............................................52
Create a New SCORM Course ................................................53
Edit a SCORM Course ..........................................................61
Delete A SCORM Course .....................................................63
Create a New Quiz ..................................................................64
Create Quiz Questions ............................................................74
Edit a Quiz Question .............................................................80
Delete a Quiz Question ........................................................83
Course Management ..............................................................85
View Attendees for a Course ..................................................86
Add or Remove Attendees for a Course .............................88
Mark Attendance for a Completed Course .............................91
Resources .................................................................................93
Manage Locations ...................................................................94
Add a Location .....................................................................94
Edit a Location ......................................................................96
Delete a Location .................................................................98
Manage Facilities .....................................................................99
Add a Facility ........................................................................99
Edit a Facility .......................................................................102
© 2016 Cisco and/or its affiliates. All rights reserved. This document is Cisco Public Information. 051216V5.1
3
Delete a Facility ..................................................................104
Book a Facility.....................................................................105
Notifications ............................................................................109
Notification Message ............................................................111
WebEx Host Management ...................................................113
Upload WebEx Users ............................................................116
Learning Plans ........................................................................118
Manage Learning Plans .........................................................119
Add a Learning Plan ...........................................................120
Edit a Learning Plan ............................................................125
Delete a Learning Plan .......................................................126
Assign a Prescribed Learning Plan ....................................127
Manage Job Roles .................................................................131
Add a Job Role ...................................................................133
Edit a Job Role ...................................................................135
Delete a Job Role ...............................................................137
Manage Skills .........................................................................138
Add a Skill ...........................................................................140
Edit a Skill ...........................................................................142
Delete a Skill .......................................................................144
Assign Instructors ..................................................................145
Completion Report ................................................................148
Import/Export Utility ..............................................................150
Master Upload .......................................................................150
Course Upload .......................................................................152
Assign Skill(s) to Course ......................................................154
Proxy Enrollment by Catalog Administrators ...................157
Table of Contents cont.
© 2016 Cisco and/or its affiliates. All rights reserved. This document is Cisco Public Information. 051216V5.1
4
Overview
The Cisco Collaborative Knowledge Learning Management System (LMS) is one of five fully integrated modules in the Cisco Collaborative Knowledge platform. It serves as the backbone for the software’s formal learning system, and comprises two main components:
§ Physical administration of the Cisco Collaborative Knowledge LMS (that is, the back end of the system in which a user who is assigned to the Catalog Administrator role and granted the corresponding permissions can manage the training catalog of course offerings); catalog-management activities occur within the Cisco Collaborative Knowledge LMS.
§ User interaction with the Cisco Collaborative Knowledge LMS (that is, the front end of the system in which users can locate and register for courses in the training catalog or create personalized learning plans to support development and career goals); user-interaction activities occur within Cisco Collaborative Knowledge.
NOTE: Generally, any third-party learning/training repository (including Cisco training repositories) plugged into Cisco Collaborative Knowledge should be managed at the repository level and not via the Cisco Collaborative Knowledge Learning Management System tools. Actions to alter the contents of a third-party learning repository through Cisco Collaborative Knowledge tools could create inconsistencies between the platform and the linked repository. This is subject to change given the nature of a specific deployment, configuration, or integration. Please contact your Cisco Collaborative Knowledge representative or Cisco Support Team if you have any questions.
Cisco Collaborative Knowledge Learning Management System Overview
© 2016 Cisco and/or its affiliates. All rights reserved. This document is Cisco Public Information. 051216V5.1
5
Overview
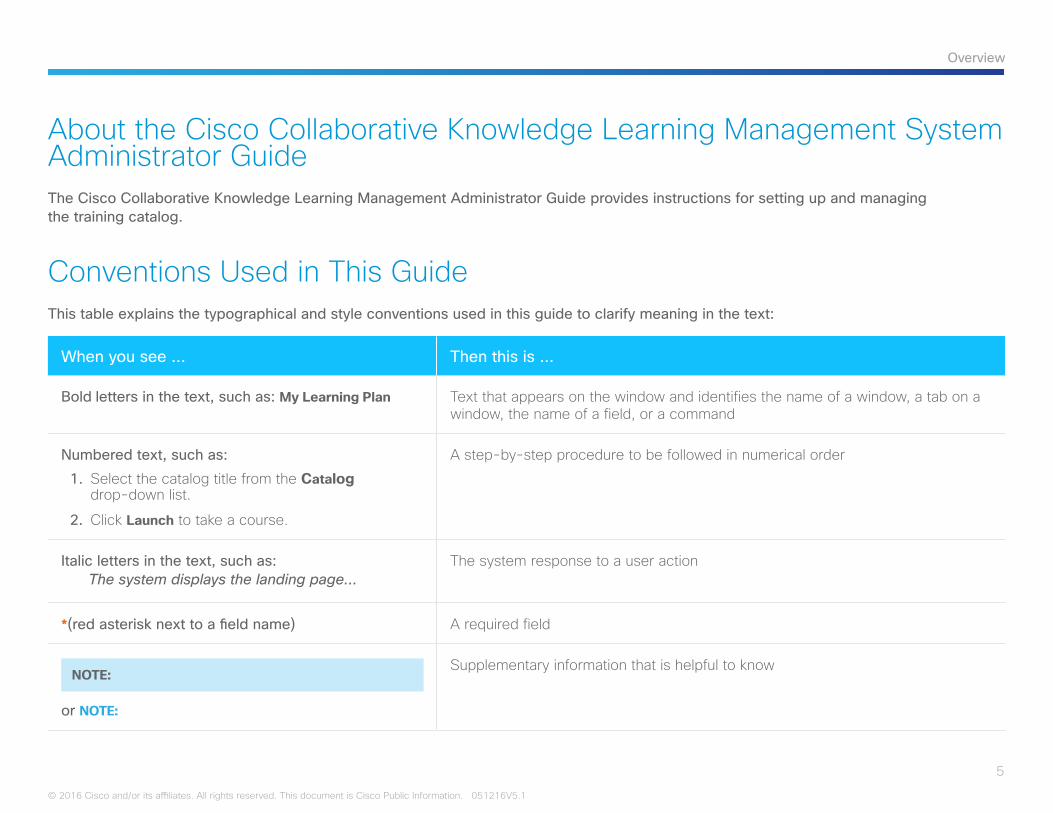
About the Cisco Collaborative Knowledge Learning Management System Administrator GuideThe Cisco Collaborative Knowledge Learning Management Administrator Guide provides instructions for setting up and managing the training catalog.
Conventions Used in This GuideThis table explains the typographical and style conventions used in this guide to clarify meaning in the text:
When you see … Then this is ...
Bold letters in the text, such as: My Learning Plan Text that appears on the window and identifies the name of a window, a tab on a window, the name of a field, or a command
Numbered text, such as:
1. Select the catalog title from the Catalog drop-down list.
2. Click Launch to take a course.
A step-by-step procedure to be followed in numerical order
Italic letters in the text, such as: The system displays the landing page…
The system response to a user action
*(red asterisk next to a field name) A required field
NOTE:
or NOTE:
Supplementary information that is helpful to know
© 2016 Cisco and/or its affiliates. All rights reserved. This document is Cisco Public Information. 051216V5.1
6
Overview
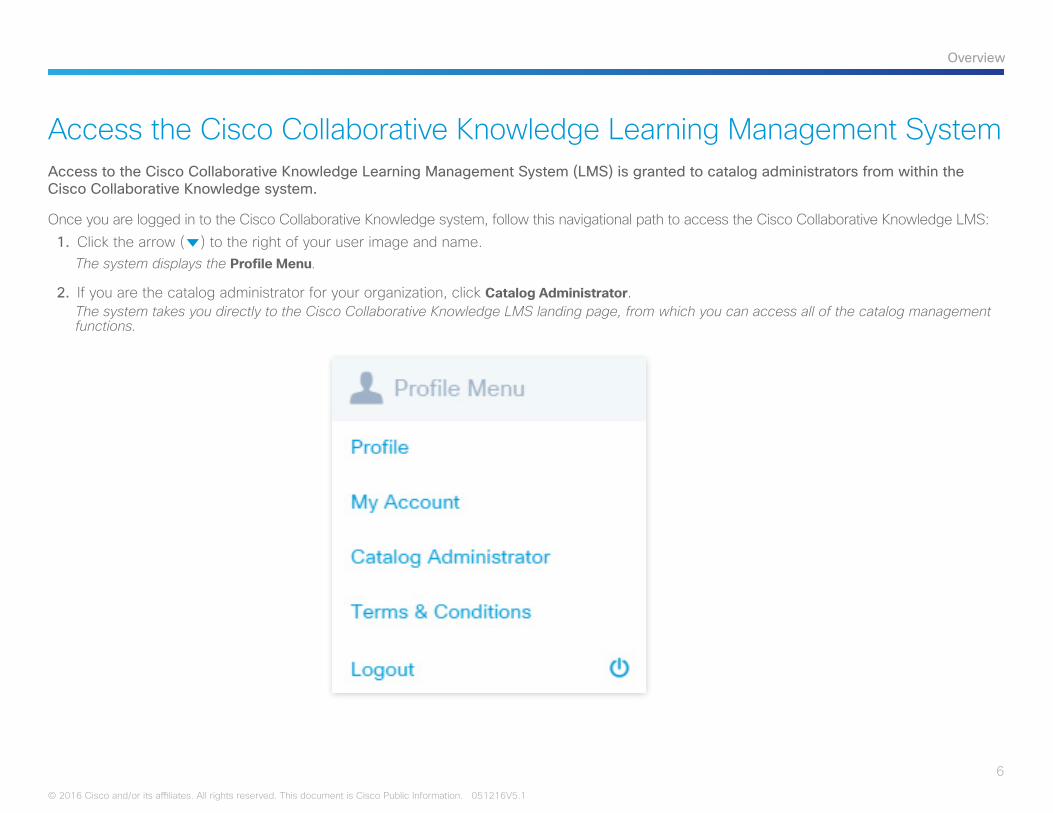
Access the Cisco Collaborative Knowledge Learning Management SystemAccess to the Cisco Collaborative Knowledge Learning Management System (LMS) is granted to catalog administrators from within the Cisco Collaborative Knowledge system.
Once you are logged in to the Cisco Collaborative Knowledge system, follow this navigational path to access the Cisco Collaborative Knowledge LMS: 1. Click the arrow (P) to the right of your user image and name.
The system displays the Profile Menu.
2. If you are the catalog administrator for your organization, click Catalog Administrator.The system takes you directly to the Cisco Collaborative Knowledge LMS landing page, from which you can access all of the catalog management functions.
7
Landing Page
© 2016 Cisco and/or its affiliates. All rights reserved. This document is Cisco Public Information. 051216V5.1
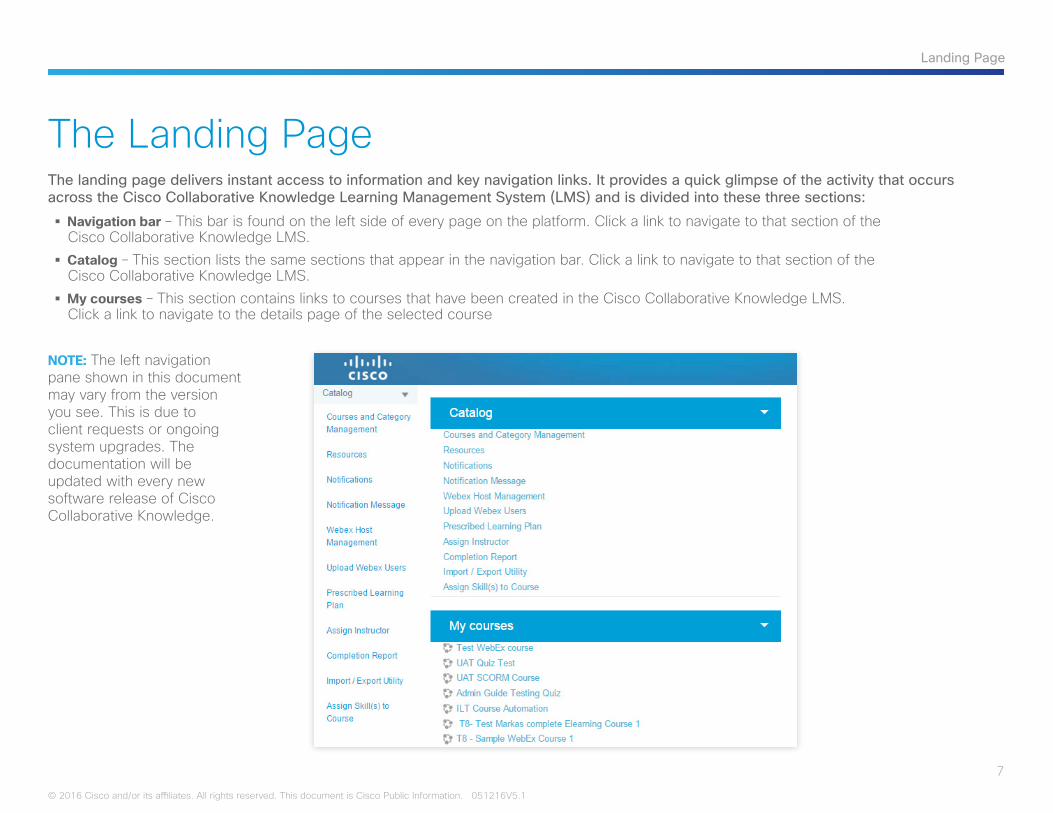
The Landing PageThe landing page delivers instant access to information and key navigation links. It provides a quick glimpse of the activity that occurs across the Cisco Collaborative Knowledge Learning Management System (LMS) and is divided into these three sections:
§ Navigation bar – This bar is found on the left side of every page on the platform. Click a link to navigate to that section of the Cisco Collaborative Knowledge LMS.
§ Catalog – This section lists the same sections that appear in the navigation bar. Click a link to navigate to that section of the Cisco Collaborative Knowledge LMS.
§ My courses – This section contains links to courses that have been created in the Cisco Collaborative Knowledge LMS. Click a link to navigate to the details page of the selected course
NOTE: The left navigation pane shown in this document may vary from the version you see. This is due to client requests or ongoing system upgrades. The documentation will be updated with every new software release of Cisco Collaborative Knowledge.
8
Category Management
© 2016 Cisco and/or its affiliates. All rights reserved. This document is Cisco Public Information. 051216V5.1
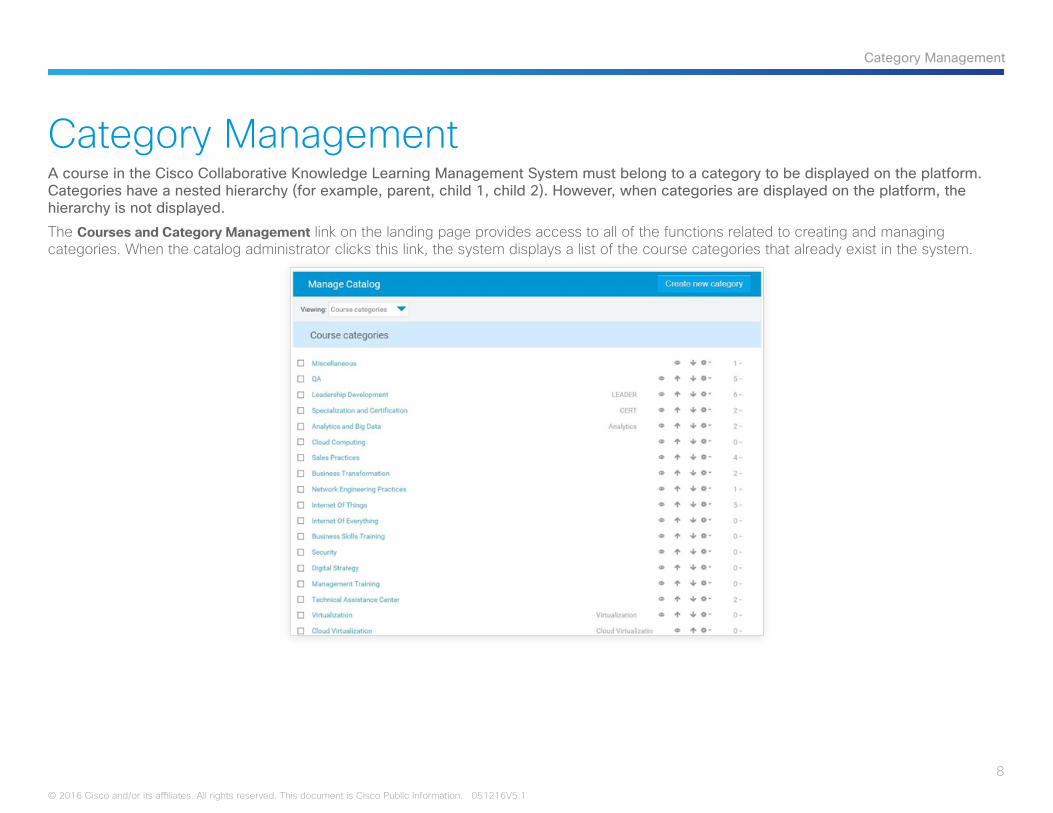
Category ManagementA course in the Cisco Collaborative Knowledge Learning Management System must belong to a category to be displayed on the platform. Categories have a nested hierarchy (for example, parent, child 1, child 2). However, when categories are displayed on the platform, the hierarchy is not displayed.
The Courses and Category Management link on the landing page provides access to all of the functions related to creating and managing categories. When the catalog administrator clicks this link, the system displays a list of the course categories that already exist in the system.
9
Category Management
© 2016 Cisco and/or its affiliates. All rights reserved. This document is Cisco Public Information. 051216V5.1
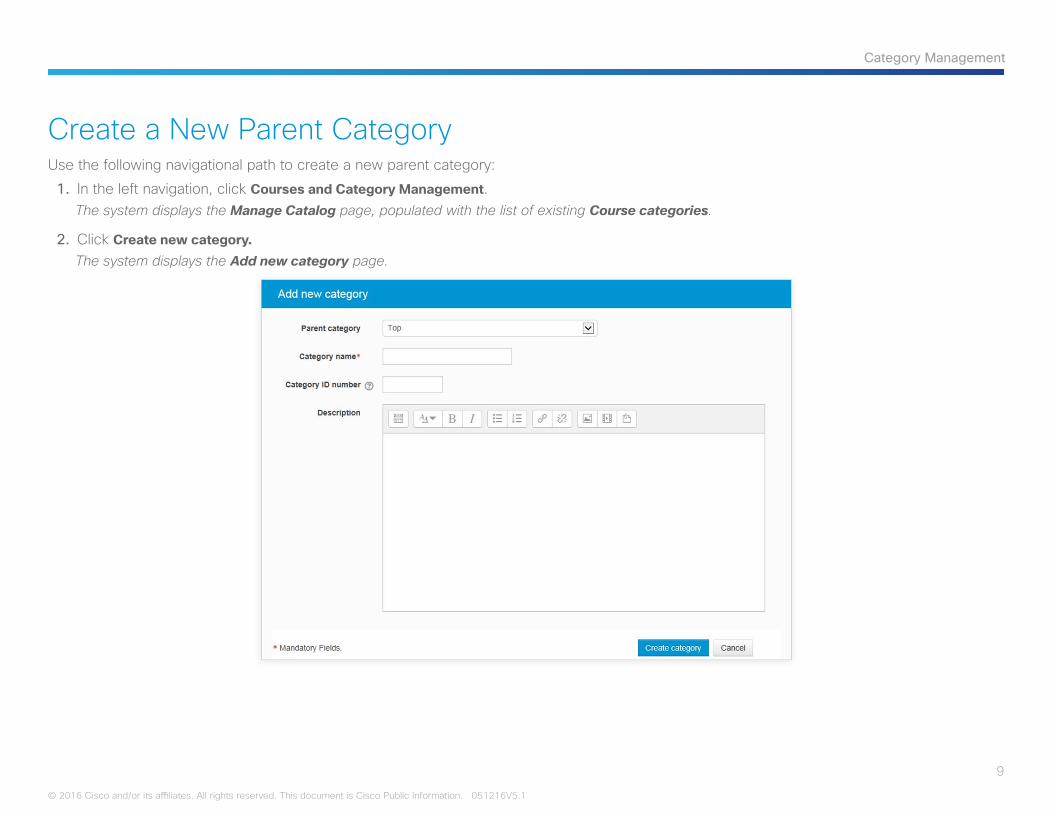
Create a New Parent CategoryUse the following navigational path to create a new parent category:
1. In the left navigation, click Courses and Category Management.The system displays the Manage Catalog page, populated with the list of existing Course categories.
2. Click Create new category.The system displays the Add new category page.
10
Category Management
© 2016 Cisco and/or its affiliates. All rights reserved. This document is Cisco Public Information. 051216V5.1
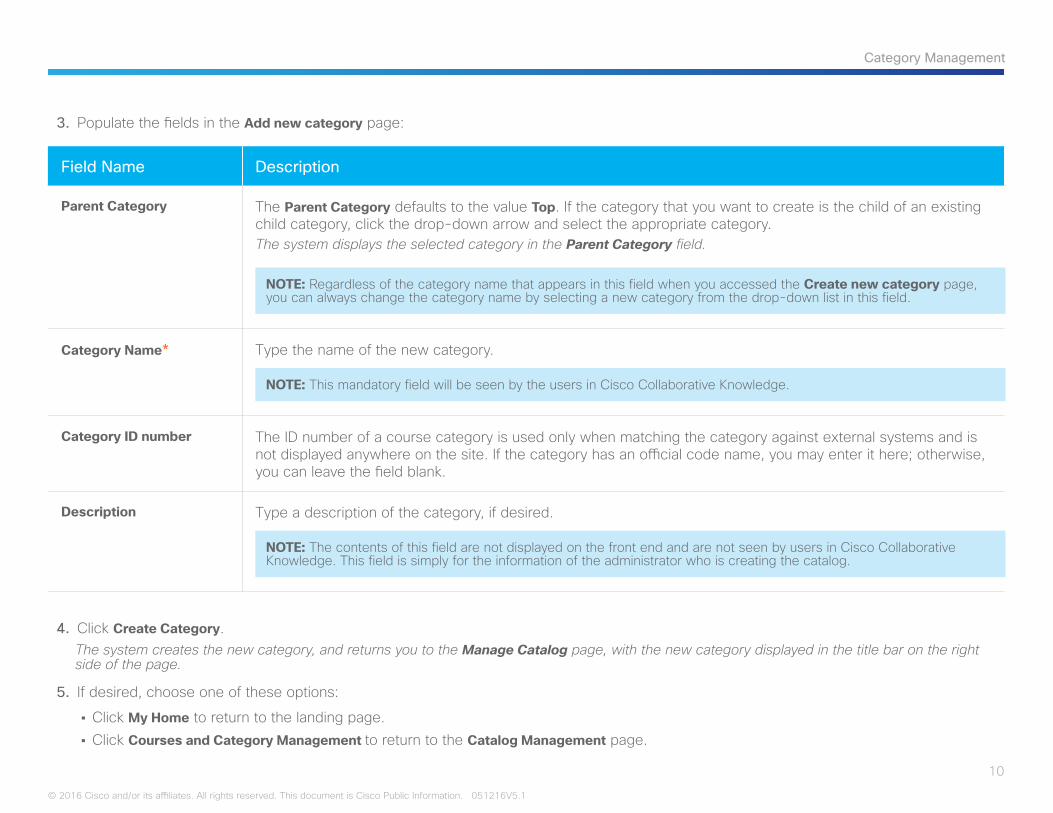
3. Populate the fields in the Add new category page:
Field Name Description
Parent Category The Parent Category defaults to the value Top. If the category that you want to create is the child of an existing child category, click the drop-down arrow and select the appropriate category.The system displays the selected category in the Parent Category field.
NOTE: Regardless of the category name that appears in this field when you accessed the Create new category page, you can always change the category name by selecting a new category from the drop-down list in this field.
Category Name* Type the name of the new category.
NOTE: This mandatory field will be seen by the users in Cisco Collaborative Knowledge.
Category ID number The ID number of a course category is used only when matching the category against external systems and is not displayed anywhere on the site. If the category has an official code name, you may enter it here; otherwise, you can leave the field blank.
Description Type a description of the category, if desired.
NOTE: The contents of this field are not displayed on the front end and are not seen by users in Cisco Collaborative Knowledge. This field is simply for the information of the administrator who is creating the catalog.
4. Click Create Category.The system creates the new category, and returns you to the Manage Catalog page, with the new category displayed in the title bar on the right side of the page.
5. If desired, choose one of these options:
• Click My Home to return to the landing page.• Click Courses and Category Management to return to the Catalog Management page.
11
Category Management
© 2016 Cisco and/or its affiliates. All rights reserved. This document is Cisco Public Information. 051216V5.1
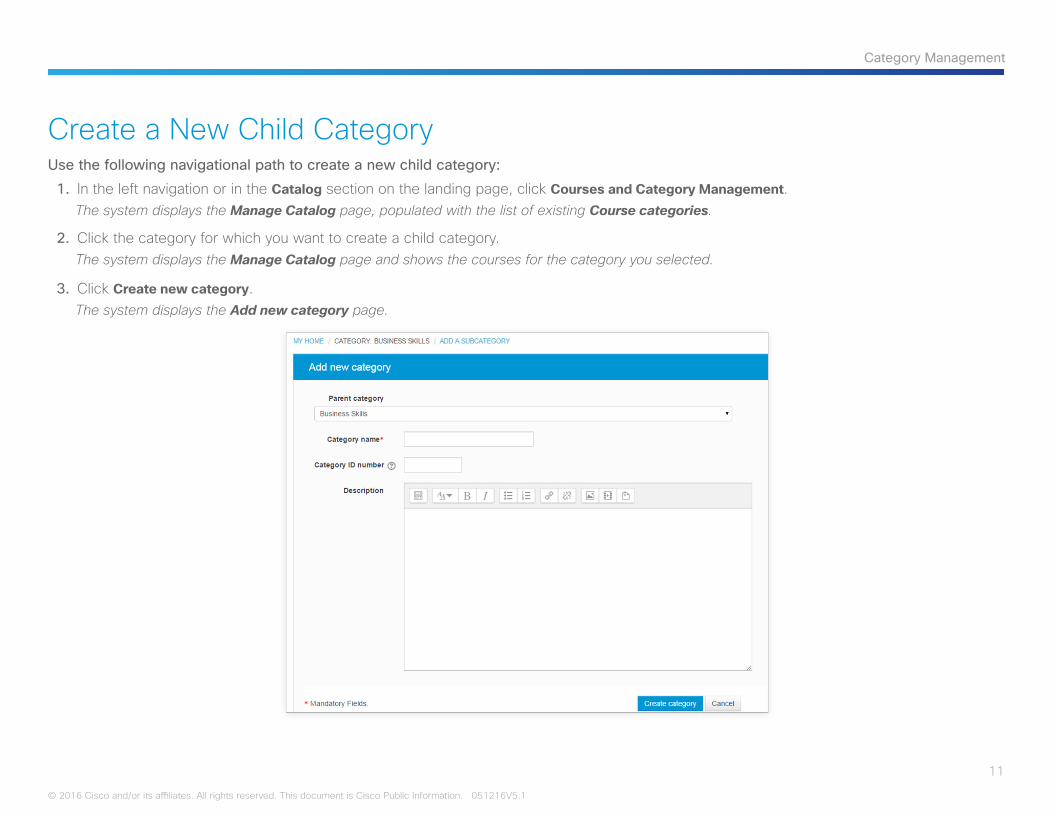
Create a New Child CategoryUse the following navigational path to create a new child category:
1. In the left navigation or in the Catalog section on the landing page, click Courses and Category Management.The system displays the Manage Catalog page, populated with the list of existing Course categories.
2. Click the category for which you want to create a child category.The system displays the Manage Catalog page and shows the courses for the category you selected.
3. Click Create new category.The system displays the Add new category page.

12
Category Management
© 2016 Cisco and/or its affiliates. All rights reserved. This document is Cisco Public Information. 051216V5.1
4. Populate the fields in the Add new category page:
Field Name Description
Parent Category The Parent Category field is populated with the name of the category you selected.
NOTE: Regardless of the category name that appears in this field when you accessed the Create new category page, you can always change the category name by selecting a new category from the drop-down list in this field.
Category Name* Type the name of the new child category.
NOTE: This mandatory field will be seen by the users in Cisco Collaborative Knowledge.
Category ID number The ID number of a course category is used only when matching the category against external systems and is not displayed anywhere on the site. If the category has an official code name, you may enter it here; otherwise, you can leave the field blank.
Description Type a description of the category, if desired.
NOTE: The contents of this field will be seen by the users in Cisco Collaborative Knowledge.
5. Click Create Category.The system creates the new category, and returns you to the Manage Catalog page, replacing the parent category name with the new child category name in the title bar on the right side of the page.
6. If desired, choose one of these options:
• Click My Home to return to the landing page.• Click Courses and Category Management to return to the Catalog Management page.
13
Catalog Management
© 2016 Cisco and/or its affiliates. All rights reserved. This document is Cisco Public Information. 051216V5.1
Catalog ManagementThe Cisco Collaborative Knowledge Learning Management System (LMS) supports two types of courses:
§ Unscheduled events – These courses can be taken at any time and from any location. E-learning and assessments are the unscheduled delivery types supported by the system.
§ Scheduled events – These courses have scheduled sessions that specify date, time, duration, and instructor. Instructor-led training (ILT), also known as classroom training, and WebEx courses, also known as virtual courses or virtual learning environments (VLEs), are the scheduled delivery types supported by the system.
NOTE: The Cisco Collaborative Knowledge LMS can support SCORM (that is, the set of technical standards for the interoperability of e-learning software products that govern how online content communicates with a learning management system). If you produce e-learning content, it is likely that a client will ask you to integrate that content into a learning management system. Similarly, if you produce a learning management system, it is certain that your clients will want to import content from a number of different sources into that system. SCORM allows this integration to happen seamlessly and simply. SCORM is the industry standard for interoperability, and SCORM conformance is required for most e-learning Requests for Proposals (RFPs).
14
Catalog Management
© 2016 Cisco and/or its affiliates. All rights reserved. This document is Cisco Public Information. 051216V5.1
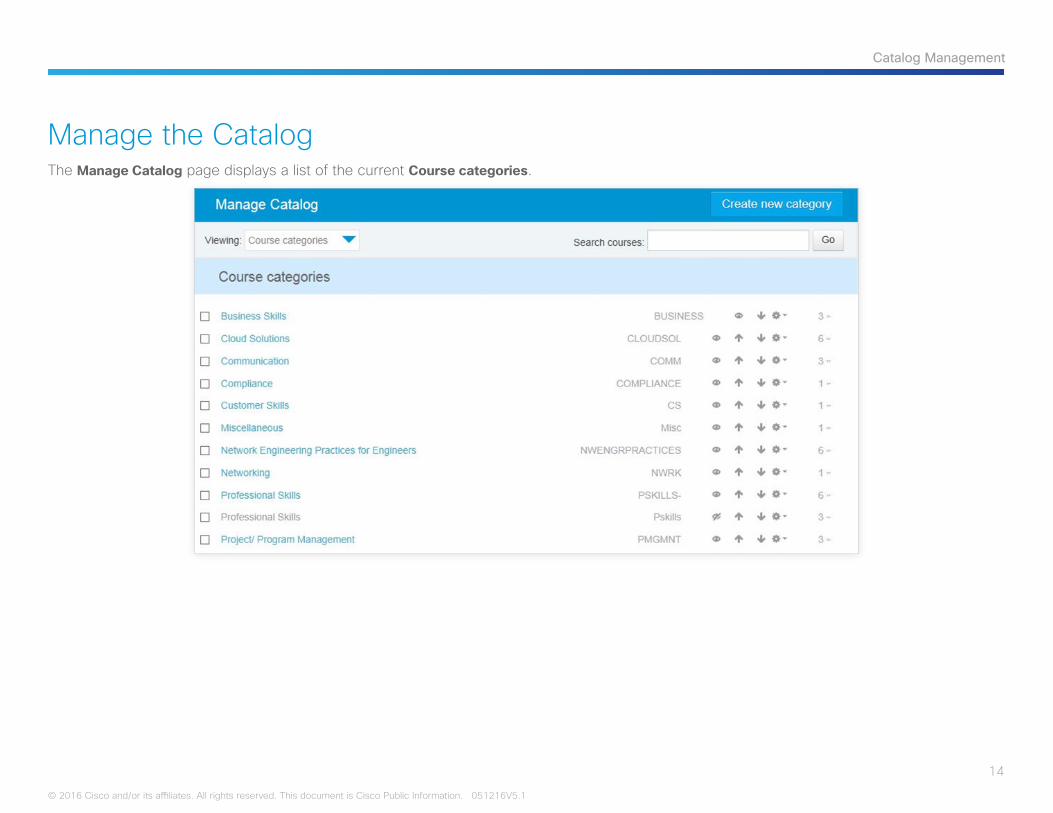
Manage the CatalogThe Manage Catalog page displays a list of the current Course categories.
15
Catalog Management
© 2016 Cisco and/or its affiliates. All rights reserved. This document is Cisco Public Information. 051216V5.1
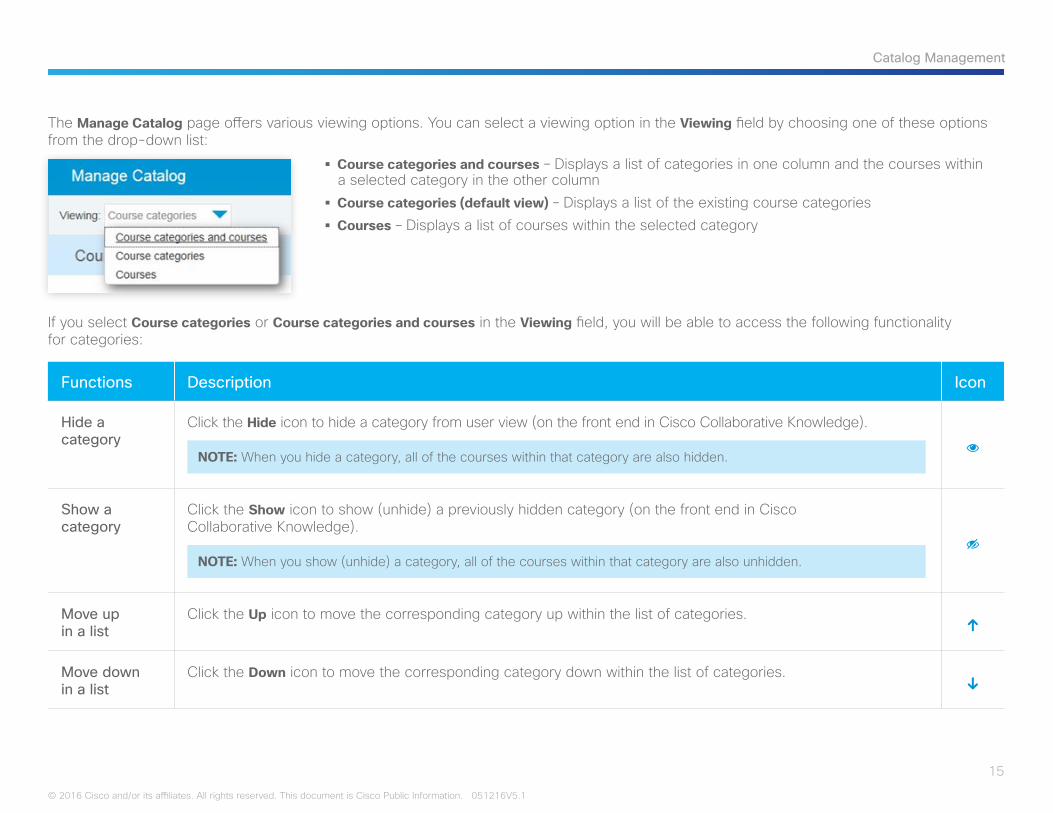
The Manage Catalog page offers various viewing options. You can select a viewing option in the Viewing field by choosing one of these options from the drop-down list:
§ Course categories and courses – Displays a list of categories in one column and the courses within a selected category in the other column
§ Course categories (default view) – Displays a list of the existing course categories § Courses – Displays a list of courses within the selected category
If you select Course categories or Course categories and courses in the Viewing field, you will be able to access the following functionality for categories:
Functions Description Icon
Hide a category
Click the Hide icon to hide a category from user view (on the front end in Cisco Collaborative Knowledge).
NOTE: When you hide a category, all of the courses within that category are also hidden.
Show a category
Click the Show icon to show (unhide) a previously hidden category (on the front end in Cisco Collaborative Knowledge).
NOTE: When you show (unhide) a category, all of the courses within that category are also unhidden.
Move up in a list
Click the Up icon to move the corresponding category up within the list of categories.m
Move down in a list
Click the Down icon to move the corresponding category down within the list of categories.j
16
Catalog Management
© 2016 Cisco and/or its affiliates. All rights reserved. This document is Cisco Public Information. 051216V5.1
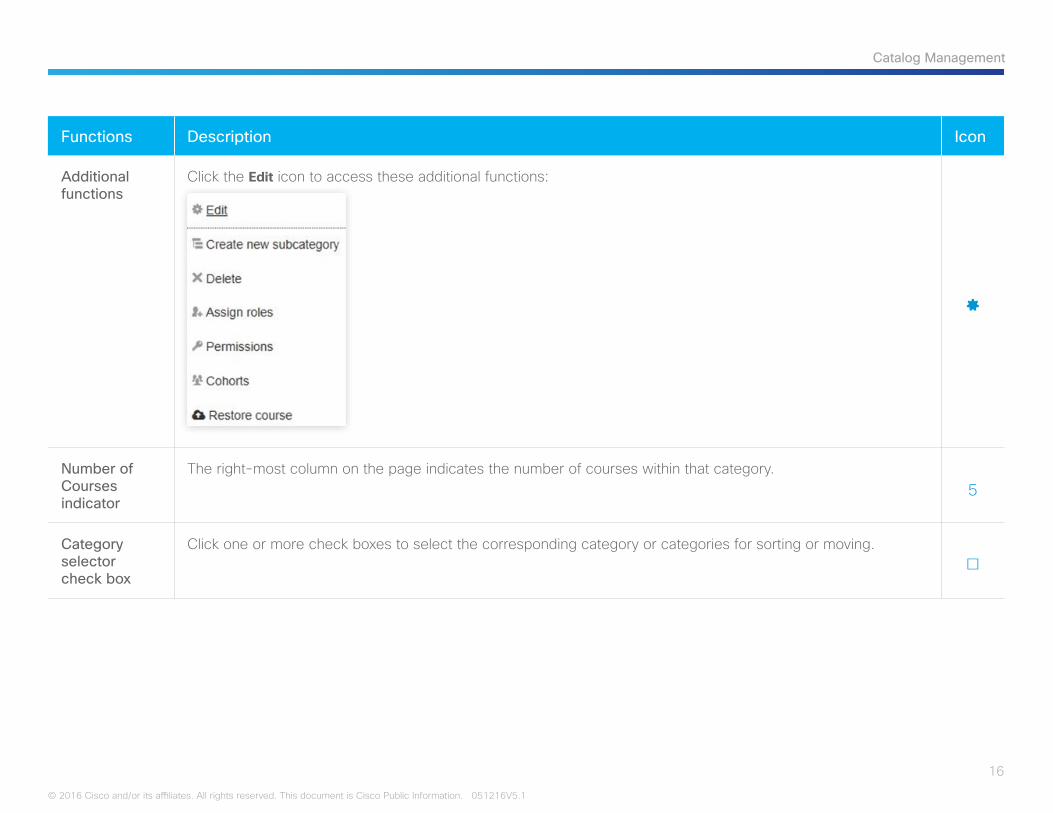
Functions Description Icon
Additional functions
Click the Edit icon to access these additional functions:
Number of Courses indicator
The right-most column on the page indicates the number of courses within that category.5
Category selector check box
Click one or more check boxes to select the corresponding category or categories for sorting or moving.5
17
Catalog Management
© 2016 Cisco and/or its affiliates. All rights reserved. This document is Cisco Public Information. 051216V5.1
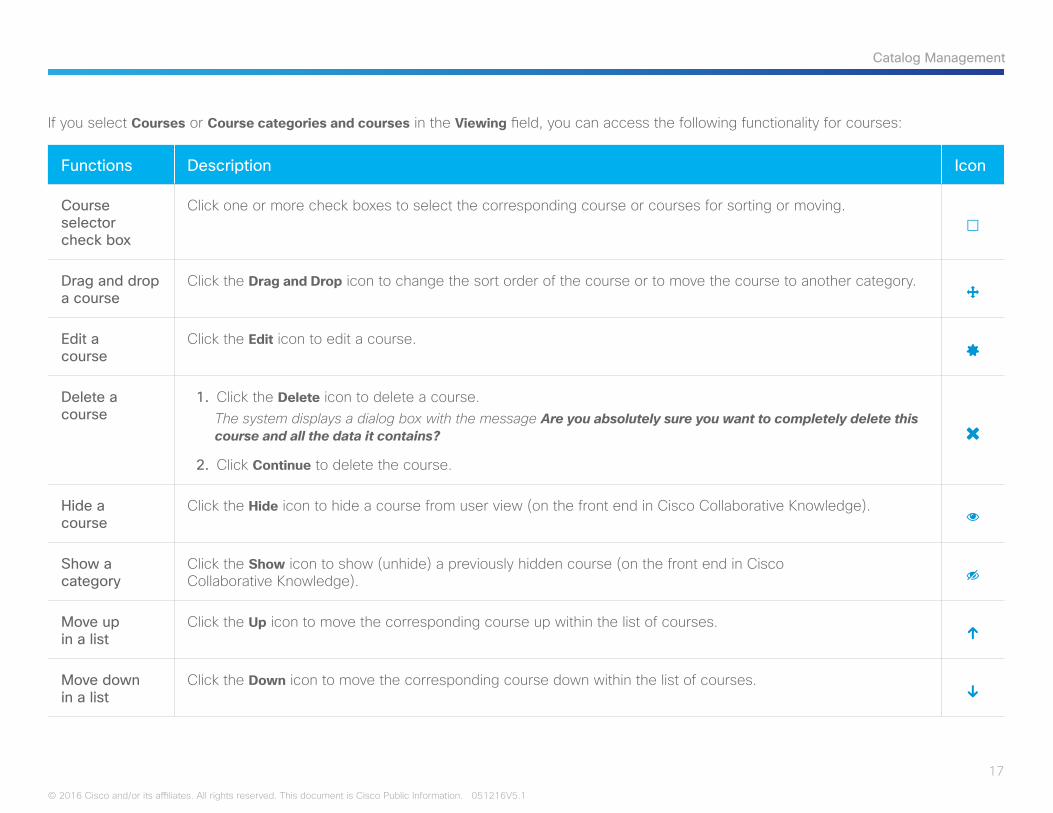
If you select Courses or Course categories and courses in the Viewing field, you can access the following functionality for courses:
Functions Description Icon
Course selector check box
Click one or more check boxes to select the corresponding course or courses for sorting or moving.5
Drag and drop a course
Click the Drag and Drop icon to change the sort order of the course or to move the course to another category.
Edit a course
Click the Edit icon to edit a course.
Delete a course
1. Click the Delete icon to delete a course.The system displays a dialog box with the message Are you absolutely sure you want to completely delete this course and all the data it contains?
2. Click Continue to delete the course.
Hide a course
Click the Hide icon to hide a course from user view (on the front end in Cisco Collaborative Knowledge).
Show a category
Click the Show icon to show (unhide) a previously hidden course (on the front end in Cisco Collaborative Knowledge).
Move up in a list
Click the Up icon to move the corresponding course up within the list of courses.m
Move down in a list
Click the Down icon to move the corresponding course down within the list of courses.j
18
Catalog Management
© 2016 Cisco and/or its affiliates. All rights reserved. This document is Cisco Public Information. 051216V5.1
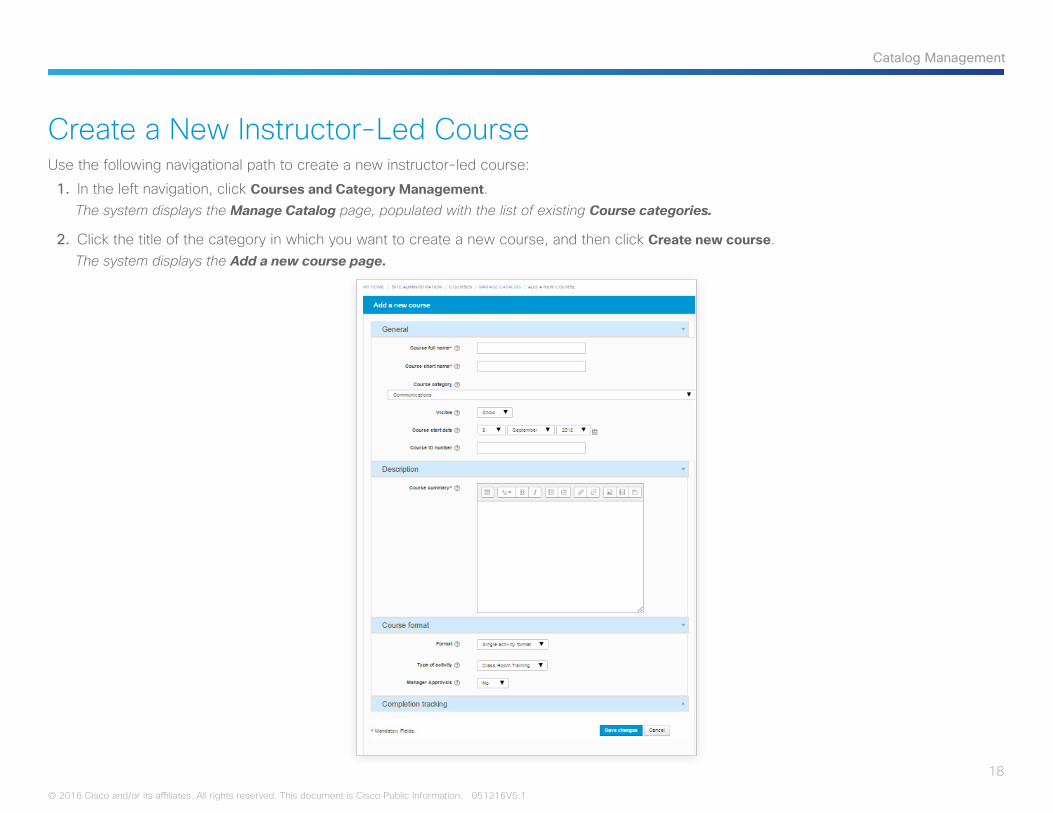
Create a New Instructor-Led CourseUse the following navigational path to create a new instructor-led course:
1. In the left navigation, click Courses and Category Management.The system displays the Manage Catalog page, populated with the list of existing Course categories.
2. Click the title of the category in which you want to create a new course, and then click Create new course.The system displays the Add a new course page.
19
Catalog Management
© 2016 Cisco and/or its affiliates. All rights reserved. This document is Cisco Public Information. 051216V5.1
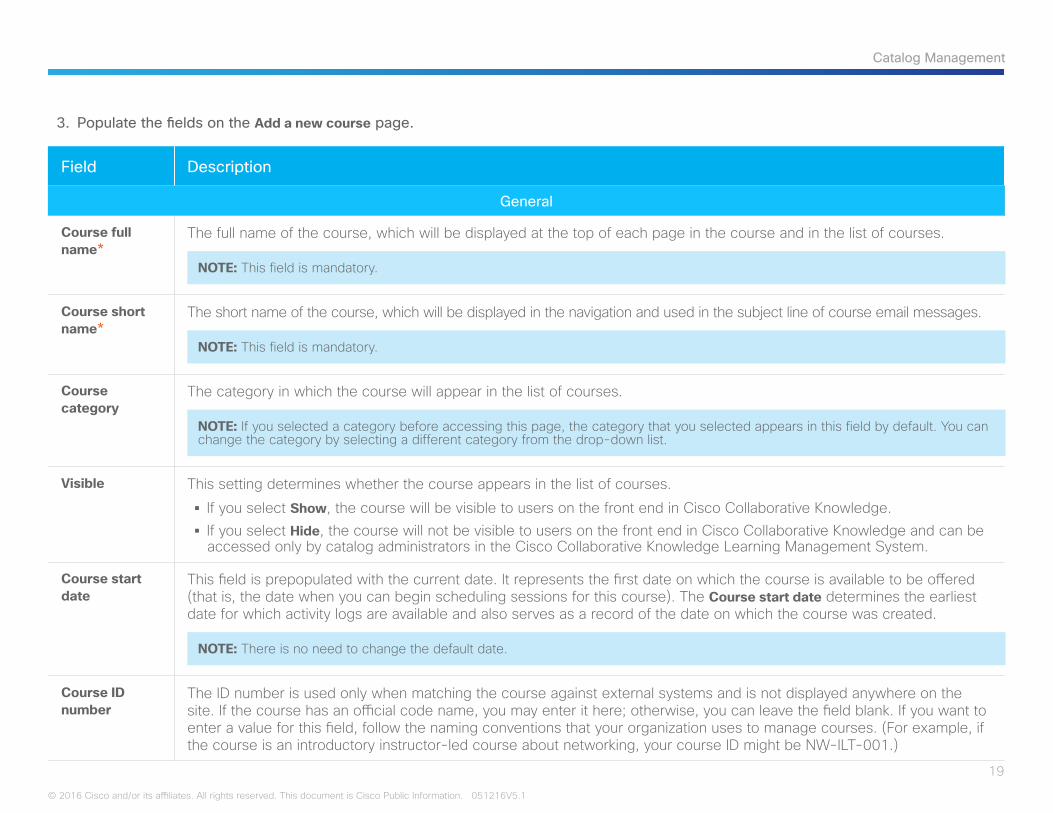
3. Populate the fields on the Add a new course page.
Field Description
General
Course full name*
The full name of the course, which will be displayed at the top of each page in the course and in the list of courses.
NOTE: This field is mandatory.
Course short name*
The short name of the course, which will be displayed in the navigation and used in the subject line of course email messages.
NOTE: This field is mandatory.
Course category
The category in which the course will appear in the list of courses.
NOTE: If you selected a category before accessing this page, the category that you selected appears in this field by default. You can change the category by selecting a different category from the drop-down list.
Visible This setting determines whether the course appears in the list of courses.
§ If you select Show, the course will be visible to users on the front end in Cisco Collaborative Knowledge. § If you select Hide, the course will not be visible to users on the front end in Cisco Collaborative Knowledge and can be accessed only by catalog administrators in the Cisco Collaborative Knowledge Learning Management System.
Course start date
This field is prepopulated with the current date. It represents the first date on which the course is available to be offered (that is, the date when you can begin scheduling sessions for this course). The Course start date determines the earliest date for which activity logs are available and also serves as a record of the date on which the course was created.
NOTE: There is no need to change the default date.
Course ID number
The ID number is used only when matching the course against external systems and is not displayed anywhere on the site. If the course has an official code name, you may enter it here; otherwise, you can leave the field blank. If you want to enter a value for this field, follow the naming conventions that your organization uses to manage courses. (For example, if the course is an introductory instructor-led course about networking, your course ID might be NW-ILT-001.)
20
Catalog Management
© 2016 Cisco and/or its affiliates. All rights reserved. This document is Cisco Public Information. 051216V5.1
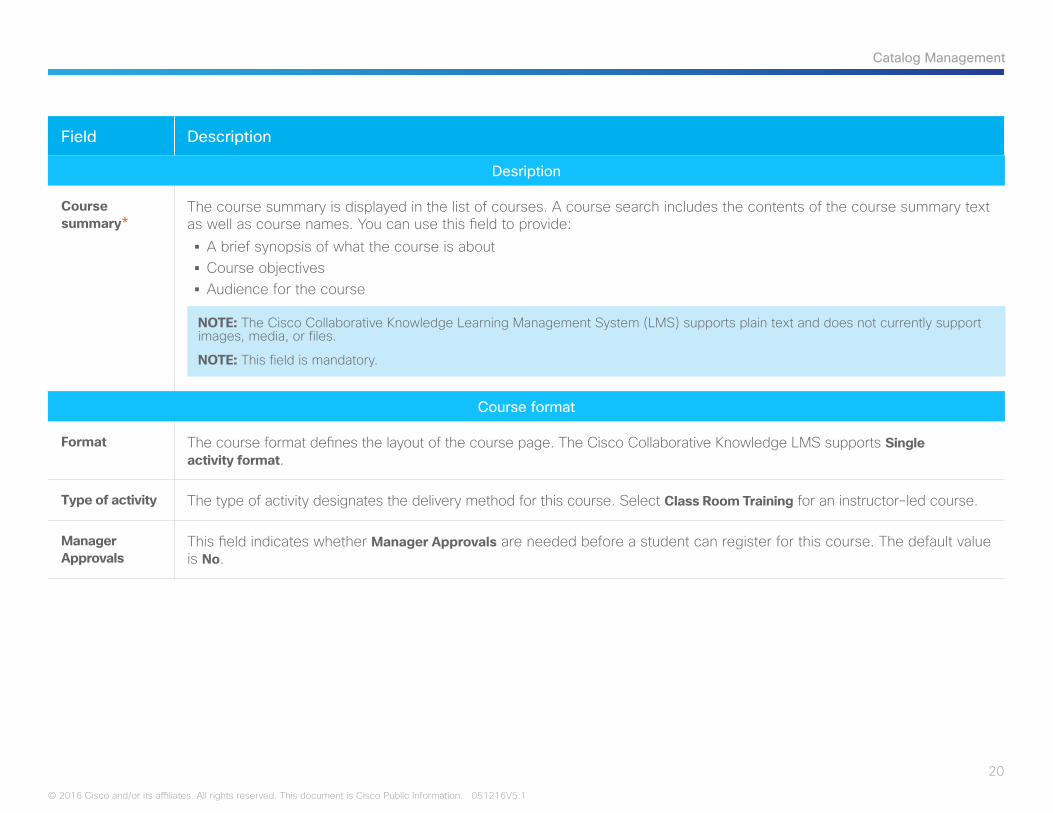
Field Description
Desription
Course summary*
The course summary is displayed in the list of courses. A course search includes the contents of the course summary text as well as course names. You can use this field to provide:
§ A brief synopsis of what the course is about § Course objectives § Audience for the course
NOTE: The Cisco Collaborative Knowledge Learning Management System (LMS) supports plain text and does not currently support images, media, or files.
NOTE: This field is mandatory.
Course format
Format The course format defines the layout of the course page. The Cisco Collaborative Knowledge LMS supports Single activity format.
Type of activity The type of activity designates the delivery method for this course. Select Class Room Training for an instructor-led course.
Manager Approvals
This field indicates whether Manager Approvals are needed before a student can register for this course. The default value is No.
21
Catalog Management
© 2016 Cisco and/or its affiliates. All rights reserved. This document is Cisco Public Information. 051216V5.1
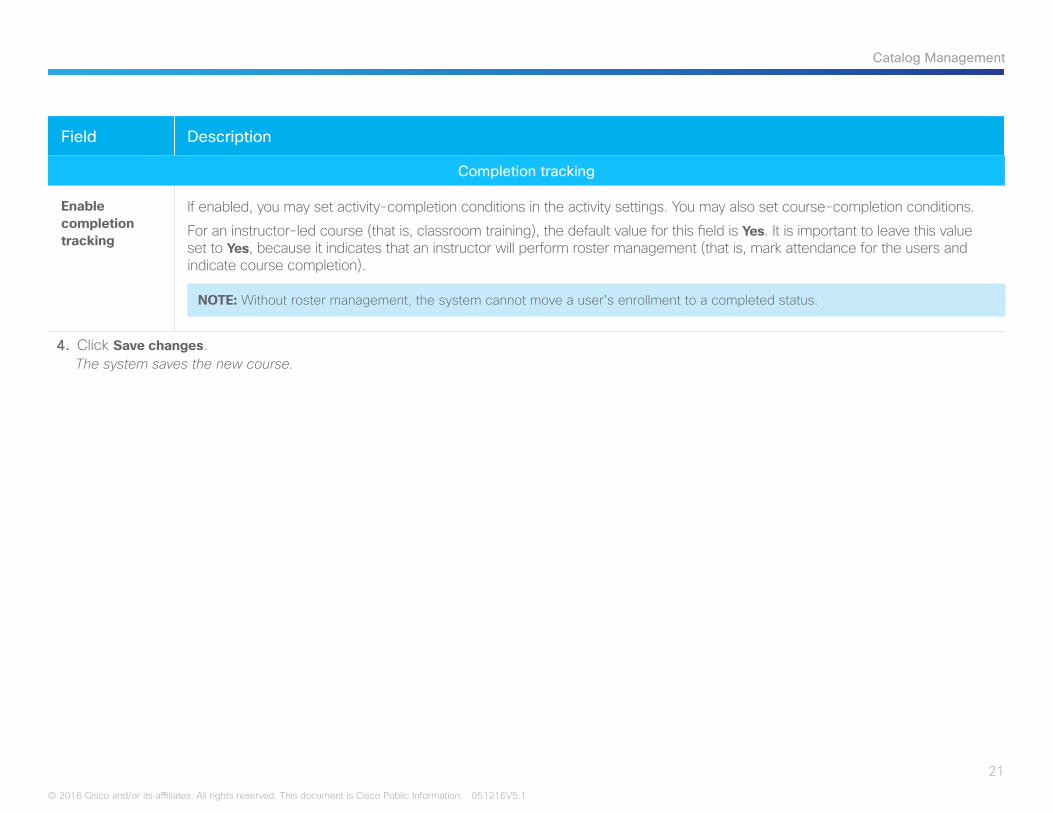
Field Description
Completion tracking
Enable completion tracking
If enabled, you may set activity-completion conditions in the activity settings. You may also set course-completion conditions.
For an instructor-led course (that is, classroom training), the default value for this field is Yes. It is important to leave this value set to Yes, because it indicates that an instructor will perform roster management (that is, mark attendance for the users and indicate course completion).
NOTE: Without roster management, the system cannot move a user’s enrollment to a completed status.
4. Click Save changes.The system saves the new course.
22
Catalog Management
© 2016 Cisco and/or its affiliates. All rights reserved. This document is Cisco Public Information. 051216V5.1
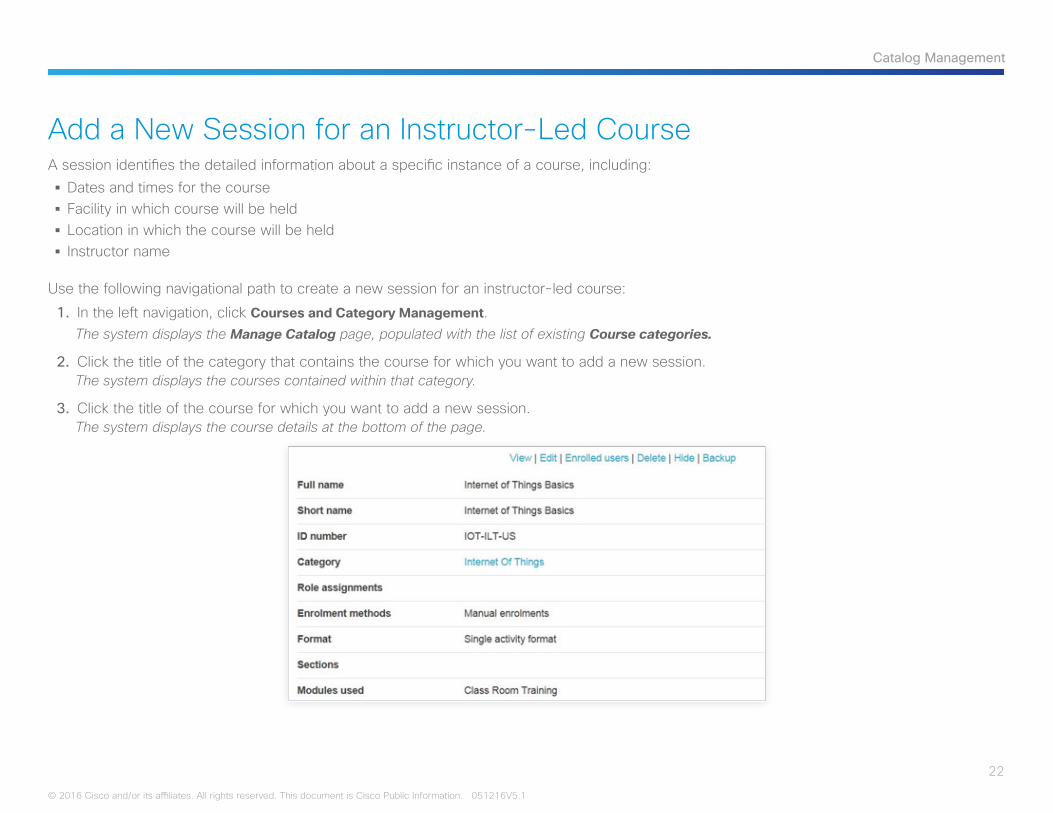
Add a New Session for an Instructor-Led CourseA session identifies the detailed information about a specific instance of a course, including:
§ Dates and times for the course § Facility in which course will be held § Location in which the course will be held § Instructor name
Use the following navigational path to create a new session for an instructor-led course:
1. In the left navigation, click Courses and Category Management.The system displays the Manage Catalog page, populated with the list of existing Course categories.
2. Click the title of the category that contains the course for which you want to add a new session.The system displays the courses contained within that category.
3. Click the title of the course for which you want to add a new session.The system displays the course details at the bottom of the page.
23
Catalog Management
© 2016 Cisco and/or its affiliates. All rights reserved. This document is Cisco Public Information. 051216V5.1
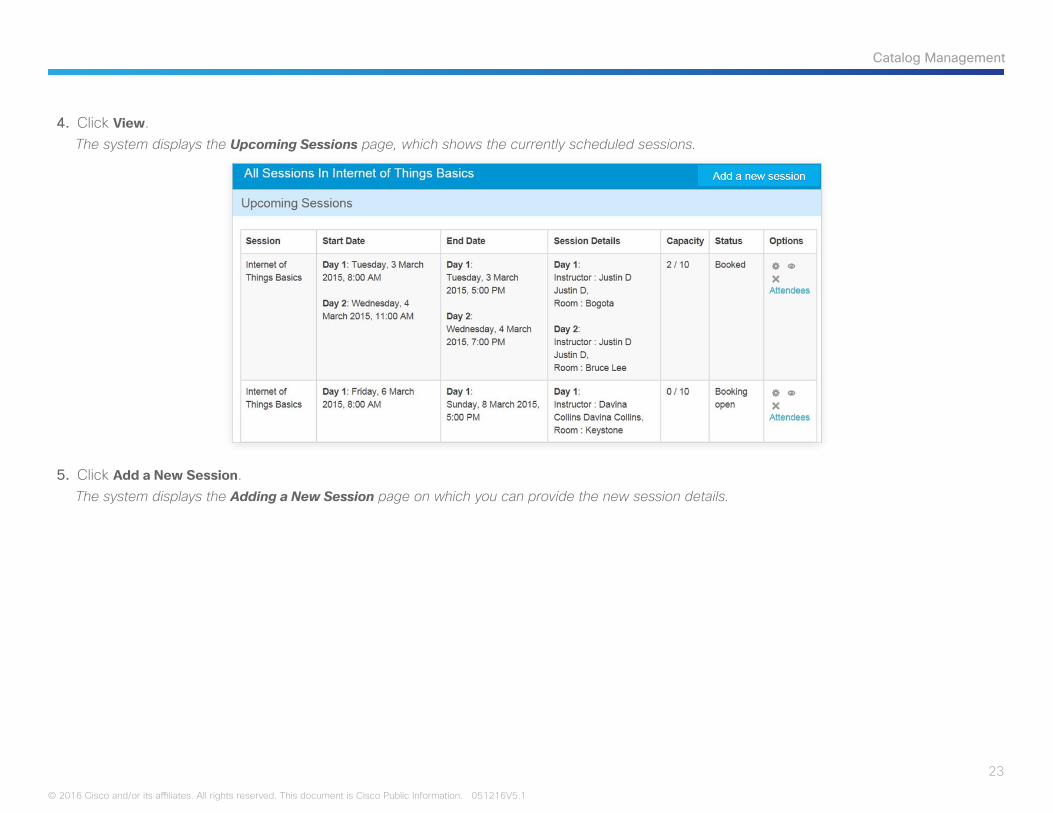
4. Click View.The system displays the Upcoming Sessions page, which shows the currently scheduled sessions.
5. Click Add a New Session.The system displays the Adding a New Session page on which you can provide the new session details.
24
Catalog Management
© 2016 Cisco and/or its affiliates. All rights reserved. This document is Cisco Public Information. 051216V5.1
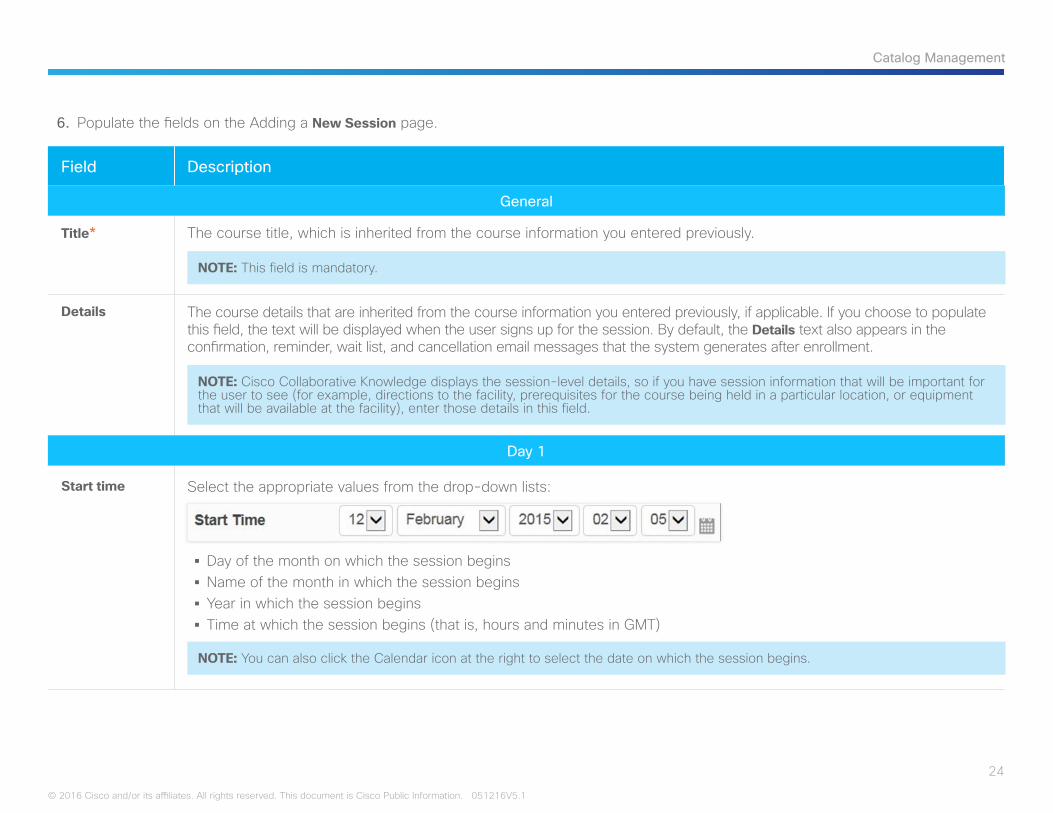
6. Populate the fields on the Adding a New Session page.
Field Description
General
Title* The course title, which is inherited from the course information you entered previously.
NOTE: This field is mandatory.
Details The course details that are inherited from the course information you entered previously, if applicable. If you choose to populate this field, the text will be displayed when the user signs up for the session. By default, the Details text also appears in the confirmation, reminder, wait list, and cancellation email messages that the system generates after enrollment.
NOTE: Cisco Collaborative Knowledge displays the session-level details, so if you have session information that will be important for the user to see (for example, directions to the facility, prerequisites for the course being held in a particular location, or equipment that will be available at the facility), enter those details in this field.
Day 1
Start time Select the appropriate values from the drop-down lists:
§ Day of the month on which the session begins § Name of the month in which the session begins § Year in which the session begins § Time at which the session begins (that is, hours and minutes in GMT)
NOTE: You can also click the Calendar icon at the right to select the date on which the session begins.
25
Catalog Management
© 2016 Cisco and/or its affiliates. All rights reserved. This document is Cisco Public Information. 051216V5.1
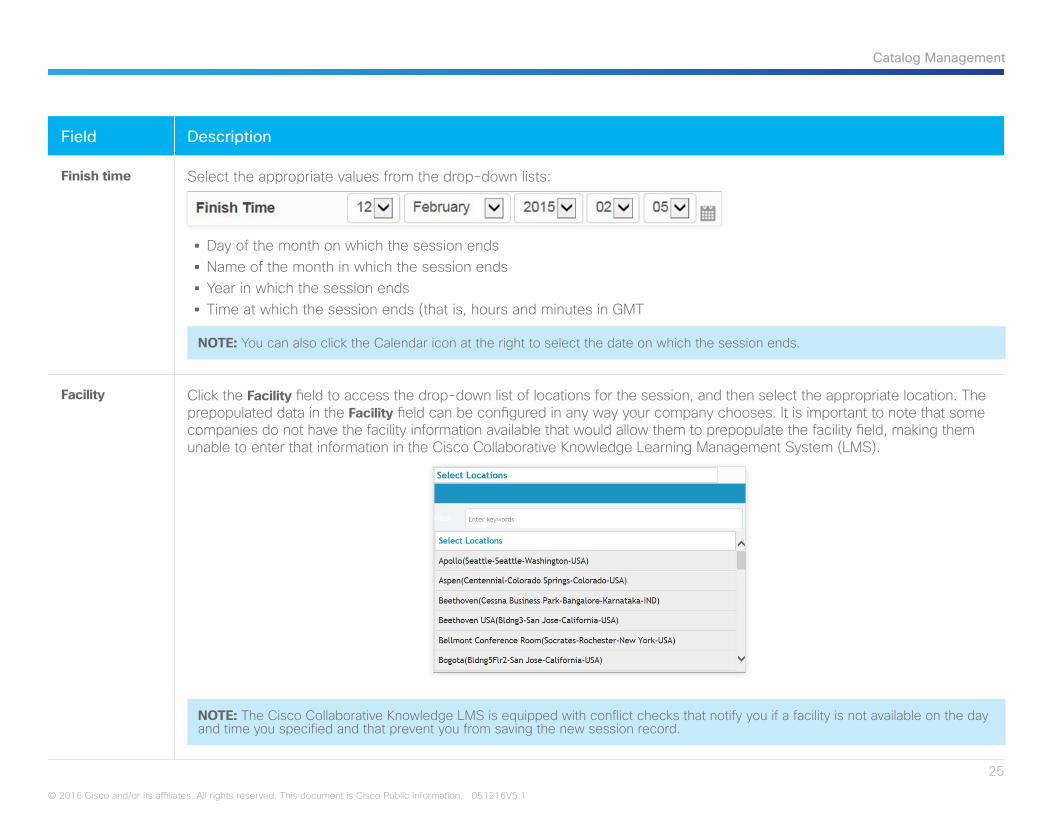
Field Description
Finish time Select the appropriate values from the drop-down lists:
§ Day of the month on which the session ends § Name of the month in which the session ends § Year in which the session ends § Time at which the session ends (that is, hours and minutes in GMT
NOTE: You can also click the Calendar icon at the right to select the date on which the session ends.
Facility Click the Facility field to access the drop-down list of locations for the session, and then select the appropriate location. The prepopulated data in the Facility field can be configured in any way your company chooses. It is important to note that some companies do not have the facility information available that would allow them to prepopulate the facility field, making them unable to enter that information in the Cisco Collaborative Knowledge Learning Management System (LMS).
NOTE: The Cisco Collaborative Knowledge LMS is equipped with conflict checks that notify you if a facility is not available on the day and time you specified and that prevent you from saving the new session record.
26
Catalog Management
© 2016 Cisco and/or its affiliates. All rights reserved. This document is Cisco Public Information. 051216V5.1
Field Description
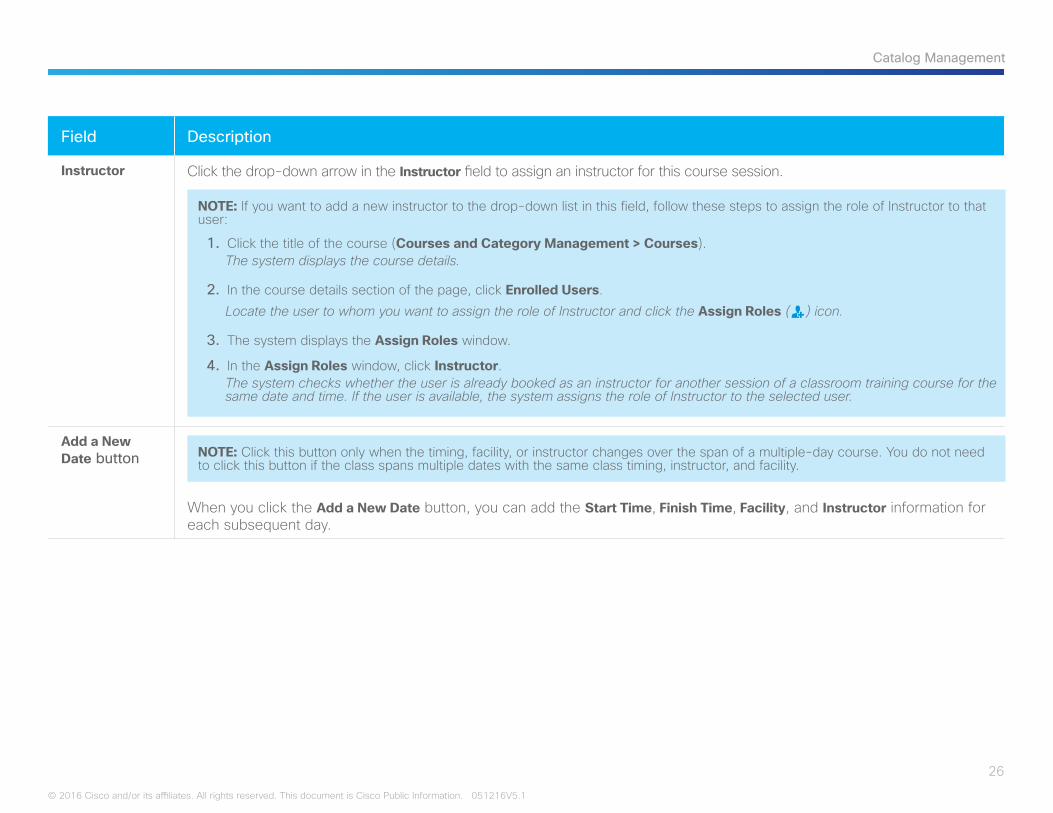
Instructor Click the drop-down arrow in the Instructor field to assign an instructor for this course session.
NOTE: If you want to add a new instructor to the drop-down list in this field, follow these steps to assign the role of Instructor to that user:
1. Click the title of the course (Courses and Category Management > Courses). The system displays the course details.
2. In the course details section of the page, click Enrolled Users.
Locate the user to whom you want to assign the role of Instructor and click the Assign Roles () icon.
3. The system displays the Assign Roles window.
4. In the Assign Roles window, click Instructor.The system checks whether the user is already booked as an instructor for another session of a classroom training course for the same date and time. If the user is available, the system assigns the role of Instructor to the selected user.
Add a New Date button NOTE: Click this button only when the timing, facility, or instructor changes over the span of a multiple-day course. You do not need
to click this button if the class spans multiple dates with the same class timing, instructor, and facility.
When you click the Add a New Date button, you can add the Start Time, Finish Time, Facility, and Instructor information for each subsequent day.
27
Catalog Management
© 2016 Cisco and/or its affiliates. All rights reserved. This document is Cisco Public Information. 051216V5.1
Field Description
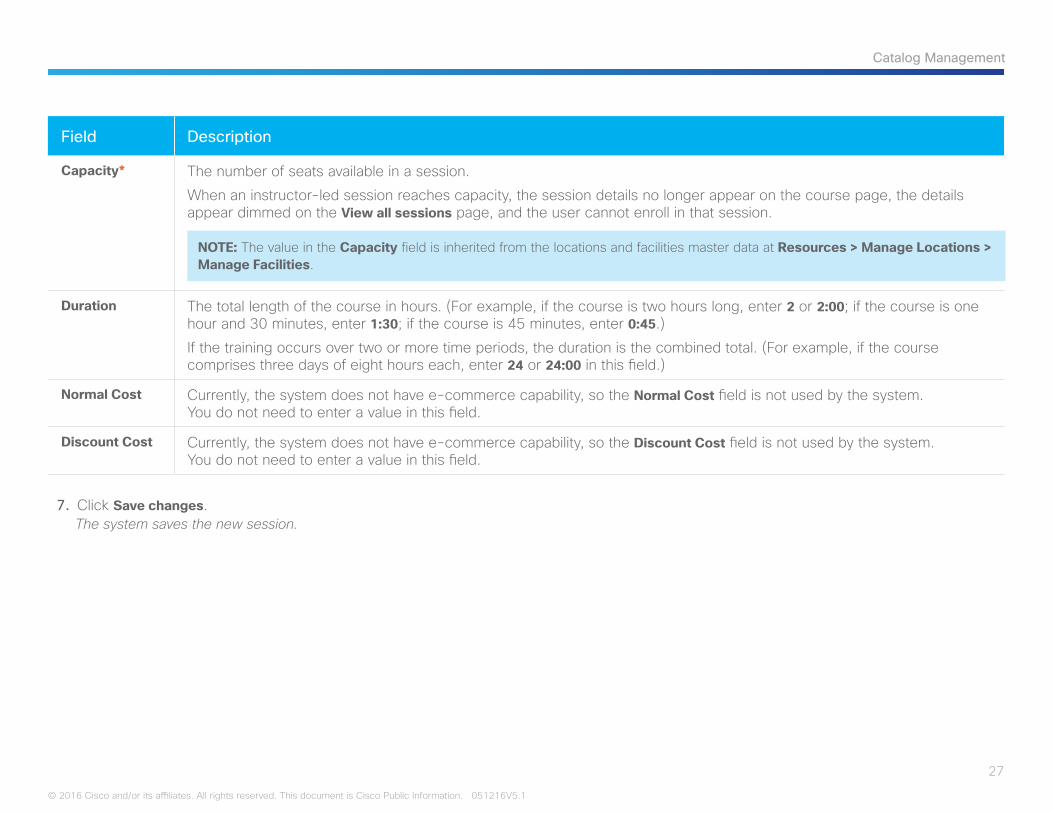
Capacity* The number of seats available in a session.
When an instructor-led session reaches capacity, the session details no longer appear on the course page, the details appear dimmed on the View all sessions page, and the user cannot enroll in that session.
NOTE: The value in the Capacity field is inherited from the locations and facilities master data at Resources > Manage Locations > Manage Facilities.
Duration The total length of the course in hours. (For example, if the course is two hours long, enter 2 or 2:00; if the course is one hour and 30 minutes, enter 1:30; if the course is 45 minutes, enter 0:45.)
If the training occurs over two or more time periods, the duration is the combined total. (For example, if the course comprises three days of eight hours each, enter 24 or 24:00 in this field.)
Normal Cost Currently, the system does not have e-commerce capability, so the Normal Cost field is not used by the system. You do not need to enter a value in this field.
Discount Cost Currently, the system does not have e-commerce capability, so the Discount Cost field is not used by the system. You do not need to enter a value in this field.
7. Click Save changes.The system saves the new session.
28
Catalog Management
© 2016 Cisco and/or its affiliates. All rights reserved. This document is Cisco Public Information. 051216V5.1
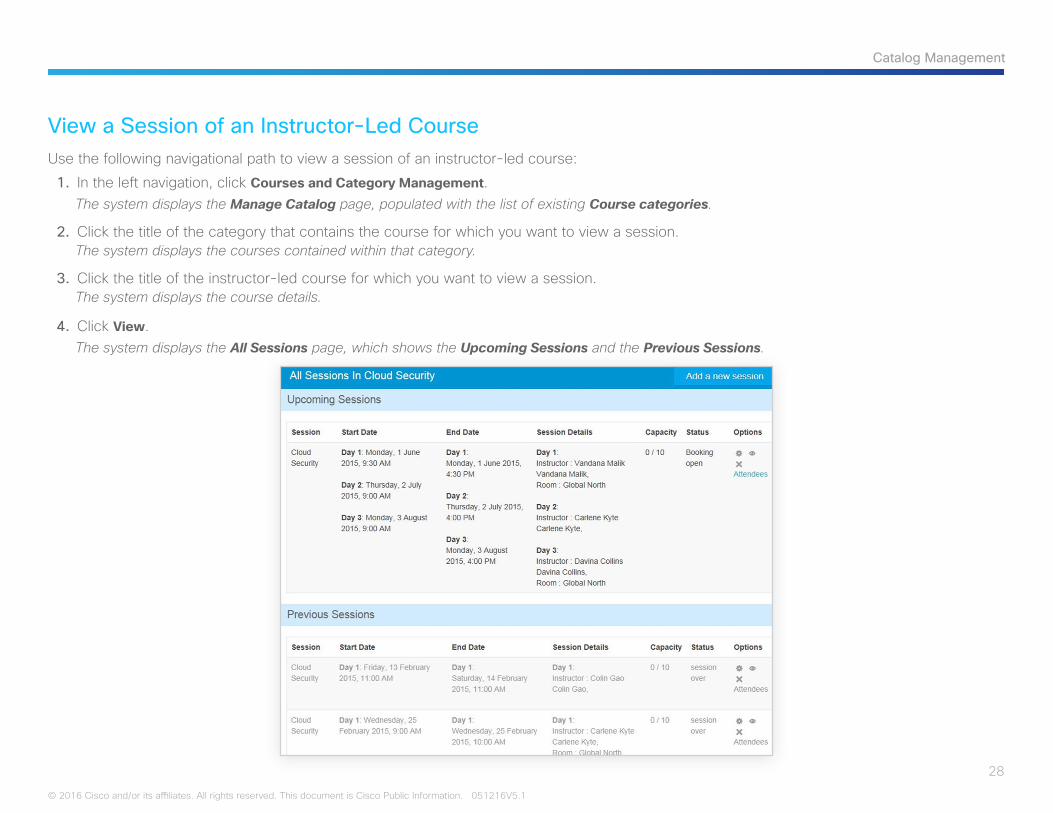
View a Session of an Instructor-Led CourseUse the following navigational path to view a session of an instructor-led course:
1. In the left navigation, click Courses and Category Management.The system displays the Manage Catalog page, populated with the list of existing Course categories.
2. Click the title of the category that contains the course for which you want to view a session.The system displays the courses contained within that category.
3. Click the title of the instructor-led course for which you want to view a session.The system displays the course details.
4. Click View.The system displays the All Sessions page, which shows the Upcoming Sessions and the Previous Sessions.
29
Catalog Management
© 2016 Cisco and/or its affiliates. All rights reserved. This document is Cisco Public Information. 051216V5.1
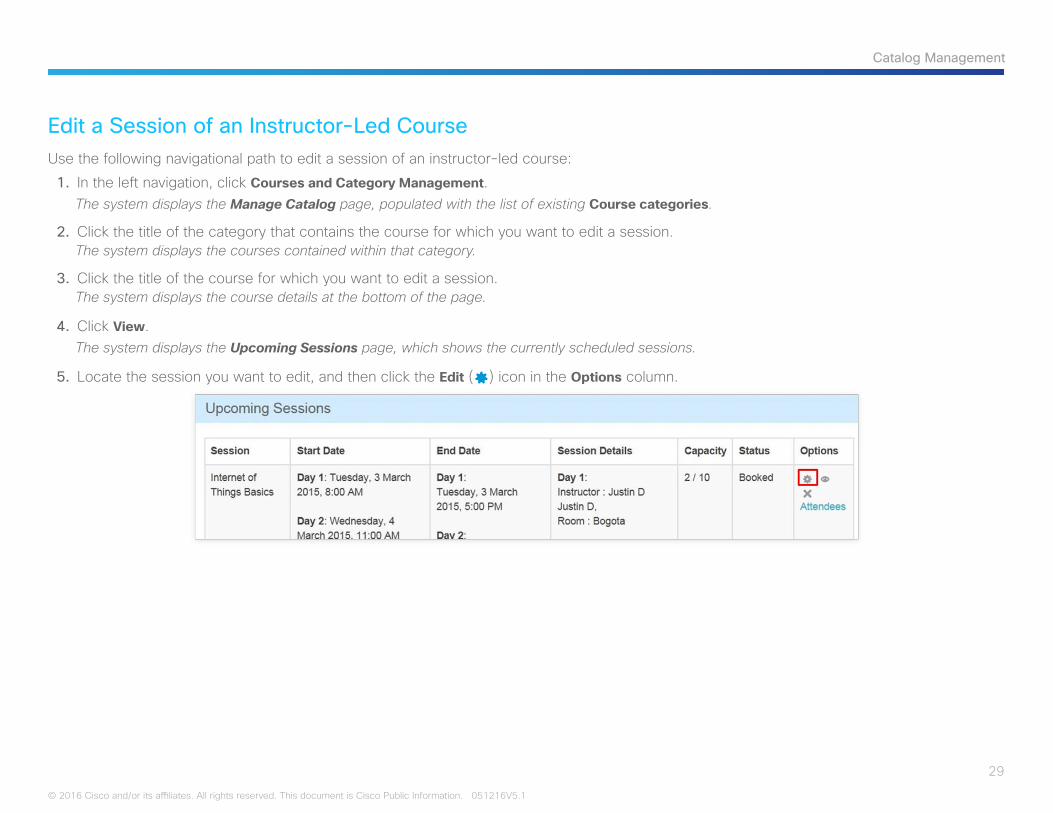
Edit a Session of an Instructor-Led CourseUse the following navigational path to edit a session of an instructor-led course:
1. In the left navigation, click Courses and Category Management.The system displays the Manage Catalog page, populated with the list of existing Course categories.
2. Click the title of the category that contains the course for which you want to edit a session.The system displays the courses contained within that category.
3. Click the title of the course for which you want to edit a session.The system displays the course details at the bottom of the page.
4. Click View.The system displays the Upcoming Sessions page, which shows the currently scheduled sessions.
5. Locate the session you want to edit, and then click the Edit () icon in the Options column.
30
Catalog Management
© 2016 Cisco and/or its affiliates. All rights reserved. This document is Cisco Public Information. 051216V5.1
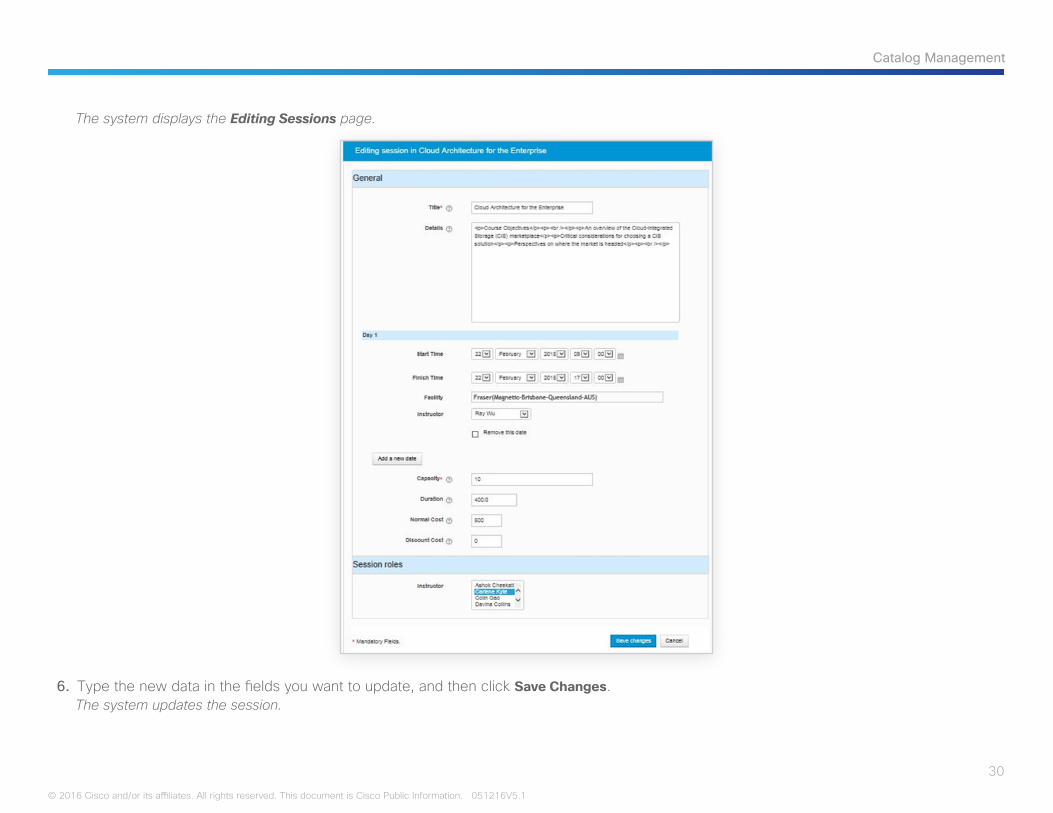
The system displays the Editing Sessions page.
6. Type the new data in the fields you want to update, and then click Save Changes.The system updates the session.
31
Catalog Management
© 2016 Cisco and/or its affiliates. All rights reserved. This document is Cisco Public Information. 051216V5.1
Delete a Session of an Instructor-Led CourseUse the following navigational path to delete a session of an instructor-led course:
1. In the left navigation, click Courses and Category Management.The system displays the Manage Catalog page, populated with the list of existing Course categories.
2. Click the title of the category that contains the course for which you want to delete a session.The system displays the courses contained within that category.
3. Click the title of the course for which you want to delete a session.The system displays the course details.
4. Click View.The system displays the Upcoming Sessions page, which shows the currently scheduled sessions.
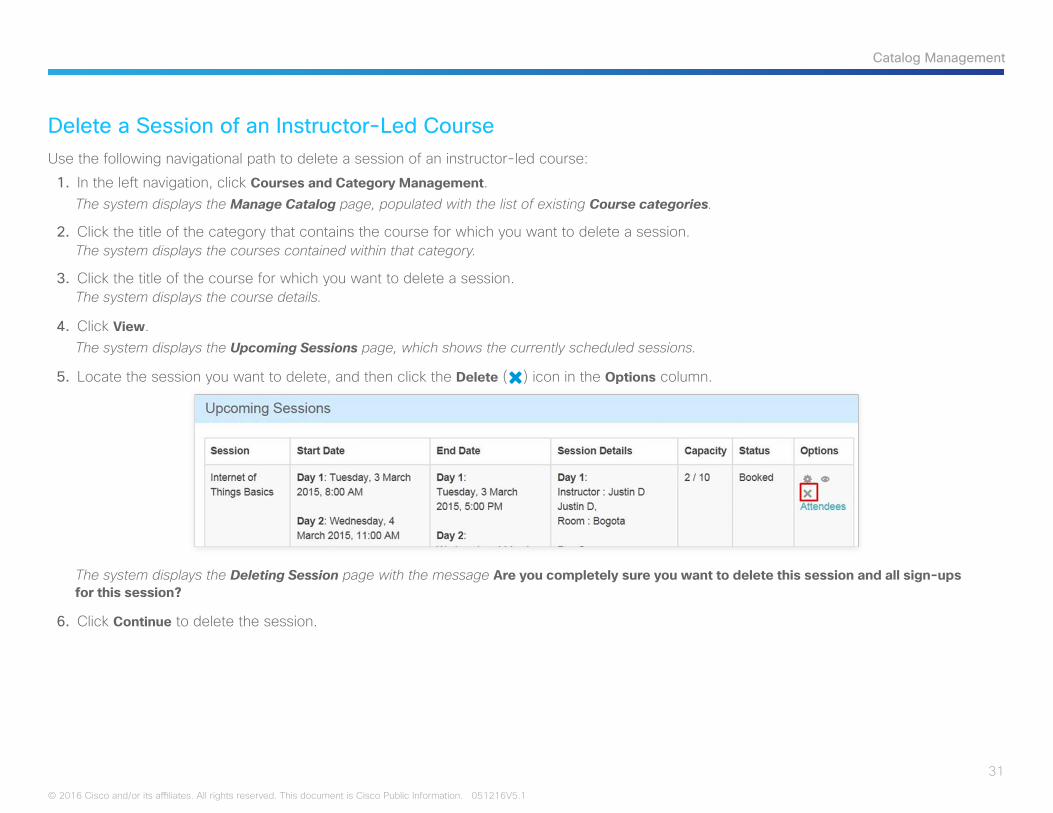
5. Locate the session you want to delete, and then click the Delete () icon in the Options column.
The system displays the Deleting Session page with the message Are you completely sure you want to delete this session and all sign-ups for this session?
6. Click Continue to delete the session.
32
Catalog Management
© 2016 Cisco and/or its affiliates. All rights reserved. This document is Cisco Public Information. 051216V5.1
Create a New WebEx CourseUse the following navigational path to create a new WebEx course:
1. In the left navigation, click Courses and Category Management.The system displays the Manage Catalog page, populated with the list of existing Course categories.
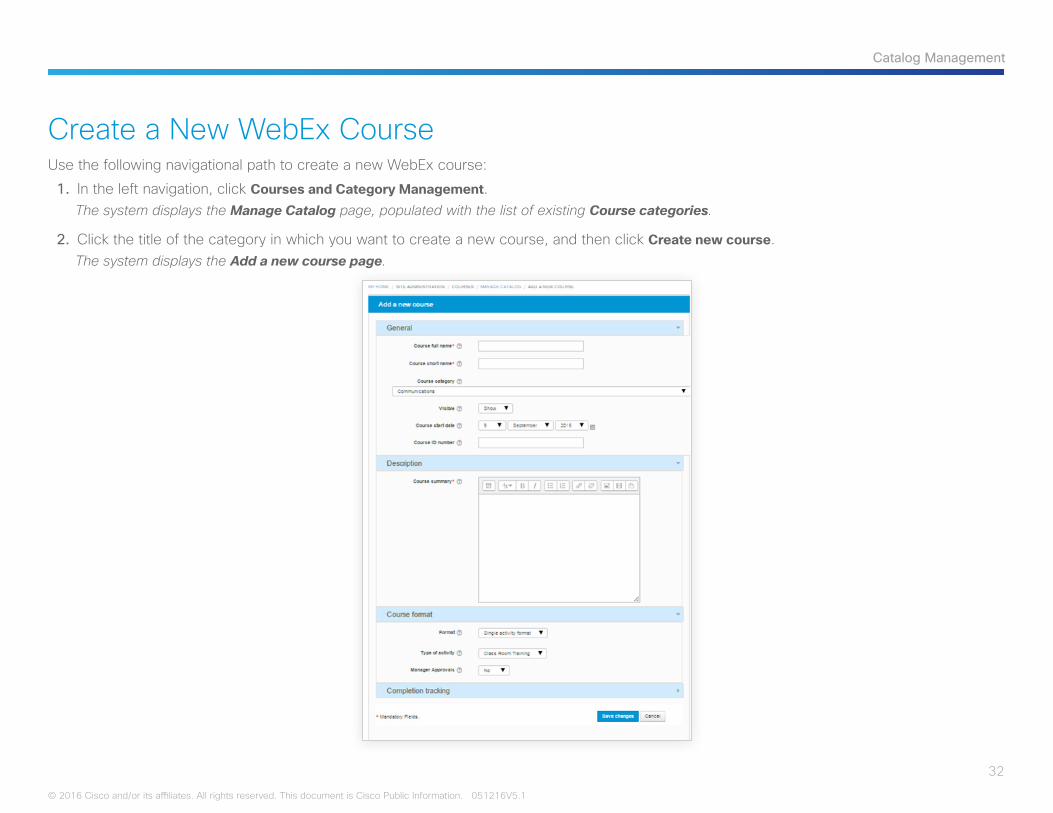
2. Click the title of the category in which you want to create a new course, and then click Create new course.The system displays the Add a new course page.
33
Catalog Management
© 2016 Cisco and/or its affiliates. All rights reserved. This document is Cisco Public Information. 051216V5.1
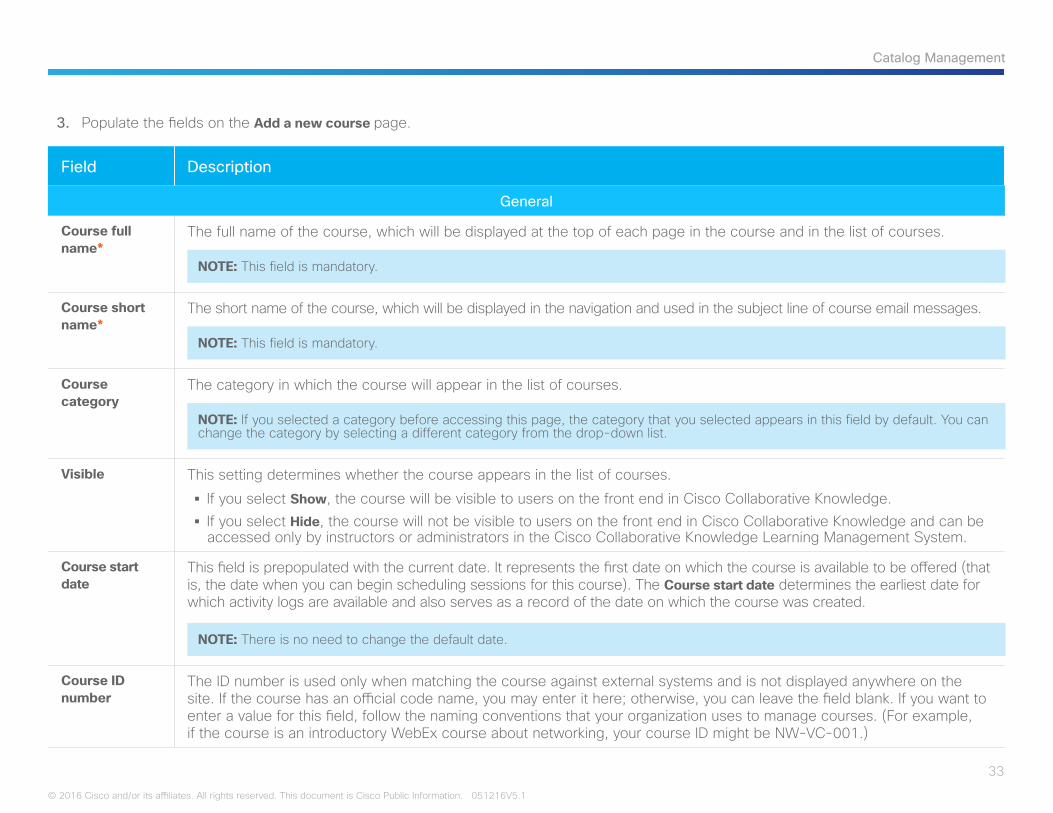
3. Populate the fields on the Add a new course page.
Field Description
General
Course full name*
The full name of the course, which will be displayed at the top of each page in the course and in the list of courses.
NOTE: This field is mandatory.
Course short name*
The short name of the course, which will be displayed in the navigation and used in the subject line of course email messages.
NOTE: This field is mandatory.
Course category
The category in which the course will appear in the list of courses.
NOTE: If you selected a category before accessing this page, the category that you selected appears in this field by default. You can change the category by selecting a different category from the drop-down list.
Visible This setting determines whether the course appears in the list of courses.
§ If you select Show, the course will be visible to users on the front end in Cisco Collaborative Knowledge. § If you select Hide, the course will not be visible to users on the front end in Cisco Collaborative Knowledge and can be accessed only by instructors or administrators in the Cisco Collaborative Knowledge Learning Management System.
Course start date
This field is prepopulated with the current date. It represents the first date on which the course is available to be offered (that is, the date when you can begin scheduling sessions for this course). The Course start date determines the earliest date for which activity logs are available and also serves as a record of the date on which the course was created.
NOTE: There is no need to change the default date.
Course ID number
The ID number is used only when matching the course against external systems and is not displayed anywhere on the site. If the course has an official code name, you may enter it here; otherwise, you can leave the field blank. If you want to enter a value for this field, follow the naming conventions that your organization uses to manage courses. (For example, if the course is an introductory WebEx course about networking, your course ID might be NW-VC-001.)
34
Catalog Management
© 2016 Cisco and/or its affiliates. All rights reserved. This document is Cisco Public Information. 051216V5.1
Field Description
Description
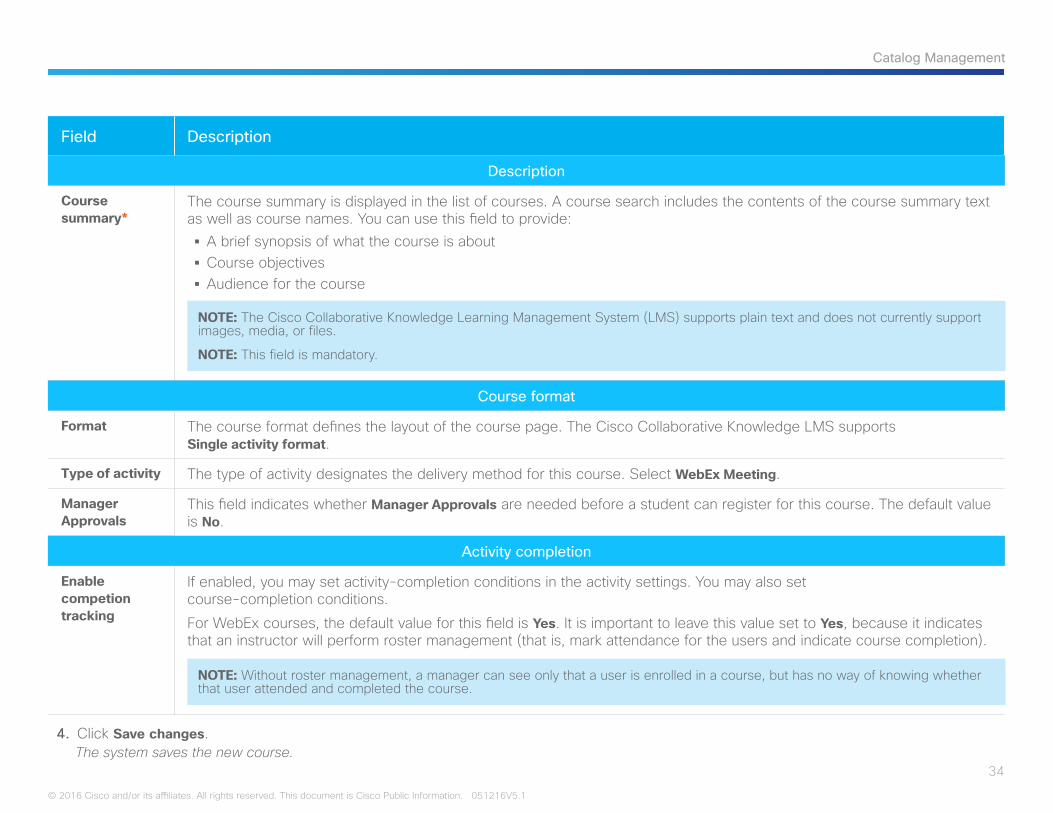
Course summary*
The course summary is displayed in the list of courses. A course search includes the contents of the course summary text as well as course names. You can use this field to provide:
§ A brief synopsis of what the course is about § Course objectives § Audience for the course
NOTE: The Cisco Collaborative Knowledge Learning Management System (LMS) supports plain text and does not currently support images, media, or files.
NOTE: This field is mandatory.
Course format
Format The course format defines the layout of the course page. The Cisco Collaborative Knowledge LMS supports Single activity format.
Type of activity The type of activity designates the delivery method for this course. Select WebEx Meeting.
Manager Approvals
This field indicates whether Manager Approvals are needed before a student can register for this course. The default value is No.
Activity completion
Enable competion tracking
If enabled, you may set activity-completion conditions in the activity settings. You may also set course-completion conditions.
For WebEx courses, the default value for this field is Yes. It is important to leave this value set to Yes, because it indicates that an instructor will perform roster management (that is, mark attendance for the users and indicate course completion).
NOTE: Without roster management, a manager can see only that a user is enrolled in a course, but has no way of knowing whether that user attended and completed the course.
4. Click Save changes.The system saves the new course.
35
Catalog Management
© 2016 Cisco and/or its affiliates. All rights reserved. This document is Cisco Public Information. 051216V5.1
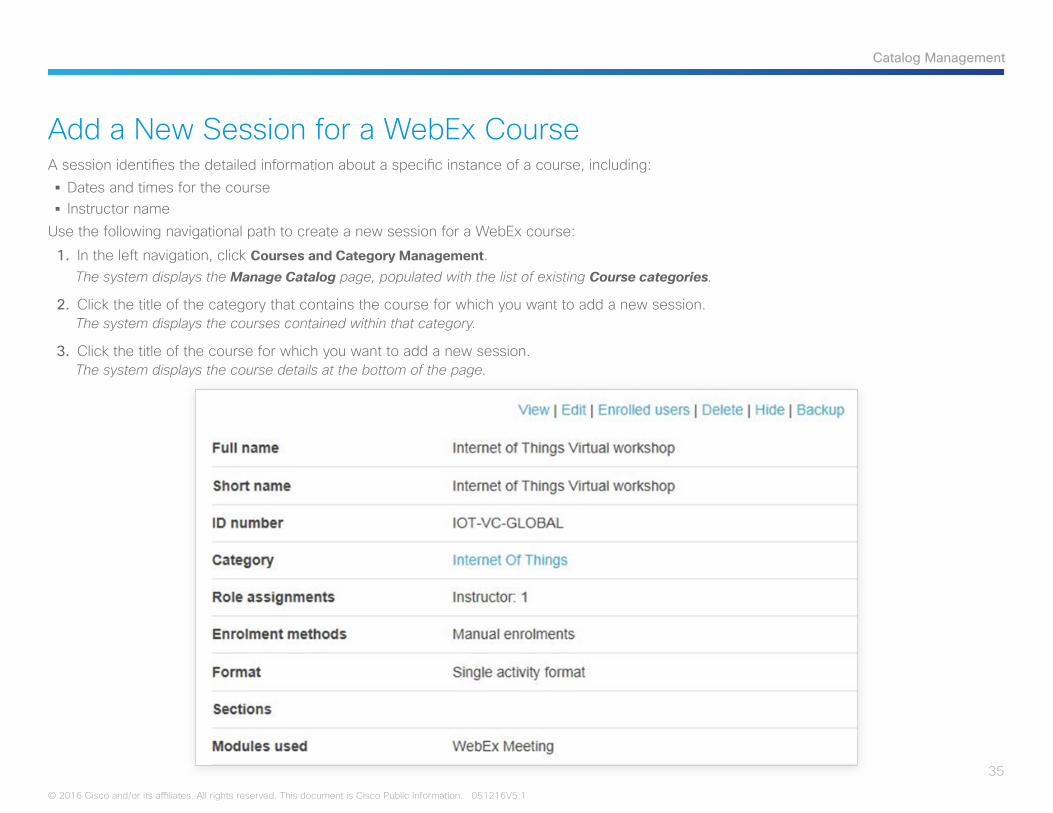
Add a New Session for a WebEx CourseA session identifies the detailed information about a specific instance of a course, including:
§ Dates and times for the course § Instructor name
Use the following navigational path to create a new session for a WebEx course:
1. In the left navigation, click Courses and Category Management.The system displays the Manage Catalog page, populated with the list of existing Course categories.
2. Click the title of the category that contains the course for which you want to add a new session.The system displays the courses contained within that category.
3. Click the title of the course for which you want to add a new session.The system displays the course details at the bottom of the page.
36
Catalog Management
© 2016 Cisco and/or its affiliates. All rights reserved. This document is Cisco Public Information. 051216V5.1
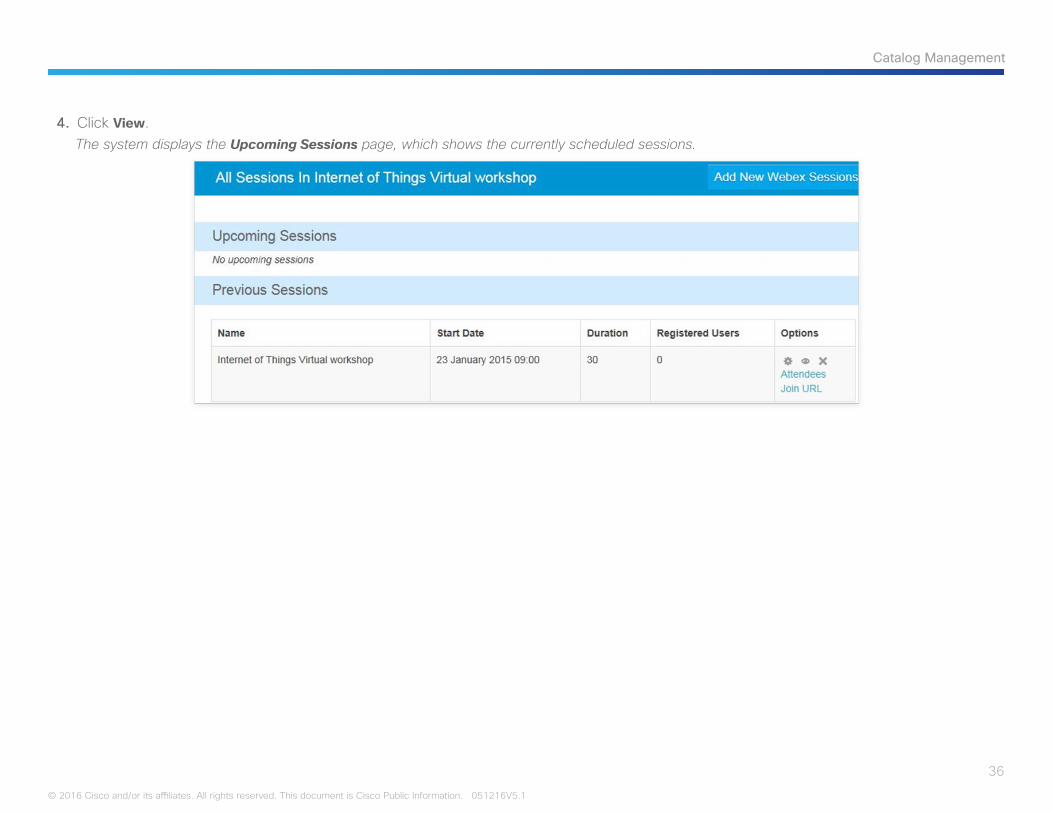
4. Click View.The system displays the Upcoming Sessions page, which shows the currently scheduled sessions.
37
Catalog Management
© 2016 Cisco and/or its affiliates. All rights reserved. This document is Cisco Public Information. 051216V5.1
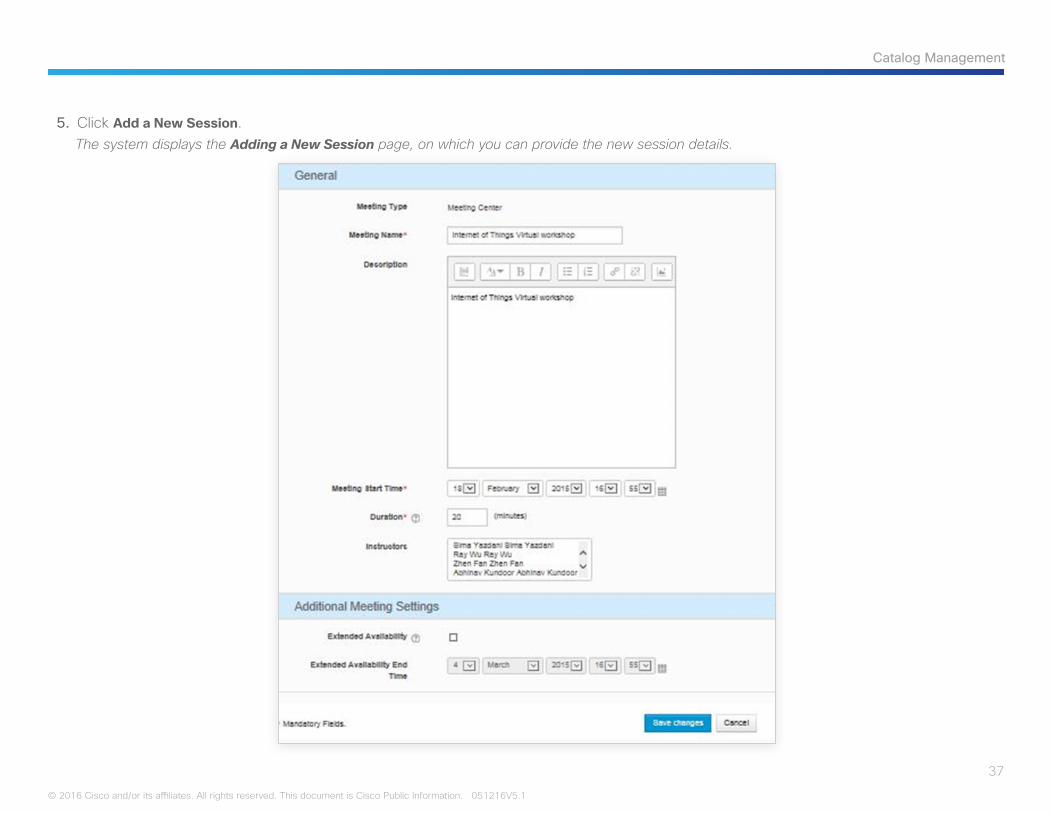
5. Click Add a New Session.The system displays the Adding a New Session page, on which you can provide the new session details.
38
Catalog Management
© 2016 Cisco and/or its affiliates. All rights reserved. This document is Cisco Public Information. 051216V5.1
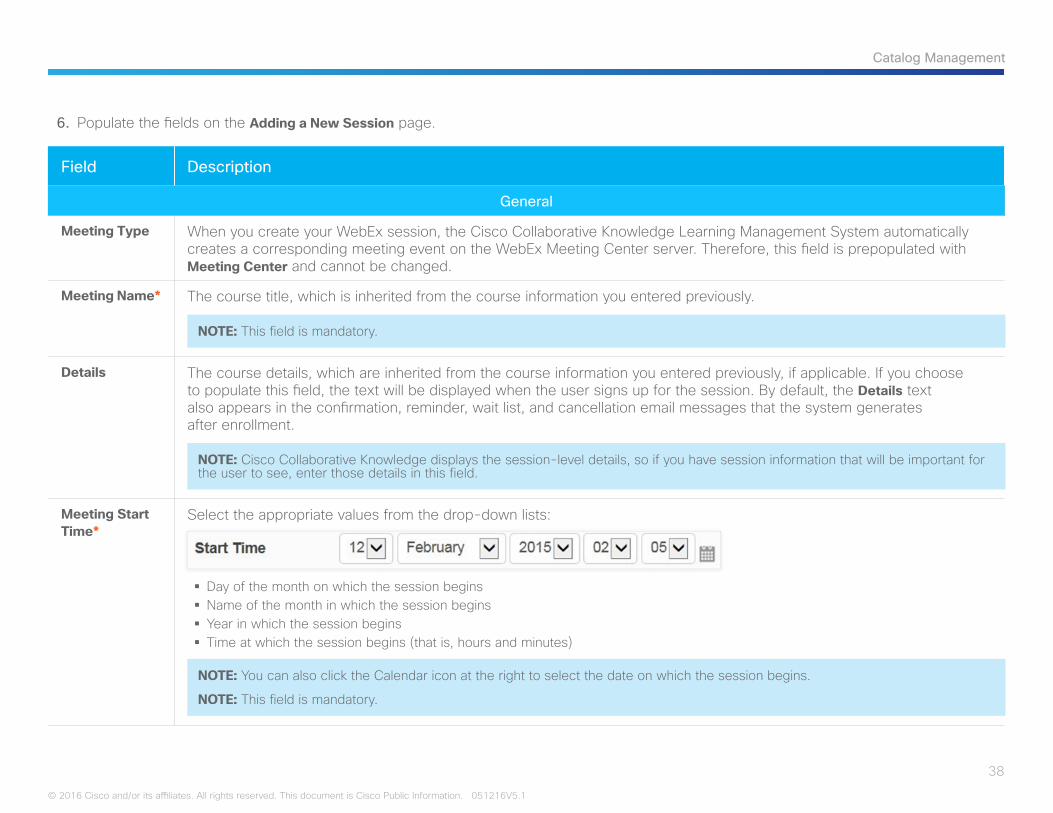
6. Populate the fields on the Adding a New Session page.
Field Description
General
Meeting Type When you create your WebEx session, the Cisco Collaborative Knowledge Learning Management System automatically creates a corresponding meeting event on the WebEx Meeting Center server. Therefore, this field is prepopulated with Meeting Center and cannot be changed.
Meeting Name* The course title, which is inherited from the course information you entered previously.
NOTE: This field is mandatory.
Details The course details, which are inherited from the course information you entered previously, if applicable. If you choose to populate this field, the text will be displayed when the user signs up for the session. By default, the Details text also appears in the confirmation, reminder, wait list, and cancellation email messages that the system generates after enrollment.
NOTE: Cisco Collaborative Knowledge displays the session-level details, so if you have session information that will be important for the user to see, enter those details in this field.
Meeting Start Time*
Select the appropriate values from the drop-down lists:
§ Day of the month on which the session begins § Name of the month in which the session begins § Year in which the session begins § Time at which the session begins (that is, hours and minutes)
NOTE: You can also click the Calendar icon at the right to select the date on which the session begins.
NOTE: This field is mandatory.
39
Catalog Management
© 2016 Cisco and/or its affiliates. All rights reserved. This document is Cisco Public Information. 051216V5.1
Field Description
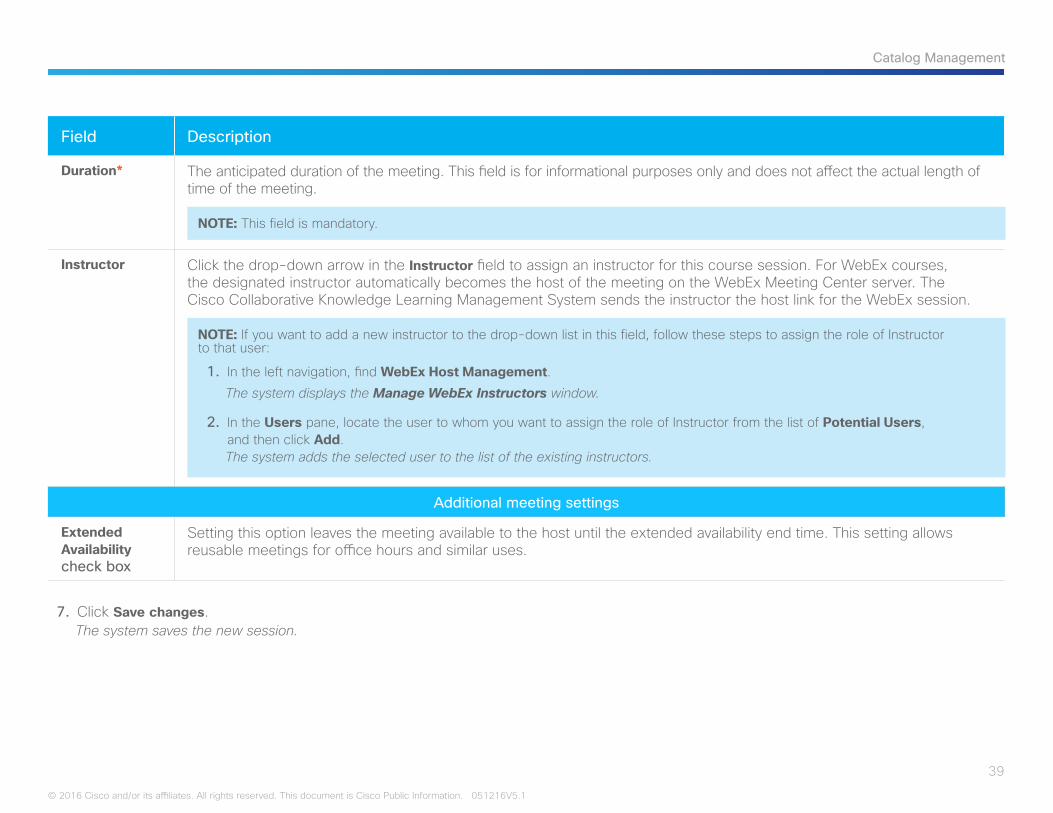
Duration* The anticipated duration of the meeting. This field is for informational purposes only and does not affect the actual length of time of the meeting.
NOTE: This field is mandatory.
Instructor Click the drop-down arrow in the Instructor field to assign an instructor for this course session. For WebEx courses, the designated instructor automatically becomes the host of the meeting on the WebEx Meeting Center server. The Cisco Collaborative Knowledge Learning Management System sends the instructor the host link for the WebEx session.
NOTE: If you want to add a new instructor to the drop-down list in this field, follow these steps to assign the role of Instructor to that user:
1. In the left navigation, find WebEx Host Management. The system displays the Manage WebEx Instructors window.
2. In the Users pane, locate the user to whom you want to assign the role of Instructor from the list of Potential Users, and then click Add.The system adds the selected user to the list of the existing instructors.
Additional meeting settings
Extended Availability check box
Setting this option leaves the meeting available to the host until the extended availability end time. This setting allows reusable meetings for office hours and similar uses.
7. Click Save changes.The system saves the new session.
40
Catalog Management
© 2016 Cisco and/or its affiliates. All rights reserved. This document is Cisco Public Information. 051216V5.1
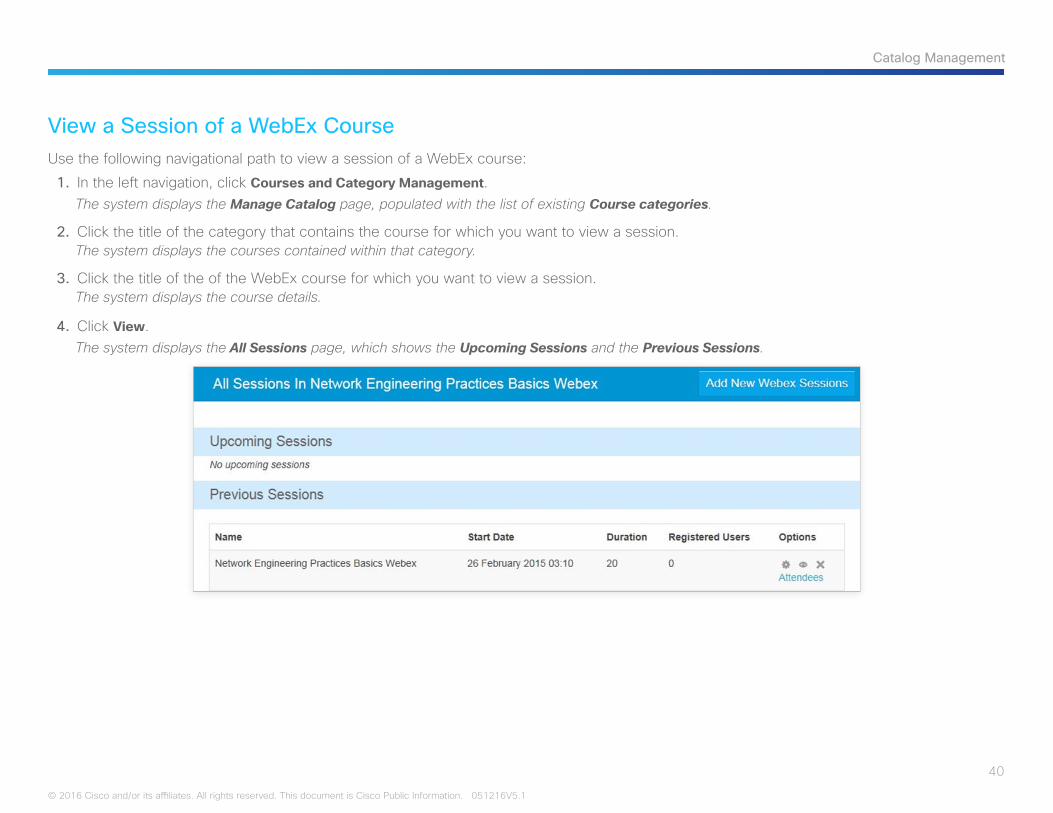
View a Session of a WebEx CourseUse the following navigational path to view a session of a WebEx course:
1. In the left navigation, click Courses and Category Management.The system displays the Manage Catalog page, populated with the list of existing Course categories.
2. Click the title of the category that contains the course for which you want to view a session.The system displays the courses contained within that category.
3. Click the title of the of the WebEx course for which you want to view a session.The system displays the course details.
4. Click View.The system displays the All Sessions page, which shows the Upcoming Sessions and the Previous Sessions.
41
Catalog Management
© 2016 Cisco and/or its affiliates. All rights reserved. This document is Cisco Public Information. 051216V5.1
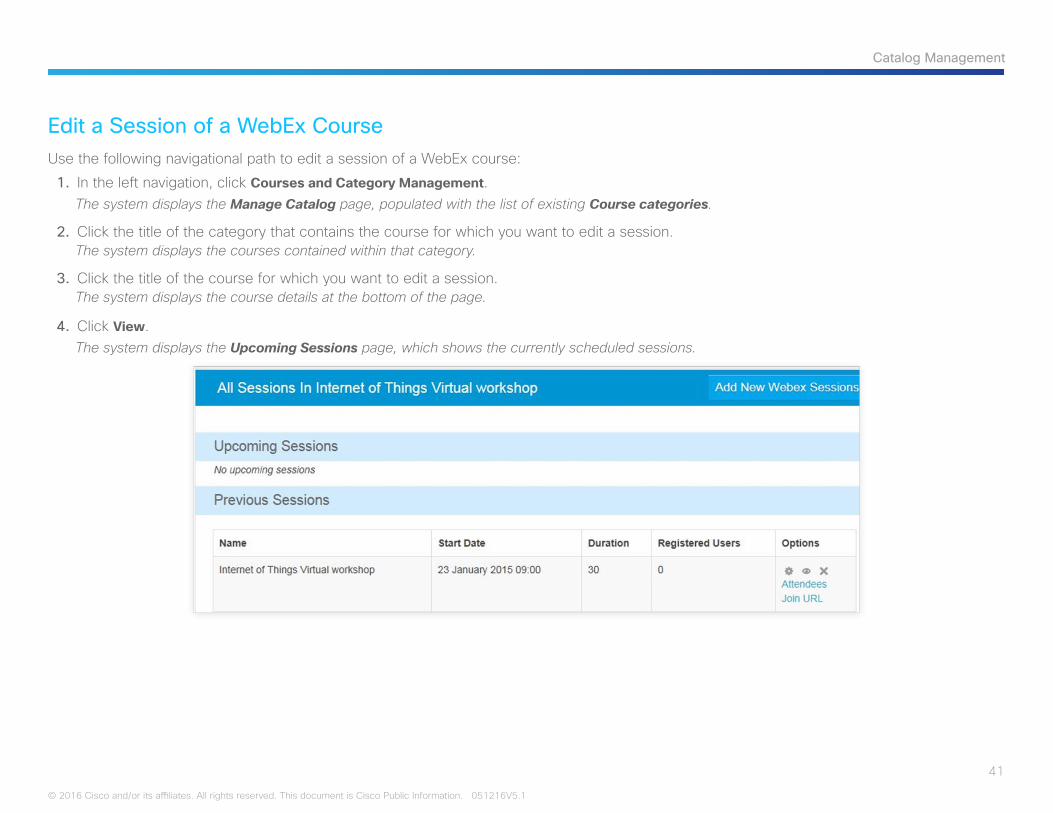
Edit a Session of a WebEx CourseUse the following navigational path to edit a session of a WebEx course:
1. In the left navigation, click Courses and Category Management.The system displays the Manage Catalog page, populated with the list of existing Course categories.
2. Click the title of the category that contains the course for which you want to edit a session.The system displays the courses contained within that category.
3. Click the title of the course for which you want to edit a session.The system displays the course details at the bottom of the page.
4. Click View.The system displays the Upcoming Sessions page, which shows the currently scheduled sessions.
42
Catalog Management
© 2016 Cisco and/or its affiliates. All rights reserved. This document is Cisco Public Information. 051216V5.1
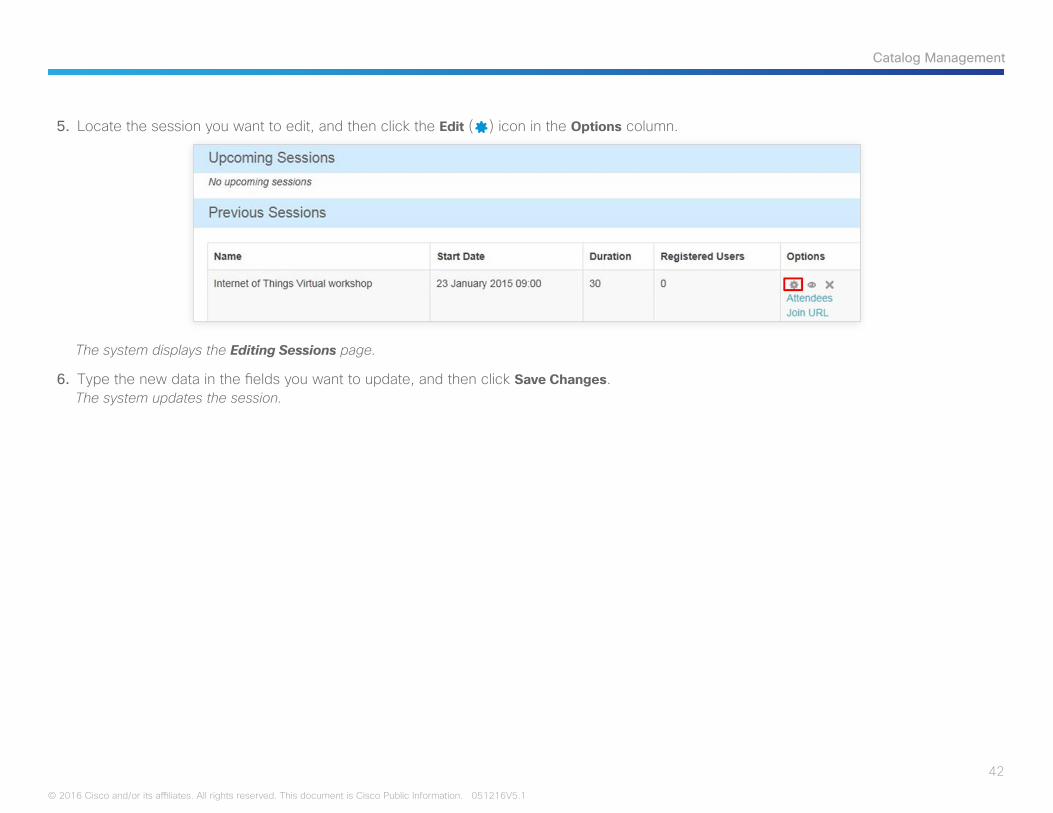
5. Locate the session you want to edit, and then click the Edit () icon in the Options column.
The system displays the Editing Sessions page.
6. Type the new data in the fields you want to update, and then click Save Changes.The system updates the session.
43
Catalog Management
© 2016 Cisco and/or its affiliates. All rights reserved. This document is Cisco Public Information. 051216V5.1
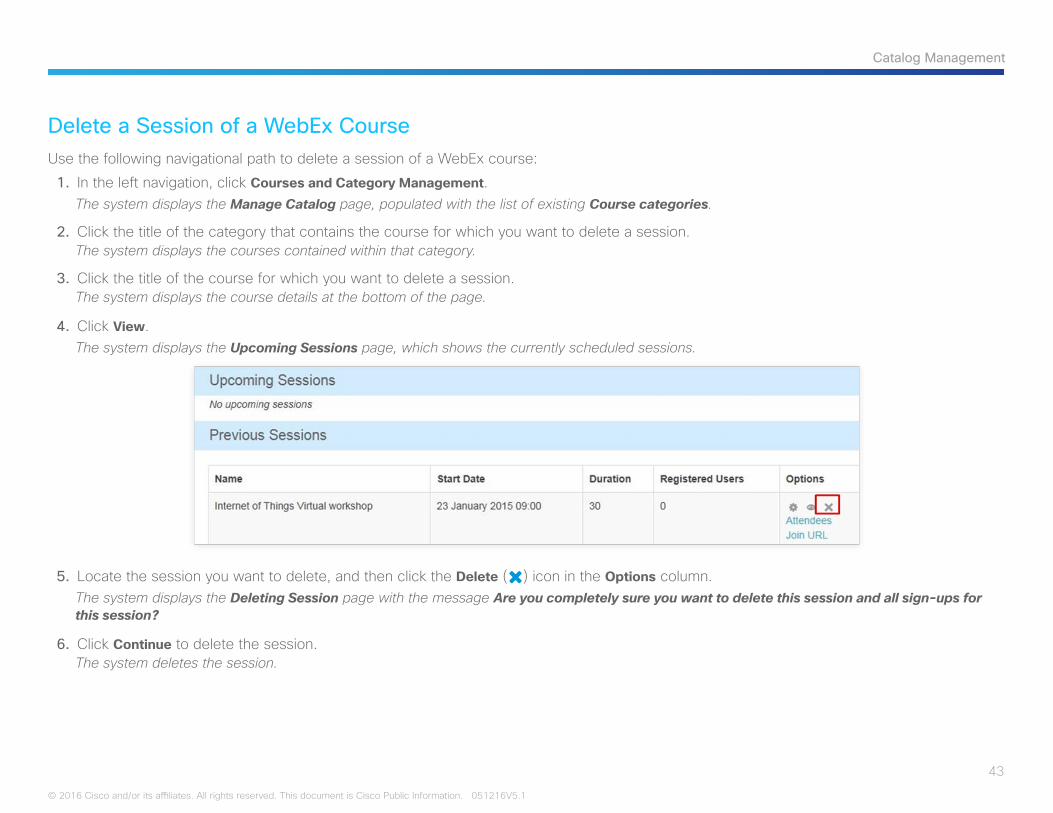
Delete a Session of a WebEx CourseUse the following navigational path to delete a session of a WebEx course:
1. In the left navigation, click Courses and Category Management.The system displays the Manage Catalog page, populated with the list of existing Course categories.
2. Click the title of the category that contains the course for which you want to delete a session.The system displays the courses contained within that category.
3. Click the title of the course for which you want to delete a session.The system displays the course details at the bottom of the page.
4. Click View.The system displays the Upcoming Sessions page, which shows the currently scheduled sessions.
5. Locate the session you want to delete, and then click the Delete () icon in the Options column.The system displays the Deleting Session page with the message Are you completely sure you want to delete this session and all sign-ups for this session?
6. Click Continue to delete the session.The system deletes the session.
44
Catalog Management
© 2016 Cisco and/or its affiliates. All rights reserved. This document is Cisco Public Information. 051216V5.1
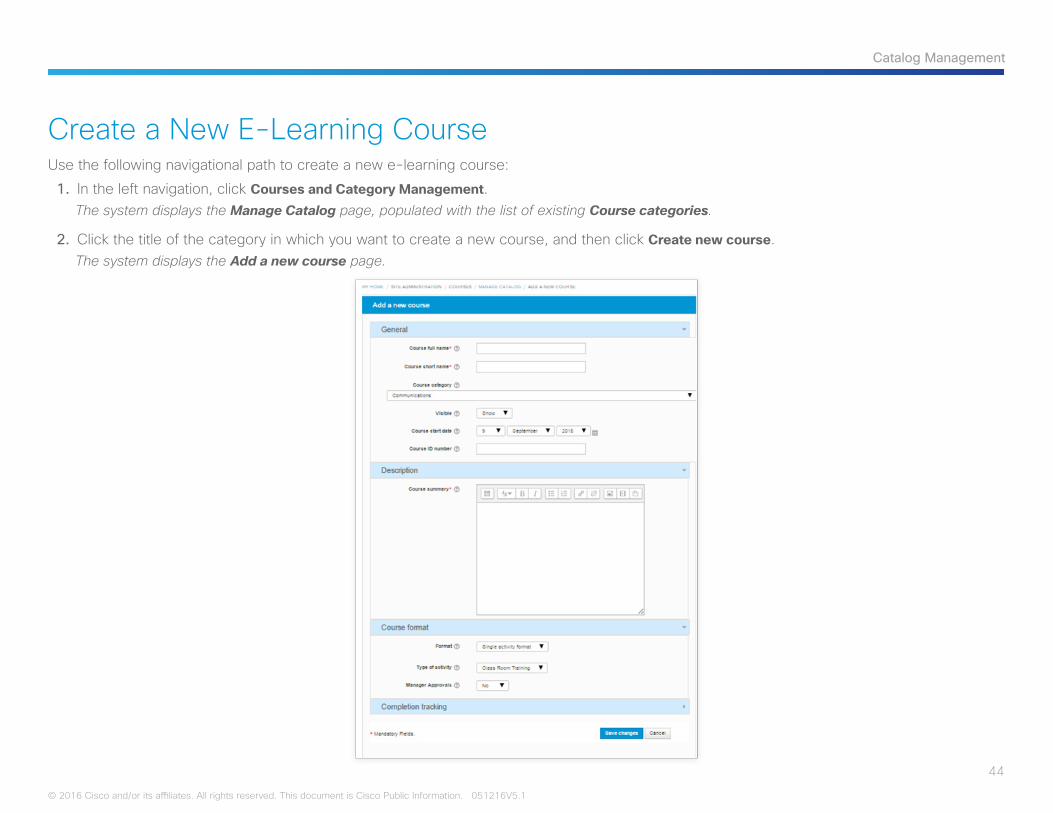
Create a New E-Learning CourseUse the following navigational path to create a new e-learning course:
1. In the left navigation, click Courses and Category Management.The system displays the Manage Catalog page, populated with the list of existing Course categories.
2. Click the title of the category in which you want to create a new course, and then click Create new course.The system displays the Add a new course page.
45
Catalog Management
© 2016 Cisco and/or its affiliates. All rights reserved. This document is Cisco Public Information. 051216V5.1
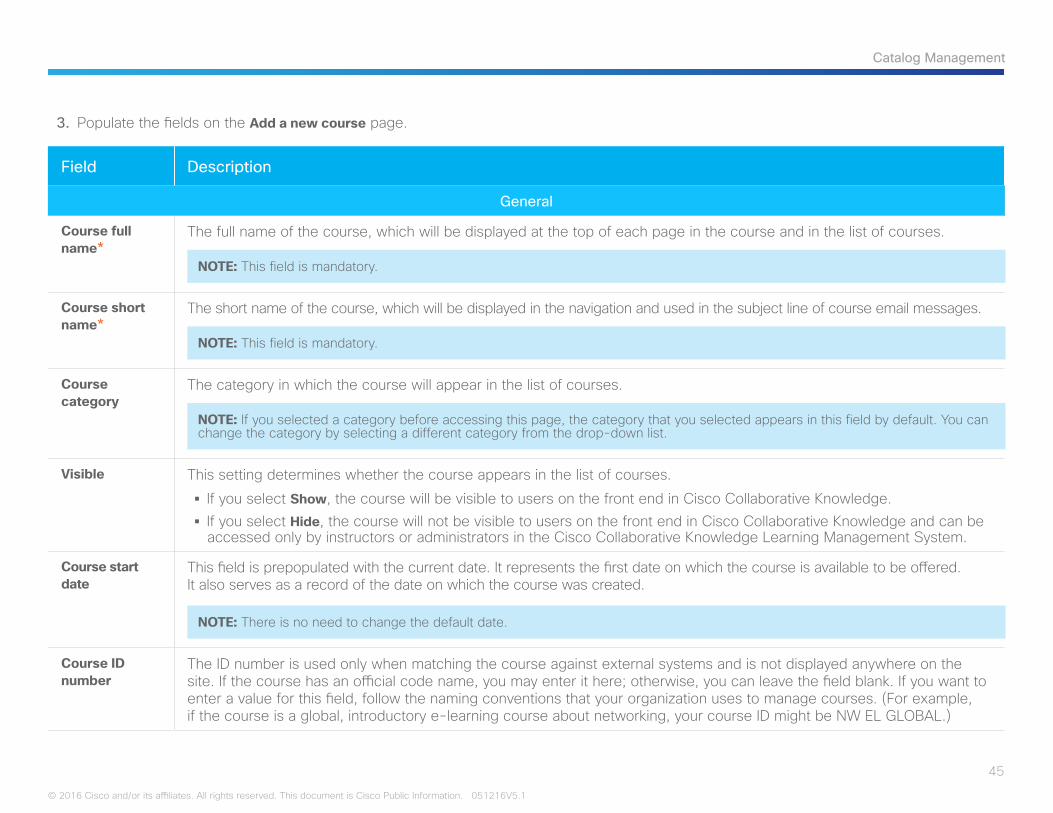
3. Populate the fields on the Add a new course page.
Field Description
General
Course full name*
The full name of the course, which will be displayed at the top of each page in the course and in the list of courses.
NOTE: This field is mandatory.
Course short name*
The short name of the course, which will be displayed in the navigation and used in the subject line of course email messages.
NOTE: This field is mandatory.
Course category
The category in which the course will appear in the list of courses.
NOTE: If you selected a category before accessing this page, the category that you selected appears in this field by default. You can change the category by selecting a different category from the drop-down list.
Visible This setting determines whether the course appears in the list of courses.
§ If you select Show, the course will be visible to users on the front end in Cisco Collaborative Knowledge. § If you select Hide, the course will not be visible to users on the front end in Cisco Collaborative Knowledge and can be accessed only by instructors or administrators in the Cisco Collaborative Knowledge Learning Management System.
Course start date
This field is prepopulated with the current date. It represents the first date on which the course is available to be offered. It also serves as a record of the date on which the course was created.
NOTE: There is no need to change the default date.
Course ID number
The ID number is used only when matching the course against external systems and is not displayed anywhere on the site. If the course has an official code name, you may enter it here; otherwise, you can leave the field blank. If you want to enter a value for this field, follow the naming conventions that your organization uses to manage courses. (For example, if the course is a global, introductory e-learning course about networking, your course ID might be NW EL GLOBAL.)
46
Catalog Management
© 2016 Cisco and/or its affiliates. All rights reserved. This document is Cisco Public Information. 051216V5.1
Field Description
Description
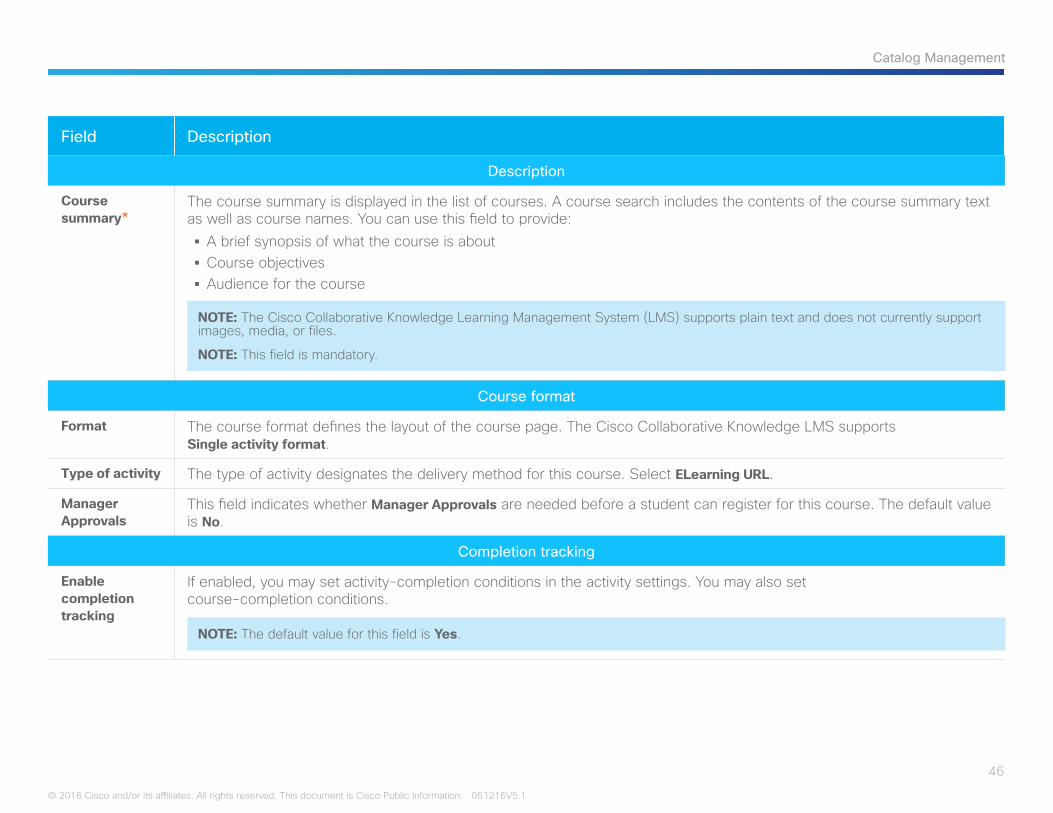
Course summary*
The course summary is displayed in the list of courses. A course search includes the contents of the course summary text as well as course names. You can use this field to provide:
§ A brief synopsis of what the course is about § Course objectives § Audience for the course
NOTE: The Cisco Collaborative Knowledge Learning Management System (LMS) supports plain text and does not currently support images, media, or files.
NOTE: This field is mandatory.
Course format
Format The course format defines the layout of the course page. The Cisco Collaborative Knowledge LMS supports Single activity format.
Type of activity The type of activity designates the delivery method for this course. Select ELearning URL.
Manager Approvals
This field indicates whether Manager Approvals are needed before a student can register for this course. The default value is No.
Completion tracking
Enable completion tracking
If enabled, you may set activity-completion conditions in the activity settings. You may also set course-completion conditions.
NOTE: The default value for this field is Yes.
47
Catalog Management
© 2016 Cisco and/or its affiliates. All rights reserved. This document is Cisco Public Information. 051216V5.1
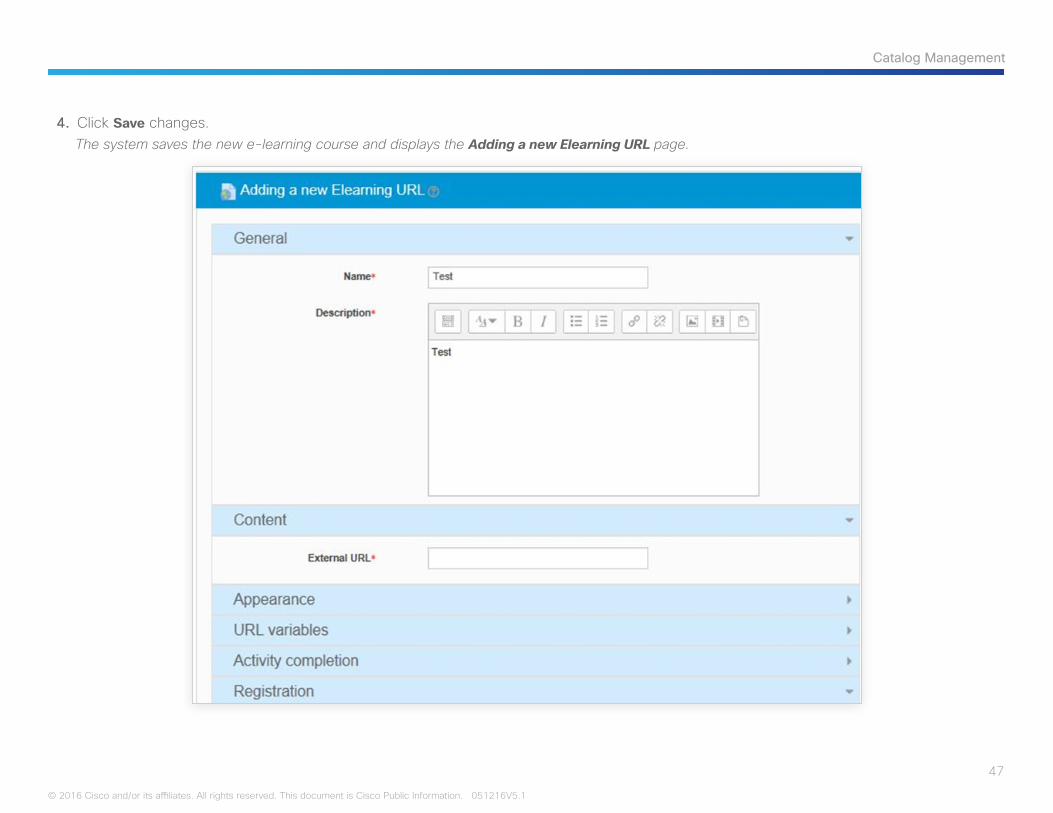
4. Click Save changes.The system saves the new e-learning course and displays the Adding a new Elearning URL page.
48
Catalog Management
© 2016 Cisco and/or its affiliates. All rights reserved. This document is Cisco Public Information. 051216V5.1
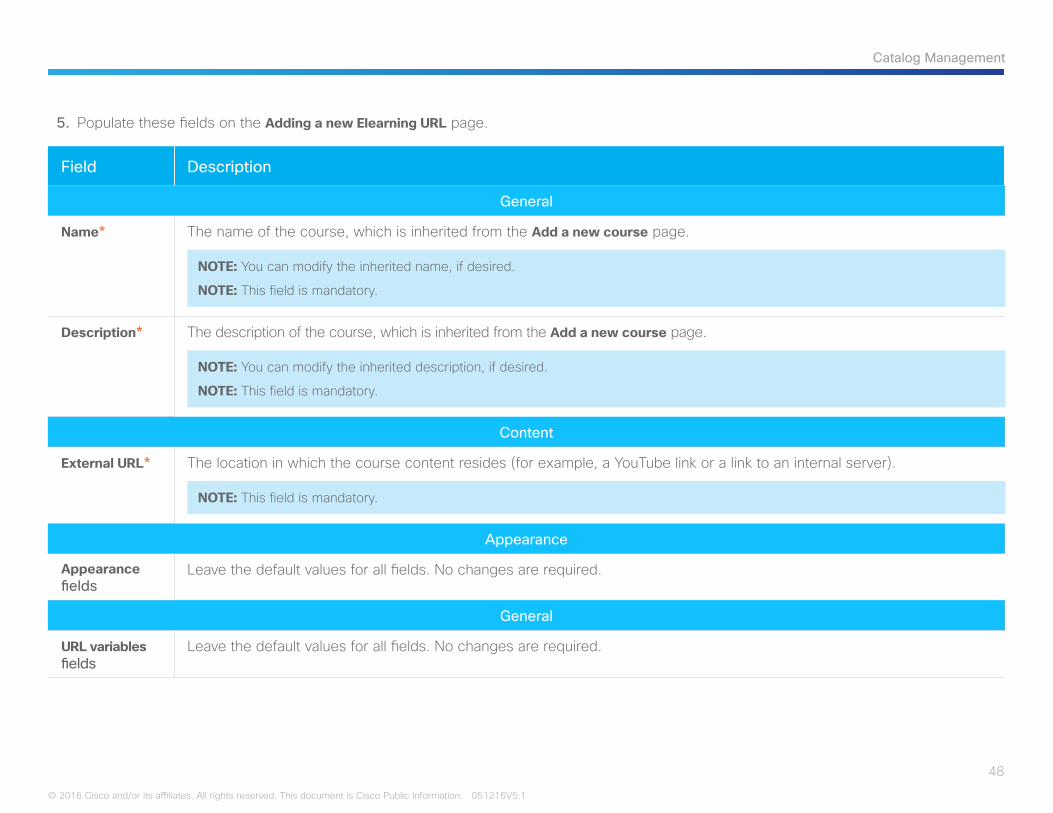
5. Populate these fields on the Adding a new Elearning URL page.
Field Description
General
Name* The name of the course, which is inherited from the Add a new course page.
NOTE: You can modify the inherited name, if desired.
NOTE: This field is mandatory.
Description* The description of the course, which is inherited from the Add a new course page.
NOTE: You can modify the inherited description, if desired.
NOTE: This field is mandatory.
Content
External URL* The location in which the course content resides (for example, a YouTube link or a link to an internal server).
NOTE: This field is mandatory.
Appearance
Appearance fields
Leave the default values for all fields. No changes are required.
General
URL variables fields
Leave the default values for all fields. No changes are required.
49
Catalog Management
© 2016 Cisco and/or its affiliates. All rights reserved. This document is Cisco Public Information. 051216V5.1
Field Description
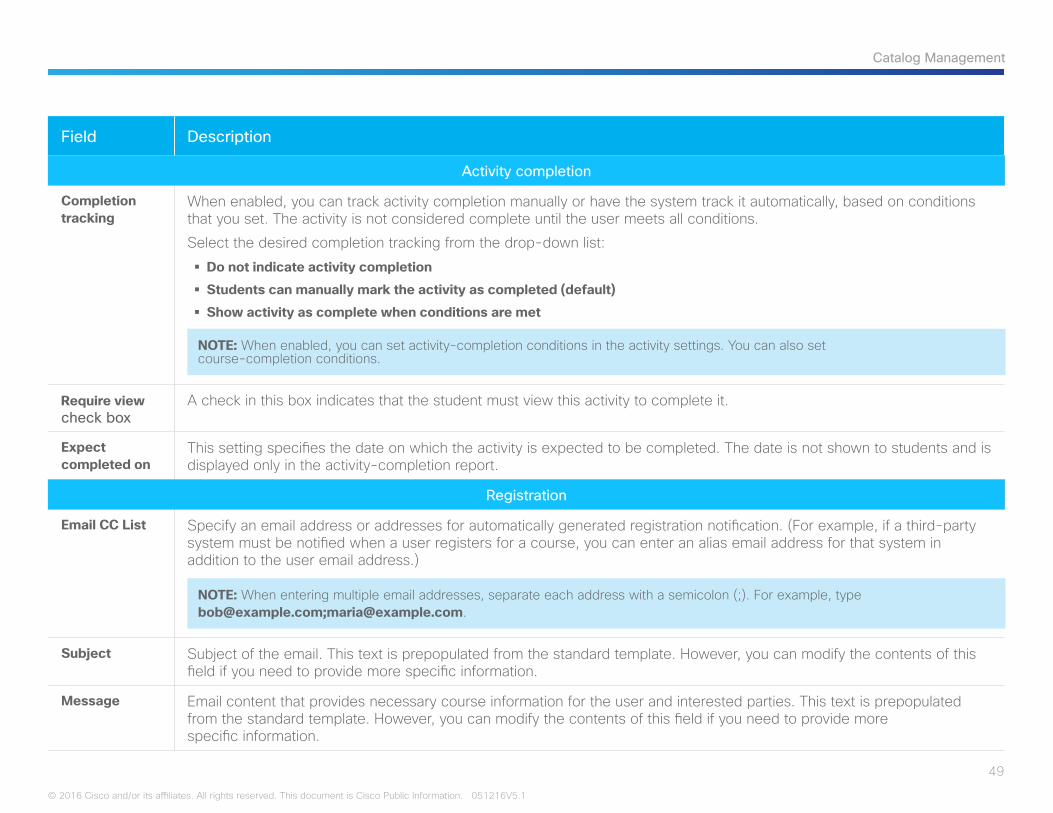
Activity completion
Completion tracking
When enabled, you can track activity completion manually or have the system track it automatically, based on conditions that you set. The activity is not considered complete until the user meets all conditions.
Select the desired completion tracking from the drop-down list:
§ Do not indicate activity completion
§ Students can manually mark the activity as completed (default)
§ Show activity as complete when conditions are met
NOTE: When enabled, you can set activity-completion conditions in the activity settings. You can also set course-completion conditions.
Require view check box
A check in this box indicates that the student must view this activity to complete it.
Expect completed on
This setting specifies the date on which the activity is expected to be completed. The date is not shown to students and is displayed only in the activity-completion report.
Registration
Email CC List Specify an email address or addresses for automatically generated registration notification. (For example, if a third-party system must be notified when a user registers for a course, you can enter an alias email address for that system in addition to the user email address.)
NOTE: When entering multiple email addresses, separate each address with a semicolon (;). For example, type [email protected];[email protected].
Subject Subject of the email. This text is prepopulated from the standard template. However, you can modify the contents of this field if you need to provide more specific information.
Message Email content that provides necessary course information for the user and interested parties. This text is prepopulated from the standard template. However, you can modify the contents of this field if you need to provide more specific information.
50
Catalog Management
© 2016 Cisco and/or its affiliates. All rights reserved. This document is Cisco Public Information. 051216V5.1
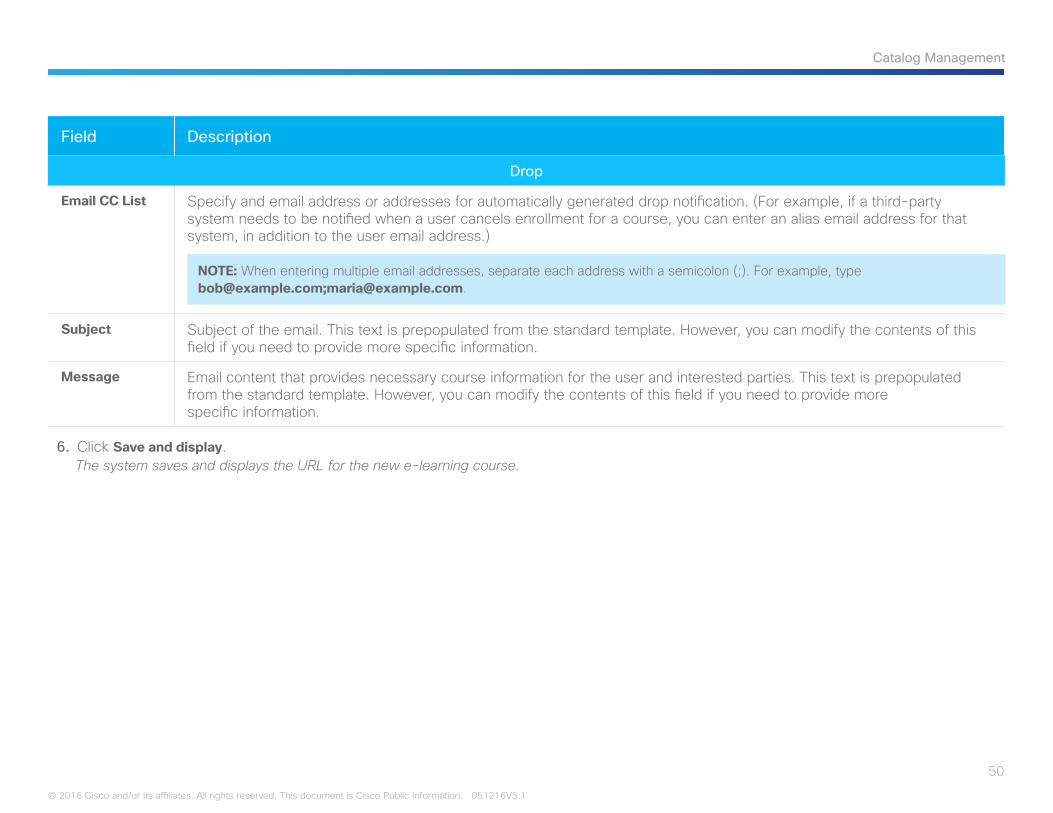
Field Description
Drop
Email CC List Specify and email address or addresses for automatically generated drop notification. (For example, if a third-party system needs to be notified when a user cancels enrollment for a course, you can enter an alias email address for that system, in addition to the user email address.)
NOTE: When entering multiple email addresses, separate each address with a semicolon (;). For example, type [email protected];[email protected].
Subject Subject of the email. This text is prepopulated from the standard template. However, you can modify the contents of this field if you need to provide more specific information.
Message Email content that provides necessary course information for the user and interested parties. This text is prepopulated from the standard template. However, you can modify the contents of this field if you need to provide more specific information.
6. Click Save and display.The system saves and displays the URL for the new e-learning course.
51
Catalog Management
© 2016 Cisco and/or its affiliates. All rights reserved. This document is Cisco Public Information. 051216V5.1
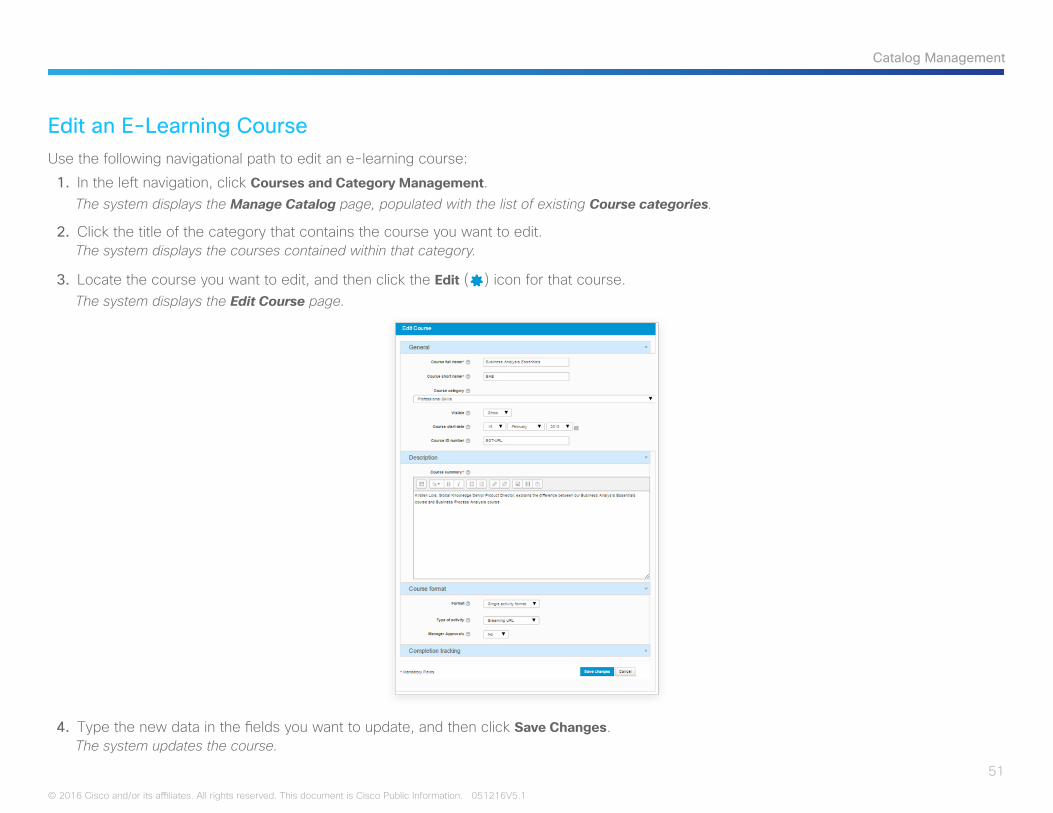
Edit an E-Learning CourseUse the following navigational path to edit an e-learning course:
1. In the left navigation, click Courses and Category Management.The system displays the Manage Catalog page, populated with the list of existing Course categories.
2. Click the title of the category that contains the course you want to edit.The system displays the courses contained within that category.
3. Locate the course you want to edit, and then click the Edit () icon for that course.The system displays the Edit Course page.
4. Type the new data in the fields you want to update, and then click Save Changes.The system updates the course.
52
Catalog Management
© 2016 Cisco and/or its affiliates. All rights reserved. This document is Cisco Public Information. 051216V5.1
Delete an E-Learning CourseUse the following navigational path to delete an e-learning course:
1. In the left navigation, click Courses and Category Management.The system displays the Manage Catalog page, populated with the list of existing Course categories.
2. Click the title of the category that contains the course you want to delete.The system displays the courses contained within that category.
3. Locate the course you want to delete, and then click the Delete () icon for that course.The system displays the message Are you absolutely sure you want to completely delete this course and all the data it contains?
4. Click Continue to delete the course.The system deletes the course.
53
Catalog Management
© 2016 Cisco and/or its affiliates. All rights reserved. This document is Cisco Public Information. 051216V5.1
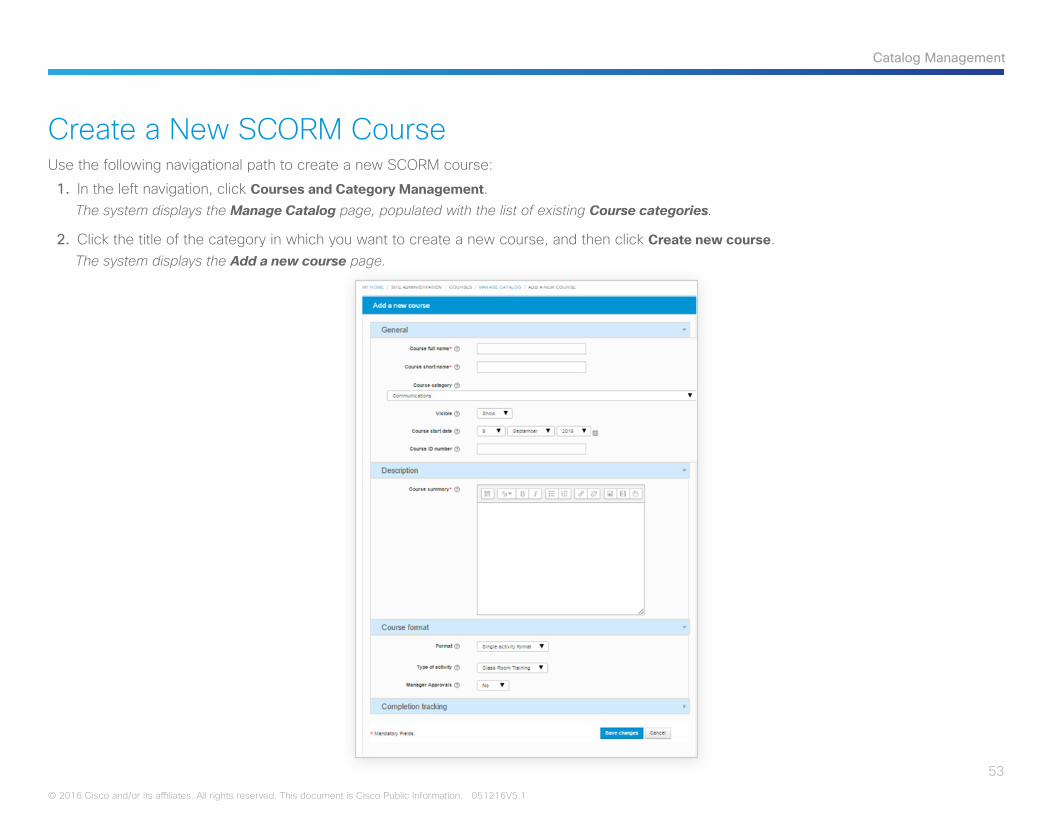
Create a New SCORM CourseUse the following navigational path to create a new SCORM course:
1. In the left navigation, click Courses and Category Management.The system displays the Manage Catalog page, populated with the list of existing Course categories.
2. Click the title of the category in which you want to create a new course, and then click Create new course.The system displays the Add a new course page.

54
Catalog Management
© 2016 Cisco and/or its affiliates. All rights reserved. This document is Cisco Public Information. 051216V5.1
3. Populate the fields on the Add a new course page.
Field Description
General
Course full name*
The full name of the course, which will be displayed at the top of each page in the course and in the list of courses.
NOTE: This field is mandatory.
Course short name*
The short name of the course, which will be displayed in the navigation and used in the subject line of course email messages.
NOTE: This field is mandatory.
Course category
The category in which the course will appear in the list of courses.
NOTE: If you selected a category before accessing this page, the category that you selected appears in this field by default. You can change the category by selecting a different category from the drop-down list.
Visible This setting determines whether the course appears in the list of courses.
§ If you select Show, the course will be visible to users on the front end in Cisco Collaborative Knowledge. § If you select Hide, the course will not be visible to users on the front end in Cisco Collaborative Knowledge and can be accessed only by instructors or administrators in the Cisco Collaborative Knowledge Learning Management System.
Course start date
This field is prepopulated with the current date. It represents the first date on which the course is available to be offered. It also serves as a record of the date on which the course was created.
NOTE: There is no need to change the default date.
Course ID number
The ID number is used only when matching the course against external systems and is not displayed anywhere on the site. If the course has an official code name, you may enter it here; otherwise, you can leave the field blank. If you want to enter a value for this field, follow the naming conventions that your organization uses to manage courses. (For example, if the course is an introductory SCORM course about networking for North America, your course ID might be NW SCORM-NA.)
55
Catalog Management
© 2016 Cisco and/or its affiliates. All rights reserved. This document is Cisco Public Information. 051216V5.1
Field Description
Description
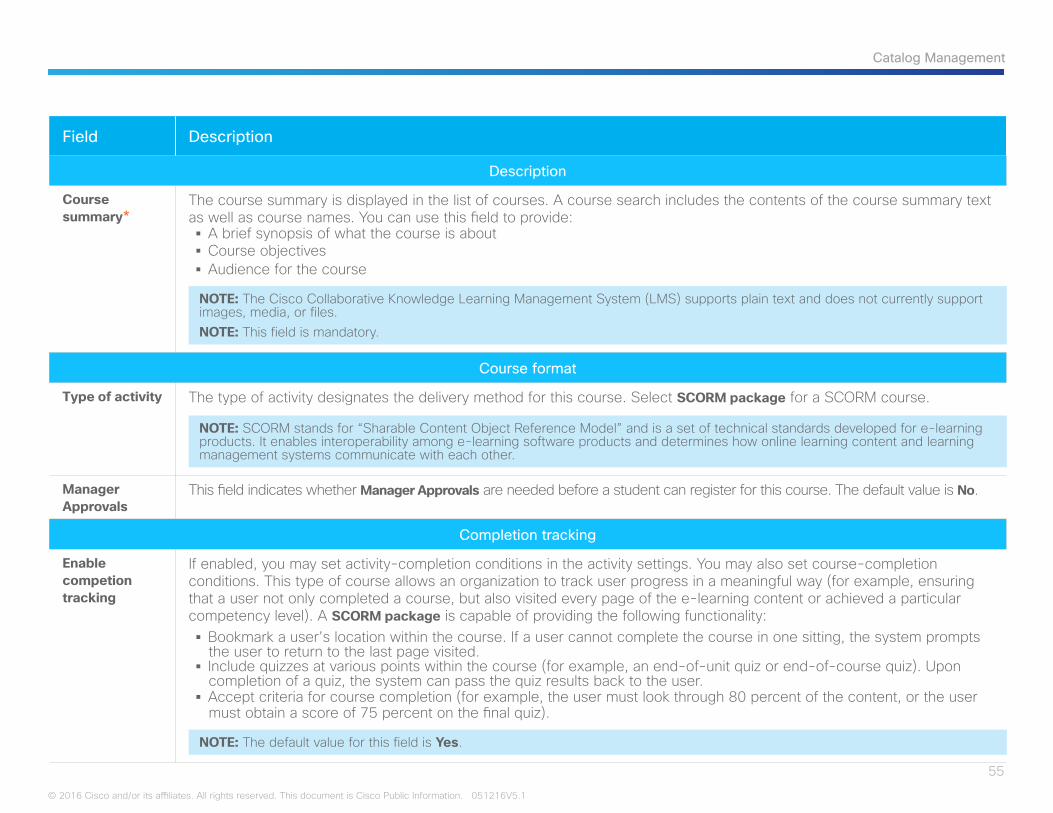
Course summary*
The course summary is displayed in the list of courses. A course search includes the contents of the course summary text as well as course names. You can use this field to provide:
§ A brief synopsis of what the course is about § Course objectives § Audience for the course
NOTE: The Cisco Collaborative Knowledge Learning Management System (LMS) supports plain text and does not currently support images, media, or files.NOTE: This field is mandatory.
Course format
Type of activity The type of activity designates the delivery method for this course. Select SCORM package for a SCORM course.
NOTE: SCORM stands for “Sharable Content Object Reference Model” and is a set of technical standards developed for e-learning products. It enables interoperability among e-learning software products and determines how online learning content and learning management systems communicate with each other.
Manager Approvals
This field indicates whether Manager Approvals are needed before a student can register for this course. The default value is No.
Completion tracking
Enable competion tracking
If enabled, you may set activity-completion conditions in the activity settings. You may also set course-completion conditions. This type of course allows an organization to track user progress in a meaningful way (for example, ensuring that a user not only completed a course, but also visited every page of the e-learning content or achieved a particular competency level). A SCORM package is capable of providing the following functionality:
§ Bookmark a user’s location within the course. If a user cannot complete the course in one sitting, the system prompts the user to return to the last page visited.
§ Include quizzes at various points within the course (for example, an end-of-unit quiz or end-of-course quiz). Upon completion of a quiz, the system can pass the quiz results back to the user.
§ Accept criteria for course completion (for example, the user must look through 80 percent of the content, or the user must obtain a score of 75 percent on the final quiz).
NOTE: The default value for this field is Yes.
56
Catalog Management
© 2016 Cisco and/or its affiliates. All rights reserved. This document is Cisco Public Information. 051216V5.1
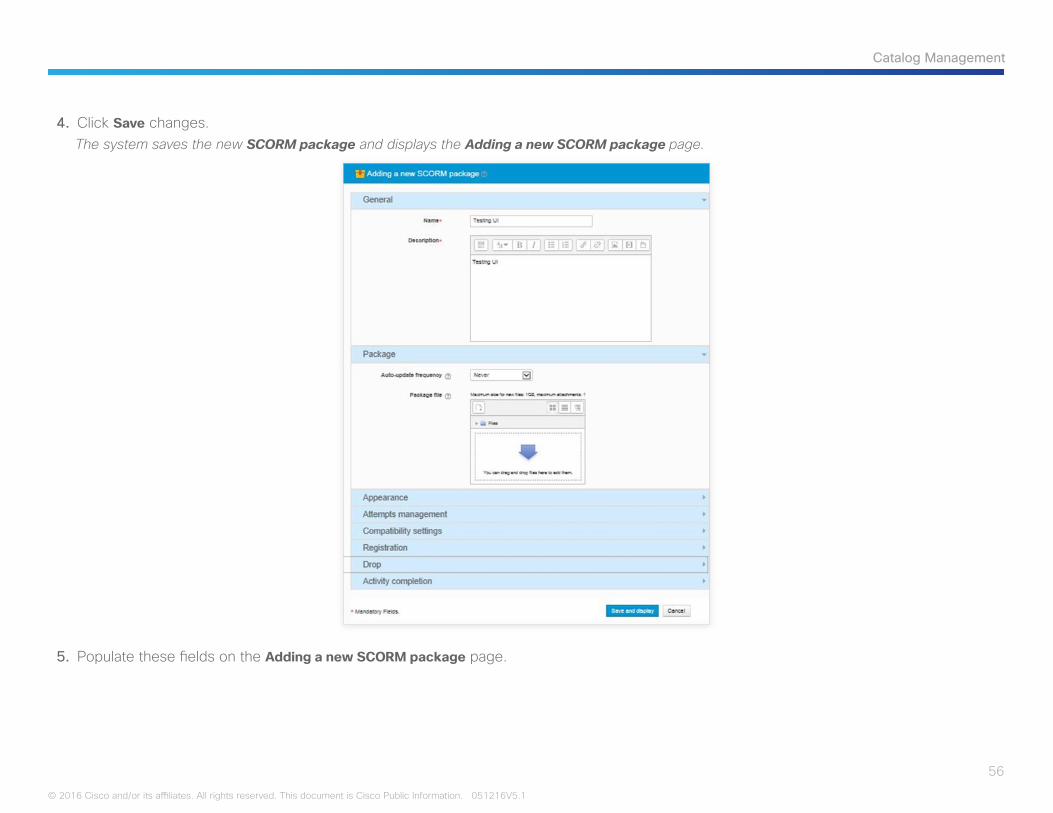
4. Click Save changes.The system saves the new SCORM package and displays the Adding a new SCORM package page.
5. Populate these fields on the Adding a new SCORM package page.
57
Catalog Management
© 2016 Cisco and/or its affiliates. All rights reserved. This document is Cisco Public Information. 051216V5.1
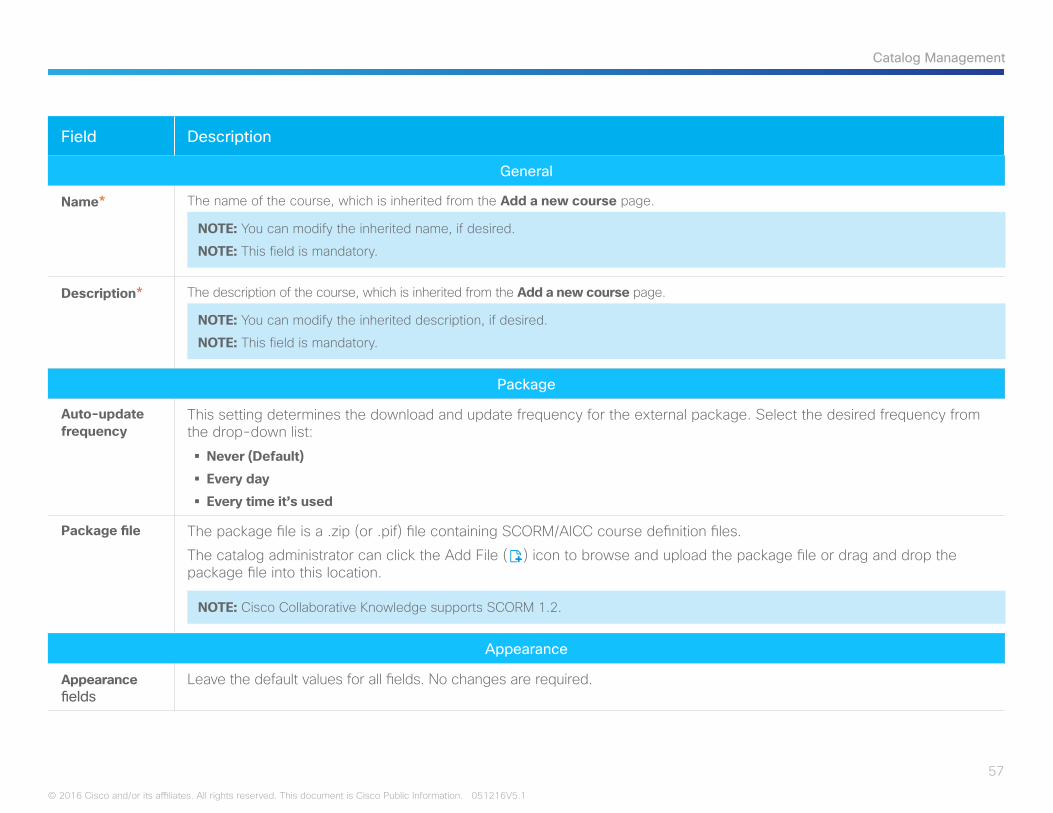
Field Description
General
Name* The name of the course, which is inherited from the Add a new course page.
NOTE: You can modify the inherited name, if desired.
NOTE: This field is mandatory.
Description* The description of the course, which is inherited from the Add a new course page.
NOTE: You can modify the inherited description, if desired.
NOTE: This field is mandatory.
Package
Auto-update frequency
This setting determines the download and update frequency for the external package. Select the desired frequency from the drop-down list:
§ Never (Default)
§ Every day
§ Every time it’s used
Package file The package file is a .zip (or .pif) file containing SCORM/AICC course definition files.
The catalog administrator can click the Add File () icon to browse and upload the package file or drag and drop the package file into this location.
NOTE: Cisco Collaborative Knowledge supports SCORM 1.2.
Appearance
Appearance fields
Leave the default values for all fields. No changes are required.
58
Catalog Management
© 2016 Cisco and/or its affiliates. All rights reserved. This document is Cisco Public Information. 051216V5.1
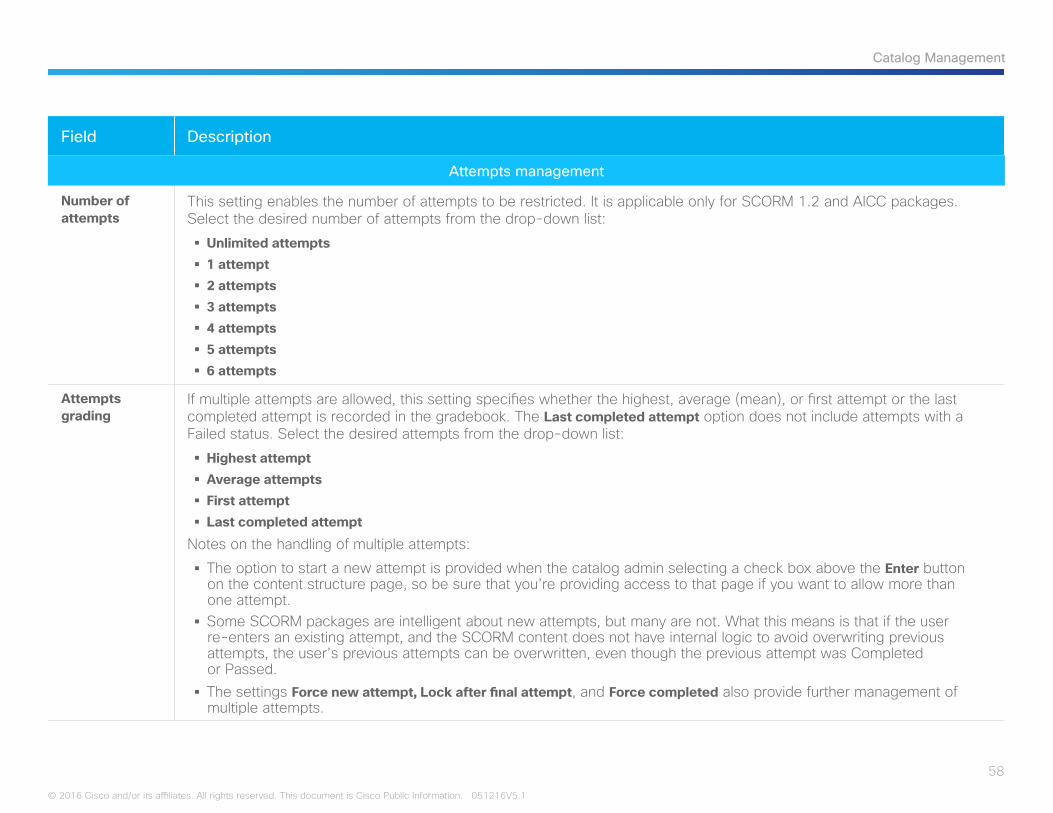
Field Description
Attempts management
Number of attempts
This setting enables the number of attempts to be restricted. It is applicable only for SCORM 1.2 and AICC packages. Select the desired number of attempts from the drop-down list:
§ Unlimited attempts § 1 attempt § 2 attempts § 3 attempts § 4 attempts § 5 attempts § 6 attempts
Attempts grading
If multiple attempts are allowed, this setting specifies whether the highest, average (mean), or first attempt or the last completed attempt is recorded in the gradebook. The Last completed attempt option does not include attempts with a Failed status. Select the desired attempts from the drop-down list:
§ Highest attempt § Average attempts § First attempt § Last completed attempt
Notes on the handling of multiple attempts:
§ The option to start a new attempt is provided when the catalog admin selecting a check box above the Enter button on the content structure page, so be sure that you’re providing access to that page if you want to allow more than one attempt.
§ Some SCORM packages are intelligent about new attempts, but many are not. What this means is that if the user re-enters an existing attempt, and the SCORM content does not have internal logic to avoid overwriting previous attempts, the user’s previous attempts can be overwritten, even though the previous attempt was Completed or Passed.
§ The settings Force new attempt, Lock after final attempt, and Force completed also provide further management of multiple attempts.
59
Catalog Management
© 2016 Cisco and/or its affiliates. All rights reserved. This document is Cisco Public Information. 051216V5.1
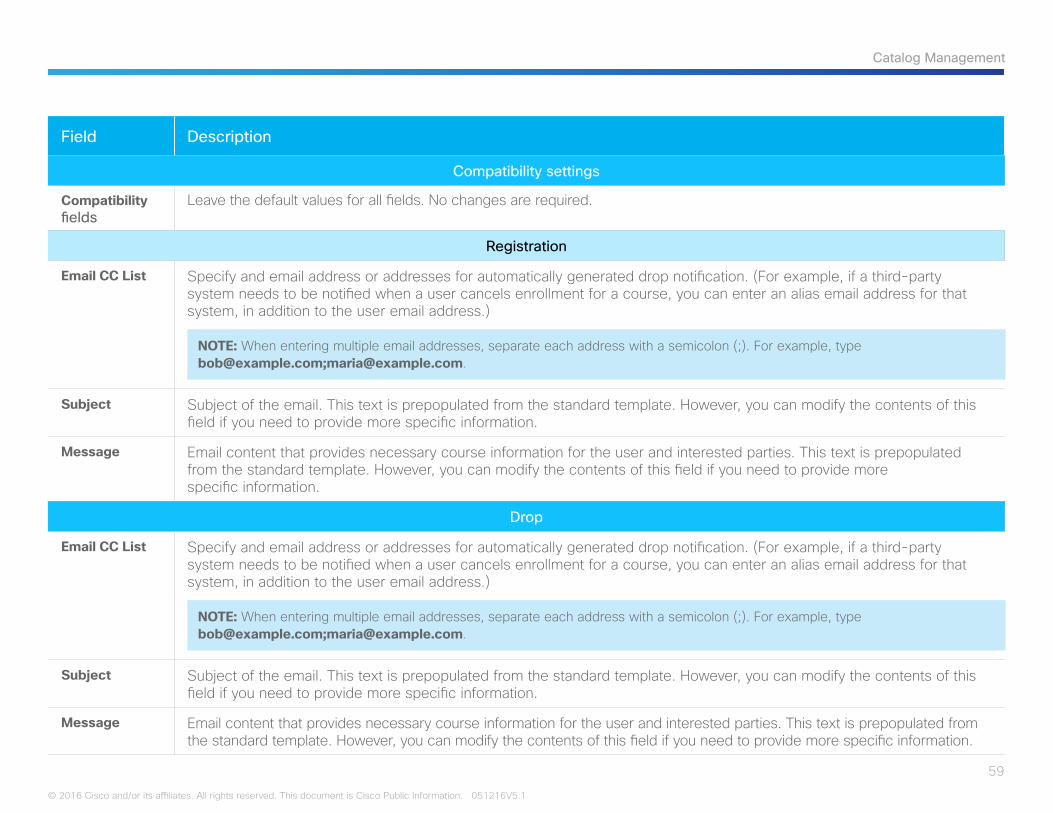
Field Description
Compatibility settings
Compatibility fields
Leave the default values for all fields. No changes are required.
Registration
Email CC List Specify and email address or addresses for automatically generated drop notification. (For example, if a third-party system needs to be notified when a user cancels enrollment for a course, you can enter an alias email address for that system, in addition to the user email address.)
NOTE: When entering multiple email addresses, separate each address with a semicolon (;). For example, type [email protected];[email protected].
Subject Subject of the email. This text is prepopulated from the standard template. However, you can modify the contents of this field if you need to provide more specific information.
Message Email content that provides necessary course information for the user and interested parties. This text is prepopulated from the standard template. However, you can modify the contents of this field if you need to provide more specific information.
Drop
Email CC List Specify and email address or addresses for automatically generated drop notification. (For example, if a third-party system needs to be notified when a user cancels enrollment for a course, you can enter an alias email address for that system, in addition to the user email address.)
NOTE: When entering multiple email addresses, separate each address with a semicolon (;). For example, type [email protected];[email protected].
Subject Subject of the email. This text is prepopulated from the standard template. However, you can modify the contents of this field if you need to provide more specific information.
Message Email content that provides necessary course information for the user and interested parties. This text is prepopulated from the standard template. However, you can modify the contents of this field if you need to provide more specific information.

60
Catalog Management
© 2016 Cisco and/or its affiliates. All rights reserved. This document is Cisco Public Information. 051216V5.1
Field Description
Activity completion
Completion tracking
When enabled, you can track activity completion manually or have the system track it automatically, based on conditions that you set. The activity is not considered complete until the user meets all conditions.
Select the desired completion tracking from the drop-down list:
§ Do not indicate activity completion
§ Students can manually mark the activity as completed (default)
§ Show activity as complete when conditions are met
NOTE: When enabled, you can set activity-completion conditions in the activity settings. You can also set course-completion conditions.
Require view check box
A check in this box indicates that the student must view this activity to complete it.
Require grade check box
A check in this box indicates that the student must receive a grade to complete this activity. Pass and fail icons may be displayed if a pass grade for the activity has been set.
Require minimum score
If enabled, this setting requires a user to achieve at least the minimum score entered to be marked complete in this SCORM activity (as well as any other Activity Completion requirements).
Require status check box
A check in this box indicates that a user must achieve at least one of the checked statuses to be marked complete in this SCORM activity (as well as any other Activity Completion requirements).
Expect completed on
This setting specifies the date on which the activity is expected to be completed. The date is not shown to students and is displayed only in the activity-completion report.
6. Click Save and display.The system saves the new SCORM course.
61
Catalog Management
© 2016 Cisco and/or its affiliates. All rights reserved. This document is Cisco Public Information. 051216V5.1
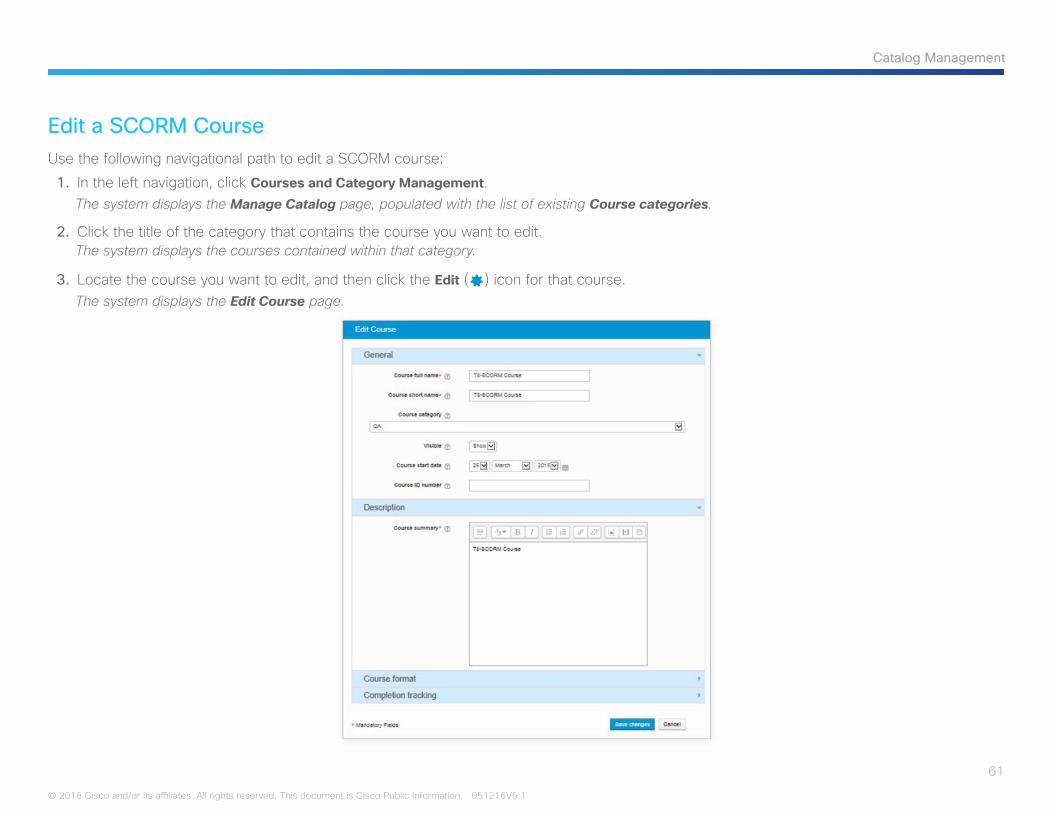
Edit a SCORM CourseUse the following navigational path to edit a SCORM course:
1. In the left navigation, click Courses and Category Management.The system displays the Manage Catalog page, populated with the list of existing Course categories.
2. Click the title of the category that contains the course you want to edit.The system displays the courses contained within that category.
3. Locate the course you want to edit, and then click the Edit () icon for that course.The system displays the Edit Course page.
62
Catalog Management
© 2016 Cisco and/or its affiliates. All rights reserved. This document is Cisco Public Information. 051216V5.1
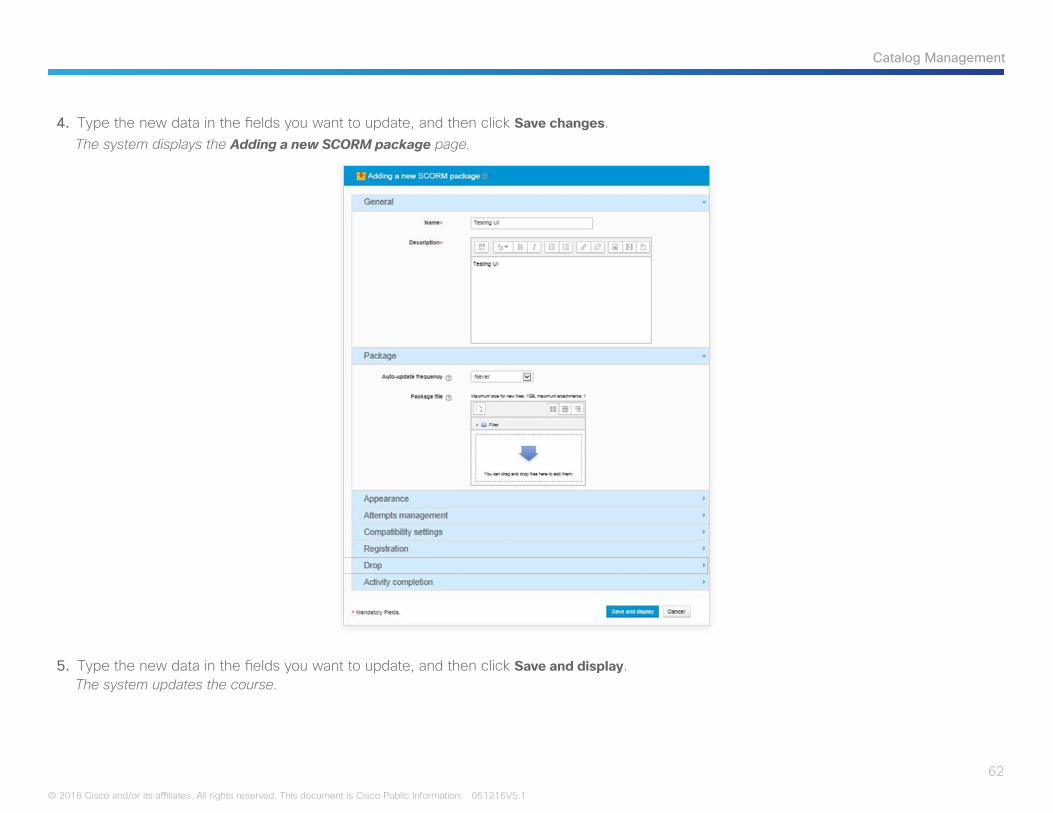
4. Type the new data in the fields you want to update, and then click Save changes.The system displays the Adding a new SCORM package page.
5. Type the new data in the fields you want to update, and then click Save and display.The system updates the course.
63
Catalog Management
© 2016 Cisco and/or its affiliates. All rights reserved. This document is Cisco Public Information. 051216V5.1
Delete A SCORM CourseUse the following navigational path to delete a SCORM course:
1. In the left navigation, click Courses and Category Management.The system displays the Manage Catalog page, populated with the list of existing Course categories.
2. Click the title of the category that contains the course you want to delete.The system displays the courses contained within that category.
3. Locate the course you want to delete, and then click the Delete () icon for that course.The system displays the message Are you absolutely sure you want to completely delete this course and all the data it contains?
4. Click Continue to delete the course.The system deletes the course.
64
Catalog Management
© 2016 Cisco and/or its affiliates. All rights reserved. This document is Cisco Public Information. 051216V5.1
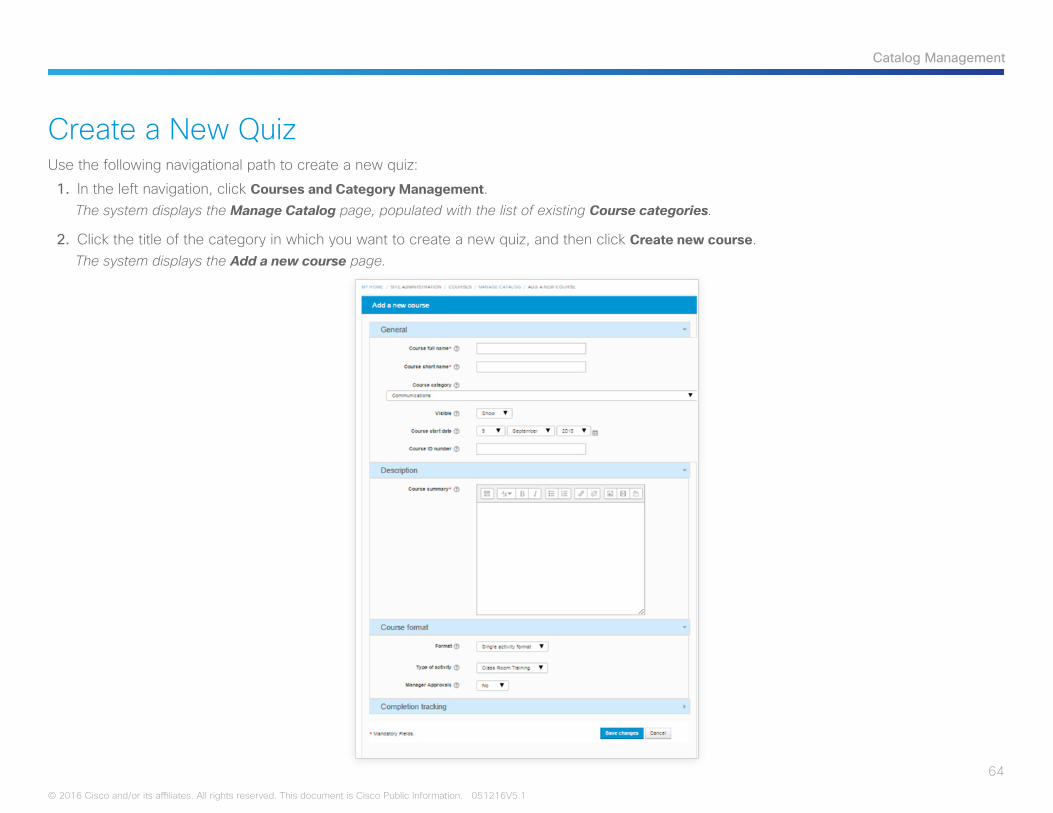
Create a New QuizUse the following navigational path to create a new quiz:
1. In the left navigation, click Courses and Category Management.The system displays the Manage Catalog page, populated with the list of existing Course categories.
2. Click the title of the category in which you want to create a new quiz, and then click Create new course.The system displays the Add a new course page.
65
Catalog Management
© 2016 Cisco and/or its affiliates. All rights reserved. This document is Cisco Public Information. 051216V5.1
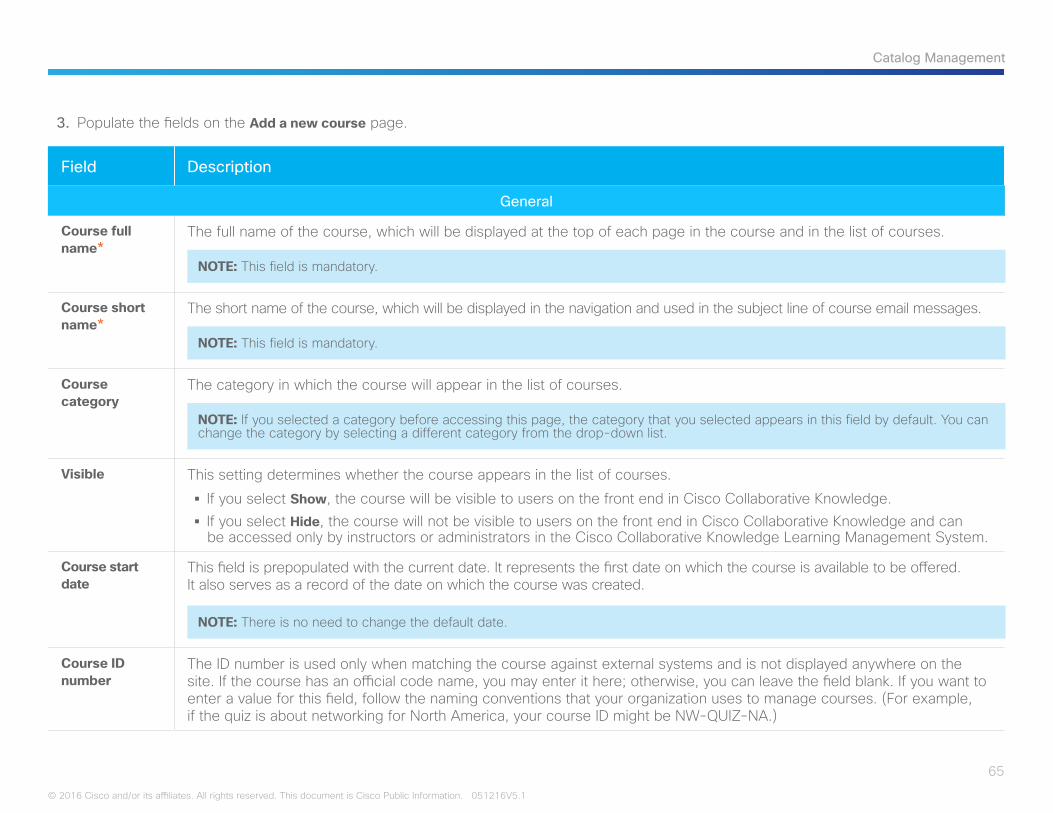
3. Populate the fields on the Add a new course page.
Field Description
General
Course full name*
The full name of the course, which will be displayed at the top of each page in the course and in the list of courses.
NOTE: This field is mandatory.
Course short name*
The short name of the course, which will be displayed in the navigation and used in the subject line of course email messages.
NOTE: This field is mandatory.
Course category
The category in which the course will appear in the list of courses.
NOTE: If you selected a category before accessing this page, the category that you selected appears in this field by default. You can change the category by selecting a different category from the drop-down list.
Visible This setting determines whether the course appears in the list of courses.
§ If you select Show, the course will be visible to users on the front end in Cisco Collaborative Knowledge. § If you select Hide, the course will not be visible to users on the front end in Cisco Collaborative Knowledge and can be accessed only by instructors or administrators in the Cisco Collaborative Knowledge Learning Management System.
Course start date
This field is prepopulated with the current date. It represents the first date on which the course is available to be offered. It also serves as a record of the date on which the course was created.
NOTE: There is no need to change the default date.
Course ID number
The ID number is used only when matching the course against external systems and is not displayed anywhere on the site. If the course has an official code name, you may enter it here; otherwise, you can leave the field blank. If you want to enter a value for this field, follow the naming conventions that your organization uses to manage courses. (For example, if the quiz is about networking for North America, your course ID might be NW-QUIZ-NA.)
66
Catalog Management
© 2016 Cisco and/or its affiliates. All rights reserved. This document is Cisco Public Information. 051216V5.1
Field Description
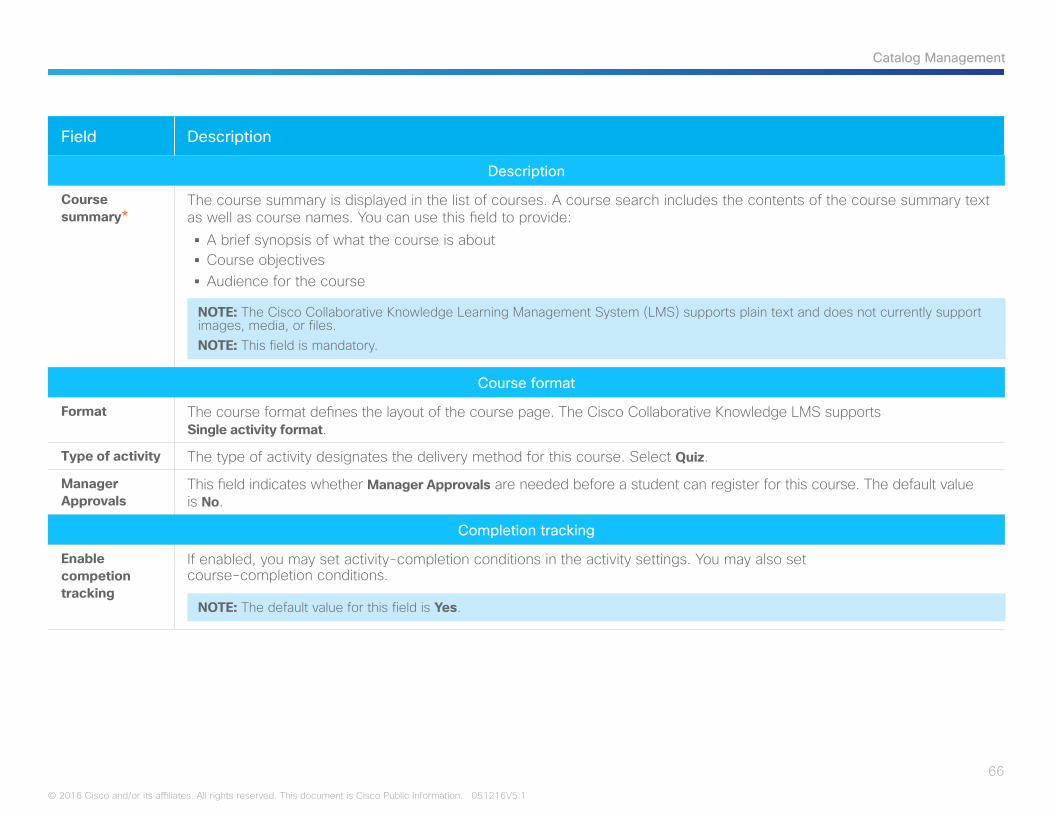
Description
Course summary*
The course summary is displayed in the list of courses. A course search includes the contents of the course summary text as well as course names. You can use this field to provide:
§ A brief synopsis of what the course is about § Course objectives § Audience for the course
NOTE: The Cisco Collaborative Knowledge Learning Management System (LMS) supports plain text and does not currently support images, media, or files.NOTE: This field is mandatory.
Course format
Format The course format defines the layout of the course page. The Cisco Collaborative Knowledge LMS supports Single activity format.
Type of activity The type of activity designates the delivery method for this course. Select Quiz.
Manager Approvals
This field indicates whether Manager Approvals are needed before a student can register for this course. The default value is No.
Completion tracking
Enable competion tracking
If enabled, you may set activity-completion conditions in the activity settings. You may also set course-completion conditions.
NOTE: The default value for this field is Yes.
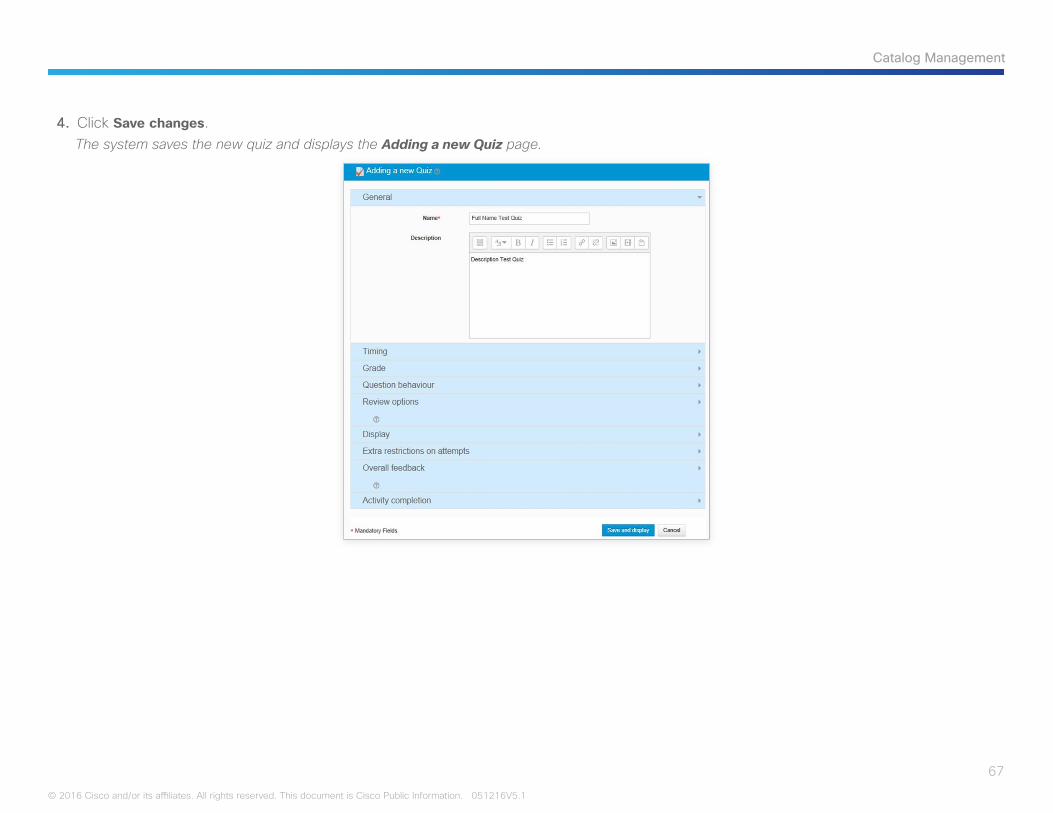
67
Catalog Management
© 2016 Cisco and/or its affiliates. All rights reserved. This document is Cisco Public Information. 051216V5.1
4. Click Save changes.The system saves the new quiz and displays the Adding a new Quiz page.
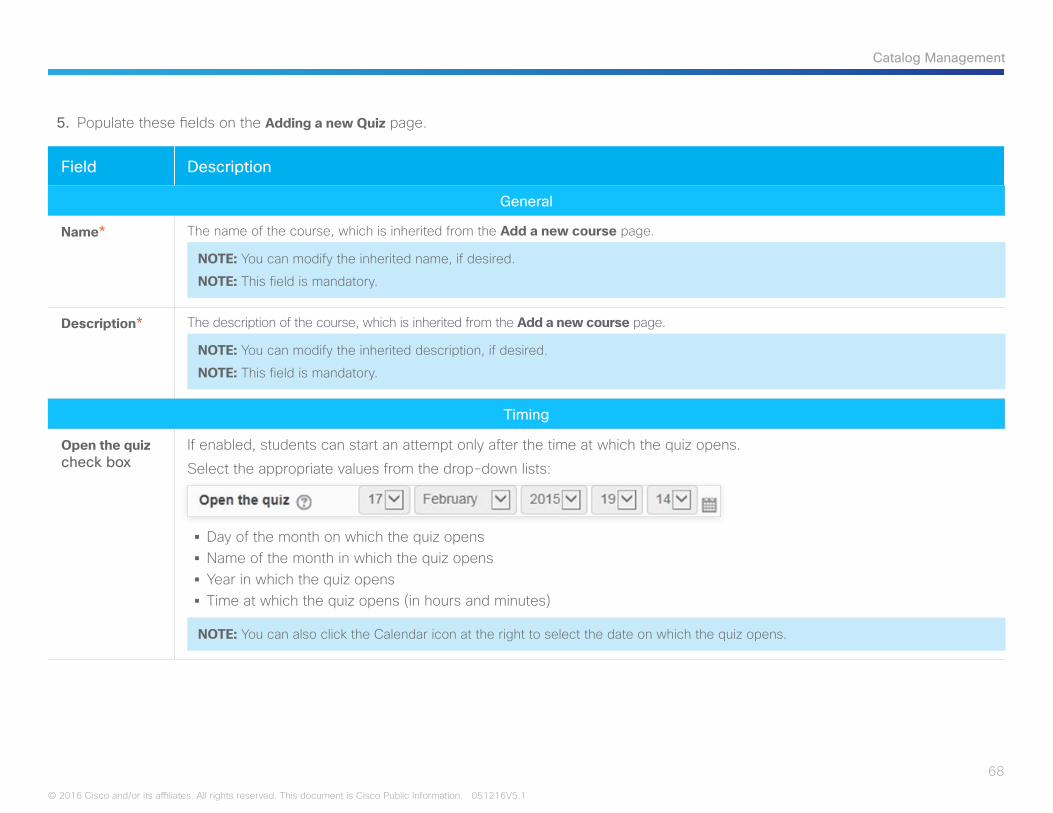
68
Catalog Management
© 2016 Cisco and/or its affiliates. All rights reserved. This document is Cisco Public Information. 051216V5.1
5. Populate these fields on the Adding a new Quiz page.
Field Description
General
Name* The name of the course, which is inherited from the Add a new course page.
NOTE: You can modify the inherited name, if desired.
NOTE: This field is mandatory.
Description* The description of the course, which is inherited from the Add a new course page.
NOTE: You can modify the inherited description, if desired.
NOTE: This field is mandatory.
Timing
Open the quiz check box
If enabled, students can start an attempt only after the time at which the quiz opens.
Select the appropriate values from the drop-down lists:
§ Day of the month on which the quiz opens § Name of the month in which the quiz opens § Year in which the quiz opens § Time at which the quiz opens (in hours and minutes)
NOTE: You can also click the Calendar icon at the right to select the date on which the quiz opens.
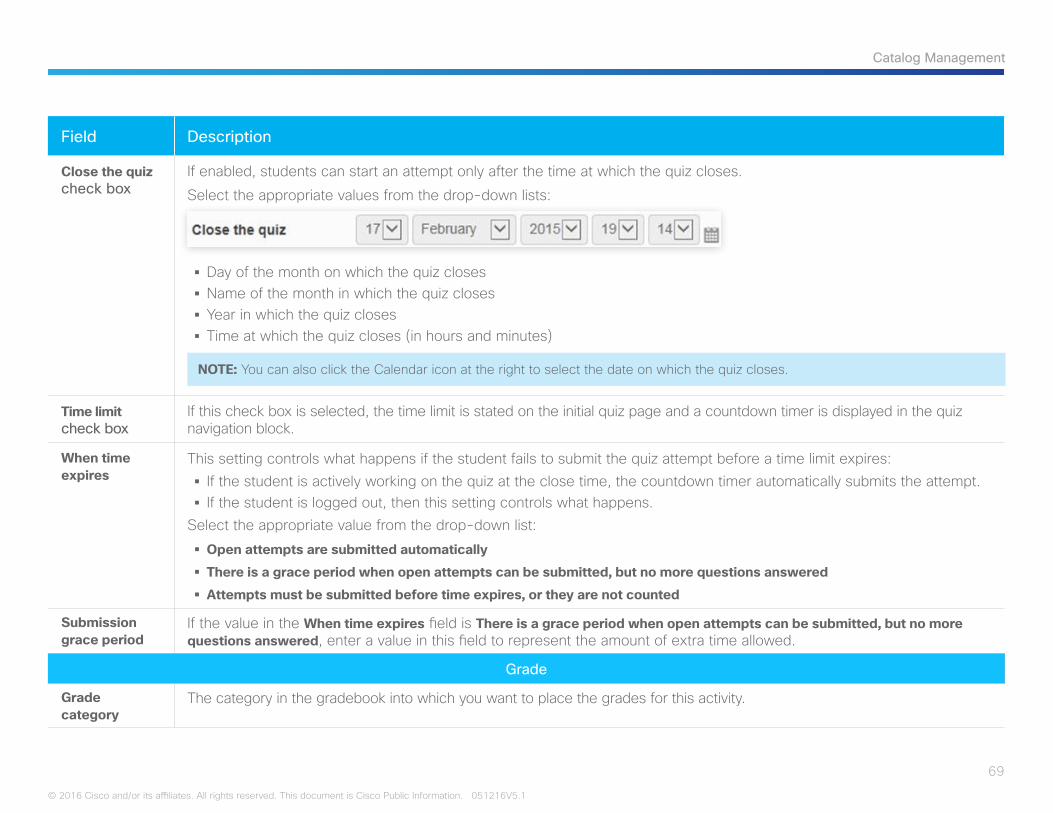
69
Catalog Management
© 2016 Cisco and/or its affiliates. All rights reserved. This document is Cisco Public Information. 051216V5.1
Field Description
Close the quiz check box
If enabled, students can start an attempt only after the time at which the quiz closes.
Select the appropriate values from the drop-down lists:
§ Day of the month on which the quiz closes § Name of the month in which the quiz closes § Year in which the quiz closes § Time at which the quiz closes (in hours and minutes)
NOTE: You can also click the Calendar icon at the right to select the date on which the quiz closes.
Time limit check box
If this check box is selected, the time limit is stated on the initial quiz page and a countdown timer is displayed in the quiz navigation block.
When time expires
This setting controls what happens if the student fails to submit the quiz attempt before a time limit expires: § If the student is actively working on the quiz at the close time, the countdown timer automatically submits the attempt. § If the student is logged out, then this setting controls what happens.
Select the appropriate value from the drop-down list:
§ Open attempts are submitted automatically
§ There is a grace period when open attempts can be submitted, but no more questions answered
§ Attempts must be submitted before time expires, or they are not counted
Submission grace period
If the value in the When time expires field is There is a grace period when open attempts can be submitted, but no more questions answered, enter a value in this field to represent the amount of extra time allowed.
Grade
Grade category
The category in the gradebook into which you want to place the grades for this activity.
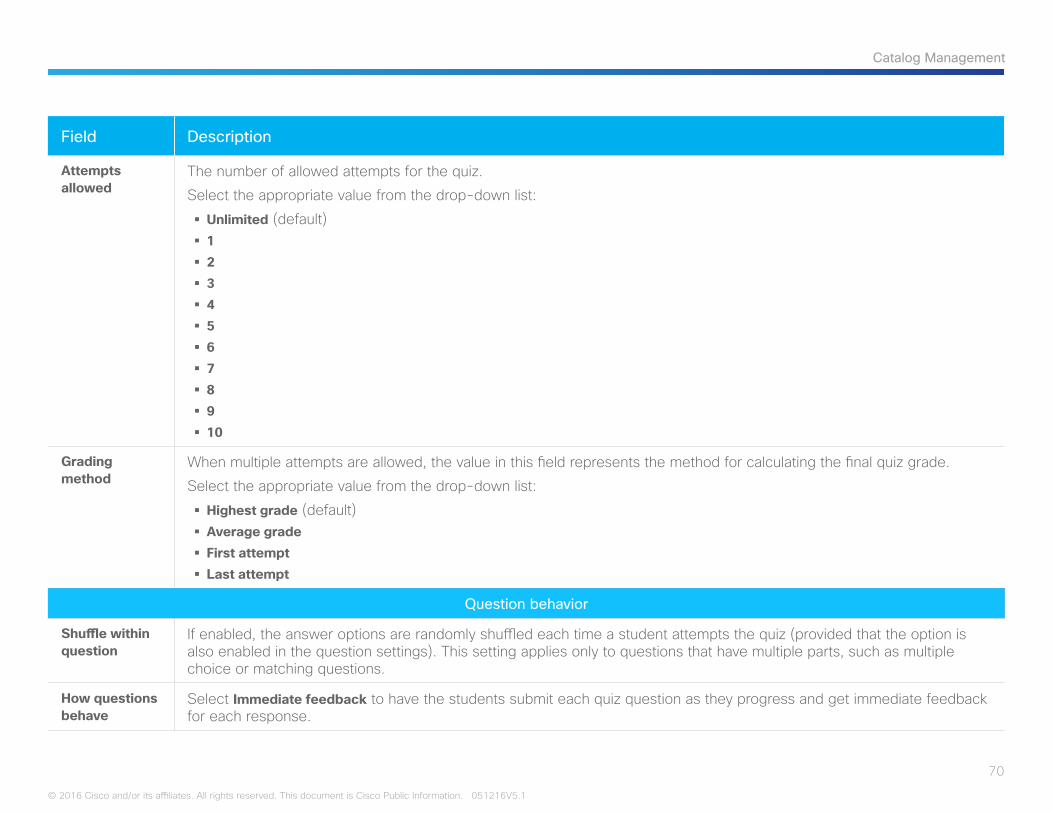
70
Catalog Management
© 2016 Cisco and/or its affiliates. All rights reserved. This document is Cisco Public Information. 051216V5.1
Field Description
Attempts allowed
The number of allowed attempts for the quiz.
Select the appropriate value from the drop-down list:
§ Unlimited (default) § 1 § 2 § 3 § 4 § 5 § 6 § 7 § 8 § 9 § 10
Grading method
When multiple attempts are allowed, the value in this field represents the method for calculating the final quiz grade.
Select the appropriate value from the drop-down list:
§ Highest grade (default) § Average grade § First attempt § Last attempt
Question behavior
Shuffle within question
If enabled, the answer options are randomly shuffled each time a student attempts the quiz (provided that the option is also enabled in the question settings). This setting applies only to questions that have multiple parts, such as multiple choice or matching questions.
How questions behave
Select Immediate feedback to have the students submit each quiz question as they progress and get immediate feedback for each response.
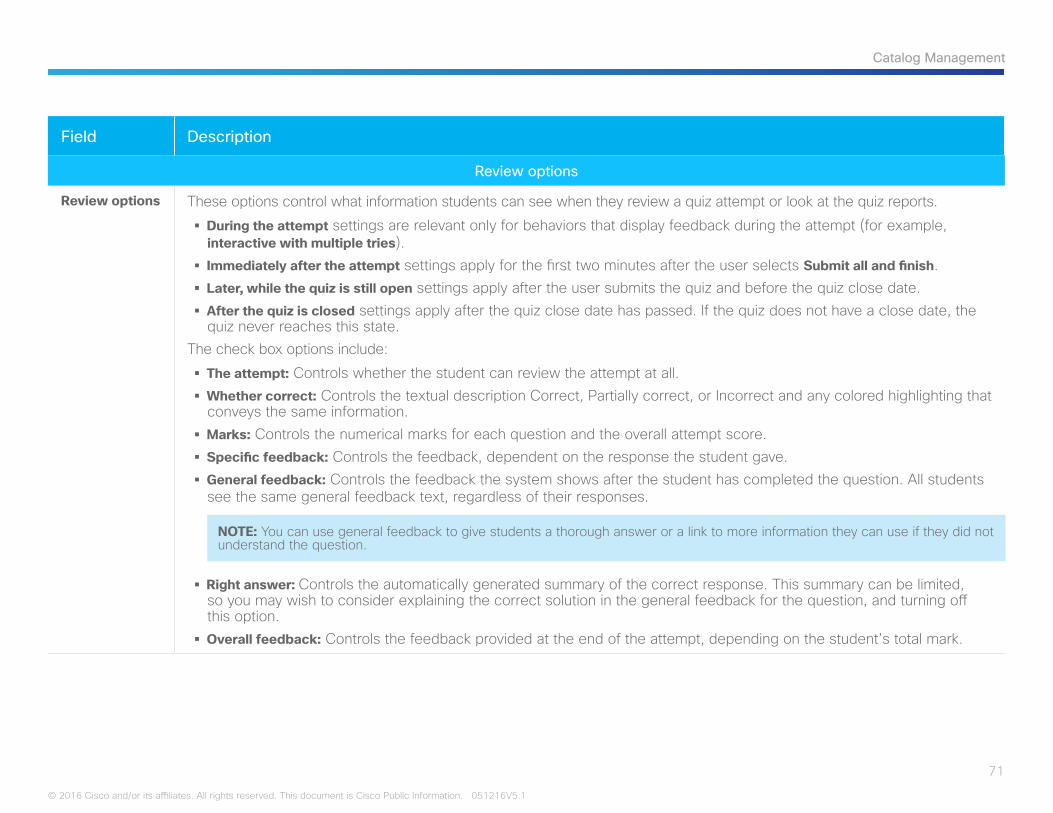
71
Catalog Management
© 2016 Cisco and/or its affiliates. All rights reserved. This document is Cisco Public Information. 051216V5.1
Field Description
Review options
Review options These options control what information students can see when they review a quiz attempt or look at the quiz reports.
§ During the attempt settings are relevant only for behaviors that display feedback during the attempt (for example, interactive with multiple tries).
§ Immediately after the attempt settings apply for the first two minutes after the user selects Submit all and finish. § Later, while the quiz is still open settings apply after the user submits the quiz and before the quiz close date. § After the quiz is closed settings apply after the quiz close date has passed. If the quiz does not have a close date, the quiz never reaches this state.
The check box options include:
§ The attempt: Controls whether the student can review the attempt at all. § Whether correct: Controls the textual description Correct, Partially correct, or Incorrect and any colored highlighting that conveys the same information.
§ Marks: Controls the numerical marks for each question and the overall attempt score. § Specific feedback: Controls the feedback, dependent on the response the student gave. § General feedback: Controls the feedback the system shows after the student has completed the question. All students see the same general feedback text, regardless of their responses.
NOTE: You can use general feedback to give students a thorough answer or a link to more information they can use if they did not understand the question.
§ Right answer: Controls the automatically generated summary of the correct response. This summary can be limited, so you may wish to consider explaining the correct solution in the general feedback for the question, and turning off this option.
§ Overall feedback: Controls the feedback provided at the end of the attempt, depending on the student’s total mark.
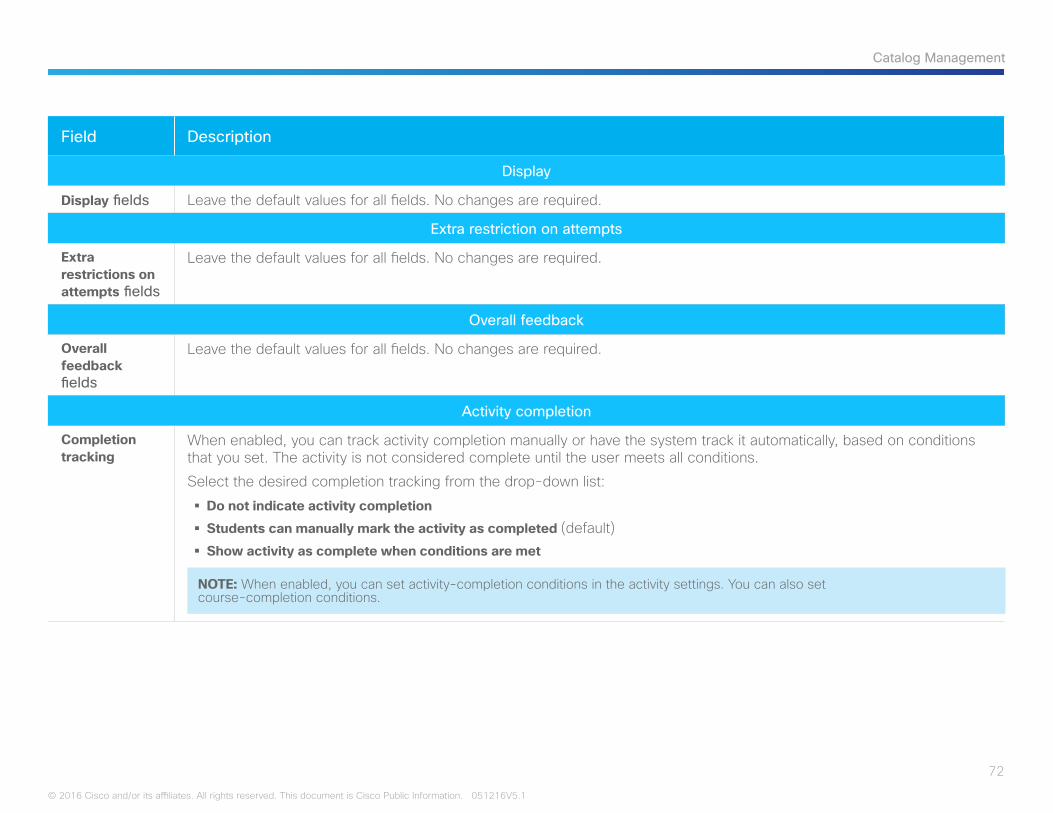
72
Catalog Management
© 2016 Cisco and/or its affiliates. All rights reserved. This document is Cisco Public Information. 051216V5.1
Field Description
Display
Display fields Leave the default values for all fields. No changes are required.
Extra restriction on attempts
Extra restrictions on attempts fields
Leave the default values for all fields. No changes are required.
Overall feedback
Overall feedback fields
Leave the default values for all fields. No changes are required.
Activity completion
Completion tracking
When enabled, you can track activity completion manually or have the system track it automatically, based on conditions that you set. The activity is not considered complete until the user meets all conditions.
Select the desired completion tracking from the drop-down list:
§ Do not indicate activity completion
§ Students can manually mark the activity as completed (default) § Show activity as complete when conditions are met
NOTE: When enabled, you can set activity-completion conditions in the activity settings. You can also set course-completion conditions.
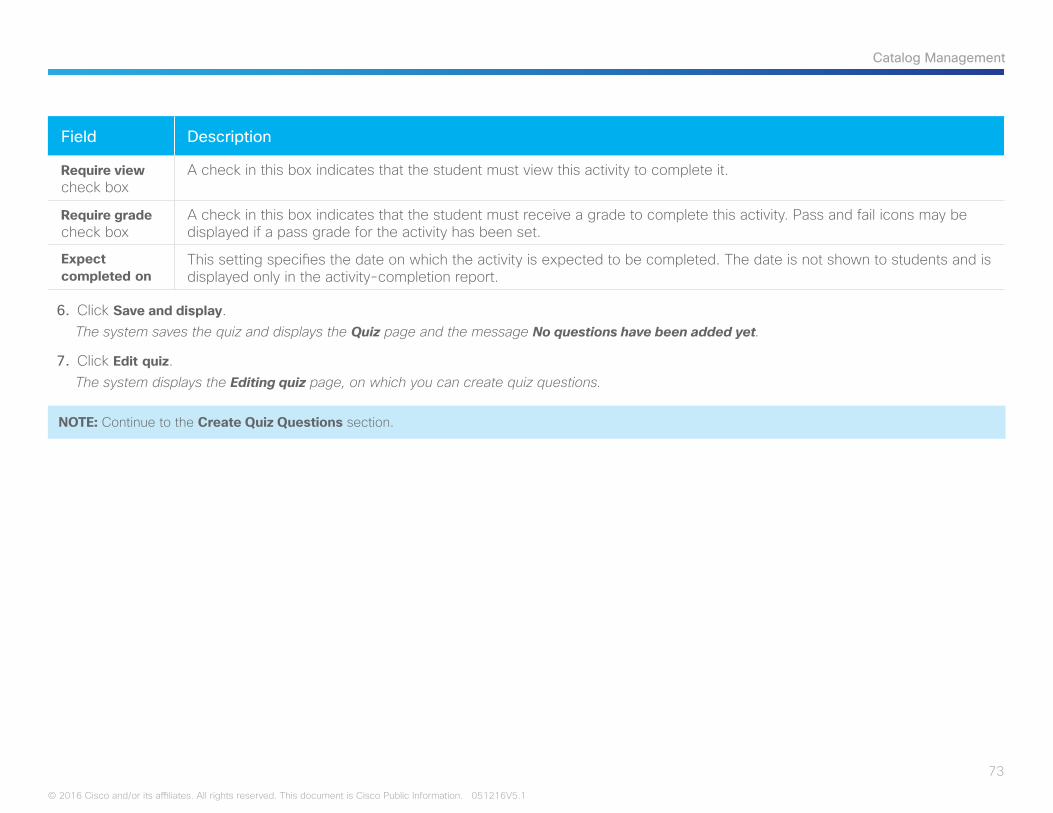
73
Catalog Management
© 2016 Cisco and/or its affiliates. All rights reserved. This document is Cisco Public Information. 051216V5.1
Field Description
Require view check box
A check in this box indicates that the student must view this activity to complete it.
Require grade check box
A check in this box indicates that the student must receive a grade to complete this activity. Pass and fail icons may be displayed if a pass grade for the activity has been set.
Expect completed on
This setting specifies the date on which the activity is expected to be completed. The date is not shown to students and is displayed only in the activity-completion report.
6. Click Save and display.The system saves the quiz and displays the Quiz page and the message No questions have been added yet.
7. Click Edit quiz.The system displays the Editing quiz page, on which you can create quiz questions.
NOTE: Continue to the Create Quiz Questions section.
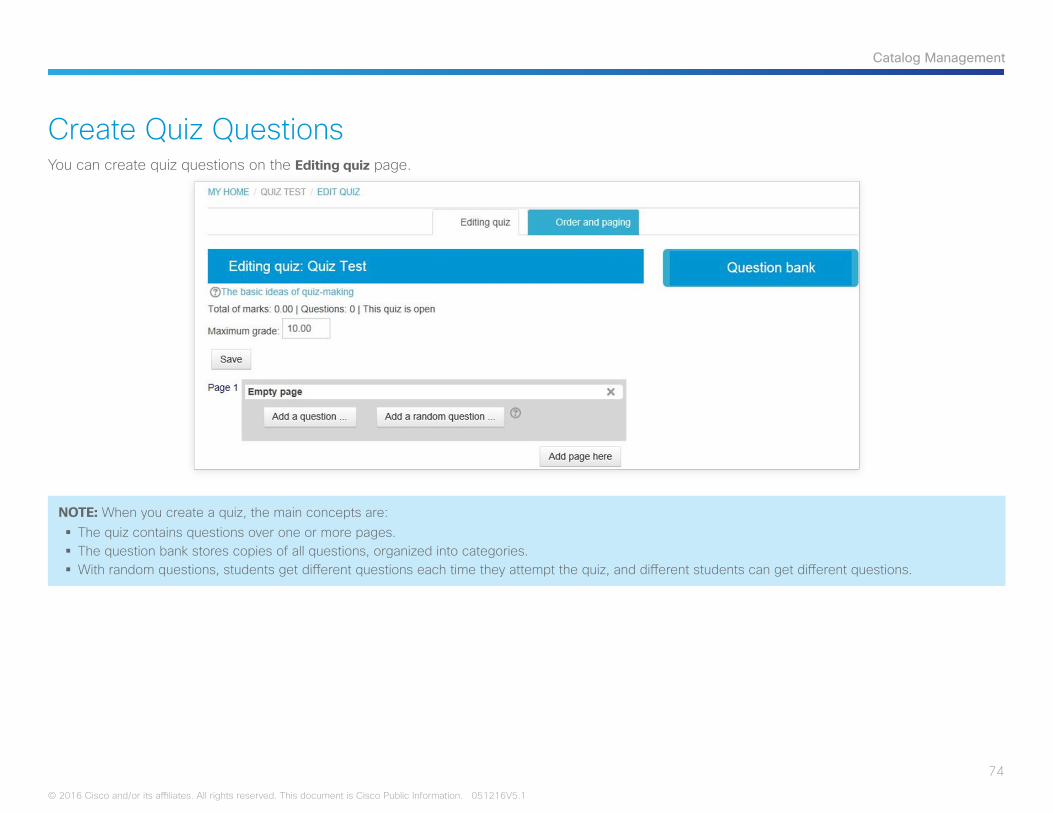
74
Catalog Management
© 2016 Cisco and/or its affiliates. All rights reserved. This document is Cisco Public Information. 051216V5.1
Create Quiz QuestionsYou can create quiz questions on the Editing quiz page.
NOTE: When you create a quiz, the main concepts are: § The quiz contains questions over one or more pages. § The question bank stores copies of all questions, organized into categories. § With random questions, students get different questions each time they attempt the quiz, and different students can get different questions.

75
Catalog Management
© 2016 Cisco and/or its affiliates. All rights reserved. This document is Cisco Public Information. 051216V5.1
Use the following navigational path to create quiz questions:
1. On the Editing quiz page, click Add a question. The system displays the Choose a question type to add dialog box.
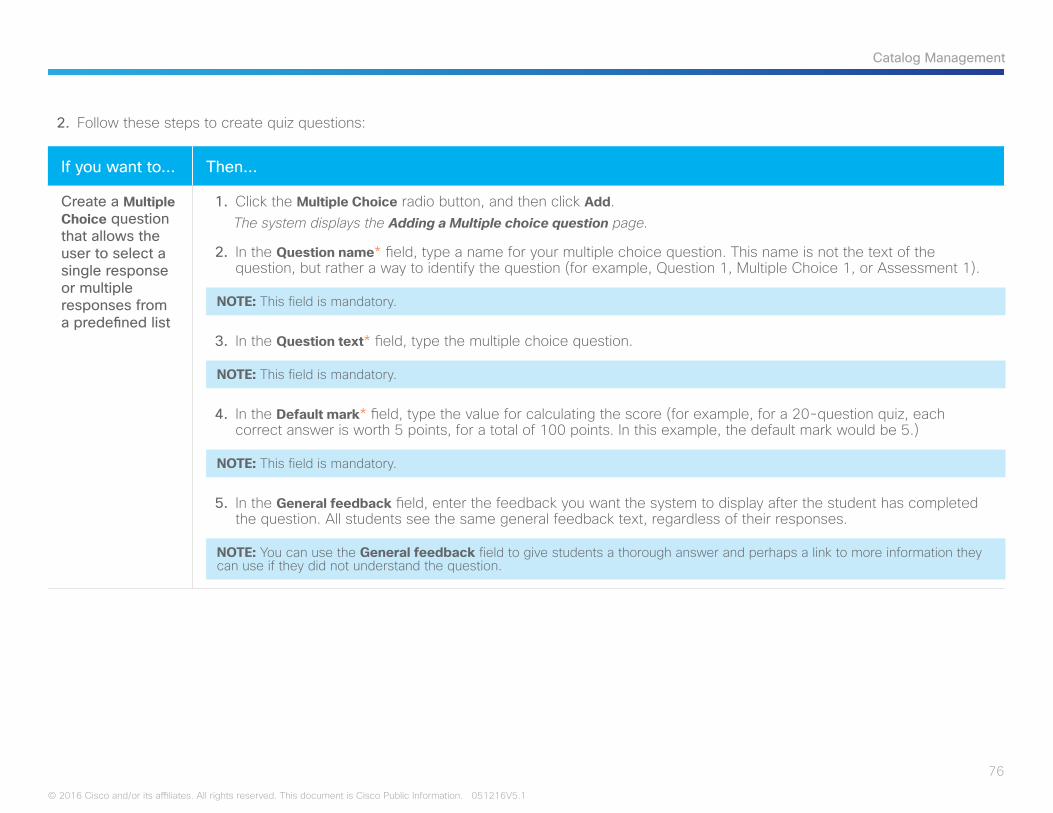
76
Catalog Management
© 2016 Cisco and/or its affiliates. All rights reserved. This document is Cisco Public Information. 051216V5.1
2. Follow these steps to create quiz questions:
If you want to… Then…
Create a Multiple Choice question that allows the user to select a single response or multiple responses from a predefined list
1. Click the Multiple Choice radio button, and then click Add.The system displays the Adding a Multiple choice question page.
2. In the Question name* field, type a name for your multiple choice question. This name is not the text of the question, but rather a way to identify the question (for example, Question 1, Multiple Choice 1, or Assessment 1).
NOTE: This field is mandatory.
3. In the Question text* field, type the multiple choice question.
NOTE: This field is mandatory.
4. In the Default mark* field, type the value for calculating the score (for example, for a 20-question quiz, each correct answer is worth 5 points, for a total of 100 points. In this example, the default mark would be 5.)
NOTE: This field is mandatory.
5. In the General feedback field, enter the feedback you want the system to display after the student has completed the question. All students see the same general feedback text, regardless of their responses.
NOTE: You can use the General feedback field to give students a thorough answer and perhaps a link to more information they can use if they did not understand the question.
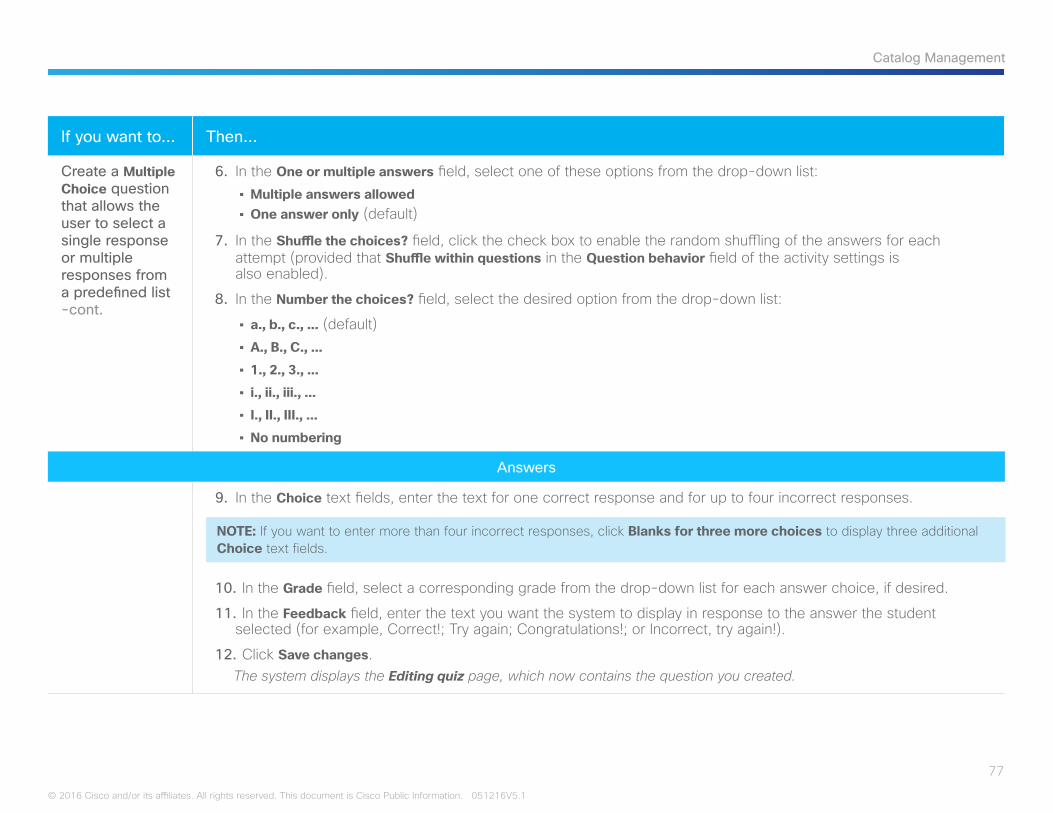
77
Catalog Management
© 2016 Cisco and/or its affiliates. All rights reserved. This document is Cisco Public Information. 051216V5.1
If you want to… Then…
Create a Multiple Choice question that allows the user to select a single response or multiple responses from a predefined list -cont.
6. In the One or multiple answers field, select one of these options from the drop-down list:• Multiple answers allowed• One answer only (default)
7. In the Shuffle the choices? field, click the check box to enable the random shuffling of the answers for each attempt (provided that Shuffle within questions in the Question behavior field of the activity settings is also enabled).
8. In the Number the choices? field, select the desired option from the drop-down list:
• a., b., c., … (default)• A., B., C., …
• 1., 2., 3., …
• i., ii., iii., …
• I., II., III., …
• No numbering
Answers
9. In the Choice text fields, enter the text for one correct response and for up to four incorrect responses.
NOTE: If you want to enter more than four incorrect responses, click Blanks for three more choices to display three additional Choice text fields.
10. In the Grade field, select a corresponding grade from the drop-down list for each answer choice, if desired.
11. In the Feedback field, enter the text you want the system to display in response to the answer the student selected (for example, Correct!; Try again; Congratulations!; or Incorrect, try again!).
12. Click Save changes.The system displays the Editing quiz page, which now contains the question you created.
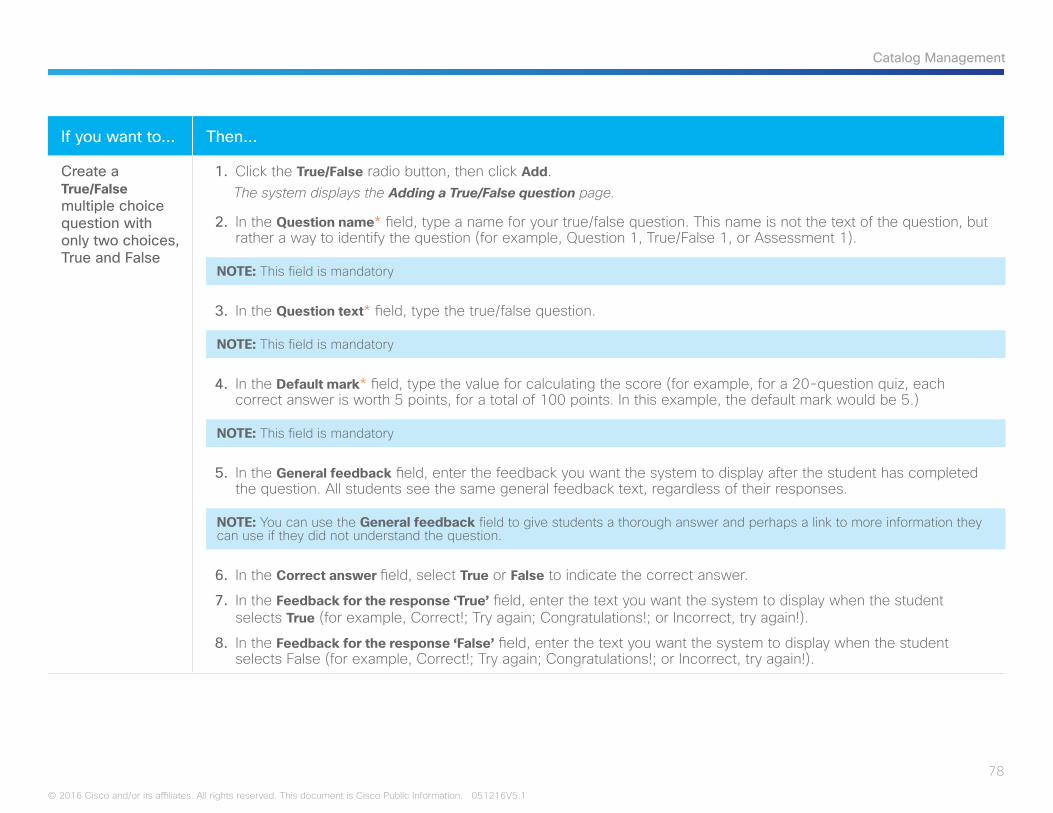
78
Catalog Management
© 2016 Cisco and/or its affiliates. All rights reserved. This document is Cisco Public Information. 051216V5.1
If you want to… Then…
Create a True/False multiple choice question with only two choices, True and False
1. Click the True/False radio button, then click Add.The system displays the Adding a True/False question page.
2. In the Question name* field, type a name for your true/false question. This name is not the text of the question, but rather a way to identify the question (for example, Question 1, True/False 1, or Assessment 1).
NOTE: This field is mandatory
3. In the Question text* field, type the true/false question.
NOTE: This field is mandatory
4. In the Default mark* field, type the value for calculating the score (for example, for a 20-question quiz, each correct answer is worth 5 points, for a total of 100 points. In this example, the default mark would be 5.)
NOTE: This field is mandatory
5. In the General feedback field, enter the feedback you want the system to display after the student has completed the question. All students see the same general feedback text, regardless of their responses.
NOTE: You can use the General feedback field to give students a thorough answer and perhaps a link to more information they can use if they did not understand the question.
6. In the Correct answer field, select True or False to indicate the correct answer.
7. In the Feedback for the response ‘True’ field, enter the text you want the system to display when the student selects True (for example, Correct!; Try again; Congratulations!; or Incorrect, try again!).
8. In the Feedback for the response ‘False’ field, enter the text you want the system to display when the student selects False (for example, Correct!; Try again; Congratulations!; or Incorrect, try again!).
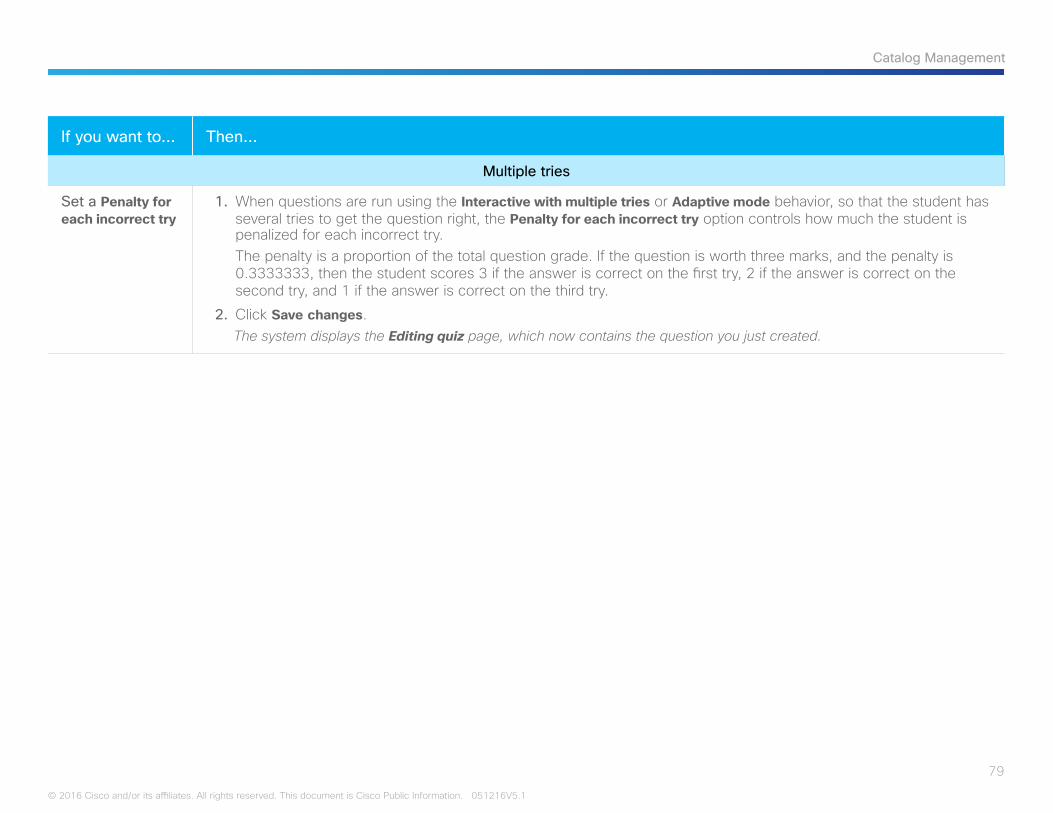
79
Catalog Management
© 2016 Cisco and/or its affiliates. All rights reserved. This document is Cisco Public Information. 051216V5.1
If you want to… Then…
Multiple tries
Set a Penalty for each incorrect try
1. When questions are run using the Interactive with multiple tries or Adaptive mode behavior, so that the student has several tries to get the question right, the Penalty for each incorrect try option controls how much the student is penalized for each incorrect try. The penalty is a proportion of the total question grade. If the question is worth three marks, and the penalty is 0.3333333, then the student scores 3 if the answer is correct on the first try, 2 if the answer is correct on the second try, and 1 if the answer is correct on the third try.
2. Click Save changes.The system displays the Editing quiz page, which now contains the question you just created.

80
Catalog Management
© 2016 Cisco and/or its affiliates. All rights reserved. This document is Cisco Public Information. 051216V5.1
Edit a Quiz QuestionUse the following navigational path to edit a quiz question:
1. In the left navigation, click Courses and Category Management.The system displays the Manage Catalog page, populated with the list of existing Course categories.
2. Click the title of the category that contains the quiz you want to edit.The system displays the courses contained within that category.
3. Locate the course you want to edit, and then click the Edit () icon for that course.The system displays the Edit Course page.
4. Click Save Changes.The system displays the Quiz page.
5. Click Update Course Details.The system displays the Updating: Quiz page.

81
Catalog Management
© 2016 Cisco and/or its affiliates. All rights reserved. This document is Cisco Public Information. 051216V5.1
6. Click Save and display.The system displays the Quiz page.
7. Click Attempt quiz now.The system displays the Preview page.
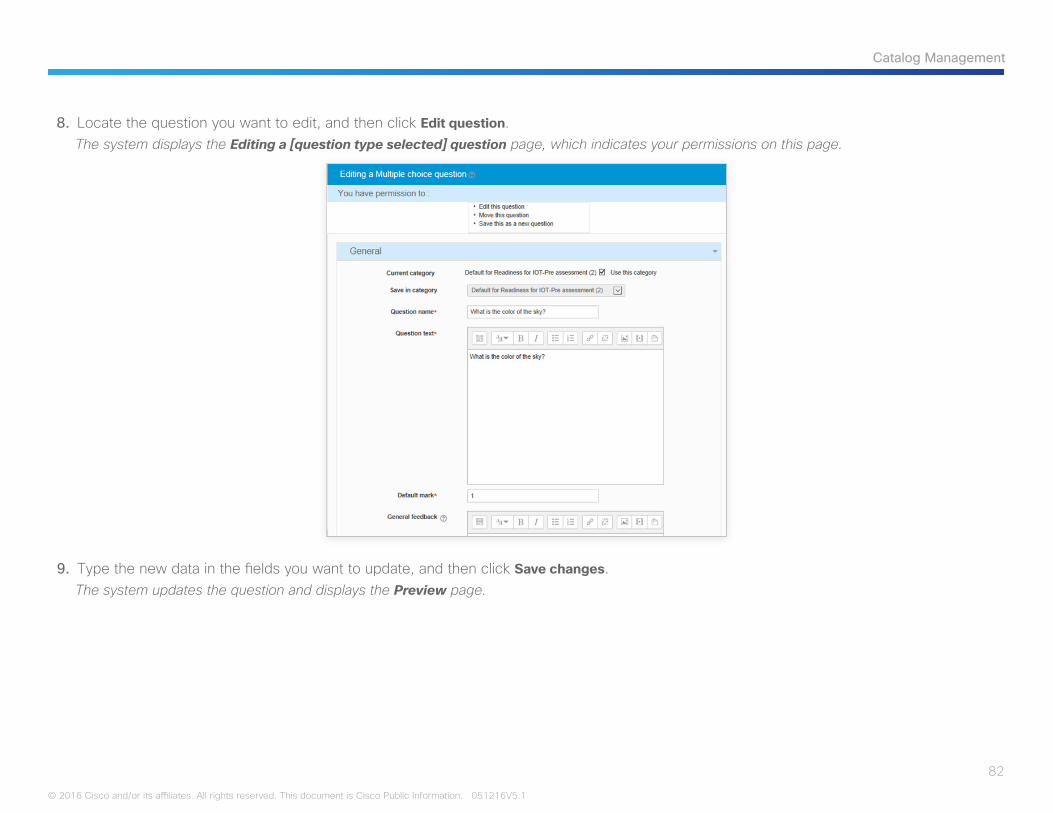
82
Catalog Management
© 2016 Cisco and/or its affiliates. All rights reserved. This document is Cisco Public Information. 051216V5.1
8. Locate the question you want to edit, and then click Edit question.The system displays the Editing a [question type selected] question page, which indicates your permissions on this page.
9. Type the new data in the fields you want to update, and then click Save changes.The system updates the question and displays the Preview page.
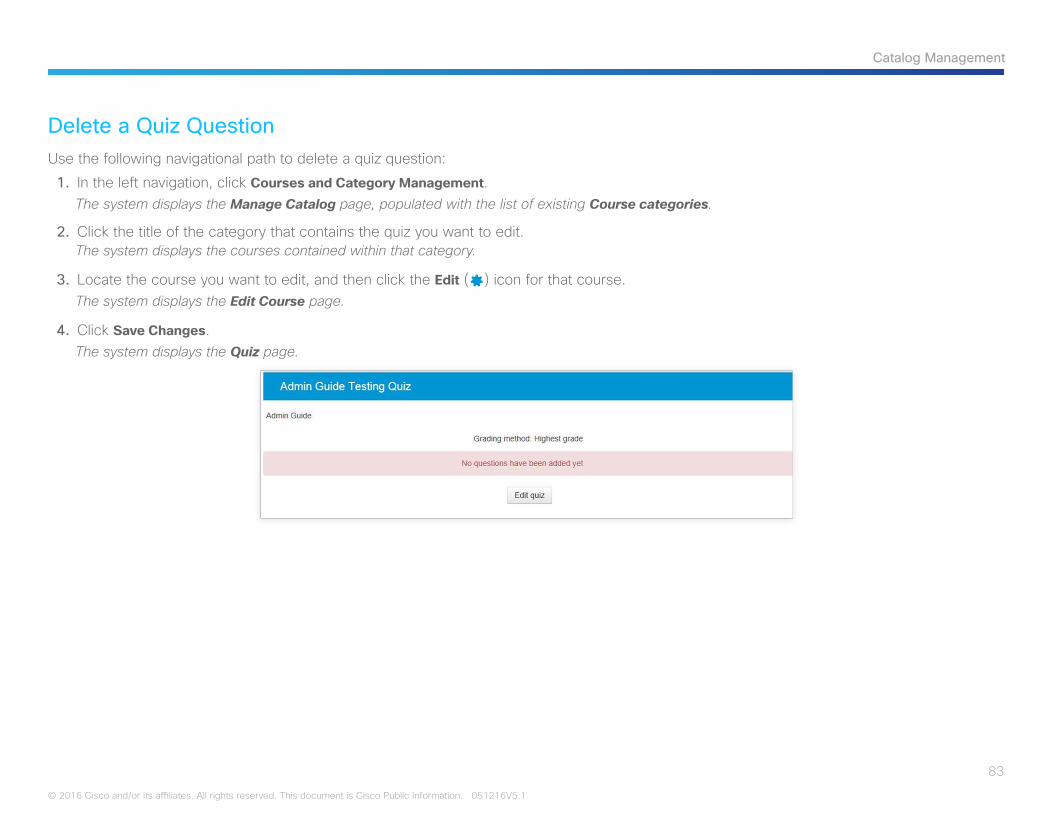
83
Catalog Management
© 2016 Cisco and/or its affiliates. All rights reserved. This document is Cisco Public Information. 051216V5.1
Delete a Quiz QuestionUse the following navigational path to delete a quiz question:
1. In the left navigation, click Courses and Category Management.The system displays the Manage Catalog page, populated with the list of existing Course categories.
2. Click the title of the category that contains the quiz you want to edit.The system displays the courses contained within that category.
3. Locate the course you want to edit, and then click the Edit () icon for that course.The system displays the Edit Course page.
4. Click Save Changes.The system displays the Quiz page.
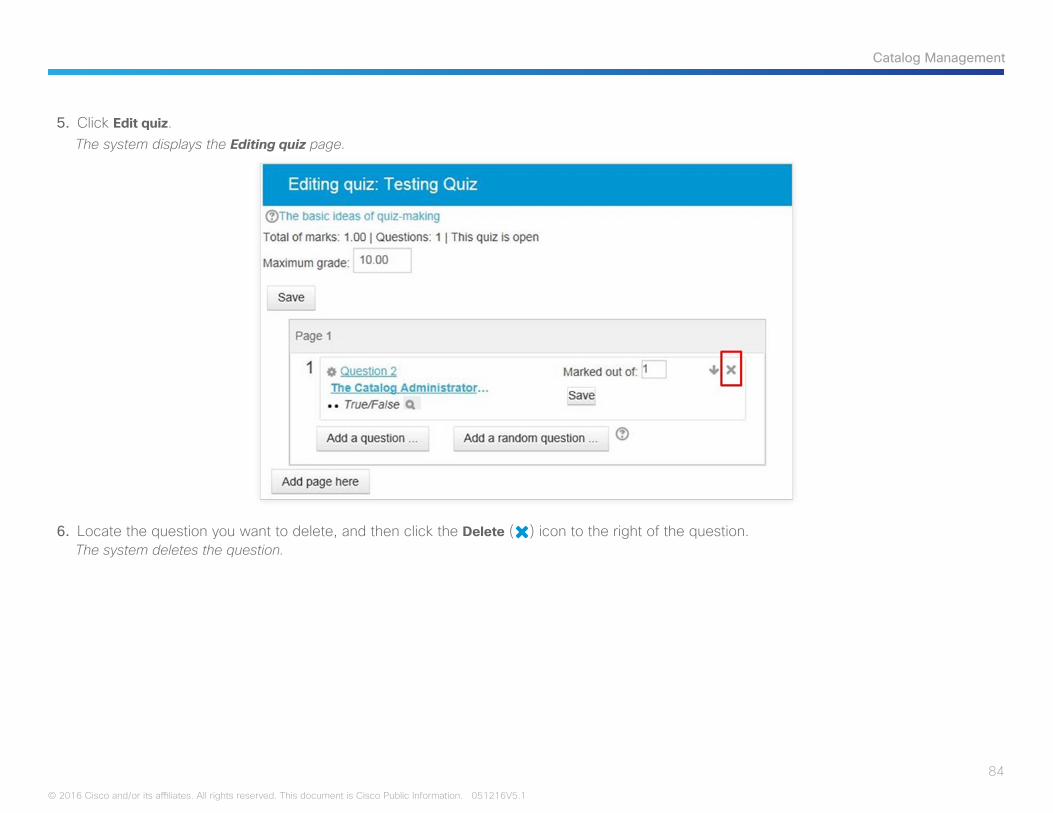
84
Catalog Management
© 2016 Cisco and/or its affiliates. All rights reserved. This document is Cisco Public Information. 051216V5.1
5. Click Edit quiz.The system displays the Editing quiz page.
6. Locate the question you want to delete, and then click the Delete () icon to the right of the question.The system deletes the question.
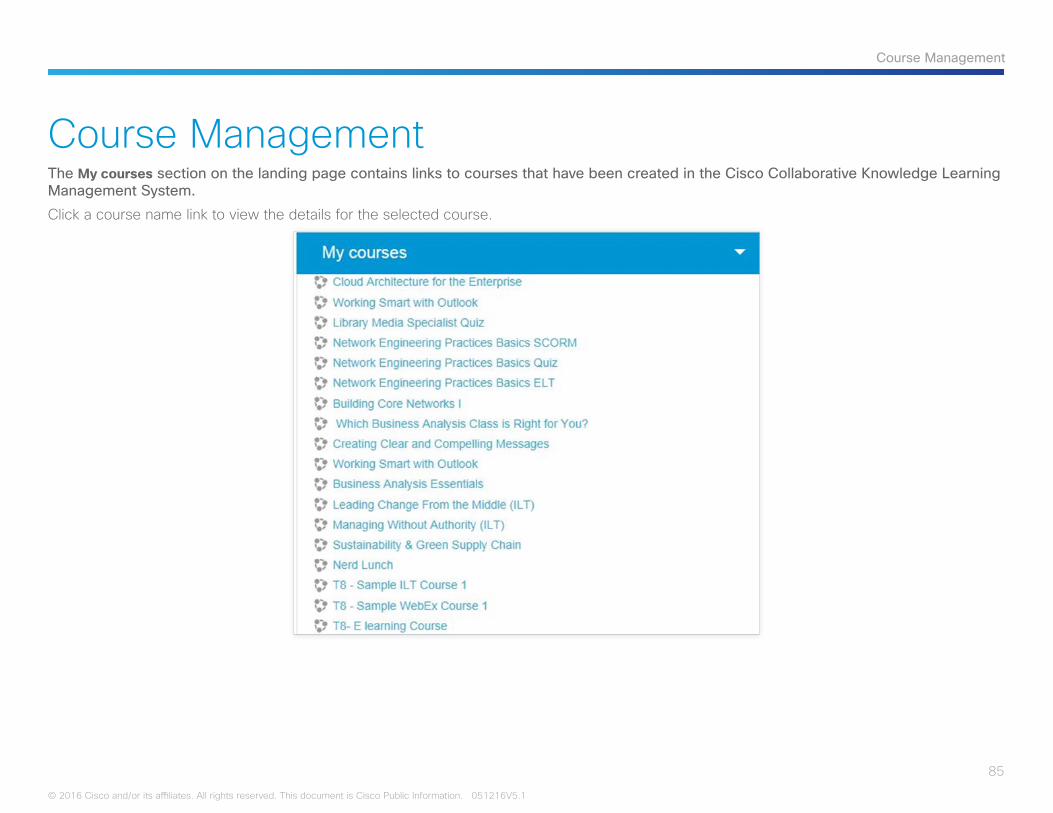
85
Course Management
© 2016 Cisco and/or its affiliates. All rights reserved. This document is Cisco Public Information. 051216V5.1
Course ManagementThe My courses section on the landing page contains links to courses that have been created in the Cisco Collaborative Knowledge Learning Management System.
Click a course name link to view the details for the selected course.
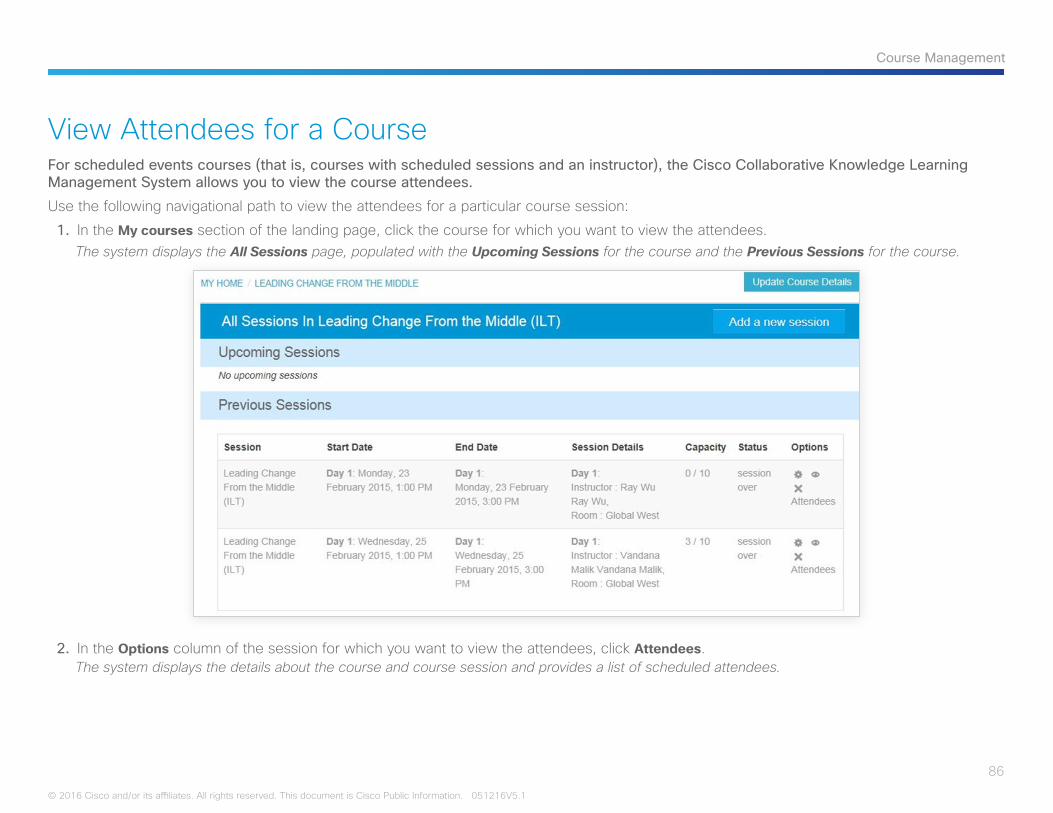
86
Course Management
© 2016 Cisco and/or its affiliates. All rights reserved. This document is Cisco Public Information. 051216V5.1
View Attendees for a CourseFor scheduled events courses (that is, courses with scheduled sessions and an instructor), the Cisco Collaborative Knowledge Learning Management System allows you to view the course attendees.
Use the following navigational path to view the attendees for a particular course session:
1. In the My courses section of the landing page, click the course for which you want to view the attendees.The system displays the All Sessions page, populated with the Upcoming Sessions for the course and the Previous Sessions for the course.
2. In the Options column of the session for which you want to view the attendees, click Attendees.The system displays the details about the course and course session and provides a list of scheduled attendees.
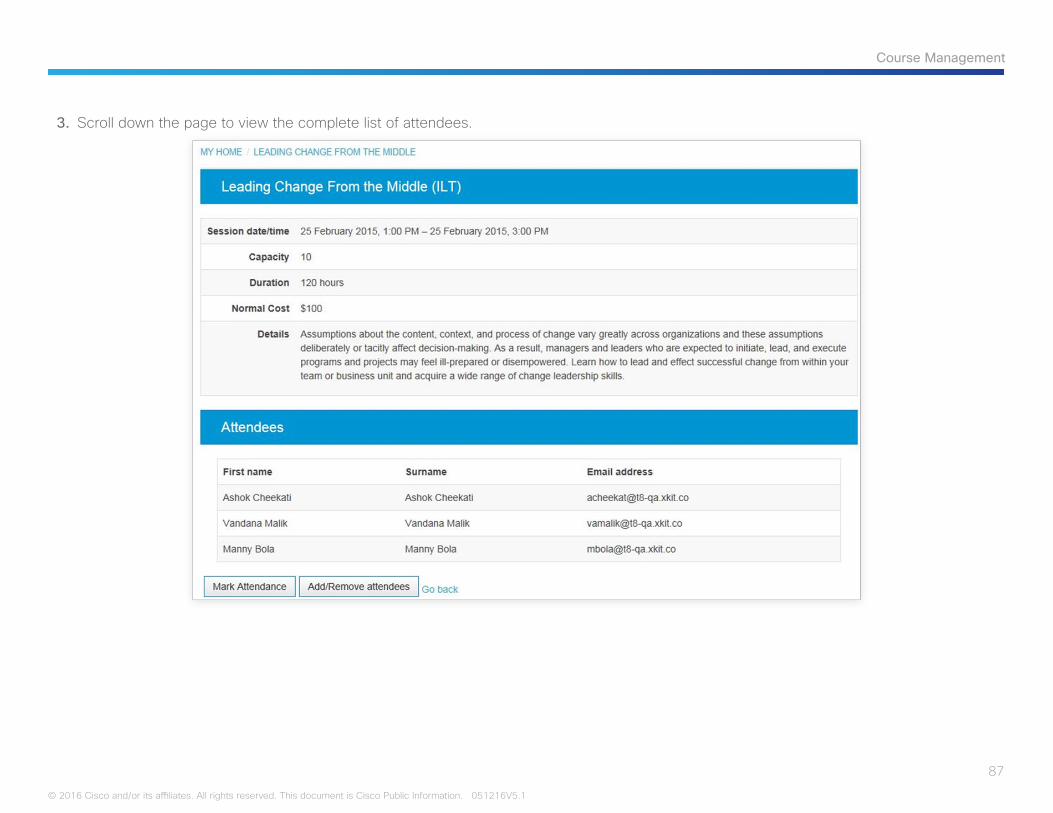
87
Course Management
© 2016 Cisco and/or its affiliates. All rights reserved. This document is Cisco Public Information. 051216V5.1
3. Scroll down the page to view the complete list of attendees.

88
Course Management
© 2016 Cisco and/or its affiliates. All rights reserved. This document is Cisco Public Information. 051216V5.1
Add or Remove Attendees for a CourseUse the following navigational path to add or remove attendees for a particular course session:
1. In the My courses section of the landing page, click the course for which you want to add or remove attendees.The system displays the All Sessions page, populated with the Upcoming Sessions for the course and the Previous Sessions for the course.
2. In the Options column of the session for which you want to add or remove attendees, click Attendees.The system displays the details about the course and course session and provides a list of scheduled attendees.
3. Click Add/Remove attendees.The system displays the Add/Remove attendees page.
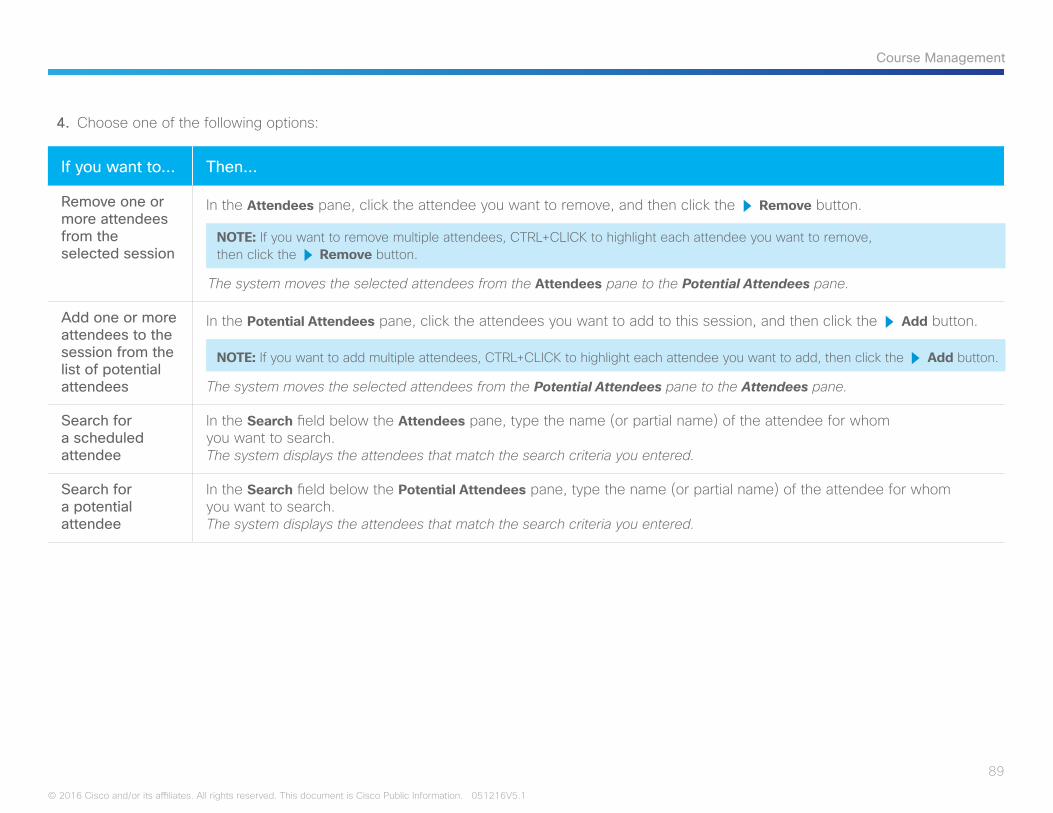
89
Course Management
© 2016 Cisco and/or its affiliates. All rights reserved. This document is Cisco Public Information. 051216V5.1
4. Choose one of the following options:
If you want to… Then…
Remove one or more attendees from the selected session
In the Attendees pane, click the attendee you want to remove, and then click the R Remove button.
NOTE: If you want to remove multiple attendees, CTRL+CLICK to highlight each attendee you want to remove, then click the R Remove button.
The system moves the selected attendees from the Attendees pane to the Potential Attendees pane.
Add one or more attendees to the session from the list of potential attendees
In the Potential Attendees pane, click the attendees you want to add to this session, and then click the R Add button.
NOTE: If you want to add multiple attendees, CTRL+CLICK to highlight each attendee you want to add, then click the R Add button.
The system moves the selected attendees from the Potential Attendees pane to the Attendees pane.
Search for a scheduled attendee
In the Search field below the Attendees pane, type the name (or partial name) of the attendee for whom you want to search.The system displays the attendees that match the search criteria you entered.
Search for a potential attendee
In the Search field below the Potential Attendees pane, type the name (or partial name) of the attendee for whom you want to search.The system displays the attendees that match the search criteria you entered.
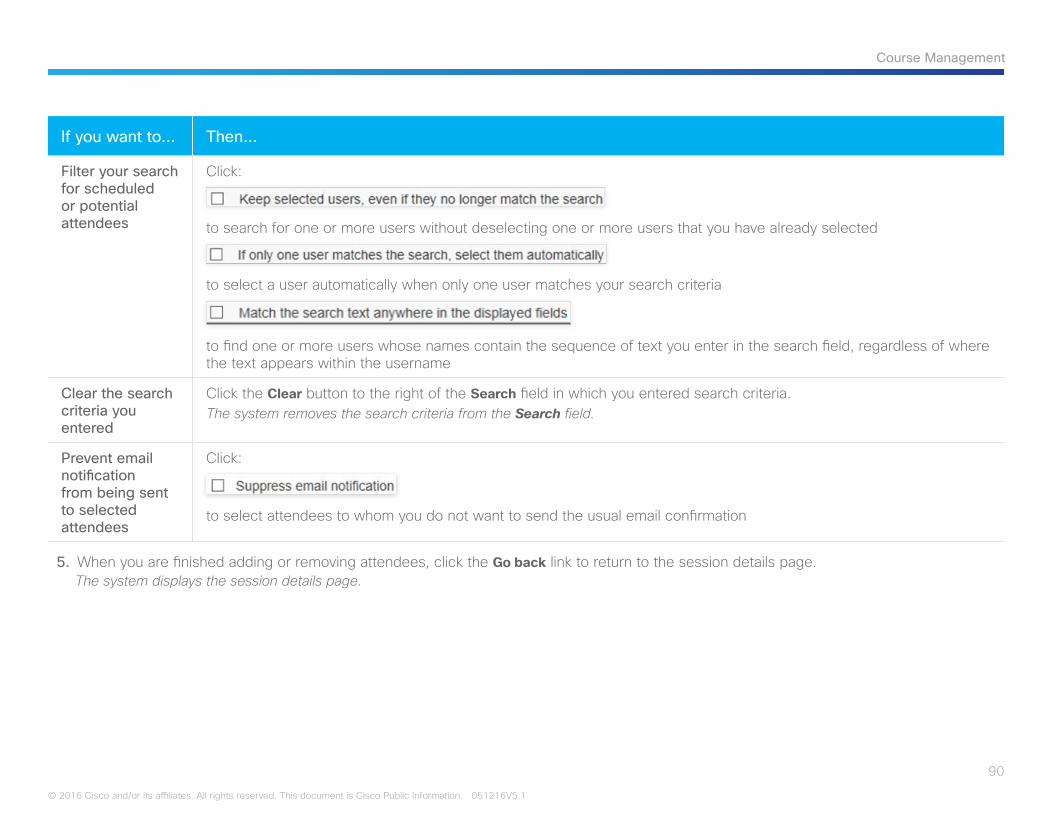
90
Course Management
© 2016 Cisco and/or its affiliates. All rights reserved. This document is Cisco Public Information. 051216V5.1
If you want to… Then…
Filter your search for scheduled or potential attendees
Click:
to search for one or more users without deselecting one or more users that you have already selected
to select a user automatically when only one user matches your search criteria
to find one or more users whose names contain the sequence of text you enter in the search field, regardless of where the text appears within the username
Clear the search criteria you entered
Click the Clear button to the right of the Search field in which you entered search criteria.The system removes the search criteria from the Search field.
Prevent email notification from being sent to selected attendees
Click:
to select attendees to whom you do not want to send the usual email confirmation
5. When you are finished adding or removing attendees, click the Go back link to return to the session details page.The system displays the session details page.
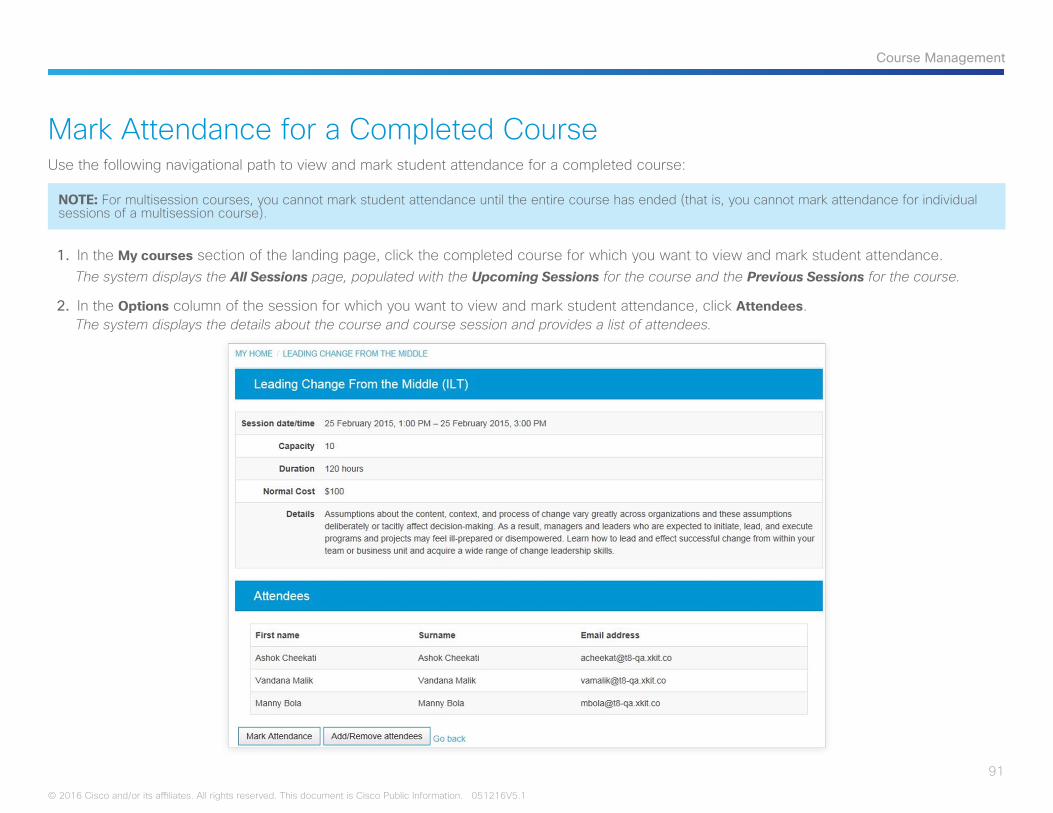
91
Course Management
© 2016 Cisco and/or its affiliates. All rights reserved. This document is Cisco Public Information. 051216V5.1
Mark Attendance for a Completed CourseUse the following navigational path to view and mark student attendance for a completed course:
NOTE: For multisession courses, you cannot mark student attendance until the entire course has ended (that is, you cannot mark attendance for individual sessions of a multisession course).
1. In the My courses section of the landing page, click the completed course for which you want to view and mark student attendance.The system displays the All Sessions page, populated with the Upcoming Sessions for the course and the Previous Sessions for the course.
2. In the Options column of the session for which you want to view and mark student attendance, click Attendees.The system displays the details about the course and course session and provides a list of attendees.
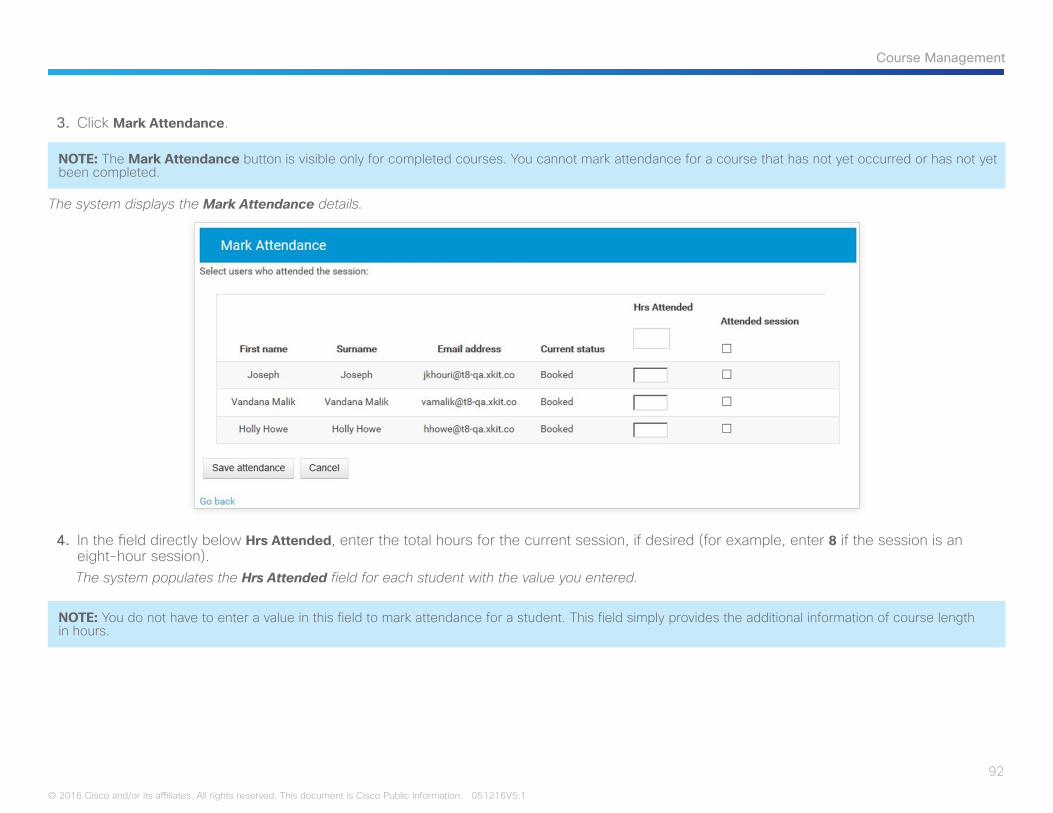
92
Course Management
© 2016 Cisco and/or its affiliates. All rights reserved. This document is Cisco Public Information. 051216V5.1
3. Click Mark Attendance.
NOTE: The Mark Attendance button is visible only for completed courses. You cannot mark attendance for a course that has not yet occurred or has not yet been completed.
The system displays the Mark Attendance details.
4. In the field directly below Hrs Attended, enter the total hours for the current session, if desired (for example, enter 8 if the session is an eight-hour session). The system populates the Hrs Attended field for each student with the value you entered.
NOTE: You do not have to enter a value in this field to mark attendance for a student. This field simply provides the additional information of course length in hours.
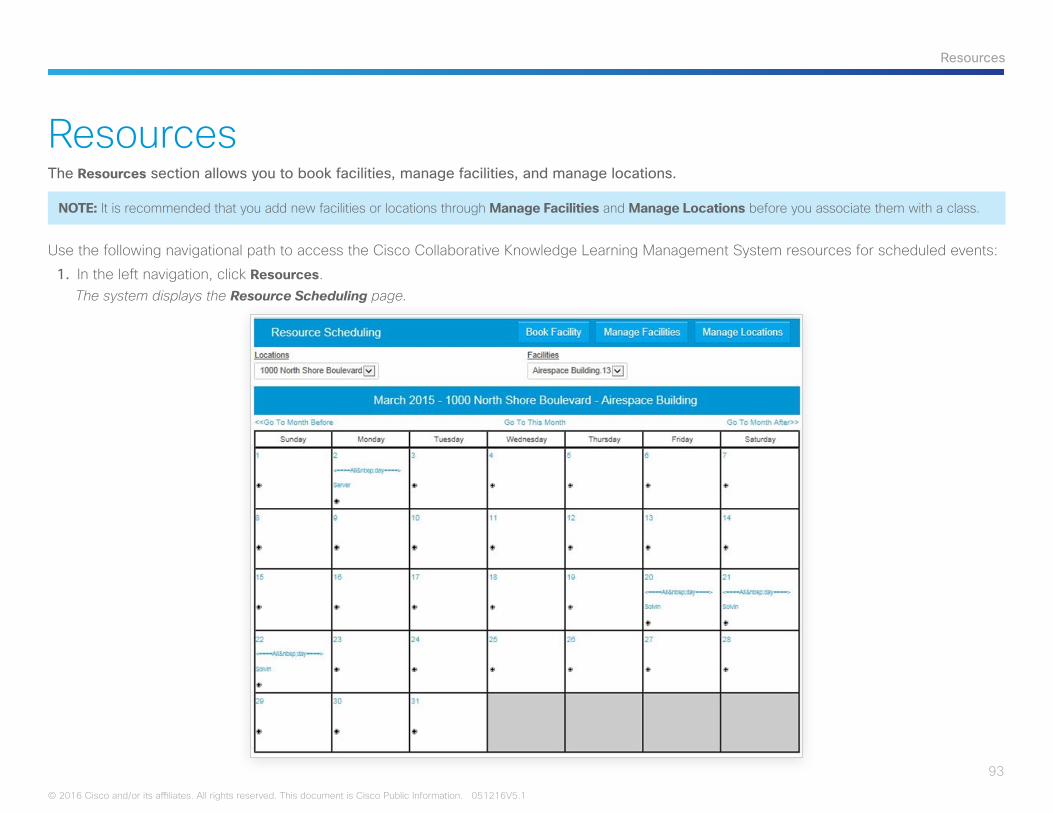
93
Resources
© 2016 Cisco and/or its affiliates. All rights reserved. This document is Cisco Public Information. 051216V5.1
ResourcesThe Resources section allows you to book facilities, manage facilities, and manage locations.
NOTE: It is recommended that you add new facilities or locations through Manage Facilities and Manage Locations before you associate them with a class.
Use the following navigational path to access the Cisco Collaborative Knowledge Learning Management System resources for scheduled events:
1. In the left navigation, click Resources.The system displays the Resource Scheduling page.
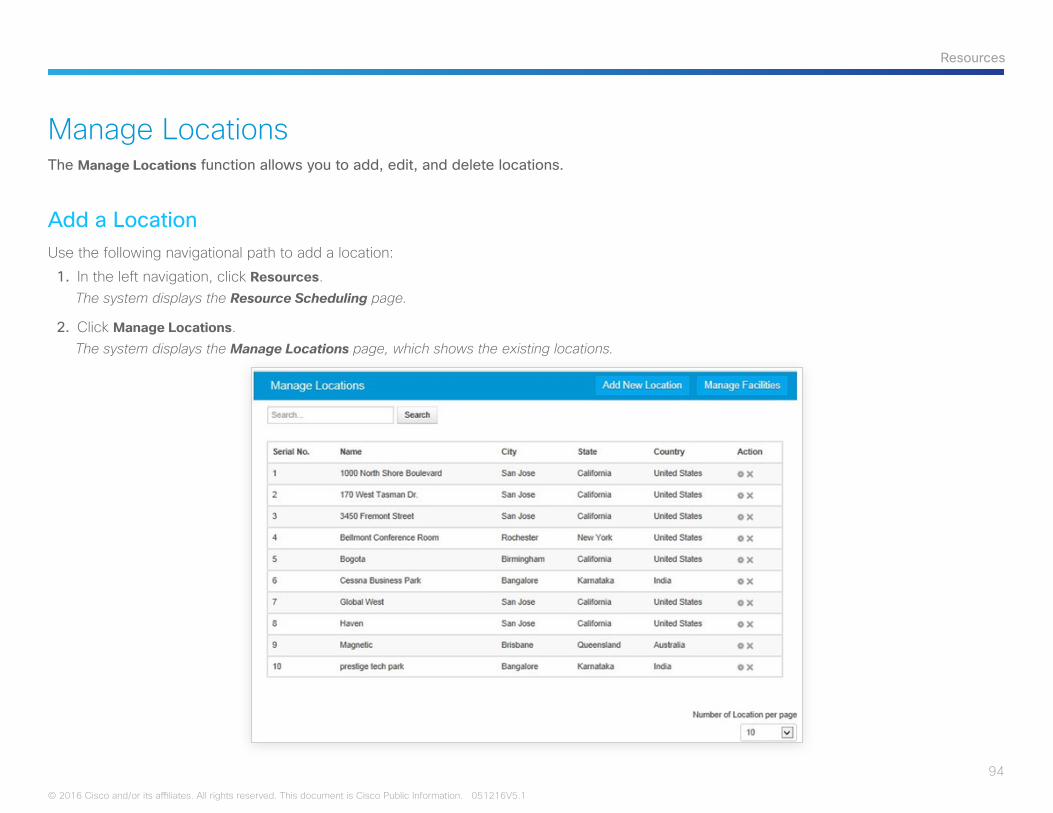
94
Resources
© 2016 Cisco and/or its affiliates. All rights reserved. This document is Cisco Public Information. 051216V5.1
Manage LocationsThe Manage Locations function allows you to add, edit, and delete locations.
Add a LocationUse the following navigational path to add a location:
1. In the left navigation, click Resources.The system displays the Resource Scheduling page.
2. Click Manage Locations.The system displays the Manage Locations page, which shows the existing locations.
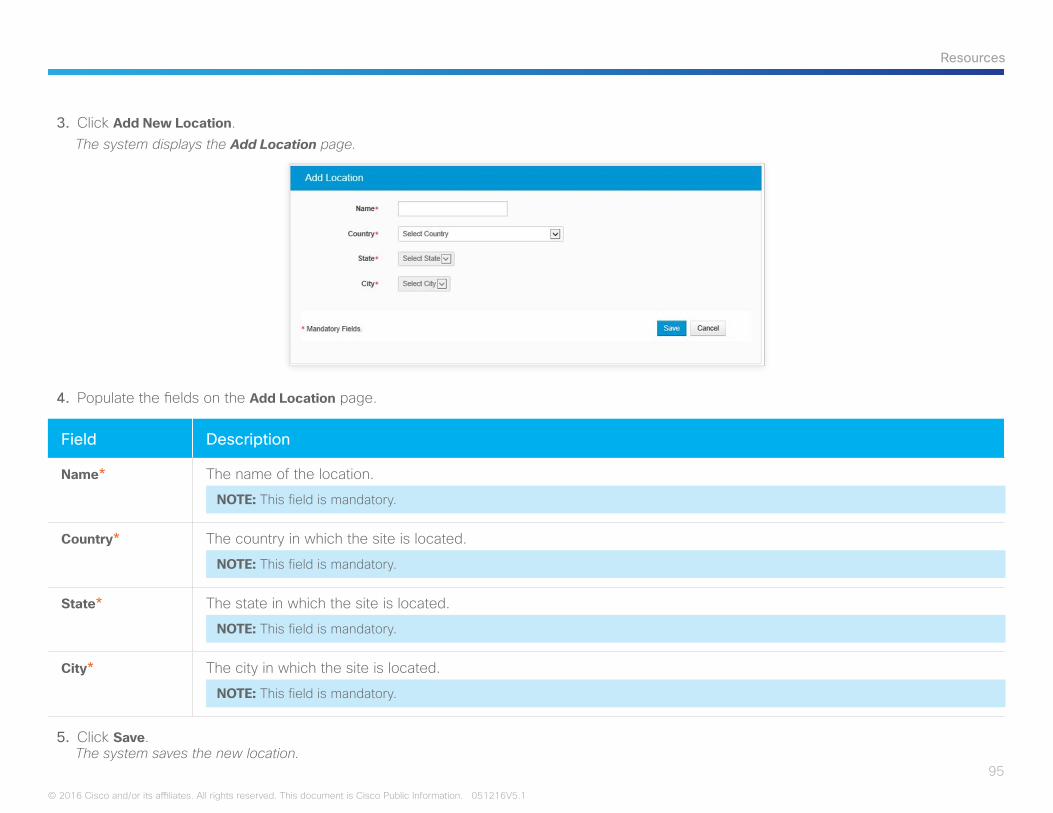
95
Resources
© 2016 Cisco and/or its affiliates. All rights reserved. This document is Cisco Public Information. 051216V5.1
3. Click Add New Location.The system displays the Add Location page.
4. Populate the fields on the Add Location page.
Field Description
Name* The name of the location.
NOTE: This field is mandatory.
Country* The country in which the site is located.
NOTE: This field is mandatory.
State* The state in which the site is located.
NOTE: This field is mandatory.
City* The city in which the site is located.
NOTE: This field is mandatory.
5. Click Save.The system saves the new location.
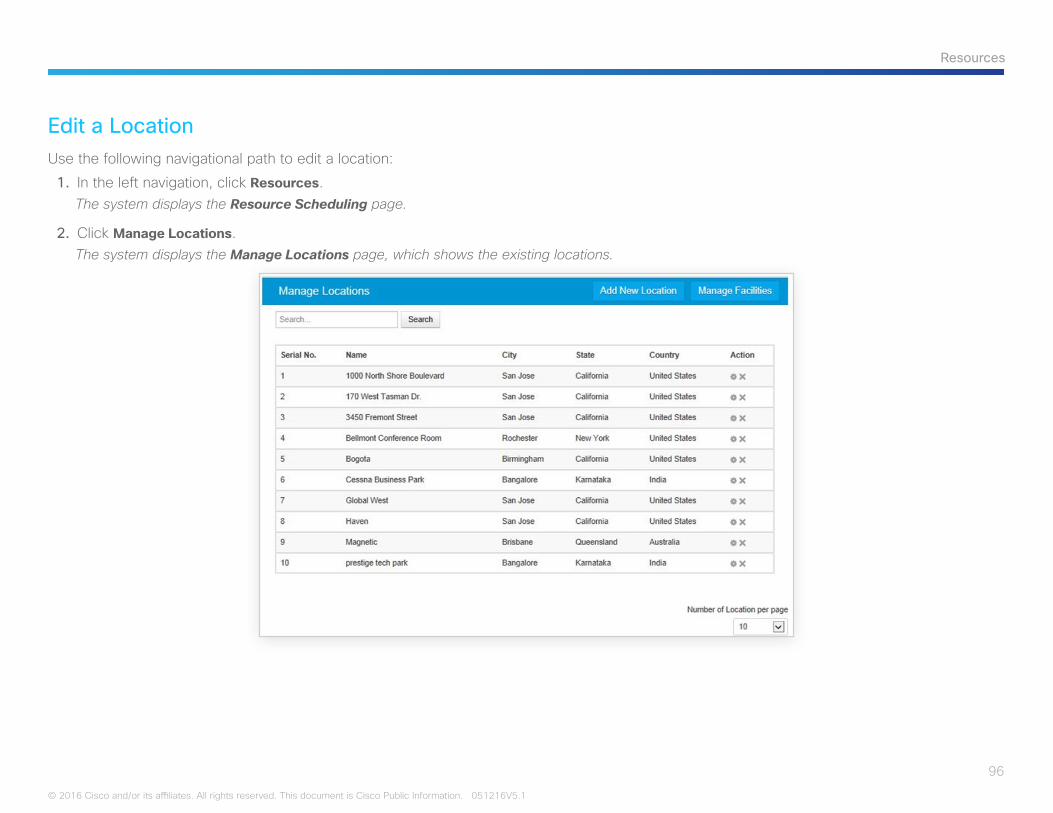
96
Resources
© 2016 Cisco and/or its affiliates. All rights reserved. This document is Cisco Public Information. 051216V5.1
Edit a LocationUse the following navigational path to edit a location:
1. In the left navigation, click Resources.The system displays the Resource Scheduling page.
2. Click Manage Locations.The system displays the Manage Locations page, which shows the existing locations.
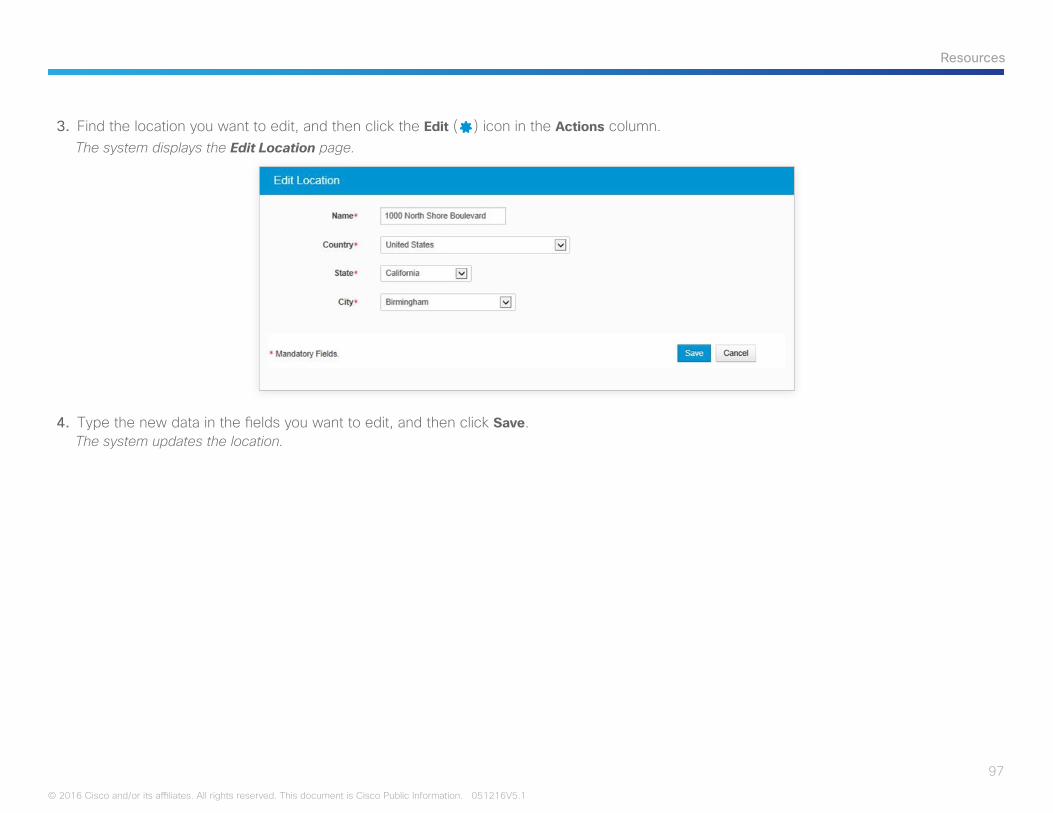
97
Resources
© 2016 Cisco and/or its affiliates. All rights reserved. This document is Cisco Public Information. 051216V5.1
3. Find the location you want to edit, and then click the Edit () icon in the Actions column.The system displays the Edit Location page.
4. Type the new data in the fields you want to edit, and then click Save.The system updates the location.
98
Resources
© 2016 Cisco and/or its affiliates. All rights reserved. This document is Cisco Public Information. 051216V5.1
Delete a Location
NOTE: Before deleting a location, you must delete all facilities within that location. If you attempt to delete a location without deleting the facilities first, the system displays the message You must delete all rooms within this area before you can delete it.
Use the following navigational path to delete a location:
1. In the left navigation, click Resources.The system displays the Resource Scheduling page.
2. Click Manage Locations.The system displays the Manage Locations page, which shows the existing locations.
3. Find the location you want to delete, and then click the Delete () icon for that location.The system displays the message Do you want to delete Location “[Location Name]”?
4. Click Continue to delete the location.The system deletes the location.
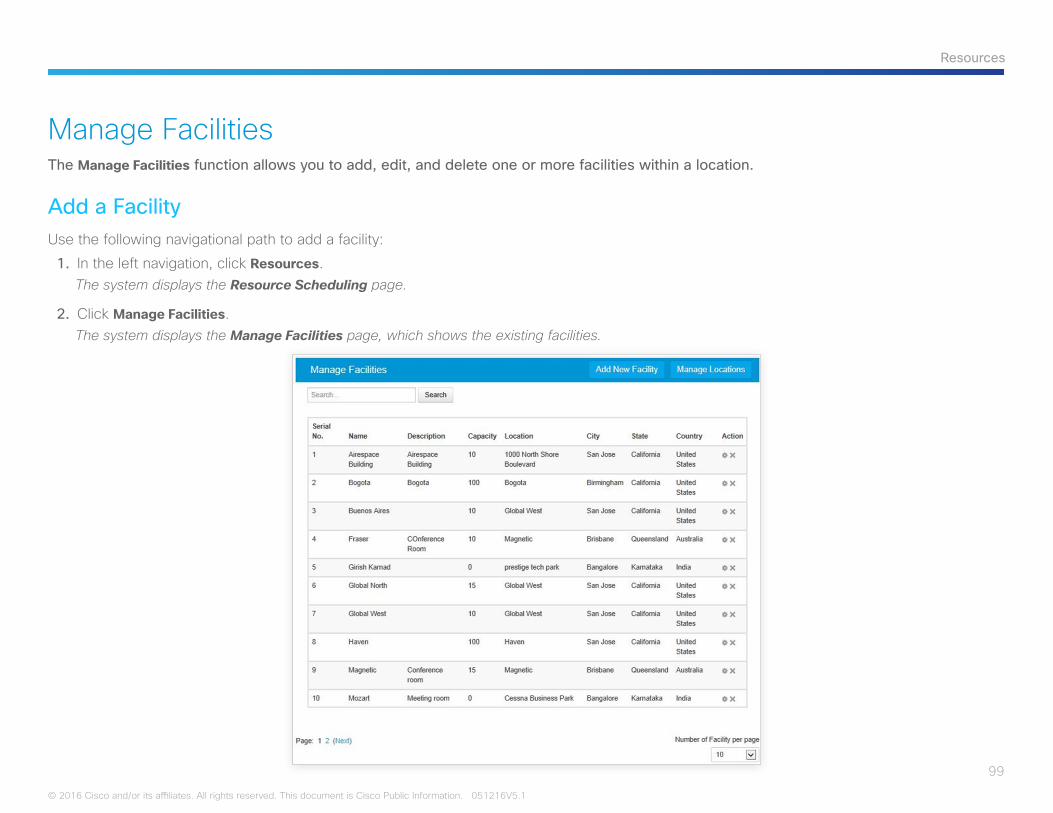
99
Resources
© 2016 Cisco and/or its affiliates. All rights reserved. This document is Cisco Public Information. 051216V5.1
Manage FacilitiesThe Manage Facilities function allows you to add, edit, and delete one or more facilities within a location.
Add a FacilityUse the following navigational path to add a facility:
1. In the left navigation, click Resources.The system displays the Resource Scheduling page.
2. Click Manage Facilities.The system displays the Manage Facilities page, which shows the existing facilities.
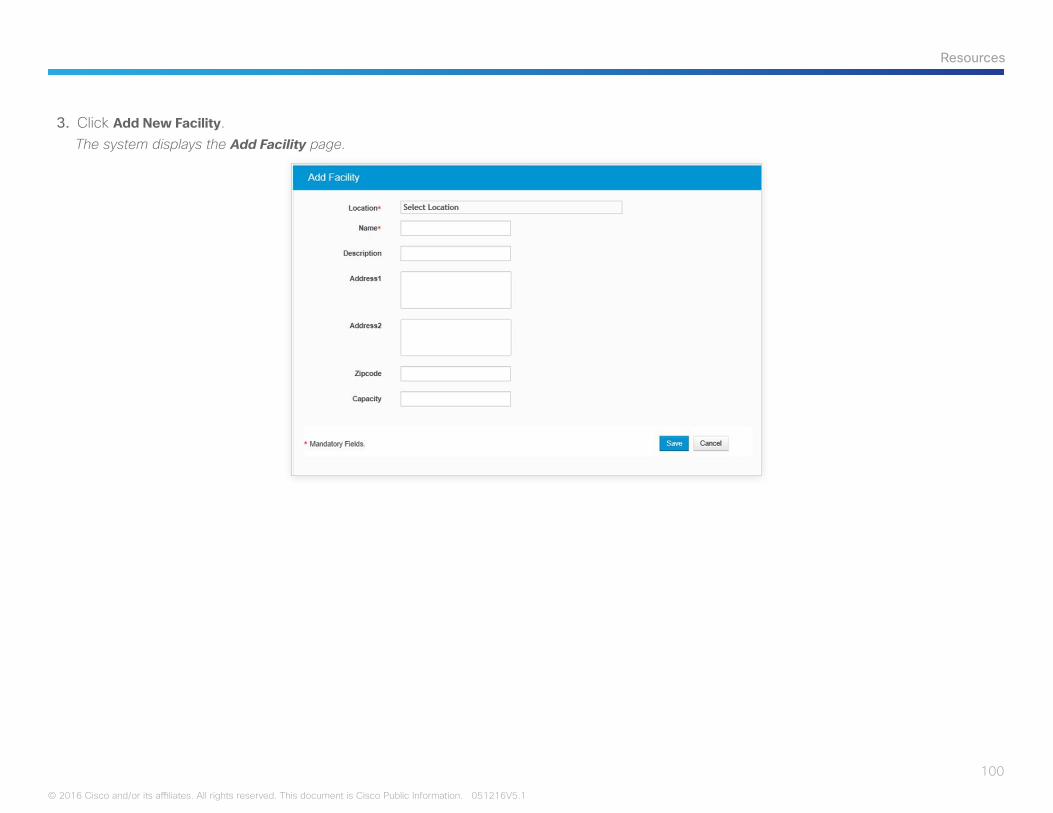
100
Resources
© 2016 Cisco and/or its affiliates. All rights reserved. This document is Cisco Public Information. 051216V5.1
3. Click Add New Facility.The system displays the Add Facility page.

101
Resources
© 2016 Cisco and/or its affiliates. All rights reserved. This document is Cisco Public Information. 051216V5.1
4. Populate the fields on the Add Facility page.
Field Description
Location* Click the drop-down arrow to select the location to which you want to add the facility.
NOTE: This field is mandatory.
Name* The name of the facility.
NOTE: This field is mandatory.
Description The description of the facility.
Address1 The address of the facility.
Address2 Additional address information for the facility, if applicable.
Zipcode The zip code of the facility.
Capacity The number of seats available in the facility.
5. Click Save.The system saves the new facility.
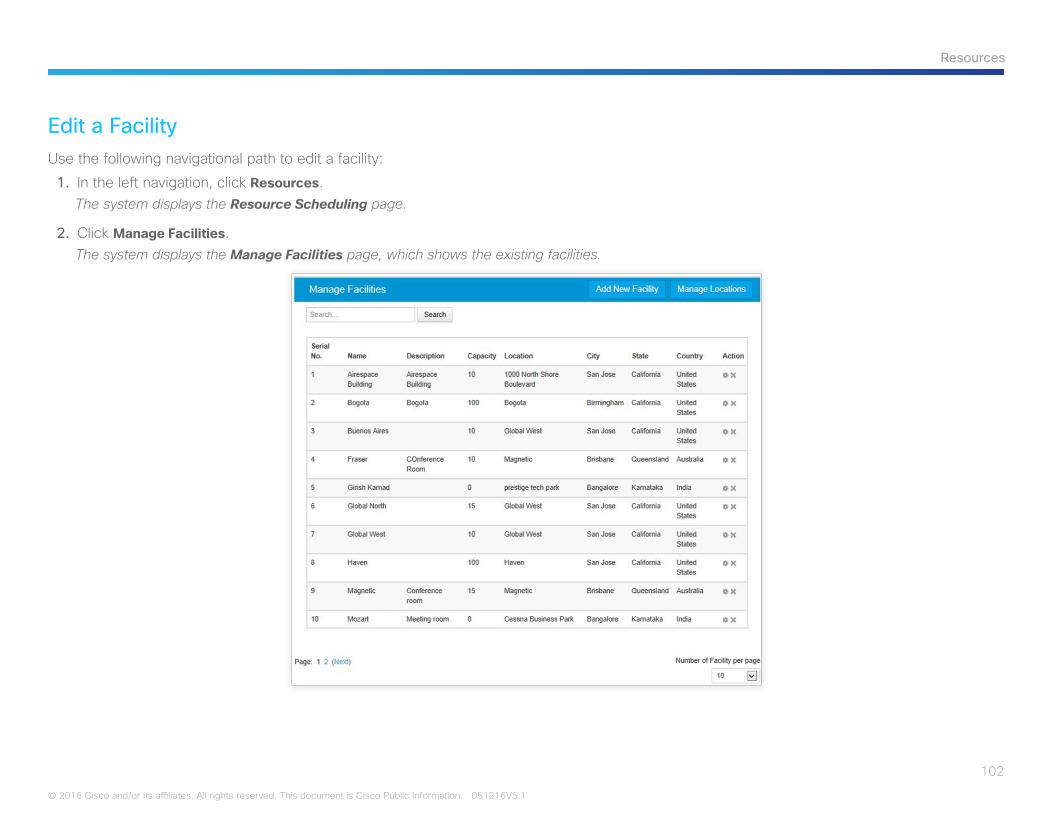
102
Resources
© 2016 Cisco and/or its affiliates. All rights reserved. This document is Cisco Public Information. 051216V5.1
Edit a FacilityUse the following navigational path to edit a facility:
1. In the left navigation, click Resources.The system displays the Resource Scheduling page.
2. Click Manage Facilities.The system displays the Manage Facilities page, which shows the existing facilities.

103
Resources
© 2016 Cisco and/or its affiliates. All rights reserved. This document is Cisco Public Information. 051216V5.1
3. Find the facility you want to edit, and then click the Edit () icon in the Actions column.The system displays the Update Facility page.
4. Type the new data in the fields you want to edit, and then click Save.The system updates the facility.
104
Resources
© 2016 Cisco and/or its affiliates. All rights reserved. This document is Cisco Public Information. 051216V5.1
Delete a FacilityUse the following navigational path to delete a facility:
1. In the left navigation, click Resources.The system displays the Resource Scheduling page.
2. Click Manage Facilities.The system displays the Manage Facilities page, which shows the existing facilities.
3. Find the facility you want to delete, and then click the Delete () icon for that facility.The system displays the message Do you want to delete Facility “[Facility Name]”?
4. Click Continue to delete the facility.The system deletes the facility.
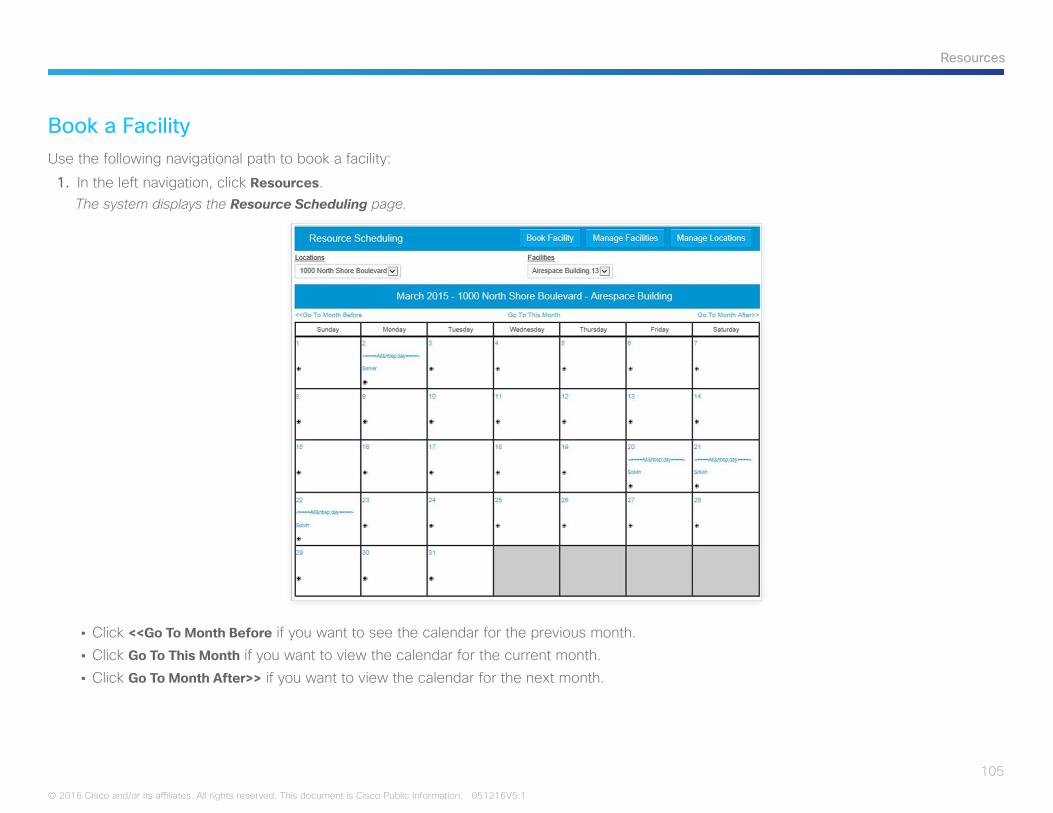
105
Resources
© 2016 Cisco and/or its affiliates. All rights reserved. This document is Cisco Public Information. 051216V5.1
Book a FacilityUse the following navigational path to book a facility:
1. In the left navigation, click Resources.The system displays the Resource Scheduling page.
• Click <<Go To Month Before if you want to see the calendar for the previous month.• Click Go To This Month if you want to view the calendar for the current month.• Click Go To Month After>> if you want to view the calendar for the next month.
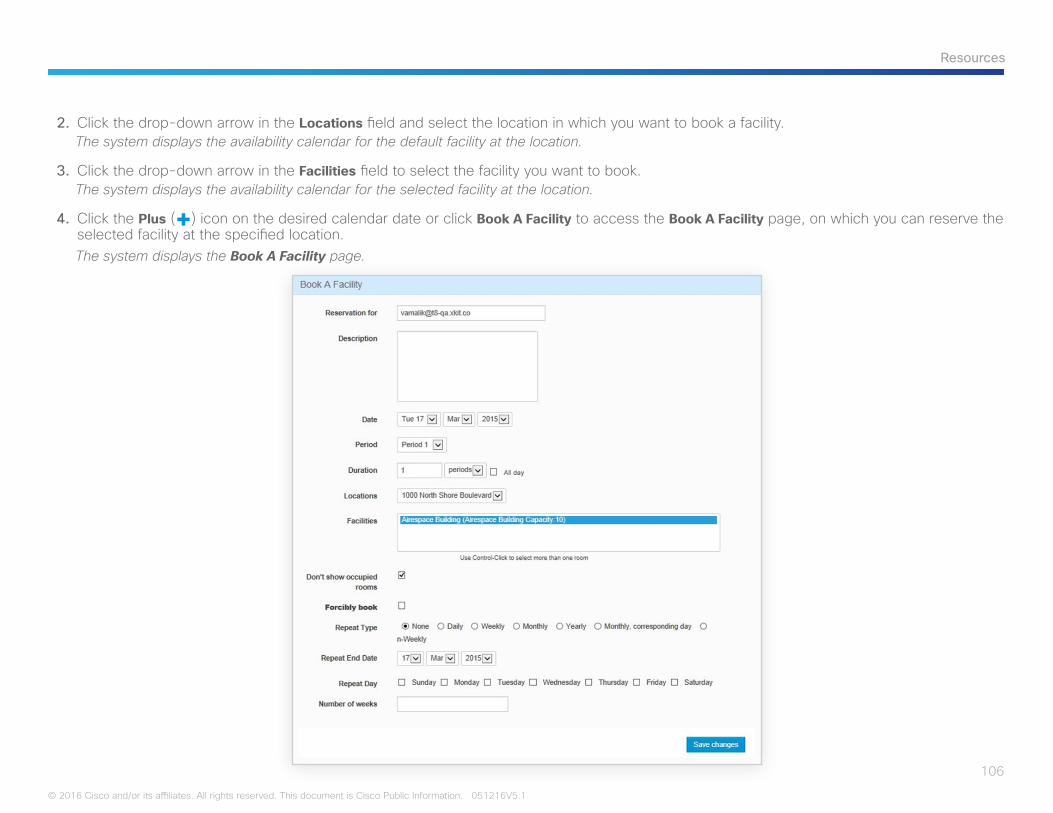
106
Resources
© 2016 Cisco and/or its affiliates. All rights reserved. This document is Cisco Public Information. 051216V5.1
2. Click the drop-down arrow in the Locations field and select the location in which you want to book a facility.The system displays the availability calendar for the default facility at the location.
3. Click the drop-down arrow in the Facilities field to select the facility you want to book.The system displays the availability calendar for the selected facility at the location.
4. Click the Plus () icon on the desired calendar date or click Book A Facility to access the Book A Facility page, on which you can reserve the selected facility at the specified location.The system displays the Book A Facility page.
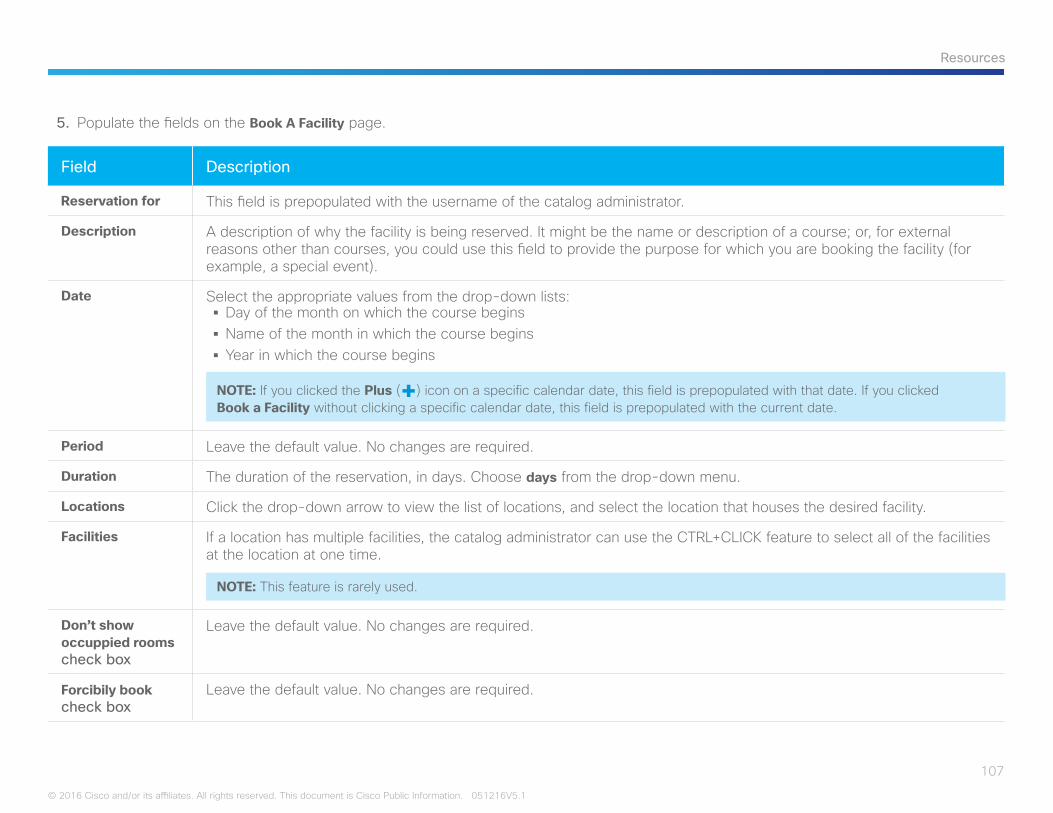
107
Resources
© 2016 Cisco and/or its affiliates. All rights reserved. This document is Cisco Public Information. 051216V5.1
5. Populate the fields on the Book A Facility page.
Field Description
Reservation for This field is prepopulated with the username of the catalog administrator.
Description A description of why the facility is being reserved. It might be the name or description of a course; or, for external reasons other than courses, you could use this field to provide the purpose for which you are booking the facility (for example, a special event).
Date Select the appropriate values from the drop-down lists: § Day of the month on which the course begins § Name of the month in which the course begins § Year in which the course begins
NOTE: If you clicked the Plus () icon on a specific calendar date, this field is prepopulated with that date. If you clicked Book a Facility without clicking a specific calendar date, this field is prepopulated with the current date.
Period Leave the default value. No changes are required.
Duration The duration of the reservation, in days. Choose days from the drop-down menu.
Locations Click the drop-down arrow to view the list of locations, and select the location that houses the desired facility.
Facilities If a location has multiple facilities, the catalog administrator can use the CTRL+CLICK feature to select all of the facilities at the location at one time.
NOTE: This feature is rarely used.
Don’t show occuppied rooms check box
Leave the default value. No changes are required.
Forcibily book check box
Leave the default value. No changes are required.

108
Resources
© 2016 Cisco and/or its affiliates. All rights reserved. This document is Cisco Public Information. 051216V5.1
Field Description
Repeat Type Leave the default value. No changes are required unless this reservation recurs. If this reservation recurs, select the frequency of the recurrence:
§ None
§ Daily
§ Weekly
§ Monthly
§ Yearly
§ Monthly corresponding day
§ n-Weekly
Repeat End Day Leave the default value. No changes are required unless this reservation recurs. If this reservation recurs, select the end date of the recurrence.
Repeat Day Leave the default value. No changes are required unless this reservation recurs. If this reservation recurs, select the day of the week on which the reservation recurs.
Numbers of weeks
Leave the default value. No changes are required unless this reservation recurs. If this reservation recurs, select the number of weeks for which the reservation recurs.
6. Click Save changes.The system creates the booking for this facility.
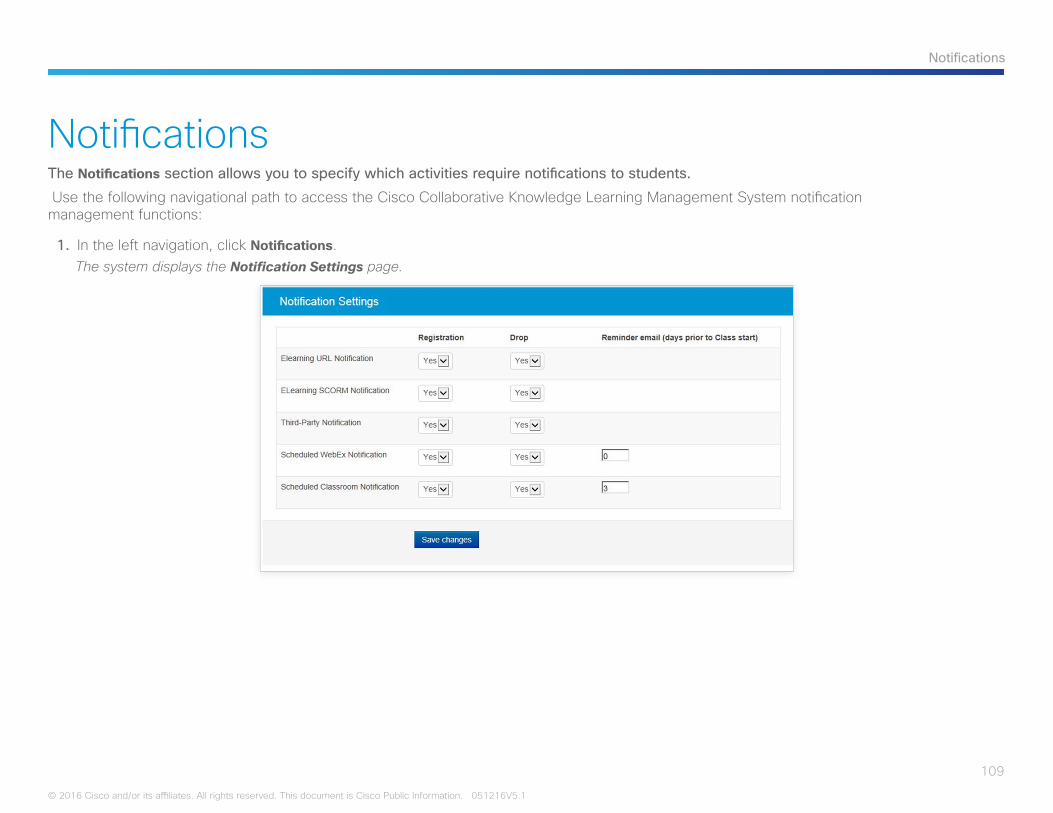
109
Notifications
© 2016 Cisco and/or its affiliates. All rights reserved. This document is Cisco Public Information. 051216V5.1
NotificationsThe Notifications section allows you to specify which activities require notifications to students.
Use the following navigational path to access the Cisco Collaborative Knowledge Learning Management System notification management functions:
1. In the left navigation, click Notifications.The system displays the Notification Settings page.
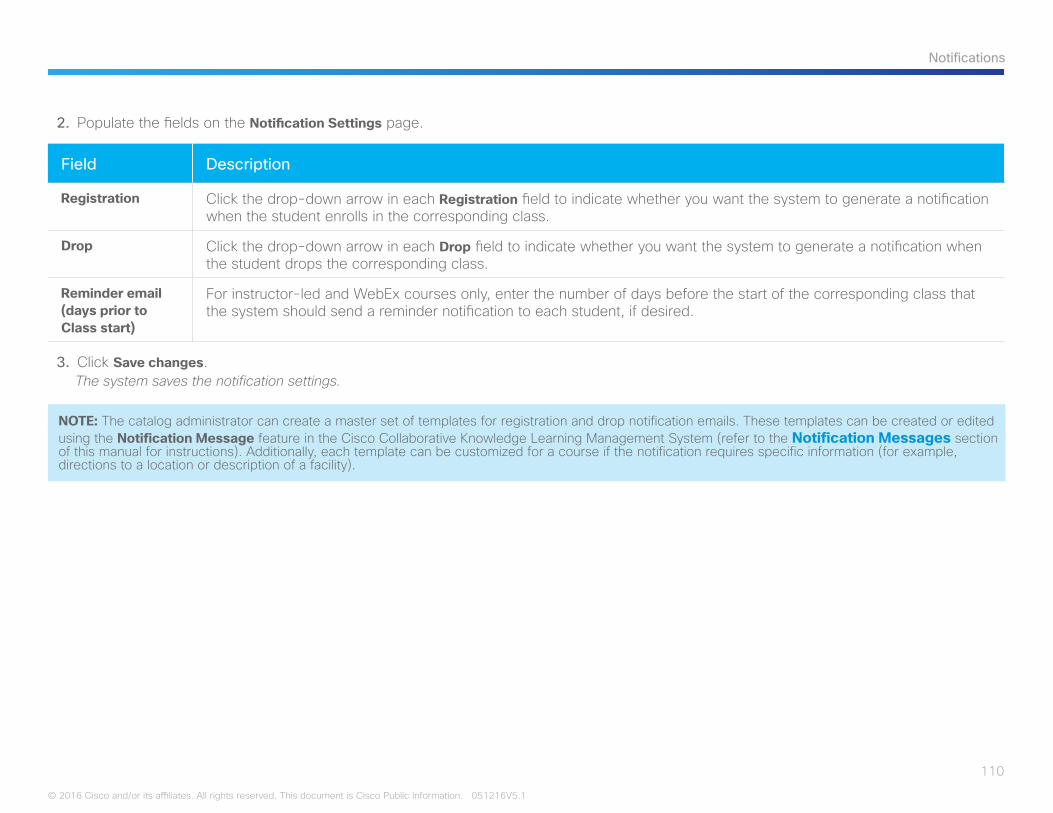
110
Notifications
© 2016 Cisco and/or its affiliates. All rights reserved. This document is Cisco Public Information. 051216V5.1
2. Populate the fields on the Notification Settings page.
Field Description
Registration Click the drop-down arrow in each Registration field to indicate whether you want the system to generate a notification when the student enrolls in the corresponding class.
Drop Click the drop-down arrow in each Drop field to indicate whether you want the system to generate a notification when the student drops the corresponding class.
Reminder email (days prior to Class start)
For instructor-led and WebEx courses only, enter the number of days before the start of the corresponding class that the system should send a reminder notification to each student, if desired.
3. Click Save changes.The system saves the notification settings.
NOTE: The catalog administrator can create a master set of templates for registration and drop notification emails. These templates can be created or edited using the Notification Message feature in the Cisco Collaborative Knowledge Learning Management System (refer to the Notification Messages section of this manual for instructions). Additionally, each template can be customized for a course if the notification requires specific information (for example, directions to a location or description of a facility).
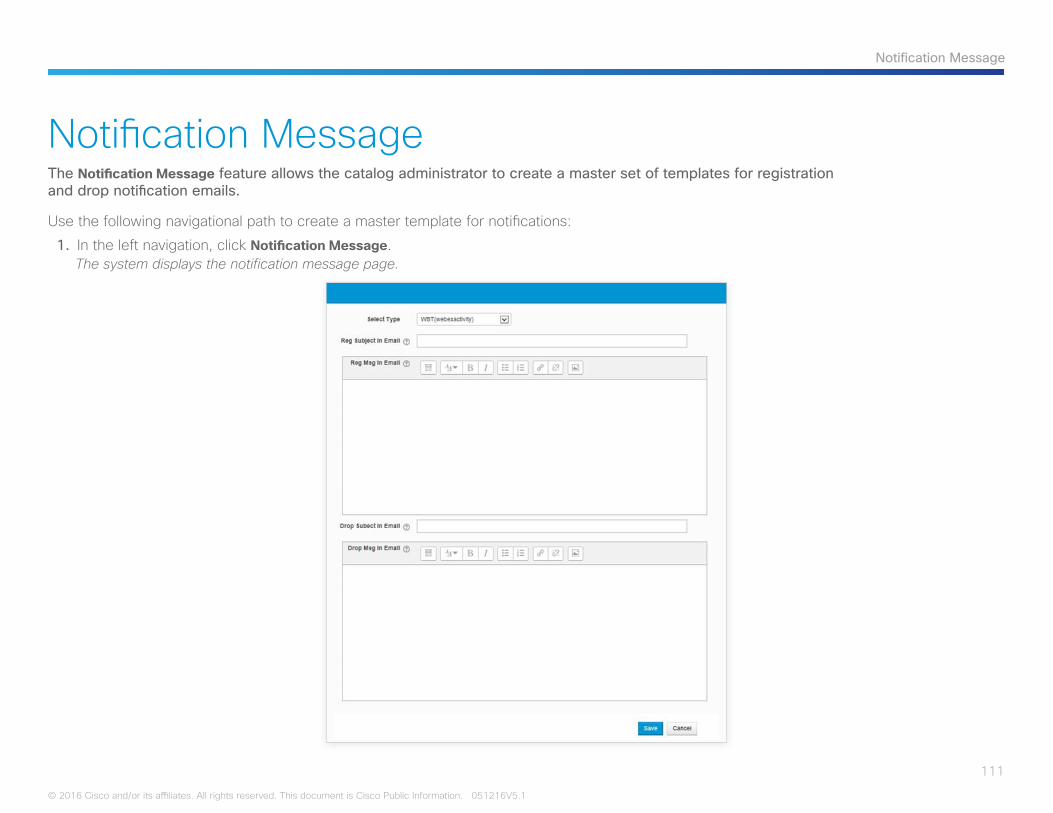
111
Notification Message
© 2016 Cisco and/or its affiliates. All rights reserved. This document is Cisco Public Information. 051216V5.1
Notification MessageThe Notification Message feature allows the catalog administrator to create a master set of templates for registration and drop notification emails.
Use the following navigational path to create a master template for notifications:
1. In the left navigation, click Notification Message.The system displays the notification message page.
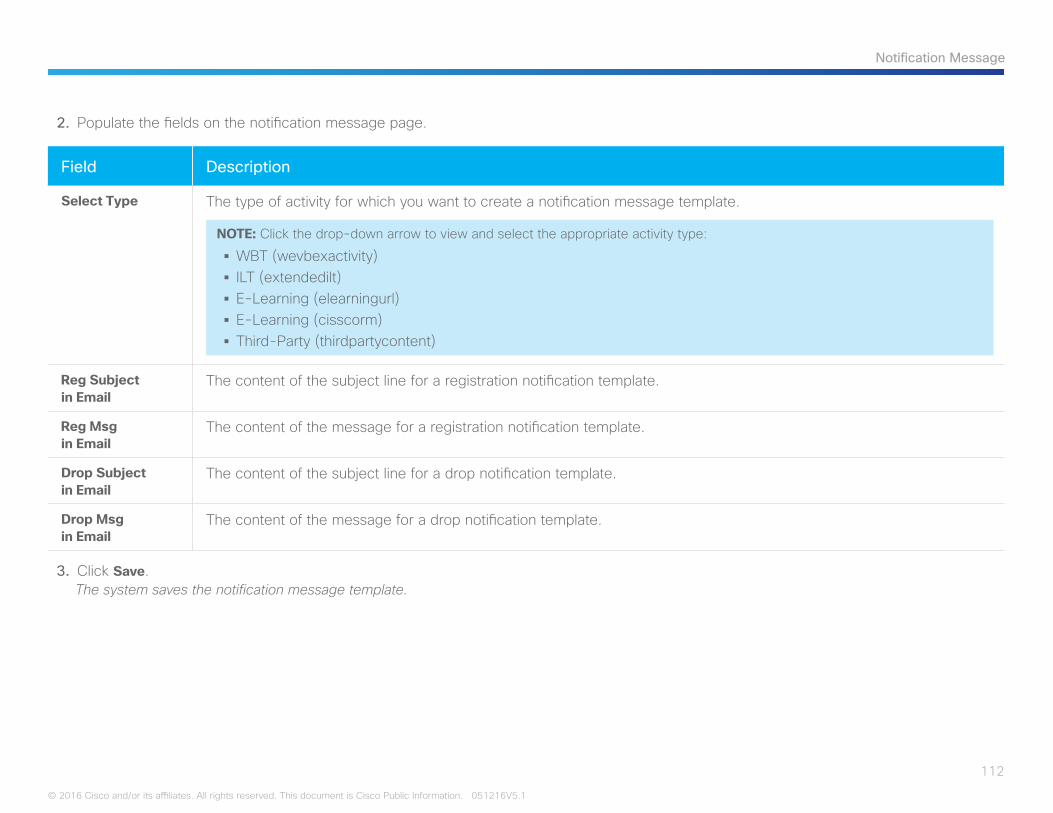
112
Notification Message
© 2016 Cisco and/or its affiliates. All rights reserved. This document is Cisco Public Information. 051216V5.1
2. Populate the fields on the notification message page.
Field Description
Select Type The type of activity for which you want to create a notification message template.
NOTE: Click the drop-down arrow to view and select the appropriate activity type:
§ WBT (wevbexactivity) § ILT (extendedilt) § E-Learning (elearningurl) § E-Learning (cisscorm) § Third-Party (thirdpartycontent)
Reg Subject in Email
The content of the subject line for a registration notification template.
Reg Msg in Email
The content of the message for a registration notification template.
Drop Subject in Email
The content of the subject line for a drop notification template.
Drop Msg in Email
The content of the message for a drop notification template.
3. Click Save.The system saves the notification message template.
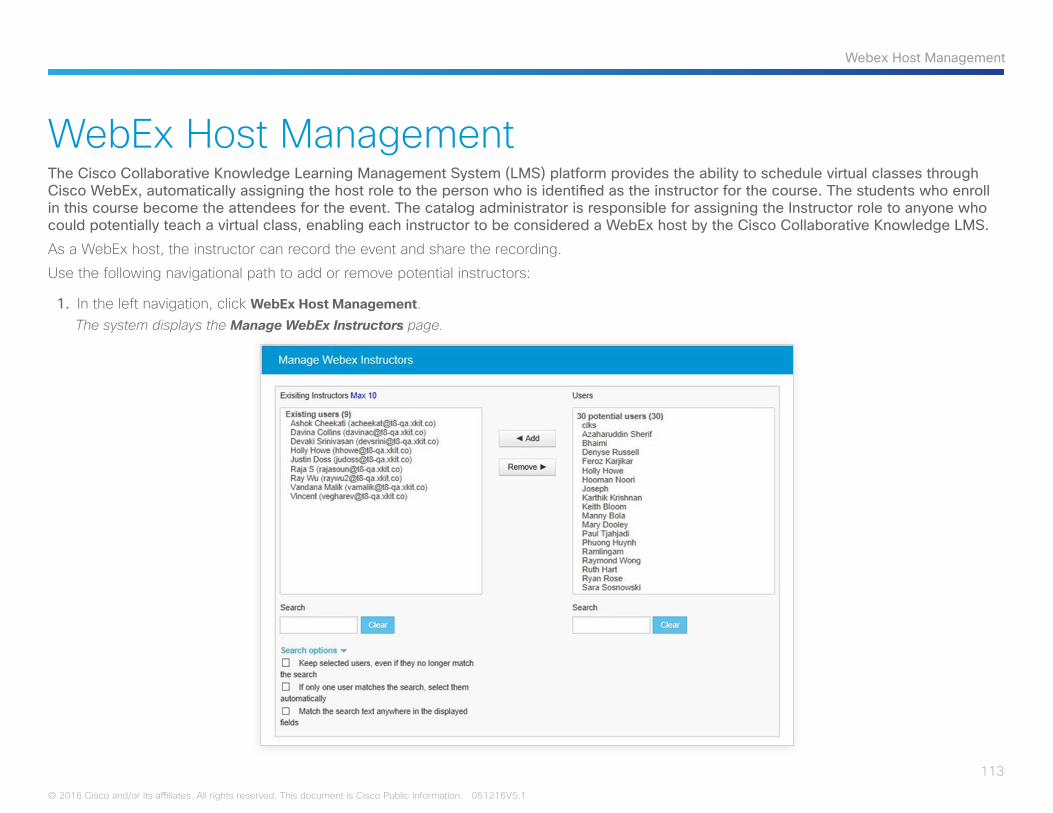
Webex Host Management
113
© 2016 Cisco and/or its affiliates. All rights reserved. This document is Cisco Public Information. 051216V5.1
WebEx Host ManagementThe Cisco Collaborative Knowledge Learning Management System (LMS) platform provides the ability to schedule virtual classes through Cisco WebEx, automatically assigning the host role to the person who is identified as the instructor for the course. The students who enroll in this course become the attendees for the event. The catalog administrator is responsible for assigning the Instructor role to anyone who could potentially teach a virtual class, enabling each instructor to be considered a WebEx host by the Cisco Collaborative Knowledge LMS.
As a WebEx host, the instructor can record the event and share the recording.
Use the following navigational path to add or remove potential instructors:
1. In the left navigation, click WebEx Host Management.The system displays the Manage WebEx Instructors page.
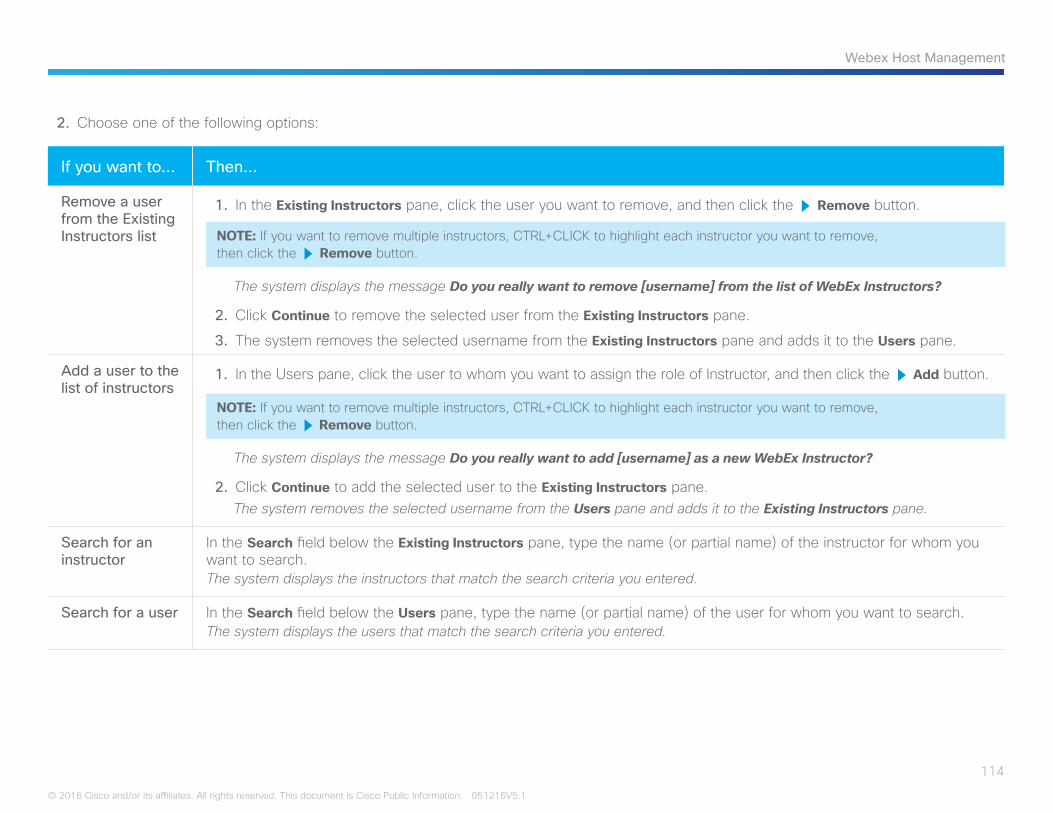
Webex Host Management
114
© 2016 Cisco and/or its affiliates. All rights reserved. This document is Cisco Public Information. 051216V5.1
2. Choose one of the following options:
If you want to… Then…
Remove a user from the Existing Instructors list
1. In the Existing Instructors pane, click the user you want to remove, and then click the R Remove button.
NOTE: If you want to remove multiple instructors, CTRL+CLICK to highlight each instructor you want to remove, then click the R Remove button.
The system displays the message Do you really want to remove [username] from the list of WebEx Instructors?
2. Click Continue to remove the selected user from the Existing Instructors pane.
3. The system removes the selected username from the Existing Instructors pane and adds it to the Users pane.
Add a user to the list of instructors
1. In the Users pane, click the user to whom you want to assign the role of Instructor, and then click the R Add button.
NOTE: If you want to remove multiple instructors, CTRL+CLICK to highlight each instructor you want to remove, then click the R Remove button.
The system displays the message Do you really want to add [username] as a new WebEx Instructor?
2. Click Continue to add the selected user to the Existing Instructors pane.The system removes the selected username from the Users pane and adds it to the Existing Instructors pane.
Search for an instructor
In the Search field below the Existing Instructors pane, type the name (or partial name) of the instructor for whom you want to search.The system displays the instructors that match the search criteria you entered.
Search for a user In the Search field below the Users pane, type the name (or partial name) of the user for whom you want to search.The system displays the users that match the search criteria you entered.
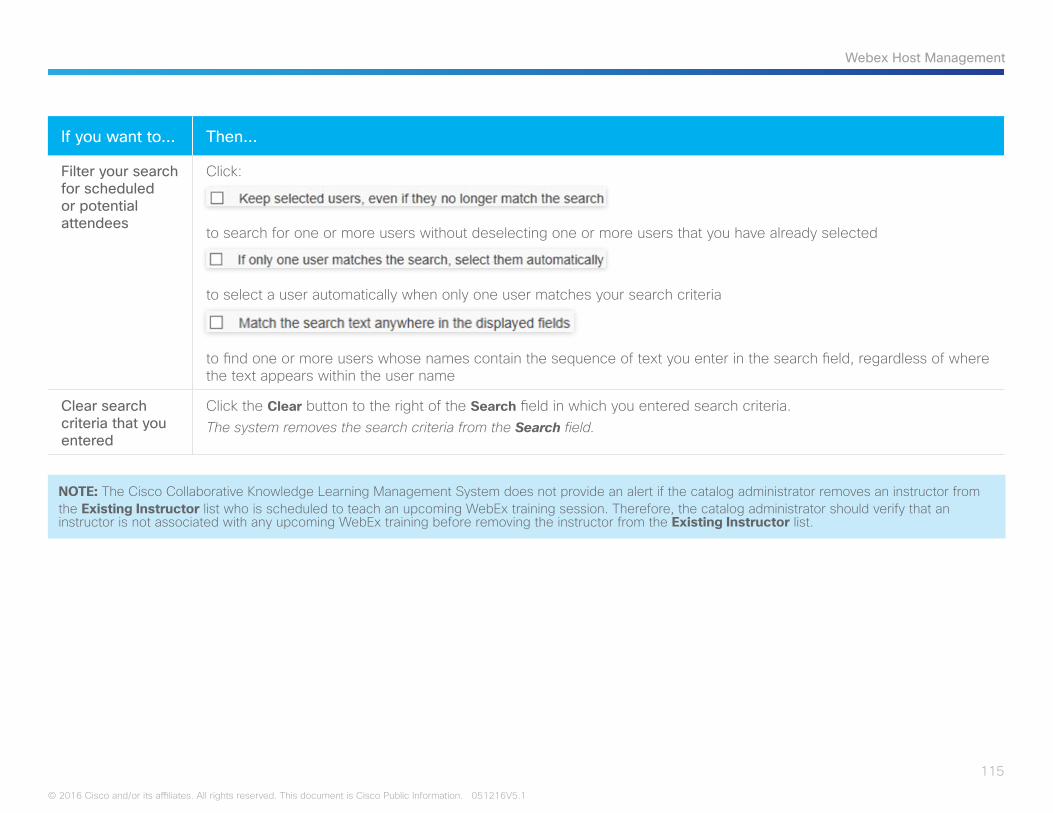
Webex Host Management
115
© 2016 Cisco and/or its affiliates. All rights reserved. This document is Cisco Public Information. 051216V5.1
If you want to… Then…
Filter your search for scheduled or potential attendees
Click:
to search for one or more users without deselecting one or more users that you have already selected
to select a user automatically when only one user matches your search criteria
to find one or more users whose names contain the sequence of text you enter in the search field, regardless of where the text appears within the user name
Clear search criteria that you entered
Click the Clear button to the right of the Search field in which you entered search criteria.The system removes the search criteria from the Search field.
NOTE: The Cisco Collaborative Knowledge Learning Management System does not provide an alert if the catalog administrator removes an instructor from the Existing Instructor list who is scheduled to teach an upcoming WebEx training session. Therefore, the catalog administrator should verify that an instructor is not associated with any upcoming WebEx training before removing the instructor from the Existing Instructor list.
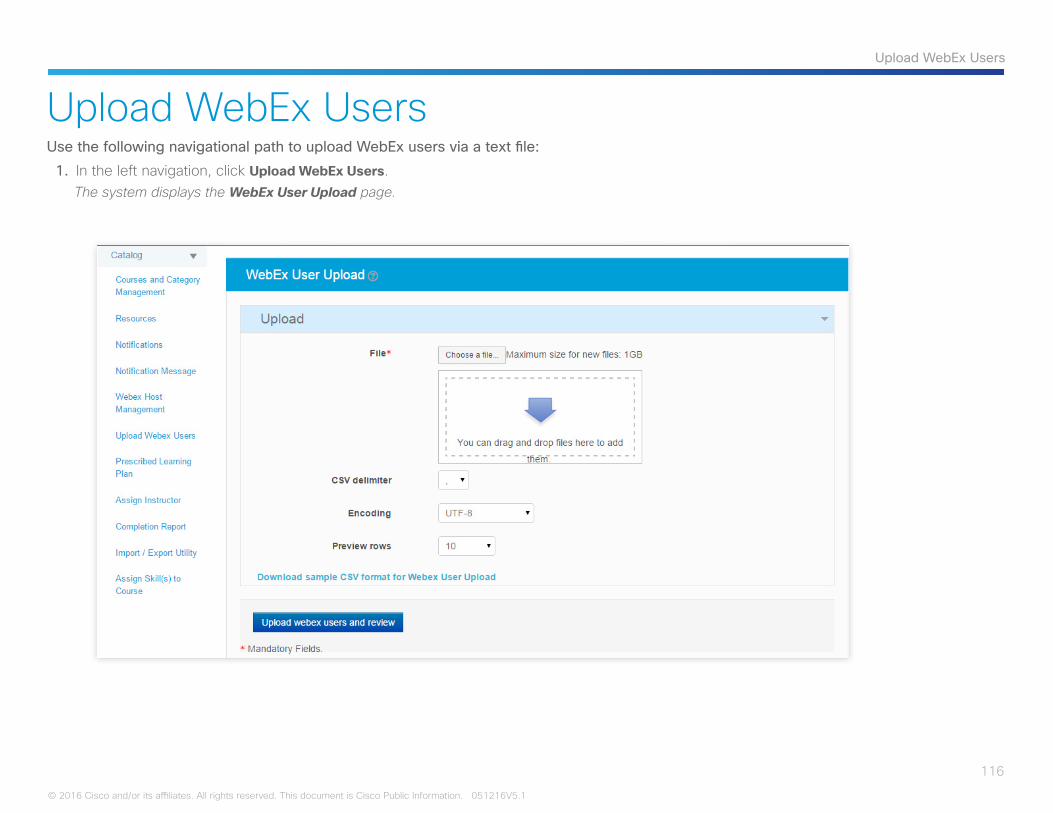
© 2016 Cisco and/or its affiliates. All rights reserved. This document is Cisco Public Information. 051216V5.1
116
Upload WebEx Users
Upload WebEx UsersUse the following navigational path to upload WebEx users via a text file:
1. In the left navigation, click Upload WebEx Users.The system displays the WebEx User Upload page.
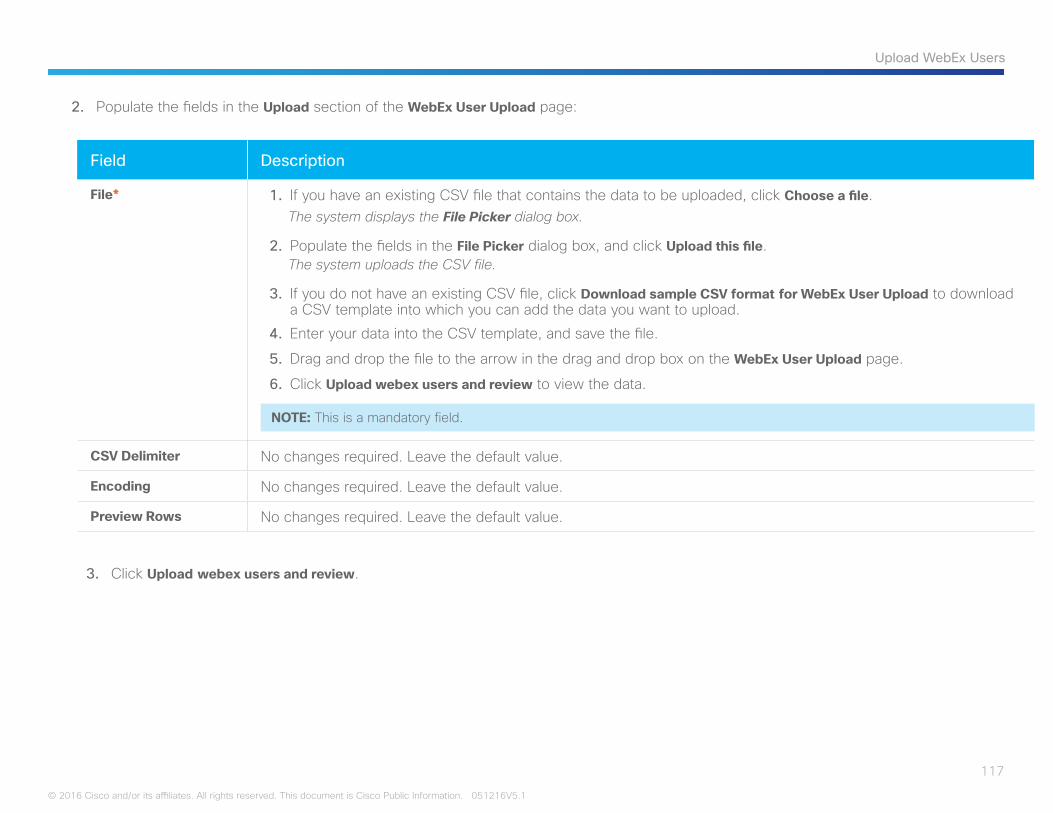
© 2016 Cisco and/or its affiliates. All rights reserved. This document is Cisco Public Information. 051216V5.1
117
Upload WebEx Users
2. Populate the fields in the Upload section of the WebEx User Upload page:
Field Description
File* 1. If you have an existing CSV file that contains the data to be uploaded, click Choose a file.The system displays the File Picker dialog box.
2. Populate the fields in the File Picker dialog box, and click Upload this file.The system uploads the CSV file.
3. If you do not have an existing CSV file, click Download sample CSV format for WebEx User Upload to download a CSV template into which you can add the data you want to upload.
4. Enter your data into the CSV template, and save the file.
5. Drag and drop the file to the arrow in the drag and drop box on the WebEx User Upload page.
6. Click Upload webex users and review to view the data.
NOTE: This is a mandatory field.
CSV Delimiter No changes required. Leave the default value.
Encoding No changes required. Leave the default value.
Preview Rows No changes required. Leave the default value.
3. Click Upload webex users and review.
118
Learning Plans
© 2016 Cisco and/or its affiliates. All rights reserved. This document is Cisco Public Information. 051216V5.1
Learning PlansA learning plan is a collection of activities that is intended to support career and development goals.
The Cisco Collaborative Knowledge Learning Management System allows for the creation of two types of learning plans: § Users can create their own learning plans to personalize and customize their learning journey. Personal learning plans consist of student-selected activities from the training catalog and selected informal tasks (for example, finding an expert or joining a community).
§ Prescribed learning plans (PLPs) consist of curriculum-based activities (of similar or different delivery methods and modalities) recommended for students. PLPs can be assigned by a manager or other superior (that is, anyone with the necessary permissions in the system). Often, PLPs are aligned with a specific job role or skill. The completion of a PLP can lead to a certification or qualification in a related area of expertise. When assigned a PLP, a student must complete each of the individual courses in that plan.
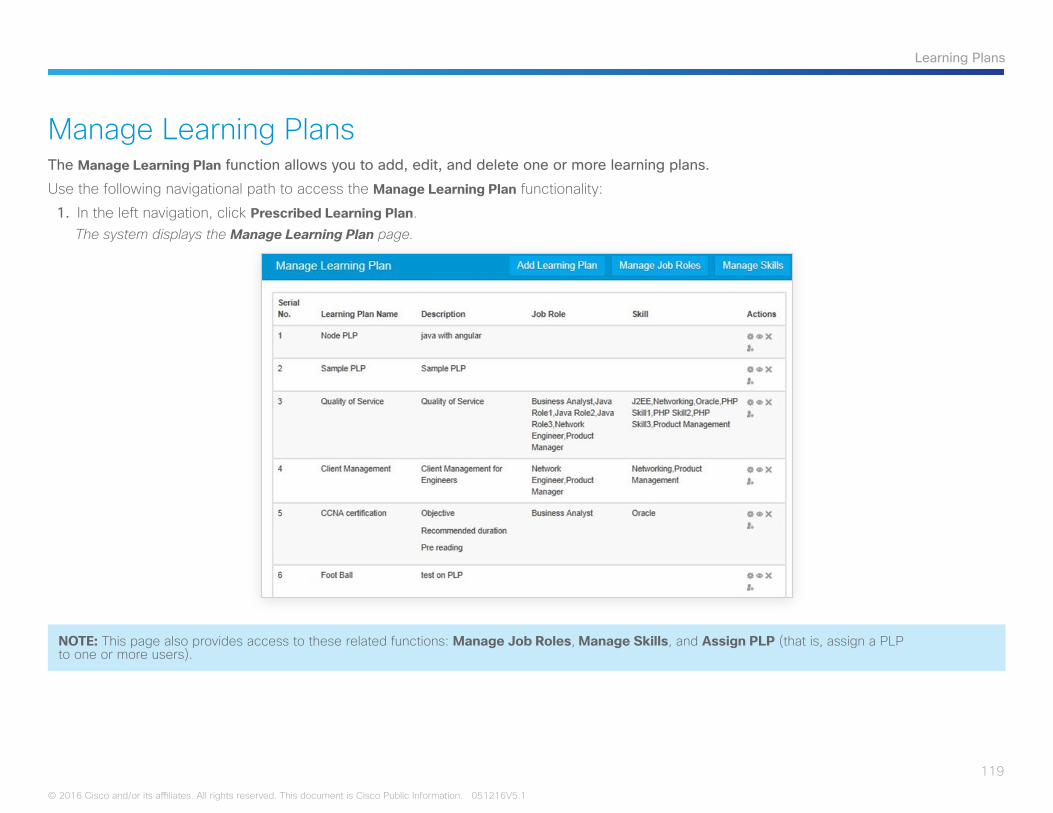
119
Learning Plans
© 2016 Cisco and/or its affiliates. All rights reserved. This document is Cisco Public Information. 051216V5.1
Manage Learning PlansThe Manage Learning Plan function allows you to add, edit, and delete one or more learning plans.
Use the following navigational path to access the Manage Learning Plan functionality:
1. In the left navigation, click Prescribed Learning Plan.The system displays the Manage Learning Plan page.
NOTE: This page also provides access to these related functions: Manage Job Roles, Manage Skills, and Assign PLP (that is, assign a PLP to one or more users).
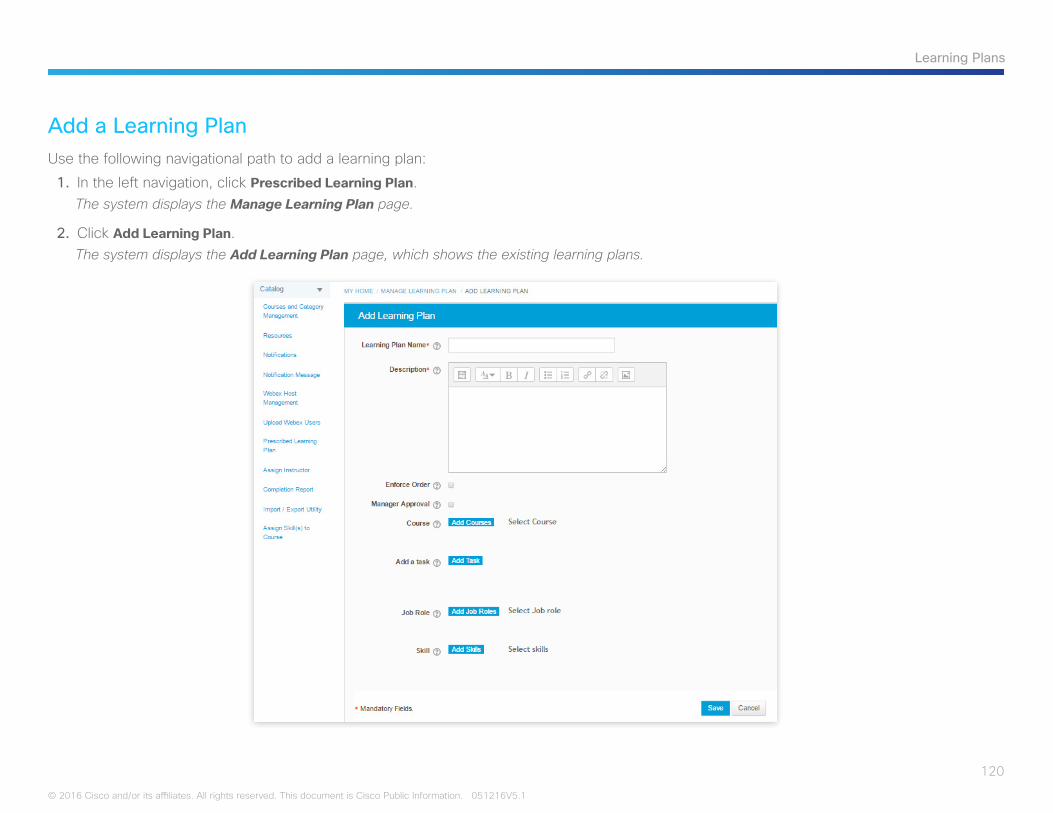
120
Learning Plans
© 2016 Cisco and/or its affiliates. All rights reserved. This document is Cisco Public Information. 051216V5.1
Add a Learning PlanUse the following navigational path to add a learning plan:
1. In the left navigation, click Prescribed Learning Plan.The system displays the Manage Learning Plan page.
2. Click Add Learning Plan.The system displays the Add Learning Plan page, which shows the existing learning plans.
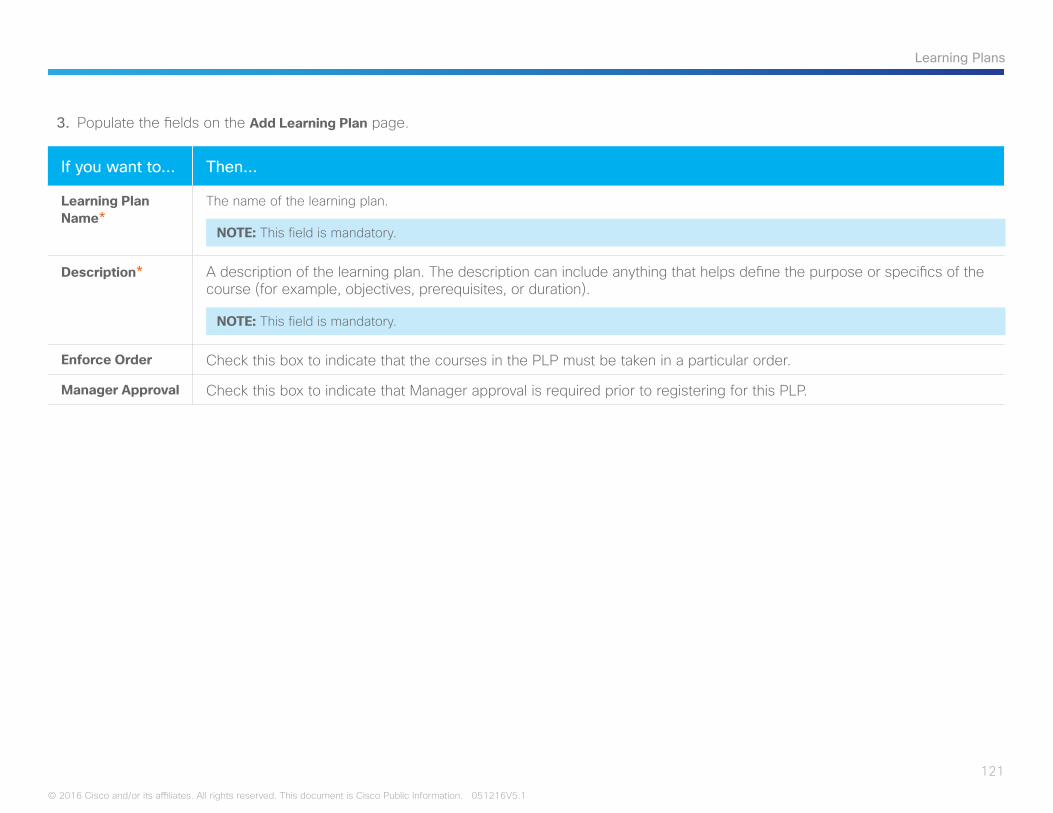
121
Learning Plans
© 2016 Cisco and/or its affiliates. All rights reserved. This document is Cisco Public Information. 051216V5.1
3. Populate the fields on the Add Learning Plan page.
If you want to… Then…
Learning Plan Name*
The name of the learning plan.
NOTE: This field is mandatory.
Description* A description of the learning plan. The description can include anything that helps define the purpose or specifics of the course (for example, objectives, prerequisites, or duration).
NOTE: This field is mandatory.
Enforce Order Check this box to indicate that the courses in the PLP must be taken in a particular order.
Manager Approval Check this box to indicate that Manager approval is required prior to registering for this PLP.
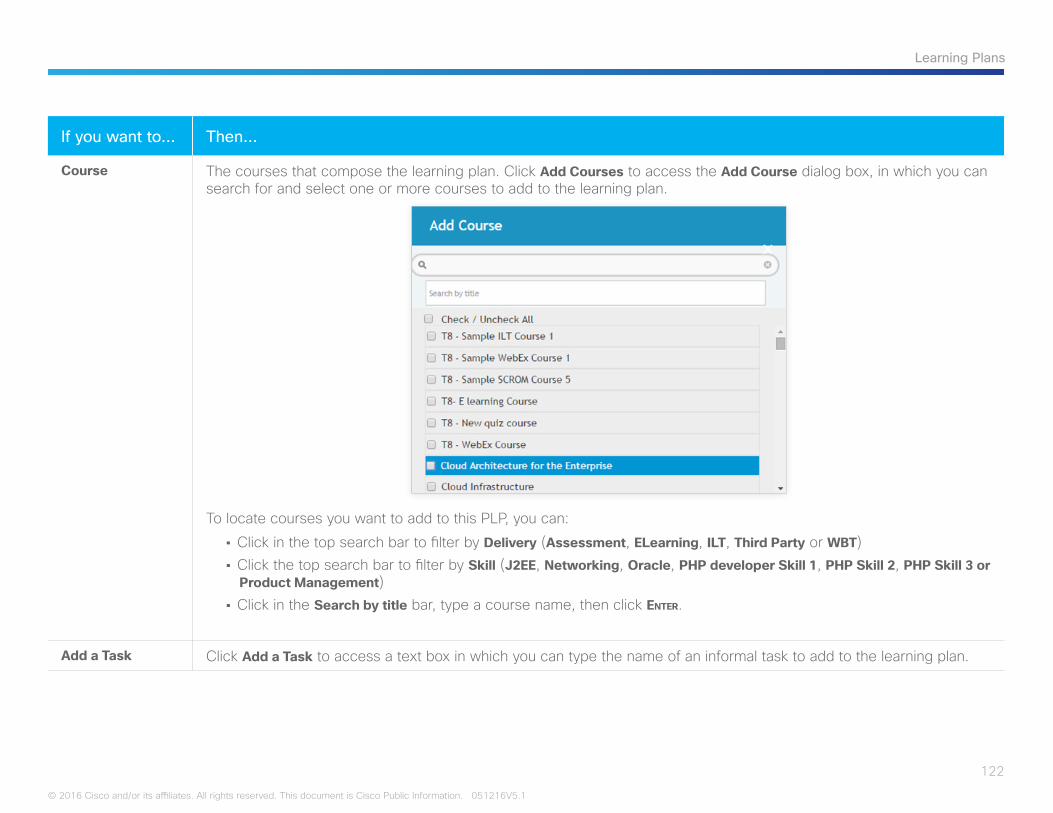
122
Learning Plans
© 2016 Cisco and/or its affiliates. All rights reserved. This document is Cisco Public Information. 051216V5.1
If you want to… Then…
Course The courses that compose the learning plan. Click Add Courses to access the Add Course dialog box, in which you can search for and select one or more courses to add to the learning plan.
To locate courses you want to add to this PLP, you can:
• Click in the top search bar to filter by Delivery (Assessment, ELearning, ILT, Third Party or WBT)• Click the top search bar to filter by Skill (J2EE, Networking, Oracle, PHP developer Skill 1, PHP Skill 2, PHP Skill 3 or
Product Management)• Click in the Search by title bar, type a course name, then click EntEr.
Add a Task Click Add a Task to access a text box in which you can type the name of an informal task to add to the learning plan.

123
Learning Plans
© 2016 Cisco and/or its affiliates. All rights reserved. This document is Cisco Public Information. 051216V5.1
If you want to… Then…
Job Role The job role or roles you want to associate with the learning plan. Click Add Job Roles or Select Job role to access the Add Job Role dialog box, in which you can search for and select one or more job roles.
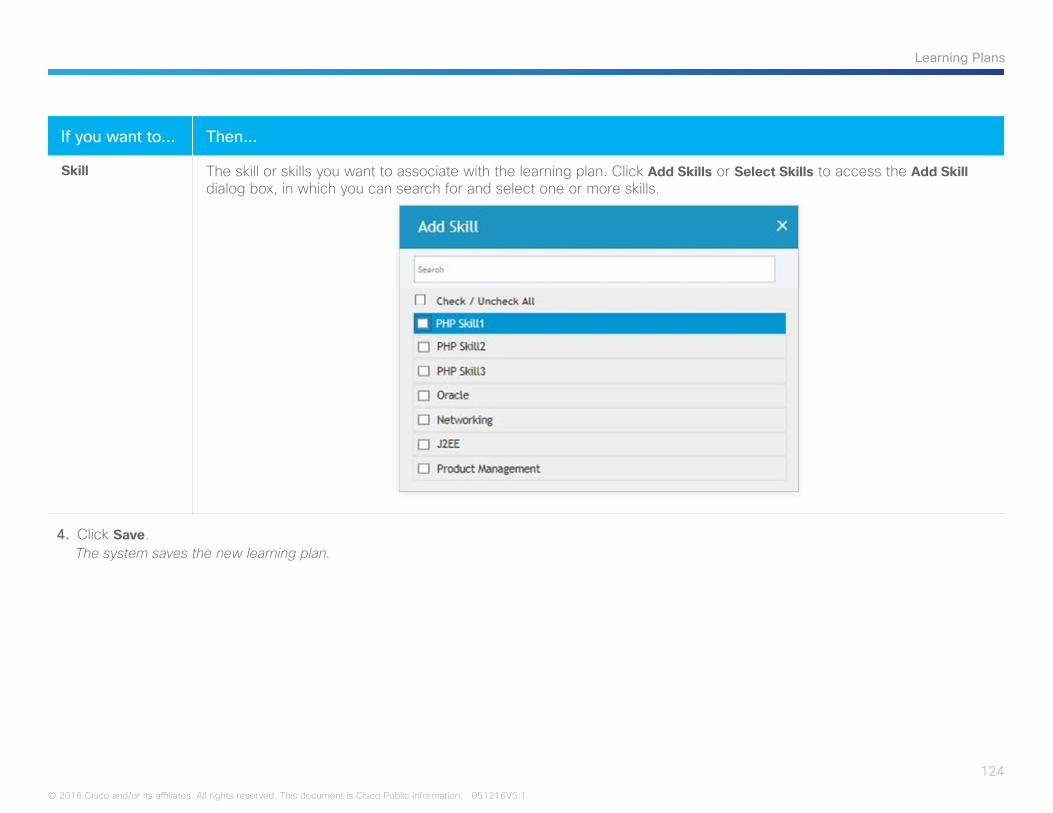
124
Learning Plans
© 2016 Cisco and/or its affiliates. All rights reserved. This document is Cisco Public Information. 051216V5.1
If you want to… Then…
Skill The skill or skills you want to associate with the learning plan. Click Add Skills or Select Skills to access the Add Skill dialog box, in which you can search for and select one or more skills.
4. Click Save.The system saves the new learning plan.
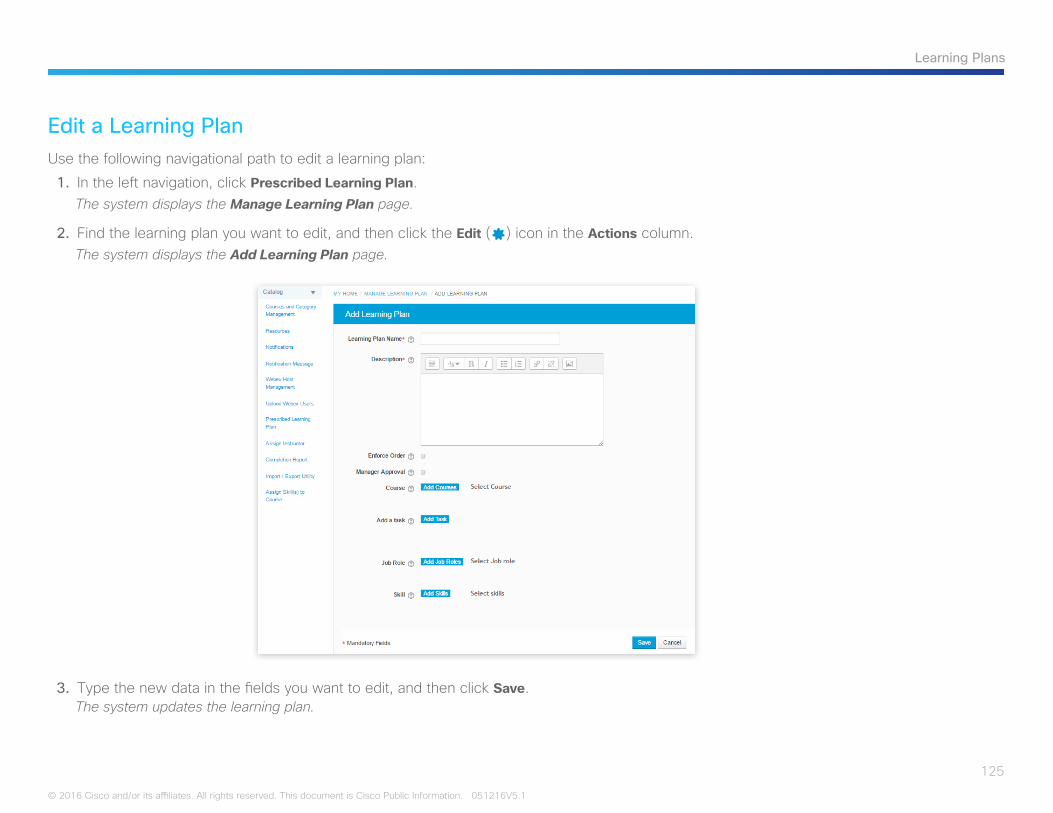
125
Learning Plans
© 2016 Cisco and/or its affiliates. All rights reserved. This document is Cisco Public Information. 051216V5.1
Edit a Learning PlanUse the following navigational path to edit a learning plan:
1. In the left navigation, click Prescribed Learning Plan.The system displays the Manage Learning Plan page.
2. Find the learning plan you want to edit, and then click the Edit () icon in the Actions column.The system displays the Add Learning Plan page.
3. Type the new data in the fields you want to edit, and then click Save.The system updates the learning plan.
126
Learning Plans
© 2016 Cisco and/or its affiliates. All rights reserved. This document is Cisco Public Information. 051216V5.1
Delete a Learning PlanUse the following navigational path to delete a learning plan:
1. In the left navigation, click Prescribed Learning Plan.The system displays the Manage Learning Plan page.
2. Find the learning plan you want to delete, and then click the Delete () icon in the Actions column.The system displays the message Do you want to delete prescribed learning plan “[PLP Name]”?
3. Click Continue to delete the learning plan.The system deletes the learning plan.
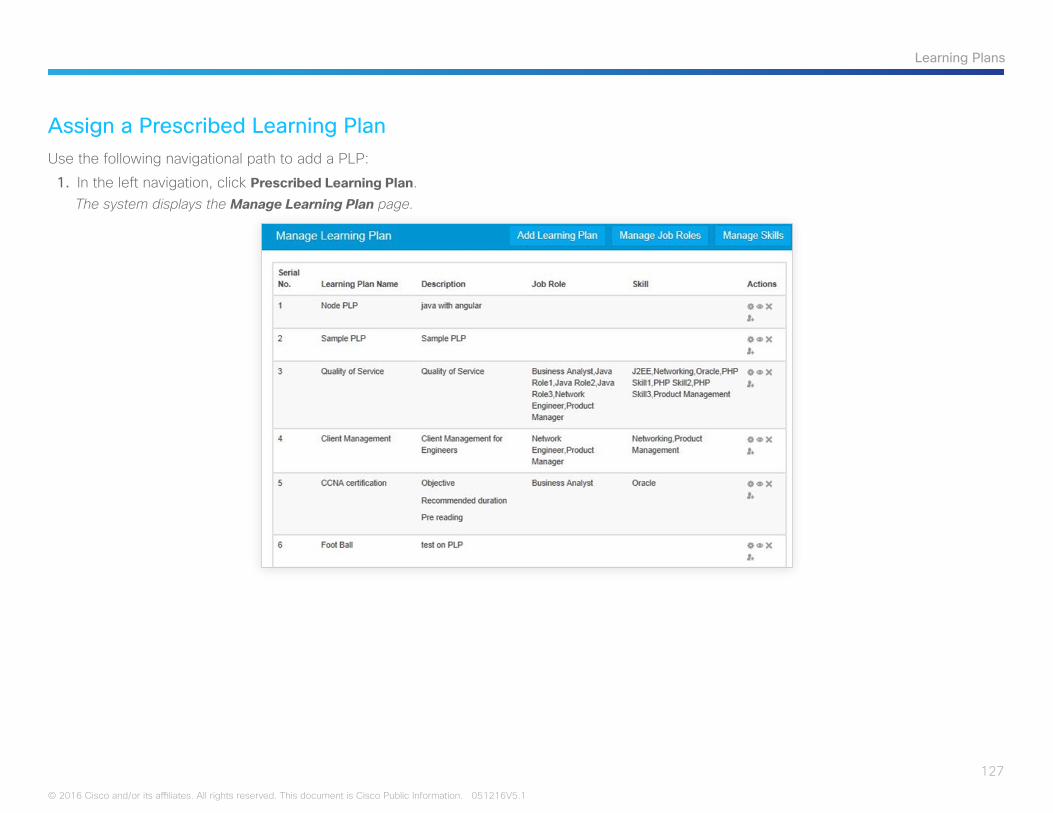
127
Learning Plans
© 2016 Cisco and/or its affiliates. All rights reserved. This document is Cisco Public Information. 051216V5.1
Assign a Prescribed Learning PlanUse the following navigational path to add a PLP:
1. In the left navigation, click Prescribed Learning Plan.The system displays the Manage Learning Plan page.
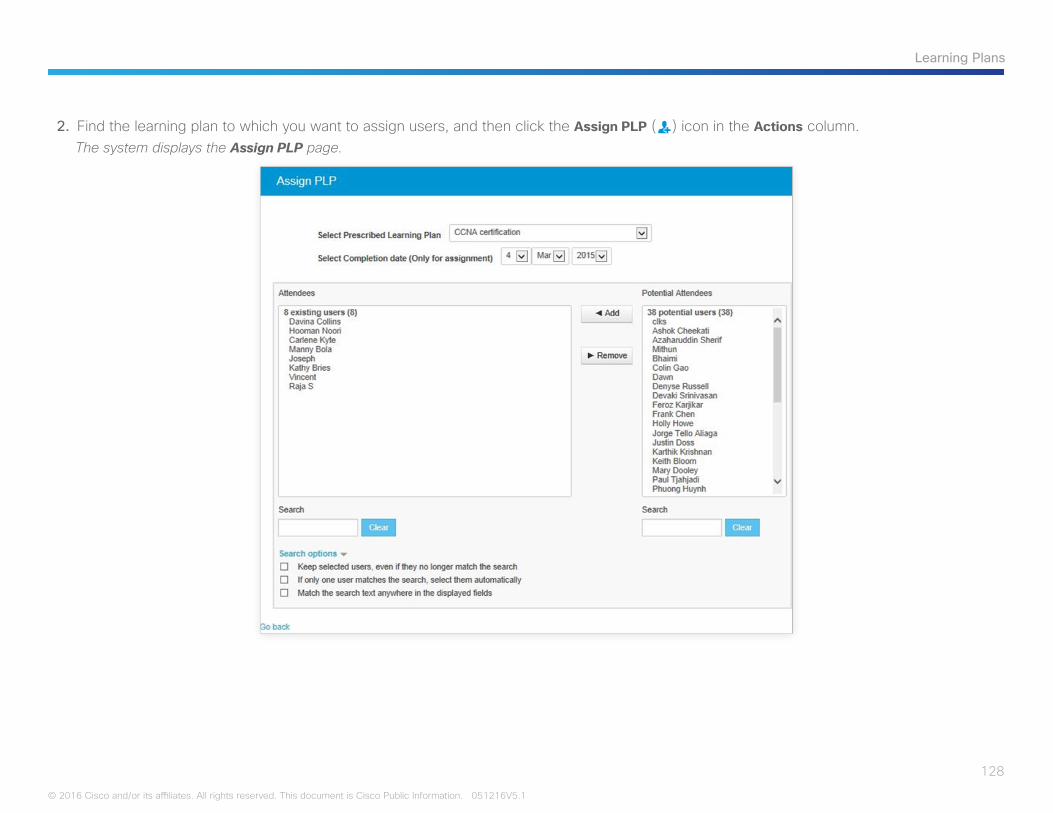
128
Learning Plans
© 2016 Cisco and/or its affiliates. All rights reserved. This document is Cisco Public Information. 051216V5.1
2. Find the learning plan to which you want to assign users, and then click the Assign PLP () icon in the Actions column.The system displays the Assign PLP page.
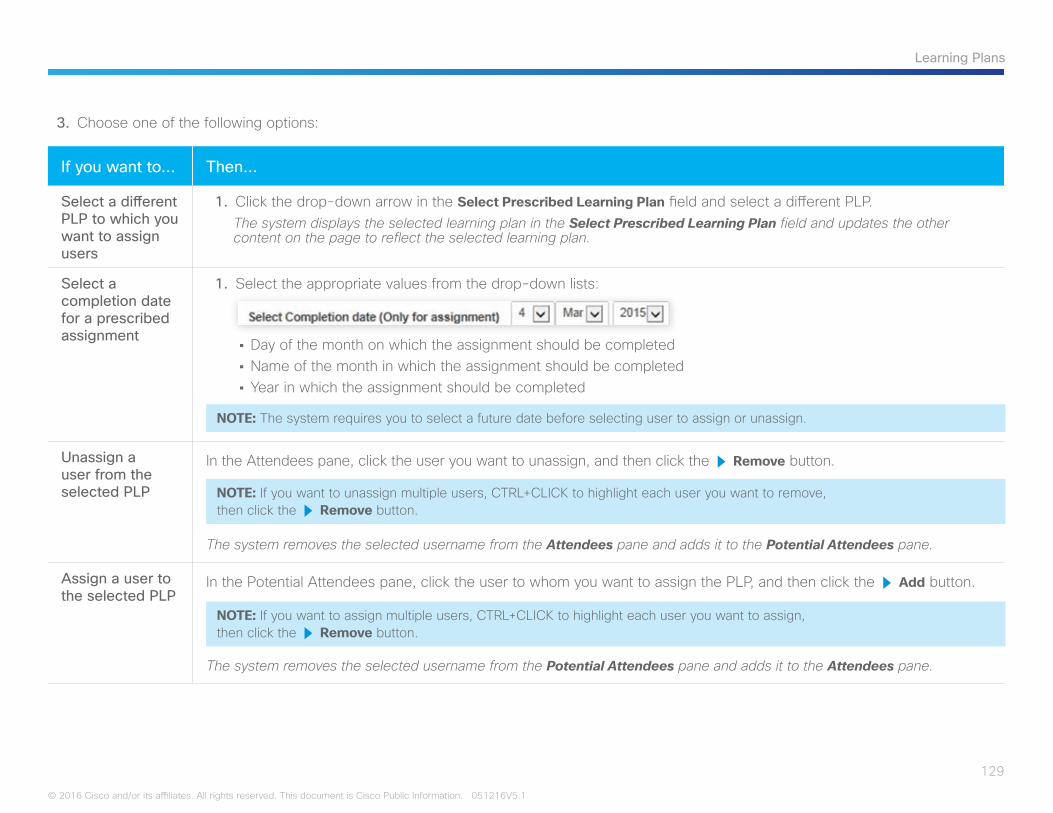
129
Learning Plans
© 2016 Cisco and/or its affiliates. All rights reserved. This document is Cisco Public Information. 051216V5.1
3. Choose one of the following options:
If you want to… Then…
Select a different PLP to which you want to assign users
1. Click the drop-down arrow in the Select Prescribed Learning Plan field and select a different PLP.The system displays the selected learning plan in the Select Prescribed Learning Plan field and updates the other content on the page to reflect the selected learning plan.
Select a completion date for a prescribed assignment
1. Select the appropriate values from the drop-down lists:
• Day of the month on which the assignment should be completed• Name of the month in which the assignment should be completed• Year in which the assignment should be completed
NOTE: The system requires you to select a future date before selecting user to assign or unassign.
Unassign a user from the selected PLP
In the Attendees pane, click the user you want to unassign, and then click the R Remove button.
NOTE: If you want to unassign multiple users, CTRL+CLICK to highlight each user you want to remove, then click the R Remove button.
The system removes the selected username from the Attendees pane and adds it to the Potential Attendees pane.
Assign a user to the selected PLP
In the Potential Attendees pane, click the user to whom you want to assign the PLP, and then click the R Add button.
NOTE: If you want to assign multiple users, CTRL+CLICK to highlight each user you want to assign, then click the R Remove button.
The system removes the selected username from the Potential Attendees pane and adds it to the Attendees pane.

130
Learning Plans
© 2016 Cisco and/or its affiliates. All rights reserved. This document is Cisco Public Information. 051216V5.1
If you want to… Then…
Search for a user who is currently assigned to the PLP
In the Search field below the Attendees pane, type the name (or partial name) of the user for whom you want to search.The system displays the users that match the search criteria you entered.
Search for a user who is not currently assigned to the selected PLP
In the Search field below the Potential Attendees pane, type the name (or partial name) of the user for whom you want to search..The system displays the users that match the search criteria you entered.
Filter your search for assigned or unassigned users
Click:
to search for one or more users without deselecting one or more users that you have already selected
to select a user automatically, when only one user matches your search criteria
to find one or more users whose names contain the sequence of text you enter in the search field, regardless of where the text appears within the username
Clear search criteria that you entered
Click the Clear button to the right of the Search field in which you entered search criteria.The system removes the search criteria from the Search field.
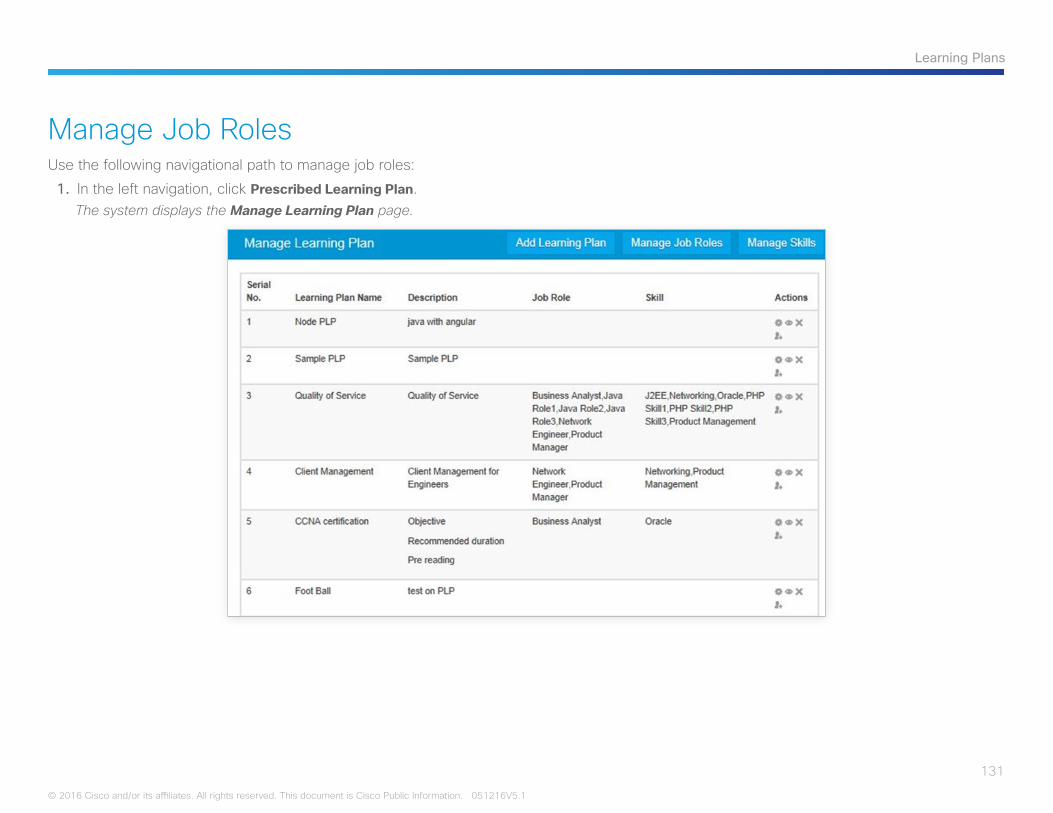
131
Learning Plans
© 2016 Cisco and/or its affiliates. All rights reserved. This document is Cisco Public Information. 051216V5.1
Manage Job RolesUse the following navigational path to manage job roles:
1. In the left navigation, click Prescribed Learning Plan.The system displays the Manage Learning Plan page.
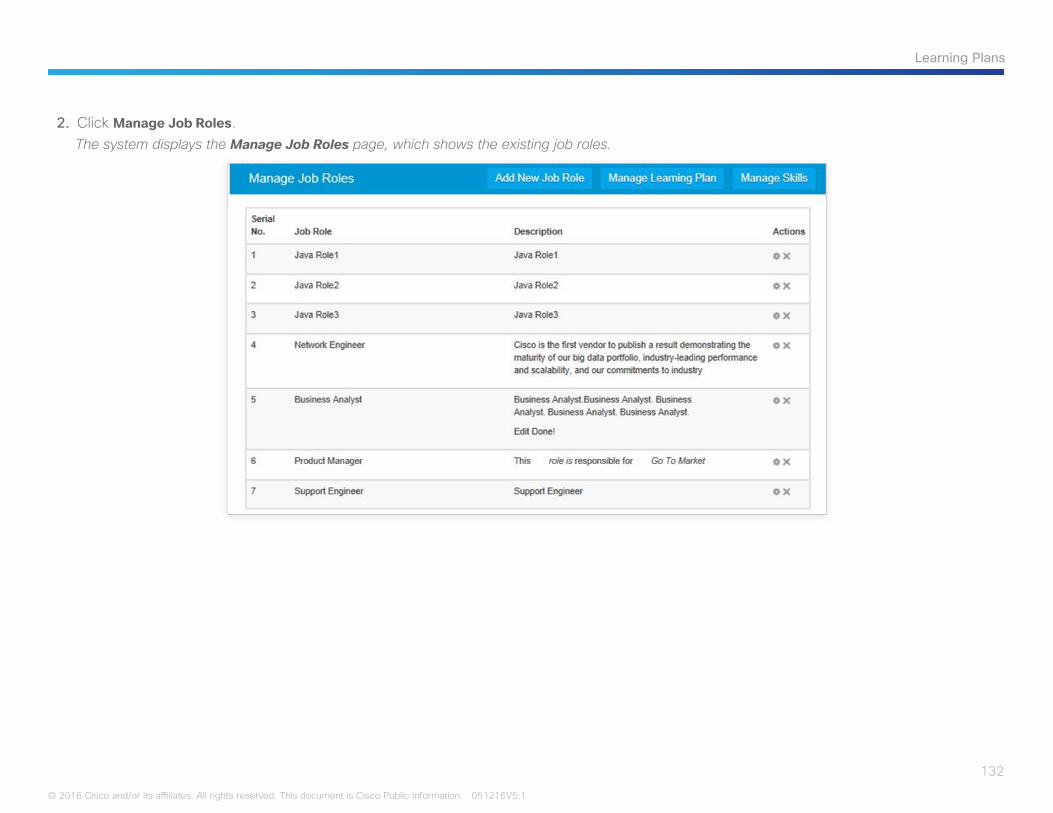
132
Learning Plans
© 2016 Cisco and/or its affiliates. All rights reserved. This document is Cisco Public Information. 051216V5.1
2. Click Manage Job Roles.The system displays the Manage Job Roles page, which shows the existing job roles.

133
Learning Plans
© 2016 Cisco and/or its affiliates. All rights reserved. This document is Cisco Public Information. 051216V5.1
Add a Job RoleUse the following navigational path to add a job role:
1. In the left navigation, click Prescribed Learning Plan.The system displays the Manage Learning Plan page.
2. Click Manage Job Roles.The system displays the Manage Job Roles page, which shows the existing job roles.
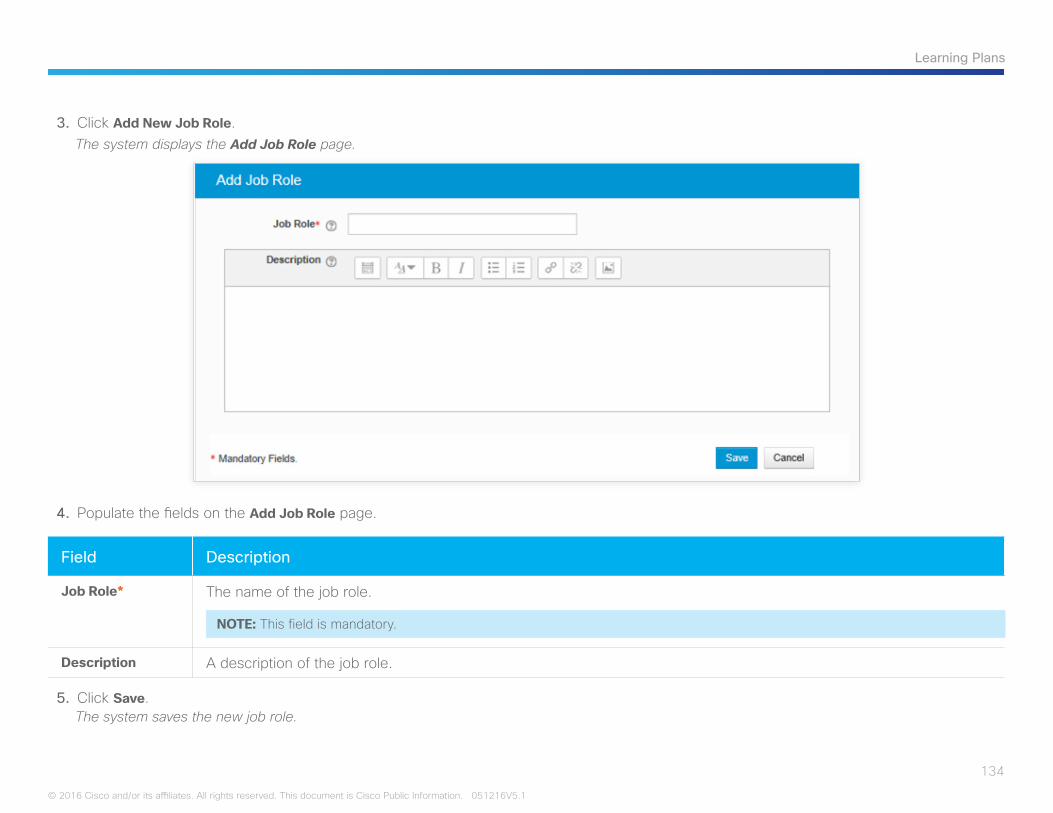
134
Learning Plans
© 2016 Cisco and/or its affiliates. All rights reserved. This document is Cisco Public Information. 051216V5.1
3. Click Add New Job Role.The system displays the Add Job Role page.
4. Populate the fields on the Add Job Role page.
Field Description
Job Role* The name of the job role.
NOTE: This field is mandatory.
Description A description of the job role.
5. Click Save.The system saves the new job role.
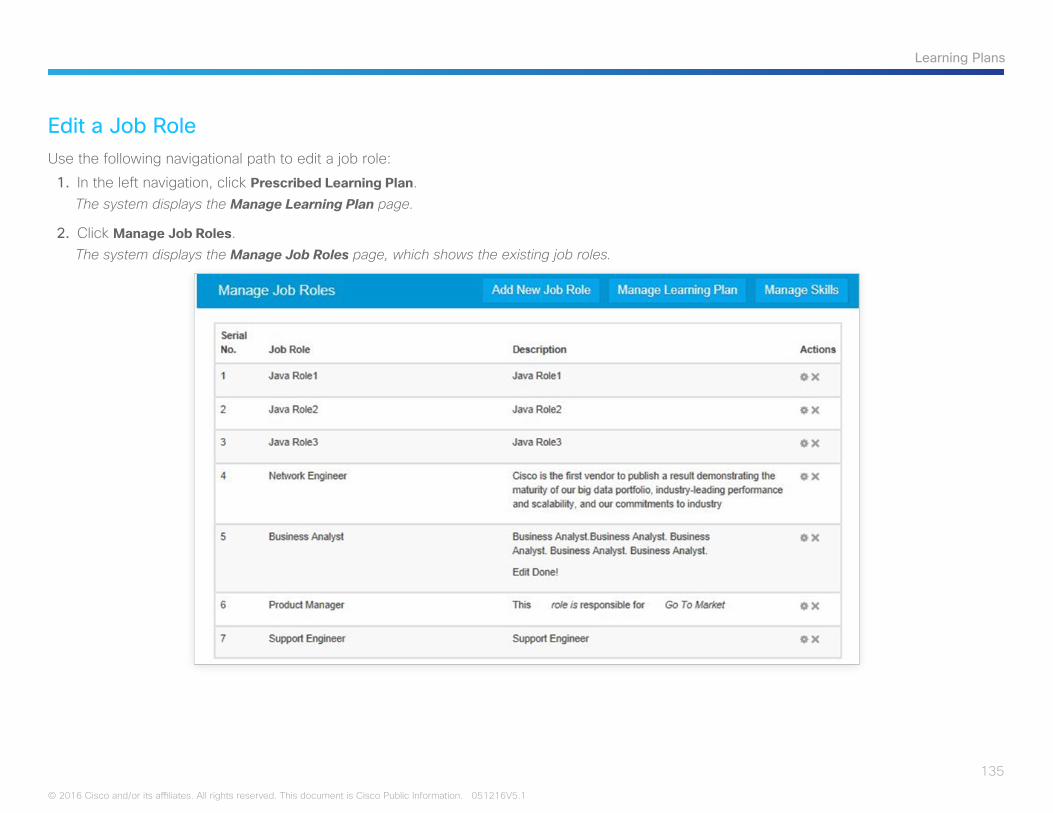
135
Learning Plans
© 2016 Cisco and/or its affiliates. All rights reserved. This document is Cisco Public Information. 051216V5.1
Edit a Job RoleUse the following navigational path to edit a job role:
1. In the left navigation, click Prescribed Learning Plan.The system displays the Manage Learning Plan page.
2. Click Manage Job Roles.The system displays the Manage Job Roles page, which shows the existing job roles.

136
Learning Plans
© 2016 Cisco and/or its affiliates. All rights reserved. This document is Cisco Public Information. 051216V5.1
3. Find the job role you want to edit, and then click the Edit () icon in the Actions column.The system displays the Add Job Role page.
4. Type the new data in the fields you want to edit, and then click Save.The system updates the job role.
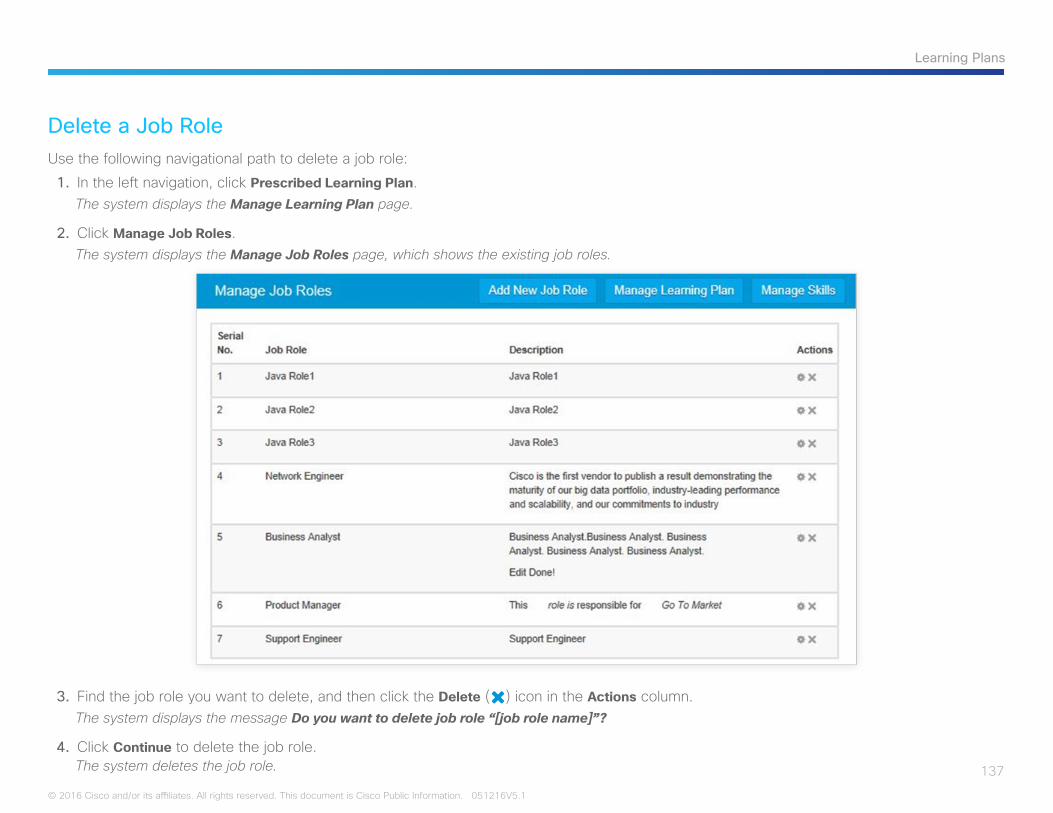
137
Learning Plans
© 2016 Cisco and/or its affiliates. All rights reserved. This document is Cisco Public Information. 051216V5.1
Delete a Job RoleUse the following navigational path to delete a job role:
1. In the left navigation, click Prescribed Learning Plan.The system displays the Manage Learning Plan page.
2. Click Manage Job Roles.The system displays the Manage Job Roles page, which shows the existing job roles.
3. Find the job role you want to delete, and then click the Delete () icon in the Actions column.The system displays the message Do you want to delete job role “[job role name]”?
4. Click Continue to delete the job role.The system deletes the job role.

138
Learning Plans
© 2016 Cisco and/or its affiliates. All rights reserved. This document is Cisco Public Information. 051216V5.1
Manage SkillsUse the following navigational path to manage skills:
1. In the left navigation, click Prescribed Learning Plan.The system displays the Manage Learning Plan page.
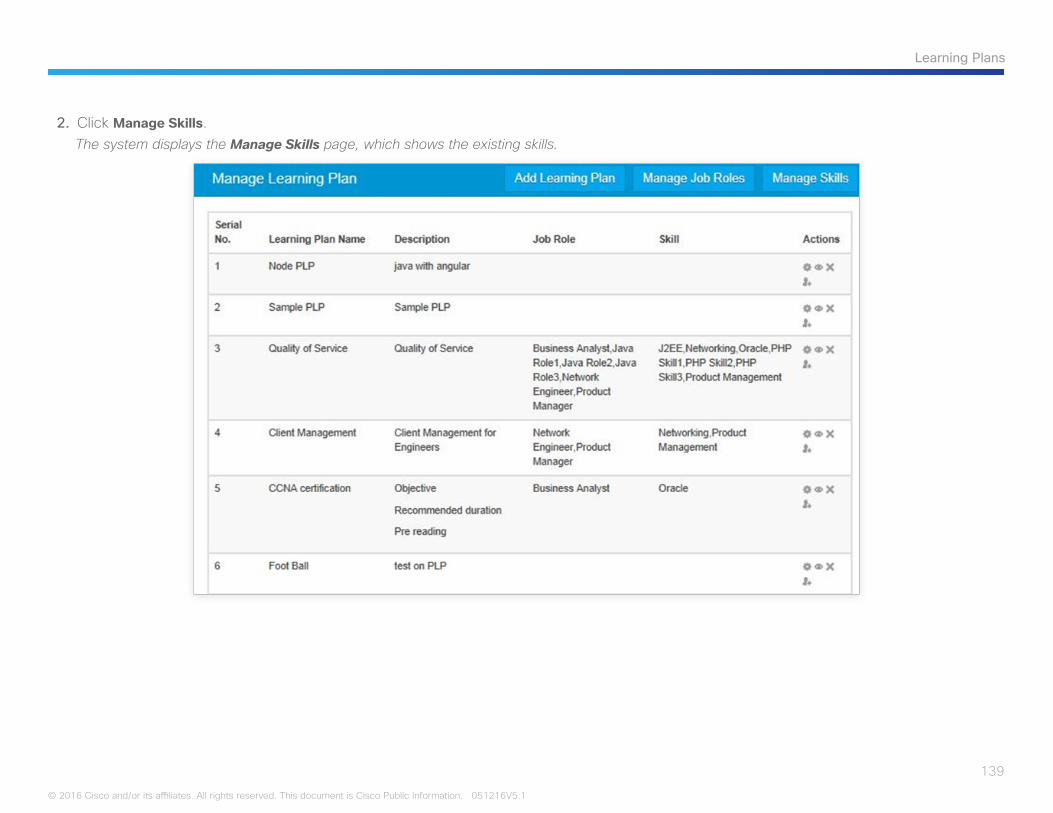
139
Learning Plans
© 2016 Cisco and/or its affiliates. All rights reserved. This document is Cisco Public Information. 051216V5.1
2. Click Manage Skills.The system displays the Manage Skills page, which shows the existing skills.

140
Learning Plans
© 2016 Cisco and/or its affiliates. All rights reserved. This document is Cisco Public Information. 051216V5.1
Add a SkillUse the following navigational path to add a skill:
1. In the left navigation, click Prescribed Learning Plan.The system displays the Manage Learning Plan page.
2. Click Manage Skills.The system displays the Manage Skills page, which shows the existing skills.
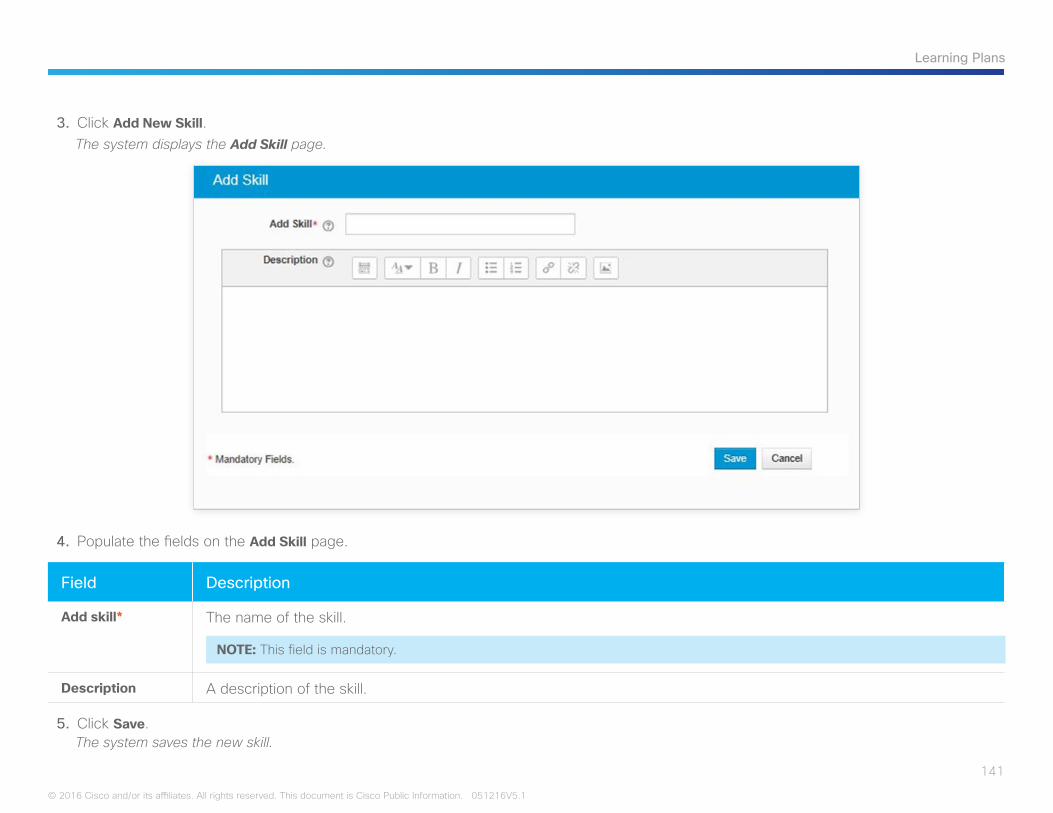
141
Learning Plans
© 2016 Cisco and/or its affiliates. All rights reserved. This document is Cisco Public Information. 051216V5.1
3. Click Add New Skill.The system displays the Add Skill page.
4. Populate the fields on the Add Skill page.
Field Description
Add skill* The name of the skill.
NOTE: This field is mandatory.
Description A description of the skill.
5. Click Save.The system saves the new skill.
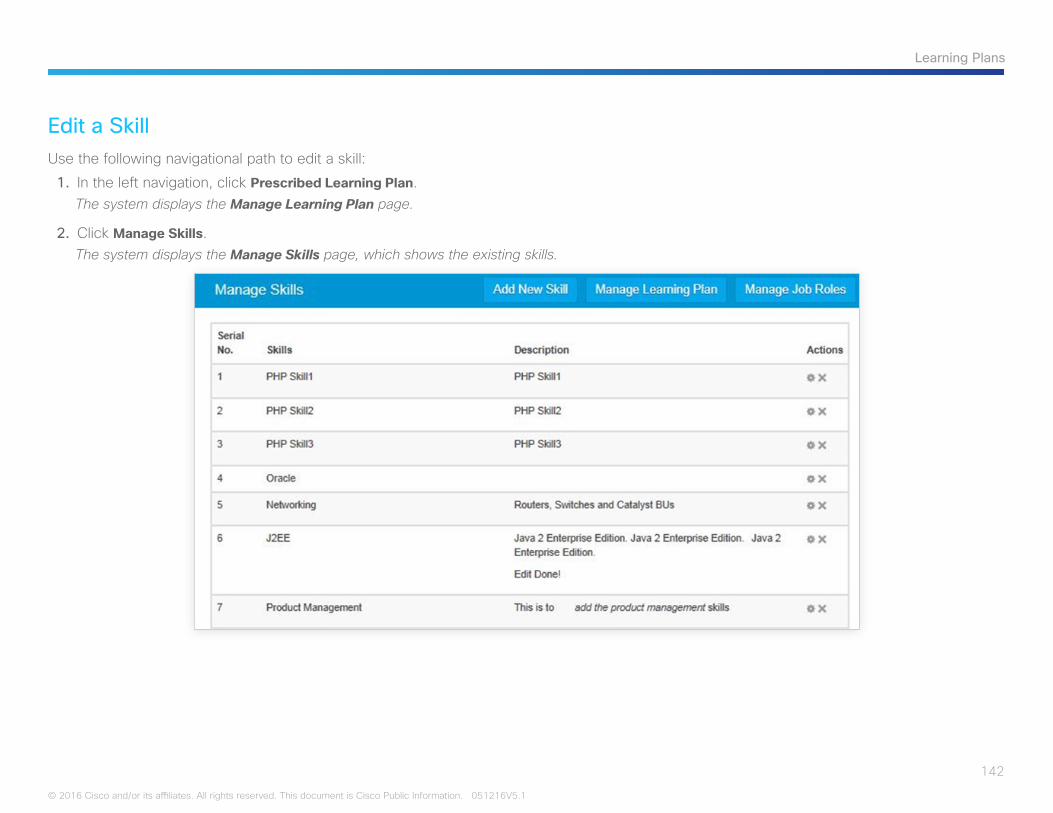
142
Learning Plans
© 2016 Cisco and/or its affiliates. All rights reserved. This document is Cisco Public Information. 051216V5.1
Edit a SkillUse the following navigational path to edit a skill:
1. In the left navigation, click Prescribed Learning Plan.The system displays the Manage Learning Plan page.
2. Click Manage Skills.The system displays the Manage Skills page, which shows the existing skills.
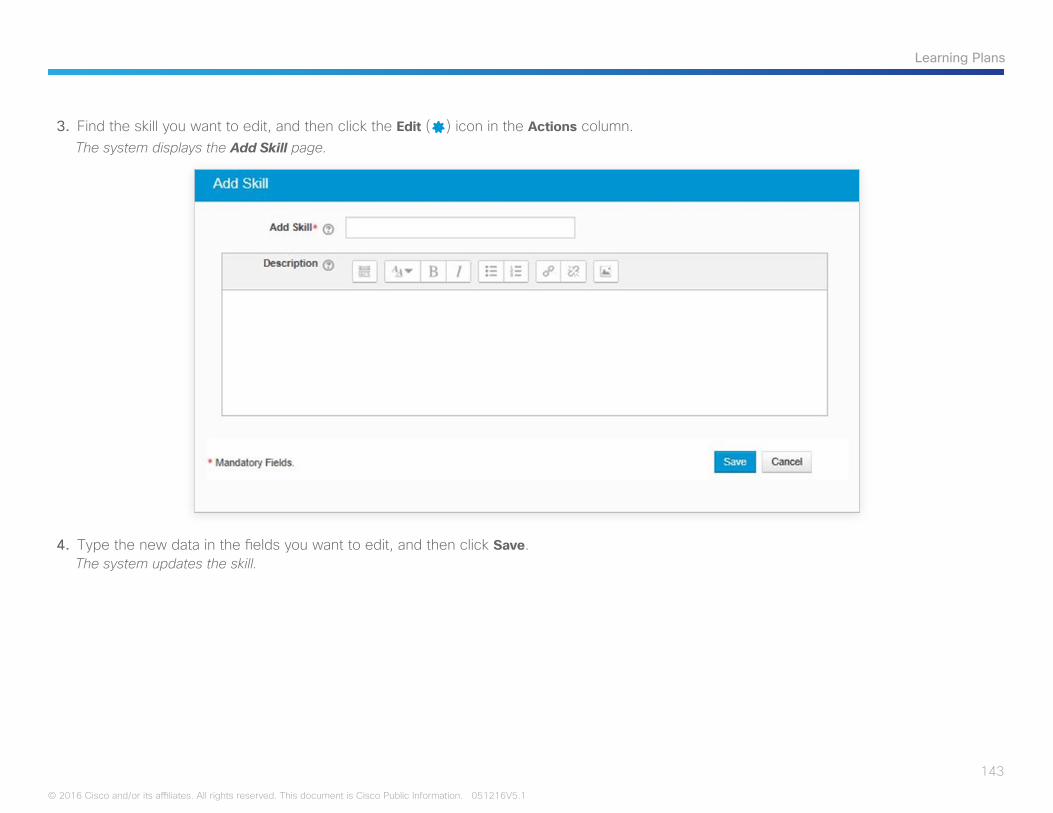
143
Learning Plans
© 2016 Cisco and/or its affiliates. All rights reserved. This document is Cisco Public Information. 051216V5.1
3. Find the skill you want to edit, and then click the Edit () icon in the Actions column.The system displays the Add Skill page.
4. Type the new data in the fields you want to edit, and then click Save.The system updates the skill.
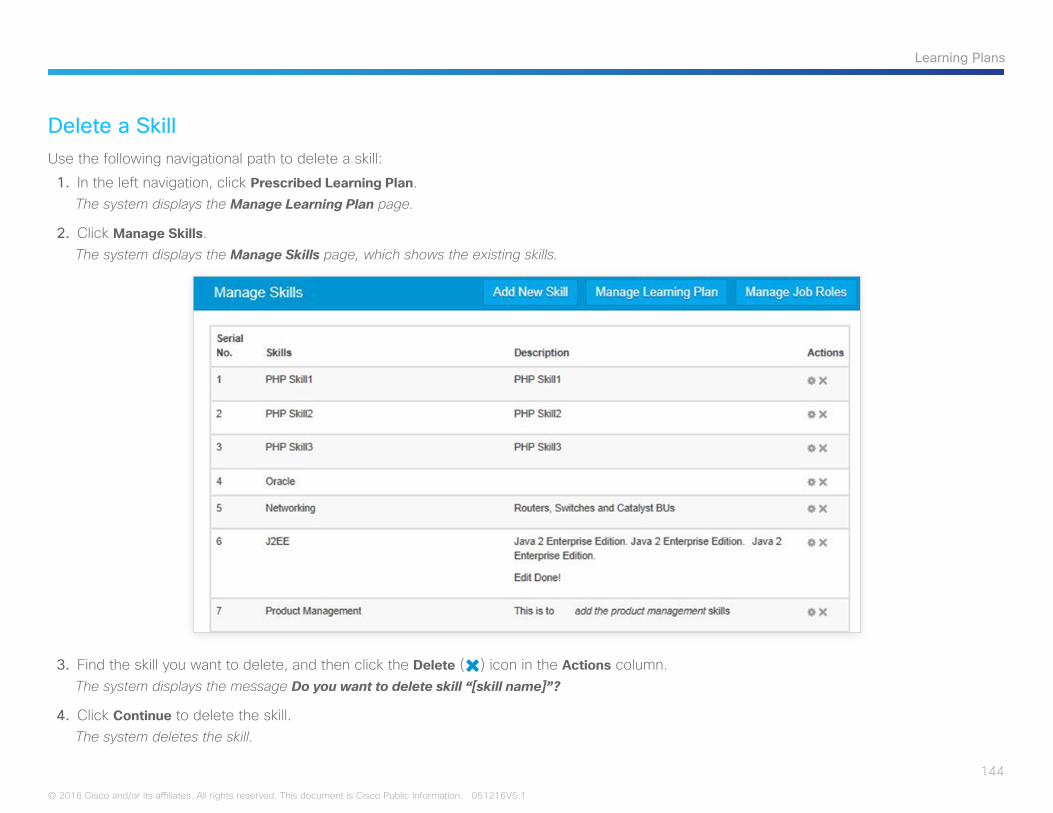
144
Learning Plans
© 2016 Cisco and/or its affiliates. All rights reserved. This document is Cisco Public Information. 051216V5.1
Delete a SkillUse the following navigational path to delete a skill:
1. In the left navigation, click Prescribed Learning Plan.The system displays the Manage Learning Plan page.
2. Click Manage Skills.The system displays the Manage Skills page, which shows the existing skills.
3. Find the skill you want to delete, and then click the Delete () icon in the Actions column.The system displays the message Do you want to delete skill “[skill name]”?
4. Click Continue to delete the skill.The system deletes the skill.

145
Assign Instructors
© 2016 Cisco and/or its affiliates. All rights reserved. This document is Cisco Public Information. 051216V5.1
Assign InstructorsThe Assign Instructor feature allows the catalog administrator to assign the role of Instructor to selected users for instructor-led courses.
NOTE: These are not instructors for WebEx training courses.
Use the following navigational path to assign the Instructor role to one or more users:
1. In the left navigation, click Assign Instructor.The system displays the Add/Remove Instructor page.
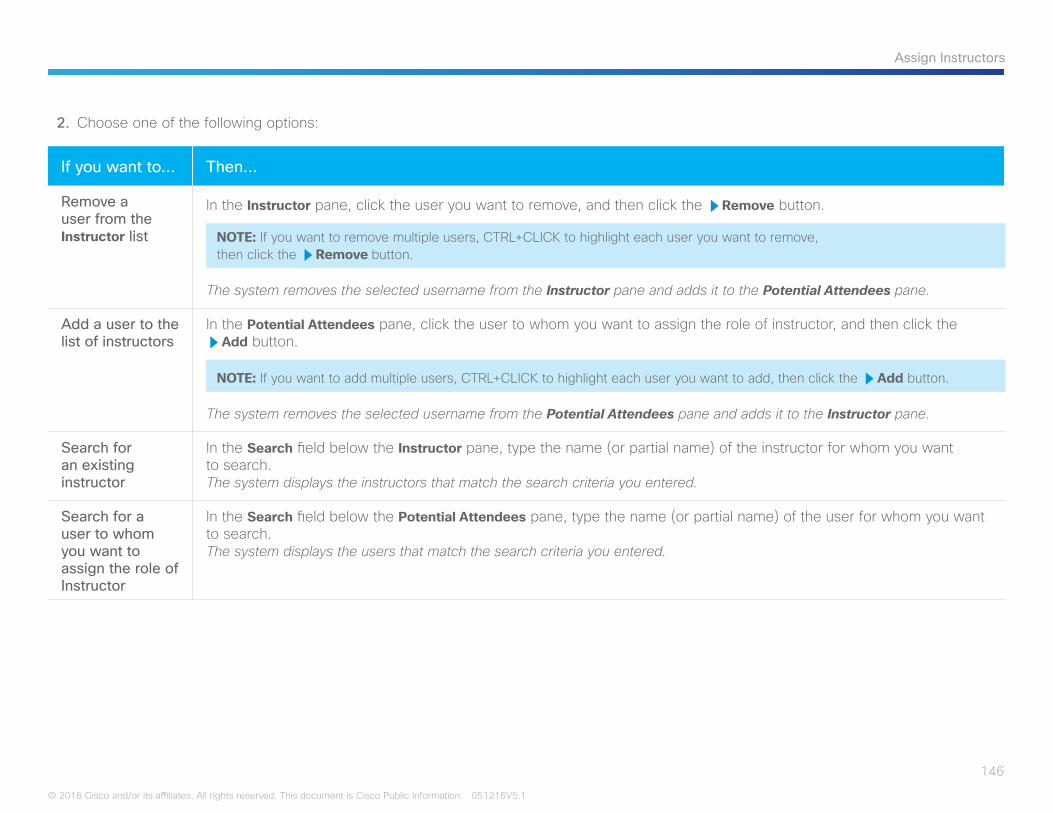
146
Assign Instructors
© 2016 Cisco and/or its affiliates. All rights reserved. This document is Cisco Public Information. 051216V5.1
2. Choose one of the following options:
If you want to… Then…
Remove a user from the Instructor list
In the Instructor pane, click the user you want to remove, and then click the RRemove button.
NOTE: If you want to remove multiple users, CTRL+CLICK to highlight each user you want to remove, then click the RRemove button.
The system removes the selected username from the Instructor pane and adds it to the Potential Attendees pane.
Add a user to the list of instructors
In the Potential Attendees pane, click the user to whom you want to assign the role of instructor, and then click the RAdd button.
NOTE: If you want to add multiple users, CTRL+CLICK to highlight each user you want to add, then click the RAdd button.
The system removes the selected username from the Potential Attendees pane and adds it to the Instructor pane.
Search for an existing instructor
In the Search field below the Instructor pane, type the name (or partial name) of the instructor for whom you want to search.The system displays the instructors that match the search criteria you entered.
Search for a user to whom you want to assign the role of Instructor
In the Search field below the Potential Attendees pane, type the name (or partial name) of the user for whom you want to search.The system displays the users that match the search criteria you entered.
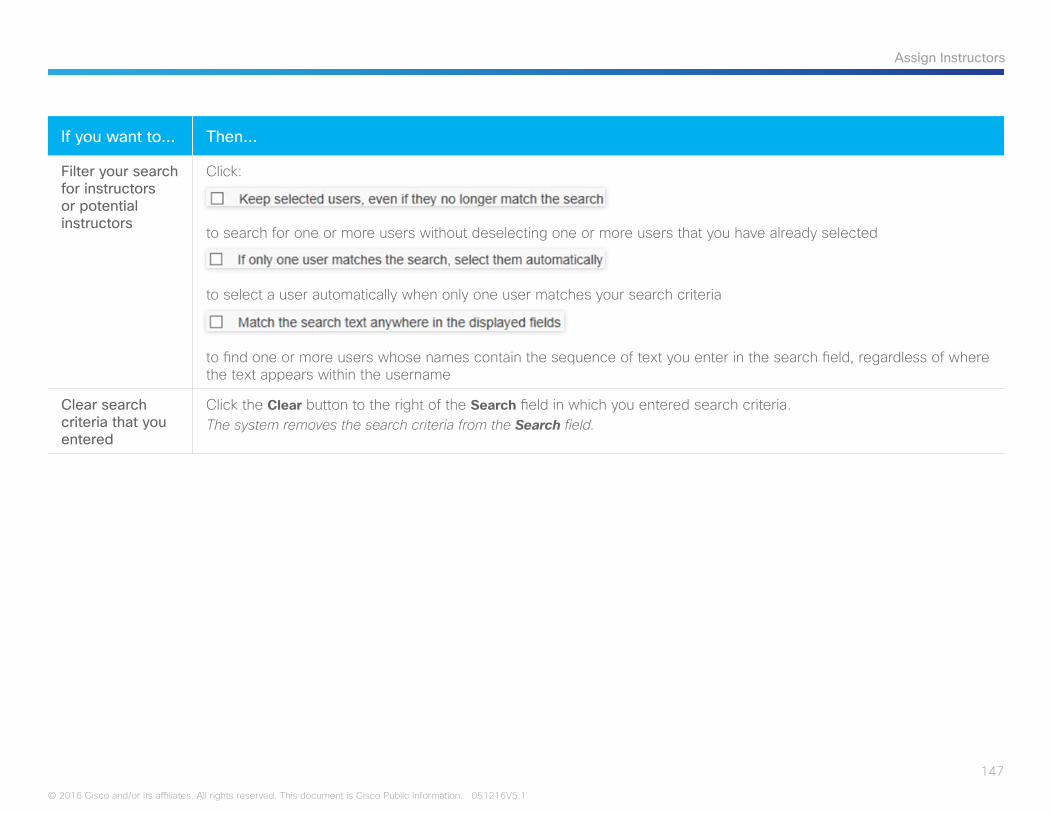
147
Assign Instructors
© 2016 Cisco and/or its affiliates. All rights reserved. This document is Cisco Public Information. 051216V5.1
If you want to… Then…
Filter your search for instructors or potential instructors
Click:
to search for one or more users without deselecting one or more users that you have already selected
to select a user automatically when only one user matches your search criteria
to find one or more users whose names contain the sequence of text you enter in the search field, regardless of where the text appears within the username
Clear search criteria that you entered
Click the Clear button to the right of the Search field in which you entered search criteria.The system removes the search criteria from the Search field.
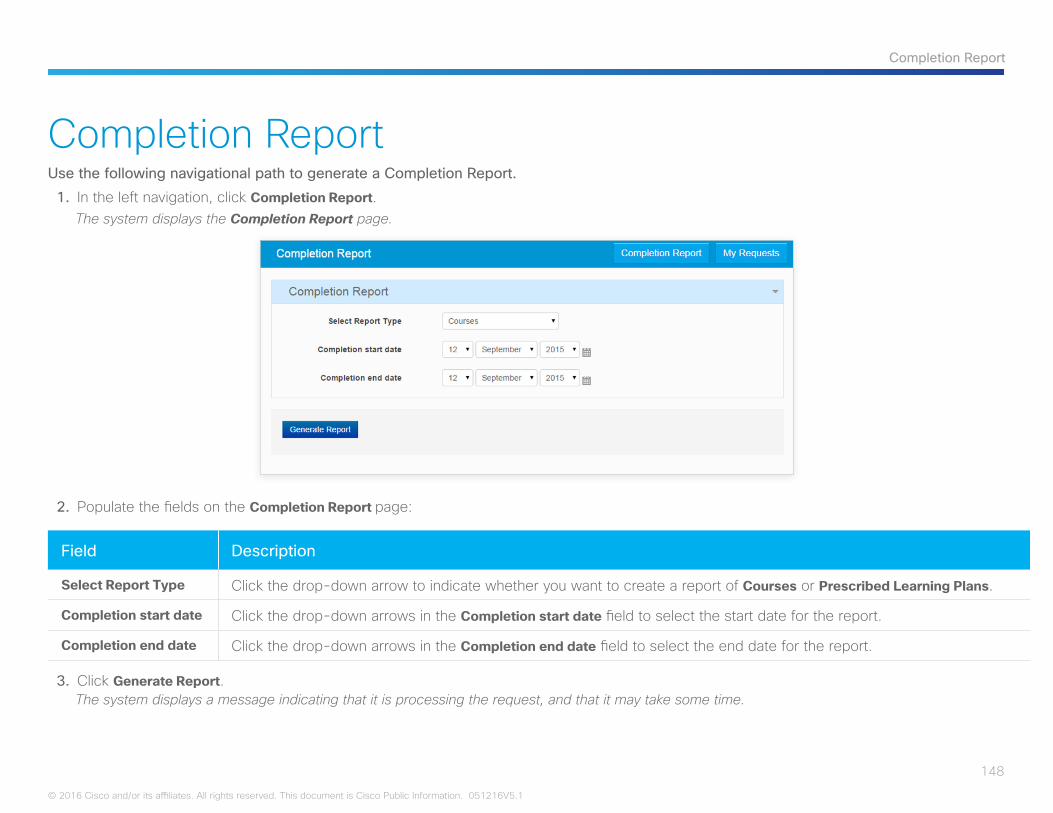
148
Completion Report
© 2016 Cisco and/or its affiliates. All rights reserved. This document is Cisco Public Information. 051216V5.1
Completion ReportUse the following navigational path to generate a Completion Report.
1. In the left navigation, click Completion Report.The system displays the Completion Report page.
2. Populate the fields on the Completion Report page:
Field Description
Select Report Type Click the drop-down arrow to indicate whether you want to create a report of Courses or Prescribed Learning Plans.
Completion start date Click the drop-down arrows in the Completion start date field to select the start date for the report.
Completion end date Click the drop-down arrows in the Completion end date field to select the end date for the report.
3. Click Generate Report.The system displays a message indicating that it is processing the request, and that it may take some time.
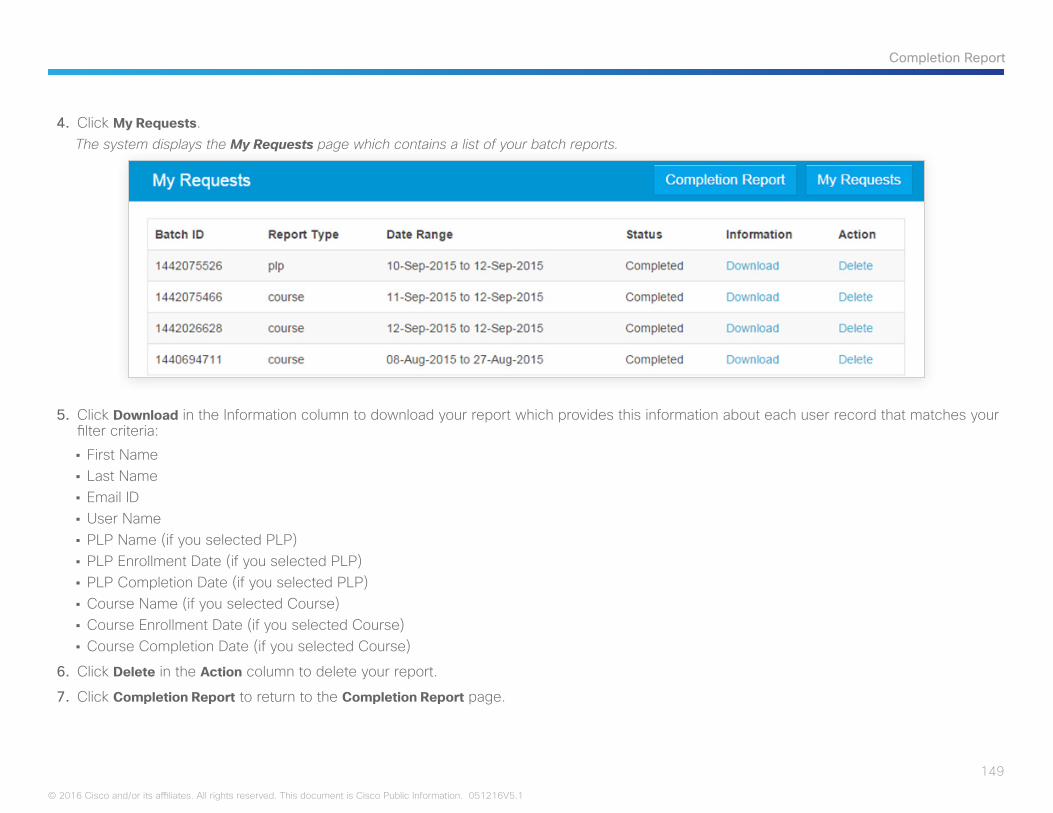
149
Completion Report
© 2016 Cisco and/or its affiliates. All rights reserved. This document is Cisco Public Information. 051216V5.1
4. Click My Requests.The system displays the My Requests page which contains a list of your batch reports.
5. Click Download in the Information column to download your report which provides this information about each user record that matches your filter criteria:
• First Name• Last Name• Email ID• User Name• PLP Name (if you selected PLP)• PLP Enrollment Date (if you selected PLP)• PLP Completion Date (if you selected PLP)• Course Name (if you selected Course)• Course Enrollment Date (if you selected Course)• Course Completion Date (if you selected Course)
6. Click Delete in the Action column to delete your report.
7. Click Completion Report to return to the Completion Report page.
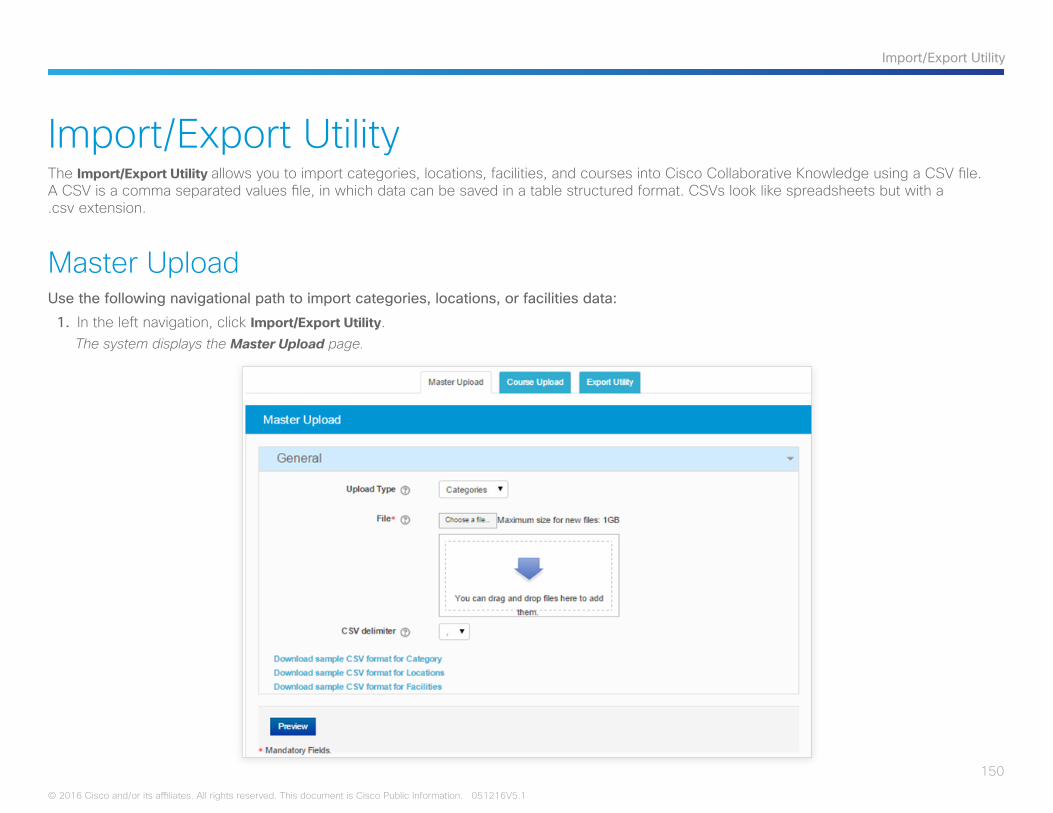
150
Import/Export Utility
© 2016 Cisco and/or its affiliates. All rights reserved. This document is Cisco Public Information. 051216V5.1
Import/Export UtilityThe Import/Export Utility allows you to import categories, locations, facilities, and courses into Cisco Collaborative Knowledge using a CSV file. A CSV is a comma separated values file, in which data can be saved in a table structured format. CSVs look like spreadsheets but with a .csv extension.
Master UploadUse the following navigational path to import categories, locations, or facilities data:
1. In the left navigation, click Import/Export Utility.The system displays the Master Upload page.
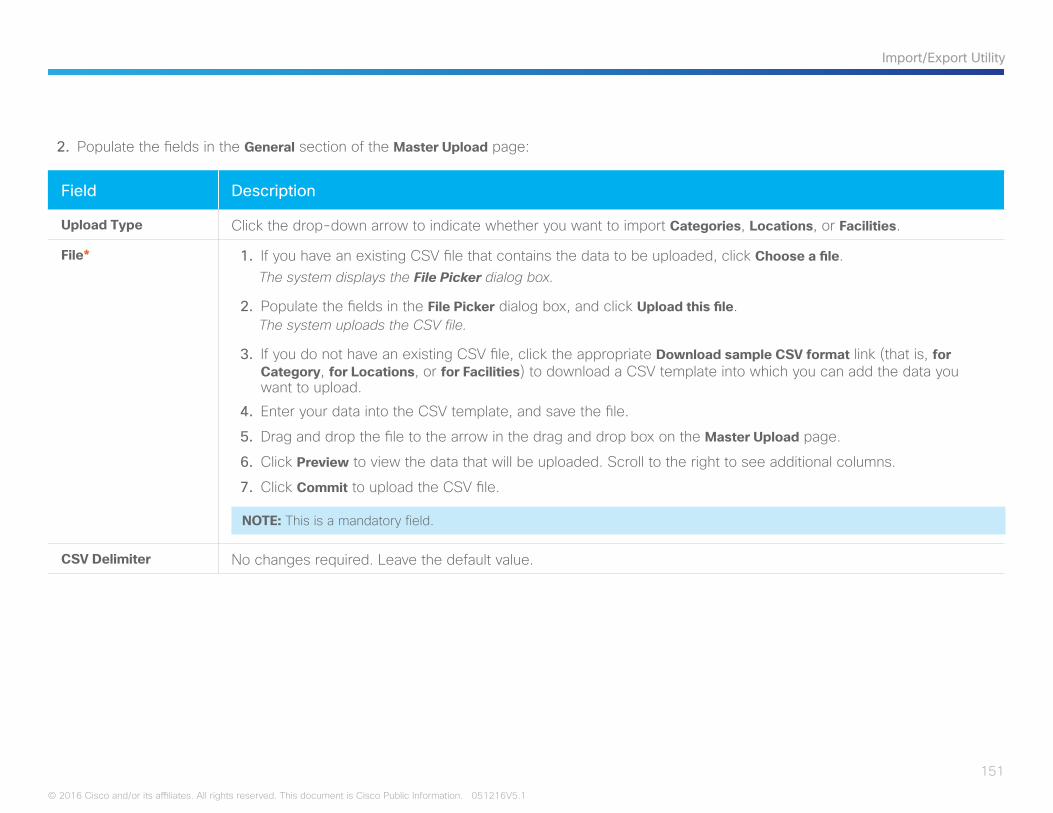
151
Import/Export Utility
© 2016 Cisco and/or its affiliates. All rights reserved. This document is Cisco Public Information. 051216V5.1
2. Populate the fields in the General section of the Master Upload page:
Field Description
Upload Type Click the drop-down arrow to indicate whether you want to import Categories, Locations, or Facilities.
File* 1. If you have an existing CSV file that contains the data to be uploaded, click Choose a file.The system displays the File Picker dialog box.
2. Populate the fields in the File Picker dialog box, and click Upload this file.The system uploads the CSV file.
3. If you do not have an existing CSV file, click the appropriate Download sample CSV format link (that is, for Category, for Locations, or for Facilities) to download a CSV template into which you can add the data you want to upload.
4. Enter your data into the CSV template, and save the file.
5. Drag and drop the file to the arrow in the drag and drop box on the Master Upload page.
6. Click Preview to view the data that will be uploaded. Scroll to the right to see additional columns.
7. Click Commit to upload the CSV file.
NOTE: This is a mandatory field.
CSV Delimiter No changes required. Leave the default value.
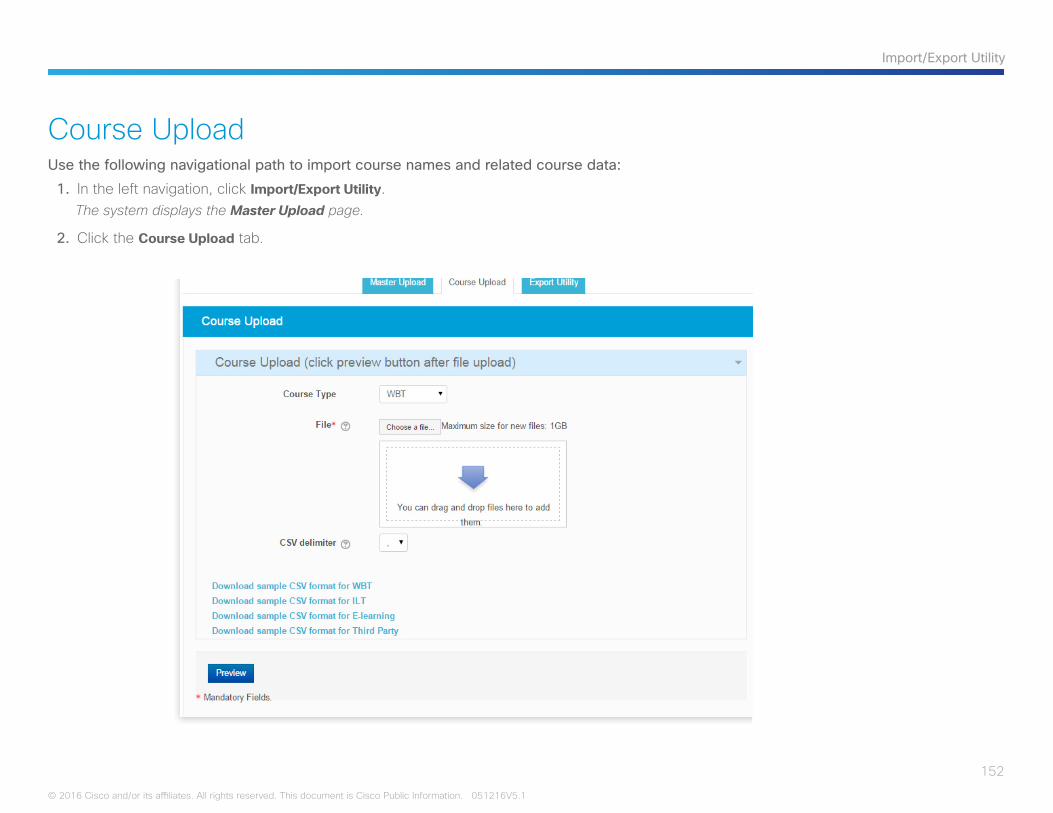
152
Import/Export Utility
© 2016 Cisco and/or its affiliates. All rights reserved. This document is Cisco Public Information. 051216V5.1
Course UploadUse the following navigational path to import course names and related course data:
1. In the left navigation, click Import/Export Utility.The system displays the Master Upload page.
2. Click the Course Upload tab.
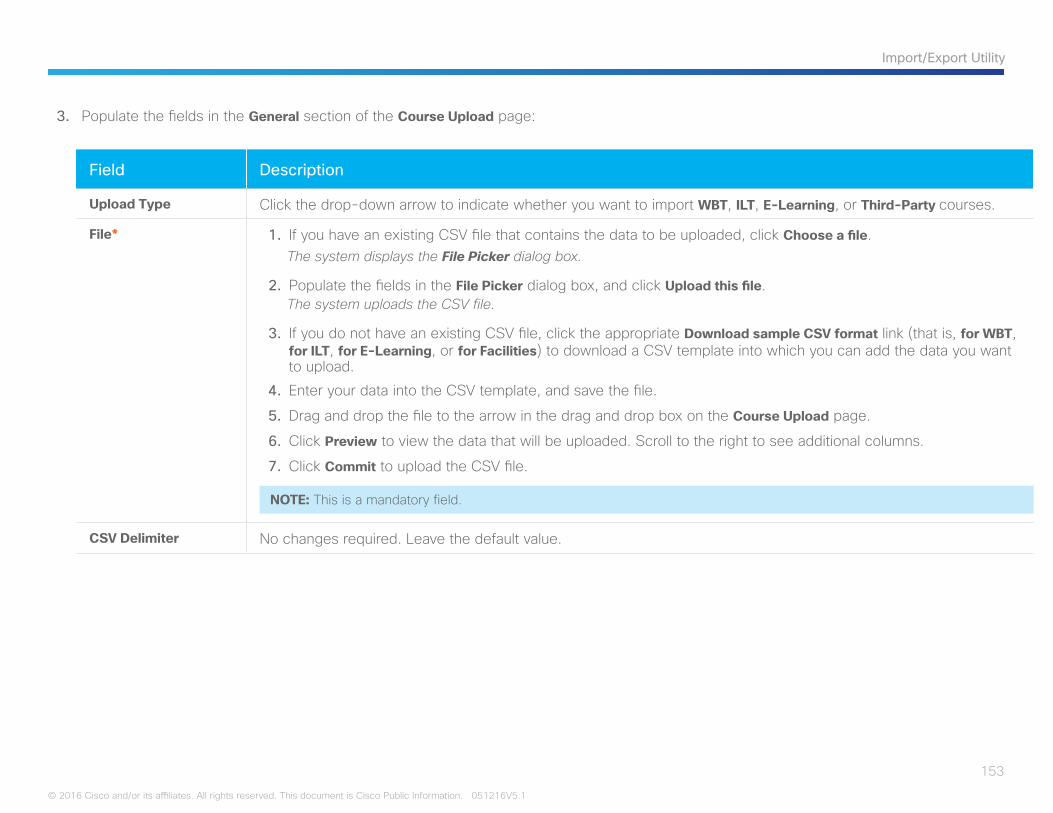
153
Import/Export Utility
© 2016 Cisco and/or its affiliates. All rights reserved. This document is Cisco Public Information. 051216V5.1
Field Description
Upload Type Click the drop-down arrow to indicate whether you want to import WBT, ILT, E-Learning, or Third-Party courses.
File* 1. If you have an existing CSV file that contains the data to be uploaded, click Choose a file.The system displays the File Picker dialog box.
2. Populate the fields in the File Picker dialog box, and click Upload this file.The system uploads the CSV file.
3. If you do not have an existing CSV file, click the appropriate Download sample CSV format link (that is, for WBT, for ILT, for E-Learning, or for Facilities) to download a CSV template into which you can add the data you want to upload.
4. Enter your data into the CSV template, and save the file.
5. Drag and drop the file to the arrow in the drag and drop box on the Course Upload page.
6. Click Preview to view the data that will be uploaded. Scroll to the right to see additional columns.
7. Click Commit to upload the CSV file.
NOTE: This is a mandatory field.
CSV Delimiter No changes required. Leave the default value.
3. Populate the fields in the General section of the Course Upload page:
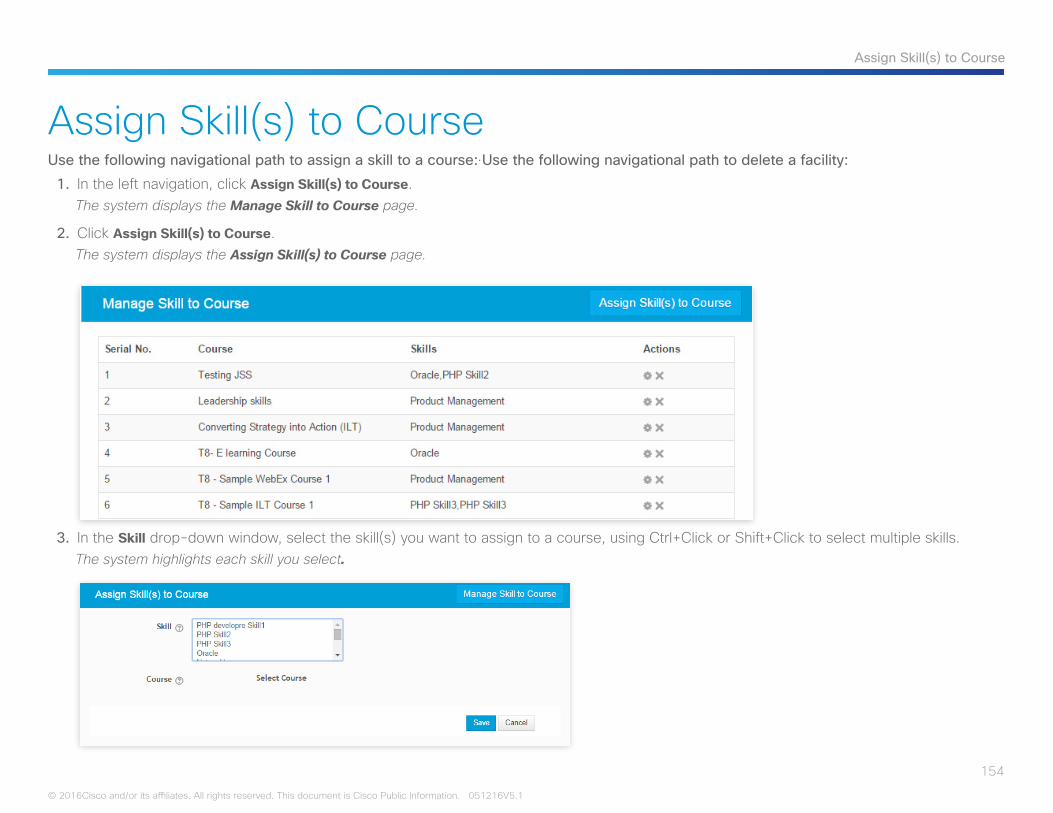
154
Assign Skill(s) to Course
© 2016Cisco and/or its affiliates. All rights reserved. This document is Cisco Public Information. 051216V5.1
Assign Skill(s) to CourseUse the following navigational path to assign a skill to a course:.Use the following navigational path to delete a facility:
1. In the left navigation, click Assign Skill(s) to Course.The system displays the Manage Skill to Course page.
2. Click Assign Skill(s) to Course.The system displays the Assign Skill(s) to Course page.
3. In the Skill drop-down window, select the skill(s) you want to assign to a course, using Ctrl+Click or Shift+Click to select multiple skills. The system highlights each skill you select.
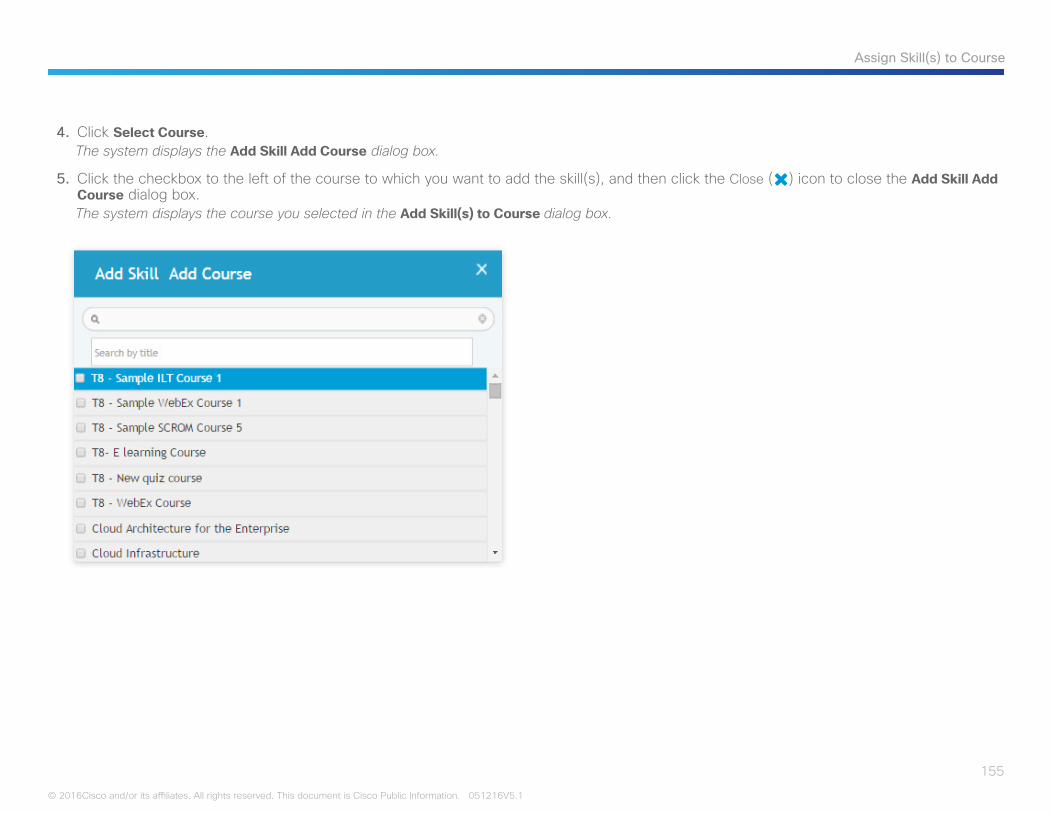
155
Assign Skill(s) to Course
© 2016Cisco and/or its affiliates. All rights reserved. This document is Cisco Public Information. 051216V5.1
4. Click Select Course.The system displays the Add Skill Add Course dialog box.
5. Click the checkbox to the left of the course to which you want to add the skill(s), and then click the Close () icon to close the Add Skill Add Course dialog box.The system displays the course you selected in the Add Skill(s) to Course dialog box.
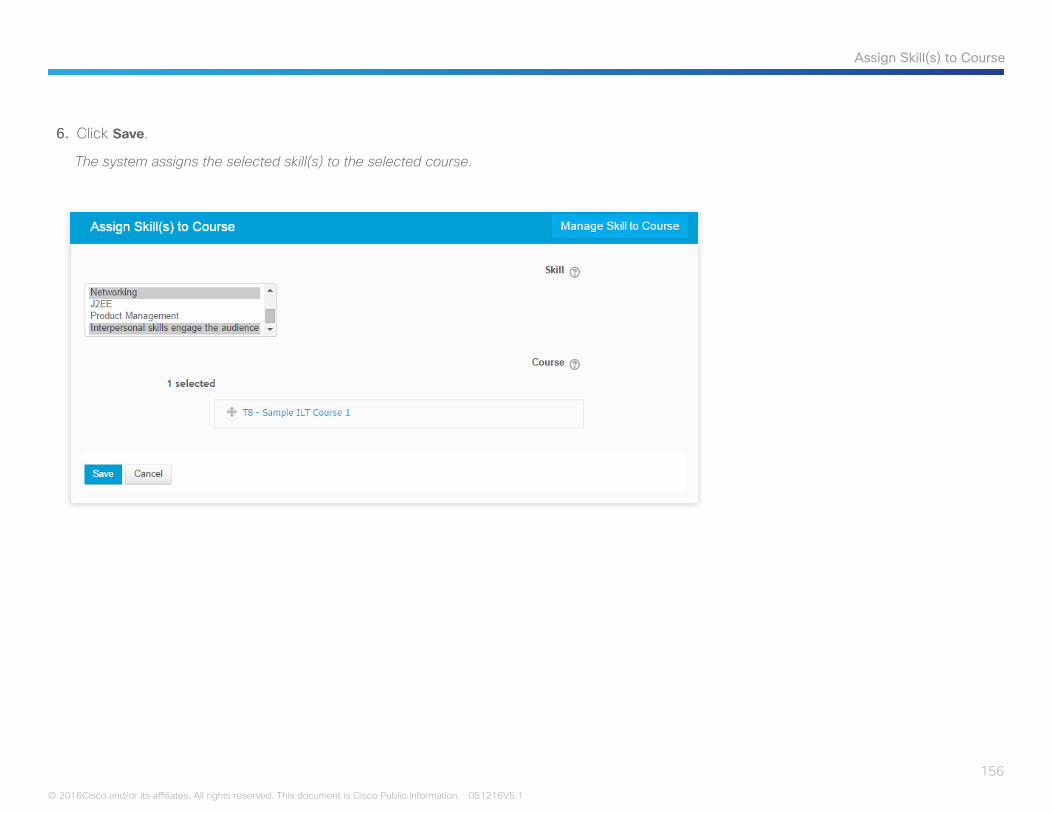
156
Assign Skill(s) to Course
© 2016Cisco and/or its affiliates. All rights reserved. This document is Cisco Public Information. 051216V5.1
6. Click Save.
The system assigns the selected skill(s) to the selected course.

157
Proxy Enrollment by Catalog Administrators
© 2016 Cisco and/or its affiliates. All rights reserved. This document is Cisco Public Information. 051216V5.1
Proxy Enrollment by Catalog AdministratorsThe Cisco Collaborative Knowledge Learning Management System allows catalog administrators to perform proxy enrollment (that is, register for courses on behalf of others).
NOTE: You can use this feature to register students for hidden courses (for example, third-party content that is designed for a specific audience only, or a course that has a restricted number of licenses available for which the students will be hand-picked). In these scenarios, users cannot self-register because the courses do not appear in the training catalog.
There are several methods you can use to register other users for a particular course session. Use one of the following navigational paths to register other users for a particular course session:
Method 1
If you want to register students for a PLP, follow the procedures in Assign a Prescribed Learning Plan.
Method 2
1. In the My courses section of the landing page, click the title of the course for which you want to register other users.The system displays the course details at the bottom of the page.
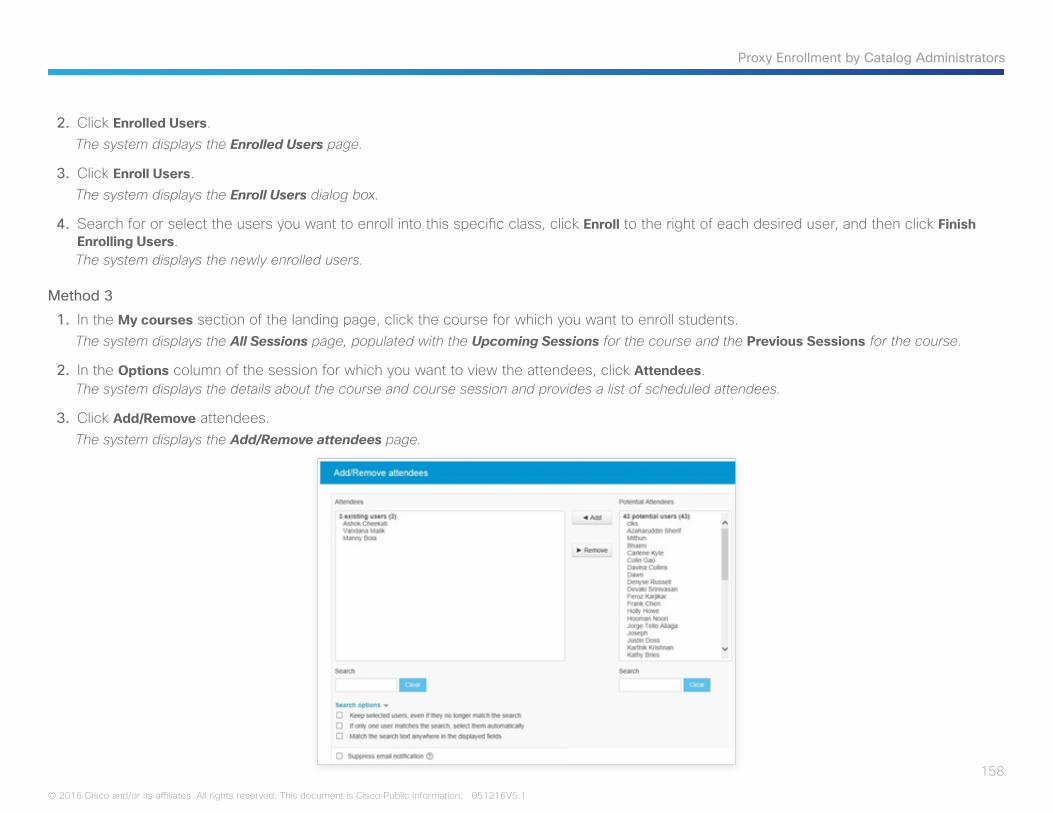
158
Proxy Enrollment by Catalog Administrators
© 2016 Cisco and/or its affiliates. All rights reserved. This document is Cisco Public Information. 051216V5.1
2. Click Enrolled Users.The system displays the Enrolled Users page.
3. Click Enroll Users.The system displays the Enroll Users dialog box.
4. Search for or select the users you want to enroll into this specific class, click Enroll to the right of each desired user, and then click Finish Enrolling Users.The system displays the newly enrolled users.
Method 3
1. In the My courses section of the landing page, click the course for which you want to enroll students.The system displays the All Sessions page, populated with the Upcoming Sessions for the course and the Previous Sessions for the course.
2. In the Options column of the session for which you want to view the attendees, click Attendees.The system displays the details about the course and course session and provides a list of scheduled attendees.
3. Click Add/Remove attendees.The system displays the Add/Remove attendees page.
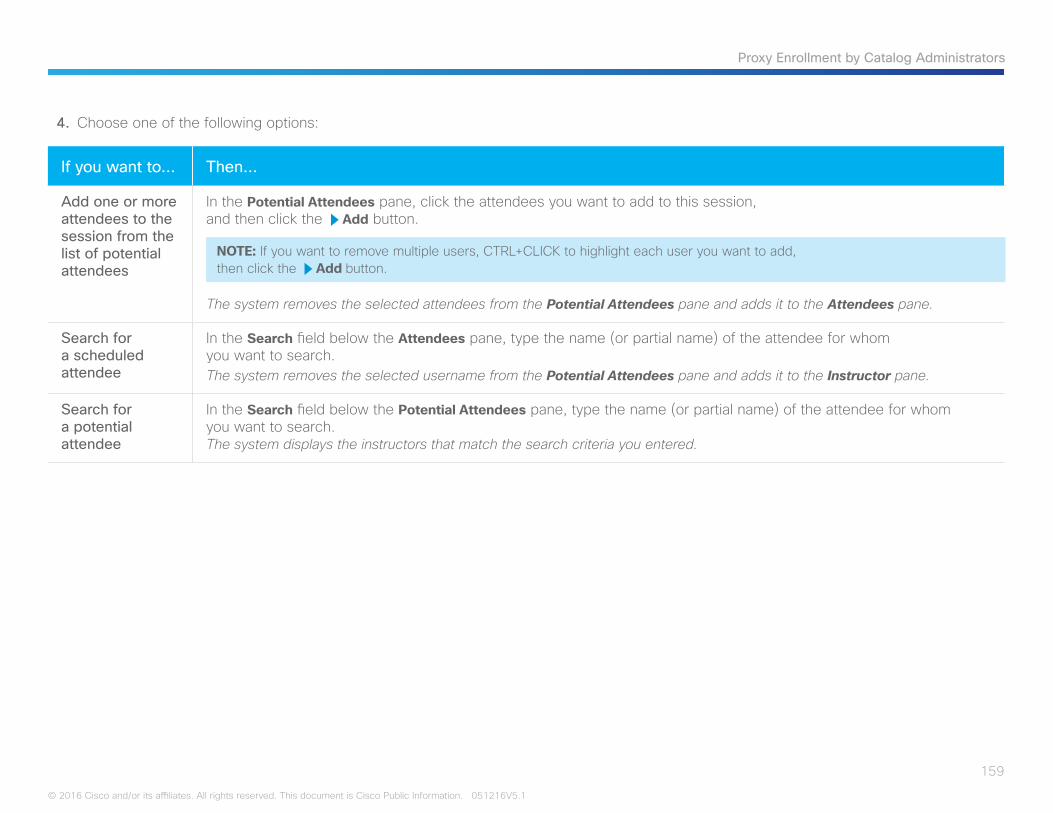
159
Proxy Enrollment by Catalog Administrators
© 2016 Cisco and/or its affiliates. All rights reserved. This document is Cisco Public Information. 051216V5.1
4. Choose one of the following options:
If you want to… Then…
Add one or more attendees to the session from the list of potential attendees
In the Potential Attendees pane, click the attendees you want to add to this session, and then click the RAdd button.
NOTE: If you want to remove multiple users, CTRL+CLICK to highlight each user you want to add, then click the RAdd button.
The system removes the selected attendees from the Potential Attendees pane and adds it to the Attendees pane.
Search for a scheduled attendee
In the Search field below the Attendees pane, type the name (or partial name) of the attendee for whom you want to search. The system removes the selected username from the Potential Attendees pane and adds it to the Instructor pane.
Search for a potential attendee
In the Search field below the Potential Attendees pane, type the name (or partial name) of the attendee for whom you want to search.The system displays the instructors that match the search criteria you entered.
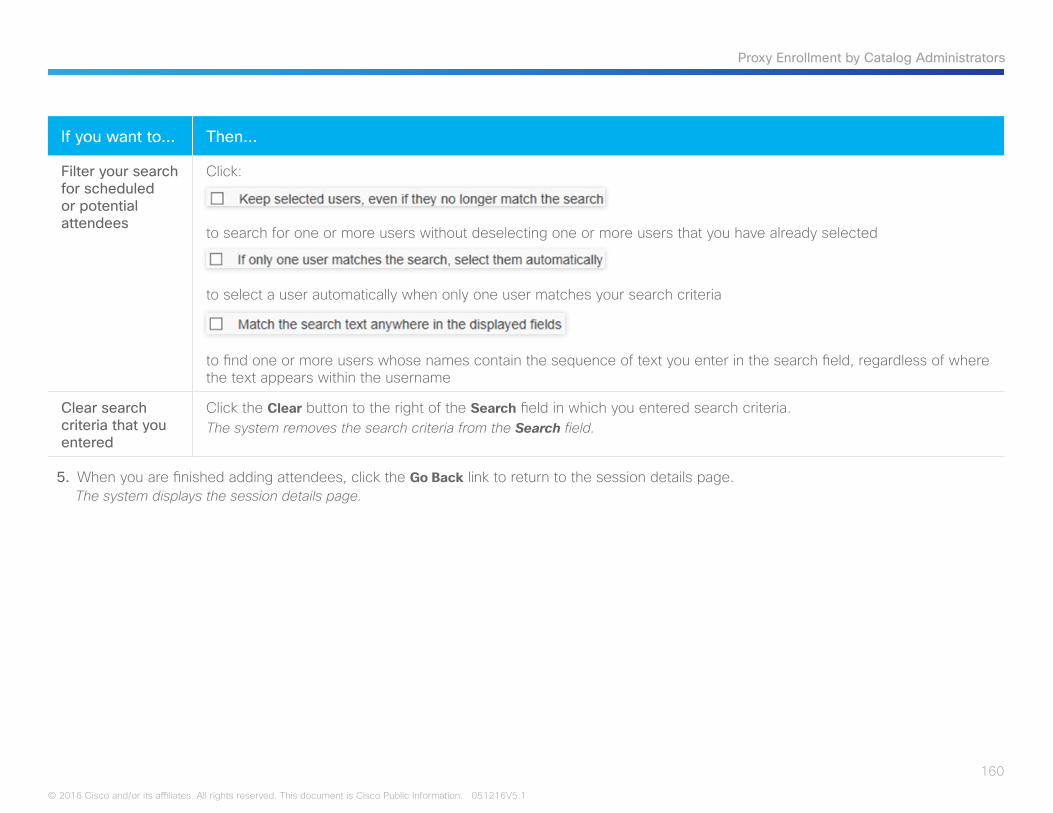
160
Proxy Enrollment by Catalog Administrators
© 2016 Cisco and/or its affiliates. All rights reserved. This document is Cisco Public Information. 051216V5.1
If you want to… Then…
Filter your search for scheduled or potential attendees
Click:
to search for one or more users without deselecting one or more users that you have already selected
to select a user automatically when only one user matches your search criteria
to find one or more users whose names contain the sequence of text you enter in the search field, regardless of where the text appears within the username
Clear search criteria that you entered
Click the Clear button to the right of the Search field in which you entered search criteria.The system removes the search criteria from the Search field.
5. When you are finished adding attendees, click the Go Back link to return to the session details page.The system displays the session details page.
© 2016 Cisco and/or its affiliates. All rights reserved. Cisco and the Cisco logo are trademarks or registered trademarks of Cisco and/or its affiliates in the U.S. and other countries. To view a list of Cisco trademarks, go to this URL: www.cisco.com/go/trademarks. Third party trademarks mentioned are the property of their respective owners. The use of the word partner does not imply a partnership relationship between Cisco and any other company. (1110R) 051216V5.1
Cisco has more than 200 offices worldwide. Addresses, phone numbers, and fax numbers are listed on the Cisco Website at www.cisco.com/go/offices.
Americas HeadquartersCisco Systems, Inc.San Jose, CA
Asia Pacific HeadquartersCisco Systems (USA) Pte. Ltd.Singapore
Europe HeadquartersCisco Systems International BV Amsterdam, The Netherlands