learning management system (“lms”) user manual: instructor · 1 . learning management system...
TRANSCRIPT

1
Learning Management System (“LMS”)
User Manual: Instructor
V NLFIG-03102017-1
Disclaimer and Warranty Information Limits of Liability / Disclaimer of Warranty
The information contained within this manual has been carefully checked and is believed to be accurate, however, Learnsoft Technology Group (“LTG”) makes no representations or warranties for this manual, and assumes no responsibility for inaccuracies, errors, or omissions that may be contained within this manual. In no event shall LTG be liable for any loss of profit including (but not limited to) direct, indirect, special, incidental, consequential, or other damages resulting from any defect or omission in this manual, even if previously advised of the possibility of such damages. In the interest of continued product development, LTG reserves the right to make improvements to this manual and the products it describes at any time, without notice or obligation.

2
INTRODUCTION
This guide provides information on how to use the Learnsoft Learning Management System’s (LMS) new, Task-Centric approach and updated design specifically focusing on functions for the Instructor. The system has been enhanced to make the Instructor experience more intuitive and give you quicker access to update rosters and complete courses.
This guide assumes you have already had experience with the system as a User. If not, please see the Learning Management System (“LMS”) – User Manual: Standard User. Only Instructor-related tasks, functions and features will be highlighted in this guide.
OVERVIEW TAB – INSTRUCTOR VIEW
Upon logging in you will be presented with an “Overview” of your LMS course and assignment data as a User. To see the Instructor View, click on the Group dropdown box in the upper right hand corner and select Instructor.
The top section, Overall Dashboard provides key Metrics pertaining to your role as an Instructor and includes: Total Active Courses, Students Enrolled, Students Taught, Evaluations Overdue, Courses & Class Instances Taught and left to teach, Credits Taught, and, if your organization provides it, an Instructor Rating, based on completed student evaluations.
By default, the bottom Section, Learning Object List, provides listing of all the courses for which there are classes with you as an Instructor. It can also display Class Roster (Session List) information.

3
Overview Tab – Instructor View - Overall Dashboard - Status Icon
The Status Icon allows the Instructor, in a single glance, to see if they and their students are up-to-date or overdue in completing learning related tasks (At this point, this focuses solely on Roster completions).
If ths Status Icon displays a Green Thumbs Up, then items are up-to-date.
If ths Status Icon displays an orange-reddish open hand (aka “stop”), then items are overdue. Click the text link below the hand to display the overdue items in the bottom section.

4
Overview Tab – Instructor View - Overall Dashboard – Metrics
The top left section of the Overall Dashboard provides Instructor Metrics, a numerical listing of your key statistics related to your role as an instructor.
The Classes to Teach, Active Courses and Rosters to Update Metrics in the upper left hand corner of the Overall Dashboard are hyperlinks. Click on the associated number to drill down to specific information, which will be shown in the bottom Learning Object List section.
For example, if you click on the “2” Classes to Teach hyperlink, the bottom section will update to a Learning Object Instance List show you a listing of the Class instances which are upcoming and for which you are listed as an Instructor.

5
Overview Tab - Instructor View - Dashboard Key Metrics
Classes to Teach – Hyperlink to a Class listing (Learning Object Instance List) which contain class instances in a scheduled status for which you are listed as an Instructor and which have not yet occurred.
Active Courses – Hyperlink to a Course listing (Learning Object List) which contain class instances in a scheduled status for which you are listed as an Instructor (Note: A single course may contain several class instances).
Rosters to Update - Hyperlink to a Class listing (Learning Object Instance List) which contain class instances in a scheduled status for which you are listed as an Instructor and which have already occurred. From here, you may access, update and complete the roster and close the class instance.
Instructor Rating– If your organization uses a singular rating system, this will provide your rating from a scale of 1 -5 (0 indicates no rating given)
Students Enrolled – A count of the number of students currently in the “Enrolled” status for active classes for which you are the instructor.
Evaluations Overdue – A count of Evaluations for classes you have already taught which your students have not yet completed but whose evaluation deadline has passed.
Classes Taught – A total count of the Class Instances you have taught.
Courses Taught – A total count of the Courses with instances you have taught. (Note: A single course may contain several class instances).
Total Credits Taught – A breakdown of assigned credits to courses you have taught by hours / units / others (other credits).
Total Students Taught – A count of students that have taken class instances which you have taught.

6
Overview Tab– Instructor View – Progress Report - Calendar
The Calendar in the top right corner displays the current month. A blue triangle will appear on days where there are class instances for which you are listed as an Instructor. You can quickly view summary information by rolling your mouse over the specific day.
Overview – Instructor View - Calendar Calendar – Rolling over date with blue shading
Click the rollover popup to bring up additional course details for all courses you are teaching that day (Scroll to see courses and click the Back button to return to the calendar).

7
PRINT REPORT – Class Roster
Click the Print Roster button to launch a printable Class Roster report in a new window.
Click the Print icon to print to .pdf file which can be sent to the printer and brought to class for attendance.
Click the View Roster button, the screen will refresh and the Class Roster (Session List) will display in the bottom section.
For Additional Roster Functions including updating user status, see the Learning Objects Tab Section.

8
Overview Tab – Instructor View – Learning Object List
The default view of the bottom section of the Instructor View of the Overview tab is the Learning Object List displaying “My Courses (Instructor)”. This is a listing of all the Courses for which you are listed as an instructor on at least one of the associated class instances.
There are a number of options to help find the specific course you wish to view:
Sort the instance list by Column by clicking on the associated Column Header. A single click sorts in ascending order; a second click sorts in descending order.
Sort by Course Name - Ascending Sort by Course Name - Descending
Filter the list by clicking on the Filter (magnifying glass icon) . Use the letters to filter by first letter of course name. Use the drop down box to selector filter option, enter search text and click Search to narrow results.
The Learning Object List will refresh with the listing narrowed by the selected criteria.

9
After finding the desired course, there are a number of options:
Click in the row of the course to Learning Object (Course) Details (See Learning Object tab section).
Click the View link to view the Learning Object Instance List (see next section)

10
Overview – Instructor View – Learning Object Instance List
When clicking on the Learning Object List - Class Count column - View link for the desired course, the screen will refresh and the Learning Object List will be replaced with the Learning Object Instance List which will display a listing of all class instances associated with the selected Learning Object (course).
There are a number of options to help find the specific instance you wish to view:
Sort the instance list by Column by clicking on the associated Column Header. A single click sorts in ascending order; a second click sorts in descending order.
Clicking on the Class Count Column View link will bring up a listing of the associated instances. Click the Exit button to return to the LO List)

11
Sort by Start Datetime - Ascending Sort by Start Datetime - Descending
Filter the list by clicking on the Filter (magnifying glass icon) . Use the drop down box to selector filter option, enter search text and click search to narrow results.
The Learning Object List will refresh with the listing narrowed by the selected criteria.
Click in the row of the instance to view instance details.
Click the Add link to add users to the course instance
Click the View link to view the Roster (Session List) / Click Print Roster to create a printable Roster Report.

12
Learning Object Instance – Details (See Learning Object Section).
Depending on your permissions, you may have access to view, edit or create LOI details. From within the prepoluated screen, you can review information for the different elements by clicking on the Instance section links: Attributes, Selctors, Recurring and Resources.
To exit and return to the Learning Object List of course, click Exit.
To review a listing of recently made changes to key information, click Audit Tral
To edit and update the information, click Edit. Ater making changes make sure to click the Save button (available in edit mode) to retain your updates.
PRINT REPORT – Class Roster
Printable Class Roster report. Click the Print icon to print to .pdf file which can be sent to the printer and brought to class for attendance.

13
Class Roster – Session List
There are a number of options to help find the specific user session you wish to view:
Add / Remove Columns Displayed by using the Gear Icon to bring up a dropdown of available additional column...
…. check the box(es) of the coumns desired and click Apply. The screen will refresh with updated columns.

14
Sort the Session List by Column by clicking on the associated Column Header. A single click sorts in ascending order; a second click sorts in descending order.
Sort by Session ID - Ascending Sort by Session ID - Descending
Filter the list by clicking on the Filter (magnifying glass icon) . Use the Letters to narrow down by first letter of last name. Use the drop down box to selector filter option, enter search text and click search to narrow results.
The Learning Object Session List will refresh with the listing narrowed by the selected criteria.
For Additional Roster Functions including updating user status, see the Learning Objects Tab Section.

15
Learning Object
The Learning Object tab gives the Instructor full screen access to courses, instances and associated class rosters for classes they teach (and other courses if permissions allowed).
By default, the majority of the screen will be taken up by the Learning Object List. If you have already accessed the Overview tab – Instructor view, the Displaying view should be that of My Courses (instructor) which provides a listing of the courses containing class instances for which you are an instructor.
If you have permissions, your Displaying dropdown may default to a different view or you can select among different view choices:
Displaying Option (if given permission)
Listing
All Active Displays ALL courses regardless of type as long as the course is in the active status.
Classroom Active Displays only classroom-based courses that are in the active status. Online Active Displays only online-based courses that are in the active status. Manual Displays only courses that are of the type “Manual Entry”. My Courses (Instructor) Displays only courses for which the instructor is listed as an
instructor for at least one course instance.

16
There are a number of options to help find the specific course you wish to view:
Sort the instance list by Column by clicking on the associated Column Header. A single click sorts in ascending order; a second click sorts in descending order.
Sort by Course Name - Ascending Sort by Course Name - Descending
Filter the list by clicking on the Filter (magnifying glass icon) . Use the letters to filter by first letter of course name. Use the drop down box to selector filter option, enter search text and click Search to narrow results.
The Learning Object List will refresh with the listing narrowed by the selected criteria.
After finding the desired course, there are a number of options:
Click in the row of the course to Learning Object (Course) Details
Click the View link to view the Learning Object Instance List

17
Learning Object Details

18
Learning Object – Learning Object Instance List
When clicking on the Learning Object List - Class Count Column - View link for the desired course, the screen will refresh and the Learning Object List will be replaced with the Learning Object Instance List which will display a listing of all class instances associated with the selected Learning Object (course).
There are a number of options to help find the specific instance you wish to view:
Sort the instance list by Column by clicking on the associated Column Header. A single click sorts in ascending order; a second click sorts in descending order.
Clicking on the Class Count Column View link will bring up a listing of the associated instances. Click the Exit button to return to the LO List)

19
Sort by Start Datetime - Ascending Sort by Start Datetime - Descending
Filter the list by clicking on the Filter (magnifying glass icon) . Use the drop down box to selector filter option, enter search text and click search to narrow results.
The Learning Object List will refresh with the listing narrowed by the selected criteria.
Click in the row of the instance to view instance details.
Click the Add link to add users to the course instance
Click the View link to view the Roster (Session List) / Click Print Roster to create a printable Roster Report.

20
Learning Object Instance – Details (See Learning Object Section).
PRINT REPORT – Class Roster
Printable Class Roster report. Click the Print icon to print to .pdf file which can be sent to the printer and brought to class for attendance.

21
Class Roster – Session List
There are a number of options to help find the specific user session you wish to view:
Add / Remove Columns Displayed by using the Gear Icon to bring up a dropdown of available additional column...
…. check the box(es) of the coumns desired and click Apply. The screen will refresh with updated columns.

22
Sort the Session List by Column by clicking on the associated Column Header. A single click sorts in ascending order; a second click sorts in descending order.
Sort by Session ID - Ascending Sort by Session ID - Descending
Filter the list by clicking on the Filter (magnifying glass icon) . Use the Letters to narrow down by first letter of last name. Use the drop down box to selector filter option, enter search text and click search to narrow results.
The Learning Object List will refresh with the listing narrowed by the selected criteria.
Click within the row of the desired session to see session detail information.

23
Update the Roster by clicking the Actions button to bring up pop up box with a series of Actions than can be taken:
• Email - Select a user by checking the box to the far left of the user’s name, click the Actions button then click the Email button. This will bring up a pop-up allowing you email the selected user from within the system.

24
• Cancel Enrollment - Select a user(s) by checking the box to the far left of the user’s name, click the Actions button and click the Cancel Enrollments button. The screen will refresh and the status will change to Cancel.
• Change the Enrollment Status to Complete, No Show or Cancel - Select a user(s) by checking the box to the far left of the user’s name, click the Actions button then use the Status dropdown box to select the desired status and click the Update Roster button.
o (Optional) You can add a reason to a Cancellation, by selecting from the Reason drop down box. If Selecting Other, you can enter free text just below. As per above, select the User, click the Actions button, Select the Cancel Status and Click Update Roster.
• Change the Status of the user the Session list - Select a user(s) and manually change the Actions Column radio button (For example to No Show, Complete, Skip, etc.) on one or more users. Then use the Update Roster button to update user status.

25
• Cancel a User Directly from the session list by Clicking the XCancel link and confirming
Evaluations - For course with Evaluations, click on the Evaluation Link to view that user’s responses.

26
Competencies (ROMS) – If the ROMS / Competencies module is active for your organization and you have added a checklist of competencies to a course, you may access it by clicking on the Checklist text link in the Actions column of the row of the user.
You may review completed information, or, if you are the Competency Validator (preceptor, approver, etc.), you may access specific competency info by clicking on the pencil icon in the edit column.

27
PRINT REPORT – Class Roster

28
Search Tab
Clicking the Search tab will yield an easy to use yet powerful search feature that in a single page combines multiple search methodologies including keyword, predictive, advanced, calendar and catalog.
When first accessing, the right side Result List will auto populate with a listing of all classes which you have permission to enroll yourself and (if permitted) students. You may use the scroll bar and Previous / Next text links to view all the available options.
The Icon on the left side will reveal the course type:
- ILT – Instructor Led Training (aka classroom-based course)
- Online Course (aka CBT – Computer-based training or WBT – Web-based training)
- LMS Certification

29
Search Tab – Detailed Info & Enroll Users
To see detailed information, click the Detail button to the right of the class. This will bring up details about the chosen class instance.

30
To enroll other users, click the Enroll button (next to the Details button).
Use the Navigation, Sort and Search Features to find the desired users to add, then click on the checkbox
to the far left of the row with the user name(s) then click the Add Attendees button
The screen will refresh, the User Lookup / User List will close and a confirmation will appear at the top left of the screen indicating if enrollments were successful (and if not, why).
• If permitted, you can also add a Deadline for the selected enrollments clicking the Actions
button and adding a Due Date (Note: The additional comments field may be enabled in a future release). This action must be taken before clicking the Add Attendees button.
31
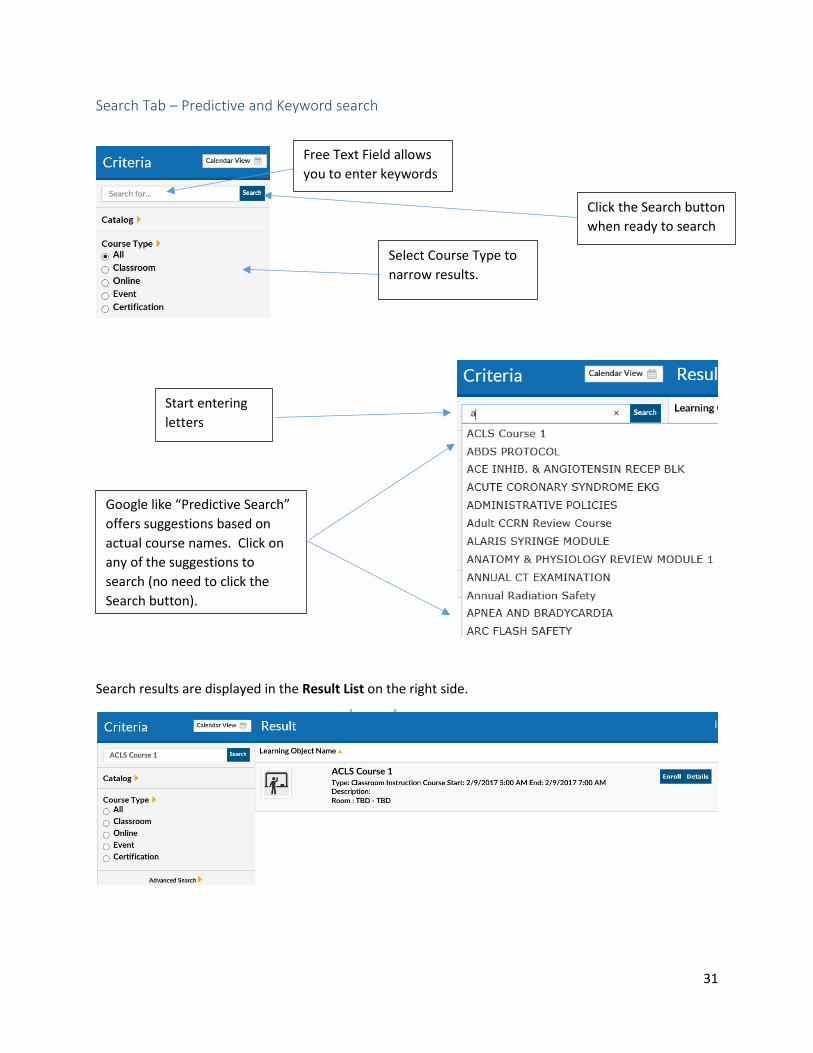
Search Tab – Predictive and Keyword search
Search results are displayed in the Result List on the right side.
Free Text Field allows you to enter keywords
Select Course Type to narrow results.
Start entering letters
Google like “Predictive Search” offers suggestions based on actual course names. Click on any of the suggestions to search (no need to click the Search button).
Click the Search button when ready to search

32
Search Tab – Advanced search
Click Advanced Search Arrow to open Advanced Search Menu allowing refined course lookup.
Use dropdown Selectors to choose from a list of prepopulated options.
Narrow to a date Range by selecting Specific Date, then entering a Start Date and End Date.
After all search criteria has been entered, click the Search button to display results.

33
Search Tab – Calendar search
Click Calendar View button to view scheduled classroom-based course instances (classes) for which you are able to enroll in a monthly calendar.
Calendar Search – Options
Time Period – Changes the Calendar Mode • 1 – Daily View • 7 – Weekly View • 31 – Monthly (default) View
Enroll / Details Link – Click to view course details. You can click Enroll from the details page to self-enroll in the course.
Enroll Others - Click the Enroll Others icon to launch the Search Users Dialog.
Time Period – In monthly view, arrows move you forward / back one month. Dropdown allows selection of any month over the next year.
List View Link – Returns you to default list view search.

34
Analytics Tab
The Analytics tab provides a graphical way to view learning metrics. They simplify often complex or large data analysis. The graphics for each organization will differ. Upon accessing the tab you will be presented with Analytics graphics that pertain to you as a User. To access the Instructor Analytics, click on the Group dropdown box and select Instructor.
Use the arrows to navigate to previous / next Analytics graphic.
Click the Report icon (if available) to bring up associated reports and drill down to specific dept or user data
Click the Emails button to directly email LMS users or others while reviewing analytic data
35
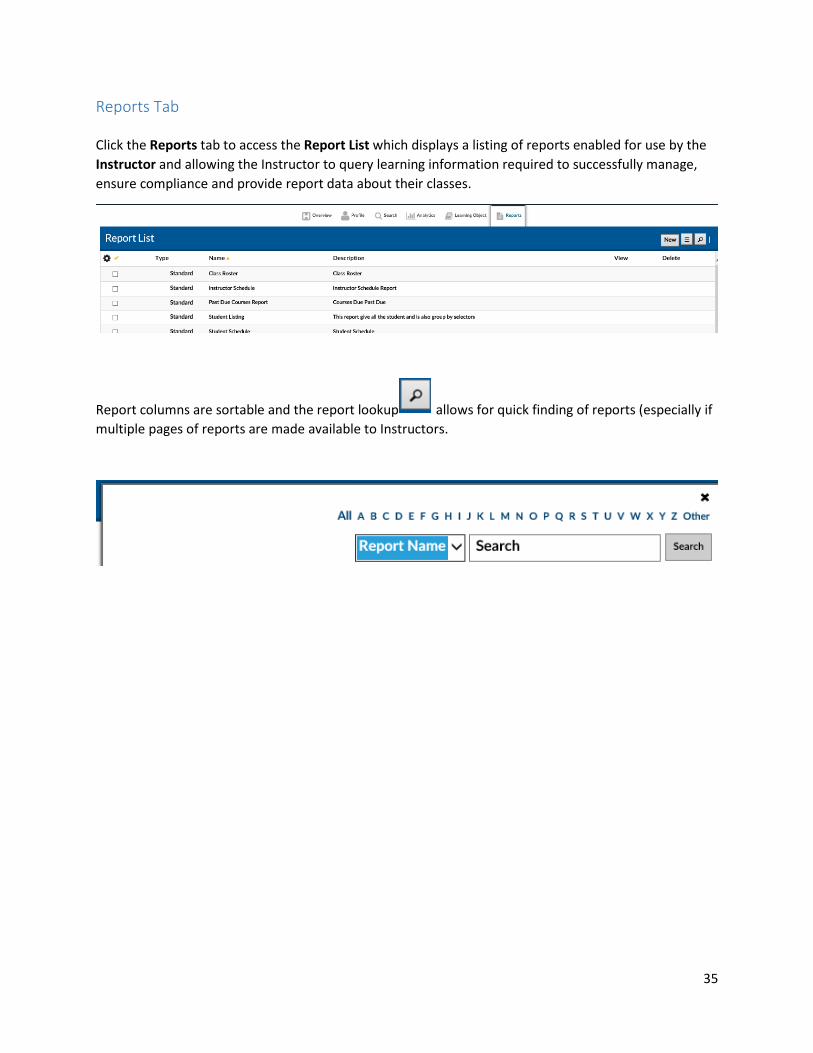
Reports Tab
Click the Reports tab to access the Report List which displays a listing of reports enabled for use by the Instructor and allowing the Instructor to query learning information required to successfully manage, ensure compliance and provide report data about their classes.
Report columns are sortable and the report lookup allows for quick finding of reports (especially if multiple pages of reports are made available to Instructors.

36
Reports – Selecting Data (Details, Filters / Selectors)
Click on the Report Name (or anywhere in the report row) to bring up the Report Page for the selected Report.
Enter the details and use the filters / Selectors to refine the report and lookup the details you seek.
Certain filters will require selection of options – e.g.
Date filters will generally allow free text date entry (mm/dd/yyyy) or allow selection from a popup calendar – e.g.

37
Lookup Filters / Selectors will link to a lookup list where you can sort, filter and search for the desired choices.
1. Click the Add button to bring up the related Lookup List.
The lookup list will close and the selected options will now be listed within lookup filter / selector text box.
If wishing to remove selectors, highlight, then click Remove. Note: Usually these items can be added in bulk, but must be removed one at a time.
Availability Tree (LMS Version of an Organization Chart) Filters allow you to use a windows-like foldering system to select specific areas within the organization to search. Selections are recursive, so higher level selections automatically select all the groups below. Use the + and – icons to open / close the Availability Tree (use the Sort by option box to determine sort order). Click the checkbox(es) to select.
2. Sort, filter and search to find the desired objects.
3. Check the box to the left of these objects.
4. Click the “Add” button

38
Reports – View, Print & Export
After entering any user data and using filters / selectors to narrow down report to the desired data, the Instructor can click to Export Report (in either PDF or Excel versions), View Report (which also allows for printing and to export in additional formats) or Cancel and return to the Report List.
If selecting to View Report, a new window will pop-up with the Report Information.
Enter text to search and click the search icon
Navigate to Next / Prev page (page 1 and 2 only)
Dropdown to go to first / last page or type in page # and click enter
Resize view
Drill down to deeper data levels (if available)
39
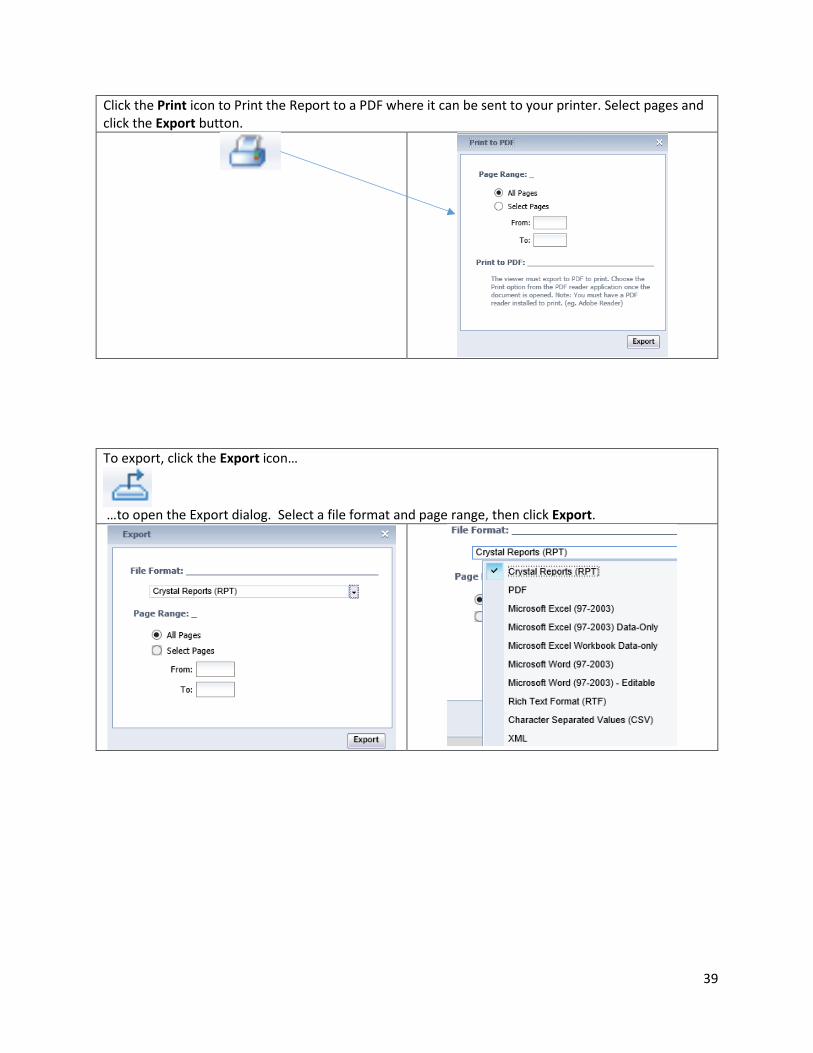
Click the Print icon to Print the Report to a PDF where it can be sent to your printer. Select pages and click the Export button.
To export, click the Export icon…
…to open the Export dialog. Select a file format and page range, then click Export.

40
Help Tab
If your LMS is configured with a Help Tab, Click the Help Tab Icon to access User Guides, Help Documents and Videos in a separate window. Your organization may provide additional information.
Log Out
When finished with your LMS session, click the Log Out text link in the upper left hand corner to Log Out.