lesson 1 plant identification aim - … is divided into two classes: a) dicotyledonae for these...
TRANSCRIPT

Lesson 1 PLANT IDENTIFICATION
Aim Distinguish between different plants, to enable identification of the plant species. This first lesson sets the stage, so to speak, for the remainder of the course. As such, it has considerably more reading than most of the other lessons. Read the material thoroughly and understand what you are reading, but do not get bogged down in trying to remember every detail. Horticulture deals with living things and so is somewhat unpredictable and variable. The way you treat a plant may vary depending on the location, season or what you are trying to get from the plant. When referring to a book or magazine article, always look at where it was written and who it was written by e.g. Most gardening writers usually write about gardening in their own locality. If you live in a different area those recommendations could be quite misleading for you. There can be great variations over relatively small distances in things like rainfall, wind and soil type. A certain type of tree might very well grow twice as tall in the eastern suburbs of a large city as what it grows in the western suburbs of the same city. In horticulture, often there are different ways of tackling a job; each one just as valid as the next. Never consider that a particular technique is the only way of doing something. You should try to be aware of the advantages and disadvantages of all of the alternatives. They all have their pros and cons, and it is up to you which technique you use. This subject has been written to teach horticulture in a way that will be relevant to all parts of the world. It puts aside regional techniques, and tries to teach you principles and concepts which can be applied to anywhere. Keep this in mind as you study. Try to see the principles. You are not just studying facts. PLANT NAMES Plants are given two different types of names: a) Common Names
These are English language names usually given to plants by amateur gardeners as a descriptive, easy to remember tag. Many plants have more than one common name, and sometimes the same common name can be given to several quite different plants. This, along with the fact that there is no real control over common names, makes them inaccurate and unreliable to use for plant identification.
b) Scientific Names These are based on the Latin language. These names often seem more complex than common names at first glance; however they have a system to them which can make plant identification much easier. The system of scientific naming is strictly controlled and co-ordinated by botanists throughout the world. Scientific names should always be used in preference to common names.
In the scientific system, plants are classified by dividing them into groups which have similar characteristics. These groups are then divided into smaller groups with similar characteristics. These are divided again and so the division of group to sub group and sub group to further sub groups goes on, until you finally have only one type of plant in each group. There are many different levels of division, although the main ones which we use are just a couple at the bottom end of the scale. The plant names you see in books or on plant labels in a nursery will usually consist of two words: The first word is the genus name of the plant. The second word is the species name of the plant. Scientific plant names are usually underlined or italicised.
The main levels of division are as follows: All plants are divided into PHYLA Phyla are divided into CLASSES Classes are divided into ORDERS Orders are divided into FAMILIES Families are divided into GENERA (singular: genus) Genera are divided into SPECIES Species are sometimes divided into VARIETIES. The main plant phyla we are concerned with in horticulture are: ANTHOPHYTA (ie. Angiosperms) This group includes all of the plants which produce flowers (eg. eucalypts, roses, lettuce, grasses). CONIFEROPHYTA (ie. Conifers) This includes all plants which produce cones (eg. pines, cypress) PTEROPHYTA (eg. Ferns) Other phyla include mosses, fungi, bacteria and algae. Anthophyta is divided into two classes: a) DICOTYLEDONAE For these plants, the first leaves to appear from a germinating seed are in a pair (two leaves appear at once). The veins in the leaves are not parallel in these plants (eg. peas, eucalypts). b) MONOCOTYLEDONAE For these plants, the first leaf to appear when a seed germinates is a single leaf. Veins in the leaves are parallel to each other (e.g. grasses, iris, orchids). It can be seen above that you can distinguish between dicotyledons and monocotyledons by a couple of very simple characteristics. In the same way, we can usually distinguish which family a plant belongs to by a few basic characteristics: EXAMPLES: Lamiaceae Family: foliage is perfumed and flowers have two distinct lips; the stems are square-shaped, e.g. Mint, Lavender. Araceae Family: leaves are usually heart-shaped and originate in tropical areas e.g. Philodendron. Asteraceae: have daisy-type flowers e.g. Chrysanthemum Apiaceae: flowers occur in an umbrella-like head on a single stalk e.g. Parsley. Orchidaceae: leaves have parallel veins, flowers have 5 petals, and three different shapes to the petals (two larger ones the same, two smaller ones the same as each other, and one which is different to the others in shape.

You should be able to tell a family name from other types of names by the fact that it will end with "ACEAE". Students have sometimes called the family name a genus. Note that a genus name virtually never ends in the letters "aceae". eg. Betula pendula Betula is the genus; pendula the species The genus name begins with a capital letter. The species name is always written beginning with a small letter. Sometimes a third word (and perhaps a fourth) is added to follow the species. These words would refer to the variety of that particular species. eg. Acer palmatum dissectum atropurpurea: - Acer is the genus - palmatum is the species - dissectum tells us that this is a variety of Acer palmatum which has dissected leaves - purpureum tells us that this variety of Acer palmatum has purple foliage. You may occasionally get confused by the difference between hybrid and variety.
• A hybrid plant is one which has resulted from two different species cross breeding. The hybrid is a combination of characteristics from two different species.... something bred or selected out of nature by man.
• A variety is just a particular type of plant in one species. A variety does not have parents from two different species, but a hybrid does.
eg. Eucalyptus "Torwood" This is a cross between Eucalyptus torquata and Eucalyptus woodwardii.
Sometimes the two plants which have been cross bred are both mentioned and a "x" is placed between them. NOTE: In the past, species names have been written occasionally beginning with a capital letter. Well respected authorities in some countries have felt that a species named after a person or place should perhaps be spelt beginning with a capital letter (eg. a species named after Mr Smith may be written Smithii, rather than smithii). The reasoning would be to do this because the person or place is normally spelled beginning with a capital. The Royal Horticultural Society in England; and many other reputable bodies around the world, would encourage us to always start a species name with a lower case letter; irrespective of the situation.
SELF ASSESSMENT Perform the self assessment test titled ‘Test 1.1’ If you answer incorrectly, review the notes and try the test again.

QUOTES FROM OUR PRINCIPAL: “John Mason”
“Whenever I see a plant I don’t know, I look closely at the flowers, fruit or even dead seed heads (if available); and the leaf shapes and arrangement of leaves on the stem. Next I look to see whether the wood is hard or soft. From these things, I can frequently determine the likely plant family, or at least narrow the possibilities.” “Once I know the family of a plant, I then know that it will probably need to be treated similar to other plants in the same family. I can make a reasonable guess at how to propagate that plant, its water and soil requirements, and even the sort of pest and disease problems it may be susceptible to.”

BOTANICAL FAMILIES Once you know the family that a plant belongs to, you can then go to plant identification books and look under plants that are in that particular family. This makes it far easier than wading through hundreds of pages of descriptions and photos in order to identify plants. You will learn more about identifying plant families in Lesson 3. Learn your plant families, and then you have a foundation that makes everything else about plant identification so much easier. Dicotyledons Family Some of the more common Genera in this family Araceae Allocasia, Arum, Calla, Anthurium, Philodendron, Caladium, Dieffenbachia, Monstera. Asteraceae (Compositae)
Brachycome, Helichrysum, Olearia, Dahlia, Chrysanthemum, Aster, Zinnia, Ageratum, Sunflower, Dandelion.
Brassicaceae (Cruciferae)
Cabbage, Cauliflower, Broccoli, Brussel Sprouts, Kale, Turnip, Wild Turnip, Mustard.
Epacridaceae Astroloma, Epacris, Leucopogon. Goodeniaceae Dampiera, Goodenia, Leschenaultia, Scaevola. Lamiaceae (Labiatae)
Mint, Thyme, Sage, Lavender, Prostanthera, Coleus, Hemiandra, Westringia, Salvia.
Legumes (Mimosaceae/ Caesalpiniaceae and Papilionaceae/ Fabaceae)
Acacia, Bauhinia, Cassia, Cercis, Chorizema, Clianthus, Erythrina, Genista, Hovea, Hardenbergia, Lotus, Pultenea, Sophora, Swainsonia, Brachysema, Goodia, Kennedya, Wisteria, Indigofera, Pea, Bean, Clover, Lupin, Peanut, Mimosa. (NB: Strictly speaking, Legumes have now been split into three different families. At this stage in your study you can for simplicity, classify all pod bearing plants as Legumes)
Malvaceae Hibiscus, Abutilon, Gossypium (Cotton). Myrtaceae Astartea, Agonis, Beaufortia, Callistemon, Calytrix, Calothamnus, Eucalyptus, Eugenia,
Kunzea, Leptospermum, Melaleuca, Tristania, Thryptomene, Micromyrtus, Chamaelaucium, Hypocalymma, Angophora, Feijoa, Myrtus.
Pittosporaceae Billardiera, Pittosporum, Hymenosporum. Primulaceae Primula, Polyanthus. Proteaceae Banksia, Conospermum, Dryandra, Grevillea, Hakea, Isopogon, Macadamia,
Stenocarpus Telopea, Protea. Ranunculaceae Delphinium, Aquilegia, Ranunculus, Paeonia, Anemone, Clematis. Rutaceae Boronia, Correa, Crowea, Eriostemon, Citrus, Diosma. Rosaceae Cydonia, Pyracantha, Geum, Spiraea, Rosa, Apple (Malus), Prunus, Strawberry
(Fragaria), Berry Fruit (Rubus). Solanaceae Petunia, Browallia, Cestrum, Solanum, Henbane, Tomato, Potato, Capsicum, Egg Plant,
Tobacco. Verbenaceae Verbena, Lantana, Clerodendrum. Umbelliferae (Apiaceae)
Actinotus, Carrot, Parsnip, Parsley.
Monocotyledons Family Some of the more common Genera in this family Amaryllidaceae Anigozanthus, Hippeastrum, Nerine, Daffodil. Poaceae (Graminae)
The grasses, corn, cereals, bamboos etc.
Iridaceae Freesia, Iris, Sparaxis, Watsonia. Liliaceae Asparagus, Xanthorrhoea, Chlorophytum, Agapanthus, Onion, Lily of the Valley, Crocus,
Hemerocallis, Hyacinth, Dracaena, Kniphofia, Lachenalia, Lilium, Liriope.
STRUCTURE AND ARRANGEMENT OF LEAVES AND LEAFLETS LEAVES: When an angiosperm seed germinates, the first leaves to be seen are called the cotyledons. Monocotyledons (e.g. grasses) only produce one cotyledon (i.e. When the first growth comes out of the seed it is only one leaf). Dicotyledons produce a pair of leaves when the seed sprouts. The first leaves which a plant has are not always the same shape and colour as the mature leaves (eg. Many eucalypts have roundish blue leaves on a young plant but once mature the leaves become longer, less rounded and green coloured). A normal leaf is made up of two main parts:
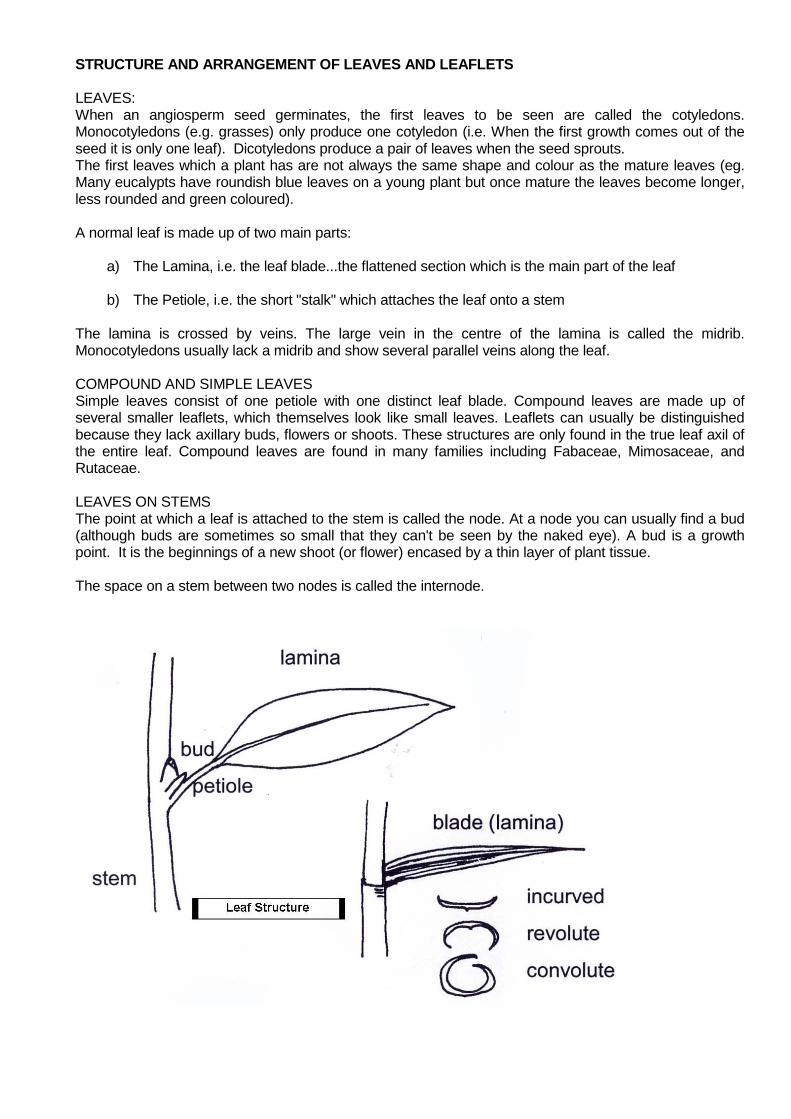
a) The Lamina, i.e. the leaf blade...the flattened section which is the main part of the leaf
b) The Petiole, i.e. the short "stalk" which attaches the leaf onto a stem The lamina is crossed by veins. The large vein in the centre of the lamina is called the midrib. Monocotyledons usually lack a midrib and show several parallel veins along the leaf. COMPOUND AND SIMPLE LEAVES Simple leaves consist of one petiole with one distinct leaf blade. Compound leaves are made up of several smaller leaflets, which themselves look like small leaves. Leaflets can usually be distinguished because they lack axillary buds, flowers or shoots. These structures are only found in the true leaf axil of the entire leaf. Compound leaves are found in many families including Fabaceae, Mimosaceae, and Rutaceae. LEAVES ON STEMS The point at which a leaf is attached to the stem is called the node. At a node you can usually find a bud (although buds are sometimes so small that they can't be seen by the naked eye). A bud is a growth point. It is the beginnings of a new shoot (or flower) encased by a thin layer of plant tissue. The space on a stem between two nodes is called the internode.

GLOSSARY OF LEAF TERMS Below are some terms used to describe leaves. This glossary does not, by any means, include all the botanical terms. You are expected to research unfamiliar terms to supplement and reinforce your learning. (Note that you might sometimes come across variations of these terms). Leaf Structure Lamina / blade - the flat part of the leaf Petiole or leaf stalk – the short stalk which attaches the leaf to the stem Veins – arranged in the lamina, they contain the fibres that carry moisture and nutrients to and from leaves Rib – sometimes used to for the main vein in leaf from which the other veins emanate. Leaf Shape Lanceolate – tapering from a rounded base to a pointed apex Linear – long and narrow with a central rib Ovate – rounded at the bottom and tapering at the apex Elliptic / elliptical – oval shape (about the same slight tapering at base and apex) Reniform – shaped somewhat like a kidney or kidney bean Falcate - curved and tapering to a point Terete – cylindrical, tapering at the apex or both apex and base, smooth Compound Leaves – Leaves composed of several lobes or similar parts Pinnate – A series of leaflets arranged on either side of a central stalk. Pinnately trifoliate / trifoliolate – pinnate compound leaf with three leaflets, one at the apex Imparipinnate – pinnate compound leaf with a single leaflet at the apex paripinnate – pinnate compound leaf with two terminal leaflets Bipinnate – pinnate compound leaf with doubly pinnate leaves (eg. ferns) Trifolioloate– three leaves on a common stem Pinnately trifoliolate – pinnate compound with three leaves, one at the apex Palmate – having distinct lobes or leaflets arising from a common point or centre.

Leaf Arrangements Opposite – leaves radiate on opposite sides of stem from a common point Distichous – arranged vertically on opposite sides of the stem, but not arising from a common point Decussate – pairs of opposite leaves arranged at right angles to the pair above and below Basal – located at the base of the stem or at the base of any other plant part Alternate – arranged singly at each node on different sides of a stem Whorled – arranged around the stem at the same point Leaf Venation Palmate – having three or more lobes or leaves or veins radiating from one point Reticulate – forming a network or net Parallel – arranged lengthwise from base to tip, almost parallel Leaf Modifications Phyllode - a petiole that has become flattened and widened while the leaf reduces or vanishes. The phyllode comes to serve the purpose of the leaf Scale leaves – specialised leaves or bracts that protect buds or catkins Leaf tendrils – a twisting structure that emanates from a leaf, helping the plant grasp something for support Bract - a bract is a modified or specialized leaf associated with an inflorescence (flowering). The flowers emanate from the axis of the bract or its stem. Stipules - outgrowths on either side of the base of a leafstalk (petiole). May be leaf- or thorn-like. Leaf Margins Serrate – with saw-toothed or notched margins (or edges) Dentate – with tooth-like projections Crenate – with low, rounded projections Lobed – with rounded lobe-like projections that are not separate Pinnatifid – serrated leave margin Pinnatisect – serrated, with deep clefts almost to midrib Palmatifid – with deep projections radiating from the base


Leaf Apex and Base Types

Leaf Arrangements a) opposite b) distichous
c) decussate d) basal e) alternate f) whorled
A B
C
D
E
F
Leaf Venation a) palmate b) reticulate c) parallel
A
B
C

A
B C
Inflorescences a) spike b) raceme c) panicle
A
D
B C
E Leaf Modifications
a) phyllode b) scale leaves c) leaflet tendrils
d & e) bracts
f) spinescent stipules

A
B
C
D
Leaf Types
a) lanceolate b) reniform c) linear d) compound leaves
Leaf Types a) elliptical b) ovate
c) & d) denate/serrate leaf margins e) imparipinnate compound leaves
A
B
C
D
E

FLOWER STRUCTURE A flower usually has four sets of parts: The Female Parts Usually a single stalk in the centre of the flower, called a ‘style’. At the top of the stalk is an enlarged section called the stigma. At the base (often hidden) is another swollen section called the ovary. The Male Parts Usually there are many fine stalks surrounding the female parts. These fine stalks are called filaments. At the top of each of these stalks is a swollen section that sheds pollen (pollen is the equivalent of male sperm). The swollen tops are called anthers. The Petals These surround the male and female parts. Collectively, petals are called the corolla. The Sepals These are often green (sometimes other colours), leaf-like structures which are found surrounding the base of the petals. Collectively, sepals are known as the calyx.
SELF ASSESSMENT Perform the self assessment test titled ‘Test 1.2’. If you answer incorrectly, review the notes and try the test again.
A
B
C
D
E
F
Leaf Types a) falcate b) lanceolate
c) linear d) compound leaves e) sagittate leaf base f) entire leaf margin

HOW SEED FORMS Pollen drops (or is transferred) from the anthers to the stigma. The pollen moves from the stigma through the centre of the style down to the ovary. In the ovary the pollen will fertilise the female ovum. From this fertilised ovum, a seed will grow. As the seed grows, the ovary will itself grow (becoming a fruit or nut). The other parts of the flower gradually die and fall off as this process proceeds.


PLANT REVIEWS The ability to identify plants is one of the most important horticultural skills you can have. At the end of each lesson in this course, you need to select and identify EIGHT different plants. You can choose the plants you review (within certain limitations), but do not discount the importance of this part of the course. Doing plant reviews can be a fast process if you already know your plants well; but if you do not, it can be tedious and time consuming. For each plant you review, you need to: a/ Illustrate the plant (or give a reference to where a photo or drawing can be found on the internet) b/ Write the name of the plant (At least the genus and common name, but preferably the species and family as well). c/ Write down some other details about the plant (eg. appearance, cultural requirements etc). A great way to learn plant names is to start your own collection of pressed plants. If done properly, the foliage and flowers of a plant can be preserved for your lifetime, or even longer, by pressing. The name of a plant tends to stick in your memory when you go through the process of collecting a specimen from a plant, identifying it, then pressing it and mounting it on a labelled sheet of paper. PRESSING PLANTS How To Press A Plant Plant specimens consisting of a few leaves and perhaps a flower or fruit can be preserved for hundreds of years by a simple technique known as "pressing". There are many ways of pressing a plant as outlined below (some being more permanent than others). All basically involve the same general procedure: a. The plant specimen is laid out flat on a sheet of absorbent material such as newspaper. b. A second sheet is placed on top of the plant. c. The plant sandwiched between these two sheets is then placed in a situation where pressure can be applied squeezing all the liquid from the plant tissue e.g. a flower press or between heavy books. d. After a period of time, anything from a week to several months, the plant can be removed and attached to a sheet of paper or card (mounted). e. The mounted specimen should be stored in a dry situation if it is to be preserved for any length of time.
REASONS WHY YOU NEED TO IDENTIFY SO MANY PLANTS • Over 100,000 different plants are grown in horticulture world wide.
• A home garden or park can often have over 300 different plants growing in it. • Thousands of different plants are weeds
• If you cannot tell the difference between a weed and a garden plant you risk unintentionally destroying garden plants or encouraging growth in weeds.
• If you can identify the group of plants (eg. Family) which a plant belongs to, and you know how to cultivate a close relative, you can then make a useful educated guess
about how to cultivate this unknown plant.
If you were studying in a classroom, you may well collect and press specimens of plants; but quarantine and other considerations make it impractical in many respects for a distance
education course. You may still choose to build a collection of pressed plants.
If you don’t, that is OK, but you should still be aware of how to do pressings.

Ways of Pressing Plant Press - A plant press consists of two boards perhaps around 400 mm x 300 mm (approx) which are able to be clamped together. Plants which are being pressed are placed between the two boards (in the sheets of newspaper) and then clamps are tightened on the outside to hold the boards together. Under a Pile of Books - A simple and easy way for anyone to press plants is simply to place your plants arranged between newspapers under a pile of books. Several thick telephone books (4 or 5) or the equivalent in other books would be appropriate. Between Mattresses - If only pressing a few plants they can be arranged in newspaper between the mattress and base of your bed. Pressing Straight into a Book - Some plants can be simply stuck onto a loose sheet of paper or into a book (attach with sticky tape). The book or sheet can then be placed in the middle of another book and left for a time. Plants treated this way will usually keep their original appearance, or close to it, for at least a few months (long enough for you to present your assignment and complete the subject you are using the plant collection in). Drier foliage plants such as eucalypts press well this way. Arranging Plants for Pressing Don't try to press too much plant material at once. The reason for pressing a plant is to have a reference for identification. For this purpose you do not need dozens of leaves and flowers. A few leaves (so you can see the arrangement of leaves on the stem), and one or two flowers is ample. Very fleshy fruit (e.g. a plum) or fleshy leaves (e.g. cactus and succulents) do not press well. If you are a beginner, do not try to press these plants. (If you wish to include these in your plant collection, send a photo or drawing). Instead of newspaper between specimens, you can use gauze cloth or blotting paper. (You might be best to still use newspaper on the outside of these materials to absorb excess moisture). Cloth or blotting paper has the ability to absorb more moisture out of the plant and so helps with pressing fleshier plants. THE NOTES SO FAR, HAVE PROVIDED YOU WITH THE BASIC OUTLINE OF PUTTING TOGETHER YOUR PLANT COLLECTION. THE NOTES TO FOLLOW PROVIDE FURTHER DETAIL FOR THOSE WHO HAVE THE DESIRE TO PRODUCE A COLLECTION OF IMPROVED QUALITY. THIS IS NOT NECESSARY FOR THE COURSE YOU ARE DOING, BUT IT MAY BE NECESSARY IF YOU WISH TO PURSUE YOUR STUDY OF A SPECIALIST GROUP OF PLANTS BEYOND THIS COURSE.
HINT 1: TO SPEED UP THE DRYNG PROCESS, AFTER PRESSING FOR A COUPLE OF DAYS YOU MAY TRY EXPERIMENTING WITH A MICROWAVE OR OVEN AT A LOW POWER/HEAT SETTING. SOME PEOPLE EVEN HAVE SUCCESS
IRONING THEIR PLANTS BETWEEN SHEETS OF PAPER.
HINT 2: FOR QUICK EFFICIENT PLANT DRYING USE
NEWSPAPER BETWEEN LAYERS OF PLANTS. Replace newspaper every day, or every
second day, as this ensures that moisture released from the plant is completed removed from the drying plants– this will speed up the drying process. This way plants may take only
one or two weeks to dry as opposed to a month. The extra effort is worth it to produce a
better specimen.
HINT 3:
LABEL THE PLANT THE MOMENT YOU COLLECT THE SPECIMEN. TRY TO IDENTIFY
ITS BOTANICAL NAME, FLOWER FEATURES, HEIGHT, THE LOCATION WHERE YOU COLLECTED IT FROM, ETC.

COLLECTING PLANTS When going out in search of plant specimens, take a plant press (see section 3) or a stiff portfolio such as an old ledger cover; place sheets of newspaper in a container of this kind and collect directly into it, placing each plant in a folded sheet of newspaper. The portfolio or press is best tied up with the straps or tapes which allow for extension, and another strap can be used to hang it over your shoulder. As fresh material can be dissected more easily than dried specimens, it is often desirable to collect extra specimens for the purpose of identifying the plants concerned. Such specimens, if collected into a plastic bag (and the bag closed by a rubber band) will keep fresh in a refrigerator for a few days. Plants for pressing may also be collected in a plastic bag and then pressed later, but petals may fall or delicate parts of plants may crumple or break if this procedure is adopted. When selecting a specimen for collection, make sure that it is representative of the species in question – i.e. do not collect material from a plant which is much larger or smaller or different in any way from most of the plants of the species in the area concerned. At the time of collection, allot each specimen a number, write this number (in pencil) on a tag and tie the tag to the specimen. It is important that a given number should only be used for material from one plant; if specimens are collected from several plants believed to belong to one species, each specimen should be given a separate number. As soon as a specimen has been numbered, this number should be recorded in a notebook, together with information about the plant and its habitat. It is most important to note the locality and date. Other information should include: the habit of the plant, the scent and colour of the flowers and details of the environment - altitude, slope (aspect with steepness), soil, vegetation type and abundance of the species. These details should be transferred as soon as possible to a label accompanying the specimen. In general, field notes should be so accurate and detailed that they could be used in drawing up a description of a plant or in directing someone to the site where it was collected. Photographs of the whole plant or of suitable parts of it are an excellent supplementary record to field notes. Collect specimens which are nearly as large as the herbarium sheets to be used. If possible, the specimens for each plant should include a leafy shoot with fruits attached as well as one provided with buds and flowers. If fruits are not present on a particular plant, old fruits on the ground around the plant may be collected if it is reasonably certain that the fruits came from the species in question and if the fact that the fruits were not collected from the plant is noted on the herbarium sheet. Both male and female flowers (attached to shoots) should be collected for plants in which the flowers are unisexual. Both juvenile (seedling) and mature leaves should be collected if these are markedly different in a species; this is particularly important in the case of eucalypts, some of which cannot be identified in the absence of juvenile leaves. Specimens of small underground parts such as bulbs, rhizomes, etc. should be collected also where they occur. PRESSING A plant press should be light and strong and should be kept in a well ventilated place where moisture. A pair of wooden lattices is suitable and can easily by made at home. In another suitable type, each half consists of a 1/4 inch iron rod frame (similar to a refrigerator tray) covered with wire mesh. Plants are pressed in newspaper; never used glazed paper for pressing. Place each plant to be pressed inside a folded sheet of newspaper. When placing these sheets in a press, each should be separated from the next by an empty folded sheet of newspaper (the drying sheet). Air circulation in the press may be improved by inserting here and there a light wooden lattice or two layers of corrugated cardboard back to back. The material is pressed by compressing the two halves of the press with the papers and plants between them. This is usually achieved by the use of straps which can be tightened or by a mechanical press. The material should not be strapped too tightly.

Difficult Specimens a) Plants which require killing before being pressed. This group includes succulents. Bulbs of any plants should be killed. Killing may prevent the leaves of some conifers, tropical plants and heaths from falling. Killing entails treatment with 4% formalin. If formalin is not available, succulents and some gymnosperms can be killed by dipping specimens in boiling water for a few seconds. b) Bulky plants or parts of plants can often be halved or sliced before pressing. c) Very delicate plants or plants with very thin petals can be pressed in a tissue paper folder. d) Very bushy twigs. A flatter specimen can be made by pruning but it should be obvious that the specimen has been trimmed. e) Spiny plants. Before pressing, place the specimen under a board and stand on it; this will prevent the spines from tearing the paper when the plant is pressed. f) Water plants. Float the plant out in a dish of water, slip a sheet of stiff white paper under the plant and lift it out. Dry off the excess water, place a piece of gauze over the plant (this will prevent it from sticking to the drying sheet) and press it in the usual way. The plant will adhere to the stiff paper which is used as the herbarium mount. g) Long specimens (eg: some grasses) may be pressed complete if they are bent into the shape of a V, N or M. h) Plants with very large organs. Several herbarium sheets may be necessary to show the different parts of the leaves, inflorescences and fruits of plants such as palms. Photographs of the plant and its parts are essential. i) Cones of some gymnosperms and Pandanaceae may need to be enclosed in wire mesh to prevent them from falling apart. DRYING It is necessary to replace the drying sheets with dry newspaper every day for the first few days after the plants have been placed in a press. Then the drying sheets can be changed occasionally until the specimens are completely dried – i.e. until they are brittle. Specimens can become moldy unless the drying sheets are changed regularly. The drying process can be speeded up by warming the press. A household clothes drying cabinet can be used as long as the temperature is not too high. • Some plants have a lower water content to the leaves (eg Grasses) and will press much faster. • Fleshy leaved plants will always take longer to press than drier leaved plants. • Plants with thicker leaves usually take longer to press than those with thin leaves. • Plants with very aromatic foliage will generally preserve better, easier (and possibly faster). The oils in plants such as Conifers, Melaleucas, Eucalypts, Citrus and Thyme are preservatives which will help stop foliage from rotting. So, if you wish to speed up the process of pressing plants to get specimens prepared faster for a plant collection, be selective about the types of plants you choose. MOUNTING Each plant is attached to a separate sheet of paper using glue placed at several points over the plant.

LABELLING SPECIMENS All data should be clearly and accurately written or printed. The information on the label could include such things as: *1. Name of plant. 2. Habit of plant. (The height and shape it grows in). 3. Flower colour and scent. *4. Name of collector. 5. Collector's address or phone number. *6. Date of collection. *7. Locality; relatively obscure geographical names should always be qualified - eg. X........., 10 miles
north of Melbourne. 8. Altitude. 9. Soil. 10. Slope - steepness, aspect. 11. Vegetation type (whether collected in a forest, home garden, open grassland etc). *12. Abundance of the species within this plant community. 13. Identifier and date identified (who identified it as being the plant which you have named it). *14. Cultural Requirements - how to grow it, watering, feeding, soil conditions, pruning etc. *15. Propagation - the different ways it can be propagated, and the way it is most commonly propagated. *16. Horticultural Use - what it is grown for (i.e. indoor plant, street tree, to crop its fruit, for erosion control, as a wind break, for its timber etc). *The categories marked with an asterix are the more important ones to include. Locate this information in the lower right hand corner of the herbarium sheet. Extra notes and comments can also be added to the herbarium sheet. It is desirable to have photographs or sketches of the habit of large or unusual plants, and these should be attached to the herbarium sheet. IDENTIFICATION OF PLANTS It is easiest to dissect and identify plants when they are fresh. If dried specimens need to be used, it is desirable to examine them before they are mounted, and, in the case of any herbarium specimen, it may be helpful to soak a flower or other structure in water containing a drop or two of detergent and then dry it with blotting paper before dissection. Dissecting instruments should include at least a sharp razor blade, knife or old scalpel for cutting hard fruits, etc., and a pair of mounted needles. Lenses should be mounted so that both hands are left free for dissecting. An 8x or 10x lens is adequate for some flowers, but for small ones, such as those of composites or grasses, a binocular dissector of 16x or 20x magnification may be necessary. Very small parts of some flowers (e.g. the stamens of composites) may be mounted on a slide and examined with a low power microscope. Sketches and notes made while dissecting the flower are helpful when attempting to use a suitable floral key to identify a plant.
MULTIMEDIA Watch the video ‘Plant Identification’ in the multimedia section.
TERMINOLOGY Learn the following definitions: Species: Plants that freely interbreed with each other. Genus: A group comprising several species that have several common characteristics, but only interbreed occasionally. Variety: A type of plant within a species that can be distinguished from other types in the same species by some obvious physical characteristic. (e.g. leaf shape or colour, flower colour etc). Fruit: A matured ovary (e.g. nuts, berries, pods, fruits). SET TASK Visit a garden, park, or anywhere else you can easily see a number of different plants. Look at the plant leaf shapes and try to describe them. Observe how the leaves are attached to the stem – are they alternate, opposite or whorled? Are the leaves simple or compound?
ASSIGNMENT Download and do the assignment called ‘Lesson 1 Assignment’.