lesson : photoshop elements – first stepswebs.wofford.edu/whisnantdm/training/gimp/gimp 06...
TRANSCRIPT

Lesson 6 GIMP – Layers July 14, 2010
David Whisnant
1
GIMP – Layers
One of the most powerful features of modern imaging software is the ability to work with layers.
If an image is made of layers, we can work on the part that is in one layer without affecting the
others. This is best understood by creating an image made of more than one layer.
Creating a Blank Image
Make sure that the background color is white. If it is not, change it to white.
Select File, New from the main menu.
Create a 1024 x 768 image and save it with
the name Composite.xcf

Lesson 6 GIMP – Layers July 14, 2010
David Whisnant
2
Creating a Composite Image
Open Grief.jpg and save as Grief.xcf.
You will now have two GIMP windows open,
one containing Composite.xcf and one
containing Grief.xcf.
Our goal now is to combine the two images.
In the “Grief” image, use the Selection tools and Eraser tool to delete out the
section of the picture that is not occupied by the figure.
The Fuzzy Select Tool
A useful selection tool we did not cover in the preceding lesson is the Fuzzy
Select Tool, which selects contiguous regions that are of the same color. Choose
this tool.
Set the Threshold for the tool to a low number, say 1.0. The
size of the threshold determines how similar the colors are that
will be selected by the tool. A threshold of 1.0
means that the tool will only select identical colors.
Make sure Feather edges is checked
Click on the white area of the picture with the selection tool.
This will select all contiguous pixels that are white. You
should see that the outer area you have deleted is selected.
Lesson 6 GIMP – Layers July 14, 2010
David Whisnant
3
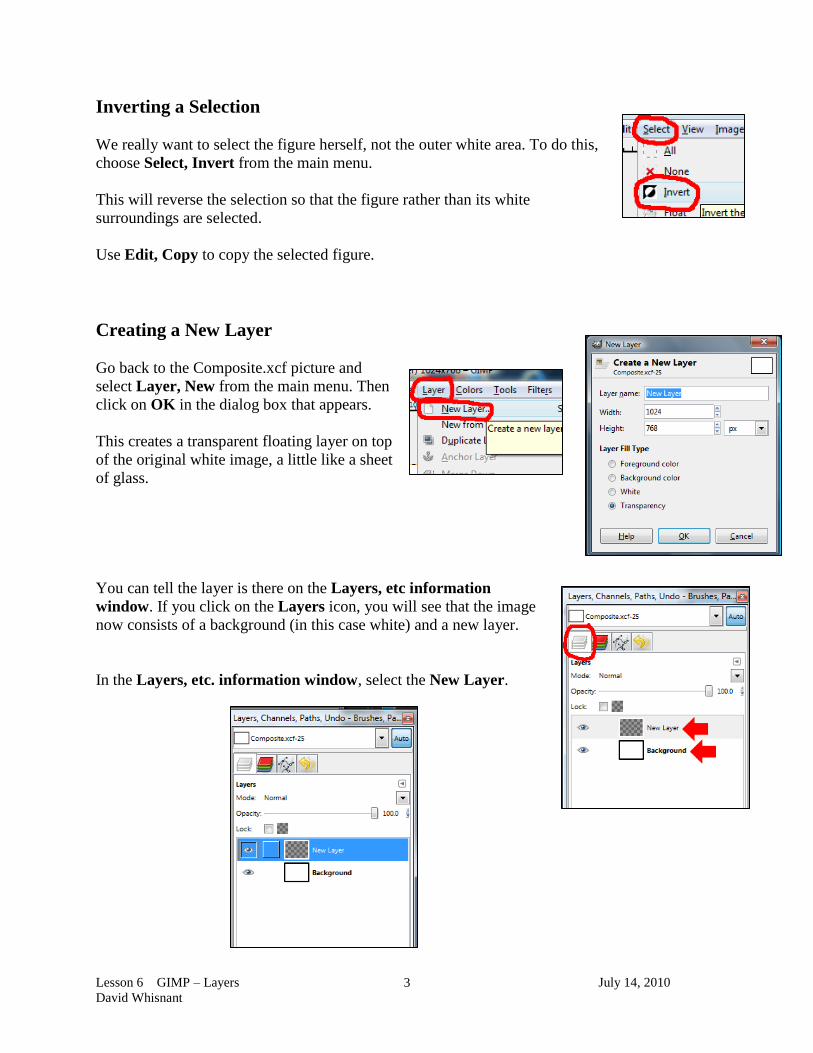
Inverting a Selection
We really want to select the figure herself, not the outer white area. To do this,
choose Select, Invert from the main menu.
This will reverse the selection so that the figure rather than its white
surroundings are selected.
Use Edit, Copy to copy the selected figure.
Creating a New Layer
Go back to the Composite.xcf picture and
select Layer, New from the main menu. Then
click on OK in the dialog box that appears.
This creates a transparent floating layer on top
of the original white image, a little like a sheet
of glass.
You can tell the layer is there on the Layers, etc information
window. If you click on the Layers icon, you will see that the image
now consists of a background (in this case white) and a new layer.
In the Layers, etc. information window, select the New Layer.
Lesson 6 GIMP – Layers July 14, 2010
David Whisnant
4
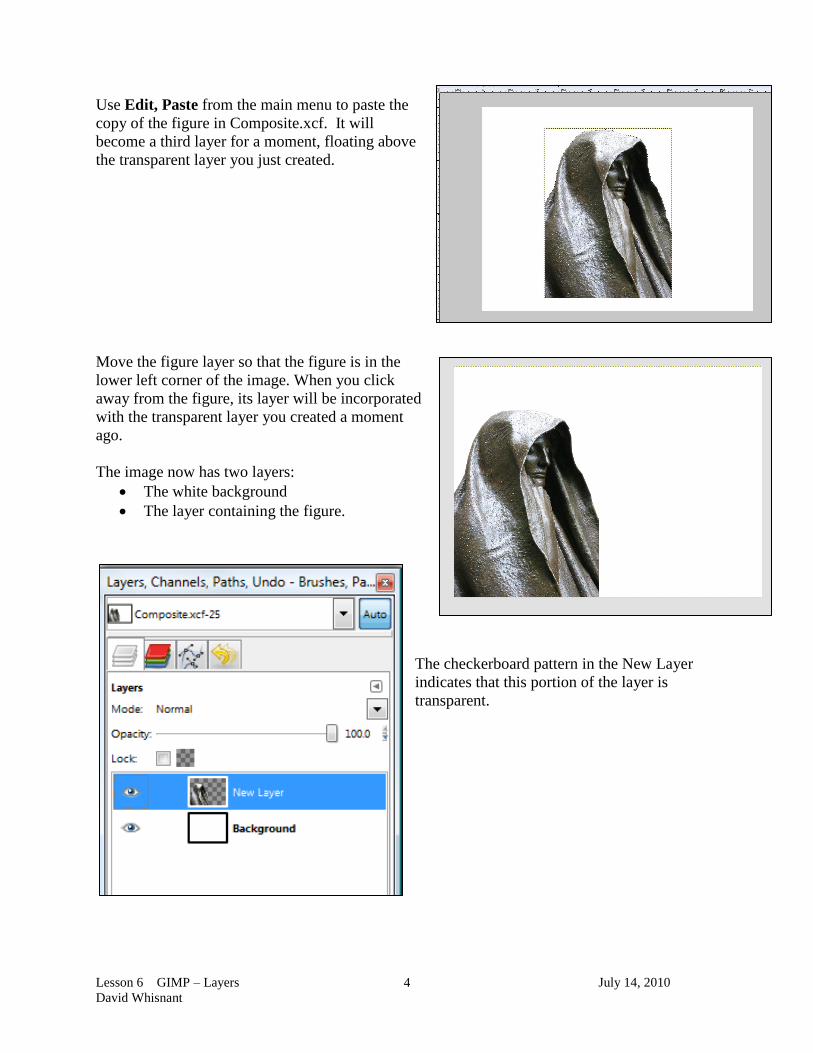
Use Edit, Paste from the main menu to paste the
copy of the figure in Composite.xcf. It will
become a third layer for a moment, floating above
the transparent layer you just created.
Move the figure layer so that the figure is in the
lower left corner of the image. When you click
away from the figure, its layer will be incorporated
with the transparent layer you created a moment
ago.
The image now has two layers:
The white background
The layer containing the figure.
The checkerboard pattern in the New Layer
indicates that this portion of the layer is
transparent.
Lesson 6 GIMP – Layers July 14, 2010
David Whisnant
5
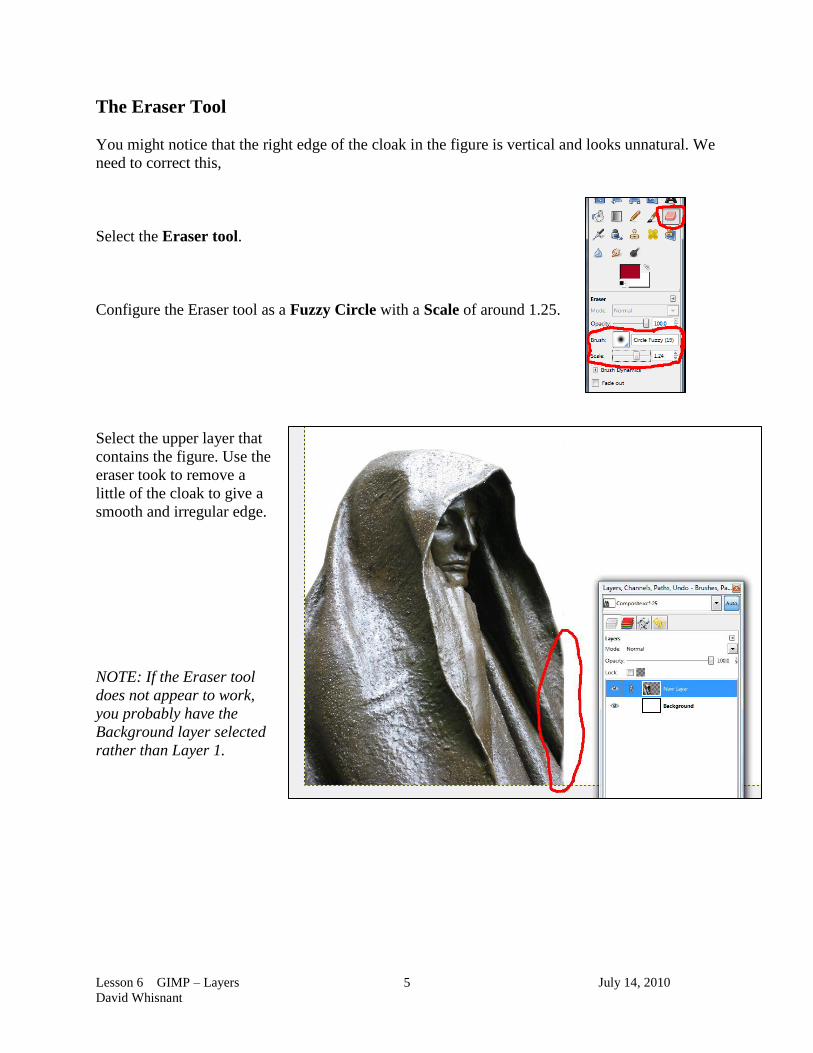
The Eraser Tool
You might notice that the right edge of the cloak in the figure is vertical and looks unnatural. We
need to correct this,
Select the Eraser tool.
Configure the Eraser tool as a Fuzzy Circle with a Scale of around 1.25.
Select the upper layer that
contains the figure. Use the
eraser took to remove a
little of the cloak to give a
smooth and irregular edge.
NOTE: If the Eraser tool
does not appear to work,
you probably have the
Background layer selected
rather than Layer 1.

Lesson 6 GIMP – Layers July 14, 2010
David Whisnant
6
Creating a Layer with a Color Gradient
Let’s create another layer between the two layers we have.
Select the Background layer and then create a New layer.
You now should have three layers.
Select the middle layer (the one you just created).
Change the foreground color to a shade of blue.
Choose the Gradient Tool in the Toolbox.

Lesson 6 GIMP – Layers July 14, 2010
David Whisnant
7
Click the mouse at the top of the picture and, holding the mouse
button down, drag the cursor down to the lower part of the screen.
You should see a line follow the cursor. When you release the mouse
button, you will see a blue gradient painted on the middle layer,
behind the figure.
Viewing or Hiding Layers
You can hide or show a layer by clicking on its eye icon
in the layer palette. If the eye is not visible, then the
layer will be hidden on the screen. If the eye is visible,
then the layer will be shown on the screen.
Try this with one or more of the layers and watch what
you see on the screen.
When you are through, make sure all the layers are
visible.

Lesson 6 GIMP – Layers July 14, 2010
David Whisnant
8
Layer Opacity
Select Layer 1, which contains the figure.
In the upper right of the Layers palette, you will see an Opacity slider, which controls how
much of underlying layers will show through a selected layer.
Opacity = 100% means a layer is completely opaque so nothing in a lower layer will
show.
Opacity = 0% means a layer is completely transparent and no longer visible.
Change the Opacity of Layer 1 to 50%, which means that it will be 50%
transparent.
The figure now is slightly obscured by the gradient
layer, which is showing through from below.
Lesson 6 GIMP – Layers July 14, 2010
David Whisnant
9
Adding Text Layers to an Image
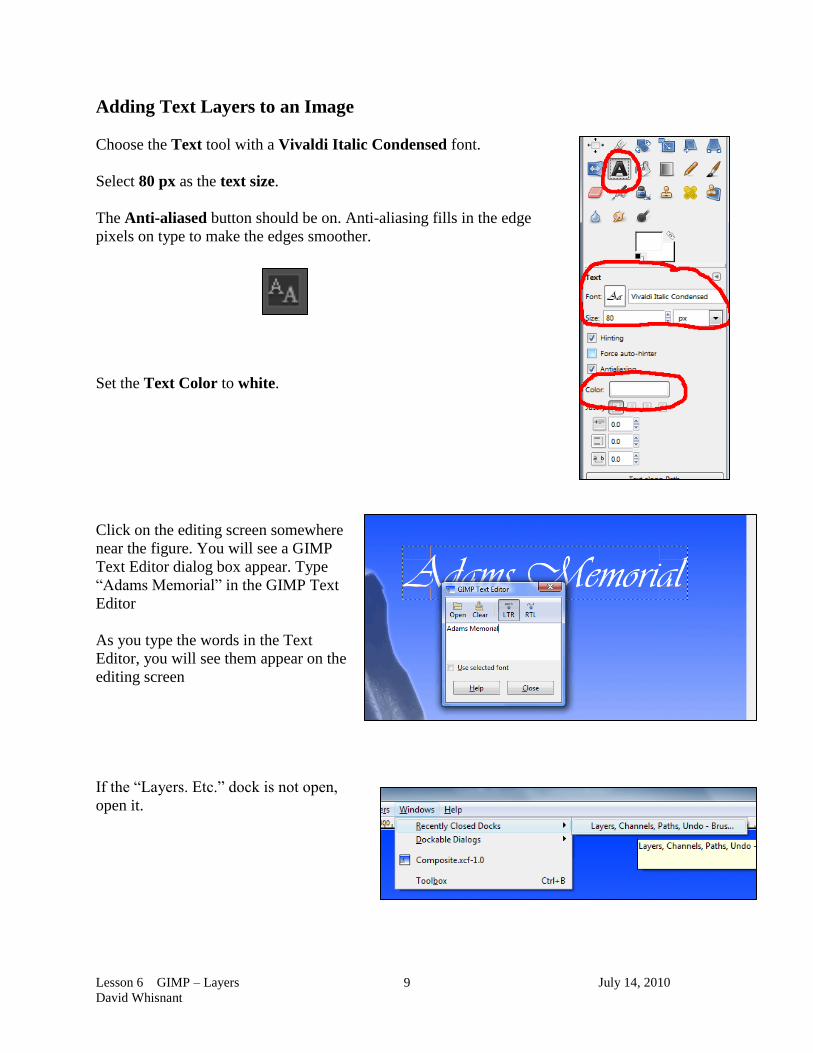
Choose the Text tool with a Vivaldi Italic Condensed font.
Select 80 px as the text size.
The Anti-aliased button should be on. Anti-aliasing fills in the edge
pixels on type to make the edges smoother.
Set the Text Color to white.
Click on the editing screen somewhere
near the figure. You will see a GIMP
Text Editor dialog box appear. Type
“Adams Memorial” in the GIMP Text
Editor
As you type the words in the Text
Editor, you will see them appear on the
editing screen
If the “Layers. Etc.” dock is not open,
open it.

Lesson 6 GIMP – Layers July 14, 2010
David Whisnant
10
Select the text layer and
move it approximately to
the position shown in the
picture at the right.
Drop Shadows
We can add drop shadows to the text to make it stand out from the
background. Select the text layer.
Choose Filters, Light and Shadow, Drop Shadow
from the main menu.
Specify the properties
of the drop shadow and
click on OK.
Lesson 6 GIMP – Layers July 14, 2010
David Whisnant
11
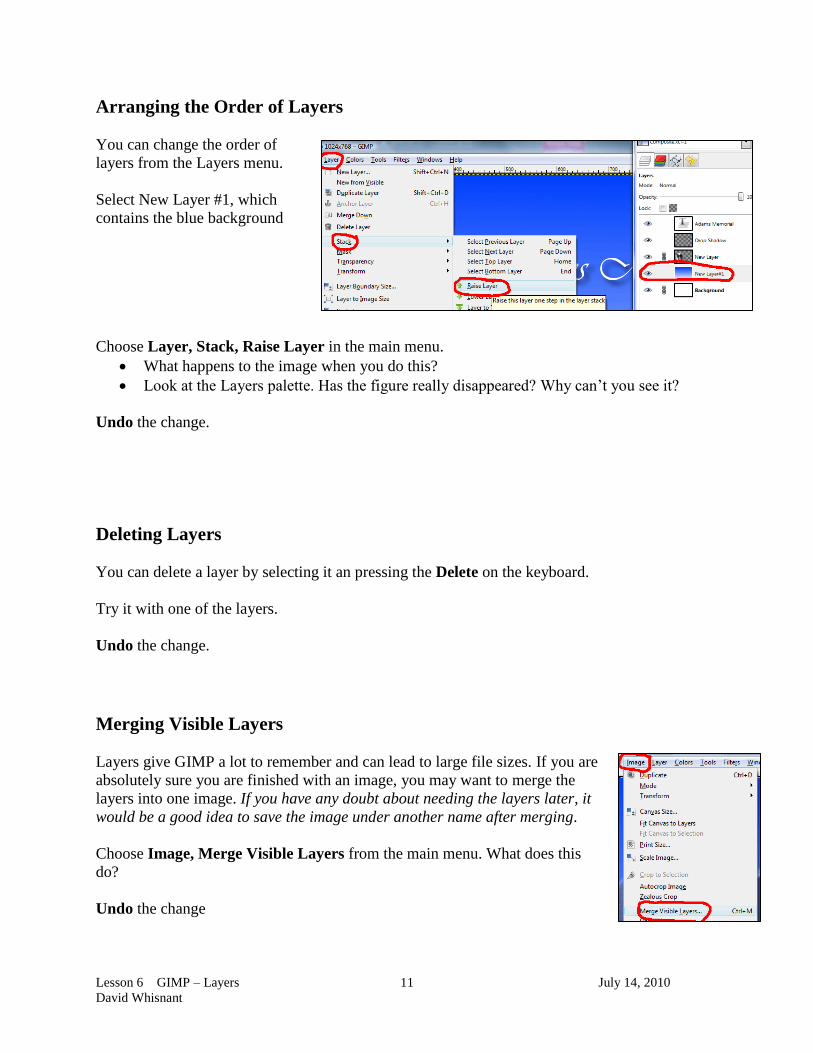
Arranging the Order of Layers
You can change the order of
layers from the Layers menu.
Select New Layer #1, which
contains the blue background
Choose Layer, Stack, Raise Layer in the main menu.
What happens to the image when you do this?
Look at the Layers palette. Has the figure really disappeared? Why can’t you see it?
Undo the change.
Deleting Layers
You can delete a layer by selecting it an pressing the Delete on the keyboard.
Try it with one of the layers.
Undo the change.
Merging Visible Layers
Layers give GIMP a lot to remember and can lead to large file sizes. If you are
absolutely sure you are finished with an image, you may want to merge the
layers into one image. If you have any doubt about needing the layers later, it
would be a good idea to save the image under another name after merging.
Choose Image, Merge Visible Layers from the main menu. What does this
do?
Undo the change

Lesson 6 GIMP – Layers July 14, 2010
David Whisnant
12
You also may want to merge only some of the layers in a stack,
rather than all of them. For example, you may want to merge the
bottom three layers (background, blue color, figure) but leave
the test floating on top.
Click on the eye icon for the two layers you do not want to
merge. You will see that the text and the drop shadow disappear
from the image because they no longer are visible.
Next choose Image, Merge Visible Layers from the main
menu. This will merge the visible layers into one layer, but leave
the invisible layers unaffected.
Correcting Perspective Problems
Open the file Chicago.jpg.
If you take a picture of a building from
ground level with a wide-angle lens, the
buildings appear to lean toward the center.
This is particularly apparent if you view the
grid, as shown in the picture at the right.
You may want to improve the look of the
image by straightening the buildings.
View the grid as we did when you rotated the image in the first lesson

Lesson 6 GIMP – Layers July 14, 2010
David Whisnant
13
Select Tools, Transform Tools, Perspective
You will see small squares at the four
corners of the image.
Push the lower squares in and pull the upper
squares out until the straight lines in the
image line up with the vertical lines in the
grid.
Click on Transform in the Perspective dialog box.
The image will be transformed to straighten the
perspective in the image. This will leave some
blank spaces at the bottom of the image, which
will need to be cropped.
You may need to sharpen the image a little with
the Unsharp Mask following the
transformation.
Lesson 6 GIMP – Layers July 14, 2010
David Whisnant
14
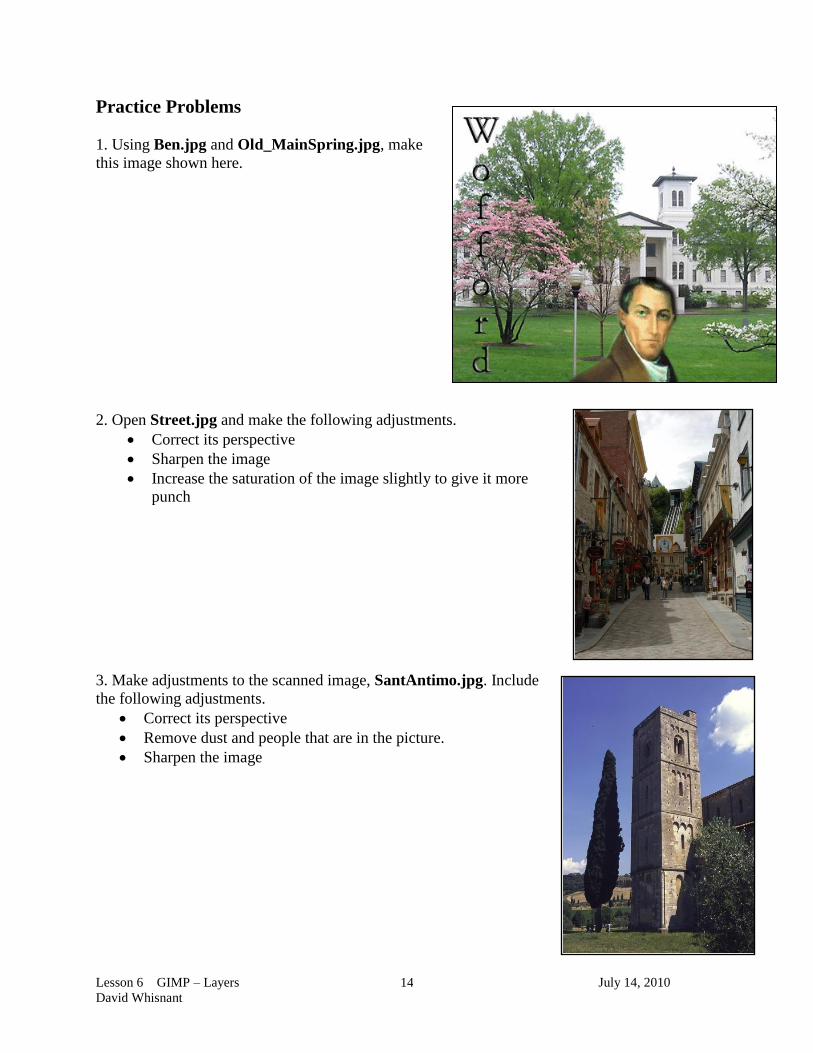
Practice Problems
1. Using Ben.jpg and Old_MainSpring.jpg, make
this image shown here.
2. Open Street.jpg and make the following adjustments.
Correct its perspective
Sharpen the image
Increase the saturation of the image slightly to give it more
punch
3. Make adjustments to the scanned image, SantAntimo.jpg. Include
the following adjustments.
Correct its perspective
Remove dust and people that are in the picture.
Sharpen the image

Lesson 6 GIMP – Layers July 14, 2010
David Whisnant
15
4. Open Famille.jpg and make the following
adjustments.
Brighten the shadows without
changing the properly exposed sky.
This may not take much adjustment to
look OK.
Adjust the perspective
Change the saturation if necessary.
Sharpen the image
Crop the image to remove the
telephone pole at the right.