level 1 study guide - ucanr
TRANSCRIPT

STANISLAUS COUNTY 4-H HORSE PROJECT STUDY GUIDE
LEVEL 1
March 2010
Use this study guide with the
CERTIFIED HORSEMANSHIP ASSOCIATION Composite Horsemanship Manual

Rev. 03/10 Level 1 Study Guide Page 1
HORSE PROJECT STUDY GUIDE LEVEL 1
HORSE SENSE:
Horse sense is being able to understand _______________ and even ______________ like a
_____________. The better you understand horses and their behavior, the more you can enjoy them.
Understanding them can even make you a better ____________.
According to the CHA Manual, the horse sense rules are:
1. Praise often and ______________ seldom. If you are firm and _______________ with your horse you
will gain _______________. Being mean will make your horse _______________ you.
2. Stop, ___________ and listen. Be careful when you are working around horses. Horses can be
_________________ by loud noises and sudden movements. Don’t __________ or ____________.
3. Never stand directly in ____________ of or in ___________ of a horse. Horses can’t see straight in front
of them or behind them and you might be _______________ or _________ over.
4. Horses should not be hand __________. You might be _____________ and it can make some horses
___________ and hard to handle.
5. Stay at least _________ horse length behind the horse in front of you. Getting too close might cause the
horse in front of you to __________ or bite. ***** If you see a horse with a red ribbon on its tail, STAY
BACK. This means the horse is very likely to kick if someone gets too close.*****
6. Check your __________________ for proper fit before you mount.
7. Always tie your horse with the ____________ and _________ rope. If you tie with the _________, they
can break or the horse’s ______________ might be ______________ if tied by the bridle and bit.
8. Treat ________________ with care and _________ it away. Taking good care of your ______________
makes it easier to use, it will last longer and it will be more comfortable for the __________ and rider.
9. Never wrap or _________ anything that is attached to your ____________ around your body. If your
horse spooks and runs, you could be ______________ by your horse.
10. Listen and ___________. Keep __________ at all times when you are around horses.
11. If you need to adjust _______________ or _______________, dismount. Unusual movement on your
horse’s back may cause him to ____________.
12. Dress appropriately. You should wear ___________ pants and wear shoes with a _________ and
smooth soles. Always wear a safety ______________ when riding.
HORSE CARE AND HANDLING:
You should approach your horse at the _______________ or as close to the __________ as you can so
that he can see you. Speak ____________ and call the horse’s ___________ as you approach in case he is
_____________. _________ him on the ____________ or neck.
Have the ______________ and lead __________ ready when you go to catch a horse. To put the
____________ on the horse, stand on the ___________ side. It is a good idea to __________ to the horse while
you stroke or pat him to let him know you are a _____________. Slide the halter over his ______________. The
long strap should come across the horse’s ___________ and behind the __________. The halter should not fit
too _____________ because it will put pressure on his face. It also should not fit too ____________, because it

Rev. 03/10 Level 1 Study Guide Page 2
could catch on something or he might get his ___________ caught in it. Sometimes horses scratch their heads
with their ____________!
When you lead your horse you should be on the ____________ in between the horse’s __________ and
_________________. Do not ___________ the reins or the rope around your hand. This could be very
dangerous if the horse spooks and decides to _________ away from you.
To turn your horse, you should turn his head _____________ from you. Move your right hand under his
chin to the _______________. This will help keep the horse from stepping on your ___________. If you must
turn the horse toward you, switch the lead rope to your ___________ hand and put your ______________ hand
on his shoulder to keep him an arm’s length away from you and your _______________.
When it is time to _______________ or _________________ your horse, you need to _________ your
horse. To do this, you should __________ the ___________ rope to a solid object like a fence post or a hitching
rail. When you tie, you should always use a _____________ _______________ knot. Tie your horse at a level
that is as high as his ______________ or ______________. It is important not to tie the lead rope too _________
because he could put his head down and get his _________ over the rope!
A horse can also be ______________________. This is usually __________ ropes tied high on each
___________.
Horses should ______________ be tied with a halter and lead rope and ______________by the bridle
and reins. Tying with the bridle and reins could _____________ your bridle or injure the horse’s ____________
with the bit if he pulls back too hard.
As part of your Level 1 assessment, you will be asked to demonstrate the proper way to catch and
halter a horse. The above section on Horse Care and Handling will help you prepare. A copy of the
judges’ checklist is included in your study guide.
GROOMING:
Grooming is important to your horse’s ______________. It helps remove ________________ and
_________ that can cause saddle sores and gives your horse’s _____________ a shine.
The ____________ ___________ is used on the horse’s __________ in a circular motion to bring dirt
to the surface. A hard ____________ ____________ should not be used on the ____________, legs or any
____________ areas of the horse.
The ____________ ___________, or hard brush, is used to remove the dirt brought up by the
_______________ ______________. You should brush in firm _____________ strokes in the direction of the
hair to remove the dirt.
The __________ ____________ is used on the body and the ___________ to remove dirt from the
surface and to leave a ______________.
The _____________ and _____________ comb is used to remove ________________. You should
start at the ______________ and work towards the _____________ to gently remove the tangles.
The ___________________ is used to clean dirt, rocks and manure from the horse’s _______________.
Clean the ____________ working ___________ from yourself.
When grooming you should start at the ______________ of the horse and work your way ____________.

Rev. 03/10 Level 1 Study Guide Page 3
It is a good idea to keep __________ ____________ on your horse so that you can feel him move. As you go
around the back of your horse, you need to move around safely. Keep ____________ _____________ on his
______________ and speak to him so he is aware of where you are.
As part of your Level 1 assessment, you will be asked to identify grooming tools, clean your
horse’s hooves and demonstrate the proper way to groom a horse. The above section on grooming will
help you prepare. A copy of the judge’s checklist is included in your study guide.
After you have demonstrated grooming, you will also demonstrate for the judge the proper way to
saddle and bridle your horse. Please refer to the CHA manual for directions on saddling and bridling. A
copy of the judge’s checklist is included to help you prepare. A parent or a leader may assist you with
placing your saddle if your saddle is too heavy or you can not safely reach up to put it on your horse.
They may NOT help you with the rest of the demonstration unless there is a safety issue and the judge is
notified ahead of time.
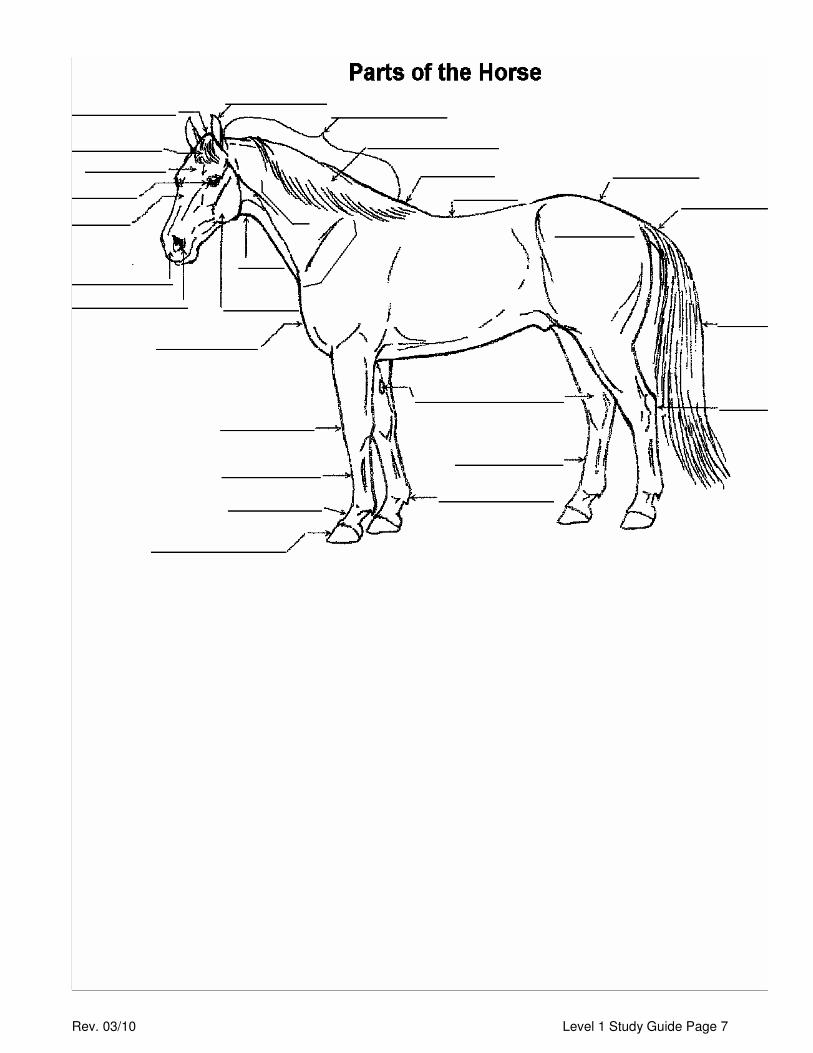
The parts of the horse and parts of the tack will be included on the written portion of your Level 1
assessment. Fill in the parts on the pictures included in your study guide using the CHA manual. For the
tack, CHOOSE either Western or English. YOU DO NOT HAVE TO DO BOTH.
HORSEMANSHIP:
The first section of Horsemanship in the CHA Manual covers mounting, dismounting, seat and
hand position and how to properly hold your reins. You should have a parent or leader review this
section with you. It will help you with your riding.
Aids are the means (or way) to ______________ a horse and help him know what the rider wants. The
two kinds of aids are _________________ and _________________.
A _________________ aid is part of your ______________. The four __________________ aids are
_________________, ____________________, ____________________ and ________________.
Some examples of an ____________________ aid are ____________, bats, whips and ____________.
Your weight is a very important ____________. By shifting your weight, you can tell the horse to stop,
__________ or turn.
Your weight also keeps you and your horse in _________________. By shifting your weight back you
can signal the horse to ____________ _____________. Shifting your weight forward means _____________
_________ and twisting your body to look in the direction you are turning tells your horse to _______________.
Your ____________ tell the horse to ______________. Squeezing gently with both legs should signal
your horse to _________________________.
Your ______________ should be quiet and gentle. Hold them steady in ____________ of the pommel
and above the horse’s ____________________.
The _______________ can be used to ________________ your horse, warn him about a signal you are
going to give him or to let him know you are displeased with him.
As part of your Level 1 assessment, you will be asked to ride a basic pattern in the arena. The
sections in the CHA manual on horse control, turns, basic figures and the trot will help you understand
the instructions for the pattern and how it will be scored by the judge. You may also find some questions
about these sections on the written portion of your Level 1 assessment.

Rev. 03/10 Level 1 Study Guide Page 4
LEVEL I DEMONSTRATION
CATCH AND HALTER
____ 1. Turned horse to face gate before releasing halter.
____ 2. Approached horse at safe angle to shoulders.
____ 3. Made contact with neck or shoulder.
____ 4. Approached quietly and communicated with horse.
____ 5. Halter was unbuckled and rope was not coiled.
____ 6. Placed rope around neck quietly.
____ 7. Put arm over neck to position halter and slipped halter over nose.
____ 8. Buckled and fit halter correctly.
____ 9. Led horse on near side with right hand near halter.
____ 10. Left hand held folds of excess rope.
____ 11. Led horse keeping his/her own body slightly in front of horse’s shoulder.
____ 12. Kept horse under control and did not get tangled in rope.
____ 13. Moved safely through the gate.
____ 14. Turned horse away from self when turning around.
____ 15. Moved horse’s hindquarters over from the ground.
____ 16. Backed the horse from the ground.
____ 17. Moved horse’s front end to the side.
____ 18. Tied horse safely with a proper knot on hitching post.
____ 19. Did NOT tie on the cross fence.
____ 20. Completed above items without instruction or coaching.
____
Total number of items checked (20 possible)

Rev. 03/10 Level 1 Study Guide Page 5
LEVEL I DEMONSTRATION
GROOMING, SADDLING & BRIDLING, UNSADDLING
IDENTIFYING GROOMING TOOLS:
____ 1. Hoof Pick – Cleans dirt from the hoof.
____ 2. Curry Comb – Rubber or metal. Roughs up the hair to get the deep dirt.
____ 3. Dandy Brush (or Hard Brush) – Use in the direction of hair to remove the dirt.
____ 4. Soft Brush (or Body Brush) – Use to remove surface dirt & shine the coat.
____ 5. Mane & Tail Comb – Use to remove tangles from the mane and tail.
____ 6. Grooming Cloths – Use to polish the body. Also for cleaning ears, eyes & nostrils.
CLEANING THE FEET:
____ 7. Hoof cleaned from heel to toe.
____ 8. Attention given to frog and cleft.
____ 9. Cleaned feet in order: left fore, left hind, right fore, right hind OR left fore, left hind, right hind, right fore.
GROOMING:
____ 10. Curry comb used in circular motions.
____ 11. Curried in sequence starting at the neck, breast, shoulder, fore leg, back, side, belly, croup and hind legs.
____ 12. Curry comb cleaned as needed.
____ 13. Dandy brush used in direction of hair with short firm strokes to remove dirt.
____ 14. Soft brush used to remove surface dirt and add shine.
____ 15. Brushed head and face carefully after finishing body.
____ 16. Remembered to clean fetlock area.
____ 17. Bent over, DID NOT KNEEL, to clean fetlocks.
____ 18. Mane & tail comb used properly beginning at ends and working towards roots.
____ 19. Tough tangles were gently removed with fingers, no harsh tugging or pulling.
____ 20. Polishing cloth used over body.
____ 21. Cloth or sponges used to clean eyes, ears, nostrils and lips.
____ 22. Cloth or sponges used to clean sheath or teat area and dock.
____ 23. Moved safely from side to side around the back of the horse.

Rev. 03/10 Level 1 Study Guide Page 6
SADDLING AND BRIDLING:
____ 24. Blanket checked for dirt and foreign material.
____ 25. Blanket placed properly, high on withers and slid back into place.
____ 26. Saddle cinches were not allowed to drag on the ground.
____ 27. Cinches were not allowed to swing down and hit horse.
____ 28. Moved to off side to check straps and saddle position before cinching.
____ 29. Cinches fastened properly.
____ 30. Untied, removed halter and placed it around neck.
____ 31. Bridled properly using thumb to open mouth, if necessary.
____ 32. Did not allow reins to drag on ground.
____ 33. Throat latch was secured and brow band or ear piece checked for proper fit.
UNSADDLING:
____ 34. Halter placed around the neck.
____ 35. Bridle removed carefully. (Paid attention to ears and teeth.)
____ 36. Halter replaced and horse re-tied properly.
____ 37. Saddle and blanket removed. Cinches were not allowed to drag the ground.
____ 38. Brushed areas where hair was disturbed.
____ 39. Was in control of horse at all times. Remained calm, firm and gentle.
____ 40. Verbal explanations of the procedure were given.
____
Total number of items checked (40 possible)
Rev. 03/10 Level 1 Study Guide Page 7

Rev. 03/10 Level 1 Study Guide Page 8

Rev. 03/10 Level 1 Study Guide Page 9

Rev. 03/10 Level 1 Study Guide Page 10
LEVEL 1 PATTERN INSTRUCTIONS
Letter Directions You are scored on
1. To O Lead horse (saddled) Leading the horse safely and correctly.
2. O Check tack and mount
(You may use a mounting block and
have an assistant hold the horse)
Remembering to safety check and mounting
properly
Controlling the horse and not disturbing him while
you are mounting
3. A Enter the ring at a walk
Turn to the right along the rail
Continue to C
Your position, seat, and control at a walk
DO NOT cut the corners
4. C Jog or trot (posting is optional)
Continue jog or trot to B without
breaking gait
Your position, seat, and control at jog or trot
DO NOT cut the corners
5. B Walk, halt, walk Control while stopping
Ease and gentleness at stopping the horse
6. B Continue trot to M Ability to get horse to trot from B to M
7. M Reverse without breaking gait in
a half circle and return to rail at
B
Turning and control while reversing at the jog or
trot
8. B Continue jog or trot to E without
breaking gait
Your position, seat, and control at jog or trot
DO NOT cut the corners
9. E
X
Turn and walk to center (X)
Stop in front of judge
Position and control while turning and stopping
10. X Dismount, prepare horse to lead
Acknowledge judge and leave
the arena leading the horse at a
walk
Dismounting safely and preparing to lead
Being in control of the horse and leading correctly
and safely

Rev. 03/10 Level 1 Study Guide Page 11