light and lighting
TRANSCRIPT

Light and lighting Nur ‘Ain Binti MohdShahroomMP121287
Sumitha Malar VasuMP121259
Noor Syahirah BteOthman
MP121160

An image is created with LIGHTS
“light makes photography. Embrace light. Admire it. Love it. But above all, KNOW light. Know it for all you are worth, and you will know the key to photography.”
Founder of Kodak,George Eastman

Sources of lights:
NATURAL AND AVAILABLE LIGHT
• Sunlight• Moonlight• Storm light
ARTIFICIAL LIGHT
• Flash light• Studio lighting
• Fresnel• Flourescent• Soft box


Effects of lighting:• Highlight important objects by drawing our eyes to
them (guide our attention)• Texture and shape• Give different mood to the picture to deliver a
certain message– Can make a character look mysterious by shading
some parts of their body– Make the character look glamorous by using
3point lighting technique– Highlight the emotion of the picture

Attached and cast shadow

Basic styles of lighting:High-key
• Predominantly bright and allows few dark areas or shadows within the scene
• Features strong illumination on the subject and often an equally exposed background
Low-key
• Enhances depth by using contrasting tones of highlights and shadow
• Only a few areas are lit at or above key, resulting in more shadow areas


Hard light• Light directly from a source such
as the sun, traveling undisturbed onto the subject being lit
• Highly directional• Creates a relatively sharp &
straight shadow – very dramatic
Soft light
• Light which appears to “wrap around” the contour of the subject.
• Produces less or softer shadow• Fills shadows and lowering
contrast

Soft light can be created by:• Bouncing the light • Using diffusion materials• Pulling the light away from the subject

Natural light: SUN

Substractive lighting• in outdoor daylight shooting, we
may have too much light filling the subject.
• Therefore, we often use a technique called substractivelighting where we use negative fill to remove the extra light to control shadows of varying densities.

Key light: main light on a subject Fill light: softens the hard edges of the key and balances the lightBack light: light behind the subject creating separation from the background (distance)

Artificial lights:

Artificial lights:

Artificial lights:
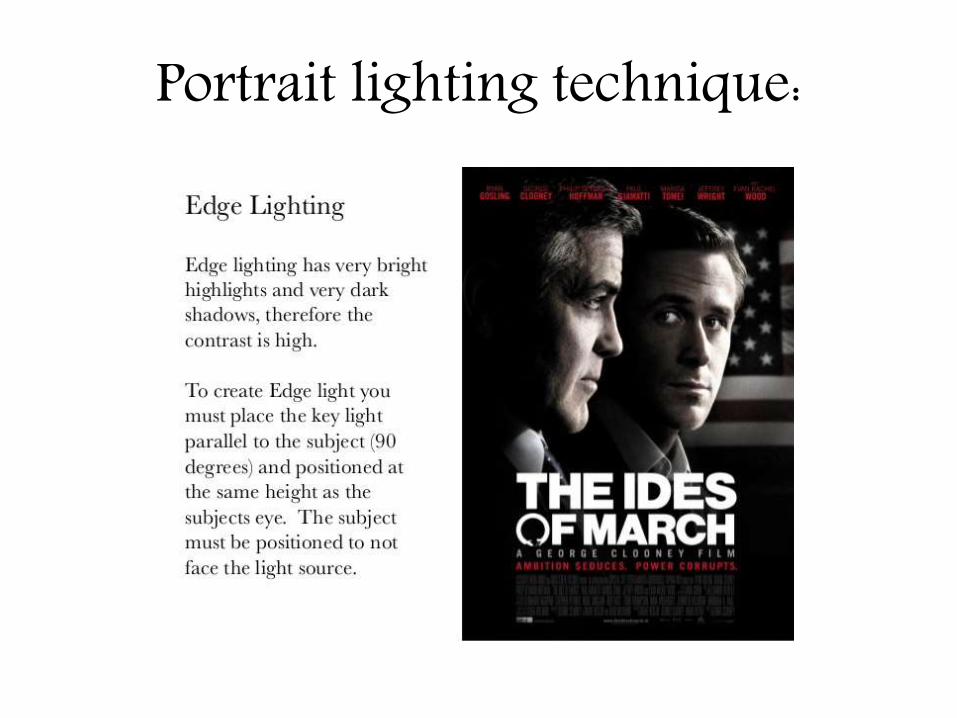
Portrait lighting technique:

Portrait lighting technique:

Portrait lighting technique:

• Mastering lighting techniques is one of the most important part in photography. Get to know and learn how to manipulate different kinds of lights to your advantage.
• Always take sample shots. Adjust the lighting based on the sample shots.
• You make the picture, not just simply take a picture. Use lighting to create your picture.

NATURAL AND AVAILABLE
LIGHT AVAILABLE
LIGHT
Photography is all about light.
Our photographs are recorded light.
How we control the available light and add additional
light when needed is basis for all photography.
There are numerous controls and methods for controlling
light available to today's photographer.
What is a Light Meter?
A light meter is an instrument inside the camera that indicate if the amount of light reaching the film will be enough or too much to properly expose the image.
The light meter takes into account on shutter speed, film speed, and aperture settings.
How To Read the Meter?
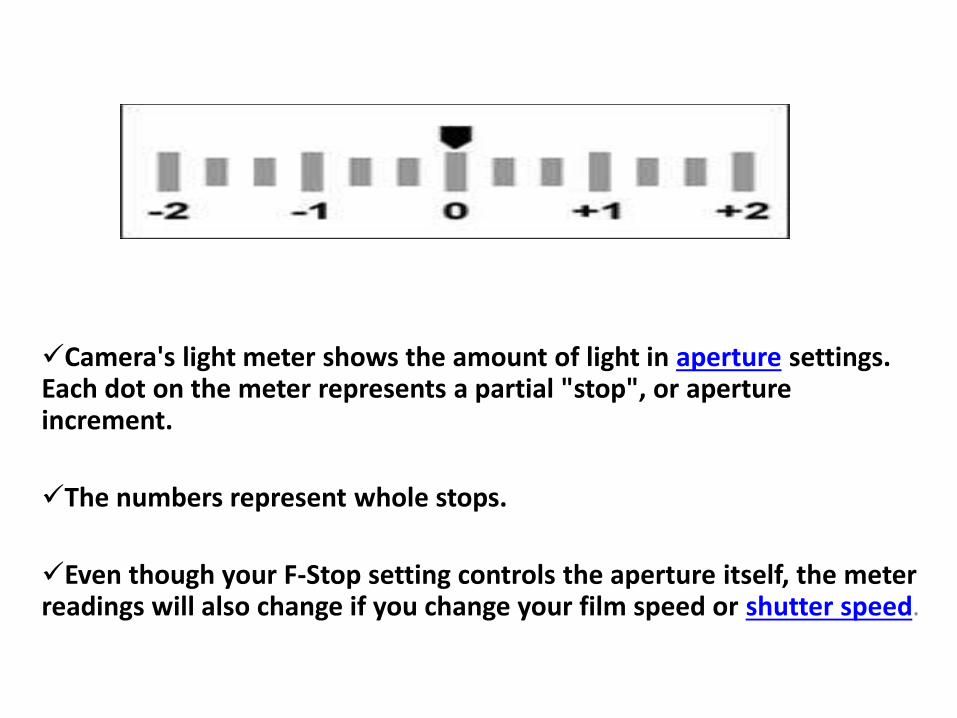
Camera's light meter shows the amount of light in aperture settings. Each dot on the meter represents a partial "stop", or aperture increment.
The numbers represent whole stops.
Even though your F-Stop setting controls the aperture itself, the meter readings will also change if you change your film speed or shutter speed.

Aperture
The aperture is an adjustable opening inside the camera lens that
works very similar like the iris in eye.
When the aperture opens wide (like your eye dilating), more light is
allowed through the lens to expose the film.
When the aperture is narrow (like your pupil in bright light), less
light reaches the film.
This works in conjunction with shutter speed and film speed to
determine the total amount of light that reaches the film.
Aperture size also affects depth of field.

APERTURE

Shutter Speed
Shutter speed one of the 3 basic light control functions of a camera. Aperture, film speed, and shutter speed work together to adjust how much light strikes film and how that light is recorded.
Shutter speed controls the amount of time the film, or digital sensor, is exposed to light.
shutter determines what image is captured on your film.
The shutter is a small plastic sheet that opens and closes to allow light onto the film or prevent light from reaching the film.
The shutter is opened when you press the shutter release button on your camera to take a picture.
The shutter speed determines how long the shutter remains open.
MEASURING SHUTTER SPEED
Shutter speed is generally measured in fractions of a second.
A shutter speed of "5000" means that the shutter will open for 1/5000th of a second.
Shutter speeds of 1 second and longer are generally marked with a ', or other similar mark, after the number.
This means that 16' on your camera's display would stand for 16 seconds.
The letter "B" is often used to indicate the shutter will remain open as long as you hold down the shutter release button.

Slow Shutter Speed
Shutter speed is considered to be "long" or "slow" when it is slower than 1/60th of a second.
This numbers comes from the fact that most people can only hold a standard lens (between 35mm and 70mm) steady for 1/60th of a second or less.
This is different from the commonly used term "long exposure" which usually refers to shutter speeds of over 1 second.
Fast Shutter Speed
Fast shutter speeds are generally considered to be those shutter speeds faster than 1/500th of a second.
These shutter speeds are used to freeze, or stop, motion for a clear image when shooting fast subjects.


ISO
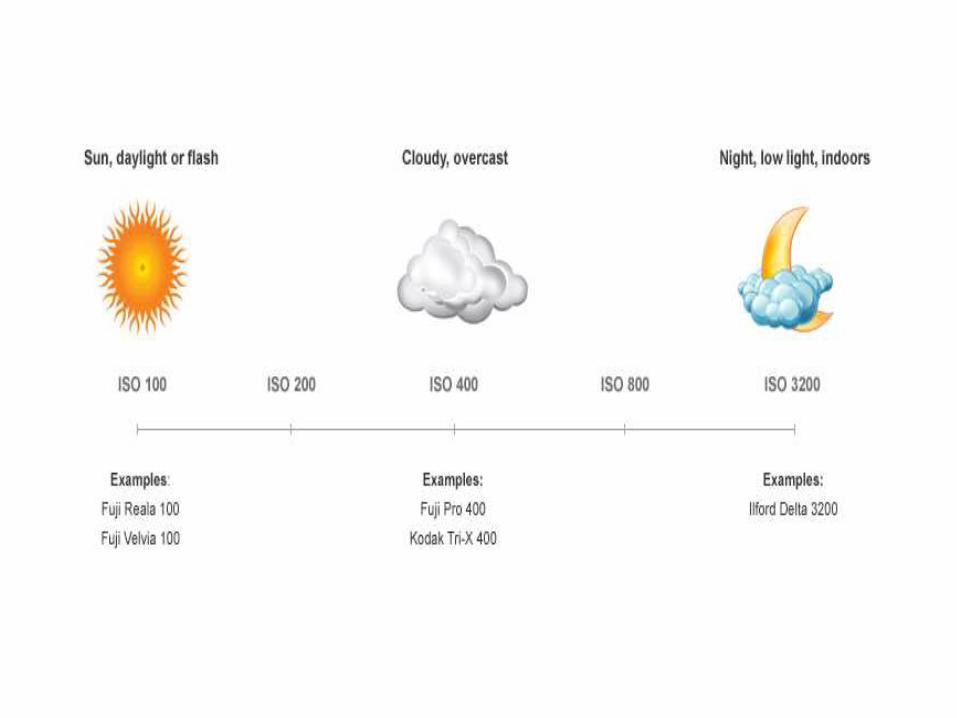
The light sensitivity of a film or equivalent digital sensor sensitivity.
The larger the number the less light is needed to capture the image.
This sensitivity is measured by a formula developed by the international Standard of Organization and is abbreviated as ISO.
Occasionally film speed is still designated by ASA, which is an older measurement standard from the American National Standards Institute.


Photography in Sunlight
Photography is all about light, the direction of the light falling on your subject is most important
You need to look at your subject carefully and watch how the shadows fall.
If you are able to choose the time of day to shoot your pictures, try to pick a time when the sun is low in the sky.

Photography in Sunlight
Shoot in the early morning or late afternoon
Shooting pictures of people with the sun too high in the sky, tends to mean the subject's eyes will be in shadow.
If you are photographing in sunlight, try to position yourself so that the sun hits your subject from the side, this will give you nice 'modelling' and help create a 3D effect in the picture


Direction of Light When looking at the lighting on a scene, you need to take into account the direction the light is coming from and also its relation to the camera (will the shadows be visible to the viewer?)
Three different kinds of lighting are defined as front , side and back lighting
Front lighting is often applied by beginners because it is “safe” and will illuminate the scene evenly, but this can create flat, less interesting photographs
Side lighting can emphasize texture and adds depth to your photographs
Back lighting can create dramatic silhouettes against a bright background

An Icelandic pony, shot against a setting sun

A bellowing red deer stag with light from the side

The hair of this pony create a golden outline when backlight by the low sun

A silhouette of a red deer stag is an instantly
identifiable form against a sunset sky

Quality of Light -The Golden Hours
Sunrise and sunset have been referred to as the “golden hours” for photography
These two times are wonderful for photographs because of the warm light and low angle of the light source.
Morning light is somewhat cooler than sunset, but both times produce warmer tones than at midday
The low angle of the sun produces long shadows and creates a feeling of depth and dimension in photographs, great for emphasizing texture and detail
These two times give better side lighting and backlighting opportunities, and often the light is soft enough so that the shadows aren’t overly dark and contrast


Quality of Light Midday Sun
• Midday sun is harsh and contrast, and the shadows it casts fall almost straight down creating a flatter feeling image than one with long, fading shadows
• It can be hard in the summer, if not impossible, to get side lighting or back lighting with a midday sun as well
• As the seasons change however, the sun is more angular even at noon and more interesting light can be found


EQUIPMENTS

ARTIFICIAL LIGHTING
Four kinds of artificial light sources for
photography
incandescent
fluorescent
LED
studio strob

Incandescent
• This lighting ranges from the common light bulb to large tungsten “hot lights” used in the studio and on movie sets. They are warm in colourtemperature compared with natural daylight.
• The light from a bare bulb is pretty harsh. That’s why we use lampshades on lights in our homes. The quality of incandescent lighting can be modified using flags, reflectors and diffusion material. They get hot to touch, so you need to be very careful around children and when photographing things that melt – like plastic or ice cream.

FLUORESCENT• Most public buildings and offices are lit with fluorescent lighting tubes.
They’ve been around for decades. They aren’t common in photography, but we sometimes get stuck with them if we’re shooting in corporate offices. One problem is that the tubes come in different colour temperatures. Traditionally they were greenish, and you had to have a magenta filter on your lens to correct for it.
• Now they come in many different flavours: cool white, warm white, daylight balanced, traditional green. As a result, it’s hard to white balance for fluorescent lighting, as you never know which type of bulbs are in the ballasts, or even if the bulbs match the ones next to them. You could have a room that has 2 or 3 different colouredtubes. In this case I’d definitely recommend doing a custom white balance using a grey card.

LED
• LED stands for light emitting diodes. Usually there are a series of hundreds small light diodes on one of the LED panels. These lights are really new on the photography and video market and their use is getting more common, especially as perimeter lighting for domestic use. You probably also use one if you ride a bicycle.
• Depending on the brand name and quality of LEDs, they can range from very stable in colour temperature to very unstable. The brightness can be varied with a built in rheostat and some models have two colour temperatures, or slide in filter panels. The quality of the light from LED’s tends to be a bit harsh and doesn’t spread out much, so you might need to soften this light with a spun diffusion material, or bounce it off a wall.

studio strob• Strobe lighting is probably the most common used artificial
lighting in photography. Strobe lighting is not suitable for video, as the duration of the flash is too short.
• The light from your camera flash is very harsh as well. Most people like to modify the light by bouncing it off a small card or by putting plastic diffusers in front of the flash head.
• Photographers have been using studio strobe lighting for many years, and it’s not going out of style any time soon. There are many manufacturers of strobe lighting systems and manylight modifying accessories to go with them such as umbrellas and softboxes.

Advantages of using artificial light
Using flashes in
low light will freeze the
action
Colour the light.
You can achieve near
perfect lighting
anywhere, anytime.
Photographs taken using
artificial light has a “fashion
look”.

Disadvantages of using artificial light
Photographs are generally
more staged/posed and does not
allow for many candid
moments
It can cost a lot more in terms of equipment
Working with equipment is
more cumbersome.

FLASH SET


BOUNCE
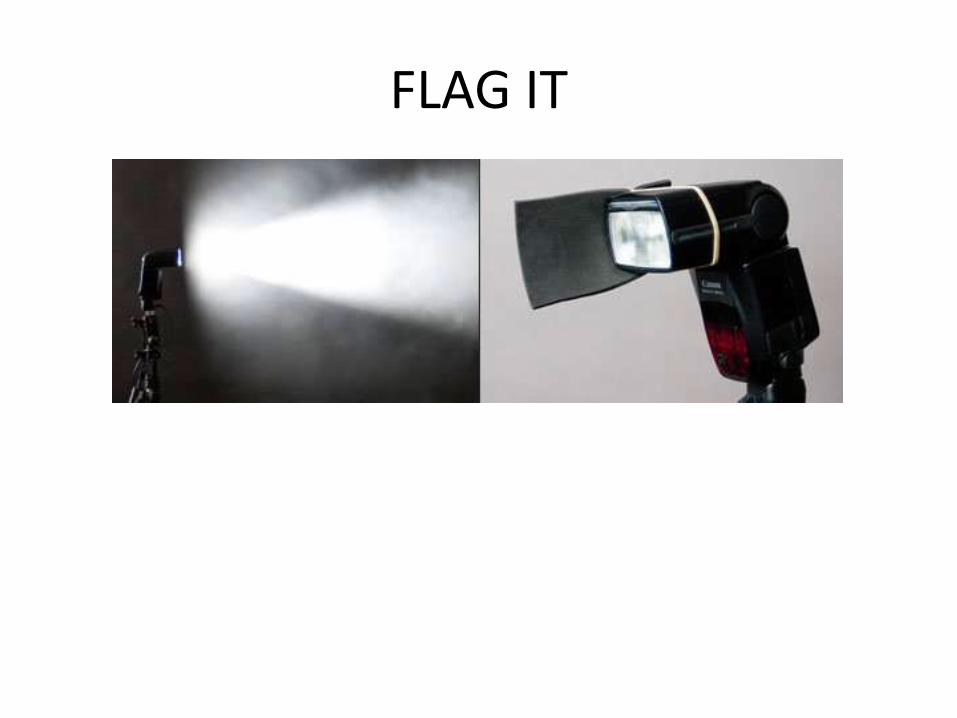
FLAG IT

Make It Bigger.

ADVANTAGES OF AN EXTERNAL FLASH
A cleaner look to the diffusers you use to soften your lighting.
Reflectors can change the angles and intensity of bounced light
A flexibility to the ways you can angle and turn it
Red eye reduction in portraits.
Better illumination of subjects who are farther away.

ADVANTAGES OF AN EXTERNAL FLASH
More control of your lighting.
Added creativity with your lighting.
More options with positioning, tripods, and remotes
Lighting looks more natural.
Varied possibilities to bounce light off walls or ceilings
