light sheet microscopy using zebrafish - lightsheet z...guide, to correctly place it and close the...
TRANSCRIPT

Protocol for
Light sheet microscopy using zebrafish - Lightsheet Z.1
Zebrafish Facility Department of Organismal Biology Uppsala University / SciLifeLab
in collaboration with Biological Visualization (Biovis) Facility
2016
1 Content 1 Content ..................................................................................................................... 2 2 General Introduction ................................................................................................ 2 3 Introduction to LightSheet Microscopy ................................................................... 2 4 Reagents ................................................................................................................... 4 5 Procedure ................................................................................................................. 4
5.1 General instructions .......................................................................................... 4 5.2 Preparation of your sample ............................................................................... 5 5.3 Initiation of the system and the software .......................................................... 5 5.4 Sample mounting .............................................................................................. 5
5.4.1 Glass capillaries: ........................................................................................ 5 5.4.2 FEP tubes: .................................................................................................. 6
5.5 Sample placing .................................................................................................. 7 5.5.1 Glass capillaries ......................................................................................... 7 5.5.2 FEP tubes: .................................................................................................. 8
6 References ................................................................................................................ 8
2 General Introduction The light sheet microscope is located at the BioVis facility. For further detailed information about the facility see http://www.biovis.medfarm.uu.se/ and the Light Sheet Microscope http://www.biovis.medfarm.uu.se/technology/microscopy/zeiss-lightsheet-z.1/. For using the instrument read information on the homepage and contact Dirk Pacholsky (email: [email protected]). Also, read the rules of the room and turning ON/OFF the whole microscope set up (above the microscope) before using and fill in the logbook.
3 Introduction to LightSheet Microscopy
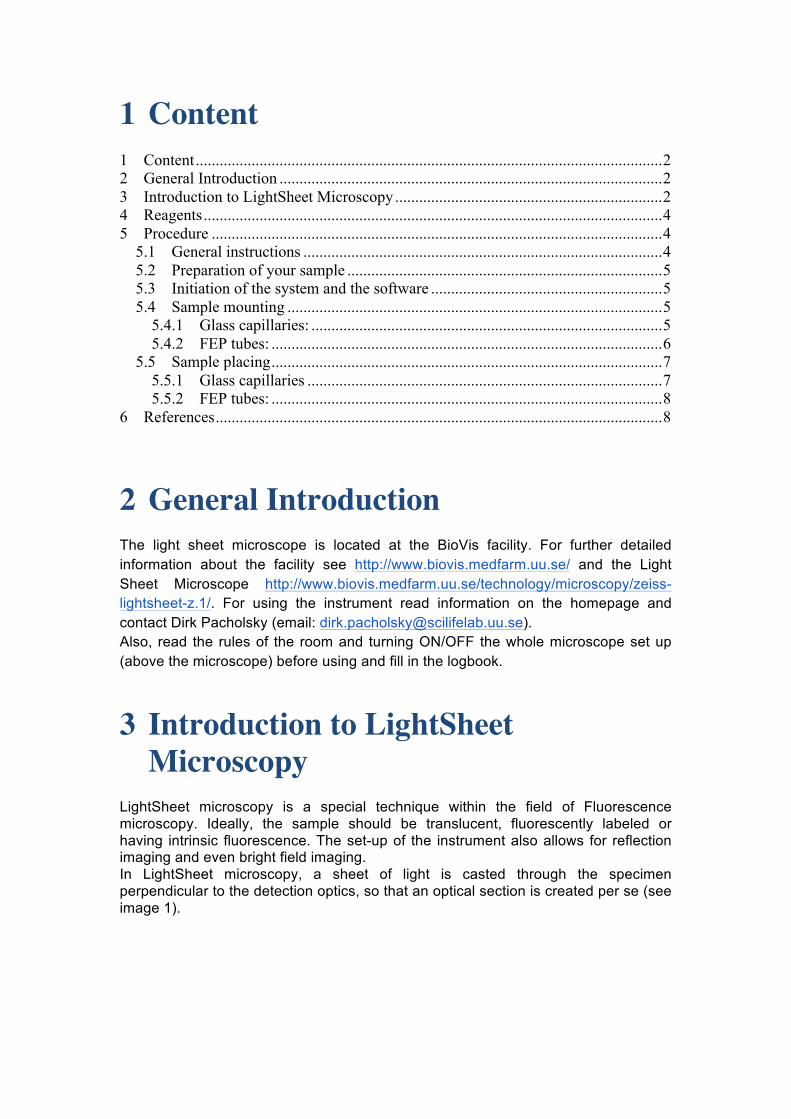
LightSheet microscopy is a special technique within the field of Fluorescence microscopy. Ideally, the sample should be translucent, fluorescently labeled or having intrinsic fluorescence. The set-up of the instrument also allows for reflection imaging and even bright field imaging. In LightSheet microscopy, a sheet of light is casted through the specimen perpendicular to the detection optics, so that an optical section is created per se (see image 1).
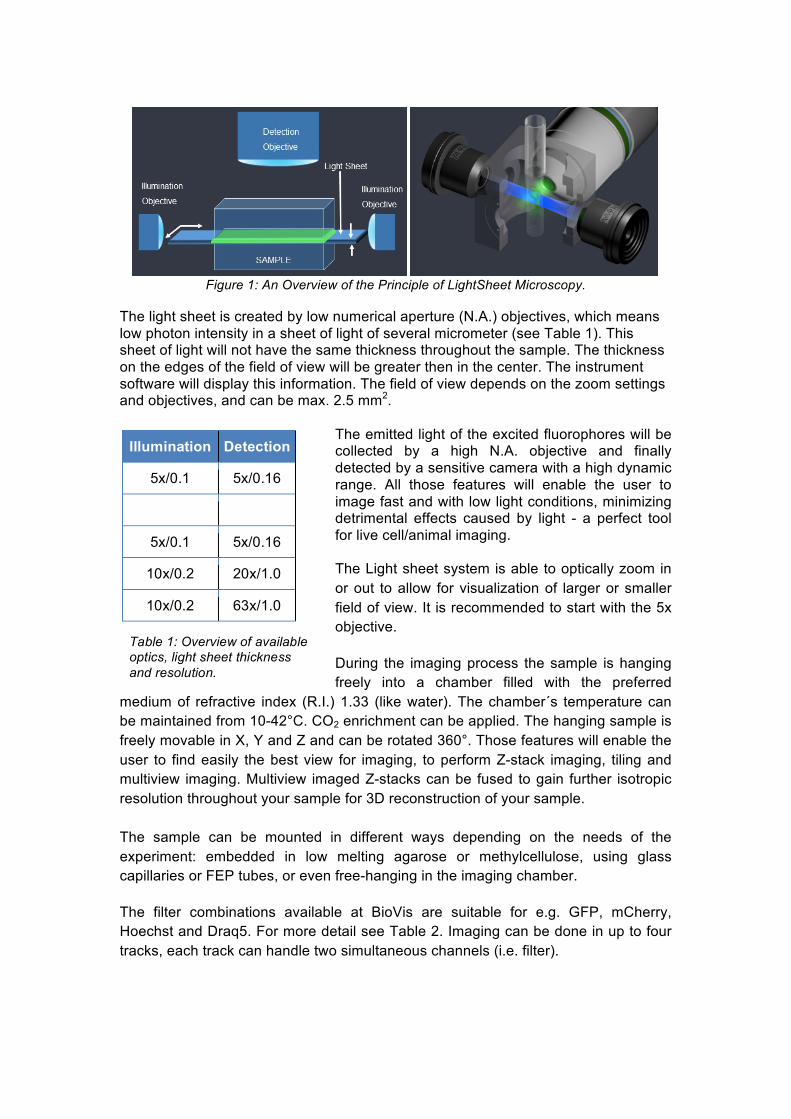
Figure 1: An Overview of the Principle of LightSheet Microscopy. The light sheet is created by low numerical aperture (N.A.) objectives, which means low photon intensity in a sheet of light of several micrometer (see Table 1). This sheet of light will not have the same thickness throughout the sample. The thickness on the edges of the field of view will be greater then in the center. The instrument software will display this information. The field of view depends on the zoom settings and objectives, and can be max. 2.5 mm2.
The emitted light of the excited fluorophores will be collected by a high N.A. objective and finally detected by a sensitive camera with a high dynamic range. All those features will enable the user to image fast and with low light conditions, minimizing detrimental effects caused by light - a perfect tool for live cell/animal imaging. The Light sheet system is able to optically zoom in or out to allow for visualization of larger or smaller field of view. It is recommended to start with the 5x objective. During the imaging process the sample is hanging freely into a chamber filled with the preferred
medium of refractive index (R.I.) 1.33 (like water). The chamber´s temperature can be maintained from 10-42°C. CO2 enrichment can be applied. The hanging sample is freely movable in X, Y and Z and can be rotated 360°. Those features will enable the user to find easily the best view for imaging, to perform Z-stack imaging, tiling and multiview imaging. Multiview imaged Z-stacks can be fused to gain further isotropic resolution throughout your sample for 3D reconstruction of your sample. The sample can be mounted in different ways depending on the needs of the experiment: embedded in low melting agarose or methylcellulose, using glass capillaries or FEP tubes, or even free-hanging in the imaging chamber. The filter combinations available at BioVis are suitable for e.g. GFP, mCherry, Hoechst and Draq5. For more detail see Table 2. Imaging can be done in up to four tracks, each track can handle two simultaneous channels (i.e. filter).
Illumination Detection
5x/0.1 5x/0.16
5x/0.1 5x/0.16
10x/0.2 20x/1.0
10x/0.2 63x/1.0 Table 1: Overview of available optics, light sheet thickness and resolution.

Filterwheel Filter I combi
Filter II combi
Filter III combi
Bright Field or Reflection
5x RGB Red/Green/Blue
DAPI - GFP (420-470) (505-545)
DAPI - RFP (420-470) (575-615)
GFP - RFP (505-545) (575-615)
yes
GRF Green/Red/FarRed
GFP - mCherry (505-545) (LP585)
GFP - Draq5 (505-545) (LP660)
GFP- mCherry (505- 530) (LP585)
yes
Table 2: Overview of available filter combinations, and filterwheels.
4 Reagents
Reagents Consumption
Tricaine solution (Ethyl-3 aminobenzoate methanesulfunate salt)*
ca. 2ml/fish
Low melting agarose 0,8%* Low melting agarose 0,1%* Low melting agarose 1,5%* Methylcellulose 3% E3 medium (or fish system water without methylene blue)*
ca. 1 ml/5 embryos ca. 1 ml/5 embryos ca. 1 ml/5 embryos ca. 1 ml/5 embryos ca. 100 ml
for FEP tubes: 1 ml syringes (BD Plastipak) Needles (BD Microlance 3 / 0,8x16mm) Note: Some syringes or needles need a little trimming on the sites to fit the sample holder.
Table 3: Overview of reagents. *not provided unless specifically requested.
5 Procedure
5.1 General instructions • In the LightSheet Microscope Zeiss Z.1 you use a chamber that can be filled
with water and you will place the zebrafish vertically in the chamber. • Keep in mind that the laser light will come from the sides and the objective
capture images in a 90° angle to the light (see Fig 1).

5.2 Preparation of your sample • Choose your samples of interest (you need a fluorescent marker in order to
image zebrafish in the LightSheet Microscope). • If you don’t use a homozygous transgenic fish line, do not forget to select
fluorescent positive embryos. • If you use embryos, dechorionate them. • Take fresh zebrafish system water (without methylene blue) or E3 medium
with you as well as tricaine to anesthetize the embryos.
5.3 Initiation of the system and the software • The dissembling and the preparation of the chamber are described in
“QuickGuide LightSheet”. • Follow the instructions of the facility for turning on the system. • Initiate the ZEN software, “start system” and follow the instructions. • Set the temperature for long term imaging to 26°C upon arrival, so the system
can heat up and stabilize temperature (for details see “QuickGuide LightSheet”).
5.4 Sample mounting • You can choose to mount your samples in glass capillaries or FEP tubes.
Glass capillary FEP tube
0.8 -1.2 % low melting agarose 0.1 – 0.5 % low melting agarose or 3% methylcellulose
Fine for single time point acquisition Better for long term imaging
Table 4: Overview of mounting options
5.4.1 Glass capillaries: • Take an aliquot of agarose (see stock
preparations) from 4°C and place it in the heating block on 100°C. Once liquid, move it to 37°C.
• Add tricaine (30 µl to ca. 1 ml agarose), flick the tube, put back on 37°C.
• Place your fluorescent embryos/larvae in a petri dish with about 30 ml of E3 medium (or fish system water) and add 1 ml of tricaine to anesthetize them.
• Select the embryos/larvae to be imaged with a stereomicroscope.
• Take a black glass capillary (Fig 2B), hold the capillary at the non-marked end and insert the plunger (Fig 2A).
Figure 2: Black glass capillary (A) and plunger (B)

CRITICAL STEP The following 3 steps should be performed fast, before agarose solidification.
• Take one agarose aliquot (with tricaine) from the heating block and add one selected embryo/larva (with a plastic pipette). Try to add as little water as possible. Let the embryo/larva sink in the agarose.
• Transfer the embryo/larvae with agarose to a small petridish, take the glass capillary with the plunger inside, position it in the agarose close to the embryo/larva.
• Pull the plunger and suck up some agarose first followed by the embryo/ larva (Fig 3). Think about your desired position of the embryo/larva (often the head should be down).
• Suck the embryo up until it is situated ca. 2-3 mm above the end of the glass capillary (see Fig 3).
• Roll the capillary between your fingers, before the agarose sets, so that the larva ends up in the center of the agarose cylinder. Wait for ca. 2 minutes to solidify.
5.4.2 FEP tubes: • Clean the FEP tubes (Kaufman et
al., 2012) and cut them into ca. 2 cm long pieces.
• Take a 1 ml syringe and attach a needle.
• Attach a FEP tube piece carefully to the needle (Fig 4).
• Heat some 1% agarose and poor it in a petridish approximately 2 mm high and let it solidify.
• If using agarose, take an aliquot from 4°C and place it in the heating block on 100°C. Once liquid, move it to 28°C.
• If using 3% methylcellulose, take out aliquot from 4°C and put it on 28°C.
• Add tricaine (30 µl to ca 1 ml agarose), flick the tube, put back on 28°C. • Place your fluorescent embryos/larvae in a petri dish with about 30 ml of E3
medium (or fish system water) and add 1 ml of tricaine to anesthetize them. • Select the embryos/larvae to be imaged with a stereomicroscope. • Take one agarose or methylcellulose aliquot (with tricaine) from the heating
block and add one selected embryo/larva (with a plastic pipette). Try to add as little water as possible. Let the embryo/larva sink in the agarose/methylcellulose.
• With the same pipette, transfer the embryo/larva to a small petridish.
Figure 3: Black glass capillary and plunger with zebrafish larvae
Figure 4: FEP tube

• Take the FEP tube attached to the syringe and under the stereomicroscope pull the plunger carefully to suck up first some agarose and then the embryo/larva.
• Keep in mind to position the embryo for long term imaging head down (suck up tail first).
• After the embryo there should be only very little agarose/methylcellulose. • Close the open end of the FEP tube with a plug by carefully pressing the FEP
tube in the earlier prepared 1% agarose layer (hold plate and syringe vertically).
5.5 Sample placing 5.5.1 Glass capillaries
• Find the correct sample holder for capillaries as well as the stem parts – cylinder and lock (Fig 5).
• Use the color code to know which teflon pieces to use (Fig 6A). For example, if using the black capillary, use two of the black teflon pieces and insert them in the open cylinder, with the beveled and slit ends pointing towards the outside.
• Screw the lock loosely in the cylinder, and assemble them in the holder.
• Insert the capillary with the sample facing down through the lock into the cylinder, holding the capillary and NOT the plunger, until you see the black mark coming out of the cylinders beveled end (Fig 6C).
• The capillary at this point is loose, so be careful not to drop it. • Fasten the lock finger tight. • Introduce the sample in the top part of the LS Z.1, using the white lines as
guide, to correctly place it and close the lid (for more details see “QuickGuide LightSheet”).
Figure 6: Black teflon pieces (A), schematic drawing of assembly (B) and sample holder with inserted glass capillary with mounted fish (C).
Figure 5 : Sample holder
A B C

5.5.2 FEP tubes: • Take the syringe sample holder for FEP tubes containing a rubber and metal
O-ring. • Insert the syringe and turn it until it locks onto the holder. • Introduce the sample in the top part of the LS Z.1, using the white lines as
guide, to correctly place it and close the lid. For more details you can check ZEISS Lightsheet Z.1 Quick Guide: ”Sample Holder Universal for Capillaries, Clearing and Large Samples”.
6 References Kaufmann, A., Mickoleit M., Weber M. Huisken J.; Multilayer mounting enables long term imaging of zebrafish development in a light sheet microscope. Development 2012