limited liability statement - otronix.com · sample timing ... manual revision 002 section 1:...
TRANSCRIPT
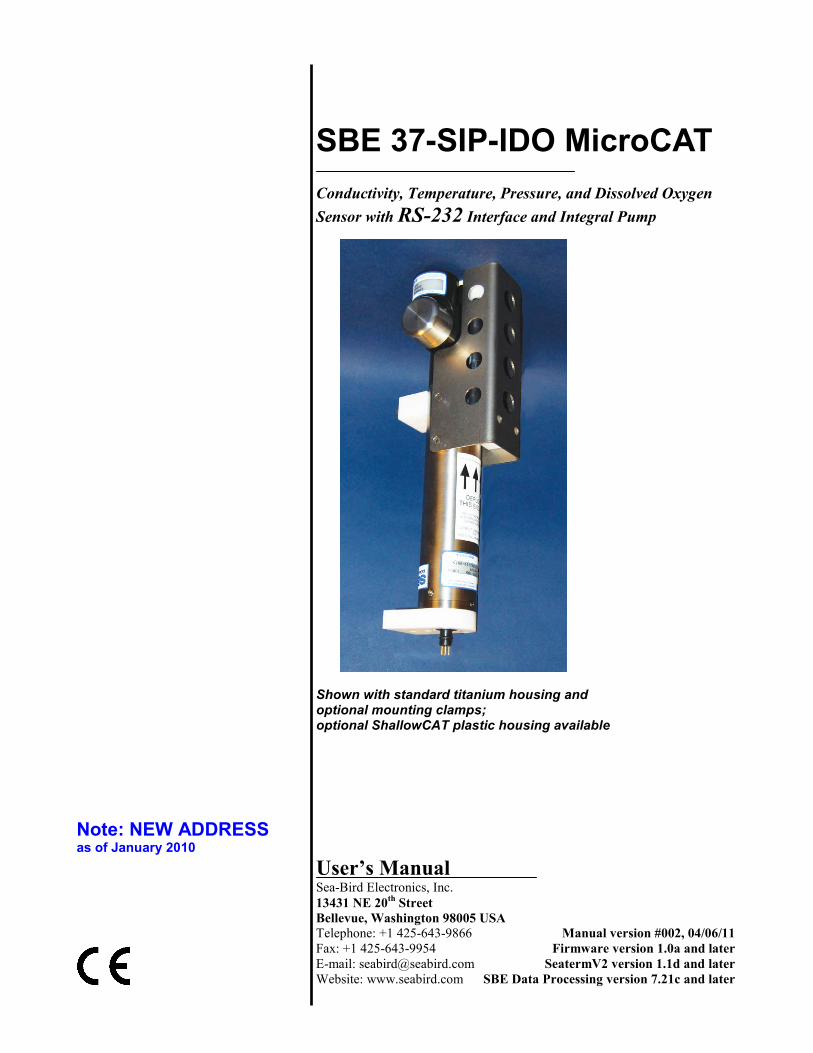
SBE 37-SIP-IDO MicroCAT Conductivity, Temperature, Pressure, and Dissolved Oxygen Sensor with RS-232 Interface and Integral Pump
Shown with standard titanium housing and optional mounting clamps; optional ShallowCAT plastic housing available
Note: NEW ADDRESS as of January 2010
User’s Manual Sea-Bird Electronics, Inc. 13431 NE 20th Street Bellevue, Washington 98005 USA Telephone: +1 425-643-9866 Manual version #002, 04/06/11 Fax: +1 425-643-9954 Firmware version 1.0a and later E-mail: [email protected] SeatermV2 version 1.1d and later Website: www.seabird.com SBE Data Processing version 7.21c and later

2
Limited Liability Statement
Extreme care should be exercised when using or servicing this equipment. It should be used or serviced only by personnel with knowledge of and training in the use and maintenance of oceanographic electronic equipment.
SEA-BIRD ELECTRONICS, INC. disclaims all product liability risks arising from the use or servicing of this system. SEA-BIRD ELECTRONICS, INC. has no way of controlling the use of this equipment or of choosing the personnel to operate it, and therefore cannot take steps to comply with laws pertaining to product liability, including laws which impose a duty to warn the user of any dangers involved in operating this equipment. Therefore, acceptance of this system by the customer shall be conclusively deemed to include a covenant by the customer to defend, indemnify, and hold SEA-BIRD ELECTRONICS, INC. harmless from all product liability claims arising from the use or servicing of this system.

Manual revision 002 Table of Contents SBE 37-SIP-IDO RS-232
3
Table of Contents Section 1: Introduction ....................................................................... 5 About this Manual .............................................................................................5 Quick Start .........................................................................................................5 Unpacking MicroCAT .......................................................................................6
Section 2: Description of MicroCAT .................................................. 7 System Description ............................................................................................7 Specifications .....................................................................................................9 Dimensions and End Cap Connector ............................................................... 10 Pump Operation ............................................................................................... 11 Sample Timing ................................................................................................. 13 Power Consumption ......................................................................................... 13 Baud Rate, Cable Length, Power, and Data Transmission Rate ...................... 15
Section 3: Preparing MicroCAT for Deployment ........................... 18 Software Installation ........................................................................................ 18 Power and Communications Test .................................................................... 18
Test Setup ................................................................................................. 18 Test ........................................................................................................... 19
Section 4: Deploying and Operating MicroCAT ............................. 24 Sampling Modes .............................................................................................. 24
Polled Sampling ........................................................................................ 25 Autonomous Sampling (Logging commands) .......................................... 26 Serial Line Synchronization (Serial Line Sync) ....................................... 27
Timeout Description ........................................................................................ 30 Command Descriptions .................................................................................... 30 Data Formats .................................................................................................... 48 Optimizing Data Quality / Deployment Orientation ........................................ 50 Setup for Deployment ...................................................................................... 51 Deployment ...................................................................................................... 51 Recovery .......................................................................................................... 53 Uploading and Processing Data ....................................................................... 54
Section 5: Routine Maintenance and Calibration ........................... 61 Corrosion Precautions ...................................................................................... 61 Connector Mating and Maintenance ................................................................ 61 Conductivity Cell and Dissolved Oxygen Sensor Maintenance ...................... 62 Plumbing Maintenance .................................................................................... 62 Handling Instructions for Plastic ShallowCAT Option .................................... 63 Pressure Sensor (optional) Maintenance .......................................................... 63 Replacing Anti-Foulant Devices – Mechanical Design Change ...................... 64 Replacing Anti-Foulant Devices (SBE 37-SI, SM, IM) ................................... 65 Sensor Calibration ............................................................................................ 66
Section 6: Troubleshooting ................................................................ 68 Problem 1: Unable to Communicate with MicroCAT ..................................... 68 Problem 2: No Data Recorded ......................................................................... 68 Problem 3: Unreasonable T, C, P, or D.O. Data .............................................. 68 Problem 4: Salinity Spikes ............................................................................... 69

Manual revision 002 Table of Contents SBE 37-SIP-IDO RS-232
4
Glossary .............................................................................................. 70
Appendix I: Functional Description ................................................. 72 Sensors ............................................................................................................. 72 Sensor Interface ............................................................................................... 72 Real-Time Clock .............................................................................................. 72
Appendix II: Command Summary ................................................... 73
Appendix III: AF24173 Anti-Foulant Device .................................. 76
Appendix IV: Replacement Parts ..................................................... 80
Appendix V: Manual Revision History ............................................ 81
Index .................................................................................................... 82

Manual revision 002 Section 1: Introduction SBE 37-SIP-IDO RS-232
5
Section 1: Introduction This section includes a Quick Start procedure, photos of a standard MicroCAT shipment.
About this Manual This manual is to be used with the SBE 37-SIP-IDO MicroCAT Conductivity, Temperature, and Dissolved Oxygen Sensor (pressure optional) with RS-232 Serial interface and integral Pump. It is organized to guide the user from installation through operation and data collection. We’ve included detailed specifications, command descriptions, maintenance and calibration information, and helpful notes throughout the manual. Sea-Bird welcomes suggestions for new features and enhancements of our products and/or documentation. Please contact us with any comments or suggestions ([email protected] or 425-643-9866). Our business hours are Monday through Friday, 0800 to 1700 Pacific Standard Time (1600 to 0100 Universal Time) in winter and 0800 to 1700 Pacific Daylight Time (1500 to 0000 Universal Time) the rest of the year.
Quick Start Follow these steps to get a Quick Start using the MicroCAT. The manual provides step-by-step details for performing each task: 1. Perform pre-check procedures to test power and communications
(Section 3: Preparing MicroCAT for Deployment). 2. Deploy the MicroCAT (Section 4: Deploying and Operating MicroCAT):
A. Ensure all data has been uploaded, and then send InitLogging to make entire memory available for recording if desired.
B. Set date and time (DateTime=), and establish setup and logging parameters.
C. Check status (DS) and calibration coefficients (DC) to verify setup. D. Remove conductivity cell guard, and verify AF24173 Anti-Foulant
Devices are installed. Replace conductivity cell guard. E. Install I/O cable connector and locking sleeve. F. Deploy MicroCAT, using Sea-Bird or customer-supplied hardware.
For most applications, mount the MicroCAT with the connector at the bottom for proper operation.
G. If desired, save real-time data to a file, using Seaterm232’s Capture function or your own software.
H. Upload data from memory.

Manual revision 002 Section 1: Introduction SBE 37-SIP-IDO RS-232
6
Unpacking MicroCAT Shown below is a typical MicroCAT shipment.
Spare hardware and o-ring kit
Conductivity cell cleaning solution (Triton-X)
Software, and Electronic Copies of Software Manuals and User Manual
I/O cable
SBE 37-SIP-IDO MicroCAT
MicroCAT User Manual
SBE 37-SIP-IDO MicroCAT
Manual revision 002 Section 2: Description of MicroCAT SBE 37-SIP-IDO RS-232
7
Section 2: Description of MicroCAT This section describes the functions and features of the SBE 37-SIP-IDO MicroCAT, including specifications, dimensions, end cap connectors, sample timing, power consumption, and baud rate and cable length considerations.
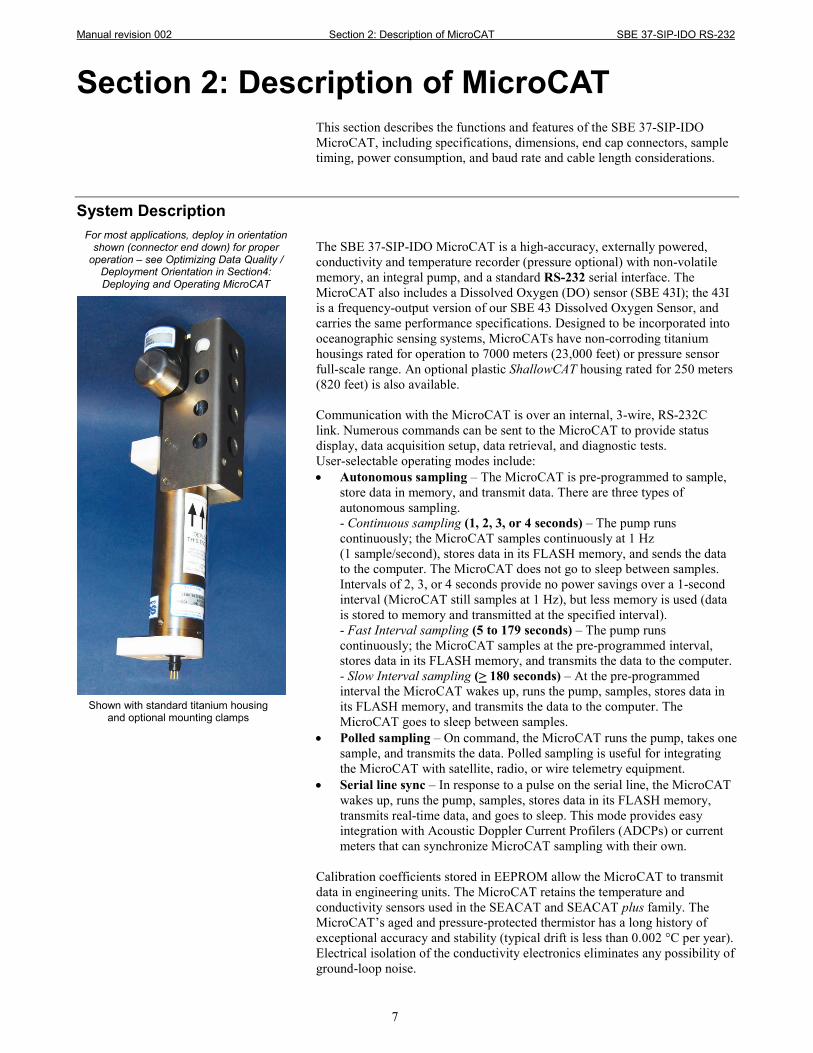
System Description The SBE 37-SIP-IDO MicroCAT is a high-accuracy, externally powered, conductivity and temperature recorder (pressure optional) with non-volatile memory, an integral pump, and a standard RS-232 serial interface. The MicroCAT also includes a Dissolved Oxygen (DO) sensor (SBE 43I); the 43I is a frequency-output version of our SBE 43 Dissolved Oxygen Sensor, and carries the same performance specifications. Designed to be incorporated into oceanographic sensing systems, MicroCATs have non-corroding titanium housings rated for operation to 7000 meters (23,000 feet) or pressure sensor full-scale range. An optional plastic ShallowCAT housing rated for 250 meters (820 feet) is also available. Communication with the MicroCAT is over an internal, 3-wire, RS-232C link. Numerous commands can be sent to the MicroCAT to provide status display, data acquisition setup, data retrieval, and diagnostic tests. User-selectable operating modes include: • Autonomous sampling – The MicroCAT is pre-programmed to sample,
store data in memory, and transmit data. There are three types of autonomous sampling. - Continuous sampling (1, 2, 3, or 4 seconds) – The pump runs continuously; the MicroCAT samples continuously at 1 Hz (1 sample/second), stores data in its FLASH memory, and sends the data to the computer. The MicroCAT does not go to sleep between samples. Intervals of 2, 3, or 4 seconds provide no power savings over a 1-second interval (MicroCAT still samples at 1 Hz), but less memory is used (data is stored to memory and transmitted at the specified interval). - Fast Interval sampling (5 to 179 seconds) – The pump runs continuously; the MicroCAT samples at the pre-programmed interval, stores data in its FLASH memory, and transmits the data to the computer. - Slow Interval sampling (> 180 seconds) – At the pre-programmed interval the MicroCAT wakes up, runs the pump, samples, stores data in its FLASH memory, and transmits the data to the computer. The MicroCAT goes to sleep between samples.
• Polled sampling – On command, the MicroCAT runs the pump, takes one sample, and transmits the data. Polled sampling is useful for integrating the MicroCAT with satellite, radio, or wire telemetry equipment.
• Serial line sync – In response to a pulse on the serial line, the MicroCAT wakes up, runs the pump, samples, stores data in its FLASH memory, transmits real-time data, and goes to sleep. This mode provides easy integration with Acoustic Doppler Current Profilers (ADCPs) or current meters that can synchronize MicroCAT sampling with their own.
Calibration coefficients stored in EEPROM allow the MicroCAT to transmit data in engineering units. The MicroCAT retains the temperature and conductivity sensors used in the SEACAT and SEACAT plus family. The MicroCAT’s aged and pressure-protected thermistor has a long history of exceptional accuracy and stability (typical drift is less than 0.002 °C per year). Electrical isolation of the conductivity electronics eliminates any possibility of ground-loop noise.
For most applications, deploy in orientation shown (connector end down) for proper
operation – see Optimizing Data Quality / Deployment Orientation in Section4: Deploying and Operating MicroCAT
Shown with standard titanium housing and optional mounting clamps

Manual revision 002 Section 2: Description of MicroCAT SBE 37-SIP-IDO RS-232
8
The MicroCAT’s internal-field conductivity cell is immune to proximity errors and unaffected by external fouling. The conductivity cell guard retains the expendable AF24173 Anti-Foulant Devices. The MicroCAT’s integral pump runs each time the MicroCAT takes a sample, providing the following advantages over a non-pumped system: • Improved conductivity and oxygen response – The pump flushes the
previously sampled water from the conductivity cell and oxygen sensor plenum, and brings a new water sample quickly into the system.
• Reduced fouling – Water does not freely flow through the conductivity
cell and oxygen sensor plenum between samples, minimizing fouling. With Adaptive Pump Control, the MicroCAT calculates the pump run time for best dissolved oxygen accuracy, as a function of the temperature and pressure of the previous sample. Note that the MicroCAT was designed to be deployed as shown, with the sensor end up, providing an inverted U-shape for the flow. This orientation prevents sediment from being trapped in the plumbing. An air bleed hole allows air to escape from the plumbing, so the pump will prime. See Optimizing Data Quality / Deployment Orientation in Section 4: Deploying and Operating MicroCAT. The MicroCAT’s optional strain-gauge pressure sensor, is available in the following pressure ranges: 20, 100, 350, 600, 1000, 2000, 3500, and 7000. Compensation of the temperature influence on pressure offset and scale is performed by the SBE MicroCAT’s CPU. Future upgrades and enhancements to the MicroCAT firmware can be easily installed in the field through a computer serial port and the bulkhead connector on the MicroCAT, without the need to return the MicroCAT to Sea-Bird. The MicroCAT is supplied with a powerful software package, SEASOFT© V2, which includes: • SeatermV2 – terminal program for easy communication and data
retrieval. SeatermV2 is a launcher, and launches the appropriate terminal program for the selected instrument (Seaterm232 for RS-232 instruments such as this MicroCAT).
• SBE Data Processing - program for calculation and plotting of
conductivity, temperature, pressure (optional), oxygen, and derived variables such as salinity, sound velocity, depth, density, etc.
Notes: • Help files provide detailed
information on the use of the software.
• A separate software manual on CD-ROM contains detailed information on the setup and use of SBE Data Processing.
• Sea-Bird supplies the current version of our software when you purchase an instrument. As software revisions occur, we post the revised software on our FTP site. See our website (www.seabird.com) for the latest software version number, a description of the software changes, and instructions for downloading the software from the FTP site.
Intake Exhaust
Shown with conductivity cell guard removed
Air bleed hole in top
Oxygen sensor
Anti-Foulant Devices
Conductivity cell
Thermistor

Manual revision 002 Section 2: Description of MicroCAT SBE 37-SIP-IDO RS-232
9
Specifications Temperature (°C) Conductivity Pressure Dissolved Oxygen
Measurement Range -5 to +35 0 to 7
(0 to 70 mS/cm)
0 to full scale range: 20 / 100 / 350 / 600 / 1000/ 2000 / 3500 /
7000 meters (expressed in meters of
deployment depth capability)
120% of surface saturation in all natural waters, fresh and salt
Initial Accuracy 0.002 0.0003 (0.003 mS/cm)
0.1% of full scale range 2% of saturation
Typical Stability 0.0002 / month 0.0003 (0.003 mS/cm) / month
0.05% of full scale range / year 0.5% per 1000 hours
Resolution 0.0001 0.00001 (0.0001 mS/cm)
0.002% of full scale range
0.035% of saturation (corresponds to
0.003 ml/l at 0° C and 35 PSU)
Sensor Calibration (measurement outside these ranges may be at slightly reduced accuracy due to extrapolation errors)
+1 to +32
0 to 6; physical calibration over range
2.6 to 6 S/m, plus zero conductivity (air)
Ambient pressure to full scale range in
5 steps
1, 4, and 7 ml/l (approximate) at
2, 6, 12, 20, 26, and 30 °C (18 points)
Memory 8 Mbyte non-volatile FLASH memory
Data Storage
Conductivity & temperature: 6 bytes/sample (3 bytes each). Oxygen: 3 bytes/sample. Time: 4 bytes/sample. Pressure (optional): 5 bytes/sample.
Recorded Parameters Memory Space (number of samples) C, T, DO, and time 615,000 C, T, P, DO, and time 444,000
Real-Time Clock 32,768 Hz TCXO accurate to ±1 minute/year. External Power 0.25 Amps at 9 - 24 VDC. See External Power.
Power Consumption
• Quiescent: 30 microAmps (0.0004 Watts) • Pump: 0.12 Watts (see Pump Operation for time that pump runs) • CTD-DO Sample Acquisition, with pressure (excluding pump): 0.17 Watts (see Sample Timing for
acquisition time) • CTD-DO Sample Waiting (pump running, not sampling), with pressure (excluding pump):
Receive line valid – 0.056 Watts Receive line not valid – 0.016 Watts
• CTD-DO Between Samples, with pressure: Receive line valid – 0.056 Watts Receive line not valid – 0.0004 Watts
• Communications: 0.065 Watts Housing Material and Depth Rating
Standard: Titanium housing rated at 7000 m (23,000 ft) Optional: Plastic housing rated at 250 m (820 ft)
Weight (without pressure sensor, with mooring guide and clamp)
Standard titanium housing: 3.6 kg (7.9 lbs) in air, 2.3 kg (5.0 lbs) in water
CAUTION: See Section 5: Routine Maintenance and Calibration for handling instructions for the plastic ShallowCAT housing.

Manual revision 002 Section 2: Description of MicroCAT SBE 37-SIP-IDO RS-232
10
Dimensions and End Cap Connector
Note: For most applications, deploy in the orientation shown (connector end down) for proper operation.
Manual revision 002 Section 2: Description of MicroCAT SBE 37-SIP-IDO RS-232
11
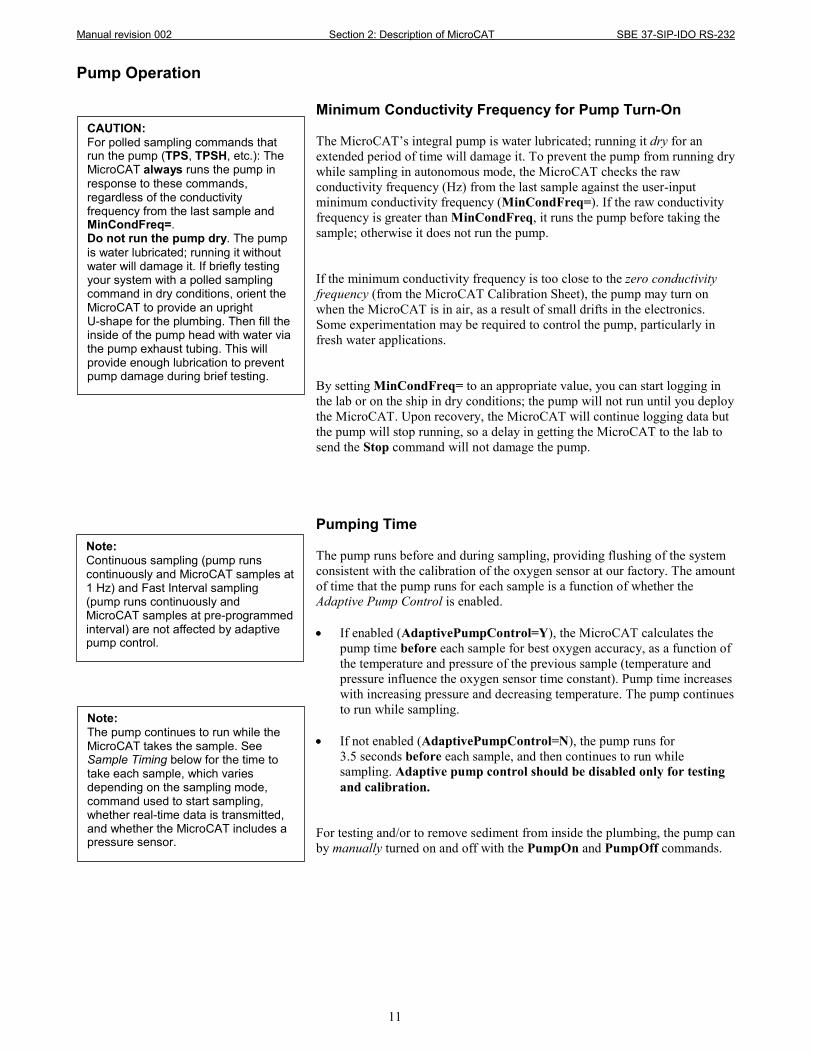
Pump Operation
Minimum Conductivity Frequency for Pump Turn-On The MicroCAT’s integral pump is water lubricated; running it dry for an extended period of time will damage it. To prevent the pump from running dry while sampling in autonomous mode, the MicroCAT checks the raw conductivity frequency (Hz) from the last sample against the user-input minimum conductivity frequency (MinCondFreq=). If the raw conductivity frequency is greater than MinCondFreq, it runs the pump before taking the sample; otherwise it does not run the pump. If the minimum conductivity frequency is too close to the zero conductivity frequency (from the MicroCAT Calibration Sheet), the pump may turn on when the MicroCAT is in air, as a result of small drifts in the electronics. Some experimentation may be required to control the pump, particularly in fresh water applications. By setting MinCondFreq= to an appropriate value, you can start logging in the lab or on the ship in dry conditions; the pump will not run until you deploy the MicroCAT. Upon recovery, the MicroCAT will continue logging data but the pump will stop running, so a delay in getting the MicroCAT to the lab to send the Stop command will not damage the pump. Pumping Time The pump runs before and during sampling, providing flushing of the system consistent with the calibration of the oxygen sensor at our factory. The amount of time that the pump runs for each sample is a function of whether the Adaptive Pump Control is enabled. • If enabled (AdaptivePumpControl=Y), the MicroCAT calculates the
pump time before each sample for best oxygen accuracy, as a function of the temperature and pressure of the previous sample (temperature and pressure influence the oxygen sensor time constant). Pump time increases with increasing pressure and decreasing temperature. The pump continues to run while sampling.
• If not enabled (AdaptivePumpControl=N), the pump runs for
3.5 seconds before each sample, and then continues to run while sampling. Adaptive pump control should be disabled only for testing and calibration.
For testing and/or to remove sediment from inside the plumbing, the pump can by manually turned on and off with the PumpOn and PumpOff commands.
CAUTION: For polled sampling commands that run the pump (TPS, TPSH, etc.): The MicroCAT always runs the pump in response to these commands, regardless of the conductivity frequency from the last sample and MinCondFreq=. Do not run the pump dry. The pump is water lubricated; running it without water will damage it. If briefly testing your system with a polled sampling command in dry conditions, orient the MicroCAT to provide an upright U-shape for the plumbing. Then fill the inside of the pump head with water via the pump exhaust tubing. This will provide enough lubrication to prevent pump damage during brief testing.
Note: The pump continues to run while the MicroCAT takes the sample. See Sample Timing below for the time to take each sample, which varies depending on the sampling mode, command used to start sampling, whether real-time data is transmitted, and whether the MicroCAT includes a pressure sensor.
Note: Continuous sampling (pump runs continuously and MicroCAT samples at 1 Hz) and Fast Interval sampling (pump runs continuously and MicroCAT samples at pre-programmed interval) are not affected by adaptive pump control.

Manual revision 002 Section 2: Description of MicroCAT SBE 37-SIP-IDO RS-232
12
The Adaptive Pump Control algorithm and operation is detailed below. ft = A + (B * T) + (C * T2) fp = e (pcor * P) tau = OxTau20 * ft * fp (minimum tau 2.0, maximum tau 30.0) pump time = 7.0 * tau (minimum pump time 15.0) where A = 2.549 B = -1.106 x 10 -1 C = 1.571 x 10 -3 pcor = 1.45 x 10 -4 OxTau20 = oxygen calibration coefficient (OxTau20=, see calibration sheet) P = measured pressure (decibars) T = measured temperature (°C) Looking at pump times in the range of oceanographic values, and using a typical OxTau20 value of 5.5:
T (°C)
P (db)
Ft Fp Tau (OxTau20=5.5)
Pump Time before sampling (sec)
(OxTau20=5.5) -3 1500 2.89 1.24 19.7 138 -3 0 2.89 1.0 15.9 111 0 0 2.549 1.0 14.0 98 0 1500 2.549 1.24 17.3 121 4 0 2.132 1.0 11.7 82 4 1500 2.132 1.24 14.5 102 20 0 0.9654 1.0 5.3 37 20 1500 0.9654 1.24 6.6 46
Note that the adaptive pump control operation can impact the interval between samples. The total time for each sample is the calculated pump time plus the actual sampling time (the pump continues to run while sampling). The MicroCAT requires a minimum of 3 seconds after taking a sample to the start of the next sampling interval. If the time required to run the pump is too large, it will not be able to take samples at the user-programmed SampleInterval=. If that occurs, the MicroCAT starts the next sampling interval 5 seconds after the end of the previous sampling interval. Sea-Bird recommends that you calculate the expected pumping time based on the algorithm above, the planned deployment pressure, and the worst (i.e., the coldest) expected temperature. Do not set the sample interval (SampleInterval=) to less than (pumping time + sampling time + 5 seconds).
Notes: • If the MicroCAT does not include the
optional pressure sensor, the Adaptive Pump Control algorithm uses ReferencePressure= in place of the measured pressure.
• The standard IDO MicroCAT uses an oxygen sensor with a 1.0-mil membrane. For the 1.0-mil membrane, OxTau20 has a range from 4 – 6.5, with a typical (average) value of 5.5. Check your oxygen calibration sheet for the correct value for your instrument.
• The calculated Pump Time does not include the pumping while sampling.
Note: Continuous sampling (pump runs continuously and MicroCAT samples at 1 Hz) and Fast Interval sampling (pump runs continuously and MicroCAT samples at pre-programmed interval) are not affected by adaptive pump control.
Manual revision 002 Section 2: Description of MicroCAT SBE 37-SIP-IDO RS-232
13
Sample Timing
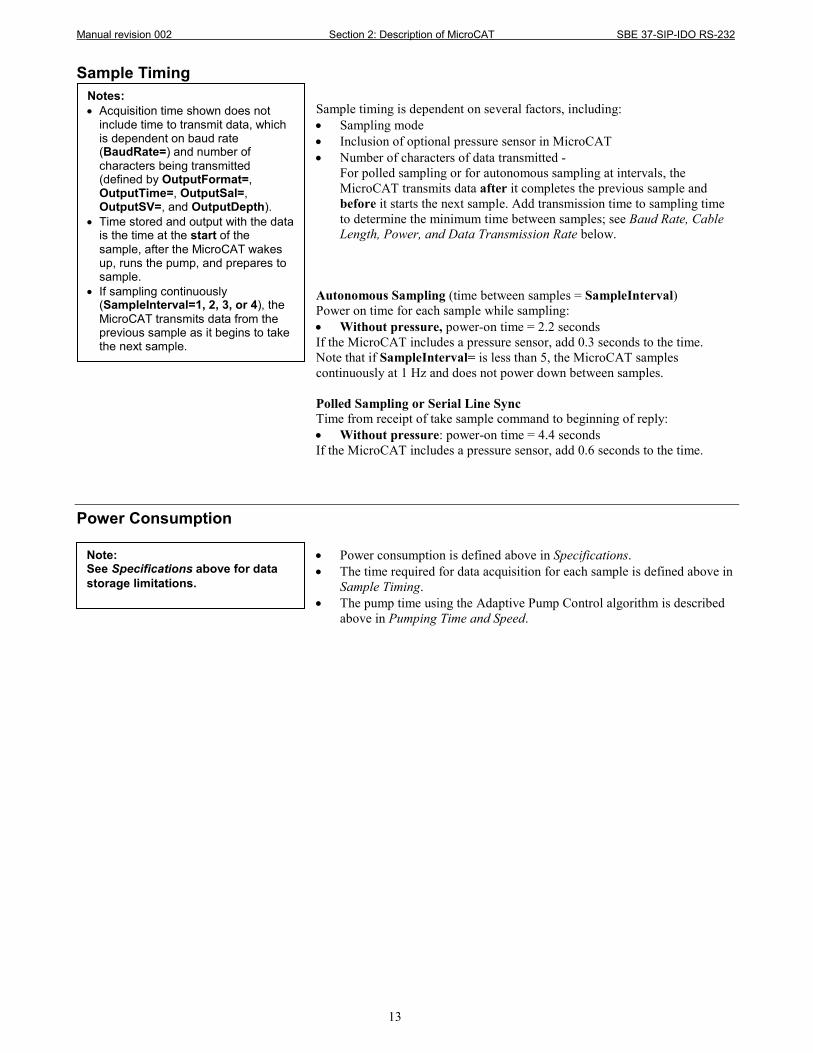
Sample timing is dependent on several factors, including: • Sampling mode • Inclusion of optional pressure sensor in MicroCAT • Number of characters of data transmitted -
For polled sampling or for autonomous sampling at intervals, the MicroCAT transmits data after it completes the previous sample and before it starts the next sample. Add transmission time to sampling time to determine the minimum time between samples; see Baud Rate, Cable Length, Power, and Data Transmission Rate below.
Autonomous Sampling (time between samples = SampleInterval) Power on time for each sample while sampling: • Without pressure, power-on time = 2.2 seconds If the MicroCAT includes a pressure sensor, add 0.3 seconds to the time. Note that if SampleInterval= is less than 5, the MicroCAT samples continuously at 1 Hz and does not power down between samples. Polled Sampling or Serial Line Sync Time from receipt of take sample command to beginning of reply: • Without pressure: power-on time = 4.4 seconds If the MicroCAT includes a pressure sensor, add 0.6 seconds to the time.
Power Consumption • Power consumption is defined above in Specifications. • The time required for data acquisition for each sample is defined above in
Sample Timing. • The pump time using the Adaptive Pump Control algorithm is described
above in Pumping Time and Speed.
Note: See Specifications above for data storage limitations.
Notes: • Acquisition time shown does not
include time to transmit data, which is dependent on baud rate (BaudRate=) and number of characters being transmitted (defined by OutputFormat=, OutputTime=, OutputSal=, OutputSV=, and OutputDepth).
• Time stored and output with the data is the time at the start of the sample, after the MicroCAT wakes up, runs the pump, and prepares to sample.
• If sampling continuously (SampleInterval=1, 2, 3, or 4), the MicroCAT transmits data from the previous sample as it begins to take the next sample.

Manual revision 002 Section 2: Description of MicroCAT SBE 37-SIP-IDO RS-232
14
So, power consumption is highly dependent on the application. Examples are shown below for two sampling schemes.
Example 1: A MicroCAT with pressure is sampling autonomously every 10 minutes (6 samples/hour). The receive line is not valid between samples, to minimize the power required from the controller. Adaptive Pump Control is enabled. The MicroCAT is to be deployed at approximately 500 db; expected temperature there is approximately 10 °C. Oxtau20 (Tau20 on calibration sheet) is 5.5. What is the power consumption? Quiescent = 0.0004 Watts In 1 hour, quiescent consumption ≈ 0.0004 Watts * 3600 seconds/hour = 1.44 Joules/hour CTD-DO Sampling = 0.17 Watts * 2.5 seconds sampling time = 0.425 Joules/sample In 1 hour, sampling consumption = 6 samples/hour * 0.425 Joules/sample = 2.55 Joules/hour Pump ft = A + (B * T) + (C * T2) = 2.549 + (-1.106 x 10 -1 * 10) + (1.571 x 10 -3 * 10 * 10) = 1.600 fp = e (pcor * P) = e (1.45e-4 * 500) = 1.075 tau = OxTau20 * ft * fp = 5.5 * 1.600 * 1.075 = 9.46 Pump Time = 7 * tau = 7 * 9.46 = 66.2 sec (> Minimum Pump Time = 15 sec) From above, pump runs for an additional 2.5 sec while sampling. Pumping, 0.12 Watts * (66.2 + 2.5) seconds = 8.24 Joules/sample In 1 hour, pump consumption = 6 samples/hour * 8.24 Joules/sample = 49.44 Joules/hour CTD-DO Waiting while pump running = 0.016 Watts * 66.2 seconds = 1.06 Joules/sample In 1 hour, consumption = 6 samples * 1.06 Joules/sample = 6.36 Joules/hour CTD-DO Waiting between Samples = 0.0004 Watts * (600 – [66.2 + 2.5]) seconds = 0.21 Joules/sample In 1 hour, consumption = 6 samples/hour * 0.21 Joules/sample = 1.26 Joules/hour Total consumption / hour = 1.44 + 2.55 + 49.44 + 6.36 + 1.26 = 61.0 Joules/hour Example 2: Same as Example 1, but MicroCAT is sampling continuously. What is the power consumption? CTD-DO Sampling = 0.17 Watts * 3600 sec/hour = 612 Joules/hour Pump = 0.12 Watts * 3600 sec/hour = 432 Joules/hour Total consumption / hour = 612 + 432 = 1044 Joules/hour

Manual revision 002 Section 2: Description of MicroCAT SBE 37-SIP-IDO RS-232
15
Baud Rate, Cable Length, Power, and Data Transmission Rate If acquiring real-time data with Seaterm232, click the Capture menu; enter the desired file name in the dialog box, and click Save. Begin sampling. The data displayed in Seaterm232 will be saved to the designated file. Process the data as desired. Note that this file cannot be processed by SBE Data Processing, as it does not have the required headers and format for Sea-Bird’s processing software. To process data with SBE Data Processing, upload the data from the MicroCAT’s memory. Baud Rate, Cable Length, and Data Transmission Rate The rate that data can be transmitted from the MicroCAT is dependent on the amount of data to be transmitted per scan and the serial data baud rate: Time to transmit data = (number of characters * 10 bits/character) / baud rate where number of characters is dependent on the included data and output format (see Data Formats). Add 2 to the number of characters shown in the output format, to account for the carriage return and line feed at the end of each scan. Include decimal points, commas, and spaces when counting characters. For polled sampling or for autonomous sampling at intervals, the MicroCAT transmits data after it has completed the previous sample and before it starts the next sample (see Sample Timing in Section 2: Description of MicroCAT). The length of cable that the MicroCAT can drive to transmit real-time data is also dependent on baud rate. The allowable combinations are:
Maximum Cable Length (meters) Maximum Baud Rate
1600 600 800 1200 400 2400 200 4800 100 9600 50 19200 25 38400 16 57600 8 115200
Notes: • Baud rate is set with BaudRate=. • Output format is set with
OutputFormat=. See Command Descriptions.
Example – How long does it take to transmit data over 800 m for a MicroCAT with optional pressure sensor, OutputFormat=1, OutputDepth=Y, OutputSal=Y, OutputSV=Y, and OutputTime=Y (output depth, salinity, sound velocity, date and time as well as C, T, and P)? With 800 meters of cable, the MicroCAT requires a baud rate of 1200. Number of characters (see Data Formats) = 8(T) + 2(comma & space) + 8(C) + 2(comma & space) + 8(P) + 2(comma & space) + 8(depth) + 2(comma & space) + 8(salinity) + 2(comma & space) + 8(sound velocity) + 2(comma & space) + +11(date) + 2(comma & space) + 8(time)+ 2(carriage return & line feed) = 83 Time required to transmit data = (83 characters * 10 bits/character) / 1200 = 0.69 seconds What is the minimum time between samples for polled sampling? From Sample Timing in Section 2: Description of MicroCAT, for sampling with pressure: Sampling time = 5.0 seconds So, minimum time between polled samples = sampling time + transmission time = 5.0 + 0.69 = 5.69 seconds
Note: If sampling continuously (SampleInterval=1, 2, 3, or 4), the MicroCAT transmits data from the previous sample as it begins to take the next sample.
Manual revision 002 Section 2: Description of MicroCAT SBE 37-SIP-IDO RS-232
16
Power and Cable Length
The MicroCAT is powered from an external source that supplies 0.25 Amps at 9-24 VDC. Electrical isolation of conductivity prevents ground loop noise contamination in the conductivity measurement. There are two issues to consider: • Limiting the IR loss during communication with the ground controller to
1 volt; higher IR loss will prevent the instrument from transmitting real-time data because of the difference in ground potential.
• Supplying enough power at the power source so that sufficient power is available at the instrument after considering IR loss.
Each issue is discussed below. Limiting IR Loss to 1 Volt The limit to cable length is typically reached when the maximum current during communication times the power common wire resistance is more than 1 volt, because the difference in ground potential of the MicroCAT and ground controller prevents the MicroCAT from transmitting real-time data.
V limit = 1 volt = IR limit Maximum cable length = R limit / wire resistance per foot
where I = current required by MicroCAT during communication. The value for I varies, depending on the sampling mode (for power consumption, see Specifications.) – • For all sampling modes except autonomous continuous sampling,
I = 0.065 Watts communications power / 13 Volts = 0.005 Amps = 5 milliAmps.
• For autonomous continuous sampling, the pump runs continuously, including during transmission of data. Therefore, I = (0.065 Watts communications power / 13 Volts) + (0.12 Watts pump power / 5 Volts) = 0.005 Amps + 0.024 Amps = 0.029 Amps = 29 milliAmps
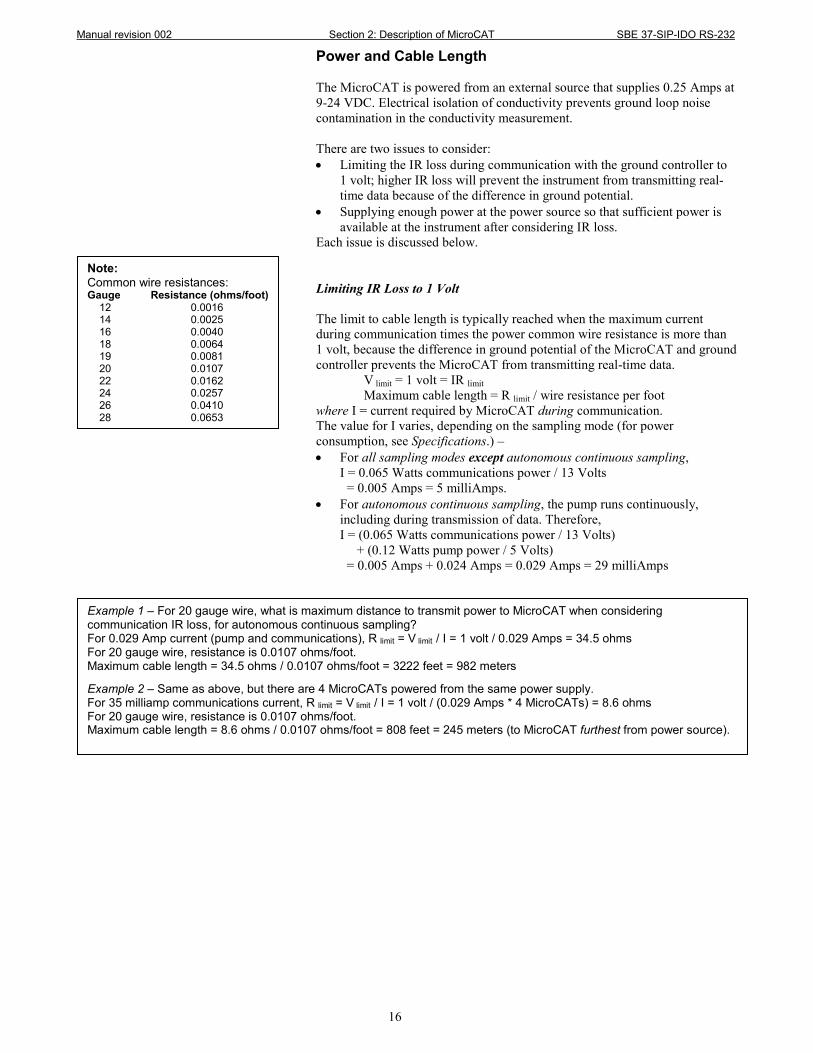
Note: Common wire resistances: Gauge Resistance (ohms/foot)
12 0.0016 14 0.0025 16 0.0040 18 0.0064 19 0.0081 20 0.0107 22 0.0162 24 0.0257 26 0.0410 28 0.0653
Example 1 – For 20 gauge wire, what is maximum distance to transmit power to MicroCAT when considering communication IR loss, for autonomous continuous sampling? For 0.029 Amp current (pump and communications), R limit = V limit / I = 1 volt / 0.029 Amps = 34.5 ohms For 20 gauge wire, resistance is 0.0107 ohms/foot. Maximum cable length = 34.5 ohms / 0.0107 ohms/foot = 3222 feet = 982 meters Example 2 – Same as above, but there are 4 MicroCATs powered from the same power supply. For 35 milliamp communications current, R limit = V limit / I = 1 volt / (0.029 Amps * 4 MicroCATs) = 8.6 ohms For 20 gauge wire, resistance is 0.0107 ohms/foot. Maximum cable length = 8.6 ohms / 0.0107 ohms/foot = 808 feet = 245 meters (to MicroCAT furthest from power source).

Manual revision 002 Section 2: Description of MicroCAT SBE 37-SIP-IDO RS-232
17
Supplying Enough Power to MicroCAT Another consideration in determining maximum cable length is supplying enough power at the power source so that sufficient voltage is available, after IR loss in the cable (from the 0.25 Amp turn-on transient, two-way resistance), to power the MicroCAT. Provide at least 9.0 volts, after IR loss.
V - IR > 9.0 volts where I = MicroCAT turn-on transient (0.25 Amps; see Specifications).
Example 1 – For 20 gauge wire, what is maximum distance to transmit power to MicroCAT if using 12 volt power source and deploying MicroCAT with no batteries? V - IR > 9 volts 12 volts - (0.25 Amps) * (0.0107 ohms/foot * 2 * cable length) > 9 volts 3 volts > (0.25 Amps) * (0.0107 ohms/foot * 2 * cable length) Cable length < 560 ft = 170 meters Note that 170 m << 6568 m (maximum distance if MicroCAT is transmitting real-time data), so IR drop in power is controlling factor for this example. Using a higher voltage power supply or a different wire gauge would increase allowable cable length. Example 2 – Same as above, but there are 4 MicroCATs powered from same power supply. V - IR > 9 volts 12 volts - (0.25 Amps * 4 MicroCATs) * (0.0107 ohms/foot * 2 * cable length) > 9 volts 3 volts > (0.25 Amps * 4 MicroCATs) *(0.0107 ohms/foot * 2 * cable length) Cable length < 140 ft = 42 meters (to MicroCAT furthest from power source)

Manual revision 002 Section 3: Preparing MicroCAT for Deployment SBE 37-SIP-IDO RS-232
18
Section 3: Preparing MicroCAT for Deployment
This section describes the pre-check procedure for preparing the MicroCAT for deployment. Installation of Sea-Bird software, and testing power and communications are discussed.
Software Installation
Sea-Bird recommends the following minimum system requirements for installing the software: Windows 2000 or later, 500 MHz processor, 256 MB RAM, and 90 MB free disk space for installation. Although SEASOFT V2 was designed to work with a PC running Win 2000/XP; extensive testing has not shown any compatibility problems when using the software with a PC running Windows Vista or Windows 7 (32-bit).
If not already installed, install Sea-Bird software programs on your computer using the supplied software CD: 1. Insert the CD in your CD drive. 2. Install software: Double click on SeasoftV2_date.exe (date is the date that
version of the software was created). Follow the dialog box directions to install the software. The installation program allows you to install the desired components. Install all the components, or just install SeatermV2 (terminal program launcher for the MicroCAT) and SBE Data Processing (data processing).
The default location for the software is c:\Program Files\Sea-Bird. Within that folder is a sub-directory for each program.
Power and Communications Test The power and communications test will verify that the system works, prior to deployment. Test Setup
1. Remove dummy plug:
A. By hand, unscrew the locking sleeve from the MicroCAT’s bulkhead connector. If you must use a wrench or pliers, be careful not to loosen the bulkhead connector instead of the locking sleeve.
B. Remove the dummy plug from the MicroCAT’s I/O bulkhead connector by pulling the plug firmly away from the connector.
2. Install the Sea-Bird I/O cable connector Standard Connector - Install the I/O cable connector, aligning the raised bump on the side of the connector with the large pin (pin 1 - ground) on the MicroCAT. OR MCBH Connector – Install the I/O cable connector, aligning the pins.
3. Connect the I/O cable connector to your computer’s serial port. 4. Connect the I/O cable connector’s red (+) and black (-) wires to a power
supply (9 - 24 VDC).
Notes: • Help files provide detailed
information on the use of SeatermV2, Seaterm232, and SBE Data Processing. A separate software manual on the CD-ROM contains detailed information on SBE Data Processing.
• It is possible to use the MicroCAT without the SeatermV2 terminal program by sending direct commands from a dumb terminal or terminal emulator, such as Windows HyperTerminal.
• Sea-Bird supplies the current version of our software when you purchase an instrument. As software revisions occur, we post the revised software on our FTP site. See our website (www.seabird.com) for the latest software version number, a description of the software changes, and instructions for downloading the software from the FTP site.
Locking sleeve
I/O cable

Manual revision 002 Section 3: Preparing MicroCAT for Deployment SBE 37-SIP-IDO RS-232
19
Test 1. Double click on SeatermV2.exe. The main screen looks like this:
SeatermV2 is a launcher, and launches the appropriate terminal program for the selected instrument.
2. In the Instruments menu, select SBE 37 RS232. Seaterm232 opens; the main screen looks like this:
• Menus – For tasks and frequently executed instrument commands. • Send Commands window – Contains commands applicable to your
MicroCAT. The list appears after you connect to the MicroCAT. • Command/Data Echo Area – Title bar of this window shows
Seaterm232’s current comm port and baud rate. Commands and the MicroCAT responses are echoed here. Additionally, a command can be manually typed or pasted (ctrl + V) here. Note that the MicroCAT must be connected and awake for it to respond to a command.
• Status bar – Provides connection, upload, script, and capture status information.
Note: See SeatermV2’s Help files.
If uploading - upload file name.
If sending XML script – script file name
Capture status Progress bar for
uploading data
Status – Ready,
Uploading, Finished
Upload, etc.
Status Bar
Command/Data Echo Area Send Commands Window
Menus
Note: See Seaterm232’s Help files.

Manual revision 002 Section 3: Preparing MicroCAT for Deployment SBE 37-SIP-IDO RS-232
20
Following is a description of the menus:
Menu Description Equivalent Command*
File
• Load command file – opens selected .XML command file, and fills Send Commands window with commands.
• Unload command file – closes command file, and removes commands from Send Commands window.
• Exit - Exit program.
-
Communications
• Configure – Establish communication parameters (comm port and baud rate).
• Connect – connect to comm port. • Disconnect – disconnect from
comm port. • Disconnect and reconnect – may be useful
if instrument has stopped responding.
-
Command
• Abort – interrupt and stop MicroCAT’s response.
• Send 5 second break (for use with Serial Line Sync mode).
• Send stop command. • Set local time– Set date and time to time
sent by timekeeping software on your computer; accuracy ± 25 msec of time provided by computer.
• Set UTC Time (Greenwich Mean Time) – Set date and time to time sent by timekeeping software on your computer; accuracy ± 25 msec of time provided by computer.
• (press Esc key several times for Abort)
• Stop • DateTime=
• DateTime=
Capture
Capture instrument responses on screen to file, to save real-time data or use for diagnostics. File has .cap extension. Click Capture menu again to turn off capture. Capture status displays in Status bar.
—
Upload Upload data stored in memory, in a format that Sea-Bird’s data processing software can use. Uploaded data has .xml extension, and is then automatically converted to a .hex and a .xmlcon file that can be used in SBE Data Processing’s Data Conversion module. Before using Upload: stop logging by sending Stop.
Several status commands and appropriate data upload command as applicable to user
selection of range of data to upload (use Upload
menu if you will be processing data with
SBE Data Processing)
Tools
• Diagnostics log - Keep a diagnostics log. • Convert .XML data file – Using Upload
menu automatically does this conversion; tool is available if there was a problem with the automatic conversion.
• Send script – Send XML script to MicroCAT. May be useful if you have a number of MicroCATs to program with same setup.
-
*See Command Descriptions in Section 4: Deploying and Operating MicroCAT.
Note: SeatermV2 with version < 1.1 did not convert the uploaded .xml data file to a .hex and .xmlcon file. Convert .XML data file in the Tools menu was used to convert the .xml data file to a .cnv file, which could be processed in SBE Data Processing. We recommend that you update your SeatermV2 software to 1.1b or later.

Manual revision 002 Section 3: Preparing MicroCAT for Deployment SBE 37-SIP-IDO RS-232
21
3. If this is the first time Seaterm232 is being used, the configuration dialog box displays:
Make the desired selections, and click OK. 4. Seaterm232 tries to automatically connect to the MicroCAT. As it
connects, it sends GetHD and displays the response, which provides factory-set data such as instrument type, serial number, and firmware version. Seaterm232 also fills the Send Commands window with the correct list of commands for your MicroCAT. If there is no communication: A. In the Communications menu, select Configure. The Serial Port
Configuration dialog box appears. Select the Comm port and baud rate for communication, and click OK. Note that the factory-set baud rate is documented on the Configuration Sheet.
B. In the Communications menu, select Connect (if Connect is grayed out, select Disconnect and reconnect). Seaterm232 will attempt to connect at the baud specified in Step A, but if unsuccessful will then cycle through all other available baud rates.
C. If there is still no communication, check cabling between the computer and MicroCAT, and try to connect again.
D. If there is still no communication, repeat Step A with a different comm port, and try to connect again.
After Seaterm232 displays the GetHD response, it provides an S> prompt to indicate it is ready for the next command.
Note: If OutputExecutedTag=Y, the MicroCAT does not provide an S> prompt after the <Executed/> tag at the end of a command response.
Note: Seaterm232’s baud rate must be the same as the MicroCAT baud rate (set with BaudRate=). Baud is factory-set to 9600, but can be changed by the user (see Command Descriptions in Section 4: Deploying and Operating MicroCAT). Other communication parameters – 8 data bits, 1 stop bit, and no parity – cannot be changed.
Computer COM port and baud rate for communication between computer and MicroCAT. Seaterm232 tries to connect at this baud rate, but if unsuccessful will cycle through all available baud rates.
Manual revision 002 Section 3: Preparing MicroCAT for Deployment SBE 37-SIP-IDO RS-232
22
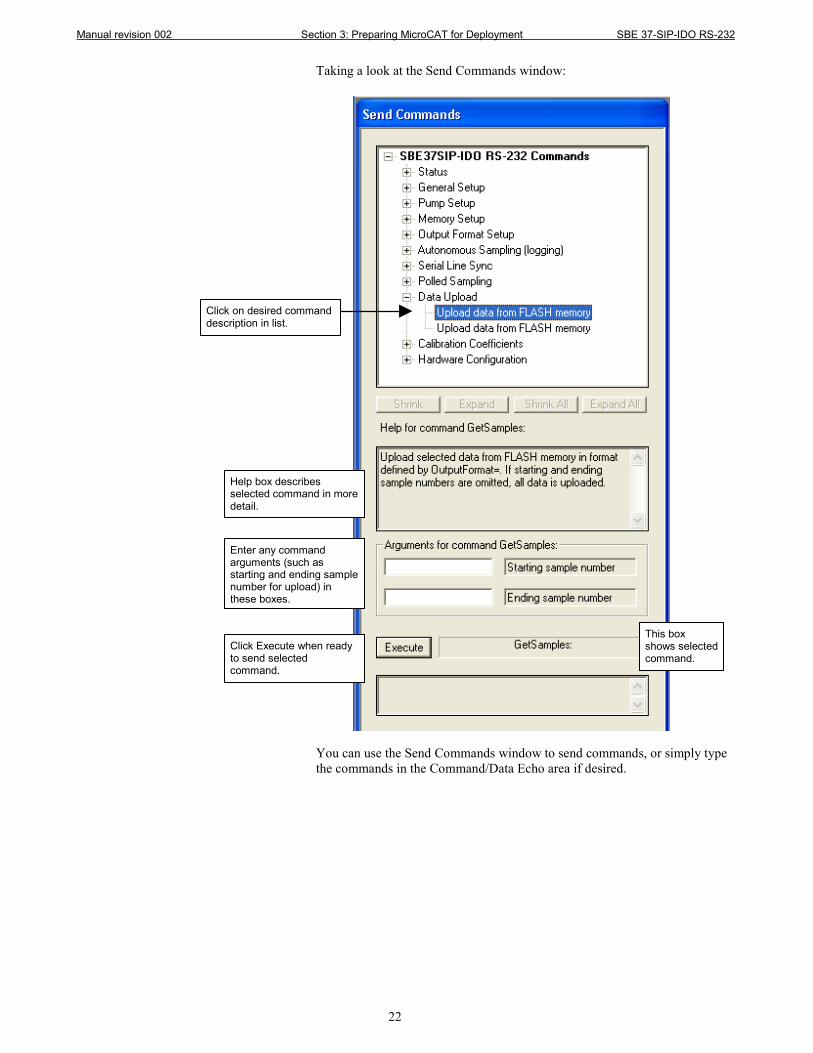
Taking a look at the Send Commands window:
You can use the Send Commands window to send commands, or simply type the commands in the Command/Data Echo area if desired.
Click on desired command description in list.
Help box describes selected command in more detail.
Enter any command arguments (such as starting and ending sample number for upload) in these boxes.
Click Execute when ready to send selected command.
This box shows selected command.

Manual revision 002 Section 3: Preparing MicroCAT for Deployment SBE 37-SIP-IDO RS-232
23
5. Display MicroCAT status information typing DS and pressing the
Enter key. The display looks like this: SBE37SIP-IDO-RS232 V 1.0a SERIAL NO. 12345 20 Apr 2011 00:48:50 vMain = 9.11, vLith = 2.84 auto run = no sync mode = no store data = yes samplenumber = 0, free = 466033 not logging, stop command sample every 6 seconds sample mode is interval, continuous pump adaptive pump control enabled data format = converted engineering output time = yes do not force on RS232 transmitter minimum conductivity frequency = 3000.0
6. Command the MicroCAT to take a sample by typing TS and pressing the
Enter key. The display looks like this (if optional pressure sensor installed, OutputFormat=1, OutputTime=Y, and you are not outputting salinity, sound velocity, or depth):
23.5796, 0.15269, 0.062, 5.355, 20 Apr 2011, 00:49:50
where 23.5796 = temperature in degrees Celsius 0.15269 = conductivity in S/m 0.062 = pressure in decibars 5.355 = dissolved oxygen in ml/l 20 Apr 2011 = date 00:49:50 = time These numbers should be reasonable; i.e., room temperature, zero conductivity, barometric pressure (gauge pressure), current date and time (shipped from the factory set to Pacific Daylight or Standard Time).
7. Command the MicroCAT to go to sleep (quiescent state) by typing QS and pressing the Enter key.
The MicroCAT is ready for programming and deployment.
Notes: • You may need to send the
Stop command (type Stop and press the Enter key) to interrupt sampling, depending on how the instrument was set up the last time it was used. You may need to send Stop several times to get the MicroCAT to respond.
• The MicroCAT automatically enters quiescent (sleep) state after 2 minutes without receiving a command. This timeout algorithm is designed to conserve power consumption if the user does not send QS to put the MicroCAT to sleep. If the system does not appear to respond, select Connect in the Communications menu to reestablish communications.
CAUTION: For polled sampling commands that run the pump (TPS, TPSH, etc.): The MicroCAT always runs the pump in response to these commands, regardless of the conductivity frequency from the last sample and the setting for MinCondFreq=. Do not run the pump dry. The pump is water lubricated; running it without water will damage it. If briefly testing your system with polled sampling commands in dry conditions, orient the MicroCAT to provide an upright U-shape for the plumbing. Then fill the inside of the pump head with water via the pump exhaust tubing. This will provide enough lubrication to prevent pump damage during brief testing.

Manual revision 002 Section 4: Deploying and Operating MicroCAT SBE 37-SIP-IDO RS-232
24
Section 4: Deploying and Operating MicroCAT
This section includes: • System operation with example sets of operation commands • Timeout description • Detailed command descriptions • Data output formats • Optimizing data quality / deployment orientation • Deploying and recovering the MicroCAT • Uploading and processing data from the MicroCAT’s memory
Sampling Modes
The MicroCAT has several basic sampling modes for obtaining data: • Polled Sampling • Autonomous Sampling • Serial Line Synchronization Data is transmitted real-time. For Autonomous sampling or Serial Line Sync sampling, data can also be saved to the MicroCAT’s FLASH memory (for later upload) by setting StoreData=Y. Commands can be used in various combinations to provide a high degree of operating flexibility. Removing external power from the MicroCAT corrupts a small amount of data in the MicroCAT’s memory (but the real-time data is unaffected); see Memory in Appendix I: Functional Description for details. Therefore, a deployment where power is completely removed between sets of samples (for example, applying power to sample autonomously for a short time and then removing power) will not provide reliable data in memory, unless the data in memory is uploaded before removing power. Commands can be used in various combinations to provide a high degree of operating flexibility. The integral pump operates as follows: • For autonomous sampling - continuous and autonomous sampling –
interval, continuous pumping (Fast Interval sampling), the pump runs continuously.
• For all other sampling methods, the pump runs for 3.5 seconds before each sample measurement if AdaptivePumpControl=N, or for a variable amount of time if AdaptivePumpControl=Y. The pump flushes the previously sampled water from the conductivity cell and brings a new water sample quickly into the cell. Water does not freely flow through the conductivity cell between samples, minimizing fouling. See Pump Operation in Section 2: Description of MicroCAT for details.
Descriptions and examples of the sampling modes follow. Note that the MicroCAT’s response to each command is not shown in the examples. Review the operation of the basic sampling modes and the commands described in Command Descriptions before setting up your system.
Note: In autonomous sampling and serial line sync modes, the pump runs only if the conductivity frequency from the last sample was greater than the minimum conductivity frequency for running the pump (MinCondFreq=). Checking the conductivity frequency prevents the pump from running in air for long periods of time, which could damage the pump. See Command Descriptions for details on setting the minimum conductivity frequency.
Note: Separate software manuals and Help files contain detailed information on installation, setup, and use of Sea-Bird’s software.
Note: After waking the MicroCAT, you may need to send the Stop command (type Stop and press the Enter key) to interrupt sampling, depending on how the instrument was set up the last time it was used. You may need to send Stop several times to get the MicroCAT to respond.

Manual revision 002 Section 4: Deploying and Operating MicroCAT SBE 37-SIP-IDO RS-232
25
Polled Sampling On command, the MicroCAT runs the pump (if applicable to the command used), takes a measurement, and sends the data to the computer. Storing of data in the MicroCAT’s FLASH memory is dependent on the particular command used. Pump operation is dependent on the setting for AdaptivePumpControl=, and on the temperature and pressure of the previous sample, as described in Pump Operation in Section 2: Description of MicroCAT. Note that for polled sampling commands that run the pump (TPS, TPSH, etc.) the pump runs automatically in response to a polled sampling command, regardless of the setting for the minimum conductivity frequency (MinCondFreq=).
Example: Polled Sampling (user input in bold) Wake up MicroCAT. Set current date and time to May 1, 2011 9 am. Set up to send data in converted decimal format, and include salinity with data. Command MicroCAT to run pump and take a sample, and send data to computer (do not store data in MicroCAT’s memory). Send power-off command. (Select Connect in Seaterm232’s Communications menu to connect and wake up.) DATETIME=05012011090000 OUTPUTFORMAT=1 OUTPUTSAL=Y GETCD (to verify setup) TPS (Pump runs before measurement.) QS When ready to take a sample (repeat as desired): wake up MicroCAT, command it to take a sample and output data, and send power-off command. (Before first sample, click Capture menu to capture data to a file – Seaterm232 requests file name for data to be stored.) (Select Connect in Seaterm232’s Communications menu to connect and wake up.) TPS (Pump runs before measurement.) QS
CAUTION: Do not run the pump dry. The pump is water lubricated; running it without water will damage it. If briefly testing your system in dry conditions, orient the MicroCAT to provide an upright U-shape for the plumbing. Then fill the inside of the pump head with water via the pump exhaust tubing. This will provide enough lubrication to prevent pump damage during brief testing.
Manual revision 002 Section 4: Deploying and Operating MicroCAT SBE 37-SIP-IDO RS-232
26
Autonomous Sampling (Logging commands)
Autonomous Sampling includes both Interval and Continuous Sampling: • Continuous (1, 2, 3, or 4 seconds) - The MicroCAT wakes up, runs the
pump continuously (if the conductivity frequency from the last sample was greater than MinCondFreq=), samples data at 1 Hz (1 sample/second), stores the data in its FLASH memory, and transmits the real-time data. Intervals of 2, 3, or 4 seconds provides no power savings over a 1-second interval (MicroCAT still samples at 1 Hz), but less memory is used (data is stored to memory and transmitted at the specified interval).
• Fast Interval (5 to 179 seconds) – The pump runs continuously (if the conductivity frequency from the last sample was greater than MinCondFreq=). At pre-programmed intervals (SampleInterval=) the MicroCAT samples data, stores the data in its FLASH memory, and transmits the real-time data.
• Slow Interval (> 180 seconds) - At pre-programmed intervals (SampleInterval=) the MicroCAT wakes up, runs the pump (if the conductivity frequency from the last sample was greater than MinCondFreq=), samples data, stores the data in its FLASH memory, transmits the real-time data, and goes to sleep (enters quiescent state). Pump operation is dependent on the setting for AdaptivePumpControl=, and on the temperature and pressure of the previous sample, as described in Pump Operation in Section 2: Description of MicroCAT.
Logging is started with Start, and is stopped with Stop. The MicroCAT has a lockout feature to prevent unintended interference with sampling. If the MicroCAT is logging, the MicroCAT will only accept the following commands: GetCD, GetSD, GetCC, GetEC, GetHD, DS, DC, TS, TSR, TPS, TPSH, TPSS, SL, SLTP, QS, and Stop. Additionally, if the MicroCAT is logging, it cannot be interrupted during a measurement to accept any commands. If the MicroCAT is logging and appears unresponsive, it may be in the middle of taking a measurement; continue to try to establish communications. Keep the signal line open circuit or within ± 0.3 V relative to ground to minimize power consumption when not trying to send commands.
Notes: • Data is stored to memory if
StoreData=Y. • If the FLASH memory is filled to
capacity, sampling continues, but excess data is not saved in memory (i.e., the MicroCAT does not overwrite the data in memory).
• Use Stop to stop logging. Once Stop is sent, the MicroCAT will accept all commands again.
Manual revision 002 Section 4: Deploying and Operating MicroCAT SBE 37-SIP-IDO RS-232
27
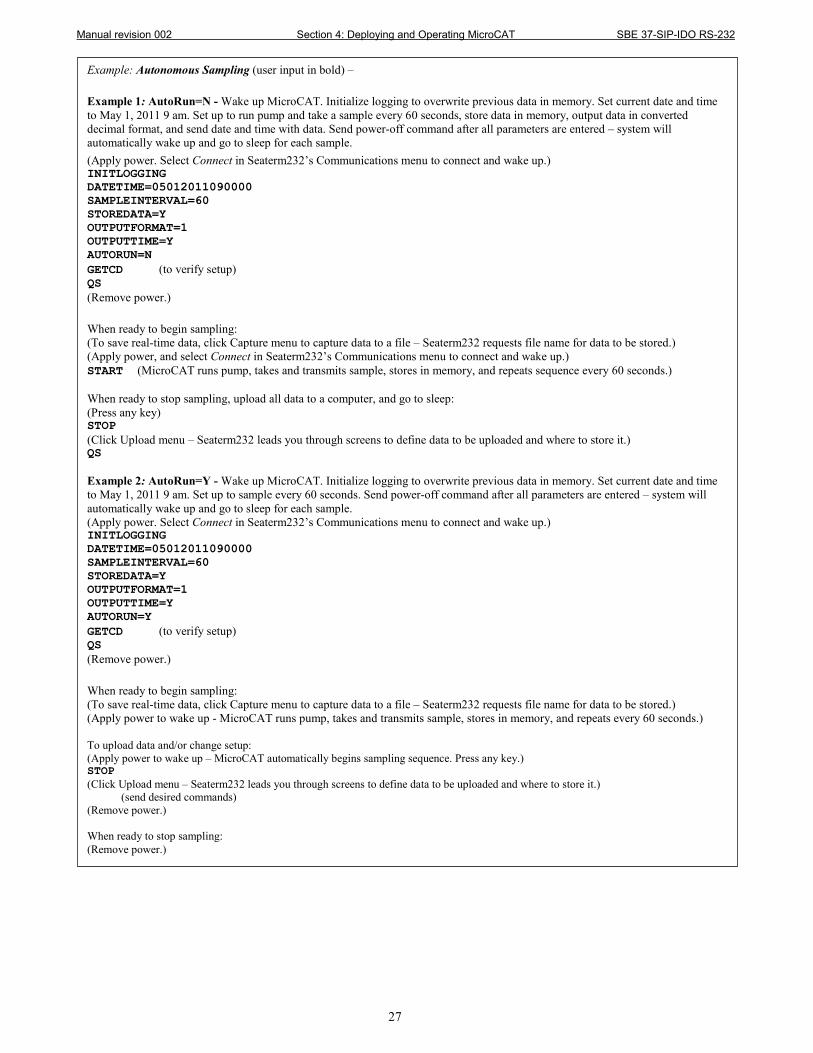
Example: Autonomous Sampling (user input in bold) – Example 1: AutoRun=N - Wake up MicroCAT. Initialize logging to overwrite previous data in memory. Set current date and time to May 1, 2011 9 am. Set up to run pump and take a sample every 60 seconds, store data in memory, output data in converted decimal format, and send date and time with data. Send power-off command after all parameters are entered – system will automatically wake up and go to sleep for each sample. (Apply power. Select Connect in Seaterm232’s Communications menu to connect and wake up.) INITLOGGING DATETIME=05012011090000 SAMPLEINTERVAL=60 STOREDATA=Y OUTPUTFORMAT=1 OUTPUTTIME=Y AUTORUN=N GETCD (to verify setup) QS (Remove power.) When ready to begin sampling: (To save real-time data, click Capture menu to capture data to a file – Seaterm232 requests file name for data to be stored.) (Apply power, and select Connect in Seaterm232’s Communications menu to connect and wake up.) START (MicroCAT runs pump, takes and transmits sample, stores in memory, and repeats sequence every 60 seconds.) When ready to stop sampling, upload all data to a computer, and go to sleep: (Press any key) STOP (Click Upload menu – Seaterm232 leads you through screens to define data to be uploaded and where to store it.) QS Example 2: AutoRun=Y - Wake up MicroCAT. Initialize logging to overwrite previous data in memory. Set current date and time to May 1, 2011 9 am. Set up to sample every 60 seconds. Send power-off command after all parameters are entered – system will automatically wake up and go to sleep for each sample. (Apply power. Select Connect in Seaterm232’s Communications menu to connect and wake up.) INITLOGGING DATETIME=05012011090000 SAMPLEINTERVAL=60 STOREDATA=Y OUTPUTFORMAT=1 OUTPUTTIME=Y AUTORUN=Y GETCD (to verify setup) QS (Remove power.) When ready to begin sampling: (To save real-time data, click Capture menu to capture data to a file – Seaterm232 requests file name for data to be stored.) (Apply power to wake up - MicroCAT runs pump, takes and transmits sample, stores in memory, and repeats every 60 seconds.) To upload data and/or change setup: (Apply power to wake up – MicroCAT automatically begins sampling sequence. Press any key.) STOP (Click Upload menu – Seaterm232 leads you through screens to define data to be uploaded and where to store it.) (send desired commands) (Remove power.) When ready to stop sampling: (Remove power.)

Manual revision 002 Section 4: Deploying and Operating MicroCAT SBE 37-SIP-IDO RS-232
28
Serial Line Synchronization (Serial Line Sync)
For Serial Line Sync, a simple pulse (a single character) on the RS-232 serial line wakes up the MicroCAT, initiating the following sequence: pump runs (if conductivity frequency from last sample > MinCondFreq=), MicroCAT takes and output a single sample and stores data in FLASH memory (if StoreData=Y), and MicroCAT goes to sleep (enters quiescent state). Pump operation is dependent on the setting for AdaptivePumpControl=, and on the temperature and pressure of the previous sample, as described in Pump Operation in Section 2: Description of MicroCAT. This mode provides easy integration with ADCPs or current meters, which can synchronize MicroCAT sampling with their own. Keep the signal line open circuit or within ± 0.3 V relative to ground to minimize power consumption when not trying to send a pulse to take a sample.

Manual revision 002 Section 4: Deploying and Operating MicroCAT SBE 37-SIP-IDO RS-232
29
Examples: Serial Line Sync – For both examples, initialize logging to overwrite previous data in memory. Set current date and time to May 1, 2011 9 am. Setup to output data in converted decimal format and send date and time with data, store data in memory. Example 1: AutoRun=N (user input in bold) Set up, and send power-off command. (Select Connect in Seaterm232’s Communications menu to connect and wake up.) INITLOGGING DATETIME=05012011090000 SYNCMODE=Y STOREDATA=Y OUTPUTTIME=Y AUTORUN=N GETCD (to verify setup) QS (Remove power.)
When ready to begin sampling: (To save real-time data, click Capture menu to capture data to a file – Seaterm232 requests file name for data to be stored.) (Apply power, and press any key to wake up) START (MicroCAT runs pump, takes and transmits 1 sample, stores in memory, and goes to sleep.)
When ready to take another sample, send a pulse (press any key) to wake up, run pump, take and transmit 1 sample, store in memory, and go to sleep. Repeat as desired. When ready to stop sampling and go to sleep: (Press any key). STOP (Click Upload menu – Seaterm232 leads you through screens to define data to be uploaded and where to store it.) QS Example 2: AutoRun=Y (user input in bold) Set up and remove power. (Apply power to wake up.) INITLOGGING DATETIME=05012011090000 SYNCMODE=Y STOREDATA=Y OUTPUTTIME=Y AUTORUN=Y GETCD (to verify setup) Remove power.
When ready to begin sampling: (To save real-time data, click Capture menu to capture data to a file – Seaterm232 requests file name for data to be stored.) (Apply power– MicroCAT runs pump, takes and transmits 1 sample, stores in memory, and goes to sleep.) Repeat as desired.
When ready to stop sampling: (Remove power.)
To change setup, temporarily disable serial line sync: (Apply power– MicroCAT automatically begins the sampling sequence. Press any key.) STOP (Click Upload menu – Seaterm232 leads you through screens to define data to be uploaded and where to store it.) (send desired commands) Remove power.

Manual revision 002 Section 4: Deploying and Operating MicroCAT SBE 37-SIP-IDO RS-232
30
Timeout Description The MicroCAT has a timeout algorithm. If the MicroCAT does not receive a command for 2 minutes, it powers down its communication circuits. This places the MicroCAT in quiescent state, drawing minimal current. To re-establish control (wake up), select Connect in Seaterm232’s Communications menu or press the Enter key.
Command Descriptions This section describes commands and provides sample outputs. Entries made with the commands are permanently stored in the MicroCAT and remain in effect until you change them. See Appendix II: Command Summary for a summarized command list. When entering commands: • Input commands to the MicroCAT in upper or lower case letters and
register commands by pressing the Enter key. Note that commands are shown with a mix of upper and lower case for ease in reading (for example, MinCondFreq=), but do not need to be entered that way.
• The MicroCAT sends an error message if an invalid command is entered. • Commands to enable a parameter (such as enabling adaptive pump
control) can be entered with the argument as Y or 1 for yes, and N or 0 for no (for example, AdaptivePumpControl=y and AdaptivePumpControl=1 are equivalent; both enable adaptive pump control).
• If a new command is not received within 2 minutes after the completion
of a command, the MicroCAT returns to the quiescent (sleep) state. • If in quiescent (sleep) state, re-establish communications by selecting
Connect in Seaterm232’s Communications menu or pressing the Enter key.
• If the MicroCAT is transmitting data and you want to stop it, press the
Esc key or type ^C. Then press the Enter key. Alternatively, select Abort in Seaterm232’s Command menu.
• The MicroCAT responds only to GetCD, GetSD, GetCC, GetEC,
GetHD, DS, DC, TS, TSR, TPS, TPSH, TPSS, SL, SLTP, QS, and Stop while sampling autonomously (Start has been sent). If you wake the MicroCAT while it is pumping or sampling (for example, to send DS to check on progress): o (if OutputExecutedTag=Y) The MicroCAT responds with one or
more <Executing> tags until the sample is complete, and then responds to the command.
o (if OutputExecutedTag=N) The MicroCAT responds to the command after the sample is complete.

Manual revision 002 Section 4: Deploying and Operating MicroCAT SBE 37-SIP-IDO RS-232
31
Status Commands GetCD Get and display configuration data, which
includes parameters related to MicroCAT setup. Most of these parameters can be user-input/modified. List below includes, where applicable, command used to modify parameter: • Device type, Serial number • Optional pressure sensor installed? • Reference pressure to use in calculations if
no pressure sensor installed (only appears if pressure sensor not installed) [ReferencePressure=]
• Output data format [OutputFormat=] • Output salinity with each sample
[OutputSal=]? • Output sound velocity with each sample
[OutputSV=]? • Output depth with each sample
[OutputDepth=]? • Latitude for depth calculation [Latitude=] • Output time with each sample
[OutputTime=]? • Always enable Tx when Rx is valid
[RS232ForceOn=]? • Interval between samples
[SampleInterval=] • Sampling mode [based on SampleInterval=] • Adaptive Pump Control enabled
[AdaptivePumpControl=Y] or Factory set pump-on time for each measurement (if AdaptivePumpControl=N).
• Start sampling when power turned on [AutoRun=]?
• Enable serial line sync [SyncMode=]? • Store data in memory [StoreData=]? • Minimum conductivity frequency for pump
turn-on [MinCondFreq=]
Example: MicroCAT with a pressure sensor (user input in bold, command used to modify parameter in parentheses). GETCD <ConfigurationData DeviceType = 'SBE37SIP-IDO-RS232' SerialNumber = '03712345’> <PressureInstalled>yes</PressureInstalled> (inclusion of optional pressure sensor set at factory) <SampleDataFormat>converted engineering</SampleDataFormat> [OutputFormat=] <OutputSalinity>yes</OutputSalinity> [OutputSal=] <OutputSV>no</OutputSV> [OutputSV=] <OutputDepth>yes</OutputDepth> [OutputDepth=] <Latitude>30.0</Latitude> [Latitude=] <OutputTime>yes</OutputTime> [OutputTime=] <RS232ForceOn>no</RS232ForceOn [RS232ForceOn=] <SampleInterval>60</SampleInterval> [SampleInterval=] <SampleMode>IntervalContinuousPump</SampleMode> [based on SampleInterval=] <AdaptivePumpControl>yes</AdaptivePumpControl> [AdaptivePumpControl=] <AutoRun>no</AutoRun> [AutoRun=] <SyncMode>no</SyncMode> [SyncMode=] <StoreData>yes</StoreData> [StoreData=] <MinCondFreq>3000.0</MinCondFreq> [MinCondFreq=] </ConfigurationData>
Note: GetCD output does not include calibration coefficients. To display calibration coefficients, use the GetCC command.
Manual revision 002 Section 4: Deploying and Operating MicroCAT SBE 37-SIP-IDO RS-232
32
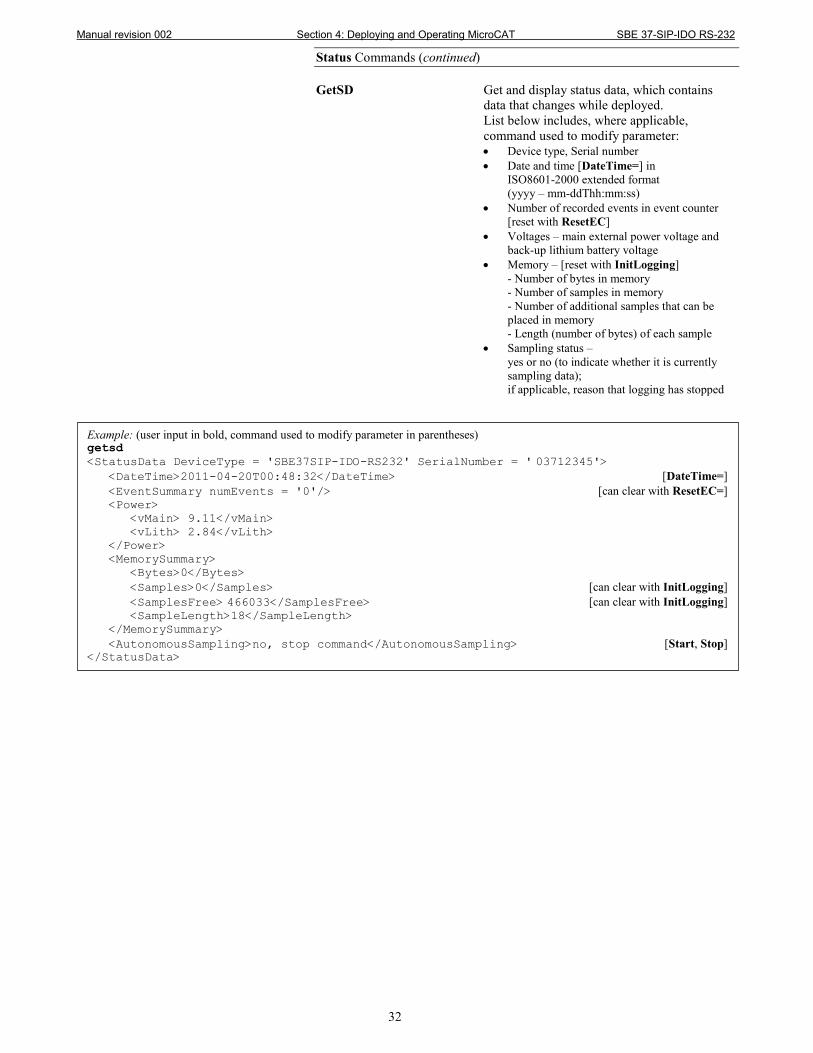
Status Commands (continued) GetSD Get and display status data, which contains
data that changes while deployed. List below includes, where applicable, command used to modify parameter: • Device type, Serial number • Date and time [DateTime=] in
ISO8601-2000 extended format (yyyy – mm-ddThh:mm:ss)
• Number of recorded events in event counter [reset with ResetEC]
• Voltages – main external power voltage and back-up lithium battery voltage
• Memory – [reset with InitLogging] - Number of bytes in memory - Number of samples in memory - Number of additional samples that can be placed in memory - Length (number of bytes) of each sample
• Sampling status – yes or no (to indicate whether it is currently sampling data); if applicable, reason that logging has stopped
Example: (user input in bold, command used to modify parameter in parentheses) getsd <StatusData DeviceType = 'SBE37SIP-IDO-RS232' SerialNumber = ' 03712345'> <DateTime>2011-04-20T00:48:32</DateTime> [DateTime=] <EventSummary numEvents = '0'/> [can clear with ResetEC=] <Power> <vMain> 9.11</vMain> <vLith> 2.84</vLith> </Power> <MemorySummary> <Bytes>0</Bytes> <Samples>0</Samples> [can clear with InitLogging] <SamplesFree> 466033</SamplesFree> [can clear with InitLogging] <SampleLength>18</SampleLength> </MemorySummary> <AutonomousSampling>no, stop command</AutonomousSampling> [Start, Stop] </StatusData>

Manual revision 002 Section 4: Deploying and Operating MicroCAT SBE 37-SIP-IDO RS-232
33
Status Commands (continued) GetCC Get and display calibration coefficients, which
are initially factory-set and should agree with Calibration Certificates shipped with MicroCAT.
Note: Dates shown are when calibrations were performed.
Example: MicroCAT with a pressure sensor (user input in bold, command used to modify parameter in parentheses) getcc <CalibrationCoefficients DeviceType = 'SBE37SIP-IDO-RS232' SerialNumber = '03712345'> <Calibration format = 'TEMP1' id = 'Temperature'> <SerialNum>03712345</SerialNum> <CalDate>04-Aug-10</CalDate> [TCalDate=] <A0>6.947802e-05</A0> [TA0=] <A1>2.615233e-04</A1> [TA1=] <A2>-1.265233e-06</A2> [TA2=] <A3>1.310479e-07</A3> [TA3=] </Calibration> <Calibration format = 'WBCOND0' id = 'Conductivity'> <SerialNum>03712345</SerialNum> <CalDate>04-Aug-10</CalDate> [CCalDate=] <G>-1.009121e+00</G> [CG=] <H>1.410162e-01</H> [CH=] <I>-2.093167e-04</I> [CI=] <J>3.637053e-05</J> [CJ=] <PCOR>-9.570000e-08</PCOR> [CTCor=] <TCOR>3.250000e-06</TCOR> [CPCor=] <WBOTC>1.954800e-05</WBOTC> [CWBOTC=] </Calibration> <Calibration format = 'STRAIN0' id = 'Pressure'> <SerialNum>2478619</SerialNum> <CalDate>28-Jul-010</CalDate> [PCalDate=] <PA0>1.729067e+00</PA0> [PA0=] <PA1>1.415754e-01</PA1> [PA1=] <PA2>1.246912e-08</PA2> [PA2=] <PTCA0>2.243971e+00</PTCA0> [PTCA0=] <PTCA1>1.055267e+00</PTCA1> [PTCA1=] <PTCA2>-2.276308e-02</PTCA2> [PTCA2=] <PTCB0>1.003849e+02</PTCB0> [PTCB0=] <PTCB1>1.014510e-02</PTCB1> [PTCB1=] <PTCB2>-2.057110e-04</PTCB2> [PTCB2=] <PTEMPA0>5.669780e+01</PTEMPA0> [PTempA0=] <PTEMPA1>-5.474043e-02</PTEMPA1> [PTempA1=] <PTEMPA2>1.267908e-05</PTEMPA2> [PTempA2=] <POFFSET>0.000000e+00</POFFSET> [POffset= (decibars)] <PRANGE>0.000000e+00</PRANGE> [PRange= (psi)] </Calibration> <Calibration format = 'OXYGEN0' id = 'Oxygen'> <SerialNum>2347</SerialNum> [OSN=] <CalDate>18-Aug-10</CalDate> [OCalDate=] <SOC>2.274800e-04</SOC> [OxSoc=] <FOFFSET>-8.854200e+02</FOFFSET> [OxFOffset=] <A>-1.589700e-03</A> [OxA=] <B>1.994300e-04</B> [OxB=] <C>-3.870700e-06</C> [OxC=] <E>3.600000e-02</E> [OxE=] <TAU20>1.080000e+00</TAU20> [OxTau20=] </Calibration> </CalibrationCoefficients>

Manual revision 002 Section 4: Deploying and Operating MicroCAT SBE 37-SIP-IDO RS-232
34
Status Commands (continued) GetEC Get and display event counter data, which can
help to identify root cause of a malfunction. Event counter records number of occurrences of common timeouts, power-on resets, etc. Can be cleared with ResetEC. Possible events that may be logged include: • WDT reset – unexpected reset • PON reset - power cycled on (each time power is
applied) • ErrorADC12TimeOut – response delayed from
A/D converter that measures main external power and back-up lithium battery power
• ErrorUART0TimeOut – timeout for transmitter to finish transmitting previous character via RS-232
• ErrorAD7714TimeOut – response delayed from temperature and pressure A/D converter
• ErrorInvWakeUpFlag – unexpected wakeup • ErrorFLASHTimeOut – problem with writing
data to FLASH memory • Alarm long - time to take next sample is too far
in future • Alarm short - woke up MicroCAT to send a
command while logging, and missed taking a sample
• LoggingRestartNoAlarm – no sample taken for 8 hours while logging, restart logging
ResetEC Delete all events in event counter (number of
events displays in GetSD response, and event details display in GetEC response).
Example: (user input in bold, command used to modify parameter in parentheses) getec <EventCounters DeviceType = 'SBE37SIP-IDO-RS232' SerialNumber = '03712345'> <EventSummary numEvents = '0'/> [can clear with ResetEC] </EventCounters>

Manual revision 002 Section 4: Deploying and Operating MicroCAT SBE 37-SIP-IDO RS-232
35
Status Commands (continued) GetHD Get and display hardware data, which is fixed
data describing MicroCAT: • Device type, Serial number • Manufacturer • Firmware version • Firmware date • PCB assembly numbers and serial numbers • Manufacture date • Sensor types and serial numbers
Example: (user input in bold, command used to modify parameter in parentheses) gethd <HardwareData DeviceType = 'SBE37SIP-IDO-RS232' SerialNumber = '03712345'> <Manufacturer>Sea-Bird Electronics, Inc.</Manufacturer> <FirmwareVersion>1.0a</FirmwareVersion> <FirmwareDate>30 Mar 2011 14:00</FirmwareDate> <CommandSetVersion>1.0</CommandSetVersion> <PCBAssembly> 41720A</PCBAssembly> [SetPCBAssembly1=] <PCBSerialNum> 25774</PCBSerialNum> [SetPCBSerialNum1=] <PCBAssembly> 41660B</PCBAssembly> [SetPCBAssembly2=] <PCBSerialNum> 26492</PCBSerialNum> [SetPCBSerialNum2=] <PCBAssembly> 41661A</PCBAssembly> [SetPCBAssembly3=] <PCBSerialNum> 25834</PCBSerialNum> [SetPCBSerialNum3=] <PCBAssembly> 41662A</PCBAssembly> [SetPCBAssembly4=] <PCBSerialNum> 25083</PCBSerialNum> [SetPCBSerialNum4=] <MfgDate> 24 Feb 2011</MfgDate> [SetMfgDate=] <FirmwareLoader>SBE 37-232-V3 FirmwareLoader V 1.0</FirmwareLoader> <InternalSensors> <Sensor id = 'Temperature'> <type>temperature-1</type> <SerialNumber>03712345</SerialNumber> </Sensor> <Sensor id = 'Conductivity'> <type>conductivity-1</type> <SerialNumber>03712345</SerialNumber> </Sensor> <Sensor id = 'Pressure'> [SetPressureInstalled=] <type>strain-0</type> <SerialNumber>2478619</SerialNumber> </Sensor> <Sensor id = 'Oxygen'> <type>oxygen-0</type> <SerialNumber>98765</SerialNumber> </Sensor> </InternalSensors> </HardwareData>

Manual revision 002 Section 4: Deploying and Operating MicroCAT SBE 37-SIP-IDO RS-232
36
Status Commands (continued) DS Display operating status and setup.
List below includes, where applicable, command used to modify parameter. • Firmware version, serial number, date and time
[DateTime=] • Main external power voltage and back-up
lithium battery voltage • Start sampling when power turned on
[AutoRun=]? • Serial line sync mode [SyncMode=]? • Store data in memory [StoreData=]? • Number of samples in memory
[SampleNumber=] and available sample space in memory
• Logging status (logging not started, logging data, not logging, or unknown)
• Interval between samples for autonomous, interval sampling [SampleInterval=]
• Sampling mode [based on SampleInterval=] • Adaptive pump control enabled
[AdaptivePumpControl=]? If not enabled, factory-set pump-on time for each measurement displays.
• Output data format [OutputFormat=] • Output salinity with each sample
[OutputSal=]? Only displays if set to yes • Output sound velocity with each sample
[OutputSV=]? Only displays if set to yes • Output depth with each sample
[OutputDepth=]? Latitude for depth calculation [Latitude=]. Only displays if OutputDepth= set to yes.
• Output time with each sample [OutputTime=]?
• Enable Tx when Rx is valid [RS232ForceOn=]?
• Reference pressure to use in calculations if no pressure sensor installed (only appears if pressure sensor not installed) [ReferencePressure=]
• Minimum conductivity frequency for pump turn-on [MinCondFreq=]
Example: MicroCAT with a pressure sensor (user input in bold, command used to modify parameter in parentheses). DS SBE37SIP-IDO-RS232 V 1.0a SERIAL NO. 12345 20 Apr 2011 10:55:45 [DateTime=] vMain = 9.11, vLith = 2.84 autorun = no [AutoRun=] sync mode = no [SyncMode=] store data = yes [StoreData=] samplenumber = 0, free = 466033 [SampleNumber=] not logging, stop command sample every 6 seconds [SampleInterval=] sample mode is interval, continuous pump [based on SampleInterval=] adaptive pump control enabled [AdaptivePumpControl=] data format = converted engineering [OutputFormat=] output time = yes [OutputTime=] do not force on RS232 transmitter [RS232ForceOn=] minimum conductivity frequency = 3000.00 [MinCondFreq=]
Note: The DS response contains similar information as the combined responses from GetSD and GetCD, but in a different format.

Manual revision 002 Section 4: Deploying and Operating MicroCAT SBE 37-SIP-IDO RS-232
37
Status Commands (continued) DC Display calibration coefficients, which are
initially factory-set and should agree with Calibration Certificates shipped with MicroCAT.
Example: MicroCAT with a pressure sensor (user input in bold, command used to modify parameter in parentheses). DC SBE37SIP-IDO-RS232 V 1.0a 12345 temperature: 04-apr-11 [TCalDate=] TA0 = 6.947802e-05 [TA0=] TA1 = 2.615233e-04 [TA1=] TA2 = -1.265233e-06 [TA2=] TA3 = 1.310479e-07 [TA3=] conductivity: 04-apr-11 [CCalDate=] G = -1.036689e+00 [CG=] H = 1.444342e-01 [CH=] I = -3.112137e-04 [CI=] J = 3.005941e-05 [CJ=] CPCOR = -9.570001e-08 [CPCor=] CTCOR = 3.250000e-06 [CTCor=] WBOTC = 1.968100e-05 [CWBOTC=] pressure S/N 2478619, range = 2901 psia, 03-apr-11 [PRange= (psi), PCalDate=] PA0 = 0.000000e+00 [PA0=] PA1 = 0.000000e+00 [PA1=] PA2 = 0.000000e+00 [PA2=] PTCA0 = 0.000000e+00 [PTCA0=] PTCA1 = 0.000000e+00 [PTCA1=] PTCA2 = 0.000000e+00 [PTCA2=] PTCB0 = 0.000000e+00 [PTCB0=] PTCB1 = 0.000000e+00 [PTCB1=] PTCB2 = 0.000000e+00 [PTCB2=] PTEMPA0 = 0.000000e+00 [PTempA0=] PTEMPA1 = 0.000000e+00 [PTempA1=] PTEMPA2 = 0.000000e+00 [PTempA2=] POFFSET = 0.000000e+00 [POffset= (decibars)] oxygen S/N = 2347, 18-apr-11 [OSN=, iiOCalDate=] SOC = 2.274800e-04 [OxSoc=] FOFFSET = -8.854200e+02 [OxFOffset=] A = -1.589700e-03 [OxA=] B = 1.994300e-04 [OxB=] C = -3.870700e-06 [OxC=] E = 3.600000e-02 [OxE=] TAU_20 = 1.080000e+00 [OxTau20=]
Notes: • The DC and GetCC responses
contain the same information, but in different formats.
• Dates shown are when calibrations were performed.

Manual revision 002 Section 4: Deploying and Operating MicroCAT SBE 37-SIP-IDO RS-232
38
General Setup Commands
DateTime= mmddyyyyhhmmss Set real-time clock month, day, year, hour,
minute, second.
BaudRate=x x= baud rate (600, 1200, 2400, 4800, 9600,
19200, 38400, 57600, or 115200). Default 9600. Check capability of your computer and terminal program before increasing baud rate. Command must be sent twice to change rate.
Length of cable that MicroCAT can drive is dependent on baud. See Baud Rate, Cable Length, Power, and Data Transmission Rate in Section 2: Description of MicroCAT.
RS232ForceOn=x x=Y: RS-232 transceiver always enables Tx.
Use this setting if providing 3-wire interface (power, ground, and transmit) and setting AutoRun=Y (to start sampling when power applied).
x=N: RS-232 transceiver enables Tx only when Rx is valid. Default.
OutputExecutedTag=x x=Y: Display XML Executing and Executed tags. Executed tag displays at end of each command response; Executing tag displays one or more times if MicroCAT response to command requires additional time.
x=N: Do not.
ReferencePressure=x x = reference pressure (gauge) in decibars.
MicroCAT without installed pressure sensor uses this reference pressure in conductivity (and optional salinity, sound velocity, and depth) calculations. It also uses reference pressure in Adaptive Pump Control algorithm (if enabled). Entry ignored if MicroCAT includes pressure sensor.
QS Quit session and place MicroCAT in quiescent
(sleep) state. Main power is turned off. Data logging and memory retention are not affected.
Example: Set current date and time to 10 September 2011 12:00:00 (user input in bold). DATETIME=09102011120000
Notes: • The MicroCAT baud rate (set with
BaudRate=) must be the same as Seaterm232’s baud rate (set in the Communications menu).
• BaudRate= must be sent twice. After the first entry, the MicroCAT changes to the new baud, and then waits for the command to be sent again at the new baud (In the Communications menu, select Configure. In the dialog box, select the new baud rate and click OK. Then retype the command.). This prevents you from accidentally changing to a baud that is not supported by your computer. If it does not receive the command again at the new baud, it reverts to the previous baud rate.
Example: Set MicroCAT to output Executed and Executing tags (user input in bold). outputexecutedtag=y <Executed/>getcd . . . (GetCD response) <Executed/> (Note: <Executed/> tag at end of command response takes place of S> prompt.)
Note: The MicroCAT automatically enters quiescent state after 2 minutes without receiving a command. This timeout algorithm is designed to conserve power consumption if the user does not send QS to put the MicroCAT to sleep.

Manual revision 002 Section 4: Deploying and Operating MicroCAT SBE 37-SIP-IDO RS-232
39
Pump Setup Commands
See Pump Operation in Section 2: Description of MicroCAT for details. MinCondFreq=x x= minimum conductivity frequency (Hz) to
enable pump turn-on for autonomous or serial line sync mode sampling, to prevent pump from running before MicroCAT is in water. Pump does not run when conductivity frequency drops below MinCondFreq=. MicroCAT Configuration Sheet lists uncorrected (raw) frequency output at 0 conductivity.
Typical value (and factory-set default) for MinCondFreq= for salt water and estuarine applications is: (zero conductivity frequency + 500 Hz).
Typical value for MinCondFreq= for fresh water applications is: (zero conductivity frequency + 5 Hz).
AdaptivePumpControl=x x=Y: Run pump before each sample based on
Adaptive Pump Control methodology.
x=N: Do not use Adaptive Pump Control methodology; run pump for 3.5 seconds before each sample.
PumpOn Turn pump on to test pump or remove
sediment from inside plumbing. Pump runs continuously, drawing current. Send PumpOff to stop. Note that PumpOn has no effect on pump operation while sampling.
PumpOff Turn pump off if it was turned on with
PumpOn. Note that PumpOff has no effect on pump operation while sampling.
CAUTION: For polled sampling commands that run the pump (TPS, TPSH, etc.): the MicroCAT always runs the pump in response to these commands, regardless of the conductivity frequency from the last sample and the setting for MinCondFreq=.
CAUTION: The MicroCAT does not check MinCondFreq when the user sends PumpOn; do not run the pump dry. The pump is water lubricated; running it without water will damage it. If briefly testing your system with the PumpOn command in dry conditions, orient the MicroCAT to provide an upright U-shape for the plumbing. Then fill the inside of the pump head with water via the pump exhaust tubing. This will provide enough lubrication to prevent pump damage during brief testing.
Note: For Continuous sampling (pump runs continuously and MicroCAT samples at 1 Hz) and Fast Interval sampling (pump runs continuously and MicroCAT samples at pre-programmed interval), the pump runs continuously if the conductivity frequency remains above MinCondFreq.
Note: Continuous sampling (pump runs continuously and MicroCAT samples at 1 Hz) and Fast Interval sampling (pump runs continuously and MicroCAT samples at pre-programmed interval) are not affected by adaptive pump control.

Manual revision 002 Section 4: Deploying and Operating MicroCAT SBE 37-SIP-IDO RS-232
40
Memory Setup Commands StoreData=x x=Y (default): Store data to FLASH memory
when sampling.
x=N: Do not. InitLogging Initialize logging – after all previous data has
been uploaded, initialize logging before starting to sample again to make entire memory available for recording. InitLogging sets sample number (SampleNumber=) to 0 (sampling will start with sample 1). If not set to 0, data will be stored after last recorded sample. Do not send InitLogging until all existing data has been uploaded.
SampleNumber=x x= sample number for last sample in memory.
SampleNumber=0 is equivalent to InitLogging. Do not send SampleNumber=0 until all existing data has been uploaded.
Note: Do not send InitLogging or SampleNumber=0 until all data has been uploaded. These commands do not delete the data; they just reset the data pointer. If you accidentally send one of these commands before uploading, recover the data as follows: 1. Set SampleNumber=x, where x is
your estimate of number of samples in memory.
2. Upload data. If x is more than actual number of samples in memory, data for non-existent samples will be bad, random data. Review uploaded data file carefully and delete any bad data.
3. If desired, increase x and upload data again, to see if there is additional valid data in memory.
Note: If the FLASH memory is filled to capacity, sampling continues, but excess data is not saved in memory (i.e., the MicroCAT does not overwrite the data in memory).

Manual revision 002 Section 4: Deploying and Operating MicroCAT SBE 37-SIP-IDO RS-232
41
Output Format Setup Commands OutputFormat=x x=0: output raw decimal data. x=1 (default): output converted decimal data.
x=2: output converted decimal data in XML.
OutputTime=x x=Y: output date and time.
x=N: do not.
OutputSal=x x=Y: Calculate and output salinity (psu) with
each sample. Only applies if OutputFormat=1 or 2.
x=N: Do not. OutputSV=x x=Y: calculate and output sound velocity
(m/sec), using Chen and Millero formula (UNESCO Technical Papers in Marine Science #44). Only applies if OutputFormat=1 or 2. x=N: do not.
OutputDepth=x x=Y: calculate and output depth (meters),
using Latitude in calculation. Only applies if OutputFormat=1 or 2. x=N: do not.
Latitude=x x= latitude (degrees) to use in depth calculation
(if OutputDepth=Y).
Notes: • See Data Formats after the
command descriptions for complete details.
• The MicroCAT always stores the sample time in memory, regardless of the setting for OutputTime=.
• The MicroCAT does not store salinity, sound velocity, and/or depth in memory if the respective parameters are enabled for output. It calculates and outputs the values real-time or as data is uploaded; therefore, outputting these parameters has no effect on the number of samples that can be stored in memory.
• Salinity, sound velocity, and depth can also be calculated in SBE Data Processing, from data uploaded from the MicroCAT’s memory.

Manual revision 002 Section 4: Deploying and Operating MicroCAT SBE 37-SIP-IDO RS-232
42
Autonomous Sampling Commands
Logging commands direct the MicroCAT to sample data at pre-programmed intervals, transmit the data, and (if StoreData=Y) store the data in its FLASH memory. Pump operation is dependent on the settings for MinCondFreq= and AdaptivePumpControl=, and on the temperature and pressure of the previous sample, as described in Pump Operation in Section 2: Description of MicroCAT. SampleInterval=x x= interval (seconds) between samples.
Note: Do not set SampleInterval= to less than (pumping time + 5 seconds); see Pump Operation in Section 2: Description of MicroCAT for details. • x=1 – 4: Continuous Sampling mode.
Pump and all sampling circuitry remain on continuously; MicroCAT samples every 1 second (1 Hz). There is no power saving over 1 Hz sampling if sampling at 2, 3, or 4 sec intervals, but less memory is used.
• x=5 – 179: Fast Interval Sampling mode (called interval, continuous pump in DS response and IntervalContinuousPump in GetCD response). Pump runs continuously, and measurements are made at chosen interval.
• x=180 – 21,600: Slow Interval Sampling mode (called interval, discontinuous pump in DS response and IntervalDiscontinuousPump in GetCD response). Pump runs before each measurement, which are made at chosen interval. Pump turns off and CTD goes into low-power state between measurements.
AutoRun=x x=Y: When power is applied, wake up and
automatically begin to sample as defined by SampleInterval= and SyncMode=.
x=N: When power is applied, wake up but do not automatically begin to sample, unless Start has been sent and Stop has not been sent.
Start Start sampling, as defined by
SampleInterval=. Data is stored in FLASH memory (if StoreData=Y) and is transmitted real-time. Applicable if: • AutoRun=N, or • AutoRun=Y and you previously sent Stop
to stop sampling. Stop Stop sampling. Press any key before entering
Stop. Stop must be sent before uploading data from memory.
* For all sampling, MicroCAT checks conductivity frequency against user-input minimum conductivity frequency (MinCondFreq=). If conductivity frequency is less than MinCondFreq=, it does not run pump. Pump runs continuously if sampling continuously. For all other sampling schemes, pump runs for 3.5 seconds before MicroCAT takes a sample if AdaptivePumpControl=N, or as described in Pump Operation in Section 2: Description of MicroCAT if AdaptivePumpControl=Y.
Notes: • If the FLASH memory is filled to
capacity, sampling continues, but excess data is not saved in memory (i.e., the MicroCAT does not overwrite the data in memory.
• You may need to send Stop several times to get the MicroCAT to respond. This is most likely to occur if sampling continuously or with a small SampleInterval.
Note: Sampling is started by one of the following methods: • (if AutoRun=N) Send Start. • (if AutoRun=Y) Apply power.
Note: If AutoRun=Y, a simple 3-wire system (Power, Ground, Transmit) may be used for deployment, since it is not necessary to command the MicroCAT to take each sample. Note that the MicroCAT does not respond to any commands in this configuration, so initial setup must be performed with all 4 wires in place.
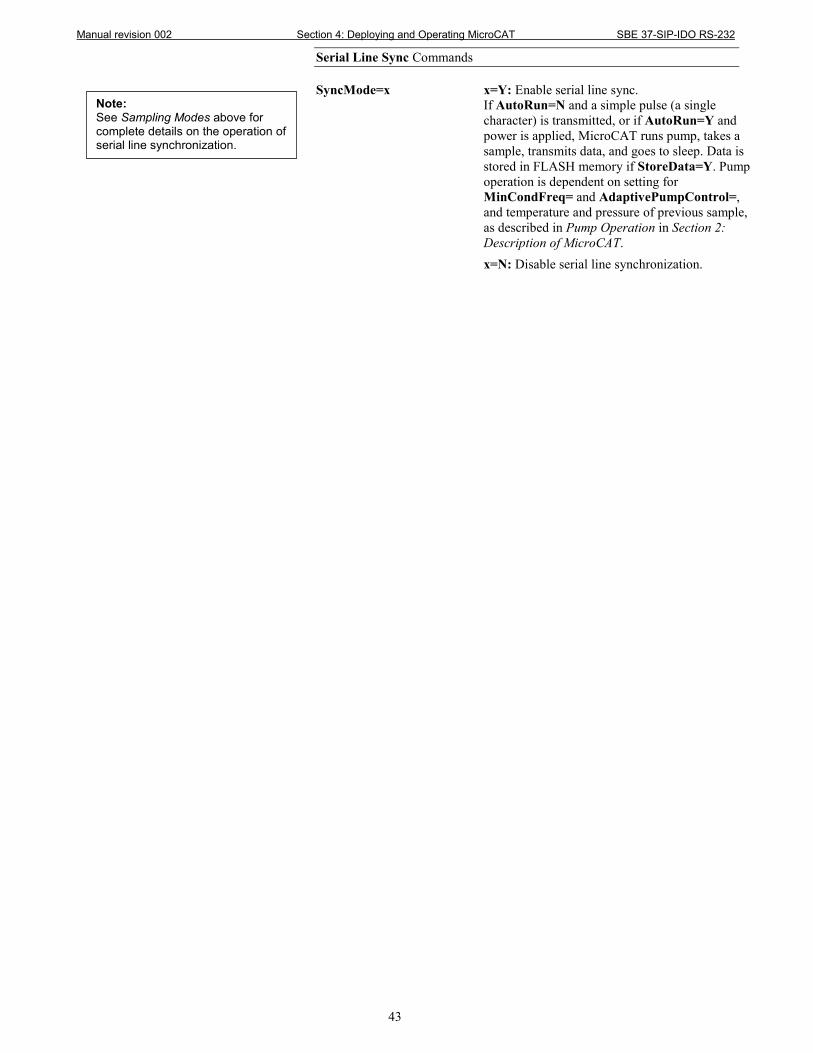
Manual revision 002 Section 4: Deploying and Operating MicroCAT SBE 37-SIP-IDO RS-232
43
Serial Line Sync Commands SyncMode=x x=Y: Enable serial line sync.
If AutoRun=N and a simple pulse (a single character) is transmitted, or if AutoRun=Y and power is applied, MicroCAT runs pump, takes a sample, transmits data, and goes to sleep. Data is stored in FLASH memory if StoreData=Y. Pump operation is dependent on setting for MinCondFreq= and AdaptivePumpControl=, and temperature and pressure of previous sample, as described in Pump Operation in Section 2: Description of MicroCAT.
x=N: Disable serial line synchronization.
Note: See Sampling Modes above for complete details on the operation of serial line synchronization.

Manual revision 002 Section 4: Deploying and Operating MicroCAT SBE 37-SIP-IDO RS-232
44
Polled Sampling Commands These commands are used to request 1 or more samples from the MicroCAT. Unless noted otherwise, the MicroCAT does not store the data in FLASH memory. For polled sampling commands that run the pump, pump operation is dependent on the setting for AdaptivePumpControl=, and on the temperature and pressure of the previous sample, as described in Pump Operation in Section 2: Description of MicroCAT. TS Do not pump. Take sample, store data in
buffer, output data. TSR Do not pump. Take sample, store data in
buffer, output data in raw decimal format (regardless of OutputFormat=).
TPS Run pump, take sample, store data in buffer,
output data. TPSH Run pump, take sample, store data in buffer
(do not output data). TPSS Run pump, take sample, store data in buffer
and in FLASH memory, and output data. Note: MicroCAT ignores this command if sampling data (Start has been sent).
TSn:x Do not pump. Take x samples and output data.
To interrupt this sampling, press Esc key. Note: MicroCAT ignores this command if sampling data (Start has been sent).
TPSn:x Run pump continuously while taking
x samples and outputting data. To interrupt this sampling, press Esc key. Note: MicroCAT ignores this command if sampling data (Start has been sent).
SL Output last sample stored in buffer. SLTP Output last sample stored in buffer. Then run
pump, take new sample, and store data in buffer (do not output data from new sample).
Note: The MicroCAT has a buffer that stores the most recent data sample. Unlike data in the FLASH memory, data in the buffer is erased upon removal or failure of power.
CAUTION: For polled sampling commands that run the pump (TPS, TPSH, etc.): the MicroCAT always runs the pump in response to polled sampling commands, regardless of the conductivity frequency from the last sample and the setting for MinCondFreq=. Do not run the pump dry. The pump is water lubricated; running it without water will damage it. If briefly testing your system with polled sampling commands in dry conditions, orient the MicroCAT to provide an upright U-shape for the plumbing. Then fill the inside of the pump head with water via the pump exhaust tubing. This will provide enough lubrication to prevent pump damage during brief testing.

Manual revision 002 Section 4: Deploying and Operating MicroCAT SBE 37-SIP-IDO RS-232
45
Data Upload Commands Stop sampling (send Stop) before uploading data. GetSamples:b,e Upload data from scan b to scan e,
in format defined by OutputFormat=. First sample is number 1. As data is uploaded, screen first displays start time = start sample number = These are start time and starting sample number for last set of logged data; can be useful in determining what data to review.
DDb,e Upload data from scan b to scan e,
in converted decimal form (OutputFormat=1) (regardless of OutputFormat=). First sample is number 1. As data is uploaded, screen first displays start time =, start sample number = . These are start time and starting sample number for last set of logged data; can be useful in determining what data to review.
Example: Upload samples 1 to 200 to a file (user input in bold). (Click Capture menu and enter desired filename in dialog box) GETSAMPLES:1,200 or DD1,200
Notes: • Use Seaterm232’s Upload menu
to upload data that will be processed by SBE Data Processing. Manually entering a data upload command does not produce data with the required header information for processing by our software. These commands are included here for reference for users who are writing their own software.
• If not using the Upload menu - To save data to a file, click Capture before entering a data upload command.
• See Data Formats after these Command Descriptions.
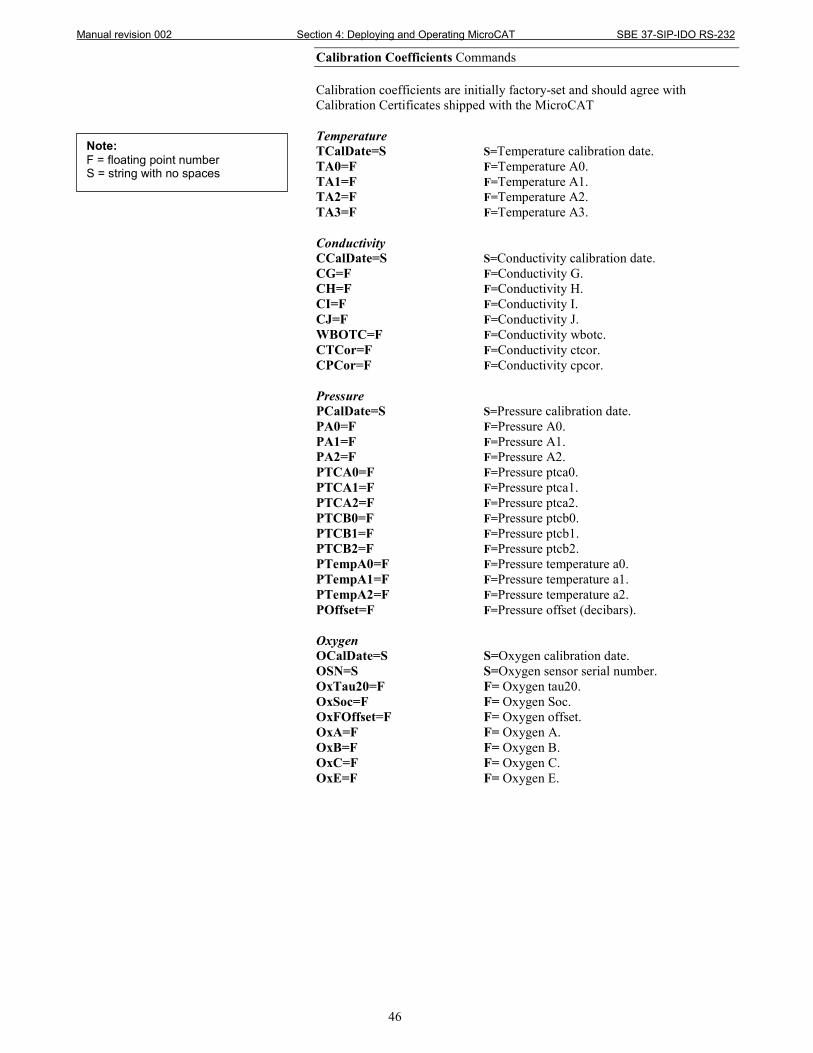
Manual revision 002 Section 4: Deploying and Operating MicroCAT SBE 37-SIP-IDO RS-232
46
Calibration Coefficients Commands
Calibration coefficients are initially factory-set and should agree with Calibration Certificates shipped with the MicroCAT Temperature TCalDate=S S=Temperature calibration date. TA0=F F=Temperature A0. TA1=F F=Temperature A1. TA2=F F=Temperature A2. TA3=F F=Temperature A3. Conductivity CCalDate=S S=Conductivity calibration date. CG=F F=Conductivity G. CH=F F=Conductivity H. CI=F F=Conductivity I. CJ=F F=Conductivity J. WBOTC=F F=Conductivity wbotc. CTCor=F F=Conductivity ctcor. CPCor=F F=Conductivity cpcor. Pressure PCalDate=S S=Pressure calibration date. PA0=F F=Pressure A0. PA1=F F=Pressure A1. PA2=F F=Pressure A2. PTCA0=F F=Pressure ptca0. PTCA1=F F=Pressure ptca1. PTCA2=F F=Pressure ptca2. PTCB0=F F=Pressure ptcb0. PTCB1=F F=Pressure ptcb1. PTCB2=F F=Pressure ptcb2. PTempA0=F F=Pressure temperature a0. PTempA1=F F=Pressure temperature a1. PTempA2=F F=Pressure temperature a2. POffset=F F=Pressure offset (decibars). Oxygen OCalDate=S S=Oxygen calibration date. OSN=S S=Oxygen sensor serial number. OxTau20=F F= Oxygen tau20. OxSoc=F F= Oxygen Soc. OxFOffset=F F= Oxygen offset. OxA=F F= Oxygen A. OxB=F F= Oxygen B. OxC=F F= Oxygen C. OxE=F F= Oxygen E.
Note: F = floating point number S = string with no spaces

Manual revision 002 Section 4: Deploying and Operating MicroCAT SBE 37-SIP-IDO RS-232
47
Hardware Configuration Commands The following commands are used to set pressure sensor configuration, manufacturing date, and PCB assembly numbers at the factory. Do not modify in the field. SetPressureInstalled= (pressure sensor is optional, and is factory installed) SetMfgDate= SetPCBAssembly1= SetPCBSerialNum1= SetPCBAssembly2= SetPCBSerialNum1= SetPCBAssembly3= SetPCBSerialNum1= SetPCBAssembly4= SetPCBSerialNum1=

Manual revision 002 Section 4: Deploying and Operating MicroCAT SBE 37-SIP-IDO RS-232
48
Data Formats Each scan ends with a carriage return <CR> and line feed <LF>. • OutputFormat=0: raw decimal data, or diagnostic use at Sea-Bird
tttttt, ccccc.ccc, pppppp, vvvv, ooooo.ooo, dd mmm yyyy, hh:mm:ss where - tttttt = temperature A/D counts. - ccccc.ccc = conductivity frequency (Hz). - pppppp = pressure sensor pressure A/D counts; sent only if optional pressure sensor installed. - vvvv = pressure sensor pressure temperature compensation A/D counts; sent only if optional pressure sensor installed. - ooooo.ooo = oxygen frequency (Hz). - dd mmm yyyy = day, month, year; sent only if OutputTime=Y. - hh:mm:ss = hour, minute, second; sent only if OutputTime=Y. Note that depth, salinity, and sound velocity are not sent, regardless of the setting for those parameters. All data is separated with a comma and a space.
• OutputFormat=1 (default): converted decimal data
tttt.tttt,ccc.ccccc,ppppp.ppp, oo.ooo, dddd.ddd,ssss.ssss,vvvv.vvv, dd mmm yyyy, hh:mm:ss where - tttt.tttt = temperature (°C, ITS-90). - ccc.ccccc = conductivity (S/m). - ppppp.ppp = pressure (decibars); sent only if optional pressure sensor installed. - oo.ooo = oxygen (mL/l). - dddd.ddd = depth (meters); sent only if OutputDepth=Y. - ssss.ssss= salinity (psu); sent only if OutputSal=Y. - vvvv.vvv = sound velocity (meters/second); sent only if OutputSV=Y. - dd mmm yyyy = day, month, year; sent only if OutputTime=Y. - hh:mm:ss = hour, minute, second; sent only if OutputTime=Y. Leading zeros are suppressed, except for one zero to the left of the decimal point. All data is separated with a comma; date and time are also preceded by a space.
Example: Sample data output when pressure sensor is installed, OutputFormat=0, and OutputTime=Y: 524276, 2886.656, 785053, 2706, 4044.734, 20 Apr 2011, 09:01:34 (temperature, conductivity, pressure sensor pressure counts, pressure sensor temperature compensation, oxygen frequency, date, time)
Example: Sample data output when pressure sensor is installed, OutputFormat=1, OutputDepth=Y, OutputSal=Y, OutputSV=Y, OutputTime=Y: 8.5796, 0.15269, 531.316, 5.355, 527.021, 1.1348,1451.478, 20 Apr 2011, 09:01:44 (temperature, conductivity, pressure, oxygen, depth, salinity, sound velocity, date, time)
Notes: • Time is the time at the start of the
sample. • The MicroCAT’s pressure sensor is
an absolute sensor, so its raw output includes the effect of atmospheric pressure (14.7 psi). As shown on the Calibration Sheet, Sea-Bird’s calibration (and resulting calibration coefficients) is in terms of psia. However, when outputting pressure in decibars, the MicroCAT outputs pressure relative to the ocean surface (i.e., at the surface the output pressure is 0 decibars). The MicroCAT uses the following equation to convert psia to decibars: pressure (db) = [pressure (psia) - 14.7] * 0.689476
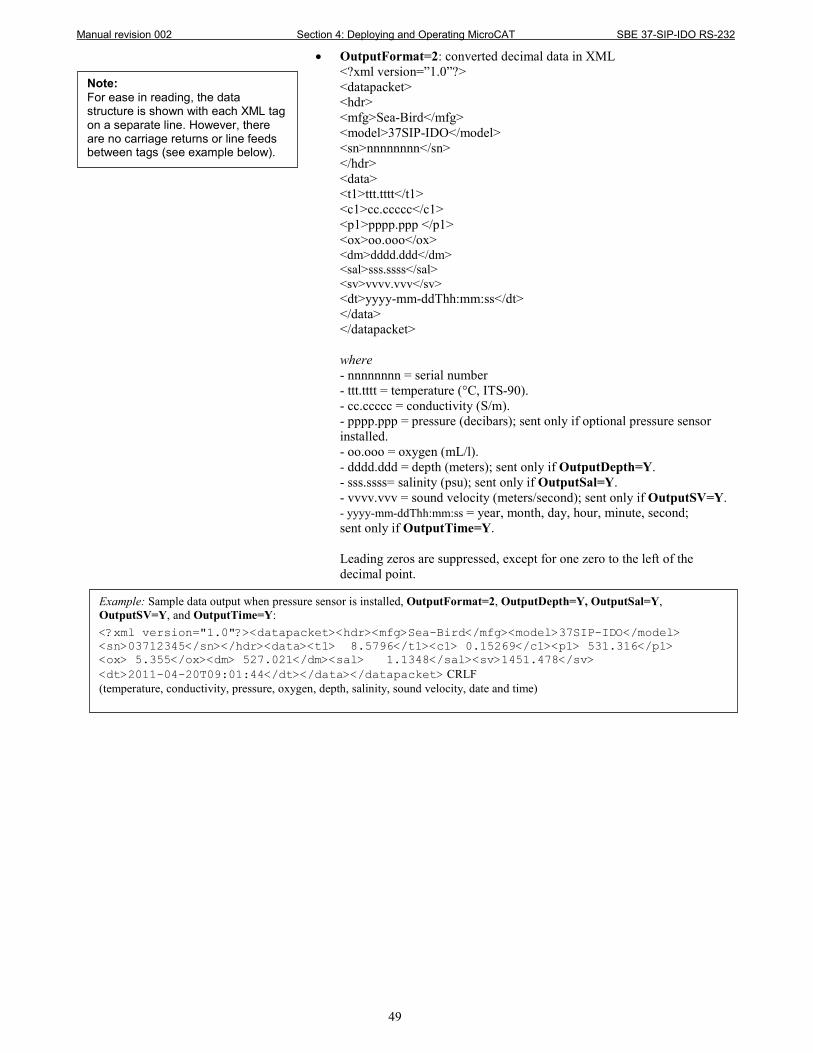
Manual revision 002 Section 4: Deploying and Operating MicroCAT SBE 37-SIP-IDO RS-232
49
• OutputFormat=2: converted decimal data in XML <?xml version=”1.0”?> <datapacket> <hdr> <mfg>Sea-Bird</mfg> <model>37SIP-IDO</model> <sn>nnnnnnnn</sn> </hdr> <data> <t1>ttt.tttt</t1> <c1>cc.ccccc</c1> <p1>pppp.ppp </p1> <ox>oo.ooo</ox> <dm>dddd.ddd</dm> <sal>sss.ssss</sal> <sv>vvvv.vvv</sv> <dt>yyyy-mm-ddThh:mm:ss</dt> </data> </datapacket> where - nnnnnnnn = serial number - ttt.tttt = temperature (°C, ITS-90). - cc.ccccc = conductivity (S/m). - pppp.ppp = pressure (decibars); sent only if optional pressure sensor installed. - oo.ooo = oxygen (mL/l). - dddd.ddd = depth (meters); sent only if OutputDepth=Y. - sss.ssss= salinity (psu); sent only if OutputSal=Y. - vvvv.vvv = sound velocity (meters/second); sent only if OutputSV=Y. - yyyy-mm-ddThh:mm:ss = year, month, day, hour, minute, second; sent only if OutputTime=Y. Leading zeros are suppressed, except for one zero to the left of the decimal point.
Example: Sample data output when pressure sensor is installed, OutputFormat=2, OutputDepth=Y, OutputSal=Y, OutputSV=Y, and OutputTime=Y: <?xml version="1.0"?><datapacket><hdr><mfg>Sea-Bird</mfg><model>37SIP-IDO</model> <sn>03712345</sn></hdr><data><t1> 8.5796</t1><c1> 0.15269</c1><p1> 531.316</p1> <ox> 5.355</ox><dm> 527.021</dm><sal> 1.1348</sal><sv>1451.478</sv> <dt>2011-04-20T09:01:44</dt></data></datapacket> CRLF (temperature, conductivity, pressure, oxygen, depth, salinity, sound velocity, date and time)
Note: For ease in reading, the data structure is shown with each XML tag on a separate line. However, there are no carriage returns or line feeds between tags (see example below).

Manual revision 002 Section 4: Deploying and Operating MicroCAT SBE 37-SIP-IDO RS-232
50
Optimizing Data Quality / Deployment Orientation
Background Information
Sea-Bird’s general recommendation is to deploy the MicroCAT with the plumbing in an inverted U-shape, to minimize the ingestion of sediment. A small bleed hole in the duct provides a way for air to exit the plumbing, so that the pump will prime and operate. In considering the effect of air on the pump, it can be instructive to look at the amount of air in the water column: • Case 1: The top ~2 meters of the water column may contain a continuous
supply of bubbles injected into the system by breaking waves. In this area, the ability to continuously eliminate air from the system, throughout the deployment, is of prime concern.
• Case 2: The next ~30 meters of the water column is not typically affected by bubbles from breaking waves. Without a bleed hole, it could take a few days to weeks after deployment for the air to clear out of the system in an inverted U-shape. However, once the air was bled, no more air would be injected into the plumbing.
• Case 3: Below ~30 meters, without a bleed hole, it could take only a few hours to a day for the air to clear out of the system in an inverted U-shape. As in Case 2, once the air was bled, no more air would be injected into the plumbing.
The bleed hole, while providing a way for air to exit the plumbing, also provides a little more ventilation; this ventilation will cause a slight decrease in the concentration of anti-foulant in the water held in the plumbing between samples. In our judgment, and the experience of customers, the risk of poor data due to sediment accumulation is usually greater than the risk of slightly reduced effectiveness of the anti-foulant, or is at least a reasonable trade-off. Deployment Recommendations
• Most deployments – Deploy the MicroCAT with the plumbing in an inverted U-shape (as shown in the photos), allowing air to exit the plumbing through the bleed hole.
• Deployments where severe bio-fouling is the main concern and sediment is not an issue – Case A: You need accurate data immediately upon deployment - Plug the bleed hole. Deploy the MicroCAT with the plumbing in an upright U-shape, providing maximum bio-foul protection but leaving the MicroCAT vulnerable to ingestion of sediment. Case B: You can skip some initial data, allowing time for trapped air to dissolve into the water and the pump to prime properly – Plug the bleed hole. Deploy the MicroCAT with the plumbing in an inverted U-shape, providing maximum bio-foul protection as well as protection from the ingestion of sediment. This deployment method will provide good data within a day if the deployment is deeper than ~30 meters. Eliminate scans associated with the initial deployment by evaluating the conductivity data; minimal changes in conductivity are an indication that pump flow is not correct because air in the plumbing has prevented the pump from priming.
• Deployments where air bubbles are the main concern and sediment is not an issue - Plug the bleed hole. Deploy the MicroCAT with the plumbing in an upright U-shape. This orientation provides better bleeding of air from the plumbing than can be achieved with the small bleed hole, but leaves the MicroCAT vulnerable to ingestion of sediment.
• Deployments where (for mounting reasons) the preferred orientation is horizontal – Sea-Bird does not recommend horizontal mounting, because sediment can accumulate in the conductivity cell, resulting in very poor quality conductivity data. As a minimum, incline the MicroCAT 10 degrees above the horizontal to prevent sediment accumulation and provide proper pump operation.
Note: A pump clogged with sediment results in poor flushing, causing poor quality data.
Shown with conductivity cell guard removed
Intake Exhaust
A A
Bleed hole
Section A-A: Looking down
10 degree minimum

Manual revision 002 Section 4: Deploying and Operating MicroCAT SBE 37-SIP-IDO RS-232
51
Setup for Deployment
Program the MicroCAT for the intended deployment (see Section 3: Preparing MicroCAT for Deployment for connection information; see information in this section on commands and sampling modes): 1. If StoreData=Y: Ensure all data has been uploaded, and then send
InitLogging to make the entire memory available for recording. If InitLogging is not sent, data will be stored after the last recorded sample.
2. Set the date and time (DateTime=).
3. Establish the setup and logging parameters.
4. Establish operating command parameters. These parameters configure the
MicroCAT’s response upon waking up, and direct the MicroCAT to sample data once, at pre-programmed intervals, or continuously.
Deployment
The MicroCAT can be mounted with customer-supplied hardware or can be ordered with pre-installed Sea-Bird mounting brackets. 1. Install customer-supplied mounting equipment (if Sea-Bird mounting
clamp and guide or brackets are not pre-installed): A. Install a mounting bracket that attaches to the tapped holes in the
MicroCAT. Use titanium hardware to attach the mounting bracket to the MicroCAT, and place non-metallic material between the titanium housing and any dissimilar metal in the bracket. Do not drill any holes in the MicroCAT.
B. Ensure the mounting scheme does not transfer mooring through-tension to the end cap, which could pull off the end cap.
2. New MicroCATs are shipped with AF24173 Anti-Foulant Devices
pre-installed. A. Remove the protective plugs, if installed, from the anti-foulant device
cup. The protective plugs must be removed prior to deployment or pressurization. If the plugs are left in place during deployment, the sensor will not register conductivity. If left in place during pressurization, the cell may be destroyed.
B. Verify that the anti-foulant device cup contains AF24173 Anti-Foulant Devices (see Section 5: Routine Maintenance and Calibration).
Remove plugs
Tapped holes for mounting guide
Tapped holes for mounting clamp
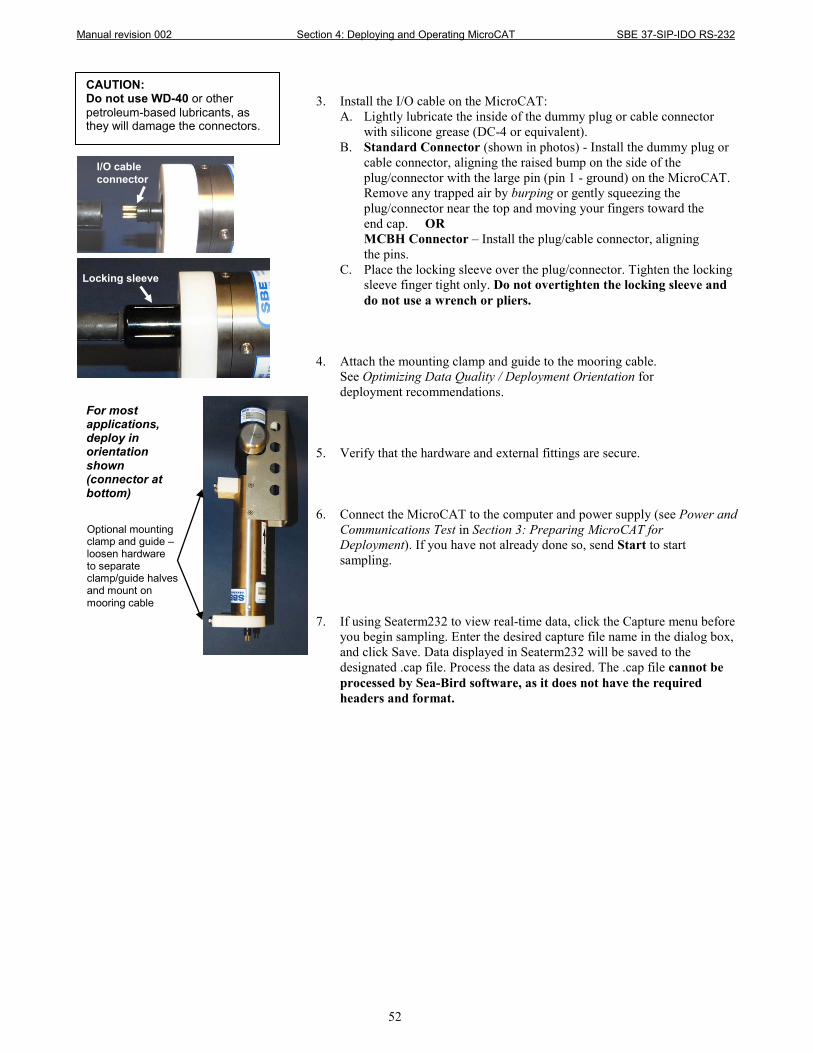
Manual revision 002 Section 4: Deploying and Operating MicroCAT SBE 37-SIP-IDO RS-232
52
3. Install the I/O cable on the MicroCAT: A. Lightly lubricate the inside of the dummy plug or cable connector
with silicone grease (DC-4 or equivalent). B. Standard Connector (shown in photos) - Install the dummy plug or
cable connector, aligning the raised bump on the side of the plug/connector with the large pin (pin 1 - ground) on the MicroCAT. Remove any trapped air by burping or gently squeezing the plug/connector near the top and moving your fingers toward the end cap. OR MCBH Connector – Install the plug/cable connector, aligning the pins.
C. Place the locking sleeve over the plug/connector. Tighten the locking sleeve finger tight only. Do not overtighten the locking sleeve and do not use a wrench or pliers.
4. Attach the mounting clamp and guide to the mooring cable. See Optimizing Data Quality / Deployment Orientation for deployment recommendations.
5. Verify that the hardware and external fittings are secure. 6. Connect the MicroCAT to the computer and power supply (see Power and
Communications Test in Section 3: Preparing MicroCAT for Deployment). If you have not already done so, send Start to start sampling.
7. If using Seaterm232 to view real-time data, click the Capture menu before
you begin sampling. Enter the desired capture file name in the dialog box, and click Save. Data displayed in Seaterm232 will be saved to the designated .cap file. Process the data as desired. The .cap file cannot be processed by Sea-Bird software, as it does not have the required headers and format.
CAUTION: Do not use WD-40 or other petroleum-based lubricants, as they will damage the connectors.
Optional mounting clamp and guide – loosen hardware to separate clamp/guide halves and mount on mooring cable
For most applications, deploy in orientation shown (connector at bottom)
Locking sleeve
I/O cable connector

Manual revision 002 Section 4: Deploying and Operating MicroCAT SBE 37-SIP-IDO RS-232
53
Recovery 1. Rinse the instrument and conductivity cell with fresh water. (See Section
5: Routine Maintenance and Calibration for cell cleaning and storage.) 2. Reinsert the protective plugs in the anti-foulant device cup.
WARNING! If the MicroCAT stops working while underwater, is unresponsive to commands, or shows other signs of flooding or damage, carefully secure it away from people until you have determined that abnormal internal pressure does not exist or has been relieved. Pressure housings may flood under pressure due to dirty or damaged o-rings, or other failed seals. When a sealed pressure housing floods at great depths and is subsequently raised to the surface, water may be trapped at the pressure at which it entered the housing, presenting a danger if the housing is opened before relieving the internal pressure. Instances of such flooding are rare. However, a housing that floods at 5000 meters depth holds an internal pressure of more than 7000 psia, and has the potential to eject the end cap with lethal force. A housing that floods at 50 meters holds an internal pressure of more than 85 psia; this force could still cause injury. If you suspect the MicroCAT is flooded, point it in a safe direction away from people, and loosen the bulkhead connector very slowly, at least 1 turn. This opens an o-ring seal under the connector. Look for signs of internal pressure (hissing or water leak). If internal pressure is detected, let it bleed off slowly past the connector o-ring. Then, you can safely remove the end cap.
Reinsert plugs
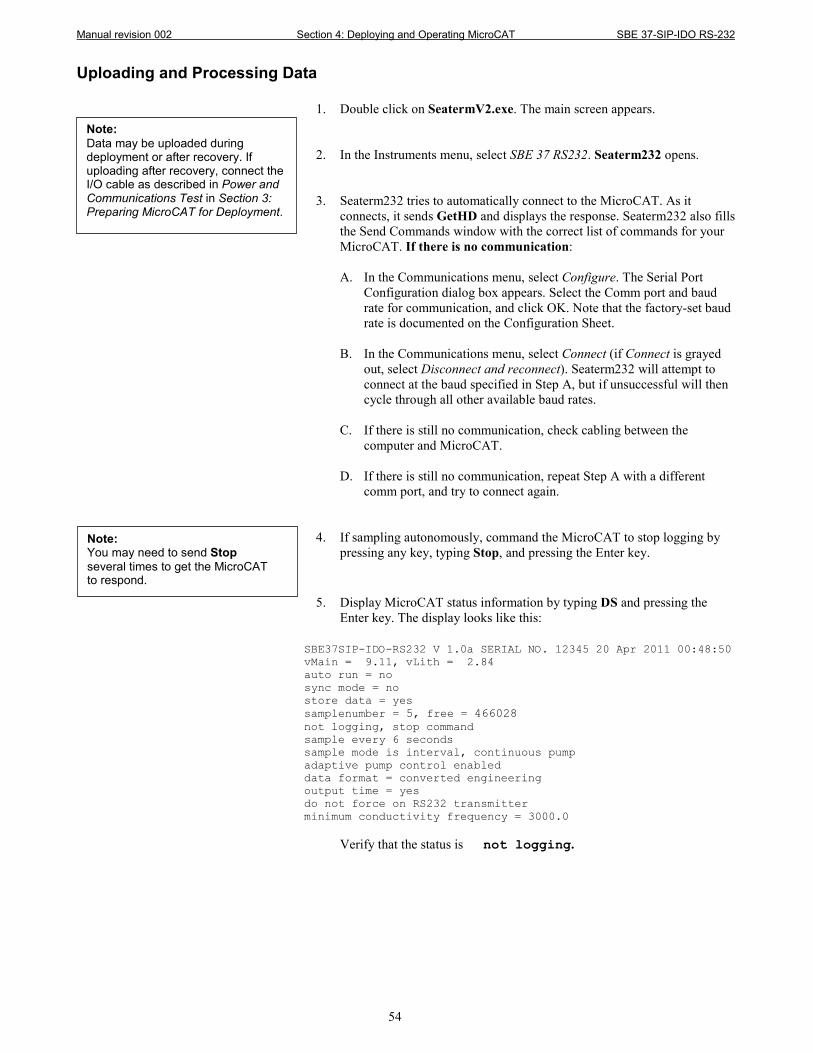
Manual revision 002 Section 4: Deploying and Operating MicroCAT SBE 37-SIP-IDO RS-232
54
Uploading and Processing Data
1. Double click on SeatermV2.exe. The main screen appears. 2. In the Instruments menu, select SBE 37 RS232. Seaterm232 opens. 3. Seaterm232 tries to automatically connect to the MicroCAT. As it
connects, it sends GetHD and displays the response. Seaterm232 also fills the Send Commands window with the correct list of commands for your MicroCAT. If there is no communication:
A. In the Communications menu, select Configure. The Serial Port
Configuration dialog box appears. Select the Comm port and baud rate for communication, and click OK. Note that the factory-set baud rate is documented on the Configuration Sheet.
B. In the Communications menu, select Connect (if Connect is grayed
out, select Disconnect and reconnect). Seaterm232 will attempt to connect at the baud specified in Step A, but if unsuccessful will then cycle through all other available baud rates.
C. If there is still no communication, check cabling between the
computer and MicroCAT.
D. If there is still no communication, repeat Step A with a different comm port, and try to connect again.
4. If sampling autonomously, command the MicroCAT to stop logging by pressing any key, typing Stop, and pressing the Enter key.
5. Display MicroCAT status information by typing DS and pressing the Enter key. The display looks like this:
SBE37SIP-IDO-RS232 V 1.0a SERIAL NO. 12345 20 Apr 2011 00:48:50 vMain = 9.11, vLith = 2.84 auto run = no sync mode = no store data = yes samplenumber = 5, free = 466028 not logging, stop command sample every 6 seconds sample mode is interval, continuous pump adaptive pump control enabled data format = converted engineering output time = yes do not force on RS232 transmitter minimum conductivity frequency = 3000.0
Verify that the status is not logging.
Note: Data may be uploaded during deployment or after recovery. If uploading after recovery, connect the I/O cable as described in Power and Communications Test in Section 3: Preparing MicroCAT for Deployment.
Note: You may need to send Stop several times to get the MicroCAT to respond.

Manual revision 002 Section 4: Deploying and Operating MicroCAT SBE 37-SIP-IDO RS-232
55
6. Click the Upload menu to upload stored data. Seaterm232 responds as follows: A. Seaterm232 sends GetSD and displays the response.
GetSD provides information on the instrument status, and number of samples in memory.
B. In the Save As dialog box, enter the desired upload file name and
click Save. The upload file has a .XML extension. C. An Upload Data dialog box appears:
Make the desired selections.
Note: If binary upload is selected, Seaterm232 uploads the data in binary and then converts it to ASCII text, resulting in a data file that is identical to one uploaded in ASCII text.
Defines data upload type and range: • All data as a single file – All data is uploaded
into 1 file. • By scan number range – Enter beginning scan
(sample) number and total number of scans. All data within range is uploaded into 1 file.
• By address range – Enter beginning byte number and total number of bytes. Note that first byte in memory is byte 0. All data within range is uploaded into 1 file.
To change upload file name selected in Step B above, click Browse to navigate to desired upload file path and name. Upload file has a .xml extension. After Seaterm232 uploads data into .xml data file, it creates .hex data file and .xmlcon configuration file that are compatible with SBE Data Processing. These files are placed in same directory as .xml data file, and have same name (but different extensions).
Select number of bytes uploaded in each block. Seaterm232 uploads data in blocks, and calculates a checksum at end of each block. If block fails checksum verification, Seaterm232 tries to upload block of data again, cutting block size in half.
Select to enable ASCII text or binary upload. Binary is approximately twice as fast.

Manual revision 002 Section 4: Deploying and Operating MicroCAT SBE 37-SIP-IDO RS-232
56
7. Click the Header Form tab to customize the header:
The entries are free form, 0 to 12 lines long. This dialog box establishes: • the header prompts that appear for the user to fill in when uploading
data, if Prompt for header information was selected • the header included with the uploaded data, if Include default header
form in upload file was selected Enter the desired header/header prompts.
8. Click Start; the Status bar at the bottom of the window displays the
upload progress: A. Seaterm232 sends several status commands providing information
regarding the number of samples in memory, calibration coefficients, etc., and writes the responses to the upload .xml file.
B. If you selected Prompt for header information in the Upload Data dialog box – a dialog box with the header form appears. Enter the desired header information, and click OK. Seaterm232 writes the header information to the upload .xml file.
C. Seaterm232 sends the data upload command, based on your selection of upload range in the Upload Data dialog box, and writes the data to the upload .xml file.
D. From the information in the .xml file, Seaterm232 creates a .hex data file and a .xmlcon configuration file that are compatible with SBE Data Processing for processing and plotting the data. These files are placed in the same directory as the .xml data file and have the same name (but different extensions).
Defines header information included with uploaded data: • Prompt for header information –
As data is uploaded, user is prompted to fill out user-defined header form.
• Include default header form in upload file – User-defined default header form included in upload file. User is not prompted to add any information when data is uploaded.
• Don’t include default header form in upload file – Header information not included in upload file.
Note: SeatermV2 with version < 1.1 did not convert the uploaded .xml data file to a .hex and .xmlcon file. Convert .XML data file in the Tools menu was used to convert the .xml data file to a .cnv file, which could be processed in SBE Data Processing. We recommend that you update your SeatermV2 software to 1.1b or later.
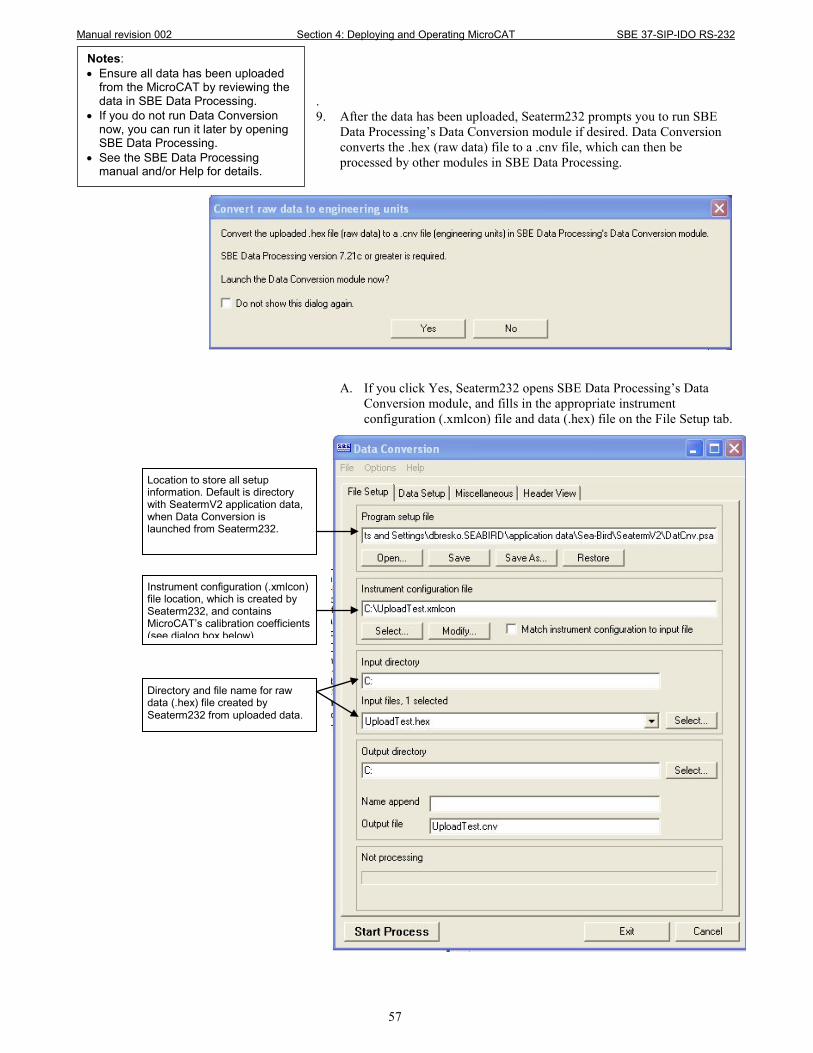
Manual revision 002 Section 4: Deploying and Operating MicroCAT SBE 37-SIP-IDO RS-232
57
. 9. After the data has been uploaded, Seaterm232 prompts you to run SBE
Data Processing’s Data Conversion module if desired. Data Conversion converts the .hex (raw data) file to a .cnv file, which can then be processed by other modules in SBE Data Processing.
A. If you click Yes, Seaterm232 opens SBE Data Processing’s Data Conversion module, and fills in the appropriate instrument configuration (.xmlcon) file and data (.hex) file on the File Setup tab.
Notes: • Ensure all data has been uploaded
from the MicroCAT by reviewing the data in SBE Data Processing.
• If you do not run Data Conversion now, you can run it later by opening SBE Data Processing.
• See the SBE Data Processing manual and/or Help for details.
Location to store all setup information. Default is directory with SeatermV2 application data, when Data Conversion is launched from Seaterm232.
Instrument configuration (.xmlcon) file location, which is created by Seaterm232, and contains MicroCAT’s calibration coefficients (see dialog box below).
Directory and file name for raw data (.hex) file created by Seaterm232 from uploaded data.

Manual revision 002 Section 4: Deploying and Operating MicroCAT SBE 37-SIP-IDO RS-232
58
The Configuration dialog box (which appears if you click Modify on the File Setup tab) looks like this:
The settings in the .xmlcon file created by Seaterm232 are based on the setup of the MicroCAT. • Review the deployment latitude, and modify as needed. • If your MicroCAT does not have a pressure sensor, review the
deployment pressure, and modify as needed.
Click Save if you made any changes, and then click Exit.
Double click on sensor to view and/or modify calibration coefficients, which are based on calibration coefficients that were programmed into MicroCAT.
Time between scans. Must agree with MicroCAT setup (SampleInterval=); see reply from GetCD or DS.
Indicates if MicroCAT includes optional pressure sensor. If no pressure sensor included, deployment pressure is used to calculate conductivity (and derived variables such as salinity and sound velocity). Value shown is based on ReferencePressure= that was programmed into MicroCAT; you can change this value in .xmlcon file, if you have updated deployment depth information.
Latitude is used to calculate local gravity (to calculate salt water depth). If enabled, software uses input latitude in calculation. If disabled, software uses Latitude on Miscellaneous tab of Data Conversion. Enter latitude for your deployment.
Indicates whether MicroCAT includes integrated dissolved oxygen sensor (37-SMP-IDO, SIP-IDO, or IMP-IDO only).

Manual revision 002 Section 4: Deploying and Operating MicroCAT SBE 37-SIP-IDO RS-232
59
B. Click on the Data Setup tab.
The Select Output Variables dialog box (which appears when you click Select Output Variables on the Data Setup tab) looks like this:
Select Temperature, Conductivity, and Pressure (optional), as well as desired derived variables such as salinity, sound velocity, etc. Click OK.
C. At the bottom of the Data Conversion dialog box, click Start Process
to convert the .hex file to a .cnv file.
Select start time source for header: Instrument’s time stamp (only appropriate selection for MicroCAT).
Select which variables to convert and output (see dialog box below).
If desired, select to have software prompt you to modify start time to put in output .cnv header (instead of using source for start time listed above), or to add a note to output .cnv header.
Select: - Upcast and downcast - Create converted data (.cnv) file only (only appropriate selections for MicroCAT)
Select ASCII output.

Manual revision 002 Section 4: Deploying and Operating MicroCAT SBE 37-SIP-IDO RS-232
60
10. Once the data is converted to a .cnv file, use the other SBE Data
Processing modules as desired: • Derive module - Calculate additional derived variables. • Sea Plot module - Plot data.
Notes: To prepare for re-deployment: 1. After all data has been uploaded, send
InitLogging. If this is not sent, new data will be stored after the last recorded sample, preventing use of the entire memory capacity.
2. Do one of the following: • Disconnect the MicroCAT from the
external power source. • Use Start to begin sampling
immediately.

Manual revision 002 Section 5: Routine Maintenance and Calibration SBE 37-SIP-IDO RS-232
61
Section 5: Routine Maintenance and Calibration
This section reviews corrosion precautions, connector mating and maintenance, conductivity cell cleaning and storage, plumbing maintenance, plastic housing handling instructions, pressure sensor maintenance, replacement of AF24173 Anti-Foulant Devices, and sensor calibration. The accuracy of the MicroCAT is sustained by the care and calibration of the sensors and by establishing proper handling practices.
Corrosion Precautions Rinse the MicroCAT with fresh water after use and prior to storage. All exposed metal is titanium; other materials are plastic. No corrosion precautions are required, but direct electrical connection of the MicroCAT housing to mooring or other dissimilar metal hardware should be avoided.
Connector Mating and Maintenance Clean and inspect the connectors and cable before every deployment and as part of your yearly equipment maintenance. Inspect connectors that are unmated for signs of corrosion product around the pins, and for cuts, nicks or other flaws that may compromise the seal. When remating: 1. Lightly lubricate the inside of the dummy plug/cable connector with
silicone grease (DC-4 or equivalent). 2. Standard Connector - Install the plug/cable connector, aligning the
raised bump on the side of the plug/cable connector with the large pin (pin 1 - ground) on the MicroCAT. Remove any trapped air by burping or gently squeezing the plug/connector near the top and moving your fingers toward the end cap. OR MCBH Connector – Install the plug/cable connector, aligning the pins.
3. Place the locking sleeve over the plug/cable connector. Tighten the
locking sleeve finger tight only. Do not overtighten the locking sleeve and do not use a wrench or pliers.
Verify that a cable is installed on the MicroCAT before deployment.
CAUTION: Do not use WD-40 or other petroleum-based lubricants, as they will damage the connectors.
Note: See Application Note 57: Connector Care and Cable Installation.
Locking sleeve
I/O cable

Manual revision 002 Section 5: Routine Maintenance and Calibration SBE 37-SIP-IDO RS-232
62
Conductivity Cell and Dissolved Oxygen Sensor Maintenance
The MicroCAT’s conductivity cell, plumbing, and oxygen sensor plenum is shipped dry to prevent freezing in shipping. Refer to Application Note 2D: Instructions for Care and Cleaning of Conductivity Cells for conductivity cell cleaning procedures and cleaning materials. • The Active Use (after each cast) section of the application note
is not applicable to the MicroCAT, which is intended for use as a moored instrument.
Refer to Application Note 64: SBE 43 Dissolved Oxygen Sensor for cleaning and storage procedures and materials. • Prolonged exposure of the dissolved oxygen sensor membrane to
Triton X-100 is harmful to the sensor membrane and causes the sensor calibration to drift. As a result of the oxygen sensor sensitivity to Triton and because the conductivity cell and oxygen sensor are integrated in this instrument, we recommend use of the dissolved oxygen sensor cleaning and storage instructions for the entire plumbing system; do not use cleaning and storage instructions for the conductivity cell (these could damage the oxygen sensor membrane).
To rinse or fill the conductivity cell, dissolved oxygen plenum, and plumbing: • Hold or clamp the MicroCAT with the connector end up, so that the
plumbing is in a U-shape. • Pour the water or solution through the plumbing with a syringe or
wash bottle.
Plumbing Maintenance Before each deployment, clean the bleed hole with 0.4 mm diameter wire, 13 mm long (0.016 inch diameter wire, 0.5 inches long) (you can use #26 AWG wire), and blow through it to ensure it is open. A clogged bleed hole can trap air, preventing the pump from functioning properly; this will affect the data quality.
CAUTIONS: • Do not put a brush or any object
inside the plumbing to clean it. Touching and bending conductivity cell electrodes can change the calibration; large bends /movement of the electrodes can damage the cell. Touching the oxygen sensor membrane can tear it.
• Do not store with water in the plumbing. Freezing temperatures (for example, Arctic environments or during air shipment) can break the conductivity cell or damage the oxygen sensor membrane if it is full of water.
Exhaust
Intake
A A
Bleed hole
Section A-A: Looking down
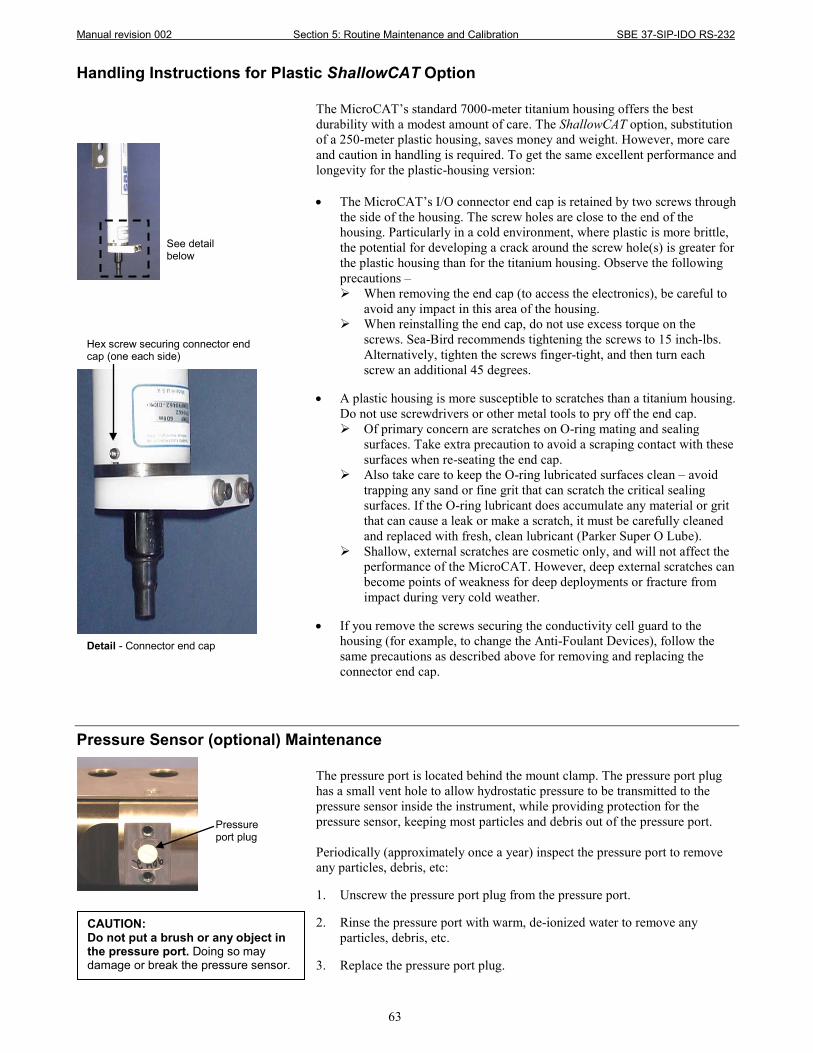
Manual revision 002 Section 5: Routine Maintenance and Calibration SBE 37-SIP-IDO RS-232
63
Handling Instructions for Plastic ShallowCAT Option The MicroCAT’s standard 7000-meter titanium housing offers the best durability with a modest amount of care. The ShallowCAT option, substitution of a 250-meter plastic housing, saves money and weight. However, more care and caution in handling is required. To get the same excellent performance and longevity for the plastic-housing version: • The MicroCAT’s I/O connector end cap is retained by two screws through
the side of the housing. The screw holes are close to the end of the housing. Particularly in a cold environment, where plastic is more brittle, the potential for developing a crack around the screw hole(s) is greater for the plastic housing than for the titanium housing. Observe the following precautions – When removing the end cap (to access the electronics), be careful to
avoid any impact in this area of the housing. When reinstalling the end cap, do not use excess torque on the
screws. Sea-Bird recommends tightening the screws to 15 inch-lbs. Alternatively, tighten the screws finger-tight, and then turn each screw an additional 45 degrees.
• A plastic housing is more susceptible to scratches than a titanium housing.
Do not use screwdrivers or other metal tools to pry off the end cap. Of primary concern are scratches on O-ring mating and sealing
surfaces. Take extra precaution to avoid a scraping contact with these surfaces when re-seating the end cap.
Also take care to keep the O-ring lubricated surfaces clean – avoid trapping any sand or fine grit that can scratch the critical sealing surfaces. If the O-ring lubricant does accumulate any material or grit that can cause a leak or make a scratch, it must be carefully cleaned and replaced with fresh, clean lubricant (Parker Super O Lube).
Shallow, external scratches are cosmetic only, and will not affect the performance of the MicroCAT. However, deep external scratches can become points of weakness for deep deployments or fracture from impact during very cold weather.
• If you remove the screws securing the conductivity cell guard to the
housing (for example, to change the Anti-Foulant Devices), follow the same precautions as described above for removing and replacing the connector end cap.
Pressure Sensor (optional) Maintenance The pressure port is located behind the mount clamp. The pressure port plug has a small vent hole to allow hydrostatic pressure to be transmitted to the pressure sensor inside the instrument, while providing protection for the pressure sensor, keeping most particles and debris out of the pressure port. Periodically (approximately once a year) inspect the pressure port to remove any particles, debris, etc: 1. Unscrew the pressure port plug from the pressure port. 2. Rinse the pressure port with warm, de-ionized water to remove any
particles, debris, etc. 3. Replace the pressure port plug.
CAUTION: Do not put a brush or any object in the pressure port. Doing so may damage or break the pressure sensor.
Hex screw securing connector end cap (one each side)
Detail - Connector end cap
See detail below
Pressure port plug

Manual revision 002 Section 5: Routine Maintenance and Calibration SBE 37-SIP-IDO RS-232
64
Replacing Anti-Foulant Devices – Mechanical Design Change
The AF24173 Anti-Foulant Devices are installed at the intake and the pump exhaust. Details are provided below on replacing the AF24173 Anti-Foulant Devices. This page provides the mechanical details for the SBE 37-SIP-IDO MicroCAT. The following page, developed for a MicroCAT that does not include an integral pump or dissolved oxygen sensor, provides the precautions and handling details. 1. Remove the 4 Phillips-head screws holding the conductivity cell guard to
the housing. Carefully remove the cell guard. 2. Remove and replace the Anti-Foulant Devices. 3. Carefully replace the cell guard, securing it to the housing with the
4 Phillips-head screws.
CAUTIONS: • Be careful not to damage the
glass conductivity cell or the thermistor when removing / replacing Anti-Foulant Devices.
• If applicable to your MicroCAT, see Handling Instructions for Plastic ShallowCAT Option.
Shown with conductivity cell guard removed
Intake Exhaust
Anti-Foulant Devices
Thermistor
Conductivity cell guard
Remove screws (both sides, 4 total)
Shorter screw
Longer screw
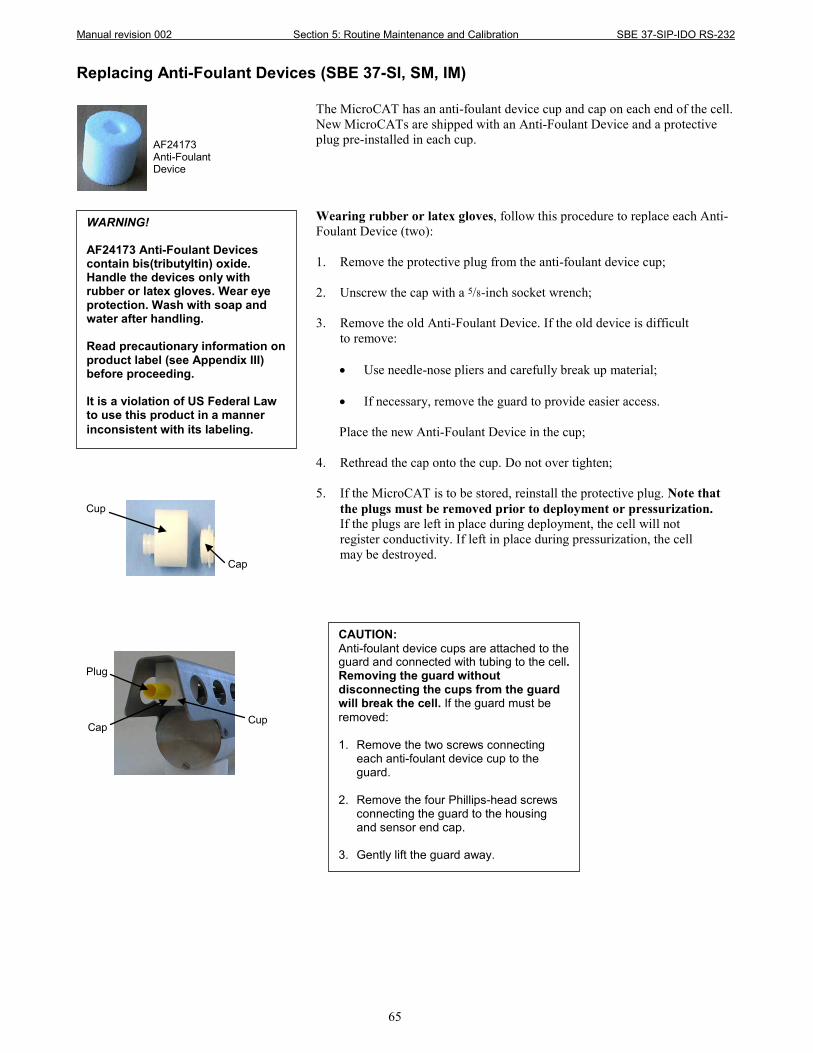
Manual revision 002 Section 5: Routine Maintenance and Calibration SBE 37-SIP-IDO RS-232
65
Replacing Anti-Foulant Devices (SBE 37-SI, SM, IM) The MicroCAT has an anti-foulant device cup and cap on each end of the cell. New MicroCATs are shipped with an Anti-Foulant Device and a protective plug pre-installed in each cup. Wearing rubber or latex gloves, follow this procedure to replace each Anti-Foulant Device (two): 1. Remove the protective plug from the anti-foulant device cup; 2. Unscrew the cap with a 5/8-inch socket wrench; 3. Remove the old Anti-Foulant Device. If the old device is difficult
to remove:
• Use needle-nose pliers and carefully break up material; • If necessary, remove the guard to provide easier access.
Place the new Anti-Foulant Device in the cup; 4. Rethread the cap onto the cup. Do not over tighten;
5. If the MicroCAT is to be stored, reinstall the protective plug. Note that
the plugs must be removed prior to deployment or pressurization. If the plugs are left in place during deployment, the cell will not register conductivity. If left in place during pressurization, the cell may be destroyed.
WARNING! AF24173 Anti-Foulant Devices contain bis(tributyltin) oxide. Handle the devices only with rubber or latex gloves. Wear eye protection. Wash with soap and water after handling. Read precautionary information on product label (see Appendix III) before proceeding. It is a violation of US Federal Law to use this product in a manner inconsistent with its labeling.
CAUTION: Anti-foulant device cups are attached to the guard and connected with tubing to the cell. Removing the guard without disconnecting the cups from the guard will break the cell. If the guard must be removed: 1. Remove the two screws connecting
each anti-foulant device cup to the guard.
2. Remove the four Phillips-head screws
connecting the guard to the housing and sensor end cap.
3. Gently lift the guard away.
Cup
Cap
Cup
Plug
Cap
AF24173 Anti-Foulant Device
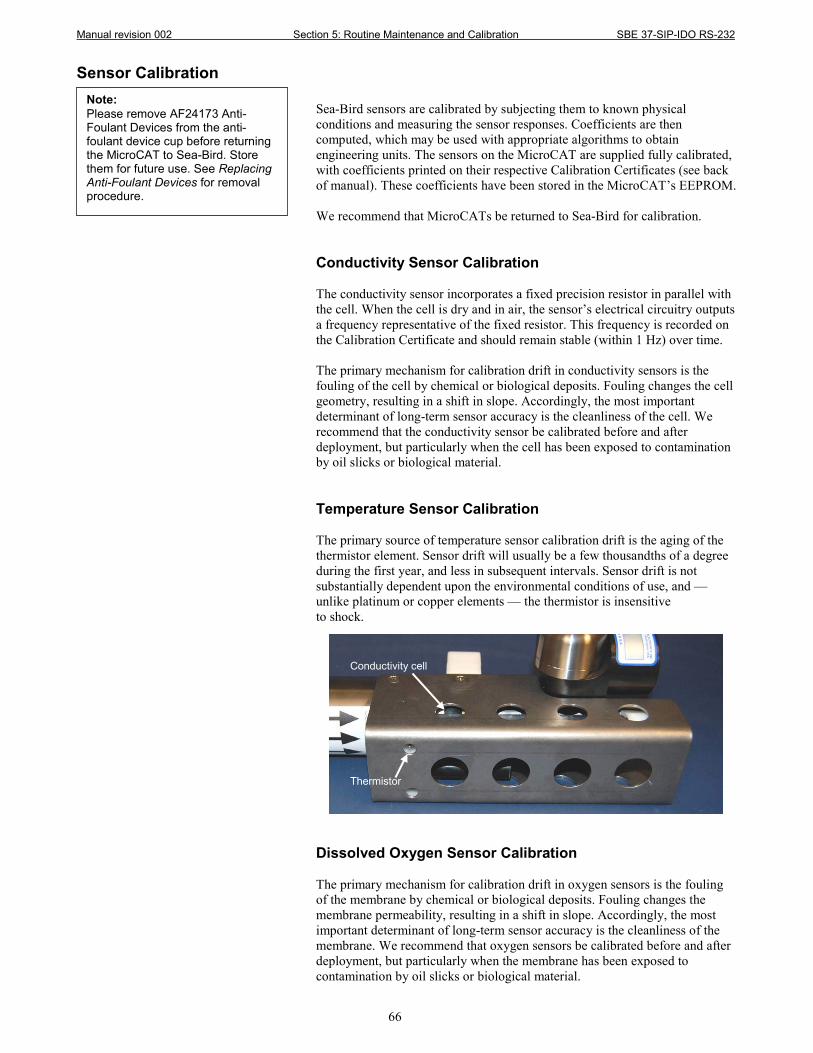
Manual revision 002 Section 5: Routine Maintenance and Calibration SBE 37-SIP-IDO RS-232
66
Sensor Calibration Sea-Bird sensors are calibrated by subjecting them to known physical conditions and measuring the sensor responses. Coefficients are then computed, which may be used with appropriate algorithms to obtain engineering units. The sensors on the MicroCAT are supplied fully calibrated, with coefficients printed on their respective Calibration Certificates (see back of manual). These coefficients have been stored in the MicroCAT’s EEPROM. We recommend that MicroCATs be returned to Sea-Bird for calibration. Conductivity Sensor Calibration The conductivity sensor incorporates a fixed precision resistor in parallel with the cell. When the cell is dry and in air, the sensor’s electrical circuitry outputs a frequency representative of the fixed resistor. This frequency is recorded on the Calibration Certificate and should remain stable (within 1 Hz) over time. The primary mechanism for calibration drift in conductivity sensors is the fouling of the cell by chemical or biological deposits. Fouling changes the cell geometry, resulting in a shift in slope. Accordingly, the most important determinant of long-term sensor accuracy is the cleanliness of the cell. We recommend that the conductivity sensor be calibrated before and after deployment, but particularly when the cell has been exposed to contamination by oil slicks or biological material. Temperature Sensor Calibration The primary source of temperature sensor calibration drift is the aging of the thermistor element. Sensor drift will usually be a few thousandths of a degree during the first year, and less in subsequent intervals. Sensor drift is not substantially dependent upon the environmental conditions of use, and — unlike platinum or copper elements — the thermistor is insensitive to shock.
Dissolved Oxygen Sensor Calibration The primary mechanism for calibration drift in oxygen sensors is the fouling of the membrane by chemical or biological deposits. Fouling changes the membrane permeability, resulting in a shift in slope. Accordingly, the most important determinant of long-term sensor accuracy is the cleanliness of the membrane. We recommend that oxygen sensors be calibrated before and after deployment, but particularly when the membrane has been exposed to contamination by oil slicks or biological material.
Note: Please remove AF24173 Anti-Foulant Devices from the anti-foulant device cup before returning the MicroCAT to Sea-Bird. Store them for future use. See Replacing Anti-Foulant Devices for removal procedure.
Conductivity cell
Thermistor
Manual revision 002 Section 5: Routine Maintenance and Calibration SBE 37-SIP-IDO RS-232
67
Pressure Sensor (optional) Calibration The optional strain-gauge pressure sensor is a mechanical diaphragm type, with an initial static error band of 0.05%. Consequently, the sensor is capable of meeting the MicroCAT’s 0.10% error specification with some allowance for aging and ambient-temperature induced drift. Pressure sensors show most of their error as a linear offset from zero. A technique is provided below for making small corrections to the pressure sensor calibration using the offset (POffset=) calibration coefficient term by comparing MicroCAT pressure output to readings from a barometer. Allow the MicroCAT to equilibrate in a reasonably constant temperature environment for at least 5 hours before starting. Pressure sensors exhibit a transient change in their output in response to changes in their environmental temperature. Sea-Bird instruments are constructed to minimize this by thermally decoupling the sensor from the body of the instrument. However, there is still some residual effect; allowing the MicroCAT to equilibrate before starting will provide the most accurate calibration correction. 1. Place the MicroCAT in the orientation it will have when deployed. 2. In Seaterm232:
A. Set the pressure offset to 0.0 (POffset=0). B. Set the output format to converted decimal (OutputFormat=1), so the
pressure output will be in decibars. C. Send TSn:100 to take 100 samples and transmit data.
3. Compare the MicroCAT output to the reading from a good barometer at the
same elevation as the MicroCAT’s pressure sensor port. Calculate offset = barometer reading – MicroCAT reading
4. Enter the calculated offset (positive or negative) in the MicroCAT’s
EEPROM, using POffset= in Seaterm232.
Offset Correction Example Absolute pressure measured by a barometer is 1010.50 mbar. Pressure displayed from MicroCAT is -2.5 dbars. Convert barometer reading to dbars using the relationship: mbar * 0.01 = dbar Barometer reading = 1010.50 mbar * 0.01 = 10.1050 dbar The MicroCAT’s internal calculations output gage pressure, using an assumed value of 14.7 psi for atmospheric pressure. Convert MicroCAT reading from gage to absolute by adding 14.7 psia to the MicroCAT’s output: -2.5 dbars + (14.7 psi * 0.689476 dbar/psia) = -2.5 + 10.13 = 7.635 dbars Offset = 10.1050 – 7.635 = + 2.47 dbars Enter offset in MicroCAT.
For demanding applications, or where the sensor’s air ambient pressure response has changed significantly, calibration using a dead-weight generator is recommended. The pressure sensor port uses a 7/16-20 straight thread for mechanical connection to the pressure source. Use a fitting that has an O-ring tapered seal, such as Swagelok-200-1-4ST, which conforms to MS16142 boss.
Note: The MicroCAT’s pressure sensor is an absolute sensor, so its raw output (OutputFormat=0) includes the effect of atmospheric pressure (14.7 psi). As shown on the Calibration Sheet, Sea-Bird’s calibration (and resulting calibration coefficients) is in terms of psia. However, when outputting pressure in engineering units, the MicroCAT outputs pressure relative to the ocean surface (i.e., at the surface the output pressure is 0 decibars). The MicroCAT uses the following equation to convert psia to decibars: Pressure (db) = [pressure (psia) - 14.7] * 0.689476

Manual revision 002 Section 6: Troubleshooting SBE 37-SIP-IDO RS-232
68
Section 6: Troubleshooting
This section reviews common problems in operating the MicroCAT, and provides the most common causes and solutions.
Problem 1: Unable to Communicate with MicroCAT If OutputExecutedTag=N, the S> prompt indicates that communications between the MicroCAT and computer have been established. Before proceeding with troubleshooting, attempt to establish communications again by selecting Connect in the Communications menu in Seaterm232 or pressing the Enter key several times. Cause/Solution 1: The I/O cable connection may be loose. Check the cabling between the MicroCAT and computer for a loose connection. Cause/Solution 2: The instrument communication settings may not have been entered correctly in Seaterm232. Verify the settings in the Serial Port Configuration dialog box (Communications menu -> Configure). The settings should match those on the instrument Configuration Sheet. Cause/Solution 3: The I/O cable between the MicroCAT and computer may not be the correct one. The I/O cable supplied with the MicroCAT permits connection to standard 9-pin RS-232 interfaces.
Problem 2: No Data Recorded Cause/Solution 1: The memory may be full; once the memory is full, no further data will be recorded. Verify that the memory is not full using GetSD or DS (free = 0 or 1 if memory is full). Sea-Bird recommends that you upload all previous data before beginning another deployment. Once the data is uploaded, send InitLogging to reset the memory. After the memory is reset, GetSD or DS will show samples = 0. Cause/Solution 2: The MicroCAT may be set to StoreData=N; see the GetCD or DS response. The MicroCAT will only store data to memory if StoreData=Y.
Problem 3: Unreasonable T, C, P, or D.O. Data The symptom of this problem is a data file that contains unreasonable values (for example, values that are outside the expected range of the data). Cause/Solution 1: A data file with unreasonable (i.e., out of the expected range) values for temperature, conductivity, pressure, or dissolved oxygen may be caused by incorrect calibration coefficients in the MicroCAT. Send GetCC to verify the calibration coefficients in the MicroCAT match the instrument Calibration Certificates. Note that calibration coefficients do not affect the raw data stored in MicroCAT memory. • If you have not yet overwritten the memory with new data, you can
correct the coefficients and then upload the data again. • If you have overwritten the memory with new data, you can manually
correct the coefficients in the .xmlcon configuration file, and then reprocess the data in SBE Data Processing’s Data Conversion module.

Manual revision 002 Section 6: Troubleshooting SBE 37-SIP-IDO RS-232
69
Cause/Solution 2: Minimal changes in conductivity are an indication that the pump flow is not correct. Poor flushing can have several causes:
• Air in the plumbing may be preventing the pump from priming. This can result from: - A clogged air bleed hole; clean the air bleed hole (see Plumbing Maintenance in Section 5: Routine Maintenance and Calibration). - Incorrect orientation for a shallow deployment in a location with breaking waves; see Optimizing Data Quality / Deployment Orientation in Section 4: Deploying and Operating MicroCAT.
• The pump may be clogged by sediment. Using a wash bottle, flush the plumbing to attempt to dislodge the sediment. If the sediment is impacted and you cannot flush it, return the MicroCAT to Sea-Bird for servicing. To minimize ingestion of sediment for future deployments, see Optimizing Data Quality / Deployment Orientation in Section 4: Deploying and Operating MicroCAT.
• The pump may not be turning on before each sample, if MinCondFreq= is set too high. See Command Descriptions in Section 4: Deploying and Operating MicroCAT for details.
Problem 4: Salinity Spikes Salinity is a function of conductivity, temperature, and pressure, and must be calculated from C, T, and P measurements made on the same parcel of water. Salinity is calculated and output by the 37-SIP-IDO if OutputSal=Y. Alternatively, salinity can be calculated in SBE Data Processing’s Data Conversion module from the data uploaded from memory (.hex file) or in SBE Data Processing’s Derive module from the converted (.cnv) file. [Background information: Salinity spikes in profiling (i.e., moving, fast sampling) instruments typically result from misalignment of the temperature and conductivity measurements in conditions with sharp gradients. This misalignment is often caused by differences in response times for the temperature and conductivity sensors, and can be corrected for in post-processing if the T and C response times are known.] In moored, pumped instruments such as the 37-SIP-IDO MicroCAT, the pump flushes the conductivity cell at a faster rate than the environment changes, so the T and C measurements stay closely synchronized with the environment (i.e., even slow or varying response times are not significant factors in the salinity calculation). More typical causes of salinity spikes in a moored 37-SIP-IDO include: Cause/Solution 1: Severe external bio-fouling can restrict flow through the conductivity cell to such an extent that the conductivity measurement is significantly delayed from the temperature measurement. Cause/Solution 2: For a MicroCAT moored at shallow depth, differential solar heating can cause the actual temperature inside the conductivity cell to differ from the temperature measured by the thermistor. Salinity spikes associated mainly with daytime measurements during sunny conditions may be caused by this phenomenon. Cause/Solution 3: For a MicroCAT moored at shallow depth, air bubbles from breaking waves or spontaneous formation in supersaturated conditions can cause the conductivity cell to read low of correct.

Manual revision 002 Glossary SBE 37-SIP-IDO RS-232
70
Glossary MicroCAT (SBE 37) – High-accuracy conductivity, temperature, and optional pressure Recorder/Monitor. A number of models are available: • 37-IM (Inductive Modem, internal battery and memory) • 37-IMP (Inductive Modem, internal battery and memory, integral Pump) • 37-IMP-IDO (Inductive Modem, internal battery and memory, integral
Pump, Integrated Dissolved Oxygen sensor) – includes internal RS-232 interface
• 37-SM (Serial interface, internal battery and Memory) • 37-SMP (Serial interface, internal battery and Memory, integral Pump) • 37-SMP-IDO (Serial interface, internal battery and Memory, integral
Pump, Integrated Dissolved Oxygen sensor) • 37-SI (Serial Interface, memory, no internal battery) * • 37-SIP (Serial Interface, integral Pump, memory, no internal battery) * • 37-SIP-IDO (Serial Interface, integral Pump, Integrated Dissolved
Oxygen sensor, memory, no internal battery) The -SM, -SMP, -SMP-IDO, -SI, -SIP, and –SIP-IDO are available with RS-232 (standard) or RS-485 (optional) interface. * Note: Version 3.0 and later of the 37-SI and 37-SIP include memory; earlier versions did not include memory. PCB – Printed Circuit Board. SBE Data Processing - Sea-Bird’s Win 2000/XP data processing software, which calculates and plots temperature, conductivity, oxygen, and optional pressure, and derives variables such as salinity and sound velocity. Scan – One data sample containing temperature, conductivity, optional pressure, oxygen, and date and time, as well as optional derived variables (salinity). SEASOFT V2 – Sea-Bird’s complete Win 2000/XP software package, which includes software for communication, real-time data acquisition, and data analysis and display. SEASOFT V2 includes SeatermV2 and SBE Data Processing. SeatermV2 – Win 2000/XP terminal program launcher, which launches the appropriate terminal program for the selected instrument (Seaterm232 for this MicroCAT). Seaterm232 – Win 2000/XP terminal program used with Sea-Bird instruments that communicate via an RS-232 interface, and that were developed or redesigned in 2006 and later. The common feature of these instruments is the ability to output data in XML.
Note: All Sea-Bird software listed was designed to work with a computer running Windows 2000/XP. Extensive testing has not shown any compatibility problems when using the software with a computer running Windows Vista or Windows 7 (32-bit).
Manual revision 002 Glossary SBE 37-SIP-IDO RS-232
71
Super O-Lube – Silicone lubricant used to lubricate O-rings and O-ring mating surfaces. Super O-Lube can be ordered from Sea-Bird, but should also be available locally from distributors. Super O-Lube is manufactured by Parker Hannifin (www.parker.com/ead/cm2.asp?cmid=3956). TCXO – Temperature Compensated Crystal Oscillator. Triton X-100 – Reagent grade non-ionic surfactant (detergent), used for cleaning the conductivity cell. Triton can be ordered from Sea-Bird, but should also be available locally from chemical supply or laboratory products companies. Triton is manufactured by Mallinckrodt Baker (www.mallbaker.com/changecountry.asp?back=/Default.asp).

Manual revision 002 Appendix I: Functional Description SBE 37-SIP-IDO RS-232
72
Appendix I: Functional Description
Sensors The MicroCAT embodies the same sensor elements (3-electrode, 2-terminal, borosilicate glass cell, and pressure-protected thermistor) previously employed in our modular SBE 3 and SBE 4 sensors and in the SEACAT and SEACAT plus family. The MicroCAT’s optional strain-gauge pressure sensor is available in the following pressure ranges: 20, 100, 350, 600, 1000, 2000, 3500, and 7000 meters. Compensation of the temperature influence on pressure offset and scale is performed by the MicroCAT’s CPU. The Integrated Dissolved Oxygen sensor is a frequency-output version of our field-proven SBE 43 Dissolved Oxygen sensor, with the same performance specifications.
Sensor Interface Temperature is acquired by applying an AC excitation to a hermetically sealed VISHAY reference resistor and an ultra-stable aged thermistor with a drift rate of less than 0.002°C per year. A 24-bit A/D converter digitizes the outputs of the reference resistor and thermistor (and optional pressure sensor). AC excitation and ratiometric comparison using a common processing channel avoids errors caused by parasitic thermocouples, offset voltages, leakage currents, and reference errors. Conductivity is acquired using an ultra-precision Wien Bridge oscillator to generate a frequency output in response to changes in conductivity.
Real-Time Clock To minimize power and improve clock accuracy, a temperature-compensated crystal oscillator (TCXO) is used as the real-time-clock frequency source. The TCXO is accurate to ± 1 minute per year (0 ºC to 40 ºC).
Note: Pressure ranges are expressed in meters of deployment depth capability.
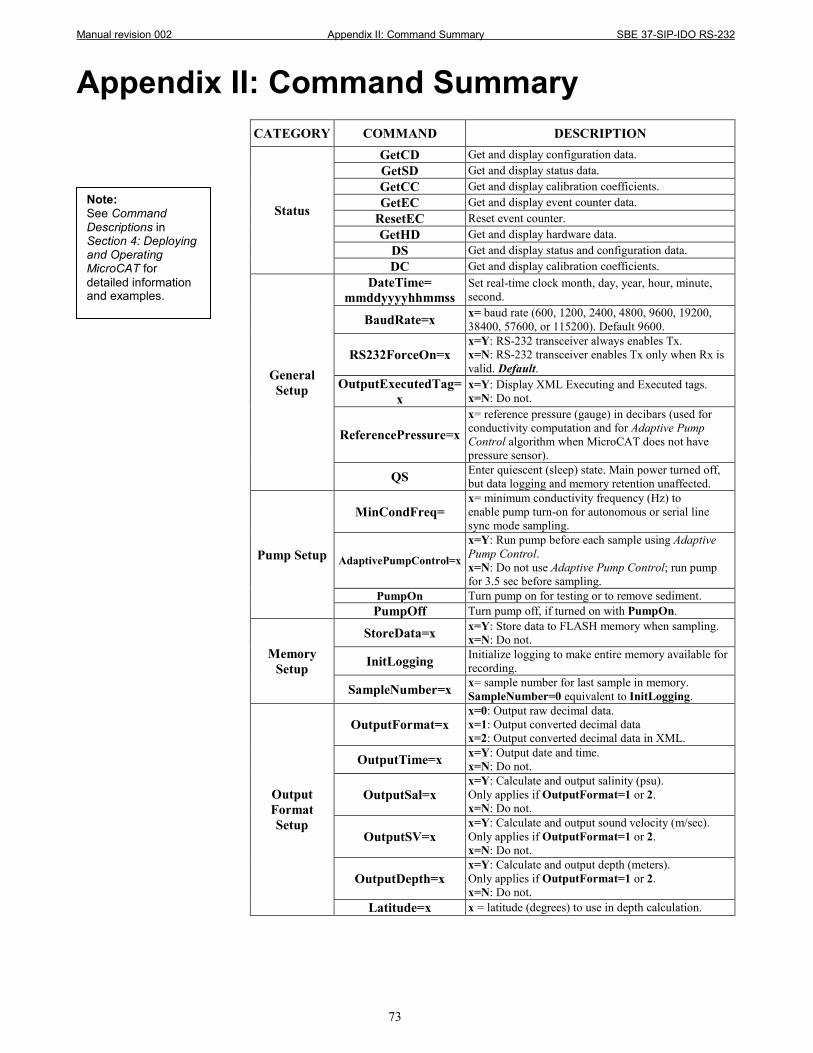
Manual revision 002 Appendix II: Command Summary SBE 37-SIP-IDO RS-232
73
Appendix II: Command Summary
CATEGORY COMMAND DESCRIPTION
Status
GetCD Get and display configuration data. GetSD Get and display status data. GetCC Get and display calibration coefficients. GetEC Get and display event counter data.
ResetEC Reset event counter. GetHD Get and display hardware data.
DS Get and display status and configuration data. DC Get and display calibration coefficients.
General Setup
DateTime= mmddyyyyhhmmss
Set real-time clock month, day, year, hour, minute, second.
BaudRate=x x= baud rate (600, 1200, 2400, 4800, 9600, 19200, 38400, 57600, or 115200). Default 9600.
RS232ForceOn=x x=Y: RS-232 transceiver always enables Tx. x=N: RS-232 transceiver enables Tx only when Rx is valid. Default.
OutputExecutedTag=x
x=Y: Display XML Executing and Executed tags. x=N: Do not.
ReferencePressure=x x= reference pressure (gauge) in decibars (used for conductivity computation and for Adaptive Pump Control algorithm when MicroCAT does not have pressure sensor).
QS Enter quiescent (sleep) state. Main power turned off, but data logging and memory retention unaffected.
Pump Setup
MinCondFreq= x= minimum conductivity frequency (Hz) to enable pump turn-on for autonomous or serial line sync mode sampling.
AdaptivePumpControl=x x=Y: Run pump before each sample using Adaptive Pump Control. x=N: Do not use Adaptive Pump Control; run pump for 3.5 sec before sampling.
PumpOn Turn pump on for testing or to remove sediment. PumpOff Turn pump off, if turned on with PumpOn.
Memory Setup
StoreData=x x=Y: Store data to FLASH memory when sampling. x=N: Do not.
InitLogging Initialize logging to make entire memory available for recording.
SampleNumber=x x= sample number for last sample in memory. SampleNumber=0 equivalent to InitLogging.
Output Format Setup
OutputFormat=x x=0: Output raw decimal data. x=1: Output converted decimal data x=2: Output converted decimal data in XML.
OutputTime=x x=Y: Output date and time. x=N: Do not.
OutputSal=x x=Y: Calculate and output salinity (psu). Only applies if OutputFormat=1 or 2. x=N: Do not.
OutputSV=x x=Y: Calculate and output sound velocity (m/sec). Only applies if OutputFormat=1 or 2. x=N: Do not.
OutputDepth=x x=Y: Calculate and output depth (meters). Only applies if OutputFormat=1 or 2. x=N: Do not.
Latitude=x x = latitude (degrees) to use in depth calculation.
Note: See Command Descriptions in Section 4: Deploying and Operating MicroCAT for detailed information and examples.

Manual revision 002 Appendix II: Command Summary SBE 37-SIP-IDO RS-232
74
CATEGORY COMMAND DESCRIPTION
Autonomous Sampling (Logging)
SampleInterval=x x= interval (seconds) between samples (10 - 21600).
AutoRun=x x=Y: When power applied, automatically sample as defined by SampleInterval= and SyncMode=. x=N: When power applied, do not begin to automatically sample.
Start Start autonomous sampling.
Stop Stop autonomous sampling. Must send Stop before uploading data.
Serial Line Sync SyncMode=x x=Y: Enable serial line sync mode.
x=N: Disable serial line sync mode.
Polled Sampling
TS Do not pump. Take sample, store in buffer, output data.
TSR Do not pump. Take sample, store in buffer, output data in raw decimal format.
TPS Run pump, take sample, store in buffer, output data.
TPSH Run pump, take sample, store in buffer (do not output).
TPSS Run pump, take sample, store in buffer and in FLASH memory, output data.
TSn:x Do not pump. Take x samples and output data.
TPSn:x Run pump continuously while taking x samples and outputting data.
SL Output last sample stored in buffer.
SLTP Output last sample stored in buffer, run pump, take new sample, and store in buffer (do not output data from new sample).
Data Upload (send Stop
before sending upload
command)
GetSamples:b,e Upload scan b to scan e, in format defined by OutputFormat=.
DDb,e Upload scan b to scan e, in alternate converted decimal form (OutputFormat=1) (regardless of setting for OutputFormat=).
Note: Use Seaterm232’s Upload menu to upload data that will be processed by SBE Data Processing. Manually entering a data upload command does not produce data with the required header information for processing by SBE Data Processing.

Manual revision 002 Appendix II: Command Summary SBE 37-SIP-IDO RS-232
75
CATEGORY COMMAND DESCRIPTION
Coefficients (F=floating
point number; S=string with
no spaces)
Dates shown are when
calibrations were
performed. Calibration
coefficients are initially factory-set and should
agree with Calibration Certificates
shipped with MicroCATs.
View all coefficients
with GetCC or DC.
TCalDate=S S=Temperature calibration date. TA0=F F=Temperature A0. TA1=F F=Temperature A1. TA2=F F=Temperature A2. TA3=F F=Temperature A3.
CCalDate=S S=Conductivity calibration date. CG=F F=Conductivity G. CH=F F=Conductivity H. CI=F F=Conductivity I. CJ=F F=Conductivity J.
WBOTC=F F=Conductivity wbotc. CTCor=F F=Conductivity ctcor. CPCor=F F=Conductivity cpcor.
PCalDate=S S=Pressure calibration date. PA0=F F=Pressure A0. PA1=F F=Pressure A1. PA2=F F=Pressure A2.
PTCA0=F F=Pressure ptca0 PTCA1=F F=Pressure ptca1. PTCA2=F F=Pressure ptca2. PTCB0=F F=Pressure ptcb0. PTCB1=F F=Pressure ptcb1. PTCB2=F F=Pressure ptcb2.
PTempA0=F F=Pressure temperature a0. PTempA1=F F=Pressure temperature a1. PTempA2=F F=Pressure temperature a2.
POffset=F F=Pressure offset (decibars). OCalDate=S S=Oxygen calibration date.
OSN=S S=Oxygen sensor serial number. OxTau20=F F= Oxygen tau20.
OxSoc=F F= Oxygen Soc. OxFOffset=F F= Oxygen offset.
OxA=F F= Oxygen A. OxB=F F= Oxygen B. OxC=F F= Oxygen C. OxE=F F= Oxygen E.
Hardware Configuration
Factory Settings – do not modify in the field SetPressureInstalled= SetMfgDate= SetPcbAssembly1= SetPcbSerialNum1= SetPcbAssembly2= SetPcbSerialNum2= SetPcbAssembly3= SetPcbSerialNum3= SetPcbAssembly4= SetPcbSerialNum4=

Manual revision 002 Appendix III: AF24173 Anti-Foulant Device SBE 37-SIP-IDO RS-232
76
Appendix III: AF24173 Anti-Foulant Device AF24173 Anti-Foulant Devices supplied for user replacement are supplied in polyethylene bags displaying the following label:
AF24173 ANTI-FOULANT DEVICE FOR USE ONLY IN SEA-BIRD ELECTRONICS' CONDUCTIVITY SENSORS TO CONTROL THE GROWTH OF AQUATIC ORGANISMS WITHIN ELECTRONIC CONDUCTIVITY SENSORS. ACTIVE INGREDIENT: Bis(tributyltin) oxide…………..…………………………..... 53.0% OTHER INGREDIENTS: ………………………………..... 47.0% Total………………………………………………………..... 100.0% DANGER See the complete label within the Conductivity Instrument Manual for Additional Precautionary Statements and Information on the Handling, Storage, and Disposal of this Product. Net Contents: Two anti-foulant devices Sea-Bird Electronics, Inc. EPA Registration No. 74489-1 13431 NE 20th Street EPA Establishment No. 74489-WA-1 Bellevue, WA 98005
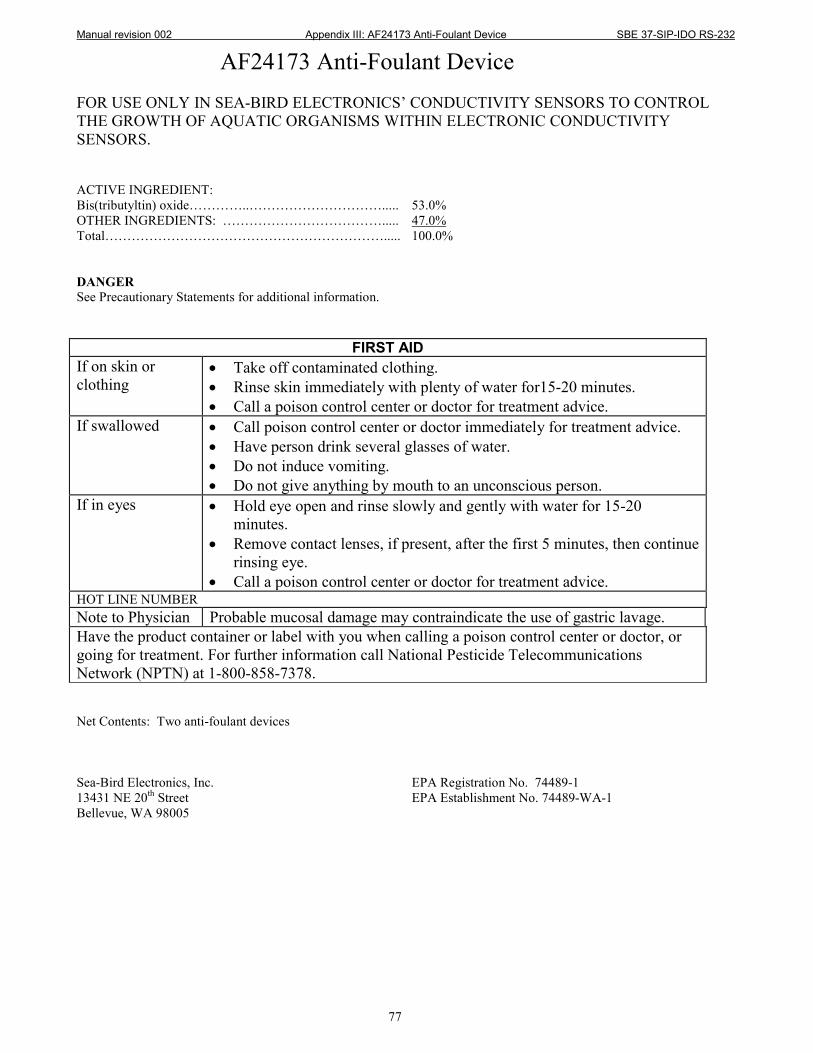
Manual revision 002 Appendix III: AF24173 Anti-Foulant Device SBE 37-SIP-IDO RS-232
77
AF24173 Anti-Foulant Device FOR USE ONLY IN SEA-BIRD ELECTRONICS’ CONDUCTIVITY SENSORS TO CONTROL THE GROWTH OF AQUATIC ORGANISMS WITHIN ELECTRONIC CONDUCTIVITY SENSORS. ACTIVE INGREDIENT: Bis(tributyltin) oxide…………..…………………………..... 53.0% OTHER INGREDIENTS: ………………………………..... 47.0% Total………………………………………………………..... 100.0% DANGER See Precautionary Statements for additional information.
FIRST AID If on skin or clothing
• Take off contaminated clothing. • Rinse skin immediately with plenty of water for15-20 minutes. • Call a poison control center or doctor for treatment advice.
If swallowed • Call poison control center or doctor immediately for treatment advice. • Have person drink several glasses of water. • Do not induce vomiting. • Do not give anything by mouth to an unconscious person.
If in eyes • Hold eye open and rinse slowly and gently with water for 15-20 minutes.
• Remove contact lenses, if present, after the first 5 minutes, then continue rinsing eye.
• Call a poison control center or doctor for treatment advice. HOT LINE NUMBER Note to Physician Probable mucosal damage may contraindicate the use of gastric lavage. Have the product container or label with you when calling a poison control center or doctor, or going for treatment. For further information call National Pesticide Telecommunications Network (NPTN) at 1-800-858-7378. Net Contents: Two anti-foulant devices Sea-Bird Electronics, Inc. EPA Registration No. 74489-1 13431 NE 20th Street EPA Establishment No. 74489-WA-1 Bellevue, WA 98005

Manual revision 002 Appendix III: AF24173 Anti-Foulant Device SBE 37-SIP-IDO RS-232
78
PRECAUTIONARY STATEMENTS
HAZARD TO HUMANS AND DOMESTIC ANIMALS
DANGER
Corrosive - Causes irreversible eye damage and skin burns. Harmful if swallowed. Harmful if absorbed through the skin or inhaled. Prolonged or frequently repeated contact may cause allergic reactions in some individuals. Wash thoroughly with soap and water after handling.
PERSONAL PROTECTIVE EQUIPMENT
USER SAFETY RECOMMENDATIONS Users should: • Remove clothing immediately if pesticide gets inside. Then wash thoroughly and put on
clean clothing. • Wear protective gloves (rubber or latex), goggles or other eye protection, and clothing to
minimize contact. • Follow manufacturer’s instructions for cleaning and maintaining PPE. If no such instructions
for washables, use detergent and hot water. Keep and wash PPE separately from other laundry.
• Wash hands with soap and water before eating, drinking, chewing gum, using tobacco or using the toilet.
ENVIRONMENTAL HAZARDS
Do not discharge effluent containing this product into lakes, streams, ponds, estuaries, oceans, or other waters unless in accordance with the requirements of a National Pollutant Discharge Elimination System (NPDES) permit and the permitting authority has been notified in writing prior to discharge. Do not discharge effluent containing this product to sewer systems without previously notifying the local sewage treatment plant authority. For guidance contact your State Water Board or Regional Office of EPA. This material is toxic to fish. Do not contaminate water when cleaning equipment or disposing of equipment washwaters. PHYSICAL OR CHEMICAL HAZARDS Do not use or store near heat or open flame. Avoid contact with acids and oxidizers. DIRECTIONS FOR USE It is a violation of Federal Law to use this product in a manner inconsistent with its labeling. For use only in Sea-Bird Electronics’ conductivity sensors. Read installation instructions in the applicable Conductivity Instrument Manual.
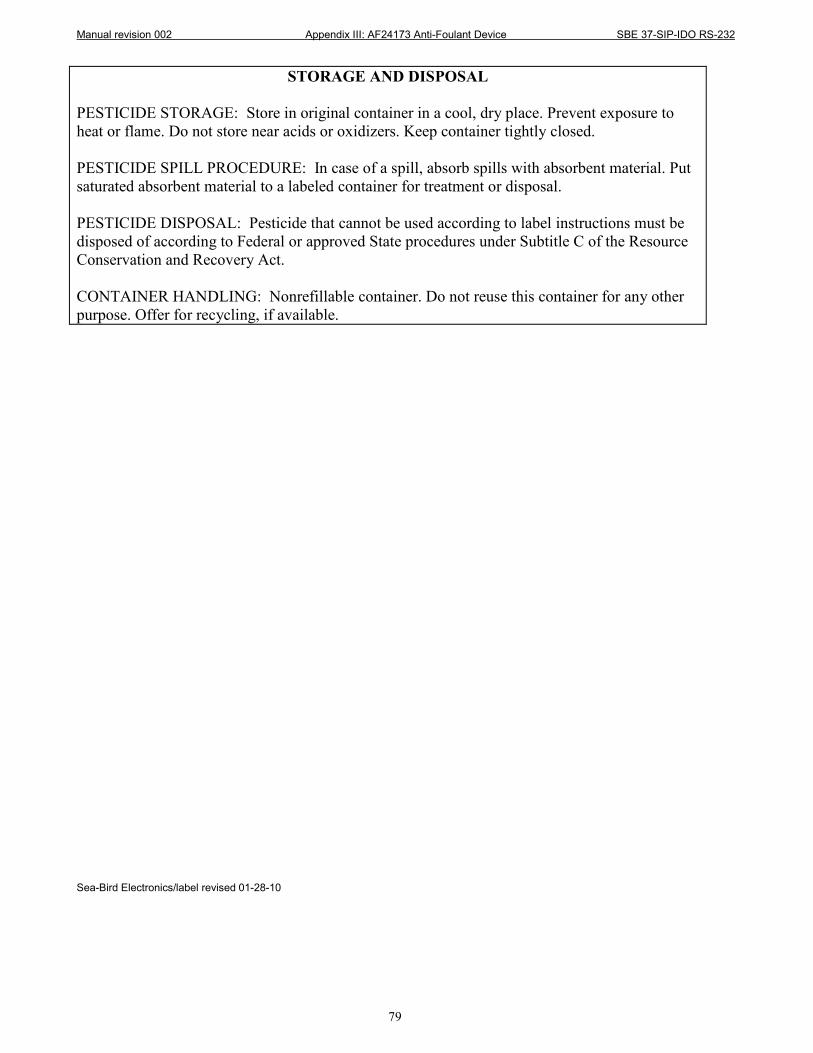
Manual revision 002 Appendix III: AF24173 Anti-Foulant Device SBE 37-SIP-IDO RS-232
79
STORAGE AND DISPOSAL
PESTICIDE STORAGE: Store in original container in a cool, dry place. Prevent exposure to heat or flame. Do not store near acids or oxidizers. Keep container tightly closed. PESTICIDE SPILL PROCEDURE: In case of a spill, absorb spills with absorbent material. Put saturated absorbent material to a labeled container for treatment or disposal. PESTICIDE DISPOSAL: Pesticide that cannot be used according to label instructions must be disposed of according to Federal or approved State procedures under Subtitle C of the Resource Conservation and Recovery Act. CONTAINER HANDLING: Nonrefillable container. Do not reuse this container for any other purpose. Offer for recycling, if available. Sea-Bird Electronics/label revised 01-28-10

Manual revision 002 Appendix IV: Replacement Parts SBE 37-SIP-IDO RS-232
80
Appendix IV: Replacement Parts
Part Number Part Application Description Quantity in
MicroCAT
801542 AF24173 Anti-Foulant Device Bis(tributyltin) oxide device inserted into anti-foulant device cup
1 (set of 2)
31363 Plug
Seals end of conductivity cell / exhaust plumbing when not deployed, keeping dust and aerosols out of conductivity cell during storage
2
30411 Triton X-100
Octyl Phenol Ethoxylate – Reagent grade non-ionic cleaning solution for conductivity cell (supplied in 100% strength; dilute as directed)
1
801385 4-pin RMG-4FS to 9-pin DB-9S I/O cable with power leads, 2.4 m (8 ft) From MicroCAT to computer 1
17043 Locking sleeve (for RMG) Locks cable/plug in place 1
17046.1 4-pin RMG-4FS dummy plug with locking sleeve For when cable not used 1
801206 4-pin MCIL-4FS (wet-pluggable connector) to 9-pin DB-9S I/O cable with power leads, 2.4 m (8 ft) long
From MicroCAT to computer 1
171192 Locking sleeve (wet-pluggable connector) Locks cable/plug in place 1
171398.1 4-pin MCDC-4-F dummy plug with locking sleeve, wet-pluggable connector For when cable not used 1
171888 25-pin DB-25S to 9-pin DB-9P cable adapter
For use with computer with DB-25 connector -
60060 Spare hardware / O-ring kit for 37-SIP-IDO
Assorted hardware and O-rings: • 30900 Bolt, ¼-20 x 2”, Hex head,
titanium (secures guide to connector end cap and clamp to sensor end cap)
• 30633 Washer, ¼” Split Ring Lock, titanium (for 30900)
• 30634 Washer, ¼” Flat, titanium (for 30900)
• 31019 O-ring, Parker 2-008 N674-70 (for 30900)
• 31066 Cap screw, 8-32 x ¾ socket head, titanium (secures guide to connector end cap)
• 31873 Cap Screw, 6-32 x ¾”, socket head, titanium (secures clamp to sensor end cap)
• 30867 Washer, #6 split ring lock, titanium (for 31873)
• 31089 Screw, 10-32 x ½” FH Phillips, titanium (secures cell guard to housing)
• 31118 Screw, 10-32 x 3/8” FH Phillips, titanium (secures cell guard to sensor end cap)
• 31516 Hex Key, 9/64" long arm, DoALL AHT58010 (cap screw tool)
• 31749 Hex Key, 7/64" long arm, DoALL BDH12106 (tool for clamp)

Manual revision 002 Appendix V: Manual Revision History SBE 37-SIP-IDO RS-232
81
Appendix V: Manual Revision History Manual Version Date Description
001 03/11 • Initial release. 002 04/11 • Add information about protective plugs in plumbing intake and exhaust.
• Add reference to Application Note 2D for conductivity cell cleaning. • Add spare parts. • Firmware 1.0a: update firmware loader in GetHD response. • Correct typos.
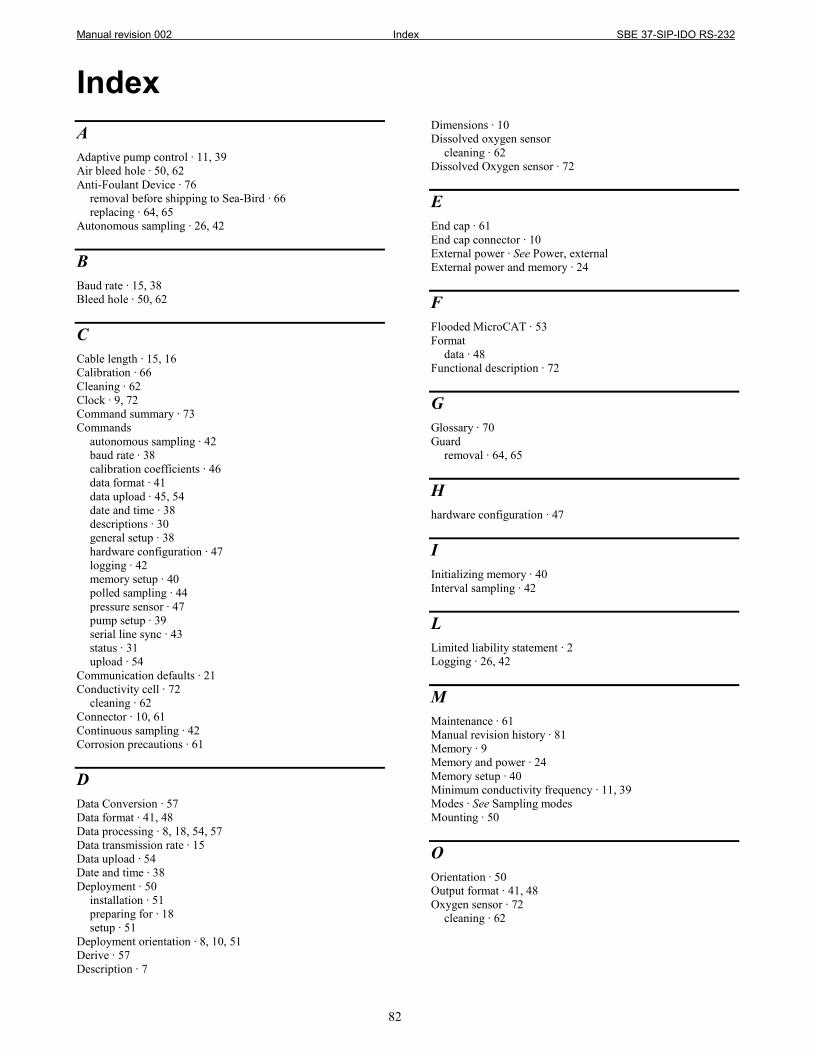
Manual revision 002 Index SBE 37-SIP-IDO RS-232
82
Index A Adaptive pump control · 11, 39 Air bleed hole · 50, 62 Anti-Foulant Device · 76
removal before shipping to Sea-Bird · 66 replacing · 64, 65
Autonomous sampling · 26, 42
B Baud rate · 15, 38 Bleed hole · 50, 62
C Cable length · 15, 16 Calibration · 66 Cleaning · 62 Clock · 9, 72 Command summary · 73 Commands
autonomous sampling · 42 baud rate · 38 calibration coefficients · 46 data format · 41 data upload · 45, 54 date and time · 38 descriptions · 30 general setup · 38 hardware configuration · 47 logging · 42 memory setup · 40 polled sampling · 44 pressure sensor · 47 pump setup · 39 serial line sync · 43 status · 31 upload · 54
Communication defaults · 21 Conductivity cell · 72
cleaning · 62 Connector · 10, 61 Continuous sampling · 42 Corrosion precautions · 61
D Data Conversion · 57 Data format · 41, 48 Data processing · 8, 18, 54, 57 Data transmission rate · 15 Data upload · 54 Date and time · 38 Deployment · 50
installation · 51 preparing for · 18 setup · 51
Deployment orientation · 8, 10, 51 Derive · 57 Description · 7
Dimensions · 10 Dissolved oxygen sensor
cleaning · 62 Dissolved Oxygen sensor · 72
E End cap · 61 End cap connector · 10 External power · See Power, external External power and memory · 24
F Flooded MicroCAT · 53 Format
data · 48 Functional description · 72
G Glossary · 70 Guard
removal · 64, 65
H hardware configuration · 47
I Initializing memory · 40 Interval sampling · 42
L Limited liability statement · 2 Logging · 26, 42
M Maintenance · 61 Manual revision history · 81 Memory · 9 Memory and power · 24 Memory setup · 40 Minimum conductivity frequency · 11, 39 Modes · See Sampling modes Mounting · 50
O Orientation · 50 Output format · 41, 48 Oxygen sensor · 72
cleaning · 62
Manual revision 002 Index SBE 37-SIP-IDO RS-232
83
P Parker Super O-Lube · 71 Parts
replacement · 80 Plastic housing
handling · 63 Plumbing
maintenance · 62 Polled sampling · 25 Power · 9, 16
consumption · 13 Power and memory · 24 Pressure sensor · 72
maintenance · 63 Pressure sensor setup · 47 Processing data · 54 Pump · 8, 9, 10, 11, 24, 42, 44, 50, 51 Pump setup commands · 39
Q Quick start · 5
R Recovery · 53
uploading data · 54 Replacement parts · 80 Revision history · 81
S Sample timing · 13 Sampling modes · 24
autonomous · 26 logging · 26 polled · 25 serial line sync · 28
SBE Data Processing · 8, 18, 57 Sea Plot · 57 SEASOFT · 8, 18 Seaterm232 · 8, 18, 19, 54 SeatermV2 · 8, 18, 19, 54 Sensors · 9 Serial line sync · 28, 43 Setup commands · 38 ShallowCAT
handling · 63 Software · 8, 18 Specifications · 9 Status commands · 31 Storage · 62 Super O-Lube · 71 System description · 7
T Terminal program · 8, 18, 19, 54 Testing · 18 Thermistor · 72 Timeout description · 30 Transient current · 16 Triton · 71 Troubleshooting · 68
U Unpacking MicroCAT · 6 Uploading data · 54
V Versions · 81
W Wiring · 18