lionel 180-watt powerhouse power supply owner’s …€¦ · lionel 180-watt powerhouse power...
TRANSCRIPT

Lionel180-Watt PowerHouse
Power SupplyOwner’s Manual
Lionel180-Watt PowerHouse
Power SupplyOwner’s Manual
72-2983-25010/06
CAUTION—ELECTRICALLY OPERATED PRODUCTNOT RECOMMENDED FOR CHILDREN UNDER EIGHT YEARS OF AGE. AS WITHALL ELECTRIC PRODUCTS, PRECAUTIONS SHOULD BE OBSERVED DURINGHANDLING AND USE TO PREVENT ELECTRIC SHOCK.TRANSFORMER RATINGS—INPUT: 120 VAC; 60 HZ ONLY.AC OUTPUT: 18 V; 180 VA
Congratulations on your purchase of the Lionel 180-Watt PowerHouse Power Supply! ThePowerHouse Power Supply generates a brawny 180 watts (ten amps) of alternating current.
Designed for use with the TMCC PowerMaster, the Track Power Controllers, the modern ZW, orthe Direct Lockon, this power supply features an ON/OFF switch and a circuit breaker for safeoperation.
2
Congratulations!
Table of contents
Operating your PowerHouse Power Supply safely 3
Powering the TMCC PowerMaster 4
Powering the Track Power Controller 4-6
Powering the ZW Transformer 7
Installing your TMCC Direct Lockon 8-9
Resolving short circuits 10
Notes 11
Limited Warranty/Lionel Service 12
The following Lionel marks may be used throughout this instruction manual and are protected under law.All rights reserved.
Lionel®, TrainMaster®, Odyssey®, RailSounds®, CrewTalk™, TowerCom™, DynaChuff™,StationSounds™, Pullmor®, ElectroCoupler™, Magne-Traction®, CAB-1® Remote Controller,PowerMaster®, Lionel ZW®, ZW®, PowerHouse®, TMCC®, Lionelville™, Lockon®, Wireless Tether™,LionMaster®, FatBoy™, American Flyer®, TrainSounds™, PowerMax™
The name FasTrack® is used with permission from Pitsco, Inc.

3
Operating your PowerHouse Power Supply safely
When using electrical products, follow these basic safety precautions:
• Read these instructions thoroughly before using this device.• The PowerHouse Power Supply is not recommended for children under eight years of age.• Parents should periodically inspect the PowerHouse Power Supply for potential hazards andhave them repaired by an authorized Lionel Service Center. In the event that such acondition exists, the PowerHouse Power Supply should not be used until it has been properlyrepaired.
• The PowerHouse Power Supply is intended to be used indoors. Do not use the PowerHousePower Supply if water is present. Serious or fatal injuries may result.
• Do not use the PowerHouse for anything other than its intended purpose. This unit wasdesigned to operate with select Lionel controllers only.
• The PowerHouse Power Supply was designed to operate on 120-volt, 60-Hz power. Do notconnect the PowerHouse Power Supply to any other source of power.
• Do not operate the PowerHouse Power Supply with a damaged cord, plug, or case.• To avoid the risk of electrical shock, do not disassemble the PowerHouse Power Supply.There are no user-serviceable parts inside. If damaged, take the unit to an authorized LionelService Center. A list of authorized Service Centers is included.
Do not operate your railroad unattended. Obstructed accessories or stalled trainsmay overheat, resulting in damage to your layout.
• If the circuit breaker trips, turn the PowerHouse Power Supply OFF. Reset the circuit breaker,then turn the power ON and resume operation. Resetting the circuit breaker duringoperation may cause the train to surge forward.
• Unplug the PowerHouse Power Supply from the power source when not in use.
Warning!
Caution!
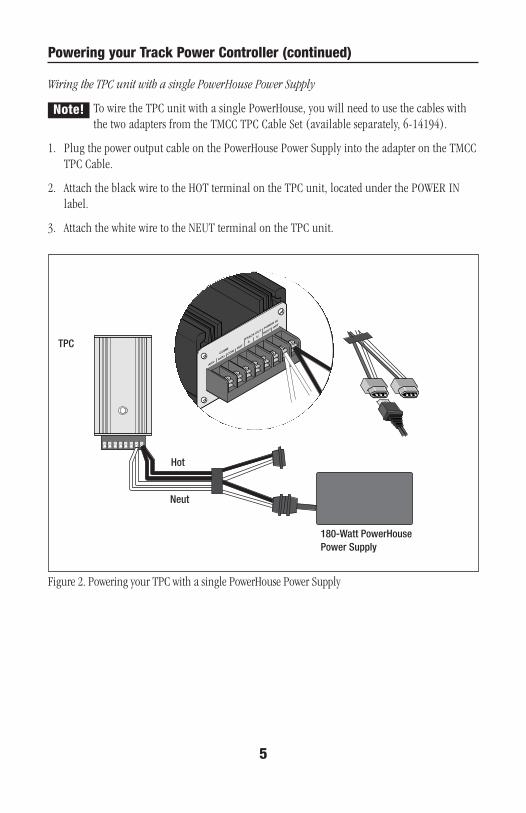
Powering the Track Power Controller
The PowerHouse Power Supply connections are made on the back panel of the Track PowerController (TPC) unit. These terminals are labeled HOT and NEUT under POWER IN. Your
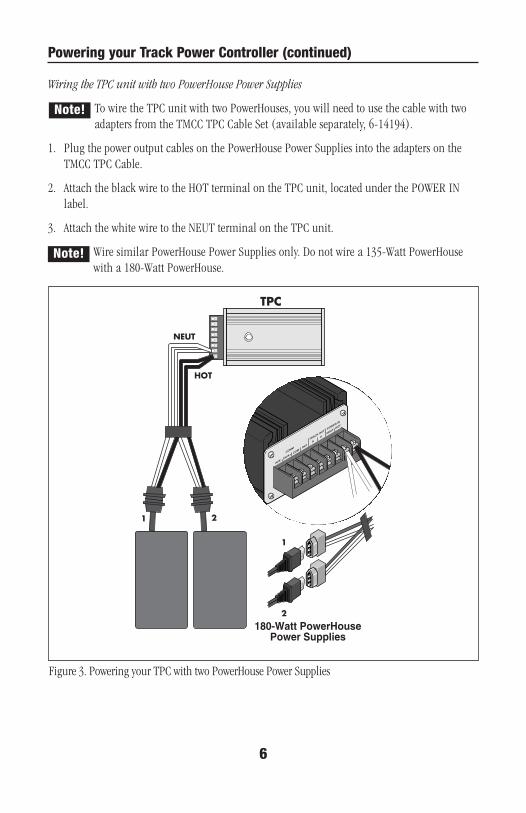
PowerHouse Power Supply will power both the TPC unit and the track to which the TPC isconnected. Keep in mind that you may power the TPC unit with two PowerHouse PowerSupplies. Be sure to use two of the same type of PowerHouse Power Supplies (e.g., two 180-wattunits).
Powering the TMCC PowerMaster
As illustrated in Figure 1, connect the plug from the PowerHouse Power Supply to thecorresponding receptacle on the PowerMaster unit. Note that the plug and the receptacle
are keyed to fit only one way.Plug in your PowerHouse Power Supply to a standard wall outlet and switch on the
PowerHouse Power Supply. The PowerMaster’s green power-on indicator illuminates to indicatethat it is receiving power. If the indicator does not illuminate, check the connection and be surethat the PowerHouse Power Supply is plugged in. Refer to the PowerMaster Owner’s Manual foradditional information.
Be sure to throw the PowerMaster’s power switch to 180 if the PowerMaster isequipped with the switch.
4
Figure 1. PowerMaster connection
PowerMasterreceptable
PowerMaster Unit
PowerHouseplug
Note!
5
Wiring the TPC unit with a single PowerHouse Power Supply
To wire the TPC unit with a single PowerHouse, you will need to use the cables withthe two adapters from the TMCC TPC Cable Set (available separately, 6-14194).
1. Plug the power output cable on the PowerHouse Power Supply into the adapter on the TMCCTPC Cable.
2. Attach the black wire to the HOT terminal on the TPC unit, located under the POWER INlabel.
3. Attach the white wire to the NEUT terminal on the TPC unit.
Powering your Track Power Controller (continued)
Figure 2. Powering your TPC with a single PowerHouse Power Supply
Note!
TPC
180-Watt PowerHousePower Supply
Hot
Neut
POWER IN
TRACK OUT
COMM
HOT
U
DAT
NEUT
A
COM
AUX+
AUX-
6
Wiring the TPC unit with two PowerHouse Power Supplies
To wire the TPC unit with two PowerHouses, you will need to use the cable with twoadapters from the TMCC TPC Cable Set (available separately, 6-14194).
1. Plug the power output cables on the PowerHouse Power Supplies into the adapters on theTMCC TPC Cable.
2. Attach the black wire to the HOT terminal on the TPC unit, located under the POWER INlabel.
3. Attach the white wire to the NEUT terminal on the TPC unit.
Wire similar PowerHouse Power Supplies only. Do not wire a 135-Watt PowerHousewith a 180-Watt PowerHouse.
Powering your Track Power Controller (continued)
1 2
NEUT
HOT
TPC
180-Watt PowerHousePower Supplies
1
2
Figure 3. Powering your TPC with two PowerHouse Power Supplies
Note!
Note!
POWER IN
TRACK OUT
COMM
HOT
U
DAT
NEUT
A
COM
AUX+
AUX-
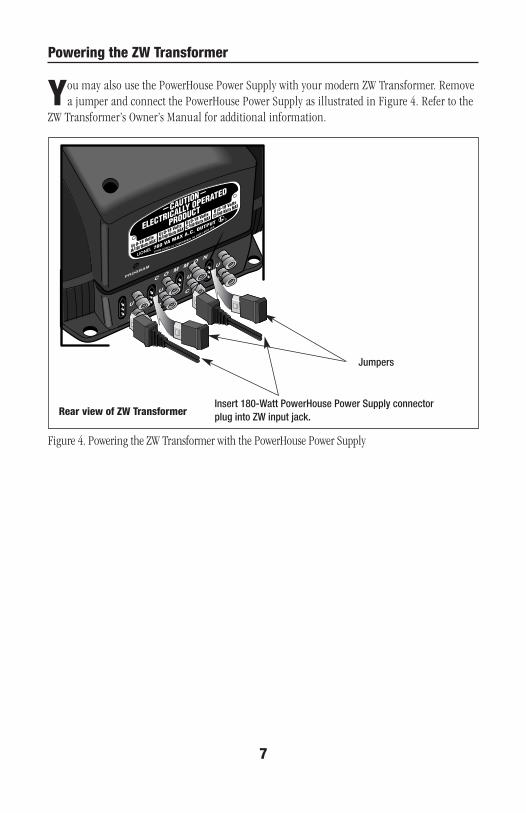
Powering the ZW Transformer
You may also use the PowerHouse Power Supply with your modern ZW Transformer. Removea jumper and connect the PowerHouse Power Supply as illustrated in Figure 4. Refer to the
ZW Transformer’s Owner’s Manual for additional information.
7
CO
MM
ON
PROGRAM
U
A
U
B
U
C
U
D
Insert 180-Watt PowerHouse Power Supply connectorplug into ZW input jack.
Jumpers
Rear view of ZW Transformer
Figure 4. Powering the ZW Transformer with the PowerHouse Power Supply

8
Installing your TMCC Direct Lockon
The PowerHouse Power Supply and Command Base connections are found inside of thestructure. Follow these steps and refer to Figure 5 as you make these connections.
1. Remove the four screws from the bottom of the Lockon structure.
2. Remove the base and lift the structure off of the circuit board.
3. Insert the PowerHouse plug into the receptacle on the circuit board.
4. Attach the Command Base wire to the spring clip terminal.Press down on the top of the terminal clip so that a metal loop is formed. Slide the bare endof the wire into the exposed loop. Release pressure on the terminal clip, allowing thecrimped metal to pinch the end of the wire in the metal loop. Give a little tug on the wire tobe sure that the hold is secure.
5. Use the switch to select the type of PowerHouse that you are using.Slide the switch to 180 for the 180-Watt PowerHouse.
6. Route the PowerHouse cord and the Command Base wire through the slotas illustrated in Figure 5 on page 9.
7. Replace the structure and the base, securing them with the four screws.
8. Connect the Direct Lockon to your track as described in the Owner’sManual.
9
180W
135W
InsertPowerHouseplug here
LionelCommand Base
LionelPowerHouse
Figure 5. Direct Lockon connections and switch location
Connect Command Basewire here
Installing your TMCC Direct Lockon (continued)

10
Resolving short circuits
Derailments, metal objects on the track, and improper wiring may cause a short circuit.Short circuits will trip the circuit breaker on the PowerHouse Power Supply. If the circuit
breaker is tripped, turn off the PowerHouse Power Supply and then correct the short circuit.After the short circuit has been corrected, press in the circuit breaker and turn on thePowerHouse Power Supply.
Do not attempt to operate the PowerHouse Power Supply until the short circuithas been removed.
Caution!

Notes
11
Limited Warranty/Lionel Service
This Lionel product, including all mechanical and electrical components, moving parts, motors andstructural components, except for light bulbs, is warranted to the original consumer-purchaser, for one
year against original defects in materials or workmanship when purchased through an authorized Lionelmerchant.
This warranty does NOT cover normal wear and tear, light bulbs, defects appearing in the course ofcommercial use, or damage resulting from abuse or misuse of the product by the purchaser. Transfer of thisproduct by the original consumer-purchaser to another person voids this warranty. Modification of this productvoids this warranty.
Any warranted product which is defective in original materials or workmanship and is delivered by theoriginal consumer-purchaser to Lionel L.L.C. or an authorized Lionel L.L.C. Service Center, together with proof oforiginal purchase will, at the option of Lionel L.L.C., be repaired or replaced, without charge for parts or labor. Inthe event the defective product cannot be repaired, and a replacement is not available, a refund of the originalpurchase price will be granted. Any products on which warranty service is sought must be sent freight or postageprepaid, as transportation and shipping charges are not covered by the warranty.
In no event shall Lionel L.L.C. be liable for incidental or consequential damages.Some states do not allow the exclusion or limitation of incidental or consequential damages, so the above
exclusion may not apply to you.This limited warranty gives you specific legal rights, and you may have other rights which vary from state
to state.
Instructions for Obtaining ServiceIf service for this Lionel L.L.C. product is required, bring the item, along with your dated sales receipt and
completed warranty information to the nearest Authorized Lionel Service Center. Your nearest Lionel ServiceCenter can be found by calling 1-800-4-Lionel, or by accessing our Website at www.lionel.com.
If you prefer to send your product back to Lionel L.L.C. for repair in Michigan, you must first call586-949-4100 or FAX 586-949-5429, or write to Customer Service, P.O. Box 748, New Baltimore, MI48047-0748, stating what the item is, when it was purchased and what seems to be the problem. You will be senta return authorization letter and label to ensure your merchandise will be properly handled upon receipt.
Once you have received your return authorization and label, make sure that the item is packed to preventdamage during shipping and handling. We suggest that you use the product’s original packaging. Thisshipment must be prepaid and we recommend that it be insured.
Please make sure you have followed all of the above instructions carefully before returning anymerchandise for service. You may choose to have your product repaired by one of our Authorized Lionel ServiceCenters after its warranty has expired. A reasonable service fee will be charged.
Warranty InformationPlease complete the information below and keep it, along with your dated sales receipt. You must present
this and your dated sales receipt when requesting warranty service.
Name ________________________________________________________________________
Address ______________________________________________________________________
Place of Purchase ________________________________________________________________
Date of Purchase ________________________________________________________________
Product Number ________________________________________________________________
Product Description ______________________________________________________________
©2006 LIONEL L.L.C., CHESTERFIELD, MI 48051-2493UNITED STATES OF AMERICAPRINTED IN CHINA