lionel streamliner trainsounds baggage car owner’s manual
TRANSCRIPT
LionelStreamliner TrainSounds
Baggage CarOwner’s Manual
72-5178-250 5/07

2
Tableofcontents
Congratulations!
C ongratulations on your purchase of the Lionel Streamliner TrainSounds Baggage Car This baggage car is equipped with realistic TrainSounds and is designed for use on
conventional or Command layouts.
Baggage car operationsCoupling your TrainSounds car 3
Transformer operationsSwitch and volume locations on your TrainSounds car 4Conventional operation of TrainSounds 5
TrainMaster Command operationsCommand Control operation of TrainSounds 6TrainSounds command table 7Sample scripts 8-9Assigning your TrainSounds car a new ID# 10Reprogramming the circuit boards to restore features 11Limited Warranty/Lionel Service 12
The following Lionel marks may be used throughout this instruction manual and are protected under law. All rights reserved.
Lionel®, TrainMaster®, Odyssey®, RailSounds®, CrewTalk™, TowerCom™, DynaChuff™, TrainSounds™, Pullmor®, ElectroCoupler™, Magne-Traction®, CAB-1® Remote Controller, PowerMaster®, Lionel ZW®, ZW®, PowerHouse®, TMCC®, Lionelville™, Lockon®, Wireless Tether™, LionMaster®, FatBoy™, American Flyer®, TrainSounds™, PowerMax™
The name FasTrack® is used with permission from Pitsco, Inc.

�
CouplingyourTrainSoundscar
When coupling your cars, at least one of the mating couplers must be open as shown at the left in Figure 1. Press down on the lock release to open the coupler, then push the cars toward
each other until they lock together.
Keep in mind that it’s easier to couple cars on a straight stretch of track.
Lock release
Figure 1. Coupler operation
Note!
Baggage car operations

�
SwitchandvolumelocationsonyourTrainSoundscar
SND
NO
SN
D
PGM
RU
N
PGM/RUN switch
Figure 2. Switches and volume control locaitons
Transformer operations
Sounds switch
Volume control knob
Rear
Front
5
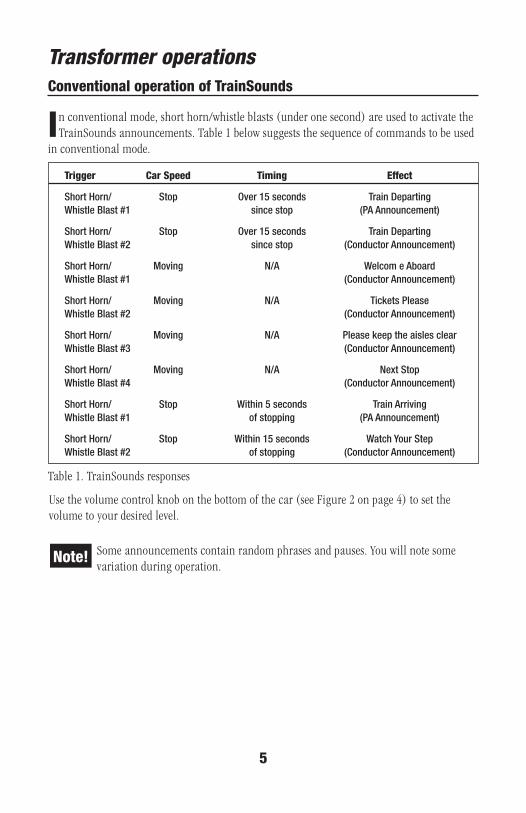
Transformer operationsConventionaloperationofTrainSounds
In conventional mode, short horn/whistle blasts (under one second) are used to activate the TrainSounds announcements. Table 1 below suggests the sequence of commands to be used
in conventional mode.
Trigger CarSpeed Timing Effect
Short Horn/ Stop Over 15 seconds Train Departing Whistle Blast #1 since stop (PA Announcement)
Short Horn/ Stop Over 15 seconds Train Departing Whistle Blast #2 since stop (Conductor Announcement)
Short Horn/ Moving N/A Welcom e Aboard Whistle Blast #1 (Conductor Announcement)
Short Horn/ Moving N/A Tickets Please Whistle Blast #2 (Conductor Announcement)
Short Horn/ Moving N/A Please keep the aisles clear Whistle Blast #3 (Conductor Announcement)
Short Horn/ Moving N/A Next Stop Whistle Blast #4 (Conductor Announcement)
Short Horn/ Stop Within 5 seconds Train Arriving Whistle Blast #1 of stopping (PA Announcement)
Short Horn/ Stop Within 15 seconds Watch Your Step Whistle Blast #2 of stopping (Conductor Announcement)
Use the volume control knob on the bottom of the car (see Figure 2 on page 4) to set the volume to your desired level.
Some announcements contain random phrases and pauses. You will note some variation during operation.
Note!
Table 1. TrainSounds responses

TrainMaster Command operations
�
1
2
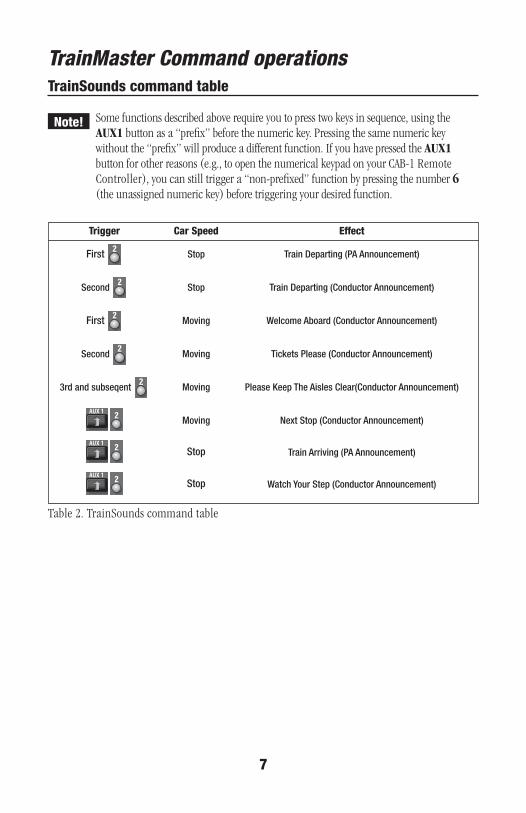
CommandControloperationsofTrainSounds
To operate in the Command Control environment, you need a Command Base (6-12911) and a CAB-1 Remote Controller (6-12868). You can find them both at your authorized
Lionel dealer.
PlaceyourTrainSoundscaronLionelorLionel-compatibleOgaugetrack(O-27minimumcurve).
• Make sure that the track power is OFF before placing the TrainSounds car on the track.
• Make sure your Lionel Command Base is plugged in and its communications wire is connected to the COMMON post on your Lionel transformer or the U post on any of your installed PowerMasters.
• Once positioned on the track, increase track voltage to FULL. If you are using any PowerMasters, be sure to slide the CMD/CONV switch to CMD.
AddressyourTrainSoundscarusingyourCAB-1RemoteController.
• Turn power on, then press ENG, 1. You are now ready to activate the Command Control TrainSounds features. Your TrainSounds car announcements will respond according to Table 2 on page 7.
All Lionel command-equipped products come factory-programmed with an ID# of 1. (To change the ID#, see page 12.) Even though your TrainSounds Car is not an “engine,” it is still addressed using ENG on the CAB-1 Remote Controller. Use the volume control on the bottom of the car (see Figure 4 on page 12) to set the volume to your desired level.
Note!
TrainMaster Command operations
7
Trigger CarSpeed Effect
First
Stop Train Departing (PA Announcement)
Second
Stop Train Departing (Conductor Announcement)
First
Moving Welcome Aboard (Conductor Announcement)
Second
Moving Tickets Please (Conductor Announcement)
3rd and subseqent
Moving Please Keep The Aisles Clear(Conductor Announcement)
Moving Next Stop (Conductor Announcement)
Stop Train Arriving (PA Announcement)
Stop Watch Your Step (Conductor Announcement)
Table 2. TrainSounds command table
Some functions described above require you to press two keys in sequence, using the AUX1 button as a “prefix” before the numeric key. Pressing the same numeric key without the “prefix” will produce a different function. If you have pressed the AUX1 button for other reasons (e.g., to open the numerical keypad on your CAB-1 Remote Controller), you can still trigger a “non-prefixed” function by pressing the number 6 (the unassigned numeric key) before triggering your desired function.
TrainSoundscommandtable
Note!

TrainMaster Command operations
8
Example 1 below shows you how to perform a complete arrival/departure script to and from an imaginary train station with a PA announcer.
Samplescripts
Train pulls into the station and stops:
Press * Station PA announces train arrival
Press
* Conductor assists arriving passengers
Press * Station PA announces train departure
Press
* Conductor calls “All Aboard!”
Train pulls out of station and starts trip:
Press
Conductor welcomes the passengers
Press
Conductor collects the tickets
Press
Random Conductor announcements
Train approaches station:
Press
Conductor informs passengers of next stop
Train pulls into station and stops.
*These functions may be repeated, if desired, by pressing the same key(s) again.
Note
how
the
patt
ern
can
ber
epea
ted
for
mul
tiple
sto
ps.
Example 1. Arrival/departure script

To make operation easier, program your TrainSounds car with the same number as your engine (see page 10). Your engine will respond to the same commands if equipped with CrewTalk communication and TowerCom announcements. If you wish to program your TrainSounds car into a lash-up, you must assign it as a “front” engine to enable the announcements.
Assign the TrainSounds car the same number as the lead engine in a lash-up. TrainSounds will not play if the car shares an ID# with the other engines.
As you experiment with your TrainSounds car, you will note that it is possible to have multiple announcements running simultaneously. You will hear them overlap with almost as much commotion as a real train station. If your engine has CrewTalk communication and TowerCom announcements, these announcements will also “overlap” with your TrainSounds car, unless your engine is equipped with a seven second delay on the TowerCom announcements.
If you would like to operate the car without the “over lap”, simply program the car with an ID# different than the engines ID#. By addressing the cars unique ID# you can now activate its sounds without triggering the engines sound features.
To return to engine control you must re-address the engines ID#.
Note!
TrainMaster Command operations
�
IN STATION“Now arriving”
“Watch your step”“Now departing”
“All aboard”
“Welcomeaboard”
“Keep theaisles clear”
“Tickets,please”
“Next stopcoming up”
“Keep theaisles clear”
“Bathroom locatedat the back of the car”
EN ROUTE
Figure 3. TrainSounds on a round trip
Samplescripts(continued)
Note!

10
TrainMaster Command operations
SND
NO
SN
D
PGM
RU
N
Volume control knob
PGM/RUN switchSounds switch
Figure 4. Switch and volume locations
AssigningyourTrainSoundscaranewID#
As your fleet of Command-equipped equipment grows, you’ll want to give your TrainSounds car a unique ID#. Choose from any number between 1 and 99. Remember,
it is best to assign your TrainSounds car the same ID# as the locomotive with which it is operating.
Set the TrainSounds Car PGM/RUN switch to PGM. Refer to Figure 4 for the location of that switch. Plug in your Command Base, then place the TrainSounds car on the track. Set your PowerMasters to CMD or set your traditional power supplies to FULL (no more than 19 volts). Using your CAB-1 Remote Controller, press ENG, the TrainSounds car ID# (that you select), then press the SET button located under your CAB-1 Remote Controller’s removable panel. Set the PGM/RUN switch to RUN. Your TrainSounds car is ready for operation with its all-new ID#.
Rear
Front

TrainMaster Command operations
11
Reprogrammingthecircuitboardstorestorefeatures
Due to the inevitable derailments, it is possible that your TrainSounds car could someday lose its setup program. The symptom of this condition is unresponsiveness in Command
mode. This condition can be easily remedied by “reprogramming” the circuit boards using the following steps.
1. Move the PGM/RUN switch on the bottom of the TrainSounds car from RUN to PGM. Refer to Figure 4 on page 10 for the switch location.
2. Plug in your Command Base.
3. Place your TrainSounds car on the track, then turn on power to the track.
4. Press ENG then input the TrainSounds car’s ID#. Press SET.
5. Press ENG, ID#, AUX1, 6 for your TrainSounds car.
6. Turn off power to the track, then wait ten seconds.
7. Remove the TrainSounds car from the track, then move the PGM/RUN switch from PGM to RUN.
8. Place the TrainSounds car back on the track and turn power on to the track.
9. Press ENG and the ID#, then operate as normal.

LimitedWarranty/LionelService
T his Lionel product, including all mechanical and electrical components, moving parts, motors and structural components, except for light bulbs, is warranted to the original consumer-purchaser, for one
year against original defects in materials or workmanship when purchased through an authorized Lionel merchant.
This warranty does NOT cover normal wear and tear, light bulbs, defects appearing in the course of commercial use, or damage resulting from abuse or misuse of the product by the purchaser. Transfer of this product by the original consumer-purchaser to another person voids this warranty. Modification of this product voids this warranty.
Any warranted product which is defective in original materials or workmanship and is delivered by the original consumer-purchaser to Lionel L.L.C. or an authorized Lionel L.L.C. Service Center, together with proof of original purchase will, at the option of Lionel L.L.C., be repaired or replaced, without charge for parts or labor. In the event the defective product cannot be repaired, and a replacement is not available, a refund of the original purchase price will be granted. Any products on which warranty service is sought must be sent freight or postage prepaid, as transportation and shipping charges are not covered by the warranty.
InnoeventshallLionelL.L.C.beliableforincidentalorconsequentialdamages.Some states do not allow the exclusion or limitation of incidental or consequential damages, so the above
exclusion may not apply to you.This limited warranty gives you specific legal rights, and you may have other rights which vary from state
to state.
InstructionsforObtainingServiceIf service for this Lionel L.L.C. product is required, bring the item, along with your dated sales receipt and
completed warranty information to the nearest Authorized Lionel Service Center. Your nearest Lionel Service Center can be found by calling 1-800-4-Lionel, or by accessing our Website at www.lionel.com.
If you prefer to send your product back to Lionel L.L.C. for repair in Michigan, you must first call 586-949-4100 or FAX 586-949-5429, or write to Customer Service, P.O. Box 748, New Baltimore, MI 48047-0748, stating what the item is, when it was purchased and what seems to be the problem. You will be sent a return authorization letter and label to ensure your merchandise will be properly handled upon receipt.
Once you have received your return authorization and label, make sure that the item is packed to prevent damage during shipping and handling. We suggest that you use the product’s original packaging. This shipment must be prepaid and we recommend that it be insured.
Please make sure you have followed all of the above instructions carefully before returning any merchandise for service. You may choose to have your product repaired by one of our Authorized Lionel Service Centers after its warranty has expired. A reasonable service fee will be charged.
WarrantyInformationPlease complete the information below and keep it, along with your dated sales receipt. You must present
this and your dated sales receipt when requesting warranty service.
Name ������������������������������������������������������������������������
Address �����������������������������������������������������������������������
Place of Purchase ����������������������������������������������������������������
Date of Purchase �����������������������������������������������������������������
Product Number �����������������������������������������������������������������
Product Description ���������������������������������������������������������������
©2007 LIONEL L.L.C., CHESTERFIELD, MI 48051-2493UNITED STATES OF AMERICAPRINTED IN CHINA