lite-vision plus remote controller installation manual · –2– lite-vision plus remote...
TRANSCRIPT

Manual de Instalação 141 Português
Installatiehandleiding 113 Nederlands
Manual de instalación 85 Español
Installationshandbuch 57 Deutsch
Manuel d’installation 29 Français
Installation Manual 1 English
Lite-Vision plus Remote Controller
Model name:
RBC-AMS51E-ES
• Read this manual before using the RBC-AMS51E-ES remote controller.
• Refer to the Installation Manual supplied with the indoor unit for any installation instructions other than operations of the remote controller.
Installation Manual
+00EH97062401.book Page 1 Thursday, March 17, 2011 10:50 AM

– 1 –
Lite-Vision plus Remote Controller Installation Manual
ContentsPrecautions for Safety . . . . . . . . . . . . . . . . . . . . . . . . . . . . . . . . . . . . . . . . . . . . . . . . . . . . 2
Accessory Parts . . . . . . . . . . . . . . . . . . . . . . . . . . . . . . . . . . . . . . . . . . . . . . . . . . . . . . . . . 3
Installation. . . . . . . . . . . . . . . . . . . . . . . . . . . . . . . . . . . . . . . . . . . . . . . . . . . . . . . . . . . . . . 4Requirements to install the remote controller. . . . . . . . . . . . . . . . . . . . . . . . . . . . . 4Install the remote controller . . . . . . . . . . . . . . . . . . . . . . . . . . . . . . . . . . . . . . . . . . . 6Wire the remote controller. . . . . . . . . . . . . . . . . . . . . . . . . . . . . . . . . . . . . . . . . . . . . 7Requirements for wiring of group control . . . . . . . . . . . . . . . . . . . . . . . . . . . . . . . . 7Requirements for installing two remote controllers . . . . . . . . . . . . . . . . . . . . . . . . 7For first use. . . . . . . . . . . . . . . . . . . . . . . . . . . . . . . . . . . . . . . . . . . . . . . . . . . . . . . . . 9Note . . . . . . . . . . . . . . . . . . . . . . . . . . . . . . . . . . . . . . . . . . . . . . . . . . . . . . . . . . . . . . . 9
Part Names and Functions . . . . . . . . . . . . . . . . . . . . . . . . . . . . . . . . . . . . . . . . . . . . . . . 10Monitor screen . . . . . . . . . . . . . . . . . . . . . . . . . . . . . . . . . . . . . . . . . . . . . . . . . . . . . 11
Initial setting . . . . . . . . . . . . . . . . . . . . . . . . . . . . . . . . . . . . . . . . . . . . . . . . . . . . . . . . . . . 121. Clock . . . . . . . . . . . . . . . . . . . . . . . . . . . . . . . . . . . . . . . . . . . . . . . . . . . . . . . . . . . 122. Name of room. . . . . . . . . . . . . . . . . . . . . . . . . . . . . . . . . . . . . . . . . . . . . . . . . . . . 133. Screen contrast . . . . . . . . . . . . . . . . . . . . . . . . . . . . . . . . . . . . . . . . . . . . . . . . . . 144. Backlight. . . . . . . . . . . . . . . . . . . . . . . . . . . . . . . . . . . . . . . . . . . . . . . . . . . . . . . . 155. Key lock . . . . . . . . . . . . . . . . . . . . . . . . . . . . . . . . . . . . . . . . . . . . . . . . . . . . . . . . 156. Header/follower . . . . . . . . . . . . . . . . . . . . . . . . . . . . . . . . . . . . . . . . . . . . . . . . . . 167. Language . . . . . . . . . . . . . . . . . . . . . . . . . . . . . . . . . . . . . . . . . . . . . . . . . . . . . . . 178. Press & hold 4sec. . . . . . . . . . . . . . . . . . . . . . . . . . . . . . . . . . . . . . . . . . . . . . . . . 18
Field setting menu . . . . . . . . . . . . . . . . . . . . . . . . . . . . . . . . . . . . . . . . . . . . . . . . . . . . . . 191. Test Mode . . . . . . . . . . . . . . . . . . . . . . . . . . . . . . . . . . . . . . . . . . . . . . . . . . . . . . . 192. Register service info . . . . . . . . . . . . . . . . . . . . . . . . . . . . . . . . . . . . . . . . . . . . . . 213. Alarm history . . . . . . . . . . . . . . . . . . . . . . . . . . . . . . . . . . . . . . . . . . . . . . . . . . . . 254. Monitor function. . . . . . . . . . . . . . . . . . . . . . . . . . . . . . . . . . . . . . . . . . . . . . . . . . 265. DN setting . . . . . . . . . . . . . . . . . . . . . . . . . . . . . . . . . . . . . . . . . . . . . . . . . . . . . . . 27
+00EH97062401.book Page 1 Thursday, March 17, 2011 10:50 AM

– 2 –
Lite-Vision plus Remote Controller Installation Manual
EN
Precautions for Safety• Read these “Precautions for Safety” carefully before installation.• The precautions described below include important items regarding safety. Observe them without fail.
Understand the following details (indications and symbols) before reading the body text, and follow the instructions.
• Ask customer to keep this Manual at accessible place for future reference.
Indication Meaning of Indication
WARNING Text set off in this manner indicates that failure to adhere to the directions in the warning could result in serious bodily harm (*1) or loss of life if the product is handled improperly.
CAUTION Text set off in this manner indicates that failure to adhere to the directions in the caution could result in serious bodily injury (*2) or damage (*3) to property if the product is handled improperly.
*1: Serious bodily harm indicates loss of eyesight, injury, burns, electric shock, bone fracture, poisoning, and other injuries which leave aftereffect and require hospitalization or long-term treatment as an outpatient.
*2: Bodily injury indicates injury, burns, electric shock, and other injuries which do not require hospitalization or long-term treatment as an outpatient.
*3: Damage to property indicates damage extending to buildings, household effects, domestic livestock, and pets.
Symbols Meaning of Symbols
“ " Indicates prohibited items.The actual contents of the prohibition are indicated by a picture or text placed inside or next to the graphic symbol.
“ " Indicates compulsory (mandatory) items.The actual contents of the obligation indicated by a picture or text placed inside or next to the graphic symbol.
WARNING
• Only a qualified installer or service person is allowed to do installation work.Inappropriate installation may result in water leakage, electric shock or fire.
• Perform installation work properly according to the Installation Manual.Inappropriate installation may result in water leakage, electric shock or fire.
• Electrical work must be performed by a qualified electrician in accordance with this installation manual. The work must satisfy all local, national and international regulations.Inappropriate work may result in electric shock or fire.
• Use predefined wire and connect them certainly. Keep the connecting terminal free from external force.Improper wire connection or clamping may result in exothermic, fire or malfunction.
• The electrical work must satisfy all local, national and international regulations.
+00EH97062401.book Page 2 Thursday, March 17, 2011 10:50 AM

– 3 –
Lite-Vision plus Remote Controller Installation Manual
Accessory PartsNo. Part name Quantity
(1) Remote controller 1
(2) Screws (small)M4 x 20 2
(3) Wood screwsM3.8 x 16 2
(4) Owner’s Manual 1
(5) Installation Manual(This manual) 1
(6) CD-ROM 1
+00EH97062401.book Page 3 Thursday, March 17, 2011 10:50 AM

– 4 –
Lite-Vision plus Remote Controller Installation Manual
EN
Installation
Requirements to install the remote controller
Installation place• Install the remote controller at a height of 1 to 1.5 m from the floor so that the average temperature in the room
can be detected.• Do not install the remote controller in a place exposed to direct sunlight or direct outside air, such as the side of
a window.• Do not install the remote controller in a place behind something or to the rear side of an object, where air flow is
not sufficient.• Do not install the remote controller in a freezing box or refrigerator, as the remote controller is not waterproof.• Install the remote controller vertically to the wall.
Installation dimension
Room temperature sensor
4-Ø4.2×8 slotted hole
+00EH97062401.book Page 4 Thursday, March 17, 2011 10:50 AM
– 5 –
Lite-Vision plus Remote Controller Installation Manual
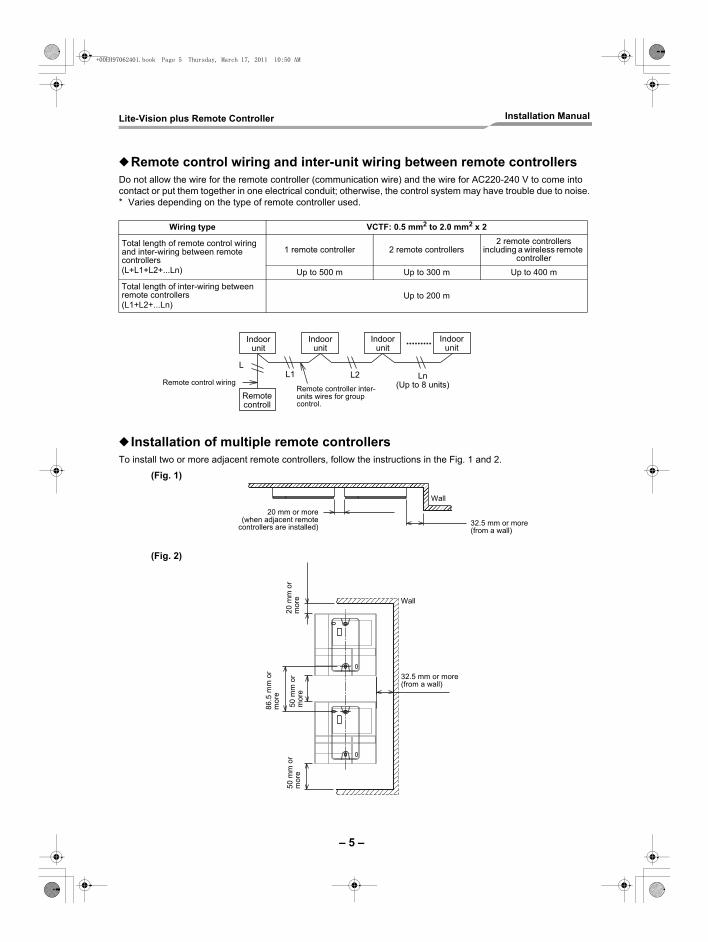
Remote control wiring and inter-unit wiring between remote controllersDo not allow the wire for the remote controller (communication wire) and the wire for AC220-240 V to come into contact or put them together in one electrical conduit; otherwise, the control system may have trouble due to noise.* Varies depending on the type of remote controller used.
Installation of multiple remote controllersTo install two or more adjacent remote controllers, follow the instructions in the Fig. 1 and 2.
Wiring type VCTF: 0.5 mm2 to 2.0 mm2 x 2
Total length of remote control wiring and inter-wiring between remote controllers (L+L1+L2+...Ln)
1 remote controller 2 remote controllers2 remote controllers
including a wireless remote controller
Up to 500 m Up to 300 m Up to 400 m
Total length of inter-wiring between remote controllers(L1+L2+...Ln)
Up to 200 m
Indoor unit
Indoor unit
Indoor unit
Indoor unit
Remote control wiring
LL1 L2 Ln
(Up to 8 units)Remote controll
Remote controller inter-units wires for group control.
Wall
32.5 mm or more(from a wall)
20 mm or more(when adjacent remote
controllers are installed)
(Fig. 1)
32.5 mm or more(from a wall)
20 m
m o
r m
ore
50 m
m o
r m
ore
86.5
mm
or
mor
e
50 m
m o
r m
ore
Wall
(Fig. 2)
+00EH97062401.book Page 5 Thursday, March 17, 2011 10:50 AM

– 6 –
Lite-Vision plus Remote Controller Installation Manual
EN
Install the remote controllerNOTE• Wiring for the remote controller should not be bundled or installed in the same conduit with a power cable.; otherwise,
malfunction may result.• Install the remote controller away from sources of electrical interference and electromagnetic fields.
1 Insert a flat-blade screwdriver into the groove on the back side of the remote controller to remove the rear case.
2 Use the wood screws (2 pieces) supplied with the remote controller to attach the rear case of the remote controller to the wall. Do not use an electrical screwdriver. Do not over-tighten the screw (Tightening torque is up to 2 kg / f•cm.); otherwise, the rear case may be damaged.
3 Connect the electrical wire from the indoor unit to the terminal block of remote controller. (Refer to “Wire the remote controller”.)Check the terminal number of electrical wire from the indoor unit to avoid miswiring. (If AC 200-240 V is applied, the remote controller and indoor unit will break down.)
Rear case
Remote controller
Wood screw x 2
<Back side of the remote controller>
+00EH97062401.book Page 6 Thursday, March 17, 2011 1:28 PM
– 7 –
Lite-Vision plus Remote Controller Installation Manual
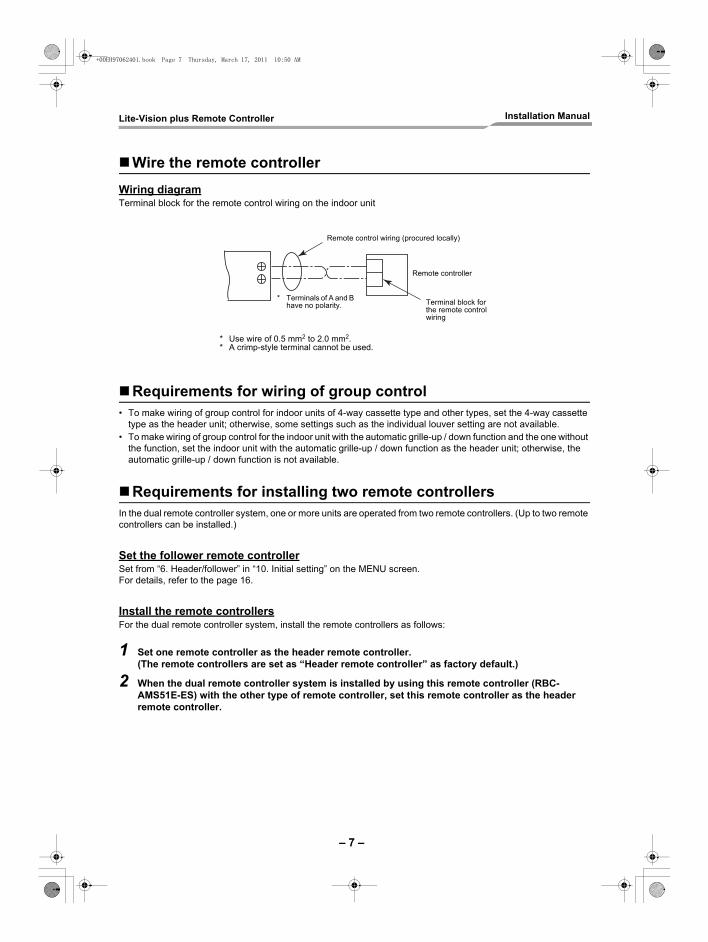
Wire the remote controllerWiring diagramTerminal block for the remote control wiring on the indoor unit
Requirements for wiring of group control• To make wiring of group control for indoor units of 4-way cassette type and other types, set the 4-way cassette
type as the header unit; otherwise, some settings such as the individual louver setting are not available.• To make wiring of group control for the indoor unit with the automatic grille-up / down function and the one without
the function, set the indoor unit with the automatic grille-up / down function as the header unit; otherwise, the automatic grille-up / down function is not available.
Requirements for installing two remote controllersIn the dual remote controller system, one or more units are operated from two remote controllers. (Up to two remote controllers can be installed.)
Set the follower remote controllerSet from “6. Header/follower” in “10. Initial setting” on the MENU screen.For details, refer to the page 16.
Install the remote controllersFor the dual remote controller system, install the remote controllers as follows:
1 Set one remote controller as the header remote controller.(The remote controllers are set as “Header remote controller” as factory default.)
2 When the dual remote controller system is installed by using this remote controller (RBC-AMS51E-ES) with the other type of remote controller, set this remote controller as the header remote controller.
Remote control wiring (procured locally)
Terminal block for the remote control wiring
Remote controller
* Terminals of A and B have no polarity.
* Use wire of 0.5 mm2 to 2.0 mm2.* A crimp-style terminal cannot be used.
+00EH97062401.book Page 7 Thursday, March 17, 2011 10:50 AM

– 8 –
Lite-Vision plus Remote Controller Installation Manual
EN
Basic wiring diagramNOTETerminals of A and B have no polarity.
To diverge from the indoor unit To diverge from the header remote controller
To operate a group control of multiple indoor units by two remote controllers* The header or follower remote controller can be connected to any indoor unit.
Remote control wiring (Locally procured)0.5 mm2 to 2.0 mm2.
Remote controller (header)
Remote controller (follower)
(Sold separately)
Terminal blockfor the remotecontrol wiring
Earth
Indoor unit
Remote control wiring (Locally procured)0.5 mm2 to 1.25 mm2.
Remote controller (header)
Remote controller (follower)
(Sold separately)
Terminal blockfor the remotecontrol wiring
Earth
Indoor unit
Remote controller inter-unit wires for group control (Locally procured)
Remote controller (header)
Remote controller (follower)
(Sold separately)
Terminal block for theremote control wiring
Earth
Indoor unit No.1
Earth Earth Earth
Indoor unit No.2
Indoor unit No.3
Indoor unit No.8
+00EH97062401.book Page 8 Thursday, March 17, 2011 10:50 AM

– 9 –
Lite-Vision plus Remote Controller Installation Manual
For first useIt takes some time before the remote controller becomes operable when the remote controller is used for the first time. This is not a malfunction.
<When the power is turned on for the first time after installation>It takes about 5 minutes before the remote controller becomes operable.
<When the power is turned on from the second time>It takes about 1 minute before the remote controller becomes operable.
NoteFor the operation of switching the room temperature sensor or the settings of the test operation, refer to the page 19.
Power on “ ” flashes “ ” disappears
Remote controller becomes operable.
About 5 minutes
Power on “ ” flashes “ ” disappears
Remote controller becomes operable.
About 1 minute
+00EH97062401.book Page 9 Thursday, March 17, 2011 10:50 AM
– 10 –
Lite-Vision plus Remote Controller Installation Manual
EN
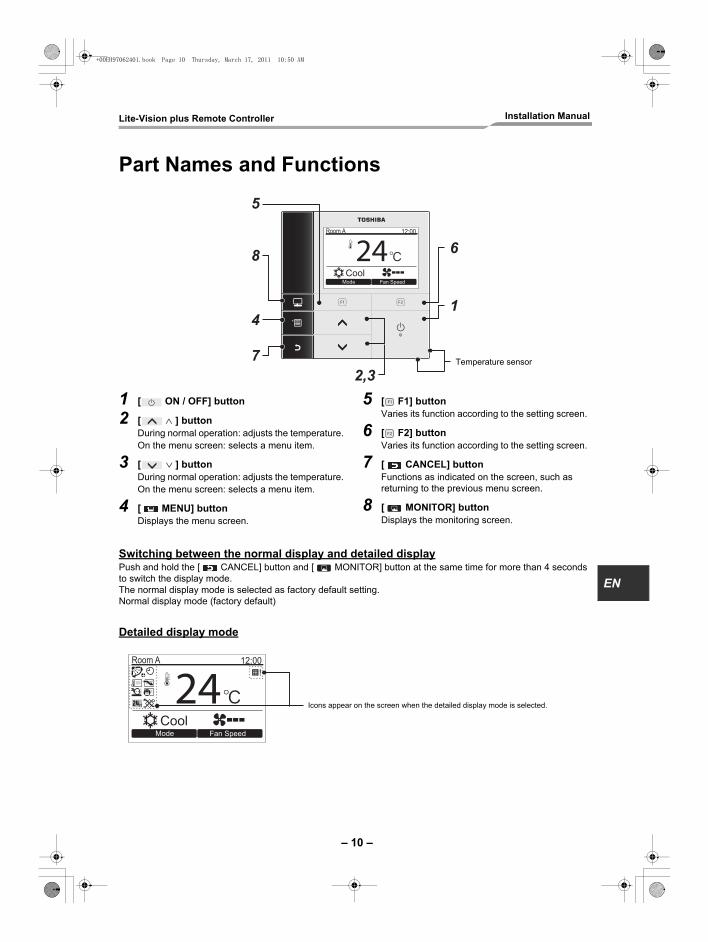
Part Names and Functions
Switching between the normal display and detailed displayPush and hold the [ CANCEL] button and [ MONITOR] button at the same time for more than 4 seconds to switch the display mode. The normal display mode is selected as factory default setting.Normal display mode (factory default)
Detailed display mode
1 [ ON / OFF] button
2 [ ∧ ] buttonDuring normal operation: adjusts the temperature.On the menu screen: selects a menu item.
3 [ ∨ ] buttonDuring normal operation: adjusts the temperature.On the menu screen: selects a menu item.
4 [ MENU] buttonDisplays the menu screen.
5 [ F1] buttonVaries its function according to the setting screen.
6 [ F2] buttonVaries its function according to the setting screen.
7 [ CANCEL] buttonFunctions as indicated on the screen, such as returning to the previous menu screen.
8 [ MONITOR] buttonDisplays the monitoring screen.
8
4
7
6
1
2,3
5
24Room A 12:00
Mode Fan SpeedCool
Temperature sensor
24Room A 12:00
Mode Fan SpeedCool
Icons appear on the screen when the detailed display mode is selected.
+00EH97062401.book Page 10 Thursday, March 17, 2011 10:50 AM
– 11 –
Lite-Vision plus Remote Controller Installation Manual
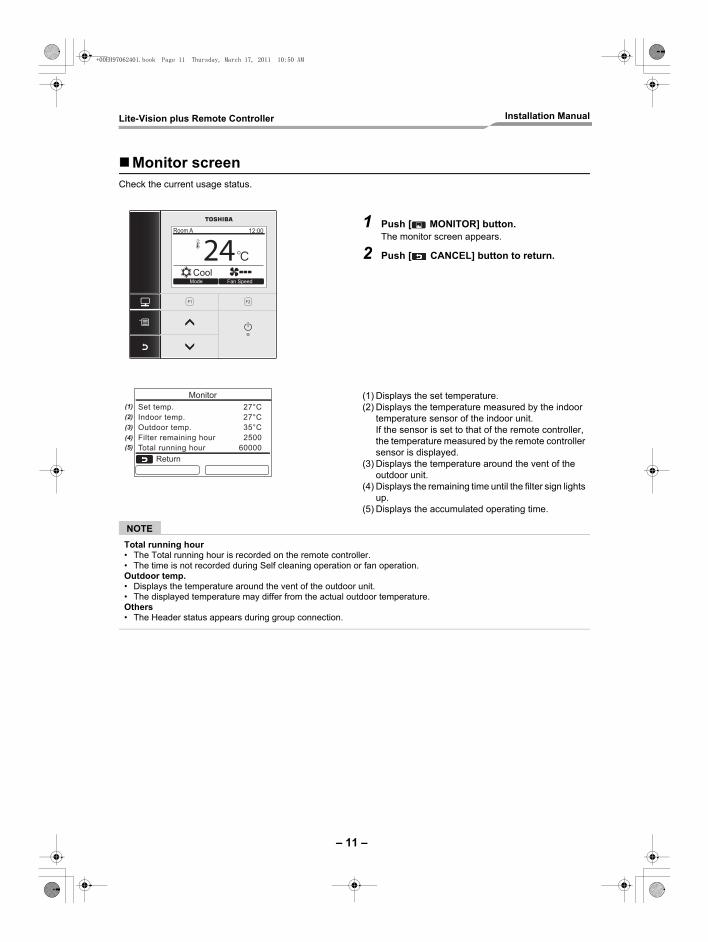
Monitor screenCheck the current usage status.
NOTETotal running hour• The Total running hour is recorded on the remote controller.• The time is not recorded during Self cleaning operation or fan operation.Outdoor temp.• Displays the temperature around the vent of the outdoor unit.• The displayed temperature may differ from the actual outdoor temperature.Others• The Header status appears during group connection.
1 Push [ MONITOR] button.The monitor screen appears.
2 Push [ CANCEL] button to return.
(1) Displays the set temperature.(2) Displays the temperature measured by the indoor
temperature sensor of the indoor unit.If the sensor is set to that of the remote controller, the temperature measured by the remote controller sensor is displayed.
(3) Displays the temperature around the vent of the outdoor unit.
(4) Displays the remaining time until the filter sign lights up.
(5) Displays the accumulated operating time.
24Room A 12:00
Mode Fan SpeedCool
Set temp. 27°C27°C35°C2500
60000
Indoor temp.Outdoor temp.Filter remaining hourTotal running hour
Monitor
Return
(1)(2)(3)(4)(5)
+00EH97062401.book Page 11 Thursday, March 17, 2011 10:50 AM

– 12 –
Lite-Vision plus Remote Controller Installation Manual
EN
Initial setting
1. ClockSet the year, month, date, and time.
1 Push the [ MENU] button to display the menu screen.
2 Push the [ ∧ ] / [ ∨ ] button to select “10.Initial setting”on the menu screen, then push the “ Set” [ F2] button.
3 Push the [ ∧ ] / [ ∨ ] button to select an item on the “Initial setting” screen.
4 Push the “ Set” [ F2] button.The selected menu setting screen will be displayed.
5 Push the [ CANCEL] button to return.The screen returns to the menu screen.
1 Push the [ ∧ ] / [ ∨ ] button to select “1. Clock” on the “Initial setting” screen, then push the “ Set” [ F2] button.
2 Push the [ ∧ ] / [ ∨ ] button to select the year, month, date, and time.
Push the “ -” [ F1] / “ +” [ F2] button to set the value.
3 Push the [ MENU] button.
Initial setting(1/2)1.Clock2.Name of room3.Screen contrast4.Backlight5.Key lock
SetReturn Set
Set
Initial setting(1/2)1.Clock2.Name of room3.Screen contrast4.Backlight5.Key lock
SetReturn
Set
– +
ClockDateMonthYearHourMinute
0101
20100000
– +Return Fix
+00EH97062401.book Page 12 Thursday, March 17, 2011 10:50 AM

– 13 –
Lite-Vision plus Remote Controller Installation Manual
To adjust the clock
2. Name of roomSet the name of the room or place where the remote controller is installed. (Operations of the air conditioner are possible without this setting.)
1 Push the [ ∧ ] / [ ∨ ] button to select “1. Clock” on the “Initial setting” screen, then push the “ Set” [ F2] button.
2 Push the [ ∧ ] / [ ∨ ] button to select the year, month, date, and time.
Push the “ -” [ F1] / “ +” [ F2] button to set the value.
3 Push the [ MENU] button.
The clock display appears on the upper right of the screen.• The clock display blinks if the clock setting has
been reset due to power failure or other cause.
NOTEThe available date range is from January 1st, 2010 to December 31st, 2099.
1 Push the [ ∧ ] / [ ∨ ] button to select “2. Name of room” on the “Initial setting” screen, then push the “ Set” [ F2] button.
2 Set the name of the remote controller.
Enter the characters of the name in the screen (1).Move the cursor to select the character with the [ ∧ ] / [ ∨ ] button and “ ←” [ F1] / “ →” [ F2] button (the selected character is highlighted), then push the [ MENU] button.Name of the remote controller appears.
Up to 16 characters can be entered for Name of room.
ClockDateMonthYearHourMinute
0101
20100000
– +Return Fix
Set
– +
24Room A 12:00
Mode Fan SpeedCool
Initial setting(1/2)1.Clock2.Name of room3.Screen contrast4.Backlight5.Key lock
SetReturn
Set
Return SetFixDel
ABCDEFGH I JKLMNOPQRSTU W X Y
Z & / : ·abcdef g h i jk lmnop q r s t
uvwxyz–+!?1234567890
(1)
+00EH97062401.book Page 13 Thursday, March 17, 2011 10:50 AM

– 14 –
Lite-Vision plus Remote Controller Installation Manual
EN
3. Screen contrastAdjust the contrast of the LCD.
To delete a character, highlight “Del” and push [ MENU] button.
To confirm the name, highlight “Fix” and push [ MENU] button.
The screen returns to the “Initial setting” screen.
1 Push the [ ∧ ] / [ ∨ ] button to select “3. Screen contrast” on the “Initial setting” screen, then push the “ Set” [ F2] button.
2 Push the “ -” [ F1] / “ +” [ F2] button to adjust.
3 Push the [ MENU] button.The screen returns to the “Initial setting” screen.
Return SetFix
ABCDEFGH I JKLMNOPQRSTU W X Y
Z & / : ·abcdef g h i jk lmnop q r s t
uvwxyz–+!?1234567890
Bedroo
Del
Return Set
Del
ABCDEFGH I JKLMNOPQRSTU W X Y
Z & / : ·abcdef g h i jk lmnop q r s t
uvwxyz–+!?1234567890
705A
Fix
Initial setting(1/2)1.Clock2.Name of room3.Screen contrast4.Backlight5.Key lock
SetReturn
Set
– +
Screen contrast
– +
+–
Return Fix
+00EH97062401.book Page 14 Thursday, March 17, 2011 10:50 AM

– 15 –
Lite-Vision plus Remote Controller Installation Manual
4. BacklightTurn on or off the back light of the LCD.
5. Key lockSelect whether to lock / unlock [ON / OFF], [ ], [MODE](F1) and [FAN SPEED](F2).
1 Push the [ ∧ ] / [ ∨ ] button to select “4. Backlight” on the “Initial setting” screen, then push the “ Set” [ F2] button.
2 Push the [ ∧] / [ ∨ ] button to select “ON” or “OFF”.
3 Push the [ MENU] button.When “ON” is selected, the back light is turned on during operating with the remote controller.When “OFF” is selected, the back light is not turned on.
NOTEThe back light of the LCD is turned on as factory default.
1 Push the [ ∧ ] / [ ∨ ] button to select “5. Key lock” on the “Initial setting” screen, then push the “ Set” [ F2] button.
2 Push the [ ∧] / [ ∨ ] button to select a key to lock / unlock.
3 Push the “ ← ” [ F1] button to select “Lock”, or “ →” [ F2] button to select “Unlock”.
4 Push the [ MENU] button.When "Lock" is selected, the key cannot be used during key lock.When "Unlock" is selected, the key can be used even during key lock.All keys are unlocked while “Check” is displayed.For the key lock setting, refer to the owner’s manual.The factory default is "Lock".
Initial setting(1/2)1.Clock2.Name of room3.Screen contrast4.Backlight5.Key lock
SetReturn
Set
BacklightON
OFF
Return Fix
Initial setting(1/2)1.Clock2.Name of room3.Screen contrast4.Backlight5.Key lock
SetReturn
Set
ON/OFF
Set temp.Lock / Unlock
Lock / Unlock
Key lock(1/2)
Return Fix
Mode
Fan speedLock / Unlock
Lock / Unlock
Key lock(2/2)
Return Fix
+00EH97062401.book Page 15 Thursday, March 17, 2011 10:50 AM

– 16 –
Lite-Vision plus Remote Controller Installation Manual
EN
6. Header/followerSet the remote controller as “Header remote controller” or “Follower remote controller”when the dual remote controller system is used.Carry out the setting operation while the indoor unit is stopped. (Turn off the air conditioning unit before starting the setting operation.)
Note for the Header/follower setting• Set the RBC-AMS51E-ES remote controller as the Header remote controller when the dual remote controller
system is used.• The RBC-AMS51E-ES remote controller can be used as the Follower remote controller when the dual remote
controller system is used that consists of two RBC-AMS51E-ES remote controllers.• The following functions are not available when the remote controller is set as the Follower remote controller:
Schedule timer / Off reminder timer / Night operation / Save operation / Return back
NOTE• Some functions are not available when the remote controller is set as the Follower remote controller.• In the dual remote controller system, the latter operation overrides the former.• The remote controller is set as “Header remote controller” as factory default.
1 Push the [ ∧ ] / [ ∨ ] button to select “6. Header/follower” on the “Initial setting” screen, then push the “ Set” [ F2] button.
2 Push the [ ∧ ] / [ ∨ ] button to select the setting.
3 Push the [ MENU] button.“Setting” appears on the screen, then the screen returns to the “Initial setting” screen.
Initial setting(2/2)6.Header/Follower7.Language8.Press & hold 4 sec.
SetReturn
Set
Header/FollowerHeaderremote controllerFollowerremote controller
Return Fix
Header remote controller
Follower remote
controller
Indoor unit
Outdoor unit
+00EH97062401.book Page 16 Thursday, March 17, 2011 10:50 AM
– 17 –
Lite-Vision plus Remote Controller Installation Manual
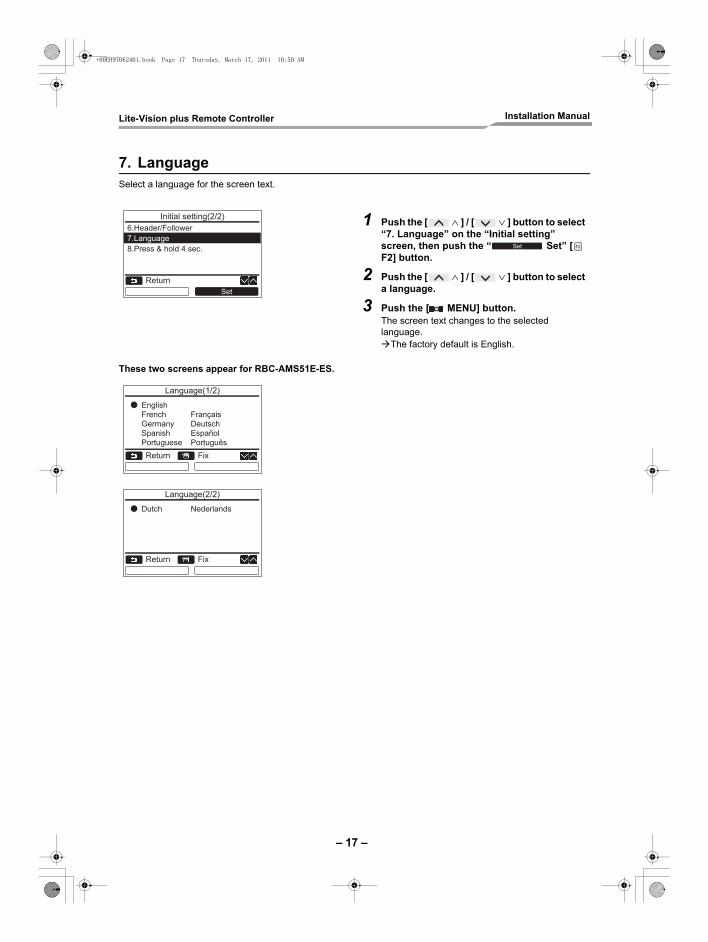
7. LanguageSelect a language for the screen text.
1 Push the [ ∧ ] / [ ∨ ] button to select “7. Language” on the “Initial setting” screen, then push the “ Set” [ F2] button.
2 Push the [ ∧ ] / [ ∨ ] button to select a language.
3 Push the [ MENU] button.The screen text changes to the selected language.
The factory default is English.
These two screens appear for RBC-AMS51E-ES.
Initial setting(2/2)6.Header/Follower7.Language8.Press & hold 4 sec.
SetReturn
Set
Language(1/2)
EnglishFrenchGermanySpanishPortuguese
FrançaisDeutschEspañolPortuguês
Return Fix
Language(2/2)
Dutch
Return Fix
Nederlands
+00EH97062401.book Page 17 Thursday, March 17, 2011 10:50 AM

– 18 –
Lite-Vision plus Remote Controller Installation Manual
EN
8. Press & hold 4sec.Set the “press and hold” operation for the [ ON / OFF] button.
1 Push the [ ∧ ] / [ ∨ ] button to select “8. Press & hold 4sec.” on the “Initial setting” screen, then push the “ Set” [ F2] button.
2 Push the [ ∧ ] / [ ∨ ] button to select “ON” or “OFF”.
3 Push the [ MENU] button.When “ON” is selected, the air-conditioner starts / stops running when the [ ON / OFF] button is pressed and hold 4 seconds.When “OFF” is selected, the air-conditioner starts / stops running when the [ ON / OFF] button is pressed.
Initial setting(2/2)6.Header/Follower7.Language8.Press & hold 4 sec.
SetReturn
Press & hold 4sec.ON
OFF
Return Fix
Set
+00EH97062401.book Page 18 Thursday, March 17, 2011 10:50 AM

– 19 –
Lite-Vision plus Remote Controller Installation Manual
Field setting menu
1. Test ModeSet for the test operation after installation.
Before the test mode• Perform the followings before turning on the power:
1) By using 500 V-megger, check that resistance of 1 MΩ or more exists between the terminal block of the power supply and the earth (earthing).If resistance of less than 1 MΩ is detected, do not run the unit.
2) Check all valve of the outdoor unit is opened fully.• To protect the compressor at the time of startup, leave the power on for 12 hours or more before operation.• Do not press the electromagnetic contactor to forcibly perform the test mode. (It is very dangerous because the
protective device does not work.)
Performing the test modeFor the procedure of the operation, refer to the supplied Owner’s Manual. A forced test mode can be performed according to the following procedure when the room temperature rises / falls enough for the thermostat to turn off. In order to prevent a continuous operation, the forced test operation is released after 60 minutes have passed and returns to the normal operation.
CAUTIONDo not perform the forced test mode for purposes other than the test mode because it applies an excessive load to the devices.
1 Push the [ MENU] button to display the menu screen.
2 Push and hold the [ MENU] button and the [ ∨] button at the same time to display the “Field setting menu”.
Push and hold the buttons for more than 4 seconds.
3 Push the [ CANCEL] button to return.
Item Function1. Test mode Settings for when performing the test operation after installation
2. Register service info Registration of information about the contact number for service, model name and serial number of the indoor unit and outdoor unit
3. Alarm history List of latest 10 alarm data: error information of check code, date, time, and unit
4. Monitor function Monitoring data of sensor temperature, rotating speed of the compressor or other factor.
5. DN setting Advanced settings using DN code
1.Test mode2.Register service info.3.Alarm history4.Monitor function5.DN setting
Field setting menu
ReturnSet
+00EH97062401.book Page 19 Thursday, March 17, 2011 10:50 AM

– 20 –
Lite-Vision plus Remote Controller Installation Manual
EN
1 Push the [ ∧ ] / [ ∨] button to select “1. Test Mode” on the “Field setting menu screen, then push the “ Set” [ F2] button.
Pushing the “ Yes” [ F1] button sets the test mode and the screen returns to the field setting menu screen.Push [ CANCEL] twice, the screen (2) appears.
2 Push the [ ON / OFF] button to start the test mode. The screen (1) shown in the left appears. (The screen (2) appears when the operation is stopped.)
Perform the test mode in the “Cool” or “Heat” mode.Temperature setting cannot be adjusted during the test mode.Check codes are displayed as usual.
3 When the test mode is finished, push the [ ∧ ] / [ ∨] button to select “1. Test Mode” on the “Field setting menu” screen, then push the “ Set” [ F2] button. The screen (3) appears.
Pushing the “ Yes” [ F1] button stops the test mode screen and continues the normal operation.
NOTEThe test mode stops after 60 minutes and the screen returns to the normal / detailed display.
1.Test mode2.Register service info.3.Alarm history4.Monitor function5.DN setting
Field setting menu
ReturnSet
Set
Yes
Return
Test mode start.
NoYes
Test mode
Test
(1) Room A 12:00
Mode Fan SpeedCool
Set
Yes
Test
(2) Room A 12:00
Return
Test mode stop.
NoYes
Test mode(3)
+00EH97062401.book Page 20 Thursday, March 17, 2011 10:50 AM

– 21 –
Lite-Vision plus Remote Controller Installation Manual
Using the Service monitor with the [ MONITOR] button during the test mode
2. Register service infoRegister information about the contact number for service, model name and serial number of the indoor unit and outdoor unit.
• Enter information manually for a Light commercial outdoor unit.Information data of Light commercial indoor unit, multi indoor unit, and VRF outdoor unit is loaded automatically. Automatic loading is not available for some models. In this case, enter information manually.
• Enter the contact number for service displayed in “2. Service information” of “11. information” on the menu screen.
• Enter the model name and serial number displayed in “1. Model information” of “11. information” on the menu screen.
Push the [ MONITOR] button
Refer to “4. Monitor function” (page 26) for details.
When the group control is used, select the unit to monitor in the unit selection screen before displaying the monitoring display.
Test
Room A 12:00
Mode Fan SpeedCool
Code00
Data0024
Return
Monitor function
+00EH97062401.book Page 21 Thursday, March 17, 2011 10:50 AM

– 22 –
Lite-Vision plus Remote Controller Installation Manual
EN
Entering information manually
Entering the contact number for service
1 Push the [ ∧ ] / [ ∨ ] button to select “2. Register service info” on the field setting menu screen.
2 Push the “ Set” [ F2] button.The setting screen for entering information appears.
3 Enter the information with the “ ←” [ F1] / “ →” [ F2] button and [ ∧ ] / [ ∨ ] button.
Item Function1. Service contact tel No. Enter the contact number for service.
2. Outdoor model name Enter / reset the model name of the outdoor unit.
3. Outdoor unit serial No. Enter / reset the serial number of the outdoor unit.
4. Indoor model name Enter / reset the model name of the indoor unit.
5. Indoor unit serial No. Enter / reset the serial number of the indoor unit.
1 Push the [ ∧ ] / [ ∨ ] button to select “1. Service contact tel No.”, then push the “ Set” [ F2] button.
2 Move the cursor to select the character (selected character is highlighted) with the “ ←” [ F1] / “ →” [ F2] button, then enter the contact number with the [ ∧ ] / [ ∨ ] button.
3 Push the [ MENU] button.
1.Service contact tel No.2.Outdoor model name 3.Outdoor unit serial No.4.Indoor model name 5.Indoor unit serial No.
Register service info
ReturnSet
Set
1.Service contact tel No.2.Outdoor model name 3.Outdoor unit serial No.4.Indoor model name 5.Indoor unit serial No.
Register service info
ReturnSet
Set
Input telephone numberService contact tel No.
FixReturn
- ---------- -
+00EH97062401.book Page 22 Thursday, March 17, 2011 10:50 AM

– 23 –
Lite-Vision plus Remote Controller Installation Manual
Entering the model name and serial numberEnter the model name and serial number manually for a Light commercial outdoor unit. Information data is loaded automatically for Light commercial indoor units, VRF indoor units (excluding large capacity air discharge type and duct type), and VRF outdoor units. Enter the model name and serial number manually after replacing the circuit board to the service circuit board (unless entering information manually before replacement of the circuit board).
<Flow chart of usual process>
Entering the model name and serial number manually
Product Model name and serial number displayLight commercial indoor unit Information data is loaded automatically from the indoor unit and displayed.
VRF indoor unitInformation data is loaded automatically from the indoor unit and displayed.Enter information manually for the indoor unit of large capacity air discharge type and duct type.
VRF outdoor unit Information data is loaded automatically from the outdoor unit and displayed.
Light commercial outdoor unit Enter information manually on the remote controller.
Service circuit board Enter information manually on the remote controller.
1 Push the [ ∧ ] / [ ∨ ] button to select “2. Outdoor model name” on the “Register service info” screen, then push the “ Set” [ F2] button.
Select “3. Outdoor unit serial No.” to enter the serial number of the outdoor unit.Select “4. Indoor model name” to enter the model name of the indoor unit.Select “5. Indoor unit serial No.” to enter the serial number of the indoor unit.
Does the indoor unit / outdoor unit automatically load information data of model name and serial number to the remote controller?
The model name and serial number loaded from the unit are displayed.
1. Manual entry is not needed.2. Select “Indoor unit (Outdoor unit)” for the display mode
(factory default).
1. Enter the model name and serial number of the unit manually on the remote controller.
2. Select “Remote controller” for the display mode.
Yes No
1.Service contact tel No.2.Outdoor model name 3.Outdoor unit serial No.4.Indoor model name 5.Indoor unit serial No.
Register service info
ReturnSet
Set
+00EH97062401.book Page 23 Thursday, March 17, 2011 10:50 AM

– 24 –
Lite-Vision plus Remote Controller Installation Manual
EN
Selecting the model name and serial No.
2 Push the [ ∧ ] / [ ∨ ] button to select “1. Manual model name input” on the “Outdoor model name” screen, then push the “ Set” [ F2] button.
Select “1. Manual serial No. input” to enter the serial number of the outdoor unit.Select “1. Manual model name input” to enter the model name of the indoor unit.Select “1. Manual serial No. input” to enter the serial number of the indoor unit.
3 Enter the model name of the outdoor unit.See page 13 about how to enter the model name and serial number.
4 Select “Remote controller” for the display mode of model name or serial number to display the manually entered model name or serial number. (See page 13.)
1 Push the [ ∧ ] / [ ∨ ] button to select “2. Model name selection” on the “Outdoor model name” screen, then push the “ Set” [ F2] button.
To select the serial number of the outdoor unit, select "2.Serial No. selection".To select the model name of the indoor unit, select "2. Model name selection".To select the serial number of the indoor unit, select "2.Serial No. selection".
2 Push the [ ∧ ] / [ ∨ ] button to select “Remote controller” or “Outdoor unit”.
When "Outdoor unit" or "Indoor unit" is selected, the model name or serial number received from the outdoor or indoor unit is displayed.When "Remote controller" is selected, the manually entered model name or serial number is displayed.The factory default is "Outdoor unit" or "Indoor unit".
3 Push the [ MENU] button.The screen returns to the “Outdoor model name” screen.
1.Manual model name input2.Model name selectionOutdoor model name
Outdoor model name
ReturnSet
Fix
Set
Return SetFixDel
ABCDEFGH I JKLMNOPQRSTU W X Y
Z & / : ·abcdef g h i jk lmnop q r s t
uvwxyz–+!?1234567890
1.Manual model name input2.Model name selectionOutdoor model name RAV-SP1104AT8-E
Outdoor model name
ReturnSet
Fix
Set
Model name selectionRemote controller
Outdoor unit
Return Fix
+00EH97062401.book Page 24 Thursday, March 17, 2011 10:50 AM

– 25 –
Lite-Vision plus Remote Controller Installation Manual
Checking the model name or serial numberThe model name or serial number to be displayed on the Outdoor (Indoor) model name or Outdoor (Indoor) unit serial No. screen is displayed.
3. Alarm historyList of latest 10 alarm data: error information of check code, date, time, and unit, is displayed.
Deleting the alarm history
1 Push the [ ∧ ] / [ ∨ ] button to select “3. Alarm history” on the “Field setting menu” screen, then push the “ Set” [ F2] button.
List of latest 10 Alarm data is displayed.* The oldest data are deleted in order to record
the new ones.The date and time when the error occurred for the first time is displayed for the repeated alarm.
1 Push the “ Reset” [ F2] button while the list of alarm history is displayed.
2 Push the “ Yes” [ F1] button after the confirmation screen is displayed.
Delete the alarm history in each remote controller when the dual remote controller system is used.
1.Manual model name input2.Model name selectionOutdoor model name RAV-SP1104AT8-E
Outdoor model name
ReturnSet
Fix
Appears here.
1.Test mode2.Register service info.3.Alarm history4.Monitor function5.DN setting
Field setting menu
ReturnSet
Set
Unit Code Date Time1. 1–2 E04 31/12/2010 12:252. – – – –3. – – – –4. – – – –
Alarm history
ReturnReset
Return
Reset all alarm data.
NoYes
Alarm history
B3
Reset
Yes
+00EH97062401.book Page 25 Thursday, March 17, 2011 10:50 AM

– 26 –
Lite-Vision plus Remote Controller Installation Manual
EN
4. Monitor functionThe sensor temperature or operational status of indoor unit, outdoor unit, or remote controller can be monitored.
1 Push the [ ∧ ] / [ ∨ ] button to select “4. Monitor function” on the “Field setting menu” screen, then push the “ Set” [ F2] button.
Push the [ ∧ ] / [ ∨ ] button to select the code to check data.
2 Refer to the Installation Manual supplied with the indoor unit or outdoor unit or service manual for details about the check code and data.
3 Push the [ CANCEL] button to return to the “Field setting menu” screen.
Monitor function
Code00
Data0024
Return
Set
+00EH97062401.book Page 26 Thursday, March 17, 2011 10:50 AM

– 27 –
Lite-Vision plus Remote Controller Installation Manual
5. DN settingPerform the advanced settings for the air conditioner.Carry out the setting operation while the indoor unit is stopped. (Turn off the air conditioning unit before starting the setting operation.)
1 Push the [ ∧ ] / [ ∨ ] button to select “5. DN setting” on the “Field setting menu” screen, then push the “ Set” [ F2] button.
The fan and louver of the indoor unit operate. When the group control is used, the fan and louver of the selected indoor unit operate.Move the cursor to select “DN code” with the “ <” [ F1] button, then set “DN code” with the [ ∧ ] / [ ∨ ] button.Move the cursor to select “data” with the “ >” [ F2] button, then set “data” with the [ ∧ ] / [ ∨ ] button.
2 Refer to the Installation Manual supplied with the indoor unit or service manual for details about the DN code and data.
3 Push the [ MENU] button to set the other DN codes. After “Continue?” is displayed on the screen, push the “ Yes” [ F1] button.
4 Push the “ No” [ F2] button to finish the setting operation. “ ” appears on the screen for a while, then the screen returns to the “Field setting menu” screen.
Pushing the “ No” [ F2] button displays the unit selection screen when the group control is used. Push the [ CANCEL] button on the unit selection screen to finish the setting operation. “ ” appears on the screen for a while, then the screen returns to the “Field setting menu” screen.
DN settingCode(DN) Data
Return
10 0000
Fix< >
Set
<
>
Yes
No
No
DN settingCode(DN) Data
Return
10 0001
Fix< >
Return
Continue?
NoYes
DN setting
+00EH97062401.book Page 27 Thursday, March 17, 2011 10:50 AM

– 28 –
Lite-Vision plus Remote Controller Installation Manual
EN
...................................................................................................
...................................................................................................
...................................................................................................
...................................................................................................
...................................................................................................
...................................................................................................
...................................................................................................
...................................................................................................
...................................................................................................
...................................................................................................
...................................................................................................
...................................................................................................
...................................................................................................
...................................................................................................
...................................................................................................
...................................................................................................
...................................................................................................
...................................................................................................
...................................................................................................
...................................................................................................
...................................................................................................
...................................................................................................
...................................................................................................
...................................................................................................
...................................................................................................
...................................................................................................
...................................................................................................
...................................................................................................
...................................................................................................
...................................................................................................
..................................................................................................
+00EH97062401.book Page 28 Thursday, March 17, 2011 10:50 AM

EH97062401
+00EH97062401.book Page 27 Thursday, March 17, 2011 10:50 AM