lk7003 (lk320) linear applications kit assignments book
TRANSCRIPT

LK7003 (LK320) Linear Applications Kit
Assignments Book
LK2100-80-1


Contents
Introduction . . . . . . . . . . . . . . . . . . . . . . . . . . . . . . . . . . . . . . . . . . . . . . . . . . . . . . . . . . . . . . . . . . 5
Locktronics kits: . . . . . . . . . . . . . . . . . . . . . . . . . . . . . . . . . . . . . . . . . . . . . . . . . . . . . . . . . . . . . . . . . . 5
This book . . . . . . . . . . . . . . . . . . . . . . . . . . . . . . . . . . . . . . . . . . . . . . . . . . . . . . . . . . . . . . . . . . . . . . . . . 5
LK320 Components . . . . . . . . . . . . . . . . . . . . . . . . . . . . . . . . . . . . . . . . . . . . . . . . . . . . . . . . . 7
Baseboard LK0 (Available Separately). . . . . . . . . . . . . . . . . . . . . . . . . . . . . . . . . . . . . . . . . . . . . . . 7
D.C Power Supply CU600T (Available Separately) . . . . . . . . . . . . . . . . . . . . . . . . . . . . . . . . . . . . 7
Lead Set LKLS (Available Separately) . . . . . . . . . . . . . . . . . . . . . . . . . . . . . . . . . . . . . . . . . . . . . . . 8
Current Probe LKCP (Available Separately) . . . . . . . . . . . . . . . . . . . . . . . . . . . . . . . . . . . . . . . . . . 8
Notes to the Supervisor or Teacher . . . . . . . . . . . . . . . . . . . . . . . . . . . . . . . . . . . . . 9
Power Supplies . . . . . . . . . . . . . . . . . . . . . . . . . . . . . . . . . . . . . . . . . . . . . . . . . . . . . . . . . . . . . . . . . . . 9
General Care and Maintenance . . . . . . . . . . . . . . . . . . . . . . . . . . . . . . . . . . . . . . . . . . . . . . . . . . . . . 9
Notes to the Student . . . . . . . . . . . . . . . . . . . . . . . . . . . . . . . . . . . . . . . . . . . . . . . . . . . . . . . 11
British Standard Symbols . . . . . . . . . . . . . . . . . . . . . . . . . . . . . . . . . . . . . . . . . . . . . . . . 13
Assignments . . . . . . . . . . . . . . . . . . . . . . . . . . . . . . . . . . . . . . . . . . . . . . . . . . . . . . . . . . . . . . . . 15
1. Two Stage CR Coupled Amplifier . . . . . . . . . . . . . . . . . . . . . . . . . . . . . . . . . . . . . . . . . . . . . . . 15 2. Intercom . . . . . . . . . . . . . . . . . . . . . . . . . . . . . . . . . . . . . . . . . . . . . . . . . . . . . . . . . . . . . . . .. . . 16 3. A Simple Transmitter . . . . . . . . . . . . . . . . . . . . . . . . . . . . . . . . . . . . . . . . . . . . . . . . . . . . . . . . . 17 4. Transmitter with Modulator. . . . . . . . . . . . . . . . . . . . . . . . . . . . . . . . . . . . . . . . . . . . . . . . . . . . . 18 5. Diode Investigation (a) . . . . . . . . . . . . . . . . . . . . . . . . . . . . . . . . . . . . . . . . . . . . . . . . . . . . . . . . 19 6. Diode Investigation (b) . . . . . . . . . . . . . . . . . . . . . . . . . . . . . . . . . . . . . . . . . . . . . . . . . . . . . . . . 20 7. Diode Investigation (c) . . . . . . . . . . . . . . . . . . . . . . . . . . . . . . . . . . . . . . . . . . . . . . . . . . . . . . . . 21 8. The Diode Receiver. . . . . . . . . . . . . . . . . . . . . . . . . . . . . . . . . . . . . . . . . . . . . . . . . . . . . . . . . . 22 9. AM Receiver with Single Stage Audio Amplifier. . . . . . . . . . . . . . . . . . . . . . . . . . . . . . . . . . . . . 23 10. AM Receiver with Two Stage Audio Amplifier . . . . . . . . . . . . . . . . . . . . . . . . . . . . . . . . . . . . . 24

Introduction
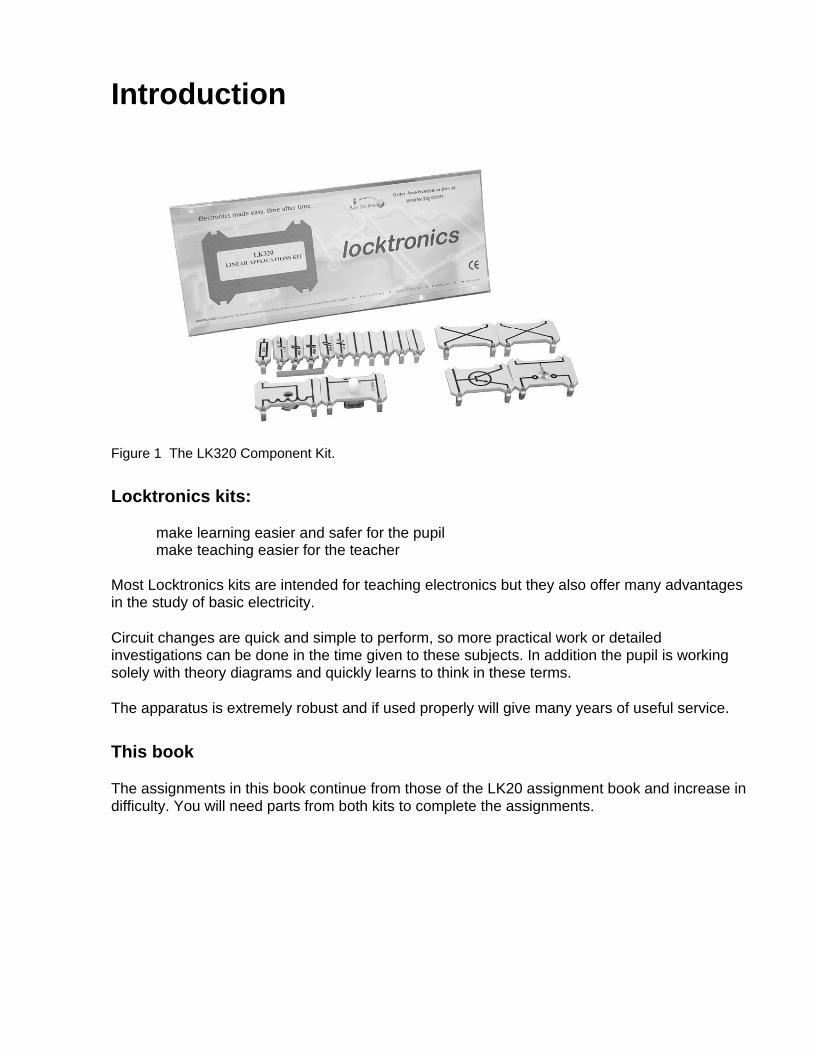
Figure 1 The LK320 Component Kit.
Locktronics kits:
make learning easier and safer for the pupil make teaching easier for the teacher Most Locktronics kits are intended for teaching electronics but they also offer many advantages in the study of basic electricity.
Circuit changes are quick and simple to perform, so more practical work or detailed investigations can be done in the time given to these subjects. In addition the pupil is working solely with theory diagrams and quickly learns to think in these terms.
The apparatus is extremely robust and if used properly will give many years of useful service.
This book
The assignments in this book continue from those of the LK20 assignment book and increase in difficulty. You will need parts from both kits to complete the assignments.


LK320 Components The LK320 Kit (shown in Figure 1) is a component kit. TQ recommends that two LK0 Baseboards, power supplies and leads (available separately) are used with the kit.
Baseboard LK0 (Available Separately)
A Baseboard with 8 rows and 3 columns of pillars.
Figure 2 The LK0 Baseboard.
D.C Power Supply CU600T (Available Separately)
A direct current power supply with a key switch at the back to select either a fixed 5 volt supply or a variable 2 to 15 volt dual supply. Maximum 1 ampere rating.
Figure 3 The CU600T Power Supply.

Lead Set LKLS (Available Separately)
Figure 4 The LKLS Lead Set.
Current Probe LKCP (Available Separately)
Figure 5 The LKCP Current Probe.

Notes to the Supervisor or Teacher
Power Supplies
The CU600 power supply units contain short circuit protection. The CU600T gives an audible warning of a short circuit. This reduces the possibility of circuits being left in a short circuit condition.
Use the recommended power supplies for these assignments or suitably fused and protected low voltage power supplies or batteries of the correct voltage.
General Care and Maintenance
During regular use the kits may become dirty.
Clean the polystyrene component carriers with a damp cloth and a little liquid detergent. Never use spirit solvent. Make sure the carriers are dry before use.
The phosphor bronze contacts are self-cleaning and will retain their proper shapes in normal use. If for any reason they are bent out of shape, use a pair of long-nosed pliers to correct the shape.
Contact with resin bonded material such as chipboard, plywood, etc. can damage the plating on the carrier contact springs thus
CAUTION
impairing their efficiency. Do not store the components in such material.


Notes to the Student As you work through these assignments:
Copy each individual circuit used into your notebook, together with its title. In your diagrams, always use the correct symbol for the components. Make a note of any important facts or information which you have learned and may need to recall for your examinations. Brief notes are usually enough. Disconnect the power supply leads before making any circuit changes. This will prevent accidental damage to components, particularly in assignments using transistors and other semi-conductor devices. Note that some components are different, even though they look the same they may not perform in the same way. Depending upon the particular subject and examination board setting your exam, you may not need to cover all the assignments given. However, check with your teacher to find out about this.
We hope you find the assignments interesting and stimulating enough to make you want to find out more about the exciting subjects of electronics and electricity which are changing the world in which we live.


British Standard Symbols Symbols are used in diagrams and on the component carriers of the Locktronics range. These symbols are based on a set of symbols approved by the British Standards Institute (BSI). The most common symbols are shown in Figures 6 and 7.
Figure 6 Common component symbols.

Figure 7 Common component symbols.
Assignments
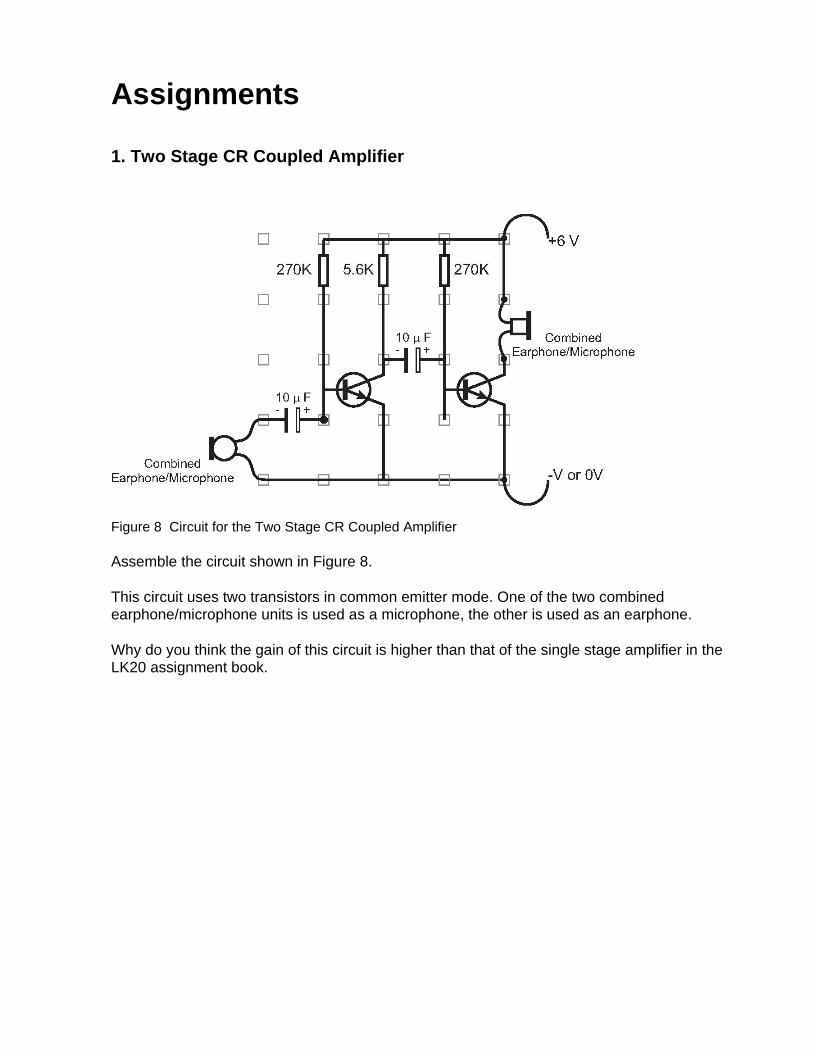
1. Two Stage CR Coupled Amplifier
Figure 8 Circuit for the Two Stage CR Coupled Amplifier
Assemble the circuit shown in Figure 8.
This circuit uses two transistors in common emitter mode. One of the two combined earphone/microphone units is used as a microphone, the other is used as an earphone.
Why do you think the gain of this circuit is higher than that of the single stage amplifier in the LK20 assignment book.

2. Intercom
Figure 9 Circuit for Intercom
Assemble the circuit shown in Figure 9.
This circuit uses the two stage CR amplifier again, but includes the two toggle switches,
connected so that each earphone/microphone unit works as both an earphone and
microphone.
When both switches are at position A, station 1 is a microphone that talks to station 2.
When both switches are at position B, station 2 is a microphone that talks to station 1.

3. A Simple Transmitter
This is a radio frequency (RF) transmitter that will transmit amplitude modulated (AM) signals at the ‘medium wave’ radio frequency. The AM medium wave band is between 535 kHz and 1605 kHz.
If you put an AM medium wave radio receiver near to this circuit and carefully adjust its tuner control, you will be able to hear a single tone. Adjust the variable capacitor to change the transmitter frequency.
Do not attach any aerial or radio frequency amplifier to this circuit. This will increase its power and you will break the law.
CAUTION

4. Transmitter with Modulator
This is the same circuit as A Simple Transmitter, but it includes an extra section that modulates the amplitude of the signal. As you speak into the microphone, the amplitude of the radio frequency signal is altered by the amplitude of your voice.
Do not attach any aerial or radio frequency amplifier to this circuit. This will increase its power and you will break the law.
CAUTION

5. Diode Investigation (a)
Figure 12 Circuit for Diode Investigation (a)
Connect a sensitive ammeter to points X and Y. The ammeter must be able to measure positive and negative current, without the need to change wires around. Can you measure any current flow? Now change the polarity of the supply. What does the diode do?

6. Diode Investigation (b)
Figure 13 Circuit for Diode Investigation (b) Connect a sensitive ammeter to points X and Y. The ammeter must be able to measure positive and negative current, without the need to change wires around. Apply a low frequency to the circuit from a signal generator. What do you notice about the direction of the current?

7. Diode Investigation (c)
Connect a two input oscilloscope to the circuit, so that one input measures the signal in and its other input measures the signal out.
Connect an amplitude modulated radio frequency signal (medium wave frequencies) to the input. The amplitude modulation must be at audio frequency for best results (between 20 Hz and 15 kHz).
The circuit should detect the low frequency modulation signal and let it pass, but stop the high radio frequency. This circuit is not really a filter - it is a signal separator. It separates the low frequency signal from the high frequency carrier. It is called a ‘diode detector’.
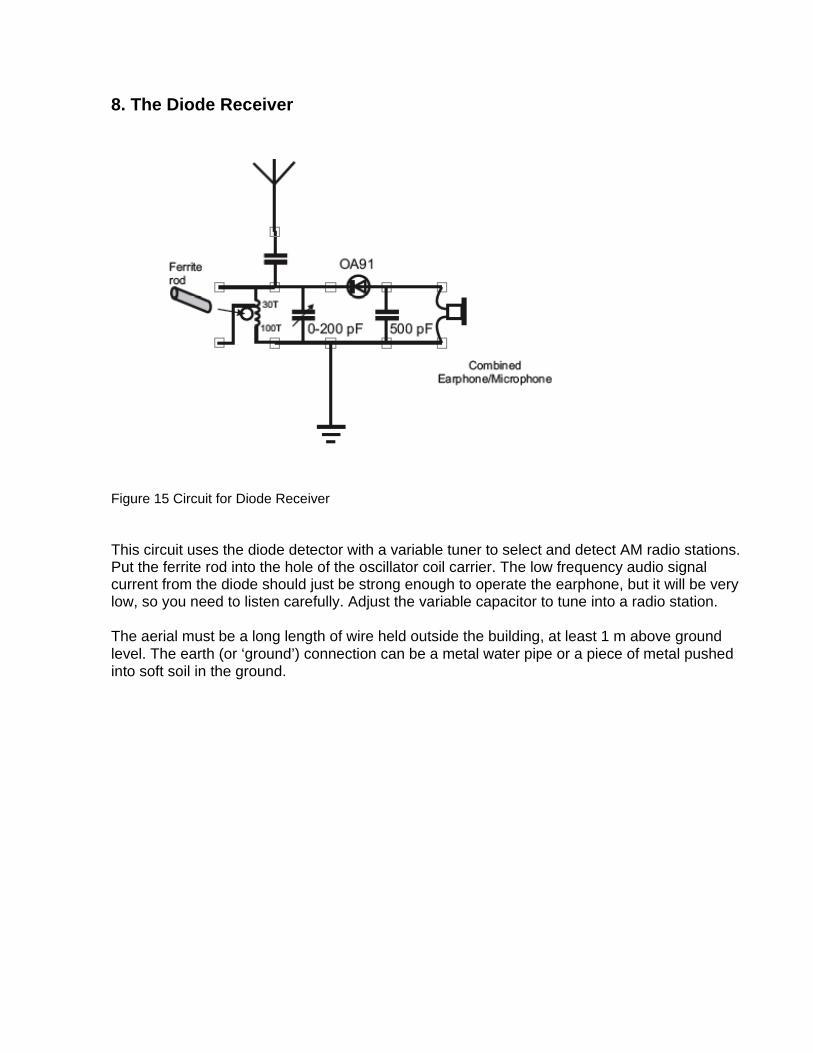
8. The Diode Receiver
Figure 15 Circuit for Diode Receiver This circuit uses the diode detector with a variable tuner to select and detect AM radio stations. Put the ferrite rod into the hole of the oscillator coil carrier. The low frequency audio signal current from the diode should just be strong enough to operate the earphone, but it will be very low, so you need to listen carefully. Adjust the variable capacitor to tune into a radio station.
The aerial must be a long length of wire held outside the building, at least 1 m above ground level. The earth (or ‘ground’) connection can be a metal water pipe or a piece of metal pushed into soft soil in the ground.

9. AM Receiver with Single Stage Audio Amplifier
This circuit uses The Diode Receiver circuit, but connects it to a single stage audio amplifier to amplify the sound. The sound will still be low, so you will need to listen carefully.

10. AM Receiver with Two Stage Audio Amplifier Figure 17 Circuit for AM Receiver with Two Stage Audio Amplifier This circuit uses The Diode Receiver circuit, but connects it to a two stage audio amplifier (from the Two Stage CR Coupled Amplifier) to amplify the sound. The sound level will be very good.