longs peak eucalyptus settee - dty store longs peak settee.pdf · longs peak eucalyptus settee...
TRANSCRIPT

www.DTYStore.comLongs Peak Eucalyptus Settee OF-113 Page 1 of 6
Longs Peak Eucalyptus SetteeItem No. OF-1013
Made in Vietnam
For assistance with assembly, please contact DTYStore.com Customer Satisfaction Center866-217-8155 . [email protected]

Longs Peak Eucalyptus Settee OF-1013 www.DTYStore.com Page 2 of 6
Pre-Assembly Instructions
Read all instructions carefully before assembly. Find a smooth clean area in which to work to avoid damaging your item. Check that all parts and hardware from the lists are present. Lay out parts in alphabetical order and hardware in numerical order to make them easier to find when
you are ready to assemble Wait to dispose of packing material until assembly is complete to avoid accidentally disposing of small
parts or hardware Tools required: Hex wrench (included) Phillips screwdriver (not included) Please use caution and care when lifting the product to avoid injury For ease of assembly two people are recommended
Part list:A. Right Leg Qty: 1 B. Left Leg Qty: 1 C. Seat Qty: 1
D. Back Qty: 1 E. Front Leg Qty: 1 F. Back Leg Qty: 1
Hardware list:1. Short Bolt 70mm long Qty: 2 2. Long Bolt 90mm long Qty: 3 3. Nut Qty: 5
4. 60mm long Screw Qty: 5 5. 35mm long Screw Qty: 2 6. Pin Qty: 1
7. 50mm long Screw Qty: 2 8. 80mm long Screw Qty: 1 9. Hex Wrench Qty: 2

Longs Peak Eucalyptus Settee OF-1013 www.DTYStore.com Page 3 of 6
Step 1:Use a Short Bolt (1), Long Bolt (2), Nut (3) and Hex Wrench (9) to loosely attach the Seat (C) to the Right Leg (A).Note: Insert fasteners only half-way until all parts have beenassembled.
Step 2:Use the Short Bolt (1), Long Bolt (2), Nut (3) and Hex Wrench (9) toloosely attach the Seat (C) to Left Leg (B).
Item Drawing Qty1 12 1
3 2
Item Drawing Qty1 12 1
3 2

Longs Peak Eucalyptus Settee OF-1013 www.DTYStore.com Page 4 of 6
Step 3:Use a 60mm long Screw (4) and Hex Wrench (9) to attach the Back (D) to the Right Leg (A) and the Left Leg (B).
Step 4:Use the 35mm long Screws (5) to secure the support rail on the Sides to the Seat. Use the Hex Wrench (9) to fully tighten all Bolts and Screws.
Item Drawing Qty
4 4
Item Drawing Qty
5 2
Longs Peak Eucalyptus Settee OF-1013 www.DTYStore.com Page 5 of 6
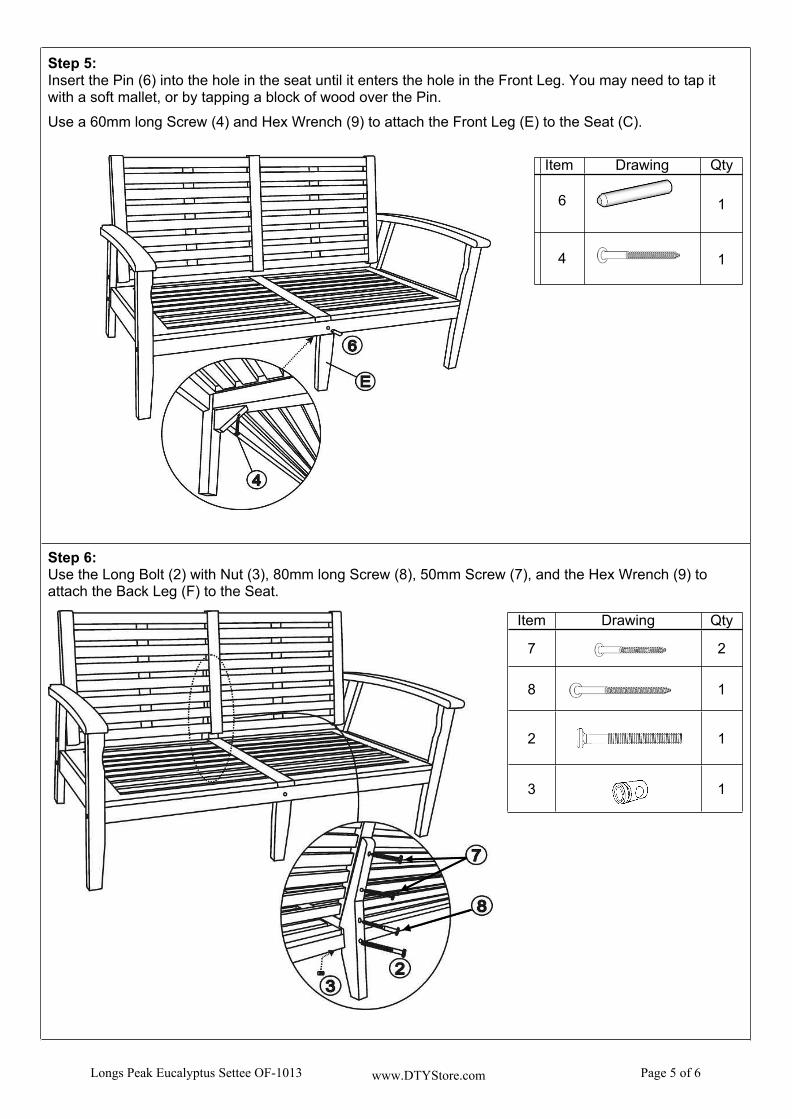
Step 5:Insert the Pin (6) into the hole in the seat until it enters the hole in the Front Leg. You may need to tap it with a soft mallet, or by tapping a block of wood over the Pin.Use a 60mm long Screw (4) and Hex Wrench (9) to attach the Front Leg (E) to the Seat (C).
Step 6:Use the Long Bolt (2) with Nut (3), 80mm long Screw (8), 50mm Screw (7), and the Hex Wrench (9) to attach the Back Leg (F) to the Seat.
Item Drawing Qty
7 2
8 1
2 1
3 1
Item Drawing Qty
6 1
4 1

Longs Peak Eucalyptus Settee OF-1013 www.DTYStore.com Page 6 of 6
Post-Assembly Instructions:
Periodically check fasteners to be sure they do not loosen over time. Do not stand on this item.
Outdoor Furniture Care Instruction:With the proper care your premium eucalyptus furniture will last up to 25 years or more. For unfinished furniture, we suggest lightly sanding the surface of the furniture with 150 or 180 grit sandpaper once a year to remove any fuzziness and any larger splinter causing fibers that occur due to exposure to the elements. Be sure to sand lightly to retain the natural patina. Furniture with an oil finish should also be treated yearly with a light coat of wood oil designed for eucalyptus or teak by applying it with a soft cloth. For finished furniture, we recommend brushing off any loose dirt or debris with a soft brush and wiping down with a mild detergent and water. We recommend you protect your furniture in the off season by using a using a good quality furniture cover. It helps keep your furniture clean and protects it from the elements thus minimizing annual maintenance.
Outdoor Cushion Care Tips
Outdoor cushions help extend the life of your outdoor furniture and keep it looking beautiful year after year. Consequently, it is important to take proper care of you cushions to keep them looking fresh and new. Care and Maintenance Outdoor cushions are made to resist the UV exposure, water, mold and mildew. However, overexposure can lessen the life of you cushions. Saturated cushions should be placed seam side down to allow the water to drain, if you cushion has zippers open the zipper. If you use your outdoor furniture year-round a good quality outdoor furniture cover will help keep your furniture and cushions in great shape. If you store your furniture in the off season it is recommended to store your cushions in a clean dry area. Make sure they are clean and completely dry before storage. Cleaning
Regular cleaning will help keep your cushions looking like new. Brush off any dirt or debris with a soft brush then vacuum thoroughly especially along seams where dirt
and debris can accumulate. After vacuuming clean your cushions using a quarter cup of mild detergent with a gallon of water and
gently brush over the entire cushion with a soft brush or sponge. Rinse with cold water. Allow to air dry thoroughly before use.
Spills and stains
Blot any spills with a clean dry cloth. To remove stains use a quarter cup of mild detergent to a gallon of water and spray on the stain. Gently
rub the stain with a soft cloth or brush. For tough stains you may want to let the solution soak into the stain. You may want to clean the entire
cushion to avoid water rings. Rinse with cold water and allow to air dry. Clean oil based stains from sunscreen and oils right away, you can use an absorbent material such as
corn starch then scrape away with a straight edge. Clean using the quarter cup mild detergent to a gallon of water solution and allow to soak into the stain. Rinse with cold water and allow to air dry.