lrubber band careader notes for challenge...
TRANSCRIPT
The challenge: Build a car that can travel at least four feet using rubber band power.
In this challenge, kids (1) build a car out of a set of parts; (2) get everything to work together efficiently so the car can go at least four feet; and (3) use the design process to debug problems. Having these skills under their belts prepares kids to add a motor and customize their cars in the next two challenges.
Introduce the challenge, brainstorm, and design. (10 minutes) Before today’s meeting begins, make a sample car, following the directions on the Challenge Sheet. Tell kids today’s challenge and show them the model you made. Encourage kids to think about how to get the parts to work together by asking:
• Which parts on this rubber band car can you find on a real car? (Wheels, axles, power source, and body. Make sure everyone knows what to call the different car parts.)
• What’s the energy source for this car? (The rubber band)
• Look at the different kinds of rubber bands. How do you think they would affect the way a car will perform? (Different lengths and widths of rubber bands will wind around the axle differently, store different amounts of energy, and release their energy differently.)
• How does the rubber band make the car move? (As it wraps around the axle, the rubber band stretches. The stretched rubber band pulls on the axle, making it spin.)
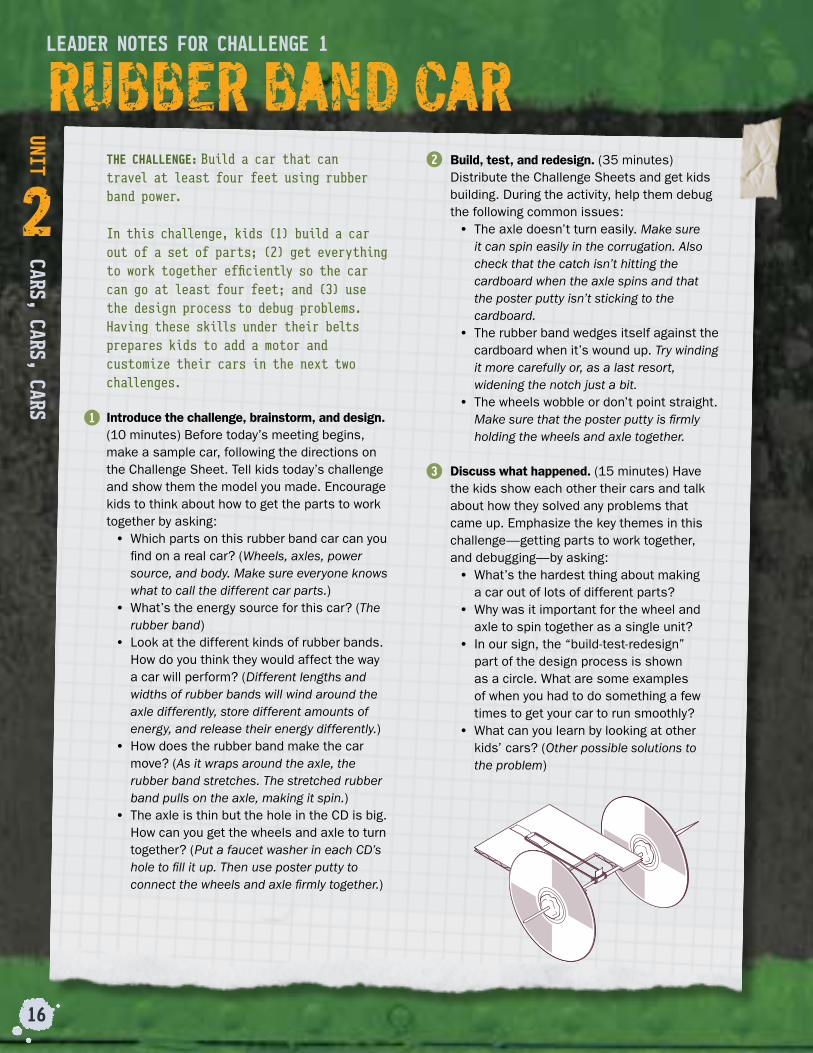
• The axle is thin but the hole in the CD is big. How can you get the wheels and axle to turn together? (Put a faucet washer in each CD’s hole to fill it up. Then use poster putty to connect the wheels and axle firmly together.)
Build, test, and redesign. (35 minutes) Distribute the Challenge Sheets and get kids building. During the activity, help them debug the following common issues:
• The axle doesn’t turn easily. Make sure it can spin easily in the corrugation. Also check that the catch isn’t hitting the cardboard when the axle spins and that the poster putty isn’t sticking to the cardboard.
• The rubber band wedges itself against the cardboard when it’s wound up. Try winding it more carefully or, as a last resort, widening the notch just a bit.
• The wheels wobble or don’t point straight. Make sure that the poster putty is firmly holding the wheels and axle together.
Discuss what happened. (15 minutes) Have the kids show each other their cars and talk about how they solved any problems that came up. Emphasize the key themes in this challenge—getting parts to work together, and debugging—by asking:
• What’s the hardest thing about making a car out of lots of different parts?
• Why was it important for the wheel and axle to spin together as a single unit?
• In our sign, the “build-test-redesign” part of the design process is shown as a circle. What are some examples of when you had to do something a few times to get your car to run smoothly?
• What can you learn by looking at other kids’ cars? (Other possible solutions to the problem)
1
2
3
leader noTes for challenge 1
rubber band car
16
UniT cars, cars, cars
2
Your challengeBuild a car that goes really fast and really far (at least four feet, that is). Oh, by the way, your power source is a rubber band, and your car can only have two wheels. Start your engines!
• 2 compact discs (CDs)• Corrugated cardboard (one piece
about 5 1/2 inches square)• 2 faucet washers (Size: 1/4 inch
Large)
• Poster putty (1/4 package—buy the tackiest available)
• Rubber bands of different lengths and widths
• Ruler
• Scissors • Tape (masking or duct)• 1 wooden skewer (buy the
thinnest available)
Materials (per car)*
1
2
3
4
5
6
17
challenge 1
rubber band car UniT cars, cars, cars
2
* For information on where to get these materials, see page 6 or visit pbskidsgo.org/designsquad/engineers.
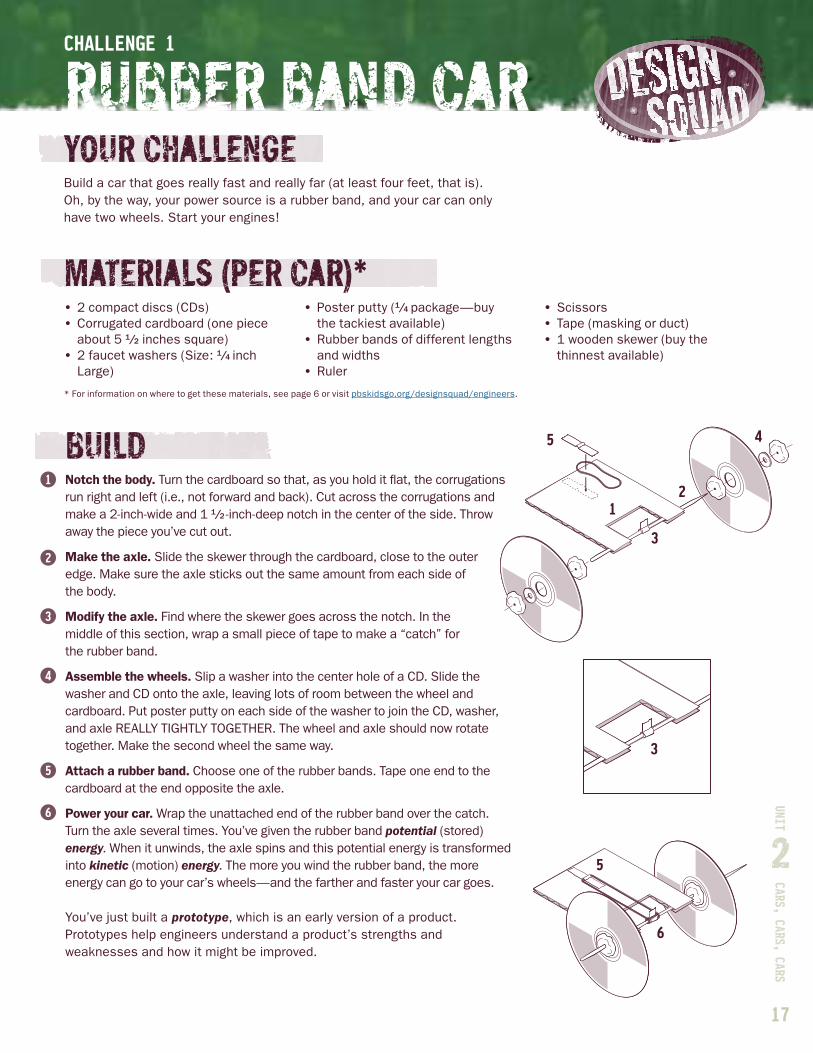
buildNotch the body. Turn the cardboard so that, as you hold it flat, the corrugations run right and left (i.e., not forward and back). Cut across the corrugations and make a 2-inch-wide and 1 1/2 -inch-deep notch in the center of the side. Throw away the piece you’ve cut out.
Make the axle. Slide the skewer through the cardboard, close to the outer edge. Make sure the axle sticks out the same amount from each side of the body.
Modify the axle. Find where the skewer goes across the notch. In the middle of this section, wrap a small piece of tape to make a “catch” for the rubber band.
Assemble the wheels. Slip a washer into the center hole of a CD. Slide the washer and CD onto the axle, leaving lots of room between the wheel and cardboard. Put poster putty on each side of the washer to join the CD, washer, and axle REALLY TIGHTLY TOGETHER. The wheel and axle should now rotate together. Make the second wheel the same way.
Attach a rubber band. Choose one of the rubber bands. Tape one end to the cardboard at the end opposite the axle.
Power your car. Wrap the unattached end of the rubber band over the catch. Turn the axle several times. You’ve given the rubber band potential (stored) energy. When it unwinds, the axle spins and this potential energy is transformed into kinetic (motion) energy. The more you wind the rubber band, the more energy can go to your car’s wheels—and the farther and faster your car goes.
You’ve just built a prototype, which is an early version of a product. Prototypes help engineers understand a product’s strengths and weaknesses and how it might be improved.
take it to the next level• Modify the car so it can work on sand or thick carpet.• Change your car so it can carry a tennis ball.
18
rubber band car
UniT cars, cars, cars
2
test and redesignWind up your car and set it on the floor. What happens when you let it go? When we made ours, we had to debug some things. For example, our axle didn’t spin easily, the wheels wobbled, the poster putty stuck to the cardboard, and the rubber band jammed itself against the cardboard. If any of these things happen to you, figure out a way to fix the problem.
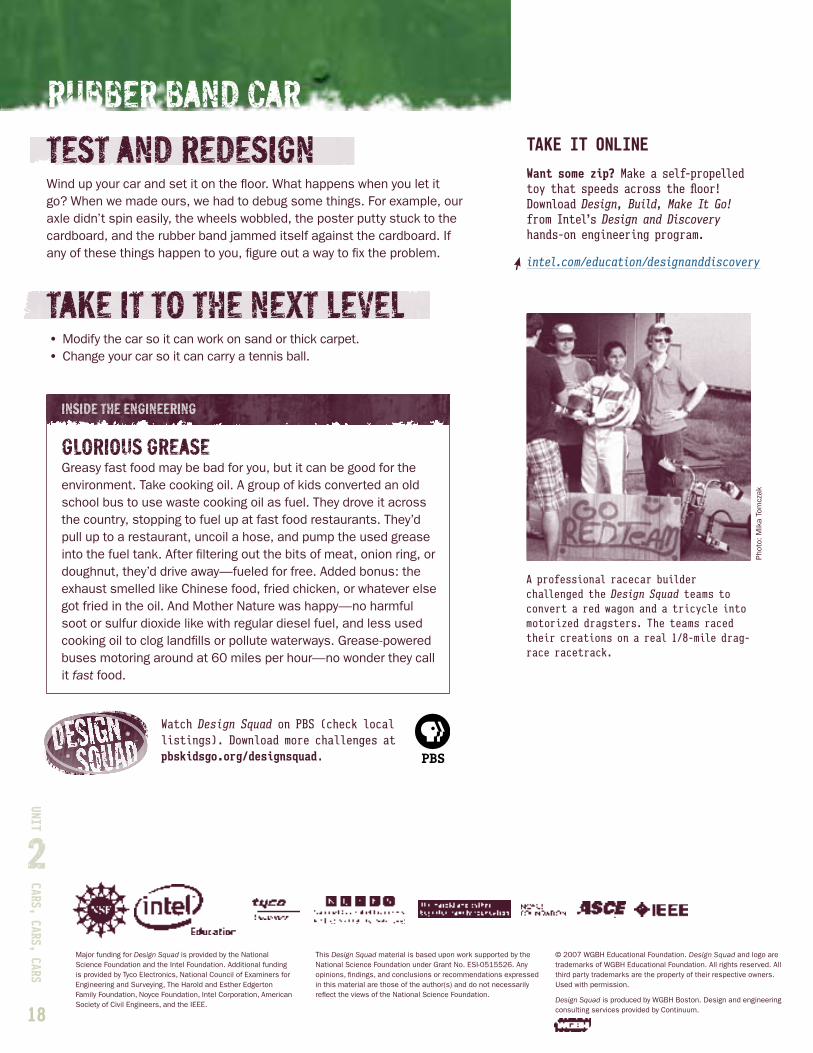
A professional racecar builder challenged the Design Squad teams to convert a red wagon and a tricycle into motorized dragsters. The teams raced their creations on a real 1/8-mile drag-race racetrack.
glorious greaseGreasy fast food may be bad for you, but it can be good for the environment. Take cooking oil. A group of kids converted an old school bus to use waste cooking oil as fuel. They drove it across the country, stopping to fuel up at fast food restaurants. They’d pull up to a restaurant, uncoil a hose, and pump the used grease into the fuel tank. After filtering out the bits of meat, onion ring, or doughnut, they’d drive away—fueled for free. Added bonus: the exhaust smelled like Chinese food, fried chicken, or whatever else got fried in the oil. And Mother Nature was happy—no harmful soot or sulfur dioxide like with regular diesel fuel, and less used cooking oil to clog landfills or pollute waterways. Grease-powered buses motoring around at 60 miles per hour—no wonder they call it fast food.
inside the engineering
Take iT online
Want some zip? Make a self-propelled toy that speeds across the floor! Download Design, Build, Make It Go! from Intel’s Design and Discovery hands-on engineering program. intel.com/education/designanddiscovery
Major funding for Design Squad is provided by the National Science Foundation and the Intel Foundation. Additional funding is provided by Tyco Electronics, National Council of Examiners for Engineering and Surveying, The Harold and Esther Edgerton Family Foundation, Noyce Foundation, Intel Corporation, American Society of Civil Engineers, and the IEEE.
This Design Squad material is based upon work supported by the National Science Foundation under Grant No. ESI-0515526. Any opinions, findings, and conclusions or recommendations expressed in this material are those of the author(s) and do not necessarily reflect the views of the National Science Foundation.
© 2007 WGBH Educational Foundation. Design Squad and logo are trademarks of WGBH Educational Foundation. All rights reserved. All third party trademarks are the property of their respective owners. Used with permission.
Design Squad is produced by WGBH Boston. Design and engineering consulting services provided by Continuum.
Phot
o: M
ika
Tom
czak
Watch Design Squad on PBS (check local listings). Download more challenges at pbskidsgo.org/designsquad.

The challenge: Make a car that uses a battery-operated motor to travel at least ten feet.
The idea of “if at first you don’t succeed, try, try again” is central to the design process and to this challenge, in which kids (1) build a battery-powered car; (2) make a working circuit; and (3) put the design process’s try-try-again approach into practice. This work prepares kids to tackle special challenges like obstacle courses or rough terrain in the next challenge. (Note: Save the cars for the next challenge.)
Introduce the challenge, brainstorm, and design. (10 minutes) Tell kids the challenge for today and begin by asking:
• How will you attach the motor and battery to the car body? (Tape or poster putty)
• Where do the motor and battery need to be in order to move the car? (The battery and wires can be placed anywhere. The motor needs to sit so that the wheel attached to it can touch the ground.)
• Why do the connections between the battery, motor, and wires need to be really good? (A gap will interrupt the flow of electrons [i.e., electricity], and the motor won’t get the electricity it needs to run. If your kids don’t know about circuits, give them time to play with batteries and motors so they can figure out how to wire them before using them in a car. Or have them do the Hidden Alarm challenge in the It’s Electric unit before starting this challenge.)
Build, test, and redesign. (35 minutes) Define an area with a smooth floor where kids can test their cars. Distribute the Challenge Sheets. During the activity, help kids debug the following common issues:
• The motor doesn’t work. Check to see if any wires are disconnected.
1
2
3
• The wheels wobble or don’t point straight. Make sure that the poster putty isn’t sticking to the cardboard and that it holds the wheels and axle firmly together.
• All four wheels don’t touch the ground evenly. One of the wheels is directly connected to the motor, which most kids attach under the body. This makes it sit at a different height from the other wheels. Ask kids if their car really needs to have four wheels. Using three wheels can keep a car stable. (See illustration.)
• The car drives slowly or goes in circles. Check that there’s nothing dragging and that the battery is fresh.
Discuss what happened. (15 minutes) Have the kids show each other their cars and talk about any problems they had and how they solved them. Emphasize the key themes in this challenge—circuits, and how the design process relates to redesigning—by asking:
• How are our cars’ circuits similar to circuits in real cars? (They both use batteries and wires to bring electricity to a device that needs it, like a motor.)
• What can you learn by looking at other cars? (There are different ways to solve problems. And, even if you use other people’s ideas in your design, your car will still be unique.)
• In our sign, the “build-test-redesign” part of the design process is shown as a circle. What was a time you went back and tried a different approach or idea? How did it help make your car better?
leader noTes for challenge 2
MotoriZed car
19
UniT cars, cars, cars
2

MotoriZe Your carUnit 2 challenge 2
20
Your challengeMake a car that uses a battery-operated motor to go at least ten feet.
• 1.5-volt AA battery• AA battery holder (optional) • Compact discs (CDs)• Corrugated cardboard (one piece
about 5 1/2 inches square)• Electrical wire (22-gauge)• 8 faucet washers (4, Size: 1/4 inch
Large; and 4, Size: 1 to 1 1/8 inch)• Motor with attached gear that runs
on 1.5-volt AA battery
• Poster putty (1/4 package—the tackiest available)
• 2 wooden skewers (the thinnest available)
• Scissors • Tape (masking or duct)• Wire strippers
Materials (per car)*
challenge 2
MotoriZed car
brainstorM and designTo begin, look at the materials and consider the following questions:• The motorized wheel attaches directly to the shaft coming out of the motor.
But how will I connect the unmotorized wheels to the car?• Where do the motor and battery need to be in order to move the car?• How will I run the wires so they don’t interfere with how the car moves?• How will I make sure the wires stay well connected to the battery and motor?
build, test, and redesignTo make your motor work, you’ll have to make a circuit, a pathway for electricity. A circuit has a source of electricity (your battery), something that uses the electricity (the motor), and conductors to carry the electricity (the wires).
Review your materials and think about how you can use them to meet the challenge. Once you’ve finish building, try out your car in the testing area. When we made ours, we had to debug some things. For example, our motor stopped working, the wheels wobbled, and some parts dragged on the ground. If any of these things happen to you, figure out a way to fix the problem.
Closed circuit
Open circuit
20
UniT cars, cars, cars
2
* For information on where to get these materials, see page 6 or visit pbskidsgo.org/designsquad/engineers.

MotoriZe Your car continuedMotoriZed cartake it to the next level
• Make your car go faster.• Make your car more stable for traveling over rough terrain.• Add a switch to turn your motor on and off.• Figure out a way to steer your car.
21
The Design Squad cast converted a tricycle into a motorized racecar using battery-powered drills as their power source. The vehicle reached 20 miles per hour.
UniT cars, cars, cars
2
skYcars awaY!So long, Earth. Looks like soon we’ll be flying cars across the sky. At least if engineer Paul Moller has anything to say about it. He’s built the Skycar®, a car that can take off and land vertically, hover in the air, go 375 miles per hour, and fly up to 36,000 feet! The Skycar® uses eight computer-controlled engines to get it off the ground and keep the car level while it zips along. Paul is still working out the bugs, like keeping the Skycar®steady and reaching top altitude and speed. There’s still a lot to work out, but Paul and his team are working hard to iron out all the bugs. It will take years, but when you get a Skycar®of your own, no parking on the roof, please!
Skycar is a registered trademark of Moller International Corporation
inside the engineering
Take iT online
short circuit? Build some circuits and see what happens when they short out! Download Short Circuits from Intel’s Design and Discovery hands-on engineering program.
intel.com/education/designanddiscovery
Major funding for Design Squad is provided by the National Science Foundation and the Intel Foundation. Additional funding is provided by Tyco Electronics, National Council of Examiners for Engineering and Surveying, The Harold and Esther Edgerton Family Foundation, Noyce Foundation, Intel Corporation, American Society of Civil Engineers, and the IEEE.
This Design Squad material is based upon work supported by the National Science Foundation under Grant No. ESI-0515526. Any opinions, findings, and conclusions or recommendations expressed in this material are those of the author(s) and do not necessarily reflect the views of the National Science Foundation.
© 2007 WGBH Educational Foundation. Design Squad and logo are trademarks of WGBH Educational Foundation. All rights reserved. All third party trademarks are the property of their respective owners. Used with permission.
Design Squad is produced by WGBH Boston. Design and engineering consulting services provided by Continuum.
Phot
o: M
ika
Tom
czak
Watch Design Squad on PBS (check local listings). Download more challenges at pbskidsgo.org/designsquad.
1
2
3
The challenge: Each kid chooses a specialized task for his or her car, such as making it go farther than before, having it drive over a rough surface, or adding steering or a switch. Then they change their cars to perform that task.
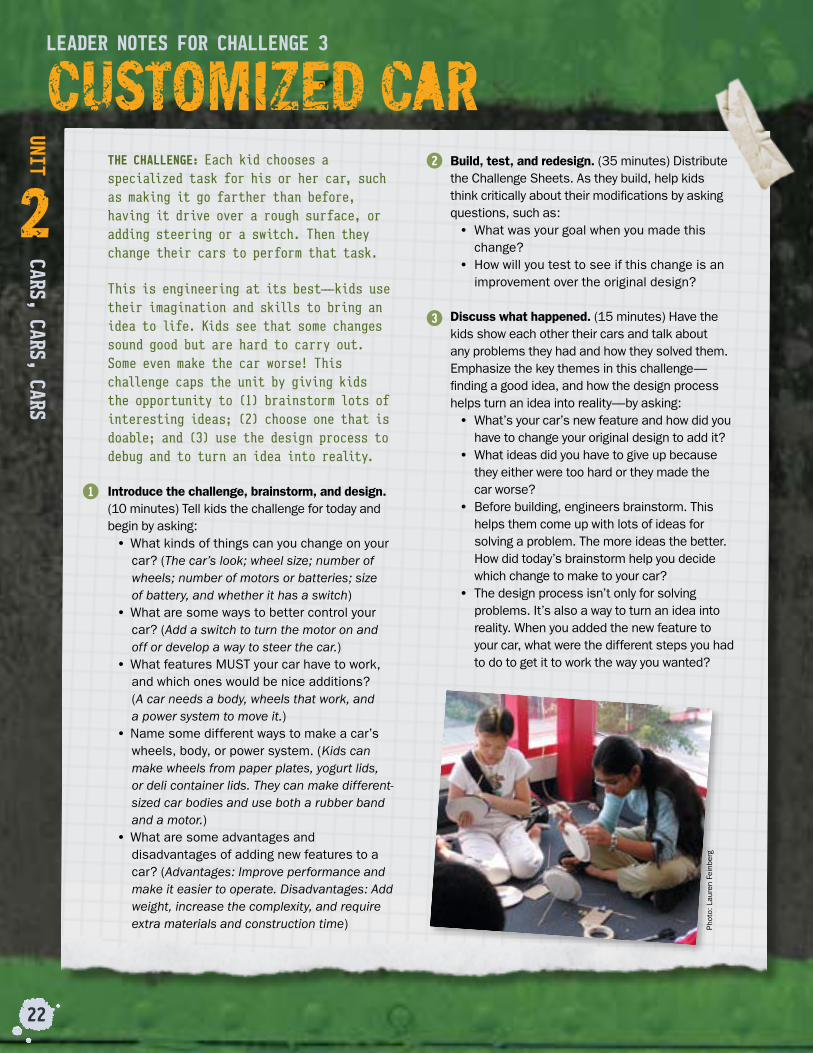
This is engineering at its best———kids use their imagination and skills to bring an idea to life. Kids see that some changes sound good but are hard to carry out. Some even make the car worse! This challenge caps the unit by giving kids the opportunity to (1) brainstorm lots of interesting ideas; (2) choose one that is doable; and (3) use the design process to debug and to turn an idea into reality.
Introduce the challenge, brainstorm, and design. (10 minutes) Tell kids the challenge for today and begin by asking:
• What kinds of things can you change on your car? (The car’s look; wheel size; number of wheels; number of motors or batteries; size of battery, and whether it has a switch)
• What are some ways to better control your car? (Add a switch to turn the motor on and off or develop a way to steer the car.)
• What features MUST your car have to work, and which ones would be nice additions? (A car needs a body, wheels that work, and a power system to move it.)
• Name some different ways to make a car’s wheels, body, or power system. (Kids can make wheels from paper plates, yogurt lids, or deli container lids. They can make different-sized car bodies and use both a rubber band and a motor.)
• What are some advantages and disadvantages of adding new features to a car? (Advantages: Improve performance and make it easier to operate. Disadvantages: Add weight, increase the complexity, and require extra materials and construction time)
Build, test, and redesign. (35 minutes) Distribute the Challenge Sheets. As they build, help kids think critically about their modifications by asking questions, such as:
• What was your goal when you made this change?
• How will you test to see if this change is an improvement over the original design?
Discuss what happened. (15 minutes) Have the kids show each other their cars and talk about any problems they had and how they solved them. Emphasize the key themes in this challenge—finding a good idea, and how the design process helps turn an idea into reality—by asking:
• What’s your car’s new feature and how did you have to change your original design to add it?
• What ideas did you have to give up because they either were too hard or they made the car worse?
• Before building, engineers brainstorm. This helps them come up with lots of ideas for solving a problem. The more ideas the better. How did today’s brainstorm help you decide which change to make to your car?
• The design process isn’t only for solving problems. It’s also a way to turn an idea into reality. When you added the new feature to your car, what were the different steps you had to do to get it to work the way you wanted?
leader noTes for challenge 3
custoMiZed car
22
UniT cars, cars, cars
2
Phot
o: L
aure
n Fe
inbe
rg
Your challengeWant a custom car? Well, make it! Today, you’re going to change your car to do a specialized task. Let your imagination run wild and change your car any way you want—as long as you can build it!
• Car from Challenge 2• 1.5-volt AA battery• AA battery holder (optional)• Compact discs (CDs)• Corrugated cardboard in various
sizes, cut so the corrugation is visible along the long edge
• Drinking straws (optional)
• Electrical wire (22-gauge)• 8 faucet washers (4, Size: 1/4 inch
Large; and 4, Size: 1 to 1 1/8 inch)• Motor with attached gear that can
run on a 1.5-volt AA battery• Paper plates (optional)• Poster putty (1/4 package—the
tackiest available)
• Rubber bands• Rulers• Scissors • Tape (masking or duct)• Wire strippers• Wooden skewers (the thinnest
available)
Materials (per car)*
brainstorM and designCustomize your ride. Are you going for speed? Do you want your car to carry things or push a ball? Do you want to give it a personalized look? How about driving over rough surfaces or going uphill? Maybe make a car that steers or starts and stops with the flick of a switch. Or find ways to reduce friction. Unleash your creativity! Look at the materials and think about the following questions:• What do I want my car to do? • What features MUST my car have to work, and which ones would be
nice additions?• What is the best way to add new features to my design?• Does adding my new feature prevent me from having another feature
I want?• How will all the parts continue to work together after I make changes?
challenge 3
custoMiZed car
23
UniT cars, cars, cars
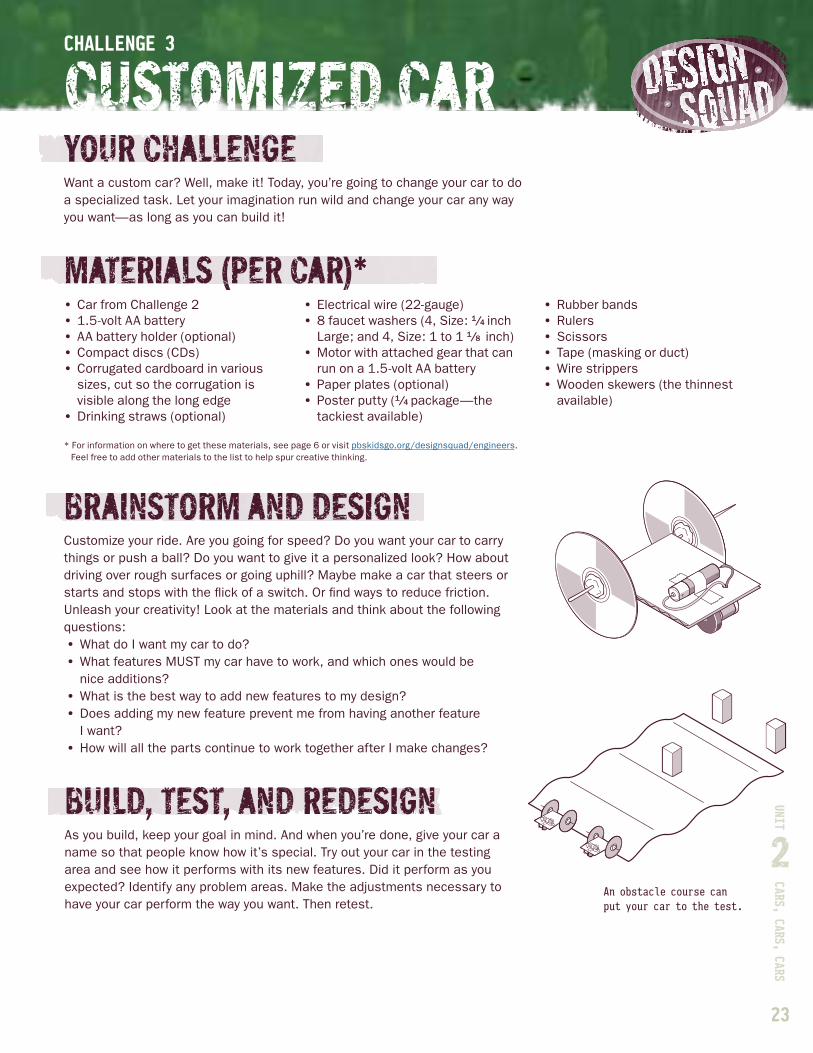
2build, test, and redesignAs you build, keep your goal in mind. And when you’re done, give your car a name so that people know how it’s special. Try out your car in the testing area and see how it performs with its new features. Did it perform as you expected? Identify any problem areas. Make the adjustments necessary to have your car perform the way you want. Then retest.
An obstacle course can put your car to the test.
* For information on where to get these materials, see page 6 or visit pbskidsgo.org/designsquad/engineers. Feel free to add other materials to the list to help spur creative thinking.

custoMiZed cartake it to the next level• Add a second new feature to your car.• Check out other kids’ customized cars. If you’re inspired by somebody
else’s idea, add a feature you like.
The Design Squad cast built some wonderfully wacky bikes——a back-to-back bike for two people and a side-by-side bike for three. With lights and a horn, the rubber really hit the road with these Design Squad choppers.
24
UniT cars, cars, cars
2
ZooM, ZooM, ZooMTalk about a customized ride. Meet racecar engineer Alba Colon. Alba and her team of engineers figure out ways to make NASCAR racecars faster and safer. That means researching and testing things like the car’s body shape and the design of its chassis, shocks, tires, and, of course, engine. (Horsepower is Alba’s favorite topic!) But the engineers don’t have to strap on helmets to do their research. Testing that could once only be carried out on the racetrack can now be done in the lab. They have machines that twist, shake, and jostle cars to simulate the stresses and strains of racing. Other machines test how efficiently cars move through the wind. Alba says that cars are “an extension of your personality. They’re also a great engineering challenge—there’s always something new to work on. No matter if I’m working on how a car drives, steers, or how fast it goes, engineering gives me the skills I need to tackle any problem.”
inside the engineering
Take iT online
Want to lighten the load? Design a better backpack! Download Improve a Backpack from Intel’s Design and Discovery hands-on engineering program. intel.com/education/designanddiscovery
Major funding for Design Squad is provided by the National Science Foundation and the Intel Foundation. Additional funding is provided by Tyco Electronics, National Council of Examiners for Engineering and Surveying, The Harold and Esther Edgerton Family Foundation, Noyce Foundation, Intel Corporation, American Society of Civil Engineers, and the IEEE.
This Design Squad material is based upon work supported by the National Science Foundation under Grant No. ESI-0515526. Any opinions, findings, and conclusions or recommendations expressed in this material are those of the author(s) and do not necessarily reflect the views of the National Science Foundation.
© 2007 WGBH Educational Foundation. Design Squad and logo are trademarks of WGBH Educational Foundation. All rights reserved. All third party trademarks are the property of their respective owners. Used with permission.
Design Squad is produced by WGBH Boston. Design and engineering consulting services provided by Continuum.
Phot
o: M
ika
Tom
czak
Watch Design Squad on PBS (check local listings). Download more challenges at pbskidsgo.org/designsquad.