lsa handbook - u11cloud.rampinteractive.com/leducsoccer/files/2018 outdoor...lsa handbook - u11...
TRANSCRIPT
Fun things about playing soccer (in no particular order) by Jaime Neefs:
Running fast“My friends on my street are on my team”‘Deking’ out players (fave move: nutmeg)“Being #5 like my brother”“The feeling you get when you score a goal”Half-time snackMeeting new peopleShootingPlaying defence“Scoring 100 goals”Dancing in the change roomGoal celebrations“Playing goalie because I get to hold the ball”Teamwork and passingLearning new ‘moves’“My dad is my coach” / “My mom is my coach”“Playing again”
Please remember to have fun… the more you have fun the more fun the kids are going to have.
1)
Please note that these drills are guidelines. Please adjust the drills as you see fit to narrow the drill to your group's talents .
2)
If you feel that there is a drill that is not suitable to your kids skill level please let the LSA know and we will move or alter the drill for future coaches.
3)
The electronic practice plan systems are available on the app "SoccerXpert". Download the app and search the name of the drills and save them to a practice. We are exploring more complete practice plans but at the moment … this is what we have.
4)
Please remember that the ideal practice one where every minute, every player is developing their skills. Standing in lines or listening to drill instructions is not development.
5)
LSA Handbook - U11July-09-173:13 PM
U11 - Drills Page 1
U11 - Drills Page 2
Provide direction to coaches and volunteers to help develop our players to their fullest potential.1)Using the preferred training method, the technical leadership will simplify the lesson plans, using a limited number of drills, enabling shortened teaching times and less instructions, that develop in complexity and difficulty as the players advance in age and skill. These drills will come from the root drills learned in U4 and carry though the age groups.
2)
With a focus on defence, fitness and individual skill we can climb the ranks to a top provincial contender.
a.
With this we will also provide skills to our players to excel at the higher levels of soccerb.
Develop LSA into the premier defensive minded soccer club.3)
The vision of the technical leadership of LSA is to:
LSA Technical VisionJuly-08-1711:25 PM
U11 - Drills Page 3
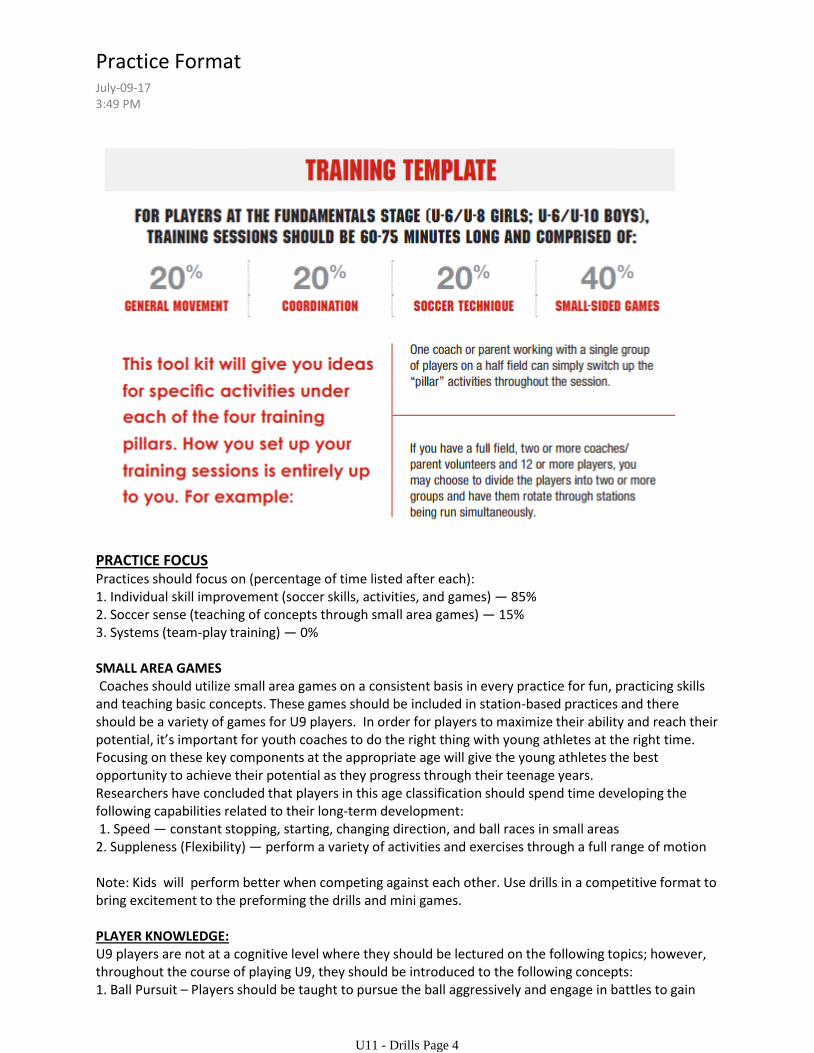
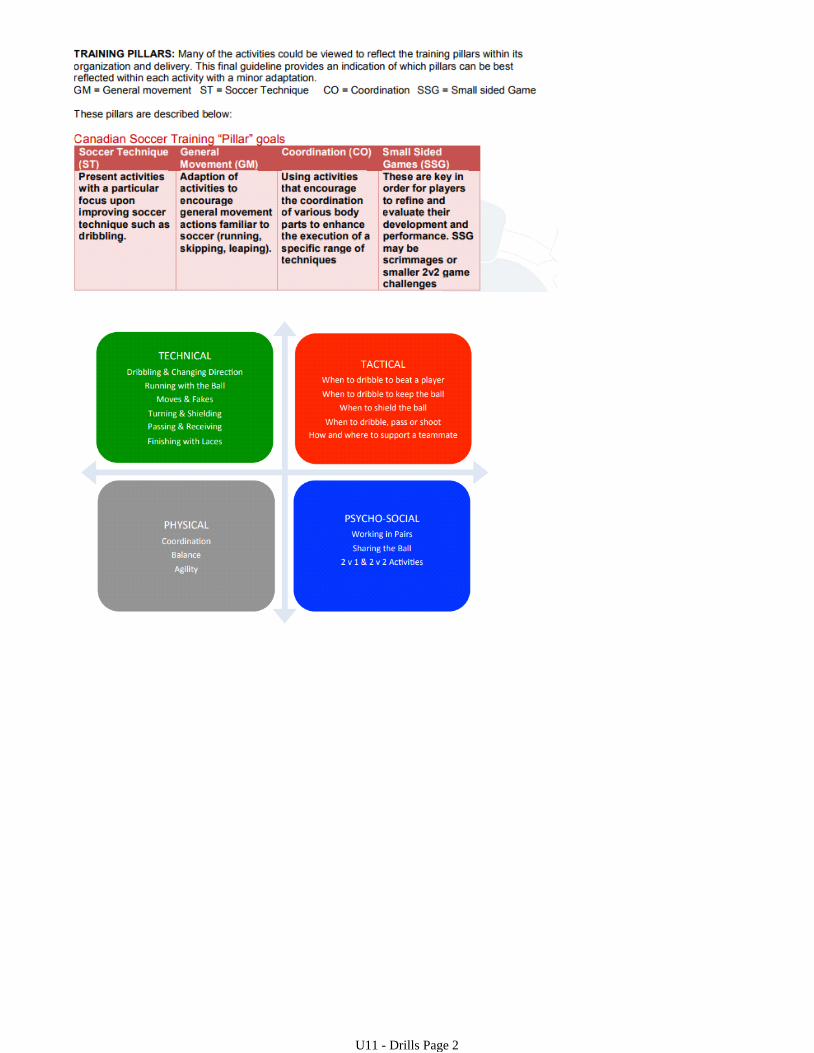
PRACTICE FOCUS Practices should focus on (percentage of time listed after each): 1. Individual skill improvement (soccer skills, activities, and games) — 85% 2. Soccer sense (teaching of concepts through small area games) — 15% 3. Systems (team-play training) — 0%
SMALL AREA GAMESCoaches should utilize small area games on a consistent basis in every practice for fun, practicing skills
and teaching basic concepts. These games should be included in station-based practices and there should be a variety of games for U9 players. In order for players to maximize their ability and reach their potential, it’s important for youth coaches to do the right thing with young athletes at the right time. Focusing on these key components at the appropriate age will give the young athletes the best opportunity to achieve their potential as they progress through their teenage years. Researchers have concluded that players in this age classification should spend time developing the following capabilities related to their long-term development:1. Speed — constant stopping, starting, changing direction, and ball races in small areas
2. Suppleness (Flexibility) — perform a variety of activities and exercises through a full range of motion
Note: Kids will perform better when competing against each other. Use drills in a competitive format to bring excitement to the preforming the drills and mini games.
PLAYER KNOWLEDGE:U9 players are not at a cognitive level where they should be lectured on the following topics; however, throughout the course of playing U9, they should be introduced to the following concepts: 1. Ball Pursuit – Players should be taught to pursue the ball aggressively and engage in battles to gain possession.
Practice FormatJuly-09-173:49 PM
U11 - Drills Page 4
possession.2. Ball Support – Players should learn to make themselves available to receive a pass from a teammate. This is the beginning of the idea of “getting open.” 3. Acceptable Conduct – Acceptable conduct should be taught and reinforced. Unsportsmanlike conduct is the broad term covering this topic, but acceptable conduct should relate to teammates, opponents, coaches, officials, etc. This is the beginning of teaching players to be good sports and to respect everyone involved with the game. 4. Allowable Contact with Opponents – Players should learn what types of physical contact are allowed with an opponent. While these young players are not at an age where they should be lectured as to the types of illegal contact, they should be made aware when they have made contact in a way that violates the rules.
FOCUS POINTS• Fun• Engagement• Active Practices• Age-Appropriate Training (includes skills and concepts)
FUNU9 coaches should never underestimate the value of having fun. While this is true at all ages, it is especially true at this age, where the soccer-for-life seed is planted. If it’s not consistently fun at this age, the novelty of the sport will wear off and the young player(s) may eventually quit. Players at this age should have fun every time they are on the pitch.
ENGAGEMENTCoaches should recognize the importance of engagement. It goes hand-in-hand with fun, but it’s more than just fun. It’s targeting the optimal skill level for each player – not too easy and not too hard. It’s teaching via small games. The players don’t need a coach to provide the feedback. The games themselves give players the opportunity to successfully demonstrate targeted skills and concepts. The coach becomes the facilitator – less talking from the coach and more learning by doing.
ACTIVE PRACTICESCoaches should strive to activate players for the majority of each practice session and avoid the archaic
practice in which kids spend much of their time standing in line waiting to participate in drills. These archaic practices activate players for only 12-15 minutes in a 60-minute practice. Coaches at the 10-and-Under age level should aim to have much more activity than this for each player in each practice (45-55 min per practice). Coaches should also consider the number of repetitions that each player executes while performing the desired skills in a practice. Coaches are encouraged to take a statistical look at their practices. This includes analyzing the number of minutes each player is active, the number of shots each player takes, the number of passes each player makes, how many shots each goaltender faces, etc. All of these are important skills and it is imperative that coaches consistently maximize the minutes of activity and the number of repetitions. Refer to the Player Activity Chart found on the free Mobile Coach App and at admkids.com under Coaches/ Repetition for a form to evaluate the developmental opportunities that occur for players in practice and in games. Station-based practices are an effective way to teach 10-and-Under players the skills they need, while also maximizing the activity level and increasing the number of repetitions for each player. Coaches might consider modifying the stations to better fit their players’ needs, however high activity levels and age-appropriate skills must remain the main focus..
STATION-BASED PRACTICESStation-based practices are an excellent way to accomplish these high-activity goals. Coaches are encouraged to split the pitch into 4-6 areas with an age-appropriate skill, drill, or game to be practiced in each of area. A typical station-based practice would include six stations with 6-10 players at each station. While coaches have some flexibility when it comes to the duration of time that players spend at
U11 - Drills Page 5
station. While coaches have some flexibility when it comes to the duration of time that players spend at each station, 6-8 minutes is a good guideline for players at theU9 level. Coaches should restrict the instructional part to less than a minute for each station. Players should practice the desired skill at each station, with coaches making sure that each player is active the majority of the time, thus receiving a high number of repetitions. Coaches may have to be creative to ensure that all players spend more time practicing the desired skill rather than waiting in line to participate. Coaches are encouraged to use a stopwatch to determine the amount of time a player is active and count the repetitions performed by an individual player at each station.
AGE-APPROPRIATE TRAININGU6 coaches must determine what skills and concepts are appropriate for the kids in their program to learn andunderstand. Most would not expect a second-grader to be taught sixth-grade math. The same should hold true for theskills and concepts related to soccer. First, coaches must determine whether the players are ready to learn the desired skill or understand the desired concept. Second, they should decide whether the skill or concept is truly important for an U9. Teaching players the right thing at the right age is crucial in their development.
Stickiness Factor Kids at this age level need to have things repeated several times for them to understand new concepts. This is why there is a limited amount of drills available to this age group with many of them carrying on and expanding from drills in previous years. The reasons are two fold. One players will learn the drills quickly and retain their value better allowing for less down time (teaching time) and enable the coach to focus on the player's skills and proper techniques rather than going over the drill. Please see Malcom Gladwell's research on stickiness in kids learning shows to understand this concept better:
INJURY PREVENTION
Proper fitting of equipment•Safety precautions for practice•The importance of warming up and cooling down •
Players and parents should be introduced to:
SPORTS PSYCHOLOGY
the difference between being relaxed and tense (fun vs. nervous). •that making mistakes is common and a part of sports. Players should be allowed to make mistakes in practice and game settings. Coaches should not squash a player’s creativity by making them feel uncomfortable while trying to perform a hockey move or skill. In order to execute a move properly, the player has to be allowed to fail along the way. The key is to establish an environment where players are willing to try again after failing.
•
the benefits of positive reinforcement. Everyone involved with youth sports needs to understand that positive comments help reduce stress and enhance the self-image of a player and team. Most of all, positive reinforcement increases the enjoyment of practices and games for the athletes.
•
Players should be taught:
CHARACTER DEVELOPMENT AND LIFE SKILLS
demonstrate high levels of sportsmanship. •have respect for their teammates, coaches, opponents, officials and parents. •
balance family, school and other activities. •be on time for practices and games.•
Players must learn to:
U11 - Drills Page 6
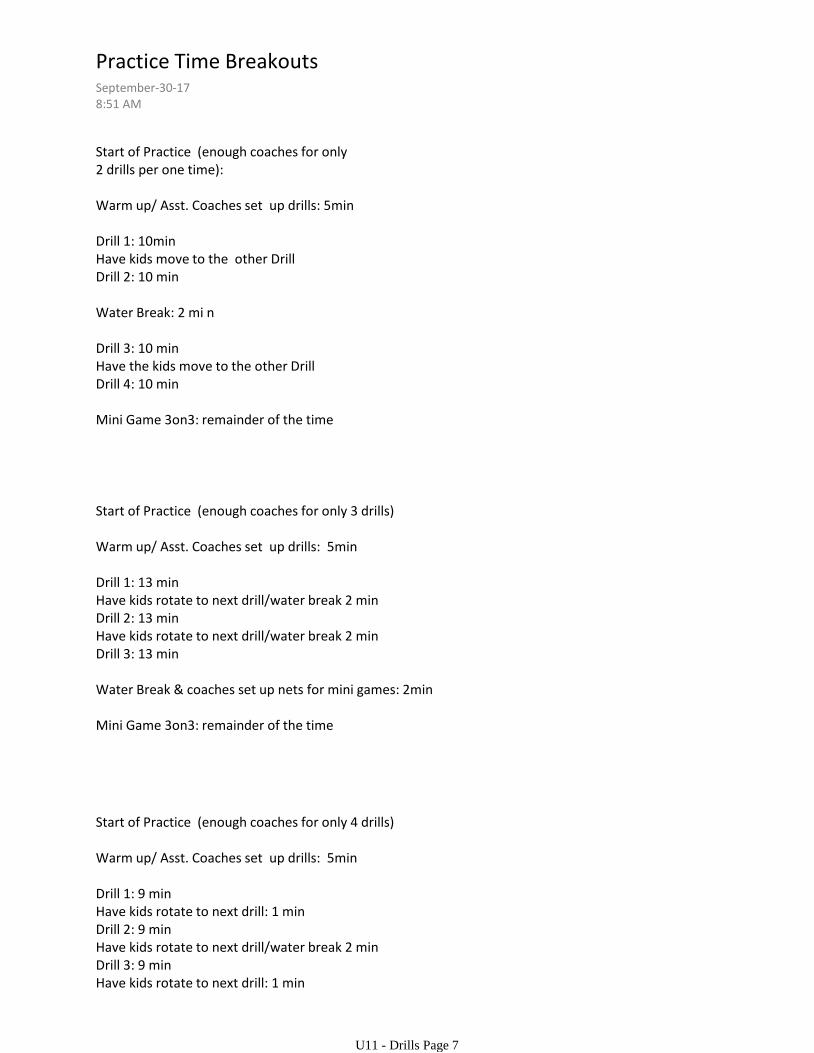
Start of Practice (enough coaches for only 2 drills per one time):
Warm up/ Asst. Coaches set up drills: 5min
Drill 1: 10minHave kids move to the other DrillDrill 2: 10 min
Water Break: 2 mi n
Drill 3: 10 minHave the kids move to the other DrillDrill 4: 10 min
Mini Game 3on3: remainder of the time
Start of Practice (enough coaches for only 3 drills)
Warm up/ Asst. Coaches set up drills: 5min
Drill 1: 13 minHave kids rotate to next drill/water break 2 minDrill 2: 13 minHave kids rotate to next drill/water break 2 minDrill 3: 13 min
Water Break & coaches set up nets for mini games: 2min
Mini Game 3on3: remainder of the time
Start of Practice (enough coaches for only 4 drills)
Warm up/ Asst. Coaches set up drills: 5min
Drill 1: 9 minHave kids rotate to next drill: 1 minDrill 2: 9 minHave kids rotate to next drill/water break 2 minDrill 3: 9 minHave kids rotate to next drill: 1 minDrill 3: 9 min
Practice Time Breakouts September-30-178:51 AM
U11 - Drills Page 7
Drill 3: 9 min
Water Break & coaches set up nets for mini games: 2min
Mini Game 3on3: remainder of the time
U11 - Drills Page 8
Start here and pick one of the following warmup games
Remember: The more fun you exhibit having have the more fun the kids will have and the more they will concentrate on you a.
Gather all the players at the center of each station kneeling beside their ball. Tell them good morning and ask if they are excited to start. Sound excited, motivated and ready to have a fun practice and this will set the tone for the rest of the practice. (30 sec)
1)
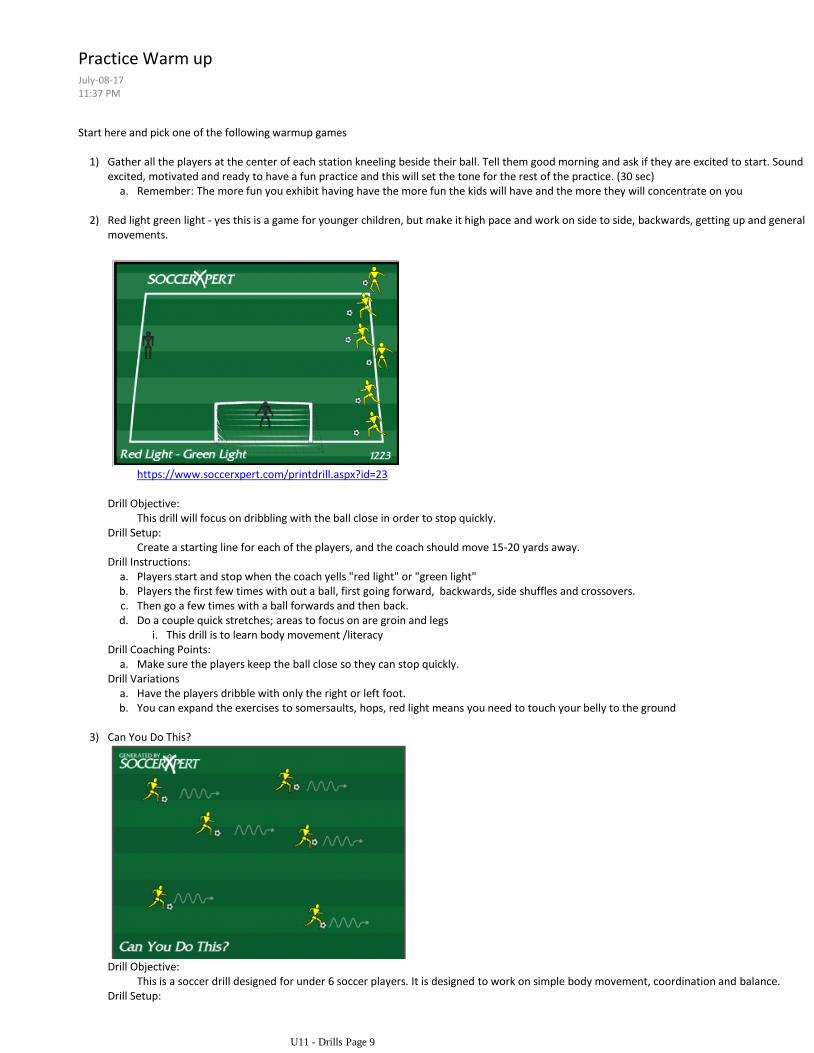
Red light green light - yes this is a game for younger children, but make it high pace and work on side to side, backwards, getting up and general movements.
2)
https://www.soccerxpert.com/printdrill.aspx?id=23
This drill will focus on dribbling with the ball close in order to stop quickly.Drill Objective:
Create a starting line for each of the players, and the coach should move 15-20 yards away.Drill Setup:
Players start and stop when the coach yells "red light" or "green light" a.Players the first few times with out a ball, first going forward, backwards, side shuffles and crossovers.b.Then go a few times with a ball forwards and then back. c.
This drill is to learn body movement /literacyi.Do a couple quick stretches; areas to focus on are groin and legsd.
Drill Instructions:
Make sure the players keep the ball close so they can stop quickly.a.Drill Coaching Points:
Have the players dribble with only the right or left foot.a.You can expand the exercises to somersaults, hops, red light means you need to touch your belly to the ground b.
Drill Variations
Can You Do This?3)
This is a soccer drill designed for under 6 soccer players. It is designed to work on simple body movement, coordination and balance.Drill Objective:
In a unmarked area gather your players without their soccer ball (you can introduce this later in this drill). The coach should come up with Drill Setup:
Practice Warm upJuly-08-1711:37 PM
U11 - Drills Page 9
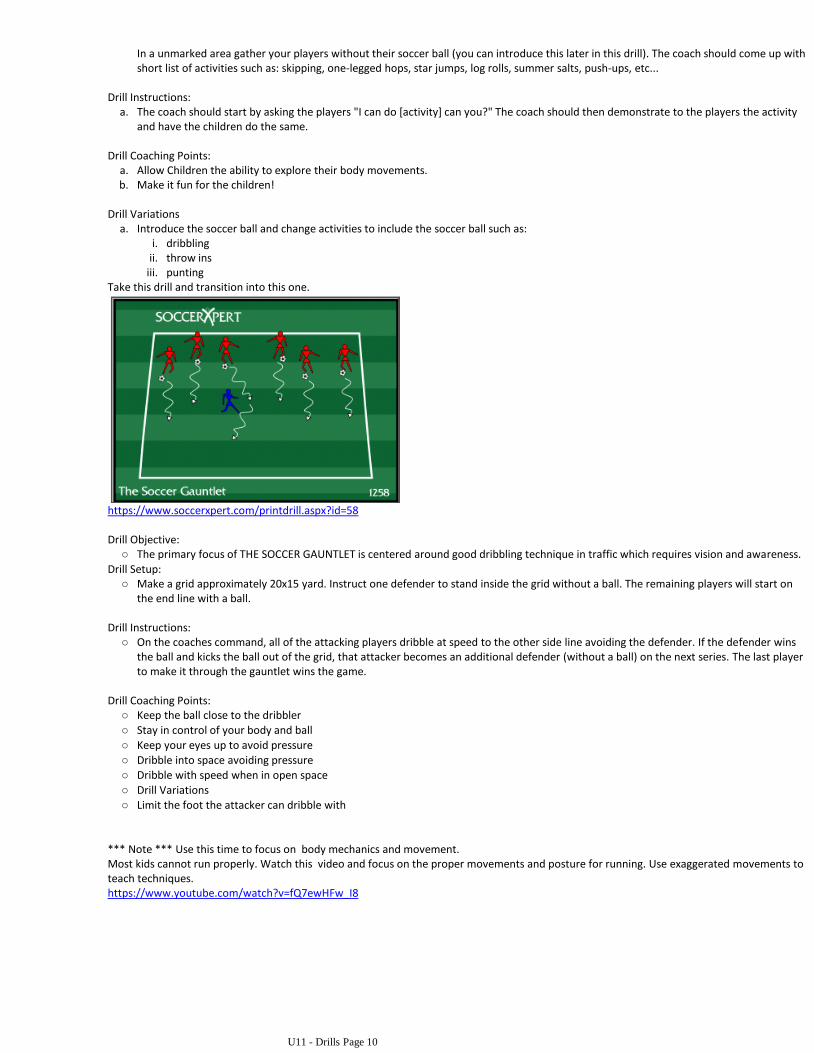
In a unmarked area gather your players without their soccer ball (you can introduce this later in this drill). The coach should come up with short list of activities such as: skipping, one-legged hops, star jumps, log rolls, summer salts, push-ups, etc...
The coach should start by asking the players "I can do [activity] can you?" The coach should then demonstrate to the players the activity and have the children do the same.
a.Drill Instructions:
Allow Children the ability to explore their body movements.a.Make it fun for the children!b.
Drill Coaching Points:
dribblingi.throw insii.puntingiii.
Introduce the soccer ball and change activities to include the soccer ball such as:a.Drill Variations
Take this drill and transition into this one.
https://www.soccerxpert.com/printdrill.aspx?id=58
The primary focus of THE SOCCER GAUNTLET is centered around good dribbling technique in traffic which requires vision and awareness.○
Drill Objective:
Make a grid approximately 20x15 yard. Instruct one defender to stand inside the grid without a ball. The remaining players will start on the end line with a ball.
○
Drill Setup:
On the coaches command, all of the attacking players dribble at speed to the other side line avoiding the defender. If the defender wins the ball and kicks the ball out of the grid, that attacker becomes an additional defender (without a ball) on the next series. The last player to make it through the gauntlet wins the game.
○
Drill Instructions:
Keep the ball close to the dribbler○
Stay in control of your body and ball ○
Keep your eyes up to avoid pressure○
Dribble into space avoiding pressure○
Dribble with speed when in open space○
Drill Variations○
Limit the foot the attacker can dribble with○
Drill Coaching Points:
*** Note *** Use this time to focus on body mechanics and movement.Most kids cannot run properly. Watch this video and focus on the proper movements and posture for running. Use exaggerated movements to teach techniques. https://www.youtube.com/watch?v=fQ7ewHFw_I8
U11 - Drills Page 10
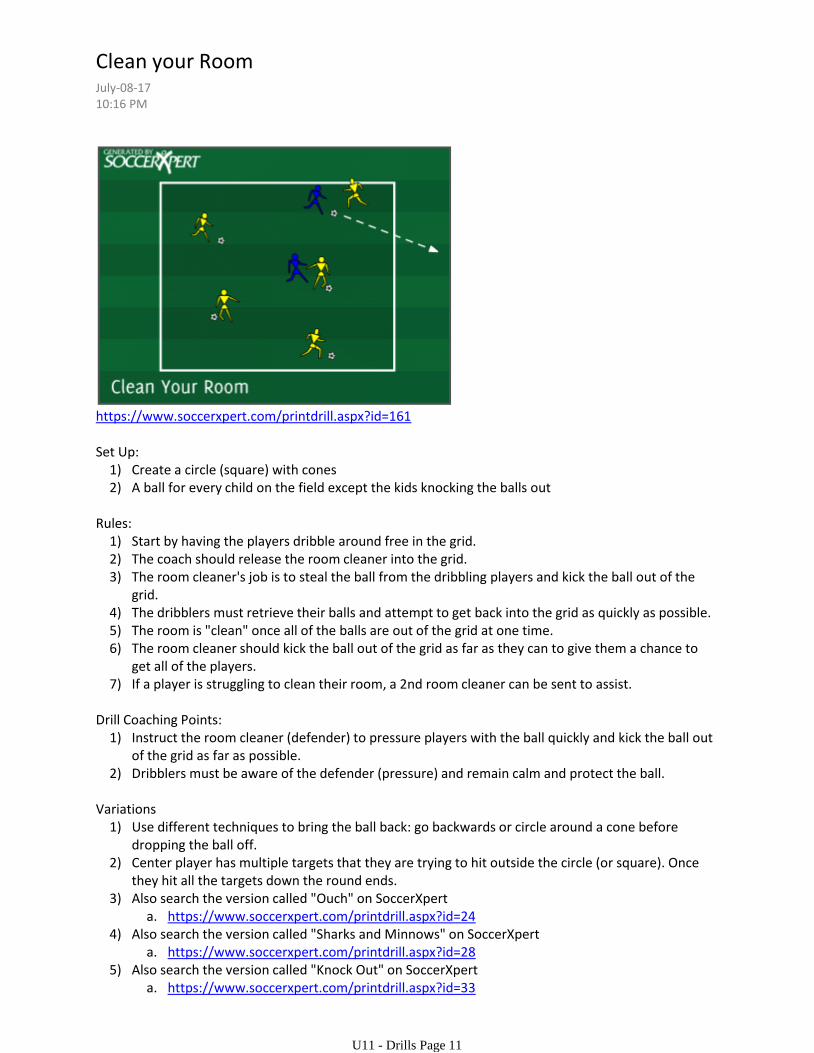
https://www.soccerxpert.com/printdrill.aspx?id=161
Create a circle (square) with cones 1)A ball for every child on the field except the kids knocking the balls out2)
Set Up:
Start by having the players dribble around free in the grid.1)The coach should release the room cleaner into the grid.2)The room cleaner's job is to steal the ball from the dribbling players and kick the ball out of the grid.
3)
The dribblers must retrieve their balls and attempt to get back into the grid as quickly as possible. 4)The room is "clean" once all of the balls are out of the grid at one time.5)The room cleaner should kick the ball out of the grid as far as they can to give them a chance to get all of the players.
6)
If a player is struggling to clean their room, a 2nd room cleaner can be sent to assist.7)
Rules:
Instruct the room cleaner (defender) to pressure players with the ball quickly and kick the ball out of the grid as far as possible.
1)
Dribblers must be aware of the defender (pressure) and remain calm and protect the ball.2)
Drill Coaching Points:
Use different techniques to bring the ball back: go backwards or circle around a cone before dropping the ball off.
1)
Center player has multiple targets that they are trying to hit outside the circle (or square). Once they hit all the targets down the round ends.
2)
https://www.soccerxpert.com/printdrill.aspx?id=24a.Also search the version called "Ouch" on SoccerXpert 3)
https://www.soccerxpert.com/printdrill.aspx?id=28a.Also search the version called "Sharks and Minnows" on SoccerXpert4)
https://www.soccerxpert.com/printdrill.aspx?id=33a.Also search the version called "Knock Out" on SoccerXpert5)
Variations
Clean your Room July-08-1710:16 PM
U11 - Drills Page 11

Please see the attached Youtube link to teach how to properly defend the ball : https://www.youtube.com/watch?v=FtEMcmzdjrwhttps://www.youtube.com/watch?v=UdieOXuFGukhttps://www.youtube.com/watch?v=f-HPNBffjh4
U11 - Drills Page 12
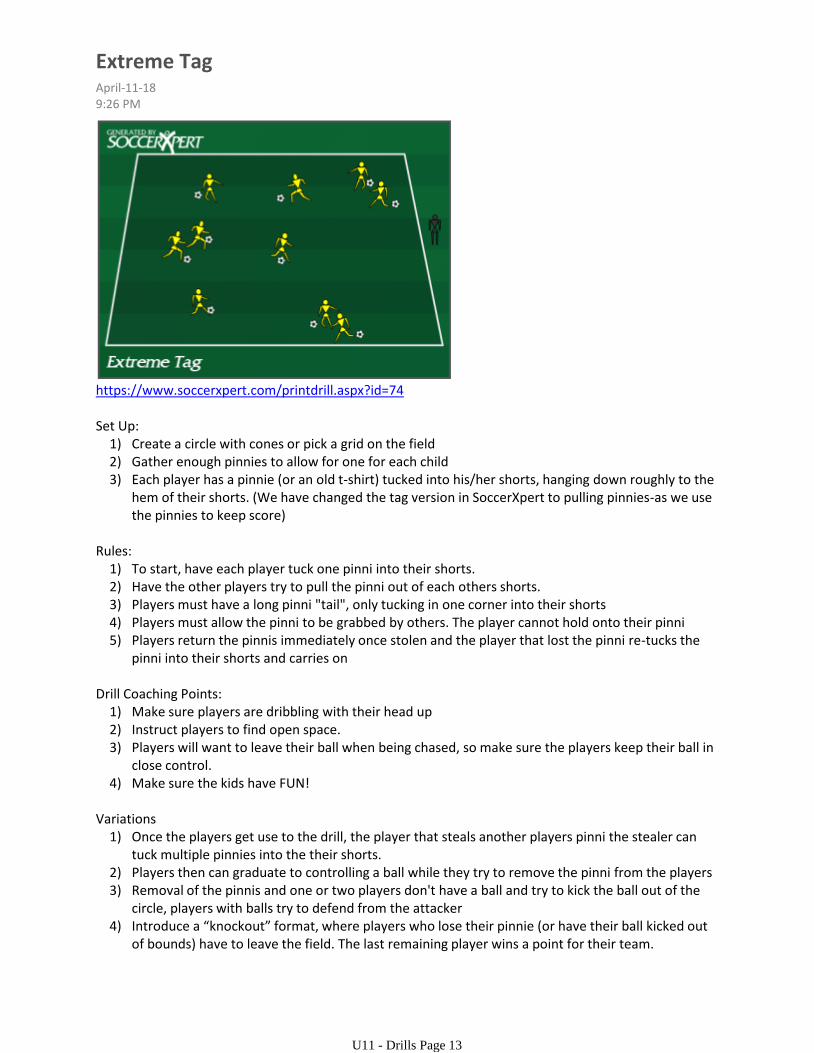
https://www.soccerxpert.com/printdrill.aspx?id=74
Create a circle with cones or pick a grid on the field 1)Gather enough pinnies to allow for one for each child2)Each player has a pinnie (or an old t-shirt) tucked into his/her shorts, hanging down roughly to the hem of their shorts. (We have changed the tag version in SoccerXpert to pulling pinnies-as we use the pinnies to keep score)
3)
Set Up:
To start, have each player tuck one pinni into their shorts.1)Have the other players try to pull the pinni out of each others shorts. 2)Players must have a long pinni "tail", only tucking in one corner into their shorts3)Players must allow the pinni to be grabbed by others. The player cannot hold onto their pinni4)Players return the pinnis immediately once stolen and the player that lost the pinni re-tucks the pinni into their shorts and carries on
5)
Rules:
Make sure players are dribbling with their head up1)Instruct players to find open space.2)Players will want to leave their ball when being chased, so make sure the players keep their ball in close control.
3)
Make sure the kids have FUN!4)
Drill Coaching Points:
Once the players get use to the drill, the player that steals another players pinni the stealer can tuck multiple pinnies into the their shorts.
1)
Players then can graduate to controlling a ball while they try to remove the pinni from the players 2)Removal of the pinnis and one or two players don't have a ball and try to kick the ball out of the circle, players with balls try to defend from the attacker
3)
Introduce a “knockout” format, where players who lose their pinnie (or have their ball kicked out of bounds) have to leave the field. The last remaining player wins a point for their team.
4)
Variations
Extreme TagApril-11-189:26 PM
U11 - Drills Page 13

https://www.soccerxpert.com/printdrill.aspx?id=107
Players working in pairs; 1 goalkeeper. 1.Players form 2 lines on either side of a coach. 2.Try to run two goals at the same time - use cones to create additional goals3.
SET UP:
On the coach’s command, the first player from each team should sprint around the cone in front of their line.
1.
As the players approach the cone, the coach plays a 50/50 ball in the middle of each cone. 2.The two players fight for possession and quickly attack the goal. 3.The players battle each other for the ball, and either player can score a goal after winning possession.
4.
Award the team scoring the goal a point. 5.The first team to 10 points wins6.
INSTRUCTIONS:
Drill Coaching Points:
Sprint at top speed around the cone1.Battle and win the 50/50 ball2.Quickly attack the goal once possession is won.3.Continue to fight for the ball when defending.4.Have fun.5.
Have player that takes away the ball and shoot at the net.•
Seated. ○
Lying on their backs. ○
In a push-up position. ○
Have players start in different positions: •
From behind the attacker. The coach serves the ball from different angles: •
OPTIONS:
1v1 50/50 to Goal Team CompetitionSeptember-30-179:41 AM
U11 - Drills Page 14
From behind the attacker. ○
From the side. ○
From the goal line. ○
U11 - Drills Page 15
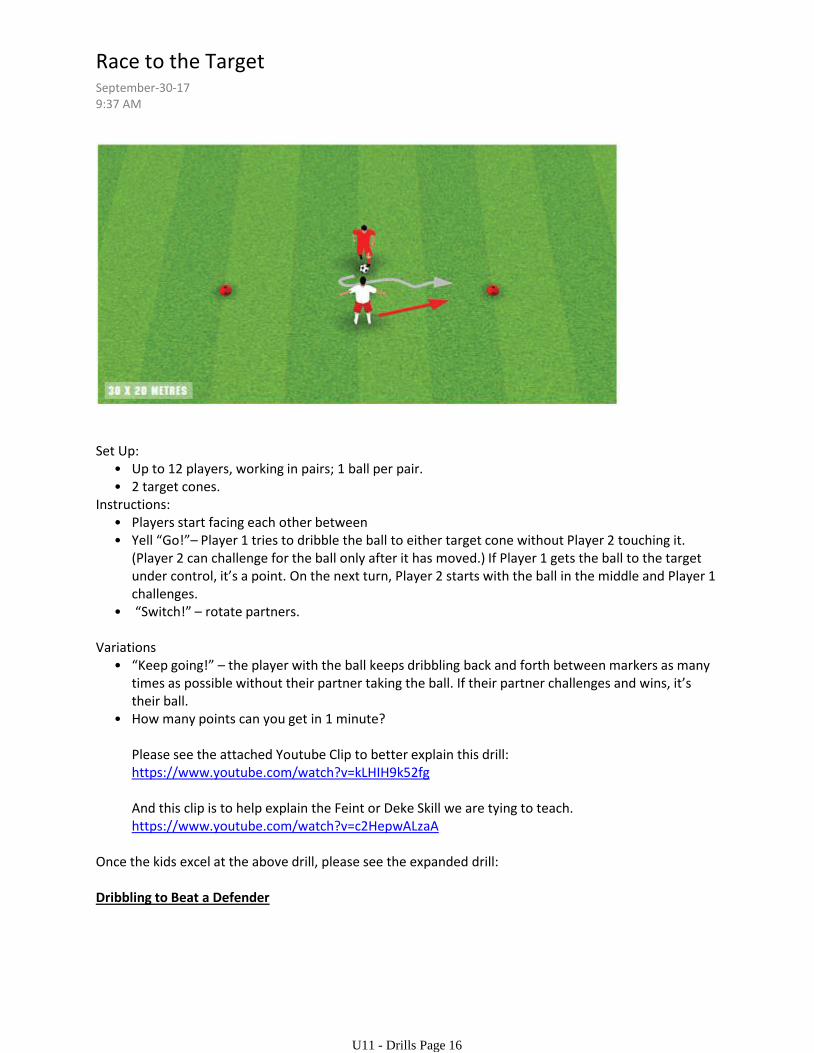
Up to 12 players, working in pairs; 1 ball per pair.•2 target cones.•
Set Up:
Players start facing each other between•Yell “Go!”– Player 1 tries to dribble the ball to either target cone without Player 2 touching it. (Player 2 can challenge for the ball only after it has moved.) If Player 1 gets the ball to the target under control, it’s a point. On the next turn, Player 2 starts with the ball in the middle and Player 1 challenges.
•
“Switch!” – rotate partners.•
Instructions:
“Keep going!” – the player with the ball keeps dribbling back and forth between markers as many times as possible without their partner taking the ball. If their partner challenges and wins, it’s their ball.
•
How many points can you get in 1 minute? •
Please see the attached Youtube Clip to better explain this drill: https://www.youtube.com/watch?v=kLHIH9k52fg
And this clip is to help explain the Feint or Deke Skill we are tying to teach.https://www.youtube.com/watch?v=c2HepwALzaA
Variations
Once the kids excel at the above drill, please see the expanded drill:
Dribbling to Beat a Defender
Race to the TargetSeptember-30-179:37 AM
U11 - Drills Page 16
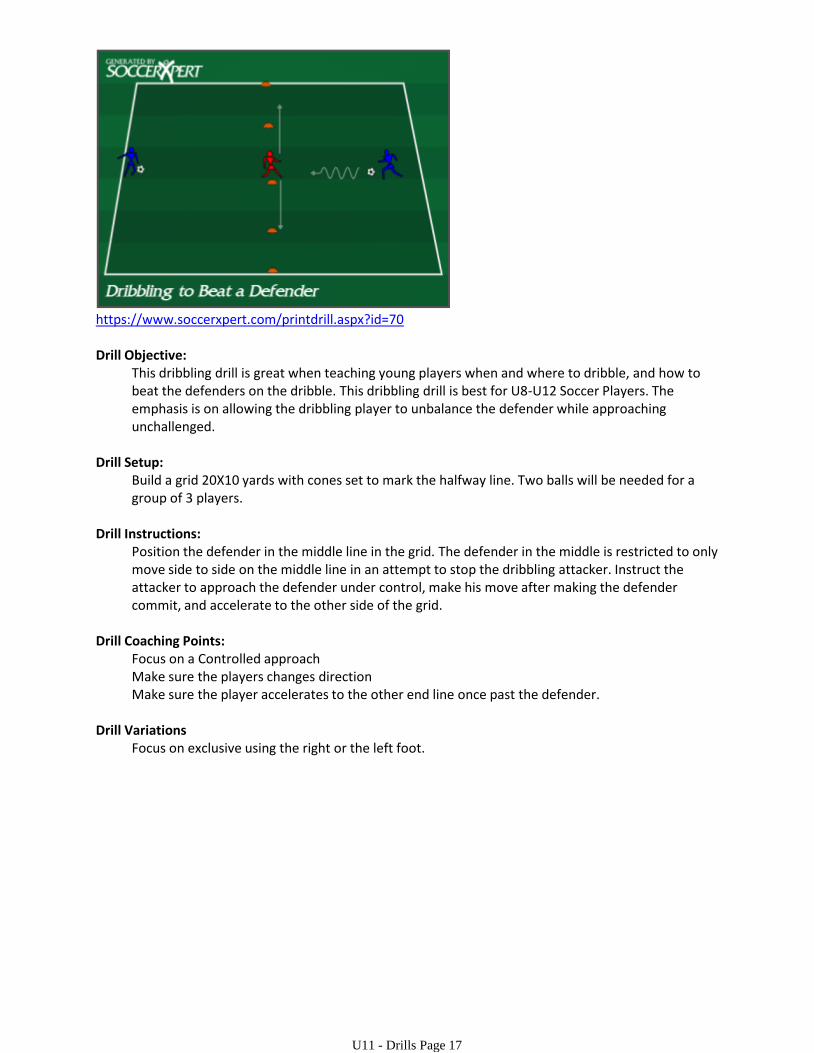
https://www.soccerxpert.com/printdrill.aspx?id=70
This dribbling drill is great when teaching young players when and where to dribble, and how to beat the defenders on the dribble. This dribbling drill is best for U8-U12 Soccer Players. The emphasis is on allowing the dribbling player to unbalance the defender while approaching unchallenged.
Drill Objective:
Build a grid 20X10 yards with cones set to mark the halfway line. Two balls will be needed for a group of 3 players.
Drill Setup:
Position the defender in the middle line in the grid. The defender in the middle is restricted to only move side to side on the middle line in an attempt to stop the dribbling attacker. Instruct the attacker to approach the defender under control, make his move after making the defender commit, and accelerate to the other side of the grid.
Drill Instructions:
Focus on a Controlled approachMake sure the players changes directionMake sure the player accelerates to the other end line once past the defender.
Drill Coaching Points:
Focus on exclusive using the right or the left foot. Drill Variations
U11 - Drills Page 17
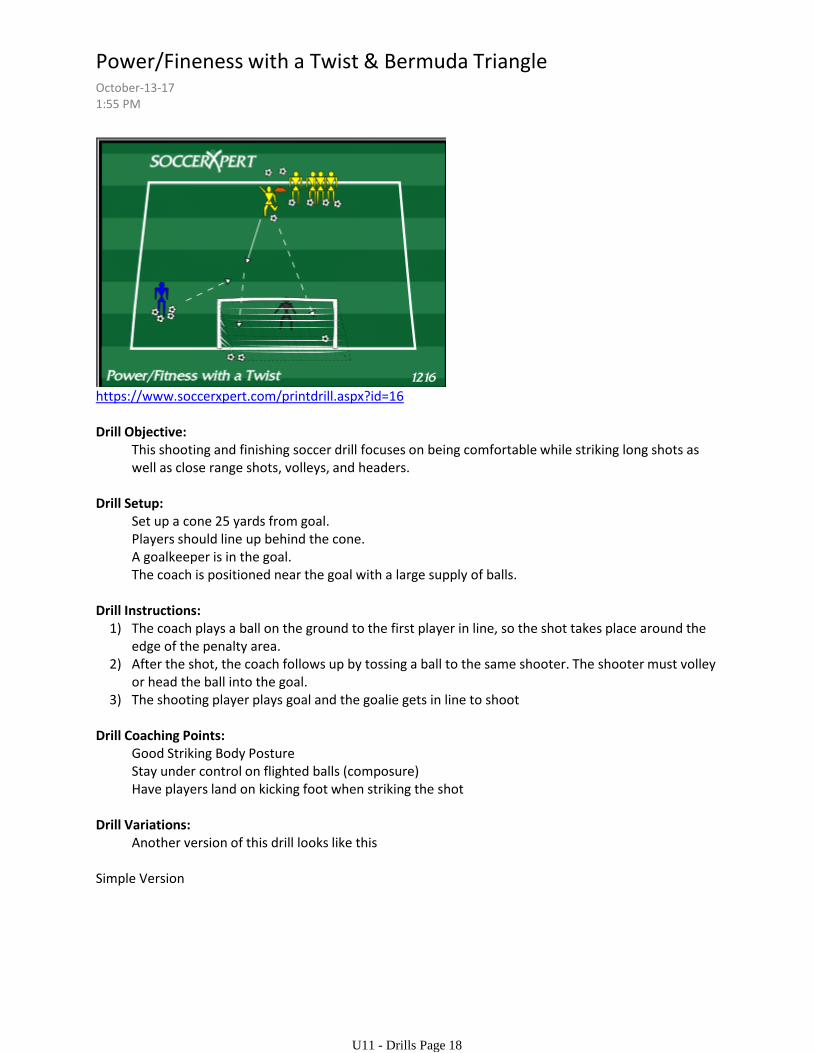
https://www.soccerxpert.com/printdrill.aspx?id=16
This shooting and finishing soccer drill focuses on being comfortable while striking long shots as well as close range shots, volleys, and headers.
Drill Objective:
Set up a cone 25 yards from goal.Players should line up behind the cone.A goalkeeper is in the goal.The coach is positioned near the goal with a large supply of balls.
Drill Setup:
The coach plays a ball on the ground to the first player in line, so the shot takes place around the edge of the penalty area.
1)
After the shot, the coach follows up by tossing a ball to the same shooter. The shooter must volley or head the ball into the goal.
2)
The shooting player plays goal and the goalie gets in line to shoot3)
Drill Instructions:
Good Striking Body PostureStay under control on flighted balls (composure)Have players land on kicking foot when striking the shot
Drill Coaching Points:
Another version of this drill looks like this Drill Variations:
Simple Version
Power/Fineness with a Twist & Bermuda TriangleOctober-13-171:55 PM
U11 - Drills Page 18
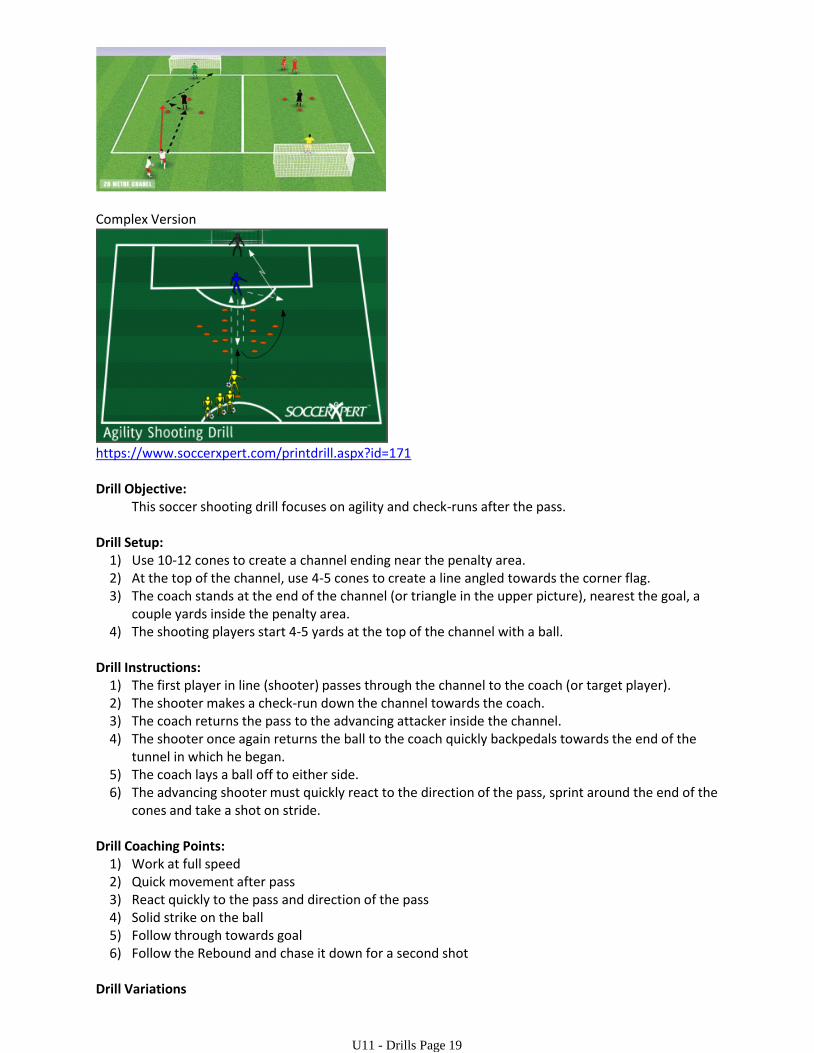
Complex Version
https://www.soccerxpert.com/printdrill.aspx?id=171
This soccer shooting drill focuses on agility and check-runs after the pass.Drill Objective:
Use 10-12 cones to create a channel ending near the penalty area.1)At the top of the channel, use 4-5 cones to create a line angled towards the corner flag.2)The coach stands at the end of the channel (or triangle in the upper picture), nearest the goal, a couple yards inside the penalty area.
3)
The shooting players start 4-5 yards at the top of the channel with a ball.4)
Drill Setup:
The first player in line (shooter) passes through the channel to the coach (or target player).1)The shooter makes a check-run down the channel towards the coach.2)The coach returns the pass to the advancing attacker inside the channel.3)The shooter once again returns the ball to the coach quickly backpedals towards the end of the tunnel in which he began.
4)
The coach lays a ball off to either side.5)The advancing shooter must quickly react to the direction of the pass, sprint around the end of the cones and take a shot on stride.
6)
Drill Instructions:
Work at full speed1)Quick movement after pass2)React quickly to the pass and direction of the pass3)Solid strike on the ball4)Follow through towards goal5)Follow the Rebound and chase it down for a second shot6)
Drill Coaching Points:
To simplify, announce to players by pointing to the side you are laying off the ball.1)Drill Variations
U11 - Drills Page 19
To simplify, announce to players by pointing to the side you are laying off the ball.1)Create different shots by bouncing, spinning, or stopping the ball as you lay it off.2)“Ground pass!” – instead of throwing the ball, the player passes to the coach/ parent. The
coach/parent passes it back just beyond the triangle. Players try to get the ball past the coach/parent in just one touch (with the inside or outside of the foot) before shooting.
3)
“Challenge!” – Put a player in the triangle rather than a coach/parent, and have them come out to challenge for the ball after passing it to the shooter. After one turn, the shooter moves to the triangle, and the player in the middle moves to the back of the line
4)
U11 - Drills Page 20
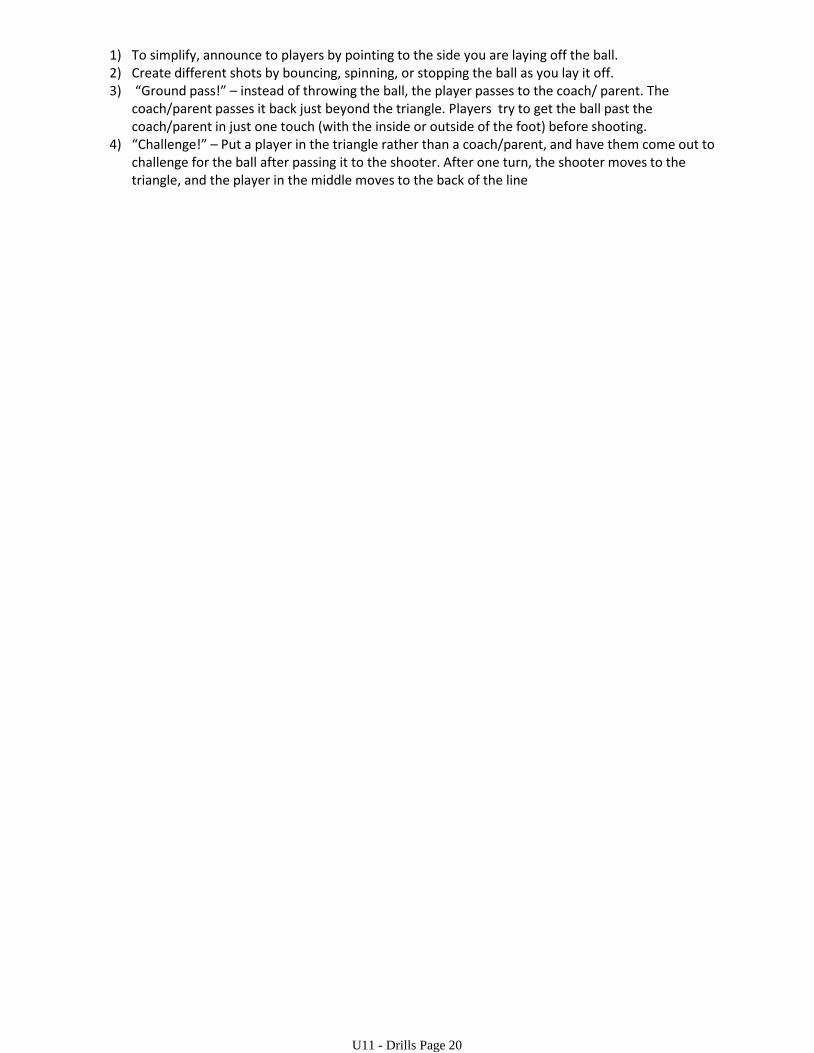
https://www.soccerxpert.com/printdrill.aspx?id=66
The Four Corners Passing Game is a great soccer drill to focus on passing, changing the point of the attack, and timing of runs and passes.
•Drill Objective:
Create four grids that are about 5x5 yard grids and set them about 40X40 yards apart on all sides. Split the group into two teams and put one team in an alternate color. Try to maintain a 3vs3 or 4vs4 game - Split into 2 groups if required and place all the weaker players in one game and stronger players in the other.
•Drill Setup:
Instruct the teams to pass among their team to keep possession while attempting to score a point by passing the ball to a teammate that is inside one of the smaller grids. The teams can score in any of the corners, however, they cannot score in the same corner twice in a row.
•Drill Instructions:
Focus on the weight and accuracy of the passing•Make sure players without the ball are supporting the player with the ball at all times•Make sure the timing of the runs and timing of the pass are in sync.•Make sure players change the point of attack and are not forcing passes into congested areas•
Drill Coaching Points:
Do not allow players to stand inside the grids waiting for a pass. Instead, instruct the players to work on timing of the runs and timing of the pass to connect inside the grid.
•
Change the scoring rule to where the goal is scored only when a give and go is performed with the player that is in the grid.
•
Drill Variations
Four Corners Passing GameApril-21-182:35 PM
U11 - Drills Page 21
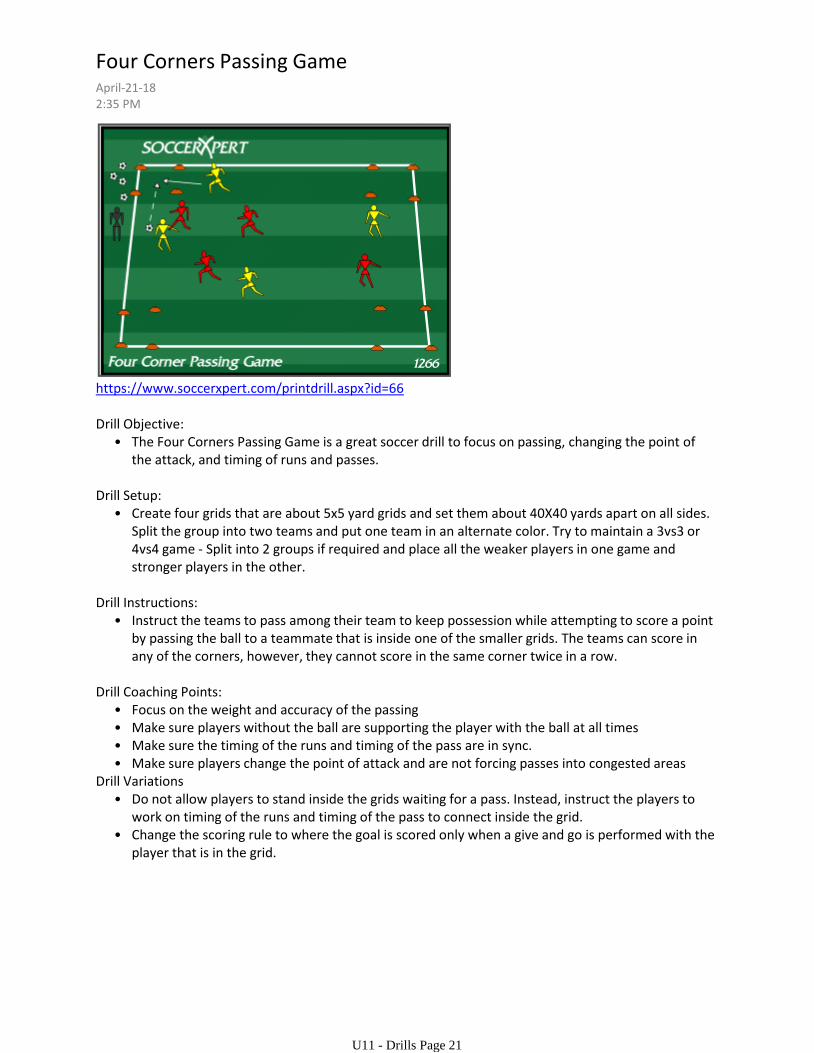
https://www.soccerxpert.com/printdrill.aspx?id=122
This is a fun passing game for younger players that allows them to focus on the passing game while playing keep away.
•Drill Objective:
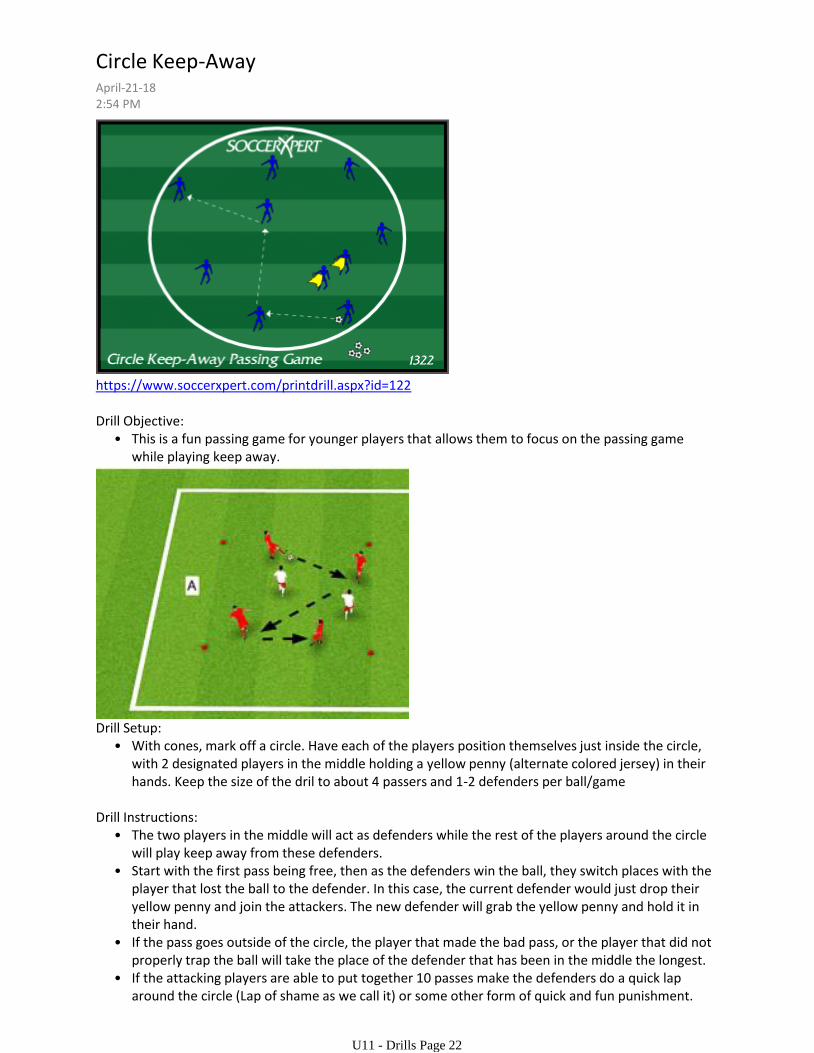
With cones, mark off a circle. Have each of the players position themselves just inside the circle, with 2 designated players in the middle holding a yellow penny (alternate colored jersey) in their hands. Keep the size of the dril to about 4 passers and 1-2 defenders per ball/game
•Drill Setup:
The two players in the middle will act as defenders while the rest of the players around the circle will play keep away from these defenders.
•
Start with the first pass being free, then as the defenders win the ball, they switch places with the player that lost the ball to the defender. In this case, the current defender would just drop their yellow penny and join the attackers. The new defender will grab the yellow penny and hold it in their hand.
•
If the pass goes outside of the circle, the player that made the bad pass, or the player that did not properly trap the ball will take the place of the defender that has been in the middle the longest.
•
If the attacking players are able to put together 10 passes make the defenders do a quick lap around the circle (Lap of shame as we call it) or some other form of quick and fun punishment.
•
The attacking players can move about the circle.•
Drill Instructions:
Circle Keep-Away April-21-182:54 PM
U11 - Drills Page 22
The attacking players can move about the circle.•
Clean, crisp passes.•Good first touch into space or towards the next pass.•Good communication.•Have fun.•
Drill Coaching Points:
Change the size of the circle to fit your players age and skill level. Make the grid smaller to make the game harder for the attackers to keep possession, or make the grid larger to make the game a bit easier for the passers.
•
Make the circle smaller for tighter and quicker passing.•Limit the number of touches.•
Drill Variations
U11 - Drills Page 23
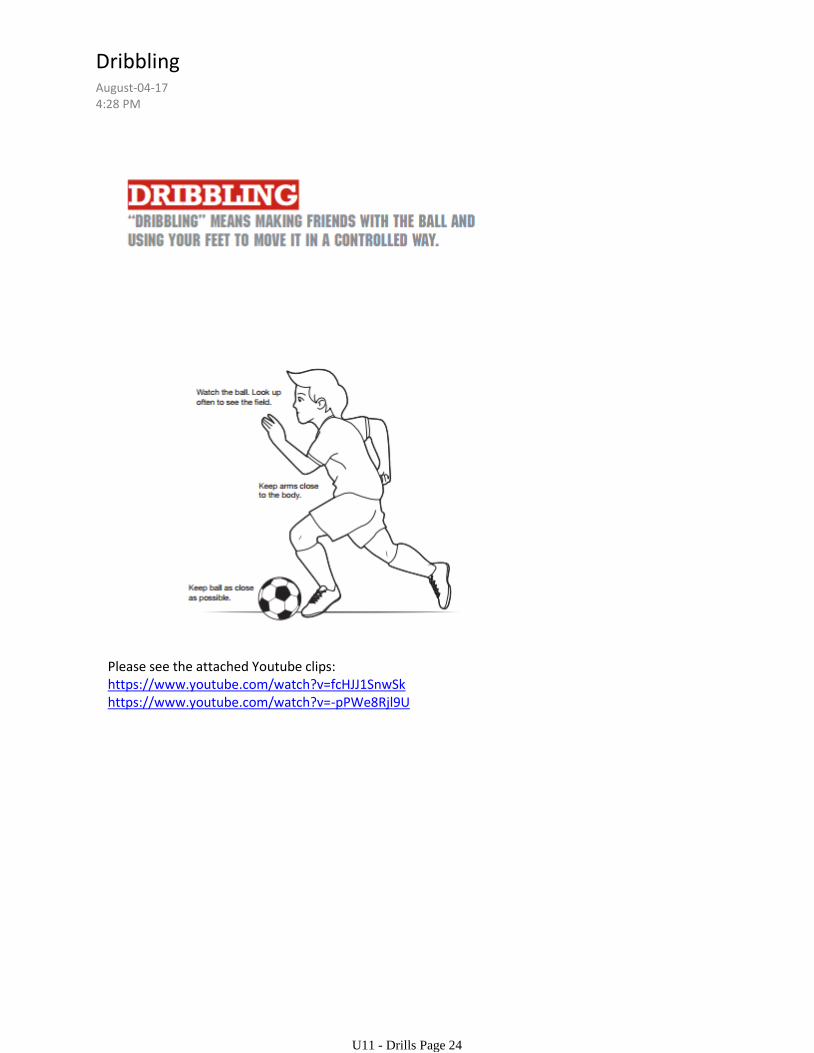
Please see the attached Youtube clips:https://www.youtube.com/watch?v=fcHJJ1SnwSkhttps://www.youtube.com/watch?v=-pPWe8Rjl9U
DribblingAugust-04-174:28 PM
U11 - Drills Page 24

Please see these Youtube clips:
Push Pass: Pass and Receivehttps://www.youtube.com/watch?v=fCanpKMKwUIhttps://www.youtube.com/watch?v=enYvjqmanY4
Chip Passhttps://www.youtube.com/watch?v=RAQ6yCh0RQMhttps://www.youtube.com/watch?v=cRwk4qPAEBg
PassingAugust-04-174:32 PM
U11 - Drills Page 25
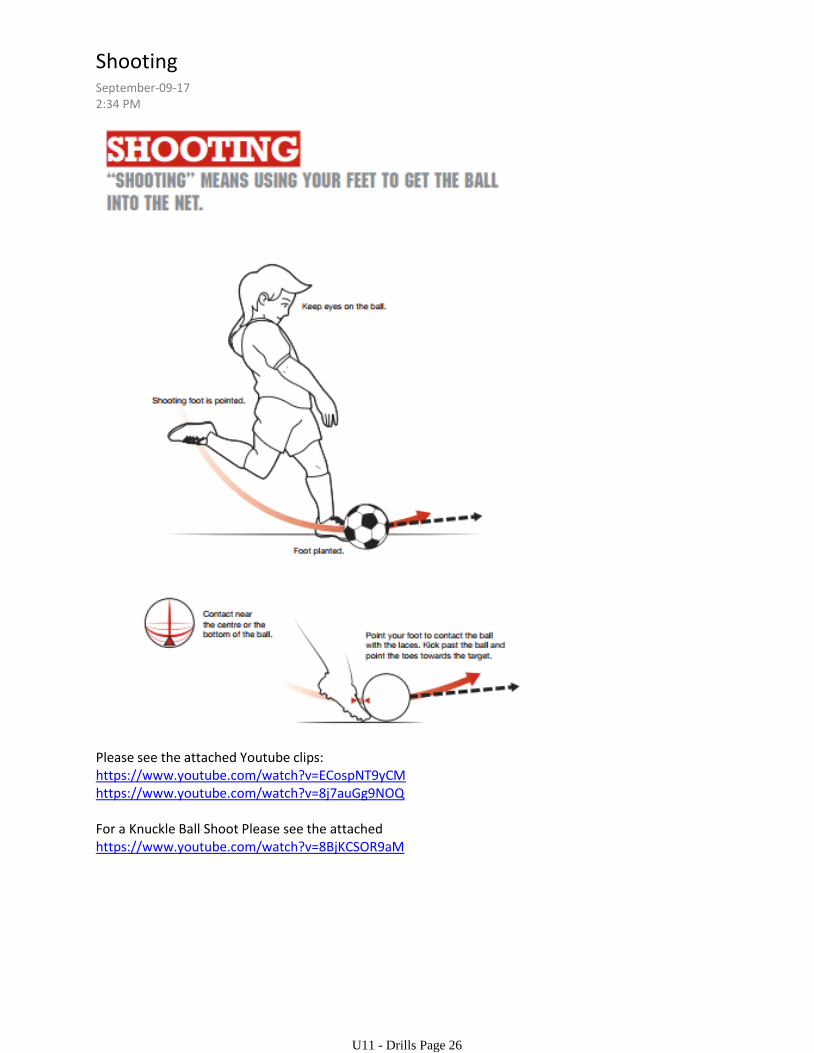
Please see the attached Youtube clips:https://www.youtube.com/watch?v=ECospNT9yCMhttps://www.youtube.com/watch?v=8j7auGg9NOQ
For a Knuckle Ball Shoot Please see the attached https://www.youtube.com/watch?v=8BjKCSOR9aM
ShootingSeptember-09-172:34 PM
U11 - Drills Page 26
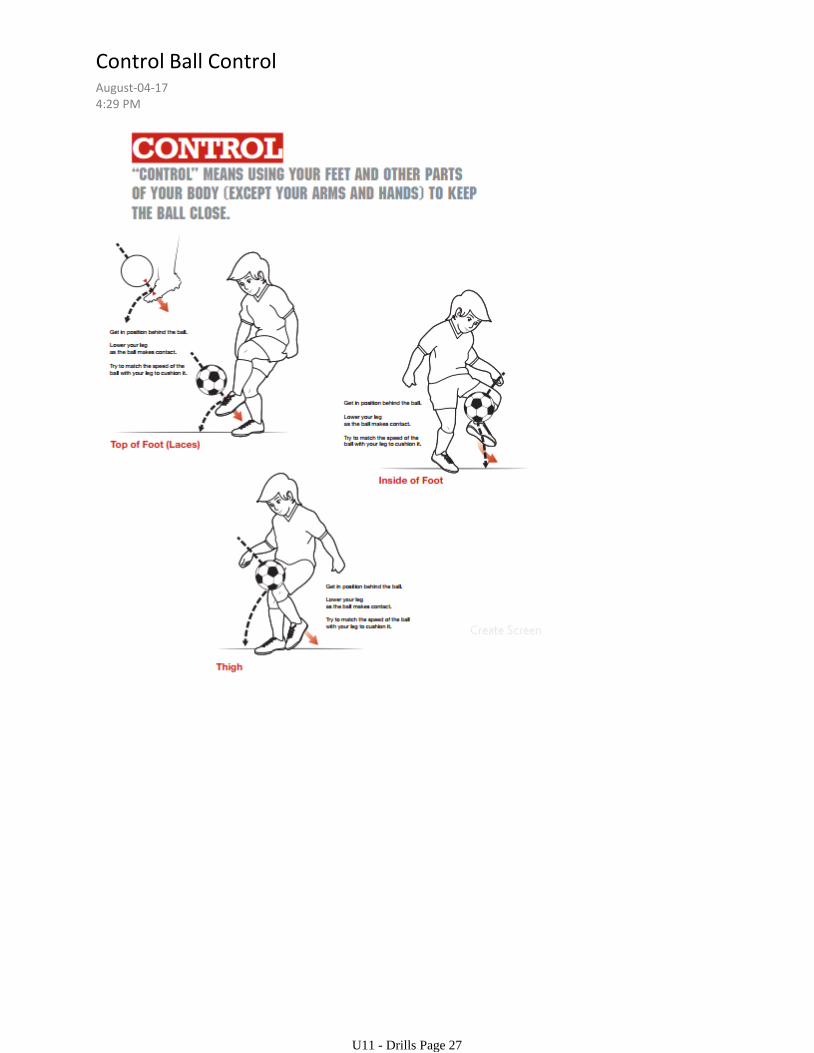
Control Ball Control August-04-174:29 PM
U11 - Drills Page 27
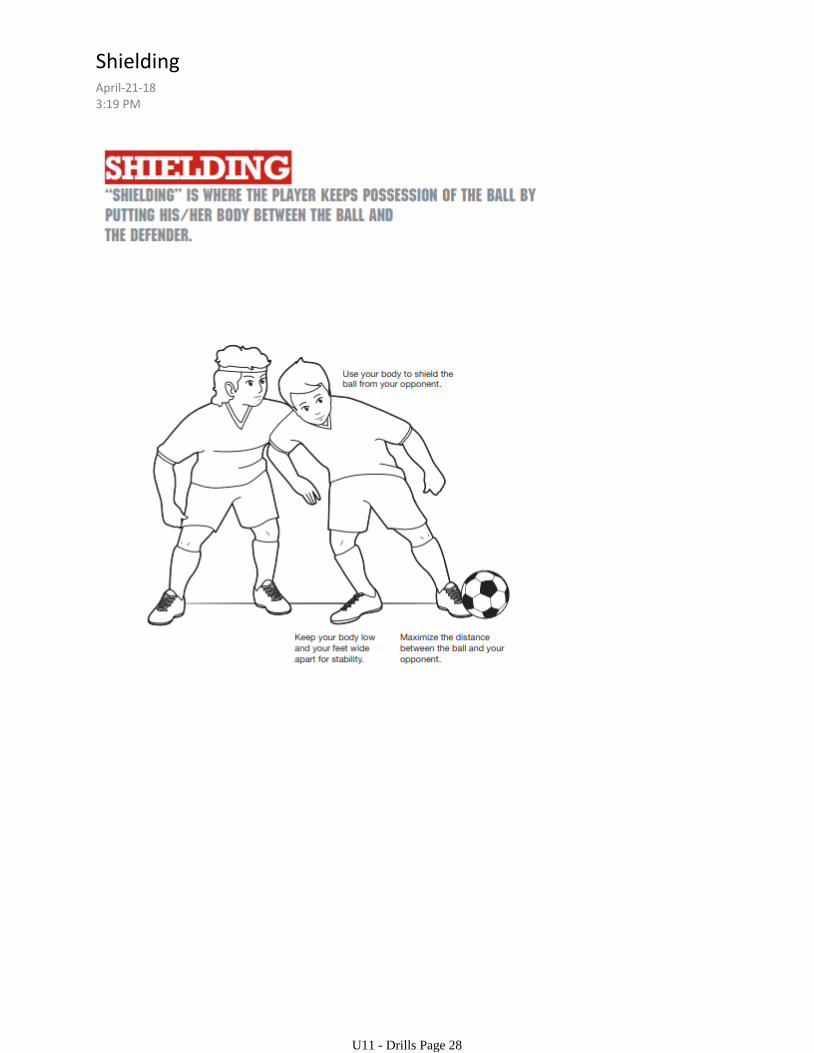
ShieldingApril-21-183:19 PM
U11 - Drills Page 28
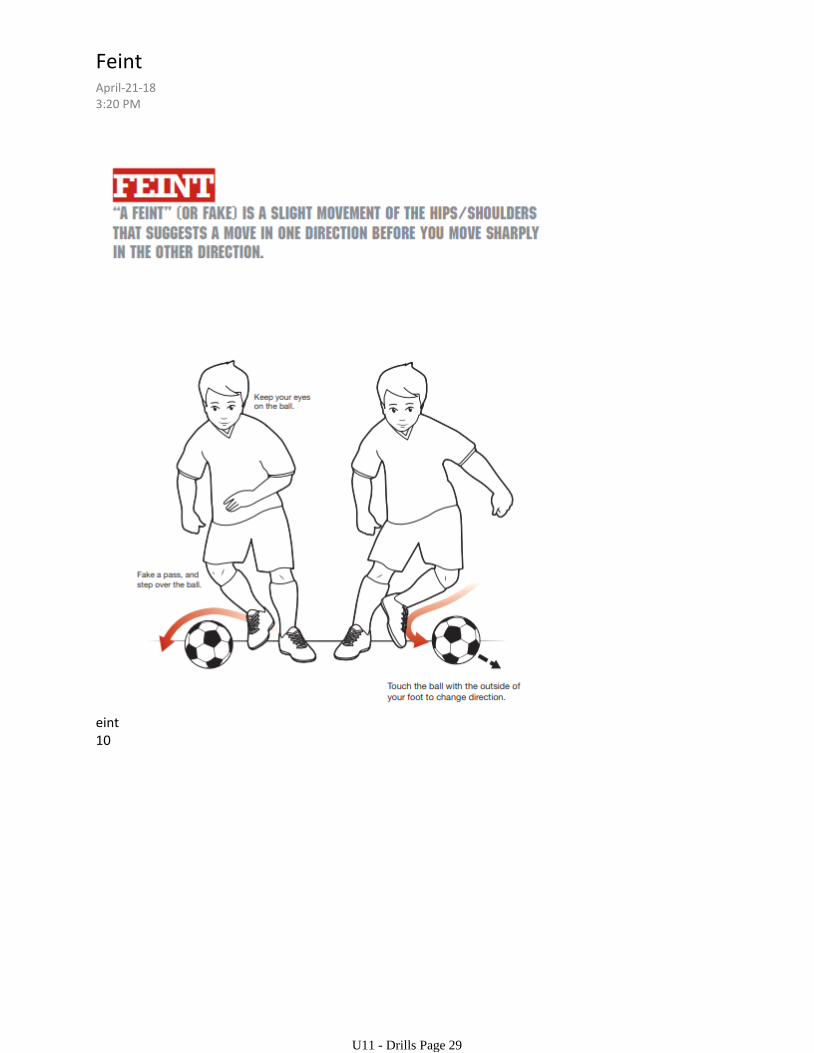
eint10
FeintApril-21-183:20 PM
U11 - Drills Page 29
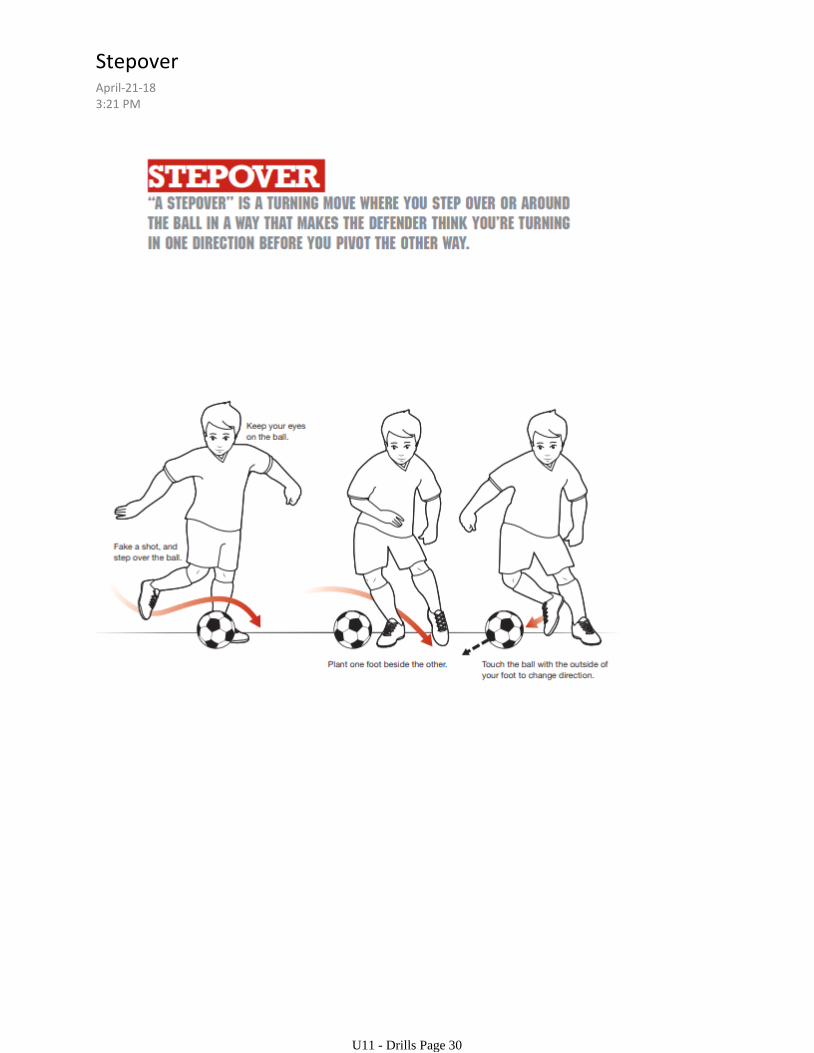
StepoverApril-21-183:21 PM
U11 - Drills Page 30
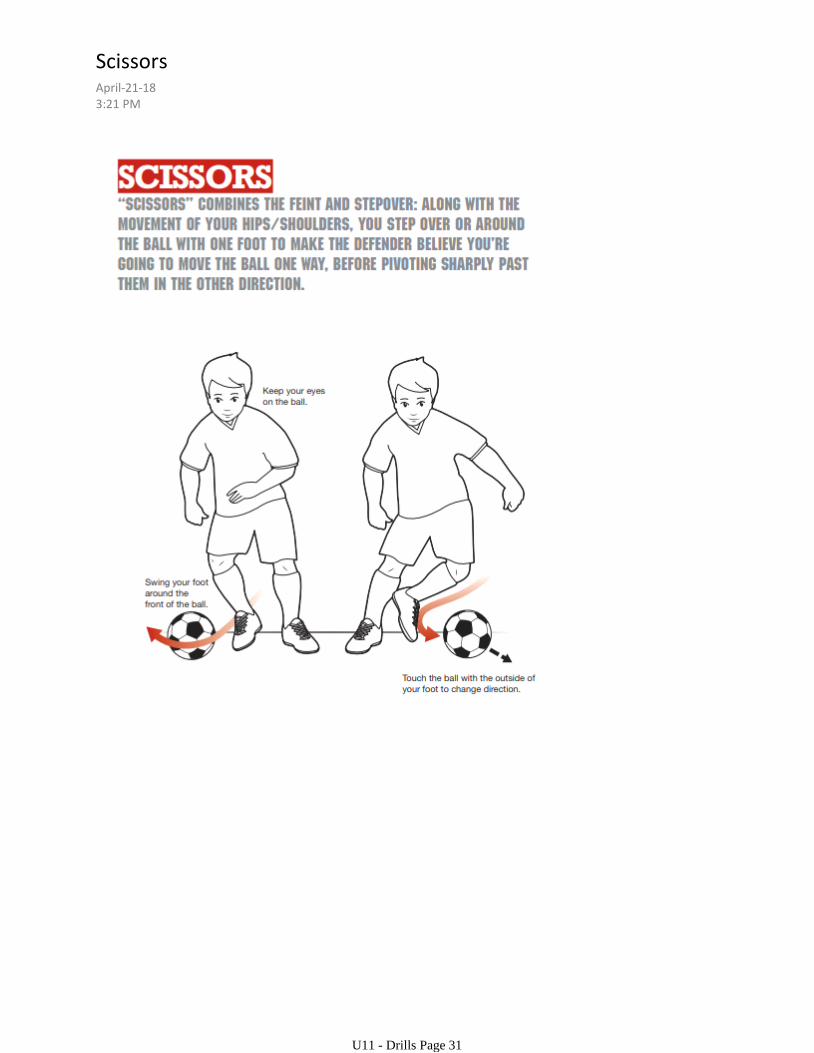
ScissorsApril-21-183:21 PM
U11 - Drills Page 31
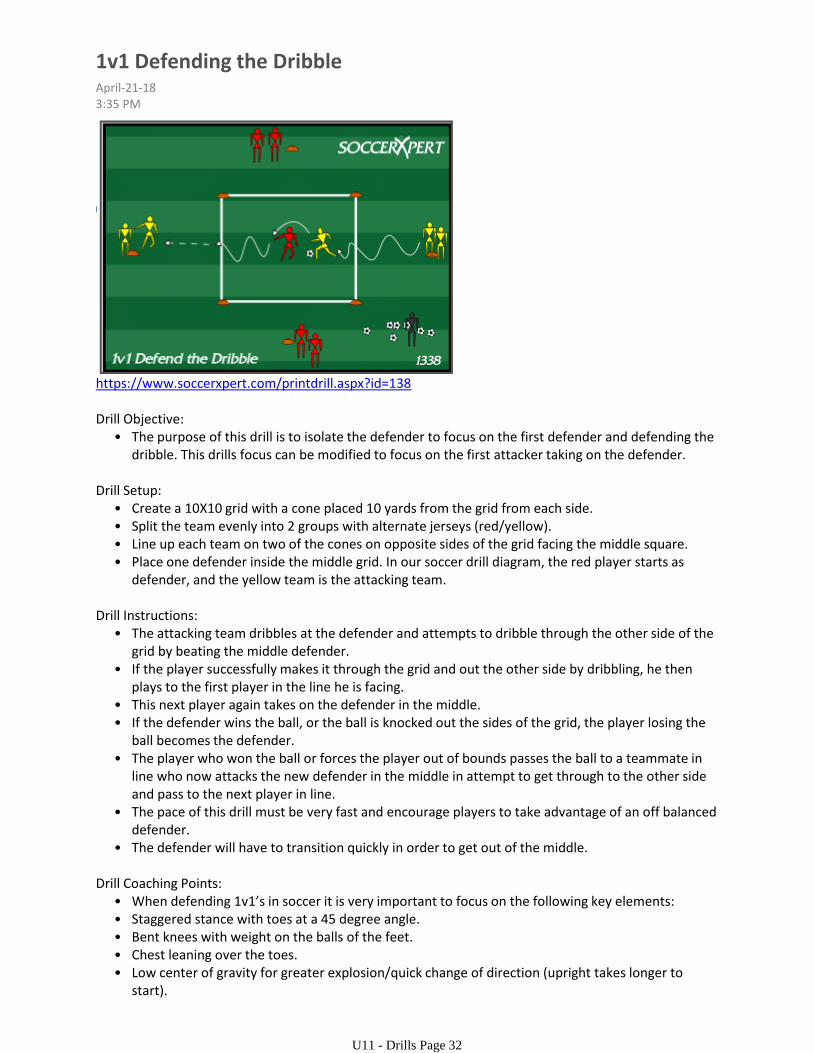
https://www.soccerxpert.com/printdrill.aspx?id=138
• The purpose of this drill is to isolate the defender to focus on the first defender and defending the dribble. This drills focus can be modified to focus on the first attacker taking on the defender.
Drill Objective:
• Create a 10X10 grid with a cone placed 10 yards from the grid from each side. • Split the team evenly into 2 groups with alternate jerseys (red/yellow). • Line up each team on two of the cones on opposite sides of the grid facing the middle square. • Place one defender inside the middle grid. In our soccer drill diagram, the red player starts as
defender, and the yellow team is the attacking team.
Drill Setup:
• The attacking team dribbles at the defender and attempts to dribble through the other side of the grid by beating the middle defender.
• If the player successfully makes it through the grid and out the other side by dribbling, he then plays to the first player in the line he is facing.
• This next player again takes on the defender in the middle. • If the defender wins the ball, or the ball is knocked out the sides of the grid, the player losing the
ball becomes the defender. • The player who won the ball or forces the player out of bounds passes the ball to a teammate in
line who now attacks the new defender in the middle in attempt to get through to the other side and pass to the next player in line.
• The pace of this drill must be very fast and encourage players to take advantage of an off balanced defender.
• The defender will have to transition quickly in order to get out of the middle.
Drill Instructions:
• When defending 1v1’s in soccer it is very important to focus on the following key elements:• Staggered stance with toes at a 45 degree angle.• Bent knees with weight on the balls of the feet.• Chest leaning over the toes.• Low center of gravity for greater explosion/quick change of direction (upright takes longer to
start).• Ability to shuffle quickly.
Drill Coaching Points:
1v1 Defending the DribbleApril-21-183:35 PM
U11 - Drills Page 32
• Ability to shuffle quickly.• Pay attention to the distance of pressure (depends on speed of attacker vs. the speed of the
defender) usually 1-3 yards• Remember that the player closest to the attacker should be the player pressuring the ball. Players
should sprint to close down space as quickly as they can, then when they get 5 yards from the attacker they should slow down and take steps backwards to match the pace of the attacker. During this time, the defender should slowly close down the space between the attacker and defender. Often proper pressure will cause the attacker to lose the ball.
• One way to have players recall the proper way to defend is by the term “Quick, Slow, Sideways, Low”.
• Quick refers to the defender speed while closing down the attacker with the ball. This should be done at full speed sprint and note that it is often best to close down the ball when the ball is in flight.
• Slow refers to the defenders ability to change of speed and direction required to start moving in the same direction of the attacker.
• Sideways refers to the body positioning often used when defending. The defender should turn their body in a 45 degree angle to create the largest amount of defensive area.
You can also Transition into this Drill:
• The purpose of this drill is to isolate the defender to focus on the first defender and defending the dribble while working with a teammate. This teaches young soccer players to work together with your teammate to shut down the attacker.
Drill Objective:
Drill Setup:Create a grid that is 50 yards wide by 40 yards deep.Place a goal about 10 yards from the sideline on two of the diagonal corners. Place a goalkeeper in each of the goals.15 yards from each goal create a 10 X 10 grid and set a cone on the opposite end lines as a starting point for the players. See diagram for field layout.Split the team into groups of 2 each partner group having the same jersey color. One of the teammates starts in line 1 where the other player starts in line 2 in the same order so they go at the same time. Begin with one set of partners as the defenders each in one of the two 10X10 grids in front of the goal.
Drill Instructions:The attackers (partners) from line 1 and line 2 go at the same time on the coaches command.The attackers attempt to dribble through the grid directly in front of them and shoot on goal.If the attacking player successfully makes it through the grid and out the other side by dribbling, the attacker attempts to score a goal.The defenders attempt to deny they player from dribbling through the grid.If and only if both of the defender wins the ball, or the ball is knocked out the sides of the grid, do the attacking team become the defenders.If only one defender wins the ball and the other team makes it through the grid the defenders stay and continue defend the grid with the next group of partners.The pace of this drill must be very fast and encourage players to take advantage of an off balanced defender. The defender will have to transition quickly in order to get out of the middle.
Drill Coaching Points:Communication between each of the defenders will become more important and working together as
U11 - Drills Page 33

Communication between each of the defenders will become more important and working together as teammates independently will be the focus.
When defending 1v1’s in soccer it is very important to focus on the following key elements:
Staggered stance with toes at a 45 degree angle.Bent knees with weight on the balls of the feet.Chest leaning over the toes.Low center of gravity for greater explosion/quick change of direction (upright takes longer to start).Ability to shuffle quickly.Pay attention to the distance of pressure (depends on speed of attacker vs. the speed of the defender) usually 1-3 yardsRemember that the player closest to the attacker should be the player pressuring the ball. Players should sprint to close down space as quickly as they can, then when they get 5 yards from the attacker they should slow down and take steps backwards to match the pace of the attacker. During this time, the defender should slowly close down the space between the attacker and defender. Often proper pressure will cause the attacker to lose the ball.
One way to have players recall the proper way to defend is by the term “Quick, Slow, Sideways, Low”.
Quick refers to the defender speed while closing down the attacker with the ball. This should be done at full speed sprint and note that it is often best to close down the ball when the ball is in flight.
Slow refers to the defenders ability to change of speed and direction required to start moving in the same direction of the attacker.
Sideways refers to the body positioning often used when defending. The defender should turn their b
Drill VariationsHave the attackers become defenders if neither of the two score a goal. This will create a lot of defender changes and will allow you to work on transition.
U11 - Drills Page 34