lt-46249, lt-52249 owner’s guide - mitsubishi...
TRANSCRIPT

Guidelines for setting up and using your new widescreen TV start on • page 7.
Forquestions:•Visitourwebsiteatwww.mitsubishi-tv.com.-E-mailusatMDEAservice@mdea.com.-CallConsumerRelationsat- 800-332-2119.
Forinformationon• System Reset,pleaseseethebackcover.
Toorderreplacementoradditionalremotecontrols,visitourwebsiteatwww.mitsuparts.comorcall•800-553-7278.
153 and 249 Series.• IRemittercablesforNetCommandhome-theatercontrolareavailableforpurchasefromMitsubishi.Call800-553-7278andrequesteitherpartnumber242D483020(two-endedcable)orpartnumber299P254020(four-endedcable).
IMMERSIVESOUNDLCDHDTVwithIntegratedSoundProjector
MODELS
151 SeriesLT-40151, LT-46151, LT-52151
153 SeriesLT-40153, LT-46153, LT-52153
249 SeriesLT-46249, LT-52249
OWNER’SGUIDE
FCC Declaration of Conformity
Product: LCDFlatPanelHDTV
Models: LT-40151,LT-46151,LT52151LT-40153,LT-40153,LT-52153LT-46249,LT-52249
ResponsibleParty:
MitsubishiDigitalElectronicsAmerica,Inc.9351JeronimoRoadIrvine,CA92618-1904
Telephone: (800)332-2119
ThisdevicecomplieswithPart15oftheFCCRules.Operationissubjecttothefollowingtwoconditions:
(1) Thisdevicemaynotcauseharmfulinterference,and
(2) Thisdevicemustacceptanyinterferencereceived,includinginterferencethatmaycauseundesiredoperation.
Note: ThisequipmenthasbeentestedandfoundtocomplywiththelimitsforaClassBdigitaldevice,pursuanttopart15oftheFCCRules.Theselimitsaredesignedtoprovidereasonableprotectionagainstharmfulinterferenceinaresidentialinstal-lation.Thisequipmentgenerates,usesandcanradiateradiofrequencyenergyand,ifnotinstalledandusedinaccordancewiththeinstructions,maycauseharmfulinterferencetoradiocommunica-tions.However,thereisnoguaranteethatinterfer-encewillnotoccurinaparticularinstallation.Ifthisequipmentdoescauseharmfulinterferencetoradioortelevisionreception,whichcanbedeterminedbyturningtheequipmentoffandon,theuserisencouragedtotrytocorrecttheinterferencebyoneormoreofthefollowingmeasures:
Reorientorrelocatethereceivingantenna.-
Increasetheseparationbetweentheequip--mentandthereceiver.
Connecttheequipmentintoanoutleton-acircuitdifferentfromthattowhichthereceiverisconnected.
Consultthedealeroranexperiencedradio/-TVtechnicianforhelp.
Changes or modifications not expressly approved by Mitsubishi could cause harmful interference and would void the user’s authority to operate this equipment.
CAUTIONRISK OF ELECTRIC SHOCK
DO NOT OPEN
CAUTION:TOREDUCETHERISKOFELECTRICSHOCK,DONOTREMOVECOVER(ORBACK).NOUSERSERVICEABLEPARTSINSIDE.REFERSERVICINGTOQUALIFIEDSERVICEPERSONNEL.
TV WEIGHT:ThisTVisheavy.Exerciseextremecarewhenliftingormovingit.LiftormovetheTVwithaminimumoftwoadults.TopreventdamagetotheTV,avoidjarringormovingitwhileitisturnedon.AlwayspoweroffyourTV,unplugthepowercord,anddiscon-nectallcablesbeforemovingit.
WARNING:Toreducetheriskoffireorelectricshock,donotexposethisapparatustorainormoisture.
WARNING:ThisproductcontainschemicalsknowntotheStateofCaliforniatocausecancerand/orbirthdefectsorotherreproductiveharm.
WARNING:ThisproductshallbeconnectedtoaMAINSsocketoutletwithaprotectiveearthingconnec-tion.
MAINS DISCONNECTION:Themainsplugisusedasthedisconnectdevice.Themainsplugshallremainreadilyoperable.
Featuresandspecificationsdescribedinthisowner’sguidearesubjecttochangewithoutnotice.
Thelightningflashwitharrowheadsymbolwithinanequilateraltriangleisintendedtoalerttheuserofthepresenceofuninsulated“dangerousvoltage”withintheproduct’s
enclosurethatmaybeofsufficientmagnitudetoconsti-tuteariskofelectricshocktopersons.
Theexclamationpointwithinanequilat-eraltriangleisintendedtoalerttheusertothepresenceofimportantoperatingandmaintenance(servicing)instructionsintheliteratureaccompanyingtheproduct.
For Your Records
Recordthemodelnumber,serialnumber,andpurchasedateofyourTV.ThemodelandserialnumbersareonthebackoftheTV.RefertothispagewhenrequestingassistancewiththeTV.
MODEL NUMBER
SERIAL NUMBER
PURCHASE DATE
RETAILER NAME
LOCATION
ContentsImportantSafetyInstructions. . . . . . . . . . . . . . . . 4ImportantInformationAboutYourTV. . . . . . . . . . 5SpecialFeaturesofYourTV. . . . . . . . . . . . . . . . . 6
1 Basic Setup and OperationPackageContents . . . . . . . . . . . . . . . . . . . . . . . 7StandInstallation . . . . . . . . . . . . . . . . . . . . . . . . 8Wall-Mounting . . . . . . . . . . . . . . . . . . . . . . . . . . 8BeforeYouBegin. . . . . . . . . . . . . . . . . . . . . . . . 9First-TimePower-On. . . . . . . . . . . . . . . . . . . . . . 9TVControls . . . . . . . . . . . . . . . . . . . . . . . . . . . 10SettingUpTVInputs. . . . . . . . . . . . . . . . . . . . . 12BasicTVOperation. . . . . . . . . . . . . . . . . . . . . . 14
2 TV ConnectionsBeforeYouBegin. . . . . . . . . . . . . . . . . . . . . . . 16CableManagement . . . . . . . . . . . . . . . . . . . . . 16InputsandOutputs. . . . . . . . . . . . . . . . . . . . . . 17YPbPrComponentVideoDevice . . . . . . . . . . . 20HDMIDevice. . . . . . . . . . . . . . . . . . . . . . . . . . . . 20DVIVideoDevice . . . . . . . . . . . . . . . . . . . . . . . 21CompositeVideoDevice. . . . . . . . . . . . . . . . . . 21AntennaorCableTVService. . . . . . . . . . . . . . . 21VCRorDVDRecordertoanAntennaorWallOutletCable . . . . . . . . . . . . . . . . . . . . . . 22
VCRorDVDRecordertoaCableBox . . . . . . . . 22A/VReceiver . . . . . . . . . . . . . . . . . . . . . . . . . . 23A/VReceiverwithHDMIOutput. . . . . . . . . . . . . 23Subwoofer. . . . . . . . . . . . . . . . . . . . . . . . . . . . 24Audio-OnlyDevice . . . . . . . . . . . . . . . . . . . . . . 24
3 Using TV FeaturesSelectinganInput . . . . . . . . . . . . . . . . . . . . . . 25SleepTimer. . . . . . . . . . . . . . . . . . . . . . . . . . . 25ChannelViewChannelListings. . . . . . . . . . . . . . 26RedirectingAudioOutput . . . . . . . . . . . . . . . . . 26ControllingA/VReceiverVolume. . . . . . . . . . . . 26StatusDisplay . . . . . . . . . . . . . . . . . . . . . . . . . 27TVSignalsandDisplayFormats. . . . . . . . . . . . . 28UsingtheTVwithaPersonalComputer . . . . . . . 29CameraImagesandMusicFiles . . . . . . . . . . . . 31SoundProjector. . . . . . . . . . . . . . . . . . . . . . . . 34StreamingInternetMovieswithVUDU . . . . . . . . 37IntroductiontoHome-TheaterControl . . . . . . . . 39
4 TV MenusMainMenu. . . . . . . . . . . . . . . . . . . . . . . . . . . . 40MenuNavigation . . . . . . . . . . . . . . . . . . . . . . . 40Adjust . . . . . . . . . . . . . . . . . . . . . . . . . . . . . . . 41Captions . . . . . . . . . . . . . . . . . . . . . . . . . . . . . 46Initial. . . . . . . . . . . . . . . . . . . . . . . . . . . . . . . . 47Inputs . . . . . . . . . . . . . . . . . . . . . . . . . . . . . . . 50Lock . . . . . . . . . . . . . . . . . . . . . . . . . . . . . . . . 52
5 NetCommand IR ControlAboutNetCommandIRControl. . . . . . . . . . . . . 55IREmitterPlacement . . . . . . . . . . . . . . . . . . . . 56InitialNetCommandSetup . . . . . . . . . . . . . . . . 57OperatingNetCommand-ControlledDevices . . . 58
6 NetCommand IR Control of an A/V ReceiverControllinganA/VReceiverafterNetCommandSetup. . . . . . . . . . . . . . . . . . . . 61
SettingUpA/VReceiverControlPowerandVolume . . . . . . . . . . . . . . . . . . . 62AutomaticSwitching(AudioorAudio/Video) . 63
AppendicesAppendixA:ProgrammingtheRemoteControl . 68AppendixB:HDMIControlofCECDevices . . . . 75AppendixC:TVCare. . . . . . . . . . . . . . . . . . . . 78AppendixD:BypassingtheParentalLock . . . . . 79AppendixE:Troubleshooting . . . . . . . . . . . . . . 81
Trademark and License Information . . . . . . . . . . 88
Network Service Disclaimer . . . . . . . . . . . . . . . . 88
Warranty . . . . . . . . . . . . . . . . . . . . . . . . . . . . . . 92
Index . . . . . . . . . . . . . . . . . . . . . . . . . . . . . . . . . 94

4
Important Safety InstructionsPleasereadthefollowingsafeguardsforyourTVandretainforfuturereference.Alwaysfollowallwarningsandinstructionsmarkedonthetelevision.
1) Readtheseinstructions.
2) Keeptheseinstructions.
3) Heedallwarnings.
4) Followallinstructions.
5) Donotusethisapparatusnearwater.
6) Cleanonlywithdrycloth.
7) Donotblockanyventilationopenings.Installinaccordancewiththemanufacturer’sinstructions.
8) Donotinstallnearanyheatsourcessuchasradiators,heatregisters,stoves,orotherapparatus(includingamplifiers)thatproduceheat.
9) Donotdefeatthesafetypurposeofthepolarizedorgrounding-typeplug.Apolarizedplughastwobladeswithonewiderthantheother.Agroundingtypeplughastwobladesandathirdgroundingprong.Thewidebladeorthethirdprongareprovidedforyoursafety.Iftheprovidedplugdoesnotfitintoyouroutlet,consultanelectricianforreplacementoftheobsoleteoutlet.
10) Protectthepowercordfrombeingwalkedonorpinchedparticularlyatplugs,conveniencereceptacles,andthepointwheretheyexitfromtheapparatus.
11) Onlyuseattachments/accessoriesspecifiedbythemanufacturer.
12) Useonlywiththecart,stand,tripod,bracket,ortablespecifiedbythemanufacturer,orsoldwiththeapparatus.Whenacartisused,usecautionwhenmovingthecart/apparatuscombinationtoavoidinjuryfromtip-over.
13) Unplugthisapparatusduringlightningstormsorwhenunusedforlongperiodsoftime.
14) Referallservicingtoqualifiedservicepersonnel.Servicingisrequiredwhentheapparatushasbeendamagedinanyway,suchaspower-supplycordorplugisdamaged,liquidhasbeenspilledorobjectshavefallenintotheapparatus,theapparatushasbeenexposedtorainormoisture,doesnotoperatenormally,orhasbeendropped.
ANT E NNALE AD IN WIR E
ANT E NNADIS C HAR G E UNIT(NE C AR T IC LE 810-20)
G R OUNDINGC ONDUC T OR S(NE C AR T IC LE 810-21)
G R OUND C LAMP S
P OWE R S E R V IC E G R OUNDINGE LE C T R ODE S Y S T E M(NE C AR T 250, P AR T H)
G R OUND C LAMP
E LE C T R ICS E R V IC EE QUIP ME NT
NE C — NAT IONAL E LE C T R IC AL C ODE
E XAMP LE OF ANT E NNA G R OUNDING
Outdoor Antenna GroundingIfanoutsideantennaorcablesystemisconnectedtotheTV,besuretheantennaorcablesystemisgroundedsoastoprovidesomeprotectionagainstvoltagesurgesandbuilt-upstaticcharges.
Replacement PartsWhenreplacementpartsarerequired,besuretheservicetechnicianhasusedreplacementpartsspeci-fiedbythemanufacturerorhavethesamecharacter-isticsastheoriginalpart.Unauthorizedsubstitutionsmayresultinfire,electricshockorotherhazards.

5
Important Information About Your TV
Installation NotesForstandinstallationandwall-mounting,seepage8.
Use with other than the authorized accessories may cause the TV to become unstable, which can cause damage to the product or possible injury.
Custom cabinet installation must allow for proper air circulation around the television.
NOTE TO CATV SYSTEM INSTALLER: THISREMINDERISPROVIDEDTOCALLTHECATVSYSTEMINSTALLER’SATTENTIONTOARTICLE820-40OFTHENECTHATPRO-VIDESGUIDELINESFORTHEPROPERGROUNDINGAND,INPARTICULAR,SPECIFIESTHATTHECABLEGROUNDSHALLBECONNECTEDTOTHEGROUNDINGSYSTEMOFTHEBUILDING,ASCLOSETOTHEPOINTOFCABLEENTRYASPRACTICAL.
TV SoftwareDonotattempttoupdatethesoftwareofthisTVwithsoftwareorUSBdrivesnotprovidedbyorauthorizedbyMitsubishiDigitalElectronicsAmerica,Inc.Non-authorizedsoftwaremaydamagetheTVandwillnotbecoveredbythewarranty.
If Your TV Gets DamagedCrystallineliquidmayleakfromtheLCDpanelandbrokenglassmaybescattered.
CAUTION: The crystalline liquid is toxic. Avoid contact with your skin, eyes, or mouth.DONOTtouchthebrokenglassorcrystallineliquid.DONOTgetglassfragmentsorcrystallineliquidintoeyesormouth.Should either contact your eyes or mouth, rinse the contacted area thoroughly with water and consult your doctor.
Disposal of Your TV TheLCDpanelcontainsasmallamountofcrystallineliquidandthefluorescenttubeinthepanelcontainsmercury.Botharetoxicandshouldnotbetouched.
DO NOT dispose of the TV with general household waste.THELAMPSINSIDETHISPRODUCTCONTAINMERCURYANDMUSTBERECYCLEDORDISPOSEDOFACCORDINGTOLOCAL,STATE,ANDFEDERALLAWS.Fordisposalorrecyclinginformation,contactyourlocalauthoritiesortheElectronicIndustriesAlli-anceatwww.eiae.org.

6
Special Features of Your TV
Yournewhigh-definitionwidescreentelevisionhasmanyspecialfeaturesthatmakeittheperfectcenterofyourhomeentertainmentsystem,including:
1080p High-Definition LCD Display SystemYourMitsubishiLCDFlatPanelHDTVusesafull1920x1080LCDpaneltocreatethepictureyouseeonthescreen.Allimagesaredisplayedat1080p.TheTVusesnewPlush1080p®5Gdigitalvideoprocessingtoconvertlower-resolutionsignalsto1080pfordisplay.
Smooth120Hz™ Film MotionSmooth120Hz™FilmMotionmakesfast-movingimagesappearsmootherandmorefluid,freefrommotionblur.Itdoesthisbydoublingthetraditionalprogressivescanframerateandcreatesnewframesofvideobetweenthetraditionalframestocreatesmoothermovingimages.Smooth120Hz™FilmMotionalsosmoothsfilmjudder(imagevibration)thatmaybepresentinfilm-basedcontentsuchasmovies.
16:9 Widescreen Picture FormatEnjoyafulltheatricalexperienceinthecomfortofyourhome.Viewpicturesasfilmdirectorsintendedthem.DigitalTVbroadcasts,DVDsandnewervideogameconsolessupportthiswidescreenformat.
Integrated HDTV TunerYourwidescreenMitsubishiHDTVhasaninternalHDTVtunerabletoreceivebothover-the-airHDTVbroad-casts(receivedviaanantenna)andnon-scrambleddigitalcablebroadcasts,includingnon-scrambledHDTVcableprogramming.
High-Definition Video Inputs
Component Video Inputs.• AlsocalledY/Pb/Prinputs,theseinputsreceivestandardanalogvideoformatsof480i,480p,720p,and1080ihigh-defini-tionsignals.ThisprovidesahighlevelofflexibilitywhenconnectingDVDplayers/recorders,cableboxes,andsatellitereceivers.
HDMI Inputs.• Theseinputsacceptdigital480i,480p,720p,1080i,and1080pvideosignalsplusbitstreamandPCMdigitalstereosignals.TheHDMI™inputscanalsoacceptavarietyofPCsignalsandresolutions.TheseinputssupportHDMI1.3DeepColor(upto36bits)andthex.v.Color extendedcolorgamut.
Usedwithanadapter,theseinputsalsoacceptcompatibledigitalDVIvideosignals.HDMIinputsprovideadditionalhigh-performance,high-definitionconnectionsformaximumflexibilityinyourchoiceofhometheaterproducts.TheHDMIinputsareHDCPcopy-protectioncompatible.
Easy Connect Auto Input SensingEasyConnect™AutoInputSensingautomaticallyrec-ognizeswhenyoupluginadeviceandpromptsyoutoassignanametoit.
Home-Theater Control
HDMI Control
Available for all models.HDMIdeviceswithConsumerElectronicsControl(CEC)capabilitiesmaybecompatiblewiththeTV’sHDMIControlfeature.CompatibledevicescanreceivecontrolsignalsthroughtheHDMIconnection,allowingtheTV’sremotecontroltooperatesomefunc-tionsofthesedevices.
NetCommand with IR Learning
153 and 249 Series.YourMitsubishiHDTVoffersanewlevelofnetworkingthatseamlesslyintegratesselectedolderA/Vproductswithnewandfuturedigitalproducts.NetCommand®supportsIR(infrared)controlofproductssuchasVCRs,DVDplayers,cableboxes,andsatel-litereceivers.NetCommandcan“learn”remotecontrolsignalsdirectlyfrommanydevices,allowingyoutocreateacustomizedNetCommand-controlledhome-theatersystem.
Sound ProjectorSoundProjectortechnologyusestheTV’sbankofspeakerstocreateasimulatedsurroundsoundeffectbyreflectingsoundofftheroomwalls.
Internet Video Streaming with VUDU™249 Series.VUDUoffersthelargeston-demandHDmovieselectionanywhere,featuringfull1080pand5.1surroundsound.VUDUallowsyoutoenjoymovieswithnostorevisits,nomailing,nolatefeesandnosubscriptions.
ENERGY STAR®
ThisisanENERGYSTAR®qualifiedTV.ProductsthatearntheENERGYSTARpreventgreenhousegasemis-sionsbymeetingstrictenergyefficiencyguidelinessetbytheU.S.EnvironmentalProtectionAgencyandtheU.S.DepartmentofEnergy.ThisTVconsumespowerinexcessofENERGYSTARguidelinesunderthefollow-ingconditions:
TV Feature ActiveTV Power
Status
PictureModesettoBrilliant On
Fast Power Onenabled
Off153 and 249 Series.ExternalControllerInputenabled

7
Basic Setup and Operation1Package Contents
Pleasetakeamomenttoreviewthefollowinglistofaccessoryitemstoensurethatyouhavereceivedeverything.
Remote Control BatteriesRemovetheremotecontrolbackcover.1.
Emitter Bulb
Loadthebatteries,makingsurethepolarities2. (+)and(-)arecorrect.Insertthenegative(-)endfirst.
Slidethecoverbackintoplace.3.
Remote Control1.
GUID
EME
NUIN
FOBA
CK
ACTI
VITY
Two AA Batteries2. AA
AA
Basic Owner’s 3. Guide
HDTV Quick Setup 4. Guide
Product Registra-5. tion Card
Power Cord6.
Cable Tie7.
Stand Screws8.
153 and 249 Series. 9. Calibration Micro-phone

8 1. Basic Setup and Operation
1
Back
Extension pieces on back of stand
2
3TV
CAUTION. Place the stand in the foam insert with the extension pieces facing away from the TV. Otherwise, the TV will be damaged in transit.
Protect the TV and stand with the original packing material.
DON’T place your hand where it can get caught between the TV and stand.
DO support the TV under the corners.
TV in protective wrapping
Extension pieces on stand must face out, away from TV.
Repacking the Stand
Two adults are required to lift the TV.
Wall-Mounting
Stand Installation
1
Back
Extension pieces on back of stand
2
3TV
CAUTION. Place the stand in the foam insert with the extension pieces facing away from the TV. Otherwise, the TV will be damaged in transit.
Protect the TV and stand with the original packing material.
DON’T place your hand where it can get caught between the TV and stand.
DO support the TV under the corners.
TV in protective wrapping
Extension pieces on stand must face out, away from TV.
Repacking the Stand
Two adults are required to lift the TV.
Ifplanningtowall-mounttheTV,donotinstallthestand.Toorderawall-mountkit,pleasecontactPeerlessIndustries,Inc.at(800)473-3753orvisitwww.peerlessmounts.com.Orderwall-mountkitmodelST650.
CAUTION: Using this TV with other than the authorized accessories may cause the TV to become unstable, which can cause damage to the product or possible injury.
Toorderawall-mountkitfromMitsubishiDigitalElec-tronicsAmerica,Inc.,pleasevisitwww.mitsuparts.comorcall(800)553-7278.
Completeinstallationinstructionsareincludedwiththekit.
Required:PhillipsScrewdriver
CAUTIONAt least TWO PEOPLE are
required to install the stand. Support the TV near the corners as shown. Failure to follow these recommendations may result in
personal injury and damage to the product.

1. Basic Setup and Operation 9
Before You BeginReviewtheimportantsafety,installation,andoper-1. atinginformationatthebeginningofthisbook.
ChoosealocationforyourTV.2. • See the stand-installation or wall-mounting
requirements on the opposite page.
• AllowatleastfourinchesofspaceonallsidesoftheTVtohelppreventoverheating.Over-heatingmaycauseprematurefailureoftheTV.
• Avoidlocationswherelightmayreflectoffthescreen.
Installthebatteriesintheremotecontrol.3. PlugtheTVintoanACpoweroutlet.4.
TV power connection
Welcome Screen Energy Options
Mitsubishirecommendsthe• Homesetting,whichusespowerwithinENERGYSTAR®guidelines.
Home Fast Power On• allowstheTVtopowerupquickly.Whilepoweredoff,however,theTVusespowerinexcessofENERGYSTARguidelinesforapowered-downdevice.
The• Retailsettinglooksbestunderbrightlight-ing.Inthismode,theTVusespowerinexcessofENERGYSTARguidelines.
ThistablecomparesenergychoicesofferedintheWelcomescreen.
HomeHome Fast Power On Retail
Picture Mode Bright Bright Brilliant
Backlight Level
ReducedBrightness
ReducedBrightness
FullBrightness
Time to Power On
Normal Fast Normal
First-Time Power-On
Confirmthattheremote1. controlisinTVmode.
Pressthesidebutton•oncetolightthemodeindicatorandconfirmthatTVmodeisactive.Tochange,pressthe•sidebuttonadditionaltimestoactivateTVmode.
GUIDE MENU INFO BACK
TV
Aimtheremotecontrol2. attheTVandpressthePOWERkey .WaitfortheWelcomescreen.
GUIDE MENU INFO BACK
Press3. ifyouwishtochangethemenulanguagetoEspañol.
Press4. tomovetotheenergy-modeselections.Seetheinformationboxfordetails.
Press5. tohighlightEXIT. PressENTERtoclearthemenu.

10 1. Basic Setup and Operation
Remote Control
F1 F3 F4F2
FAVON
DEMAND
GUIDE MENU INFO BACK
ACTIVITY
PowersTVonoroff
Sidebuttonsetsthecontrolmodeforthetypeofdevicetooperate.SetmodetoTVfornormalTVviewing.
Number/letterkeysChanneltuning,page14
MORE Displaysamenushowingaddi-tionalfunctionsforthenumberkeys.
Forthe• MOREmenuinTVmode,seebelow.Withremotecontrolprogrammed•foranotherdevice,theMOREmenuisspecifictothedevice.Seepage68.ForCEC-enableddevices,• page75
CHANNEL UPVOLUME UP
Record/PlaybackcontrolsforexternaldevicesWhenremotecontrolisprogrammed,page68
HDMIcontrol,page77153 and 249 Series:NetCommand,page58
VCRCABL/SATTVDVDAUDIOControl-modeindicatorfordevicetypetocontrol.Usethesidebuttontochange.
MUTE
VOLUME DOWN
LAST.Returnstothepreviouslytunedchannel.
CHANNEL DOWN
TV Controls
Note: Tooperateotheraudio/videodevicesusingtheTV’sremotecontrol:
• SeeAppendixA,“ProgrammingtheRemoteControl.”
• ForHDMIdevicescompatiblewiththeTV’sHDMIControlfeature,seeAppendixB.
• 153 and 249 SeriesSee- page55forNetCommandIR“Learn-ing”ofdevicekeys.ForuseofspecifickeyswithNetCom--mand-controlleddevices,see“SpecialOperationMethods,”page58.
The MORE menu in TV mode
GUIDE ChannelViewlistings,page26.
MENU TVmainmenu,page40
INFO TVstatus(page27)orTVhelp.
BACK Stepsbackonemenu;clearsthetopmenuorStatusDisplay.
(PAUSE)FreezesabroadcastTVpicture.
Addsaseparatorwhenenteringdigitalchannelnumbers.Clearssomemenuentries.
PresstoselectaTVactivityandinput.Seepage25.
249 Series:Seepage68.
249 Series:Seepage68.
PAGE UP
ENTERSelectsachannelnumberormenuitem.
Navigationcontrols
PAGE DOWN
SLEEP SleepTimer,page25FORMAT Pictureshape(aspectratio),page28MORE ClearstheMOREmenu.
CC ClosedCaptions,page46VIDEO Videoadjustments,
page41AUDIO Audioadjustments,
page42

1. Basic Setup and Operation 11
TV Control PanelButtonsonthecontrolpanelduplicatesomekeysontheremotecontrol.
ACTIVITY• ,CH,andVOLareavailablewhennoTVmenusaredisplayed.
• andENTERareavailablewhenusingTVmenusorafteractivatingaspecialfunction.
System Reset
IftheTVfailstorespondtotheremotecontrol,thecontrol-panelbuttons,orwillnotpoweron/off,performSystemReset.RecentsettingchangesmadebeforeusingSystemResetmaybelost.
ToperformSystemReset,pressandholdthePOWERbuttononthecontrolpanelfortenseconds.
Panel-Lock Release
To• releasethePanelLockusingtheTVcontrolpanel,pressandholdtheACTIVITYbuttononthecontrolpanelfortenseconds.IftheTVisoff,pressthePOWERbuttontohaveitpoweron.ToactivatethePanelLock,usethe• Lockmenu,page54.
TV Controls, continued
Key
OffSteadyOnSlowBlinking
LED Color TV Condition Additional Information
None TVispoweredoff. Normaloperation.
Green TVispoweredon. Normaloperation.
Green TVpoweredoff,auto-onTVTimerisset.
Normaloperation.TVcanbeturnedonatanytime.
Red TVmayrequireservice. TurnofftheTVandunplugthesetfromtheACpowersource.Waitoneminuteandthenplugthesetbackin.SeeAppendixE.
IftheredLEDisstillon,contactyourdealeroraMitsubishiAuthorizedServiceCenter.Gotowww.mitsubishi-tv.comorcall1-800-332-2119toreceiveAuthorizedServiceCenterinformation.
POWER Indicator
POWER
The TV control panel is located on the side.
TheTV’sIR(infrared)sensorreceivessignalsfromtheremotecontrol.Donotcoverthesensor.
IR Sensor

12 1. Basic Setup and Operation
Setting Up Other Inputs
ConnectyourdevicestotheTV,makingnoteof1. whichTVinputjackisusedforeachdevice.See“TVConnections,”page16,forrecommendations.
Poweronthedevicestoensuredetection.2. PowerontheTV.3. TheTVwilldisplaytheNew Device FoundscreenforeachnewconnectionitdetectsLearnmoreaboutAutoInput/AutoOutputSensingontheoppositepage.
Selectthedevicetypeifthedeviceisnotrecog-4. nizedautomatically.
Sample New Device Found screen.
153 and 249 Series. 5. YoucanperformNetCom-mandIR“learning”afterselectingthedevicetypeoratalatertimewhenconvenient.Toperformnow,highlightNetCommandandpressENTER.See“InitialNetCommandSetup,”page57or“SettingUpA/VReceiverControl,”page62.
Important Note for NetCommand IR Users
153 and 249 Series. Besuretoselectthecorrectdevicetypehere.AlthoughyoucanchangethedevicetypelaterintheInputs>Namemenu,any“learned”NetCommandIRcodeswillbeerasedwhenyoumakethechange.
Press6. BACKtoclosetheNew Device Foundscreen.TheTVwillthendisplaytheNew Device Foundscreenforthenextconnectionitfinds.
Channel Scan for Digital ChannelsIf you skip this step, the TV cannot receive digital channels.
Ifusinganantennaordirectcableservice(nocablebox),connecttheincomingcoaxialcabletotheTV’sANTinput.Refertopage21.
Youmustperformachannelscantoenablereceptionofallavailablehigh-definitionandstandard-definitiondigitalchannels.Thechannelscanwillsearchforchannelsavailablelocallyandsavethemtomemory.Memorizing Channels with Channel ScanFor the ANT input
To start channel memorization
PowerontheTV.1. Press2. MENUandopentheInitial > Channelmenu.
Start channel memorization from the Initial > Channel menu.
Press3. ENTERtoenterthemenu.
Select4. Ant Airifconnectedtoanover-the-airantenna.SelectAnt Cablefordirectcable(servicewithoutacablebox).
Highlight5. ScanandpressENTER.Channelmemorizationmaytakeupto15minutestocomplete.
To stop channel memorization before completion, press CANCEL.
UsetheInitial > Channel>Editmenu(page48)foradditionalchanneloptions,suchasaddingordeletingchannelsfrommemory.
Setting Up TV Inputs

1. Basic Setup and Operation 13
About Auto Input Sensing/Auto Output SensingThisTV’sEasyConnect™AutoInputSensingfeaturedetectsmostconnectionsautomatically.Theexcep-tionsare:
Aconnectiononthe• ANTinputAnHDMIdevicethatispoweredoff.Poweron•thedevicetoensuredetection.
Auto Sensing for Most Devices
Whenyoufirstconnectadevice,theTVwill:
a. Detecttheconnecteddeviceandautomaticallyswitchtoit.
b. Promptyoutoidentifythedevicetype.c. 153 and 249 Series.Promptyoutoperform
NetCommandset-upforthedevice,ifavailable.d. Repeatthesestepsforanyothernewlydetected
devices.
When You First Connect a Device
Most Device Types.• Selectthedevicetypefromtheon-screenlist.ThedevicetypeyouselectherewillappearasadeviceiconintheActivitymenu.
A/V Receiver•
TheTVdetectsaudioconnectionsonthe- DIGITAL AUDIO OUTPUTjackandtheright(red)AVR AUDIO OUTPUTjack.
ForanHDMIA/Vreceiver,select- AVRfromthelistofdevicetypesiftheA/Vreceiverisnotrecognizedautomatically.
HDMI CEC Devices Compatible with the TV’s •HDMI Control Feature.CompatibleCEC-enabledHDMIdevicesareoftenrecognizedauto-maticallybytheTV.HDMIControlmayallowyoutocontrolsomefunctionsofaCEC-enableddevice.SeeAppendixB,“HDMIControlofCECDevices.”
New Device Found screen for a device with HDMI control enabled. Select On to enable the TV’s CEC control of the device. In some cases, as in the example above, you will also be prompted to select a device name.
Tips on Auto Sensing
Chooseadifferentnameforeachinput.•Theantennainput(• ANT)isneverdetected,althoughyoucanturnofftheunusedantennainputintheInputs>Namemenu.Changethedevicetypedisplayedinthe• Activity menuintheInputs > Namemenu(page50).Youmustswitchtoadifferentinputbeforechangingthedevicetype.153 and 249 Series.• Any“learned”NetCom-mandIRcodeswillbeerasedifyouchangethedevicetypeintheInputs > Namemenu.
Reactivating Auto Sensing for an HDMI Input
WhenyoudisconnectanHDMIdevice,AutoSensingisdisableduntilyouperformthesesteps.
Switchtoanyinputotherthantheonetobedis-1. connected.
DisconnecttheHDMIdevice.2.
DeletetheremovedHDMIdeviceinthe3. Inputs>Namemenu(see“RemovinganHDMIDevice,”page77).
ConnectthenewHDMIdeviceandthe4. New Device Foundscreenwilldisplay.
Setting Up TV Inputs, continued

14 1. Basic Setup and Operation
Watching Broadcast TVTV Connected to an Antenna, Direct Cable Service, Cable Box, Set-Top Box, or Satellite Receiver
Press1. ACTIVITY.
Press2. and toselectabroadcastsource.IfyounameddevicesduringAutoInputSensing,selectaninputfromtheWatch TVgroup.Note:YourTVmayhaveonlyonegroup(Watch TV).
Note: FormoreabouttheActivitymenu,seepage25.
Activity menu, antenna input selected
Press3. ENTERtoswitchtotheinput.
TunetoachannelontheANTinputusinganyof4. thesemethods.
Enterthechannelnumberusingthenumber•keysontheremotecontrolandpressENTER.
Foratwo-partdigitalchannel,suchas3-1,press3 —
CANCEL 1toenteradash(separator).
Press• CHANNEL UP/CHANNEL DN(+,–)tochangechannelsonechannelatatime.
Press• (LAST)toswitchbacktotheprevi-ouslytunedchannel.
Antenna or Direct Cable Only.• PressGUIDEtodisplayChannelViewchannellistings,highlightachannelnumber,andpressENTERtotune.
Watching DVDs or VideosTV Connected to a DVD Player, DVR, or VCR
Press1. ACTIVITY.
Press2. and toselectamoviesource.IfyounameddevicesduringAutoInputSensing,selectaninputfromtheWatch Moviegroup.
Activity menu, DVD input selected
Press3. ENTERtoswitchtotheinput.
Basic TV Operation
1. Basic Setup and Operation 15
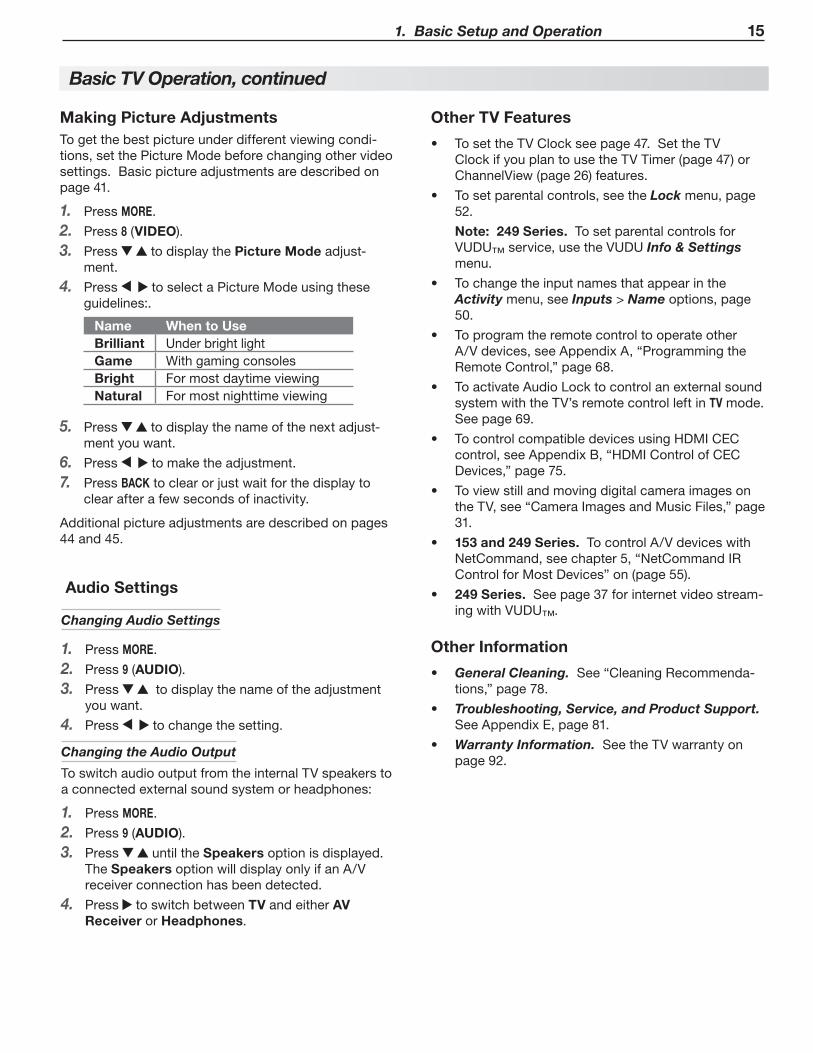
Making Picture AdjustmentsTogetthebestpictureunderdifferentviewingcondi-tions,setthePictureModebeforechangingothervideosettings.Basicpictureadjustmentsaredescribedonpage41.
Press1. MORE.
Press2. 8(VIDEO).
Press3. todisplaythePicture Modeadjust-ment.
Press4. toselectaPictureModeusingtheseguidelines:.
Name When to UseBrilliant UnderbrightlightGame WithgamingconsolesBright FormostdaytimeviewingNatural Formostnighttimeviewing
Press5. todisplaythenameofthenextadjust-mentyouwant.
Press6. tomaketheadjustment.
Press7. BACKtoclearorjustwaitforthedisplaytoclearafterafewsecondsofinactivity.
Additionalpictureadjustmentsaredescribedonpages44and45.
Audio Settings
Changing Audio Settings
Press1. MORE.
Press2. 9(AUDIO).
Press3. todisplaythenameoftheadjustmentyouwant.
Press4. tochangethesetting.
Changing the Audio Output
ToswitchaudiooutputfromtheinternalTVspeakerstoaconnectedexternalsoundsystemorheadphones:
Press1. MORE.
Press2. 9(AUDIO).
Press3. untiltheSpeakersoptionisdisplayed.TheSpeakersoptionwilldisplayonlyifanA/Vreceiverconnectionhasbeendetected.
Press4. toswitchbetweenTVandeitherAV ReceiverorHeadphones.
Other TV Features
TosettheTVClocksee• page47.SettheTVClockifyouplantousetheTVTimer(page47)orChannelView(page26)features.
Tosetparentalcontrols,seethe• Lockmenu,page52.
Note: 249 Series.TosetparentalcontrolsforVUDU™service,usetheVUDUInfo & Settingsmenu.
Tochangetheinputnamesthatappearinthe•Activitymenu,seeInputs>Nameoptions,page50.
Toprogramtheremotecontroltooperateother•A/Vdevices,seeAppendixA,“ProgrammingtheRemoteControl,”page68.
ToactivateAudioLocktocontrolanexternalsound•systemwiththeTV’sremotecontrolleftinTVmode.Seepage69.
TocontrolcompatibledevicesusingHDMICEC•control,seeAppendixB,“HDMIControlofCECDevices,”page75.
Toviewstillandmovingdigitalcameraimageson•theTV,see“CameraImagesandMusicFiles,”page31.
153 and 249 Series.• TocontrolA/VdeviceswithNetCommand,seechapter5,“NetCommandIRControlforMostDevices”on(page55).
249 Series.• Seepage37forinternetvideostream-ingwithVUDU™.
Basic TV Operation, continued
Other Information
General Cleaning.• See“CleaningRecommenda-tions,”page78.
Troubleshooting, Service, and Product Support.• SeeAppendixE,page81.
Warranty Information.• SeetheTVwarrantyonpage92.

16
2 TV Connections
Auto Input/Auto Output Sensing
TheTV’sAutoSensingfeatureautomaticallyrecognizesmostconnectionsandpromptsyoutoidentifythetypeofdeviceconnected.Seepage13formoreonAutoSensing.
Connection Types
Usetheconnectiontypesavailableonyourinputdevicesthatwillgivethebestvideoquality.Forexample,chooseHDMIovercomponentvideo,andchoosecomponentvideoovercompositevideo.
Picture Quality
Forbestpicturequality,routesignalsdirectlyfromtheinputdevicetotheTVwheneverpossible.
Surround Sound
Forbestsurroundsoundaudioquality,routeaudioorHDMIcablesfromthesourcedevicedirectlytoyourTV(forSoundProjector)ordirectlytoyourA/Vreceiverifusinganexternalsoundsystem.
IMPORTANTAccessory items such as cables, adapters, splitters, or combiners required for TV connections are not supplied with the TV. These items are available at most electronics stores.
Before You Begin
Cable Management
1
2
Install the cable tie (supplied) in one of
the four mounting holes on the back.
Lock the cable tie in place by pushing the end into the mounting hole.
To remove the cable tie, squeeze the side tabs and pull out.
Sample cable routing. Secure the cable bundle with the release tab facing out.
Press the release tab to loosen the cable tie.
2. TV Connections 17
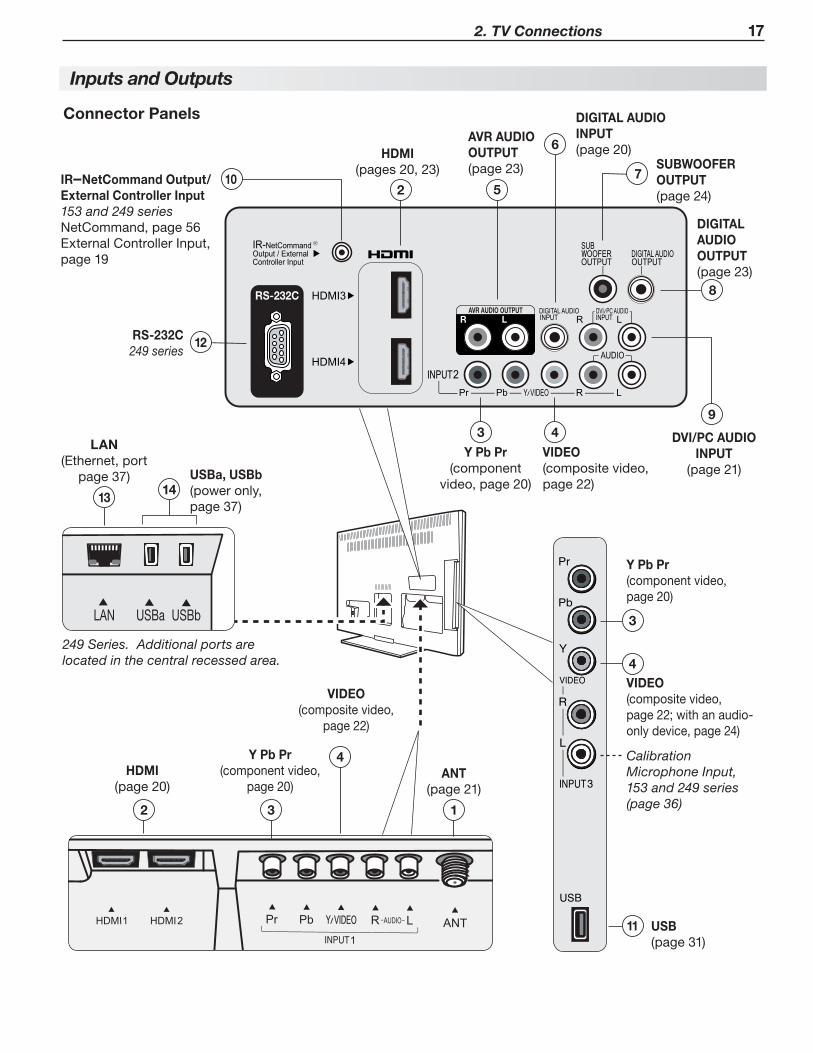
Inputs and Outputs
13
4
14
2
HDMI(page20)
DIGITAL AUDIO OUTPUT(page23)
SUBWOOFER OUTPUT(page24)
IR–NetCommand Output/External Controller Input 153 and 249 seriesNetCommand,page56ExternalControllerInput,page19
VIDEO(compositevideo,
page22)
VIDEO(compositevideo,page22;withanaudio-onlydevice,page24)
Y Pb Pr (componentvideo,
page20)
Y Pb Pr (componentvideo,page20)
ANT(page21)
USB(page31)
USBa, USBb(poweronly,page37)
VIDEO (compositevideo,page22)
Y Pb Pr (component
video,page20)
RS-232CAVR AUDIO OUTPUT
R L
Connector Panels
2
HDMI(pages20,23)
9
DVI/PC AUDIO INPUT
(page21)
AVR AUDIO OUTPUT(page23)
DIGITAL AUDIO INPUT(page20)
5
6
8
10
3 4
7
3
4
11
Calibration Microphone Input,153 and 249 series(page 36)
RS-232C249 series
12
LAN(Ethernet,port
page37)
LAN USBa USBb
13
249 Series. Additional ports are located in the central recessed area.

18 2. TV Connections
Inputs and Outputs, continued
1. ANT (Antenna)Connectyourmainantennaordirectcableservice(nocablebox)toANT.TheANTinputcanreceivedigitalandanalogover-the-airchannelsfromaVHF/UHFantennaornon-scrambleddigital/analogcablesource.
2. HDMI™ Inputs (High-Definition Multimedia Interface)TheHDMIinputssupportuncompressedstandardandhigh-definitiondigitalvideoformats,PCMdigitalstereoaudio,anddigital5.1surroundsound.TheseinputsareHDCP(High-BandwidthDigitalCopyProtection)compliant.
Mitsubishi recommends you use category 2 HDMI cables,alsocalledhigh-speedHDMIcables,toconnectHDMI1.3sourcedevices.High-speedcat-egory2cablesbringyouthefullbenefitsofDeepColorandx.v.Color.
TheTV’sHDMIinputsarecompatiblewithmanyDVI-DandHDMIcomputervideosignals.
UsetheHDMIinputstoconnecttoCEA-861HDMIcompliantdevicessuchasahigh-definitionreceiverorDVDplayer.Theseinputssupport480i,480p,720p,1080i,and1080pvideoformats.
TheseHDMIinputscanalsoacceptdigitalDVIvideosignals.Toconnectadevice’sDVIoutputtotheTV’sHDMIinput,useanHDMI-to-DVIadapterorcableplusanalogaudiocables.ConnecttheanalogaudiocablestotheDVI/PC INPUT AUDIOjacksontheTVtoreceiveleftandrightstereoaudiofromyourDVIdevice.
3. Y Pb Pr (Component Video)Connectdeviceswithcomponentvideooutputstothisjack.UsetheadjacentAUDIO RandLjacksifyouwishtosendaudiototheTV.
4. VIDEO (Composite Video)ConnectaVCR,DVDplayer,standardsatellitereceiver,orotherA/VdevicetotheTV.UsetheadjacentAUDIO RandLinputsifyouwishtosendaudiototheTV.
5. AVR AUDIO OUTPUTUseAVR AUDIO OUTPUTtosendanalogaudioofthecurrentprogramtoananalogA/Vsurroundsoundreceiverorstereosystem.DigitalaudiofromdigitalchannelsandHDMIdevicesisconvertedtoanalogaudiobytheTVforoutputonthisjack.ThisistheonlyaudioconnectionneededtotheTVifusingananalogA/Vreceiverorstereosystem.
Headphones.Thesejackscanalsobeusedforhead-phonesthatacceptstandardlinelevelaudiosignals.Anadaptermaybeneeded.
6. DIGITAL AUDIO INPUTThisinputsendsdigitalsurroundsoundtotheTV’sspeakerarrayfromadevice,suchasaDVDplayer,connectedtoINPUT 2.
7. SUBWOOFER OUTPUTConnectapoweredsubwoofertocomplementSoundProjectorspeakereffects.
8. DIGITAL AUDIO OUTPUTThisoutputsendsDolbyDigitalorPCMdigitalaudiotoyourdigitalA/Vsurroundsoundreceiver.Incom-inganalogaudioisconvertedbytheTVtoPCMdigitalaudio.IfyouhaveadigitalA/Vreceiver,inmostcasesthisistheonlyaudioconnectionneededbetweentheTVandyourA/Vreceiver.
9. DVI/PC AUDIO INPUTWhenconnectingaDVIdevicetooneoftheTV’sHDMIinputs,usethesejackstosendleftandrightanalogaudiototheTV.
HDMI Cable Categories
HDMIcablesareavailableasCategory1andCategory2types.
Category 2 Cables• (alsocalledhigh-speedHDMIcables).Newer,HDMI1.3-compliantDVDplayers,videogames,andset-topboxesrequireCategory2cables,suitableforclockfrequenciesupto340MHzordataratesofupto10.2gigabitspersecond.Usecategory2cablesforhigh-speed1080pHDsignalscarryingextendedcolorencodings(i.e.,30ormorebits,alsocalledDeepColor).Category2cablesarealsosuitableforstandardHDTVsignals.
Category 1 Cables• (alsocalledstandardHDMIcables).Category1cablesmaybeunmarked.TheyaresuitableforstandardHDTV720p,1080i,and1080psignalswith8-bitcolordepth.Usecategory1cablesforclockfrequenciesupto74.25MHzordataratesofupto2.23gigabitspersecond.

2. TV Connections 19
Inputs and Outputs, continued
10. IR–NetCommand Output/External Controller Input153 and 249 Series.UseanIRemittercablewiththisjacktosendcontrolsignalstoexternalIRremote-con-trolleddevices.Alternatively,yourprofessionalinstallercanusethisjackastheinputforanexternalcontroller.
ConnecttothisjackandwhentheNew Device Foundscreenappears,selectoperationofthejackaseitheraninput(foranexternalcontroller)orasanoutput(forNetCommandIRcontrol).Seepage56.
11. USBTheTVcanreadJPEGphotofilesandmp3musicfilesfromaUSBdevice.
12. RS-232C249 Series.UsetheRS-232Cinterfacetoreceivecontrolsignalsfromcompatiblehome-theatercontroldevices.Seewww.mitsubishi-tv.comforalistofcontrolsignalsforthisinterface.
13. LAN249 Series.UsetheLANEthernetjackforstreaminginternetvideototheTV.Seepage37forsetup.Visitwww.VUDU.comfordetailsaboutVUDU™service.
14. USBa, USBb249 Series.StandardUSB5-volt,500-milliamppoweroutputsyoucanusetosupplypowertoanaccessorydevice.ForusewiththeVUDUwirelessadapter,seepage37.

20 2. TV Connections
HDMI DeviceHDTV Cable Box, Satellite Receiver, DVD/Blu-ray PlayerSuitable for use with Sound Projector surround sound
Required:HDMI-to-HDMIcable.
ConnectanHDMIcablefromtheTVbackpaneltotheHDMIdeviceoutput.HDMIdevicesprovidevideoandaudiothroughthesinglecable.ThisconnectionsendsdigitalsurroundsoundfromthesourcedevicetotheTV’sspeakerarray.
Mitsubishirecommendsyouusecategory2(high-speed)HDMIcablestoconnectHDMI1.3sourcedevices.High-speedcategory2cablesbringyouthefullbenefitsofDeepColorandx.v.Color.See“HDMICableCategories”onpage18formoreonHDMIcabletypes.
AVR AUDIO OUTPUTR L
Pb YPrAUDIO OUTVIDEO OUT
LR
TV
Any device with HDMI output
HDMI-to-HDMI cable
Y Pb Pr Component Video DeviceHDTV Cable Box, Satellite Receiver, DVD/ Blu-ray Player
Suitable for use with Sound Projector surround sound.
IfyoursourcedevicehasanHDMIoutput,usetheconnectionsforHDMIdevicesdescribedonthispageinsteadofcomponentvideo.
Required:1. RCA-typecomponentvideocables2. Audiocable(s)
2a.Digitalaudiocable or2b.Left/rightanalogstereoaudiocables.
Note:ToheardigitalsurroundsoundfromtheTV’s•SoundProjectorspeakerarray,connectthedigitalaudiooutputfromthedevicetotheTV’sDIGITAL AUDIO INPUTjack.
Toheardigitalsurroundsoundfromanexternal•soundsystem,connectthedigitalaudiooutputfromthedevicedirectlytoyourdigitalA/VreceiverinsteadoftheTV.
AVR AUDIO OUTPUTR L
Pb PrY/ VIDEO
– AUDIO –LR
Pb YPrAUDIO OUT
DIGITAL AUDIO OUTVIDEO OUT
LR
Incoming from cable service or
satellite dish
Any device with component video output
TV
1.
2a.
2b.
or
CABLE IN or SATELLITE IN

2. TV Connections 21
DVI Video DeviceCable Box, Satellite Receiver, DVD PlayerConnectDVIdevices(digitalonly)totheTV’sHDMIinputjacks.
Required:1. DVI-to-HDMIcableorDVI/HDMIadapterandHDMI
cable2. Left/rightanalogaudiocables.
Somedevicesrequireconnectiontoananaloginputfirstinordertoviewon-screenmenusandtoselectDVIastheouput.Pleasereviewyourequipmentinstruc-tionsforDVIconnectivityandcompatibility.
Note: TheHDMIconnectionsupportscopyprotection(HDCP).
AVR AUDIO OUTPUTR L
Pb YPrAUDIO OUTVIDEO OUT
LR
DVI OUTANALOG
AUDIO OUTR
L
TV1.
Any device with DVI output
2.
Antenna or Cable TV ServiceConnecttheincomingcabletotheTV’sANTinput.
ANT
INOUT
Cable TV service
UHF antenna
VHF antenna
TV
Not recommeded. Other connection types provide
better quality audio and video.
Dire
ct c
able
(no
cabl
e bo
x)
or
or
Older cable
box
300-ohm-to75-ohm combiner
(side view)
AVR AUDIO OUTPUTR L
AUDIO OUT
COMPOSITE VIDEO OUT
L
R
AUDIOR L
TV
1.
2.
VCR or other
device with composite
video output
Composite Video DeviceVCR or other device with composite video outputRequired:1. Compositevideocable(usuallyyellow)2. Analogstereoaudiocables.

22 2. TV Connections
VCR or DVD Recorder to an Antenna or Wall Outlet Cable
Required:1. Videocables
1a. Componentvideocables(red/blue/green) or1b. Compositevideocable(usuallyyellow)
2. Left/rightanalogaudiocables.
3. Two-wayRFsplitter
4. Twocoaxialcables
Note:
Usecompositevideoonlyifcomponentvideoor•HDMIareunavailable.ForanHDMIconnectionbetweentheTVandrecorder,seepage20.
Ifyourrecordingdevicehasananalog-onlytuner,•youmustuseadigitalconverterboxtoenablerecordingofdigitalbroadcasts.
AVR AUDIO OUTPUTR L
1 2 3
HDMI
AVR AUDIO
OUTPUT
L
R
PbY/ VIDEO Pr
Pb Pr
INP
UT
2IN
PU
T 1
DIGITALAUDIO
OUTPUT
DVI/PC
AUDIO (480i / 480p / 720p / 1080i)LR
LRINPUT
AUDIO
Y/ VIDEO
3DGLASSESEMITTER
ANT
IR-NetCommand Output
R
ANT
Y/ VIDEO
AUDIO OUTCOMPOSITE VIDEO OUT COMPONENT
VIDEO OUTLR ANTENNA
IN
TV
1a. 2.
3.
4.
4.
1b. or
DVD Recorder or VCR
Incoming cableRF Splitter
VCR or DVD Recorder to a Cable Box Required:. Videocables
1a. Componentvideocables(red/blue/green) or1b. Compositevideocable(usuallyyellow)
2. Left/rightanalogaudiocables.
3. Two-wayRFsplitter
4. Threecoaxialcables
5. VideoandaudiocablesrequiredtoconnecttheTVtothecablebox.
Notes: UsecompositevideoifonlyifcomponentvideoorHDMIareunavailable.ForanHDMIconnec-tionbetweentheTVandrecorder,seepage20.
Whenusingthisconnectionconfiguration,itispossibletoviewlivecableprogramsthroughtherecordingdevice.ForbestpicturequalityalwaysviewlivecableprogramsdirectlyfromtheTVinputconnectedtothecableboxdevice.
1 2 3
HDMI
AVR AUDIO
OUTPUT
L
R
PbY/ VIDEO Pr
Pb Pr
INP
UT
2IN
PU
T 1
DIGITALAUDIO
OUTPUT
DVI/PC
AUDIO (480i / 480p / 720p / 1080i)LR
LRINPUT
AUDIO
Y/ VIDEO
3DGLASSESEMITTER
ANT
RS-232C
IR-NetCommand Output
R
ANT
Y/ VIDEO
AUDIO OUTCOMPOSITE VIDEO OUT COMPONENT
VIDEO OUTLR
INOUT
ANTENNA IN
Cable Box
TV
1a. 2.
5.
3.
4.
4.
4.
1b. or
DVD Recorder or VCR
Incoming cable
RF Splitter
Audio and video from cable box directly to TV

2. TV Connections 23
A/V ReceiverMostsetupsrequireeitheradigitalaudiocableoranalogstereoaudiocables.TosendaudiofromTVchannelsreceivedontheANTinputordevicescon-necteddirectlytotheTV,youmustuseoneoftheconnectionsshownbelow.Usually,onlyoneoftheseconnectionsisrequired.
TheTVmakesallaudioavailableindigitalandanalogformats:
AnalogaudiocomingintotheTVisavailableas•outputindigitalstereoformatontheDIGITAL AUDIO OUTPUTjack.
Digitalincomingaudioisavailableasanalogoutput•ontheAVR AUDIO OUTPUT L andRjacks.
AVR AUDIO OUTPUTR L
AVR AUDIO OUTPUTR L
AUDIO OUT
COMPOSITE VIDEO OUT
L
R
COAXIAL INPUT
OPTICAL INPUT
COAXIAL INPUT
AUDIOR L
TV
or
Digital coaxial cable (for a digital A/V receiver)
Stereo analog cables(for an analog A/V
receiver)
A/V receiver back panel
Note:
Onrareoccasions,anHDMIsignalmaybe•copy-restrictedandcannotbeoutputfromtheTVasadigitalsignal.Tohearthesecopy-protectedsignalsthroughtheA/Vreceiver,usetheconnectionforananalogA/Vreceiver.
ChecktheA/Vreceiver’sOwner’sGuidefor•informationconcerninguseofthedigitalinputandswitchingbetweendigitalsoundandanalogstereosoundfromtheTV.
A/V Receiver with HDMI OutputRequired:OneHDMI-to-HDMIcable
ThisoptionallowsyoutoviewcontentfromdevicesconnectedtoanA/VreceiveroverasingleHDMIcablegoingtotheTV.TheHDMIcablecantransmitbothaudioandvideototheTV.
YoucanuseanHDMIconnectionasdescribedhereinadditiontoanaudioconnectionfromtheTV’saudiooutput.Theoptionalaudioconnectionallowsyoutohear,throughtheA/Vreceiver,devicesconnectedtotheTVonly,e.g.,anantennaontheANTinput.
YoumaybeabletousetheTV’sremotecontrol(inTVmode)tooperateconnectedCEC-enabledHDMIdevices.ExperimentwithyourequipmenttodeterminewhichfunctionsareavailabletotheTV’sremotecontrol.SeeAppendixB,page75.
153 and 249 Series:ThissetupallowsyoutouseNetCommand-controlledaudioandvideoswitchingovertheHDMIcable.See“Case3:AutomaticAudioandVideoSwitchingviaHDMI”onpage65.
TouseNetCommandtosupplementHDMIcontrolofaCEC-enabledA/Vreceiver,notetherecommendationsunder“MoreAboutUsinganHDMIConnection,”page65.
AVR AUDIO OUTPUTR L
HDMI OUT DIGITALAUDIO INANALOG AUDIO IN
L R
High-definition DVD player DVD player
Cable box
VCR
AUDIOR L
TV
A/V receiver with HDMI output
Any connection types
Optional analog or
digital audio connection
HDMI cable

24 2. TV Connections
Subwoofer
Required:AudiocablewithRCA-styleplug
AVR AUDIO OUTPUTR L
AUDIOR L
TV
Subwoofer
L
R
Y
VIDEOAudio-only device
Unused RCA-style plug
(plug in first)
Audio-Only Device
KeepanunusedRCA-stylecon-nectorintheY/VIDEOjackwhileusinganaudio-onlydevicesuchasanMP3orCDplayer.
25
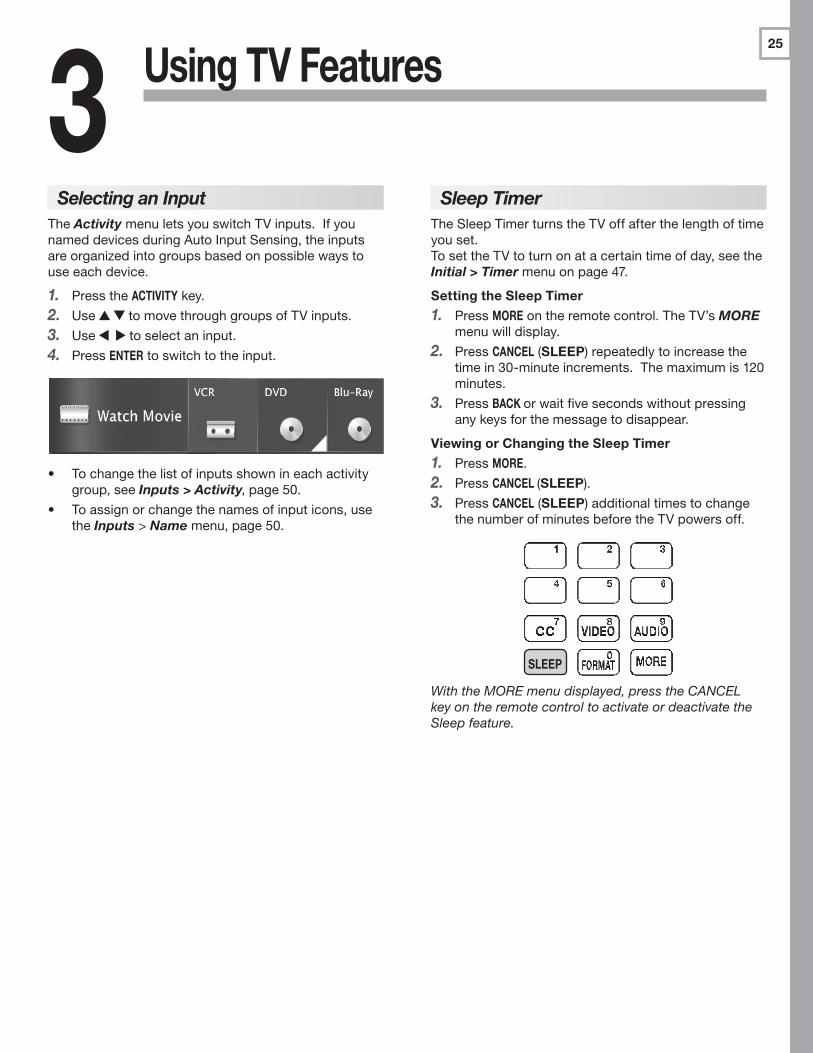
Using TV Features3Selecting an Input
TheActivitymenuletsyouswitchTVinputs.IfyounameddevicesduringAutoInputSensing,theinputsareorganizedintogroupsbasedonpossiblewaystouseeachdevice.
Pressthe1. ACTIVITYkey.
Use2. tomovethroughgroupsofTVinputs.
Use3. toselectaninput.
Press4. ENTERtoswitchtotheinput.
Tochangethelistofinputsshownineachactivity•group,seeInputs > Activity,page50.
Toassignorchangethenamesofinputicons,use•theInputs>Namemenu,page50.
Sleep TimerTheSleepTimerturnstheTVoffafterthelengthoftimeyouset.TosettheTVtoturnonatacertaintimeofday,seetheInitial > Timermenuonpage47.
Setting the Sleep Timer
Press1. MOREontheremotecontrol.TheTV’sMOREmenuwilldisplay.
Press2. CANCEL(SLEEP)repeatedlytoincreasethetimein30-minuteincrements.Themaximumis120minutes.
Press3. BACK orwaitfivesecondswithoutpressinganykeysforthemessagetodisappear.
Viewing or Changing the Sleep Timer
Press1. MORE.
Press2. CANCEL (SLEEP).
Press3. CANCEL(SLEEP)additionaltimestochangethenumberofminutesbeforetheTVpowersoff.
SLEEP
With the MORE menu displayed, press the CANCEL key on the remote control to activate or deactivate the Sleep feature.

26 3. Using TV Features
ChannelView Channel Listings
ChannelView. Programs for the tuned channel are listed on right side of screen.
ChannelView™showsmemorizedchannelsontheANTinput.Itdisplayschannelnamesandprograminforma-tionfordigitalchannelsassentbybroadcastersoryourlocalcableserviceprovider(informationmaybeincom-plete).Noprograminformationisdisplayedforanalogchannels.
Note: YoumustsettheTVClock(page47)toreceiveChannelViewlistingsforthecurrentchannel.
Using ChannelView
Feature Instructions
Receiveupdatesforadigitalchannel.
Press1. tohighlightachannelnumber.Pressthe2. INFOkey(thescreenmaybrieflygoblank).
Display/hideChannelViewlistingsfromtheANTinput.
GUIDE
Scanchannelsonebyone. Hold or .
Scanchannelsquickly. HoldPAGE UP/PAGE DN
Jumptolistingsforaspe-cificchannel.
Enterthechannel1. number.Press2. ENTER.
Seemoreoftheprogramdescriptionforthecurrentchannel(ifavailable).
INFO
Tunetothehighlightedchannel.
ENTER
Redirecting Audio Output
Selecting an Audio Output Device
Press1. MOREandthen 9 (AUDIO).
Press2. toshowtheSpeakersoption.TheSpeak-ersoptionwilldisplayonlyifthereisarecognizedaudiodeviceonanaudioorHDMIoutput.
Press3. toselecteitherAV Receiver, Head-phones,orTV.
Adjusting an External Subwoofer
Playsamplevideoormusiccontaininglow-fre-1. quencybasssound.
Press2. MOREandthen9(AUDIO).Use todisplaytheSubwooferoption.
With3. SubwoofersettoOn,pressENTERtodisplayasliderforvolume.
Press4. toadjustthesubwoofervolumelevel.
Disconnecting an Analog A/V ReceiverWhenyoudisconnectananalogA/Vreceiver,changetheSpeakerssettingtoTVtohearsoundfromtheTVspeakers.Changethesettingusingtheremotecon-trol’sMORE> 9(AUDIO )keyortheAdjust> Audio > Speakersmenu.
Controlling A/V Receiver Volume
With a Standard TV SetupRecommended Method:• ProgramtheTV’sremotecontrolforyourA/VreceiverandenabletheAudioLockfeature.Seepage69.
ProgramtheTV’sremotecontrolforyourA/V•receiverandsettheTVremotecontrol’smodetoAUDIO.ReturnthecontrolmodetoTVtocontroltheTV.
UsetheremotecontrolthatcamewiththeA/V•receiver.
With HDMI Control (CEC-Enabled HDMI A/V Receiver)TheTV’sremotecontrolmaycontrolsomefunctionsoftheA/Vreceiver.SeeAppendixB,“HDMIControlofCECDevices,”page75.
With NetCommand IR Control153 and 249 Series.SetupNetCommandcontroloftheA/Vreceiver’svolumefunctionsintheInputs>AVRmenu.TheTV’sremotewillthencontrolA/Vreceivervolume.Seepage62.

3. Using TV Features 27
PresstheINFOkeytoseetheon-screenstatusdisplay.Themostcommondisplaysareshownhere.
Sample information from the on-screen
status display
1. CurrentInput
2. AudioIndicator.Key:
TVspeakers Externalsoundsystem
Headphones Mute
3. Channelnumber(antennasourceonly)Digitalchannelincludesmajorandsub-channelnumbers.
4. Digitalchannelname(ifbroadcast);antennasourceonly.
5. V-ChipratingAntennasourceonlyfordigitalsignal•Antennaor• VIDEOcompositejackforanalogsignal
6. Programname(ifbroadcast);digitalsourceonly
7. Programdescription(ifbroadcast);digitalsource,antennaonly.PresstheINFOkeyadditionaltimestoseemoreofthedescription.
8. SleepTimerremainingtime
9. Dayandtime
10. Signaltypebeingreceived
11. Screenformatinuse
12. Program Audioindicator(antennasourceonly)Digit• alsource:Stereo,SurroundAnal• ogsource:Stereo,StereoSAP,SAP
13. Availablelanguage(digitalsource,antennaonly)
14. Signal-strengthindicator(digitalsource,antennaonly)
Status Display
INFOAbout Channel NumbersChannel Numbers for Over-the-Air Reception or Reception by Direct Cable
Note: Allsignalsareautomaticallyconvertedto1080pfordisplay.
Standard-Definition Analog Channels
Cable 3
480i Stretch
Receiving Standard-Definition Analog Signal (480i)
Cable Reception Channel 3
Standard-Definition Digital Channels
Ant 7-1 KABC-SD
SD 4:3 Stretch
Receiving Standard-Definition Digital Signal (SD)
Over-the-AirAntenna Reception
Main Channel 7Sub-Channel 1
High-Definition Digital Channels
Ant 7-1 KABC-HD
HD 16:9 Stretch
Receiving High-Definition Digital Signal (HD)
Over-the-AirAntenna Reception
Main Channel 7Sub-Channel 1
402-101 KABC Monday Night FootballTV-PG DLSV St. Louis vs. Tampa Bay, played in Tampa for
13
2
4 6
7
Sleep 30 min813
14
Tuesday 9:10 PM Surround English
HD 1080i Standard
12
1110
9
5

28 3. Using TV Features
TV Signals and Display Formats
Signal Definitions480i:OldertypeofinterlacedsignalsfromtheANTinput,compositeVIDEO,componentY Pb Pr,orHDMIjacks.
480p:Progressive-scanDVDsignalsoncomponentY Pb ProrHDMIjacks.
720p and 1080i:High-definitionsignalsreceivedthroughcomponentY Pb Pr orHDMIjacks.Thesesignalsarealways16:9(widescreen).
1080p:High-definitionsignalsfromaPCorBlu-rayplayer,HDMIinputsonly.
SD 4:3:Standard-definitionsquarish-screen-formatsignalsfromdigitalchannelsontheANTinput.
SD 16:9: Standard-definitionwidescreen-formatsignalsfromdigitalchannelsontheANTinput.
HD 16:9:High-definition16:9widescreensignalsfromdigitalchannelsontheANTinput.
Thisisa16:9widescreenTVsuitableforimagesavailablefromHDTVandmanyDVDs.Youcanviewolder-style,squar-ishimages(4:3aspectratio)usingoneofthedisplayformatsdescribedonthispage.PresstheMOREkeyandthenthe0key(FORMAT)tocyclethroughavailabledisplayformats.TheTVrememberstheformatyoulastusedforeachinput.
DVD Image DefinitionsImageinformationmaybestatedontheDVDcase.SomeDVDssupportbothformatsdescribedbelow.
Anamorphic (or Enhanced for WideScreen TV). IndicatesDVDsrecordedtoshowwidescreenimagesproperlyon16:9TVsetsusingtheTV’sStandardformatmode(recommended).
Non-Anamorphic (or 4:3, 1.33:1, Letter Box, or Full Screen). IndicatesDVDsrecordedforviewingonsquarishTVscreens.Theymaybefullscreen(4:3or1.33:1)whichcropsmoviestofitthenarrowTV,orletterbox,whichaddsblacktopandbottombars.
TV Display Format DefinitionsStandard: Thefull-screenformatusedbyHDTVsignals.UsethisformattodisplayanamorphicDVDswitha1.78:1or1.85:1aspectratio.AnamorphicDVDswitha2.35:1aspectratioaredisplayedcorrectlybutwithtopandbottomblackbars.Squarish(4:3)imagesarestretchedevenlyfromsidetoside.Availableforallsignals.
Expand:Enlargesthepicturetofillthescreenbycroppingthetopandbottom;usefulforreducingtheletterboxtopandbottombarsofnon-anamorphicDVDimages.
Zoom: Enlargesthepicturetofillthescreenbycroppingthesides,top,andbottomtoeliminateblackbars.
480i/480p and SD 4:3 signals:• EliminatestopandbottombarsonanamorphicDVDswitha2.35:1aspectratio.720p, 1080i, SD 16:9, and HD signals:• Eliminatesbarsaddedtosquarish4:3images.
Stretch:Stretchessquarish4:3imagesacrossthescreentodisplaytheentireimagewithlessdistortionthanStan-dard.
Stretch Plus: SimilartoStretch,butminimizesdistor-tiononthesidesbyexpandingthepicturetocropoffportionsofthetopandbottom.Use toadjusttheverticalpositionofthepicture.
Narrow: Displaysnarrow4:3imagesintheiroriginalshape.Addsblacksidebarstofillthescreen.
Wide Expand: Enlargesthepicture,croppingtheimageonbothsides.Removesorreducesblacksidebarsaddedtonarrowimagesconvertedto16:9signalsfordigitalbroadcast.
Note:Allhigh-definitionchannelssendwidescreen(16:9)signals,butnotallprogrammingwascreatedforthewidescreenformat.Thebroadcastermaystretchtheimageoraddsidebarstofillthewidescreenarea.
Full Native:Displaysallpixelsintheoriginalimage
Non-anamorphic or SD 4:3 Anamorphic DVD
Standard Distorted.Notrecom-mended.
Recommended
Expand Recom-mendedforletterbox.SeeNote1.
Distorted;notrecommended.SeeNote1.
Zoom Distorted.Notrecom-mended.SeeNote1.
Recommendedforanamorphic2.35:1images.SeeNote1.
Stretch Recom-mendedforstandardbroadcasts.SeeNote1.
Distorted;notrecommended.SeeNote1.
Stretch Plus
Recom-mendedforstandardbroadcasts.SeeNote1.
Distorted;notrecommended.SeeNote1.
Narrow SeeNote1 Distorted;notrecommended.SeeNote1.
Note 1: Availablefor480i,480p,anddigitalSD4:3signalsonly.
Original Signal Display Formats
SD 16:9 or HD Digital 720p, 1080i, 1080p Signal
Wide Expand
Recommendedtore-movesidebars.
Zoom Recommendedtore-movebarsfromthetop,bottom,andsides.
(except720p)
Full Native
Bestforcomputerorgameimages(compo-nentandHDMIonly)
TV Display Formats. Press MORE and then 0(FORMAT)to see the displays available for the current program. Press INFO to see the name of the display format in use.
Original Signal
TV Display

3. Using TV Features 29
Connecting a Computer to the TVUseoneoftheconnectionmethodslistedbelowbasedonyourcomputer’svideooutput.
Computer Video Output
Video ConnectionAudio
Connection
Digital DVI DVI-to-HDMIcableoranHDMIcablewithanHDMI-to-DVIadapter
Stereoaudiocables
Note:Ifthecomputer’saudiooutputisasingleminijack,aminiaudio-to-RCA-male“Y”adaptercableisalsorequired.
HDMI HDMI-to-HDMIcable
Noadditionalaudioconnec-tionisrequired.
IMPORTANTThis TV accepts digital computer signals only.
Connectthecomputer’sdigitalsignaloutputtoone1. oftheTV’sHDMIjacks.Seetheconnectiondia-gramsforthemethodsuitedtoyourequipment.
Connectthecomputer’saudiooutputusingoneof2. theseoptions:
• FordigitalDVIsignals,connectanalogleft/rightaudiototheTV’sDVI/PC INPUT AUDIO jacks.
• ForHDMIsignals,noadditionalaudioconnec-tionisrequired.
PowerontheTVandcomputer.TheTVwilldetect3. theconnectionanddisplaytheNew Device Foundscreen.
Inthe4. New Device Foundscreen,press tohighlightPCinthelistofdevicetypes.Itisimpor-tanttousethenamePCsothattheTVprocessesthevideosignalcorrectly.
Press5. BACKtoclosetheNew Device Foundscreen.
AVR AUDIO OUTPUTR L
TV
Computer with HDMI audio and video output
An HDMI-to-HDMI connection carries all video and audio on a single cable.
AVR AUDIO OUTPUTR L
AVR AUDIO OUTPUTR L
DVI OUTAUDIOOUT
R L
TV
HDMI-to-DVI cable
Analog audio cables
Computer with DVI and analog audio outputs
A DVI connection from a personal computer requires a separate audio connection.
Note: Ifyourcomputerprovidesdigitalaudioout-put(coaxialoroptical),youcanconnectitdirectlytoadigitalA/VreceiverandbypasstheTV.
Using the TV with a Personal Computer

30 3. Using TV Features
Tip
Setthecomputer’sscreensavertodisplayapatternafterseveralminutesofinactivity.ThisactsasareminderthattheTVispoweredon
Computer Video Adjustments
Poweronthecomputer.1. Select2. PCfromtheActivitymenu.Todothis,pressACTIVITYtoopentheActivitymenu,movethehighlighttothePCicon,andpressENTER.
Workingfromthecomputer,changetheresolution3. ofthecomputerimage.ViewthecomputerimageontheTVandmaximizethecomputerresolutionwhilemaintainingasuitableaspectratiofortheimage.
PerformTVvideoadjustments.4. PressMOREthenpress8(VIDEO)repeatedlytoaccessvideo-adjustmentoptions.
Press5. MOREthenpress0(FORMAT)repeatedlytofindthepictureformat(aspectratio)bestsuitedtotheimage.SeethechartonthispageshowinghowdifferentcomputerresolutionscanbedisplayedontheTV.
Image ResolutionYourMitsubishiTVcandisplaytheresolu-tionsshowninthechartfromstandardVGA(640x480)through1920x1080signalsatarefreshrateof60Hz.
Inmostcases,thecomputerwillselectthebestresolutionmatchtodisplayontheTV.Youcanoverridethissettingifyouwish.Refertoyourcomputeroperatingsystem’sinstructionsforinformationonchangingthescreenresolution.
Youmayneedtorestartthecomputerforchangestotakeeffect.
Using the TV with a Personal Computer
Distortion in Computer Images
Computerimagesmayshowdistor-tionwhenviewedontheTV,e.g.,linesthatshouldbestraightmayappearslightlycurved.
Computer Display FormatsPressMOREthenpress0(FORMAT)repeatedlytocyclethroughtheTVdisplaysavailableforyourcomputer’svideosignal.
Computer Signal As Displayed on TV Screen
Original Format4 X 3
Standard16 X 9
StandardZoom
VGA640X480
WVGA848X480
SVGA800X600
WSVGA1064X600
Original Format Standard Zoom
XGA1024X768
PC720p1280X720
WXGA1360X768
SXGA1280X1024
Original Format Standard
PC1080p1920X1080

3. Using TV Features 31
The USB Media Player Menu
Displaying the Menu
BackupthedataonyourUSBdrivebeforecon-1. nectingittotheTV.Mitsubishiisnotresponsibleforanyfiledamageordataloss.
ConnectyourUSBdrivetotheTV’sUSBport.2. TheUSB Media Playermenudisplayswhilefilesarebeingread.WaituntilthePlayiconappearshighlightedandinfullcolor.
The TV can read photo and music files from the USB port.
AVR AUDIO OUTPUTR L
AUDIOR L
DVI OUTANALOG
AUDIO OUTR
L
FromtheUSBMenuyoucan:3.
Activateanyofthemenuoptions
HighlightaniconandpressENTER.
DisplaytheActivitymenu.
PressACTIVITY. Pressagaintoclear.
Displaythemainmenu.
PressMENU. Pressagaintoclear.
Displaystatusforthefilesource.
PressINFO. PressBACKtoclear.
ToresumeuseoftheUSBportafterswitchingthe4. TVtoadifferentinput,pressACTIVITY,chooseView Photos,andselecttheUSBport.
Playing a Slide Show or PlaylistUsethesekeyswhileplayingaslideshoworplaylist.
orENTER
Replaystheslideshoworplaylist.
Pausesaslideshoworplaylist.
Stopsaslideshoworplaylist.
Displaysthepreviousornextslide.Playsthepreviousornexttrack.
GUIDERotatesanimageclockwisein90˚incre-ments.
BACK DisplaystheUSB Media Playermenu.
MENU Displaysthemainmenuandstopsplay.
ACTIVITY DisplaystheActivitymenuandstopsplay.
INFODisplaysslidenameortrackname.PressBACKtoclear.
IMPORTANTAlways stop playback with (STOP)or change to a different TV input before disconnecting your USB device.
TheTVcanreadphotoormusicfilesfromaUSB•drive.PhotosmustbeinJPEGformatandmusicfilesmustbeinmp3format.Toplaymusicfileswhiledisplayingaphotoslideshow,see“USBMediaSetupMenu”onthenextpage.
TheTVcandisplayfilesofstillormovingimages•fromacamerathroughtheY/VIDEOport.
Camera Images and Music Files
The TV can read JPEG files as created by the camera. If you edit a picture file on a computer and resave the image, the TV may be unable to read the resaved file.

32 3. Using TV Features
Thumbnail and Playlist Menus
JPEG Thumbnail Menu
UsethesekeyswhileviewingJPEGthumbnailimagesorthemusictracksinaplaylist.
Movesthehighlightfromitemtoitem.
GUIDERotatesathumbnailclockwisein90˚increments
orENTER
Playstheslideshoworplayliststartingwiththehighlighteditem.
Selectsthelastitemonthecurrentpage.
Selectsthefirstitemonthecurrentpage.
PAGE UP/DN
Displaysthenextorpreviouspageofitems.
BACK DisplaystheUSB Media Playermenu.
MENU Displaysthemainmenu.
ACTIVITY DisplaystheActivitymenu.
Notes on Using the USB Port
• TheTVignoresallcommandswhilereadingfiles.WaituntilthePlayiconappearshighlightedandinfullcolorbeforecontinuing.
• Largefilesorhigh-capacitystoragedevicesmaytakealongtimetodisplay.
• TheTVcanreadfilesupto10MBinsizewithamaximumof2,500filesstoredonthedevice.TheFAT16orFAT32filesystemisrecommended.
• UseaUSBdriveinsteadofacardreader.
• BackupthedataonyourUSBdrivebeforecon-nectingittotheTV.Mitsubishiisnotresponsibleforanyfiledamageordataloss.
• Somemanufacturers’devicesmaybeincompat-iblewiththeTV.IftheTVisunabletodisplayyourphotos,youcan:
Transfer- filestoadifferentUSBdrive.Useyourdigitalcamera’scompositevideo-output.Seepage33.
USB Media Setup Menu
UsetheUSBMedia Setupmenusetupplayofaslideshoworplaylist.
• IfJPEGimagefilesandmp3filesareontheUSBdevice,choose:
Slideshow + Music-Slideshow-Music only-
Slideshow.• SelecteitherAutoorManualadvancefortheslideshow.Duringmanualoperation,pressENTERtoadvancetothenextslide.
Interval.• Forautomaticadvance,selectthetimeintervalfordisplayofeachslide.Theintervalyouselecthereistheminimumtimebetweenslides;actualtimemaybelongerforlargerfiles.
Frequency.• Forautomaticadvance,selectthenumberoftimes(frequency)toplaythecompleteslideshowand/orplaylist:Once,Twice,orContinuous.
Press• BACKtoclosetheMedia SetupmenuandreturntotheMedia Playermenu.
Picture Files Compatible with the USB Port
• StillimagesrecordedondigitalcamerasusingtheExchangeableImageFileFormat,version2.1(EXIF2.1)standardfordigitalstillcamerasandDesignRulesforCameraFileSystemsversion1.0(DCF1.0)
• Someimagesopenedandresavedonacomputermaynotplaybackormaynotdisplayinthethumb-naillist.Thishappensifthefileswereresavedinanincompatibleformat.
• Fullpathfilenamescanbenolongerthan50char-actersandmustendina.jpgextension.Onlythefirst20ofthe50characterswilldisplay.
Camera Images and Music Files, continued

3. Using TV Features 33
Photos and Moving Video as Composite VideoConnectthecameratotheTVusingacompositevideocableif:
• YouareunabletoseeimagesusingtheUSBport.• Youwishtoviewmovingvideofromthecamera.
ControltheslideshowormoviethroughthecameraastheTV’sUSB Media Playermenuwillbeunavailable.Thedisplayresolutionwillbestandard-definition(480i).
Refertotheowner’smanualsuppliedwiththe1. cameraforinstructionsneededforthissetup.
Setthecamera’soutputsignaltypeto2. NTSCandputthecameraintoplaybackmode.
Withthecamerastillturnedon,connectyourdigital3. camera’scompositevideocable(usuallyyellow)totheTV’sY/VIDEOjack.Tohearaudio,connectthecamera’saudiooutputcabletotheAUDIOLjack.
AUDIOR L
DVI OUTANALOG
AUDIO OUTR
L
Optional Audio Cable
Camera connection using a composite video cable
Whenthe4. New Device Foundscreendisplays,assignthenameCamcorder.
Press5. BACKtoclosetheNew Device Foundscreen.
Press6. ACTIVITY,selectWatch Movie > Cam,andpressENTER.
Ifviewingphotos,advancethroughtheimages7. manuallyorsetthecameratoadvanceautomati-cally.

34 3. Using TV Features
Sound Projector TechnologyTheTV’sbankofspeakerscanbeadjustedtoreflectsoundofftheroomwallstocreateasurroundsoundeffect.
Setupcanbeperformedmanuallyand/orautomatically,dependingonyourTVmodel:
Manualsetuponly 151series
ManualorAutosetup 153and249series
Tocreatethesurroundsoundeffect,theroomwalls•mustreflectsoundandnotbecoveredwithsound-absorbentmaterial.
Repeatthesetupprocedureifyoureconfigurethe•room’swallsorfurnishings.
Before You Begin
Positioning the TV
CentertheseatingareainfrontoftheTVandat•leastsixfeetawayfromit.
Arrangementsthatgivegoodresults:•
Iftheroomisanoddshape,locatetheTVtotake•bestadvantageofwallreflections.
Avoidlocationsthatmaydistortsoundreflections.•
Connecting the TV
TogetthefullbenefitoftheTV’sSoundProjector,theTVmustbeconnectedtoasourceinputprovidingdigitalsurroundsound.TheTVcanreceivedigitalsur-roundsoundon:
AnyHDMIjack•The• DIGITAL AUDIO INPUTjack(whenusedinconjunctionwithINPUT 2)The• ANTinput(fromsomedigitalbroadcasts)
Seepage20forsuggestionsonconnectingyourdevices.
Basic Setup
Note: 153 and 249 Series.Ifyouhavealreadyper-formedAutosetup,anymanualadjustmentswilleraseallsettingscreatedduringAutosetup.
Press1. MENUandgotoInitial > SoundPro. PressENTERtoenterthemenu.
Entertheroomdimensionsandlayoutinformation2. requestedinthescreen.Tochangemeasure-ments,press .
Press3. MENUtoexit.
Playsomesampleaudiotochecksoundquality.4. Iffurtheradjustmentisneeded,usetheCustommenuasdescribedbelow.
Custom MenuUsetheCustommenuafterdefiningtheroomlayout.
Foraroomwithlargeareasofcurtainsthatmightaffectsoundreflection,dothefollowing:
Openthecurtainsfullytoimprovesoundreflec-a. tion.Setanglesbyperformingtheprocedureinb. “AdjustingBeamAngles.”
Sound Projector

3. Using TV Features 35
Closethecurtains.c. Setlevelsbyperformingtheprocedureind. “AdjustingLevels.”
Fromthe1. Initial > SoundPromenugototheCustommenu.
Positionyourselfinyourusualviewinglocation.2. Remaininthisposition,lookingattheTV,whilemakingthefollowingadjustments.
Adju3. sting Beam Angles
a. AdjustCenter Beam Angleuntilsoundisaboutequalinbothears.
b. AdjustLeft Beam Angletomaximizesoundheardfromthefrontleftside.
c. AdjustRight Beam Angletomaximizesoundheardfromthefrontrightside.
d. AdjustLeft Surround Beam Angletowherethesoundseemstocomefromtheleftrearside.Ifthiscannotbeachieved,makethesettingthesameasthatforLeftBeamAngle.
e. AdjustRight Surround Beam Angletowherethesoundseemstocomefromtherightrearside.Ifthiscannotbeachieved,makethesettingthesameasthatforRightBeamAngle.
Adjus4. ting Levels
a. AdjustCenter Leveltothemidlevel.
b. Adjustthefollowinglevelsoneatatimesothateachonesoundsaboutthesameasthecenterlevel:
Left LevelRight LevelLeft Surround LevelRight Surround Level
c. Checkallsoundlevelsbyquicklyswitchingbetweenthemusing .
d. Readjustindividuallevelsinsmallincrementsandrecheckasaboveuntilallsoundlevelsseemaboutthesame.
Adjusting an External Subwoofer5. a. Playsamplevideoormusiccontaininglow-
frequencybasssound.
b. PressMOREandthen9(AUDIO).Use todisplaytheSubwooferoption.
c. WithSubwoofersettoOn,pressENTERtodisplayasliderforthevolume.
d. Press toadjustthesubwoofervolume.
How to Make Adjustments in the Custom Menu
Press• toselectanaudiobeam;colorsoftheadjusterscorrespondtoaudiobeamsintheon-screendiagram.Press• toredirecttheaudiobeamorchangethesoundlevel.
Controls in the SoundPro > Custom menu adjust the direction and focus of the TV’s sound output.
At extreme beam angles, adjustment may be limited and the image on screen may not accurately represent the sound beams.
Adjust the volume level of individual audio beams using sliders in the SoundPro > Custom menu.
Resetting Angle and Level Values in the Custom Menu
Press1. BACKtoclearallmenus.
Press2. MENU.GototheInitial > SoundPromenuandpressENTER.
Changeanysetting(e.g.,3. TV Location).
Press4. BACKtoclearallmenus.
Press5. MENU.GototheInitial > SoundPromenuandpressENTER.
Enterthecorrectvaluesfortheroomlayout.6. Returntothe7. Custommenutoadjustanglesandlevels.
Sound Projector, continued

36 3. Using TV Features
Auto Setup153 and 249 Series
AutosetupusesacalibrationmicrophonetooptimizeSoundProjectorperformanceformostroomcondi-tions.Iftheroomisverylargeorhasmanyobstaclesaffectingthesoundbeams,youmaywishtotrymanualsetup,whichisdonewithoutthemicrophone.
Initial Preparation
PositionandconnecttheTVasdescribedunder1. “BeforeYouBegin,”page34.
PowerontheTVandexternalsubwoofer,ifany.2. PlugthemicrophonecableintotheTV’s3. INPUT 3leftaudiojack.
Placethemicrophoneasdescribedintheguide-4. linesonthispage.
Start Auto Setup
Press1. MENUandgotoInitial > SoundPro.
Press2. ENTER. SetModetoAuto.
Highlight3. STARTandpressENTER.
Quietlyexittheroomrightaway.Thecalibration5. sequencewillstartinafewsecondsandmaybeloud.Itisimportanttoleavetheroomasyourpres-encewillinterferewiththecalibrationprocess.
Waitforcompletionofsetupbeforereturningtothe6. room.
Playsomesampleaudiomaterialtocheckthe7. soundquality.
Note: Donotperformmanualadjustmentsafterrun-ningAutosetup,asdoingsowilleraseallset-tingsdefinedduringAutosetup.
Storethemicrophoneoutofdirectsunlightand8. awayfromheat.
Microphone Placement
Makesuretherearenolargeobstaclesbetween•theTVandmicrophone.
Placethemicrophone•
Onaflat,levelsurfaceatleastsixfeetaway-fromthefrontoftheTV.
Onatripodoronthebackrestofyour-seating.
Atthesameheightyoursearswouldbe-whenwatchingTV.Theheightmustbewithin3verticalfeetoftheheightoftheTV’sspeakerarray.
CenteredinfrontoftheTV,notofftothe-side.
Be sure the height of the microphone is within three feet of the speaker height.
Center the micro-phone in front of the TV.
Set the microphone on a level surface at ear height at least six feet from the TV. Use a seat backrest or tripod so as to pick up sound from all directions.
Maximum height above speakers
MicrophoneTV
6 ft. minimum
Microphone
Height of TV speakers
3 ft.
Sound Projector, continued

3. Using TV Features 37
Streaming Internet Movies with VUDU
249 Series.ThisTV’sbuilt-inVUDU™capabilitiesallowyoutoaccessyourownpersonalhomevideostorerightonyourTV.VUDU’sserviceoffersyou:
Thelargeston-demandHDmovieselectionany-•where,featuringfull1080pand5.1surroundsound.
AllofHollywood’slatesthitsandclassics.Movies•areavailabletorentorbuythesamedaythemoviecomesoutonDVD.
VUDUallowsyoutoenjoymovieswithnostore•visits,nomailing,nolatefeesandnosubscriptions.
Parentalcontrolsallowyoutorestrictaccessto•contentaccordingtoMPAAratings.SeetheVUDUInfo & Settingsmenu.
VUDUfeaturespopularinternetapplicationslike•Pandora,Picasa,andmanyothers.
Visitwww.VUDU.comtolearnmoreaboutavailabletitles,prices,recommendedbandwidth,andservicesoffered.Atthetimeofthiswriting,VUDUrequiresaninternetbandwidthof4.0MbpsorhigherforinstantHDvideoand2.0MbpsorhigherforinstantSDvideo.Thesespecificationsaresubjecttochange.Foralistofrecommendedroutersandswitches,seetheSupport > FAQsectionatVUDU.com.
Required for VUDU Service
Broadbandinternetservice•
Ethernetcable• ortheVUDUwirelesskit.
ComputeraccesstotheVUDU.comwebsite•(requiredforone-timeaccountactivation).
Acreditcardforrentalandpurchasetransactions.•
Standard ConnectionConnecttheTVtoyournetworkrouterordirectlytoahigh-speedinternetmodemusinganEthernetcable(notsupplied).
Ethernet cable
Router or modem providing high-speed internet service
LAN USBa USBb
Standard VUDU connection via Ethernet
VUDU Wireless KitTheVUDUwirelesskitisavailableforpurchasefromVUDU.com.Thekitincludesthetwowirelessboxes,twopowercables,andtwoEthernetcablesshowninthediagrambelow.VUDUcapabilitiesarebuiltrightintotheTV,soconnectVUDUWirelessBox2directlytotheTVasshown.
TheLEDindicatorsfor• POWERandETHERNETwilllightuponcepowerisappliedtotheboxes.
Afterafewseconds,theLEDindicatorfor•WIRELESSwillstarttoblink,indicatingthewirelessadaptershavebeensetupsuccessfully.
TheLEDindicatorsfor• WIRELESSandETHERNETwillblinkwhendataisbeingtransmitted.
LAN USBa USBbTV
AC-to-DC power cable
USB-to-DC power cable
Routeror modem
Ethernet cable
Ethernet cable
VUDU Wireless Box 1
VUDU Wireless Box 2
Connecting the VUDU wireless kit. Connect VUDU Wireless Box 2 directly to the TV.
38 3. Using TV Features
F1 F3 F4F2
FAVON
DEMAND
GUIDE BACK
ACTIVITY
ReturnstotheVUDUhomemenuwhileinVUDU.
VUDUPLUS.Displaysmoreoptionsforthecurrentselection(ifavailable).PAGE UP/PAGE DOWN
Jumpstotheprevious/nextpageofmenuitems.
ACTIVITY ToexitVUDU,pressACTIVITYandselectadifferentTVinput.
DisplaystheTV’sMOREmenuwiththesespecialVUDUoptions:
Displaysnetworkinformationusefulfortroubleshooting.
ResetsVUDUifVUDUstopsrespondingtocommands.
Goestothepreviousscreen.•Stopsvideoplaybackandreturnstothe•previousmenu.
PLAY/PAUSEStartsorpausesvideoplayback.
FAST FORWARD/REVERSEPresstosearchscenesforward•orback.Pressadditionaltimestospeed•upsearch.Pressoppositekeytoslowand•pausesearch.
STOPStopsvideoplaybackandreturnstothepreviousmenu.
ENTER Selectsamenuitem.•Pausesvideoanddisplaysascene-•selectionstripforframe-by-framesearch.Pressagaintoresumeplay.
Directionalnavigation
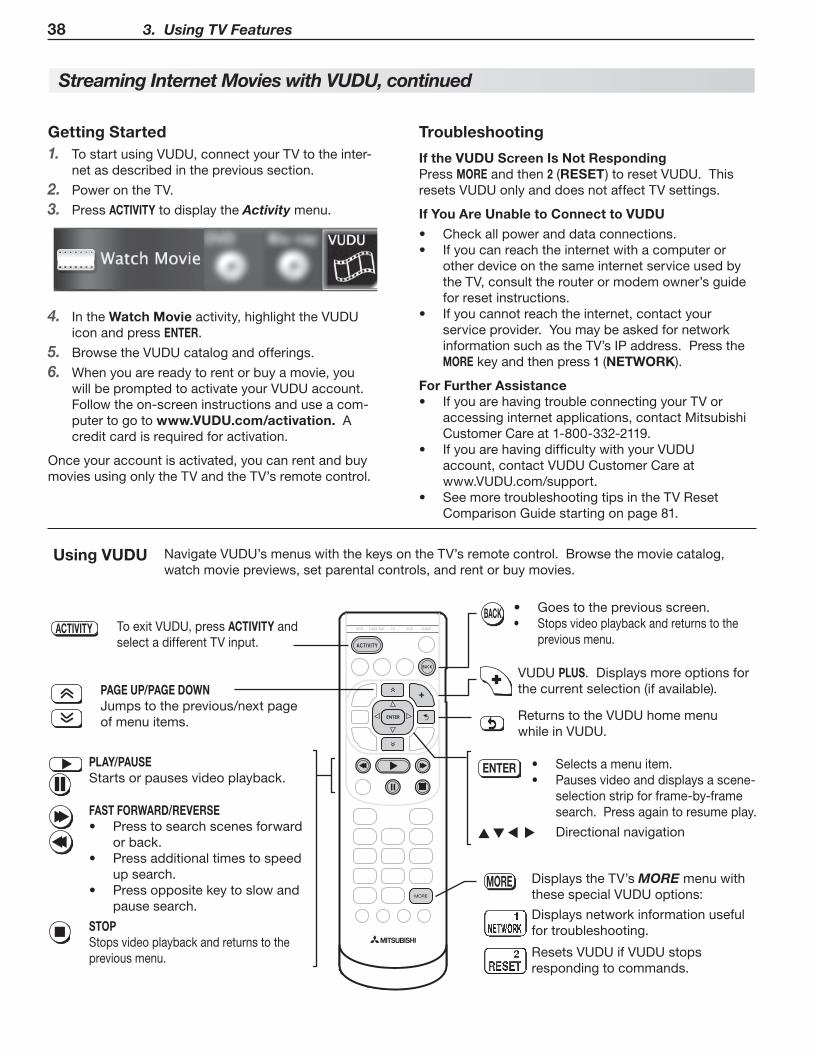
Getting StartedTostartusingVUDU,connectyourTVtotheinter-1. netasdescribedintheprevioussection.
PowerontheTV.2. Press3. ACTIVITYtodisplaytheActivitymenu.
Inthe4. Watch Movieactivity,highlighttheVUDUiconandpressENTER.
BrowsetheVUDUcatalogandofferings.5. Whenyouarereadytorentorbuyamovie,you6. willbepromptedtoactivateyourVUDUaccount.Followtheon-screeninstructionsanduseacom-putertogotowww.VUDU.com/activation.Acreditcardisrequiredforactivation.
Onceyouraccountisactivated,youcanrentandbuymoviesusingonlytheTVandtheTV’sremotecontrol.
Troubleshooting
If the VUDU Screen Is Not RespondingPressMOREandthen2(RESET)toresetVUDU.ThisresetsVUDUonlyanddoesnotaffectTVsettings.
If You Are Unable to Connect to VUDU
Checkallpoweranddataconnections.•Ifyoucanreachtheinternetwithacomputeror•otherdeviceonthesameinternetserviceusedbytheTV,consulttherouterormodemowner’sguideforresetinstructions.Ifyoucannotreachtheinternet,contactyour•serviceprovider.YoumaybeaskedfornetworkinformationsuchastheTV’sIPaddress.PresstheMOREkeyandthenpress1(NETWORK).
For Further AssistanceIfyouarehavingtroubleconnectingyourTVor•accessinginternetapplications,contactMitsubishiCustomerCareat1-800-332-2119.IfyouarehavingdifficultywithyourVUDU•account,contactVUDUCustomerCareatwww.VUDU.com/support.Seemoretroubleshootingtipsinthe• TVResetComparisonGuidestartingonpage81.
Streaming Internet Movies with VUDU, continued
Using VUDU NavigateVUDU’smenuswiththekeysontheTV’sremotecontrol.Browsethemoviecatalog,watchmoviepreviews,setparentalcontrols,andrentorbuymovies.

3. Using TV Features 39
Introduction to Home-Theater ControlThissummaryofferssomeexamplesofcontrolmethodsavailableusingtheTV’s remote control.YoumaywishtouseoneormoreofthesemethodsinyourhometheateraftercompletingAutoInputSensing.
Source device connected directly to the TVRemote Control Programming (Any Connection Type)ProgramtheremotecontroltooperatetheA/Vdevice.Tocontrolthedevice,settheremotecontroltothecorrectmodeforthedevicetype.SeeAppendixA,“Pro-grammingtheRemoteControl.”InthecaseofanA/Vreceiver,usetheAudioLockfeature,page69.
Any Connection Type
TVA/V Device
CEC-Enabled HDMI Device (HDMI Connection Only)SeeAppendixB,“HDMIControlofCECDevices,”page75.
TVCEC-Enabled A/V Device
HDMI Cable
153 and 249 Series: NetCommand IR Control (Any Connection Type)SetupNetCommandIRcontrolofthedevice’skeysasdesired.See“IREmitterPlacement,”page56,and“InitialNetCommandSetup,”page57.
Any Connection Type
TVA/V Device
Source device connected to an A/V receiver connected to the TV
CEC-Enabled HDMI A/V ReceiverTheTV’sremotecontrolmayoperatesomefunctionsofaconnectedA/Vdevice.YoucanswitchtothedevicebyselectingitsiconintheTV’sActivitymenu.SeeAppendixB,“HDMIControlofCECDevices,”page75.
HDMI Cable
HDMI Cable
TV
CEC-Enabled Source Device
A/V Receiver
153 and 249 Series: A/V Receiver with HDMI Output (no CEC)
SetupNetCommandIRcontrolofthe1. A/V receiver’skeysasdesired.See“IREmitterPlacement,”page56,and“SettingUpA/VReceiverControl,”page62.
SetupNetCommandIRcontrolofthe2. source device’skeysasdesired.See“NetCommandControlofaDeviceConnectedtoanHDMIA/VReceiver,”page66.
TV
Any Con-nection Type
Source Device
A/V ReceiverHDMI Cable

40
4 TV Menus
Displaysorclearsthemainmenu.
Movesnavigationintothe•optionsarea.Selectsanitem.•
Movesuponemenulevel.•Clearsthecurrentmenu.•
Movesthehighlightwithinmenus.
Makesadjustmentsinsomemenus.
Look for the key guide at the bottom of each menu.
Main MenuPressMENUontheremotecontroltoopenthemainmenuandthenselectfromoneofthesecategories.
Adjust Customizepictureandsoundsettings. 41
Captions Turnclosedcaptionsonandoff;customizecaptiondisplays. 46
InitialPerformbasicTVsetup.Setlanguage,scan(memorize)channelsandeditchanneloptions,settheTVclock,setEnergyMode,setauto-onTVTimer,setupSoundProjector.
47
Input AssignnamestoTVinputs,enableHDMIControl,assignactivitiestoinputs.153 and 249 Series.PerformNetCommandIR“learning.”
50
Lock RestrictTVuse.Disablethecontrol-panelbuttons.Setapasscode. 52
Menu Navigation

4. TV Menus 41
Adjust
Picture
AssignnamestoTVinputsbeforemakingvideoadjustments(New Device FoundorInputs > Namemenu).Adjustmentswillberesettothedefaultsifyounameorrenameinputsafterwards.Tomakepictureadjust-ments:
From the • Adjust > Picture menu:Press1. tohighlightanoption.Press2. toadjust.
While watching TV:• PresstheMOREkeyandthen8(VIDEO)intheon-screenmenu.Press toselectthevideooptionyouwanttochange.Press tochangesettings.
Note: ChangingPicturesettingsfromthedefaultval-uesusedinHomemodemayincreaseenergyuseaboveENERGYSTAR®guidelines.
Picture Mode
Brilliant Foruseunderbrightlight;unavailablewhenthecurrentinputisnamedGameorPC.WhenPictureModeisBril-liant,energyuseisgreaterthanENERGYSTAR®guidelines.
SetthePictureModefirstbeforechangingothervideosettings,assomesettingsarestoredindependentlyforeachPictureMode.UsePictureModestogetthebestimageunderdifferentviewingcondi-tions.
Game Optimizespictureandvideoprocessingforgamingconsoles.AvailableonlywhenthenameoftheinputisGameorPC.
Bright Formostdaytimeviewingandx.v.Colorsources
Natural Formostnighttimeviewingandx.v.Colorsources
Special AdvancedPictureModes.Contactyourprofessionalinstallerforsetuporseepage45.151, 153 series: Special/ADV249 series: ISF Day/ADV1, ISF Night/ADV2
ISF Day, ISF Night
Contrast
Lowcontrastshowsavarietyofshadesindarkerimages•Inmosthomelightingsituations,mediumcontrastlooksbest.•Highcontrastshowsdarkerimagesmoreuniformlyblackand•makescolorsappearmorevibrant.Highcontrastisgoodforbrightlylitenvironments.
Adjuststhewhite-to-blacklevelSettingsarestoredindepen-dentlyforeachPictureMode.
Brightness Adjustsoverallpicturebrightness.SettingsarestoredindependentlyforeachPictureMode.
Color Adjustsoverallcolorintensityfromnocolortofullysaturated.
Tint Adjuststhered-to-greenratio.
Sharpness Adjustspicturedetailandclarity.
Color Temp
High Giveswhiteimagesacoolcast.Mayprovidethemostrealisticpictureunderbrightlighting.
Adjuststhewhitebalance.Settingsarestoredindepen-dentlyforeachPictureMode.Low Giveswhiteimagesawarmcast.Natural/ColorTemp
atthelowsettingdisplaysvideoatapproximatelythe6500KindustrystandardforNTSCpictures.
Video Noise
High, Medium, Low, Off
Reducesminornoise(graininess)inthepicture.Savedbyinput.ThisadjustmentisnotavailableifthecurrentinputisnamedPCorGame.
UseHighwithpoor-qualitysignals.UseMediumformoderatenoisereduction.UseLowwithgood-qualitysignals.UseOfftoleavethepictureunaltered.
SharpEdgeOn, Off SharpEdge™addsspecialedgeenhancementstomaketheimageappearsharper.
Savedbyinput.
DeepField Imager
On, Off 153, 249 Series. DeepField™Imagerdynamicallyenhancesblacklevelsinportionsofthescreentoprovidestrongcontrastwithdetailovermixedscreencontent.
Demo Forcomparison,displaysasplitpicturetoshowOn(rightside)andOff(leftside).
Backlight Adjustspeakbrightnessofthebacklight.PressENTERtoturnoffthebacklight.

42 4. TV Menus
Speakers TheSpeakersoptiondisplaysonlyifanA/Vreceiverorheadphoneconnectionhasbeendetected.DetectionoccursontherightAVR AUDIO OUTPUTjackortheDIGITAL AUDIO OUTjack.AnA/VreceivercanalsobedetectedonanHDMIjack.
TV TurnsontheinternalTVspeakers.
AV Receiver TurnsofftheTVspeakerssoyouhearsoundonlyfromaconnectedA/Vreceiver.Note:WhenyoudisconnectananalogA/Vreceiver,besuretochangetheSpeakerssettingtoTVtohearsoundfromtheTVspeakers.
Headphones TurnsofftheTVspeakerssoyouhearsoundonlyfromconnectedheadphones.Seepage18.ThisoptionisnotavailableifDIGITAL AUDIO OUTPUTisconnected.
Subwoofer Off,On
TheSubwooferoptiondisplaysonlyifasubwooferconnectionhasbeenidenti-fiedontheSUBWOOFER OUTPUTjack.ThesettingyouselectisappliedtoallTVinputs.UseOfftoturnoffaudiotoaconnectedsubwoofer.
[Subwoofer level adjust-ment]
Toadjustthesubwoofervolumelevel,highlightSubwooferandpressENTERtodisplayanadjustmentslider.
Bass Controlsvolumeoflow-pitchedsoundfromtheTVspeakers.
Treble Controlsvolumeofhigh-pitchedsoundfromtheTVspeakers.
BalanceControlsaudiobalancebetweentheleftandrightTVspeakers;availableonlywhenSoundModeisStereo.
Sound Mode Stereo NospecialaudioeffectsfromtheTVspeakers;monauralprogramsareplayedasmono,stereoandsurroundsoundareplayedasstereo.
Surround ProgramswithsurroundsoundareplayedwithSoundProjectorsurround•sound.Otheraudioismodified:•
Formonaural(non-stereo)programs,createsasimulatedstereoeffect.-Forstereoprograms,createsasimulated- surroundsoundeffect.
Music 153 and 249 Series.OptimizesSoundProjectorspeakersformusiclistening.
Night Directssoundtoaspecificareatolessenthedisturbancetoothersoutsidetheroom.SettingsareresettothedefaultwhenyoupowerdowntheTV.
Positionyourselfintheseatingarea.1. Press2. ENTERtodisplayanadjustmentslider.Press3. toadjustthedirectionofthesoundbeamsuntilsoundseemstheloudest.
Audio
Tomakeaudioadjustments:
From the • Adjust > Audio menu:Press1. tohighlightanoptionPress2. toadjust.
Adjust, continued
While watching TV:• PresstheMOREkeyandthen9(AUDIO)intheon-screenmenu.Press toselecttheaudiooptionyouwanttochange.Press tochangesettings.

4. TV Menus 43
Adjust, continued
Listen To
Appliesonlytoanalogchan-nelsfromtheANTinput
Stereo TheTVplaysstereobroadcastsinstereoandmonobroadcastsinmono.ThewordStereoisdisplayedwhenyoutunetoachannelbroadcastinginstereo.
Mono Reducesbackgroundnoise.Usewhenreceivingaweakstereoaudiosignal.Allaudioisplayedasmonowiththissetting.
SAP(SecondAudioProgram)
SelectsanadditionalmonauralsoundtracknotaudibleduringnormalTVviewing.TheSAPsignalmightberelatedtotheprogram(suchasasoundtrackinaforeignlanguage),oritmightbeunrelated(suchasaweatherreport).IfanSAPsignalisbroadcast,thelettersSAParedisplayedwhenyoutunetothechannel.
Language SelectsthecurrentlanguageforadigitalprogramfromtheANTinput.Eachdigitalprogrammayincludefromzerotosevenlanguagechoices.
AppliesonlytodigitalchannelsfromtheANTinput.
Level Sound On, Off Reducesdifferencesinsoundvolumebetweenprogrammingsegments,suchasthedifferencebetweenregularbroadcastprogramsandcommercialsegments.
Audio, continued

44 4. TV Menus
Reset Resetsaudioandpictureadjustmentsforthecurrentinput.Highlightthe• ReseticonandpressENTERtwice.Reset• hasnoeffectonglobalsettings(Balance,Listen To,Language,Film Mode,and Advanced Picture).
Global Globalsettingsapplytoallinputs.
Video Mute(non-antennainputsonly)
On Displaysasolidcoloredbackgroundwhenthereisnovideosignalfromthecurrentinput.ThecoloredscreenremindsyouthattheTVispoweredonwhenthereisnopicture.TheTVwillpoweroffafterfiveminuteswithoutreceivingavideosignal.
Off Thescreenappearsblackwhenthereisnovideosignalfromthecurrentinput.
Screensaver On, Off SelectOntodisplayarandompatternwhileplayinganaudio-onlyinput.Tousethisfeature,theinputmustbeeither
Namedasanaudiosource(e.g.,• CDorMP3 Player) or
Bethe• ANTinput.
Film Mode(480iand1080isignalsonly)
Auto, Off InAuto,theTVautomaticallydetectsandappliesfilm-decodingcor-rectiontomoviesfilmedat24framespersecond.TrytheOffsettingifimagesshowmanyjaggededges.
Smooth 120 Film Motion(151series)
Standard, High, Off
Standard:• Removesjudder(imagevibration)andsmoothsmotionscenesinfilm-basedcontentsuchasmovies.High:• Removesmorejudderinmotionscenesinmovies.Off:• UsethissettingifStandardorHighcreateimagenoise.
Smooth 120 Film Motion(153and249series)
Removesjudder(imagevibration)andsmoothsmotionscenesinfilm-basedcontentsuchasmovies.
Highlighttheiconandpress1. ENTERtodisplayanadjustmentscreen.
Press2. tochangetheamountofcorrectionorsettozerototurnoffthecorrection.
Press3. BACKtoreturntonormalTVviewing.
Blue Glow(249series)
On, Off SelectOntoseeblueaccentlightingwhentheTVispoweredon.
Test Picture
DisplaysatestpictureforusebyTVservicers.Pressanykeyontheremotecontroltoclearthetestpicture.
Adjust, continued

4. TV Menus 45
Adjust, continued
Picture+
PerfectColor
PerfectColor Sliders Adjuststhesaturation(intensity)ofsixcolorsforthecurrentimagesource.
PerfectTint Sliders(153or249series)
Adjustssixhuesforthecurrentimagesource
Using PerfectColor:HighlightthePerfectColor™iconandpressENTERtodisplaythePerfectColormenu.SettingsareretainedindependentlyforeachTVinput.
• Press tomovefromonecolorbartothenext.• Press tochangesettings.• PressCANCEL torestoredefaultsettings.• PressMENUtoreturntothemainmenu.
Using PerfecTint (153 or 249 Series):ToswitchbetweenPerfectColor™andPerfecTint™adjustments,highlightAdjust Modeandpress .
Advanced Picture
Advanced Pictureallowsyoutosavehighlycustomizedpictureadjustmentsforeachinput.Mitsubishi recommends these adjustments be made by a professional installer.
Press1. MENU.UnderPicture+,highlighttheAdvanced PictureiconandpressENTER.
With2. Picture Modehighlighted,pressENTERtochangefromblank(undefined)toADV.249 Series:ChooseADV1(daytimesettings)orADV2(nighttimesettings)
Use3. tohighlightanoptionyouwishtochangeandpressENTERtoseetheadjustmentdisplay.
Sample adjustment display for Advanced Picture options
Press4. tochangesettings.
Use5. tonavigatetoadditionaloptionsandpress tochangesettings.
Press6. MENUtoreturntotheAdvanced Picturemenu.TheAdvanced Pictureadjustmentswillbeineffectforthecurrentinput.
To use the custom Picture Mode at a later time
PressMENUandgotoAdjust > Picture > Picture Mode and:
151 or 153 Series 249 Series
Select• SPECIALifsettingsweresavedbyyourprofessionalinstaller.
Otherwiseselect• ADV.
Sele• ctISF DayorISF Nightifsettingsweresavedbyyourprofessionalinstaller.
Otherwiseselect• ADV1orADV2.
To return to the default values for Advanced Picture
DisplaythePicture+ > Advanced Picturemenuand:
151 or 153 Series 249 Series
HighlightRESET Pic ModeandpressENTER. Highlightthe1. Advanced Picture modetochange.
H2. ighlightRESET Pic ModeandpressENTER.PerformthisstepindividuallyforbothADV1andADV2.

46 4. TV Menus
Captions
Captions on Analog ChannelsTheTVcandecodecaptionsfromtheANT INPUT andthecompositeVIDEOjacks.Broadcasterscansendeitherstandardclosedcaptionsortextservice.Standardclosedcaptionsfollowthedialogueoftheprogramanddisplayinasmallsectionofthescreen.Text-serviceclosedcaptionsoftencontaininformationsuchasweatherornewsandcoveralargeportionofthescreen.
IMPORTANT• Analog text-service options display a large
black or gray box on the screen when no signal is being broadcast.
• Thecontentofcaptionsisdeterminedbythebroadcaster. If captions show strange char-acters, misspellings, or odd grammar, it is not a malfunction of the TV.
• Closed-caption signals are not available through HDMI or component jacks. See the menus for devices connected to these inputs for closed-caption decoding.
Captions on Digital ChannelsTheTVcandecodecaptionsfromtheANTinputonly.Broadcasterscansenduptosixdifferentcaptioningselectionsorcansendanalogcaptionsforaprogramthatoriginatedinanalogformat.ATVstationmaybroadcastonlyoneortwotypesofcaptionsornoneatall.
Services Digital On if MuteCaption 1–Caption 6Off
On if Mute:• Displaysdigitalclosed-captionsignalCaption1whenaudiofromtheTVspeakersismuted.WhenwatchingTV,pressMUTEtoturnclosedcaptionson/off.Caption 1–Caption 6: • Captionsignalssentbythebroad-caster
Analog On if MuteCC 1–CC 4Text 1–Text 4Off
On if Mute: • DisplaysanalogclosedcaptionssignalCC1whenaudiofromtheTVspeakersismuted.WhenwatchingTV,pressMUTEtoturncaptionson/off.CC 1–CC 4:• Standardclosed-captionsignalsText 1–Text 4: • Text-servicesignals
Analog Back-ground
Gray, Black Selectseitheragrayorblacktextbackgroundtomakeanalogclosedcaptionseasiertoread.
Effects
(forcaptionsfromdigitalchannels)
Font DefaultFont 1–Font 7
Defaultchangessettingstothoseselectedbythecaptionspro-vider,or,ifnone,totheTV’sowncaptiondefaults.UseFonts1through7togivecaptionsondigitalchannelsacustomappear-ance.
Font Size LargeMediumSmall
Largeistherecommendedsize.
Font Color White, Black, Magenta, etc. Guidelinesforsettingdigitalcaptions:
• A white font on a black translucent background makes an easy-to-read combination.
• Usecontrastingcolorsforcaptionsandbackground.
Font Opacity Translucent, Opaque, Flashing, Transparent
Background Color
White, Black, Magenta, etc.
Background Opacity
Translucent, Opaque, Flashing, Transparent
Note: 249 Series.TheTV’sCaptionsmenudoesnotcontrolclosedcaptionsforcontentreceivedfromtheVUDU™internetservice.

4. TV Menus 47
Language EnglishSpanish
Displayson-screenmenusineitherEnglishorSpanish.
Note:Tolistentoaudioinotherlanguages(whenavailable),seeAdjust > Audio > Listen To > SAP(analogsignal)orLanguage(digitalsignal)onpage43.
Clock
SettheTVclockto:
UsetheTVTimertopowerontheTVautomaticallyatapresettime•ReceivecorrectupdatestoChannelViewlistings•
Note:WhentheDaylightSavingsTimechangeoccurs,youmustopenthismenuandsettheTV’sclockaheadorback.
Time Withthehourhighlighted,press1. tochangethehourandtheAM/PMindicator.Pressandholdtochangethehourdisplayquickly.Press2. ENTERtosetthehour.Withtheminuteshighlighted,press3. tochangetheminutes.Pressandholdtochangetheminutesdisplayquickly.
Date Withthemonthhighlighted,press1. toselect.PressENTERtoset.Withthedayhighlighted,press2. toselect.PressENTERtoset.Withtheyearhighlighted,press3. toselectthecurrentyear.
Time Zone Eastern, Central, Mountain, Pacific,etc.ThecorrecttimezoneisrequiredforaccurateChannelViewupdates.
DST On, Off DaylightSavingsTime.Selectthesettingforyourarea.ThecorrectDSTsettingisrequiredforaccurateChannelViewupdates.
Timer Timer On, Off SelectOntoenabletheTimer.
TheTimertellstheTVtopoweronautomaticallyatatimeyouset.Usethismenutosetaday,time,input,andchannelfortheTimer.IftheTVisalreadyonattherequestedtime,theTVwillautomati-callychangetothedesignatedchannelorinput.
• TheTVclockmustbesetbeforeyoucanusetheTimerfeature.
• ToremindyouthattheTVTimerhasbeenset,thePOWERindicatoronthefrontoftheTVflashesslowlywhiletheTVispoweredoff.
• WhentheTimerturnsontheTV,pressanykeyontheremotecontroltokeepiton.Otherwise,theTVwillturnoffafterfiveminutes.
Day Daily, Mon-Fri, (every) Sunday, (every) Monday, (every) Tuesday,etc.
SelectthedayordaysoftheweekfortheTimertoturnontheTV.
Time TosetthetimefortheTVtocomeon:Withthehourhighlighted,press4. repeatedlytochangethehourandtheAM/PM indicator.Pressandholdtochangethehourdisplayquickly.Press5. ENTERtohighlighttheminutes.Press6. tochangetheminutes.Pressandholdtochangetheminutesdisplayquickly.
Input Ant, DVD, VCR,etc.
SelecttheinputyouwantdisplayedwhentheTVcomeson.ChoosefromthedefinedandenabledinputsthatappearintheActivitymenu.
Channel IfthesourceistheANTinput,selectachannelnumberbypressing orpressandholdtoscrollthroughchannels.
Initial

48 4. TV Menus
Initial, continued
Energy Energy Usage
Standard, Fast Power On
OptionsforpowerconsumptionwhiletheTVispoweredoff.
Standard• keepstheTV’senergyusewithinENERGYSTAR®guide-lineswhilepoweredoff.
Fast Power On• letstheTVpowerupquickly.TheTVusespowerwhileintheoffstateinexcessofENERGYSTARguidelinesforapowered-downdevice.
Channel
(Channel Manage-ment)
Ant Air, Ant Cable
You must perform a channel scan to receive digital channels.Scansearchesforbroad-castchannelsandaddsthemtoTVmemory.Tostartchannelscan:
Highlightoneoftheinputselectionsbasedonyourconnectiontothe1. ANT input:Air• whenconnectedtoanindoororoutdoorantenna.Cable• whenconnectedtodirectcable(nocablebox)
Press2. tohighlightSCAN.Press3. ENTERtostartchannelmemorization.
Scan
Edit Afterchannelscan,Editletsyouaddanddeletememorizedchannels.• PressPAGE DN/UPtojumptothenextorpreviouspageofchannelnumbers.• Press tomovethroughallchannelnumbers,oneatatime.
Notes on Scan and channel memorization
• Channelmemorizationmaytakeupto15minutestocomplete.
• Tostopchannelmemorizationbeforecompletion,pressCANCEL.Channelsalreadyaddedareretained.
• WhenwatchingTV,pressCH tomovethroughmemorizedchannels.
• ToaddadigitalchannelthatdoesnotappearintheEditmenuwithoutrepeatingchannelmemorization:
Lookupthe1. physicalchannelnumberforthenewdigitalchannel.Seethewebsitewww.antennaweb.orgforhelp.
Press2. ACTIVITYandselecttheANT input.
Usethenumberkeysand3. CANCELkeytoenterthephysicalchannelnumberfollowedby“-1”andENTER.Forexample,forphysicalchannel36,press
3 6 1 ENTER.
TheTVwillsearchforadigitalchannelonthechannel36frequency.Whenitfindsthechannel,itwill:
a. Addthechanneltomemory.b. Changethechannelnumbertothevirtual
channelnumbersentbythebroadcaster.c. Addtomemoryanyassociatedsub-
channels.
RememorizechannelsifyoumovetheTVtoadiffer-•entgeographicareawithadifferentchannelline-up.
Adding/Deleting Channels Using the Channel Edit MenuChannelsmarkedwithacheckareinmemory.•Toaddordeleteachannelfrom• memory,highlightthechannelnumberandpressENTER.Toaddasingledigitalchannelnotinthelist,seethenotesunder• Scanonthispage.Digitalchannelsarelistedbyvirtualchannelnumberwiththephysicalchannelnumbershowninsmallgraytext.•Seebelowforanexplanationoftheseterms.
Virtual - Channel Number(digitalchannelsonly).Achannelnumbersentbyalocalbroadcaster.Usuallythevirtualnumberisassociatedwiththecorrespondinganalogchannelnumber.Forexample,abroadcastermayassociatedigitalchannel2-1withtheiranalogchannel2.Physical Digital Channel Number.- Thechannelnumberofficiallyassignedtotheactualbroadcastfrequency;shownonscreeningraytext.

4. TV Menus 49
Initial, continued
Basic Screen
SoundPro
Mode(153, 249 series)
Auto START PerformAutosetupusingthesuppliedcalibrationmicrophone.Seepage36.
Manual Custom Toperformmanualsetup,seepage34.
Note: DonotperformmanualadjustmentsafterrunningAutosetup.DoingsowilleraseallsettingscreatedduringAutosetup.
TV Location Center, Left, L Corner, Right, R Corner
HighlighttheitemthatbestdescribestheTV’sloca-tionrelativetothewall.RequiredforManualsetup.
TV Wall Length(infeet)
[Enter digits] Press tochangethenumberorenterdigits.RequiredforManualsetup.
Other Wall Length (infeet)
[Enter digits] Press tochangethenumberorenterdigits.RequiredforManualsetup.
TV to Sofa(infeet)
[Enter digits] Press tochangethenumberorenterdigits.EnterthedistancefromtheTVtotheprimaryseatingarea.RequiredforManualsetup.
Custom(all models)
Afterdefiningtheroomlayout,highlightCustomandpressENTER.Usethisoptiontofine-tuneSoundProjectortoyouruniqueroomlayout.Seedetailsonpage35.
Adjustments in the Custom Menu
Left Beam AngleRight Beam AngleCenter Beam AngleLeft Surround Beam AngleRight Surround Beam Angle
Left LevelRight LevelCenter LevelLeft Surround LevelRight Surround Level
Press• toselectanaudiobeam;colorsoftheadjusterscorrespondtoaudiobeamsintheon-screendiagram.Press• toredirecttheaudiobeamorchangethesoundlevel.Toresettheseadjustments,•see“ResettingAngleandLevelValuesintheCustomMenu,”page35.
Sound ProjectorForfullsetupinstructions,seepage34.
Controls in the SoundPro > Custom menu adjust the direction and focus of the TV’s sound output.
At extreme beam angles, adjustment may be limited and the image on screen may not accurately represent the sound beams.

50 4. TV Menus
Inputs
Name Cablebox, Cam(corder), CD, DVD (DVD, DVD2, Blu-ray), DVR, Game (Game, PS, Xbox, Wii), MP3 Player, PC, Satellite, VCR, AVR
Delete (deactivatedHDMIonly)
On/Off (ANTonly)
Letsyouassignor• changenamesofinputsappearingintheActivitymenu.
Press- tomovebetweeninputs.Press- toselectaname.Youcannotchangethenameofthecurrentinput;you-mustfirstswitchtoanotherinput.Ifyouhaveonlyoneinput,suchasacablebox,makesuretheAntinputisOnandswitchtoAntennaintheActivitymenubeforerenamingthesingleinput.
Letsyouturnthe• AntinputOn/Off(todisplay/hideitintheActiv-itymenu).LetsyoudeleteunusedHDMIinputsfromthe• Activitymenu.ACEC-enabledtunercanbenamedeither• Cable BoxorSatellite.ACEC-enabledDVDplayercanbenamed• DVD,DVD2,orBlu-ray.
General NotesWhenyouchangeaninputnameintheNamemenuandthenexittheNamemenu:
Thenameischanged•Theiconinthe• ActivitymenuischangedAudioandvideosettingsarechangedtothedefaultsforthenewdevicetype.•153 and 249 Series:• AllpreviousNetCommandIR“learning”fortheinputiserased.
Notes for HDMI devicesDisconnecting an HDMI device:• WhenyoudisconnectanHDMIdevice,theiconremainsintheActivitymenuuntilyouremoveit.SelectDeleteintheInputs > NamemenutoremoveanunwantediconforanHDMIinput.
Ifthe• New Device FoundscreendoesnotdisplayasexpectedwhenyouconnectanHDMIdevice,seetheresetinstructionsunder“ReactivatingAutoSensingforanHDMIInput,”page13.
HDMI Control and CEC-Enabled Devices:• SeeAppendixB,“HDMIControlofCECDevices,”page75.
If case of CEC conflicts:• TurnoffCECsignalsinoneoftheseways:
TurnofftheTV’sHDMIControlsignalstothedevice(seebelowfor- HDMI Control).Turnoffeachdevice’sinternalCECcapability.-
SeeAppendixBfortheTV’sHDMIControlor,toturnon/offaspecificdevice’sresponsetoCECsignals,seethedeviceowner’smanual.
Learn 153 and 249 SeriesSetsuporchangesNetCommandIRcontrolofthecurrentviewingdevice.
See“AboutNetCommandIRControl,”page55.
AVR 153 and 249 SeriesSetsuporchangesNetCommandIRcontrolofanA/Vreceiver.
See“NetCommandIRControlofanA/VReceiver”onpage61.
HDMI Control On, Off SelectOnorOfftoenableordisabletheTV’scontrolofaCEC-enableddevice.SeeAppendixBforuseofthisfeature.
Activity Letsyou• customizetheActivitymenuchoicesforthecurrentinput.
Highlighttheactivitynameandpress• ENTERtomakechanges.
See• “HowistheActivityMenuGenerated?”ontheoppositepage.
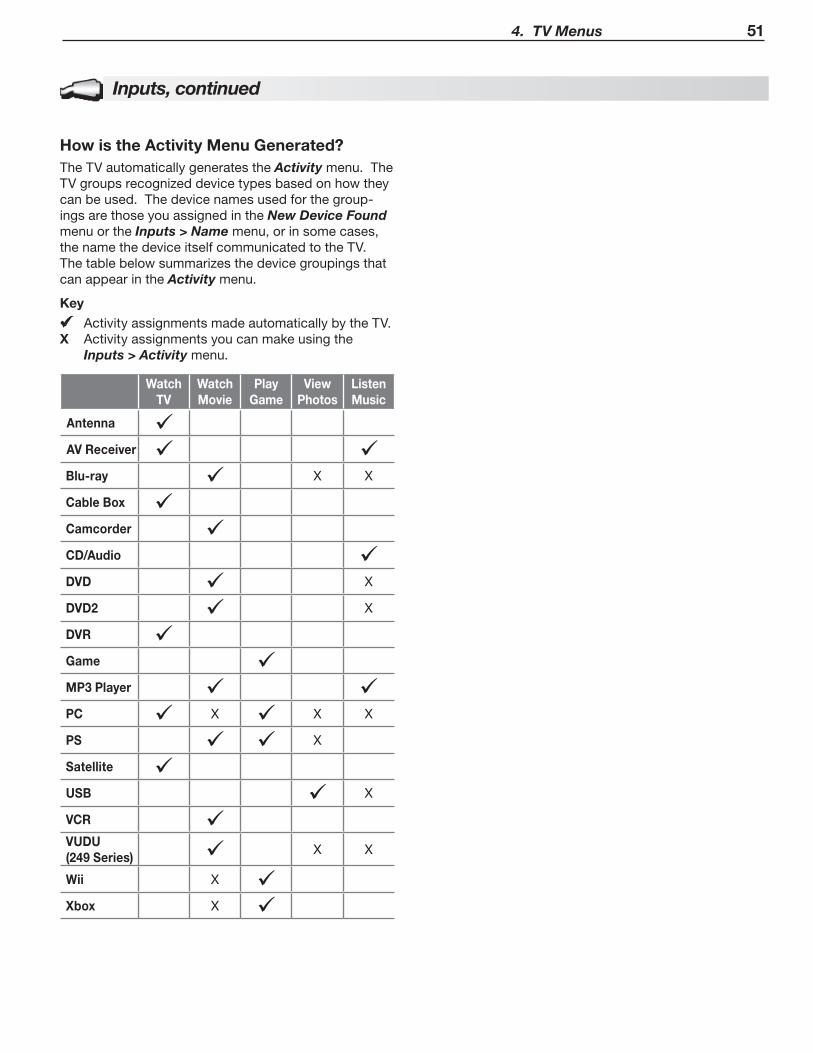
4. TV Menus 51
How is the Activity Menu Generated?TheTVautomaticallygeneratestheActivitymenu.TheTVgroupsrecognizeddevicetypesbasedonhowtheycanbeused.Thedevicenamesusedforthegroup-ingsarethoseyouassignedintheNew Device FoundmenuortheInputs > Namemenu,orinsomecases,thenamethedeviceitselfcommunicatedtotheTV.ThetablebelowsummarizesthedevicegroupingsthatcanappearintheActivitymenu.
Key
ActivityassignmentsmadeautomaticallybytheTV.X Activityassignmentsyoucanmakeusingthe
Inputs > Activitymenu.
Watch TV
Watch Movie
Play Game
View Photos
Listen Music
Antenna AV Receiver Blu-ray X X
Cable Box Camcorder CD/Audio DVD X
DVD2 X
DVR Game MP3 Player PC X X X
PS X
Satellite USB X
VCR VUDU (249 Series) X X
Wii X Xbox X
Inputs, continued
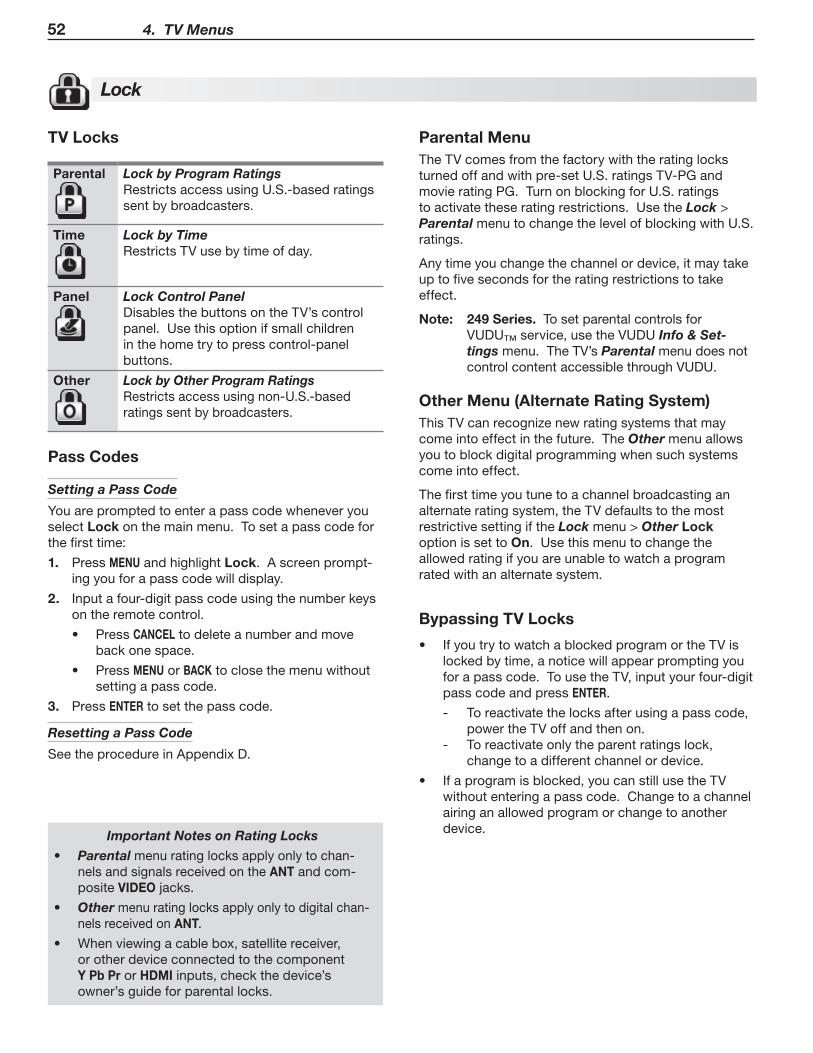
52 4. TV Menus
TV Locks
Parental Lock by Program RatingsRestrictsaccessusingU.S.-basedratingssentbybroadcasters.
Time Lock by TimeRestrictsTVusebytimeofday.
Panel Lock Control PanelDisablesthebuttonsontheTV’scontrolpanel.Usethisoptionifsmallchildreninthehometrytopresscontrol-panelbuttons.
Other Lock by Other Program RatingsRestrictsaccessusingnon-U.S.-basedratingssentbybroadcasters.
Pass Codes
Setting a Pass Code
YouarepromptedtoenterapasscodewheneveryouselectLockonthemainmenu.Tosetapasscodeforthefirsttime:
Press1. MENUandhighlightLock.Ascreenprompt-ingyouforapasscodewilldisplay.
Inputafour-digitpasscodeusingthenumberkeys2. ontheremotecontrol.
Press• CANCELtodeleteanumberandmovebackonespace.
Press• MENUorBACKtoclosethemenuwithoutsettingapasscode.
Press3. ENTERtosetthepasscode.
Resetting a Pass Code
SeetheprocedureinAppendixD.
Bypassing TV Locks
IfyoutrytowatchablockedprogramortheTVis•lockedbytime,anoticewillappearpromptingyouforapasscode.TousetheTV,inputyourfour-digitpasscodeandpressENTER.
Toreactivatethelocksafterusingapasscode,-powertheTVoffandthenon.Toreactivateonlytheparentratingslock,-changetoadifferentchannelordevice.
Ifaprogramisblocked,youcanstillusetheTV•withoutenteringapasscode.Changetoachannelairinganallowedprogramorchangetoanotherdevice.
Parental MenuTheTVcomesfromthefactorywiththeratinglocksturnedoffandwithpre-setU.S.ratingsTV-PGandmovieratingPG.TurnonblockingforU.S.ratingstoactivatetheseratingrestrictions.UsetheLock>ParentalmenutochangethelevelofblockingwithU.S.ratings.
Anytimeyouchangethechannelordevice,itmaytakeuptofivesecondsfortheratingrestrictionstotakeeffect.
Note: 249 Series.TosetparentalcontrolsforVUDU™service,usetheVUDUInfo & Set-tingsmenu.TheTV’sParentalmenudoesnotcontrolcontentaccessiblethroughVUDU.
Other Menu (Alternate Rating System)ThisTVcanrecognizenewratingsystemsthatmaycomeintoeffectinthefuture.TheOthermenuallowsyoutoblockdigitalprogrammingwhensuchsystemscomeintoeffect.
Thefirsttimeyoutunetoachannelbroadcastinganalternateratingsystem,theTVdefaultstothemostrestrictivesettingiftheLockmenu>OtherLockoptionissettoOn.Usethismenutochangetheallowedratingifyouareunabletowatchaprogramratedwithanalternatesystem.
Lock
Important Notes on Rating Locks
• Parentalmenuratinglocksapplyonlytochan-nelsandsignalsreceivedontheANTandcom-positeVIDEOjacks.
• Othermenuratinglocksapplyonlytodigitalchan-nelsreceivedonANT.
• Whenviewingacablebox,satellitereceiver,orotherdeviceconnectedtothecomponentY Pb ProrHDMIinputs,checkthedevice’sowner’sguideforparentallocks.

4. TV Menus 53
Lock, continued
Parental
Lock Off, On DisablesorenablesblockingbasedonV-ChipsignalsandtheU.S.ratingsystem.
Start Time
SetsthetimeofdayforenforcementofratingrestrictionssetintheParentalmenu.
Highlightthehourdigitsfor1. Start Time.
Press2. repeatedlytochangethehourandassociatedAM/PMindicator.Youcanalsojustpressandholdtomovequicklythroughthenumbers.
Press3. ENTERtohighlighttheminutes.
Withtheminutesdigitshighlighted,press4. repeatedlytochangetheminutes.Youcanalsojustpressandholdtomovequicklythroughthenumbers.
Highlightthe5. Stop Timedigitsandsetthetimeasdescribedabove.
Note: Tomakeratingrestrictionsactive24hoursaday,makeStart TimeandStop Timethesame.
Stop Time
TV Rating
TV-Y Youth.Forchildrenunder7. HighlighttheratinglevelyouwishtochangeandpressENTERtoblockit( )orallowit( ).
Youcanapplysupple-mentalcontentblockingtotheage-basedratingsbyusingtheTVcontentcategorieslistedbelow.
TV-Y7 Youth 7andolder.
TV-G General Audience.Fortheentirefamily.
TV-PG Parental Guidance.ParentalGuidancerecommended;maynotbesuitableforsomechildren.
TV-14 Adolescent 14 and older.Notrecommendedforchildrenunder14.
TV-MA Mature Audience.Foradultsonly.
FV Fantasy Violence.AppliestoTV-Y7only.
TV Content Categories
D Sexual Dialog.AppliesindifferingdegreestoTV-PGandTV-14.
L Adult Language.AppliesindifferingdegreestoTV-PG,TV-14,andTV-MA.
S Sexual Situations.AppliesindifferingdegreestoTV-PG,TV-14,andTV-MA.
V Violence(graphicorrealistic).AppliesindifferingdegreestoTV-PG,TV-14,andTV-MA.
Movie Rating
G General Audience.Designedfortheentirefamily.
PG Parental Guidance.ParentalGuidancerecommended;maynotbesuitableforsomechildren.
PG-13 Parental Guidance, 13 and Older.Notrecommendedforchildrenunder13.
R Restricted.Restrictedintheatersto17yearsoldandolderunlessaccompaniedbyanadult.
NC-17 No Children 17 or Under.Restrictedintheatersto18yearsoldandolder.
X Adult.Designedforandrestrictedintheaterstoadultaudiencesonly.
Not Rated NoMPAAratingassigned

54 4. TV Menus
Lock, continued
Time
BlocksalluseoftheTVduringthetimeperiodyouspecify.YoumustenterapasscodetousetheTVwhenthetimelockisineffect.
Lock by Time Enables/disablesLock by Time.
Lock Time, Unlock Time
Tosetthelockandunlocktimes:
Highlightthehourdigitsforthe1. Lock Time.
Press2. repeatedlytochangethehourandassociatedAM/PMindicator.Tomovequicklythroughthenumbers,justpressandhold.
Press3. ENTERtosetthehourandhighlighttheminutes.
Withtheminuteshighlighted,press4. repeatedlytochangetheminutes.Tomovequicklythroughthenumbers,justpressandhold.
Highlightthe5. Unlock Timedigitsandsetthetimeasdescribedabove.
Note: TomakeLockbyTimeactive24hoursaday,makeStart TimeandStop Timethesame.
Panel
Off, On OnlocksandOffunlocksthebuttonsontheTV’scontrolpanel.UsethisoptionifsmallchildrentrytopressTVbuttons.
To• releasethePanelLockfromtheTV’scontrolpanel,pressandholdtheACTIVITYbuttonfortenseconds.IftheTVispoweredoff,pressPOWERafterthelockreleasestomaketheTVpoweron.Toreactivatethelock,returntothismenuandchangethesettingto• On.
Other
Other Menu Options (alternate rating system)ThisTVcanrecognizenewratingsystemsthatmaycomeintoeffectinthefuture.TheOtheroptionremainsgrayedoutuntiltheTVreceivesasignalusinganalternateratingsystem.SuchalternateratingsystemswillapplyonlytodigitalprogrammingreceivedontheANTinput.
Lock On, Off Enables/disablesprogramblocking.
System Name Theratingsystemavailableforthechannel
Group Ratinggroupsavailableintheratingsystemshownonthescreen.Ratinggroupsaredefinedbytheratingsystemineffect.
Rating Ratingrestrictionsavailableintheselectedratingsystemandgroup.HighlighttheratingandpressENTERtocheck(block)oruncheck(allow)ratedcontent.
55
5 NetCommand IR Control
NetCommand IR home-theater control is avail-•able on 153 and 249 series TVs.
IR emitter cables are available for purchase •from Mitsubishi. Visitwww.mitsuparts.comorcall800-553-7278andrequestoneofthefollowing:
242D483020- (two-endedcable)
299P254020- (four-endedcable).
NetCommandsetupisoptional.•
YoucanperformNetCommandsetupwhentheTV•firstrecognizesadeviceduringAutoInputSensingoratanyconvenienttimeafterward.
Important Note on NetCommandBe sure to connect the IR emitter cable to the TV and properly place the emitters so that NetCommand can control your devices.
NetCommandoperatesbysendingremotecontrol•signalsfromtheTVtoyourotherdevicesviatheIR(infrared)emitters,tellingthedevicestoplay,record,changeinputs,adjustvolume,changechan-nels,orperformotherfunctions.Allthisisaccom-plishedwiththeTV’sremotecontrolleftinTVmode.
YoumaywishtouseNetCommandIRcontrolto•supplementcontrolofCEC-enableddevices.
About NetCommand IR Control

56 5. NetCommand IR Control
TheNetCommandsystemusesemittersconnectedtotheIR–NetCommand OutputjacktocontrolotherdevicessuchasDVDplayers,cableboxes,satellitereceivers,andVCRs.
IR emitter cables are available for purchase from Mitsubishi.Call(800)553-7278andrequesteitherpartnumber242D483020(two-endedcable)orpartnumber299P254020(four-endedcable).
ConnecttheplugendoftheIRemittercabletothe1. IR—NetCommand OutputjackontheTVbackpanel.
Whenthe2. New Device Foundscreendisplays,leaveIR—NetCommand Output selected.
Highlight3. EXITandpressENTER.
The New Device Found screen displays when you connect the IR emitter.
Positiontheemitterendwiththeemitterbulbfacing4. thedevice’sremotecontrolsensor.Thebulbemitsinfraredlightinacone-shapedpattern.Placethebulbfarenoughfromthesensortoallowtheconepatterntoreachthesensor.
Insomecases,theemitterworksbetterfacingdownwardfromthetopofthedevice.Experimenttofindwhatworksbest.
Securetheemitterendsinplaceusingdouble-5. sidedtape.
Placeanyunusedendsbehindthedevicesto6. preventstraysignalsfromreachingtheIRsensors.
AVR AUDIO OUTPUTR L
Pr
TVD I G I T A L
S U R R O U N D
SCH
A/V Receiver
Other A/V Device
Connecting IR–NetCommand Output
In front of a single average-sized device
On top of a single tall device
In front, shared by two average-sized devices
IR sensor
IR sensor
IR sensor
IR sensor
In front of a single average-sized device
On top of a single tall device
In front, shared by two average-sized devices
IR sensor
IR sensor
IR sensor
IR sensor
IR sensor
In front of a single average-sized device
On top of a single tall device
In front, shared by two average-sized
devices
IR sensor
IR sensor
IR sensor
IR sensor
IR sensor
Place IR emitters so the signal can be “seen” by the IR sensor on each device.
If You are Unable to Locate a Device’s IR Sensor
TheIRsensorisusuallybehindtheplasticwindow•ofthefrontdisplaypanel.Usingaflashlight,youmaybeabletoseeitasaroundorsquarecutout.
Ifyoucannotseethesensorandthedevice’s•Owner’sGuidedoesnotspecifythelocation,dothefollowingusingthedevice’sremotecontrol.
Startingatoneendoftheplasticwindow,hold1. thedevice’sremotecontrolaboutone-halfinchfromthefrontofthedeviceandpressthePOWERkey.
Ifthedevicedoesnotrespond,movethe2. remotecontroloneinchtowardthecenterandtryagain.Repeatuntilthedeviceresponds.
Repeatthepreviousstepsstartingattheother3. endofthewindow.Thesensorwillbebetweenthesetwopoints.
IMPORTANTPosition IR emitters so that each device’s sensor “sees” the signal from only one emitter. Otherwise, a device receiving signals from multiple sources (remote controls, IR emitters) may not respond at all.
IR Emitter Placement

5. NetCommand IR Control 57
Toperformthisprocedure,youneed:
TheremotecontrolsforboththeTVandthe•deviceyouwanttocontrol.
AnIRemittercableavailablefromMitsubishi• .
Note: TosetupanA/Vreceiver,see“SettingUpA/VReceiverControl,”page62.
ConnectandpositiontheIRemittersforthe1. devicesyouwishtocontrol.See“IREmitterPlace-ment”ontheoppositepage.
Setthe2. TV’sremotecontroltoTVmodeandpowerontheTV.
OpentheNetCommand3. Learnscreenasfollows:
Ifworkingfromthe• New Device Foundscreenafterthedeviceisfirstdetected,highlightNetCommandandpressENTERtoopentheLearnscreenforthedevice.
IfperformingNetCommandsetupatanytime•afterthedevicehasbeenrecognizedthroughAutoInputSensing:
a. PressACTIVITY.b. Highlightthedesiredinputiconandpress
ENTERtoswitchtothatinput.c. PressMENU,highlightInputs,andhighlight
LearntoopentheInputs > Learnscreenforthedevice.
Thefirstfunctionhighlightedinthe4. LearnscreenisalwaysPower On.AimtheTV’sremotecontrolattheTVandpressENTERtobeginlearningforthatfunction.
Whenthe5. Power Ontextstartsflashing,aimthedevice’sremotecontrolattheTVandholdthePOWERkeyuntilacheckmarkappearsnexttoPower On.
Ifthetextstopsflashingbeforethecheckmark•appears,repeatthepreviousstep.
ToremovethekeyfromNetCommandcontrol,•presstheCANCELkeywhilethekeynameishighlighted.
Pressthe6. keysontheTV’sremotecontroltohighlightotherkeysonthelist.Repeatsteps4and5foreachadditionalfunctionyouwishtocontrolthroughNetCommand.
Note: Devicekeysinthefarrightcolumnwillbeasso-ciatedwiththeremotecontrol’sMOREkeywhen“learned.”Seethetableonpage59.
Ifthedevicehasaseparate7. POWER OFFkey,press ontheTV’sremotetohighlightPower Off.
Repeattheearlierstepsto“learn”thePOWER OFFkey.If the device has no POWER OFF key, skip this step.
Press8. BACKtofinishNetCommand“learning”forthecurrentdevice.
From the New Device Found screen, highlight NetCommand and press ENTER to open the Learn screen.
Initial NetCommand Setup
Inputs > Learn screen
Key names marked with a check have been “learned.”
Device-specific keys in the rightmost column can be accessed with the MORE key after “learning.”
Adding or Removing Device Keys from NetCommand Control
SwitchtheTVtothedevice.Press1. ACTIVITY,high-lightthedevice’sicon,andpressENTER.
Openthe2. InputsmenuandhighlighttheLearnicon.
Whenthe3. Learnscreendisplays:
To add keys: • Continueasdescribedearlierunder“InitialNetCommandSetup”onthispage.
To delete keys:• HighlightthenameofthekeyyouwishtodeleteandpressCANCELontheTV‘s remotecontroltoclearthecheckmark.

58 5. NetCommand IR Control
Special Operation MethodsKey Name in Learning Screen Special Operation Description and Setup How to Use
Power On Manual Power On/Off
UsefordevicesthathaveonlyonePOWERkey.
Press1. ACTIVITY.
Press2. tohighlighttheiconforthedevicetobepoweredonoroff.
Withthe3. Activitymenustilldisplayed,pressPOWERtosendthepowersignal;youmayneedtopressPOWERtwice.
Note: IfyoupressPOWERwithouttheActivitymenudisplayed,theTVwillturnoff.
Press4. ENTER toswitchtheTVtothedevice.
Power On
Power Off
Automatic Power On/Off
ThisfeatureisonlyfordevicesthathaveseparatePOWER ONandPOWER OFFkeysontheiroriginalremotecontrols.IfyourdevicedoesnothaveaseparatePOWER OFFkey,donotusethePower Offlearningposition;useonlytheManualPowerON/OFFmethoddescribedabove.
IntheNetCommandLearnscreen:
a. “Learn”thePower OncommandinthePower Onlearningposition.
b. “Learn”thePower OffcommandinthePower Offlearningposition.
To Power On the Device•
Press1. ACTIVITY.
Press2. tohighlighttheiconforthedevicetobepoweredonoroff.
Press3. ENTER toswitchtheTVtothedeviceandNetCommandwillsendthePower Oncommandtothedevice.
To Power Off the Device•WhenyouturntheTVoff,theTVsendsalllearnedPower Offcommandstoalldevices.
Menu Displaying a Menu for the Current Device
“Learn”theMENUkeyontheoriginalremoteintheMenulearningposition.
PressMOREandthen1tosendthemenucommandtothecurrentdevice.
Guide Displaying the On-Screen Program Guide (cable box or satellite receiver)
“Learn”the1. GUIDEkeyontheoriginalremoteintheGuidelearningposition.
Learnthe2. PAGEUPandPAGEDOWNkeysoftheoriginalremoteinthePage UpandPage Downlearningpositions.
Whilewatchingthedevice,press1. GUIDEtodisplaytheguide.
Press2. PAGEUP/DOWN( )tosendthePage Up/Dncommandsfortheguide.
Operating NetCommand-Controlled Devices
Controlling Most Device TypesAsanexampleofNetCommandcontrol,ifyouarewatchingyourcableboxandyouwishtotunetothenextchannelhigher,pressCHANNEL UP.NetCommandthensendsthe“learned”channel-upcontrolsignaltothecablebox.
PerformNetCommandsetupforthedeviceas1. describedinthischapter.
Whenyouwishtousethedevice,press2. ACTIVITY.
Press3. tohighlighttheiconforthedevice.
Press4. ENTERtoswitchtheTVtothedevice.
Note: ifyouhavesetupautomaticinputswitchingfortheA/Vreceiver,theA/Vreceiverwillautomati-callyswitchtothecorrectinputforthedevice.
Tooperatethedeviceusingthe5. TV’sremotecontrol,pressthesidebuttontoputtheremotecontrolintoTVmode.
Pointtheremotecontrolatthe6. TV(notthedevice)andpressthekeyforthedesiredfunction.
Pressthe7. MOREkeytoaccessadditionalkeyfunc-tionsyoumayhave“learned”forthedevice.

5. NetCommand IR Control 59
Key Name in Learning Screen Special Operation Description and Setup How to Use
Enter ENTER-Key Functions (cable boxes, satellite receivers, etc.)
Somedeviceshavetwokeysthathave“enter”functions.OnekeyisformenusandisoftenlabelledSELECTorOK.Asecondkeyisforusewithnumberkeysfordirectchannelselection.NetCommandusesthesameENTERkeyforbothoperations.
WhenENTERhasamenuorguidefunctionorwhentheoriginalremotecontrolusesthesamekeyformenusandchannelselection:
LearntheENTER,SELECT,orOKkeyintheNetCommandEnterlearningposition.
Press1. MENUorGUIDE todisplaythedevice’smenuorguide.
Press2. ENTERwithinthemenuandNetCommandwillsendtheEntersignalformenus.
Enter (digits) WhenENTERisforchannelchanges,i.e.,theorigi-nalremotecontrolhasaseparateENTERkeyforthisfunction):
LearntheENTERkeyforchannelselectionintheNetCommandEnter (digits)learningposi-tion.UsethislearningpositiononlyiftheoriginalremotecontrolhasseparatekeysforEnter inmenusandEnterforchannelselection.
Pressdigitkey(s)andthenpressENTER.NetCommandwillsendtheEntersignalforchannelselection.
Cancel CANCEL as the Cancel or Exit Function
“Learn”theCancelorExitfunctionintheNetCommandCancellearningposition
Press1. MENUorGUIDEtodisplaythemenuorguide.
Press2. CANCELandNetCommandwillsendtheCancelorExitsignal.
— (separator)
Thesymbol“—”canserveastheseparatorbetweenadigitalchannel’smainandsub-channeldigits,e.g.,digitalchannel12-1(mainchannelis12,sub-channelis1).
“Learn”thechannelseparatorfunctionintheNetCommand– (separator)learningposition.
Pressdigitkey(s)andpressCANCEL.NetCommandwillsendthechannel-separatorsignal.
The MORE Key Menu and NetCommandPerformNetCommandsetupforthesedevice-specifickeysandthenaccesstheirfunctionswiththeMOREkey.
DeviceKey V
CR
Cab
le/
SA
T
DV
D/
DV
R
A/V
Rece
iver
Menu
Input
SP/EP
List
On Demand
A
B
C
D
DeviceKey V
CR
Cab
le/
SA
T
DV
D/
DV
R
A/V
Rece
iver
Top Menu
Angle
Audio (DVD)
Subtitle
Repeat
Bonus View
Setup
Surround
Night

60 5. NetCommand IR Control
NetCommand Specialized Device KeysRefertothischartwhen“learning”devicekeys.“Learn”some,all,ornoneofthekeysusedforeachdevicetype.
Seepage58formoreonkeysmarkedinthe“SpecialOperationMethod”column.
Key Name in Learning Screen
FunctionName on TV Remote Control
See Special Operation Method Table
Power On PowerOnorPowerON/OFF(toggle) Guide On-ScreenProgramGuideorDVDDiscMenus Channel +/Skip + NextChannelHigher/
SkipForward(Disc)
Channel –/Skip - NextChannelLower/SkipBackward(Disc)
Page Up PageUpinGuides
Page Dn PageDowninGuides
Up Arrowup
Down Arrowdown
Left Arrowleft
Right Arrowright
Enter EnterorSelect(menus) Cancel Cancelorerase(menus) Play Startplayback
Stop Stopplayback
Forward FastForward
Rewind Rewind/FastReverse
Pause Pauseplayback
Record StartRecording
1, 2, 3, 4, 5, 6, 7, 8, 9, 0 Digits 1, 2, 3, 4, 5, 6, 7, 8, 9, 0
Enter (digits) Useafterenteringdigitstotunedirectlytoachannelbynumber
- (separator) Adddigitalchannelseparatorbetweenmainchannelnumberandsub-channelnumber
Last LastChannelRecall
Info On-screenstatusdisplayorinformationdisplay Mayrequiretwokeypresses
Power Off PowerOff
Operating NetCommand-Controlled Devices, continued

61
6 NetCommand IR Control of an A/V Receiver
Controlling an A/V Receiver after NetCommand Setup
Switching Audio to and from the A/V Receiver
Press1. MOREandthen 9 (AUDIO).
Press2. toshowtheSpeakersoption.
Press3. toselecteitherAV ReceiverorTV.
Controlling A/V Receiver Power
With Any Connection Type
Press1. MOREandthen 9 (AUDIO).
Press2. toshowtheSpeakersoption.
Press3. toselectAV Receiver.
Pointtheremotecontrolatthe4. TV(nottheA/Vreceiver)andpressPOWERtopowertheA/Vreceiveronoroff.
With an HDMI Connection
Press1. ACTIVITY.
HighlighttheA/Vreceivericon.2. Press3. POWER.
Controlling Other A/V Receiver FunctionsWiththeA/Vreceiverpoweredonandselected,theTV’sremotecontroloperatesthevolumeandmutefunctions.Also,whenyouswitchtoadeviceintheActivitymenu,theA/Vreceiverautomaticallyswitchestothecorrectaudioinputforthedevice.
NetCommand IR home-theater control is available on 153 and 249 series TVs.
SeveraltypesofA/VreceivercontrolcanbesetupusingtheInputs> AVRmenu.
Power and volume.• Seethenextpage.
Audio switching.• Formostequipmentsetups,see“Case1:AutomaticA/VReceiverSwitchingtotheTVAudioInput”page63.
Audio switching and surround sound.• Tosetupswitchingtoasurroundsounddevice,see“Case2:AutomaticA/VReceiverSwitchingtoaSurroundSoundDevice”page64
Audio and video switching over HDMI• .IfyourA/VreceiverhasanHDMIoutput,itmaybecon-venienttosendaudioandvideototheTVoverasingleHDMIcablethroughtheA/Vreceiver.See“Case3:AutomaticAudioandVideoSwitchingviaHDMI,”page65.
Note: Tosetupcontrolofotherdevicetypes,see“InitialNetCommandSetup,”page57.

62 6. NetCommand Control of an A/V Receiver
IMPORTANTTo hear audio sent from the TV to the A/V receiver, you must have:
Physically connected the TV to the A/V •receiver.
Assigned, if needed, the name AVR if using an •HDMI A/V receiver.
“• Learned” the IR codes for the A/V receiver inputs.
Assigned the TV’s audio output to the correct •input in the NetCommand Inputs > AVR menu.
Selected the A/V receiver as the audio source. •Press MORE then 9 (AUDIO), then to show the Speakers option, then to select the A/V Receiver.
Setting Up A/V Receiver Control
Power and VolumePerformthissetuptocontroltheA/VreceiverpowerandvolumewiththeTV’sremotecontrol.
Toperformthissetupyouneed:TheremotecontrolsforboththeTVandthe•A/Vreceiver.AnIRemittercableavailablefromMitsubishi.•
Before You Begin
ConnectyourA/VreceivertotheTVandanyaddi-1. tionaldevices.See“SettingUpTVInputs,”page12and“TVConnections,”page16.
ConnecttheIRemittercabletotheTVandposition2. theIRemitterwhereitcansendsignalstotheA/Vreceiver.See“IREmitterPlacement,”page56.
Setthe3. TV’sremotecontroltoTVmodeusingthesidebutton.
Setup to Control A/V Receiver Power and Volume
Openthe1. Inputs >AVR screeninoneoftwoways:
Ifusingthe• New Device FoundscreenfortheA/Vreceiver,highlightNetCommandandpressENTERtoopentheAVRscreen.
IfperformingNetCommandsetupatanytime•afterAutoSensing:
PressMENU,highlightInputs,andhighlightAVRtoopentheAVRmenu.
Thefirstfunctionhighlightedinthe2. AVRscreenisalwaysPower.AimtheTV’sremotecontrolattheTVandpressENTERtobeginlearningforPower.
Inputs > AVR screen. Perform NetCommand IR “learning” for A/V receiver power and volume keys.
Whenthe3. Powertextstartsflashing,aimtheA/V receiver’sremotecontrolattheTVandholdthePOWERorPOWER ONkeyuntilacheckmarkappearsnexttoPower.
Ifthetextstopsflashingbeforethecheckmark•appears,repeatthisstep.
ToremovethekeyfromNetCommandcontrol,•presstheCANCELkeywhilethekeynameishighlighted.
Pressthe4. keyontheTV’sremotecontroltohigh-lightotherkeysinthelist.Repeatsteps2and3foreachadditionalfunctionyouwishtocontrolthroughNetCommand.
IftheA/Vreceiverhasaseparate5. POWER OFFkey,press ontheTV’sremotetohighlightPower Off.Repeatsteps2and3to“learn”thePOWER OFFkey.If the device has no POWER OFF key, skip this step.
Whenfinished“learning”thepowerandvolume6. keys,either
TowatchTV,press• BACK.TocontinuewithNetCommandsetuptocontrol•switchingofA/Vreceiverinputs,highlightNEXTandpressENTER.

6. NetCommand Control of an A/V Receiver 63
Automatic Switching (Audio or Audio/Video)ThefollowingsetupsenabletheA/VreceivertoswitchautomaticallytothecorrectinputwhenyouselectadeviceintheTV’sActivitymenu.
Threedifferentconnectionarrangementsaredescribedhere.Reviewthedescriptionstofindthesetupneededforyourequipment.
To hear digital surround sound from a source device you must use the setup described for Case 2.
TosetupcontrolofanA/Vreceiveryouneed:
TheremotecontrolsfortheTVandA/Vreceiver.•AnIRemittercableavailablefromMitsubishi.•Connectingcables•
IMPORTANT
All audio from what you are watching on the TV is always available from both the TV’s AVR AUDIO OUTPUT and DIGITAL AUDIO OUTPUT jacks.
To use the digital surround sound capabilities of your A/V receiver however, you must connect the audio output from your DVD player, satellite receiver, or cable box directly to the A/V receiver.
Before You Begin
ConnectyourA/VdevicestotheTVandconnect1. yourA/VreceivertotheaudiooutputsontheTVandtheDVDplayer.NotethenameofthedeviceconnectedtoeachA/Vreceiverinput.Seeinitialsetup,page12,and“TVConnections,”page16.
PositionNetCommandIRemittersasdescribedin2. “IREmitterPlacement,”page56.
SettheTV’sremotecontrolto3. TVmodeusingthesidebutton.
Openthe4. Inputs>AVRmenu,highlightNEXTandpressENTERtodisplaythedevice-key-learningmenu.
Case 1: Automatic A/V Receiver Switching to the TV Audio Input
MostdevicesaresetuptousetheTV’saudiooutputliketheVCRinthisexample;analogaudiofromthedeviceissentthroughtheTVtotheA/Vreceiver’sTVaudioinput.
Usethissetupfor:
Analog Stereo Audio. • Audiofromsourceswithonlyanalogstereooutput(suchasaVCR)canbesenteitherdirectlytotheA/VreceiverorthroughtheTVfirst.
MitsubishirecommendsyousendaudiothroughtheTVasshownintheexample.TheTVconvertsanalogaudiotodigitalformattosendtoadigitalA/Vreceiver.
Setting Up A/V Receiver Control, continued
Audio Available from TV only. • SendaudiofromtheANTinputtotheA/VreceiverfromtheTV’sanalogordigitalaudiooutput.
UsethissetuptomaketheA/VreceiverswitchtoitsdesignatedTVaudioinputwhenviewingprogrammingfromtheANTinput.
HDMI Digital Stereo Audio. • DigitalstereoaudiofromanHDMIconnectionisavailablebothindigitalandanalogformatfromtheTV’sanaloganddigitalaudiooutputjacks.
TV
audi
o +
vide
o Incoming Coaxial Cable to TV’s ANT input
A/V Receiver
TV audio input TV audio out
audio output from TV (digital or analog)
vid
eo
anal
og a
udio
VCR with Analog Audio Output
Important:Tousethissetup,youmustconnecttheTV’saudiooutputtotheA/Vreceiver’sTVaudioinputjack.
Inthe1. Inputs > AVRmenu,press tohighlightTV audio outastheA/Vreceiverinputtocontrol.
Press2. ENTERontheTV’sremotecontrol.
Whilethetext3. TV audio outisflashing,pressandholdtheTV INPUTkeyontheA/V receiver’sremotecontrol.
Whenacheckappearsnextto4. TV audio out,releasetheTV INPUTkey.
Ifthetextstopsflashingbeforethecheckmark•appears,repeatthisstep.ToerasetheIRcodejust“learned,”press•CANCELwhilethenameishighlighted.
Press5. MENUiffinishedorcontinuewithCase2setupifyouwanttocontrolsurroundsoundswitchingforanotheraudiosource.
Case 1: NetCommand setup for controlling A/V receiver switching to the A/V receiver’s audio input from the TV. The list displayed represents inputs in use. The device names are those you assigned in the New Device Found screen or in the Inputs > Name menu.

64 6. NetCommand Control of an A/V Receiver
Setting Up A/V Receiver Control, continued
Case 2: Automatic A/V Receiver Switching to a Surround Sound Device
Note: Use this setup to send digital surround sound from a source device directly to your external sound system. For non-surround sound source devices, Mitsubishi recommends using the setup for Case 1, in which audio is sent through the TV.
AdevicecansenddigitalsurroundsoundsuchasDolbyDigitalorDTSdirectlytotheA/Vreceiver.ThedevicemightbeaDVDplayer,cablebox,orsatellitereceiver,andcouldhaveHDMIoutput.ADVDplayerisusedinthisexample.
YoursetupmayincludeadditionaldeviceswithdigitalsurroundsoundconnecteddirectlytotheA/Vreceiver.ThesedevicesmightbeaDVDplayerplusacableboxorsatellitereceiver.
TVaudio + videoIncoming Coaxial
Cable
A/V Receiver
DVD audio input
DVD Player with Digital Surround Sound
video
video
digital surround sound
digital surround sound
vid
eo
anal
og a
udio
DVD Player with
Digital Surround
Sound
Case 2: A/V receiver audio from a device providing surround sound directly to the A/V receiver
Inthe1. Inputs > AVRmenu,press tohighlightthenameoftheA/Vreceiverinputtocontrol.Inthisexample,itistheDVDinput.
Press2. ENTERontheTV’sremotecontrol.
Case 2: NetCommand setup for controlling A/V receiver switching to the A/V receiver’s DVD input. The list contains connected inputs with names assigned during Auto Input Sensing.
Whilethetext3. DVDisflashing,pressandholdtheDVD INPUTkeyontheA/V receiver’sremotecontrol.
Whenacheckappearsnextto4. DVD,releasetheDVD INPUTkey.
Ifthetextstopsflashingbeforethecheckmark•appears,repeatthisstep.ToerasetheIRcodejust“learned,”press•CANCELwhilethenameishighlighted.
Iffinished,highlight5. EXITandpressENTERorcontinuetosetupadditionalA/Vreceiveraudiosources.
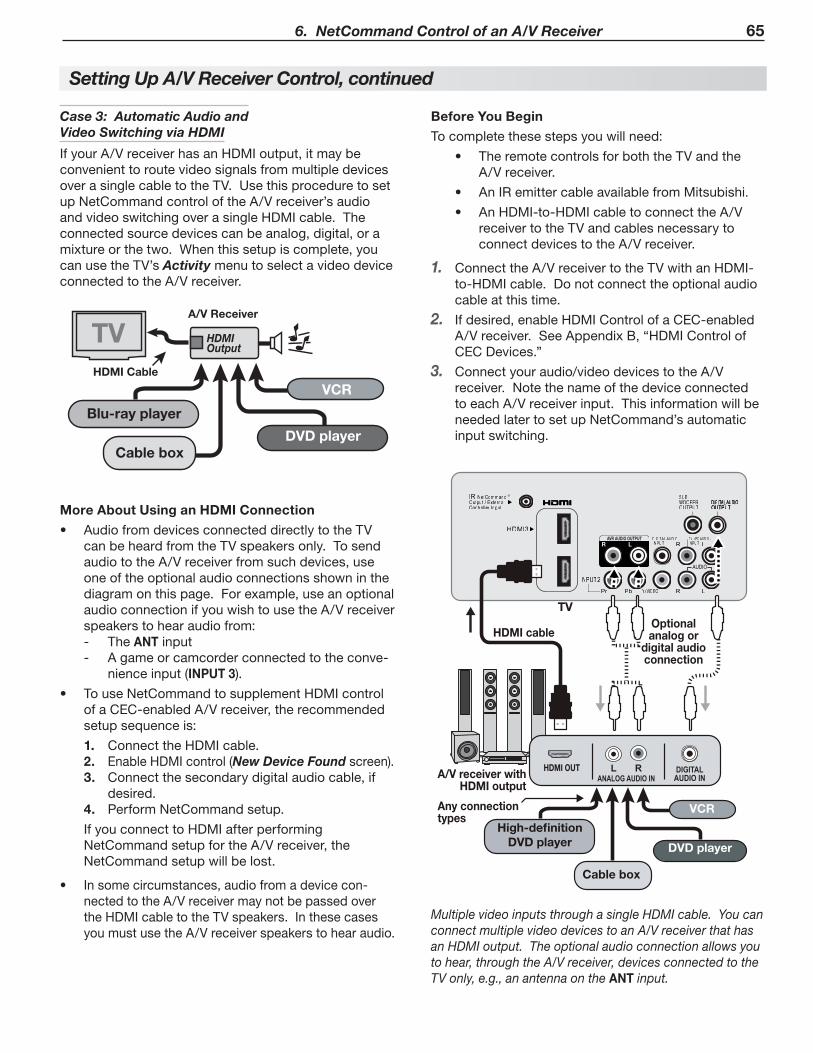
6. NetCommand Control of an A/V Receiver 65
Multiple video inputs through a single HDMI cable. You can connect multiple video devices to an A/V receiver that has an HDMI output. The optional audio connection allows you to hear, through the A/V receiver, devices connected to the TV only, e.g., an antenna on the ANT input.
AVR AUDIO OUTPUTR L
HDMI OUT DIGITALAUDIO INANALOG AUDIO IN
L R
High-definition DVD player DVD player
Cable box
VCR
AUDIOR L
TV
A/V receiver with HDMI output
Any connection types
Optional analog or
digital audio connection
HDMI cable
Before You Begin
Tocompletethesestepsyouwillneed:
TheremotecontrolsforboththeTVandthe•A/Vreceiver.
AnIRemittercableavailablefromMitsubishi.•
AnHDMI-to-HDMIcabletoconnecttheA/V•receivertotheTVandcablesnecessarytoconnectdevicestotheA/Vreceiver.
ConnecttheA/VreceivertotheTVwithanHDMI-1. to-HDMIcable.Donotconnecttheoptionalaudiocableatthistime.
Ifdesired,enableHDMIControlofaCEC-enabled2. A/Vreceiver.SeeAppendixB,“HDMIControlofCECDevices.”
Connectyouraudio/videodevicestotheA/V3. receiver.NotethenameofthedeviceconnectedtoeachA/Vreceiverinput.ThisinformationwillbeneededlatertosetupNetCommand’sautomaticinputswitching.
Setting Up A/V Receiver Control, continued
Case 3: Automatic Audio and Video Switching via HDMI
IfyourA/VreceiverhasanHDMIoutput,itmaybeconvenienttoroutevideosignalsfrommultipledevicesoverasinglecabletotheTV.UsethisproceduretosetupNetCommandcontroloftheA/Vreceiver’saudioandvideoswitchingoverasingleHDMIcable.Theconnectedsourcedevicescanbeanalog,digital,oramixtureorthetwo.Whenthissetupiscomplete,youcanusetheTV’sActivitymenutoselectavideodeviceconnectedtotheA/Vreceiver.
VCR with Analog Audio Output
A/V Receiver
HDMI Output
digital surround sound
HDMI Cable
Blu-ray player
DVD playerCable box
VCR
TV
More About Using an HDMI Connection
AudiofromdevicesconnecteddirectlytotheTV•canbeheardfromtheTVspeakersonly.TosendaudiototheA/Vreceiverfromsuchdevices,useoneoftheoptionalaudioconnectionsshowninthediagramonthispage.Forexample,useanoptionalaudioconnectionifyouwishtousetheA/Vreceiverspeakerstohearaudiofrom:
The- ANTinputAgameorcamcorderconnectedtotheconve--nienceinput(INPUT 3).
TouseNetCommandtosupplementHDMIcontrol•ofaCEC-enabledA/Vreceiver,therecommendedsetupsequenceis:
ConnecttheHDMIcable.1. EnableHDMIcontrol(2. New Device Foundscreen).Connectthesecondarydigitalaudiocable,if3. desired.PerformNetCommandsetup.4.
IfyouconnecttoHDMIafterperformingNetCommandsetupfortheA/Vreceiver,theNetCommandsetupwillbelost.
Insomecircumstances,audiofromadevicecon-•nectedtotheA/VreceivermaynotbepassedovertheHDMIcabletotheTVspeakers.InthesecasesyoumustusetheA/Vreceiverspeakerstohearaudio.

66 6. NetCommand Control of an A/V Receiver
IfusinganoptionalaudiocablebetweentheTVand4. A/Vreceiver,connectit.
ConnecttheIRemittercabletotheTVandposition5. theIRemitterwhereitcansendsignalstotheA/Vreceiver.See“IREmitterPlacement,”page56.
Setup to Control Automatic Audio and Video Switching via HDMI
Whenthissetupiscomplete,the“learned”A/VreceiverinputwillappearintheTV’sActivitymenuasaselect-ableinput.
PowerontheA/Vreceiver.1. Setthe2. TV’sremotecontroltoTVmodeusingthesidebutton.
PowerontheTV.3. Whenthe4. New Device Foundscreendisplays,selectdevicenameAVRifitisnotrecognizedauto-matically.
Navigatetothe5. Inputs > AVRmenuor,fromwithintheNew Device Foundscreen,highlightNetCommandandpressENTER.
To set up A/V switching over HDMI, choose your devices from a list. Unlike the device list described for Case 2, this is a generic list containing more than just the devices detected in your setup.
Inthe6. Inputs > AVRmenu,press tohighlightthenameoftheA/Vreceiverinputtocontrol.Inthisexample,itistheDVDinput.
Press7. ENTERontheTV’sremotecontrol.
Whilethetext8. DVDisflashing,pressandholdtheDVD INPUTkeyontheA/V receiver’sremotecontrol.
Whenacheckappearsnextto9. DVD,releasetheDVD INPUTkey.
Ifthetextstopsflashingbeforethecheckmark•appears,repeatthisstep.ToerasetheIRcodejust“learned,”press•CANCELwhilethenameishighlighted.
Iftherearenomoredevicestosetup,highlight10. EXITandpressENTERorcontinuetosetupaddi-tionalA/Vreceiveraudio/videosources.
Setting Up A/V Receiver Control, continued
NetCommand Control of a Device Con-nected to an HDMI A/V Receiver
UsethissetuptohaveNetCommandcontroladevicesendingaudioandvideothroughtheA/VreceivertotheTVviaHDMI.
Youmusthavealreadycompletedtheprocedureunder“SetuptoControlAutomaticAudioandVideoSwitchingviaHDMI”onthispage.ThatprocedureplacesaniconintheActivitymenuforthedevice(input)connectedtotheA/Vreceiver.
HDMI Cable
TV
Any Connection Type
Source Device
A/V Receiver
SetupNetCommandcontrolofA/Vreceiveraudio/1. videoswitchingviaHDMIasdescribedonthispage.
Press2. BACKtocloseanyopenmenusandreturntonormalTVviewing.
Press3. ACTIVITY.
HighlighttheiconfortheA/Vreceiverinputyou4. wishtocontrol.
Press5. ENTERtoswitchtheTVtotheA/VreceiverandtheA/Vreceivertotheinput.
Openthe6. Inputs > Learnmenu.
PerformNetCommand“learning”forthecon-7. necteddevicebyfollowingthestepsin“InitialNetCommandSetup,”page57.

67
Appendix A: Programming the Remote Control . . . . . . . . . . . 68
Appendix B: HDMI Control of CEC Devices . . . . . . . . . . . . . . 75
Appendix C: TV Care . . . . . . . . . . . . . . . . . . . . . . . . . . . 78
Appendix D: Bypassing the Parental Lock . . . . . . . . . . . . . . 79
Appendix E: Troubleshooting . . . . . . . . . . . . . . . . . . . . . . 81
Appendices

68 Appendices
ThisappendixexplainsprogrammingtheTV’sremotecontroltooperateotherA/Vdevices.ThisisdistinctfromNetCommandcontrol.
Functions Available for Other A/V DevicesTheTV’sremotecontrolcanbeprogrammedtooperateothertypesandbrandsofA/Vproducts.Thefunctionsperformedineachswitchpositionvarydependingontheproduct.Notallfunctionsworkforallmodels.Themostcommonfunctionsavailablearelistedonthispage.
Control modes
VCRs and DVRs
• CHANNEL UP/DN• POWER• SLEEP(fromMOREmenu)• (FAST FORWARD)• (PAUSE)• (PLAY)
• (RECORD)• (REVERSE)• (STOP)• GUIDE(DVRonly)• MENU (DVRonly)• 0–9NumberButtons
MitsubishiVCRsarecompatiblewithsomeadditionalkeys.
Cable Boxes and Satellite Receivers
(notallfunctionsforallmodels)
• PAGE UP/DOWN• CANCEL• CHANNEL UP/DN• ENTER• GUIDE• POWER• • LAST(ENTER;forchan-
nelsonsomemodels)• 0–9NumberKeys
Therecord/playbackkeys:• (FAST FORWARD)• (PAUSE)• (PLAY)• (RECORD)• (REVERSE)• (STOP)
249 Series Keys for Cable Boxes
FAV•ON DEMAND•F1–F4•
A/V Receivers
• MUTE• POWER• SLEEP(fromMOREmenu)• VOLUME• 0–9NumberButtons
• DirectInputSelectionbuttons:numbersandLAST(onsomeMitsubishimodels)
CD Players
(notallfunctionsforallmodels)
• SLEEP(fromMOREmenu)• (FAST FORWARD)• (PAUSE)• (PLAY)
• (REVERSE)• (STOP)• 0–9NumberButtons
DVD Players
(notallfunctionsforallmodels)
• CANCEL(onsomemodels)
• CHANNEL UP/DN(fortrackskiponsomemodels)
• ENTER• MENU• POWER• SLEEP(fromMOREmenu)•
• (FAST FORWARD)• (PAUSE)• (PLAY)• (RECORD)• (REVERSE)• (STOP)• 0-9NumberKeys
Appendix A: Programming the Remote Control
IMPORTANTSome manufacturers may change their products or they may use more than one remote control system. The TV’s remote control may be unable to operate your A/V equipment in these cases.
GUIDE MENU INFO BACK
ACTIVITY
To use the remote after programming, press the side button to change the control mode to match the device type.
The MORE MenusPresstheMOREkeytodisplayamenushowingaddi-tionalkeyfunctionsavailableafterprogrammingtheremotecontrolforadevice.
249 Series Supplemental KeysThesupplementalcableboxkeysofferedwiththe249seriesmayprovideadditionalcontrols.Programtheremotecontrolforyourcableboxandtestthekeys.
TheTV’sremotecontrolmayoperatetheFavoritesandOnDemandfeaturesofyourcablebox.
TheF1–F4keysworkliketheA,B,C,Dbuttonsonsomecableboxes.

Appendices 69
Programming the Remote ControlPressthesidebuttonontheremotecontrolto1. changetothecorrectmodefortheproductyouwanttocontrol.Refertothetablebelow.Onlyoneofeachdevicetypecanbecontrolledineachmode.
Mode Affected Device
CABLE/SAT CableBoxDTVReceiverSatelliteReceiver
VCR VCRDVRDVDPlayer/Recorder
DVD DVDPlayer/RecorderDVRVCR
AUDIO A/VReceiverAudioAmplifierCDPlayer
Pressandhold2. POWERontheremotecontrolforseveralsecondsuntilthemodeindicatorblinkstwiceandgoesoff.
Releasethe3. POWERkey.
Enterthefirstfive-digitcodelistedforyourequip-4. ment.
Themodeindicatorblinkstwicewhenyou•starttoenterthecodeandthenonceforeachadditionalkeypress.
Themodeindicatorblinkstwicewhenyoufinish•enteringavalidcode.
Ifyouneedtostartoverorwishtoexitpro-•grammingmode,temporarilychangetoadifferentmodeusingthesidebutton.
Pointtheremotecontrolattheequipmentand5. pressPOWER.Iftheproducthasnopoweron/offfunction,pressadifferentkey,suchas (PLAY),
(STOP), VOLUME UP,or MUTE.
Iftheequipmentresponds,theremotecontrol•isproperlyprogrammed.
Iftheequipmentdoesnotrespond,repeat•steps2–4withthenextfive-digitcodelistedforyourequipment.
Onceyouhavefoundthecorrectcode,writeitin6. thespacebelowforfuturereference.
Mode Device Type Code
CABLE/SAT
VCR
DVD
AUDIO
IMPORTANTYou may need to reprogram the remote control after changing the batteries. Record the codes for each mode in the space provided to make this faster.
Code Verification
Todeterminethecodeprogrammedforanymode:
Setthemodetotheoneyouwishtoverify.1. Pressandhold2. POWERontheremotecontrolforseveralsecondsuntilthemodeindicatorblinkstwiceandgoesoff.
Presskeys3. 9 9 0
Press4. 1andcounttheblinksofthepowerkey.Writedownthenumberofblinksasthefirstdigitofthecode.
Repeatstep4forthesecond,third,fourth,andfifth5. digitsofthecode.
Audio Lock: Universal A/V Receiver ControlWithAudioLockenabled,theremotecontroloperatesvolumeandmuteontheA/Vreceiverinallmodessetbythesidebutton.ActivateAudioLockifyounormallyuseanA/VreceiverwithyourTVandotherA/Vequipment.
Program1. AUDIOmodeforyourA/Vreceiverasdescribedin“ProgrammingtheRemoteControl”onthispage.
Withtheremotecontrolin2. AUDIOmode,holdPOWERontheremotecontrolforseveralsecondsuntilthemodeindicatorblinkstwiceandgoesoff.
Presskeys3. 9 9 3 ENTER
ThemodeindicatorwillblinktwicetoindicateAudioLockisactive.
To Reset the Remote Control to Operate Volume and Mute for the TV Speakers
Pressandhold1. POWERforseveralsecondsuntilthemodeindicatorblinkstwiceandgoesoff.
Presskeys2. 9 9 3 VOLUME UP.
ThemodeindicatorwillblinkfourtimestoindicateAudioLockhascleared.
Appendix A: Programming the Remote Control, continued

70 Appendices
Programming Codes
Appendix A: Programming the Remote Control, continued
Audio AmplifiersAdcom 41100,40577AltecLansing 41742BelCantoDesign
41583
Bose 40674Carver 40892CaryAudioDesign
41879
Classe 41461Flextronics 41879Halcro 41934Harman/Kardon
40892
JVC 40331Krell 41837LeftCoast 40892Lexicon 41802,41145Marantz 40892MarkLevinson
41483
Parasound 41934Philips 40892PolkAudio 40892Victor 40331Yamaha 40354
Cable BoxesA-Mark 10144,10008ABC 10237,10008Acorn 10237Action 10237Active 10237Americast 10899Amino 11822,11602Archer 10237BellSouth 10899Century 10008Cisco 11982,11877,10877Comcast 11982Digeo 12187Director 10476GE 10144GeneralInstrument
10476
GoldStar 10144Hitachi 10008i3Micro 11602Insight 10476Jerrold 10476Memorex 10000Motorola 11376,11254,10476Myrio 11822,11602NovaVision 10008Novaplex 10008Pace 11877,10877,10237,
10008Panasonic 11982,10144,10008,
10000
Cable BoxesParagon 10525,10008,10000Penney 10000Philips 11305Pioneer 11877,10877,10533,
10144Pulsar 10000Quasar 10000Runco 10000Samsung 10144ScientificAtlanta
11877,10877,10477,10237,10008,10000
Sejin 11602Sony 11006Sprucer 10144Toshiba 10000USElec-tronics
10008
Videoway 10000Zenith 10899,10525,10000
CD PlayersAcousticResearch
40420
Akai 40083Burmester 40420CaliforniaAudioLabs
40029
DKK 40000Fisher 40000Garrard 40420Hafler 40173Harman/Kardon
41202,40173,40100,40083
Inkel 40180Integra 40101JVC 41294,40072Kenwood 40626,40190,40037,
40029,40000KLH 41711,41318Koss 41317LG 41208Magnavox 40038Marantz 40626,40435,40180,
40038,40029McIntosh 41703MCS 40029Memorex 40420,40000MGA 40083Miro 40000Mitsubishi 40098,40083Modulaire 40420,40180,40087,
40000MTC 40420NAD 41208Onkyo 41327,40101Optimus 40420,40087,40037,
40000Panasonic 40752,40388,40029
CD PlayersParasound 40420Penney 40029Philips 40626Pioneer 41087Proceed 40420Quasar 40029RadioShack 40420,40180,40000RCA 40420Realistic 40420,40180,40087,
40000Roksan 40435Rotel 40420Sansui 40000Sanyo 40087,40000Sharp 40180,40037Sherwood 41950,40180Sony 41364,40490,40185,
40100,40000Symphonic 40180Tascam 40420TDK 41208Teac 40490,40420,40180Technics 40029Victor 40072Wards 40087Yamaha 41292,40490,40036Yorx 40000
A/V ReceiversADC 40531Aiwa 41641,41405,41388,
41243,40189,40121Alco 41390AMC 41077Anam 41609,41074Arcam 41189Audiotronic 41189Audiovox 41390Bose 41933,41841,41629,
41253,41229,40639Cairn 40189Capetronic 40531Carver 41289,41189,40189,
40121CurtisMathes
40014
Daewoo 41250Denon 41360,41306,41142,
40121Emerson 40531Fisher 41801Grundig 40189Harman/Kardon
41306,41304,41289,40891,40189,40110
Hitachi 41801Insignia 42169,41893,41077,
41030

Appendices 71
Programming Codes, continued
Appendix A: Programming the Remote Control, continued
A/V ReceiversIntegra 41805,41320,41298,
40842JBL 41306,40110JVC 42331,41643,41495,
41374,41282,41058Kawasaki 41390Kenwood 41570,41569,41313KLH 41428,41390LG 42197,41293Linn 40189Magnavox 41514,41269,41266,
41189,40531,40189Marantz 41289,41269,41189,
40891,40189McIntosh 41289Micromega 41189,40189Mitsubishi 41957,41922,41921,
41920,41393Myryad 41189Nakamichi 41313Onkyo 41905,41805,41320,
41298,40842Optimus 41074,41023,40531,
40121,40014Panasonic 42967,41764,41763,
41633,41548,41518,41509,41316,41308,41288,41275
Philips 41269,41266,41189,40891,40531,40189
Pioneer 41935,41384,41123,41023,40630,40531,40150,40014
Polaroid 41508PolkAudio 41289,40189Proscan 41254RadioShack 41609RCA 41609,41511,41390,
41254,41123,41074,41023,40531
Realistic 41609,40121Revox 40189Rio 41869Samsung 41500,41304,41295Sansui 41189,40189Sanyo 41801Sherwood 42169,41905,41077SherwoodNewcastle
42169
SonicBlue 41869Sony 41858,41822,41759,
41758,41658,41622,41558,41441,41382,41258,41131,41058
Stereophonics 41023Sunfire 41313Teac 41390,41074
A/V ReceiversTechnics 41518,41308Thorens 41189Toshiba 41788,41123,40842Venturer 41390Wards 40189,40014Yamaha 41815,41476,41376,
41375,41331,41276,41176,41023,40176
YBA 41921Zenith 41293
Satellite ReceiversBellExpressVu 11170,10775Chaparral 10216Crossdigital 11109DirecTV 11856,11749,11640,
11639,11609,11442,11414,11392,11377,11142,11109,10819,10749,10639,10566,10392,10247,10099
DishNetworkSystem
11775,11505,11170,10775
Dishpro 11775,11505,10775Echostar 11775,11505,11170,
10775Expressvu 11775,10775FortecStar 11821Funai 11377GE 10566GOI 11775,10775Hitachi 11250,10819,10749Houston 10775HTS 11775,10775HughesNetworkSystems
11749,11442,11142,10749
Humax 11790,11781Innova 10099JVC 11775,11170,10775LG 11414Magnavox 10722Mitsubishi 10749Netsat 10099Panasonic 10701,10247Pansat 11807Philips 11749,11442,11142,
10775,10749,10722,10099
Proscan 10566,10392RadioShack 10775,10566RCA 11442,11392,11142,
10855,10775,10566,10392,10143
Samsung 11609,11442,11377,11276,11142,11109
Satellite ReceiversSKY 10099Sony 11640,11639,10639Thomson 10566,10392Tivo 11442,11142Toshiba 11749,10790,10749UltimateTV 11640,11392Uniden 10722Zenith 11856,11810
VCRsA-Mark 20278,20046,20037,
20000ABS 21972Accurian 20000Admiral 20479,20209,20060,
20048,20047,20039Adventura 20037,20000Aiko 20278Aiwa 20124,20037,20000Akai 20242,20175Alba 20278,20209Alienware 21972Allegro 20039AmericaAction
20278
AmericanHigh
20081,20035
Amstrad 20000Astra 20035Audiovox 20278,20038,20037Avis 20000Bell&Howell
20479,20048,20046,20039,20035,20000
BellExpressVu
21944
Broksonic 20479,20209,20184,20121
Calix 20037Candle 20038,20037Canon 20035Carver 20081,20035CCE 20278Cineral 20278Citizen 20479,20278,20209,
20037,20035,20000Classic 20037Colortyme 20278,20060,20045,
20035Colt 20000Craig 20047,20037Criterion 20000Crosley 20081,20035,20000Crown 20278CurtisMathes
20432,20278,20162,20060,20035,20000
CyberPower 21972Daewoo 20278,20046,20045,
20037

72 Appendices
Programming Codes, continued
Appendix A: Programming the Remote Control, continued
VCRsDaytron 20278,20037Dell 21972Denon 20081,20042DirecTV 20739DishNetworkSystem
21944
Dishpro 21944Dual 20000Durabrand 20039,20038Dynatech 20000Echostar 21944Electrohome 20209,20060,20043,
20037,20000Electrophonic 20037Emerald 20184,20121Emerex 20032Emerson 21593,20593,20479,
20278,20209,20184,20121,20043,20037,20000
Expressvu 21944Fisher 20047,20046,20039,
20000Fuji 20035,20033Fujitsu 20000Funai 21593,20593,20278,
20037,20000Garrard 20000Gateway 21972GE 20060,20048,20035,
20000Gemini 20060Genexxa 20278,20037,20000GFM 21593GoVideo 20614,20432GOI 21944GoldStar 20278,20039,20038,
20037,20035,20000Goodmans 20278,20081,20037,
20000Gradiente 20000Granada 20081,20042Grundig 20081HarleyDavidson
20000
Harman/Kardon
20081,20075,20038
Headquarter 20046HewlettPackard
21972
HI-Q 20047,20035,20000Hitachi 20089,20045,20042,
20037,20035,20000HowardComputers
21972
HP 21972
VCRsHTS 21944HughesNetworkSystems
20739,20042
Humax 21988,21797,20739Hush 21972Hytek 20047,20000iBUYPOWER 21972InstantReplay
20035
Jensen 20067JVC 21944,20067KEC 20278,20037Kenwood 20067,20046,20038Kodak 20037,20035KTV 20000LG 20038,20037Linksys 21972Lloyd’s 20038,20000Loewe 20081Logik 20000Lumatron 20278Luxor 20046LXI 20067,20042,20037,
20000Magnasonic 20593,20278,20037,
20000Magnavox 21593,20618,20593,
20563,20081,20048,20039,20037,20035,20000
Marantz 20081,20038,20035Marta 20037Matsui 20209,20037Matsushita 20162,20081,20035MediaCenterPC
21972
MEI 20035Memorex 20479,20278,20209,
20162,20048,20047,20046,20039,20037,20035,20000
Metz 20037MGA 20060,20043Microsoft 21972Mind 21972Minolta 20042Mitsubishi 20443,20242,20214,
20173,20075,20067,20060,20048,20047,20043,20042,20000
Motorola 20048,20035MTC 20000MTX 20000Multitech 20039,20000NEC 20067,20038Nikko 20278,20037
VCRsNikkodo 20278,20037NiveusMedia
21972
Northgate 21972Olympus 20162,20035Onkyo 20222Optimus 21062,21048,20593,
20432,20162,20048,20047,20037,20035,20000
Orion 20479,20278,20209,20184,20121,20000
Panama 20035Panasonic 21062,20616,20614,
20225,20162,20035,20000
Penney 20162,20081,20067,20047,20042,20038,20037,20035,20000
Pentax 20042Philco 20479,20209,20081,
20035,20000Philips 21181,21081,20739,
20618,20616,20209,20162,20081,20048,20045,20035,20000
Pilot 20037Pioneer 20162,20081,20067,
20042PolkAudio 20081Portland 20278Presidian 21593Proscan 20060Protec 20000Pulsar 20278,20039Quarter 20046Quartz 20047,20046,20035Quasar 20162,20035RadioShack 20162,20048,20047,
20046,20037,20035,20000
Radix 20037Randex 20037RCA 20880,20060,20048,
20045,20042,20035,20000
Realistic 20278,20162,20121,20048,20047,20046,20037,20035,20000
ReplayTV 20616,20614Ricavision 21972Runco 20039Salora 20075Samsung 20739,20432,20060,
20045,20038,20000Sanky 20048,20039

Appendices 73
Programming Codes, continued
Appendix A: Programming the Remote Control, continued
VCRsSansui 20479,20209,20067,
20000Sanyo 20479,20159,20047,
20046,20000Scott 20184,20121,20045,
20043Sears 20209,20162,20067,
20060,20048,20047,20046,20045,20043,20042,20039,20037,20035,20033,20000
Sharp 20848,20048,20047,20032,20000
Shintom 20039,20000Siemens 20037Signature 20479,20060,20048,
20046,20037,20035,20000
Singer 20037SonicBlue 20616,20614Sonographe 20046Sony 21972,21032,20636,
20067,20047,20046,20035,20033,20032,20000
Soundmaster 20000Stack9 21972STS 20042SV2000 20000SVA 20000Sylvania 21593,20593,20081,
20043,20035,20000Symphonic 21593,20593,20000Systemax 21972TagarSystems
21972
Tandy 20000Tashiko 20037Tatung 20081,20067,20048,
20000Teac 20067,20000Technics 20162,20037,20035,
20000Teknika 20037,20035,20000Tevion 20479Thomas 20000Thomson 20060Tisonic 20278Tivo 21944,20739,20636,
20618TMK 20000TNIX 20037Toshiba 21988,21972,21008,
20209,20045,20043,20000
Tosonic 20278Totevision 20037
VCRsTouch 21972Trix 20037Ultra 20278,20045Vector 20045VectorResearch
20184,20038
Victor 20067VideoCon-cepts
20242,20045
Videomagic 20037Videosonic 20000Viewsonic 21972Villain 20000Voodoo 21972Wards 20479,20081,20060,
20048,20047,20046,20045,20043,20042,20038,20037,20035,20033,20000
Wharfedale 20593WhiteWestinghouse
20479,20278,20209,20000
World 20479,20209XR-1000 20035,20000Yamaha 20038Zenith 21139,20479,20278,
20209,20039,20037,20033,20000
ZTGroup 21972
DVD and Blu-ray Players3DLAB 30539,30503Accurian 31416,30675AcousticSolutions
30730
Adcom 31094Afreey 30698Aiwa 30641,30533Akai 31089,30770,30705,
30695Alba 30717,30672Alco 30790Allegro 30869AmphionMediaWorks
30872
AMW 30872ApexDigital 31061,31056,31020,
31004,30797,30796,30794,30755,30717,30672,30533
Arrgo 31023AspireDigital
31168,31407
Astar 31489Audiovox 31041,30790,30717Awa 30730
DVD and Blu-ray PlayersB&K 30662,30655BBK 31224BelCantoDesign
31571
Blaupunkt 30717BlueParade 30571BlueSky 30699,30695Bose 32023,31895Brandt 30651Broksonic 30695CaliforniaAudioLabs
30490
Celestial 31020Centrex 31004,30672Cinea 30831CineVision 30869,30833Citizen 32116,31587,31277,
31003,30695Clairtone 30571Coby 31351,31177,31165,
31107,31086,31077,30852,30778
Craig 30831Creative 30539,30503CurtisMathes
31087
CyberHome 31537,31502,31129,31117,31024,31023,30874,30816
Cytron 30705Daewoo 31242,31234,31172,
31169,30869,30833,30784,30770,30705
Dansai 30770Daytek 30872Decca 30770Denon 32258,30634,30490Denver 30778Desay 31407DigitalMax 31738Digitrex 30672Disney 31270,30675DiViDo 30705Dual 31068,30675Durabrand 31127,31023DVD2000 30521Electrohome 32116,31003Emerson 31268,30675,30591Enterprise 30591Entivo 30539,30503Enzer 30770ESA 31268Firstline 30651Fisher 30670Funai 31268,30675Gateway 31158,31077,31073GE 30815,30717,30522
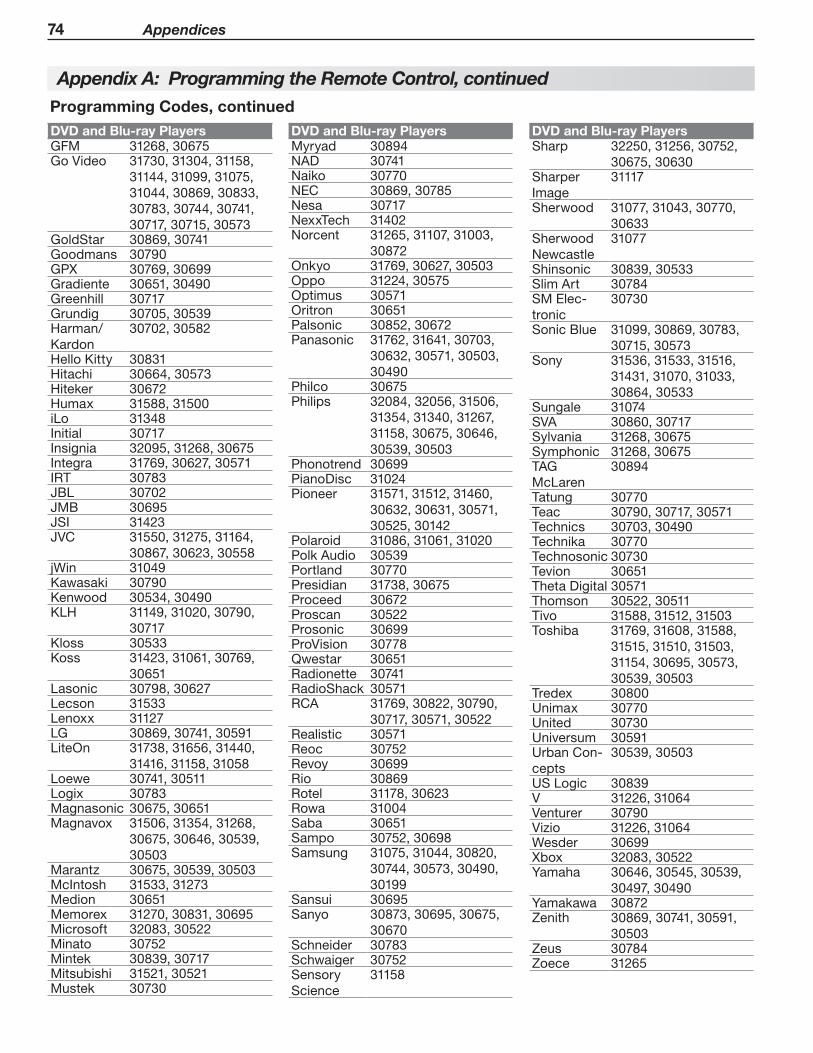
74 Appendices
Programming Codes, continued
Appendix A: Programming the Remote Control, continued
DVD and Blu-ray PlayersGFM 31268,30675GoVideo 31730,31304,31158,
31144,31099,31075,31044,30869,30833,30783,30744,30741,30717,30715,30573
GoldStar 30869,30741Goodmans 30790GPX 30769,30699Gradiente 30651,30490Greenhill 30717Grundig 30705,30539Harman/Kardon
30702,30582
HelloKitty 30831Hitachi 30664,30573Hiteker 30672Humax 31588,31500iLo 31348Initial 30717Insignia 32095,31268,30675Integra 31769,30627,30571IRT 30783JBL 30702JMB 30695JSI 31423JVC 31550,31275,31164,
30867,30623,30558jWin 31049Kawasaki 30790Kenwood 30534,30490KLH 31149,31020,30790,
30717Kloss 30533Koss 31423,31061,30769,
30651Lasonic 30798,30627Lecson 31533Lenoxx 31127LG 30869,30741,30591LiteOn 31738,31656,31440,
31416,31158,31058Loewe 30741,30511Logix 30783Magnasonic 30675,30651Magnavox 31506,31354,31268,
30675,30646,30539,30503
Marantz 30675,30539,30503McIntosh 31533,31273Medion 30651Memorex 31270,30831,30695Microsoft 32083,30522Minato 30752Mintek 30839,30717Mitsubishi 31521,30521Mustek 30730
DVD and Blu-ray PlayersMyryad 30894NAD 30741Naiko 30770NEC 30869,30785Nesa 30717NexxTech 31402Norcent 31265,31107,31003,
30872Onkyo 31769,30627,30503Oppo 31224,30575Optimus 30571Oritron 30651Palsonic 30852,30672Panasonic 31762,31641,30703,
30632,30571,30503,30490
Philco 30675Philips 32084,32056,31506,
31354,31340,31267,31158,30675,30646,30539,30503
Phonotrend 30699PianoDisc 31024Pioneer 31571,31512,31460,
30632,30631,30571,30525,30142
Polaroid 31086,31061,31020PolkAudio 30539Portland 30770Presidian 31738,30675Proceed 30672Proscan 30522Prosonic 30699ProVision 30778Qwestar 30651Radionette 30741RadioShack 30571RCA 31769,30822,30790,
30717,30571,30522Realistic 30571Reoc 30752Revoy 30699Rio 30869Rotel 31178,30623Rowa 31004Saba 30651Sampo 30752,30698Samsung 31075,31044,30820,
30744,30573,30490,30199
Sansui 30695Sanyo 30873,30695,30675,
30670Schneider 30783Schwaiger 30752SensoryScience
31158
DVD and Blu-ray PlayersSharp 32250,31256,30752,
30675,30630SharperImage
31117
Sherwood 31077,31043,30770,30633
SherwoodNewcastle
31077
Shinsonic 30839,30533SlimArt 30784SMElec-tronic
30730
SonicBlue 31099,30869,30783,30715,30573
Sony 31536,31533,31516,31431,31070,31033,30864,30533
Sungale 31074SVA 30860,30717Sylvania 31268,30675Symphonic 31268,30675TAGMcLaren
30894
Tatung 30770Teac 30790,30717,30571Technics 30703,30490Technika 30770Technosonic 30730Tevion 30651ThetaDigital 30571Thomson 30522,30511Tivo 31588,31512,31503Toshiba 31769,31608,31588,
31515,31510,31503,31154,30695,30573,30539,30503
Tredex 30800Unimax 30770United 30730Universum 30591UrbanCon-cepts
30539,30503
USLogic 30839V 31226,31064Venturer 30790Vizio 31226,31064Wesder 30699Xbox 32083,30522Yamaha 30646,30545,30539,
30497,30490Yamakawa 30872Zenith 30869,30741,30591,
30503Zeus 30784Zoece 31265

Appendices 75
Ifpromptedforaname,4. highlightthenameyouwanttoassignthedevice.
Highlight5. On.
Highlight7. EXITandpressENTERtoclosetheNew Device Foundscreen.
Note: AtanytimeaftercompletingAutoInputSens-ing,youcansettheTV’sHDMIcontrolonoroffintheInputs > HDMI Controlmenu.
153 or 249 Series.8. TosupplementHDMIcontrolwithNetCommandIRcontrol,seepage55.
ManynewHDMIdeviceshaveafeaturecalledCon-sumerElectronicsControl(CEC)orHDMIControl.HDMIControlallowsonedevice,suchastheTV,tocontrolotherdevices,suchasanA/Vreceiverordiscplayer.UseofCECisoptional.
EachmanufacturerchooseswhichCECfunctionstosupportsoitisdifficulttopredictwhichdevicesandfeaturesarecompatiblewithMitsubishi’sHDMIControl.YoumayfindthatCECfunctionsforaspecificdevicearelimited.
To use HDMI Control, you must enable it in both the TV and the device.
In the TV.• EnableHDMIcontrolfromtheNew Device FoundscreenorfromtheInputs > HDMI Controlmenu.
I• n the Device.MostdeviceswithHDMICECcom-patibilityletyouturnitonoroffinthedevicemenus,whereitistypicallylistedas“HDMIControl.”
Enabling HDMI Control of CEC DevicesToensureproperdetection
PoweronHDMIdevicesbeforeconnectingthemto•theTV.ConnectandsetupHDMIdevicesoneatatime.•
Poweronthedeviceandallowittocompletethe1. power-onsequence(bootup).Stopanyplayback.
ConnectthedevicetooneoftheTV’sHDMIinputs.2. WhentheTVdetectstheconnection,the3. New Device Found screenwillappear.
Note: See“IftheNewDeviceFoundScreenDisplaysNoHDMIControlOption”onthispageifthereisnoHDMIControloption.
New Device Found screen with HDMI Control option. This screen displays only if the device’s HDMI Control is enabled.
Appendix B: HDMI Control of CEC Devices
If the New Device Found Screen Displays No HDMI Control OptionIftheNew Device FoundscreenshowsnooptionforHDMIControl,oneoftheseconditionsapplies:
HDMI Control is turned off in the menus of the •new device
Action:Highlighta. EXITandpressENTERtoclosetheNew Device Foundscreen.Displaythedevice’ssetupmenusandenableb. thedevice’sCECcapabilities.WaitfortheTV’sc. New Device Foundscreentoappearagain.Ifthed. New Device Foundscreendoesnotappear,poweroffthedevice.PoweronthedeviceandwaitfortheNew Device FoundscreentodisplaywiththeHDMIControloption.
The device does not have CEC compatibility•
Action:
Controlthedevicewithitsownremote-controlorprogramtheTV’sremotecontroltooperatethedevice.
153 and 249 Series.- UsetheTV’sNetCommandIRcontrol(page55).

76 Appendices
HDMI Control of an HDMI A/V Receiver and Connected Devices
Note: ConnecttheA/VreceivertotheTVwithanHDMIcablebeforemakingotherconnections.
EnableHDMIControlfortheA/Vreceiveras1. describedin“EnablingHDMIControlofCECDevices”onthepreviouspage.
PowerontheHDMIdeviceyouwishtoconnectto2. theA/Vreceiver(suchasadiscplayer,cablebox,orsatellitereceiver).Allowthedevicetocompletethepower-onsequence(bootup).Stopplaybackifthedevicestartsplaying.
ConnectthedevicetotheA/Vreceiverwithan3. HDMIcable.
Selectthedevice’sHDMIinputontheA/Vreceiv-4. er’sfrontpanelcontrolsorremotecontrol.
WhentheTVdetectstheconnection,the5. New Device Found screenwillappear.
Note: IftheTVisunabletodetectthedevice,eitherthedevice’sCECcapabilityisnotenabledorthedeviceisnotCECcompatible.EnableHDMIcontrolthroughthedevice’smenusbeforecontinuing.Youmayneedtotemporar-ilyconnectthedevicedirectlytotheTVtoviewdevicemenus.
Highlight6. On.
Highlight7. EXITandpressENTERtoclosetheNew Device Foundscreen.
Optional:ConnecttheTV’s8. DIGITAL AUDIO OUTPUTtoaninputontheA/Vreceiver.Usethisadditionalconnectionif:
YouwanttheabilitytoswitchbetweentheA/V•receiverspeakersandtheTVspeakers.YouwanttousetheA/Vreceivertolistento•devicesconnectedtotheTVonly,e.g.,anantennainputorcamcorder.
153 Series.9. Ifdesired,performNetCommandIRLearningtosupplementCECfunctions.YoumustfirstconnectandplaceIRemittersforthedevices.Seepage55.
AVR AUDIO OUTPUTR L
HDMI OUT DIGITALAUDIO INANALOG AUDIO IN
L R
High-definition DVD player DVD player
Cable box
VCR
AUDIOR L
TV
A/V receiver with HDMI
output
HDMI cable
HDMI cables
Optional digital audio
cable
Connecting HDMI devices. The optional digital audio connection allows you to hear audio through the A/V receiver from devices connected to the TV only.

Appendices 77
Using HDMI ControlAsanexampleofusingHDMIControl,pressPLAYonthedeviceitselfto:
PowerontheTV•Switchtothedevice(noneedtodisplaythe•Activitymenu)Beginplayofthedevice•
Direct Keys
TestyourequipmentwiththeTV’sremotecontroltofindadditionalsupportedcommands.Seethetablebelowforcommandsthatmaybeavailable,dependingontheindividualdevice.
CEC-enabled VCR, DVD, and DVR functions that may be available:
Record/Playback
Menu Navigation
Channel Tuning Other
CHANNEL UP/DN GUIDE
ENTER Digits0–9,CANCEL MENU
CANCEL(tocancel)
ENTER
IfyouhaveaCEC-enabledA/Vreceiver,CEC-enableddevicesconnectedtotheA/VreceiverwithanHDMIcablemayalsobecontrollable.TheycanbeselectedfromtheTV’sActivitymenu.
CEC-enabled A/V receiver functions that may be available:
Trythe• VOLUME UP/DOWN,MUTE,andmenu-navigationkeys.ToopentheA/Vreceivermenu,followthesesteps:•
WhilewatchingTV,press1. MOREthen9 (AUDIO).Press2. untiltheSpeakersoptiondisplays.Press3. toselectAVRasthesource.Press4. MORE andthen1 (MENU)todisplaythemenu.
The MORE Menu and HDMI Control
PressMOREontheTV’sremotecontroltoseeamenuofadditionalsupportedfunctionsforthecurrentCEC-enableddevice.Toissueacommand,pressthenumberkeyindicatedinthemenu.
MORE key: Sample menu for a CEC-enabled DVD player
Resolving CEC ConflictsBecauseeachmanufacturerselectswhichCECfunc-tionstosupport,somedevicescanconflictwithotherdevices.Ifcontrolconflictsarise,youcan:
TurnoffTVcontrolofanindividualCEC-enabled•device(seebelow).
TurnoffCECinthesetupmenuofoneofthe•devices.
Turning Off the TV’s HDMI Control of a CEC Device
Press1. MENUontheTVremotecontrol.
Highlight2. Inputs > HDMI ControlandpressENTERtoopenthemenu.
Movetothedevicenameandpress3. toselectOfftoturnofftheTV’sabilitytocontrolthedevice.
Press4. MENUtoclearthemenu.
Inputs > HDMI Control menu
Removing an HDMI Device
Poweroffthedevice.1. DisconnecttheHDMIcable.2. Press3. MENUontheTVremotecontroltoentertheTVmainmenu.
Highlight4. Inputs > NameandpressENTERtoopenthemenu.
Select5. DeletefromtheHDMIinputnames.
Press6. MENUtoclearthemenus.
Inputs > Name menu with Delete selected for HDMI-3.

78 Appendices
Cleaning RecommendationsNormally,lightdustingwithadry,non-scratchingdusterwillkeepyourTVclean.Ifcleaningbeyondthisisneeded,pleaseusethefollowingguidelines:
First,turnofftheTVandunplugthepowercordfromthepoweroutlet.
Top and Sides of the TV
Occasionallycleandustbuild-upfromtheair-intake•grillesonthebackandsidesoftheTV.Cleanusingavacuumcleanerwithabrushattachment.
GentlywipedownyourTVwithasoft,non-abrasive•clothsuchascottonflannel,microfiber,oracleanclothdiaper,lightlymoistenedwithwater.Drywithaseconddry,soft,non-abrasivecloth.
Foroilydirt,addafewdropsofmildliquiddeter-•gent,suchasdishwashingdetergent,tothewaterusedtomoistenthecloth.Rinsewithasecondclothmoistenedonlywithwater.Drywithathirddry,soft,non-abrasivecloth.
Glossy Surfaces: • TakespecialcarewhencleaningtheTV’sglossysurfaces.
Alwaysshakeorbrushthecleaningclothfirstto-removeanydirtparticles.Wipetheglossyareasgently,withoutapplying-pressure.Ifnecessary,lightlydampentheclothwith-water.Usenochemicalorabrasivecleaners.
LCD Screen Cleaning
IMPORTANTDO NOT apply any type of liquid to the surface of the TV screen.
Use only a soft, dry cloth to clean the LCD •screen. Do not use any liquids.Wipethescreengentlywithanupanddown•motion.Cleantheentirescreenevenly,notjustsectionsof•thescreen.
Care of the Remote Control
Remote Control Tips
Forlongerlife,usealkalinebatteries.•
Donotmixoldandnewbatteries.•
Bewithin20feetoftheequipment.•
Donotpresstwoormorekeysatthesametime•unlessinstructedtodoso.
Donotallowtheunittogetwetorbecomeheated.•
Keeptheunitoutofdirectsunlight.•
Avoiddroppingonhardsurfaces.•
Donotuseharshchemicalstoclean.Useonlya•soft,lightlymoistenedcloth.
Resetting the Remote Control
IfTVmodeisselectedandtheTVdoesnotrespondproperly,resettheremotecontrol.
Pressandhold1. POWERforseveralsecondsuntilthemodeindicatorblinkstwiceandgoesoff.
Releasethe2. POWERkey.
Presskeys3. 0 0 9 3 5andthemodeindicatorwillblinktwicewhenyoufinishenteringthecode.Whenenteringthecode,pauseforamomentbetweeneachkeypresstoensureitisrecognized.
Low-Battery Indicator
Ifyoupressakeyandthemodeindicatorblinksfivetimes,replacetheremotecontrol’sbatteries.
Appendix C: TV Care
General Cleaning Precautions
DONOTallowliquidtoentertheTVthroughthe•ventilationslotsoranycrevice.
DONOTuseanystrongorabrasivecleaners,as•thesecanscratchthesurfaces.
DONOTuseanycleanerscontainingammonia,•bleach,alcohol,benzene,orthinners,asthesecandullthesurfaces.
DONOTsprayliquidsorcleanersdirectlyonthe•TV’ssurfaces.
DONOTscruborrubtheTVharshly.Wipeitgently.•

Appendices 79
Bypassing the Parental LockAfteryousetthelock,youmustuseyourpasscodeto:
Viewalockedprogram•
ViewthelockedTV•
Cancelthelock•
Enterthe• Lockmenus
Ifyouforgetyourpasscode,youcanviewthelockedTVwithoutenteringyourpasscode.Whenpromptedforthepasscode,pressthenumber9and (LAST)keysontheTVremotecontrolatthesametime.ThisprocesstemporarilyunlockstheTV.
WhenenteringtheLockmenu,youarepromptedtoenterapasscode.
• Tochangethepasscode,press9and (LAST)atthesametime.EitherenteranewpasscodetoopentheLockmenuandmakechangesorpressBACKtoclosethemenu.
• Ifanyofthelocksareturnedonandyouexitthemenuswhenpromptedforanewcode,theoldcodeandalllocksettingsareretained.
• Ifalllocksareturnedoffandyouexitthemenuswhenpromptedforanewcode,thenthepreviouscodeiserased.
Lock
Byp
ass
Inst
ruct
ion
s H
ave
Bee
n Fi
led
fo
r Fu
ture
Ref
eren
ce
IMPORTANTCut along the dotted line and file bypass instructions in a safe place for future reference.
IMPORTANTWhen changing or deleting your pass code, you must use the remote control included with this TV. You cannot use a Mitsubishi remote control from another component or a “universal” remote.
Appendix D: Bypassing the Parental Lock
Mitsubishi Unisen LCD HDTV151 Series153 Series249 Series

80 Appendices
This page intentionally left blank

Appendices 81
Reset Name When to Use How to Use Resulting Action
Format Whenthepictureshapeseemsincorrect,useMORE > 0 (FORMAT)tochangetheshapeofthepicture.
PresstheMOREkeyandthenrepeat-edlypress0(FORMAT)tocyclethroughtheavailableaspectratios.
Thelast-usedformatforasignaltypeismemorizedforeachinput.Thenexttimethesameinputandthesamesignaltypeisviewed,thelast-usedformatwillberecalled.
PerfectColor™
ResetorPerfectColor™/ PerfecTint™ Reset (153 and 249 Series)(forthesingleinputcurrentlybeingwatched)
Whenthecolorintensitiesseemoutofbalance,usethePerfectColor/PerfecTintresettoresetthecolorbalancestotheoriginalfactorysettings.BothPerfectColorandPerfecTintareresetatthesametime.
Whileviewingtheinputto1. bereset,pressMENUandgotoAdjust > Picture+ > PerfectColor.
Press2. ENTERtodisplaythePerfectColoradjustmentscreen.
Press3. CANCELtoresetthecolors.
AllPerfectColor/PerfecTintslidersareresettotheoriginalcenterposition.ThePefectColor/PerfecTintsettingsforotherinputsremainunchanged.
A/V Memory Reset(forthesingleinputcurrentlybeingwatched)
Whenaudioand/orvideosettingsforasingleinputseemincorrect,useA/VMemoryResettoreturntheinputtotheoriginalfactorysettings.
Whileviewingtheinputtoreset,1. pressMENUandgotoAdjust > Reset.
Press2. ENTERtohighlighttheReseticon.
Press3. ENTERagaintoreset.
AllAudioandVideosettingsfortheindividualinputareresetexceptfortheListenTo,Language,audioBalance,ClosedCaption,andAdvancedPicturesettings.
A/V Reset(forallinputs)
Toresetaudioandvideoadjustmentsforallinputstotheoriginalfactorysettings.
WhileviewingtheTV,pressthecontrol-panelbuttonsACTIVITYandVOLUME DOWNatthesametimeforatleasttwoseconds.
AllAudioandVideosettingsarereturnedtotheoriginalfactorysettings,includingListenTo,Language,audioBalance,ClosedCaptions,andFormat.
TV Reset Comparison GuideYoucanresolvemanycommonTVproblemsusingtheresetfunctionsdescribedinthefollowingtable.Seealsothetroubleshootingsuggestionslaterinthisappendix.
IMPORTANTBefore you change sound or picture settings: Ifpictureorsoundsettingsseemwrongforabroadcastchannel
(achannelfromtheANTinput,acablebox,orsatellitereceiver),firstcheckotherchannelsfromthesameinputbeforechangingsettings.Ifmostotherchannelsfromthesameinputseemcorrect,thereislikelyaproblemwiththebroadcastratherthanwiththeTV.Usecareinthiscase,aschangesyoumaketofixproblemsonindividualchannelsalsoaffectallotherchannelsonthesameinput.
Appendix E: Troubleshooting
Service and Customer Support
Service
IfyouareunabletocorrectaproblemwithyourTV,consultyourMitsubishidealerorMitsubishiConsumerRelationsat(800)332-2119.
• DONOTadjustanycontrolsotherthanthosedescribedinthisOwner’sGuide.
• DONOTremovetheprotectivebackcoverofyourTV.
Customer Support
• Toorderreplacementoradditionalremotecon-trolsortopurchaseanIRemittercable,visitourwebsiteatwww.mitsuparts.comorcall(800)553-7278.
• Forquestions: CallConsumerRelationsat800-332-2119. E-mail:[email protected] Website:www.mitsubishi-tv.com
249 Series.• IfyouarehavingdifficultywithyourVUDUaccount,contactVUDUCustomerCareatwww.VUDU.com/support.

82 Appendices
Reset Name When to Use How to Use Resulting Action
Channel Memorization
Toeraseandre-memorizechannelsontheANT input.
WhileviewingtheTV,press1. MENUtodisplaythemainmenu.Navigatetothe2. Initial> Channelmenu.Press3. ENTER.Highlightthereceptionmode,4. e.g.Ant Air.Highlight5. Scan.Press6. ENTERtostartchannelmemorization.
Allpreviouslymemorizedchan-nelsfortheantennainputareerasedandanewsetofmemo-rizedchannelsiscreated.Toaddordeleteindividualchan-nels,seeInitial > Channel > Editmenuinstructionsonpage48.
Lock Menu Pass Code
TochangeyourLockmenupasscode
SeethecutoutpagefromAppendixD,page79.
Allowsestablishmentofanewcode.
Control-Panel Lock Release
Tore-enablethecontrol-panelbuttonsafteractivationoftheControl-PanelLock
PressandholdtheACTIVITYbuttononthecontrolpanelfortenseconds.IftheTVispoweredoff,youcannowpressthePOWERbuttontoturniton.
Allowsthecontrolpaneltobeunlockediftheremotecontrolismisplaced.
Auto Input Sensing for HDMI
IftheNew Device FoundscreendoesnotappearwhenyouconnectanHDMIdevice.
DisconnecttheHDMIdevice.1. DeletetheHDMIinputinthe2. Inputs>Namemenu(seepage50).Poweronandconnectthenew3. device.
TheNew Device Foundscreenwilldisplay.
System Reset IftheTVdoesnotturnonoroff,doesnotrespondtotheremotecontrolorcontrol-panelbuttons,orhasaudiobutnovideo.
PressandholdthePOWERbuttononthecontrolpanelfortenseconds.
TheTVwillturnoff.PowerontheTVandthegreenLEDwillflashquicklyforaboutoneminute.Thechangesyoumademostrecently,beforeusingSYSTEM RESET,maybelost.
TV Reset
IMPORTANT:Usethisresetonlyifothertroubleshootinghasbeenunsuc-cessful.
Toresetallconsumer-accessiblesettingsandallmemoriestotheoriginalfactorydefaults.
UseTVResetiftheTVcanrespondtocon-trolsbutTVbehaviorisabnormal.
CAUTION:Allowner-performedsetupsandadjustmentswillbeerased.
WhileviewingtheTV,press1. MENUtodisplaytheTVmainmenu.Withthemainmenudisplayed,2. pressnumberkeys1 2 3todisplaytheResetmenu.READ THE ON-SCREEN 3. WARNING AND INSTRUC-TIONS.
Ifyoudonotwishtousethis•reset,pressBACKorMENUtobackout.
Ifyoudowishtousethe•reset,pressENTERtoeraseallmemoriesandsettings.
TheTVwillstarttheinitializationprocessandthenturnoff.PowerontheTVandthefrontgreenLEDwillstartflashing.AllmemoryandsettingsoutlinedinthisOwner’sGuidewillneedtobesetagain.
VUDU™Reset VUDU Connection(249 Series)
VUDUdoesnot•respondtocommands.Theselectiondoesnot•play(e.g.,screenisblackorthe“Loading”messgeisfrozenonscreen).
PresstheMOREKey.1. Pressthe2key.2.
ThescreenwillbrieflygoblankwhileVUDUinitializes.ThisresetdoesnotresettheTVoranyTVsettings.
Appendix E: Troubleshooting, continued

Appendices 83
Appendix E: Troubleshooting, continued
General TV Operation
Symptom Remarks
1. TheTVremotecontroldoesnotwork. Checkthatthebatteriesarefreshandinstalledcorrectly.•CheckthatthecontrolmodeontheremoteissettoTV.•Benomorethan20feetfromtheTVwhenusingtheremotecontrol.•ProgramtheremotecontroltooperatetheTVorotherdevice.•Resettheremotecontrol.•
2. WhenItrytousetheremotecontrol,thePOWERkeyblinksfivetimes.
Replacethebatteries.
3. TVdoesnotrespondtotheremotecontrolortocontrol-panelbuttonsandTVwillnotpoweronoroff.
UnplugtheACpowercordfor10seconds.•PressandholdthePOWERbuttononthecontrolpanelto•performsystemreset.
4. WhenadeviceisselectedfromtheActivitymenu,thescreenisblueorblack(nosignalsource).
• Makesuretheselecteddeviceisturnedon.• Beginplayofthedevice.
5. YouhaveforgottenyourLockmenupasscode. See“BypassingtheParentalLock”,AppendixD.
6. Ratingrestrictionsarenotworking. OpentheLock>ParentalLockmenuand:• Verifythattheratingslocksareactive.• ChecktheLockTime/UnlockTimetocheckifratingrestric-
tionsaredisabled.• RatingrestrictionsapplyonlytocontentontheANTinput.
7. On-screendisplaysappeareachtimeyouchangeafunction.
NormalTVoperation.
8.
9. IhaveturnedonCECformyHDMIdevicesbutcontroliserraticandIwishtodisableit.
First• turnofftheTV’sHDMIcontrolforthespecificdevice.OpentheInputs>HDMIControlmenu,selectthedevice,selectOff.DisableCEConthedeviceitself.Seethedevice’sinstruc-•tions.Iftheproblempersists,dothefollowing:•
DisconnectthedevicefromtheTV.1. OpentheInputs>NamemenuandselectDeleteforthe2. device.ReconnectthedevicetotheTVandAutoInputSensing3. willrecognizethedevicewithCECdisabled.
Reset Name When to Use How to Use Resulting Action
VUDUReset VUDU Account Password(249 Series)
Youhaveforgottenyouraccountpass-word.
Usingacomputer,gotowww.VUDU.com.
ResetyouraccountpasswordfromtheVUDUwebsite(requiresaccesstoe-mail).
VUDUReset Parental Controls Passcode(249 Series)
Youhaveforgottenyourpasscode.
CallVUDUCustomerCareat1-888-554-VUDU(8838).
VUDUCustomerCarewillresetyourpasscode.

84 Appendices
Appendix E: Troubleshooting, continued
TV Power On/Off
Symptom Remarks
1. TVtakesanexcessivelylongtimetopoweron.
Whenpoweredon,theTVneedstimetobootup,justas•doesacomputer.Forfasterpower-up,changetheEnergysettingtoFast•PowerOn(Initial>Energymenu).WiththissettingtheTV’spowerusagewhenoffexceedsENERGYSTAR®recom-mendedlevelsforapowered-downdevice.
2. YoucannotprogramtheTVtoturnonauto-matically(Timerfunction)
TheTVmaybelocked.•Theclockmaynotbeset.•
3. TVturneditselfoffandthelightonthefrontpanelstartedtoblink.
MomentarypowerfluctuationcausedtheTVtoturnoffto•preventdamage.WaitforthegreenlighttostopflashingandturntheTVonagain.IftheTVdoesnotstayon,pressthePOWERbuttononthe•controlpanelforatleasteightsecondstoperformSystemReset.Ifthishappensfrequently,obtainanAClinepowerconditioner/surgeprotector.Anunusualdigitalsignalmayhavebeenreceived,triggeringa•protectioncircuit.WaitforthelighttostopflashingandturnTVon.
4. TVwillnotpoweroff. PressthePOWERbuttononthecontrolpanelfortensecondstoperformSystemReset.
TV Channels
Symptom Remarks
1. TheTVtakesseveralsecondstorespondtochannelchanges.
Itisnormalfordigitalchannelstotakelongertotunein.•PressENTERafterenteringachannelnumbertoavoid•delays.Usea4-digitnumberforanover-the-airdigitalchannel.•Usea6-digitnumberfordigitalcablechannelsifyourcable•serviceisabletorecognize6-digitchannelnumbers.
2. Youcannotaccessachannel. UsenumberkeysinsteadofCHANNELUp/Down.•Besurethechannelyouwanttoviewisinmemory.•CheckthattheTVisswitchedtothecorrectdeviceor•antennaforthatchannelbypressingtheACTIVITYkey.MakesuretheLock>ParentmenulockissettoOff.•Ifyoucannottunetoavirtualdigitalchanneleventhoughthe•TVhasalreadymemorizeddigitalchannels,tunetothephysi-calchannelnumberusedbythebroadcaster.Thevirtualchannelwillthenbeautomaticallyaddedtomemory.Youmaybetryingtotunetoananalogchannelthatisno•longerbroadcasting.
3. WhenChannelViewlistisdisplayed,informa-tionappearsincomplete
PressINFOtoupdatethedisplayforthehighlightedchannel.•Programinformationisdisplayedonlyforthecurrentlytuned•channel.Availableinformationissentfromthebroadcasterorcable•provider.Nootherdataisavailable.MakesuretheTVclockissetcorrectly.•
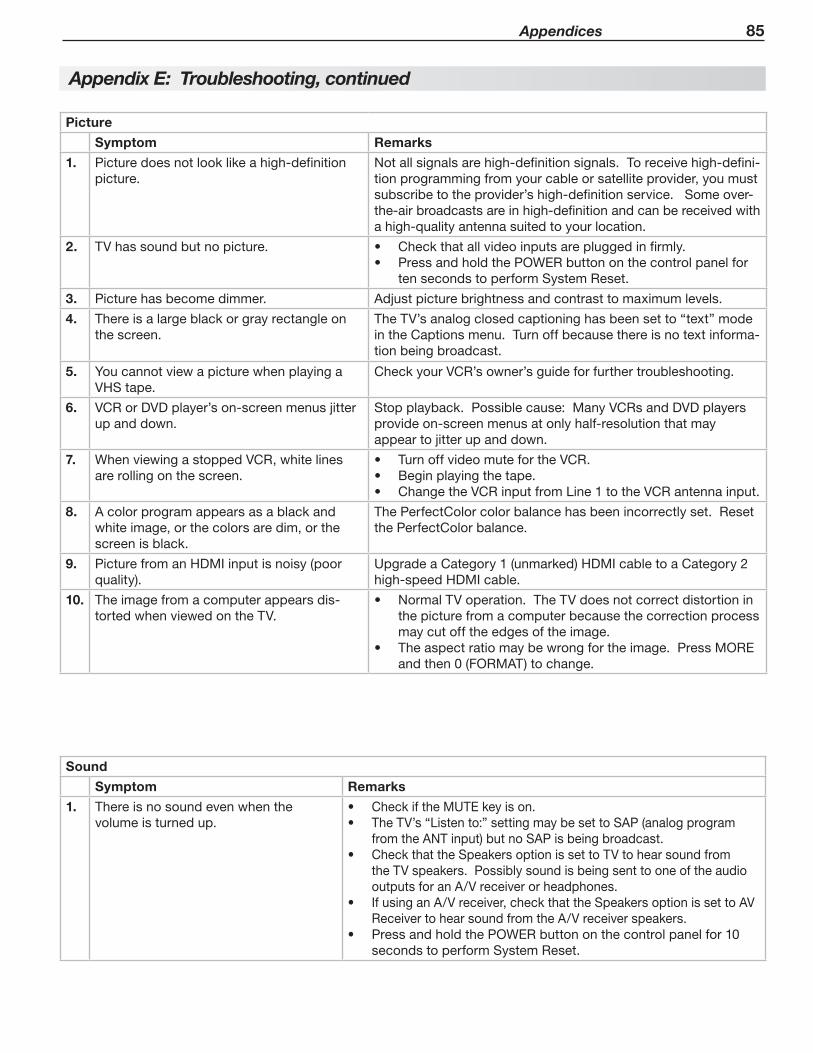
Appendices 85
Appendix E: Troubleshooting, continued
Picture
Symptom Remarks
1. Picturedoesnotlooklikeahigh-definitionpicture.
Notallsignalsarehigh-definitionsignals.Toreceivehigh-defini-tionprogrammingfromyourcableorsatelliteprovider,youmustsubscribetotheprovider’shigh-definitionservice.Someover-the-airbroadcastsareinhigh-definitionandcanbereceivedwithahigh-qualityantennasuitedtoyourlocation.
2. TVhassoundbutnopicture. Checkthatallvideoinputsarepluggedinfirmly.•PressandholdthePOWERbuttononthecontrolpanelfor•tensecondstoperformSystemReset.
3. Picturehasbecomedimmer. Adjustpicturebrightnessandcontrasttomaximumlevels.
4. Thereisalargeblackorgrayrectangleonthescreen.
TheTV’sanalogclosedcaptioninghasbeensetto“text”modeintheCaptionsmenu.Turnoffbecausethereisnotextinforma-tionbeingbroadcast.
5. YoucannotviewapicturewhenplayingaVHStape.
CheckyourVCR’sowner’sguideforfurthertroubleshooting.
6. VCRorDVDplayer’son-screenmenusjitterupanddown.
Stopplayback.Possiblecause:ManyVCRsandDVDplayersprovideon-screenmenusatonlyhalf-resolutionthatmayappeartojitterupanddown.
7. WhenviewingastoppedVCR,whitelinesarerollingonthescreen.
• TurnoffvideomutefortheVCR.• Beginplayingthetape.• ChangetheVCRinputfromLine1totheVCRantennainput.
8. Acolorprogramappearsasablackandwhiteimage,orthecolorsaredim,orthescreenisblack.
ThePerfectColorcolorbalancehasbeenincorrectlyset.ResetthePerfectColorbalance.
9. PicturefromanHDMIinputisnoisy(poorquality).
UpgradeaCategory1(unmarked)HDMIcabletoaCategory2high-speedHDMIcable.
10. Theimagefromacomputerappearsdis-tortedwhenviewedontheTV.
NormalTVoperation.TheTVdoesnotcorrectdistortionin•thepicturefromacomputerbecausethecorrectionprocessmaycutofftheedgesoftheimage.Theaspectratiomaybewrongfortheimage.PressMORE•andthen0(FORMAT)tochange.
Sound
Symptom Remarks
1. Thereisnosoundevenwhenthevolumeisturnedup.
• CheckiftheMUTEkeyison.• TheTV’s“Listento:”settingmaybesettoSAP(analogprogram
fromtheANTinput)butnoSAPisbeingbroadcast.• CheckthattheSpeakersoptionissettoTVtohearsoundfrom
theTVspeakers.PossiblysoundisbeingsenttooneoftheaudiooutputsforanA/Vreceiverorheadphones.
• IfusinganA/Vreceiver,checkthattheSpeakersoptionissettoAVReceivertohearsoundfromtheA/Vreceiverspeakers.
• PressandholdthePOWERbuttononthecontrolpanelfor10secondstoperformSystemReset.

86 Appendices
Appendix E: Troubleshooting, continued
Sound
Symptom Remarks
2. Thesounddoesnotmatchthescreenpicture.
TheTV’s“Listento:”settingmaybesettoSAP(analogprogramfromtheANTinput).
3. ThesoundfrommyA/Vreceiverdoesnotmatchthescreenpicture(IshouldhearthecorrectaudiofrommyA/Vreceiver).
CheckthatDIGITALAUDIOOUTPUTand/orAVRAUDIO•OUTPUTonTV’smainpanelisconnectedtotheA/Vreceiver.Withoutthisconnection,devicesconnectedonlytotheTV(andnottheA/Vreceiver)canbeheardonlyfromtheTVspeakers.NotethatthisincludestheANTinput,adevice(suchasacamcorder)connectedtotheconveniencepanel,andanyotherdevicesendingaudiototheTVonly.IfusingaNetCommand-controlledA/Vreceiver,NetCommand•maybeselectingthewrongA/Vreceiveraudioinput.ChecktheA/Vreceiver’sNetCommandsetupintheInputs>AVRmenu.
4. Cannotselectanaudio-onlydevice;itdoesnotappearintheActivitymenu.
PluganunusedvideoplugintotheY/VIDEOjacktoactivateAutoInputSensingandmaketheaudiodeviceselectableintheActivitymenu.
5. SoundiscomingfromtheTVspeakersinsteadoftheA/Vreceiver.
Disconnectheadphones.ConnecttheTV’sAUDIOOUTtotheA/VreceiverandselectAVReceiverfromtheNewDeviceFoundscreen.
NetCommand IR Control (NetCommand-equipped models only)
Symptom Remarks
1. CannotseethemenufromtheA/VReceiver. A/VReceiverSetUpforAudio-OnlySwitching•TheA/VReceiverisnotconnectedtoanyvideoinputoftheTV.TochecktheA/VReceivermenu,temporarilyplugintoanunusedinputoftheTV,suchasInput3.ExittheNewDeviceFoundscreenandselectInput3fromtheActivitymenu.PressMENUontheA/Vreceiver’sremotecontrol.
A/V Receiver Set Up for Audio and Video Switching over •HDMIUsetheMENUkeyontheA/Vreceiver’sremotecontrol.
A/V Receiver with • HDMI ControlSwitchtheremotecontroltoAUDIOmode.PresstheMOREkeyandthen1(Menu).
2. NetCommandunabletolearnspecificdevicekeys.
A/VDevicedoesnotuseIRformatforremotecontrol•signal.ITTandRFformatscannotbelearned.Roomlightingmayaffectthesignal.Havetheremotesvery•close(6inchesorless)totheTVduringLearning.IflearningaMitsubishiremotecontrol,makesuremodeis•notsettoTV.Some,butnotall,devicekeyfunctionscanbelearnedby•NetCommand.Forexample,POWERandPLAYmaybelearned,butotherfunctionsmaynot.Thesignalfromtheremotecontrolmaynotbestrong•enough.InsertfreshbatteriesandtryLearningagain.
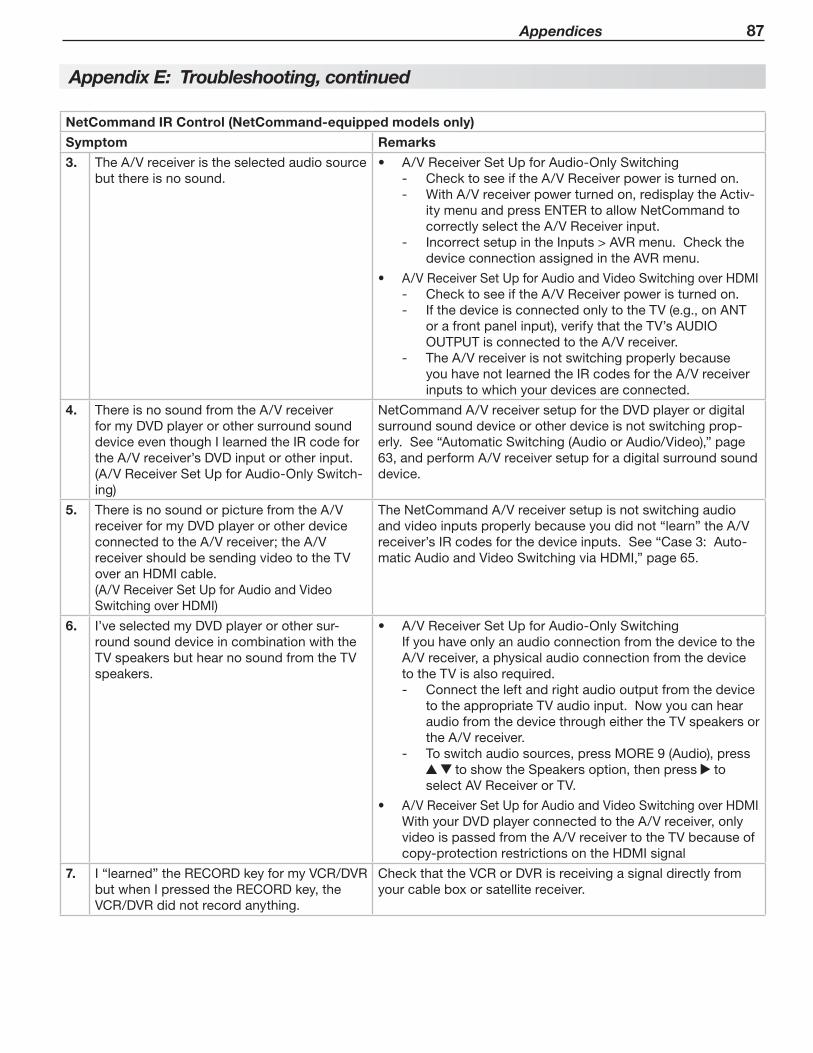
Appendices 87
Appendix E: Troubleshooting, continued
NetCommand IR Control (NetCommand-equipped models only)
Symptom Remarks
3. TheA/Vreceiveristheselectedaudiosourcebutthereisnosound.
A/VReceiverSetUpforAudio-OnlySwitching•ChecktoseeiftheA/VReceiverpoweristurnedon.-WithA/Vreceiverpowerturnedon,redisplaytheActiv--itymenuandpressENTERtoallowNetCommandtocorrectlyselecttheA/VReceiverinput.IncorrectsetupintheInputs>AVRmenu.Checkthe-deviceconnectionassignedintheAVRmenu.
A/VReceiverSetUpforAudioandVideoSwitchingoverHDMI•ChecktoseeiftheA/VReceiverpoweristurnedon.-IfthedeviceisconnectedonlytotheTV(e.g.,onANT-orafrontpanelinput),verifythattheTV’sAUDIOOUTPUTisconnectedtotheA/Vreceiver.TheA/Vreceiverisnotswitchingproperlybecause-youhavenotlearnedtheIRcodesfortheA/Vreceiverinputstowhichyourdevicesareconnected.
4. ThereisnosoundfromtheA/VreceiverformyDVDplayerorothersurroundsounddeviceeventhoughIlearnedtheIRcodefortheA/Vreceiver’sDVDinputorotherinput.(A/VReceiverSetUpforAudio-OnlySwitch-ing)
NetCommandA/VreceiversetupfortheDVDplayerordigitalsurroundsounddeviceorotherdeviceisnotswitchingprop-erly.See“AutomaticSwitching(AudioorAudio/Video),”page63,andperformA/Vreceiversetupforadigitalsurroundsounddevice.
5. ThereisnosoundorpicturefromtheA/VreceiverformyDVDplayerorotherdeviceconnectedtotheA/Vreceiver;theA/VreceivershouldbesendingvideototheTVoveranHDMIcable.(A/VReceiverSetUpforAudioandVideoSwitchingoverHDMI)
TheNetCommandA/Vreceiversetupisnotswitchingaudioandvideoinputsproperlybecauseyoudidnot“learn”theA/Vreceiver’sIRcodesforthedeviceinputs.See“Case3:Auto-maticAudioandVideoSwitchingviaHDMI,”page65.
6. I’veselectedmyDVDplayerorothersur-roundsounddeviceincombinationwiththeTVspeakersbuthearnosoundfromtheTVspeakers.
A/VReceiverSetUpforAudio-OnlySwitching•IfyouhaveonlyanaudioconnectionfromthedevicetotheA/Vreceiver,aphysicalaudioconnectionfromthedevicetotheTVisalsorequired.
Connecttheleftandrightaudiooutputfromthedevice-totheappropriateTVaudioinput.NowyoucanhearaudiofromthedevicethrougheithertheTVspeakersortheA/Vreceiver.Toswitchaudiosources,pressMORE9(Audio),press- toshowtheSpeakersoption,thenpress to
selectAVReceiverorTV.
A/VReceiverSetUpforAudioandVideoSwitchingoverHDMI•WithyourDVDplayerconnectedtotheA/Vreceiver,onlyvideoispassedfromtheA/VreceivertotheTVbecauseofcopy-protectionrestrictionsontheHDMIsignal
7. I“learned”theRECORDkeyformyVCR/DVRbutwhenIpressedtheRECORDkey,theVCR/DVRdidnotrecordanything.
CheckthattheVCRorDVRisreceivingasignaldirectlyfromyourcableboxorsatellitereceiver.
88 Trademark and License Information
LICENSOR’SSUPPLIERSDONOTMAKEORPASSONTOENDUSERORANYOTHERTHIRDPARTY,ANYEXPRESS,IMPLIEDORSTATUTORYWARRANTYORREPRESENTATIONONBEHALFOFSUCHSUPPLIERS,INCLUDING,BUTNOTLIMITEDTOTHEIMPLIEDWARRANTIESOFNON-INFRINGEMENT,TITLE,MERCHANTABIL-ITYORFITNESSFORAPARTICULARPURPOSE.
ManufacturedunderlicensefromCambridgeMechatronicsLtd.Rapidfireandthe1...logoaretrademarksofCambridgeMechatronicsLtd
ManufacturedunderlicensefromDolbyLaboratories.DolbyisatrademarkofDolbyLaboratories.
ENERGYSTAR®andtheENERGYSTARmarkareregisteredU.S.marks.ENERGYSTARisaregisteredmarkownedbytheU.S.government.
HDMI™theHDMIlogoandHigh-DefinitionMultimediaInterfacearetrademarksorregisteredtrademarksofHDMILicensingLLC.
ImagingScienceFoundationCertifiedCalibrationControls
ThesoftwareinthisTVisbasedinpartontheworkoftheIndependentJPEGGroup,copyright©1991-1998,ThomasG.Lane,allrightsreserved.
x.v.Colorandthex.v.ColorlogoaretrademarksofSonyCorporation.
VUDU™isatrademarkofVUDU,Inc.
ChannelView™,DeepField™Imager,EasyConnect™,NetCommand®,PerfectColor™,PerfecTint™,Plush1080p®5G,SharpEdge™,Smooth120Hz™FilmMotion,Unisen™aretrademarksofMitsubishiDigitalElectronicsAmerica,Inc.
Trademark and License Information
Network Service DisclaimerThirdpartycontentandservices,includingwithoutlimitationhomeentertainmentservicesbyVUDU,Inc.,areprovidedinaccordancewithwhatevertermsandconditionsareestablishedbythethirdpartyprovidersandagreedtobyyou.MitsubishiDigitalElectronicsAmerica(“MDEA”)hasnocontroloveranysuchthirdpartiesoranyagreementyoureachwiththem.MDEAhasnocontroloverthenetworksortransmissionfacilitiesbywhichcontentandservicesareprovidedbythirdparties.Yourconnectiontotheinternetmayvaryinavailabilityandquality.Customerservicequestionsaretobedirectedtothethird-partyprovider,notMDEA.
MDEADOESNOTWARRANTCONTENTORSERVICESPROVIDEDBYANYTHIRDPARTY,EITHEREXPRESSLYORIMPLIEDLY,FORANYPURPOSE.MDEADOESNOTWARRANTTHATANYTHIRDPARTYSERVICEWILLREMAINAVAILABLEFORANYPERIODOFTIMEORTHATITWILLBESATISFACTORY,UNIN-TERRUPTEDORERRORFREE.MDEAEXPRESSLYDISCLAIMSANYIMPLIEDWARRANTIES,INCLUDINGBUTNOTLIMITEDTO,WARRANTIESOFMERCHANTABILITYORFITNESSFORAPARTICULARPURPOSEWITHRESPECTTOANYTHIRDPARTYCONTENTANDSERVICES.
MDEAWILLNOT,UNDERANYCIRCUMSTANCES,BELIABLE,WHETHERINCONTRACTORTORTOROTHERLEGALTHEORY,FORANYDIRECT,INDIRECT,INCIDENTAL,SPECIALORCONSEQUENTIALDAMAGES,ATTORNEYFEES,EXPENSES,ORANYOTHERDAMAGESARISINGOUTOF,ORINCONNEC-TIONWITH,YOURUSEOFANYCONTENTORSERVICETHATISPROVIDEDTOYOUBYANYTHIRDPARTY,EVENIFADVISEDOFTHEPOSSIBILITYOFSUCHDAMAGES.

Trademark and License Information 89
Mitsubishi TV SoftwareEND-USER LICENSE AGREEMENT FOR EMBEDDED SOFTWAREIMPORTANT – READ CAREFULLY:ThisLicenseAgreementisalegalagreementbetweenyou(eitheranindividualoranentity)andMitsubishiDigitalElectronicsAmerica,Inc.(MDEA)forallsoftwarepreinstalledand/orprovidedalongwiththistelevision(“Software”).ByutilizingthistelevisionandSoftware,youagreetobeboundbythetermsofthisLicenseAgreement.
TheSoftwareisprotectedbyUnitedStatescopyrightlawsandinternationaltreatyprovisions,aswellasotherintellectualpropertylawsandtreaties.TheSoftwareislicensed,notsold.
1. LICENSE GRANT. MDEAgrantsyouanon-exclusive,non-transferable,limitedrightandlicensetouseonecopyoftheSoftwareonlywiththeMitsubishitelevisionmodelthatincludedthisowner’sguideandownedbyyou.
2. RIGHTS AND LIMITATIONS.SoftwareNotforResale.YoumaynotresellorotherwisetransferforvaluetheSoftware,exceptinconjunctionwithasaleoftheTVthatSoftwarehasbeenpreinstalled.
ProhibitiononReverseEngineering,DecompilationandDisassembly.TheSoftwarecontainstradesecretsorotherproprietarymaterialinitshumanperceivableformandtoprotectthem,youmaynotreverseengineer,decompile,ordisassemble,orotherwisereducetheSoftwaretoanyhumanperceivableform,excepttotheextentthattheforegoingrestrictionisexpresslyprohibitedbyapplicablelaw.
SeparationofComponents.TheSoftwareislicensedasasingleproduct.ItscomponentpartsmaynotbeseparatedforuseonmorethanoneTV.
NoRental.Youmaynotrent,lease,lend,orsublicensetheSoftware.
Trademarks.ThisLicenseAgreementdoesnotgrantyouanyrightstoanytrademarksofMDEA.
3. VIOLATIONS.Youunderstandthatanyuse,copyingortransferoftheSoftware,exceptaspermittedpursuanttothisLicense,maysubjectyoutoseriouscriminalandcivilpenaltiesincludingdamagesandanawardtoMDEAofattorneys’feesinconnectionwithanyviolationofthisLicense.Youfurtherunderstandthatyoumaybeheldlegallyresponsibleforanycopyrightinfringementorotherviolationofintellectualpropertyrightsthatiscaused,encouraged,orinducedbyyourfailuretoabidebythetermsoftheLicense.Thislicenseiseffectiveuntilterminated,andwillterminateimmediatelywithoutnoticefromMDEAorjudicialresolutionifyoufailtocomplywithanyprovisionofthisLicense.
4. COPYRIGHT. AlltitleandintellectualpropertyrightsinandtotheSoftware(includingbutnotlimitedtoanyimages,photographs,animations,video,audio,music,text,and“applets”incorporatedintotheSoftware),andanyaccompanyingprintedmaterialsareownedbyorlicensedtoMDEA.AlltitleandintellectualpropertyrightsinandtothecontentwhichmaybeaccessedthroughuseoftheSoftwareisthepropertyoftherespectivecontentownerandmaybeprotectedbyapplicablecopyrightorotherintellectualpropertylawsandtreaties.ThisLicenseAgreementgrantsyounorightstousesuchcontent,exceptthatyouownthemediaonwhichtheSoftwareisrecorded,butMDEAanditslicensorsretainownershipoftheSoftwareitself.AllrightsnotexpresslygrantedarereservedbyMDEA.
5. EXPORT RESTRICTIONS. MDEAislicensingtheSoftwareforusewithintheUnitedStates.Youagreethatyouwillnotexportorre-exporttheSoftware.Youspecificallyagreenottoexportorre-exporttheSoftware:(i)toanycountrytowhichtheU.S.hasembargoedorrestrictedtheexportofgoodsorservices,whichcurrentlyinclude,butarenotnecessarilylimitedtoCuba,Iran,Iraq,Libya,NorthKorea,Sudan,andSyria,ortoanynationalofanysuchcountry,whereverlocated,whointendstotransmitortransporttheSoftwarebacktosuchcountry;(ii)toanypersonorentitywhoyouknoworhavereasontoknowwillutilizetheSoftwareinthedesign,development,orproductionofnuclear,chemical,orbiologicalweapons;or(iii)toanypersonorentitywhohasbeenprohibitedfromparticipatinginU.S.exporttransactionsbyanyfederalagencyoftheU.S.government.YouwarrantandrepresentthatneithertheBXAnoranyotherU.S.federalagencyhassuspended,revoked,ordeniedyourexportprivileges.
6. DISCLAIMER OF WARRANTY. EXCEPT AS OTHERWISE PROVIDED IN THIS LICENSE OR IN THE LIMITED WARRANTY APPLICABLE TO THE TV, MDEA MAKES NO OTHER WARRANTIES OF ANY KIND WHATSOEVER REGARDING THE SOFTWARE AND HEREBY EXPRESSLY DISCLAIMS ALL WARRANTIES OF ANY KIND WHATSOEVER, EXPRESS OR IMPLIED, WITH RESPECT TO THE SOFTWARE. ALL IMPLIED WARRANTIES, INCLUDING, WITHOUT LIMITATION, THE IMPLIED WARRANTIES OF MERCHANTABILITY AND FITNESS FOR A PARTICULAR PURPOSE ARE HEREBY EXPRESSLY DISCLAIMED BY MDEA. IN NO EVENT SHALL MDEA BE LIABLE TO YOU OR ANY THIRD PARTIES, IN CONTRACT, IN TORT OR OTHERWISE, FOR ANY DIRECT, INDIRECT, SPECIAL, INCIDENTAL OR CONSEQUENTIAL DAMAGES OF ANY KIND OR NATURE. BECAUSE SOME JURISDICTIONS DO NOT ALLOW THE EXCLUSION OR LIMITATION OF IMPLIED WARRANTIES, THE ABOVE LIMITATION MAY NOT APPLY TO YOU.7. LIMITATION OF LIABILITY. MDEA SHALL NOT, UNDER ANY CIRCUMSTANCES BE LIABLE TO YOU OR ANY THIRD PARTIES FOR ANY DAMAGES OF ANY NATURE, WHETHER INDIRECT, SPECIAL, INCIDENTAL, CONSEQUENTIAL OR OTHERWISE, INCLUDING, BUT NOT LIMITED TO, ANY CLAIMS FOR LOST PROFITS, LOSS OF GOOD WILL OR EXPENDITURES MADE OR COMMITTED FOR IN RELIANCE ON THE CONTINUATION OF THIS LICENSE. YOU AGREE THAT NEITHER MDEA’S BREACH OF THIS LICENSE NOR ITS FAILURE TO REPAIR A DEFECT, ERROR OR BUG SHALL CONSTITUTE A FAILURE OF THE ESSENTIAL PURPOSE OF THIS LICENSE. BECAUSE SOME JURISDICTIONS DO NOT ALLOW THE EXCLUSION OR LIMITATION OF LIABILITY FOR CONSEQUENTIAL OR INCIDENTAL DAMAGES, THE ABOVE LIMITATIONS MAY NOT APPLY TO YOU. MDEA’s liability to you for direct damages for any cause whatsoever and regardless of the form of the action, will be limited to the money paid by you for the TV (based on fair market value of the TV) that caused the damages.8. GENERAL.ThisLicenseAgreementwillbegovernedbythelawsoftheStateofCalifornia.
WARNING:ThisproductcontainschemicalsknowntotheStateofCaliforniatocausecancerand/orbirthdefectsorotherreproductiveharm.

90 Trademark and License Information
GNU General Public LicenseVersion 2, June 1991
Copyright(C)1989,1991 FreeSoftwareFoundation,Inc. 675MassAve,Cambridge,MA02139,USAEveryoneispermittedtocopyanddistributeverbatimcopiesofthislicensedocument,butchangingitisnotallowed.
PreambleThelicensesformostsoftwarearedesignedtotakeawayyourfreedomtoshareandchangeit.Bycontrast,theGNUGeneralPublicLicenseisintendedtoguaranteeyourfreedomtoshareandchangefreesoftware--tomakesurethesoftwareisfreeforallitsusers.ThisGeneralPublicLicenseappliestomostoftheFreeSoftwareFoundation’ssoftwareandtoanyotherprogramwhoseauthorscommittousingit.(SomeotherFreeSoftwareFoundationsoftwareiscoveredbytheGNULibraryGeneralPublicLicenseinstead.)Youcanapplyittoyourprograms,too.
Whenwespeakoffreesoftware,wearereferringtofreedom,notprice.OurGeneralPublicLicensesaredesignedtomakesurethatyouhavethefreedomtodis-tributecopiesoffreesoftware(andchargeforthisserviceifyouwish),thatyoureceivesourcecodeorcangetitifyouwantit,thatyoucanchangethesoftwareorusepiecesofitinnewfreeprograms;andthatyouknowyoucandothesethings.
Toprotectyourrights,weneedtomakerestrictionsthatforbidanyonetodenyyoutheserightsortoaskyoutosurrendertherights.Theserestrictionstranslatetocertainresponsibilitiesforyouifyoudistributecopiesofthesoftware,orifyoumodifyit.
Forexample,ifyoudistributecopiesofsuchaprogram,whethergratisorforafee,youmustgivetherecipientsalltherightsthatyouhave.Youmustmakesurethatthey,too,receiveorcangetthesourcecode.Andyoumustshowthemthesetermssotheyknowtheirrights.
Weprotectyourrightswithtwosteps:(1)copyrightthesoftware,and(2)offeryouthislicensewhichgivesyoulegalpermissiontocopy,distributeand/ormodifythesoftware.
Also,foreachauthor’sprotectionandours,wewanttomakecertainthateveryoneunderstandsthatthereisnowarrantyforthisfreesoftware.Ifthesoftwareismodifiedbysomeoneelseandpassedon,wewantitsrecipientstoknowthatwhattheyhaveisnottheoriginal,sothatanyproblemsintroducedbyotherswillnotreflectontheoriginalauthors’reputations.
Finally,anyfreeprogramisthreatenedconstantlybysoftwarepatents.Wewishtoavoidthedangerthatredistributorsofafreeprogramwillindividuallyobtainpatentlicenses,ineffectmakingtheprogramproprietary.Topreventthis,wehavemadeitclearthatanypatentmustbelicensedforeveryone’sfreeuseornotlicensedatall.
Theprecisetermsandconditionsforcopying,distributionandmodificationfollow.
GNU GENERAL PUBLIC LICENSETERMS AND CONDITIONS FOR COPYING, DISTRIBUTION AND MODIFICATION
0.ThisLicenseappliestoanyprogramorotherworkwhichcontainsanoticeplacedbythecopyrightholdersayingitmaybedistributedunderthetermsofthisGeneralPublicLicense.The“Program”,below,referstoanysuchprogramorwork,anda“workbasedontheProgram”meanseithertheProgramoranyderiva-tiveworkundercopyrightlaw:thatistosay,aworkcontainingtheProgramoraportionofit,eitherverbatimorwithmodificationsand/ortranslatedintoanotherlanguage.(Hereinafter,translationisincludedwithoutlimitationintheterm“modification”.)Eachlicenseeisaddressedas“you”.
Activitiesotherthancopying,distributionandmodificationarenotcoveredbythisLicense;theyareoutsideitsscope.TheactofrunningtheProgramisnotrestricted,andtheoutputfromtheProgramiscoveredonlyifitscontentsconstituteaworkbasedontheProgram(independentofhavingbeenmadebyrunningtheProgram).WhetherthatistruedependsonwhattheProgramdoes.
1.YoumaycopyanddistributeverbatimcopiesoftheProgram’ssourcecodeasyoureceiveit,inanymedium,providedthatyouconspicuouslyandappropri-atelypublishoneachcopyanappropriatecopyrightnoticeanddisclaimerofwarranty;keepintactallthenoticesthatrefertothisLicenseandtotheabsenceofanywarranty;andgiveanyotherrecipientsoftheProgramacopyofthisLicensealongwiththeProgram.
Youmaychargeafeeforthephysicalactoftransferringacopy,andyoumayatyouroptionofferwarrantyprotectioninexchangeforafee.
2.YoumaymodifyyourcopyorcopiesoftheProgramoranyportionofit,thusformingaworkbasedontheProgram,andcopyanddistributesuchmodifica-tionsorworkunderthetermsofSection1above,providedthatyoualsomeetalloftheseconditions:
a)Youmustcausethemodifiedfilestocarryprominentnoticesstatingthatyouchangedthefilesandthedateofanychange.
b)Youmustcauseanyworkthatyoudistributeorpublish,thatinwholeorinpartcontainsorisderivedfromtheProgramoranypartthereof,tobelicensedasawholeatnochargetoallthirdpartiesunderthetermsofthisLicense.
c)Ifthemodifiedprogramnormallyreadscommandsinteractivelywhenrun,youmustcauseit,whenstartedrunningforsuchinteractiveuseinthemostordinaryway,toprintordisplayanannouncementincludinganappropriatecopyrightnoticeandanoticethatthereisnowarranty(orelse,sayingthatyouprovideawarranty)andthatusersmayredistributetheprogramundertheseconditions,andtellingtheuserhowtoviewacopyofthisLicense.(Exception:iftheProgramitselfisinteractivebutdoesnotnormallyprintsuchanannouncement,yourworkbasedontheProgramisnotrequiredtoprintanannouncement.)
Theserequirementsapplytothemodifiedworkasawhole.IfidentifiablesectionsofthatworkarenotderivedfromtheProgram,andcanbereasonablyconsid-eredindependentandseparateworksinthemselves,thenthisLicense,anditsterms,donotapplytothosesectionswhenyoudistributethemasseparateworks.ButwhenyoudistributethesamesectionsaspartofawholewhichisaworkbasedontheProgram,thedistributionofthewholemustbeonthetermsofthisLicense,whosepermissionsforotherlicenseesextendtotheentirewhole,andthustoeachandeverypartregardlessofwhowroteit.
Thus,itisnottheintentofthissectiontoclaimrightsorcontestyourrightstoworkwrittenentirelybyyou;rather,theintentistoexercisetherighttocontrolthedistributionofderivativeorcollectiveworksbasedontheProgram.
Inaddition,mereaggregationofanotherworknotbasedontheProgramwiththeProgram(orwithaworkbasedontheProgram)onavolumeofastorageordistributionmediumdoesnotbringtheotherworkunderthescopeofthisLicense.
3.YoumaycopyanddistributetheProgram(oraworkbasedonit,underSection2)inobjectcodeorexecutableformunderthetermsofSections1and2aboveprovidedthatyoualsodooneofthefollowing:
Trademark and License Information 91
GNU General Public License, continueda)Accompanyitwiththecompletecorrespondingmachine-readablesourcecode,whichmustbedistributedunderthetermsofSections1and2aboveonamediumcustomarilyusedforsoftwareinterchange;or,
b)Accompanyitwithawrittenoffer,validforatleastthreeyears,togiveanythirdparty,forachargenomorethanyourcostofphysicallyperformingsourcedistribution,acompletemachine-readablecopyofthecorrespondingsourcecode,tobedistributedunderthetermsofSections1and2aboveonamediumcustomarilyusedforsoftwareinterchange;or,
c)Accompanyitwiththeinformationyoureceivedastotheoffertodistributecorrespondingsourcecode.(Thisalternativeisallowedonlyfornoncommercialdistributionandonlyifyoureceivedtheprograminobjectcodeorexecutableformwithsuchanoffer,inaccordwithSubsectionbabove.)
Thesourcecodeforaworkmeansthepreferredformoftheworkformakingmodificationstoit.Foranexecutablework,completesourcecodemeansallthesourcecodeforallmodulesitcontains,plusanyassociatedinterfacedefinitionfiles,plusthescriptsusedtocontrolcompilationandinstallationoftheexecut-able.However,asaspecialexception,thesourcecodedistributedneednotincludeanythingthatisnormallydistributed(ineithersourceorbinaryform)withthemajorcomponents(compiler,kernel,andsoon)oftheoperatingsystemonwhichtheexecutableruns,unlessthatcomponentitselfaccompaniestheexecutable.
Ifdistributionofexecutableorobjectcodeismadebyofferingaccesstocopyfromadesignatedplace,thenofferingequivalentaccesstocopythesourcecodefromthesameplacecountsasdistributionofthesourcecode,eventhoughthirdpartiesarenotcompelledtocopythesourcealongwiththeobjectcode.
4.Youmaynotcopy,modify,sublicense,ordistributetheProgramexceptasexpresslyprovidedunderthisLicense.Anyattemptotherwisetocopy,modify,sublicenseordistributetheProgramisvoid,andwillautomaticallyterminateyourrightsunderthisLicense.However,partieswhohavereceivedcopies,orrights,fromyouunderthisLicensewillnothavetheirlicensesterminatedsolongassuchpartiesremaininfullcompliance.
5.YouarenotrequiredtoacceptthisLicense,sinceyouhavenotsignedit.However,nothingelsegrantsyoupermissiontomodifyordistributetheProgramoritsderivativeworks.TheseactionsareprohibitedbylawifyoudonotacceptthisLicense.Therefore,bymodifyingordistributingtheProgram(oranyworkbasedontheProgram),youindicateyouracceptanceofthisLicensetodoso,andallitstermsandconditionsforcopying,distributingormodifyingtheProgramorworksbasedonit.
6.EachtimeyouredistributetheProgram(oranyworkbasedontheProgram),therecipientautomaticallyreceivesalicensefromtheoriginallicensortocopy,distributeormodifytheProgramsubjecttothesetermsandconditions.Youmaynotimposeanyfurtherrestrictionsontherecipients’exerciseoftherightsgrantedherein.YouarenotresponsibleforenforcingcompliancebythirdpartiestothisLicense.
7.If,asaconsequenceofacourtjudgmentorallegationofpatentinfringementorforanyotherreason(notlimitedtopatentissues),conditionsareimposedonyou(whetherbycourtorder,agreementorotherwise)thatcontradicttheconditionsofthisLicense,theydonotexcuseyoufromtheconditionsofthisLicense.IfyoucannotdistributesoastosatisfysimultaneouslyyourobligationsunderthisLicenseandanyotherpertinentobligations,thenasaconsequenceyoumaynotdistributetheProgramatall.Forexample,ifapatentlicensewouldnotpermitroyalty-freeredistributionoftheProgrambyallthosewhoreceivecopiesdirectlyorindirectlythroughyou,thentheonlywayyoucouldsatisfybothitandthisLicensewouldbetorefrainentirelyfromdistributionoftheProgram.
Ifanyportionofthissectionisheldinvalidorunenforceableunderanyparticularcircumstance,thebalanceofthesectionisintendedtoapplyandthesectionasawholeisintendedtoapplyinothercircumstances.
Itisnotthepurposeofthissectiontoinduceyoutoinfringeanypatentsorotherpropertyrightclaimsortocontestvalidityofanysuchclaims;thissectionhasthesolepurposeofprotectingtheintegrityofthefreesoftwaredistributionsystem,whichisimplementedbypubliclicensepractices.Manypeoplehavemadegenerouscontributionstothewiderangeofsoftwaredistributedthroughthatsysteminrelianceonconsistentapplicationofthatsystem;itisuptotheauthor/donortodecideifheorsheiswillingtodistributesoftwarethroughanyothersystemandalicenseecannotimposethatchoice.
ThissectionisintendedtomakethoroughlyclearwhatisbelievedtobeaconsequenceoftherestofthisLicense.
8.Ifthedistributionand/oruseoftheProgramisrestrictedincertaincountrieseitherbypatentsorbycopyrightedinterfaces,theoriginalcopyrightholderwhoplacestheProgramunderthisLicensemayaddanexplicitgeographicaldistributionlimitationexcludingthosecountries,sothatdistributionispermittedonlyinoramongcountriesnotthusexcluded.Insuchcase,thisLicenseincorporatesthelimitationasifwritteninthebodyofthisLicense.
9.TheFreeSoftwareFoundationmaypublishrevisedand/ornewversionsoftheGeneralPublicLicensefromtimetotime.Suchnewversionswillbesimilarinspirittothepresentversion,butmaydifferindetailtoaddressnewproblemsorconcerns.
Eachversionisgivenadistinguishingversionnumber.IftheProgramspecifiesaversionnumberofthisLicensewhichappliestoitand“anylaterversion”,youhavetheoptionoffollowingthetermsandconditionseitherofthatversionorofanylaterversionpublishedbytheFreeSoftwareFoundation.IftheProgramdoesnotspecifyaversionnumberofthisLicense,youmaychooseanyversioneverpublishedbytheFreeSoftwareFoundation.
10.IfyouwishtoincorporatepartsoftheProgramintootherfreeprogramswhosedistributionconditionsaredifferent,writetotheauthortoaskforpermission.ForsoftwarewhichiscopyrightedbytheFreeSoftwareFoundation,writetotheFreeSoftwareFoundation;wesometimesmakeexceptionsforthis.Ourdecisionwillbeguidedbythetwogoalsofpreservingthefreestatusofallderivativesofourfreesoftwareandofpromotingthesharingandreuseofsoftwaregenerally.
NO WARRANTY
11.BECAUSETHEPROGRAMISLICENSEDFREEOFCHARGE,THEREISNOWARRANTYFORTHEPROGRAM,TOTHEEXTENTPERMITTEDBYAPPLI-CABLELAW.EXCEPTWHENOTHERWISESTATEDINWRITINGTHECOPYRIGHTHOLDERSAND/OROTHERPARTIESPROVIDETHEPROGRAM“ASIS”WITHOUTWARRANTYOFANYKIND,EITHEREXPRESSEDORIMPLIED,INCLUDING,BUTNOTLIMITEDTO,THEIMPLIEDWARRANTIESOFMERCHANTABIL-ITYANDFITNESSFORAPARTICULARPURPOSE.THEENTIRERISKASTOTHEQUALITYANDPERFORMANCEOFTHEPROGRAMISWITHYOU.SHOULDTHEPROGRAMPROVEDEFECTIVE,YOUASSUMETHECOSTOFALLNECESSARYSERVICING,REPAIRORCORRECTION.
12.INNOEVENTUNLESSREQUIREDBYAPPLICABLELAWORAGREEDTOINWRITINGWILLANYCOPYRIGHTHOLDER,ORANYOTHERPARTYWHOMAYMODIFYAND/ORREDISTRIBUTETHEPROGRAMASPERMITTEDABOVE,BELIABLETOYOUFORDAMAGES,INCLUDINGANYGENERAL,SPECIAL,INCIDENTALORCONSEQUENTIALDAMAGESARISINGOUTOFTHEUSEORINABILITYTOUSETHEPROGRAM(INCLUDINGBUTNOTLIMITEDTOLOSSOFDATAORDATABEINGRENDEREDINACCURATEORLOSSESSUSTAINEDBYYOUORTHIRDPARTIESORAFAILUREOFTHEPROGRAMTOOPERATEWITHANYOTHERPROGRAMS),EVENIFSUCHHOLDEROROTHERPARTYHASBEENADVISEDOFTHEPOSSIBILITYOFSUCHDAMAGES.

92 Warranty
Mitsubishi LCD Flat Panel HDTV Limited WarrantyMITSUBISHIDIGITALELECTRONICSAMERICA,INC.(“MDEA”)warrantstotheoriginalpurchaserofthisLCDFlatPanelHDTVthatifpurchasedfromanauthorizedMITSUBISHIAudio/VideoDealer,shoulditprovedefectivebyreasonofimproperwork-manshipand/ormaterial:
a.Parts.Allparts(exceptanysoftwareincorporatedintothisHDTV)arewarrantedforaperiodofoneyearfromthedateoftheoriginalpurchaseatretail.Wewillrepairorreplace,atouroption,anydefectivepartwithoutchargeforthepart.Partsusedforreplacementmaybereplacedwiththoseoflikekindandqualityandmaybeneworremanufactured.Partsusedforreplace-mentarewarrantedfortheremainderoftheoriginalwarrantyperiod.
b. Embedded Software. MDEAwarrantsthatallsoftwareincorporatedintothisHDTV(the“EmbeddedSoftware”)willperforminaccordancewiththefunctionaldescriptionofEmbeddedSoftwareinallmaterialrespects,butMDEAdoesnotwarrantthattheEmbeddedSoftwareiserror-free.Thewarrantycontainedinthissectionshallcontinueforaperiodofoneyear,fromthedateoftheoriginalpurchasefromtheauthorizeddealer.If,afterpromptnoticewithinthewarrantyperiod,MDEAdeterminesthattheEmbeddedSoftwarehasfailedtoperforminaccordancewithsuchfunctionaldescriptioninallmaterialrespectsandifsuchfailureisnotduetoaccident,misuse,modificationormisapplicationoftheEmbeddedSoftware,thenMDEAshallmodifyorreplacethenonconformingEmbeddedSoftwareatnochargetoyou,whichatMDEA’ssolediscretionmaybefulfilledbymeansofmodificationorreplacementsoftwarecontainedonareplacementmemorycardforConsumerinstallation.TheforegoingshallbeMDEA’ssoleobligationtoyouunderthislimitedwarranty.Allrightsunderthislimitedwar-rantyontheEmbeddedSoftwarealsosubjecttoyourcompliancewiththetermsoftheSoftwareLicenseAgreementappli-cabletothisHDTV,andthislimitedwarrantyontheEmbeddedSoftwareshallbenullandvoidiftheEmbeddedSoftwareismodifiedorchangedinanymannerexceptasspecificallyauthorizedbyMDEA.
c. Labor. Forcertainitemsthataredesignedtobereplacedbytheconsumer,including(butnotlimitedto)someEmbed-dedSoftware,theconsumerissolelyresponsibleforanyreplacementlabor.Forallotherparts,wewillprovidethelaborforawarrantyrepairbyanauthorizedMITSUBISHIservicecenterwithoutchargeforoneyearfromtheoriginaldateofpurchaseatretail.
d. Notice.Toobtainwarrantyservice,youmustnotifyanauthorizedMITSUBISHIservicecenterofanydefectwithintheappli-cablewarrantytimeperiod.
BEFORE REQUESTING SERVICE, please review the TV owner’s guide to insure proper installation and correct cus-tomer control adjustment. If the problem persists, please arrange for warranty service.
1. TO OBTAIN WARRANTY SERVICE:
a.ContactyournearestauthorizedMITSUBISHIservicecenterwhosenameandaddresscanbeobtainedfromyourMIT-SUBISHIdealer,bywritingtotheaddressprovidedbelow,callingMDEAat800-332-2119,orusingthesupportfeatureofourwebsiteatwww.Mitsubishi-tv.com.
b.Warrantyservicewillbeprovidedinyourhomeor,ifrequired,atanauthorizedserviceshop,providedthatyourtelevisionislocatedwithinthegeographicterritorycustomarilycoveredbyanauthorizedMITSUBISHIservicecenter.Ifnot,youmusteitherdeliveryourtelevisiontoanauthorizedservicelocationatyourownexpense,orpayforanytraveland/ortransportationcoststheservicecentermaychargetoandfromyouhome.Actualservicelaborwillbeprovidedwithoutcharge.
c.ProofofpurchasefromanauthorizedMITSUBISHIdealerisrequiredwhenrequestingwarrantyservice.Presentyoursalesreceiptorotherdocumentwhichestablishesproofanddateofpurchase.THERETURNOFTHEOWNERREGISTRATIONCARDISNOTACONDITIONOFWARRANTYCOVERAGE.However,pleasereturntheOwnerRegistrationCardsothatwecancontactyoushouldaquestionofsafetyarisewhichcouldaffectyou.
2. THIS LIMITED WARRANTY DOES NOT COVER:
a.Upto.01%pixeloutages(smalldotpictureelementsthataredarkorincorrectlyilluminated).
b.Cosmeticdamageoranyotherdamagewheresuchdamageiscausedbyunauthorizedmodification,alteration,repairstoorserviceoftheproductbyanyoneotherthananauthorizedMITSUBISHIservicecenter;physicalabusetoormisuseoftheproduct(oranyproductdamagedbyexcessivephysicalorelectricalstress);anyproductsthathavehadaserialnumberoranypartthereofaltered,defacedorremoved;productuseinanymannercontrarytotheOwner’sGuide;freightdamage;oranydamagecausedbyactsofGodorotherfactorsbeyondthereasonablecontrolofMDEA,suchaspowersurgedamagecausedbyelectricalsystemordamagescausedbyuseofthirdpartymountingbracketsorstands.Thislimitedwarrantyalsoexcludesservicecallswherenodefectintheproductcoveredunderthiswarrantyisfound,servicecallsrelatedtounsatisfactoryaudioorvisualreceptionorsignalunlesscausedbyadefectintheproductthatiscoveredunderthislimitedwarranty,allcosts,expensesoranyotherdamagesarisingfromproductinstallation,removalfromorre-installationintocustominstallationsoron

Warranty 93
wallmountings,orset-ups,anyadjustmentsofusercontrols(includingcontrast,brightness,color,tint,finetuning,sharpness),otheradjustmentnecessarytopreparetheunitfordisplayoruse,connectionwithanyexternalaudioreceiver,antenna,cableorsatellitesystems,orserviceofproductspurchasedorservicedoutsidetheU.S.A.PleaseconsulttheoperatinginstructionscontainedintheOwner’sGuidefurnishedwiththeproductforinformationregardingusercontrols.
3.ANYEXPRESSWARRANTYNOTPROVIDEDHEREIN,ANDANYREMEDYWHICH,BUTFORTHISPROVISION,MIGHTARISEBYIMPLICATIONOROPERATIONOFLAW,ISHEREBYEXCLUDEDANDDISCLAIMED.THEIMPLIEDWARRANTIESOFMERCHANTABILITYANDOFFITNESSFORANYPARTICULARPURPOSEAREEXPRESSLYLIMITEDTOATERMOFONEYEAR.
4.UNDERNOCIRCUMSTANCESSHALLMDEABELIABLETOPURCHASERORANYOTHERPERSONFORANYINCI-DENTAL,SPECIALORCONSEQUENTIALDAMAGES,WHETHERARISINGOUTOFBREACHOFWARRANTY,BREACHOFCONTRACT,OROTHERWISE.
5.Somestatesdonotallowlimitationsonhowlonganimpliedwarrantylasts,ortheexclusionorlimitationofincidental,special,orconsequentialdamages,sotheabovelimitationsorexclusionsmaynotapplytoyou.
6.Thislimitedwarrantygivesyouspecificlegalrights,andyoumayalsohaveotherrightswhichvaryfromstatetostate.
7. Intheeventofanydisputeunderthislimitedwarranty,jurisdictionandvenueforresolvingthatdisputewillbeinthestatewherethetelevisionwaspurchasedandthelawsofsuchstatewillgovern.InnoeventshallMitsubishihaveanyliability,includ-ingwithoutlimitation,forgeneral,consequential,incidental,orspecialdamagesforloss,destruction,damageorcorruptionofrecordeddata,mediaorsoftwareresultingfromuseofthistelevision,orcostofrecoveryoflostdata,mediaorsoftwaretherefore.
MITSUBISHIDIGITALELECTRONICSAMERICA,INC.9351JeronimoRoadIrvine,CA92618-1904

94 Index
Index
AAccentLighting44ActivityMenu25
AutomaticGeneration51ChangeInputName50Customizing50NetCommand-ControlledSwitch-ingofA/VReceiverInputs58
RemovingaDisconnectedHDMIDevice50
AnamorphicPictureFormat28AntennaInput(ANT)17,18
SignalStrengthforDigitalChan-nels27
AudioLock(A/Vreceivercontrol)69AudioOutputJacks17,18AutoInputSensing13Auto-Off(SleepTimer)25Auto-On(Timer)47A/VReceiver
andSpeakersOption42andTV’sRemoteControl68AudioLock69Connecting18,23,65,76ControllingSoundVolume26DisconnectingAnalog26NetCommandIRControl61,62
ControllingaDeviceConnectedtotheA/VReceiver39,66VideoandAudioSwitchingviaHDMI66
BBacklight9,41Batteries7BlueGlow44Brightness(pictureadjustment)41
CCableBox
andTV’sRemoteControl68Connecting20,21,22
CameraFiles31CaptionsMenu46CEC(ConsumerElectronicsControl)6,39,75A/VReceiver26,76,86Troubleshooting83
Channelsantennaweb.org48Physical/VirtualChannelNum-bers48
Scan(memorize)12,48Troubleshooting84
ChannelView™ChannelListings26Cleaning78
Clock,SetDateandTime47ClosedCaptions46ColorAdjustments45
ResetColor45,81Computer
andDisplayFormats30Connecting29
Contrast41ControlPanel11ControlPanelLock11,54
DDate.SeeClockDefaultSettings,Returningto81DIGITALAUDIOINPUT18DIGITALAUDIOOUTPUT18DigitalCameraVideoOutput33DVDPlayer
andTV’sRemoteControl68Connecting20,21
DVIDevice,Connecting21
EEnergyUsage48
FFastPowerOn48FilmMode44Font(digitalclosedcaptions)46FORMAT(aspectratio,MOREmenu)28
FreezePicture(PAUSEkey)10FrontPanel11
BlueGlowAccentLighting44FullNative28
GGame
GamePictureMode41HDMICablesforGames18
GUIDEKeyChannelView26HDMIControl77NetCommandControl58,60
HHD(High-Definition)Signal)28HDMI
ChangingOutanHDMIDeviceandAutoInputSensing13
ConnectinganHDMIDevice20A/VReceiverwithHDMI23
HDMICableCategories18HDMIControlofCECDevices75HDMIJack18RemovinganHDMIDevicefromtheActivityMenu50
HeadphonesJack18SpeakersOption42
IINFOKey
ChannelView26StatusDisplay27USBMenu31
InternetVideo37IREmitterPlacement56IRNetCommandOutput(jack)19
LLanguage
ChangingtheMenuLanguage47
inDigitalPrograms43SAP(SecondAudioProgram)43
Learn50.See alsoNetCommandIRControl
LetterBoxImageDisplay28LevelSound43ListenTo43Listings(ChannelView)26LockTV
BypassingtheLock79LockbyRatings53LockbyTime54LockControlPanel54PresetV-ChipBlocking52
MMemorizingChannels12,48
AddSingleChanneltoMemory48
MP3Player(audio-onlyconnection)24
MusicFiles31Mute
ClosedCaptions46MUTEKey10VideoMute44
NName(forinputs;Inputs>Namemenu)50
NetCommandIRControlAbout55A/VReceiverControl62InitialSetupforMostDevices57Operating58Troubleshooting86
PParentalMenu(TVlocks)53PassCode
Resetting79Setting52VUDUPassword83
PAUSEKey10PerfectColor/PerfecTint45
Reset81

Index 95
PhotoViewing32Picture
GlobalPictureAdjustments44Picture+Adjustments45PictureMenuAdjustments41PictureQualityandFilmMode44
Troubleshooting85
RRatings(TVandMovie)53RemoteControl
Batteries7KeysandFunctions10ProgrammingCodes(referencechart)70
ProgrammingInstructions69Reset78
ResetA/VMemoryReset(forthecur-rentinput)81
A/VReset(forallinputs)81HDMIAutoInputSensing13PassCode79PerfectColor/PerfecTint81RemoteControl78RemoteControlAudioLock69SystemReset11TVResetComparisonGuide81VUDU82
RS-232C19
SSafetyInstructions4,5SAP(secondaudioprogram)43SatelliteReceiver
andtheRemoteControl68Connecting20,21
Scan(memorizechannels)48ScreenSaver44SD(Standard-DefinitionSignal)28ServiceandSupport81SignalDefinitions28SignalStrengthIndicator27SleepTimer25Sound
ControllingA/VReceiverVolume(NetCommand)62AudioLock69
LevelSound43SoundMode(audioeffects)42SoundProjector
ConnectingSourceDevices20SoundProjectorSetup34
SpeakersOption42Standard-DefinitionSignal28StandInstallation8StatusDisplay27StereoSystem.SeeA/VReceiver
Subwoofer26,42SurroundSound
ExternalSoundSystem23SimulatedSurroundSound42SoundProjector34TVAudioOutputs18
SystemReset11,82
TTestPicture44Time.SeeClockTimer(auto-on)47TimeZone.SeeClockTroubleshooting81
UUSBMenu31,32
VV-ChipRatings
Definitions53InStatusDisplay27
VCRConnecting22Troubleshooting85
VideoGame.SeeGameVideoMute44ViewingDevice.SeeActivityMenuVUDUMovieService37
VUDUHelp82,83
WWall-Mounting8
Xx.v.Color18,20,41

Website:www.mitsubishi-tv.com
E-mail:[email protected]
For questions, call Consumer Relations at
800-332-2119
To order replacement or additionalremote controls or IR emitter cables,
Visit our website www.mitsuparts.com
or call
800-553-7278
SYSTEM RESETIftheTVdoesnotrespondtotheremotecontrol,control-panelbuttons,orwillnotpoweron/off,pressandholdthePOWERbuttononthecontrolpanelfortenseconds.
TheTVwillturnoff.PowerontheTVandthegreenLEDwillflashquicklyforaboutoneminute.Thechangesyoumademostrecently,beforeusingSYSTEM RESET,maybelost.
VLP41_VLP41+_IB_e_20090827©2009MitsubishiDigitalElectronicsAmerica,Inc.