lua - instruction manual - eepnolie.be · lua - instruction manual general information with plug-in...
TRANSCRIPT

Lua - Instruction Manual
Table of Contents:
General information ................................................ ........................................ 2
Embedding in "X Train" ............................................ ..................................... 2
Syntax of Lua .................................................................................................. 4
What commands are available ............................................. ........................... 5
General Lua commands .................................................................................. 5
"Train X" specific commands ............................................ ............................ 6
Functions ........................................................................................................ 6
Several examples ................................................ ........................................... 6
Description of the layout "Tutorial_33_LUA_1.anl3" ................................... 8
Description of the layout "Tutorial_34_LUA_2.anl3" .................................. 15
Description of the layout "Tutorial_35_LUA_3.anl3" ................................. 18
Description of the layout "Tutorial_36_LUA_4.anl3" ................................ 21
Summary ................................................. ................................................. 25
The future................................................................................................................... 25
A little translation note: The word switch appears form German with two meanings. Switch has been used here to mean “a set of points” and these and the signals are operated rather than switched. Some of the translations got very confusing over this point.
Page no 1

Lua - Instruction Manual
General information
With Plug-in 2 for "Eisenbahn X", a new feature was introduced under the umbrella term "Lua".With this manual, the terms are explained and the various possible functions presented in detail.You will soon discover that this new feature raises the control options in “Eisenbahn X” "to newlevels. On the following pages you will learn how to operate the new feature.
Before we go into the EEP specific functions we give the basic description of what Lua actually is:
You can find a theoretical explanation of this under http://de.wikipedia.org/wiki/Lua or
http://en.wikipedia.org/wiki/Lua_(programming_language)
Additional documentation and descriptions of the general functions are available at this link:
http://lua.coders-online.net/Content/ShowSingle?type=htm
Some conventions and functions of this software will be addressed here and explained in depth.It is certainly useful to refer to these pages to get a basic understanding of the syntax of a Luascript.
Embedding in "Eisenbahn X"
Working with "Eisenbahn X" - We have embedded Lua into the programme to give you theability to control signals and switches via a script. You can now read the status of a switch or asignal and control all other switches or signals as a function of this status.
There is a new window “ EEP event window” to view the progress of the programme. There youcan write your own texts and view the current output (Figure 1).
Page no 2

Lua - Instruction Manual
Now, to create or edit a script, we have created another window (Figure 2). The purpose of thiswindow is explained in detail later in this note. You must write your code for the script in thiswindow . Should you wish to create or edit your script in an external editor, it is possible to loadthis script using the button at the bottom of the page (in the usual manner – load = laden, save =speichern, etc).
Now to the explanation of the functions and dealing with them in "Eisenbahn X". As anintroduction to this topic we have provided examples supplied with plug-in two, which haveworking scripts. You can find these layouts in the folder "ANLAGE \ TUTORIAL \":
1 Tutorial_33_LUA_1.anl3
2 Tutorial_34_LUA_2.anl3
3 Tutorial_35_LUA_3.anl3
4 Tutorial_36_LUA_4.anl3
It may be helpful if you load the first layout into Eisenbahn X and to run it in parallel with this documentation to be involved "live".
Page no 3

Lua - Instruction Manual
Syntax of Lua
An important note: like all software, Lua requires great accuracy in terms of syntax. You musttherefore enter a command in exactly the correct format in the script interpreter. If mistakes aremade the function will not be executed properly, if at all. You must therefore note and check theinstructions very closely. An example will illustrate this: You want to write a comment in yourscript. For this purpose, the actual comment must be preceded by two hyphens. If you haveentered at this point only a single hyphen, you get picture 3 as a result.
This window gives you not only an indication that an error is present, but simultaneouslyindicates where the error was made
Suppose the script reads:
-- Lua tutorial-- This tutorial demonstrates how to operate switches and signals- depending on the value of a variable
If the second hyphen in the third line has been forgotten, you get when reloading the script theerror message shown.
Another example:
You need the "EEP event window" open to be able to write something using the "print"command.
It is important to note that LUA differentiates between upper and lower case text. Give it a try.The correct line would be:
print ("Hey let's start, EEP version is:" EEPVer)
Wrong would be:
Print ("Hey let's start, EEP version is:" EEPVer)
Take a careful note of this: the syntax, spelling and grammar must be correct or the programmewill fail. It can cause many errors that can quickly lead to difficult troubleshooting of complexscripts.
Page no 4
Lua - Instruction Manual
Basic rule:
Create your scripts step by step. Edit each function and test it. Does it work as expected? Only when it does, move on to, and write, the next function. In this way you can simplify any necessary troubleshooting significantly.
What commands are available
Now we come to the most important point for you, the commands that are available to you. It isadvisable to divide them first of all in general and "Eisenbahn X" specific commands.
The general commands in Lua are combined with the special commands designed for the controlof "Eisenbahn X".
General Lua commands
Since the instruction set of Lua is very large and exceeds the scope of this documentation by far,we refer to the following websites. Here you will find an explanation of the internal Luafunctions:
http://lua.coders-online.net/Content/ShowSingle?type=htm
http://lua.gts-stolberg.de/
http://www.lua.org/docs.html
Page no 5

Lua - Instruction Manual
Functions At this point we clarify what is a function and how to assemble it. For EEP use it is important toknow which function is called and how is it used. This is best illustrated with an example from thelayout "Tutorial_33_LUA_1.anl3".
In order to understand what is being discussed, you should now open the layout.
function OpenAllSignals ()
print ("open signal")
EEPSetSignal (4, 1)
EEPSetSignal (5, 1)
end
Page no 6
EISENBAHN X SPECIFIC COMMANDS
Command Description Example
clearlog ()
EEPTimeH print (EEPTimeH)
EEPTimeM print (EEPTimeM)
EEPTimeS print (EEPTimeS)
EEPTime print (EEPTime)
EEPSetSignal (x, y, z) EEPSetSignal (1.2)
EEPGetSignal (x) Result = EEPGetSignal(1)
EEPSetSwitch (x, y, z) EEPSetSwitch (1.2)
EEPGetSwitch (x) Result = EEPGetSignal(1)
EEPRegisterSignal (x) EEPRegisterSignal (1)
EEPRegisterSwitch (x) EEPRegisterSwitch (1)
EEPOnSignal_x (y)
EEPOnSwitch_x (y)
The content of the EEP event window is deleted
Numerical value of hours in current time Numerical value of minutes in current time
Numerical value of seconds in current time Number of seconds since midnightSets the signal x to status y. When using for CALLBACK use z=1 to turn on.Returns the current condition of signal x
Sets the switch x to status y. When using for CALLBACK use z=1 to turn on.
Returns the current condition of switch x
Signal is registered as usable by LUA
Switch is registered as usable by LUAIf a signal has previously registered, this function can be used to reregister. X indicates the number of the signal Y is the statusIf a switch has previously registered, this function can be used to reregister. X indicates the number of the switch Y is the status
Lua - Instruction Manual
Let's look at this feature. In the first entry in line 1 is the Lua command "function". This introduces a new function. Then comes the name of the function which you use in the "Eisenbahn X" script. It should be noted here that no special characters (such as ä, ü, ö -, etc.) and no spaces may be used within this name.
The assigned name is here "OpenAllSignals" followed by an opening and a closing bracket. Wewill come to the use of the brackets later. Here only this much: You can pass parameters to beused within the function.
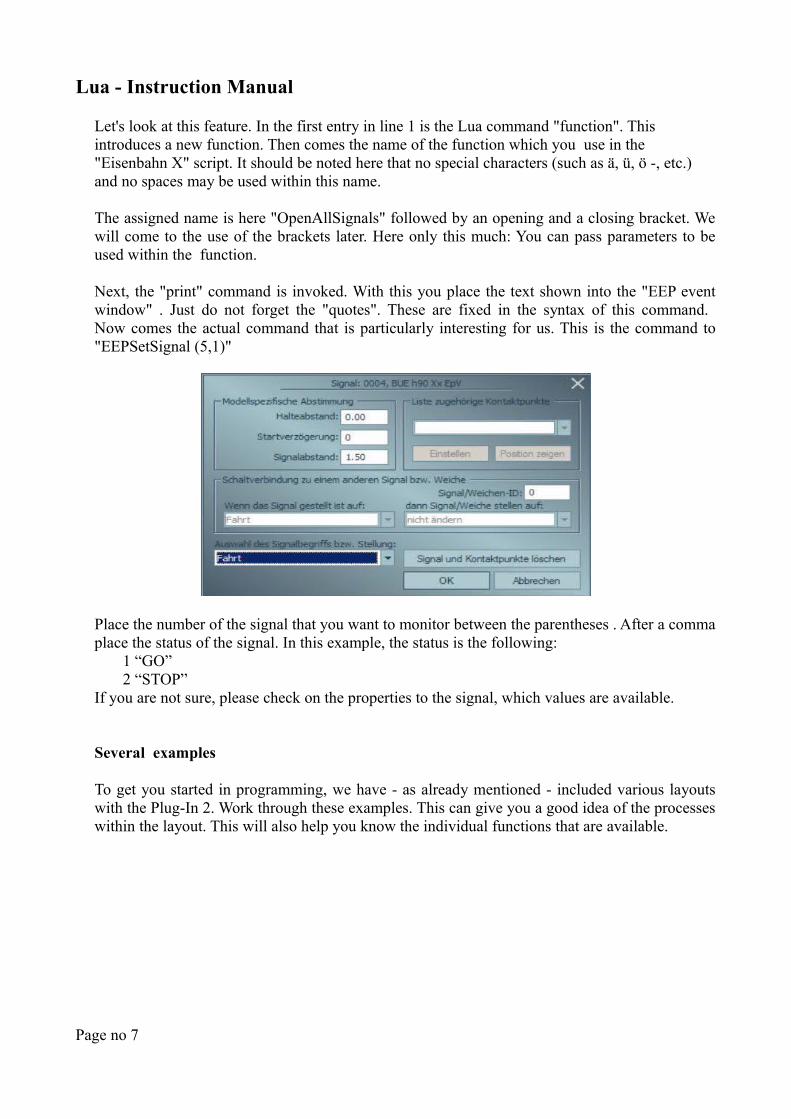
Next, the "print" command is invoked. With this you place the text shown into the "EEP eventwindow" . Just do not forget the "quotes". These are fixed in the syntax of this command. Now comes the actual command that is particularly interesting for us. This is the command to"EEPSetSignal (5,1)"
Place the number of the signal that you want to monitor between the parentheses . After a commaplace the status of the signal. In this example, the status is the following:
1 “GO”2 “STOP”
If you are not sure, please check on the properties to the signal, which values are available.
Several examples
To get you started in programming, we have - as already mentioned - included various layoutswith the Plug-In 2. Work through these examples. This can give you a good idea of the processeswithin the layout. This will also help you know the individual functions that are available.
Page no 7

Lua - Instruction Manual
First layout: "Tutorial_33_LUA_1.anl3"
Picture 5
In the picture the signals and switches together with the contact points (KP) are noted. These namesare used in the course of this example are given,. Next, the entire script for this system is printed.The figures in parentheses show which contact point triggers the following function in the script. Furthermore, the line numbers are inserted for clarity.
Line Content
1 - -LUA tutorial
2 - - This tutorial demons trates how to operate switches and signal
3 - -DEPENDING on value of variable
4 - -Functions SETROUTE1 () and OpenAllSignals () calls contact
points.
5 clearlog ()
6 route = 0
7 print ("Hey let's start, EEP version is:" EEPVer)
8 function EEPMain ()
9 return 1
10 End
(KP 2)
11 function SETROUTE1 ()
Page no 8

Lua - Instruction Manual
12 print ("Function called from contact point")
13 print ("Set switch and signal")
14 - -Variable changes switch -
15 route = route + 1
16 if ((route% 2) == 1) then
17 print ("Route 1")
18 EEPSetSwitch (1, 1)
19 EEPSetSignal (5, 2)
20 else
21 print ("Route 2")
22 EEPSetSwitch (1, 2)
23 EEPSetSignal (4, 2)
24 end
25 end
(KP 1)
26 - - Open signal
27 function OpenAllSignals ()
28 print ("open signal")
29 EEPSetSignal (4, 1)
30 EEPSetSignal (5, 1)
31 end
We can now analyse the individual lines and show in detail what happens in each row. This may be the easiest way to learn how to be your scripts.
Lines 1-4
Here only internal comments are written. A comment is always initiated using two adjacent hyphens - - and will be ignored by LUA. It only serves the author of the script as a reminder in the script. Our advice is to take advantage of this opportunity fully. Imagine, you have created a script 6 months ago and want to change it now. The notes will help you to find your functions quickly. Comments can be placed at any location of your script. They also help others to whom you want to make your script available.
Line 5
The "Clearlog ()" command is used to delete all entries in of the "EEP event window". To turn this window on and off tick the box as shown below.
Page no 9

Lua - Instruction Manual
Line 6
This is a variable. It is defined here and a value is assigned. Lua recognizes exactly what type of variable it is. An example will clarify this:
route = 0 means that here a numerical value is assigned which can be used in calculations.
route = "This is a text" means that this is a text variable, noted by the quotation marks.
You can of course use any name for your variables. Note that you may not use any special characters or spaces.
Line 7
With the "Print ()" command the output is sent to the "EEP event window". In this case, theoutput would read thus “Hey let's start, EEP version is 10.2”
Line 8-10
At this point, the processing of the subsequent script is started. This must always come before your own functions. Without the EEPMain() function nothing will happen. Also, the "return" value is of importance. This must always be set to 1. Set as 0, this function would be called only once. Always apply these lines in your scripts.
Line 11-25 Here we see the first "Eisenbahn X" specific function. In line 11 the name of the function is
Page no 10

Lua - Instruction Manual
stored. Be sure to check the spelling of the declaration. It is initiated with the word "function". Now comes the name you can assign freely. Again, of course no special characters or spaces maybe used. At the end, behind the name, are two closed brackets. The purpose is explained in more detail elsewhere and of no particular interest at this point.
Example of a name: function Testfunktion_fuer_Mich ()
Next lets skip to line 25, the end of the function is marked. Each function always requires an "end". If it is missing, there is a corresponding error message.
Example: function Testfunktion_fuer_Mich () <This is where your function is described> end
In lines 12 and 13, text is written into the "EEP event window".
Line 14 contains a comment.
Now we come to the line 15 This is the variable that we defined in line 6, recalculated. Please read this statement as follows: The new value of the variable is equal to the old value of the variable plus 1. Initially, the value of the variable route = 0, subsequently the value = 1
An important element of Lua is the ability to make decisions. This is described in lines 16 – 24. The decision making process is invoked in line 16 and finishes in 24. An alternative decision takes place in line 20. To understand this "monster" , take it line by line and translate it into an understandable format. In this comparison, a Lua function is called. More specifically, it is here at this part (route % 2) which calls an internal function commonly known as MODULO. There is an internal function named Modulo called here. In this example it always returns a value between 0 and 1. In general,MODULO always returns the remainder after division. To understand this, here's the details. example: Route = 1 (here called a) The value = 2 (called here b) The formula that is behind is as follows: a - (b * integer(a / b)) → 1 - (2 * integer(1 / 2)) → result = 1
Route = 2 (here called a) The value = 2 (called here b) The formula that is behind is as follows: a - (b * integer(a / b)) → 2 - (2 * integer(2 / 2)) → result = 0
These are internal operations and not available to the script writer.
Page no 11

Lua - Instruction Manual
If the result of the modulo operation is 1, then operate switch 1 and signal 5. If the result is 0, then operate switch 1 and signal 4. On the first call of this function, it would be like this: "Route" is incremented by 1 (now has the value 1) When (1% 2) = 1 then Write in the "EEP event window" Set switch 1 Set signal 5 ElseSet switch 1 Set signal 4 End of “if statement”
With the operation 1% 2, the result has the value 1. As the condition is fulfilled, because 1 is indeed equal to 1, the program branches in the if-branch and executes these instructions.
With the subsequent call, "Route" is incremented by 1 (now has the value 2) If (2% 2) = 1 then Write in the "EEP event windowSet switch 1 Set signal 5 Else Set switch 1 Set signal 4 End of if
With the operation 2% 2, the result has the value 0. As the condition is not fulfilled, because 0 isnot equal to 1, the program branches now in the else-branch and executes these instructions.
We note: For each call, the variable is incremented by 1 and the (route% 2) function is called. This always returns a value of 0 or 1, and the decision will be taken thereafter. Now that we have looked at the decision, we come to the remaining rows 18 and 19 or 21 and 22
The point of calling this "Eisenbahn X" function is to set the specified switch. In brackets the number of the switch is sent first, and after the comma the switch position. example: EEPSetSwitch (2, 1) It operates to set switch number 2 towards "MAIN". (FAHRT)or EEPSetSwitch (2, 2) It operates to set switch number 2 towards "BRANCH".(ABZWEIG)
Line 19 and 23
By using this EEP specific function the specified signal is accessed.As above, the figure in brackets is firstly the number of the signal and secondly after the comma the status.
Page no 12
Lua - Instruction Manual
example: EEPSetSignal (4, 1) Operates to set signal number 4 to "GO". (FAHRT) or EEPSetSignal (4, 2) Operates to set signal number 4 to "STOP”. (HALT)
Line 26 Text here is only a programmer's comment and has no other function.
Lines 27-31 This is another function, which we can call from "Eisenbahn X" . The name of this function is
"OpenAllSignals". Line 28 prints "Open signals” in the "EEP event window". In line 29 a command is sent to signal4, specifically, this signal is set to "GO" (position 1). The same command is sent to signal 5. The Line 31 marks the end of this function.
Sequence within the layout
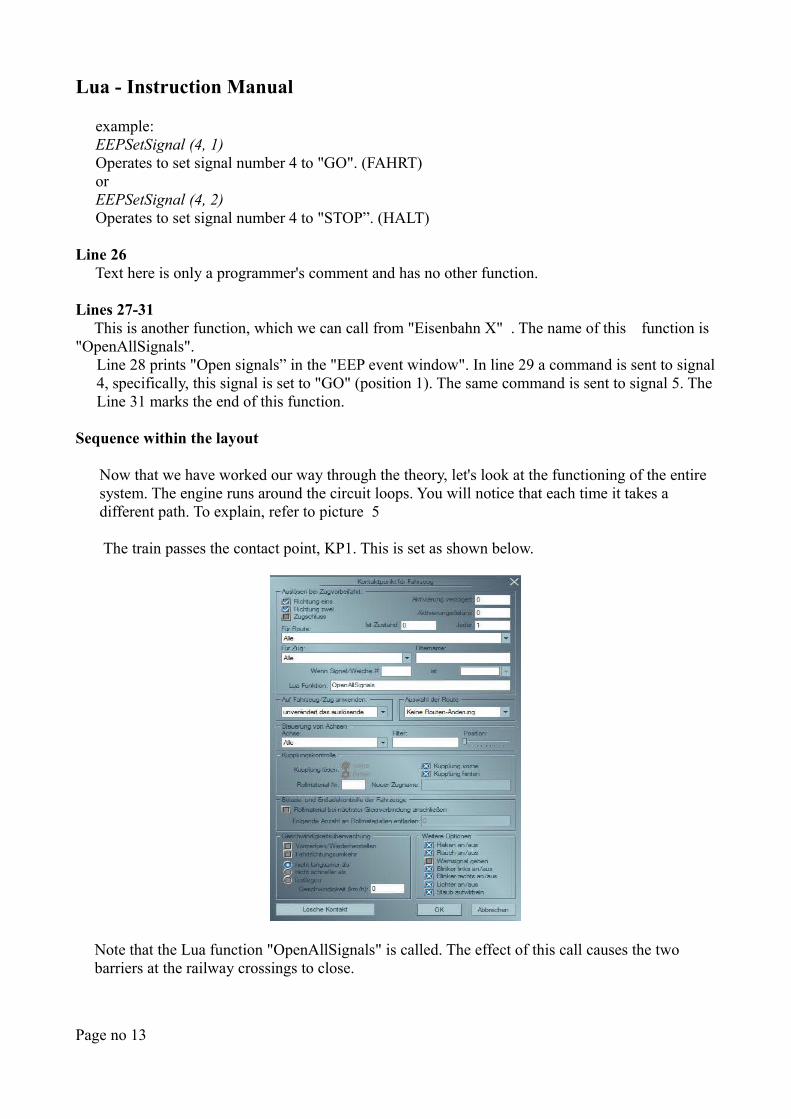
Now that we have worked our way through the theory, let's look at the functioning of the entire system. The engine runs around the circuit loops. You will notice that each time it takes a different path. To explain, refer to picture 5
The train passes the contact point, KP1. This is set as shown below.
Note that the Lua function "OpenAllSignals" is called. The effect of this call causes the two barriers at the railway crossings to close.
Page no 13
Lua - Instruction Manual
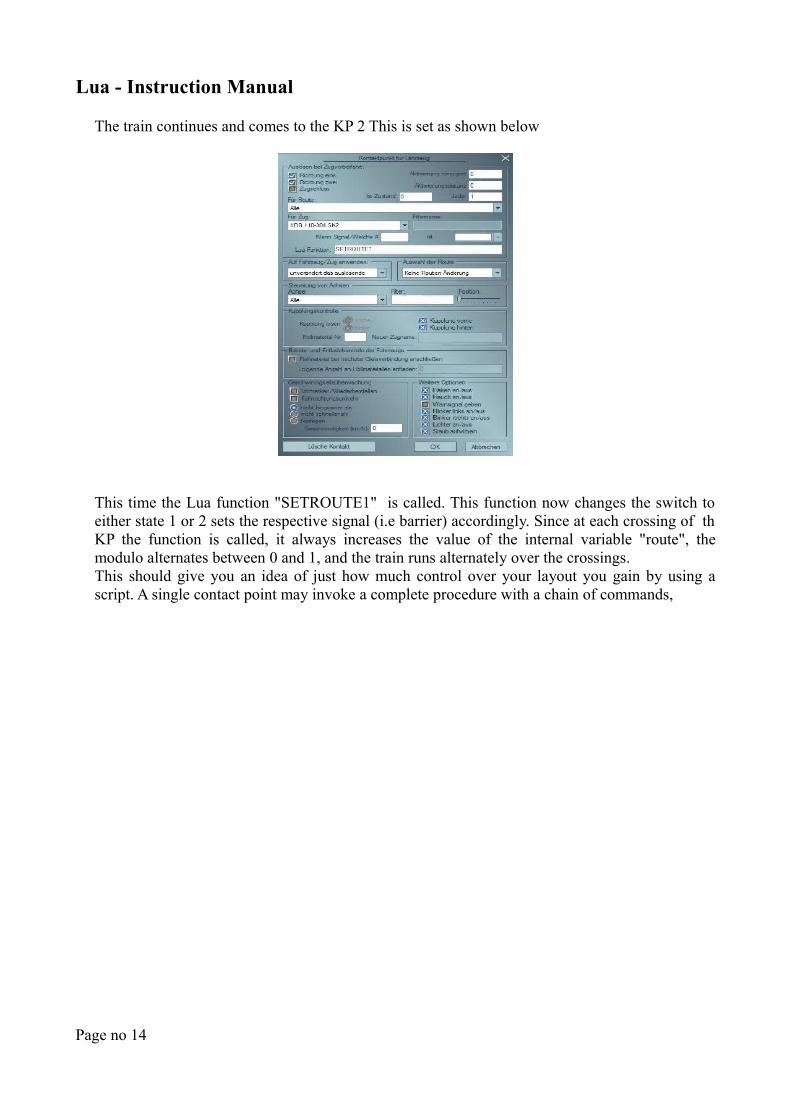
The train continues and comes to the KP 2 This is set as shown below
This time the Lua function "SETROUTE1" is called. This function now changes the switch toeither state 1 or 2 sets the respective signal (i.e barrier) accordingly. Since at each crossing of thKP the function is called, it always increases the value of the internal variable "route", themodulo alternates between 0 and 1, and the train runs alternately over the crossings. This should give you an idea of just how much control over your layout you gain by using ascript. A single contact point may invoke a complete procedure with a chain of commands,
Page no 14

Lua - Instruction Manual
Second layout: "Tutorial_34_LUA_2.anl3"
In this section we want to introduce the technique of "callbacks". What this function does will become clear later in this chapter. With this function you can establish dependencies between points and signals.
If, for example, signal 1 is set to "Go {Fahrt}", then signal 2 is set to "Stop (Danger) {Halt}".
What can be changed and connected is almost unlimited: signals to signals, signals to switches, etc.
In this section, the complete script is shown. Unlike the last chapter, we omit the comments (for simplicity). What comments do has been already sufficiently explained in the last chapter. We also omit a detailed explanation of the previously mentioned functions. Please review the previous chapters if needed.
Line No Content
1 I = 0
2 clearlog ()
3 print ("Hey let's start, EEP version is:" EEPVer)
4 EEPRegisterSignal (1)
5 EEPRegisterSignal (2)
6 function EEPMain ()
Page no 15

Lua - Instruction Manual
7 return 1
8 End
9 function EEPOnSignal_1(status)
10 print ("SIGNAL 1 CALL BACK STATUS:")
11 if (status == 1) then
12 print ("OPEN (" status ")");
13 EEPSetSignal (2, 2, 1)
14 else
15 print ("CLOSE (" status ")");
16 EEPSetSignal (2, 1, 1)
17 end
18 end
19 function EEPOnSignal_2(status)
20 print(" SIGNAL 2 CALLBACK STATUS: ")
21 if(status == 1) then
22 print(" OPEN (", status, ")" );
23 else
24 print(" CLOSE (", status, ")" );
25 end
26 end
Line 1 Here a variable with the name I is initialized and simultaneously given the value 0.
Line 4 and 5 Here the signals get registered in an internal memory area. The exact procedure at this point is not important. But it is important that you make this registry for each signal, which is
required to provide feedback.
Lines 9-18 Here, a function is defined. Unlike in the previous chapters this time we use a transfer parameter (status). A transfer parameter is always defined in the brackets following a function name. In line 18, the end of the function is characterized by "end".
Lines 11-17 These lines form an “IF – THEN – ELSE” statement. If the status passed to this function is 1, then processing continues directly after the line "IF ...". If the status is not equal to 1, it skips to the "ELSE" section. In the line 17 the end of the decision procedure is marked with "end".
Page no 16
Lua - Instruction Manual
Line 13 Here, the signal 2 is given status 2 ("stop") .
Line 16Here, the signal 2 is given status 1 ("go")
Line 19-26 This is essentially the same as lines 9 - 18. The difference is that only outputs are sent to the "EEP event window". No signal gets changed.
Now we come to the usage of the script. You can not call these functions now, this is not necessary, since these are invoked automatically at the start of the layout. Now observe what happens when you operate the signal with the number 1 - the signal with the number 2 is also operated. Turn the signal with the number 2, nothing happens except the output appears in the "EEP event window"
Perhaps this is a good opportunity to make an attempt at writing. Try adding a command to the second function which operates signal 1.After you have inserted your own code first, press the button "Reload Script" and close the window of the Script Editor. Watch what happens when you now operate signal 2. Congratulations! You just created your first own script. A giant step towards controlling your own layouts.
Page no 17

Lua - Instruction Manual
Description of the layout "Tutorial_35_LUA_3.anl3"
The theme of this layout is the dependency between signals and points. Again, the technique of "callbacks" is used. Large parts of the documentation are already described in "Tutorial_34_LUA_2.anl3". Check out these statements if required.
First of all, let's look at the Lua code that is used here. Immediately notice the similarities to layout "Tutorial_34_LUA_3.anl3".
Line no Content
1 clearlog()
2 print("Hey let's start, EEP Version is: ", EEPVer)
3 EEPRegisterSignal(4)
4 EEPRegisterSignal(5)
5 EEPRegisterSignal(6)
6 EEPRegisterSignal(7)
7 function EEPMain()
8 return 1
9 end
10 function EEPOnSignal_4(status)
11 if(status == 1) then
12 print("Set route 1")
13 EEPSetSwitch(1, 1)
14 EEPSetSwitch(5, 2)
15 EEPSetSignal(6, 2)
Page no 18

Lua - Instruction Manual
16 EEPSetSignal(2, 1, 1)
17 EEPSetSignal(7, 2)
18 end
19 end
20 function EEPOnSignal_5(status)
21 if(status == 1) then
22 print("Set route 2")
23 EEPSetSwitch(1, 2)
24 EEPSetSwitch(2, 2)
25 EEPSetSignal(4, 2)
26 EEPSetSignal(6, 2)
27 EEPSetSignal(7, 2)
28 end
29 end
30 function EEPOnSignal_6(status)
31 if(status == 1) then
32 print("Set route 3")
33 EEPSetSwitch(1, 2)
34 EEPSetSignal(2, 1)
35 EEPSetSwitch(3, 2)
36 EEPSetSignal(4, 2)
37 EEPSetSignal(5, 2)
38 EEPSetSignal(7, 2)
39 end
40 end
41 function EEPOnSignal_7(status)
42 if(status == 1) then
43 print("Set route 4")
44 EEPSetSwitch(1, 2)
45 EEPSetSwitch(2, 1)
46 EEPSetSwitch(3,1)
47 EEPSetSignal (4,2)
Page no 19

Lua - Instruction Manual
49 EEPSetSignal (5,2)
49 EEPSetSignal (6,2)
50 end
51 end
How does this code work? Upload the layout and click, while holding down the Shift key on theindividual signals. This time various actions are executed, depending on which signal you havechosen. Look again at lines 41-51. As soon as you click on the signal with the number 7, thefunction in the line 41 is called. When the signal is set to the position 1, the code beginning atline 43 is carried out. You can add any extra lines so that complex processes can be fullyautomated. Should you wish for further explanations on the working please refer to the script inthe layout "Tutorial_34_LUA_3.anl3".
Page no 20

Lua - Instruction Manual
Description of the layout "Tutorial_36_LUA_4.anl3"
1 arr_lr = {"RIGHT", "LEFT"}2 arr_oc = {"OPEN", "CLOSE"}3 s = 04 TXT_info_1 = "no train"5 TXT_info_2 = "no train"6 clearlog()7 print("Hey let's start, EEP Version is: ", EEPVer)8 function EEPMain()9 s=s+110 if (s>5) then11 PrintInfo()12 s=013 End14 return 115 end16 function SetSwitch1()17 current_state = math.random(1, 2)18 EEPSetSwitch(1, current_state)19 End20 function PrintInfo()21 clearlog()22 print(os.date("current date and time: %c"))23 print("")24 signal4_state = EEPGetSignal(4)25 print("Signal 4 status: ", arr_oc[signal4_state])26 signal3_state = EEPGetSignal(3)27 print("Signal 3 status: ", arr_oc[signal3_state])28 print("")29 print( "Switch 1 state: ", arr_lr[EEPGetSwitch(1)] )30 print("")31 print ("Station 1 info: ", TXT_info_1)32 print ("Station 2 info: ", TXT_info_2)33 end34 function SetInfoFromCP1()35 TXT_info = "train arrived to station"36 end37 function SetInfoFromCP2()
Page no 21
Lua - Instruction Manual
38 TXT_info_2 = "train arrived to statio 2"39 end40 function SetInfoFromCP3()41 TXT_info_1 = "train leave station 1"42 EEPSetSignal(4, 2)43 end44 function SetInfoFromCP4()45 TXT_info_2 = "train leave station 2"46 EEPSetSignal(3, 2)47 end
Line 1 Here an array with the name "arr_lr" is initialized and is assigned the values "RIGHT" and "LEFT". The contents of the array is arbitrary. Gve it a try.You can, for example, remove "RIGHT" and “LEFT” replace it with “DEXTER” and “SINISTER”
Line 2 Here an array with the name "arr_oc" is initialized and is assigned the values "OPEN" and "CLOSE". Note to arrays: An array is a list of variables that are stored in a kind of filing cabinet with many drawers. Each drawer has a number (eg 1-10). The cabinet takes the name of the array. For example, "arr_lr". The term “drawer” is used solely for visualisation. In the programme it is called an index. An array is defined as follows: TestArray = {} An assignment to the array looks like this: TestArray [1] = "Sample Text" Test array is the name of the cabinet. In this example, the value "Sample text" is now stored in the drawer 1. If another value is to be stored in drawer 2, the statement looks like this: Test Array [2] = "Something" In line 1 of our script a slightly different style of assignment used, which saves space in the first place. arr_lr = {"RIGHT", "LEFT"}
In this way the array is defined and immediately takes the values shown in the brackets. In this case,"RIGHT" gets stored under index 1 and “LEFT” under index 2. This notation is exactly this: arr_lr = {} arr_lr [1] = "RIGHT" arr_lr [2] = "LEFT"
Line 3 Initialization of the variable "s" and assigning the value = 0
Line 4 Initialization of the variable "TXT_info_1" and assigning the value ("no train")
Page no 22

Lua - Instruction Manual
Line 5 Initialization of the variable "TXT_info_2" and assigning the value ("no train")
Line 6Output the welcome message Line 7-14 Here the function "EEPMain" is described. The function is run 5 times per second.
Line 9 The variable "s" is incremented by the value 1. This is done 5 times per second. After exactly one second, the variable has the value of 5.
Line 10 Here now, a comparison. In words this means: If the variable "s" > 5 then execute the instructions following. If not jump to the end in line 13
Line 11 Calling the function "Print ()", see later in this list.
Line 12Here the variable "s" is reset to 0. This means that the next time the function is called with "s" = 0.
Line 13Here the end of the comparison is indicated.
Line 14The EEPMain function should always return a value greater than – or the execution of the script will be stopped
Line 14This is the end of the function "EEPMain".
Line 16-19 Here a function for altering a switch is defined. This function is called in the layout through a contact point and switches randomly. You will see how this works exactly in the following lines.
Line 17Here the variable "current_state" is defined and at the same time it is assigned a random number. The Lua function "math.random" is called. You can give a range from which a random number is determined. In this case, the range is between 1 and 2; as a result either a 1 or 2 is returned. If for example, you write "math.random (1,10)" in this area, then a random number between 1 to 10 is returned.current_state math.random = (1, 2) Line 18 The "EEPSetSwitch" function is called. As a parameter it has the number of the switch to be changed followed by the new state.
Since this is not a 3-way switch, the value can of course only be in the range 1-2. If it was a 3-way
Page no 23
Lua - Instruction Manual
switch, the value might also be 3. In our example, we do not use a set value, but the value of the variable "current_state", which we have previously determined to be random.
Line 19 The end of the function.
Line 20-33 The "PrintInfo" function is for output of messages in the "EEP event window".
Line 21 The "EEP event window" gets cleared. All existing entries are deleted.
Line 22 This outputs the current date and the current time. Please note! That this is your system time, not theEisenbahn-X-time.
Line 23 This outputs a blank line in the “EEP event window”
Line 24 The current status of signal 4 is assigned to the variable "signal4_state". For this purpose the internal function "EEPGetSignal" is called. This provides the current status of the signal specified inthe brackets as a result.
Line 25 The value which was stored in the array "arr_oc" under the index specified by the value of "signal4_state" is output in the “EEP event window” . An example may help you understand this better.
In this case, the output in the “EEP event window” would be the text that has previously been storedin the array “arr_oc” under the index of 1.Line 26-30 The is a repeat of the previous procedure for signal 3 and the switch.
Line 31-32 The contents of two variables "TXT_info_1" and "TXT_info_2" is output.
Line 33 Here the end of the function "Print Info" is reached.
Line 34-47 The final lines feature functions which assign text strings to the variables "TXT_info_1" and "TXT_info_2".
Page no 24

Lua - Instruction Manual
Summary It was our intention to provide you, with this document, a first insight into the vast world ofprogramming. We would like to give you some advice: Set yourself some simple tasks to beginwith. Work on the principle "From easy to harder". If you were successfully accomplish a simpletask, then you will be able to bring that experience to a next, perhaps more difficult task. If youbegin too ambitiously, you risk frustration. With success from simple tasks comes experience andpleasure, which will motivate you to improve skills.
Try to follow the functions in the tutorials so you can easily understand each step of your work and do not lose yourself in a complicated control.
The futureThe functionality of the "Eisenbahn X" -Lua will continue to grow in the coming years. So far, the available commands are only the beginning of a path on which we have embarked. And we are eager to develop this much further.We wish you lots of success and of course a lot of fun in the automation of your layouts with Lua scripts! Your "Eisenbahn X" team
Page no 25