lucas 2018 - soil component - esdac.jrc.ec.europa.eu · this publication is a technical report by...
TRANSCRIPT

LUCAS 2018 - SOIL COMPONENT Sampling Instructions for Surveyors
Fernaacutendez-Ugalde O Orgiazzi A
Jones A Lugato E Panagos P
2017
EUR 28501 EN
This publication is a Technical report by the Joint Research Centre (JRC) the European Commissionrsquos science
and knowledge service It aims to provide evidence-based scientific support to the European policymaking
process The scientific output expressed does not imply a policy position of the European Commission Neither
the European Commission nor any person acting on behalf of the Commission is responsible for the use that
might be made of this publication
Contact information
Name Oihane Fernaacutendez-Ugalde
Address European Commission Joint Research Centre (JRC) Directorate D - Sustainable Resources Land
Resources Via E Fermi 2749 I-21027 Ispra (VA) Italy
Email oihanefernandez-ugaldeeceuropaeu
Tel +39 0332 783791
JRC Science Hub
httpseceuropaeujrc
JRC105923
EUR 28501 EN
PDF ISBN 978-92-79-66255-3 ISSN 1831-9424 doi102760023673
Luxembourg Publications Office of the European Union 2017
copy European Union 2017
The reuse of the document is authorised provided the source is acknowledged and the original meaning or
message of the texts are not distorted The European Commission shall not be held liable for any consequences
stemming from the reuse
How to cite this report Fernaacutendez-Ugalde O Orgiazzi A Jones A Lugato E Panagos P LUCAS 2018 ndash
SOIL COMPONENT Sampling Instructions for Surveyors EUR 28501 EN doi 102760023673
All images copy European Union 2017
i
Contents
Acknowledgements 2
Abstract 3
1 Introduction Purpose of the soil sampling in the LUCAS Survey 4
2 Manual 1 Standard sampling for points where bulk density will not be determined 5
21 Equipment to collect soil samples 5
22 Collecting soil samples in the field 5
23 Measuring thickness of organic horizon in peat soils 9
24 Collecting soil samples in special cases 11
25 Collecting soil samples in case of difficult access 12
26 Air-drying samples in the nightrsquos location 13
27 Impossibility to collect the soil sample 14
3 Manual 2 Sampling procedure for points where bulk density and soil biodiversity will be determined 15
31 Equipment to collect soil samples 15
32 Before going to the field 16
33 Collecting soil samples in the field 16
34 Measuring thickness of organic horizon in the field 30
35 Collecting soil samples in special cases 32
36 Collecting soil samples in case of difficult access 33
37 Weighing and air-drying samples in the nightrsquos location 34
4 Manual 3 Guidelines for soil erosion assessment 36
41 Types of water and wind erosion 36
42 Questionnaire for soil erosion 41
5 Conclusions 43
2
Acknowledgements
Thanks are due to our colleagues in ESTAT Beatrice Eiselt Helena Ramos and
Alessandra Palmieri that contributed to develop the instructions for the soil sampling on
LUCAS 2018 Survey
3
Abstract
The European Commission launched a soil assessment component to the periodic LUCAS
Land UseLand Cover Area Frame Survey in 2009 Composite soil samples from 0-20-cm
depth were taken air-dried and sieved to 2 mm in order to analyse physical and
chemical parameters of topsoil in 25 Member States (EU-27 except Bulgaria Romania
Malta and Cyprus) The aim of the LUCAS Soil Component was to create a harmonised
and comparable dataset of main properties of topsoil at the EU The LUCAS Soil
Component was extended to Bulgaria and Romania in 2012 Overall ca 22000 soil
samples were collected and analysed All samples were analysed for percentage of coarse
fragments particle-size distribution pH organic carbon carbonates phosphorous total
nitrogen extractable potassium cation exchange capacity multispectral properties and
heavy metals In 2015 the soil sampling was repeated in the same set of points of
LUCAS 20092012 to monitor changes in topsoil physical and chemical parameters across
the EU The soil component was extended to points above elevations of 1000 m which
were not sampled in LUCAS 20092012 Furthermore soil samples were taken in Albania
Bosnia-Herzegovina Croatia Macedonia Montenegro Serbia and Switzerland The soil
sampling was carried out following the instructions already used in LUCAS 20092012
Approximately 27000 samples were collected and will be analysed during 2016 and
2017
In 2018 a new soil sampling campaign will be carried out within the LUCAS framework
Soil samples will be taken in repeated points of LUCAS 20092012 and LUCAS 2015 The
novelty of the survey is that new physical chemical and biological parameters will be
analysed Key parameters for evaluating soil quality such as bulk density and soil
biodiversity will be analysed These analyses require specific methods of soil sampling
preparation and storage of samples Furthermore field measurements such as the
thickness of organic layer in peat soils and visual assessment of signs of soil erosion will
be carried out in 2018 This technical report compiles the instructions for collecting the
various soil samples and for performing field measurements in the soil survey of 2018
These instructions will be used for all LUCAS surveyors to create a comparable database
of soil characteristics all over Europe
4
1 Introduction Purpose of the soil sampling in the LUCAS
Survey
The soil component has been incorporated in the LUCAS survey in order to create a
harmonised and comparable dataset of soil properties and to improve the quality of soil
modelling in Europe The outcome of the soil component of the LUCAS is used for
assessing the state and change of soil characteristics over time updating the European
soil database and supporting the development and implementation of EU land based
policies
In the LUCAS 20092012 and LUCAS 2015 soil samples were collected across Europe
following a standardized sampling procedure and several physical and chemical
properties were analysed in them In the LUCAS 2018 sampling will be adapted in order
to collect samples for the assessment of new properties soil biodiversity bulk density
and thickness of organic horizon in peat soils
Results of the various analysis and measurements will be published trough the European
Soil Data Centre (httpesdacjrceceuropaeu) Should the land ownerland user ask
to obtain a copy of the results of the soil analysis it will be possible to do so provided
that full contact details are recorded in the Field Form
This document contains three manuals
- Manual 1 standard sampling for points where bulk density will not be
determined
- Manual 2 sampling procedure for points where bulk density and soil biodiversity
will be determined
- Manual 3 guidelines for soil erosion assessment
Surveyors will need to read carefully the manuals before going to the field
5
2 Manual 1 Standard sampling for points where bulk
density will not be determined
This manual describes the standard soil sampling procedure1 for the analysis of core
physical and chemical properties (analysed also in LUCAS 20092012 and LUCAS 2015)
This sampling will be carried out in 18500 LUCAS points Surveyors will receive from
their coordinators the list of the specific points before the survey
If the LUCAS points are located in peats soils surveyors will also need to measure the
thickness of the organic horizon Surveyors will receive from their coordinators the list of
the points located in peat soils before the survey
21 Equipment to collect soil samples
The surveyors will be equipped with the following material for each LUCAS point
- a spade with a blade of approx 20 cm
- a trowel (small spade)
- a bucket
- a meter stick
- 2 printed plastic labels per point
- 2 plastic bags and 2 ties per point
- a box to store and transport the samples
- mail boxes (appropriate to send 25 kg to 5 kg)
22 Collecting soil samples in the field
1 The sample is
collected only if
the point is
reached
Go to one of the LUCAS points of the list provided
For the soil survey you need to be able to reach the exact point
(observation distance le100 m) in contrast to the rest of the survey
where you can also make observations from a certain distance
Soil samples should be taken within a maximum of 100 m distance
from the LUCAS point and if possible in the same field where the
LUCAS point is located Soil samples have to be taken always from
the same land cover class as observed at the LUCAS point
If it is not possible to take the soil sample in one LUCAS point due
to inaccessibility problems (eg forbidden zone wetland
impenetrable forest barriers access denied by landowner) then no
soil sample will be collected for that point
1 Adapted from the Technical Documentation of LUCAS Survey in 2015 (accessed on 14022017)
httpeceuropaeueurostatdocuments2050026786255LUCAS2015-C1-Instructions-20150227pdf
6
2 Collect a
composite sample
of at least 500g of
soil
A minimum of 500 gr (ge 05kg) of topsoil has to be collected This
quantity should be representative of a larger area
For this reason the soil sample has to be a composite one resulting
from the mixture of 5 subsamples
The first subsample will be collected in the LUCAS point the other 4
subsamples will be collected at a distance of 2 meters following the
cardinal directions (North East South West)
3 Remove
residues from the
surface
Remove vegetation residues grass and litter if any from the
surface Some fine roots and brownish organic material from the
upper part of the soil can remain in the sample as it is difficult to
remove it completely
4 Cut a slice of
soil and trim the
sides
Using the spade dig a (V shaped) hole in the central point to a
depth of approximately 15-20 cm (the depth of the spade) as shown
in the image
7
Take a slice of soil with the spade This slice is approximately 3 cm
thick Remove any remaining vegetation residues stones and litter
Now trim the sides of the sample leaving a 3 cm sample on the
spade
5 Put soil in the
bucket
Put the soil in the bucket Clean soil in excess from the spade
6 Repeat the
process in the
other 4 locations
(N E S W)
From the central point walk 2 meters to North take a subsample
(with the same procedure as before) and put the sample to the
bucket Clean excess soil from the spade and walk back to the
central point
From the central point walk 2 meters to East take a subsample
(with the same procedure as before) and put the sample to the
bucket Clean excess soil from the spade and walk back to the
central point
From the central point walk 2 meters to South take a subsample
(with the same procedure as before) and put the sample to the
bucket clean excess soil from the spade and walk back to the
central point
From the central point walk 2 meters to West take a subsample
(with the same procedure as before) and put the sample to the
bucket Clean excess soil from the spade and walk back to the
central point
7 Use the trowel
to mix the 5 sub-
samples in the
bucket
Use the trowel to mix the 5 soil subsamples together By mixing the
five subsamples you get the required composite soil sample In
addition clods and lumps are broken up
Remove any extra vegetation residues and litter
8 Take at least
500g of soil and
put it in the
smaller plastic
bag Tag it and tie
it
Take minimum 500 grams (about 5-heaped trowels full) of soil
place it in the plastic bag
8
Put the first available plastic label with a progressive number and an
ldquoArdquo sign printed on it inside this bag (white label)
Close the bag using a tie
9 500g of dry soil
are needed for the
analysis
In case the soil is too wet collect more than 500 g to compensate
for weight loss during the drying process
10 Put the smaller
plastic bag into
the larger one
Tag again and tie
it
Put the plastic bag in a second one
Put a label with the same progressive number as in step 8 but with
a ldquoBrdquo sign on it inside the outer bag (white label)
Close the bag using a tie This is the sample to be shipped
11 Register the
label number in
the Field Form
Record the progressive label number in the appropriate Field Form
12 Take the soil
photo
Put the bag next to the LUCAS point Take a photo of the LUCAS
point with the bag (keep the label visible) and as many as possible
of the 5 holes clearly visible
13 Take additional
photo of the label
The label has to be clearly readable
14 Complete the
questionnaire on
soil
Complete the questions on the Field Form related to signs of
erosion ploughing crop residues and stones
See manual 3 for assessment of soil erosion
15 Percentage of
residuals and
percentage of
stones are
evaluated on the
2m radius area
that serves as
base for soil
collection
The surveyor has to estimate the percentage of the surface that is
covered with vegetation residues and stones
This assessment is made on the 2m radius area that serves as base
for the soil collection
The presence of stones in the soil does not need to be estimated As
explained above stones should be taken out of the subsamples
before making a composite sample
9
16 Take additional
pictures if needed
If appropriate take any additional pictures (eg to justify that a
subsample was not taken due to excessive amount of thorny
shrubs)
17 Make any
necessary remarks
If the procedure was not followed strictly report any changes in the
comments explaining the reason (eg superficial sample as
underground rock hard due to tree roots)
For free text remarks the use of English is mandatory Special
characters are to be avoided
18 If applicable
take note of the
land owner
contacts
If the land ownerland user asks to obtain a copy of the results of
the soil analysis include hisher contact details (at least name
postal address and telephone number if available also e-mail
address) in the Field Form
Move to section 23 if the point is located in a peat soil
You will need to measure the thickness of the organic horizon in the peat soil
Before leaving the point
Close the holes Using the soil in excess close the 5 holes you did
Clean and store
the material
Clean the spade trowel and bucket This is important in order to
prevent cross-contamination
Donrsquot forget to
take all material
and samples with
you
Be aware that you do not forget material or samples collected on
the field before leaving the point
Put the closed bag in the box used for transport the samples and
put the box in the trunk of the car
23 Measuring thickness of organic horizon in peat soils
1 Reuse the holes
already dug for
the soil sampling
Thickness of organic horizon will be measured in the 5 holes already
dug for soil sampling
Start from the central LUCAS point
2 Dig one of the
faces of the hole
to 40 cm
Digging a hole in peat should be easy
Dig one of the faces of the hole to a depth of 40 cm Make sure that
the face is vertical to the soil surface
3 Identify the
organic horizon
Organic horizon is formed from the accumulation of organic material
deposited on the soil surface They must have at least 20 of
organic carbon and a thickness of 10 cm
The intense dark colour of organic horizon compared to mineral
horizons make easy to recognize them
10
Examples of sections through peats showing deep organic soils
A soil profile showing organic horizon (dark layer) overlaying
mineral layers (brownorange layer)
We are looking to see if the dark layer is at least 40 cm thick
4 Measure the
thickness of
organic horizon
Using a meter stick measure the thickness of organic horizon from
the top to the bottom of the horizon on the face of the hole
Accumulation of
organic material
Accumulation of organic material
Organic horizon
11
Record the thickness in the Field Form If the bottom limit of the
organic horizon is below 40-cm depth indicate it together with the
measured thickness in the Field Form
5 Take a picture Take a picture of the face of the hole with the meter stick showing
the scale and indicating the label number of the point
6 Measure the
thickness of
organic horizon at
the other 4
locations
The other 4 measurements will be done at a distance of 2 m from
the central LUCAS point following North East South and West
directions
Repeat steps 2 to 5 to do the measurements at each location
Before leaving the point
Close the holes Using the soil in excess close the 5 holes you did
Clean the material Clean the material you used This is important in order to prevent
cross-contamination
Donrsquot forget to
take all material
Be aware that you do not forget material or samples collected on
the field before leaving the point
24 Collecting soil samples in special cases
If it is impossible
to collect the
subsample in the
appropriate
location find a
suitable location
within 2m from
the central point
If in one or more of the 4 subsample locations belonging to the
LUCAS soil point (central North East South or West) it is not
possible to collect a topsoil sample for any reason (accessibility
problems hardness of the ground coverage ndash trees houses etc)
walk along the dotted line until you find a suitable location or walk
less than 2m from central point to take the subsample (represented
by the small red circles)
If a sample is very
wet treat it as a
normal sample It
has to be dried in
the same manner
What to do if the sample is very wet or comes from a peat bog
Treat these samples in the same way as any other sample unless it
is inaccessible or it is impossible to collect soil
Open the bag roll down the sides and let the samples dry until you
ship them
12
25 Collecting soil samples in case of difficult access
If access to the point is difficult because of
- a risk of damage to crops
- harvesting of a crop
- on-going fertilizer application
then apply one of the following methods of soil collection The methods are presented by
order of preference
Linear sample at
least 5m from the
edge of the field
The soil sampling is carried out inside the field at 5m distance from
the edge in between the rows of the crops using a linear sampling
pattern taking as the central one the LUCAS point (if not on the
crop) or the one closest to the LUCAS point not on the crop (if
LUCAS point on the crop)
Linear sample
near the edge of
the field
If it is not possible to collect the soil sample in-between the rows of
the crops then the soil sample has to be taken near the edge inside
the field as close as possible to where the original LUCAS point is
located
Choose the edge closest to the LUCAS point and as farer as possible
from any artificial surface (eg road)
The same linear sampling pattern as previously described for
sampling in-between rows has to be respected
Road
Road
Field boundary
13
Linear sample
when point is close
to a road
The same linear sampling schema has to be applied if the LUCAS
point is too near to the road In this situation the soil sample can be
taken between the rows or if not possible on the hedge of the
fields with the same approach shown in the example above
Use the remarks
field
The need for using special arrangements for soil collection should be
reported in the remarks section of the Field Form
26 Air-drying samples in the nightrsquos location
Before the shipment soil sample need to be air-dried Wet or damp samples may give
unreliable results if inappropriately stored
1 Drying the
sample
To dry the sample roll down the sides of both bags and open as
much as possible at the end of the days work when you have
reached your nights location
2 Handle with care Make sure that the samples do not fall over and contaminate each
other
3 Close the bags
carefully
Close the inside bag with a tie (check the label A is still inside)
Close the second bag with a tie (check the label B is still in between
the two bags and has the same progressive number as the other)
Make sure all bags are properly closed in order to prevent
contamination during transport when the boxes may not be kept
upright all the time
14
4 Ship the
samples to the
supervisor
When 5 to 10 samples were collected (total weight around 25 to
5kg) they should be shipped to the supervisor (eg via mail) Tape
the sides of the box for extra security
Buy a new box that you will use for storing the samples to be
collected until you will come again to a post office and that you will
use for the next shipment
27 Impossibility to collect the soil sample
If the ground conditions prevent the surveyor from taking any soil sample in the LUCAS
point
It is acceptable
not to make a soil
collection if certain
conditions are met
Ground conditions that prevent the soil collection include
- Abundance of rocks (S ge 50 )
- Excessive shrub cover that makes impossible to reach the
soil (eg excess of thorny shrubs)
If it is not possible to collect soil a compulsory remark has to be
added in the Field Form for the point
15
3 Manual 2 Sampling procedure for points where bulk
density and soil biodiversity will be determined
This manual describes the sampling procedure for the determination of bulk density
analysis of core physical and chemical properties and assessment of soil biodiversity In
9000 LUCAS points soil samples will be taken for the determination of bulk density and
analysis of core physical and chemical properties Unlike the standard sampling
surveyors have to collect separate soil samples from the 0-10 cm and 10-20 cm depth
increments in these points Only in points located in Portugal surveyors have to take soil
samples also from the 20-30 cm depth increment Besides in 1000 out of the 9000
points soil samples for biodiversity assessment will also be collected Surveyors will
receive from their coordinators the list of the specific points indicating the samples that
have to be collected in each one before the survey
If the LUCAS points are located in peats soils surveyors will also need to measure the
thickness of the organic horizon Surveyors will receive from their coordinators the list of
the points located in peat soils before the survey
31 Equipment to collect soil samples
Surveyors will be equipped with the following material for the 9000 LUCAS points
- a spade with a blade of approx 20 cm
- a trowel (small spade)
- a bucket
- a meter stick
- a flat-bladed knife
- metallic rings
- a rubber mallet
- a wood block
- a balance to weigh the samples
- a marker to write in plastic bags
- 7 printed plastic labels per point
- 6 small plastic bags and 1 big plastic bag with their ties per point
- a box to store and transport the samples
- mail boxes (appropriate to send 25 to 5 kg)
Additionally surveyors will be equipped with the following material for the 1000 points
where samples for the assessment of soil biodiversity will be taken
- alcohol in dispenser
- 2 pairs of plastic surgical gloves per point
- 2 printed plastic labels per point
- 1 plastic jar per point
- 1 polystyrene box (to ship the sample) per point
- 2 freezer packs per polystyrene box
- packing tape to close the polystyrene box
- address label for the polystyrene box
16
32 Before going to the field
Surveyors will need to tag 2 plastic bags per point with the following labels Bag A 0-10
cm Bag B 10-20 cm Surveyors in Portugal have to prepare another plastic bag with the
label Bag C 20-30 cm
For the points where samples for the assessment of soil biodiversity will be taken
surveyors will need to
1 put the 2 freezer packs into a freezer at least 2448 hours before the sampling
2 the morning before going to the field place the 2 freezer packs into the
polystyrene box
3 wash the sampling material (the small and large spades the knife and the
bucket) using water and a paper napkin to remove soil from previous sampling
33 Collecting soil samples in the field
1 Samples are
collected only if
the point is
reached
Go to one of the LUCAS points of the list provided
For the soil survey you need to be able to reach the exact point
(observation distance le100 m) in contrast to the rest of the survey
where you can also make observations from a certain distance
Soil samples should be taken within a maximum of 100 m distance
from the LUCAS point and if possible in the same field where the
LUCAS point is located Soil samples have to be taken always from
the same land cover class as observed at the LUCAS point
Collected samples have to be representative of a larger area than
the LUCAS point For this reason composite samples resulting from
the mixture of 5 subsamples will be collected
The first subsample will be collected in the LUCAS point the other 4
subsamples will be collected at a distance of 2 meters following the
cardinal directions (North East South West)
ATTENTION
Do not collect a
sample in
saturated peat
soils
Soil samples can only be taken in the mature surface layer of the
peat soil under unsaturated conditions
If the peat soil is saturated with water do not take samples
17
Move to step 2 if you have to take a sample for assessment of soil biodiversity
Move to step 3 if you do not have to take a sample for assessment of soil biodiversity
2 Use gloves if a
sample for
biodiversity
assessment have
to be taken
Wear plastic gloves if you are in one of the 1000 points where a
sample for the assessment of soil biodiversity will be taken
Ensure that the material for the sampling (spades the bucket and
the knife) do not have soil residues from previous sampling
Quickly wash them first with alcohol and then with water
3 Remove
residues from the
surface
Remove vegetation residues grass and litter if any from the
surface Some fine roots and brownish organic material from the
upper part of the soil can remain in the sample as it is difficult to
remove it completely
4 Drive the ring
into soil
Gently press the metallic ring bevelled edge down into the soil with
the help of a mallet Use a block of wood to push the ring with the
mallet in order to avoid compaction of soil and protect the ring
Avoid pushing the ring in too far or the soil will compact
18
Excavate a little bit around the outside edge of the ring with a
small flat-bladed knife Put the plastic cap to the ring
5 Dig a square
hole to a depth of
20 cm
Dig a hole at a distance of 2-3 cm from the metallic ring
Make 4 cuts with the spade to dig the hole Avoid standing
stepping where the ring is hammed
Extract the resulting clump of soil with the spade Take care that
the hole remains clean
Move to step 6 if you have to take a sample for assessment of soil biodiversity
Move to step 8 if you do not have to take a sample for assessment of soil biodiversity
19
6 Cut a slice of
soil and trim the
sides if a sample
for biodiversity
assessment have
to be taken
Take a slice of soil with the spade from the face of the hole opposite
to the ring Remove any remaining vegetation residues stones and
litter
Trim the sides of the slice leaving a 5 cm segment on the spade
Take care that the hole remains clean and that the trimmed
material does not end up again in the hole
7 Put collected soil
in the bucket
Put collected soil in the bucket Clean soil residues from the spade
8 Remove the
metallic ring
Make 3 cuts with the spade in the remaining sides around the ring
at a distance of 2-3 cm from the metallic ring
Place the spade (or the trowel) underneath the ring and carefully
remove the clump of soil with the ring intact
20
Remove excess soil from the bottom of the ring and around the
outside edge of the ring with the knife
If the metallic ring is not completely filled with soil (less
than 10 missing due to a stone or lost material when
removing from soil) you can fill the ring with removed soil
If the missing part in the ring is greater discard the soil
core and take other on one of the other faces of the hole
following steps 3 to 8
21
9 Put the soil core
in the plastic bag
tagged as ldquoBag A
0-10 cmrdquo
Push out the soil core into the plastic bag labelled as ldquoBag A 0-10
cmrdquo using the knife
Make sure the entire core is placed in the plastic bag
10 Repeat the
process at the
other 4 locations
(N E S W)
From the central LUCAS point walk 2 m to North and repeat steps 2
to 9 When finished walk back to the LUCAS point
From the central LUCAS point walk 2 m to East and repeat steps 2
to 9 When finished walk back to the LUCAS point
From the central LUCAS point walk 2 m to South and repeat steps
2 to 9 When finished walk back to the LUCAS point
From the central LUCAS point walk 2 m to West and repeat steps 2
to 9 When finished walk back to the LUCAS point
Be aware that you take all material and samples with you when you
move to a new location
11 Label the
plastic bag
containing the 5
soil cores collected
in 0-10 cm depth
increment
Insert the first available yellow plastic label with a progressive
number and ldquoBULK 0-10 Ardquo sign printed on it inside the bag
containing the 5 soil cores collected from 0-10 cm depth increment
Close the bag with a tie
12 Put the plastic
bag containing soil
cores within a
second plastic bag
and label it again
Put the plastic bag containing the 5 soil cores within a second plastic
bag Insert the yellow plastic label with the same progressive
number as in step 11 and with ldquoBULK 0-10 Brdquo sign printed on it
inside the outer bag Close the bag with a tie
This will be the first sample for the determination of bulk density
and analysis of core physical and chemical properties
22
13 Place the
sample in the big
plastic bag and
label it
Put the plastic bag inside the big plastic bag Insert the yellow
plastic label with the same progressive number as in steps 11 and
12 and with ldquoBULKrdquo sign printed on it inside the big bag
Move to step 14 if you have to take a sample for assessment of soil biodiversity
Move to step 17 if you do not have to take a sample for assessment of soil biodiversity
14 Mix the 5
subsamples in the
bucket if a sample
for biodiversity
have to be taken
Use the trowel to mix the 5 subsamples in the bucket and to get a
homogeneous composite sample Clods and lumps have to be also
broken up
Remove any extra vegetation residues stones and litter
15 Transfer 500 g
of soil to the
plastic jar and
label it
Take 500 g (about 5 handfuls) of the composite sample and place it
in the plastic jar
Insert the first available green plastic label with the same
progressive number as in steps 11 and 12 and with ldquoBIO Ardquo sign
printed on it in the jar and close it
This will be the sample for soil biodiversity assessment It has to be
shipped fresh to the JRC as soon as possible
23
16 Prepare the
polystyrene box
for shipping
Place the plastic jar in the polystyrene box Place the 2 freezer
packs at the sides of the bag
Insert the green plastic label with the same progressive number
as in step 15 and with ldquoBIO Brdquo sign printed on it in the box
Close the box and seal it with the packaging tape to ensure the
cover is secured Attached the address label on the box
The box must be shipped to the JRC as soon as possible either
same day or early morning the day after (in this case the box must
be stored in a fridge overnight)
17 Move again to
the central LUCAS
point
Be aware that you take all material and samples with you when you
move to a new location
18 Drive the ring
into soil from 10-
20 cm depth
increment
Measure the depth of the hole where the first soil core was taken
If the depth of the hole is less than 10 cm dig to reach at least 10
cm depth
24
Gently press the metallic ring bevelled edge down into the soil with
the help of a mallet Use a block of wood to push the ring with the
mallet in order to avoid compaction of soil and protect the ring
Avoid pushing the ring in too far or the soil will compact
Excavate a little bit around the outside edge of the ring with a
small flat-bladed knife Put the plastic cap to the ring
19 Remove the
metallic ring
Excavate more around the outside edge of the ring with a small
flat-bladed knife
Place the spade (or the trowel) underneath the ring and carefully
remove it intact
25
Remove excess soil from the bottom of the ring and around the
outside edge of the ring with the knife
If the metallic ring is not completely filled with soil (less
than 10 missing due to a stone or lost material when
removing from soil) you can fill the ring with removed soil
If the missing part in the ring is greater discard the soil
core and take other on the opposite face of the hole Dig at
least to 10 cm depth and follow steps 18-19
20 Put the soil
core in the plastic
bag tagged as
ldquoBag B 10-20 cmrdquo
Push out the soil core into the plastic bag labelled as ldquoBag B 10-20
cmrdquo using the knife Make sure the entire core is placed in the
plastic bag
21 Repeat the
process at the
other 4 locations
(N E S W)
From the central LUCAS point walk 2 m to North and repeat steps
18 to 20 When finished walk back to the LUCAS point
From the central LUCAS point walk 2 m to East and repeat steps 18
to 20 When finished walk back to the LUCAS point
From the central LUCAS point walk 2 m to South and repeat steps
18 to 20 When finished walk back to the LUCAS point
26
From the central LUCAS point walk 2 m to West and repeat steps
18 to 20 When finished walk back to the LUCAS point
Be aware that you take all material and samples with you when you
move to a new location
22 Label the
plastic bag
containing the 5
soil cores
Insert the yellow plastic label with the same progressive number
as in steps 11 and 12 and with ldquoBULK 10-20 Ardquo sign printed on it
inside the bag containing the 5 soil cores collected from 10-20 cm
depth increment Close the bag with a tie
23 Put the plastic
bag containing soil
cores within a
second plastic bag
and label it again
Put the plastic bag with the 5 soil cores within a second plastic bag
Insert the yellow plastic label with the same progressive number
as in step 22 and with ldquoBULK 10-20 Brdquo sign printed on it inside the
outer bag Close the bag with a tie
This will be the second sample for the determination of bulk density
and analysis of core physical and chemical properties
24 Place the
sample in the big
plastic bag
Put the plastic bag inside the big plastic bag (the same bag in which
you put the first sample from 0-10 cm depth)
Make sure that the yellow plastic label with the same progressive
number as in steps 22 and 23 and with ldquoBULKrdquo sign printed on it is
still inside Close the bag with a tie if you do not have to take soil
cores from 20-30 cm depth increment (taken only in Portugal)
Move to step 25 if you have to collect soil cores from 20-30 cm depth increment (only
for Portugal)
Move to step 33 if you do not have to collect soil cores from 20-30 cm depth increment
25 Move again to
the central LUCAS
point
Be aware that you take all material and samples with you when you
move to a new location
27
26 Drive the ring
into soil from 20-
30 depth
increment
Make sure that the depth of the hole where the previous two soil
cores were taken is at least 20 cm
Gently press the metallic ring bevelled edge down into the soil with
the help of a mallet Use a block of wood to push the ring with the
mallet in order to avoid compaction of soil and protect the ring
Avoid pushing the ring in too far or the soil will compact
Excavate a little bit around the outside edge of the ring with a
small flat-bladed knife Put the plastic cap to the ring
27 Remove the
metallic ring
Excavate more around the outside edge of the ring with a small
flat-bladed knife
Place the spade (or the trowel) underneath the ring and carefully
remove it intact
20 cm
28
Remove excess soil from the bottom of the ring and around the
outside edge of the ring with the knife
If the metallic ring is not completely filled with soil (less
than 10 missing due to a stone or lost material when
removing from soil) you can fill the ring with removed soil
If the missing part in the ring is greater discard the soil
core and take other following steps 26-27
28 Put the soil
core in the plastic
bag tagged as
ldquoBag C 20-30 cmrdquo
Push out the soil core into the plastic bag labelled as ldquoBag C 20-30
cmrdquo using the knife Make sure the entire core is placed in the
plastic bag
29 Repeat the
process at other 2
locations
(N E S W)
Select 2 other locations from the 4 cardinal directions (North East
South West)
From the central LUCAS point walk 2 m to the selected locations
At each location repeat steps 26 to 28 to take the soil core from
20-30 cm depth increment
Be aware that you take all material and samples with you when you
move to a new location
30 Label the
plastic bag
containing the 3
soil cores
Insert the yellow plastic label with the same progressive number
as in steps 11-12 and 22-23 and with ldquoBULK 20-30 Ardquo sign
printed on it inside the bag containing the 3 soil cores collected from
20-30 cm depth increment
29
Close the bag with a tie
31 Put the plastic
bag containing soil
cores within a
second plastic bag
and label it again
Put the plastic bag with the 3 soil cores within a second plastic bag
Insert the yellow plastic label with the same progressive number
as in step 30 and with ldquoBULK 20-30 Brdquo sign printed on it inside the
outer bag Close the bag with a tie
This will be the second sample for the determination of bulk density
and analysis of core physical and chemical properties
32 Place the
sample in the big
plastic bag and
close it
Put the plastic bag inside the big plastic bag (the same bag in which
you put the samples taken from 0-5 cm depth and 10-20 cm
depth)
Make sure that the yellow plastic label with the same progressive
number as in steps 30 and 31 and with ldquoBULKrdquo sign printed on it is
still inside Close the bag with a tie
33 Register the
label number in
the Field Form
Record the progressive label number in the appropriate Field Form
34 Take the soil
photo
Put the bag and the polystyrene box (if a sample for assessment of
soil biodiversity has been taken) next to the LUCAS point Take a
photo of the LUCAS point with the bag (keep the label visible) and
the box and as many as possible of the 5 holes clearly visible
35 Take additional
photo of the label
The label has to be clearly readable
36 Complete the
questionnaire on
soil
Complete the questions on the Field Form related to signs of
erosion ploughing crop residues and stones
See manual 3 for assessment of soil erosion
30
37 Percentage of
residuals and
percentage of
stones are
evaluated on the
2m radius area
that serves as
base for soil
collection
The surveyor has to estimate the percentage of the surface that is
covered with vegetation residues and stones
This assessment is made on the 2m radius area that serves as base
for the soil collection
The presence of stones in the soil does not need to be estimated As
explained above stones should be taken out of the subsamples
before making a composite sample
38 Take additional
pictures if needed
If appropriate take any additional pictures (eg to justify that a
subsample was not taken due to excessive amount of thorny
shrubs)
39 Make any
necessary remarks
If the procedure was not followed strictly report any changes in the
comments explaining the reason (eg superficial sample as
underground rock hard due to tree roots)
For free text remarks the use of English is mandatory Special
characters are to be avoided
40 If applicable
take note of the
land owner
contacts
If the land ownerland user asks to obtain a copy of the results of
the soil analysis include hisher contact details (at least name
postal address and telephone number if available also e-mail
address) in the Field Form
Move to section 34 if the point is located in a peat soil
You will need to measure the thickness of the organic horizon in the peat soil
Before leaving the point
Close the holes Using the soil in excess close the 5 holes you did
Clean and store
the material
Clean the spade trowel and bucket This is important in order to
prevent cross-contamination
Donrsquot forget to
take all material
and samples with
you
Be aware that you do not forget material or samples collected on
the field before leaving the point
Put the closed bag in the box used for shipping the samples and put
the box in the trunk of the car
34 Measuring thickness of organic horizon in the field
1 Reuse the holes
already dug for
the soil sampling
Thickness of organic horizon will be measured in the 5 holes already
dug for soil sampling
Start from the central LUCAS point
31
2 Dig one of the
faces of the hole
to 40 cm
Digging a hole in peat should be easy
Dig one of the faces of the hole to a depth of 40 cm Make sure that
the face is vertical to the soil surface
3 Identify the
organic horizon
Organic horizon is formed from the accumulation of organic material
deposited on the soil surface They must have at least 20 of
organic carbon and a thickness of 10 cm
The intense dark colour of organic horizon compared to mineral
horizons make easy to recognize them
Examples of sections through peats showing deep organic soils
A soil profile showing organic horizon (dark layer) overlaying
mineral layers (brownorange layer)
We are looking to see if the dark layer is at least 40 cm thick
Accumulation of
organic material
Accumulation of
organic material
Organic
horizon
32
4 Measure the
thickness of
organic horizon
Using a meter stick measure the thickness of organic horizon from
the top to the bottom of the horizon on the face of the hole
Record the thickness in the Field Form If the bottom limit of the
organic horizon is below 40-cm depth indicate it together with the
measured thickness in the Field Form
5 Take a picture Take a picture of the face of the hole with the meter stick showing
the scale and indicating the label number of the point
6 Measure the
thickness of
organic horizon at
the other 4
locations
The other 4 measurements will be done at a distance of 2 m from
the central LUCAS point following North East South and West
directions
Repeat steps 2 to 5 to do the measurements at each location
Before leaving the point
Close the holes Using the soil in excess close the 5 holes you did
Clean the material Clean the material you used This is important in order to prevent
cross-contamination
Donrsquot forget to
take all material
Be aware that you do not forget material or samples collected on
the field before leaving the point
35 Collecting soil samples in special cases
If it is impossible
to collect the
subsample in the
appropriate
location find a
suitable location
within 2m from
the central point
If in one or more of the 4 subsample locations belonging to the
LUCAS soil point (central North East South or West) it is not
possible to collect a topsoil sample for any reason (accessibility
problems hardness of the ground coverage ndash trees houses etc)
walk along the dotted line until you find a suitable location or walk
less than 2m from central point to take the subsample (represented
by the small red circles)
33
If a sample is very
wet treat it as a
normal sample It
has to be dried in
the same manner
What to do if the sample is very wet or comes from a peat soil
Treat these samples in the same way as any other sample unless it
is inaccessible or it is impossible to collect soil
Open the bag roll down the sides and let the samples dry until you
ship them
36 Collecting soil samples in case of difficult access
If access to the point is difficult because of
a risk of damage to crops
harvesting of a crop
on-going fertilizer application
then apply one of the following methods of soil collection The methods are presented by
order of preference
Linear sample at
least 5m from the
edge of the field
The soil sampling is carried out inside the field at 5m distance from
the edge in between the rows of the crops using a linear sampling
pattern taking as the central one the LUCAS point (if not on the
crop) or the one closest to the LUCAS point not on the crop (if
LUCAS point on the crop)
Linear sample
near the edge of
the field
Road
Field boundary
34
If it is not possible to collect the soil sample in-between the rows of
the crops then the soil sample has to be taken near the edge inside
the field as close as possible to where the original LUCAS point is
located
Choose the edge closest to the LUCAS point and as farer as possible
from any artificial surface (eg road)
The same linear sampling pattern as previously described for
sampling in-between rows has to be respected
Linear sample
when point is close
to a road
The same linear sampling schema has to be applied if the LUCAS
point is too near to the road In this situation the soil sample can be
taken between the rows or if not possible on the hedge of the
fields with the same approach shown in the example above
Use the remarks
field
The need for using special arrangements for soil collection should be
reported in the remarks section of the Field Form
37 Weighing and air-drying samples in the nightrsquos location
Soil samples except samples for soil biodiversity determination need to be weighed
before and after air-drying prior to shipping the samples to JRC Wet or damp samples
may give unreliable results if inappropriately stored
1 Weigh the
samples placed in
the big plastic bag
At the end of the dayrsquos work when you have reached the nightrsquos
location
Take out the small bags containing the samples from the big plastic
bag Open the bags removing the ties
Weigh the samples within their bags Record the weight of each
sample (field-moist weight) in the Field Form
35
2 Air-dry the
samples
Roll down the sides of the bags and open them as much as
possible
Crumble samples into small clodspeds by hand
Air-dry samples until constant weight within their bags in a well
ventilated room
Make sure that samples donrsquot fall over and contaminate each other
3 Weigh the air-
dried samples
Weigh the air-dried samples within their bags Record their weight
(air-dried weight) in the Field Form
4 Close the plastic
bags carefully
Close the inside bag containing the sample with a tie (check that
label A is still inside)
Close the outer bag with a tie (check that label B is still inside and
has the same progressive number as the other)
Make sure all bags are properly closed in order to prevent
contamination during transport when the boxes may not be kept
upright all the time
5 Put them again
in the big plastic
bags
Put them again in their corresponding big plastic bags Make sure
that the plastic label is still inside the big plastic bag
Close the bag with a tie
Make sure all bags are properly closed
6 Ship the
samples to the
supervisor
When 5 to 10 samples are collected (total weight around 25 kg to 5
kg) they should be shipped to the coordinator (eg via mail) Tape
the sides of the box for extra security
Buy a new box that you will use for storing the samples to be
collected until you will come again to a post office and that you will
use for the next shipment
36
4 Manual 3 Guidelines for soil erosion assessment
Erosion by water and wind can be a major type of soil degradation While it is a naturally
occurring process on all land soil erosion can cause serious losses of topsoil which
results reduced crop yields lower surface water quality damaged drainage networks and
the release of greenhouse gases Water and wind erosion are responsible for about 84
of all degraded land on the planet
In this instance we are asking surveyors to notice if there is any evidence of erosion by
water andor wind within a distance of 500 m from the LUCAS point In case of any
evidence of erosion surveyors have to take a picture of the area and indicate in the Field
Form how far from the LUCAS point erosion occurs and in which direction (North East
South or West of the LUCAS point)
41 Types of water and wind erosion
Examples of the main types of water and wind erosion are shown below together with
the appropriate code for the Field Form (eg 2 for rill erosion)
1 Sheet
erosion
A thin layer of topsoil is removed over a significant area mdashoften not be
readily noticed
Sheet erosion is usually only a few cm deep but several meters wide
2 Rill
erosion
Rill erosion occurs when water running along the surface forms narrow and
relatively shallow channels (lt30 cm deep) often evident where gradient
becomes steeper Rills tend to develop from sheet erosion
37
3 Gully
erosion
Gullies are significant features that occur when water runoff concentrates to
cause a significant movement of soil particles Gully depth is gt 30 cm often
limited by the depth of the underlying rock which means gullies are but
may reach 10ndash15m on deep soils
4 Mass
movement
Mass movement occurs when gravity moves soil (and sometimes rocks)
downslope either slowly (millimetres per year) or suddenly during periods
of prolonged and heavy rainfall (eg landslides rock falls)
Different forms of mass movement include
- Landslide
38
- Soil creep - small natural terracesripples on hill slopes (can resulted
in tilted poles misaligned fences curved tree trucks)
- Rock slides
39
5 Re-
deposited
soil
Perhaps evidence of erosion is not obvious but clear signs that water has
moved soil across the land surface
6 Wind
erosion
Signs of wind erosion may be harder to spot than water erosion Examples
include visible soil particles being blown off the soil dust clouds following
tractors tilling the land accumulated particles along barriers
40
The following table shows the details of practices that can reduce soil erosion
Plough direction
Is the direction of ploughing across or down the slope
Stone Walls
Not maintained Well Maintained
In the example 2 ploughing has been done up and down the slope
In this field plough is across the
slope as evidence by the channel
(flowing downslope) that cuts
across Ploughing along constant
elevations (contours) is a good way
to reduce erosion
41
Presence of crop residues
Example of crop residues on soil surface
Grass margins
Example of grass margins between fields
42 Questionnaire for soil erosion
Erosion signs
1 Type of erosion
917760 1 Sheet erosion 917760 5 Re-deposited soil
917760 2 Rill erosion 917760 6 Wind erosion
917760 3 Gully erosion 917760 Not applicable
917760 4 Mass movement
2 How far from the LUCAS point erosion occurs ________
3 In which direction is erosion occurring
917760 North of LUCAS point 917760 East of LUCAS point
917760 South of LUCAS point 917760 West of LUCAS point
42
4 Number of rills or gullies observed
917760 lt 5 rills or gullies
917760 5-10 rills or gullies
917760 gt10 rills or gullies
Practices to reduce erosion
5 Plough direction
917760 Across the slope 917760 Down the slope 917760 Not applicable
6 Slope of the ploughed field
917760 Flat
917760 Gently sloping (no effort when walking up to slope)
917760 Steeply sloping (requires effort to walk up the slope)
917760 Undulating (land slopes in more than one direction)
7 Presence of crop residues
917760 Yes 917760 No
8 Presence of grass margins
917760 No
917760 lt1 m wide
917760 gt1 m wide
9 Stone Walls
917760 No
917760 Yes but not maintained
917760 Yes well maintained
43
5 Conclusions
This technical report compiles the instructions for surveyors to collect the various soil
samples and to perform the field measurements specified in the soil survey of LUCAS
2018 Surveyors will have to take the following type of soil samples (1) composite soil
samples following the procedure used in LUCAS 20092012 and LUCAS 2015 for
analysing standard physical and chemical properties monitored in every LUCAS soil
survey (2) soil cores for measuring bulk density and (3) fresh soil samples for analysing
soil biodiversity Furthermore surveyors will measure thickness of the organic horizon in
peat soils and carry out a visual assessment of erosion signs in the field Using the same
soil sampling methodology all over EU in LUCAS creates an archive of comparable soil
samples of Europe AS in LUCAS 20092012 and LUCAS 2018 physical chemical and
biological parameters will be then analysed on collected soil samples with standard
methods in a central laboratory
Europe Direct is a service to help you find answers
to your questions about the European Union
Freephone number ()
00 800 6 7 8 9 10 11 () The information given is free as are most calls (though some operators phone boxes or hotels may
charge you)
More information on the European Union is available on the internet (httpeuropaeu)
HOW TO OBTAIN EU PUBLICATIONS
Free publications
bull one copy
via EU Bookshop (httpbookshopeuropaeu)
bull more than one copy or postersmaps
from the European Unionrsquos representations (httpeceuropaeurepresent_enhtm) from the delegations in non-EU countries (httpeeaseuropaeudelegationsindex_enhtm) by contacting the Europe Direct service (httpeuropaeueuropedirectindex_enhtm) or calling 00 800 6 7 8 9 10 11 (freephone number from anywhere in the EU) () () The information given is free as are most calls (though some operators phone boxes or hotels may charge you)
Priced publications
bull via EU Bookshop (httpbookshopeuropaeu)
KJ-N
A-2
8501-E
N-N
doi102760023673
ISBN 978-92-79-66255-3
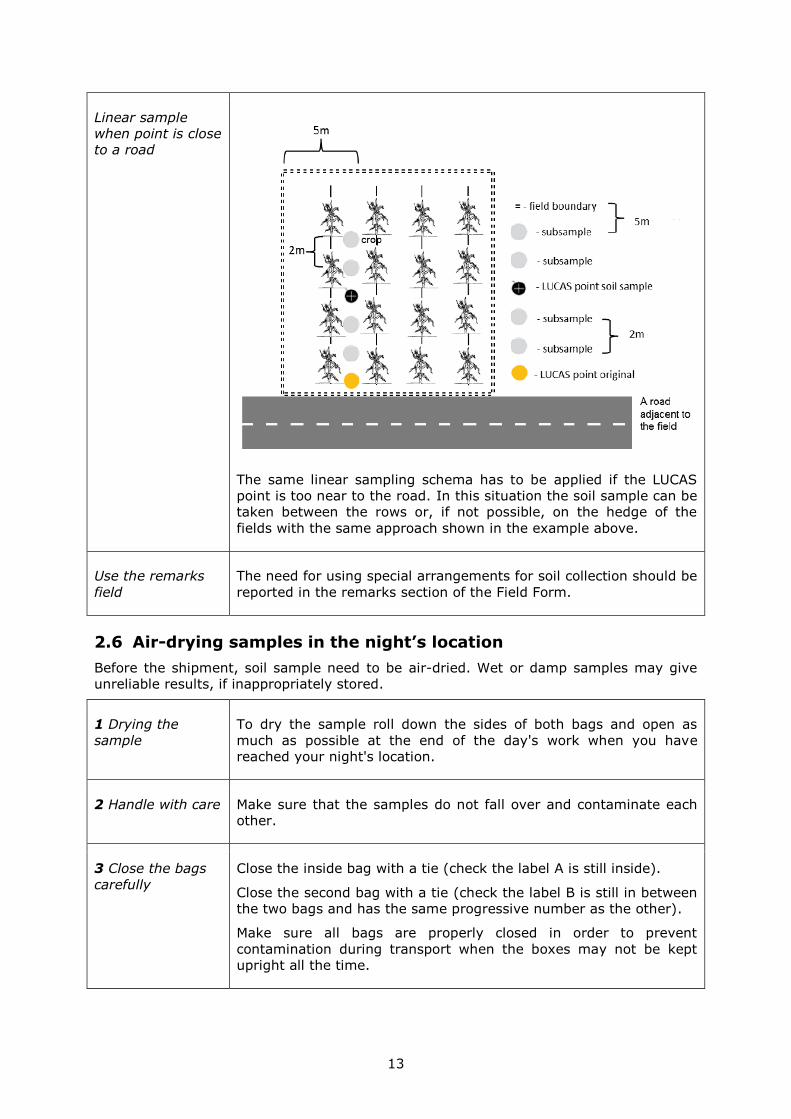
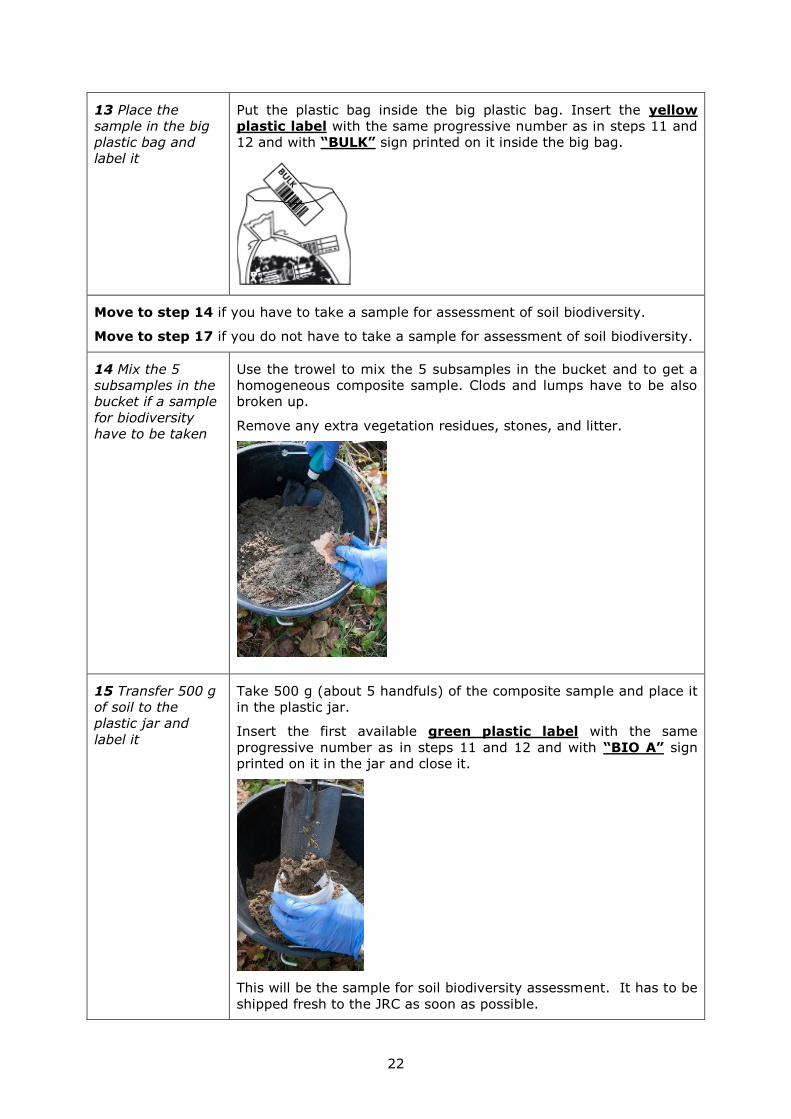
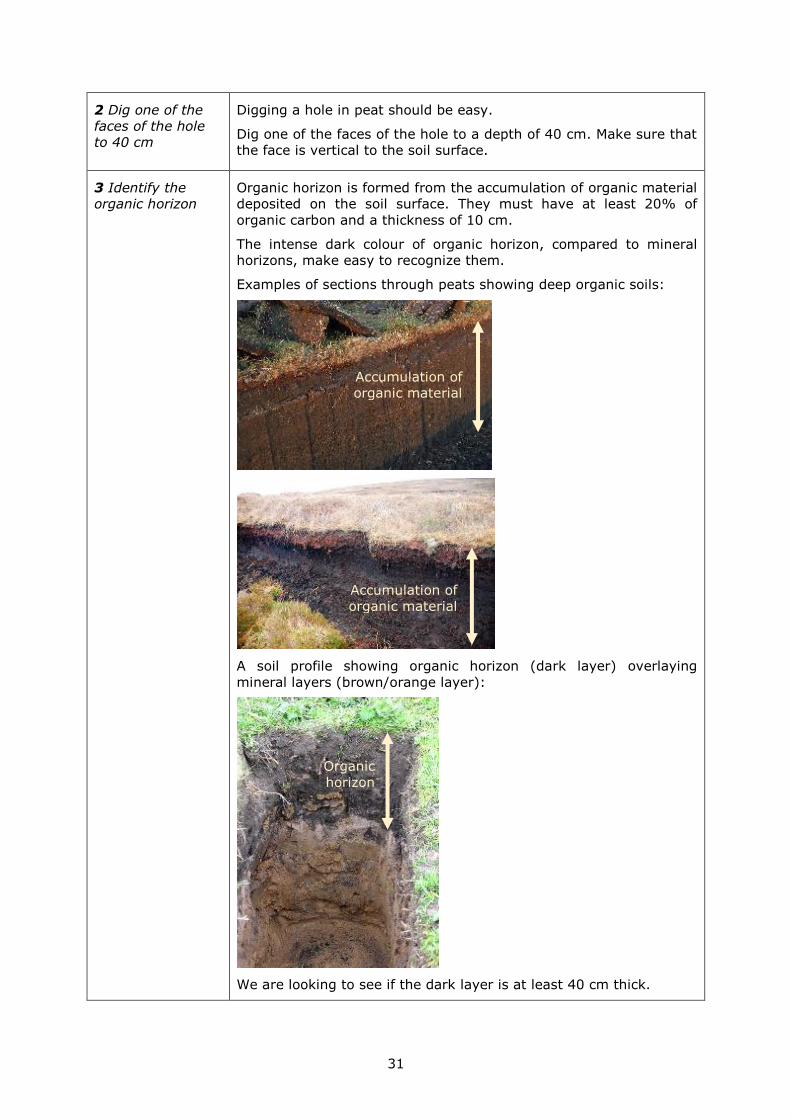
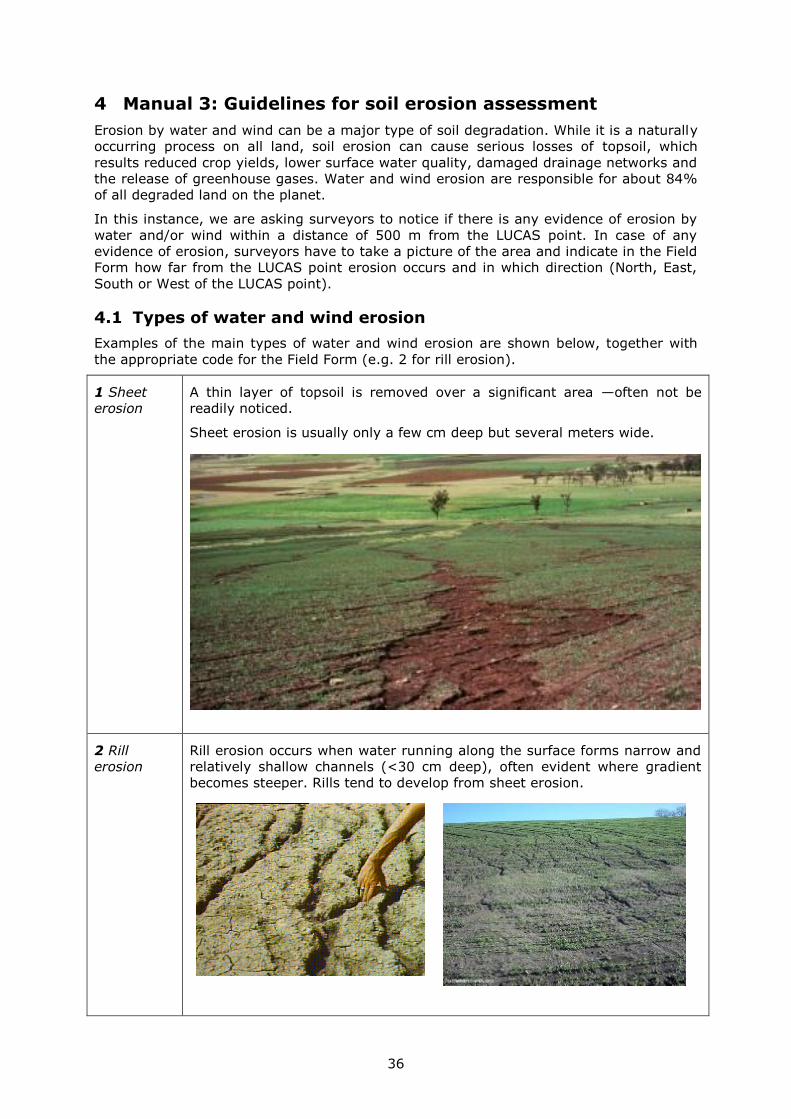
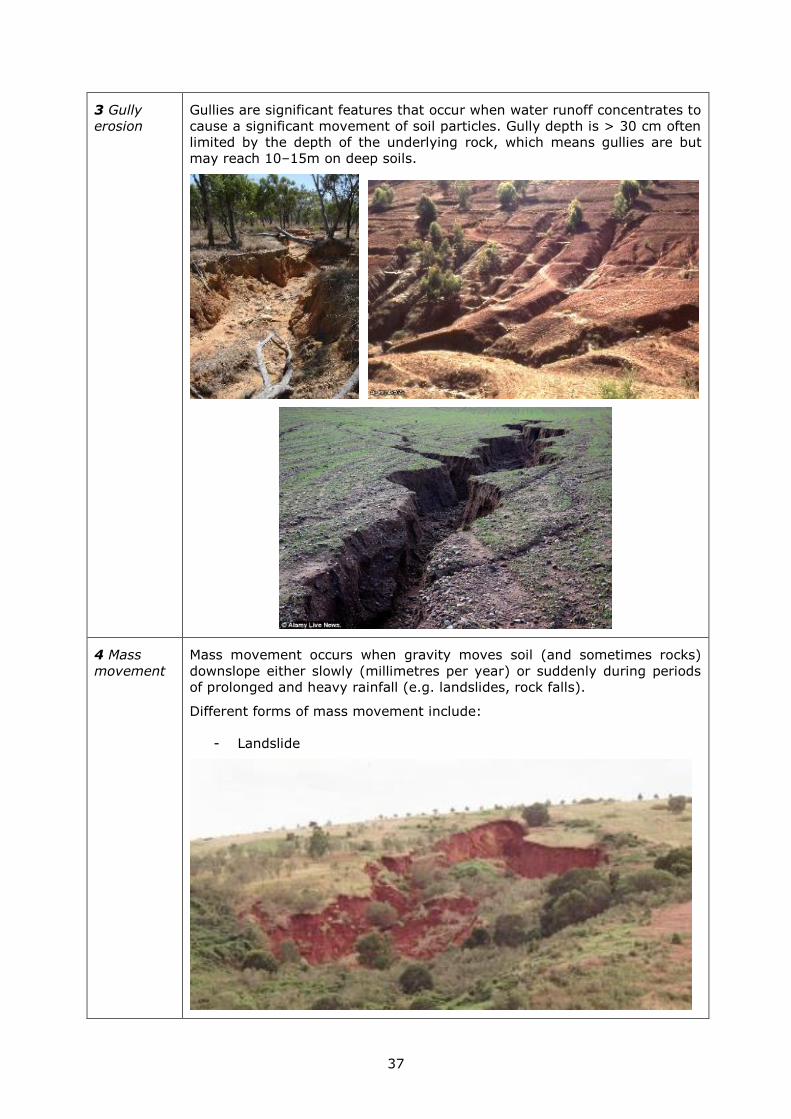
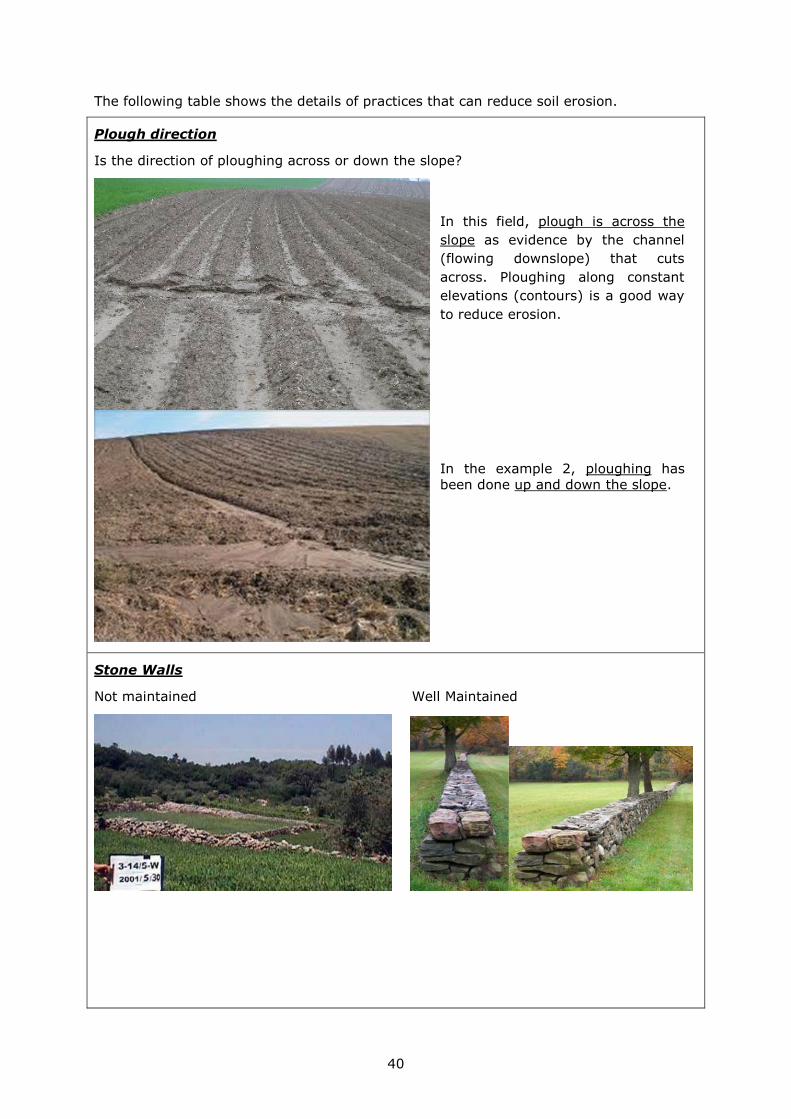
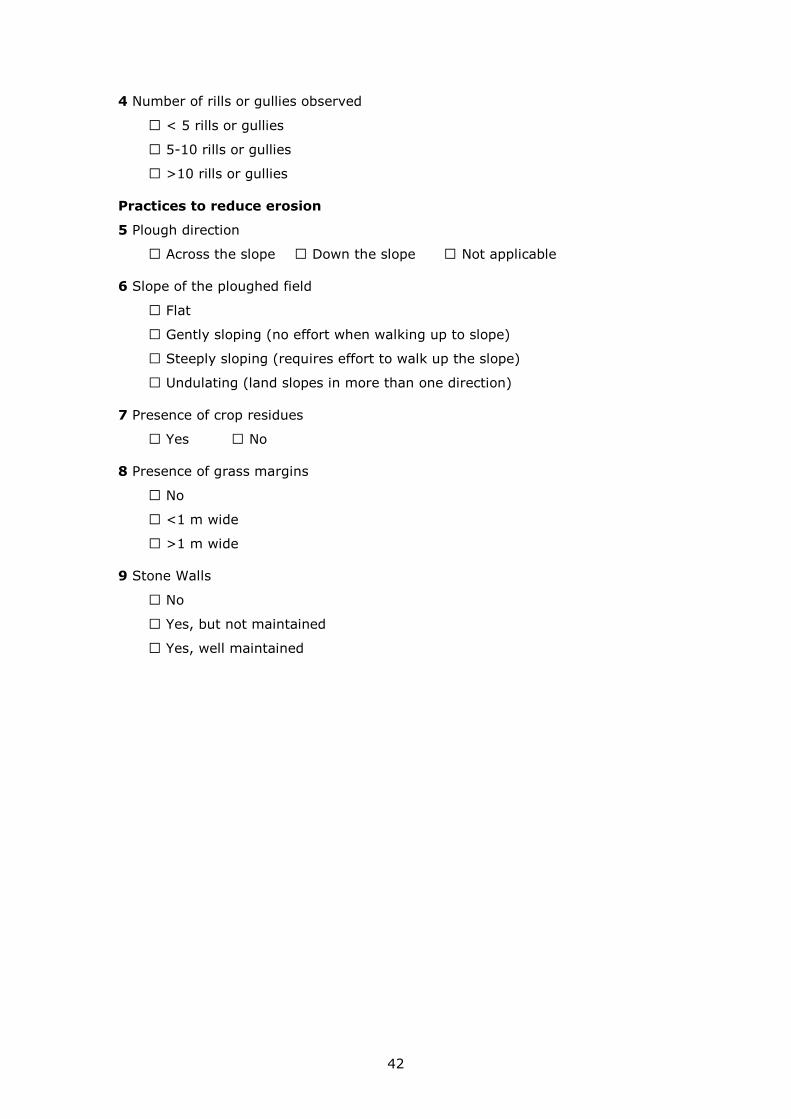

KJ-N
A-2
8501-E
N-N
doi102760023673
ISBN 978-92-79-66255-3