lucas county ems
TRANSCRIPT

Lucas County EMS
ESO
Tutorial Guides

ESO Tutorial Guides Table of Contents
SECTION ESO Mobile / Web Application ........................................................................................ A
License Scan (option) ..................................................................................................... B
Picture Attachments (camera) ........................................................................................ C
Patient Data Transfer between ESO Agencies (Send / Receive) ................................... D
Handtevy Integration with EHR (Phone / Tablet) ............................................................ E
ECG Data Import from LP15 (External Modem / Serial Cable) ........................................ F

Section A:
ESO Mobile/ Web
Application
ESO Tutorial: Mobile App vs. Web App
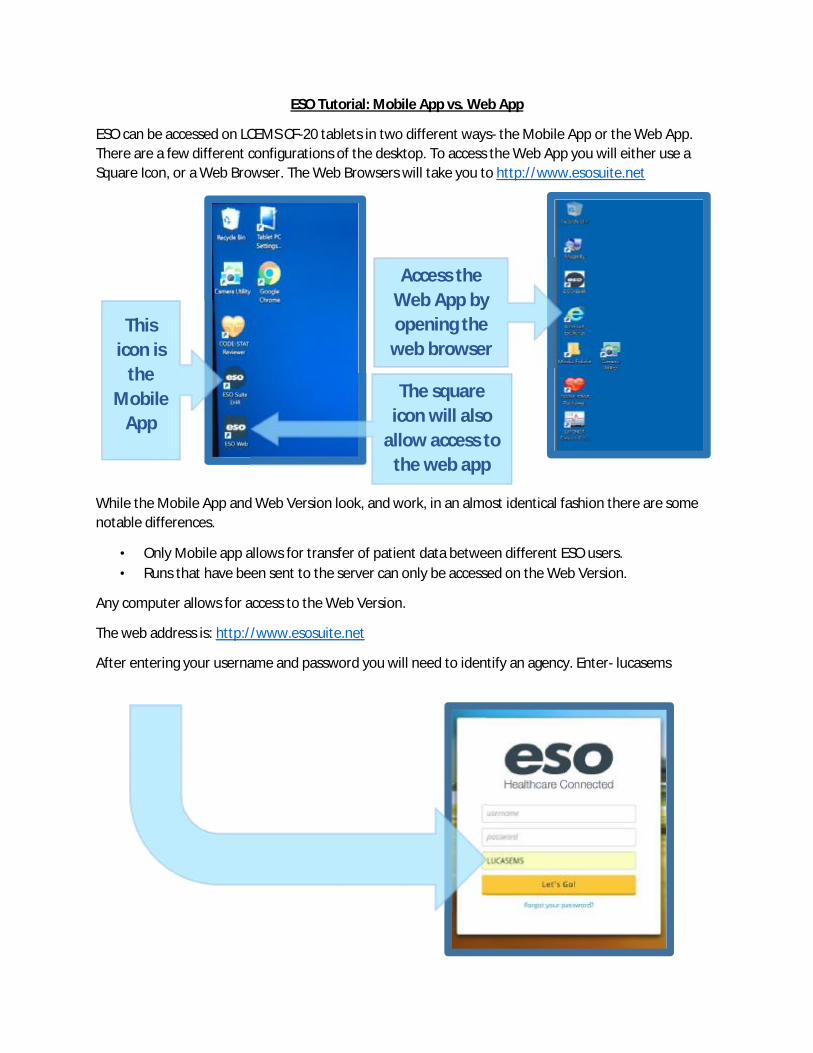
ESO can be accessed on LCEMS CF-20 tablets in two different ways- the Mobile App or the Web App. There are a few different configurations of the desktop. To access the Web App you will either use a Square Icon, or a Web Browser. The Web Browsers will take you to http://www.esosuite.net
While the Mobile App and Web Version look, and work, in an almost identical fashion there are some notable differences.
• Only Mobile app allows for transfer of patient data between different ESO users. • Runs that have been sent to the server can only be accessed on the Web Version.
Any computer allows for access to the Web Version.
The web address is: http://www.esosuite.net
After entering your username and password you will need to identify an agency. Enter- lucasems
This icon is
the Mobile
App
The square icon will also
allow access to the web app
Access the Web App by opening the
web browser

Section B:
License Scan (option)

1
ESO Tutorial: Importing Information from a Patient’s Driver’s License
Patient Tab - Demographics: When the patient demographics tab has been reached you may easily input information from the patients driver’s license.
Locate the barcode on the back of the license
2
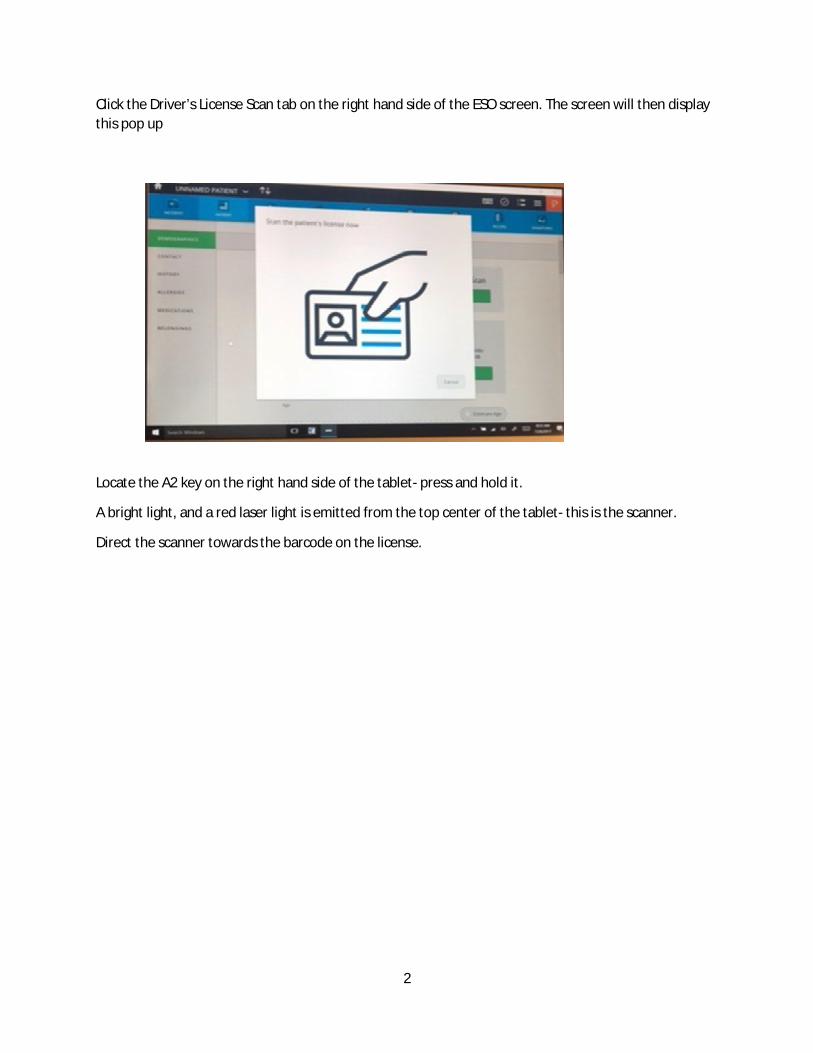
Click the Driver’s License Scan tab on the right hand side of the ESO screen. The screen will then display this pop up
Locate the A2 key on the right hand side of the tablet- press and hold it.
A bright light, and a red laser light is emitted from the top center of the tablet- this is the scanner.
Direct the scanner towards the barcode on the license.

3
Screen will then reload with the information from the license. Please be sure to double check the demographic section for accuracy.
Scan Light Emitter
A2 button must be held down until scan is
complete

Section C:
Picture Attachments
(camera)

1
ESO Tutorial: Picture File Attachment
A picture (i.e., MVA mechanism of injury, Medication List, etc.) can be imported as a file attachment to the EHR.
You must first access the camera on the CF 20 desktop. Double click the Camera utility icon to open it.
When you open the camera icon you will have the option take a picture. These are automatically saved to the media file folder on the desktop.
Click here to take a picture

2
A picture can be attached to the HCR by opening the ESO menu- three horizontal lines located in the upper right hand side of the screen.
After opening the menu click on “Attachments”

3
A pop-up will appear, click “Add Attachment”.
Another pop up screen will appear, click on “Browse”.

4
In the Media File folder you will see time and date stamped folders- open and select the pictures that you want to attach
After the attachment is selected you should see another pop up that has the file name appear. Click on attach again.
Media File Folder
Pictures will be inside folders that are “named” with the time and date
the picture was taken

5
When the screen refreshes you should see your file name listed. Hit close.
When viewing a list of your runs you can see that there is an attachment.

6

Section D:
Patient Data Transfer
between ESO Agencies (Send / Receive)

1
ESO Tutorial: Electronic Patient Information Transfer
Patient information can be transferred electronically between crews that have the ESO mobile app.
To send information to be transferred click on the arrows icon at the top of the screen.
A pop up menu will appear. Select “Transfer Patient”
2
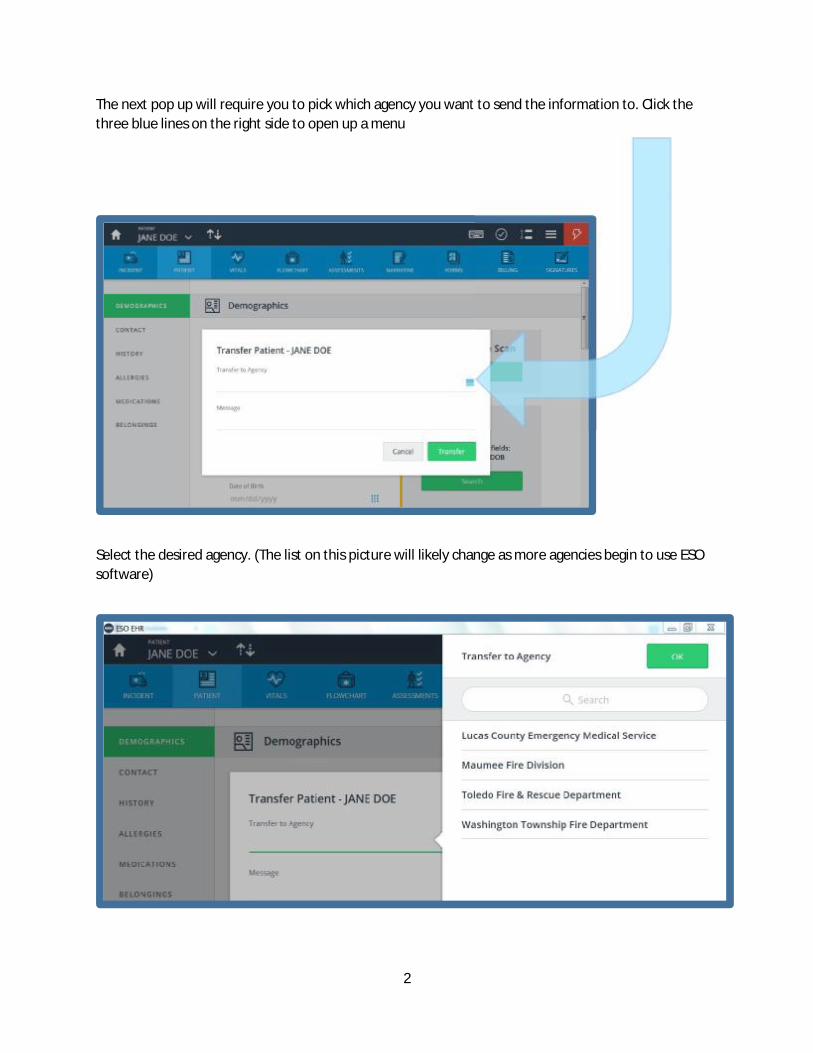
The next pop up will require you to pick which agency you want to send the information to. Click the three blue lines on the right side to open up a menu
Select the desired agency. (The list on this picture will likely change as more agencies begin to use ESO software)

3
Once you have ensured the correct agency is listed click the “Transfer” button to send information.
When the screen refreshes you will see a pin code appear. The crew receiving the information will need the code for access.

4
ESO Tutorial: Receiving Electronic Patient Information
Patient information can be transferred electronically between crews that have the ESO mobile app.
To receive information to be transferred click on the arrows icon at the top of the screen.
A pop up menu will appear. Select “Receive Patient”
5
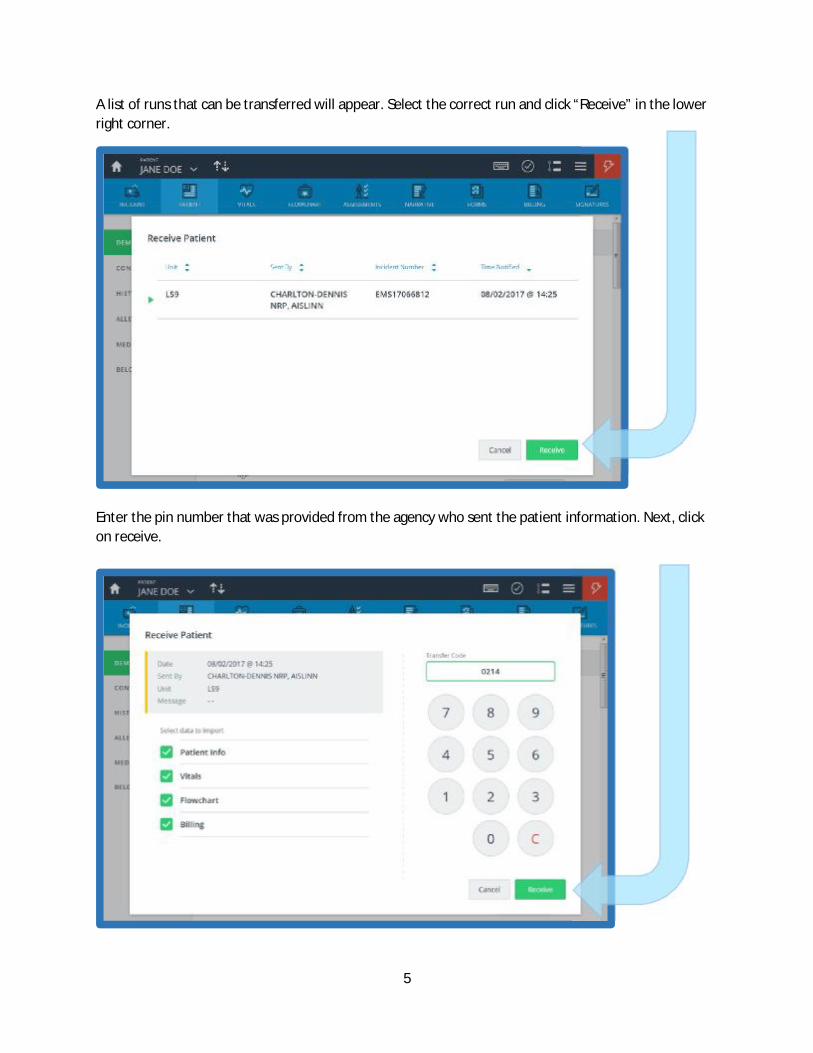
A list of runs that can be transferred will appear. Select the correct run and click “Receive” in the lower right corner.
Enter the pin number that was provided from the agency who sent the patient information. Next, click on receive.

6
The screen will automatically reload. If it informs you that the patient information was received correct click “OK”- you will now be able to complete the rest of your run.
Section E:
Handtevy Integration
with EHR (Phone / Tablet)

1
ESO Tutorial: Handtevy Integration from Mobile (Phone) App
Information from the Handtevy app can be imported into ESO from a mobile phone. First log into the app. Select start a new patient to begin
Select the correct age for your patient
2
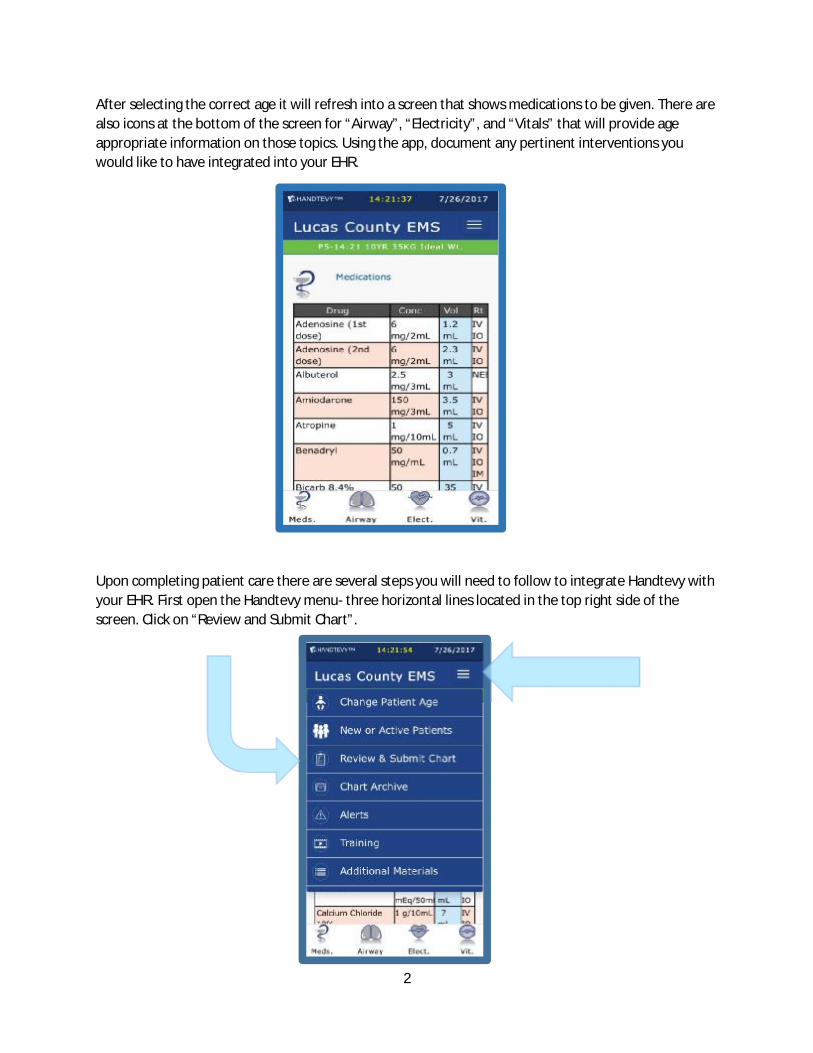
After selecting the correct age it will refresh into a screen that shows medications to be given. There are also icons at the bottom of the screen for “Airway”, “Electricity”, and “Vitals” that will provide age appropriate information on those topics. Using the app, document any pertinent interventions you would like to have integrated into your EHR.
Upon completing patient care there are several steps you will need to follow to integrate Handtevy with your EHR. First open the Handtevy menu- three horizontal lines located in the top right side of the screen. Click on “Review and Submit Chart”.

3
The screen will automatically reload. Scroll down to find the correct patient record. Click “Open Patient Record” at the bottom of the chart.
The screen will refresh again. You should now see a summary of the interventions recorded. Where it asks for a name please enter something into the field- your initials will be sufficient. You must also check the box at the left side of the green field.
Now click the “Submit to my EHR and Close”
Check this Box
Click here to finish
and submit
Name or initials here
4
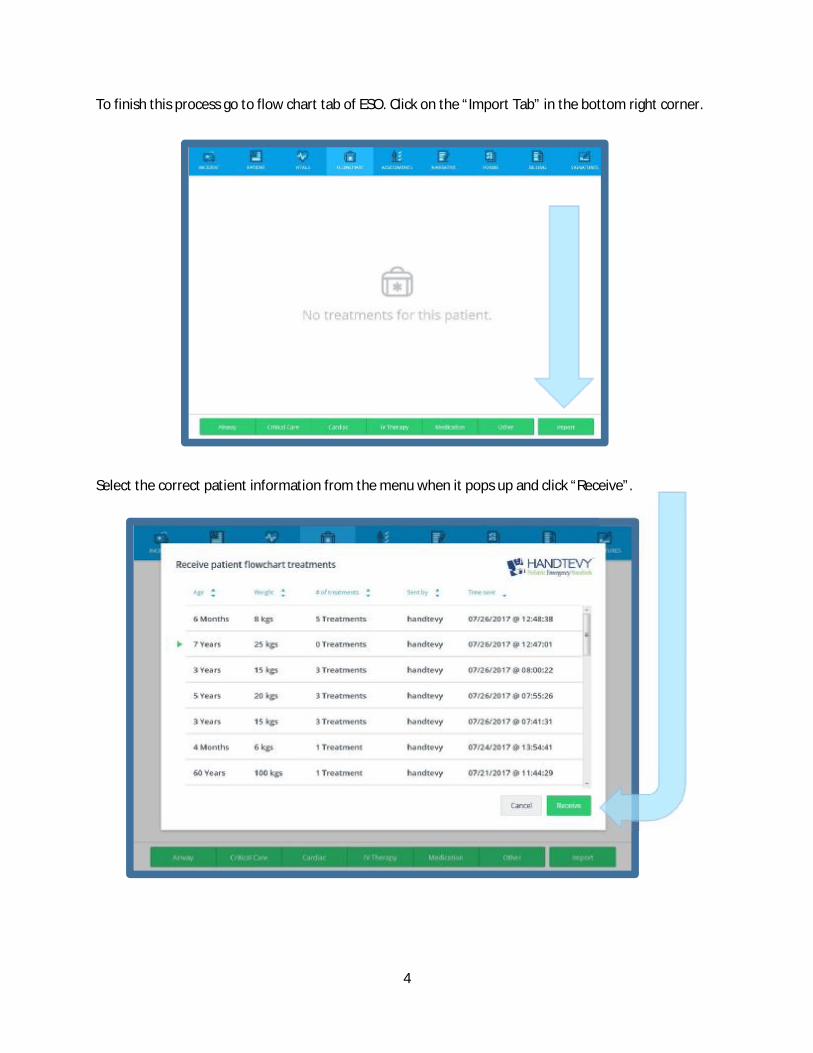
To finish this process go to flow chart tab of ESO. Click on the “Import Tab” in the bottom right corner.
Select the correct patient information from the menu when it pops up and click “Receive”.

5
The screen will refresh and the data from Handtevy will be visible in the Flowchart Tab.
If you have imported the incorrect Handtevy information click on the “Undo Import” button in the bottom right hand corner.

6
A pop up will appear asking if you are sure you want to undo the import.
After clicking the undo import the screen will refresh. You can then go back and select the correct patient information.

Section F:
ECG Data Import
from LP15 (External Modem /
Serial Cable)

1
ESO Tutorial: Importing LP15 Patient Data via External Modem
The Life Squad LifePak 15’s are equipped with an external modem (black box), which allows for ECG data transfer to the EHR via the cloud.
For data transfer during patient monitoring push the transmit button on the left side of LifePak to begin the process. Ensure that ESO is the selected site. Select “Send” with the dial on the right side of the LifePak and press the center of the dial in to begin transmission.
A progress bar of transmission will appear at the bottom of the LifePak Transmit screen. The LifePak will print out a notification when it is completely finished transmitting data.

2
In your EHR, go to the Vital Sign tab. Click the tab at the lower right labeled “Monitor Import”.
A pop-up screen will appear that asks you to select a source. Select “Cloud”.

3
Data will be present from all calls that have been transmitted in the past several days. Unless you specify the device (LifePak) you want data from, you will also see information from other devices. Please select the correct data.
After selecting the data that you want a brief loading screen will appear as the data is imported.
Filter devices
here

4
Vital signs and events from the LifePak will be visible in their respective tabs.
If you look in the flowchart tab you will see interventions that were documented using the events button on the Life Pak.

5
If you realize that you have imported the incorrect monitor data it is a simple process to change it. In the bottom right hand corner of the vital sign import tab you will see a button labeled “Undo Import”.
A pop-up will appear asking if you are sure you want to undo the import

6
A final pop up will appear telling you the imported vital signs were removed.
After clicking OK you can go back and import the correct information.

7
ESO Tutorial: Importing LP15 Patient Data via Serial Cable
Importing ECG data from a LifePak that does not have an external modem requires a connection via serial cable.
An external modem uses the same port as the serial cable- you must unplug the modem before plugging in the serial cable.
First locate the serial cable port on the LifePak- located on the rear of the monitor.
Next attach the serial cable. It should lock firmly into place.

8
Now attach the other end of the cable into the USB port on the tablet, which is located near the charging port.
For data transfer during patient monitoring push the transmit button on the left side of LifePak. Ensure that ESO is the selected site. Select “Send” with the dial on the right side of the LifePak and press the center of the dial in to begin transmission

9
A progress bar of transmission will appear at the bottom of the LifePak Transmit screen. The LifePak will print out a notification when it is completely finished transmitting data.
In your EHR go to the Vital Sign tab. Click the tab at the lower right that says “Monitor Import”.

10
A pop-up screen will appear that asks you to select a source. Select “Local”.
A list of all imported data will appear. Please select the correct information to import.

11
After selecting the data that you want a brief loading screen will appear as the data is imported.
Vital signs and events from the LifePak will be visible in their respective tabs.

12
If you look in your flowchart tab you will see interventions that were documented using the events button on the Life Pak.
If you realize that you have imported the incorrect monitor data it is a simple process to change it. In the bottom right hand corner of the vital sign import tab you will see a button labeled “Undo Import”.

13
A pop-up will appear asking if you are sure you want to undo the import
A final pop up will appear telling you the imported vital signs were removed.
After clicking OK you can go back and import the correct information.
14
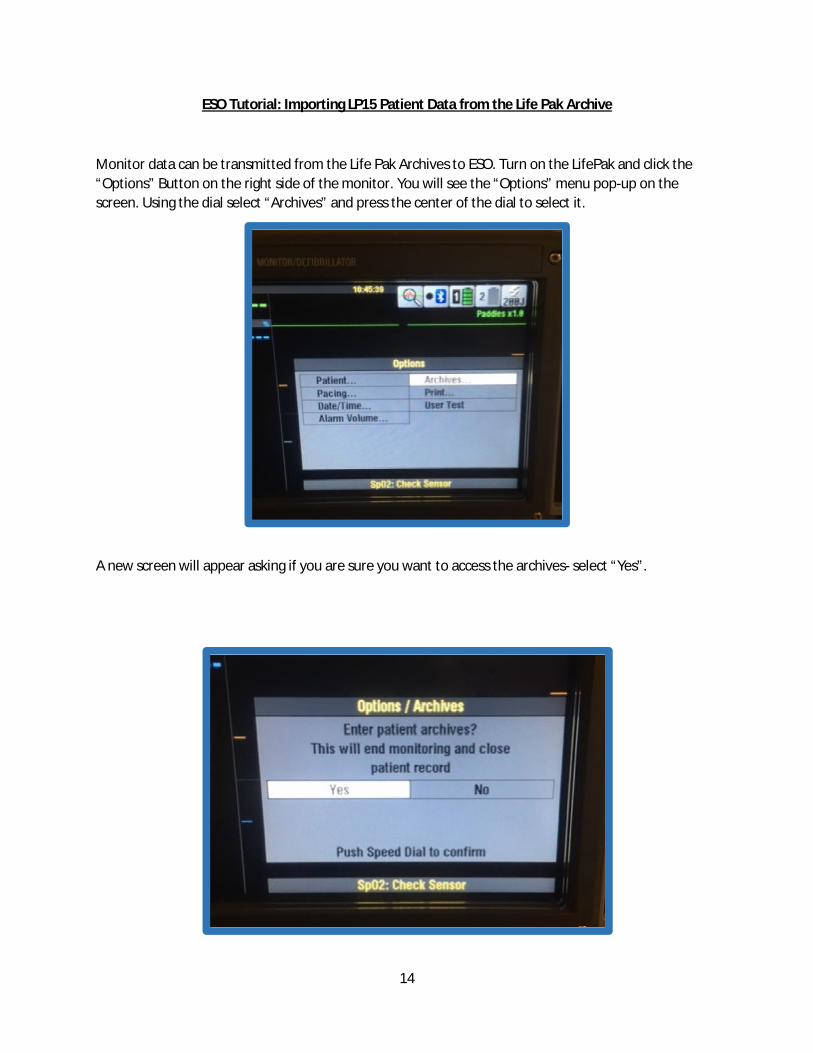
ESO Tutorial: Importing LP15 Patient Data from the Life Pak Archive
Monitor data can be transmitted from the Life Pak Archives to ESO. Turn on the LifePak and click the “Options” Button on the right side of the monitor. You will see the “Options” menu pop-up on the screen. Using the dial select “Archives” and press the center of the dial to select it.
A new screen will appear asking if you are sure you want to access the archives- select “Yes”.

15
Once you have entered the Archives select “Send Data”.
This will take you to the next menu screen. The default option is “All Patients”. To transmit only the information needed for the current EHR. Select the “Patient” tab.

16
A list of Monitor Data will appear. Select the correct information you want to transmit.
Once selected you will return to the previous menu screen.
If you are connected to ESO via a modem or serial cable you are now ready to transmit.
Please see the transmission tutorials if you are uncertain how to connect or transmit data via a serial cable or modem.
Select “Send”. A progress bar will appear at the bottom of the screen. A short message will be printed by the LifePak when it’s complete transmitting.