lupita - dar lighting...2.4 semi flush swing lock assembly – this product is supplied collapsed to...
TRANSCRIPT
LUPITA
PIL0688 ISSUE 02/ 12/17
11/14
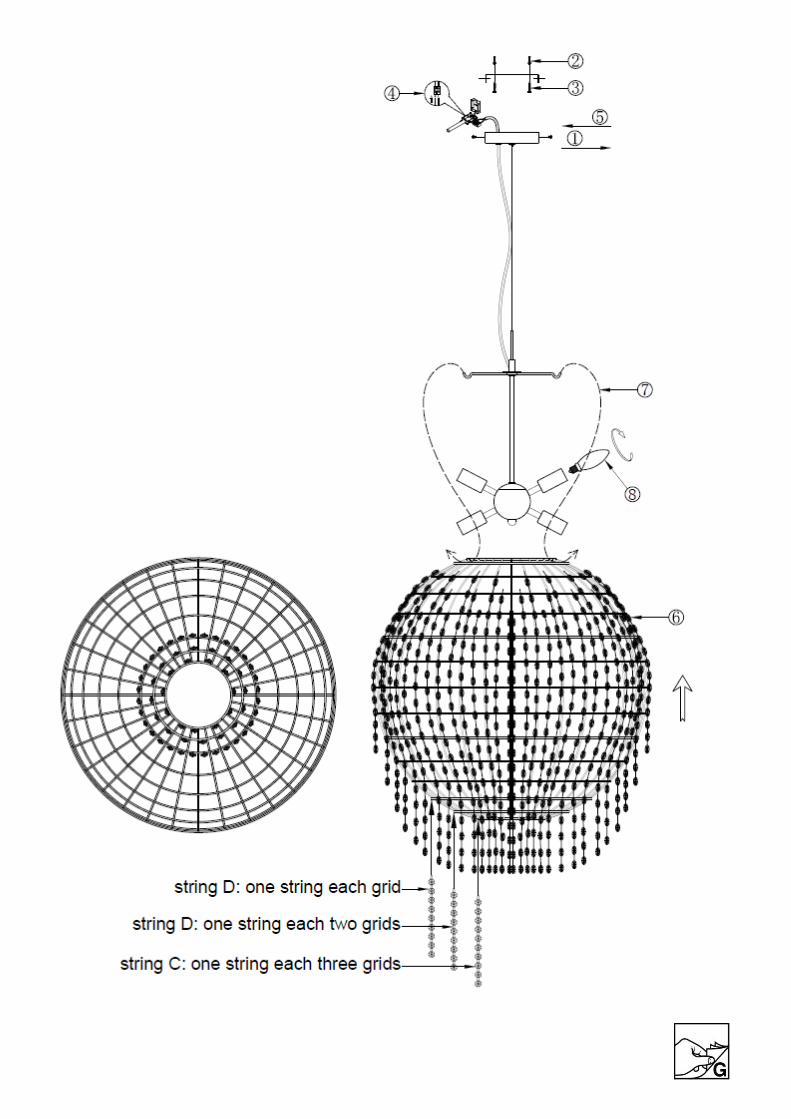
GLASS PENDANT
1 2.2
3.1 – 3.3
3.4
3.5
3.6, 3.8 – 3.10
3.12 – 3.14
1 – 1.B
PART C PART E PART 21 SELV
3.16 – 3.17
4.1 – 4.1, 4.4
3.19
3.18

These instructions are provided for your safety. Please read ALL INSTRUCTIONS Carefully before commencing work and retain for future reference.
1. SAFETY INFORMATION
If you are in any doubt consult a person competent to give advice on the installation of electrical equipment.
This fitting should be fitted in accordance with relevant wiring and building regulations: Certain regulations require that a fitting can only be installed by a qualified electrician ensure you are familiar with the requirements in your Country or State. If in doubt, check prior to any attempt at installation to avoid unnecessary risk.
To prevent electrocution, switch off at the mains supply before installing or maintaining this fitting.
Ensure other persons cannot restore the electricity supply without your knowledge.
To avoid damage to concealed wiring during installation, establish the direction of the supply cable before drilling fixing holes.
Always be sure to use the correct type and wattage of bulbs as indicated on the fitting. Never exceed the wattage stated.
When changing bulbs, always switch off at the mains and allow the old bulb to cool down before handling. Dispose of bulbs carefully. Some bulbs (e.g. fluorescent) require special disposal.
The help of another person may be needed where the fitting is awkward or heavy.
1. A. SAFETY INFORMATION – FOR CLASS I FITTINGS:
Items marked with this symbol: are Class I and should be fitted to a lighting supply with earth protected by a 5 amp fuse or equivalent circuit breaker.
1. B. SAFETY INFORMATION – FOR CLASS II FITTINGS:
Items marked with this symbol: are Class II and must not be connected to earth - they should be fitted to a lighting supply protected by a 5 amp fuse or equivalent circuit breaker.
2. ASSEMBLY INSTRUCTIONS – NOT ALL FITTINGS REQUIRE ASSEMBLY: Please refer ONLY to the relevant instructions as indicated on SHEET B – e.g. 2.1, 2.4 or 2.5
2.1 ADJUSTING CHAIN LINK PENDANTS – Chain links may be adjusted to reduce the height of the fitting. Using two pairs of pliers carefully open the chain links and remove the required number of links. Close the links. Note: Cloth should be used between the jaws of the pliers to protect the decorative finish. Pull any excess cable through the ceiling cup and trim as required.
IMPORTANT! Always ensure the chain is supporting the weight of the fitting and not the supply cable.
2.2 PENDANT STEEL WIRE ADJUSTMENT – It is important that any height adjustments are made prior to installation. No adjustment must be made while the product is installed. Adjust the drop of the fitting to the desired height. The weight of the fitting must always be supported by the chain/suspension wires and not the electrical cables. To shorten suspension wires, push up excess wire into the ceiling cup. To lengthen wires, push the small tube where wire enters the ceiling cup whilst at the same time, pull gently on the wire to achieve the required length – let go of the tube when correct length is achieved. Note: All wires must be the same length to ensure the fitting hangs evenly in situ.
2.3 PENDANT HEIGHT ADJUSTMENT 2 – Release cable restraint on mounting bracket by loosening the screw(s). Adjust height by moving the ‘figure 8’ shaped cable restraint along the cable as required and then ensure cable restraint is resting on ceiling cup. Tighten the plastic screw located on the ceiling cup whilst taking care not to over tighten. Trim the electrical wires as required and re-terminate wires into the terminal blocks as required ensuring no loose strands are present. To shorten suspension wire: use a screwdriver to undo 2 small screws located on metal tube located main body end of suspension wire. To shorten, adjust wire position along the loop as required. Use a screw driver to tighten the two small screws fully, ensure screws are sufficiently tight to support the weight of the fitting. Excess suspension wire must be trimmed appropriately.
2.4 SEMI FLUSH SWING LOCK ASSEMBLY – This product is supplied collapsed to reduce packaging waste. One or more of the arms is locked into its final position and is marked with a coloured dot. Simply swing the other arms out firmly and they will lock into the correct final position. No wiring or special tools are required. Once locked, the arms cannot be released so do not try to force them back to their original position. A small amount of movement in the arms when locked is normal.
2.5 CEILING LIGHT SEMI FLUSH ASSEMBLY – This light fitting is supplied collapsed to reduce packaging waste. Screw the central stem into the main body of the fitting and tighten by hand. Secure the stem into position by tightening the grub screw on the stem with a Hex key.
2.6 CEILING LIGHT SEMI FLUSH ASSEMBLY 2 – To reduce packaging, some assembly of this product is required. Gently pull the cable from the ceiling cup until the stem touches main body of the fitting then turn the stem clockwise to screw onto main body until fully tightened.
2.7 SEMI FLUSH STEM CHANGE OPTIONS – Fitting is supplied as a pendant, follow these steps to convert to a semi flush fitting.
2.7a. You will require a spanner and a screwdriver (not supplied) for this conversion. 2.7b. Remove the mounting bracket from the fitting. 2.7c. Remove the terminal block from the wiring by unscrewing the terminals. 2.7d. Remove the stem from the fitting and take care not to lose the plastic bush inside the ceiling rose. 2.7e. With a suitable spanner, undo the nut in the ceiling rose and retain all the parts. 2.7f. Exchange the stem for the alternative version and ensure the longer threaded end of the stem is fitted to the ceiling rose. 2.7g. Fit washer, earth lug and shake proof washer then secure with nut removed earlier. 2.7h. Feed the cable through the assembled stem then refit the plastic bush onto the ceiling rose to protect the cable.
2.7i. Connect wires to the terminal block and ensure brown = ‘L’, both green / yellow = , blue = 'N' to the non-label side.
2.8 SEMI FLUSH HEIGHT ADJUSTMENT – Prior to installation, adjust height of fitting by turning knurled nut at the end of top stem anticlockwise to loosen. Adjust to the height required then turn locking knurled nut clockwise to lock into position. Where required, use Hex key to tighten grub screw(s) to firmly secure stem in place – ANY GRUB SCREWS FITTED TO THIS PRODUCT MUST BE FULLY TIGHTENED BEFORE INSTALLATION.
2.9 DUAL MOUNT OPTION – THIS FITTING IS SUPPLIED AS A PENDANT FITTING BUT CAN BE CONVERTED TO A SEMI FLUSH FITTING BY FOLLOWING THESE INSTRUCTIONS:
2.9a. You will require a spanner and a screwdriver (not supplied) for this conversion. 2.9b. Remove the mounting bracket from the fitting. 2.9c. Unscrew the terminal screws to disconnect the wiring from the terminal block 2.9d. Hold the ceiling cup firmly and use a suitable spanner to undo the nut inside ceiling cup. Retain all the parts. 2.9e. Gently unwind cable from the chains, taking care not to pull the cable. 2.9f. Once cable is free from the chain links, hold the short stem on the fitting firmly then turn the last loop in the chain taking care
not to damage the wire. 2.9g. Attach the ceiling cup, earth wire, shake proof washer, terminal block plate and shake proof washer and secure in place with
the nut removed earlier. Tighten fully with a spanner. 2.9h. If it is not possible to fit excess cable into the ceiling void, cut the cable and prepare wires before reconnecting into terminal
block – Take care not to cut the inner cable sheath. 2.9i. Your fitting is now ready to install.
3. INSTALLATION INSTRUCTIONS: Please only refer the relevant instruction as indicated on SHEET B, e.g. 3.1, 3.2
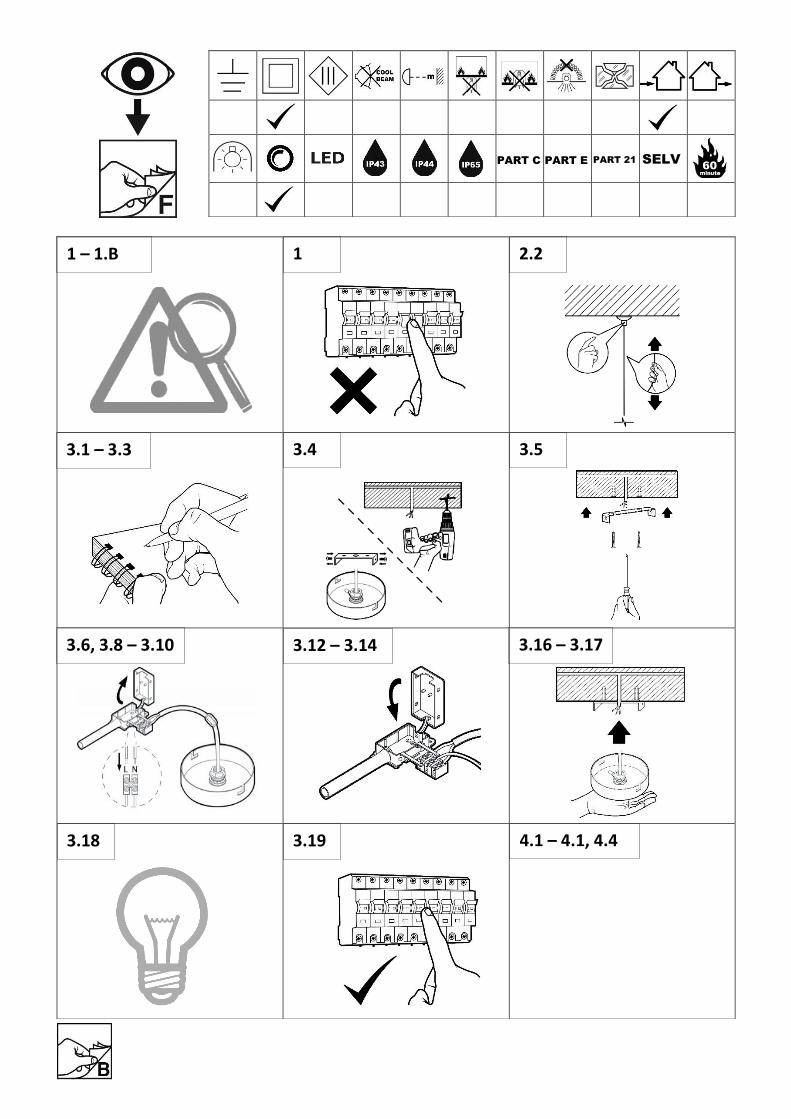
3.1 Ensure the house electricity supply is switched off at the fuse board.
3.2 Where required, unscrew the ceiling / wall rose to expose the mounting bracket / cover casting and keep the parts for later.
3.3 Before removing the existing rose, carefully note the position of each set of cables. If there are ‘loop in’ cables that are not connected to the light these must be terminated in a separate terminal block (not supplied) not connected to the fitting.
3.4 Unscrew the mounting bracket from the fitting and retain the screws for later. Using the mounting bracket as a template mark and then drill fixing holes into the ceiling / wall. Ensure the proposed mounting surface is suitable and use appropriate fixings suitable for this construction. Take care not to damage wiring.
3.4a Where required, carefully make a small hole in the soft rubber seal then feed supply cable though the seal.
3.5 Attach the mounting bracket onto the prepared mounting surface using suitable fixings Take care not to damage wiring.
3.6 Prepare supply cable for termination to connector block then offer the fitting close to the mounting bracket, weight of the fitting must be supported whilst you make the electrical connections.
3.6a. For ceramic fittings without a separate mounting bracket, offer the fitting to the mounting surface in the desired position, ensuring there sufficient space for electrical terminations (NOTE: Some items have a recess in the rear to accommodate the terminal block whilst others require a cavity in the mounting surface to accommodate terminations). Mark the position of the fixing holes to ensure the fitting is truly horizontal. Drill the fixing holes in to a solid surface and fit the wall plugs, taking care not to damage any hidden wires. Screw the mounting screws partway into the wall plugs then 'hang' the ceramic fitting onto them. Tighten the screws to take up any slack, ensuring that they are not over tightened as this may cause the ceramic to crack. The weight of fitting must be supported whilst you make the electrical connections.
3.6b. For fittings with Orange Boot – Separate the two halves of the boot by cutting the spur connecting them with scissors or a knife. Cut the ends off the rubber boots with sharp scissors or a knife to reveal a suitable size hole depending on the cable being used. The boot must be a tight fit around the insulation of the cable to ensure a watertight seal. It is therefore important not to cut the boots back too far. If you should cut back the boot too far the wire entry can be sealed with silicone mastic.
3.7 Where required thread the cable through the suspension hook / rod and then the ceiling / wall bracket or cover casting.
3.8 Use a flat bladed screwdriver to carefully lever open the connector block housing then feed the supply cable through the rubber grommet and make electrical connections as follows:
3.9 Connect the supply live (normally brown / red) to fitting live (marked “L”) on the terminal block.
3.10 Connect the supply neutral (normally blue / black) to fitting neutral (marked “N”) on the terminal block.
3.11 Connect the earth (normally green / yellow or unsheathed) to terminal block marked “ ” on the fitting.
3.12 Please note: No earth should be connected to any part of a fitting where “ ” appears. If any earth wires are present, please terminate these in a separate terminal block (not supplied) to ensure that continuity is maintained for the earth circuit.
3.13 Ensure electrical connections are tight and no loose strands of wire are left out of the connector block. Where required ensure terminal blocks and rubber sleeve are correctly seated then close the connector block housing.
3.14 Close the terminal block cover by snapping cover back together, where required attach the connector block into position on the back plate or fitting cup. For fittings with Orange Boot - Push the two halves of the boots together so the arrows on the top of the boot are in line. Fully engage the ribs in order to create a good watertight seal. The halves are fully engaged when the front edge of the outer boot is hard up against the stop on the inner boot
3.15 Slide the ceiling bracket cover casting over the threaded rod on the ceiling bracket before screwing the suspension hook fully home. Finally hang the suspension chain from this hook.
3.16 Offer fitting up to mounting bracket (or directly onto the mounting surface) and secure using the appropriate fixings.
3.17 Take care not to trap or damage wires. Any excess cable or wires should be carefully located into the ceiling / wall void.
3.18 Fit the bulb: type and wattage as indicated on the fitting. The wattage indicated must not be exceeded.
3.19 Switch on the electricity supply at the fuse board.
4. GENERAL INFORMATION
4.1 This fitting is designed for internal use only and must be fitted to a dry surface, as any dampness in plaster or paint can damage the finish.
4.2 CLEANING - Use a soft dry cloth for cleaning – never use polish or abrasive cleaners.
4.3 SILK SHADE - If your fitting is supplied with silk shades, please note: The processes involved in the manufacture of the shade material may result in some colouring and weave variation from batch to batch. This is unavoidable and is an accepted part of production
4.4 GLASS FITTINGS - Please note: The hand processes involved in the firing / colouring and shaping of the glass employed in the manufacture of the these products may result in some colour variation ‘glass to glass’ being evident. This is unavoidable and an accepted part of production.
4.5 G9 & OTHER FITMENT LAMPS / REPLACEMENT - please follow instructions below:
4.5a. DO NOT TOUCH THE LAMP WITH BARE FINGERS.
4.5b. The lamp is supplied wrapped; carefully slip the lamp out to expose the end of the lamp with the metal contacts.
4.5c. Holding the lamp (with the bag surrounding it) place carefully in the lampholder and push the lamp firmly and squarely into the lampholder.
4.5d. Discard the wrapper safely.
4.6 ELECTRONIC BALLAST / DRIVER - Products fitted with electronic ballast or electronic LED drivers are not suitable for dimming.
4.7 TRANSFORMER PRODUCTS - Product is fitted with an electronic transformer and is suitable for dimming only when used with a suitable trailing edge dimmer. Refer to dimmer manufactures specification for specific advice. Please note a dimmer switch is a third party accessory and compatibility with our products is not guaranteed. Buzzing from the transformer is frequently caused by the dimmer switch - this may be because the wrong type of dimmer has been selected but it is quite normal for there to be some buzzing from either the dimmer switch or the transformer of any item being dimmed.
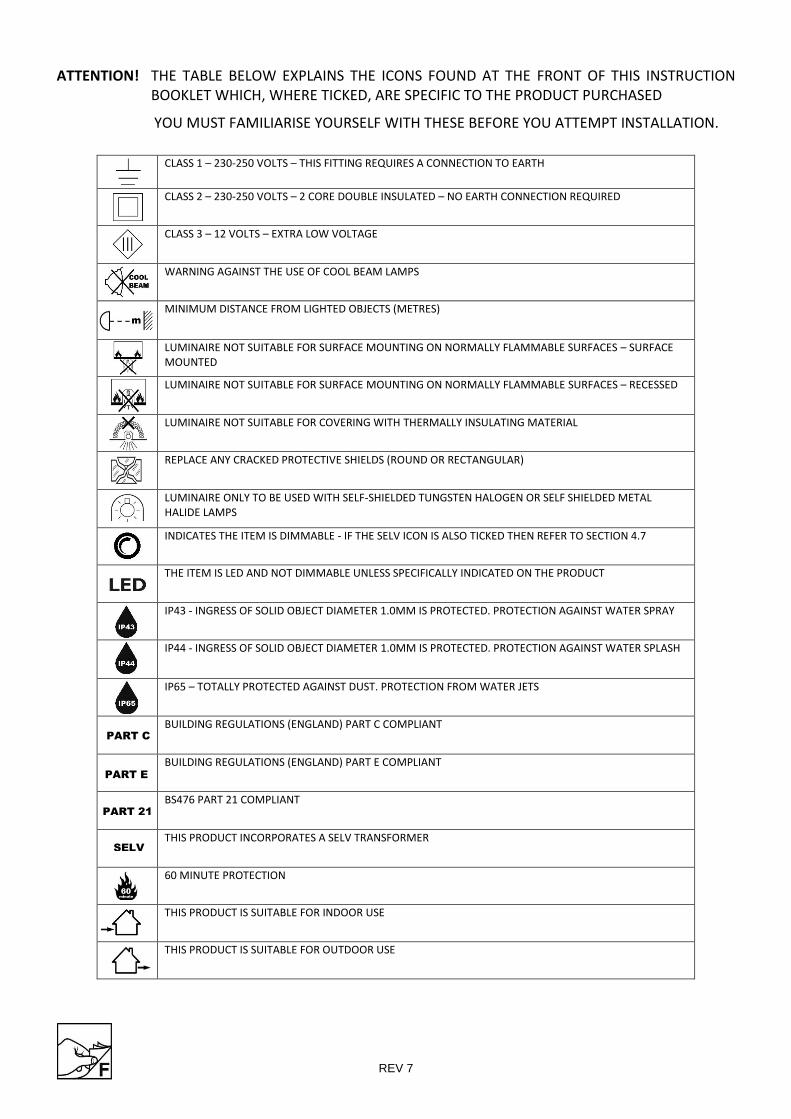
ATTENTION! THE TABLE BELOW EXPLAINS THE ICONS FOUND AT THE FRONT OF THIS INSTRUCTION
BOOKLET WHICH, WHERE TICKED, ARE SPECIFIC TO THE PRODUCT PURCHASED
YOU MUST FAMILIARISE YOURSELF WITH THESE BEFORE YOU ATTEMPT INSTALLATION.
CLASS 1 – 230-250 VOLTS – THIS FITTING REQUIRES A CONNECTION TO EARTH
CLASS 2 – 230-250 VOLTS – 2 CORE DOUBLE INSULATED – NO EARTH CONNECTION REQUIRED
CLASS 3 – 12 VOLTS – EXTRA LOW VOLTAGE
WARNING AGAINST THE USE OF COOL BEAM LAMPS
MINIMUM DISTANCE FROM LIGHTED OBJECTS (METRES)
LUMINAIRE NOT SUITABLE FOR SURFACE MOUNTING ON NORMALLY FLAMMABLE SURFACES – SURFACE MOUNTED
LUMINAIRE NOT SUITABLE FOR SURFACE MOUNTING ON NORMALLY FLAMMABLE SURFACES – RECESSED
LUMINAIRE NOT SUITABLE FOR COVERING WITH THERMALLY INSULATING MATERIAL
REPLACE ANY CRACKED PROTECTIVE SHIELDS (ROUND OR RECTANGULAR)
LUMINAIRE ONLY TO BE USED WITH SELF-SHIELDED TUNGSTEN HALOGEN OR SELF SHIELDED METAL HALIDE LAMPS
INDICATES THE ITEM IS DIMMABLE - IF THE SELV ICON IS ALSO TICKED THEN REFER TO SECTION 4.7
THE ITEM IS LED AND NOT DIMMABLE UNLESS SPECIFICALLY INDICATED ON THE PRODUCT
IP43 - INGRESS OF SOLID OBJECT DIAMETER 1.0MM IS PROTECTED. PROTECTION AGAINST WATER SPRAY
IP44 - INGRESS OF SOLID OBJECT DIAMETER 1.0MM IS PROTECTED. PROTECTION AGAINST WATER SPLASH
IP65 – TOTALLY PROTECTED AGAINST DUST. PROTECTION FROM WATER JETS
BUILDING REGULATIONS (ENGLAND) PART C COMPLIANT
BUILDING REGULATIONS (ENGLAND) PART E COMPLIANT
BS476 PART 21 COMPLIANT
THIS PRODUCT INCORPORATES A SELV TRANSFORMER
60 MINUTE PROTECTION
THIS PRODUCT IS SUITABLE FOR INDOOR USE
THIS PRODUCT IS SUITABLE FOR OUTDOOR USE
PART C
PART E
PART 21
SELV
REV 7

PIL0688 ISSUE 02/ 12/17