lw training manual 08-2015 - florida lakewatchlakewatch.ifas.ufl.edu/pdf/lw_training_manual.pdf ·...
TRANSCRIPT

Florida
LAKEWATCH
Training Manual and Instruction Booklet

Contents
Overview ...................................................................................................... 1 Sampling the water: A detailed description ................................................. 2 Sampling the water: A summary ................................................................. 6 Filtering procedure: A summary .................................................................. 7 Filtering procedure: A detailed description .................................................. 8 Checklist ..................................................................................................... 11 Questions ................................................................................................... 12 Appendix A: How to use navigational bearing lines ................................... 14 Appendix B: Additional LAKEWATCH Volunteer Opportunities .................. 16 Appendix C: LAKEWATCH Data Sheets ....................................................... 18 Appendix D: How to refresh desiccant ....................................................... 20

1
Overview
What is the Florida LAKEWATCH program? Florida LAKEWATCH is a team effort in which volun--- teers, working with researchers at the University of Florida, collect water samples that, when analyzed, will contribute to the understanding of Florida’s water bod--- ies. As a trained LAKEWATCH volunteer, you will help develop a database of water chemistry for your particu--- lar water body. These data can then be used to estab--- lish trends and develop an overview of how your water body fits into the overall picture of Florida water bodies.
What training will I receive? This booklet con--- tains information you will learn during your training ses--- sion. In the session, you will receive hands---on training in sampling techniques and use of all equipment. To be--- come a LAKEWATCH volunteer, you must demonstrate proficiency in all sampling and filtering procedures.
What will I have to do to take LAKEWATCH samples? Every month you will sample a number of pre--- determined locations, called stations, in your water body. At each station, you will perform the following tasks:
1. Fill a sample bottle with water that will later be tested in the Florida LAKEWATCH laboratory for nutrients (total phosphorus and total nitrogen), color and conductivity.
2. Collect a jug of water that you will filter. This fil--- ter will later be analyzed in the Florida LAKE--- WATCH laboratory to determine the amount of chlorophyll (used to estimate the algae levels) in your water body.
3. Use a device called a Secchi disc to measure wa--- ter clarity.
4. Measure water depth. 5. Fill out a data sheet with information and ob---
servations pertinent to your water body. 6. Freeze all samples (nutrients, algae and data
sheet) and deliver your frozen samples to a LAKEWATCH collection center.
Techniques you will use to sample the water at each station are described in detail in this booklet and will be taught during a LAKEWATCH training session at a time and place convenient to you.
How long does it take to do LAKEWATCH sampling? It usually takes about an hour to complete the sampling procedure, exclusive of boating and deliv--- ery time.
Do I have to take samples on the same day every month? You don’t have to take your samples on exactly the same day every month. The date of your first sampling will determine your ‘target range’. You will attempt to sample within plus or minus five days of your first sampling. For example, if you first sample your water body on August 14, then in September you would try to sample again between September 9 and 19. Ideal--- ly, during this 11--- day target range, you will be able to accommodate your personal schedule and allow for adverse weather conditions. However, if you cannot collect samples during the target range, take samples sometime during each month. Please do not skip a whole month of sampling just because you cannot hit your target range. Try to allow some time to pass be--- tween sampling dates. For example, if you collect on June 30th, don’t collect on July 2nd; wait until at least July 15th.
How can I remember everything? Collecting LAKEWATCH samples is not difficult, but it does require careful attention to detail. Use this booklet for a review every month before you do your sampling. It contains both a detailed description and a summary of each pro--- cedure. Also you will receive a laminated training field guide to carry with you when you sample.

Sampling the water: A detailed description
Getting water for nutrient testing Water sample bottles will be furnished by the
Florida LAKEWATCH laboratory. They are available at your collection center. If you do not know where your collection center is, please call the Florida LAKEWATCH Program. For inland water bodies use the smaller 250 mL bottles packaged with white data sheets. For saline stations use the larger 500 mL bottles packaged with blue data sheets. These bottles have been specially cleaned at the lab to prevent sample contamination. Do not substitute any other containers for sampling.
Water collected in these bottles will be ana--- lyzed monthly for total phosphorus and total nitrogen. In addition to total phosphorus and total nitrogen, sta--- tion 1 bottles will be analyzed quarterly for color and specific conductance. Water sampling procedures de--- scribed below are the same for both inland water bod--- ies and saline stations. You will be asked to furnish a waterproof marker for labeling the bottles.
If your boat has a gasoline motor, take the sample on a side of the boat that will allow you to avoid picking up any contaminants that could possibly come from the motor. Always take the nutrient sample as soon as the boat arrives at the sampling site. A useful technique is to cut the engine, coast up to your station location, and take the sample from the front of the boat while the boat is still coasting gently into position.
Step 1: Each bottle has a label on it for identifi--- cation. Using a permanent waterproof marker, label the sample bottle with the following information:
•Water body name •County name •Month---day---year •Station 1, 2, or 3, etc.
You may want to label your bottles before you start out to sample. The labels are very difficult to write on when
2
wet. Be sure your pen is waterproof. Always double check your labels; dates and station numbers are essential to recording your data correctly. Example: Water Body: Little Weston County: Polk Date: 8-26-91 Station: 3
Step 2: At each sampling location, uncap the appropriately labeled bottle. Because your hands may carry traces of contaminating substances, be careful not to touch the inside of either the bottle or the lid.
Step 3: Swish the lid in the water and set it aside. Give the bottle a thorough rinse by gripping it securely, partially filling it with water and shaking the water out vigorously. Repeat the rinse.
Step 4: After rinsing the bottle twice, change your grip on it. With the tips of your fingers, grasp the bottom rim of your upright sample bot--- tle. The purpose of this grip is to keep your hand as far away from the mouth of the bottle as possi--- ble in order to help prevent pos--- sible contamination.
Step 5: Turn the bottle upside down. The bottle will be lowered into the water in an up--- side down position, with its mouth pointing downward as if it were being emptied. This pre--- vents an inflow of debris from the water’s surface.

Step 6: Push the upside down bottle down into the water until your arm is elbow deep.
Step 7: Turn the bottle to a horizon--- tal position to let it fill, turning the mouth of
the bottle right side up underwater and bring it out of the water.
Step 9: Because the sample will be fro--- zen, pour some water out of the bottle in or--- der to allow some space for the water to expand as it freezes. If
the bottle so that it points in the direction in which your boat is traveling. This lets the bottle fill with water that has not been in contact with your hand, thereby minimizing the chance of contamina--- tion.
Step 8: When the bottle is full, turn
gentle with the frozen bottles. They may become brittle and can shatter if they are dropped.
Getting water for the algae testing
You will be asked to furnish a plastic jug for each station and a dark towel, dark plastic bag, or cooler. To prepare the jugs, simply rinse them in tap water. Never clean them with bleach, any chemical cleaner, or soap. You may use chlorinated tap water to rinse the jugs. Even if recycled milk jugs are being used, rinse them in water only. The same jugs can be used month after month as long as no fungus or mold is growing in them. Store them with the caps off so they can dry out thoroughly between uses.
Using a permanent waterproof marker, write a number on each of the jugs so each station can be iden--- tified later.
Step 1: Remove the jug lid and rinse it in water body water.
Step 2: Rinse the jug by filling it with a couple of inches of water and vig--- orously shaking the water out. Repeat once.
Step 3: Turn the jug upside down and push it underwater to elbow depth.
Step 4: Once at the the bottle is overfilled, it might crack or split open. A good fill level is about one---half inch below the shoulder of the sample bottle. If the bottles bulge after they are frozen, pour out a little more water next time.
Step 10: Cap the bottle and screw the lid on tightly.
Step 11: If you will be spending more than an hour on the water body, put the bottle on ice in a cool--- er. Otherwise, just keep it out of the sun.
Step 12: When you return home, dry your sam--- ple bottles and put them all, along with your data sheet, into a ziplock bag. Put the bag of water sample bottles in the freezer immediately. Include the data sheet! Be
proper depth, fill the jug by turning its mouth in the direction the boat is mov--- ing. If clumps of vegetation
flow into the jug, empty it and start over. If it is too dif--- ficult to force the underwater jug into an upright posi--- tion to fill, smaller bottles may be substituted.
Step 5: Bring the jug out of the water and cap it. Step 6: Cover the jug with a dark towel in order
to block out light. Intense sunlight can stimulate the growth of algae, resulting in an inaccurate measure--- ment of the algae level in your water body.
Step 7: The water should be filtered as soon as possible. Filtering may be postponed several hours if necessary, but the jugs must be stored in a cold dark location, preferably on ice or in a refrigerator. The filter--- ing procedure is explained in detail on page 7.
3

4
A Secchi (pro--- nounced Seck---ee) disc will be used to measure water clarity. Florida LAKEWATCH uses a white eight---inch disc with a line marked at one---foot in--- tervals attached to its center. A weight on the
Measuring water clarity at all), raise and lower it a few times to determine the exact vanishing point of the disc. Step 8: When the disc is at the vanishing point, clip the clothespin onto the rope at the waterline. Do not put the provided clothespin on the rope where your hand is unless your hand is at the waterline. Step 9: As soon as the clothespin is clipped onto the Secchi disc rope, check to see how much cloud cover there is over the sun. This information will be recorded
bottom of the disc helps it sink quickly. If necessary, more weight can be added. If you need a Secchi with more weight, please con--- tact the LAKEWATCH office.
Lower the Secchi disc over the side of the boat while feeding out the rope. Watch the disc until it vanishes from sight. Meas--- ure and record how many feet underwater the disc was when it vanished. To get the most reliable meas--- urement:
Step 1: To maxim--- ize the Secchi reading,
choose a day when there is full sun and minimal wind. Step 2: Sample between 9 a.m. and 3 p.m. if
possible. During these hours the sun is at a higher angle, reducing glare and permitting sunlight to penetrate fur--- ther into the water.
Step 3: Do NOT wear sunglasses while taking the Secchi reading.
Step 4: If the wind is blowing the boat around, anchor so that the Secchi rope will be vertical when the reading is taken. Anchor carefully to avoid stirring up bottom sediments that may interfere with water sam--- ples and water clarity. It is preferable to take water samples before anchoring the boat.
Step 5: Put the sun at your back and take the reading from the side of the boat that will allow you to cast your own shadow out on the water. Lowering the Secchi disc in your shadow helps to minimize interfer--- ence from surface glare.
Step 6: Interference from waves may be mini--- mized by taking the Secchi reading from the side of the boat that is downwind. Step 7: After the Secchi disc is lowered into the water to the vanishing point (where it absolutely cannot be seen
on your data sheet. Step 10: Pull the disc into the boat and count the rope markings to read how many feet below the surface of the water the disc was when it vanished from sight (the length of the line from the disc to the clothespin). Esti--- mate the Secchi reading to the nearest quarter of a foot. Step 11: Write the Secchi reading on your data sheet by writing the whole number in the space provided and circling the appropriate quarter foot increment (if needed). Use a pencil or waterproof pen. Step 12: The very last measurement taken at the station is the depth of the water. Lower the Secchi disc until it rests on the bottom; the rope will go slack. Take up the slack, mark the waterline with a clothespin, pull up the disc and count the feet between the clothespin and the disc. Estimate the water depth reading to the nearest quarter of a foot. Record the depth on the data sheet by writing the whole number in the space provided and circling the appropriate quarter foot increment (if needed). Use a pencil or waterproof pen.
Measure the depth last, after taking water samples and measuring water clarity. When the disc hits bot--- tom it may stir up sediments that could affect all other measurements.

Step 1: To record the Secchi reading, several special notations are used:
a. Check “yes” to indicate that you collected wa--- ter for total phosphorus, total nitrogen (small 250 ml bottle) and chlorophyll ½ gal jug and “yes” that you took a Secchi depth reading (if you measured the water clarity).
b. Write “B” on the data sheet to indicate that the disc went to the bottom and is still visible on the bottom.
c. Write “W” on the data sheet to indicate that the Secchi disc disappeared into weeds growing in the water body. Also record the depth at which the disc disap--- peared into the weeds.
Step 2: Record the cloud coverage when the Secchi reading was taken in the column headed “Sun Code #” by writing a number between 1 and 5 chosen from the data sheet column headed “Sun Codes.”
Do not indicate how much cloud cover there was in the sky at the time the Secchi reading was taken;
record the cloud cover directly over the sun only. For example, if the sky was very cloudy, but the sun popped out from be--- hind the clouds during the time the Secchi disc was being read, a #1 would be entered for the Sun Code #. Step 3: Fill out the remainder of the data sheet. Write com--- ments on the back of the data sheet if necessary. Include any--- thing that might possibly be useful. For example, “limerock washed into water body from torrential rainfall on roads, “grass carp were stocked in wa--- ter body last week,” or “public beach was closed by Health De---
partment on May 10th.” If you choose to record water levels regularly, please clearly label the type of gauge you are reading. If you do not know the type of gauge then call the LAKEWATCH office to get help determining the type of gauge. A copy of both LAKEWATCH data sheets (inland water and saline sta--- tions) is provided in Appendix C on pages 18---19.
Lake Name: Little Weston County: Polk Sampler: Jane Doe Phone:(352) 867-5309 Date: 9/15/2015 Time:_10:00 am Yes ✓No : Surface Water Collected for Total Phosphorus and Total Nitrogen. Yes ✓No : Surface Water Collected for Chlorophyll and Filtered Within 48 Hours. Yes ✓No : Secchi Depth Reading Taken
Secchi Disc Measurements:
• For Secchi depth and water depth measurements, please indicate the number of feet and then estimate and circle the appropriate fraction, if needed.
• If your disc is visible on the bottom write B, If your disc disappears in the weeds write W, in the vanishing point column and the depth at which your disc disappears. Vanishing Point
Sun Code Number
Sun Code Key Use the codes from below to fill in the Sun Code Number column.
Water Depth Time
Sta 1 W 3 ft. ¼ ½ ¾ 1 1 = full sun 8 ft. 1/4 1/2 3/4 11:45 Sta 2 6 ft. ¼ ½ ¾ 1 2 = haze over sun 8 ft. 1/4 1/2 3/4 12:20 Sta 3 B ft. ¼ ½ ¾ 2 3 = thin cloud cover 8 ft. 1/4 1/2 3/4 12:50
4 = medium cloud cover 5 = heavy cloud cover
5
Filling in the data sheet

6
A. Filling the nutrient bottle 1. Use a waterproof marker to fill in the blanks on the label of each sample bottle. • Water body name • County • Month---day---year • Station number 2. Without touching the inside of the bottle and lid, rinse them in the water body twice. 3. Grasp the bottle at its base, turn it upside down and lower it, mouth downward, into the wa--- ter body to elbow depth. 4. Fill the bottle by turning it to a horizontal position and pointing its mouth in the direction the boat is traveling. 5. Bring the bottle up and pour enough water out to leave a 1---inch space for the freezing water to expand. 6. Cap the bottle tightly and put it in a shaded place or ice chest.
B. Filling the chlorophyll jug 1. Rinse the jug and lid in the water body twice. 2. Invert the jug and lower it into the water body to elbow depth. 3. Fill the jug by pointing its mouth in the direction the boat is traveling. 4. Bring the jug up, cap it, and keep it in the dark, covered with a dark towel or bag or stored in a cooler.
C. Measuring water clarity 1. Without wearing sunglasses, lower the Secchi disc into the water on the shaded side of the boat. 2. At the point when the disc first vanishes from sight, put the clothespin on the rope at the wa--- ter line (rope should be vertical). 3. Glance to check the sun cover, haul in the disc, and count rope markings to read how many feet under water the disc was when it vanished from view. 4. Record this data and the appropiate sun code on the LAKEWATCH data sheet.
D. Measuring water depth 1. Lower the Secchi disc to the bottom. 2. At the point when the rope goes slack, put the clothespin on the rope at the water line (rope should be vertical). 3. Haul in the disc, and count rope markings. 4. Record this number on the LAKEWATCH data sheet. 5. Fill in the rest of the LAKEWATCH data sheet.
E. Repeat all above steps at remaining stations. Put all nutrient bottles and data sheets in a ziploc bag and freeze them immediately. Make a copy of your data sheet before you deliver your samples to the collection center (optional).
Sampling the water: A summary *PLEASE WEAR YOUR LIFE JACKET*
7
Filtering procedure: A detailed description
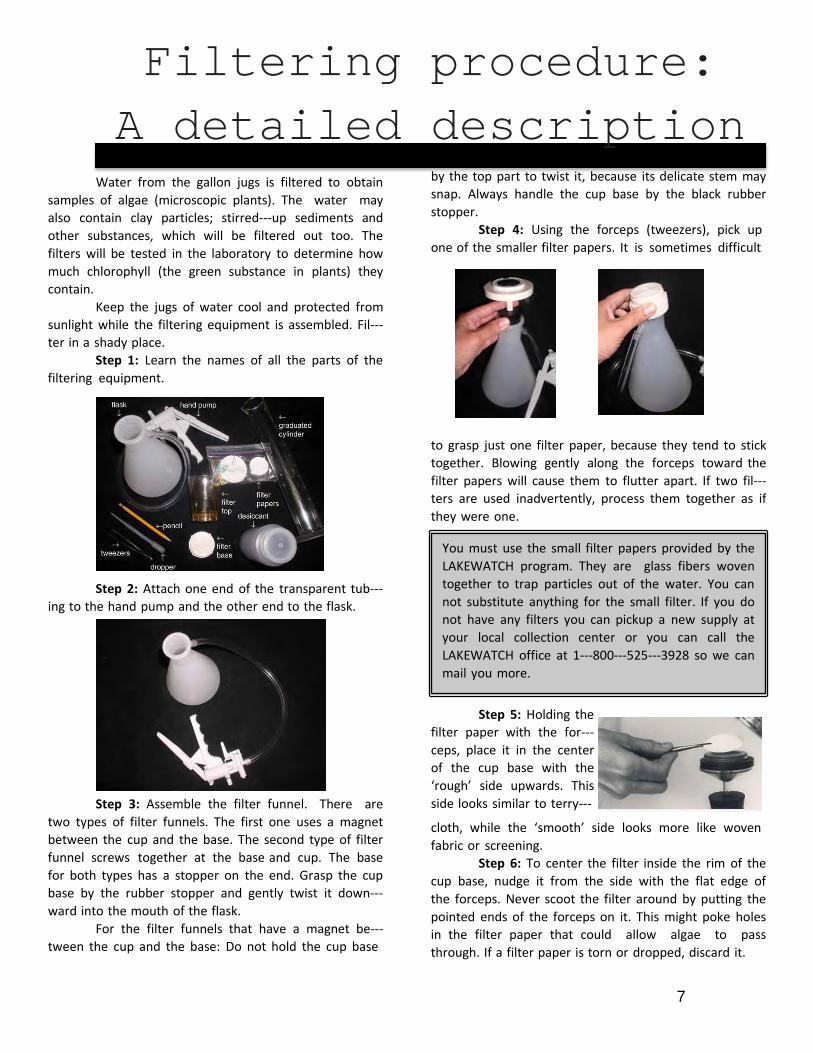
Water from the gallon jugs is filtered to obtain samples of algae (microscopic plants). The water may also contain clay particles; stirred---up sediments and other substances, which will be filtered out too. The filters will be tested in the laboratory to determine how much chlorophyll (the green substance in plants) they contain.
Keep the jugs of water cool and protected from sunlight while the filtering equipment is assembled. Fil--- ter in a shady place.
Step 1: Learn the names of all the parts of the filtering equipment.
Step 2: Attach one end of the transparent tub--- ing to the hand pump and the other end to the flask.
by the top part to twist it, because its delicate stem may snap. Always handle the cup base by the black rubber stopper.
Step 4: Using the forceps (tweezers), pick up one of the smaller filter papers. It is sometimes difficult
Step 3: Assemble the filter funnel. There are two types of filter funnels. The first one uses a magnet between the cup and the base. The second type of filter funnel screws together at the base and cup. The base for both types has a stopper on the end. Grasp the cup base by the rubber stopper and gently twist it down--- ward into the mouth of the flask.
For the filter funnels that have a magnet be--- tween the cup and the base: Do not hold the cup base
Step 5: Holding the filter paper with the for--- ceps, place it in the center of the cup base with the ‘rough’ side upwards. This side looks similar to terry---
cloth, while the ‘smooth’ side looks more like woven fabric or screening.
Step 6: To center the filter inside the rim of the cup base, nudge it from the side with the flat edge of the forceps. Never scoot the filter around by putting the pointed ends of the forceps on it. This might poke holes in the filter paper that could allow algae to pass through. If a filter paper is torn or dropped, discard it.
to grasp just one filter paper, because they tend to stick together. Blowing gently along the forceps toward the filter papers will cause them to flutter apart. If two fil--- ters are used inadvertently, process them together as if they were one.
You must use the small filter papers provided by the LAKEWATCH program. They are glass fibers woven together to trap particles out of the water. You can not substitute anything for the small filter. If you do not have any filters you can pickup a new supply at your local collection center or you can call the LAKEWATCH office at 1---800---525---3928 so we can mail you more.

8
Step 7: Using tap water, rinse the filter cup. Rinse the cup every time water from a different jug is filtered.
Step 8: After rinsing the cup in tap water, place it on top of the cup base. The cup and base are either held together magnetically or screwed down onto the base to form a watertight seal.
Step 9: Shake the gallon jug that is about to be filtered. This is very important and very easy to forget. Some folks have writ--- ten, “Shake Me” on their jugs as a remind--- er. Do whatever is nec--- essary to jog your memory.
Shaking the jug evenly redistributes any algae that has settled to the bottom. The jug must be shaken even before the water is used for rinsing.
Step 10: Using the shaken water body water to rinse the measuring cylinder. To rinse, pour about a cup of water into it. Swirl the water around, and then twirl the cylinder as the water is poured out so that it rinses the sides of the cylinder.
Step 11: Pour water body water from the shak--- en jug into the measuring cylinder up to the anticipated measure line. The cylinder is calibrated in milliliters, which is abbreviated ‘mL.’ It is very important to keep track of how many milliliters are filtered. This infor--- mation will be used to calculate the concentration of algae in the water body water.
Note that the line on the cylinder indicating a certain measurement is actually below the number, not beside it. For example, the 450---mL line is below where the number 450 is written on the cylinder. It is usually easier to determine which line goes with which number by looking where the lines end; in that way the longest lines can be seen more easily.
Step 12: Use a pipette (dropper) to adjust the
water level in the graduated cylinder. When water is measured, it will creep up the sides, forming a slightly u--- shaped surface. When seen from the side at eye---level, this u---shaped surface is called the ‘meniscus.’ To meas--- ure volume accurately, adjust the water level so that the bottom of the meniscus rests on top of the target
line on the cylinder. To most people, this alignment looks as if the graduated cylinder is slightly overfilled. Squeeze the pipette dry before using it for the next sta--- tion.
Use your judgement to decide how much water to filter. There is no pre---determined amount of water that must be filtered. The goal is to filter as much water as necessary to turn the filter paper a noticable color. If there is a lot of algae in the water body, only a small volume of water may be necessary. On the other hand, if there is little algae in the water body that month, a greater volume may be needed. Do not filter more than 3000 mL even if that amount doesn’t produce a no--- ticable color change.
On some water bodies, the filter may clog be--- fore it produces a noticable color change. Clay and some kinds of slimy algae can quickly clog a filter. To judge how much water to filter, watch the flow of water through the filter. When the flow decreases noticeably or the pump becomes very hard to work, don’t attempt to filter any more water.
If the filter clogs and the water remaining in the filter cup can not be pumped through, pour out all the water, reassemble the filter apparatus with a clean filter and start over using less water. For example, if 300 mL of water clogged the filter before all the water could flow through, start over using only 200 mL the second time.
In general, the approach is to measure out the amount of water thought necessary, pour it into the filter cup and pump it through. If the filter doesn’t be--- come clogged, check for a noticable color change. If there is not enough color, measure out more water and pump that through too. Pay attention to whether the water is hard to pump and whether the stream of water is diminishing. Either of these observations is a signal that the filter is getting close to the clogging point. If so, add more water in smaller increments (50 to 100 mL), rather than trying to pump a larger volume through. Keep track of the total amount of water filtered.
Step 13: To retrieve the filter paper, either gen--- tly tip the empty cup to one side or unscrew the cup so it comes up off the filter paper and base. The filter pa--- per should remain on the cup base. Sometimes the filter paper will stick inside the bottom of the cup. If this happens put a hand under the bottom of the cup to propel the filter paper out. Alternatively, the edge of the filter paper can be carefully loosened and peeled off gently with the forceps.
If the forceps accidentally touch the algae that has accumulated on the filter paper, algae will come off on the forceps and the amount left on the filter paper

9
will not be the proper amount. Any filter paper on which the algae has been touched by fingers, forceps or any other object must be discarded and the filter pro--- cess for that station must be started over.
Step 14: Assuming the cup comes off the base properly and leaves the filter paper behind on the base, use forceps to remove the filter paper from the base. Grasp the filter paper only by the white outer rim------ do not touch the algae with the forceps. Peel the filter pa---
per up off the cup base. Step 15: To enclose and
protect the algae, fold the filter paper exactly in half—with the algae side inside. You can touch the back of the filter paper with your fingers. Do not touch the algae during the folding. No
FOLD IN HALF SO THE ALGAE IS COMPLETELY COVERED. algae should be peeking out along the edge of the fold--- ed filter paper. If the forceps tears off a small piece of filter paper, just encase it inside the folded filter paper and continue processing it.
Step 16: Put the folded sample on a paper tow--- el. Fold the paper towel over the sample and blot it as dry as possible. Let the sample sit on the paper towel while you prepare an envelope for it.
Step 17: Prepare an envelope by folding one of the larger filter papers in half. It can be handled with your fingers. Using pencil only (NEVER use any kind of marker or ink to write on the envelopes. The ink might bleed through onto the sample and ruin it), fill in the blanks on the label on the large filter paper:
•Water Body name
•County name •Month---day---year •Station number •Volume filtered
Example: Water Body: Little Weston County: Polk Date: 3---26---01 Station: 3 Amount Filtered: 600 mL
Always double check your label. Be sure you have filled out all the lines with all the required infor--- mation.
Step 18: Tuck the folded sample inside its enve--- lope.
Step 19: Fasten the circular edge of the enve--- lope with a plastic coated paperclip, provided in your kit. Never use metal paperclips; rust may bleed into the sample and ruin it.
Step 20: Put the algae envelope in the jar of desiccant (blue and white silica gel crystals). The desic--- cant crystals absorb moisture from the filter, drying it out to preserve the algae. Gently roll the jar to distrib---
ute the crystals around the filter papers. Do not shake the jar.
Step 21: Store the desiccant jar in the freezer. If the blue crystals turn pink, it indicates that the crystals are saturated with water and not absorbing moisture effectively. Satura--- tion of the desiccant is most likely caused by inadequate blotting of the algae samples. If your desiccant is turn--- ing pink refer to Appendix B: how to refresh your desic--- cant on page 16.
Step 22: Repeat all steps for the remaining jugs of water and put all the filter papers into the bottle of desiccant. Store in the freezer.
Step 23: Rinse the equipment with tap water and let it air dry.
Step 24: Check the number of bottles, filters and paper clips to assure there is an adequate supply for next month’s sampling.
Step 25: Deliver your water bottles, data sheet, and desiccant bottle to your local collection center.
Step 26: Pick up new supplies at your local col--- lection center or call the LAKEWATCH office at 1---800--- 525---3928.

10
A. Assemble the filtering apparatus (out of the sunlight) by inserting the filter base into the flask.
B. Using forceps, center a small filter (rough side up) on the cup base.
C. Using tap water, rinse the filter cup and set or screw it on the base.
D. Shake the jug of water and use some of it to rinse the measuring cylinder. Repeat this rinse for each jug as you prepare to filter from it.
E. Measure water from the jug into the graduated cylinder.
F. Pour measured water from the graduated cylinder into the filter cup and pump it through the filter paper until a noticable color appears on the filter or it starts to clog.
G. After pumping the cup dry, tip or unscrew the cup off the base.
H. Using the forceps to grip the white part of the filter paper, lift it off the cup base.
I. Being careful not to touch the algae, fold the filter in half, algae side in to enclose the algae and blot the small filter thoroughly on a paper towel.
J. Using a pencil, label a large filter paper with
• Water body name • County • Station number • Month---day---year • Amount of water filtered (mL)
K. Fold the large paper filter in half, tuck the small filter inside and fasten with a plastic---coated metal paper clip.
L. Repeat all steps for the remaining jugs of water and put all the filters into the bottle of desic--- cant. Store in the freezer.
M. Rinse equipment with tap water, let air dry and check to see if there are enough supplies for next month— GOOD WORK!
Filtering A detailed
procedure: description

11
Boat checklist Sampling kit inventory
1. Life Jacket 2. Sample bottles/one per station, in a ziploc bag 3. Waterproof marker* 4. Chlorophyll jugs*/one per station 5. Dark colored towel, black trash bag, or ice cooler* 6. Data sheet with pencil 7. Secchi disc with clothespin 8. Map of station locations 9. Laminated reference card (*furnished by the volunteer)
1. Secchi disc with clothespin 2. 1000 mL filter flask 3. Hand pump with tubing 4. Filter funnel cup 5. Cup base 6. Forceps (tweezers) 7. Pipette 8. Graduated cylinder 9. Desiccant bottle 10. 250 mL sample bottles for inland sites and 500 mL sample bottles for saline sites 11. Small filters: 47 mm type A/E glass fiber filters 12. Large filters: 7 cm paper filters 13. Plastic coated, metal paper clips 14. Data sheets 15. Florida LAKEWATCH instruction booklet 16. Laminated reference card
Filtering A detailed
procedure: description

12
What do I deliver to the collection center? De---
liver three things: (1) ziploc bag containing frozen bot--- tles of water; (2) jar of desiccant containing algae filters; and (3) data sheets. Make copies of your data sheets for your future reference.
How long can I keep my samples in my freezer? You should take your samples to the Gainesville labora--- tory or to the nearest collection center when it is con--- vienent for you, although the faster you turn them in the more quickly they will be analyzed. Some collection centers are picked up monthly, some every two months, and some only quarterly. To find out your collection center pick---up schedule please call the LAKEWATCH of--- fice.
Where can I get supplies? When delivering samples, you can always pick up any supplies you need. You can always pick up replacement bottles, data sheets and a bottle of desiccant. You may also need more fil--- ters and paper clips. If you have any difficulty getting supplies, call the LAKEWATCH office.
If I run out of filters, can I use coffee filters or some other kind? No, there is no substitute for the al--- gae filters (the smaller filters) They are made of glass fibers, not paper, and are specially designed for chemi--- cal analysis.
You may use coffee filters or any soft paper in place of the big filter as envelopes for the algae filters, but not for the algae filters themselves. To assure you have the necessary supplies, check your filters for next month when you are storing your equipment.
How will I be able to get back to my stations every month? If you have access to a Global Positioning System (GPS) the latitude and longitude of each sam--- pling station can be stored in the GPS and used each month to get to the same spots. If you do not have ac--- cess to a GPS then refer to Appendix A on page 14 for a discussion on how to create and use navigational bear--- ing lines as an aid in returning to the same spots.
Is it important to label each station with the same station numbers? Yes, it is extremely important that, once located, the stations are referred to by their
correct number. For example Station 1 is always labeled Station 1, never Station 2 or 3.
How often will I be getting results? After you have accumulated data for about a year, you will re--- ceive a detailed annual report. In this report, we pre--- sent summary data collected on individual systems that have been part of the LAKEWATCH program. This sum--- mary is from the whole period of record for individual systems. The first part of this summary will allow a comparison of the long---term mean nutrient concentra--- tions with the nutrient zone concentrations mentioned above (Table 1). The second part of the summary will examine for any long---term trends that may be occurring in the system. Finally, the last part will be a bar---chart of the long---term data over time.
If there is a fish kill, what should I do? You can report a fish kill, diseased fish, or fish with other ab--- normalities directly to the Fish and Wildlife Health Group at the Fish and Wildlife Conservation Commis--- sion's (FWC) Fish and Wildlife Research Institute in St. Petersburg. Call: 1---800---636---0511.
If I have questions, who do I call? Call the LAKEWATCH office at 1---800---LAKEWAT (525---3928), or 352---392---4817. Or you can contact us via e---mail. Our e--- mail address is [email protected].
My algae filter did not fold exactly in half and some of the algae is showing, like an algae ‘grin’ along the edge. Is this okay? No. All the algae must be en--- closed in the folded smaller filter, otherwise the ex--- posed algae will rub off onto the larger filter into which it is tucked. If the algae touches anything other than the small filter, the measurement will be invalid. Can I take water in my chlorophyll jug and pour it into the smaller bottles? No, the small bottles are specially cleaned and the jug is not. If you pour water from the jugs into the bottles, the water will be contaminated by the jug. Also, you used special collection techniques when you filled the bottle which are designed to pre--- vent contamination from your body. You do not take these precautions when you collect water in your gallon jugs.
Questions

13
The crystals in my desiccant bottle are changing color. What is the problem? The blue crystals in your desiccant bottle will change to pink when they become saturated with moisture. Refer to Appendix D on page 20 to learn what to do about it. The probable cause of your problem is
hand pump. Remove your thumb. If there was not no--- ticeable suction, then your hand pump is broken. If your pump is broken, call the LAKEWATCH office. A new one can be sent out to you. Spare replacement pumps are sometimes stocked at collection centers. Please return your broken pump because sometimes the manufactur---
that either you are putting too many samples in one bottle or you are not blotting each sam--- ple as dry as possible before you put it in the bottle.
What is the most common mistake made while collecting water samples? Usu--- ally people forget to rinse their bottles and jugs in the water body before they collect their samples.
What are the most common mistakes made while doing the filtering? Volunteers sometimes forget to write how much water they filtered. If the amount is not recorded, the concentration of algae in the water cannot be calculated. Also, sometimes people forget that they should not use a pen or marker to write on their fil--- ter. The ink bleeds into the sample and ruins it. Please only use a pencil to fill in the neces--- sary informtion on the large filter. Of course, we never know how many volunteers forget to shake their jugs of water before they begin the filtering proce--- dure.
My graduated cylinder seems to be getting dirty. Can I clean it? Yes, simply soak it in hot soapy water. Rinse it thor--- oughly. Never scrub it with a brush or scrubber. Never put it in your dishwasher.
I pump and I pump, but the water doesn’t seem to go down in my filter cup. What can I do? You shouldn’t have to ‘pump till you slump.’ We have found that a small percentage of our hand pumps break down. Test yours by pulling off the plastic tubing and placing your thumb over the open end of the tubing. Pump the
er will replace it or we can scavenge them for parts. One possible reason for breakage is that people forget to empty their flask. When it becomes filled with more than 1000 mL of water, water will be sucked down through the plastic tubing and will be spit out through the pump, damaging the mecha--- nism. If you find that your pump is okay, check to see if the rubber stopper is fitted tightly into the mouth of your flask. If it is and there is still a problem, your water may con--- tain clay or other substances that clog the filter easily. In this case, pump only as much water as you can in about five minutes. Remember, you have to pump your cup dry, so don’t fill it very full to begin with.
Can I train other peo--- ple on my water body to take samples? No. Only a designated trainer can certify the LAKE--- WATCH samplers. In this way we know that every certified sampler has been passed through the same training pro--- cedure. It is a quality control provision. We will be glad to train as many folks as are inter--- ested; just let us know.
Can I come visit the laboratory in Gainesville? Yes, we would be glad to have you visit between 8:30 am and 4:30 pm on weekdays. Maps are available on the LAKEWATCH website or you can call the LAKE--- WATCH office for directions.

14
If you do not have a Global Positioning System
(GPS) to get to the location of each station each month, you can use the technique of navigational bearing lines. The use of navigational bearing lines is a simple tech--- nique to permit you to return to the same location in
your water body every time you sample there.
To master this technique, you merely have to learn to line up two ob--- jects on the shoreline so that they appear to be one behind the other. For ex--- ample, in the picture to the right, the pine tree trunk is lined up exactly with the white chimney. Do you see them?
Notice that if the observer moved to the left or the right, the trunk would not line up in front of the chimney any more.
In the picture to the left below, the utility pole is in front of the building but is not lined up with the corner. In the picture to the right below, the utility pole is lined up with the edge of the building. Can you see the alignment? By just moving your location to the right the two objects (corner of the building and the utility pole) are in alignment.
Take a look at this next one. Do you see the small post lined up with the middle of the ramp/ walk--- way? By moving to the left the small post is now lined up with the right railing of the ramp/walk way.
By changing your position in your water body, you can line up on practically any two objects you want. You can use fence posts, dock posts, trees, antennas, chimneys, doorways, roof peaks, power poles, bird houses, flag poles, windows; any two objects, just so one is closer to the water body than the other. Of course you should use permanently situated objects, not sailboat masts, for example.
Once you have mastered the technique of lining up two objects, you are ready to use it to navigate to your station location.
Appendix A How to use navigational bearing lines

15
At station 1 in your water body, examine the shoreline and find two objects you can line up with each
other). Write down a description of the objects you are
other. The first time you do this you may have to shift your boat position a little so that readily identifiable objects actually align with one another. Once you spot two objects that line up one behind the other, you are located on an imaginary line that would connect these two objects. The picture below shows a top view of the line you would be on by aligning a chimney with a palm
tree. This is your first bearing line. The problem is that you could be anywhere along this line.
To narrow down your location, examine your shoreline that is at a right angle (90 degrees) from your first bearing line. Again, find two objects that appear to line up with one another. You may have to shift the boat around a bit.
The alignment of these second two objects will form a second bearing line that will intersect the first one at a unique point. Look at the picture below which shows a top view of how a second bearing line (formed by aligning an antenna with a dock post) will intersect your first bearing line.
Notice that if you drift a few feet, your chosen objects do not appear to line up with each other any--- more. That’s good. If you drift off station and your cho--- sen objects still seems to be aligned with each other, choose other objects (the ones you have chosen may be too close together or may be actually touching each
lining up to define bearing lines. You will use these same bearing lines month after month. Your description should contain enough detail about each object so that you can find the same one every time and so that the description fits one object uniquely.
A poor example (the wrong way)
Station 1: flagpole with dock pine with culvert
Station 2: antenna with tree fence
Station 3: sidewalk with door pole with tower
A good example (the right way)
Station 1: (a) On north shore, align the Smith’s flagpole with the right front dock post of their dock (b) On the west shore, align the tallest pine tree with the stormwater culvert
Station 2: (a) On the north shore, align the TV antenna
on the two story grey house with the palm tree closest to their dock. (b) On the east shore, align the fence posts on the chainlink fence (to the right of the yellow stucco house) with each other.
Station 3: (a) On the southwest shore, align the
lakeshore end of the sidewalk with the front door of the A---frame house. (b) On the northwest shore, align the street sign pole with the middle radio tower on the horizon.
Notice that each bearing line utilizes two ob---
jects, and that each station must have two bearing lines. It should be mentioned that many folks
have developed a habit of marking spots on a water body by getting in between two objects on the shore. Do not use this technique, because it is not accurate. Using bearing lines may be new to you, but you will get reliable results once you master it.

16
Angler Fish Diaries
If you, a friend or a neighbor fishes the water body that you are sampling for water chemistry, you may want to participate in the angler fish diary program through Florida LAKEWATCH. Long---term fish data col--- lected on individual water bodies through the use of fishing diaries can be used in a similar way as the LAKEWATCH water chemistry data; it gives us hard numbers to use in identifying patterns or trends that
may be occurring in your water body’s fish populations. For exam--- ple, these data can yield trend analyses of catch per unit effort (number of fish caught per unit of time). If the catch per unit effort decreases significantly over time, this could suggest a problem with the fish population that needs to be looked at more intensely. Additionally if catch per unit effort re--- mains constant through time then the water body and fish populations are probably fine. If diaries are kept on many water bodies, data will be available for LAKE--- WATCH personnel to examine relationships among oth--- er environmental data (like the amount of algae or sur--- face area) and fishing data.
The LAKEWATCH fishing diaries record infor--- mation from 10 trips or fishing events. It has been de--- signed so that it can easily fit in your tackle box or boat’s dry storage compartment. There is even a con--- venient ruler that can be stuck onto a cooler or an area on your boat to measure each fish caught.
If you are interested in participating in the LAKEWATCH angler fish diary program, please call the Florida LAKEWATCH office and we will mail you the in--- formation needed to get started.
Appendix B Additional LAKEWATCH volunteer opportunities.

17
Aquatic Bird Survey
Since the inception of Florida LAKEWATCH, there has been a desire to survey bird use of Florida’s water bodies. One LAKEWATCH volunteer collected monthly bird counts for five years when he went out to sample water chemis--- try. He brought the da--- ta to the LAKEWATCH program and it led to a publication in the Jour--- nal of Lake and Reser--- voir Management. The data were used to show that volunteer bird monitoring efforts can provide valuable infor--- mation on the long--- term status of Florida’s aquatic bird popula--- tions. Similar sampling protocol was developed and is now being of--- fered to anyone interested in monitor--- ing the monthly occur--- rence of bird use on a water body. The objec--- tive of the Florida LAKEWATCH Aquatic Bird Survey is to estab---
lish a standardized, statewide, long---term monitoring program to examine seasonal and yearly trends in Flori---
da’s aquatic birds. This data will offer insights into the effects of shoreline habitat, water chemistry, and broad---scale climatic factors on the foraging, nesting, and roosting of aquatic birds.
A considerable number of bird species are known to utilize water bodies, but few studies have directly quantified their num--- bers or examined long--- term trends in diversity and abundance. As Flor--- ida’s wetlands continue to be altered or destroyed, the im--- portance of lake habitat to aquatic bird commu--- nities needs to be doc--- umented. Monitoring the distribution and abundance of birds as--- sociated with Florida water bodies will help us determine which bird species utilize Flor--- ida water bodies and develop future man--- agement strategies. If you are interested in participating in the Flor--- ida LAKEWATCH Aquat--- ic Bird Survey, please call the Florida LAKE---
WATCH office and we will mail you the information needed to get started.

18
*
Florida LAKEWATCH Freshwater Data Sheet
Lake Name: County:
Sampler:
Phone:( ) Date: Time:_
Yes No : Surface Water Collected for Total Phosphorus and Total Nitrogen. Yes No : Surface Water Collected for Chlorophyll and Filtered Within 48 Hours. Yes No : Secchi Depth Reading Taken
Secchi Disc Measurements:
• For Secchi depth and water depth measurements, please indicate the number of feet and then estimate and circle the appropriate fraction, if needed. • If your disc is visible on the bottom write B, If your disc disappears in the weeds write W, in the vanishing point column and the depth at which your disc disappears.
Vanishing Point
Sun Code Number
Sun Code Key Use the codes from below to fill in the Sun Code Number column.
Water Depth Time
Sta 1 ft. ¼ ½ ¾ 1 = full sun ft. 1/4 1/2 3/4 Sta 2 ft. ¼ ½ ¾ 2 = haze over sun ft. 1/4 1/2 3/4 Sta 3 ft. ¼ ½ ¾ 3 = thin cloud cover ft. 1/4 1/2 3/4
4 = medium cloud cover 5 = heavy cloud cover
DESCRIBE the amount and duration of any unique occurrences that have occurred within two weeks or so before your sampling date either in the lake or on the local watershed:
Lake Level Measurements: Please circle or describe the type of gauge located in the lake and then record the lake level. Type of Staff Gauge: WMD / City / LCWA / USGS / Other (Please describe):
Lake level: Rain (in.) since last report:
* If you wish to record lake levels of your lake, please fill in these last two blank. Call LAKEWATCH (1-800-LAKEWAT) if you have any questions on how to get started.
Florida LAKEWATCH Datasheets.
Appendix C

19
Florida LAKEWATCH Saline Data Sheet
Lake Name: County:
Sampler:
Phone:( ) Date: Time:_
Yes No : Surface Water Collected for Total Phosphorus and Total Nitrogen. Yes No : Surface Water Collected for Chlorophyll and Filtered Within 48 Hours. Yes No : Secchi Depth Reading Taken.
Secchi Disc Measurements:
• For Secchi depth and water depth measurements, please indicate the number of feet and then estimate and circle the appropriate fraction, if needed. • If your disc is visible on the bottom write B, If your disc disappears in the weeds write W, in the vanishing point column and the depth at which your disc disappears.
Vanishing Point
Sun Code Number
Sun Code Key Use the codes from below to fill in the Sun Code Number column.
Water Depth Time
Sta 1 ft. 1/4 1/2 3/4 1 = full sun ft. 1/4 1/2 3/4 Sta 2 ft. 1/4 1/2 3/4 2 = haze over sun ft. 1/4 1/2 3/4 Sta 3 ft. 1/4 1/2 3/4 3 = thin cloud cover ft. 1/4 1/2 3/4 Sta 4 ft. 1/4 1/2 3/4 4 = medium cloud cover ft. 1/4 1/2 3/4 Sta 5 ft. 1/4 1/2 3/4 5 = heavy cloud cover ft. 1/4 1/2 3/4 Sta 6 ft. 1/4 1/2 3/4 ft. 1/4 1/2 3/4 Sta 7 ft. 1/4 1/2 3/4 ft. 1/4 1/2 3/4 Sta 8 ft. 1/4 1/2 3/4 ft. 1/4 1/2 3/4 Sta 9 ft. 1/4 1/2 3/4 ft. 1/4 1/2 3/4 Sta 10 ft. 1/4 1/2 3/4 ft. 1/4 1/2 3/4
DESCRIBE the amount and duration of any unique occurrences that have occurred within two weeks or so before your sampling date either in the coastal waters or on the local watershed:
Tide: Please circle one in each column. Example: High and Falling.
High Falling Low Rising
Call LAKEWATCH (1-800-LAKEWAT) if you have any questions on how to get started.

20
Florida LAKEWATCH Aquatic Bird Survey Lake Data Recorder: County Phone Number: Method: Boat, Dock (Yard), or Shore Walk Date Start Time: Stop Time:
Type Species Tally of Each Bird Species Observed Total Number
Diving Pied-billed Grebe Common Loon Double-crested Cormorant Anhinga Belted Kingfisher Ducks Hooded Merganser Red-breasted Merganser Mottled Duck Ring-necked Duck Mallard Wood Duck Blue-winged Teal American Coot Marsh Common Moorhen Purple Gallinule Rails Wading Great Blue Heron Least Bittern Little Blue Heron Tricolored Heron Black-crowned Night Heron Yellow-crowned Night Heron Green-backed Heron Great Egret Snowy Egret Cattle Egret Wood Stork Sandhill Crane Limpkin Glossy Ibis White Ibis Hawks American Kestrel Northern Harrier Red-tailed Hawk Red-shouldered Hawk Bald Eagle Osprey Swallow-tailed Kite Turkey Vulture Black Vulture Mixed Vultures Marine White Pelican Brown Pelican Gulls Terns Shore Killdeer Plovers Sandpipers Common Snipe Song Crows Boat-tailed Grackle Common Grackle Red-winged Blackbird Purple Martin Swallows Swifts Notes on Additional Bird Species, Weather Conditions, Water Level, Rainfall, etc. . . . . . (Continue notes on back)
21
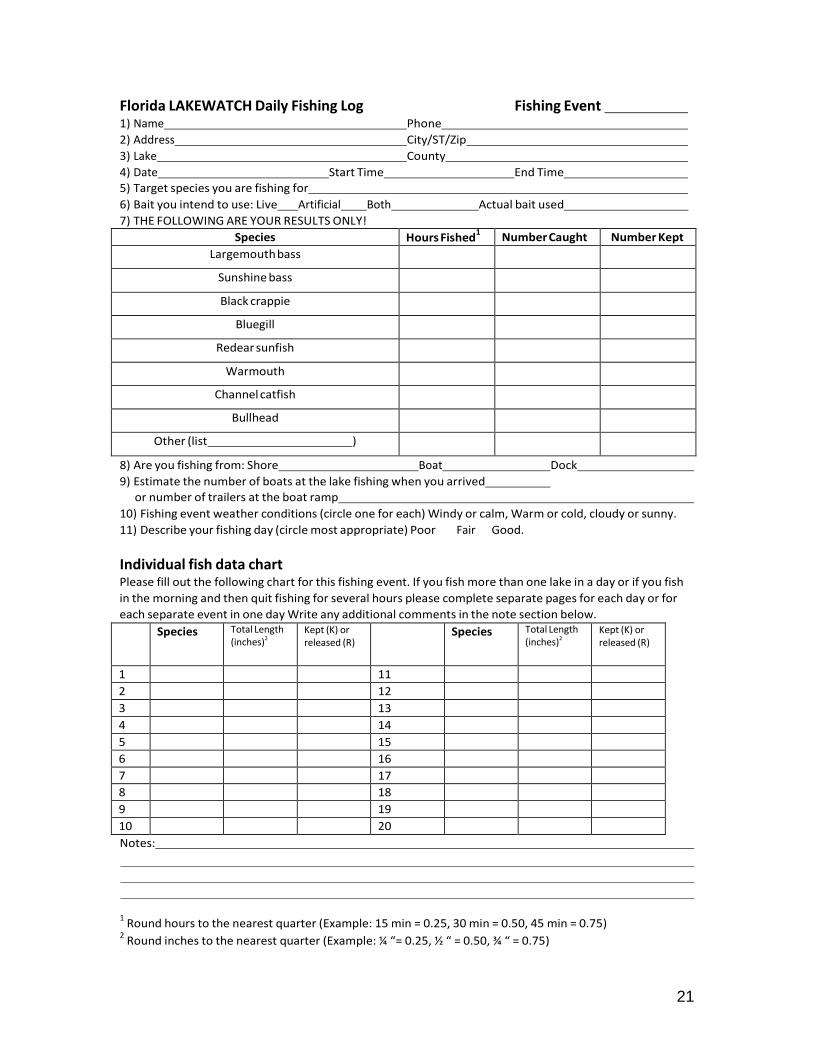
Florida LAKEWATCH Daily Fishing Log Fishing Event 1) Name Phone 2) Address City/ST/Zip 3) Lake County 4) Date Start Time End Time 5) Target species you are fishing for 6) Bait you intend to use: Live Artificial Both Actual bait used 7) THE FOLLOWING ARE YOUR RESULTS ONLY!
Species Hours Fished1 Number Caught Number Kept
Largemouth bass Sunshine bass Black crappie
Bluegill Redear sunfish
Warmouth Channel catfish
Bullhead Other (list )
8) Are you fishing from: Shore Boat Dock 9) Estimate the number of boats at the lake fishing when you arrived
or number of trailers at the boat ramp 10) Fishing event weather conditions (circle one for each) Windy or calm, Warm or cold, cloudy or sunny. 11) Describe your fishing day (circle most appropriate) Poor Fair Good.
Individual fish data chart Please fill out the following chart for this fishing event. If you fish more than one lake in a day or if you fish in the morning and then quit fishing for several hours please complete separate pages for each day or for each separate event in one day Write any additional comments in the note section below.
Species Total Length (inches)2
Kept (K) or released (R)
Species Total Length (inches)2
Kept (K) or released (R)
1 11 2 12 3 13 4 14 5 15 6 16 7 17 8 18 9 19 10 20 Notes:
1 Round hours to the nearest quarter (Example: 15 min = 0.25, 30 min = 0.50, 45 min = 0.75) 2 Round inches to the nearest quarter (Example: ¼ “= 0.25, ½ “ = 0.50, ¾ “ = 0.75)

22
How to refresh dessiccant Florida LAKEWATCH volunteers put their algae filters into plastic bottles containing blue and white crystals. The crystals are a desiccant, that is, a material that ab--- sorbs moisture. The blue crystals contain a chemical that turns from blue to pink when the crystals become saturated with moisture. This color change signals that the crystals cannot effectively absorb more moisture and need to be ‘refreshed.’ To restore the crystals to their initial dry condition, follow these steps:
1. Remove all algae filter samples from the bottle of crystals. Tweezers are useful for handling the filters. Put the filter samples in the freezer while you refresh the desiccant. Do not let the sam--- ples thaw out.
2. Pour the crystals out of the plastic desiccant bottle into an ovenproof glass container.
3. Cook the crystals in an oven until they turn blue again. Alternatively, you can microwave them for several minutes. An average time might be two minutes on high in a 600---watt microwave oven. Regardless of how you cook them, DO NOT leave them in the plastic bottle. It WILL melt, even in a microwave. If you choose to use a microwave to dry out the crystals, a paper plate works well to hold the crystals.
4. Allow the crystals to cool. 5. Pour the cooled crystals back into the plastic
bottle. The algae filter samples can now be re--- turned to the desiccant bottle.
Appendix D
Remember to store the desiccant bottle in the freezer whenever it contains algae samples.
23
CITIZEN SCIENCE SINCE 1986