lync 2013 configuration guide for sip trunk testing -xo · pdf filetekvizion pvs, inc....
TRANSCRIPT
tekVizion PVS, Inc. Confidential
Lync 2013 Configuration Guide
For SIP Trunk Testing
For
XO Communications
April 7th 2014
tekVizion PVS, Inc. Confidential
Copyright © 2014 by tekVizion PVS, Inc.
All Rights Reserved.
Confidential Information
The information contained in this document is confidential and proprietary to tekVizion PVS, Inc.
This document is the property of, and is proprietary to tekVizion. It is not to be disclosed in whole or in part without the express written authorization of tekVizion, shall not be duplicated or used, in whole or in part, for any purpose other than to evaluate the proposed scope of testing under contemplation.
TEKVIZION, TEKVIZION PVS, AND TEKVIZION LABS ARE TRADEMARKS OF TEKVIZION PVS, INC. FAST FORWARD IS A SERVICE MARK OF TEKVIZION.
DOCUMENT REVISION HISTORY
Version Reason for Change Date Created/Updated by
1.0 Initial Draft for Lync 2013 28/03/2013 Karthick Kumaraguru
1.1 Changes in line with setup 04/02/2013 Kishore Mukkamala
1.2 Added Voice Routing and Lync User Configuration 11/07/2013 Satheesh Kumar
1.3 SIP trunk configuration for XO 07/04/2014 Eder Moncada C.

tekVizion PVS, Inc. Confidential
Preface:
This document is intended to provide guidelines on how to setup a Lync SIP trunk
test. The IP addresses or FQDNs mentioned in this guide are intended to provide
an idea of the setup using one of the Lync environments here in the lab. Please
substitute the IP addresses or FQDNs for trunks/Gateways (public or private) and
the termination end point IP address from service provider accordingly.
tekVizion PVS, Inc. Confidential
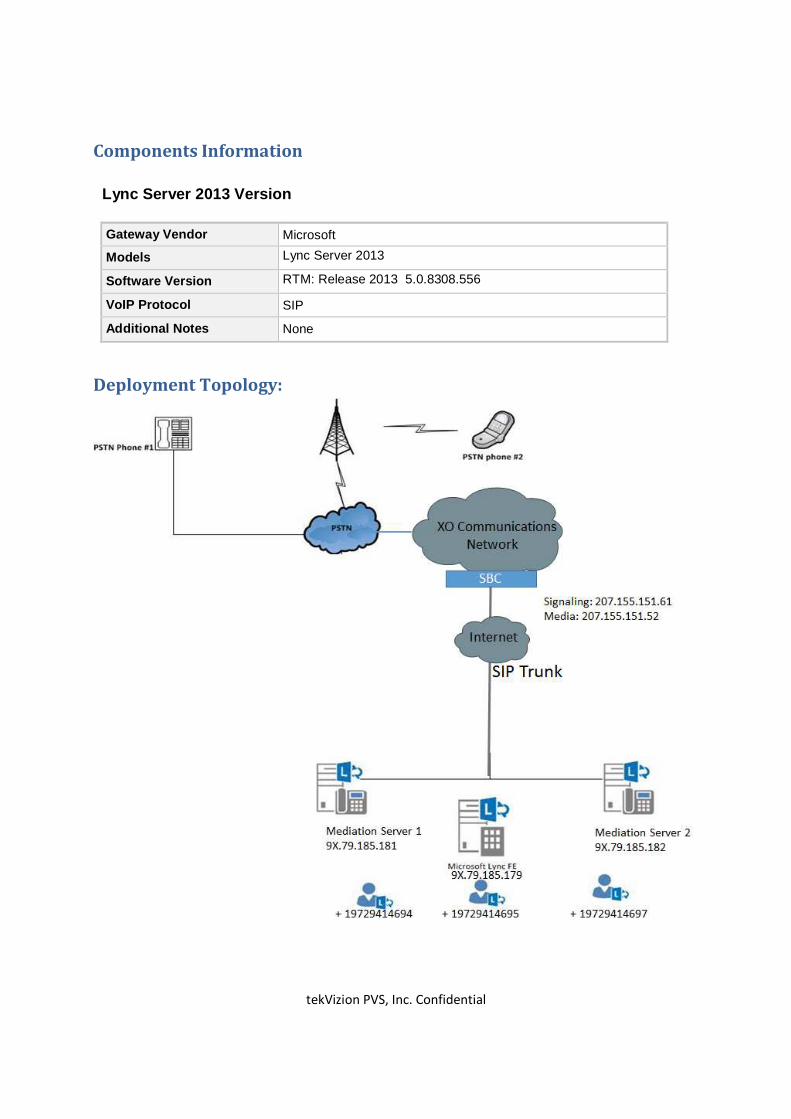
Components Information
Lync Server 2013 Version
Gateway Vendor Microsoft
Models Lync Server 2013
Software Version RTM: Release 2013 5.0.8308.556
VoIP Protocol SIP
Additional Notes None
Deployment Topology:
tekVizion PVS, Inc. Confidential
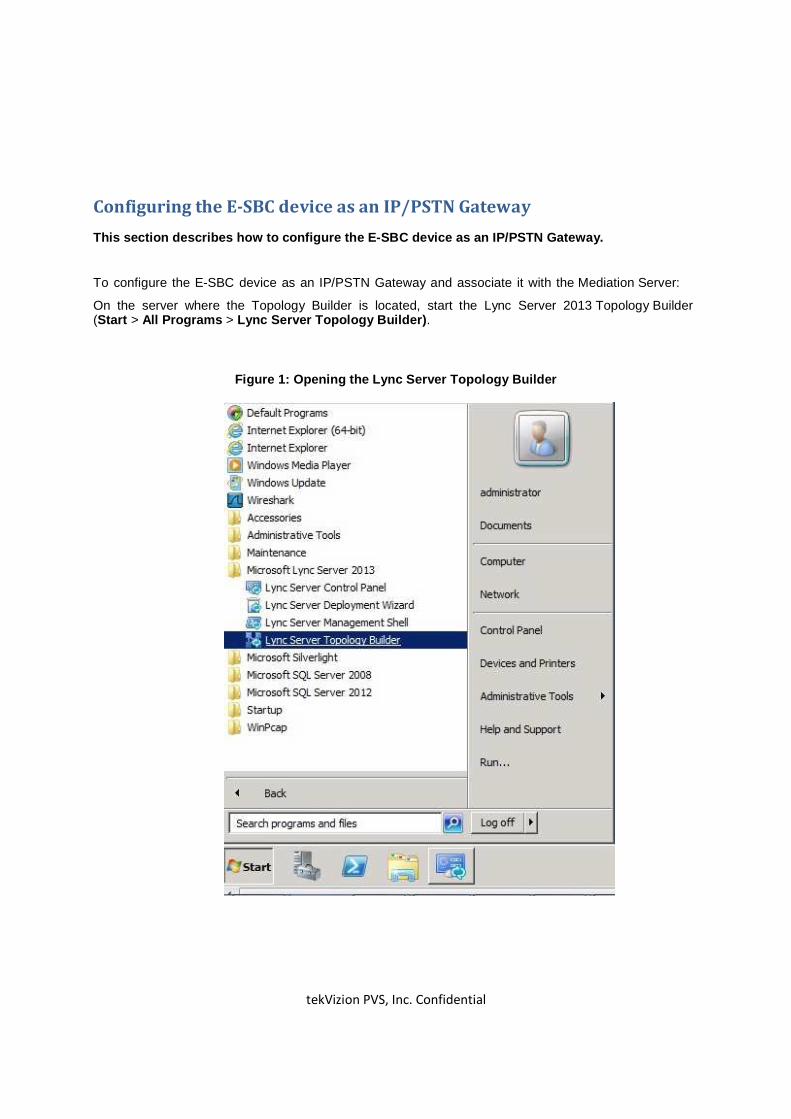
Configuring the E-SBC device as an IP/PSTN Gateway This section describes how to configure the E-SBC d evice as an IP/PSTN Gateway.
To configure the E-SBC device as an IP/PSTN Gateway and associate it with the Mediation Server:
On the server where the Topology Builder is located, start the Lync Server 2013 Topology Builder (Start > All Programs > Lync Server Topology Builder) .
Figure 1: Opening the Lync Server Topology Builder
tekVizion PVS, Inc. Confidential
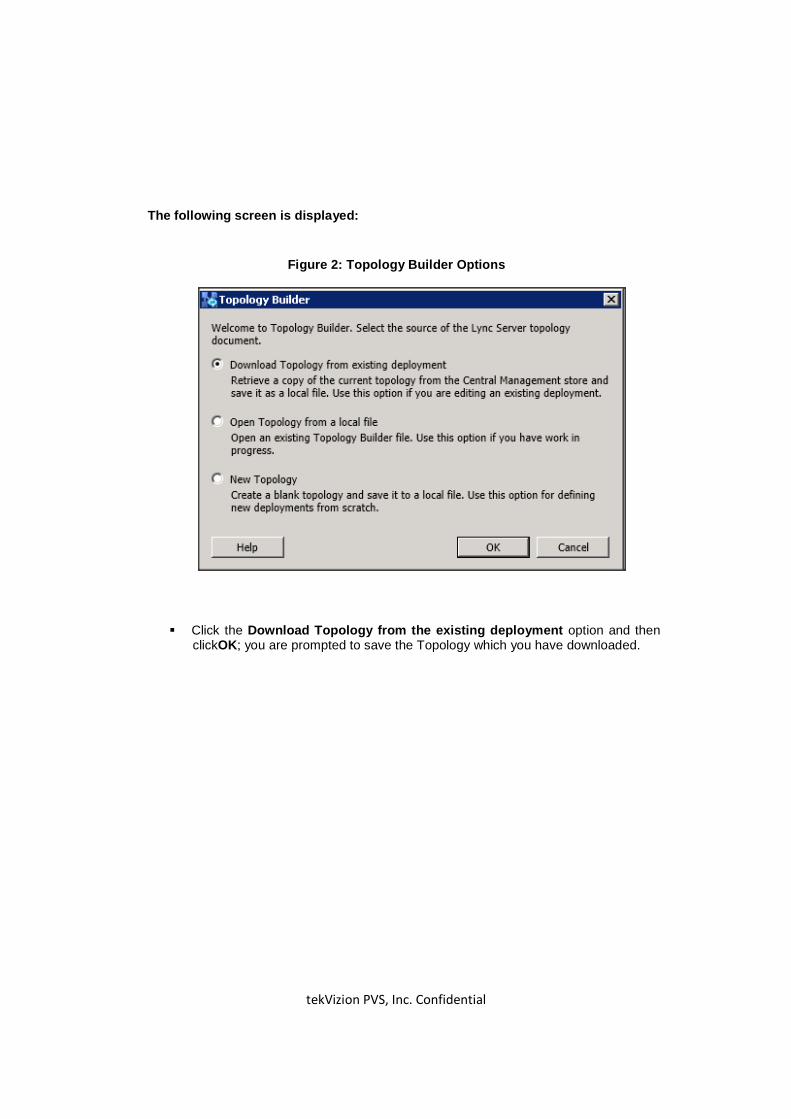
The following screen is displayed:
Figure 2: Topology Builder Options
� Click the Download Topology from the existing deployment option and then clickOK; you are prompted to save the Topology which you have downloaded.
tekVizion PVS, Inc. Confidential
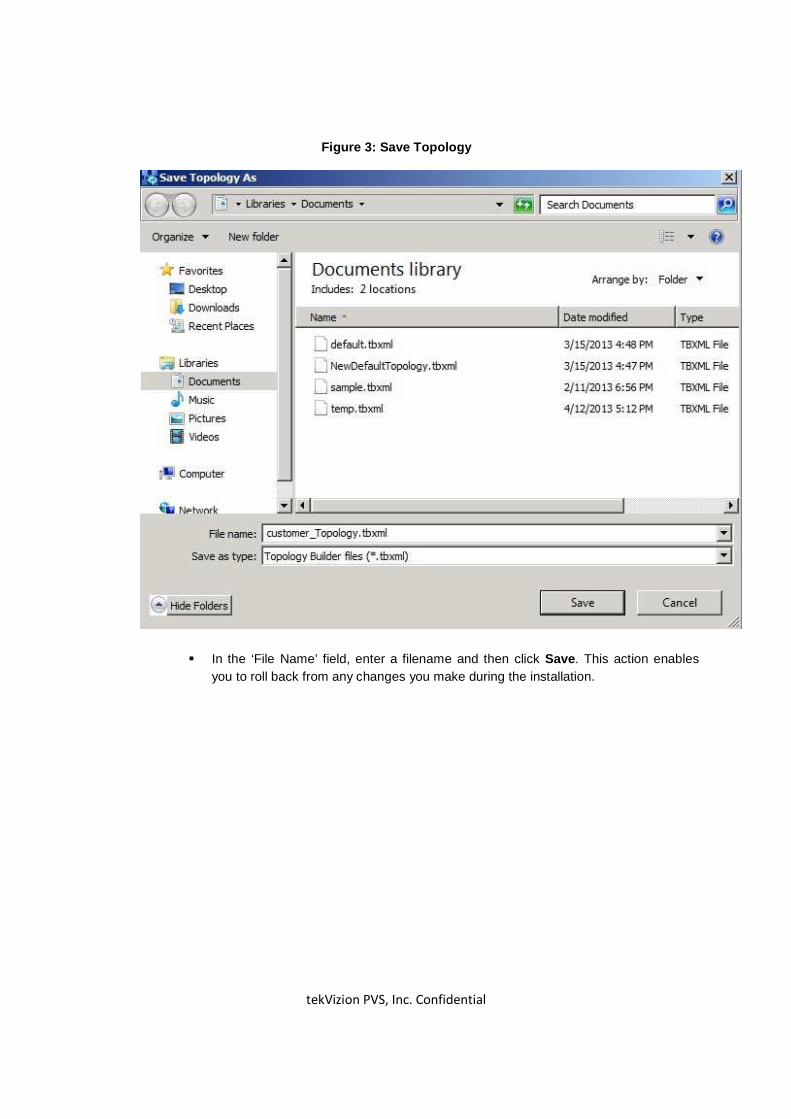
Figure 3: Save Topology
� In the ‘File Name’ field, enter a filename and then click Save. This action enables you to roll back from any changes you make during the installation.
tekVizion PVS, Inc. Confidential
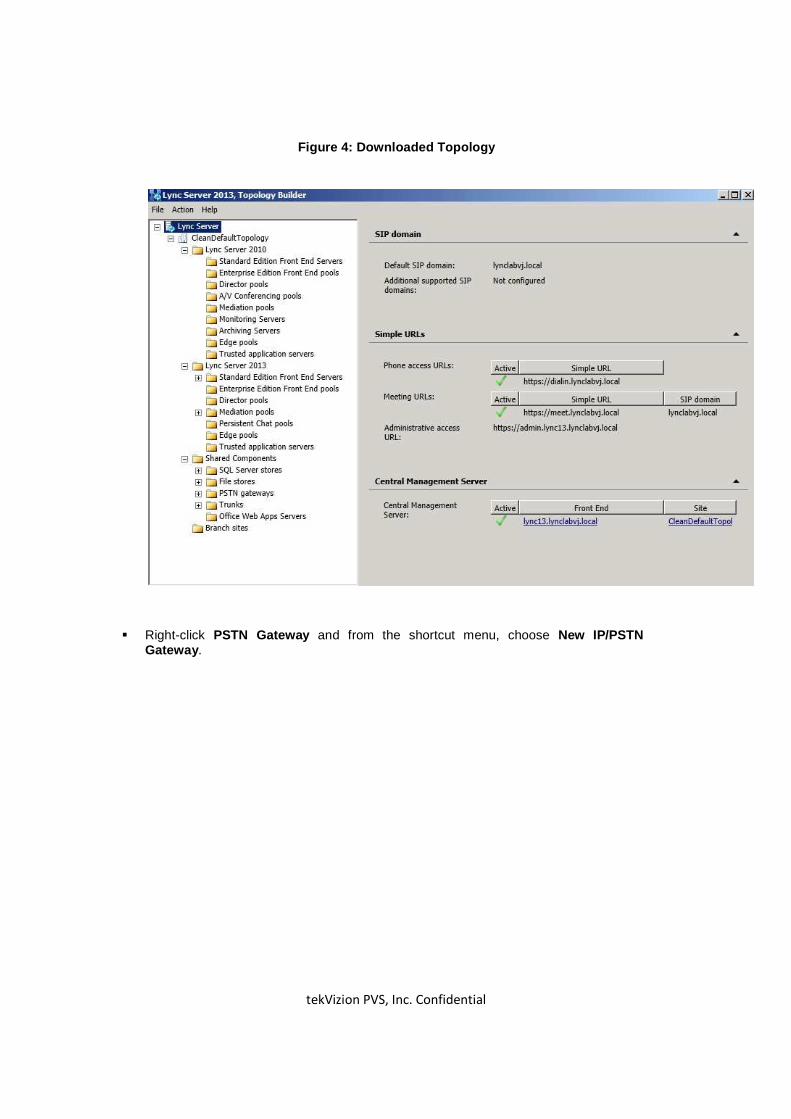
Figure 4: Downloaded Topology
� Right-click PSTN Gateway and from the shortcut menu, choose New IP/PSTN Gateway .
tekVizion PVS, Inc. Confidential
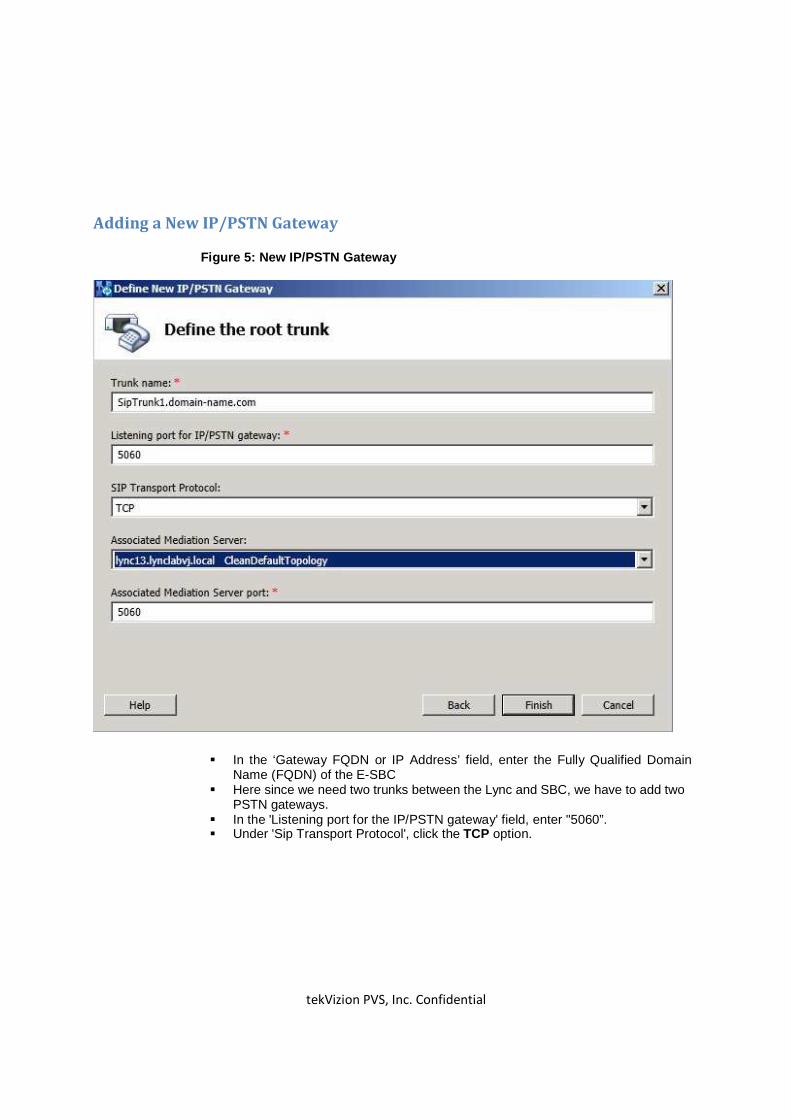
Adding a New IP/PSTN Gateway
Figure 5: New IP/PSTN Gateway
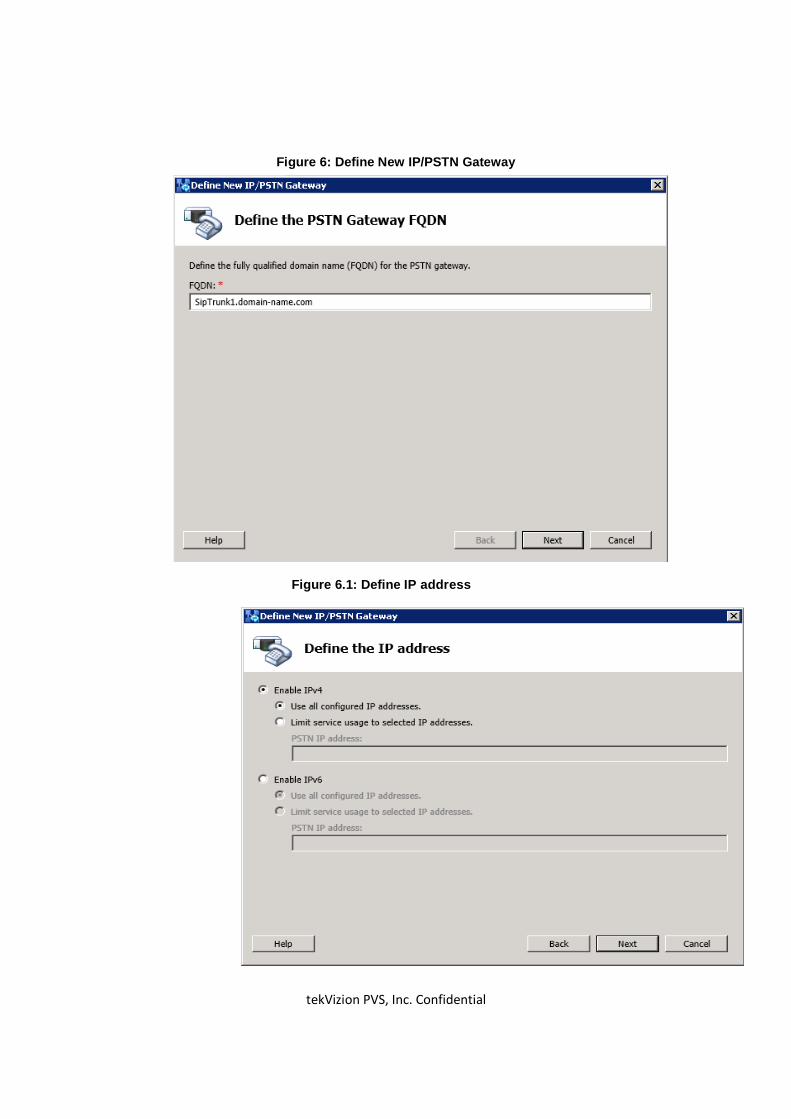
� In the ‘Gateway FQDN or IP Address’ field, enter the Fully Qualified Domain Name (FQDN) of the E-SBC
� Here since we need two trunks between the Lync and SBC, we have to add two PSTN gateways.
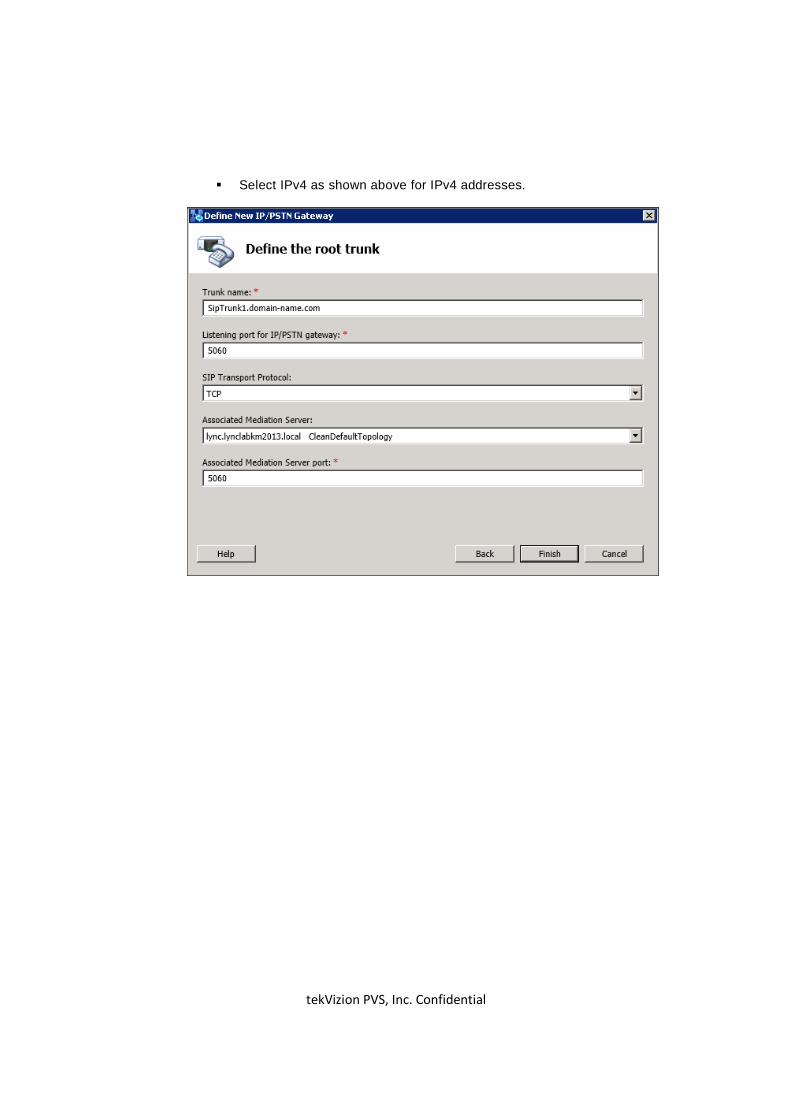
� In the 'Listening port for the IP/PSTN gateway' field, enter "5060”. � Under 'Sip Transport Protocol', click the TCP option.
tekVizion PVS, Inc. Confidential
Figure 6: Define New IP/PSTN Gateway
Figure 6.1: Define IP address
tekVizion PVS, Inc. Confidential
� Select IPv4 as shown above for IPv4 addresses.
tekVizion PVS, Inc. Confidential
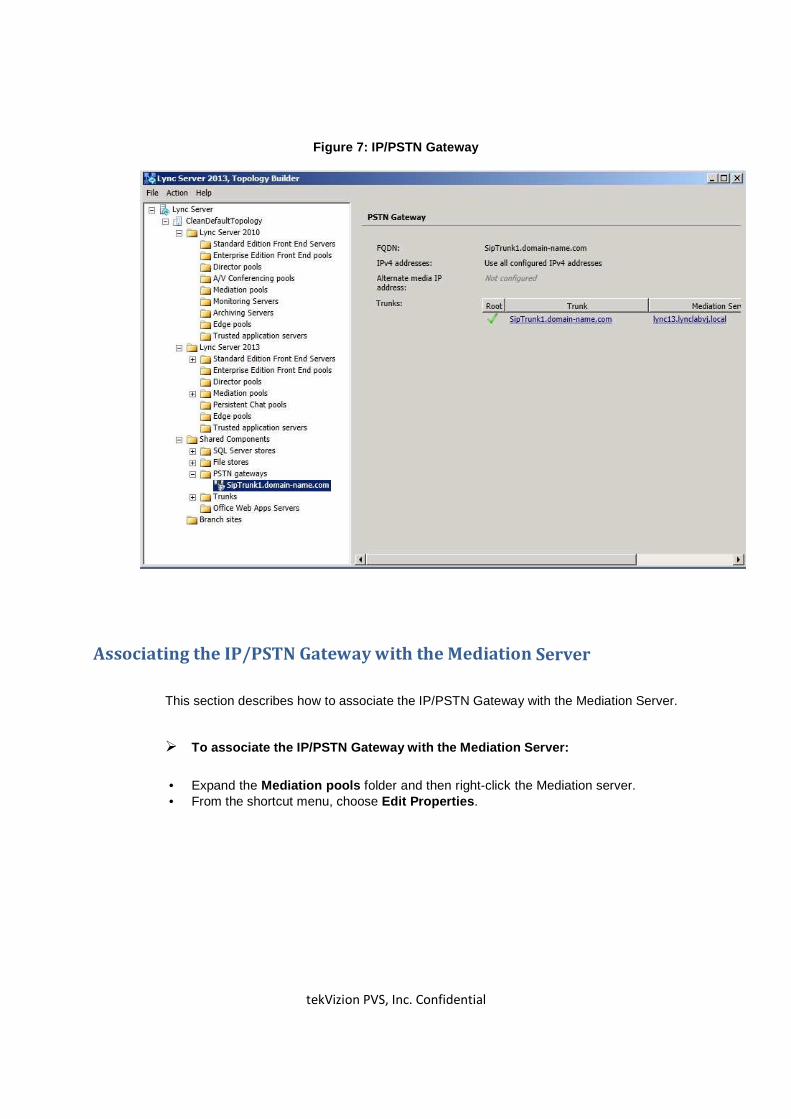
Figure 7: IP/PSTN Gateway
Associating the IP/PSTN Gateway with the Mediation Server
This section describes how to associate the IP/PSTN Gateway with the Mediation Server.
� To associate the IP/PSTN Gateway with the Mediation Server:
• Expand the Mediation pools folder and then right-click the Mediation server. • From the shortcut menu, choose Edit Properties .

tekVizion PVS, Inc. Confidential
Figure 8: Associating Mediation Server with IP/PSTN Gateway
� In the left pane, choose PSTN gateway , as shown in the figure below.
tekVizion PVS, Inc. Confidential
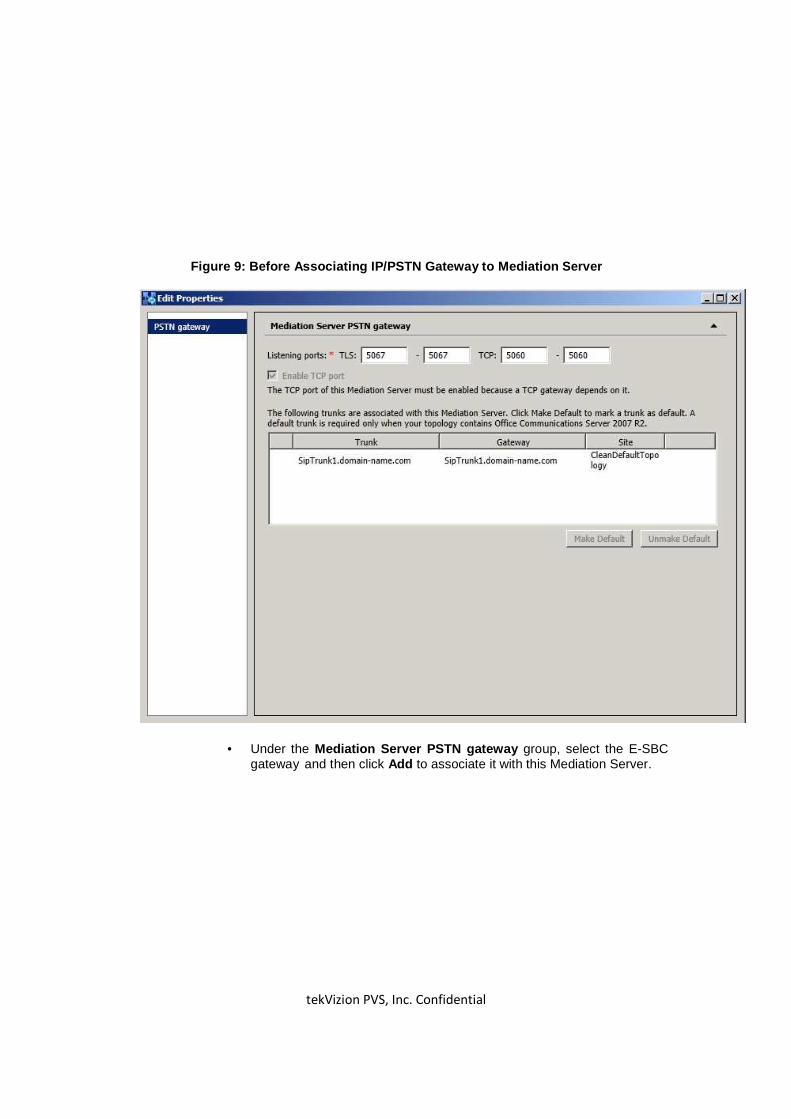
Figure 9: Before Associating IP/PSTN Gateway to Med iation Server
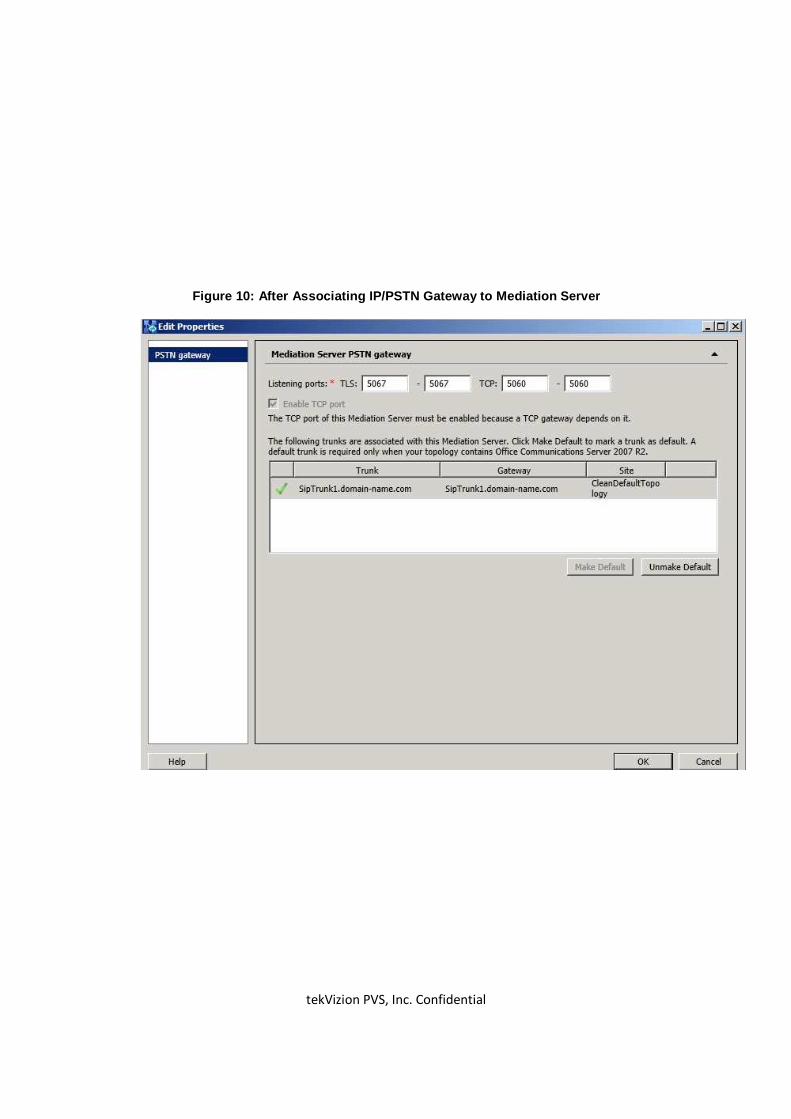
• Under the Mediation Server PSTN gateway group, select the E-SBC gateway and then click Add to associate it with this Mediation Server.
tekVizion PVS, Inc. Confidential
Figure 10: After Associating IP/PSTN Gateway to Med iation Server
tekVizion PVS, Inc. Confidential
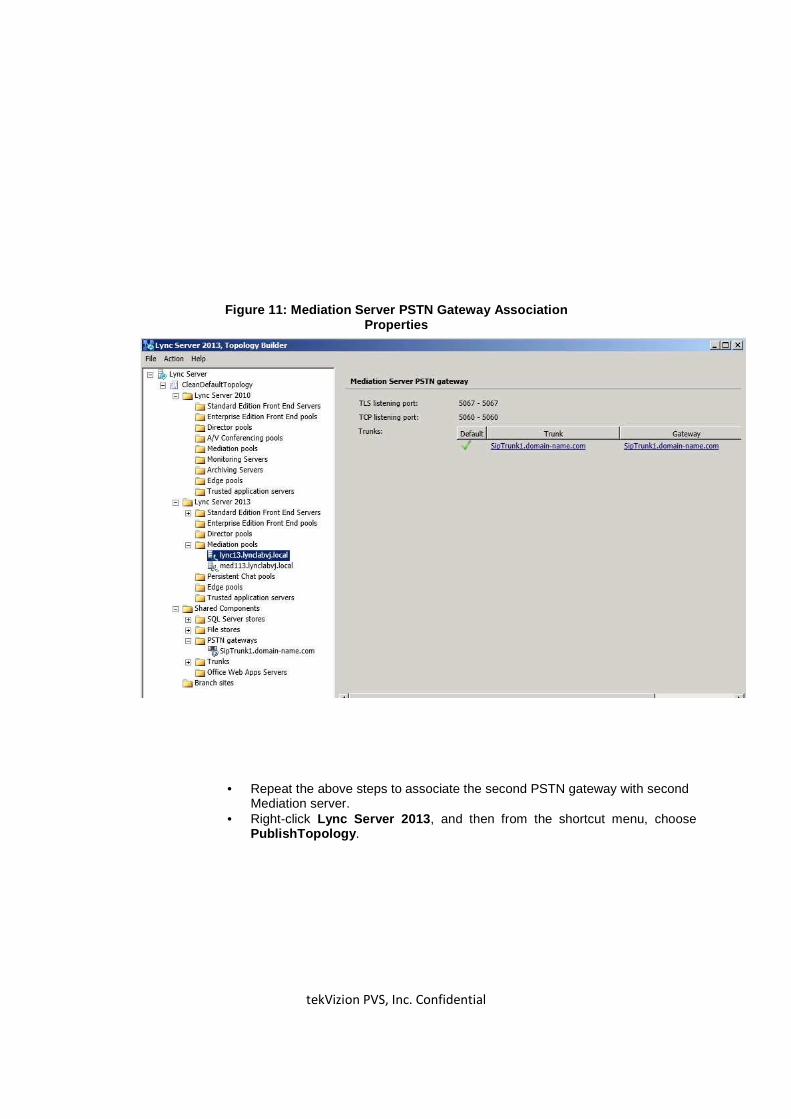
Figure 11: Mediation Server PSTN Gateway Associatio n Properties
• Repeat the above steps to associate the second PSTN gateway with second Mediation server.
• Right-click Lync Server 2013 , and then from the shortcut menu, choose PublishTopology .
tekVizion PVS, Inc. Confidential
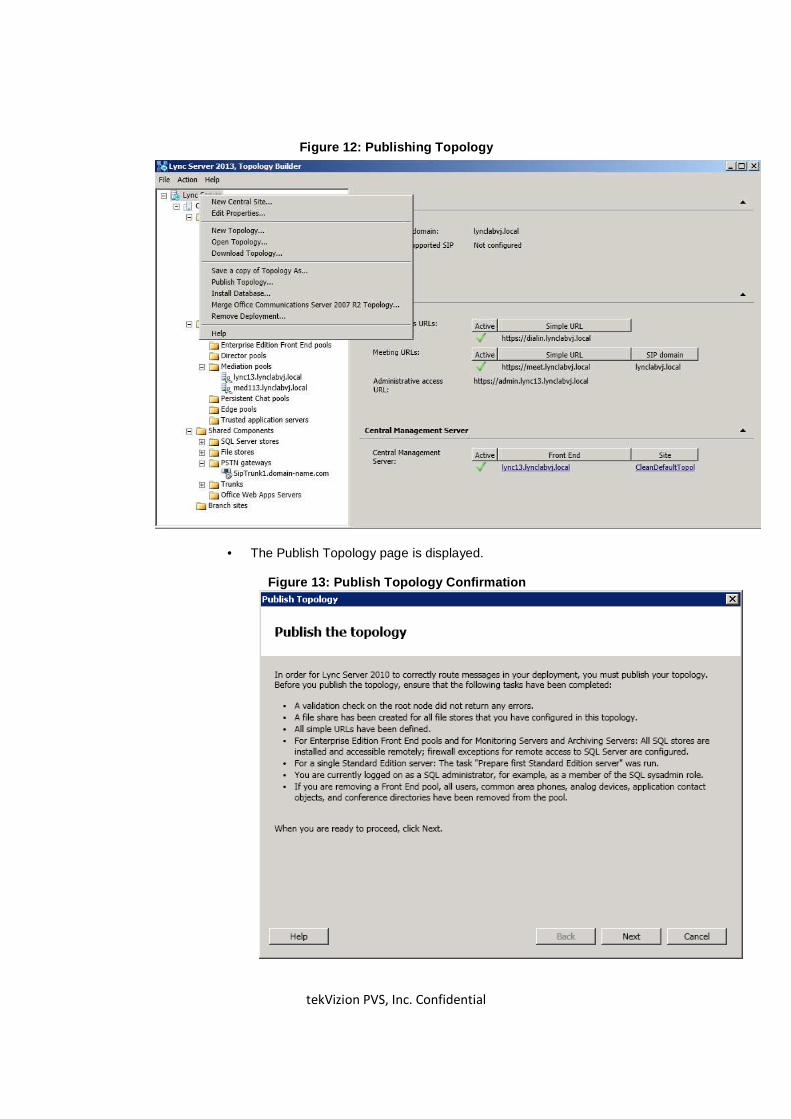
Figure 12: Publishing Topology
• The Publish Topology page is displayed.
Figure 13: Publish Topology Confirmation
tekVizion PVS, Inc. Confidential
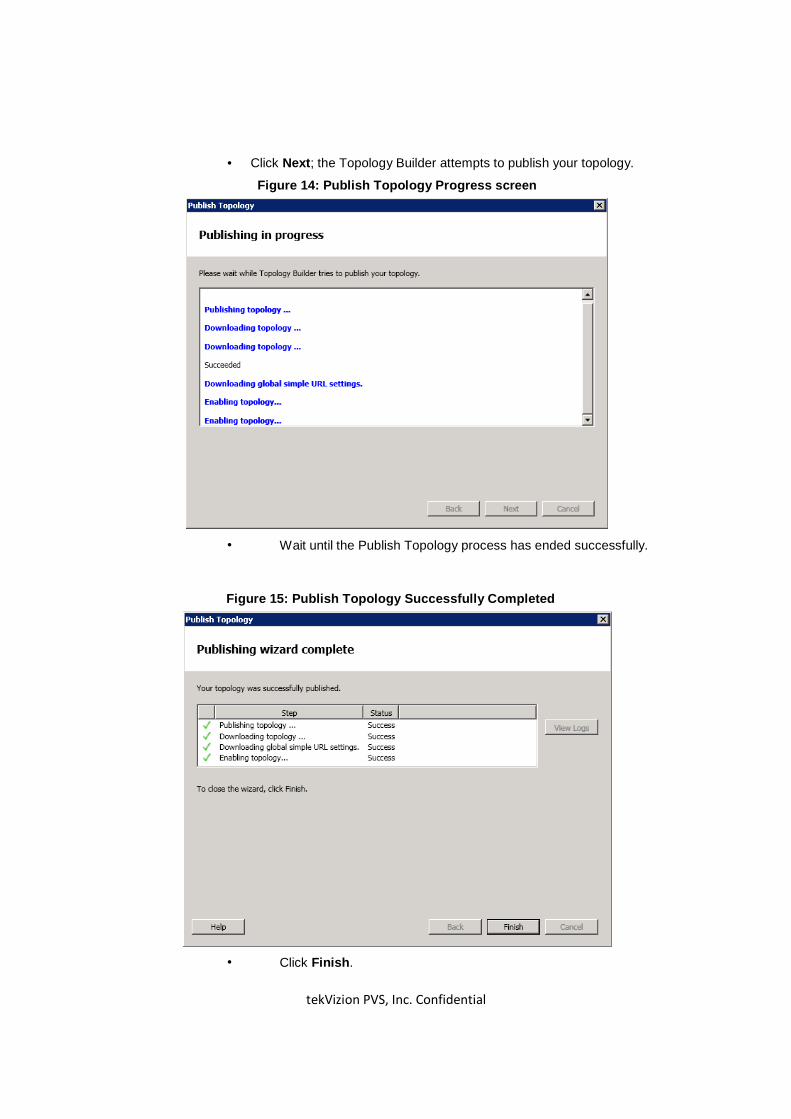
• Click Next ; the Topology Builder attempts to publish your topology.
Figure 14: Publish Topology Progress screen
• Wait until the Publish Topology process has ended successfully.
Figure 15: Publish Topology Successfully Completed
• Click Finish .
tekVizion PVS, Inc. Confidential
Configuring the “Voice Routing” on Lync Server 2013
Adding a Route: This section describes how to configure a Route on Lync Server 2013 and associate it with the E-SBC PSTN gateway.
� To configure the route on Lync Server 2013:
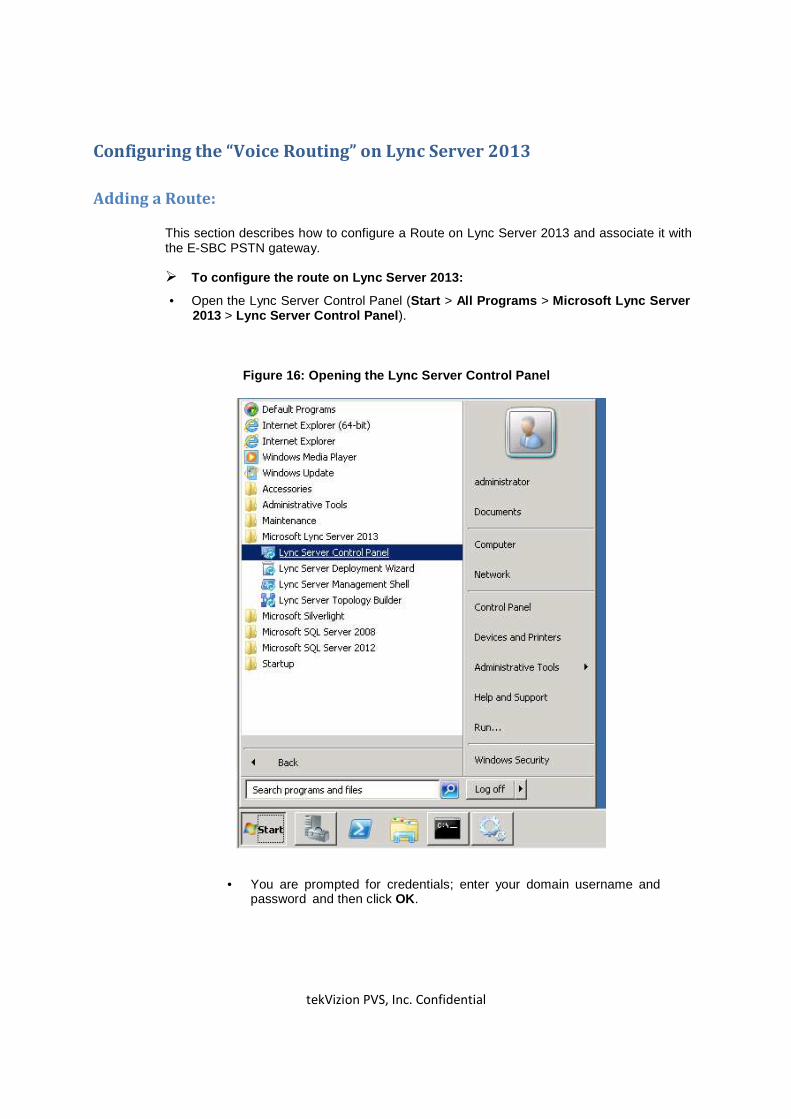
• Open the Lync Server Control Panel (Start > All Programs > Microsoft Lync Server 2013 > Lync Server Control Panel ).
Figure 16: Opening the Lync Server Control Panel
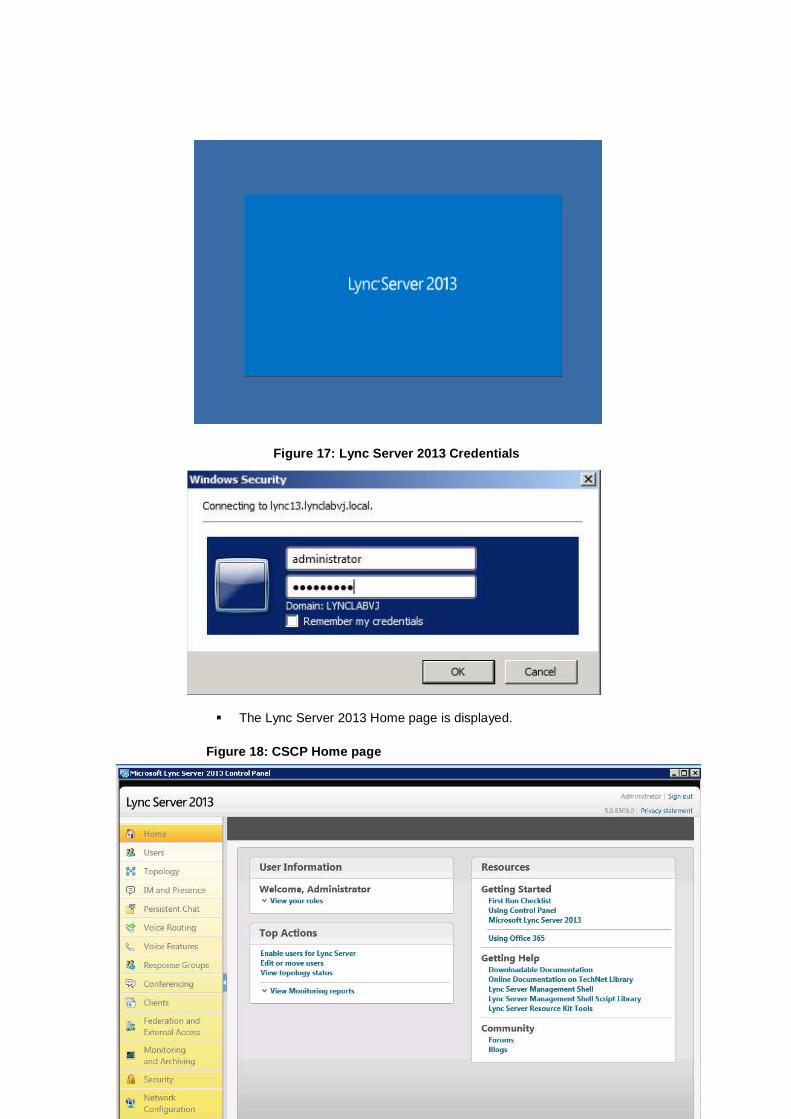
• You are prompted for credentials; enter your domain username and password and then click OK.
tekVizion PVS, Inc. Confidential
Figure 17: Lync Server 2013 Credentials
� The Lync Server 2013 Home page is displayed.
Figure 18: CSCP Home page
tekVizion PVS, Inc. Confidential
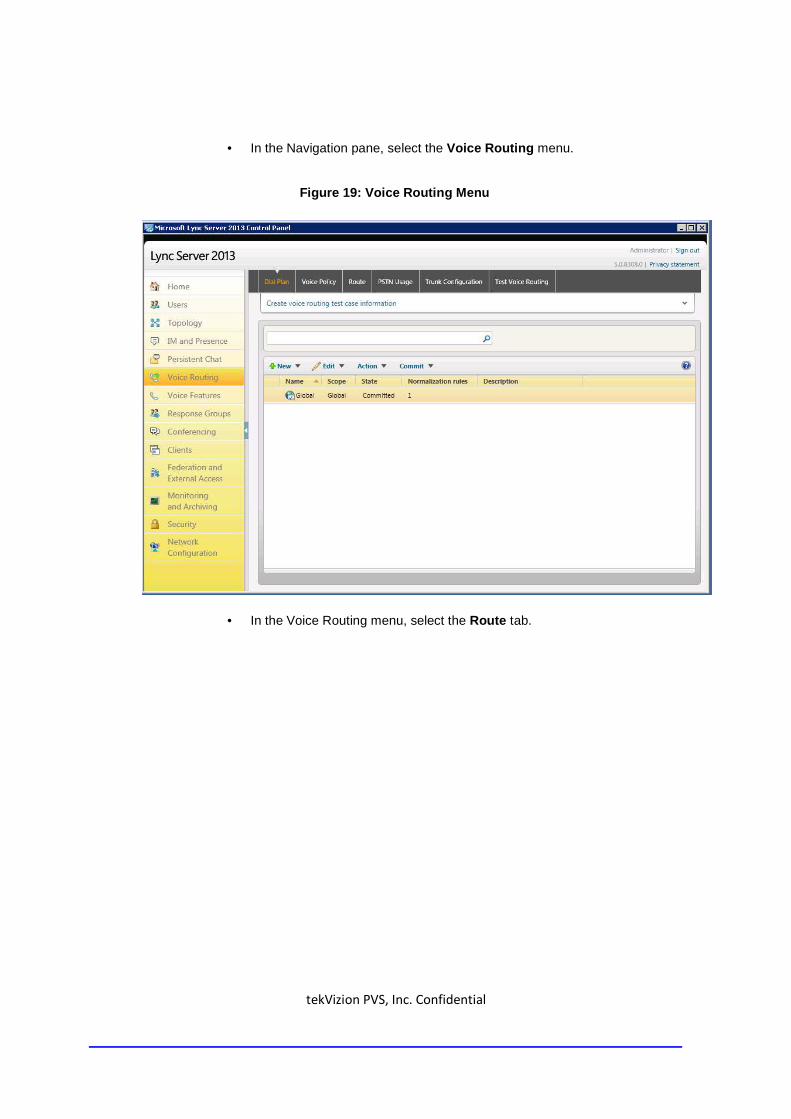
• In the Navigation pane, select the Voice Routing menu.
Figure 19: Voice Routing Menu
• In the Voice Routing menu, select the Route tab.
tekVizion PVS, Inc. Confidential
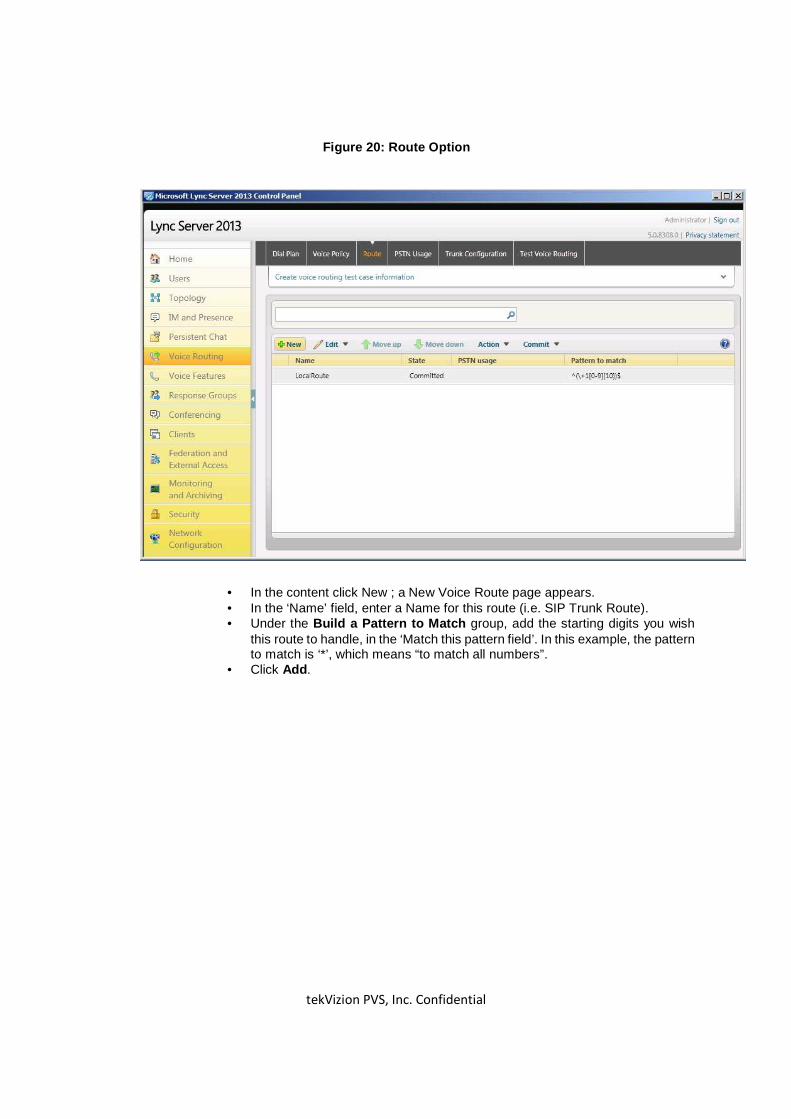
Figure 20: Route Option
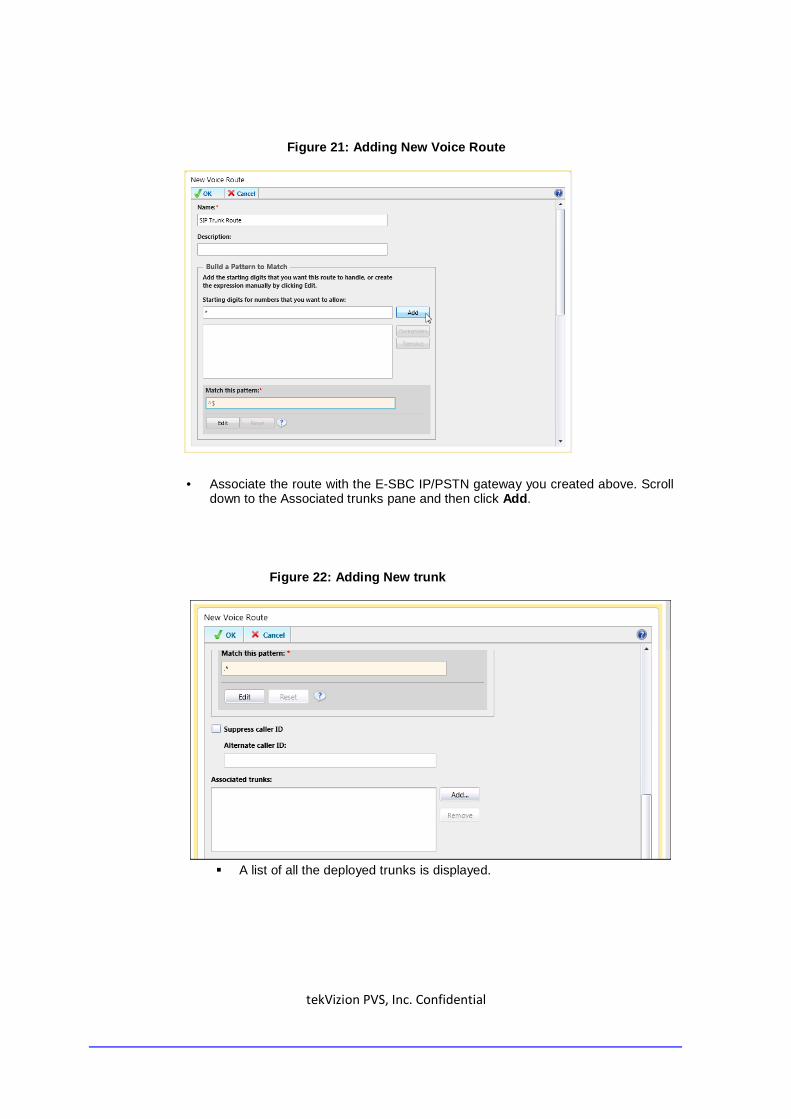
• In the content click New ; a New Voice Route page appears. • In the ‘Name’ field, enter a Name for this route (i.e. SIP Trunk Route). • Under the Build a Pattern to Match group, add the starting digits you wish
this route to handle, in the ‘Match this pattern field’. In this example, the pattern to match is ‘*’, which means “to match all numbers”.
• Click Add .
tekVizion PVS, Inc. Confidential
Figure 21: Adding New Voice Route
• Associate the route with the E-SBC IP/PSTN gateway you created above. Scroll down to the Associated trunks pane and then click Add .
Figure 22: Adding New trunk
� A list of all the deployed trunks is displayed.
tekVizion PVS, Inc. Confidential
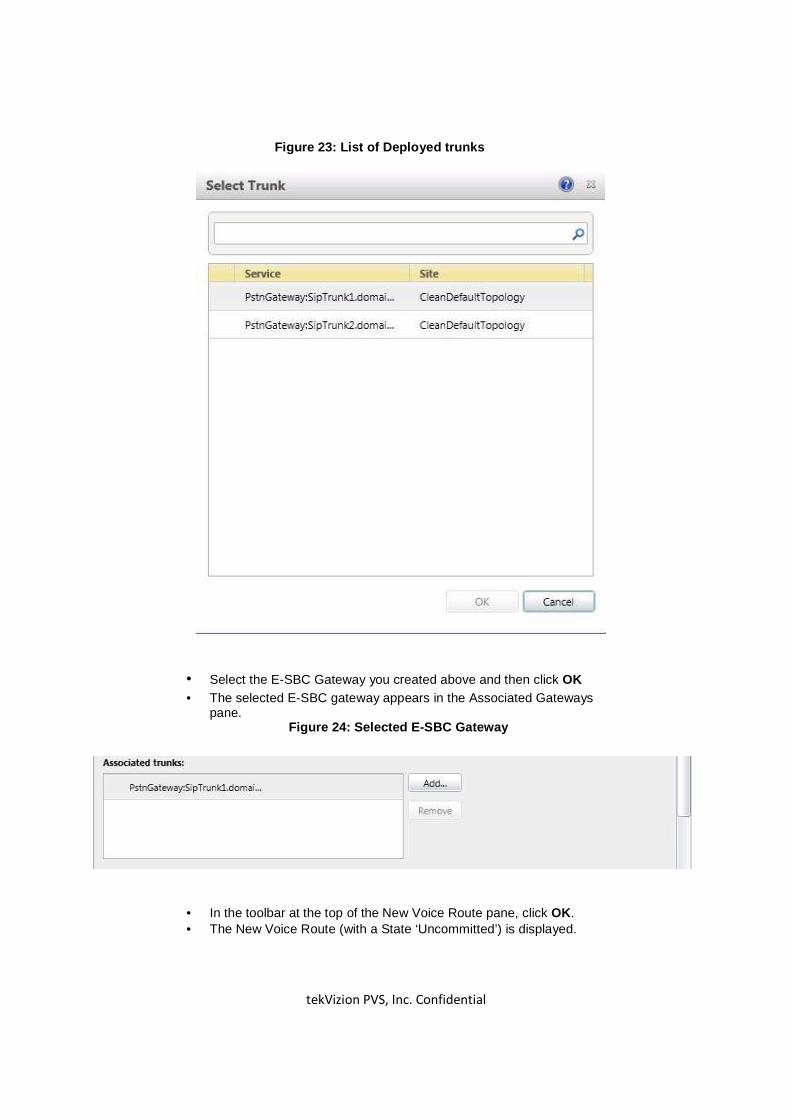
Figure 23: List of Deployed trunks
• Select the E-SBC Gateway you created above and then click OK
• The selected E-SBC gateway appears in the Associated Gateways pane. Figure 24: Selected E-SBC Gateway
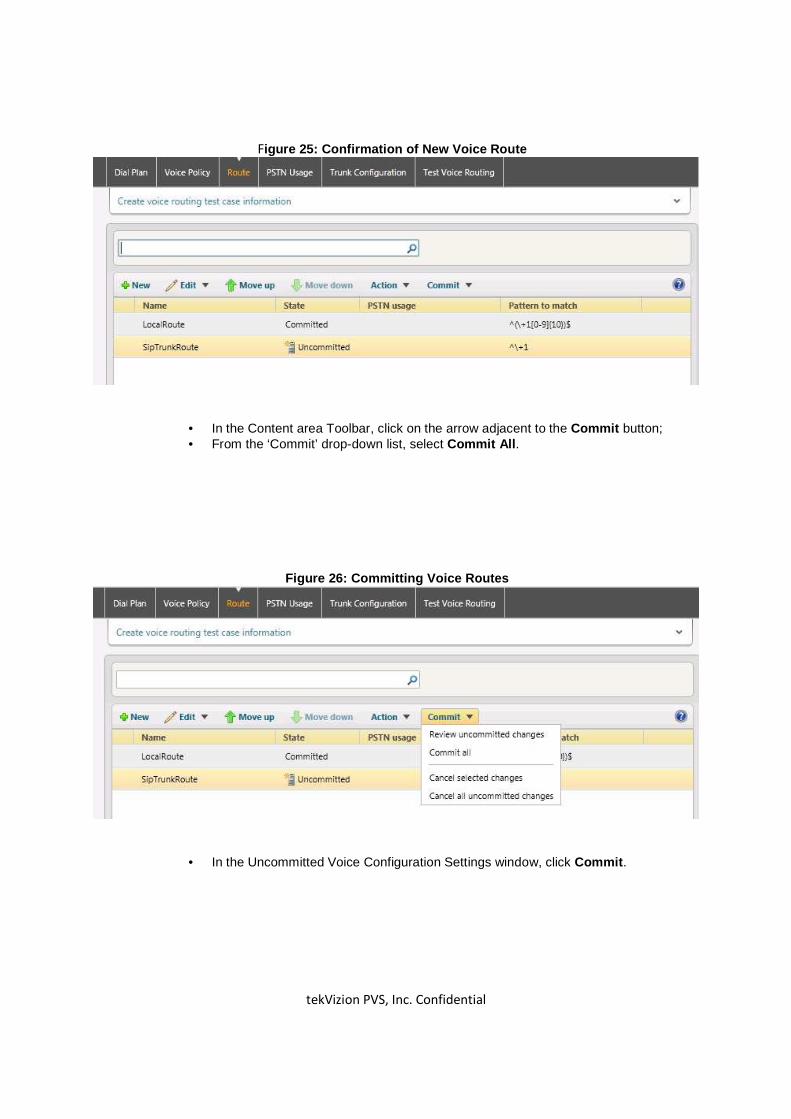
• In the toolbar at the top of the New Voice Route pane, click OK. • The New Voice Route (with a State ‘Uncommitted’) is displayed.
tekVizion PVS, Inc. Confidential
Figure 25: Confirmation of New Voice Route
• In the Content area Toolbar, click on the arrow adjacent to the Commit button; • From the ‘Commit’ drop-down list, select Commit All .
Figure 26: Committing Voice Routes
• In the Uncommitted Voice Configuration Settings window, click Commit .
tekVizion PVS, Inc. Confidential
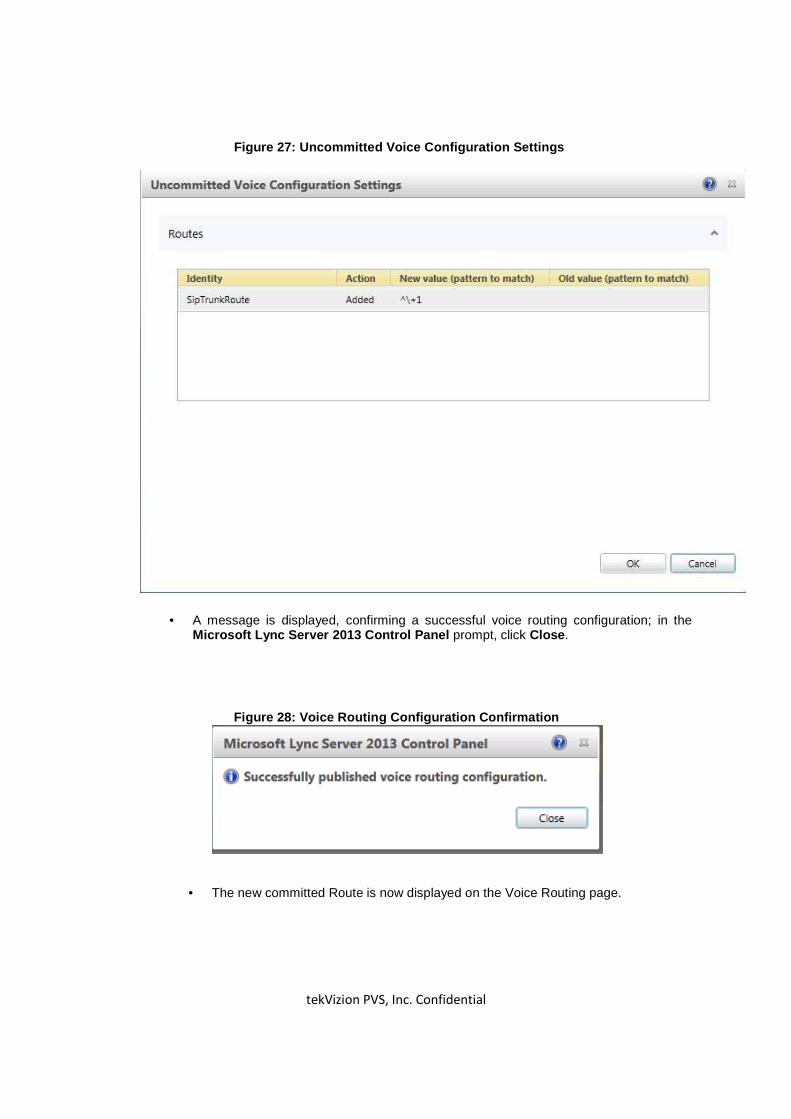
Figure 27: Uncommitted Voice Configuration Settings
• A message is displayed, confirming a successful voice routing configuration; in the Microsoft Lync Server 2013 Control Panel prompt, click Close .
Figure 28: Voice Routing Configuration Confirmation
• The new committed Route is now displayed on the Voice Routing page.
tekVizion PVS, Inc. Confidential
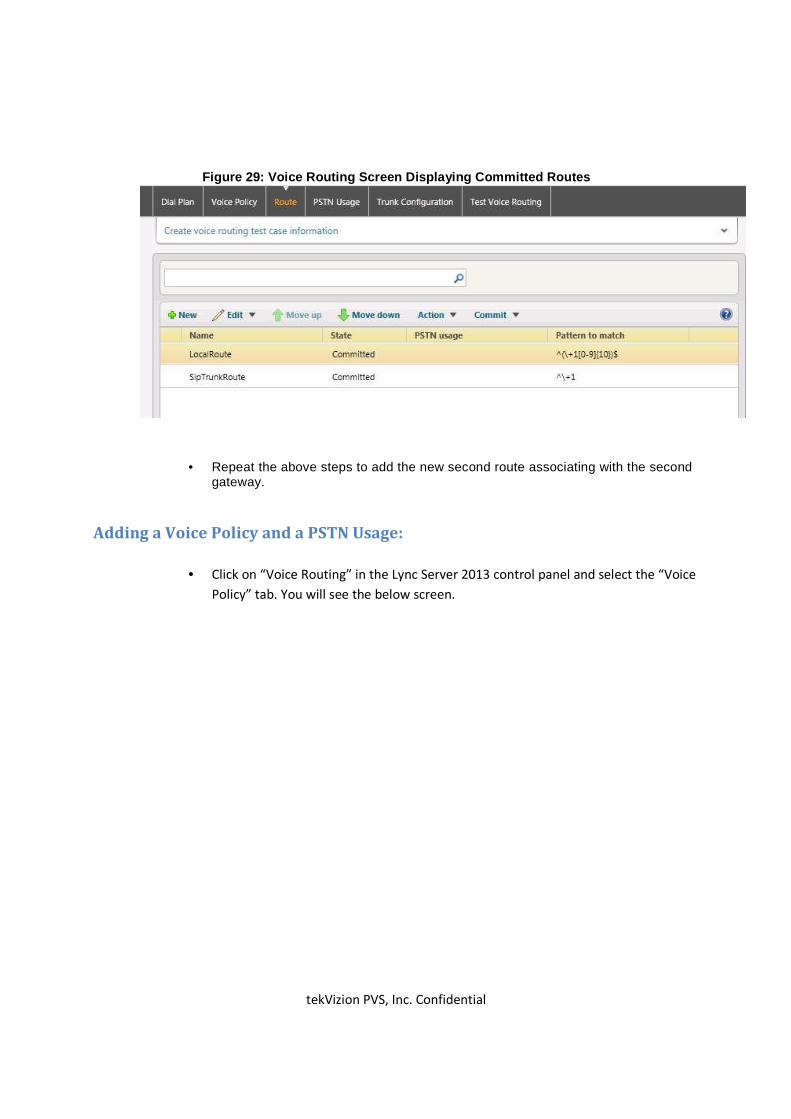
Figure 29: Voice Routing Screen Displaying Committe d Routes
• Repeat the above steps to add the new second route associating with the second gateway.
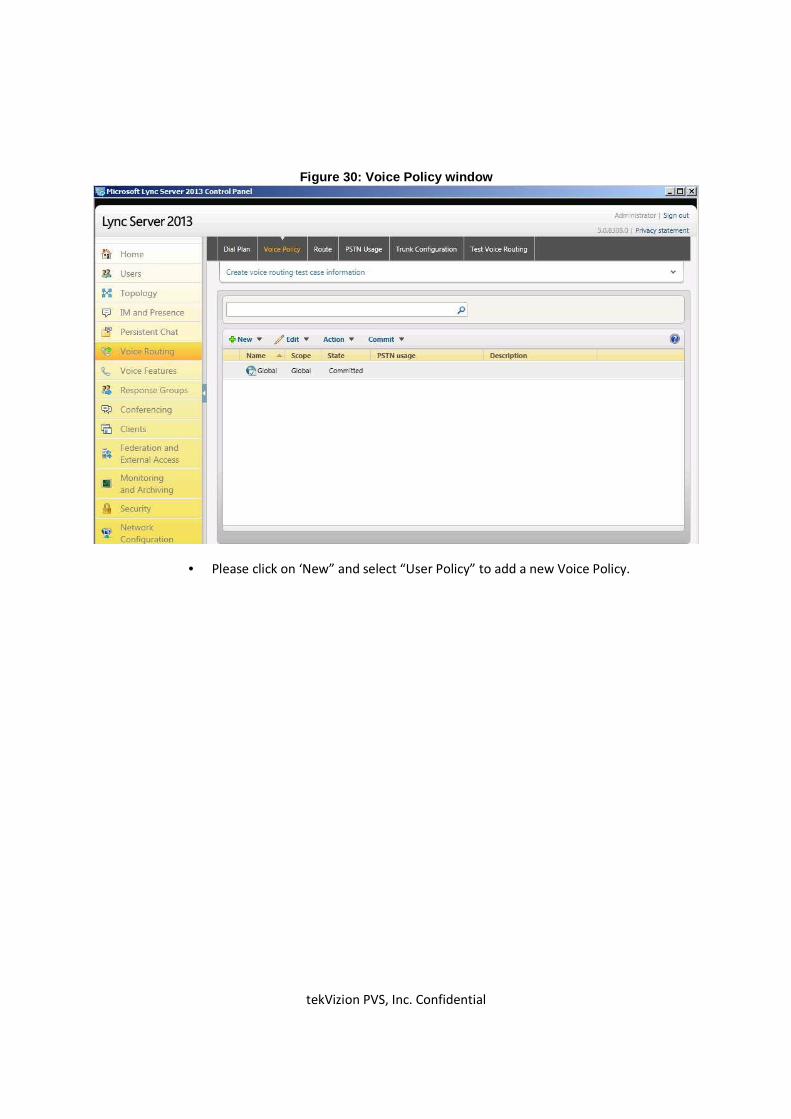
Adding a Voice Policy and a PSTN Usage:
• Click on “Voice Routing” in the Lync Server 2013 control panel and select the “Voice
Policy” tab. You will see the below screen.
tekVizion PVS, Inc. Confidential
Figure 30: Voice Policy window
• Please click on ‘New” and select “User Policy” to add a new Voice Policy.
tekVizion PVS, Inc. Confidential
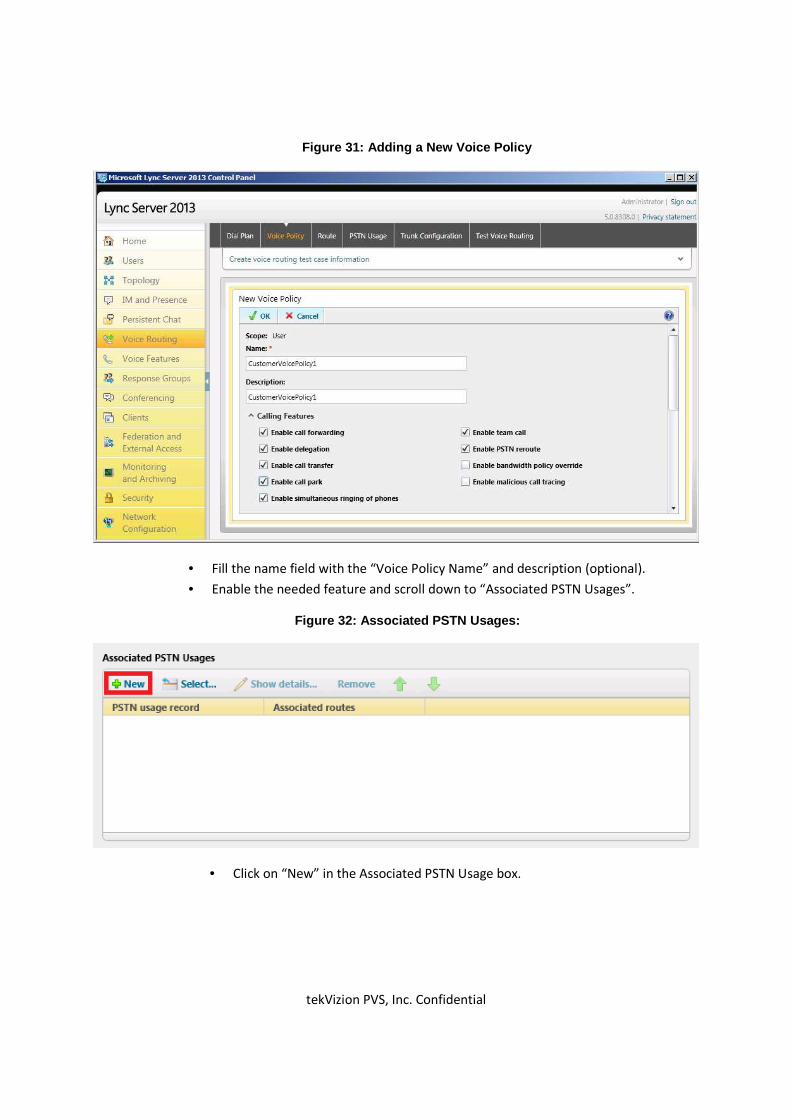
Figure 31: Adding a New Voice Policy
• Fill the name field with the “Voice Policy Name” and description (optional).
• Enable the needed feature and scroll down to “Associated PSTN Usages”.
Figure 32: Associated PSTN Usages:
• Click on “New” in the Associated PSTN Usage box.
tekVizion PVS, Inc. Confidential
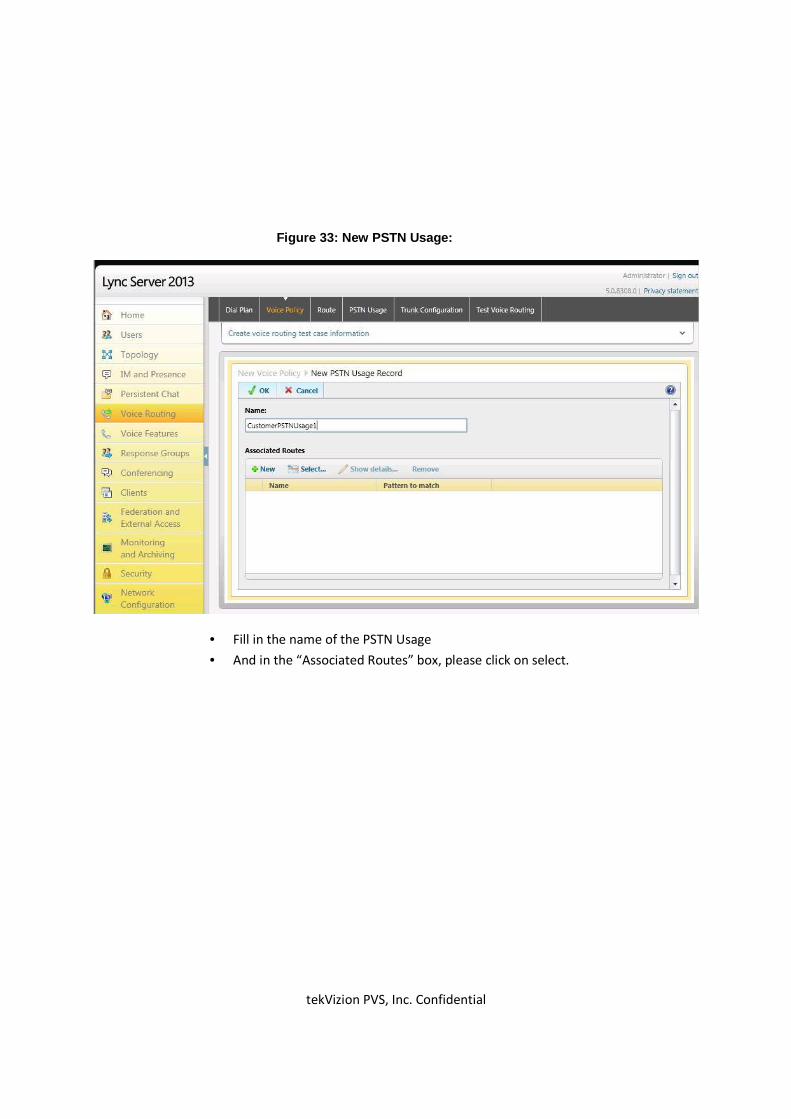
Figure 33: New PSTN Usage:
• Fill in the name of the PSTN Usage
• And in the “Associated Routes” box, please click on select.
tekVizion PVS, Inc. Confidential
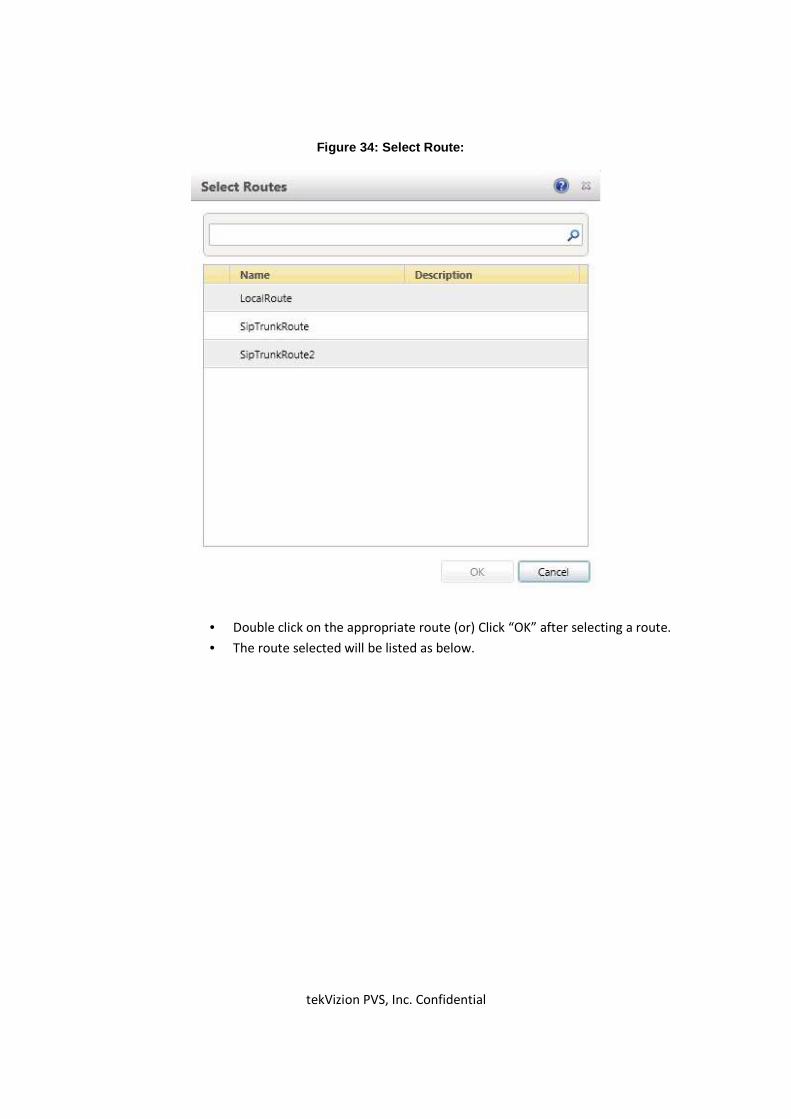
Figure 34: Select Route:
• Double click on the appropriate route (or) Click “OK” after selecting a route.
• The route selected will be listed as below.
tekVizion PVS, Inc. Confidential
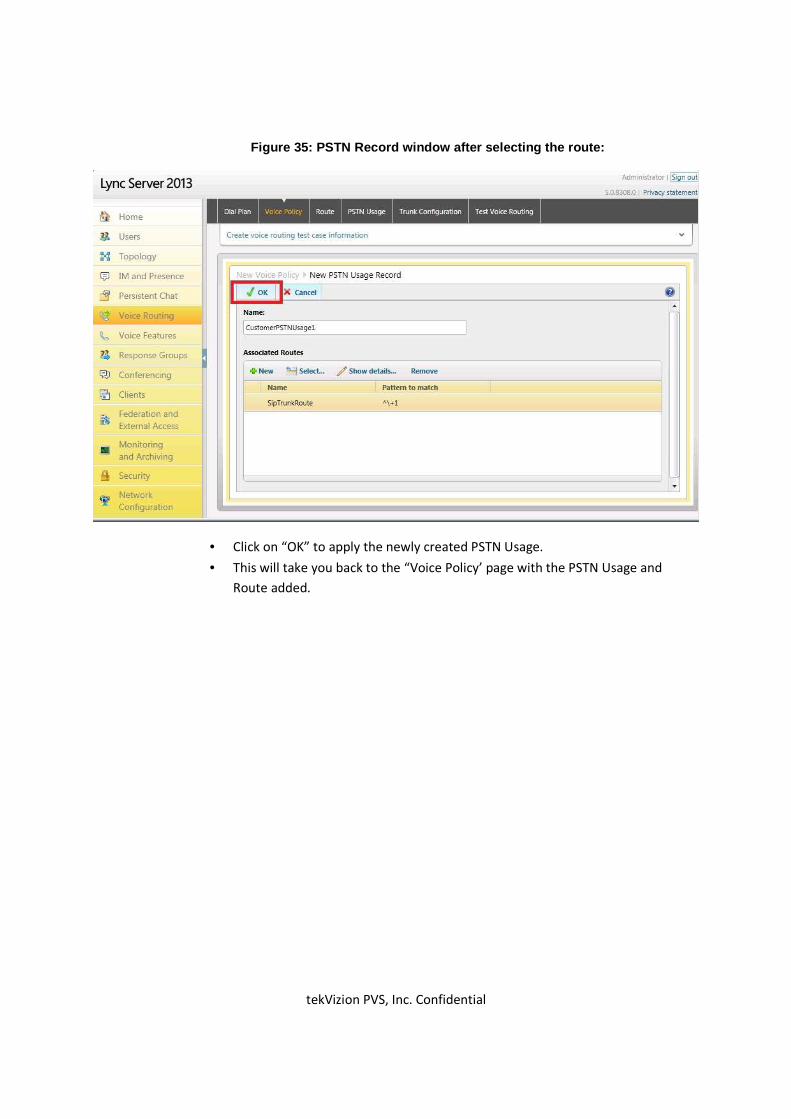
Figure 3 5: PSTN Record window after selecting the route:
• Click on “OK” to apply the newly created PSTN Usage.
• This will take you back to the “Voice Policy’ page with the PSTN Usage and
Route added.
tekVizion PVS, Inc. Confidential
Figure 36: ‘Voice Policy” config uration page with PSTN Usage and Route Selected:
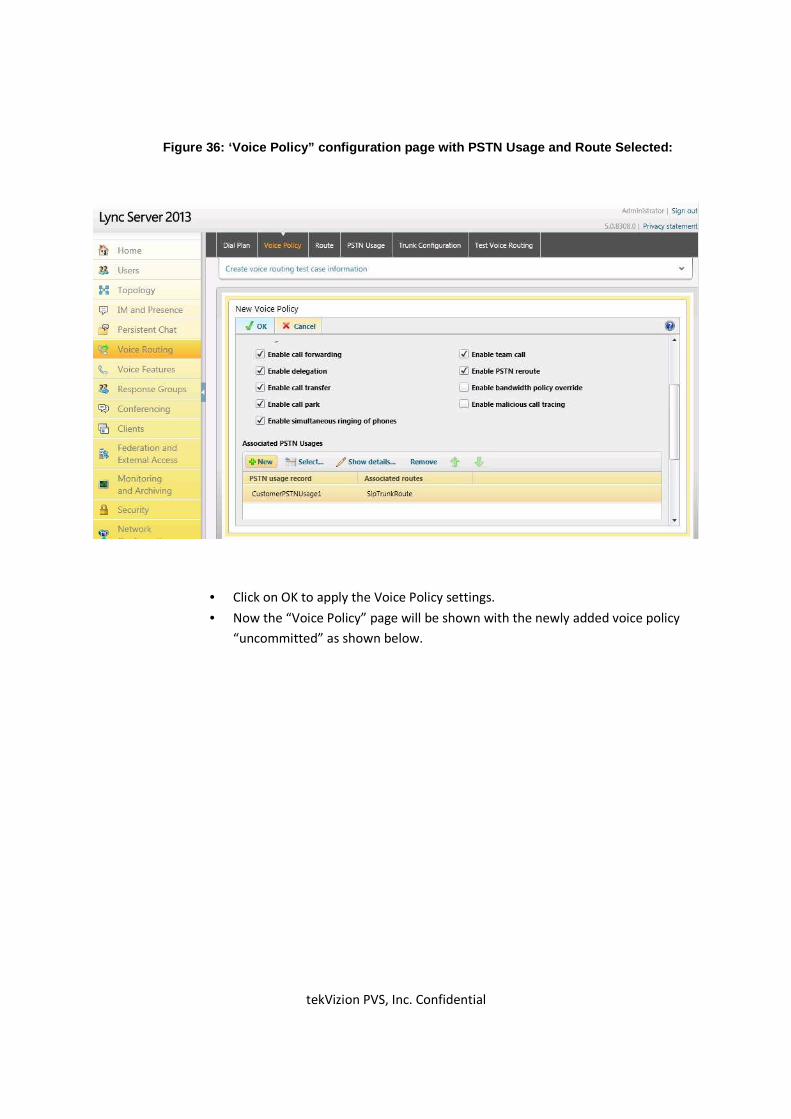
• Click on OK to apply the Voice Policy settings.
• Now the “Voice Policy” page will be shown with the newly added voice policy
“uncommitted” as shown below.
tekVizion PVS, Inc. Confidential
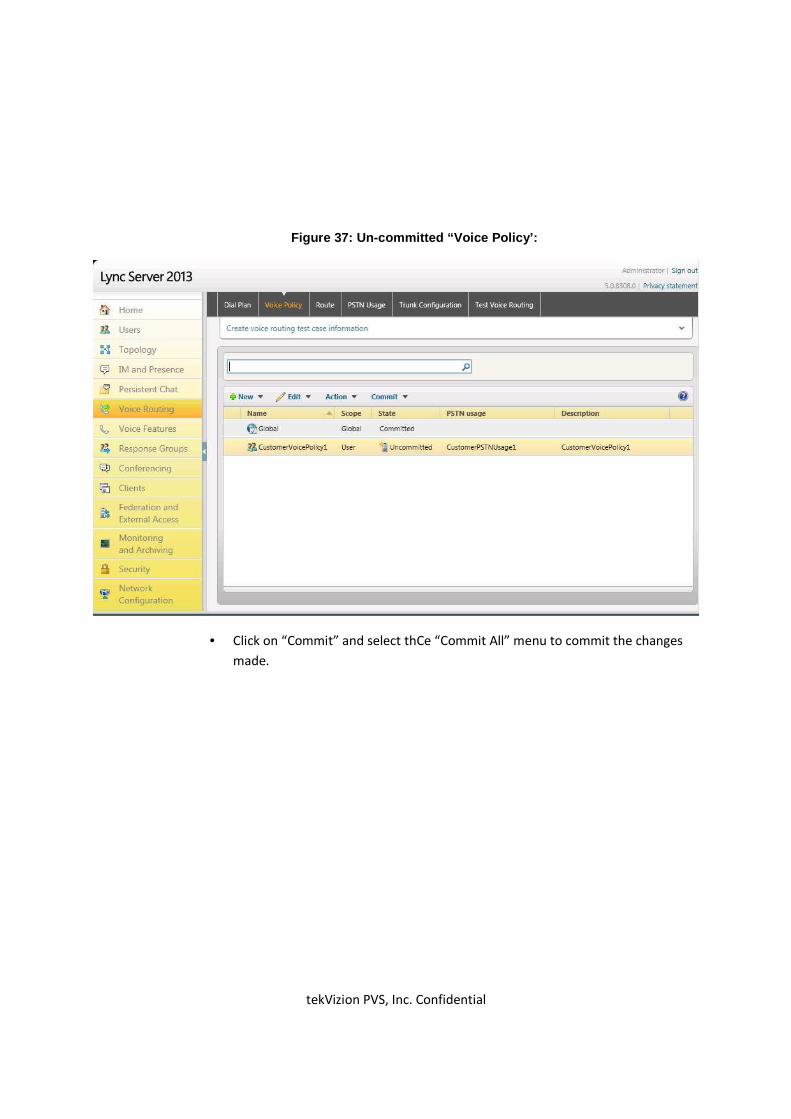
Figure 37: Un-committed “Voice Policy’:
• Click on “Commit” and select thCe “Commit All” menu to commit the changes
made.
tekVizion PVS, Inc. Confidential
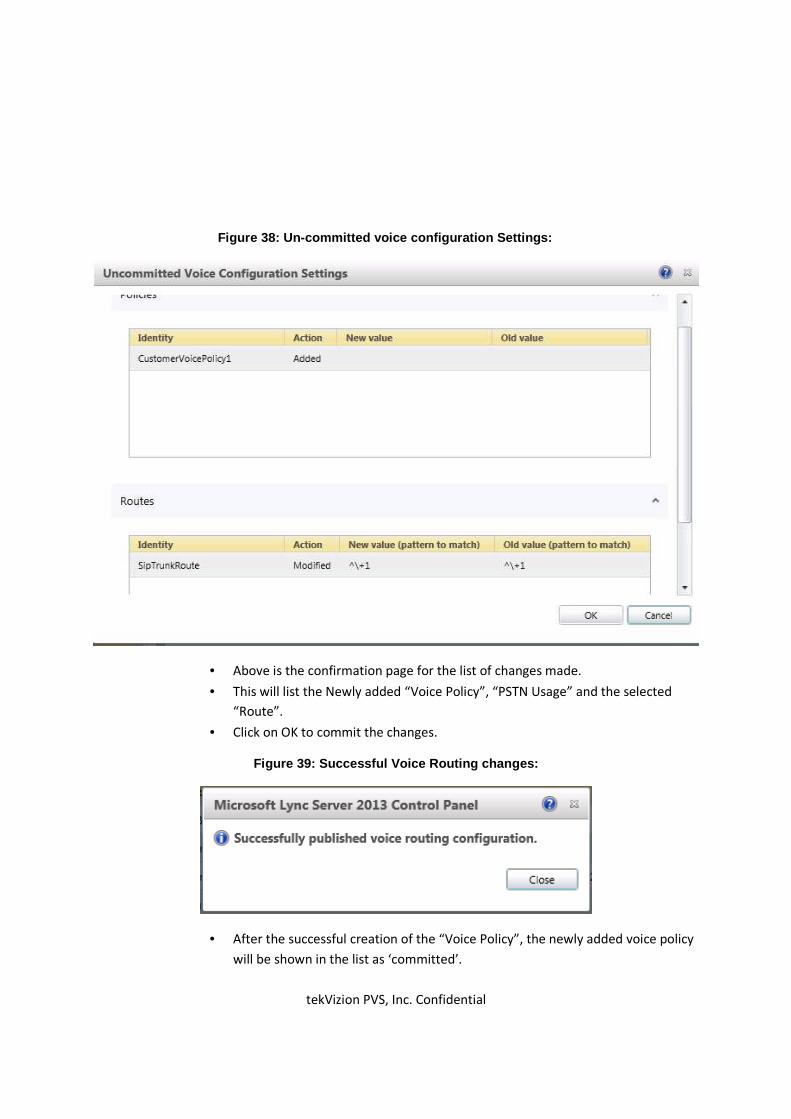
Figure 38: Un-com mitted voice configuration Settings:
• Above is the confirmation page for the list of changes made.
• This will list the Newly added “Voice Policy”, “PSTN Usage” and the selected
“Route”.
• Click on OK to commit the changes.
Figure 39: Successful Voice Routing changes:
• After the successful creation of the “Voice Policy”, the newly added voice policy
will be shown in the list as ‘committed’.
tekVizion PVS, Inc. Confidential
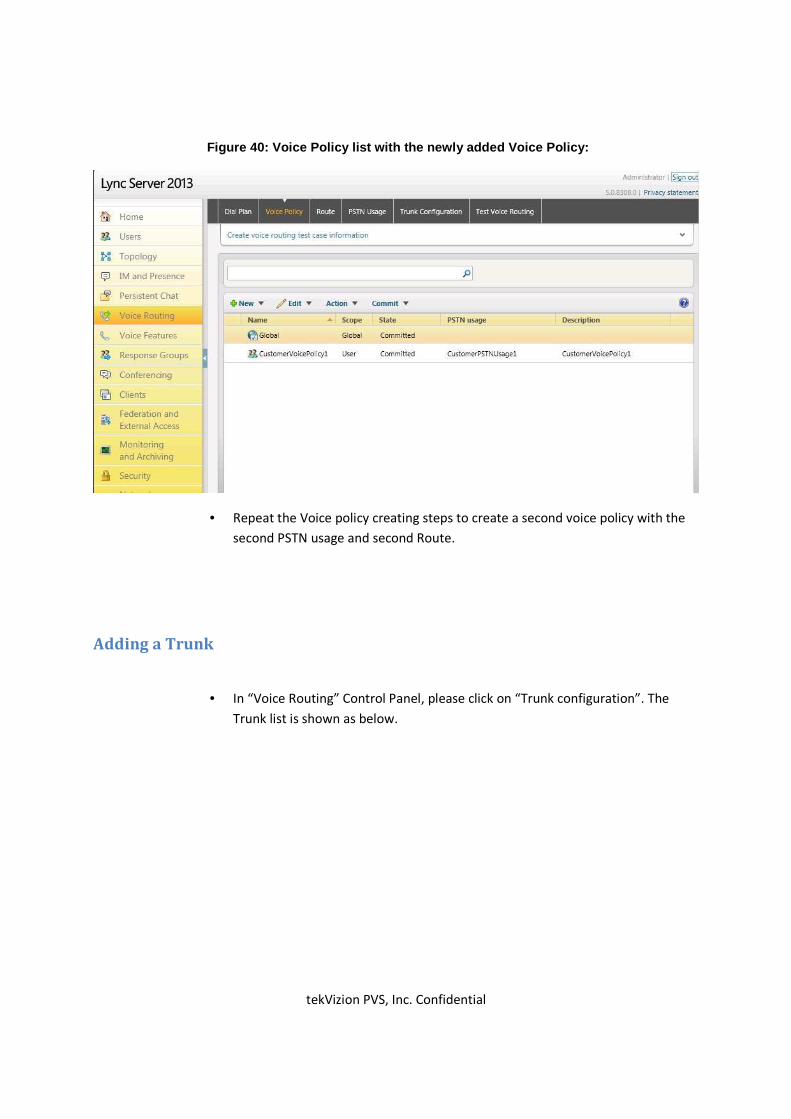
Figure 40: Voice Pol icy list with the newly added Voice Policy:
• Repeat the Voice policy creating steps to create a second voice policy with the
second PSTN usage and second Route.
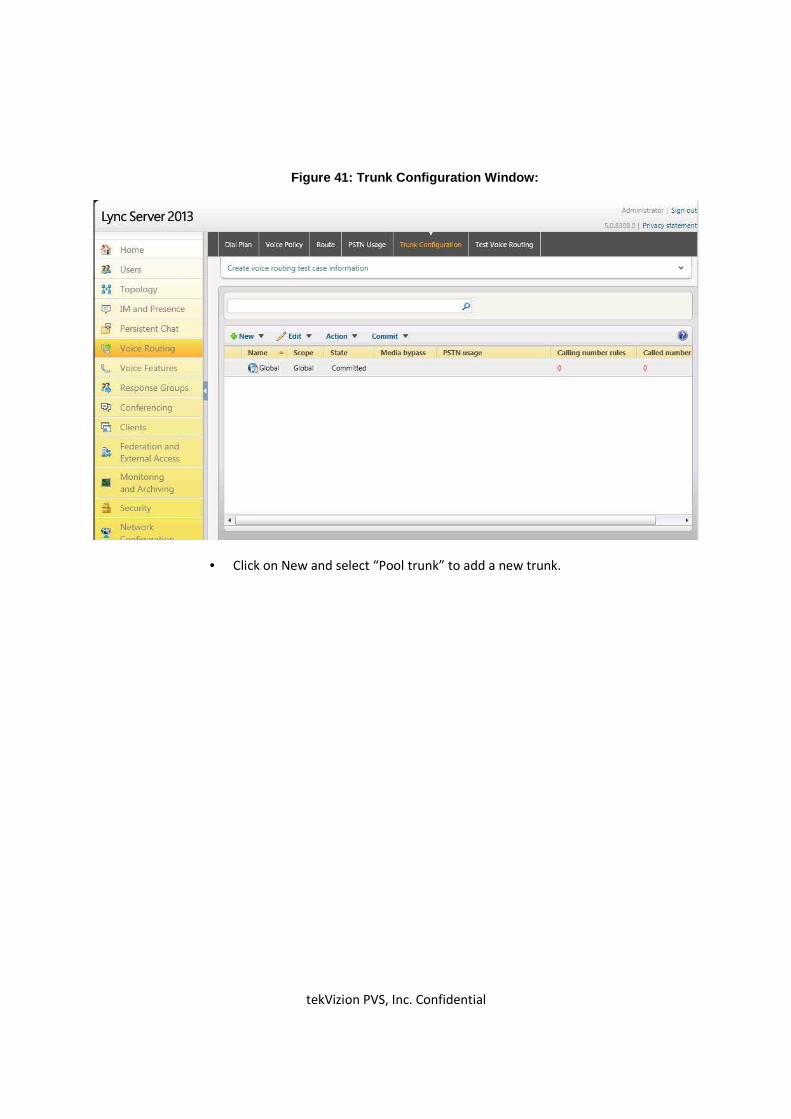
Adding a Trunk
• In “Voice Routing” Control Panel, please click on “Trunk configuration”. The
Trunk list is shown as below.
tekVizion PVS, Inc. Confidential
Figure 41: Trunk Configuration Window:
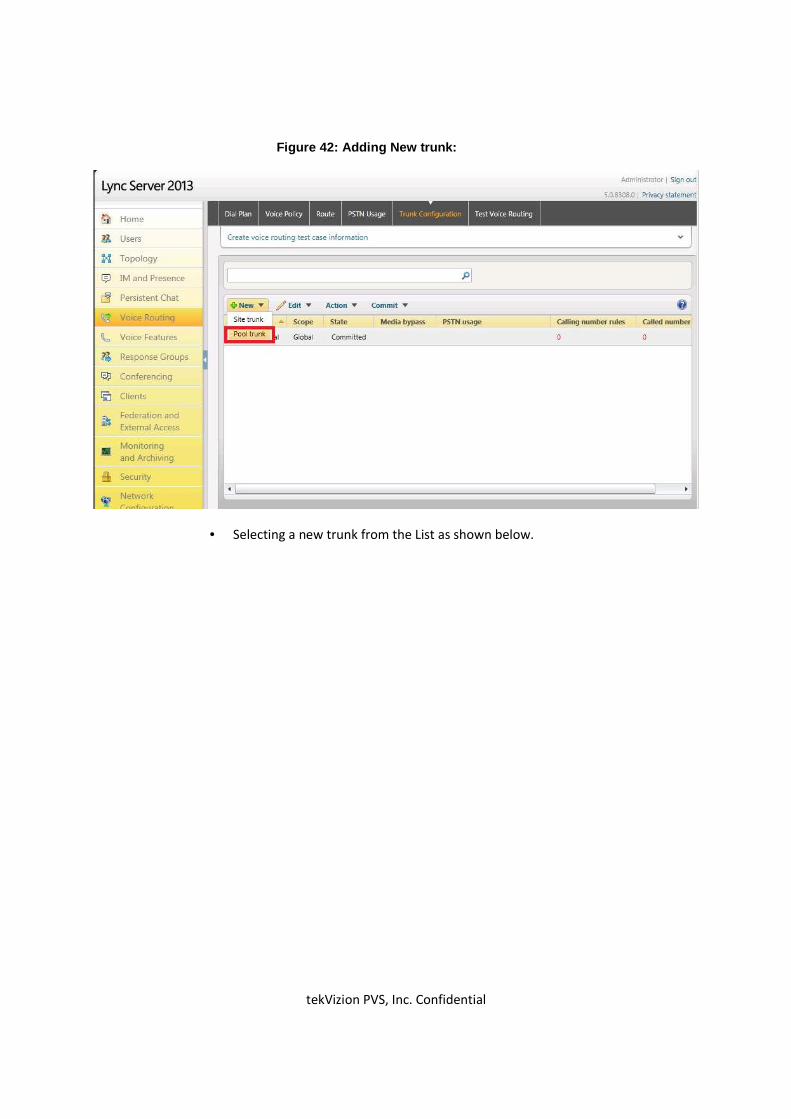
• Click on New and select “Pool trunk” to add a new trunk.
tekVizion PVS, Inc. Confidential
Figure 42: Adding New trunk:
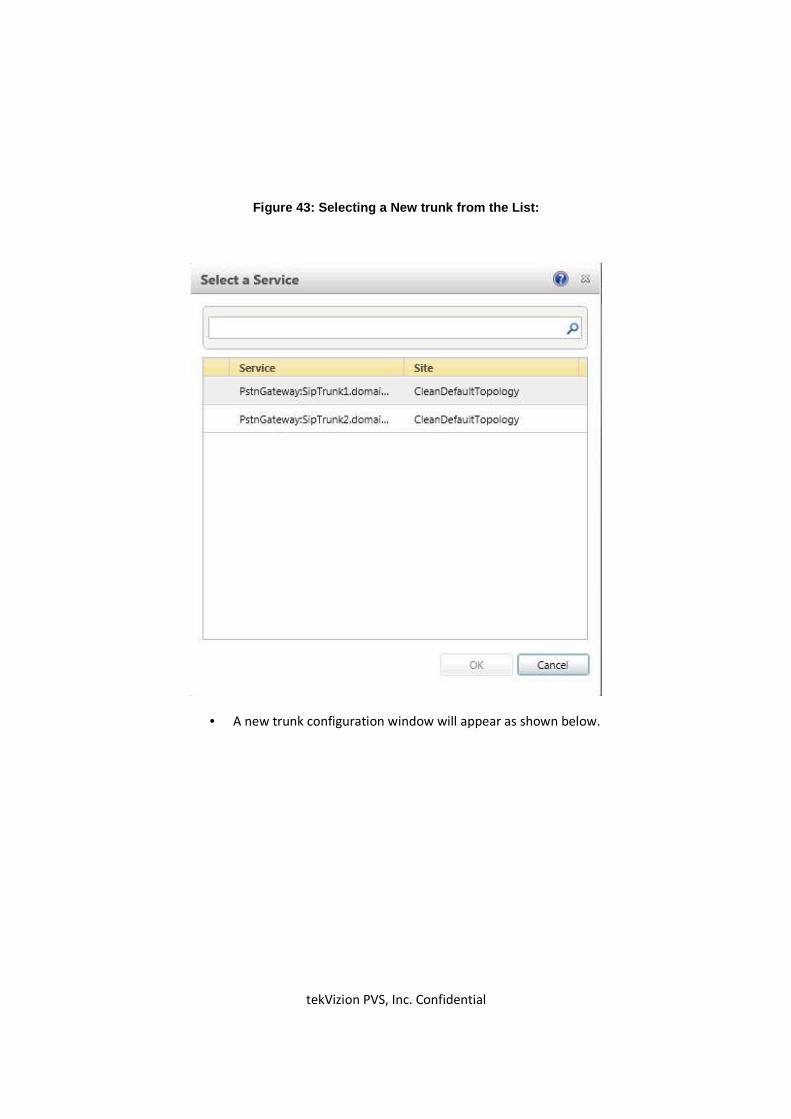
• Selecting a new trunk from the List as shown below.
tekVizion PVS, Inc. Confidential
Figure 43: Selecting a New trunk from the List:
• A new trunk configuration window will appear as shown below.

tekVizion PVS, Inc. Confidential
Figure 44: New trunk Configuration:
Figure 45: New trunk Configuration - Continued:
tekVizion PVS, Inc. Confidential
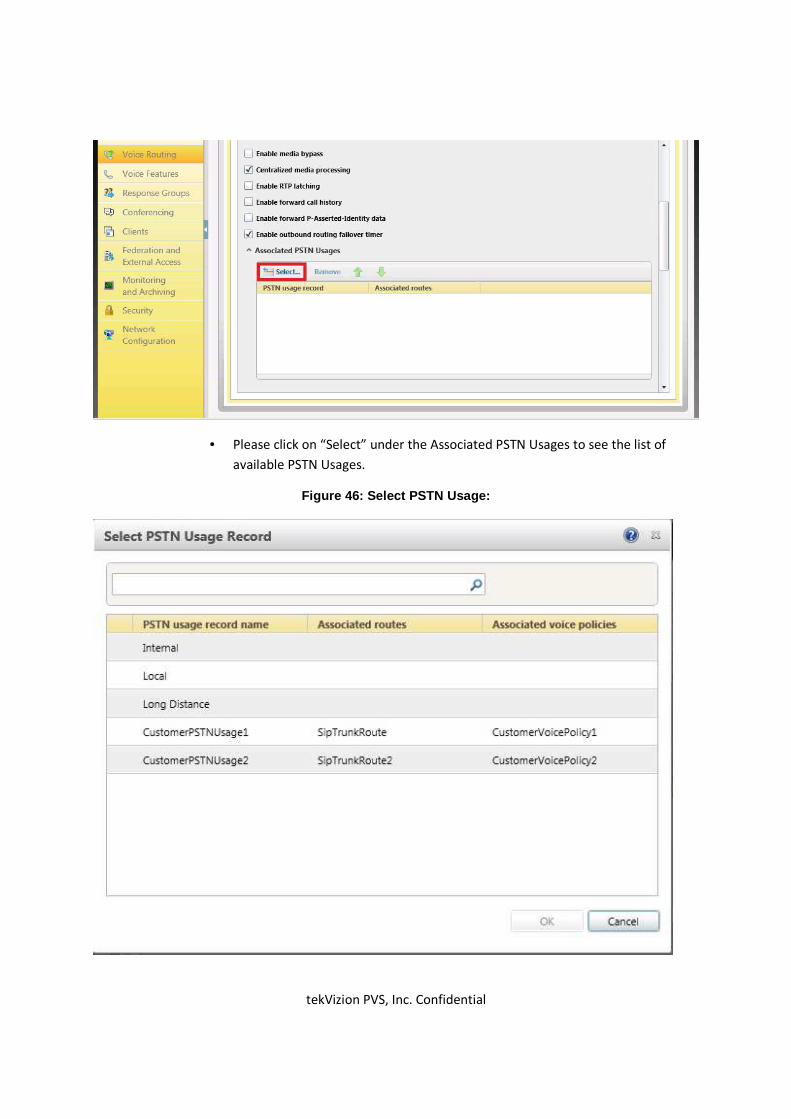
• Please click on “Select” under the Associated PSTN Usages to see the list of
available PSTN Usages.
Figure 46: Select PSTN Usage:
tekVizion PVS, Inc. Confidential
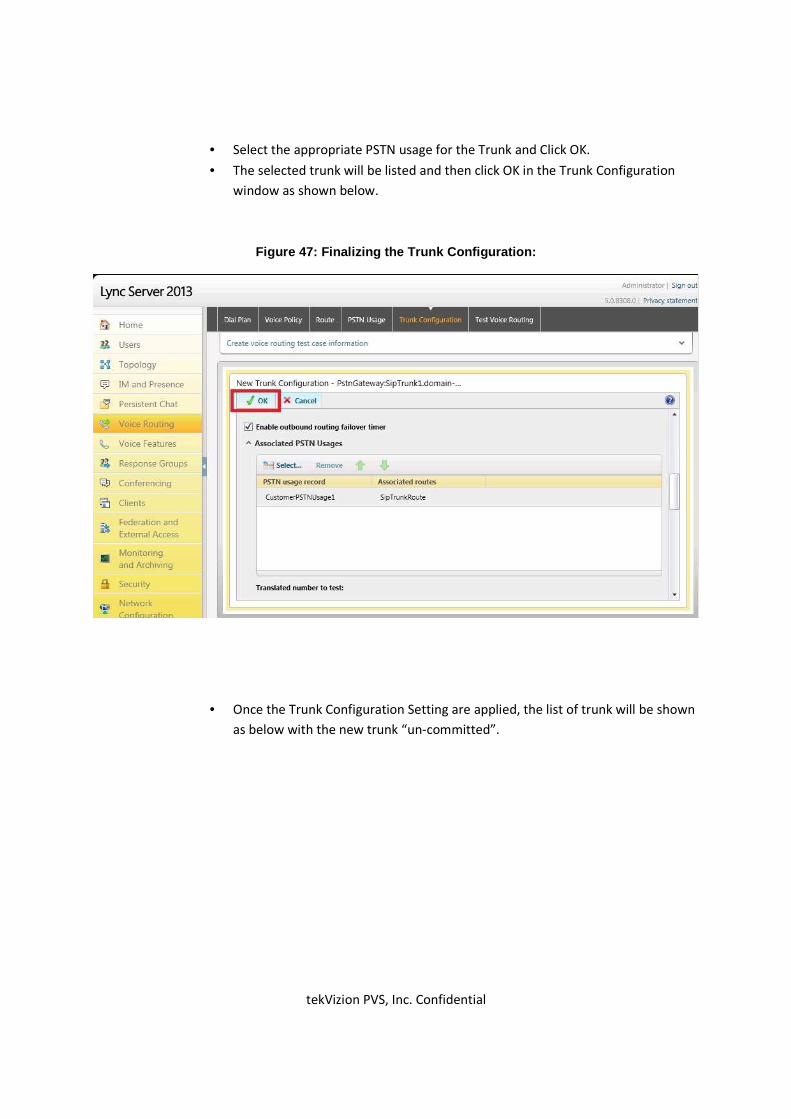
• Select the appropriate PSTN usage for the Trunk and Click OK.
• The selected trunk will be listed and then click OK in the Trunk Configuration
window as shown below.
Figure 47: Finalizing the Trunk Configuration:
• Once the Trunk Configuration Setting are applied, the list of trunk will be shown
as below with the new trunk “un-committed”.
tekVizion PVS, Inc. Confidential
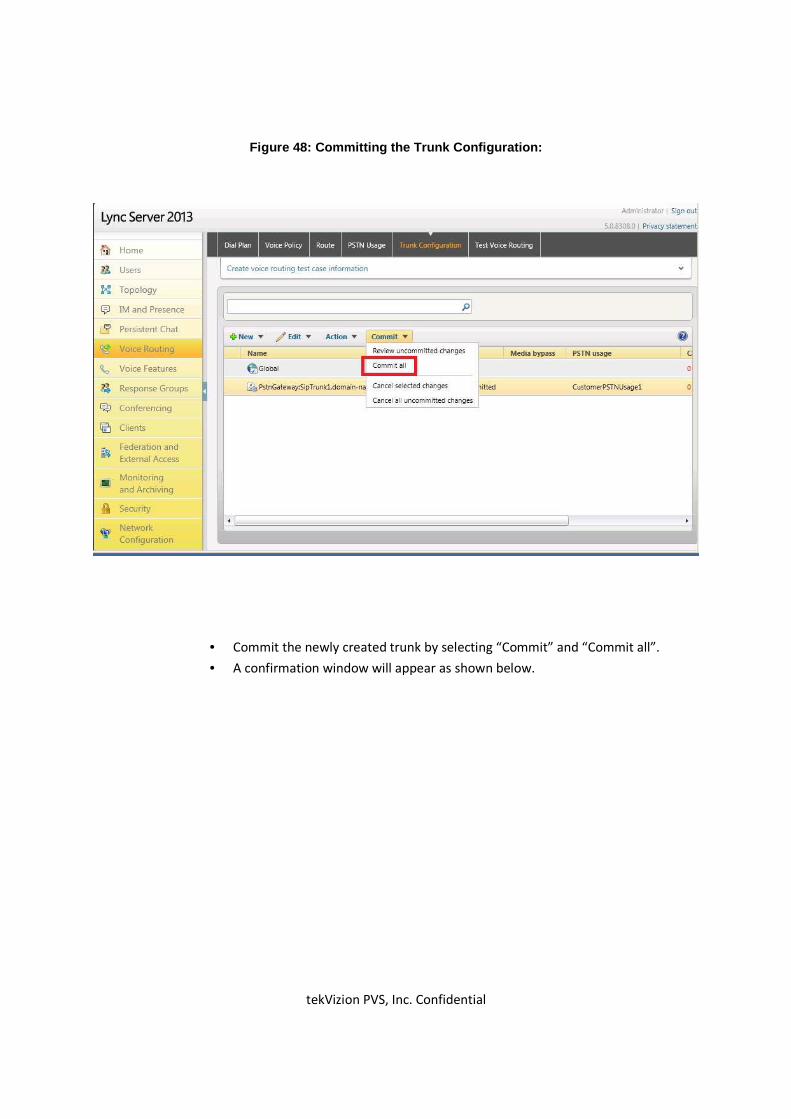
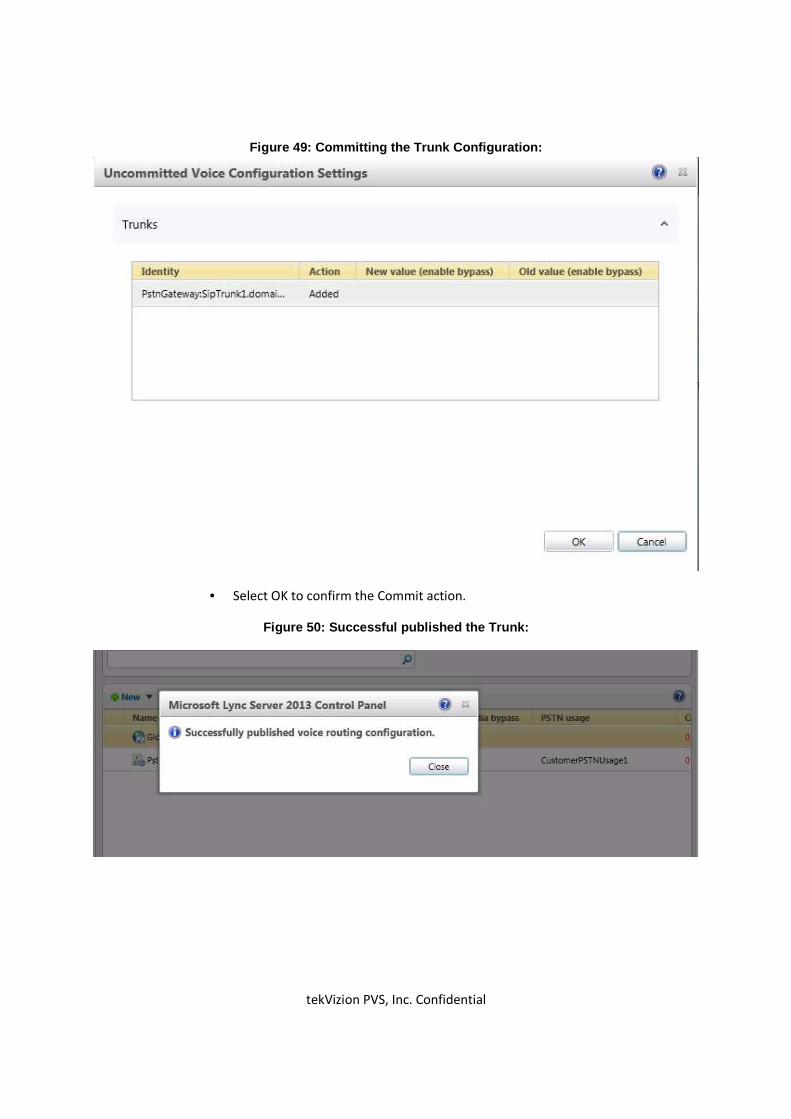
Figure 48: Committing the Trunk Configuration:
• Commit the newly created trunk by selecting “Commit” and “Commit all”.
• A confirmation window will appear as shown below.
tekVizion PVS, Inc. Confidential
Figure 49: Committing the Trunk Configuration:
• Select OK to confirm the Commit action.
Figure 50: Successful published the Trunk:
tekVizion PVS, Inc. Confidential
Configuring the Lync Users
Adding a New User:
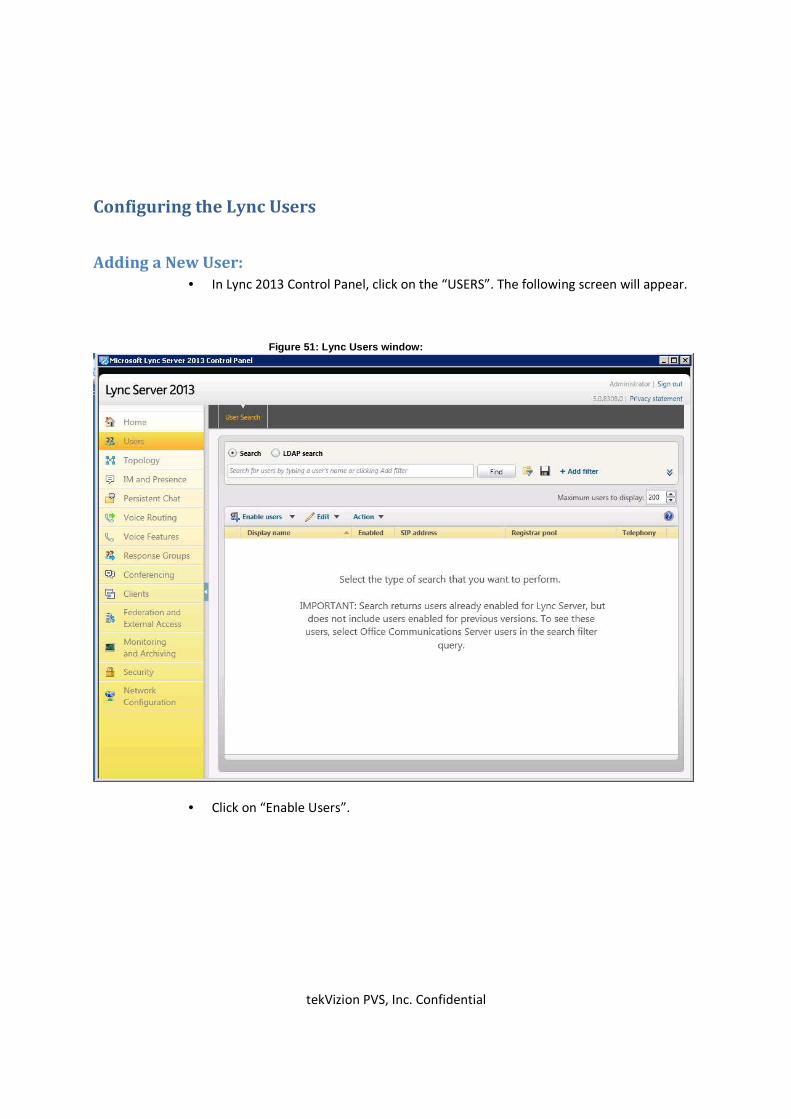
• In Lync 2013 Control Panel, click on the “USERS”. The following screen will appear.
Figure 51: Lync Users window:
• Click on “Enable Users”.
tekVizion PVS, Inc. Confidential
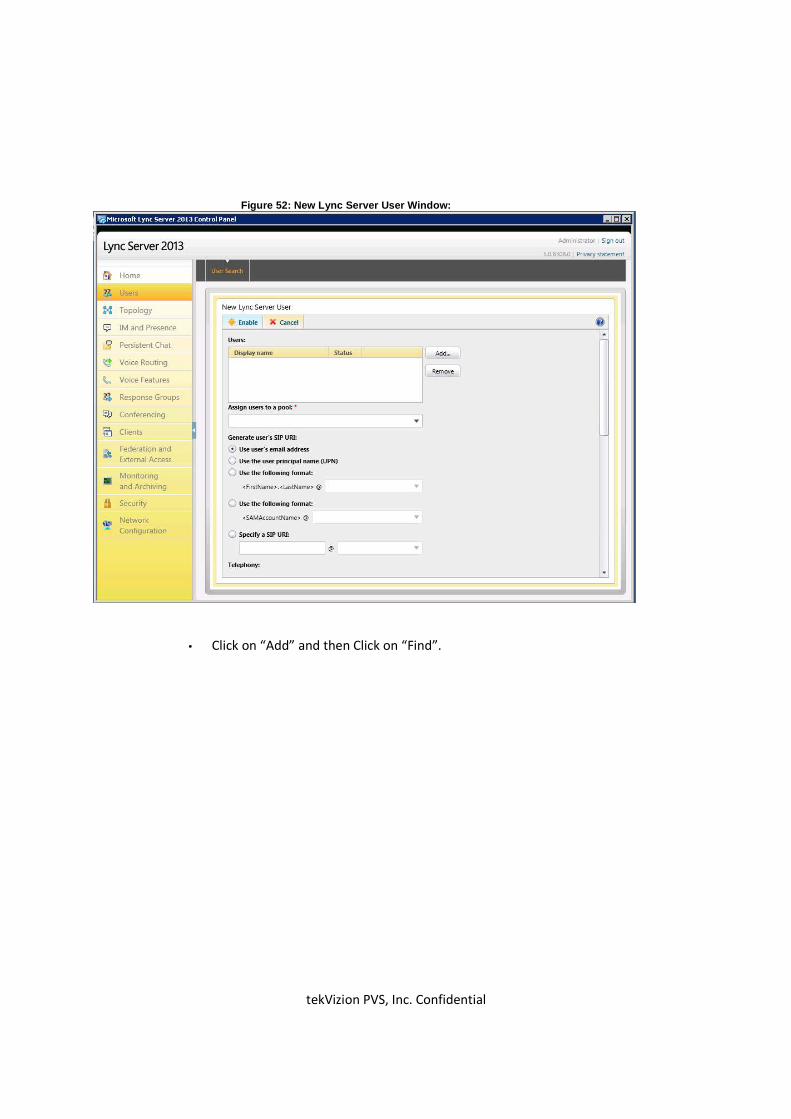
Figure 52: New Lync Server User Window:
• Click on “Add” and then Click on “Find”.
tekVizion PVS, Inc. Confidential
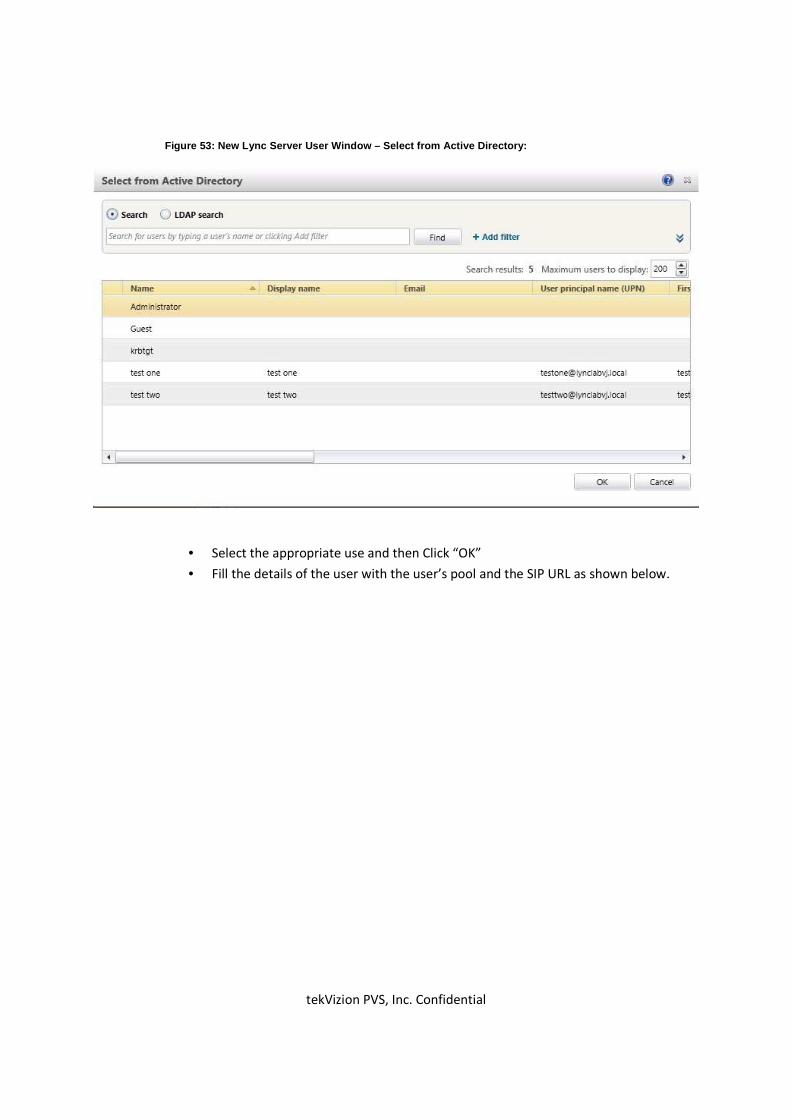
Figure 53: New Lync Server User Window – Select fro m Active Directory:
• Select the appropriate use and then Click “OK”
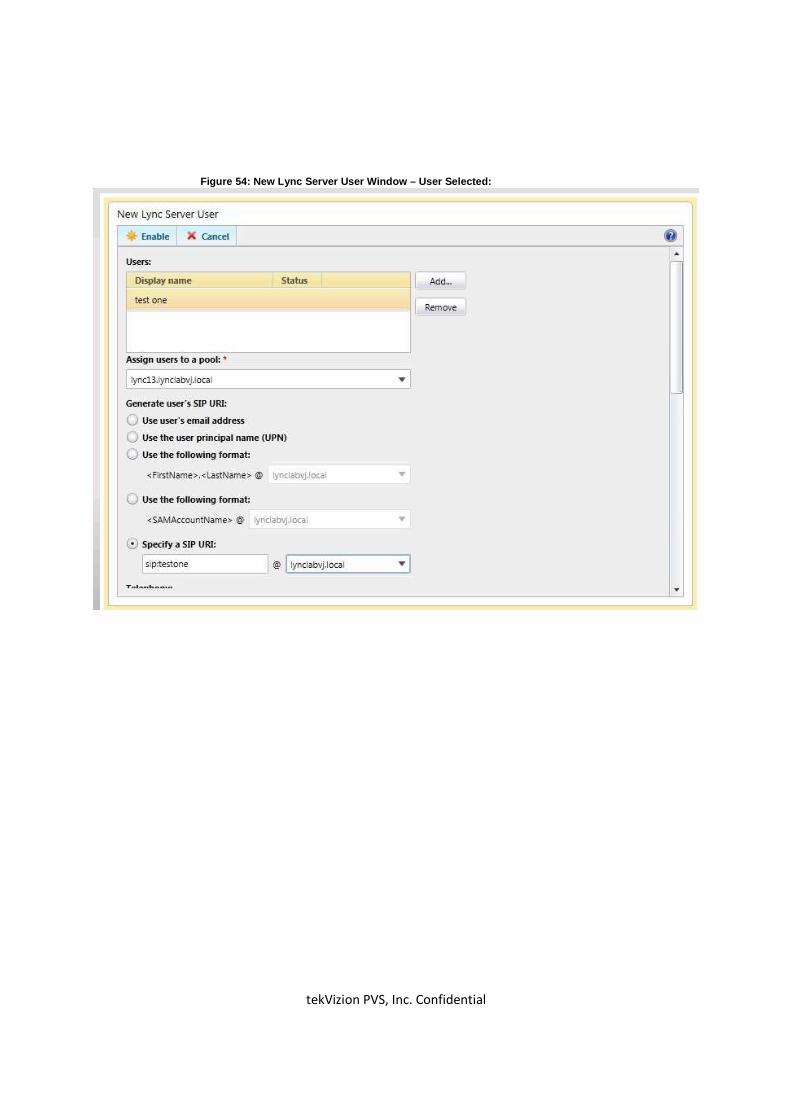
• Fill the details of the user with the user’s pool and the SIP URL as shown below.
tekVizion PVS, Inc. Confidential
Figure 54: New Lync Server User Window – User Selec ted:
tekVizion PVS, Inc. Confidential
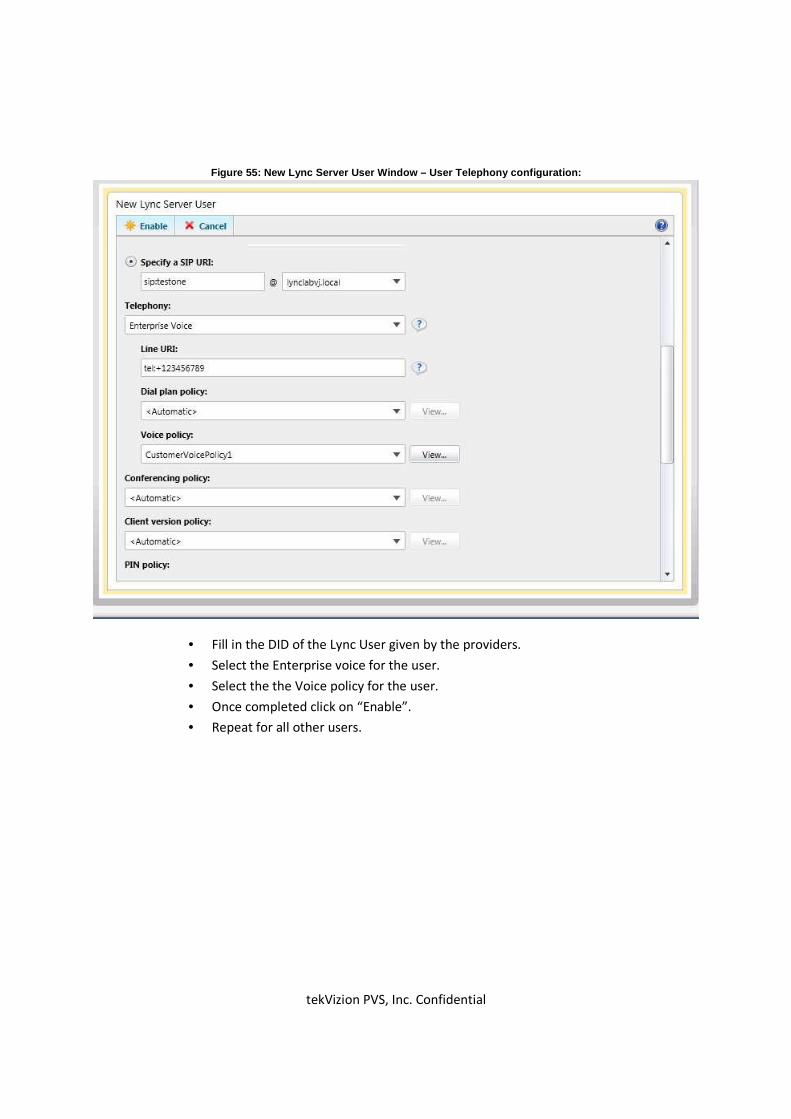
Figure 55: New Lync Server User Window – User Telep hony configuration:
• Fill in the DID of the Lync User given by the providers.
• Select the Enterprise voice for the user.
• Select the the Voice policy for the user.
• Once completed click on “Enable”.
• Repeat for all other users.
tekVizion PVS, Inc. Confidential
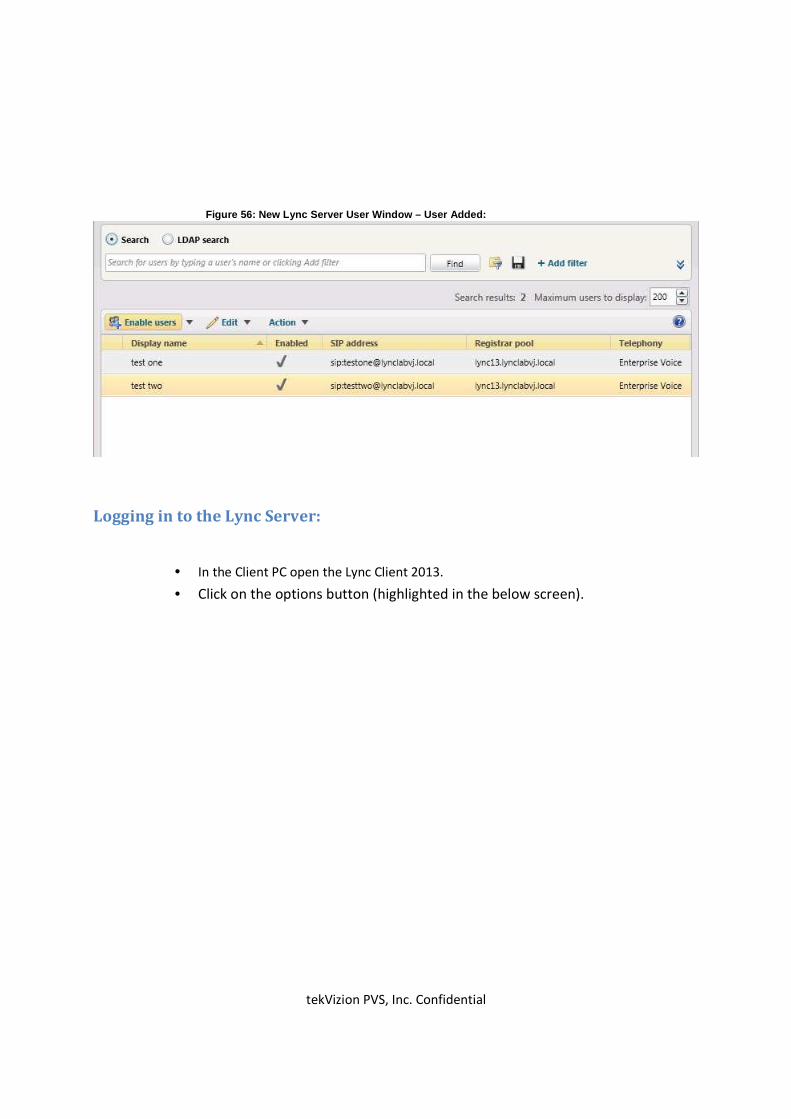
Figure 56: New Lync Server User Window – User Added :
Logging in to the Lync Server:
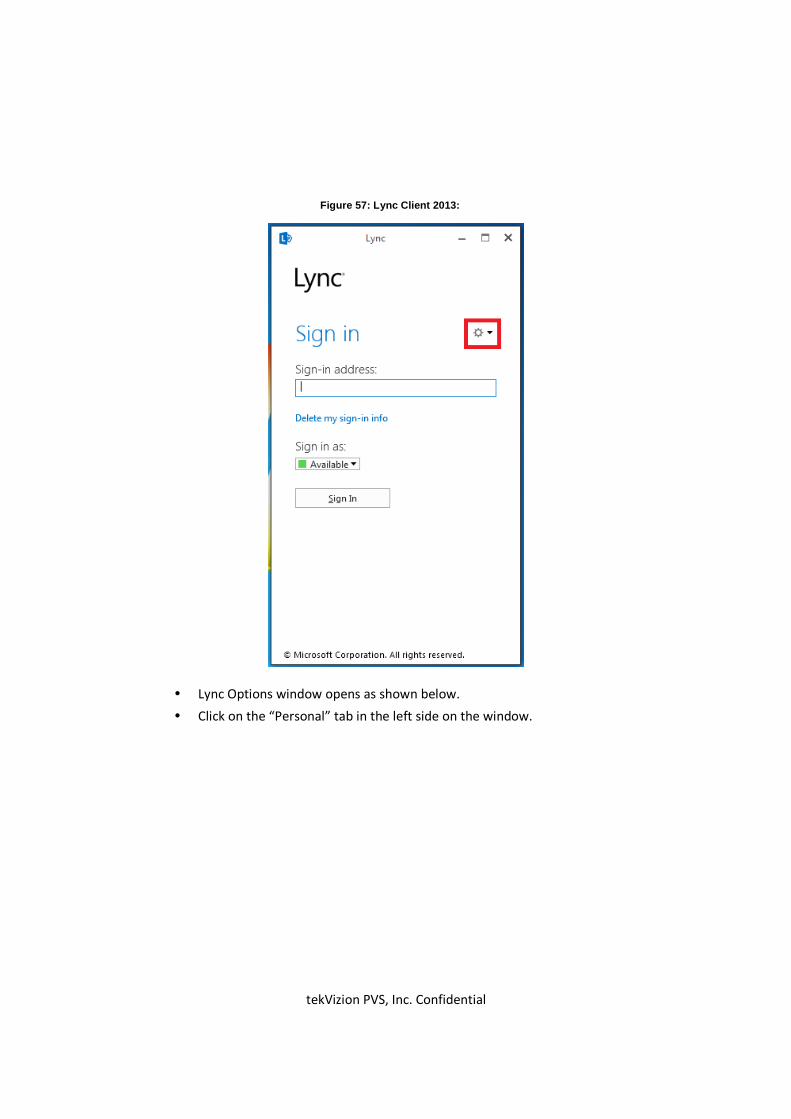
• In the Client PC open the Lync Client 2013.
• Click on the options button (highlighted in the below screen).
tekVizion PVS, Inc. Confidential
Figure 57: Lync Clien t 2013:
• Lync Options window opens as shown below.
• Click on the “Personal” tab in the left side on the window.
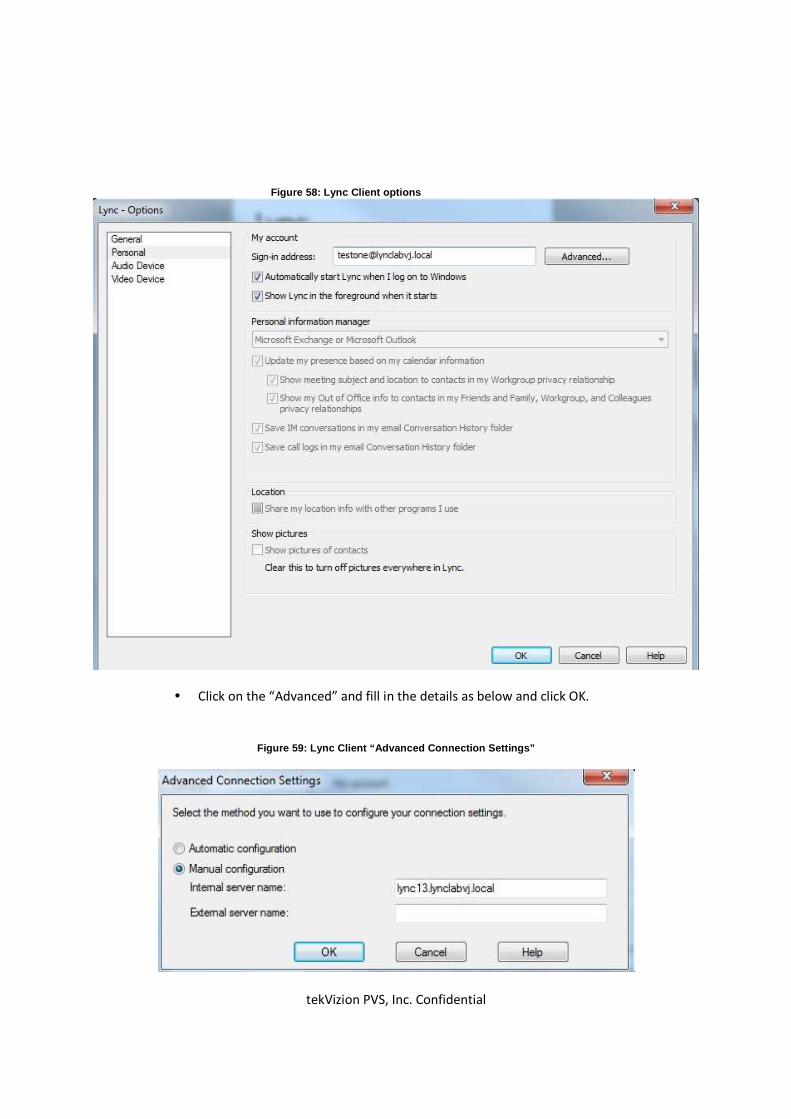
tekVizion PVS, Inc. Confidential
Figure 58: Lync Client options
• Click on the “Advanced” and fill in the details as below and click OK.
Figure 59: Lync Client “Advanced Connection Setting s”
tekVizion PVS, Inc. Confidential
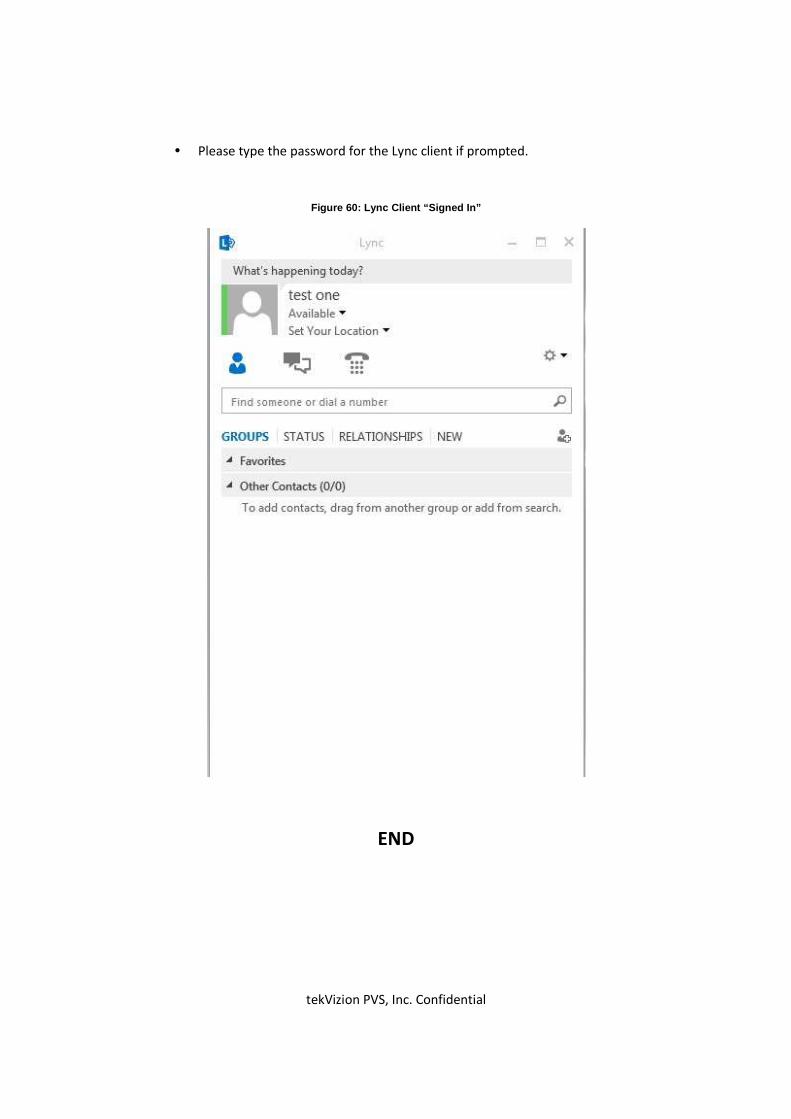
• Please type the password for the Lync client if prompted.
Figure 60: Lync Client “Signed In”
END