lync user guide - information technology · pdf file1 | p a g e lync user guide the lync 2010...
TRANSCRIPT

1 | P a g e
Lync User Guide
The Lync 2010 client allows you to access the University of Arizona’s Unified Communications
solution. Lync provides real-time instant message (IM) Audio and Video calling and also
provides multiparty IM, Audio and Video Conferencing, and Collaboration.
Note that calling, ringtones, conference calls, and other VoIP functions are NOT supported at
this time.
Installing Lync
1. First you will need to download the Lync Client software from the UA Site License page:
https://sitelicense.arizona.edu/uaconnect-onsite
2. Before you launch Lync for the first time you will need to install the latest Cumulative
Update (CU). As of this writing the current version is CU5. It is very important that you
apply these updates before starting Lync for the first time. After installing the CU, a
reboot may be required. You can download the CU installer on the Microsoft site:
32 bit: http://www.microsoft.com/en-us/download/details.aspx?id=25055
64 bit: http://www.microsoft.com/en-us/download/details.aspx?id=14490
Before starting it is important to note that you should receive some “sign-in didn’t work”
error messages, this is expected behavior for the first sign-in. Chrome users may experience
some issues downloading the file. Internet Explorer or Firefox are suggested for this step.
Lync First Run
1. After you have installed and updated Lync, launch the program from the Start Menu.
2. If your computer is joined to the CatNet Active Directory, you will automatically be
signed-in and you may proceed directly to the Lync Client Overview section.
3. Upon first launch, you will be presented with the sign on screen and prompted for a sign
on address. The correct sign on address is: [email protected].

2 | P a g e
4. Once you click the Sign In button you should receive a “Sign-in didn’t work” notification. This is
normal, Click the Close button.
5. You will once again be presented with the sign on screen, this time there is a password entry
box. Enter your CatNet password and click the Sign In button.

3 | P a g e
6. You will receive the “Sign-in didn’t work” notification one last time. Click the Close button.
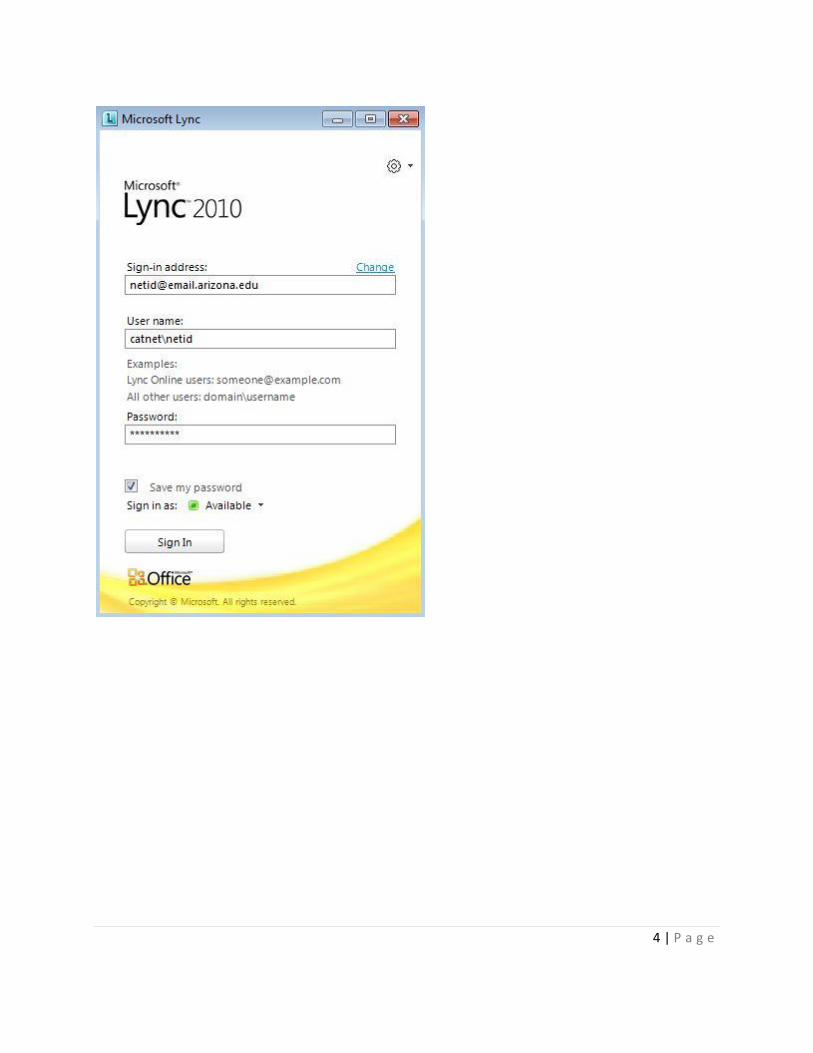
7. You will be presented with the Sign-In screen one last time, note that now there is a “User
Name” entry box now. For the User Name enter: catnet\netid and ensure that you have
entered the correct password. Ensure that the “Save my password” box is checked and select
your preferred status. Click Sign In.
4 | P a g e

5 | P a g e
8. You should now be signed in. If this is the initial logon you will be presented with a “Start Here”
screen which can be used to view an introduction video and personalize your Lync experience.
Start here Screen
Lync Fully Signed In

6 | P a g e
Introduction/Personalization Screen
9. Click the Presence Menu below your name and click Exit. The Lync Client will Sign-off and
close.
1

7 | P a g e
Lync is now configured and ready for use.
1

8 | P a g e
Lync Client Overview
When you sign into Lync, you have three display options available:
Contacts: The contact list is displayed.
Activity Feeds: Displays your contacts activity feed (Out of Office messages, personal notes, etc.).
Conversations: Conversation history, past conversations are viewable here (stored in Exchange)
2
2
3
4
3 4
9 | P a g e
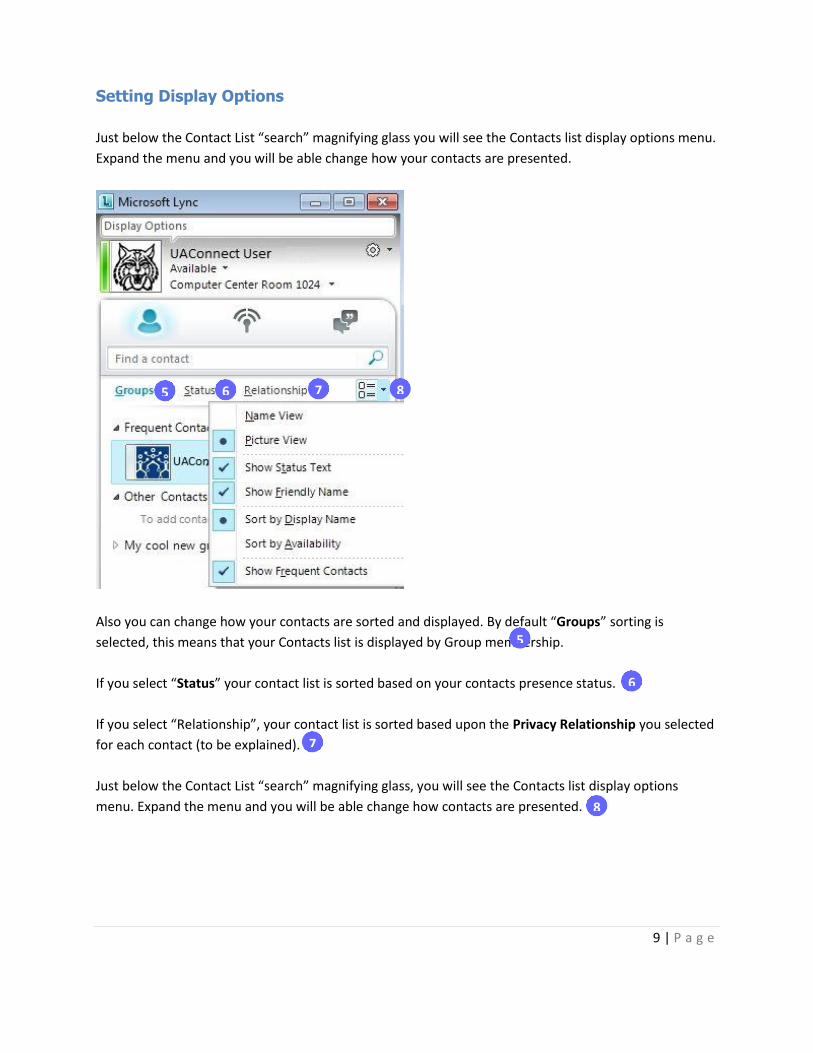
Setting Display Options
Just below the Contact List “search” magnifying glass you will see the Contacts list display options menu.
Expand the menu and you will be able change how your contacts are presented.
Also you can change how your contacts are sorted and displayed. By default “Groups” sorting is
selected, this means that your Contacts list is displayed by Group membership.
If you select “Status” your contact list is sorted based on your contacts presence status.
If you select “Relationship”, your contact list is sorted based upon the Privacy Relationship you selected
for each contact (to be explained).
Just below the Contact List “search” magnifying glass, you will see the Contacts list display options
menu. Expand the menu and you will be able change how contacts are presented.
5 6 7 8
5
6
7
8

10 | P a g e
Setting Lync General Options
You can configure your Lync options by clicking the gear icon.
Once you click on the gear icon, you are presented with the Lync General Options screen:
The first Option screen General allows you to set some basic options in Lync.
9
9

11 | P a g e
Setting Lync Personal Options
If you click on Personal on the left hand pane, you will be able to change
Personal Options.
My Account/Advanded:
You can set Lync to launch and sign-
on when you log on to Windows
Personal Information Manager:
This setting should be configured as
“Microsoft Exchange or Microsoft
Outlook”
Update my presence based on
Calendar information:
This setting will allow Lync to
determine you presence state based
upon your Exchange/Outlook
calendar. The options below
determine how much information will
be shown.
Save instant message conversations
in my email Conversation History
folder:
This setting will allow Lync to store
conversation history in your mail
folders. You can also specify if you’d
like call logs stored there as well.
Save my Lync contacts in my personal
contacts folder on the Exchange
Server:
This setting allows Lync contact
information to be stored in Exchange
(Outlook must be installed). If you
disable this, contacts are only stored
in Lync.
10
10
11
11
12
12
13
13
14
14

12 | P a g e
Setting Lync Status Options
If you click on Status on the left hand pane, you will be able to change your Status Options.
Under the Status options, you set Lync to change your status based upon system or Lync inactivity. You
can also set presence privacy options based upon personal preference or UITS policy.
Lync Status Options:
Setting Lync Alert Options
If you click Alerts on the left hand pane, you will be able to change your Alerts Options.
On this screen you can specify how you would like Lync to alert you. You can enable notification alerts
when someone adds you to his or her contact list (default) and also specify alert behavior when you
have set Do not Disturb status.

13 | P a g e
Setting Lync Ringtones and Sound Options
Note that calling, ringtones, conference calls, and other VoIP functions are NOT supported at
this time.
If you click Ringtones and Sounds on the left hand pane, you will be able to set your Sound Options.
Sound options:

14 | P a g e
Audio Device Options
If you click Audio Device on the left hand pane, you will be able to set your Audio Device options.
In the Audio Device option screen, you can specify which Audio-In and Out devices. There is also a
button to check audio quality.
Note that calling, ringtones, conference calls, and other VoIP functions are NOT supported at
this time.

15 | P a g e
Lync Video Device Options
If you have a webcam clicking Video Device on the left hand pane will allow you to set your Video
Device Options. In this screen you can specify which web cam you would like to use for video calls and
change any Driver Based Webcam Settings if necessary.

16 | P a g e
Instant Messaging and Presence
Presence information enables you to approach colleagues at the right time with the right form of
communication, to lead to a more productive work environment. Presence is a collection of information
that includes availability, willingness to communicate, additional notes (such as location and status), and
how you can be contacted.
Presence is enhanced in Lync 2010 with pictures, location information, and a default set of presence
states that includes “Off Work,” “Do Not Disturb,” “Be Right Back,” “Available,” “Busy,” and “In a
Conference.”
You may set different levels of contacts, each of which can view different levels of presence information.
By simply looking at a Contacts list, users can find everything they need to know at a glance. Simple
colored icons indicate other users’ presence status, and picture and location are also shown.
With Instant Messaging in Lync, you can quickly message your peers in timely fashion.
On the next page you will find a table which contains the Presence Status options available to you and
how they are set.

17 | P a g e
As indicated in the table, some
presence states can be set by
the Lync you manually, some
are set automatically by Lync,
and some can be set either
way. Keep in mind that any
presence state you set
manually will stay in place
until you change it back to
Available.
A red asterisk next to a
contact’s status indicates that
he or she has set an Out of
Office notification in
Outlook/Exchange.

18 | P a g e
Once signed onto Lync, simply click the presence menu under the your name and select the desired
presence state.
Set a personal note
The presence states in Lync cannot be customized or added to. However you may want to provide
additional details about where you are or what you are doing. This is accomplished by setting a
“personal note”.
To set a personal note, click the note display area. This is the text balloon above your name. Once you
click on the text you can type over anything that is currently displayed.
15
15
16
16

19 | P a g e
Setting Your Location
By default the Lync client will keep track of where you are, as you log on from different locations. The
location name you specify corresponds to your current network connection. For example, you may be
using Lync on your office workstation, once you sign off and connect from your home computer or
mobile device, conference room etc. Lync will prompt you for your location and depending on policy,
display your active location information to your contacts. Once you set a particular location name, Lync
will remember it, so the next time it detects that you are on that network connection, the location name
that is displayed with your presence will change to reflect it.
To set your location information, click the location menu box just below the presence menu.
You can now enter and commit your current location information.
17
17

20 | P a g e
If privacy is a concern, it is possible to hide your location information. Simply click on the location menu
arrow.
Uncheck “Show Others My Location” , your location information will no longer be published. The
“NO” icon which appears the left of your location information will appear to notify you that location
information is not being published.
18
18
19
19

21 | P a g e
Managing Contacts
Adding a Contact
In order to communicate with someone in Lync you will need to add him or her to your contact list.
Once you have signed on to Lync, you will need to enter either the user’s name or email address in the
“Find a Contact” box.
In this case, we will use the users e-mail address. Enter the e-mail address and you will see the search
results appear below. Once the contact appears, you have the option to immediately.
If you click on the plus sign you are presented with options to add the user to your contact list.
20
20
21
21

22 | P a g e
You can add the user to a New Contact Group, or one of your existing groups.
Contact has been successfully added, and now appears in the contact list.
22
22

23 | P a g e
Removing Contacts:
To remove a contact from the contact list and any associated groups. Right-Click the contact you wish to
remove. You will be presented with the contacts option menu, select “Remove from Contact List”.
The contact will be removed.
23
23
24 | P a g e
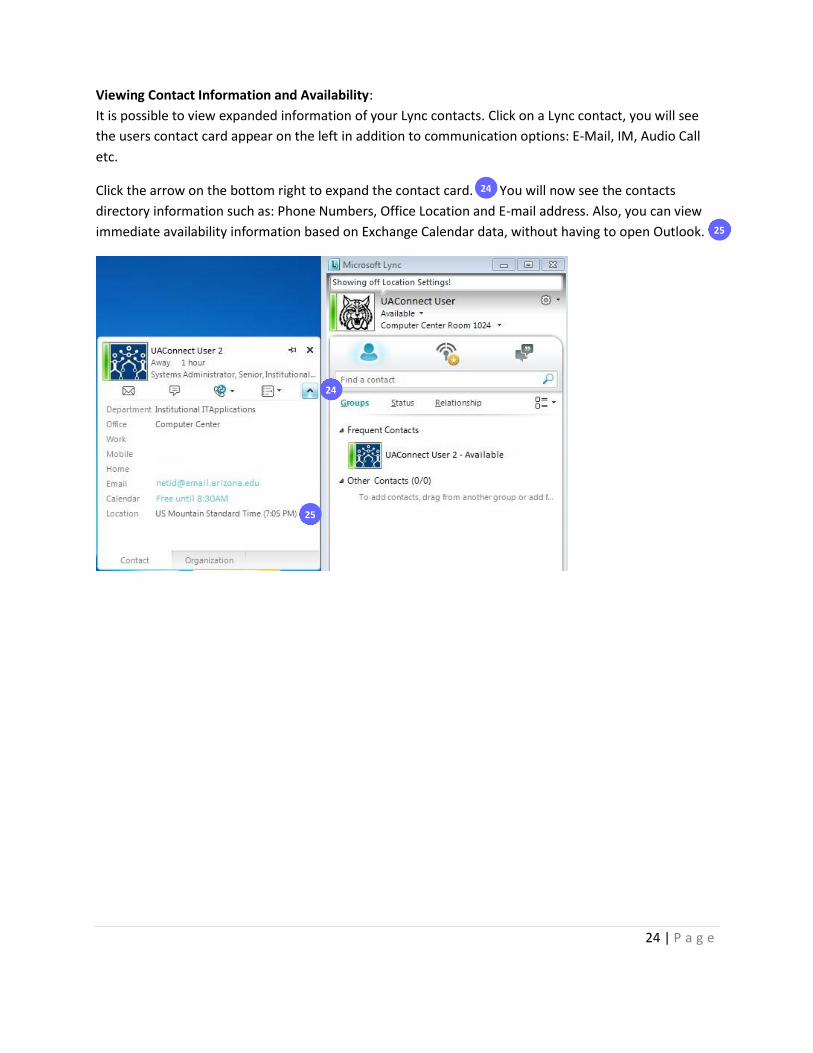
Viewing Contact Information and Availability:
It is possible to view expanded information of your Lync contacts. Click on a Lync contact, you will see
the users contact card appear on the left in addition to communication options: E-Mail, IM, Audio Call
etc.
Click the arrow on the bottom right to expand the contact card. You will now see the contacts
directory information such as: Phone Numbers, Office Location and E-mail address. Also, you can view
immediate availability information based on Exchange Calendar data, without having to open Outlook.
24
24
25
25

25 | P a g e
Initiating Conversations and Calls
In addition to the Right-Click options listed above, you can initiate an Instant Messaging Conversation
with any contact simply by double-clicking it.
Instant Message Conversation:
You can elevate any in-progress IM conversation to an Audio or Video call simply by clicking the Call
or Video menus. You can also add additional participants by clicking the “people” icon
or dragging a contact into an in progress IM/ Video session.
Note that calling, ringtones, conference calls, and other VoIP functions are NOT supported at
this time.
26 27 28
26
27 28

26 | P a g e
Collaboration and Sharing
Clicking the Share menu displays content sharing options:
Desktop: This will share your entire desktop to any participant(s) of the current conversation. This
feature is useful for support or demonstration purposes. Users with multiple monitors will have the
option to share one or both, as well.
Program Sharing: This is similar to Desktop Sharing. However instead of presenting your entire desktop
to the participants, you can select which application/window to share. This is useful for users who do
not wish to show their entire desktop.
Powerpoint Presentation: This option will share a Power Point presentation and display it on the
participant(s) screens. You or any participant you define as a presenter can control the slide show.
New Whiteboard: This option will display a Whiteboard, this is useful for collaboration and all
drawings/annotations can be saved.
New Poll: This option is useful for larger meetings/conferences. You can create a poll and display the
results.
Show/Hide Stage: The stage is where the shared content is displayed. You may show or hide the
content.
29
30
31
32
33
34
29
30
31
32
33
34
35
35

27 | P a g e
Creating and Managing Contact Groups
You can use groups to organize your contacts. A contact can be placed into more than one group. Once
you have learned how to create and manage groups, we will go over enhanced features provided by
groups.
To create a group, simply sign into Lync. Once you are signed on, right click on any group , by default
you should have “Frequent Contacts” and an “All Contacts” group. You will now see the contact list
menu. Select “Create a New Group.”
36
36
37
37

28 | P a g e
The new group will appear.
Type in a name for the group and hit “Enter.”
38
38

29 | P a g e
Group creation is now complete.
Deleting a Group
To delete a group, simply select it and push the “delete” key, or you may right click on the group and
select Delete Group. Please note that if the group contains the only copy of a contact, you will
need to re-add the contact or move it out of the group before you delete it. If you have a copy of the
contact in another group, it will not be affected.
39

30 | P a g e
You will see a confirmation window, click OK. Remember that if the group contains the last copy of a
contact, you will need to re-add the contact or move it out of the group before you delete it. If you have
a copy of the contact in another group, it will not be affected.
39

31 | P a g e
Adding a Contact to a Group
There are a couple of ways to populate groups. The simplest would be to just drag a contact into a
group. This method moves a contact from one group to another. You can also right click a contact
select copy contact to then select the group you wish to copy the contact to. The benefit of this
method is that you can have the contact in multiple groups, and the deletion of one copy will not affect
others.
40
41
40
41

32 | P a g e
Adding Distribution Group to the Contact List
To add a Distribution group to the Contact list just type in the group name in the search bar , the
results will appear below. Right click the group and it can be added to the Contact list.
42
43
42
43

33 | P a g e
Once the group has been added, you will notice the distribution group icon on the right.
44
44

34 | P a g e
Group Actions
Once you have populated your groups, you can expand the group, view the presence state of each
individual contact and perform group actions. In the previous image above, you can see that when the
group is selected, you can initiate a group communicator (audio) call to all group members at once. If
you right click the group you can view the other communications options available.
In addition to starting a Group Instant Message Conversation/Conference, you can start a group Audio
or Video Conference. Keep in mind that all participants must have a microphone and audio device.
You can even send an email message to the group or schedule a conference if Outlook is installed.
Note that calling, ringtones, conference calls, and other VoIP functions are NOT supported at
this time.
45
46
47
45
46
47

35 | P a g e
In this case, we will initiate a Group Instant Message Conversation/Conference by selecting “Send an
Instant Message.” After a moment, the conversation will initiate.

36 | P a g e
Privacy Relationships
With Lync you set privacy relationships to control how much of your presence information others can
see. Contacts are assigned one of five privacy relationships, and each relationship provides access to a
different set of information. The following table describes each privacy relationship, and what
information is made visible. An asterisk (*) next to a presence information item in the table indicates
that if this attribute is defined in CatNet AD to be visible, it will be visible to everyone regardless of
privacy relationship. A pound sign (#) indicates that the attribute is visible by default.
The following table illustrates the amount of information that is published based upon relationship
permissions:

37 | P a g e
In order to change a contacts privacy relationship, simply right click a contact, near the bottom of
the menu you will see the “Change Privacy” relationship menu . When you expand the menu, you
will be able to select the desired relationship.
Privacy Relationship Setting:
Tagging Contacts
You can mark or “tag” a contact in your Contacts list so that you’ll be notified when he or she becomes
available. When you tag a contact, Lync will display a notification as soon as a contact’s status changes.
48
49
48
49

38 | P a g e
To “Tag” a contact, in your Contacts list right-click the person you want to tag. Click “Tag for Status
Change Alerts”.
Blocking Contacts
To Block a contact so that they cannot contact you using Lync, right-click the person you want to block
and set their privacy relationship to “Blocked Contacts”.
Conferencing
One major Lync feature is Conferencing (Online Meetings). With Online Meetings, you can collaborate,
share information and coordinate efforts with your peers in real-time. Voice and Video conferencing
capabilities can be used from any location with an Internet connection. Meeting tools integrated into
Outlook 2010 enable you to schedule a meeting or start an impromptu conference with a single click.
Note that calling, ringtones, conference calls, and other VoIP functions are NOT supported at
this time.
Joining an Online Meeting
Once you have the Lync client installed and configured, joining and participating in a meeting is as
simple as clicking a link. Simply double click the meetings calendar entry in Outlook, and you will see the
“Join online meeting” link/url.
50
50

39 | P a g e
You can also join a meeting by opening the corresponding calendar entry in OWA and clicking the “Join
online meeting” link:
Please note that you can still join an online meeting by clicking the Join link even if you do not have the
Lync client installed however, you will be prompted to install the Lync Attendee. (The Attendee is a small
install which only allows for meeting join/participation functionality).
51
51

40 | P a g e
In addition to clicking the Join Online url in the calendar item, you may also join the Online meeting by
clicking the “Join Online” button in the Outlook (full client only) reminder screen:
Scheduling Online Meetings
Scheduling an Online Meeting is fairly simple. When the Lync client is installed, there is also an Online
Meeting plugin for Outlook that gets installed as well. There are two ways to schedule a meeting in
Outlook.
First select Calendar View in Outlook. Once it is open you will see a “New Online Meeting” button on the
Home ribbon in Outlooks calendar view.
o
52
52
53
53

41 | P a g e
If you click the “New Online Meeting” button you will be taken to a “New Meeting” window which is
already populated with the Online meeting URL. You can schedule the Online meeting as you would a
regular meeting (invite attendees etc.). The attendees will be presented with the Join online meeting
information.
It is also possible to schedule a new Online meeting from the standard “New Meeting” window. Simply
click the “Online Meeting” button and the Online Meeting url information will be populated and you will
also be able to change Online meeting options.
54
54

42 | P a g e
If you click on “Meeting Options” You can change meeting Access and Presenter settings.