lynq 2020 user guide
TRANSCRIPT

LYNQ 2020 USER GUIDE Page 1 / 171
LYNQ 2020 User guide
LYNQ 2020 USER GUIDE
NOVEMBER 2020

LYNQ 2020 USER GUIDE Page 2 / 171
Contents
How to use this guide ........................................................................... 4
Components of LYNQ ........................................................................... 5
Importing your LYNQ license ............................................................... 6
Navigating LYNQ ................................................................................... 7
Settings .......................................................................................... 8
Advanced Settings (General) ...................................................... 9
Personal Settings ........................................................................ 13
System insights ........................................................................... 14
Document library ........................................................................ 16
Storing your profile ..................................................................... 18
Detailed scheduling ............................................................................ 19
Navigating Visual APS ............................................................... 20
Navigating Visual APS ................................................................ 21
Shifts ............................................................................................ 59
Work Units .................................................................................. 63
Material availability ................................................................... 66
Scheduling basics ...................................................................... 70
Saving and publishing ............................................................... 95
Capable to promise ................................................................... 96
Calculating potentially late ....................................................... 97
Dashboards and reports ........................................................... 98
Dispatching ......................................................................................... 99
Planning KPIs ........................................................................... 100
Dispatching Dashboard ........................................................... 101
Production plan ......................................................................... 102
Equipment plan ......................................................................... 103
Production status .....................................................................104
Material list ................................................................................ 105
Production job list .................................................................... 106
Equipment job list ..................................................................... 107
Production history .................................................................... 108
Resource management ..................................................................... 109
Seat maintenance ..................................................................... 110
Resource maintenance ............................................................ 114
Data collection ....................................................................................115
Workbench ..................................................................................116
Timesheet ................................................................................... 127
Tracking .............................................................................................. 128
Employee KPIs .......................................................................... 129
Overall labour effectiveness (OLE) ........................................ 130
Equipment KPIs..........................................................................131

LYNQ 2020 USER GUIDE Page 3 / 171
Overall equipment effectiveness (OEE) ................................ 132
Tracking dashboard .................................................................. 133
Employee status........................................................................ 134
Equipment status ...................................................................... 135
Job status ................................................................................... 136
Employee performance ............................................................ 137
Equipment performance .......................................................... 138
Management Reports ............................................................... 139
Execution management ....................................................................140
Terminal Maintenance ............................................................. 141
Transaction review ................................................................... 144
Continuous Improvement ................................................................. 152
Loss management ..................................................................... 153
Performance analysis ....................................................................... 155
Factory KPIs............................................................................... 156
Product KPIs .............................................................................. 157
Total effective equipment performance (TEEP) ................... 158
Factory dashboard .................................................................... 159
Loading ....................................................................................... 160
Availability ..................................................................................161
Quality ........................................................................................ 162
Employee analysis ............................................................................. 163
Equipment analysis ........................................................................... 164
Product analysis ....................................................................... 165
Alerts & Issues ................................................................................... 166
Alert maintenance .................................................................... 167
Issue maintenance ................................................................... 169

LYNQ 2020 USER GUIDE Page 4 / 171
Knowledgebase To assist further with your learning, register on our portal to watch videos and read our knowledgebase articles and more support.lynqmes.com
Training Plans This guide covers the
basic features typically
used by our users. If
give you everything you
need our Solution
Consultants can
provide tailored
training plans to help
you with your learning.
Drop us an email and
tell us about any
specific requirements
you may have.
Advanced Users If you are looking for
an advanced training
guide for your users,
contact our service
team and they will
gladly send you a copy.
How to use this guide
LYNQ is reinventing manufacturing execution system (MES) software for small
to midsize manufacturers looking for a configurable, plug-and-play offering to
digitalise and drive their factory performance. Formed around international
-in-one solution can plan, track, automate,
analyse and optimise factories to increase efficiency, productivity and
profitability.
This guide is designed to cater for new users who required an introduction to
the basic features of LYNQ. You should refer to the following user guides for
advanced application use.
LYNQ Advanced Guides:
• Advanced User Guide
• Factory Automation Feature Guide
• Webhooks Feature Guide
• Integration White Paper
Visual APS Advanced User Guide:
• Advanced Resource Settings
• Resource Mapping
• Alternative Resources
• Secondary Constraints for tools
• Product and Global Constraints
• Changeover Minimization
• Bottleneck Scheduling
• Advanced Scheduling Techniques
Anyone learning LYNQ will need to be proficient in the Inventory and
Manufacturing areas of the Enterprise Resource Planning application.
It is recommended that you also view the corresponding online page as
indicated in the tips column panel (left column). Online pages are continually
updated and provide additional links to other relevant pages. The PDF version
of the user guide is only updated annually after each major software release.
When learning using this user guide, you should refer to the glossary. The
glossary explains the mapping between the terms used in the user guide and
the terms used for your Enterprise Resource Planning application. This allows
the user guide to be written in a common language, that supports all LYNQ
customers and partners. The glossary can be found from the LYNQ help menu.

LYNQ 2020 USER GUIDE Page 5 / 171
Online Version Click here to read
this page online.
The online version
provides additional
links to other
related information.
LYNQ mes A hybrid product
combining web based
and desktop
applications to provide
the best possible
customer and user
experience.
Components of LYNQ
LYNQ - Manufacturing Operations Management
Frontline managers need complete visibility and control of the shop floor to
prevent problems. Collecting data by conventional methods can be
complicated, time-consuming and expensive.
able to gather time, attendance and production data from your employees and
equipment easily from any device with a browser. Clocking terminals and
interactive job lists simplify the execution of production plans and data capture
of start and stop times, downtime, labour hours, materials issued, quantities
reported, scrap and more
factory performance and loss insight you can
baseline and drive your business to world class standards for overall labour
effectiveness (OLE), overall equipment effectiveness (OEE) and total effective
equipment performance (TEEP).
Visual APS - Advanced Planning & Scheduling
scheduling (APS), you can quickly and accurately schedule while minimising
downtime. Deliver to your customers faster and in the most cost-effective way,
by creating production plans that factor in constraints around machines,
tooling, personnel and inventory to make smarter use of your materials and
resources.
LYNQ api - Application Program Interface
With LYNQ api you can connect to your Enterprise Resource Planning and
third-party applications.

LYNQ 2020 USER GUIDE Page 6 / 171
Online Version Click here to read
this page online.
The online version
provides additional
links to other
related information.
LYNQ mom license The license for LYNQ
mom is stored in a sub
directory of the LYNQ
mom website folder.
Once applied all users
will be able to see the
new license details.
LYNQ aps license The license for LYNQ
aps is stored in a sub
directory of the LYNQ
aps application folder.
The license must be
applied on each
computer or server
where LYNQ aps is
installed.
LYNQ api license The license for LYNQ
api is stored in a sub
directory of the LYNQ
api website folder.
Once applied all users
will be able to see the
new license details.
Importing your LYNQ license
A valid license file must be applied to each component of LYNQ. The license is
applied during installation. A new license must be applied annually and under
the following conditions:
The legal name of the license has changed
The no. of licensed seats has changed
How to import a new LYNQ mom or LYNQ aps license
From LYNQ mom or LYNQ aps click on Help.
Click on Change Product License.
Click Upload license manually to upload a physical license file or
Select Get License Online if you know the license name
How to import a new LYNQ api license
From LYNQ api click Settings > Licensing
Click Upload license manually to upload a physical license file or
Select Get License Online if you know the license name

LYNQ 2020 USER GUIDE Page 7 / 171
Online Version Click here to read
this page online.
The online version
provides additional
links to other
related information.
Product Version The version of LYNQ installed
Company name The company you are working in.
User name The windows username you are logged into LYNQ with.
Message Centre See messages and management alerts from the factory floor.
Issue Log Review, assign and resolve your production issues.
Document Library Add files, forms and links to Job orders, Employees and Equipment.
Personal settings Switch to a different user or set language or localisation
Help Access online help with videos and other articles.
Bookmark For frequently used dashboards, views, or reports.
Navigating LYNQ
You access LYNQ via a web browser. You will need to contact your systems
administrator to obtain the correct URL for your instance of LYNQ.
Once logged into LYNQ you will find links to the other components such as
Visual APS and LYNQ api. You must however have Visual APS
installed on your computer or on a terminal server to access this
component. LYNQ will try to find the Visual APS application on the computer
or server where your browser is running from. Your rights to the features in
LYNQ will be controlled by your systems administrator.
When rights are disabled, you will still see the menu option but will not be
able to open the feature that has been restricted.
The theme applied will depend upon whether the installation was selected as
production or sandbox.
What is at the top of the home page?
Your systems administrator will control your rights to the features in LYNQ.
When rights are disabled, you will still see the menu option but will not be able
to open the feature that has been restricted.
What is at the bottom of the home page?
All other features of LYNQ can be accessed directly from the home page.
LYNQ 2020 USER GUIDE Page 8 / 171
Online Version Click here to read
this page online.
The online version
provides additional
links to other
related information.
Settings To determine the
global defaults for the
site name, language
and localisation.
display the site in
different languages or
localisations can do so
from personal settings.
LYNQ supports
English, French,
German, Portuguese,
Spanish and Turkish
languages.
Email Settings To send emails from
LYNQ via the message
centre, you must
specify email account
credentials. This
account will appear as
the sender on all email
activity
Database Settings Do not change these
settings unless you
have been instructed
to do so. Changing
these settings will
update the web.config
file.
Settings
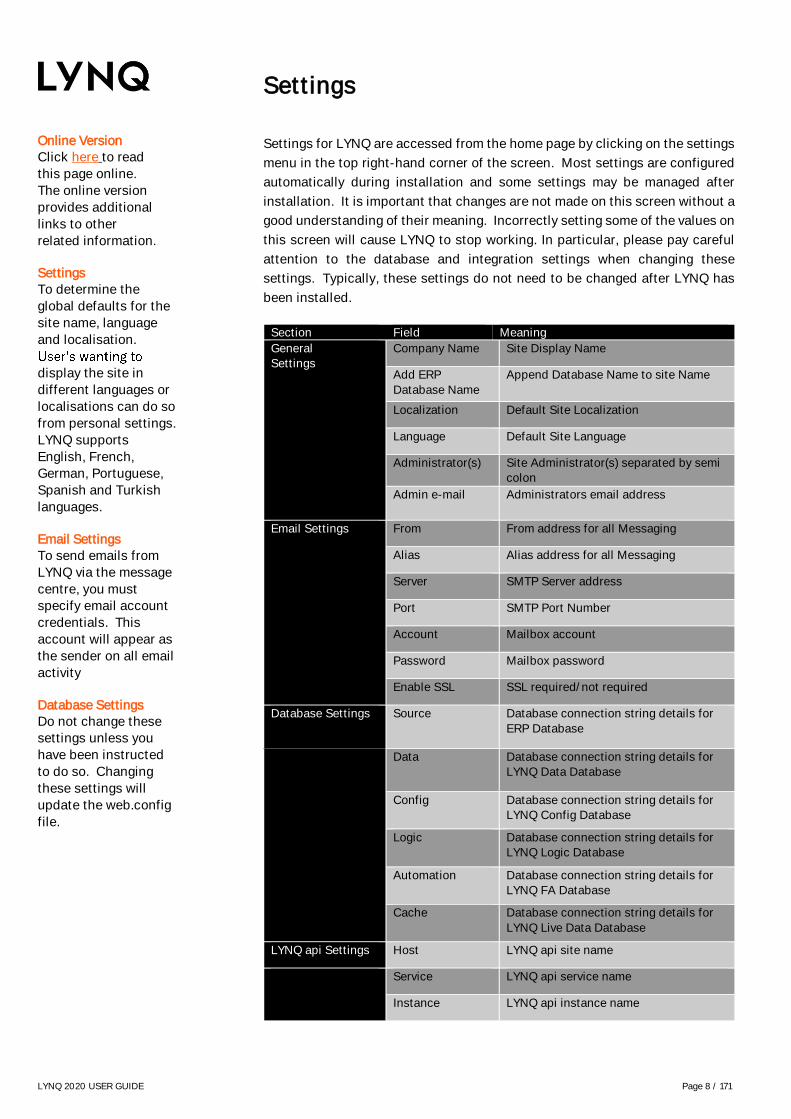
Settings for LYNQ are accessed from the home page by clicking on the settings
menu in the top right-hand corner of the screen. Most settings are configured
automatically during installation and some settings may be managed after
installation. It is important that changes are not made on this screen without a
good understanding of their meaning. Incorrectly setting some of the values on
this screen will cause LYNQ to stop working. In particular, please pay careful
attention to the database and integration settings when changing these
settings. Typically, these settings do not need to be changed after LYNQ has
been installed.
Section Field Meaning
General
Settings
Company Name Site Display Name
Add ERP
Database Name
Append Database Name to site Name
Localization Default Site Localization
Language Default Site Language
Administrator(s) Site Administrator(s) separated by semi
colon
Admin e-mail Administrators email address
Email Settings From From address for all Messaging
Alias Alias address for all Messaging
Server SMTP Server address
Port SMTP Port Number
Account Mailbox account
Password Mailbox password
Enable SSL SSL required/not required
Database Settings Source Database connection string details for
ERP Database
Data Database connection string details for
LYNQ Data Database
Config Database connection string details for
LYNQ Config Database
Logic Database connection string details for
LYNQ Logic Database
Automation Database connection string details for
LYNQ FA Database
Cache Database connection string details for
LYNQ Live Data Database
LYNQ api Settings Host LYNQ api site name
Service LYNQ api service name
Instance LYNQ api instance name

LYNQ 2020 USER GUIDE Page 9 / 171
Online Version Click here to read
this page online.
The online version
provides additional
links to other
related information.
Overview In most cases, general
settings will not need
to be changed once
LYNQ has been
configured.
Data Caching LYNQ caches data
periodically for better
performance of the
application. Data is
read from Enterprise
Resource Planning
during the caching
process. Adjust the
values here if you want
to cache data more
frequently. Setting
these values too low
can place additional
load on the SQL server.
You can force caching
of data by selecting
Refresh. Data caching
affects the data you
see in reports and
dashboards
Advanced Settings (General)
General settings are used to manage default application settings in relation to
data collection, display of decimals, group security and data management. The
application is shipped with these default settings.
To access General Settings:
From the LYNQ Home menu select Settings
Select Advanced Settings
Select General
General Maintenance mode Disabled Allows administrators to put
LYNQ mom sites into
Administration Mode. This
setting can be used whilst
performing upgrades or
troubleshooting to prevent shop
employees interacting with the
Workbench or any other data-
originating functions. Once
enabled, the entire web
application is only functional
when run via 'localhost'. (i.e.
directly on the server). In
addition, the following functions
are disabled:
1. Scheduled Actions (manual
Actions execution will continue to
work from Localhost)
2. REST API (when called outside
of localhost)
3. Alerts
Enable find as you type filter Enabled When enabled, grid views will
automatically filter as the user
starts to type in a column
heading. Turn this feature off to
manually control when to filter
data.
Time duration edit mode Combined Determines the format for
entering timesheet entries or
editing transactions in the
Transaction Review screen.
These settings also apply to the
creation of Production Issues.
Split equipment by primary type False When enabled, in reports and
dashboards, resources are
categorised into Primary and
Secondary Resources
(employees/equipment and
tools).
Send application telemetry True When enabled, this setting helps
LYNQ to enhance product
features and user experience.
Usage data sent to LYNQ is not
shared with any third party.

LYNQ 2020 USER GUIDE Page 10 / 171
Online Version Click here to read
this page online.
The online version
provides additional
links to other
related information.
Advanced Settings (General)
Financial Loss Labour rate 25.00 Default labour rate for the Loss
Management Report
Employee revenue rate 125.00 Default Revenue rate for the Loss
Management Report
Overhead rate 35.00 Default overhead rate for the
Loss Management Report
Equipment revenue rate 175.00 Default equipment revenue rate
for the Loss Management Report
Financial loss currency $ Default Currency Symbol for the
Loss Management Report
Group Security & Messaging Direct (single level) False When enabled, transactions and
messaging will be limited to a
single reporting level
Dependent (multi level) False When enabled, transactions and
messaging will be extended to
multi reporting levels
Supervisor workbench access True When enabled, supervisors will
have the ability to clock onto
Messages and Alerts Validity period, days 30 No of days when messages/alerts
will be set to automatically read
File uploading Settings Upload file max size (MB) 5 Maximum file attachment size for
the Document Library
Data Collection
Employee status (default) Out/Off Default status for employees
Equipment status (default) Out/Off Default status for equipment
Clock out warning after (hrs) 14.0 The number of hours an
employee can be clocked into the
workbench for before being
asked to clock out.
Terminal timeout after (secs) 600 The number of seconds before a
workbench terminal will revert to
the clock in screen.
Clocked time (default) Office Time The default pre-defined task for
office time.
Data selector (default) Operation
Selection
The default data selector
Report quantity (maximum) 1000000.00 The maximum Report Quantity
that can be entered during data
collection
Report scrap (maximum) 1000000.00 The maximum Scrap Quantity
that can be entered during data
collection.
Enable Automation False When enabled, data can be
collected via factory automated
devices.
Automation polling interval (sec) 10 Determines how frequently data
will be read in the factory
automation database to LYNQ.
Automation polling interval (sec)
Chunk size
1000 Determines the number of
records that can be processed in
one request

LYNQ 2020 USER GUIDE Page 11 / 171
Online Version Click here to read
this page online.
The online version
provides additional
links to other
related information.
Advanced Settings (General)
Data Collection
Data buffer interval (sec) 60 Determines how frequently the
processor will translate machine
data into LYNQ transactional
data.
Data buffer interval (sec) Chunk
size
3000 Determines the number of
records that can be processed in
one request
Transaction generation interval
(sec)
60 Determine the frequency for
generating transactions. This
setting applies to:
• Activity performed via the
workbench feature
• Data captured via the
factory automation feature
• Data generated via the
REST API feature
Transaction generation interval
(sec) Chunk size
10000 Determines the number of
records that can be processed in
one request
API Enable REST API False When enabled data can be
collected via REST API
REST API specification
REST API documentation
Data Retention Default retention history (days) 10 The number of days to retain raw
data for. Note: raw data is not
required once the corresponding
transaction has been generated
in Transaction Review. Only raw
data with a corresponding
transaction is eligible for purging
Tag retention history (days) 10 The number of days to retain tag
data for. Note: Tag data is used
by factory automation and is not
required once the corresponding
transaction has been generated
in Transaction Review
Data Caching Interval (s) Tasks 620 Determines the frequency for
caching data from ERP to LYNQ
Tasks schedule 630 Determines the frequency for
caching data from ERP to LYNQ
Operations 610 Determines the frequency for
caching data from ERP to LYNQ
Materials 640 Determines the frequency for
caching data from ERP to LYNQ
Jobs 600 Determines the frequency for
caching data from ERP to LYNQ
Employees 3600 Determines the frequency for
caching data from ERP to LYNQ
Equipment 3600 Determines the frequency for
caching data from ERP to LYNQ
APS planning statistics 3600 Determines the frequency for
caching data from ERP to LYNQ

LYNQ 2020 USER GUIDE Page 12 / 171
Online Version Click here to read
this page online.
The online version
provides additional
links to other
related information.
Advanced Settings (General)
Display Decimals Hours 2 Default display decimals for
hours
Quantities 2 Default display decimals for
reported quantities
Material quantity 2 Default display decimals for
material quantities
Other 2 Default display decimals for other
types of fields not listed above.

LYNQ 2020 USER GUIDE Page 13 / 171
Online Version Click here to read
this page online.
The online version
provides additional
links to other
related information.
Personal Settings
Personal settings are accessed from the home page by clicking on the personal
settings menu in the top right-hand corner of the screen.
Section
Field Meaning
General Settings Language Default language for the user
Localisation Default localisation for the user
• Grids will automatically
filter as the user is typing
when enabled
• Grid will be manually
filtered as the user has
finished typing and the user
presses enter when
disabled
Time duration edit mode Specifies the format for editing
transactions.
Options include
• Decimal
• HHMM (Hours/Minutes)
• Combined (both)
Developer mode Used by LYNQ support for
debugging application issues
Message and Alert
Settings
Validity period, days
unread messages will remain as
unread. When the validity
period days is reached, unread
messages will automatically
change to read
Production Schedule
Filters
Open only Default filter setting for the
Production Plan
APS only Default filter setting for the
Production Plan
Loaded only Default filter setting for the
Production Plan
Transactions
Labour time Default filter setting for
Transaction Review
Good quantity Default filter setting for
Transaction Review
Task status Default filter setting for
Transaction Review
Scrap quantity Default filter setting for
Transaction Review
Material reject Default filter setting for
Transaction Review
Material issue Default filter setting for
Transaction Review
Production issue Default filter setting for
Transaction Review
Machine time Default filter setting for
Transaction Review

LYNQ 2020 USER GUIDE Page 14 / 171
Online Version Click here to read
this page online.
The online version
provides additional
links to other
related information.
Overview Stay informed and
check the overall
health of LYNQ by
using the Systems
Insight screen.
Please wait Be patient with this
screen. It can take a
minute or two to run on
larger databases.
Troubleshooting A great feature used by
support when
troubleshooting the
application at the
technical level.
System insights
System Insights displays the current health and state of your LYNQ application.
This page is used by system administrators to troubleshoot and diagnose areas
of LYNQ that are not functioning as expected. The SQL account that is
specified in Settings, Database Settings must have SQL admin rights for this
page to function properly.
Any values on the page that are highlighted red should be investigated for the
continued operational health of LYNQ. This page provides at a glance a quick
way to identify if there are any underlying SQL views that are not functioning
correctly due to violation of key constraints. This is particularly useful when
the database of the Enterprise Resource Planning application that LYNQ is
connected to is set to a collation that is case sensitive. LYNQ is not a case
sensitive application and therefore SQL views may not execute if there are
duplicate keys returned.
One example of this is where two Product records have been created in the
Enterprise Resource Planning application that differ on case. LYNQ would treat
the value PRODUCTA and producta as a duplicated value. If duplicate keys are
returned by the LYNQ SQL views, the application will be severely affected and,
in some cases, partly or fully inaccessible by users. It is therefore important to
understand these limitations and monitor the health of the application to
ensure the application is fully operational.
LYNQ 2020 USER GUIDE Page 15 / 171
Databases
your databases and
include them in your
maintenance plans.
Posting If you see a high
number of transactions
that have a status of
posting this might
imply that the
application pool
settings need to be
fine-tuned. Check out
our knowledge base
articles on this subject.
Views Data is read from
Enterprise Resource
Planning
proprietary views.
Sometimes these views
are customised to give
you some extra data
mapped through to
LYNQ. Be aware that
views can get
overwritten with an
upgrade. Best to let
LYNQ help you perform
your upgrade. You can
book us through the
support desk.
Platform Service The LYNQ Platform
Windows Service
consolidates your
activity into
transactions. This
service may stop due
to heavy load on the
server or it failed to
start during a server
reboot. Check this
service is running on
the Web Server.
System insights
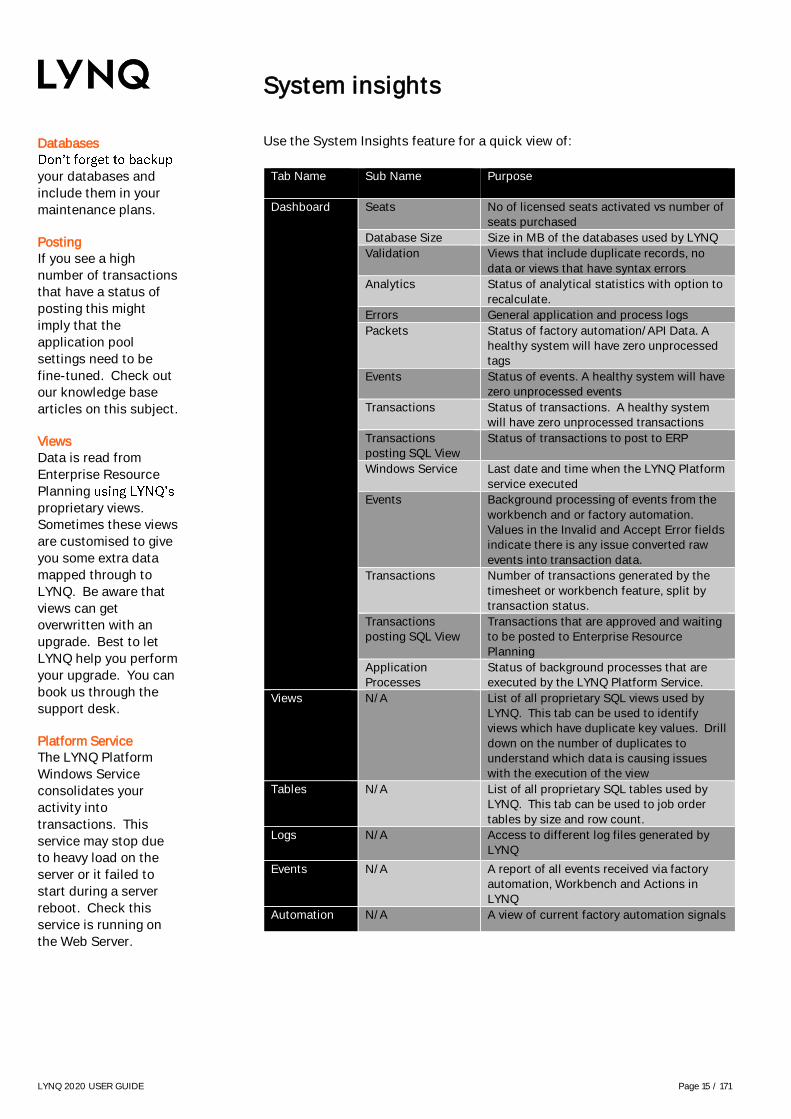
Use the System Insights feature for a quick view of:
Tab Name Sub Name Purpose
Dashboard Seats No of licensed seats activated vs number of
seats purchased
Database Size Size in MB of the databases used by LYNQ
Validation Views that include duplicate records, no
data or views that have syntax errors
Analytics Status of analytical statistics with option to
recalculate.
Errors General application and process logs
Packets Status of factory automation/API Data. A
healthy system will have zero unprocessed
tags
Events Status of events. A healthy system will have
zero unprocessed events
Transactions Status of transactions. A healthy system
will have zero unprocessed transactions
Transactions
posting SQL View
Status of transactions to post to ERP
Windows Service Last date and time when the LYNQ Platform
service executed
Events Background processing of events from the
workbench and or factory automation.
Values in the Invalid and Accept Error fields
indicate there is any issue converted raw
events into transaction data.
Transactions Number of transactions generated by the
timesheet or workbench feature, split by
transaction status.
Transactions
posting SQL View
Transactions that are approved and waiting
to be posted to Enterprise Resource
Planning
Application
Processes
Status of background processes that are
executed by the LYNQ Platform Service.
Views N/A List of all proprietary SQL views used by
LYNQ. This tab can be used to identify
views which have duplicate key values. Drill
down on the number of duplicates to
understand which data is causing issues
with the execution of the view
Tables N/A List of all proprietary SQL tables used by
LYNQ. This tab can be used to job order
tables by size and row count.
Logs N/A Access to different log files generated by
LYNQ
Events N/A A report of all events received via factory
automation, Workbench and Actions in
LYNQ
Automation N/A A view of current factory automation signals

LYNQ 2020 USER GUIDE Page 16 / 171
Online Version Click here to read
this page online.
The online version
provides additional
links to other
related information.
Go Paperless LYNQ supports a
paperless shop floor by
providing electronic
work instructions (EWI)
to the shop floor in
various forms (static
files, simple forms or
by providing links to
instructional videos).
The provision of online
document control
offers a
countermeasure to
operator shortages
involving
documentation helping
to eliminate time and
materials as a result of
paperwork trails
Document library
Links can also be used to connect job orders, operations, employees and
equipment to online file document management repositories when regulatory
or other requirements demand version control, archiving and audit trails.
Links can further be used to display other types of files such as CAD drawings
in DWG or DXF file formats. All you need is to ensure that a suitable viewer is
installed on the tablet or the panel PC device where you want to view the files
from.
You can attach files and drawings in Word, Excel, PDF, JPEG, PNG or other file
formats to Jobs, Operations, Employees and Equipment. These files are
available to view only and cannot be changed.
Attaching a static file to a job order
Click on the Document Library
Click Job orders and then select the specific job record/s
Click Add File and select Add File to Job
Drag and drop or click to browse to attach your files to the selected
jobs
Click Save
Attaching a static file to an employee
Click on the Document Library, Employees and then select the specific
employee record/s
Click Add File and select Add File to Employee
Drag and drop or click to browse to attach your files to the selected
employee
Click Save
Attaching a static file to equipment
Click on the Document Library
Click Equipment and then select the specific job order record/s
Click Add File and select Add File to Equipment
Drag and drop or click to browse to attach your files to the selected
equipment
Click Save

LYNQ 2020 USER GUIDE Page 17 / 171
Online Version Click here to read
this page online.
The online version
provides additional
links to other
related information.
Online Forms Create online forms to
record basic
information and
checks during the
production process.
Note: this should only
be used where there is
no audit trail, version
control and/or
archiving requirement.
Where this is a
requirement, see
working with document
management systems.
Excel & Work Copy and paste from
Excel or Word
(formatting may
change)
Document library
Attaching a simple form to a job
Click on the Document Library
Click Job orders and then select the specific job record/s
Click Add Form and select Add Form to job
Create your form or checklist in the WYSIWYG Editor
Click Save
You can link to document management systems such as Qpulse® or
SharePoint® (Microsoft Office 365) to view videos and work with controlled
shop packet information where audit trails, version control and archiving is a
requirement.
Care should be taken to organize your document library within your document
management system to make it easy for the operator, supervisor or manager to
work with.
For example, rather than link individual documents to specific operations, if the
document library is organized it may be easier to link to a shop packet library
for the specific job that contains all information such as videos, assembly
instructions, checklists, quality control forms and other controlled documents.
While this method requires a level of understanding from the user, it requires
far less administration and still ensures that only the paperwork related to that
specific job is used.
Linking to an online document library for a specific job
Click on the Document Library
Click Job orders and then select the specific job order record
Click Add Link and select Add URL to job
Place your cursor in the Link field
Copy and paste the URL from your document management system
library
Place your cursor in the Link Description field
Enter a description for the link (e.g. Shop Packet)
Click Save

LYNQ 2020 USER GUIDE Page 18 / 171
Online Version Click here to read
this page online.
The online version
provides additional
links to other
related information.
Versions You should only import
a profile into LYNQ
when the source and
destination instances
are on the same
version number and
language.
Backups Save a copy of your
profile before making
any significant
changes to advanced
settings.
Config Database An exported profile is a
textual representation
of the configuration
tables in XML format.
Factory Defaults LYNQ is shipped with a
default profile and
loaded during
installation. Do not
delete this profile as it
can be used to reset to
factory settings.
Reset Profile Do not reset your
profile unless you
really want to wipe all
of your settings.
Storing your profile
Most of the settings configured in LYNQ are stored in the configuration
database. These settings can be saved as a profile and exported to file. This
is a really useful feature if you want an easy way to transfer configuration
settings to another instance of LYNQ.
For data integrity purposes, unfortunately not everything can be stored and
exported in the profile. Nearly all of the settings found in advanced settings
included in a profile export.
Feature Sub Feature Excluded
Seats Users Users
Seat Properties Settings such as photo, crew
and Factory Automation
Groups Seat to group relationships
which affect Alerts, Access
Controls
Terminals Linked Equipment
Transaction Rules Rules which are defined by
Equipment and/or Employee
Alerts Settings relating to measured
Resources
Workbench Onscreen Elements Setting related to associated
equipment and login as
equipment
How to export your LYNQ Profile
You may be asked by the support team to export your settings for
troubleshooting purposes or may use this feature to transfer settings from one
site to another. Complete the following steps to export your current settings.
Click on Settings, Advanced Settings
Click on the Profiles Tab
Click on Save Current
Enter a new name and description (i.e. Profile Current System Date)
Click on Save
Select the profile that was saved in step 5
Select Export to File
The profile will be saved in your windows downloads folders
To export settings, the user must be a member of the Administrators Group.

LYNQ 2020 USER GUIDE Page 19 / 171
Features Look out for these
features in this section
of the user guide. For
advanced users of
Visual APS, refer to the
Advanced User Guide.
Detailed scheduling
LYNQ provides detailed scheduling so your organisation can easily
• Schedule multiple resources
• Customise load of scheduling demand
• Build customisable workflows for identification of scheduling
priorities
• View powerful grids and views of job prioritisation
• View high resolution calendar-based Gantt graphical planning
boards
• Manually and auto schedule individual operations, sequenced
operations within a job and sequenced jobs with sub job hierarchies
• Drag and drop schedule with enhanced impact behaviours
• Forward and backward auto schedule with rule and priority-based
scenarios for scheduling optimisation
• Semi-automatically reschedule late operations with autofit, shift,
replace, move and schedule around options
• Fix jobs and period fencing (pinning)
• Apply alternative resource scheduling with item/operation-based
constraints
• Apply variable resource constraint consumption strategies
• Apply what If and capable to promise (CTP) scenarios for capacity
and materials
• Dynamic scheduling and execution alerts
• Apply materials planning and availability analysis
• Capacity plan
• Publish and dispatch

LYNQ 2020 USER GUIDE Page 20 / 171
Online Version Click here to read
this page online.
The online version
provides additional
links to other
related information.
Reset Layout You can reset the
layout back to factory
settings by clicking on
file, company settings,
and reset layout.
Task Panel Columns Column settings are
saved in your Visual
APS profile that is
stored in your windows
user profile.
Imported Equipment Equipment, which has
been imported from
your ERP, will appear
in the factory explorer.
Navigating Visual APS
The Visual APS graphical interface is divided into three main sections.
• Factory Explorer
• Task Panel
• Schedule Board
Each section can be resized, pinned or moved around the screen as per your
desired preferences. The schedule board can be displayed on another monitor
to utilise the entire screen size.
Factory Explorer
The Factory Explorer Panel provides an outline view of the manufacturing
facility. A checkbox against the resource allows you to indicate whether it
should be displayed in the schedule board. They appear to the left of the board
in alphanumeric job order.
Task Panel
The Task Panel displays your job orders, dependant on the Job Import Rules
defined in Settings. Tabs show the total number of job orders currently
contained in its grid. The job order counter is dynamic and responds to a data
refresh, changes in the setting or filters. The column that you see in the task
panel can be customised by right clicking on the column heading.
Schedule Board
The schedule board displays all scheduling information related to the
resource and it's shift times and activities. The start and end date/time for
scheduled job orders are graphically represented. Vertical lines divide the time
bar in various increments.

LYNQ 2020 USER GUIDE Page 21 / 171
Features Look out for these
features in this section
of the user guide. For
advanced users of
Visual APS, refer to the
Advanced User Guide.
Navigating Visual APS
Quick Access Toolbar
The Quick Access Toolbar appears at the top left of the screen above the File
menu. It includes some of the most common commands for easy access.
• Save and Publish
• Refresh Data
• Unschedule Selected Items
• Highlight Job order
•
• Unload All Resource s
• Perform Auto Scheduling
• Show Resource Consumption
Ribbon Menu
Visual APS includes 9 different ribbon menus. Ribbon menus provide a fast
method of seeing and utilising functions in Visual APS.
This ribbon menu can be collapsed to free up space for other windows. To
collapse the ribbon menu, right click on an area in the ribbon menu and select
Collapse Ribbon. To restore the ribbon menu, right click on a menu option on a
visible ribbon menu and select Expand Ribbon.
Planning Interval
The Planning Interval is the period specified in which you want to make
scheduling changes. Scheduling cannot be performed outside of the planning
interval. The planning interval can be changed at any time from the ribbon menu
The default planning interval setting may be set by user in the Visual APS
settings window.
Company
you are logged into by viewing the company name next to the Welcome Tab
under the File Menu.

LYNQ 2020 USER GUIDE Page 22 / 171
Online Version Click here to read
this page online.
The online version
provides additional
links to other
related information.
Last Company When you exit Visual APS,
company connection
information will be saved
within your windows user
profile. The next time you
open Visual APS, the
company will automatically
load. The load company at
startup setting in general
settings will determine
whether the last company
opened is loaded
automatically.
SQL Security Refer to the Advanced
User Guide to
understand how to
setup security in SQL
for Visual APS.
Multiple Companies
multiple companies at
the same time.
Opening a company
You can launch the Visual APS Desktop Client from the LYNQ home page or
directly from the shortcut on your desktop. You will need to contact your
systems administrator to obtain the correct Enterprise Resource
Planning database to connect to. You must also have been setup as a user in
Visual APS to use the application.
To open a company with Visual APS
From the File Menu, select Open
Click New Database Connection
In the Server field enter the name of the SQL server where Enterprise
Resource Planning resides
Select the correct authentication method as setup by your
administrator
Select the App Role security setting if turned on by your administrator
In the Company field enter the Enterprise Resource Planning database
name
Click OK to open the company

LYNQ 2020 USER GUIDE Page 23 / 171
Limited Settings? You must open a company
to access all settings.
Settings will be limited if
the company is not open.
Resetting Settings Use reset settings to
reset settings to the
default values.
Saving Settings Settings are
automatically saved
when the user exists
Visual APS. Click on the
Save button to save the
settings to a file. The
file can be imported
later or shared with
other users.
Loading Saved Settings Settings saved to a file
can be loaded by
clicking on Load.
Quick Save Quick save allows users
to save settings
immediately.
Reset Layout Select the Reset Layout
button to reset the
layout of Visual APS to
the default layout.
Company settings
Access to Visual APS settings can be gained via the File, Manage, Plan,
Schedule & View menu tabs of the application. You will be directed to the
relevant company settings depending upon which menu tab you are on.
integration value in the General Tab and the User Access settings which are
stored in LYNQ tables within the ERP database.
To edit company settings
Select the File Menu
Select Company Settings
Select General

LYNQ 2020 USER GUIDE Page 24 / 171
Online Version Click here to read
this page online.
The online version
provides additional
links to other
related information.
MOM Integration Setting This setting is stored
globally for all users.
General settings
Refer to the table below for an explanation of all settings on the General Tab.
General Settings
Section Setting Explanation
General Load company
at startup
Indicates the company will automatically
open on application startup
Save windows
layout
Indicates the layout will appear as it did in
the previous session.
Save schedule
zoom
Indicates the schedule zoom will appear as
it did in the previous session.
Save and
publish warning
message
Indicates whether a warning message
should appear after selecting Save and
Publish
Show related
orders only
Indicates whether to only display jobs with
dependencies in the related jobs pocket.
Choose theme The theme for the company.
MOM
Integration
MOM
Integration URL
The URL link to the MOM installation.
MOM reports and dashboards would be
inaccessible from menus in Visual APS if
no value is specified.
Running
Version
Provided for backward compatibility with
older installations of LYNQ. Default value
is 2016 R2 and higher.
ERP
Integration
Processing type How LYNQ updates Jobs in the ERP
application.
Auto Refresh Use auto
refresh
Indicates whether data should be
refreshed automatically. In addition,
whether a notification is displayed each
time a refresh occurs. This notification can
be set by checking the Show notification
window before each refresh box. When
unchecked, refresh is completed by
selecting refresh from the Toolbar.

LYNQ 2020 USER GUIDE Page 25 / 171
Online Version Click here to read
this page online.
The online version
provides additional
links to other
related information.
Error Logs Even if the company does
not open due to an error,
you will still be able to
access the log files from the
Visual APS application.
General settings
General Settings
Section Setting Explanation
Update
Notification
Update
notification
Indicates whether a pop up at the selected
interval is displayed advising how long-ago
APS was updated.
Error Log Error log Should Visual APS return an error to the
user the full error message is captured
within an error log file. Log files are
generated by user and not centrally located.
Workflow Workflow
filters
Select to restore Workflow filters globally.

LYNQ 2020 USER GUIDE Page 26 / 171
Online Version Click here to read
this page online.
The online version
provides additional
links to other
related information.
Domain Name Do not specify the domain
name when creating users.
User access settings
Users are managed under user access. Users that have SQL sysadm rights will
automatically be able to access these settings. Visual APS users must be
added to this screen.
To add users
Select the File Menu
Select Company Settings
Select User Access
Click on the next available row where there is no username specified
name)
Click on OK
To restrict access to work centres and work units from the By Planner Tab
Select the File Menu
Select Company Settings
Select User Access
Select by Planner
Select the relevant user
Place a check in the required work centres and work units

LYNQ 2020 USER GUIDE Page 27 / 171
Online Version Click here to read
this page online.
The online version
provides additional
links to other
related information.
License Password Contact LYNQ Support to
request your license
password.
User access settings
Refer to the table below for an explanation of all settings on the User Access
Seats Tab
User Access - Seat Settings
Section Setting Explanation
User Access
Logged User Displays the current logged in user
Use Application
Role
Specifies whether the application role will
be used to provide SQL permissions to
users. When enabled, users must select
Company Window. See the section on
opening a company
Protect this
page with
license
password
Specifies whether the user access page
can only be accessed using the license
password. The license password is
supplied on shipment with the license.

LYNQ 2020 USER GUIDE Page 28 / 171
Online Version Click here to read
this page online.
The online version
provides additional
links to other
related information.
Job management settings
You can control which jobs are loaded into the Task Panel based on their start
and end date in relation to the planning interval from the company settings
screen.
To edit job management settings
Select the File Menu
Select Company Settings
Select Job Import & Rules

LYNQ 2020 USER GUIDE Page 29 / 171
Online Version Click here to read
this page online.
The online version
provides additional
links to other
related information.
Planner Code You must enter the
warehouse code as it is
referenced
Job management settings
Refer to the table below for an explanation of all settings on the Job Import &
Rules General Tab.
General Import & Rules Settings
Section Setting Explanation
General
Selective Time
Loading
Specifies whether selective time loading is
enabled.
• Only load orders where order start
date is within current planning
interval (plus no. of day)
• Only load orders where order end
date is within current planning
interval (plus no. of days)
If either the job start or end dates is outside
of the planning interval plus the no. of days
added, they will not be shown.
By entering, a number in either of these
boxes gives you the ability to extend this
window and the jobs shown in the grid view.
Selective
Planner
Loading
Specifies whether jobs should be loaded for
a specific planner code. You must enter the
planner code as it is referenced in the ERP
application.
Selective
Warehouse
Loading
Specifies whether Jobs should be loaded for
a warehouse code.
LYNQ 2020 USER GUIDE Page 30 / 171
Online Version Click here to read
this page online.
The online version
provides additional
links to other
related information.
Code Format You must enter the status
code as it is referenced in
the ERP application.
Job management settings
Refer to the table below for an explanation of all settings on the Job Import &
Rules Production Tab.
Production Import & Rules Settings
Section Setting Explanation
Production
Status Specifies which production jobs are loaded
based on status.
Custom Specifies which production jobs are loaded
based on a custom status. The custom
status must be mapped to the Status Code 2
field in the
Lynq_VP_SourceProductionOrdersView view

LYNQ 2020 USER GUIDE Page 31 / 171
Online Version Click here to read
this page online.
The online version
provides additional
links to other
related information.
Code Format You must enter the status
code as it is referenced in
the ERP application.
Job management settings
Refer to the table below for an explanation of all settings on the Job Import &
Rules MRP Tab.
MRP Import & Rules Settings
Section Setting Explanation
MRP
Status Specifies which MRP jobs are loaded based
on status.
Custom Specifies which MRP jobs are loaded based
on a custom status. The custom status must
be mapped to the Status Code 2 field in the
Lynq_VP_SourceProductionOrdersView view
LYNQ 2020 USER GUIDE Page 32 / 171
Online Version Click here to read
this page online.
The online version
provides additional
links to other
related information.
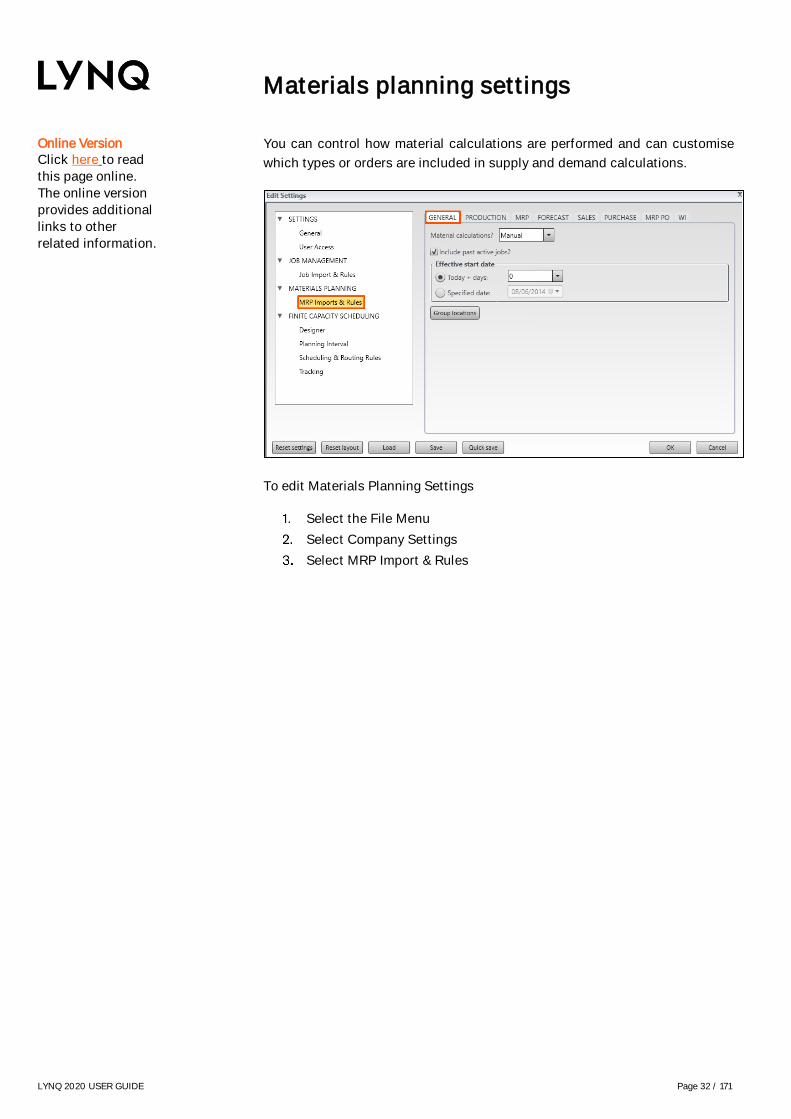
Materials planning settings
You can control how material calculations are performed and can customise
which types or orders are included in supply and demand calculations.
To edit Materials Planning Settings
Select the File Menu
Select Company Settings
Select MRP Import & Rules

LYNQ 2020 USER GUIDE Page 33 / 171
Online Version Click here to read
this page online.
The online version
provides additional
links to other
related information.
Manual Calculations Manual calculations can
be performed when the
material calculation is
set to auto. Setting the
material calculations
setting to Auto may
increase startup times.
Materials planning settings
Refer to the table below for an explanation of all settings on the MRP Import &
Rules General Tab.
MRP Imports & Rules General Settings
Section Setting Explanation
General
Material
Calculations
Specifies whether materials
calculations will happen manually or
automatically.
• Manual (when recalculate materials
is selected).
• Auto (on startup of Visual APS and
when refresh is selected)
Include Past
Active Orders
Specifies whether past active jobs will
be included in material calculations.
Effective Start
Date
Specifies the effective start date of
orders in the past.
Group Locations Provides the ability to create groups of
locations that materials calculation will
consider when using multiple
warehouses.

LYNQ 2020 USER GUIDE Page 34 / 171
Online Version Click here to read
this page online.
The online version
provides additional
links to other
related information.
Different Order Types Depending on the types of
orders supported by the
integrated ERP application,
there are additional tabs,
which appear next to the
General Tab. (i.e.
Production, MRP Jobs,
Forecast, Sales, Purchase,
MRP PO & WI).
Materials planning settings
These tabs are split by supply, demand or both, allowing you to manage which
types or orders are considered for materials planning. You can choose to delete
the status code if required. When included in the list, the order will be
considered when materials planning is run. Within the profile shipped with
Visual APS, default codes are automatically included. These are configured to
match the status codes within the integrated ERP application.
MRP Imports & Rules by Order Type Settings

LYNQ 2020 USER GUIDE Page 35 / 171
Online Version Click here to read
this page online.
The online version
provides additional
links to other
related information.
Finite capacity scheduling settings
Within finite capacity scheduling settings, you are able to change the
appearance of the task panel, factory explorer and planning board. Default
planning interval settings can be configured to define the period of time into
the future (and back into the past) where scheduling can occur. Scheduling
and routing rules allow users to set default rules for scheduling. These can be
overwritten during scheduling, by using the options on the schedule tab if
required. Tracking when enabled, provides progress indicators to alert when
production is running late or early by more than a set percentage.
Finite Capacity Scheduling Settings
To edit Finite Capacity Scheduling settings
Select the File Menu
Select Company Settings
Select Finite Capacity Scheduling

LYNQ 2020 USER GUIDE Page 36 / 171
Online Version Click here to read
this page online.
The online version
provides additional
links to other
related information.
Resetting Settings Use reset settings to
reset settings to the
default values.
Finite capacity scheduling settings
Refer to the table below for an explanation of all settings on the Designer
General Tab.
Example Design

LYNQ 2020 USER GUIDE Page 37 / 171
Online Version Click here to read
this page online.
The online version
provides additional
links to other
related information.
Finite capacity scheduling settings
Designer General Settings
Section Setting Explanation
Designer
Wide Row Width The size of each row in the
production jobs window and the
factory explorer
Hide Work Centres
with no associated
work units
When enabled, work centres with no
associated work units are not
displayed in the factory explorer or
in the schedule board
Background Background colour of the planning
board.
Schedule Colour of the schedule board where
scheduled jobs/operations appear.
Schedule Height Height of schedule
Separation Margin Distance between each schedule
Label Font Size Label font size on the schedule
Show Shifts Specifies whether the shift bar is
displayed which shows working and
non-working time
Shift Height Specifies the height of the shift bar.
Show Resources Specifies whether the resources bar
is displayed
Hide when Zero Hides the resource label in the
resources bar when resources are
zero
Resource Height Height of the Resource bar
Show Available
Hours
Specifies whether resources
available by hour are displayed
above the schedule
Available Hours
Height
Height of Available hours bar
Show Consumption
As
Show resource as an equaliser, line
or text
Percentage Data
Labels
View percentage data labels which
show available resources in the form
of a percentage
LYNQ 2020 USER GUIDE Page 38 / 171
Online Version Click here to read
this page online.
The online version
provides additional
links to other
related information.
Custom Text Text boxes before and after
data in the right window,
allow prefix and suffix
values to be added. Data
labels are reordered by
selecting the heading and
using the up & down
buttons.
Finite capacity scheduling settings
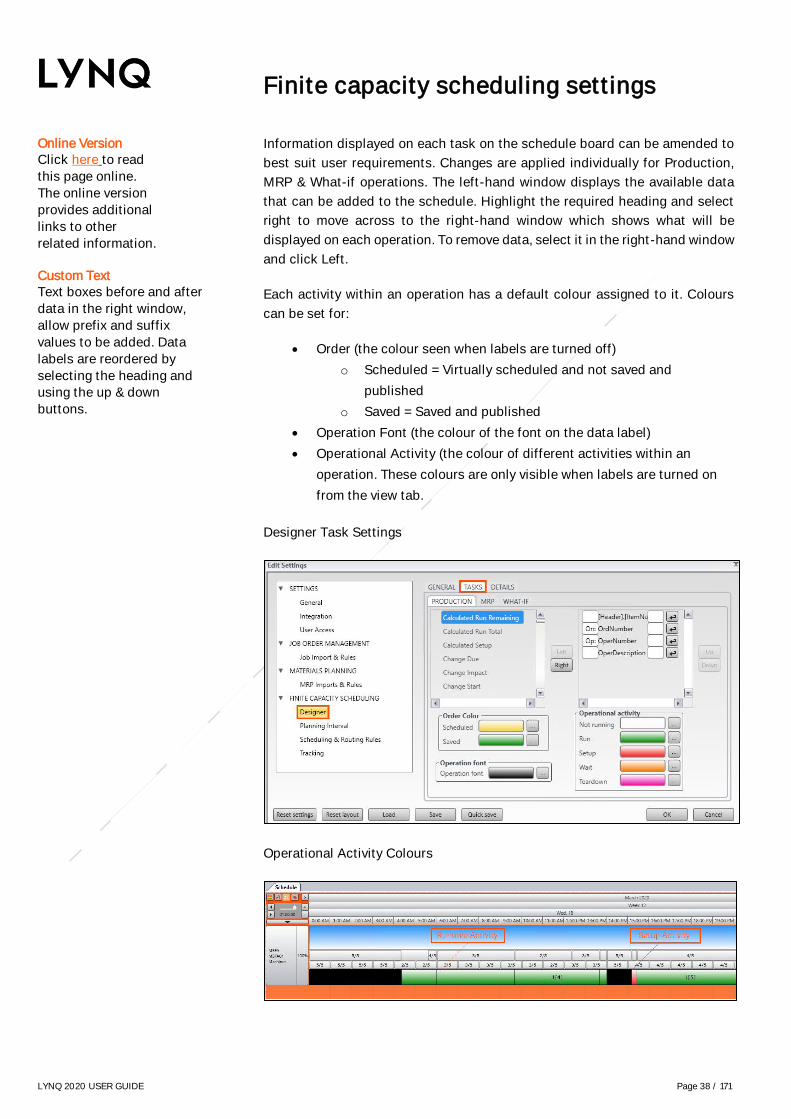
Information displayed on each task on the schedule board can be amended to
best suit user requirements. Changes are applied individually for Production,
MRP & What-if operations. The left-hand window displays the available data
that can be added to the schedule. Highlight the required heading and select
right to move across to the right-hand window which shows what will be
displayed on each operation. To remove data, select it in the right-hand window
and click Left.
Each activity within an operation has a default colour assigned to it. Colours
can be set for:
• Order (the colour seen when labels are turned off)
o Scheduled = Virtually scheduled and not saved and
published
o Saved = Saved and published
• Operation Font (the colour of the font on the data label)
• Operational Activity (the colour of different activities within an
operation. These colours are only visible when labels are turned on
from the view tab.
Designer Task Settings
Operational Activity Colours

LYNQ 2020 USER GUIDE Page 39 / 171
Online Version Click here to read
this page online.
The online version
provides additional
links to other
related information.
Settings by Tab Details can be set
separately for Production
operations, MRP operations
& WI operations.
Finite capacity scheduling settings
It is often useful for Planners using Visual APS to quickly see more details about
an operation, and which settings were used when the operation was scheduled.
Users are able to select the Show Details function to gain a better insight into
the scheduling parameters used and the current status of the operation. The
Show Details function also provides users with the ability to customise and add
additional fields to the screen.
Under details there is a list of available column headings, with buttons allowing
you to move them to the right (to include them in the additional details region)
and up and down buttons to allow you to arrange them as necessary. Up to 6
additional fields can be added.
The show details function is accessed by right clicking on the operation line in
the Task Panel.
Show Details Screen

LYNQ 2020 USER GUIDE Page 40 / 171
Online Version Click here to read
this page online.
The online version
provides additional
links to other
related information.
Orders in the Task Panel The planning interval does
not restrict the range of
orders/jobs that appear in
the Task Panel. To filter the
orders/jobs in the Task
Panel refer to the Order
Import & Rules section.
Planning interval settings
The planning interval defines the period of time into the future (and back into
the past) where scheduling can occur. The planning interval can be changed at
any time from the Schedule tab. Scheduling cannot be performed outside the
planning interval.
Planning Interval Settings
Section Setting Explanation
Planning
Interval
From Today Allowing the user to select the
amount of days before or after today
that the planning interval starts and
the number of weeks after the start
date that the planning interval ends.
Previous Loaded When enabled, work centres with no
associated work units are not
displayed in the factory explorer or in
the schedule board
Custom Giving the user the ability to select a
specific date range.

LYNQ 2020 USER GUIDE Page 41 / 171
Online Version Click here to read
this page online.
The online version
provides additional
links to other
related information.
Supported in ERP? Different ERP applications
support different
scheduling parameters to
manufacture a product. (i.e.
Queue, Setup, Wait,
Teardown, Move,
Subcontract,
Transfer/Overlap). Where
supported, Visual APS will
read the parameters from
the operation/routing in the
ERP application.
Parameters can optionally
be set manually in Visual
APS by using the Edit Job
function.
Scheduling & routing rule settings
The settings within scheduling and routing rules allow the planner to
manipulate the captured routing to better schedule tasks. Each of the options
can be turned off and on by adding or removing a check in the corresponding
box under the following sub headings; General, Queue, Setup, Wait, Teardown,
Move, Sub Contract, Transfer/Overlap, Status definition for completed
operations. In addition, the planner can set default values for manual and auto
scheduling.
To edit the Scheduling & Routing Rule settings
Select the File Menu
Select Company Settings
Select Scheduling & Routing Rules

LYNQ 2020 USER GUIDE Page 42 / 171
Online Version Click here to read
this page online.
The online version
provides additional
links to other
related information.
Float Resources Using float will decrease or
increase the elapsed time
of the operation.
Scheduling & routing rules settings
Refer to the table below for an explanation of all settings on the Scheduling &
Routing Rules > Default Tab
Scheduling & Routing Rules Default Settings
Section Setting Explanation
Default
Float Resources By default, LYNQ consumes the
number of resources defined in the
operation parameters. By using float,
LYNQ can consume variable quantity
of resources.
• Off = Resources defined in
the operation will be
consumed
• On = Resources are
consumed based on the
number of resources defined
against the work unit.
Resources will only be
consumed up to the Float
Consumption Max value
• Specific = The Max
Consumption rates values will
apply to all work units
The default settings can be amended
from the Schedule Tab, prior to
scheduling.
Consumption Rate
Min/Max
Used by Float Specific

LYNQ 2020 USER GUIDE Page 43 / 171
Online Version Click here to read
this page online.
The online version
provides additional
links to other
related information.
Scheduling & routing rules settings
Scheduling & Routing Rules Default Settings
Section Setting Explanation
Default Split Tasks This setting allows Visual APS to
utilise any free space in the schedule
even if it means that the
operation/job will be started and
stopped before completion. For
example, imagine that a shift is from
8:00 to 12:00 and an operation is
scheduled from 9:00 to 11:00. If a 2
hour operation is scheduled with split
tasks enabled, the operation will be
split to start from 8:00 to 9:00 for 1
hour and then from 11:00 to 12:00 for
1 hour, when dragged to start at 8:00
on the schedule board.
Split Task
Consumption (Min)
The minimum amount of time an
operation can be split for. The Split
Task Consumption (Min) value
specified in (HH:MM) is configured
against the work unit. If less time is
available, the task cannot be
scheduled during that time slot. This
is used to prevent situations where
operations are scheduled for a short
period of time before it needs to be
stopped for another operation to
start.
Split Task
Interruption (Max)
The maximum amount of time an
operation can be interrupted for. The
Split Task Interruption (Max) value
specified in (HH:MM) is configured
against the work unit.. If more time
than this amount is required to
interrupt the task (for other tasks),
the task cannot be scheduled during
that time slot.

LYNQ 2020 USER GUIDE Page 44 / 171
Online Version Click here to read
this page online.
The online version
provides additional
links to other
related information.
Supported in ERP? Different ERP applications
support different
scheduling parameters to
manufacture a product. (i.e.
Queue, Setup, Wait,
Teardown, Move,
Subcontract,
Transfer/Overlap). Where
supported, Visual APS will
read the parameters from
the operation/routing in the
ERP application.
Parameters can optionally
be set manually in Visual
APS by using the Edit Job
function.
Scheduling & routing rules settings
Refer to the table below for an explanation of all settings on the Scheduling &
Routing Rules > Routing Tab.
Scheduling & Routing Rules Routing Settings
Section Setting Explanation
General
Hide completed
operations
When enabled, completed
operations will not be visible on
the schedule board and capacity is
available for other operations to be
scheduled. Note this setting does
not hide the operation in the Task
Panel.
Schedule when
status is complete
When enabled, an operation can
be scheduled where it is marked
complete and there is outstanding
quantity to produce.
Queue Use Queue Time Queue time is the period of time
during which the product awaits
transfer to the next operation in
the routing. When enabled, queue
time will be scheduled.
Apply as hours
instead of days
When enabled, queue time will be
treated in hours instead of days.
Auto schedule to
next day
When enabled, queue time will be
scheduled to the next day when
auto scheduled.
Apply after
previous
Determines whether queue time is
applied after the previous
operation.

LYNQ 2020 USER GUIDE Page 45 / 171
Online Version Click here to read
this page online.
The online version
provides additional
links to other
related information.
Scheduling & routing rules settings
Section Setting Explanation
Setup Use Setup Time Indicates the time it takes to
prepare the manufacturing work
unit for production. When
enabled, setup time will be
scheduled.
Apply even when no
run or open quantity
Indicates that setup time should
be scheduled even when there is
no run time or open quantity.
Wait Use Wait Time Indicates the amount of time
between the end of the current
operation and the availability of
the product to be moved to the
next work centre. This forms part
of elapsed time
Apply to Operation
(off = unit)
When disabled, wait time will be
applied to the operation. When
enabled, wait time will be applied
for each unit.
Wait Time Resources Indicates whether resources will
be consumed during wait time.
Apply to Non-
Working Time
When enabled, wait time can be
scheduled during non-working
time.
Apply even when no
run or open quantity
Indicates that wait time should be
scheduled even when there is no
run time or open quantity.
Teardown Use Teardown Indicate the time taken to close
down the specific machine, line,
or work centre used in the
operation after production is
complete. It forms part of the
elapsed time. Typically, no usable
items are produced during the
teardown period.
Apply to Operation
(off = unit)
When disabled, teardown time
will be applied to the operation.
When enabled, teardown time will
be applied for each unit.
Teardown Resources Indicates whether resources will
be consumed during teardown
time.
Apply to Non-
Working Time
When enabled, teardown time can
be scheduled during non-working
time.
Apply even when no
run or open quantity
Indicates that teardown time
should be scheduled even when
there is no run time or open
quantity.
LYNQ 2020 USER GUIDE Page 46 / 171
Online Version Click here to read
this page online.
The online version
provides additional
links to other
related information.
Scheduling & routing rules settings
Section Setting Explanation
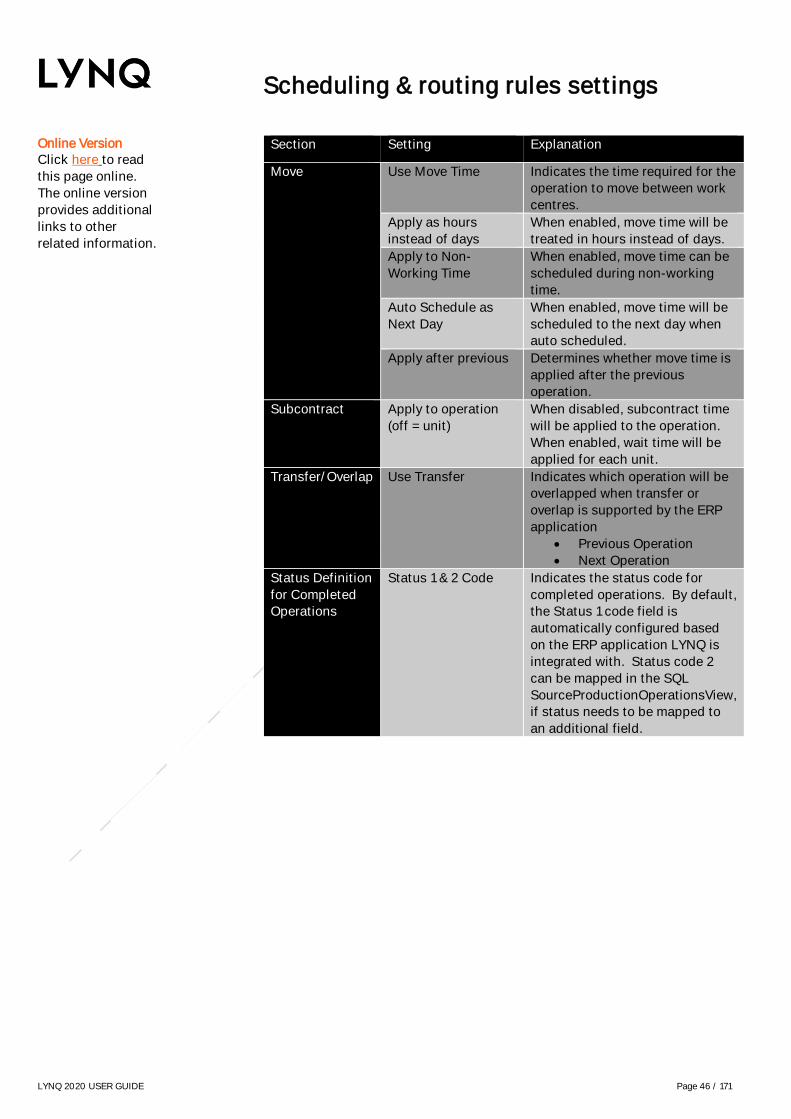
Move Use Move Time Indicates the time required for the
operation to move between work
centres.
Apply as hours
instead of days
When enabled, move time will be
treated in hours instead of days.
Apply to Non-
Working Time
When enabled, move time can be
scheduled during non-working
time.
Auto Schedule as
Next Day
When enabled, move time will be
scheduled to the next day when
auto scheduled.
Apply after previous Determines whether move time is
applied after the previous
operation.
Subcontract Apply to operation
(off = unit)
When disabled, subcontract time
will be applied to the operation.
When enabled, wait time will be
applied for each unit.
Transfer/Overlap Use Transfer Indicates which operation will be
overlapped when transfer or
overlap is supported by the ERP
application
• Previous Operation
• Next Operation
Status Definition
for Completed
Operations
Status 1 & 2 Code Indicates the status code for
completed operations. By default,
the Status 1 code field is
automatically configured based
on the ERP application LYNQ is
integrated with. Status code 2
can be mapped in the SQL
SourceProductionOperationsView,
if status needs to be mapped to
an additional field.
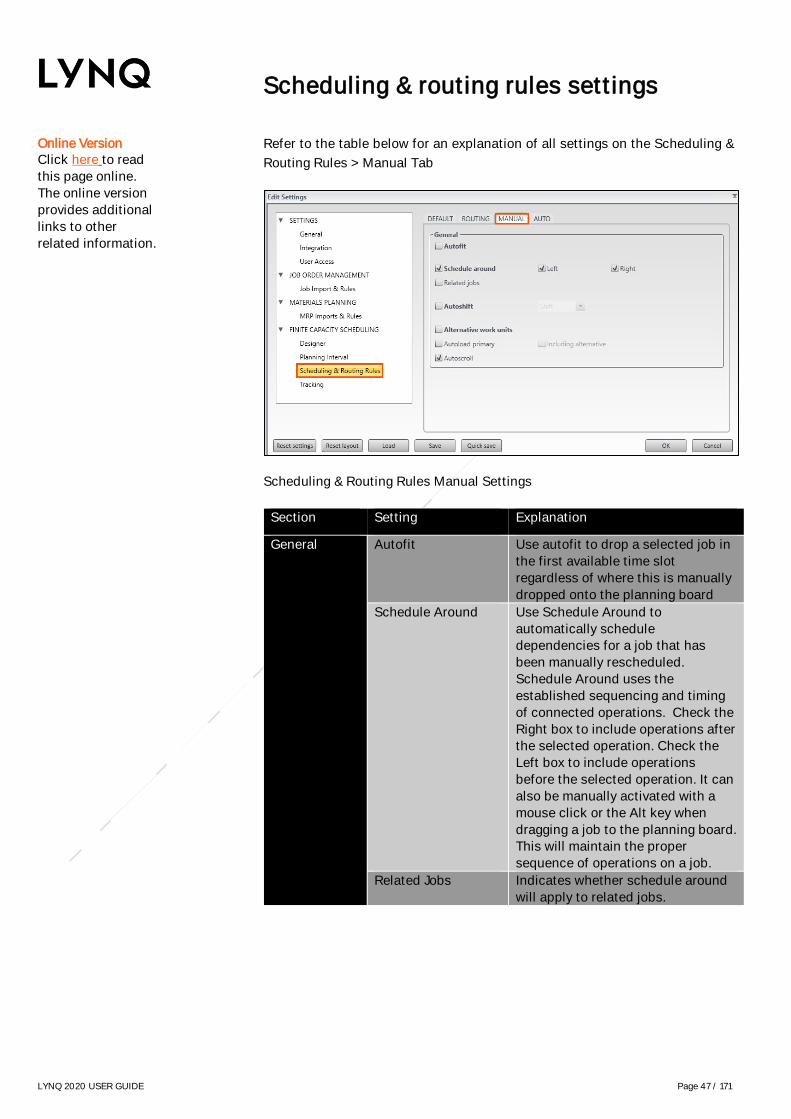
LYNQ 2020 USER GUIDE Page 47 / 171
Online Version Click here to read
this page online.
The online version
provides additional
links to other
related information.
Scheduling & routing rules settings
Refer to the table below for an explanation of all settings on the Scheduling &
Routing Rules > Manual Tab
Scheduling & Routing Rules Manual Settings
Section Setting Explanation
General Autofit Use autofit to drop a selected job in
the first available time slot
regardless of where this is manually
dropped onto the planning board
Schedule Around Use Schedule Around to
automatically schedule
dependencies for a job that has
been manually rescheduled.
Schedule Around uses the
established sequencing and timing
of connected operations. Check the
Right box to include operations after
the selected operation. Check the
Left box to include operations
before the selected operation. It can
also be manually activated with a
mouse click or the Alt key when
dragging a job to the planning board.
This will maintain the proper
sequence of operations on a job.
Related Jobs Indicates whether schedule around
will apply to related jobs.

LYNQ 2020 USER GUIDE Page 48 / 171
Online Version Click here to read
this page online.
The online version
provides additional
links to other
related information.
Scheduling & routing rules settings
Manual Scheduling & Routing Rules Settings
Section Setting Explanation
General
Autoshift Use Autoshift when inserting an
urgent new job. There are 3 ways in
which Autoshift can be used:
• Use Replace to schedule a new
operation or job on the timeline
and unschedule the order that
occupied that time.
• Use Shift to schedule a new
operation and move all affected
jobs on the timeline to the right
after the new order. Caution:
this does not affect dependent
operations or jobs.
• Use Move ASAP to schedule a
new operation or job,
unschedule the existing and
reschedule it in the first
available slot.
Alternative Work
Units
Indicates whether alternative work
units can be scheduled to when an
alternative work unit exists.
Autoload Primary Indicates that a products primary
work centre should automatically be
loaded into the planning board.
Including
Alternatives
Indicates that an alternative work
unit should automatically be loaded
into the timeline.
Autoscroll Option to have the planning board
automatically scroll to the first work
centre that can perform the work for
an order you are manually
scheduling.

LYNQ 2020 USER GUIDE Page 49 / 171
Online Version Click here to read
this page online.
The online version
provides additional
links to other
related information.
Scheduling & routing rules settings
Refer to the table below for an explanation of all settings on the Scheduling &
Routing Rules > Auto Tab
Scheduling & Routing Rules Auto Settings
Section Setting Explanation
General Scheduling Method Indicates the default scheduling
method when manually and
automatically scheduling
• Forward scheduling means the
scheduling process will start
from a selected date,
irrespective of when the order
is due
• Backward scheduling means
the scheduling process will be
completed one day before the
due date
Forward From Indicates which date to schedule
forward from
Backward From Indicates which date to schedule
backward from
Sequence By Indicates the sequence of
scheduling
• Grid grouping uses the
sequence the job orders appear
in the scheduling grid to
schedule them in order.
• Priority index uses a priority
field in the scheduling to
represent the order in which
jobs are scheduled.

LYNQ 2020 USER GUIDE Page 50 / 171
Online Version Click here to read
this page online.
The online version
provides additional
links to other
related information.
Scheduling & routing rules settings
Auto Scheduling & Routing Rules Settings
Section Setting Explanation
General Link Jobs Indicates whether auto scheduling
should simulate the behaviour of sub
jobs, whereby the scheduler can
manually define which jobs must be
completed before subsequent jobs can
commence. For example, sub-
assemblies must be completed before
the parent good. The default link jobs
settings relate to the create
dependency settings and work in
Auto scheduling.
From Date Indicates whether the schedule from
date uses a specified date or the job
order date when scheduled.
Preferences ASAP Enables Work Unit Balancing
Work Unit
Balancing
Indicates the preferences for
scheduling
• Schedule (Critical) will schedule
jobs irrespective of whether the
due date can be met using all
available resources
• Schedule (Primary) will schedule
jobs irrespective of whether the
due date can be met with priority
of primary machine first and
alternatives second
• Schedule (Alternatives) will
schedule jobs irrespective of
whether the due date can be met
with priority of alternative
machines first and primary
machines second
• Due Date (Critical) will schedule
jobs only when the due date can
be met using all available
resources
• Due Date (Primary) will schedule
jobs only when the due date can
be met with priority of primary
machine first and alternatives
second
• Due Date (Alternatives) will
schedule jobs only when the due
date can be met with priority of
alternative machines first and
primary machine second

LYNQ 2020 USER GUIDE Page 51 / 171
Online Version Click here to read
this page online.
The online version
provides additional
links to other
related information.
Tracking settings
Visual APS includes a progress alert function to highlight to the planner when
operations are running early or late. Progress alerts will appear in the task
panel and against the operation in the schedule board. Progress is based on
the unit of units produced in the expected amount of time.
Progress Alerts
Changes made to scheduled operations can be tracked, and additional columns
in the Jobs lists will show whether a job has been changed (tick box) the impact
(shifted left or right), along with the changes (+ or -) to the start date/time, and
the due date/time. There is no visual change on the schedule board to indicate
a change has been made.
LYNQ 2020 USER GUIDE Page 52 / 171
Online Version Click here to read
this page online.
The online version
provides additional
links to other
related information.
Reset Layout You can reset the
layout back to factory
settings by clicking on
file, company settings,
and reset layout.
Filtering Filters may be applied
for any column or
columns in the task
panel. When a filter is
applied, the tab name
shows the number of
jobs followed by the
word filtered in red.
Task Panel Columns Column settings are
saved in your Visual
APS profile, which is
stored in your windows
user profile.
Imported Equipment Equipment, which has
been imported from
ERP, will appear in the
factory explorer.
Rearranging the layout
You can rearrange the layout of Visual APS to suit your individual requirements.
Users with dual screens may prefer to show the schedule board on a second
screen.
How to Move the Factory Explorer, Task Panel or Scheduling Board
Select and hold the left mouse button on the window header. A
coloured area indicates the window you are moving. Small icons
indicate the possible locations to move the window.
Drag the window to the new location on the screen. Point to one of the
icons to dock the window to that location. Or drag it anywhere to open
that panel in a separate window (floating).
How to Resize the Factory Explorer, Task Panel or Scheduling Board
Point the mouse on the job order of the window until the resizing
cursor appears.
Click and hold the left mouse button and drag the job order as needed.
Release the left mouse button.
How to Float the Factory Explorer, Task Panel or Scheduling Board
Click on the small arrow at the top right of the window that you want to
float.
Select floating from the menu. The panel is now in a separate window.
You can also simply double-click the window header.
How to Dock the Factory Explorer, Task Panel or Scheduling Board
Windows are automatically docked. If you have previously floated a window,
you can redock it by moving it to one of the docked locations indicated by the
small icons that appear when you move a window.
How to Auto Hide the Factory Explorer, Task Panel or Scheduling Board
Select the Auto hide icon on the right side of the window header.
The window is hidden on the side it was docked to. Hover over the
window name to see it or click on the name to open it.
LYNQ 2020 USER GUIDE Page 53 / 171
Online Version Click here to read
this page online.
The online version
provides additional
links to other
related information.
Hierarchies The groups that you see
in the Factory Explorer
are read from Enterprise
Resource Planning
directly. The resources
that you see under the
group names are
typically imported by
running the Import
option from Visual APS.
Factory explorer in more detail
You are able to manage the resources that you see in the schedule board by
using simple techniques below:
• Check the box next to a resource it in the schedule board.
• Check the box next to a resource group to view all of the associated
Resources in the schedule board.
• Uncheck the box next to a resource to remove it from the schedule
board.
• Check or clear the checkbox at the top of the factory explorer panel
(to the left of the column headings) to view or remove all resources
from the schedule board
resources a user is able to see.
To restrict access by user
From the File Menu, select Company Settings
Click User Access
Click by Planner
Select the User
Place check marks against the resources you wish them to see
Click OK
In addition to restricting which resources a user can see; you also have the
ability to prevent any resource groups from being displayed where there are no
resources underneath them.
To hide resources groups where there are no associated resource
From the File Menu, select Company Settings
Click Designer
Click Hide resource groups where there are no associated resources
Click OK

LYNQ 2020 USER GUIDE Page 54 / 171
Online Version Click here to read
this page online.
The online version
provides additional
links to other
related information.
Sorting Columns Quickly sort columns
by clicking on the
column name.
Default Task View By default, the task
panel will show the job
order and then the
operations underneath
them. To see the
operations, you need to
expand each job order.
You can change this
view so that the task
panel shows a list of
operations instead. To
do this click on the
manage menu and
select list by operation.
Sub Job orders Tab The sub job orders tab
will show a view, which
relates the sub job
order to its parent or
master job order.
Volume of job orders The planning interval
does not affect the
volume of job orders
that you see in the
Task Panel. The
interval is used for
calculating your
capacity.
Task panel in more detail
To change the job order of the columns in the task panel drag a column header
to a new location. Visual APS retains the changes and the task panel will again
appear in this job order when the software is reopened. A number of additional
columns are available and can be added to the task panel.
To add columns to the task panel
Right click on a column heading
Click Column Settings
Expand the required entity in the left window
Click on the + symbol
Customise the label of the column if required
Set the desired position by changing the number value
Click the arrow symbol to change column position
Click on OK
To remove columns from the task panel
Right click on a column heading
Uncheck the column in the right window
Click OK
The types of job orders that appear in the task panel are controlled by settings
in Visual APS. These settings are in the Visual APS profile which is stored in
job orders are loaded,
whether job orders should only be loaded for a particular planner code and
whether job orders should be loaded within the current planning internal
To customise the types of job order that are loaded in the task panel
From the File Menu, select Company Settings
Click Job order Import & Rules
Click on the Production or MRP tab
Change the settings to show All, Scheduled Only or Excluded
Click OK

LYNQ 2020 USER GUIDE Page 55 / 171
Online Version Click here to read
this page online.
The online version
provides additional
links to other
related information.
Share your settings After you have spent
some time getting your
columns to look just as
you want them, why
not send your profile to
other users. You can
save you profile from
Company Settings.
User Defined Fields Visual APS has a
number of different
User Defined Fields
that can be displayed
as columns. By
Default, these columns
are not mapped to any
data fields in the
Enterprise Resource
Planning application.
Contact LYNQ Support
if you want to map
these fields to values
from your Enterprise
Resource Planning
application.
Task panel column explanation
The task panel includes a number of different columns. Understanding the
most the meaning behind each of the columns will improve your experience of
the application.
The table below provides some explanations of most frequently used columns.
Field Name Description
Attach This provides the ability to add a document related to a job order
or an item. When a job order document is attached, a paperclip
icon is displayed in this column.
Materials? Provides a visual indicator as to whether materials are available at
the start date of the job order.
Operations? This round coloured symbol indicates if there is adequate
information for Visual APS to schedule the operation or job order.
Green = Valid for scheduling
Red = Cannot be scheduled
Yellow = Does not need to be scheduled
Grey = Needs to be validated (by clicking on the line)
Scheduled? This column is blank if a job order is not scheduled. When
scheduled, the graphic may be;
Thumbs up with yellow cuff = scheduled/unsaved
Thumbs up with green cuff = scheduled / saved
Warning sign = partial scheduling of some operations
Pinned? Provides a visual indicator if the job order has been pinned. This
job order can no longer be moved unless the pin is removed first.
Marker Markers appear as user defined visual indicators that can be set
against job orders. Markers can be color coded and used for
sorting and filtering purposes.
Possible
Errors
Available capacity for a resource may change when settings or
shifts are amended. After saving amendments, a dialog box
appears asking if any job orders should be ignored, unscheduled or
marked as possible errors. This column will display a red circle
with an x as the possible error designation. The job orders or
operations should be verified. To remove this icon, use the resolve
possible errors function.
Scheduled
Start
When imported from Enterprise Resource Planning, this is the job
order/operation planned start date. This field will be updated once
the Job order/Operation is scheduled within Visual APS with the
actual scheduled start date.
Scheduled
Due
When imported from Enterprise Resource Planning, this is the job
order/operation planned due date. This field will be updated once
the Job order/Operation is scheduled within Visual APS with the
actual scheduled due date.
ERP Name The field name that you see will be your Enterprise Resource
Planning application name This field shows the original planned
scheduled due date from the Enterprise Resource Planning
application. This date does not change when the job order is
scheduled.
Job ordered The total quantity to produce on the Job order.
Reported How many units have been produced against the job order.
Remaining Shows the difference between the job ordered quantity and the
reported quantity.
Running Late? Shows whether the job order is running late based on its planned
schedule.

LYNQ 2020 USER GUIDE Page 56 / 171
Online Version
Click here to read this page online.
Zoom in and out Use the + & - icons on
the top left-hand
corner of the schedule
board to zoom in and
out or alternatively
access the zoom in and
out functions from the
Review menu.
Changing Colours You can customise the
colours of different
types of job orders and
tasks. Click on
Company Settings and
on Designer Settings to
change the colours to
suit your preferences.
Labels You can change the
way job orders are
viewed on the
scheduling board. The
labels function
provides the ability to
view job orders broken
down by set up, run
and processing times
within the operation.
This is particularly
useful when
minimising
changeovers
Hide Completed Select the Hide
Completed Operations
setting in Company
Settings, Scheduling
Routing Rules, Routing
to stop a completed
operation from
appearing and
consuming resources
on the scheduling
board.
Schedule board in more detail
The schedule board is arranged into three horizonal sections. Immediately
below the date and time lines you will see:
• Resource capacity
• Resource availability
• Task sequence in blocks of time
Resource capacity
The top line indicates the resource capacity defined by shifts. It displays the
work unit scheduled hours in coloured blocks for working / non-working or
other activities. In the example above the blue area indicates working the
blocks on the timeline that represents working time.
Resource Availability
The middle line presents resource availability at any point of time. This
information can be presented in %, quantity or coloured equalizer modes.
These options are represented by the following icons and views can be
amended by selecting the corresponding image. This option changes the
representation only for resource with the enabled resource mode.
Task sequence in blocks of time
The bottom line displays scheduled tasks in blocks on a line in the sequence
they are scheduled. The tasks cover the time required for that item to be
produced. The time consumption is calculated according to the route
parameters of the resource (i.e., item units per hour, number of workers,
calendar rules, etc.).
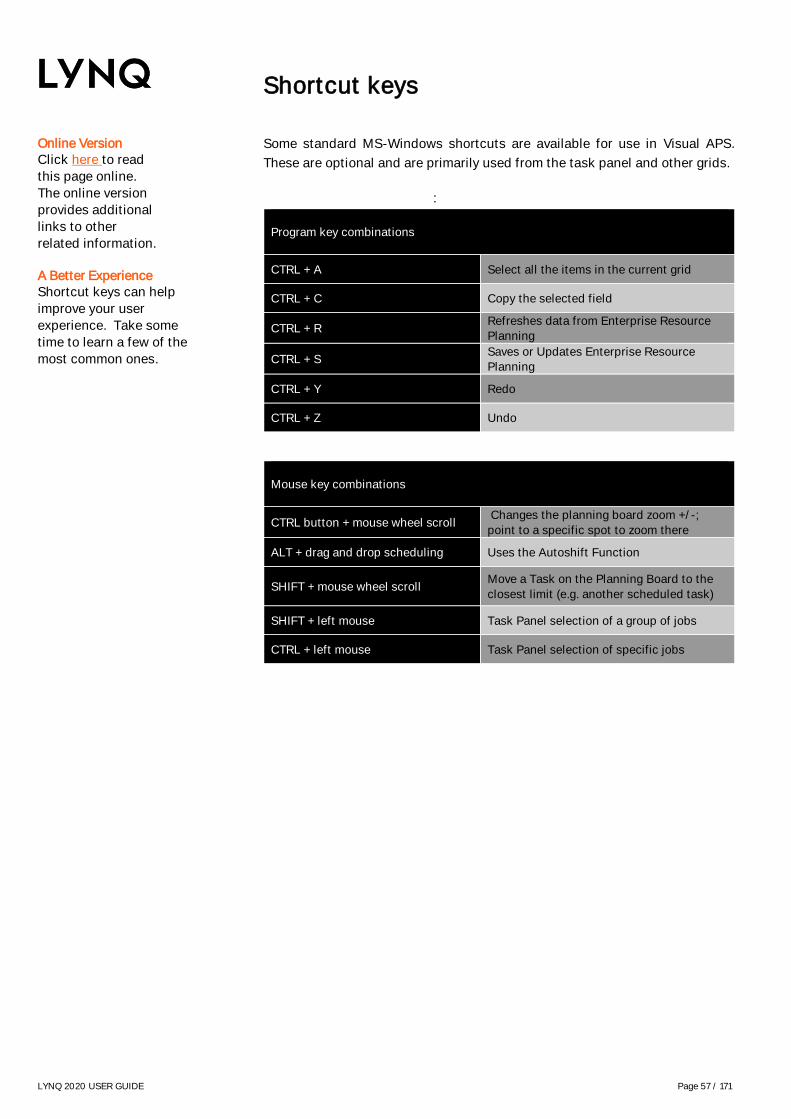
LYNQ 2020 USER GUIDE Page 57 / 171
Online Version Click here to read
this page online.
The online version
provides additional
links to other
related information.
A Better Experience Shortcut keys can help
improve your user
experience. Take some
time to learn a few of the
most common ones.
Shortcut keys
Some standard MS-Windows shortcuts are available for use in Visual APS.
These are optional and are primarily used from the task panel and other grids.
:
Program key combinations
CTRL + A Select all the items in the current grid
CTRL + C Copy the selected field
CTRL + R Refreshes data from Enterprise Resource
Planning
CTRL + S Saves or Updates Enterprise Resource
Planning
CTRL + Y Redo
CTRL + Z Undo
Mouse key combinations
CTRL button + mouse wheel scroll Changes the planning board zoom +/-;
point to a specific spot to zoom there
ALT + drag and drop scheduling Uses the Autoshift Function
SHIFT + mouse wheel scroll Move a Task on the Planning Board to the
closest limit (e.g. another scheduled task)
SHIFT + left mouse Task Panel selection of a group of jobs
CTRL + left mouse Task Panel selection of specific jobs

LYNQ 2020 USER GUIDE Page 58 / 171
Online Version Click here to read
this page online.
The online version
provides additional
links to other
related information.
Deleting Activities Activities cannot be
deleted once they have
been created. Think
carefully before
creating these.
Adding new activities
The work calendar is a combination of both activities and shifts which
represents the working hours, holiday calendar, breaks, plant shutdowns and
shift schedules. Before you can use LYNQ for detailed scheduling, you must
define a work calendar. Work calendars are configured within Visual APS and
are setup independently of Enterprise Resource Planning.
Before a resource can be available for scheduling purposes, the resource must
be associated with a Shift. Shifts are used to define the available capacity of a
resource. Shifts contain different activity types to identify working time from
non-working time and downtime. A shift may contain multiple activity types.
The default activity type included in the application are:
• Working time
• Non-working time
• Lunch time
• Maintenance time
• Approved overtime
To create new activities
Click on the Home Menu
Click Activities
Click Add New
Enter a value in the Activity Code field
Enter a suitable description in the Activity Description field
Select a Color for the activity by c
Click OK
Click OK

LYNQ 2020 USER GUIDE Page 59 / 171
Online Version Click here to read
this page online.
The online version
provides additional
links to other
related information.
Making Changes Click on the Home Menu
and then Shifts to edit your
default shifts.
Shifts
By default, LYNQ is pre-configured with two shift patterns. These rarely suit the
shift patterns for every manufacturer. New shifts can be created to suit new
operational requirements.
To create a new shift
Click on the Home Menu
Click on Shifts
Click Add New
Enter a value in the Shift Name field
Enter a value in the Shift Description field
Select the day of the week when the shift applies
Using the left mouse button drag to highlight the time from and to.
Select the correct type of activity code for the shift
Repeat steps 7 & 8 to overlay different activities within the shift (i.e
lunch)
Once you have created your new shift for a day, you can copy the same shift
pattern to other days in the week.
To copy the same shift to another day
On the day you want to copy, left click on Copy Shift Pattern
With the left click still activated, drag and drop the shift to the relevant
day
Repeat steps 1 and 2 for all days you want to have the same shift

LYNQ 2020 USER GUIDE Page 60 / 171
Online Version Click here to read
this page online.
The online version
provides additional
links to other
related information.
Rebuild If you are not
immediately seeing
changes after updating
your work unit
properties, you may
need to tick the rebuild
check box on the work
unit record
Assign a new shift to a resource
At any time, you can reset the shift against a resource. When the resource has
scheduled operations, you should decide how you wish to handle this before
changing the resource.
When changing a shift against a resource you will be asked what to do with
existing scheduled operations
Your choices are:
• Nothing
• Unschedule operations
• Mark operations as possible errors
To assign a shift for a single resource
Right click on the resource in the schedule board
Click on Edit
Select a different shift in the shift column
Click Rebuild if a shift was previously assigned to the resource
Click OK
Select how you wish to manage scheduled activities
Click OK
To assign a shift for multiple resources
Click on the Home Menu
Click on Work units
Select a different shift in the shift column
Click Rebuild if a shift was previously assigned to the resource
Click OK
Select how you wish to manage scheduled activities
Click OK

LYNQ 2020 USER GUIDE Page 61 / 171
Online Version Click here to read
this page online.
The online version
provides additional
links to other
related information.
Remove shift rule To remove shift rules,
right click on the day(s)
in the calendar view
and select Set to
Default.
Making shift changes (single)
At any time, you can make changes to a shift. There may be occasions where
you want to include non-working time into your shifts to reflect shutdown or
holiday periods.
Shift changes can be applied to
• A single resource
• Multiple resources
To change the shift for a single resource
Navigate to the Factory Explorer
Expand the relevant site
Locate the work unit
Right click on the work unit
Click Shift (Change)
Click on Add New
Enter a value in the Shift change code field (i.e. shutdown)
Under the timeline left click and drag to highlight the time (i.e. 00:00
to 00:00)
Set the Activity Code to StdNonWorking
Click OK
Click on the heading Ungrouped from the Day Shift Changes task
panel
Right click on Shutdown
Click Copy
Select the dates (i.e 18th Dec to 1st Jan) by click/hold of left mouse
button
Right click on 1st January
Click Paste
Click Apply
Click YES to rebuild the calendar
Click Nothing
Click OK

LYNQ 2020 USER GUIDE Page 62 / 171
Online Version Click here to read
this page online.
The online version
provides additional
links to other
related information.
Remove shift rule To remove shift rules,
right click on the day(s)
in the calendar view
and select Set to
Default.
Making shift changes (multiple)
Changes can be made to multiple resources at a time.
To change the shift for multiple resources
Click on the Home Menu
Click on Changes
Tick the relevant sites and work units
Right click on the work unit
Click on Add New
Enter a value in the Shift change code field (i.e. shutdown)
Under the timeline left click and drag to highlight the time (i.e. 00:00
to 00:00)
Set the Activity Code to StdNonWorking
Click OK
Click on the heading Ungrouped from the Day Shift Changes task
panel
Right click on Shutdown
Click Copy
Select the dates (i.e 18th Dec to 1st Jan) by click/hold of left mouse
button
Right click on 1st January
Click Paste
Click OK
Click Apply
Click YES to rebuild the calendar
Click Nothing
Click OK

LYNQ 2020 USER GUIDE Page 63 / 171
Online Version Click here to read
this page online.
The online version
provides additional
links to other
related information.
Remember to refresh If you create any new
work units in
Enterprise Resource
Planning, remember to
refresh Visual APS
before you run the
import process.
What to import
import all work units
into Visual APS. You
can be selective during
the import process
Work Units
Resources are defined as personnel, equipment and/or materials. Resources
such as employees and work units are associated to shifts and help define your
production capacity. Resources are typically imported from Enterprise
Resource Planning and their settings can be extended further in LYNQ. Before
resources are available for scheduling, they must be associated to a shift. A
default shift can be selected during import of the resource from Enterprise
Resource Planning.
Primary and secondary resources are imported:
Order Data Type Imported To Imported From
1 Work Units Visual APS Visual APS
2 Tools Visual APS Visual APS
3 Employees LYNQ Website LYNQ Website
4 Work Units LYNQ Website LYNQ Website
5 Tools LYNQ Website LYNQ Website
Open Visual APS
Click on the Home Menu
Click on Import
If Visual APS recognises that there are new Work Units available for
import, a Work Unit dialog box will appear
At this point, you have the option to declare any default values for the
new Work Unit(s)
Click OK
Select the Work Units to import from the grid view
Click on OK

LYNQ 2020 USER GUIDE Page 64 / 171
Remember to refresh If you create any new
work units in
Enterprise Resource
Planning, remember to
refresh Visual APS
before you run the
import process.
Work Units
Once imported you will see the work units under the associated work centre in
the factory explorer. Note, if tools are supported by Enterprise Resource
Planning, these will be included in the import work unit process and can be
seen in the factory explorer under the work centre of Tools.
To import Work Units imported into Visual APS to LYNQ
From LYNQ select Seat Maintenance
Select Seats
Select Import
Select Import Equipment
Select the required Work Units
Select OK
Double click on the new equipment record to edit properties
In the group section, assign the work unit to the appropriate group
Click Active
Review and select appropriate value for "Planned availability
calculated by"
Click Save
To import Employees from Enterprise Resource Planning to LYNQ
Open LYNQ
Select Seat Maintenance
Select Seats
Select Import
Select Import Employees
Select the required resources
Select OK
Double click on the new employee to edit properties
In the group section, assign the employee to the appropriate group
Review and select appropriate value for "Planned availability
calculated by"
Click Active
Click Save

LYNQ 2020 USER GUIDE Page 65 / 171
Online Version Click here to read
this page online.
The online version
provides additional
links to other
related information.
Rebuild If you are not
immediately seeing
changes after updating
your work unit
properties, you may
need to tick the rebuild
check box on the work
unit record.
Work unit properties
Visual APS allows additional properties to be set against a work unit. Refer to
the Advanced User Guide for Float resources and consumption settings.
Work unit properties
Section Field Value
Resources Infinite Resource Indicates no limits to capacity
Resource Type Type of resource
Default Resource Qty Default No. of Resources
Float Resource Usage Float Resources based on Type
Float Resource Usage Type All/Less or Equal/Greater or
Equal
Float Discrete Resource
Usage
Float Resources based on
min/max
Min Resource Consumption Min no. of resources required
Max Resource Consumption Max no. of resources required
Recommended Load Level
(%)
Recommended load level
percentage
Split Task Consumption
(Min)
Minimum time during which a
task can be started when
splitting tasks
Split Task Interruption (Max) Maximum time interruption
when splitting tasks
Shifts Shift Default shift
How to configure work unit properties
From the Factory Explorer or Schedule board right click on the work
unit
Click Edit
Change the properties as required
Click OK

LYNQ 2020 USER GUIDE Page 66 / 171
Online Version Click here to read
this page online.
The online version
provides additional
links to other
related information.
Saving Calculations User have the ability to
take a snapshot of the
material calculation
information. This can
be useful if additional
analysis needs to be
performed outside of
Visual APS against the
stock data. The data
relating to material
calculations is stored
in the Enterprise
Resource Planning
database in the LYNQ
stock info tables.
Material availability
Visual APS provides a material indicator column in the task panel to indicate to
the planner, the availability of material for different types of orders. The
material indicator is updated whenever the calculate material function is run.
This feature can be run manually when the calculate method is set to manual
or when you open or refresh Visual APS when the calculate method is to auto.
Setting calculation method to manual or auto
Click on the Plan menu
Click MRP - Settings
Click on the General Tab
Select Manual or Auto from the Material Calculation lookup
Due to the complexities of material calculations, setting Visual APS to
automatically recalculate can significantly slow down performance of Visual
APS. Every time Visual APS is refreshed and opened, Material Calculations are
performed. Therefore, it is recommended that the material calculation method
is set to manual, so the user can control when recalculations will occur
Setting calculation method to manual or auto
Click on the Plan Menu
Click Recalculate
Select Yes to save the current plan prior to running recalculate
Select production job orders Task Panel
The material column will now be updated

LYNQ 2020 USER GUIDE Page 67 / 171
Online Version Click here to read
this page online.
The online version
provides additional
links to other
related information.
Excluding or Including The Planner can elect to
include or exclude job
orders, or reserve stock
in the calculations Visual
APS performs by clicking
on the Plan menu
Material indicators
The Material Status Indicator appears against each job order in the task panel,
Double clicking on the Material Status Indicator will drill down to the Bill of
Material and provide an availability view for each component.
The same color coding is adopted throughout the Bill of Material. Drilling down
further on a specific component material status icon displays a list of job orders
that are consuming or replenishing the component. This can help you
determine which components may be shifted from another shop job order or re-
sequenced.
Job orders that have a yellow or red material indicator may require further
action. For example, you may not want to schedule a job order where there are
known shortages. To identify which component(s) have a shortage, double click
on the Material Indicator to show the availability of materials by component.
Drilling down further on the material indicator for the component ill show which
job orders are consuming or replenishing the component.
When materials are attached to Operations, Visual APS provide greater
accuracy of material requirements. When an operation is not declared in the
Bill of Material the material required date is calculated for the start date of the
job order. When specifying an operation for a component within a Bill of
Material, Visual APS will validate the material on the start date of the Operation
rather than the job order. This is very important to help control inventory as all
the materials won't be job ordered too early for the capacity where they will be
used.

LYNQ 2020 USER GUIDE Page 68 / 171
Online Version Click here to read
this page online.
The online version
provides additional
links to other
related information.
Export to Excel To inform procurement
of any shortages export
the overview reports to
excel.
MRP limitations It is important to note
that the MRP and
Material
Availability functions are
not designed to replace
materials management in
Enterprise Resource
Planning. It is intended to
assist the planner during
the planning and
scheduling process. By
using markers, planners
are able to mark job
orders that have material
issues.
MRP shortages Shortages are not seen
as a constraint in Visual
APS. Job orders with
shortages can still be
scheduled. To overcome
this, use the marker to
job orders with shortages
and excludes these job
orders during scheduling
Material shortages
The MRP View feature in provides a stock enquiry of the current quantities for
components over a period of time. The MRP Views feature supports up to 100
periods by day or week.
MRP Overview
Each component used on a job order is returned in a grid view. The rows are
ordered first by location then by product. If Visual APS has calculated any
shortages for a component the quantity will be highlighted in red text. The
number of job orders affected by this shortage can be seen in the Job orders
affected column. Doubling clicking on the quantity value provides the user with
a drill down into the individual order details.
MRP Selected
Works in the same ways as MRP Overview but is useful for checking one or a
few job orders at a time.
To review shortages for all job orders
Click on the Plan Menu
Click Recalculate
Click on the Plan Menu
Click on Overview
Select the Period Type Day or Week
Enter the number of periods to review in the Period field
Click on Apply
To review shortages for a selected job orders
Click on the Plan Menu
Click Recalculate
Highlight the job order you want to review from the task panel
Click on the Plan Menu
Click on Selected
Select the Period Type Day or Week
Enter the number of periods to review in the Period field
Click on Apply

LYNQ 2020 USER GUIDE Page 69 / 171
Online Version Click here to read
this page online.
The online version
provides additional
links to other
related information.
Settings The settings you make
in company settings
are saved to your user
profile, which is stored
in your windows user
profile folder. If you
want other users to use
the same MRP
settings, give them a
copy of your profile
Material calculation settings
A number of setting are available to control how material calculations are
performed. Material status is calculated based on the supply and demand
settings within company settings, MRP import & rules.
Include Past Active job orders
Include past active orders is a setting that helps deal with job orders with a due
date less or earlier than today. These are considered already in the past but
may still be active. It is not possible to consume materials in the past, so how
do we want to see these job orders from a material viewpoint? Users can
completely exclude these job orders from the calculation (and you will see
those with an X) by not checking this box. Or users can include those job orders
in the material calculation but look at a different start date. By default, this
effective start date is set to today, or you can consider it into the future (i.e. +10
days).
This helps answer the question when will the materials for late job orders be
available? You should really reschedule these job orders for the date when they
will be kit clear or leave them as they are and enable material validation to
include them. If you include past active job orders, it is difficult to know what
is available tomorrow. So, the setting of "today" lets Visual APS know that the
job order is late but the replenishment will occur today and that material will be
available. The stock for tomorrow will include the past due quantities.
Group Locations
In Group locations the warehouse used in the calculation for material
requirements is read from the Bill of Material captured against the job order.
Sometimes the stock on hand in the default warehouse is not enough but stock
may be available at another warehouse and you want to include another
warehouse in the material calculation. For that reason, Visual APS has a
function to group warehouses together. When grouping warehouses all stock
movements for the grouped warehouses can be viewed in the stock information
window

LYNQ 2020 USER GUIDE Page 70 / 171
Online Version Click here to read
this page online.
The online version
provides additional
links to other
related information.
Planning Interval The planning interval
can be changed by
clicking on the
Schedule Menu. To
change the default
planning interval,
select Company
Settings, Planning
Interval. These settings
are saved in your
Visual APS profile and
only apply to you.
Scheduling basics
The planning interval in Visual APS defines the period of time where scheduling
can occur. You cannot perform scheduling outside the planning interval. The
planning interval is defined under the settings area in Visual APS and saved to
the user's settings file. The Planning Interval can also be changed at any time
by going to the Schedule menu and select Interval. By default, this is set to 12
weeks. The interval for planning is visible in The Title Bar at the top of the
Visual APS window along with the server name, database name, and date and
time when the was last loaded.
There are two primary methods of scheduling in Visual APS
Forward scheduling
• Forward scheduling takes a job order with a number of tasks and
allocates those tasks to resources as early as possible, in other
words when resources become available. There is also an option for
Visual APS to schedule forward from a specific day.
Backward scheduling
• Backward scheduling takes a job order with a number of tasks and
allocates those tasks to resources in reverse job orders, from last to
first operation, and schedules the task on the resource.
You can either manually drag and drop a job order or an operation onto the
schedule board or use the auto scheduling feature.
You can only schedule a job order or an operation when there is sufficient
resource capacity. By default, Visual APS will try to schedule the resources
that are captured against the job order Enterprise Resource
Planning. If insufficient resources are available you may only be able to
schedule the job order
around function when you want to schedule an entire set of operations for a job
order. This will enable you to schedule all operations together.
When using schedule around it is important to remember that operations will
only be scheduled when there is available capacity. If you drag and drop
operation 20 to a time on the schedule board which is right at the beginning of
your planning interval, any operations that come before operation 20 will not
be scheduled as these would need to be scheduled before the start of our
planning interval

LYNQ 2020 USER GUIDE Page 71 / 171
Online Version Click here to read
this page online.
The online version
provides additional
links to other
related information.
Markers Visual APS allows you
to define multiple
markers to help
prioritise and
categorise your job
orders.
Prioritising what to schedule
Understanding how production should be prioritised is an important
consideration for any manufacturer. All manufacturers have at least works job
orders, some of which are urgent, others of which are less so. Hence the need
to prioritise how job orders are scheduled. The priorities that are set, will
ultimately drive the schedule and is a main factor for how scheduled dates are
calculated.
To help prioritise job orders, Visual APS provides different features to help you:
• Markers
• Basic and Advanced Filters
• Workflow Filters
• Grouping
Markers
• Markers appear as user defined visual indicators that can be set
against shop job orders on the task panel window. Markers can be
color coded and used for sorting and filtering purposes.
To create a new marker
Click on the manage menu
Click on markers
Click on the marker1 tab
Enter i.e. critical in the value field
Click on add
Click on the circle to the right critical
Click on i.e. red from the color palette
Click on OK
Click on OK
To set a marker against a job order
From the Task Panel select the couple of job orders that are critical
Right click and select Markers
Click Marker1
Click i.e. Critical

LYNQ 2020 USER GUIDE Page 72 / 171
Online Version Click here to read
this page online.
The online version
provides additional
links to other
related information.
Save filter to file You can save your
filters and share the
xml file that is saved
with other users.
Save filter to menu Saving filters to the
workflow menu is a
relatively new feature
in Visual APS. You can
now save your filters so
they appear just for
yourself or they can be
saved and used
globally by other users.
Filtering Columns Columns can be
quickly filtered by
clicking on the arrow to
the right of the column
name.
Advanced Filtering Right click on the
column heading and
select Filter Settings to
perform more complex
filtering. From the Edit
Filters windows, you
can save the filter to
file or save the filter so
that it appears on the
workflow tab.
Grouping Tasks Drag the column to the
area above the column
heading to group tasks
by column value
Prioritising what to schedule
You can also sort job orders in the task panel. In the default view, the task panel
displays job orders by ascending job order number. In order to change the
presentation of the job orders, any column can be selected as the primary sort.
Select on a column header to sort the data according to that criteria. Select the
column header again to sort in the reverse job order. The arrow next to the
column header indicates the job order of the sort. Select a third time to remove
the sort.
Basic and advanced filters
The application provides two types of filters:
• Basic filters are created from column headings and allow you to
manage which job orders are visible based on the chosen criteria.
• Complex filters are used for multiple criteria selections and then the
filter can be saved and/or shared with other users or attached to the
workflow menu.
The use of filters allows you to prioritise job orders ready for scheduling.
To create a filter in the task panel
Right click on any column heading in the Task Panel
Click Filter Settings
Click AND
Click Add Criterion field
Select a column in the first field
Select an operator in the second field
Enter a condition in the value field
Click OK
To save a filter to file
Right click on any column heading in the Task Panel
Click Filter Settings
Click AND
Click Add Criterion field
Select a column in the first field
Select an operator in the second field
Enter a condition in the value field
Click Save to File
Enter a file name and location
Click Save
Click OK

LYNQ 2020 USER GUIDE Page 73 / 171
Online Version Click here to read
this page online.
The online version
provides additional
links to other
related information.
Multiple groups You can group on more
than one column
heading.
Groups Resetting Groups are reset when
data is refreshed or
when the application is
closed
Prioritising what to schedule
When creating filters, you can save the filter as a workflow item.
To create a workflow filter
Right click on any column heading in the Task Panel
Click Filter Settings
Click AND
Click Add Criterion field
Select a column in the first field
Select an operator in the second field
Enter a condition in the value field
Click Save to Menu
Select Who the Workflow will apply to
Click Add New
Enter a Name for the Workflow
Click OK
Click OK
The filter will now be available on the Workflow Menu
Grouping can be used when scheduling job orders based on a particular
characteristic. For example, you may want to minimize change overs by
scheduling all job orders for the same product together.
To group job orders in the task panel
Drag the column heading to the top of the task panel
The data will be grouped by column dragged. Use the + and - icons to the left
of each grouping to expand or collapse the contents of the group. Sub groups
can be added by dragging additional column headings to the top of the task
panel.

LYNQ 2020 USER GUIDE Page 74 / 171
Online Version Click here to read
this page online.
The online version
provides additional
links to other
related information.
Valid Operations To change the color of
the valid for scheduling
indicator from red to
green you must update
the job order in
Enterprise Resource
Planning and refresh
the Visual APS data.
Drag and Drop Visual APS takes you
automatically to the
first work unit to be
scheduled when
dragging the job order
onto the schedule
board
Not Scheduling If you find you are
unable to schedule a
large batch of job
order
likely your planning
interval has
insufficient capacity.
Either increase your
planning ,interval,
reduce the number of
job orders to schedule
or increase the number
of resources.
Manual scheduling
Before operations can be manually or automatically scheduled, they must be
recognised by LYNQ as being valid for scheduling. The valid for scheduling
indicator must be green for Visual APS to schedule it. The indicator is displayed
on the task panel at the job order level and at the operation level.
You will notice that the valid for scheduling indicator will have mainly 3 different
colour codes. Each colour represents a different meaning:
Green meaning the operation has time to be scheduled
Yellow meaning the operation has already been completed by qty or
status
Red meaning Visual APS
scheduled
The routing will define the number of resources required. When scheduling you
must have sufficient resources available. You will be able to see this on the
resource availability bar in the schedule board for a given resource. You can
quickly edit the number of resources by right clicking and selecting edit on the
resource in the schedule board.
To manually schedule, the planner is able to simply drag and drop either the job
order or individual operations onto the desired slot on the schedule board. This
is particularly useful when a job order is required to run on a specific day or
time.
To schedule job orders using drag and drop
Click on the Schedule Menu
Click on Schedule Around and check Left and Right
Click either forward or backward scheduling
Select a job order from the task panel
Right click and select load required work unit
Click and hold the selected job order
Drag it down to correct time on the schedule board

LYNQ 2020 USER GUIDE Page 75 / 171
Online Version Click here to read
this page online.
The online version
provides additional
links to other
related information.
Scheduling Sequence When the auto
schedule dialog
window appears if
grouping shop job
orders by grid grouping
the first job order to be
scheduled it will be the
one at the top of the
list. If grouping by
index, then scheduling
priority it will be from
lowest to highest
number.
Grid Grouping The default grid
grouping setting can
be changed in
Company Settings,
Scheduling & Routing
Rules, Auto.
Auto scheduling
Auto scheduling is one of two methods for scheduling job orders in Visual APS.
The production planner has full control over the sequencing of job orders and
is then able to use the auto schedule feature to place these onto the schedule
board. Auto schedule will ensure that job orders are scheduled in the
predefined job order in the next free slot based on the required and available
resources.
job orders using two different methods:
• Grid grouping
• Priority index
To auto schedule by sequencing job orders using grid grouping
Auto Scheduling uses the sequence the job orders appear in the scheduling
grid to schedule them in order
change the sequence of job orders.
Select a range of job orders to schedule
Right click and click auto schedule
Re-arrange the sequence by dragging job orders up or down
Click schedule by grid grouping
Click Schedule
Click OK twice
To auto schedule by sequencing job orders using priority index
Each job order can be given a number of priority which will then represent the
job order in which these are scheduled on the schedule board.
Select a range of job orders to schedule
Right click and click auto schedule
Click schedule by priority Index
Click the job order that must take priority, and right click
Click Set Priority > 1
Click the other job orders that are not as urgent, and right click
Click Set Priority > 2
Click Schedule
Click OK twice

LYNQ 2020 USER GUIDE Page 76 / 171
Online Version Click here to read
this page online.
The online version
provides additional
links to other
related information.
Schedule Around All operations will be
scheduled the first
time a job is
scheduled.
Subsequently, any
operation may be
changed on the board.
Operations before that
will also reschedule if
Operations after the
manually changed op
will be rescheduled if
Default to On Schedule Around can be
enabled by default from
the Scheduling and
Rules Manual Tab in
Company Settings
Scheduling with schedule around
The Schedule Around function automatically schedules operations for a
selected job when one operation is manually scheduled. Schedule Around uses
the established sequencing and timing of connected operations.
To use Schedule Around
Example 1
Enable the Schedule Around option from the Schedule Tab
Ensure both Left and Right checkboxes are turned on
Drag a Job with multiple operations to the Planning Board
Notice how all operations for the Job are scheduled in sequence
Example 2
Enable the Schedule Around option from the Schedule Tab
Ensure both Left and Right checkboxes are turned on
Drag a single operation of a multi operation Job to the Planning Board
Notice how all operations for the Job are scheduled in sequence
Example 3
Enable the Schedule Around option from the Schedule Tab
Ensure only the Right checkbox is turned on
Drag a Job with multiple operations to the Planning Board
Notice how all operations for the Job are scheduled in sequence
Drag the 2nd operation to the right to adjust the start time
Notice operations to the right will also move in sequence

LYNQ 2020 USER GUIDE Page 77 / 171
Online Version Click here to read
this page online.
The online version
provides additional
links to other
related information.
Default to On Autofit can be enabled
by default from the
Scheduling and Rules
Manual Tab in Company
Settings
Scheduling with autofit
Autofit is a function used to drag and drop a selected job or operation into the
first available time slot. This is true even if the availability is not visible on the
planning board when you drop it.
To use Autofit
Enable the Autofit option from the Schedule Tab
Drag a Job to the Planning Board where there is no availability
Keep the left mouse button down to show the information panel
The information panel will indicate when the job can be scheduled
Let go of the left mouse button
The job will be scheduled to the date suggested
Select Save and Publish from the Quick Start Toolbar
LYNQ 2020 USER GUIDE Page 78 / 171
Online Version Click here to read
this page online.
The online version
provides additional
links to other
related information.
Default to On Autoshift can be
enabled by default from
the Scheduling and
Rules Manual Tab in
Company Settings
Scheduling with autoshift
Auto shift is a manual technique on the Schedule tab that allows a job or
operation to be inserted where something is already scheduled.
Imagine you have an existing schedule saved and a new urgent operation is
needed. There is not enough available capacity but this new urgent operation
must take precedence. As LYNQ is a finite system, capacity must be made
available and there are three options to do that:
• Replace
o Drag & drop the new operation on top of an existing operation.
The operation on the schedule board will be unscheduled.
• Shift
o Drag & drop the new operation into place on the planning board.
The previously scheduled operations on the schedule board will
be moved out to the right.
• Move ASAP
o Drag & drop the new operation on top of an existing operation.
This function works similar to Replace but instead of
completely replacing the operation, the previously scheduled
operation will be moved out to the first available capacity.
Autoshift with Replace Before & After
Drag an operation on top of a previously scheduled operation
Note the previously scheduled operation is unscheduled

LYNQ 2020 USER GUIDE Page 79 / 171
Online Version Click here to read
this page online.
The online version
provides additional
links to other
related information.
Scheduling with autoshift
Autoshift with Shift Before & After
Drag an operation on top of a previously scheduled operation
Note the previously scheduled operation is shifted right along with all
other operations
Autoshift with Move ASAP Before & After
Drag an operation on top of a previously scheduled operation
Note the previously scheduled operation is rescheduled to the next
available time slot

LYNQ 2020 USER GUIDE Page 80 / 171
Online Version Click here to read
this page online.
The online version
provides additional
links to other
related information.
Scheduling with split tasks
The Split Tasks function will utilise any free space in the schedule even if it
means that the operation/job will be started and stopped before completion.
For example, imagine that a shift is from 8:00 to 14:00 and an operation is
scheduled from 10:00 to 11:00 and another operation is scheduled from 12:00
to 13:00. If a 2 hour operation is scheduled to start from 09:00 with split tasks
enabled, the operation will be split to start from 9:00 to 10:00 for 1 hour and
then from 11:00 to 12:00 for 1 hour.
To Split Tasks
Manually schedule operations 1 and 2 for the same work unit so there
is a 1 hour gap before and after each operation. Operations 1 and 2
should have a duration of 1 hour each.
Enable the Split Tasks option from the Schedule Tab
Manually schedule operation 3 which has a duration of 2 hours, so that
it starts 1 hour before operation 1
Operations 1 and 2 Scheduled for 1 hour duration, 1 hour apart
Operation 3 Scheduled for 2 hour duration is split between the other operations

LYNQ 2020 USER GUIDE Page 81 / 171
Online Version Click here to read
this page online.
The online version
provides additional
links to other
related information.
Float On Resources are
consumed based on
the number of
resources defined
against the work unit.
Resources will only
be consumed up to
the Float
Consumption Max
value set against the
work unit.
Float Specific The max
consumption rates
values will apply to
all work units.
Scheduling with float
Visual APS defines available resources using the default machine settings and
by using the settings for the applied Shift.
The schedule tab allows users to use float in different ways
• Float off
• Float on
• Float specific
Consider an operation has the following requirements
• 8 Hours of run time
• 2 Resources to complete
Using Float Off
Right click on the work unit and select edit
Set the value of Resources to 3
Click on the Schedule Tab and select Float off
Schedule an operation at 09:00 (8 hours run time / 2 resources)
The operation is scheduled based on 2 resources for 4 hours elapsed time.
(2 x 4 = 8 hours total)

LYNQ 2020 USER GUIDE Page 82 / 171
Online Version Click here to read
this page online.
The online version
provides additional
links to other
related information.
Scheduling with float
Using Float On when LESS resources are available
Right click on the work unit and select edit
Set the value of Resources to 1
Click on the Schedule Tab and select Float On
Schedule an operation at 09:00 (8 hours run time / 2 resources)
There are less resources to that required by the operation. However, due to
float being enabled, scheduling is permitted.
The operation will be scheduled for 8 hours using one resource instead of the
two defined in the operation. Elapsed time is 8 hours.
.

LYNQ 2020 USER GUIDE Page 83 / 171
Online Version Click here to read
this page online.
The online version
provides additional
links to other
related information.
Scheduling with float
Using Float On when MORE resources are available
Right click on the work unit and select edit
Set the value of Resources to 4
Click on the Schedule Tab and select Float On
Schedule an operation at 09:00 (8 hours run time / 2 resources)
In this scenario the 8 hours required are delivered by four resources instead of
the two defined in the operation. Elapsed time is 2 hours.

LYNQ 2020 USER GUIDE Page 84 / 171
Online Version Click here to read
this page online.
The online version
provides additional
links to other
related information.
Scheduling with float
Using Float On when VARIABLE resources are available
Amend the shift pattern to replicate the number of resources below
Click on the Schedule Tab and select Float On
Schedule an operation at 09:00 (8 hours run time / 2 resources)
In the example below resources are variable and show greater and/or less than
that required by the operation.
In this scenario the 8 hours required are delivered when resources are available.
Elapsed time is 4.5 hours.

LYNQ 2020 USER GUIDE Page 85 / 171
Online Version Click here to read
this page online.
The online version
provides additional
links to other
related information.
Scheduling with float
Using Float On with FLOAT CONSUMPTION (MAX)
Amend the shift pattern to replicate the number of resources below
Right click on the work unit and select edit
Set the Float Consumption (Max) value to 2
Click on the Schedule Tab and select Float On
Schedule an operation at 09:00 (8 hours run time / 2 resources)
In the example below resources are variable and show greater and/or less than
that required by the operation. However, the work unit has the Float
Consumption Max setting set to a value of 2
In this scenario the 8 hours required are delivered when no more than 2
resources are consumed. Elapsed time is 5.5 hours.

LYNQ 2020 USER GUIDE Page 86 / 171
Online Version Click here to read
this page online.
The online version
provides additional
links to other
related information.
Scheduling with float
Using Float Specific without FLOAT CONSUMPTION (MAX)
When using Float Specific without the Consumption (Max) defined, Visual APS
applies float settings to all work units instead of reading the settings from each
individual work unit. In addition, all resources are consumed.
Consider a job has the following requirements
• Operation 1 Work Unit A
o 8 Hours of run time and 2 Resources to complete
• Operation 2 Work Unit B
o 10 Hours of run time and 1 Resource to complete
• Operation 3 Work Unit C
o 10 Hours of run time and 1 Resource to complete
• Quantity to manufacture 1
To use Float Specific
Right click on work unit A and select edit
Set the value of Resources to 10
Check on the Float Resource checkbox
Repeat steps 1 to 3 for work units B and C
Click on the Schedule Tab and select Float Specific
Schedule the Job to start at 09:00
In the example above, all available resources for each work unit are consumed,
reducing the elapsed time for each operation.

LYNQ 2020 USER GUIDE Page 87 / 171
Online Version Click here to read
this page online.
The online version
provides additional
links to other
related information.
Scheduling with float
Using Float Specific with FLOAT CONSUMPTION (MAX)
When using Float Specific with Consumption (Max) defined, Visual APS applies
float settings to all work units instead of reading the settings from each
individual work unit. In addition, resources up to Consumption (Max) are
consumed.
Consider a job has the following requirements
• Operation 1 Work Unit A
o 8 Hours of run time and 2 Resources to complete
• Operation 2 Work Unit B
o 10 Hours of run time and 1 Resource to complete
• Operation 3 Work Unit C
o 10 Hours of run time and 1 Resource to complete
• Quantity to manufacture 1
To use Float Specific
Right click on work unit A and select edit
Set the value of Resources to 10
Check on the Float Resource checkbox
Repeat steps 1 to 3 for work units B and C
Click on the Schedule Tab and select Float Specific
Set the Consumption (Max) value to 6
Schedule the Job to start at 09:00
In the example above, a maximum of 6 resources for each work unit are
consumed, reducing the elapsed time for each operation.

LYNQ 2020 USER GUIDE Page 88 / 171
Online Version Click here to read
this page online.
The online version
provides additional
links to other
related information.
Scheduling with float
Using Float Discrete, Visual APS is forced to consume resources based on the
quantity to produce. It will not consume more resources than required to
produce the quantity.
Consider an operation has the following requirements
• Quantity of manufacture 2
• 2 Hours of run time
• 1 Resource to complete
Units cannot be produced faster than this.
To produce two units would therefore take four hours.
Right click on the work unit and select edit
Set the value of Resources to 3
Check on the Float Discrete checkbox
Click on the Schedule Tab and select Float On
Schedule an operation at 09:00
In the example above, resources are consumed based on time it takes to
produce each unit. Two units are required to be produced and there are three
resources available. As it takes one resource, two hours to produce each unit,
two resources are consumed for two hours each to produce the two units
required.
Scheduling is successful and the elapsed time is 2 hours.
Extended this scenario to the example above you could also produce 3 units in
the same elapsed time as you have 3 resources available. However, four units
would take 4 hours of elapsed time (considering available resources are as in
the above example).
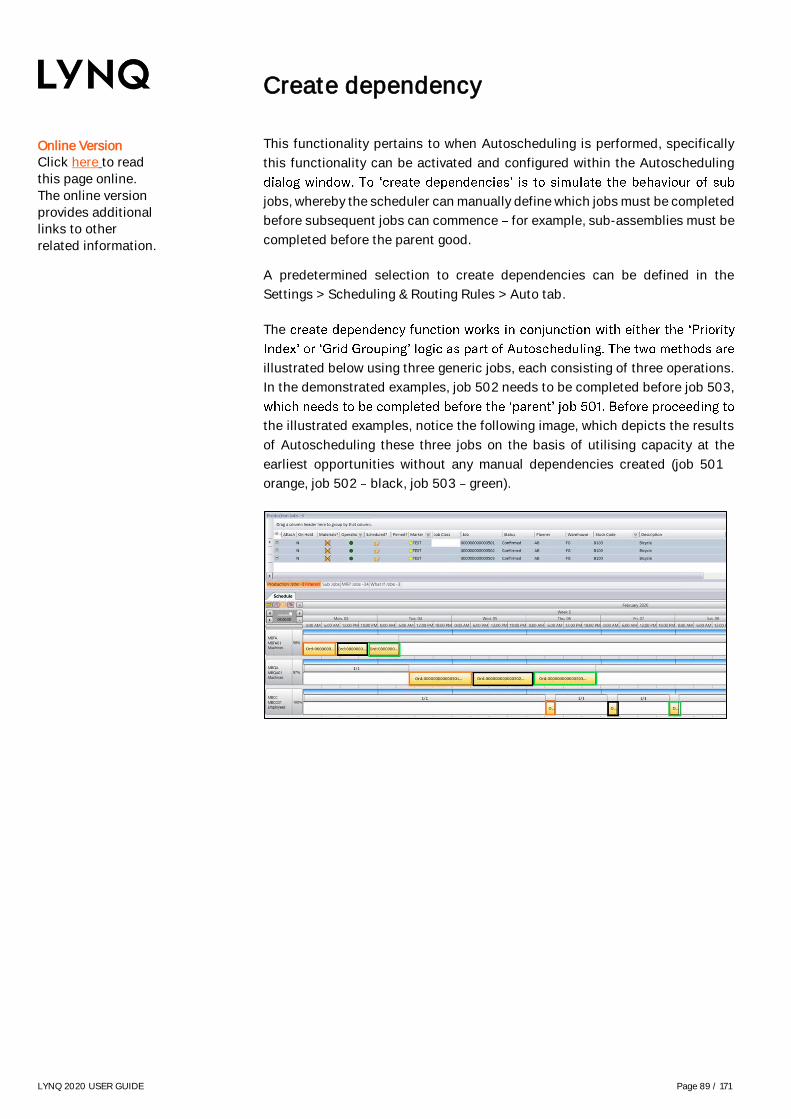
LYNQ 2020 USER GUIDE Page 89 / 171
Online Version Click here to read
this page online.
The online version
provides additional
links to other
related information.
Create dependency
This functionality pertains to when Autoscheduling is performed, specifically
this functionality can be activated and configured within the Autoscheduling
jobs, whereby the scheduler can manually define which jobs must be completed
before subsequent jobs can commence for example, sub-assemblies must be
completed before the parent good.
A predetermined selection to create dependencies can be defined in the
Settings > Scheduling & Routing Rules > Auto tab.
The
illustrated below using three generic jobs, each consisting of three operations.
In the demonstrated examples, job 502 needs to be completed before job 503,
the illustrated examples, notice the following image, which depicts the results
of Autoscheduling these three jobs on the basis of utilising capacity at the
earliest opportunities without any manual dependencies created (job 501
orange, job 502 black, job 503 green).

LYNQ 2020 USER GUIDE Page 90 / 171
Online Version Click here to read
this page online.
The online version
provides additional
links to other
related information.
Create dependency
Creating dependencies using Priority Index logic
Start by selecting all three
Now based on the way the jobs must be completed, right-click to assign priority
numbers to them accordingly the lowest number (including zero) is regarded
as the highest priority, meaning that it gets scheduled first. So, in our scenario,
this is the sequence that the jobs must be completed in.
After executing the Autoschedule we can see the results

LYNQ 2020 USER GUIDE Page 91 / 171
Online Version Click here to read
this page online.
The online version
provides additional
links to other
related information.
Create dependency
Creating dependencies using Grid Grouping logic
Again, select all the jobs to Autoschedule. In the dialog window, ensure that
priority to be started, i.e. the job at the top of the list goes first, then the second,
-sequence the list based on your requirements. The list in our
scenario needs to be job 502, job 503, then job 501. Once the jobs are listed in
the grouping bar just above this enacts the grid grouping logic.
An additional criterion that can be applied to both of these methods when
creating dependencies is to select a chosen date to schedule from. In this
example a different start date to default is now selected.
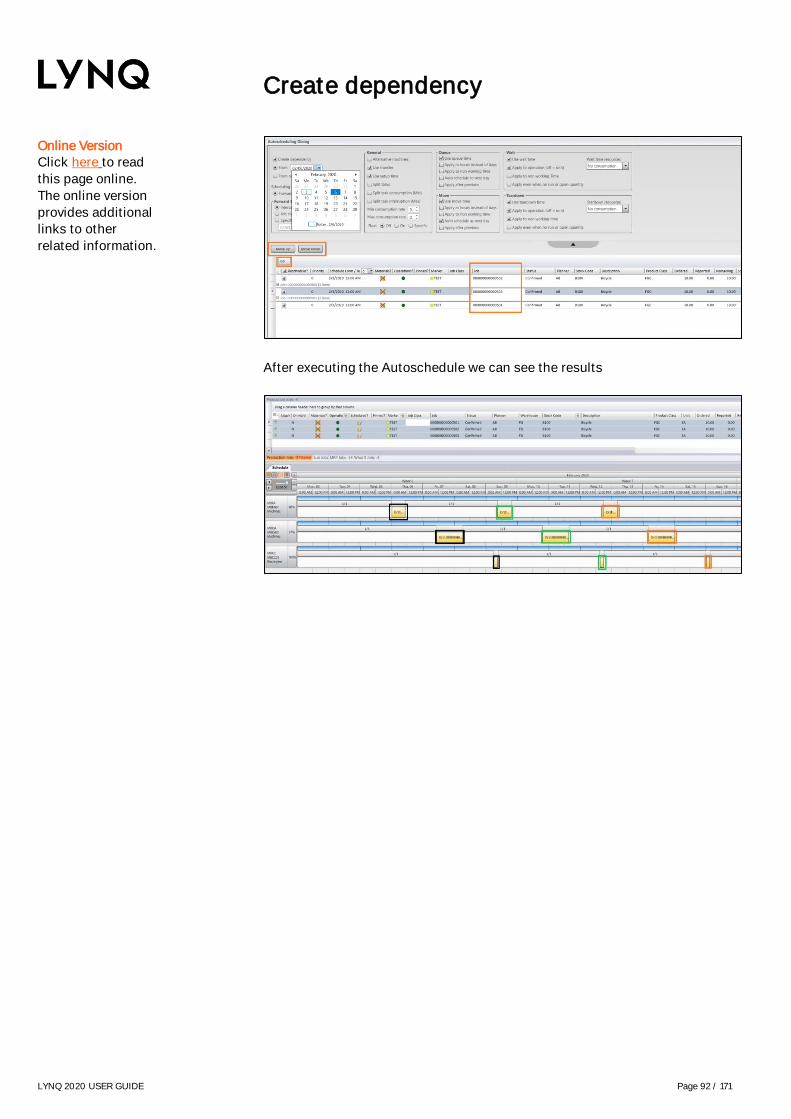
LYNQ 2020 USER GUIDE Page 92 / 171
Online Version Click here to read
this page online.
The online version
provides additional
links to other
related information.
Create dependency
After executing the Autoschedule we can see the results

LYNQ 2020 USER GUIDE Page 93 / 171
Online Version Click here to read
this page online.
The online version
provides additional
links to other
related information.
Planned Start/End When job orders or
operations are
unscheduled, the
planned start and end
dates will revert back
to the original dates
Unschedule a job order/operation
Scheduled job orders and operations are easily unscheduled. There are a
couple of ways to unschedule in Visual APS.
Right click on the job order or operation in the task panel
Click Unschedule or press delete on your keyboard
Highlight the operation on the schedule board
Right click and select Unschedule or press delete on your keyboard
Once un-scheduled remember to save and publish your changes to the plan to
update LYNQ and Enterprise Resource Planning.
LYNQ 2020 USER GUIDE Page 94 / 171
Online Version Click here to read
this page online.
The online version
provides additional
links to other
related information.
Pin Indicator The Pin Indicator
shows in the task
panel and in the
schedule board
Firming the plan using pinning
Visual APS offers the option to freeze job orders or operations to the production
schedule for a period of time, this is done using the Pin function. Pinning the
operations to the scheduling board means that those operations cannot be
moved or unscheduled unless you remove the Pin.
The "frozen" period will vary depending on the manufacturing environment but
it marks the boundary of which changes to the schedule be made, anywhere
outside this period job orders can be moved or re-scheduled.For example, a
company "freezes" the production schedule for 1 week. The Production Planner
and Production supervisor meet once a week to review the plan for the following
week and once agreed, its pinned to the scheduling board, meaning no one can
make changes to the plan unless agreed.
There are two ways to pin in Visual APS
• Pin (for selected job orders and operations)
• Pin Advanced (by date interval and work unit)
To use pin so no changes can be made
Click on the Review Menu
Highlight a job order, a range or job orders or an individual operation
Click Pin
Notice now that your selection will have a pin showing in the pin
column
Pinning can be reversed by click Remove Pin
To use pin advanced so no changes can be made
Click on the Review Menu
Click Pin Advanced
Set the Pin Interval from and to dates
Click the selected sites and or work units
Click Pin
Pinning can be reversed by clicking Unpin

LYNQ 2020 USER GUIDE Page 95 / 171
Online Version Click here to read
this page online.
The online version
provides additional
links to other
related information.
Save & Publish Depending on the
Enterprise Resource
Planning application in
use, Visual APS will
either update the
scheduled dates on the
job order directly or by
using LYNQ api. The
integration settings
can be checked from
the home, settings
menu.
Saving and publishing
The thumbs up image in the scheduled column will turn yellow when you
manually or auto schedule a job order. If the scheduled column does not
display the thumb icon, the job order has either only scheduled partial
operations or scheduling was not successful. When all operations are
scheduled and the scheduled column is yellow the order is virtually
scheduled. At this point Enterprise Resource Planning and data collection will
be unaware of the scheduled dates. You can at this point make any changes
before committing the schedule back to Enterprise Resource Planning.
To dispatch the orders for data collection, the save and publish function must
be used.
To save and publish:
Select Save and Publish from the Quick Access Toolbar or
Use CTRL + S
Once published, the thumbs up image in the scheduled column will turn green.

LYNQ 2020 USER GUIDE Page 96 / 171
Online Version Click here to read
this page online.
The online version
provides additional
links to other
related information.
Capable to Promise What-if job orders
provide an ability to
calculate capable to
promise dates
Capable to promise
The What-if job order feature allows you to create a job order that is not saved
within Enterprise Resource Planning so that you can estimate a production
unit's capacity without affecting any of the Enterprise Resource Planning data.
Once created the what-if job order can also be scheduled, it may be determined
that a live manufacturing job order should be created. The what-if job order can
then be unscheduled and remain on the task panel or it can be deleted.
To create a What-If job order
Click on the Schedule Menu
Click on Add What If
Select product number, Routing code, Location, Quantity and Date
In description 1 and 2 reference for instance customer name and quote
number
Select OK.
Once the What-If order has been created it will appear in the What-If Jobs tab
under the Task Panel. The material indicator will show the availability of the
components for the What-If order. Double click the indicator to review the
earliest date when the material will be available. With this date known you can
now schedule the what-if order on that date.

LYNQ 2020 USER GUIDE Page 97 / 171
Online Version Click here to read
this page online.
The online version
provides additional
links to other
related information.
Re-Scheduling Rescheduling can be
targeted to a specific
work unit. In order to
do this, Schedule
Around should be
turned off first, and
then only the targeted
work unit should be
loaded in the
Schedule. Whilst the
Calculate function still
calculates all
potentially late jobs, in
this scenario, only the
jobs for the selected
work unit will be
rescheduled.
Further reading Check out the articles
in the knowledgebase
relating to
rescheduling
potentially late for
further information
support.lynqmes.com
Calculating potentially late
Calculate potentially late highlights any job orders on both the schedule board
& the task panel that are in jeopardy of becoming late. Visual APS can calculate
which future operations are potentially going to be late, and can reschedule
those along with the operations already running late. The potentially late
function can only be executed you have enabled tracking from the settings
menu. This is located in Company Settings, Tracking.
To calculate potentially late job orders or operations
Click on the Manage Menu
Click Calculate from the Potentially Late options
Observe which operations have been flagged as potentially late (these are
highlighted in blue on the task list and have a blue vertical band to the left of
the operation in the Planning board).
To reschedule potentially late job orders or operations
Click on the Manage Menu
Click Reschedule from the Potentially Late options
Note that all Shop Job orders/operations highlighted during the calculation
process have now been virtually rescheduled. Any manual adjustments can be
made to the rescheduling proposal at this point. Once complete, select Save
and Publish to apply the changes.
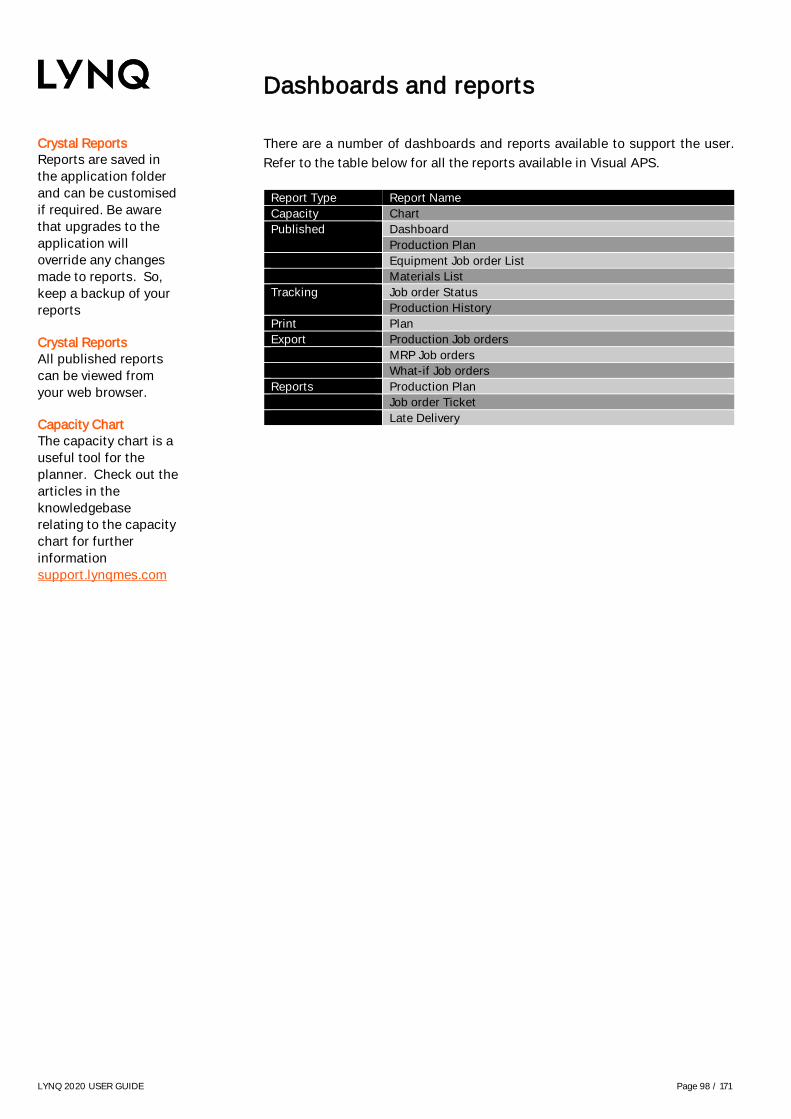
LYNQ 2020 USER GUIDE Page 98 / 171
Crystal Reports Reports are saved in
the application folder
and can be customised
if required. Be aware
that upgrades to the
application will
override any changes
made to reports. So,
keep a backup of your
reports
Crystal Reports All published reports
can be viewed from
your web browser.
Capacity Chart The capacity chart is a
useful tool for the
planner. Check out the
articles in the
knowledgebase
relating to the capacity
chart for further
information
support.lynqmes.com
Dashboards and reports
There are a number of dashboards and reports available to support the user.
Refer to the table below for all the reports available in Visual APS.
Report Type Report Name
Capacity Chart
Published Dashboard
Production Plan
Equipment Job order List
Materials List
Tracking Job order Status
Production History
Print Plan
Export Production Job orders
MRP Job orders
What-if Job orders
Reports Production Plan
Job order Ticket
Late Delivery

LYNQ 2020 USER GUIDE Page 99 / 171
Future Activity Dashboards and reports are
based on planned future
activity and provide insight
as to how this will influence
your resources (equipment
utilisation) and your
product output (job order
fulfilment).
.
Dispatching
LYNQ provides dispatching functionality to support the administration and
coordination of schedules as part of Detailed Scheduling.
Core features include:
• Dashboard
• Production Plan
• Equipment Plan
• Production Status
• Material Lists
• Production Lists
• Equipment Lists
• Production History

LYNQ 2020 USER GUIDE Page 100 / 171
Planned Utilisation Planned Utilisation,
also known as loading,
considers the
proportion of calendar
time that has been
scheduled for
production (run time).
You can set whether
the scheduled hours
includes or excludes
setup, teardown and
processing time. By
default, these times
are considered as
downtime.
Planned Job order
Fulfilment
Tells you whether the
jobs that are due to
start have been
scheduled to start.
Based on the principle
that if a job has not
been scheduled to
start then it is unlikely
to be fulfilled
Planning KPIs
There are various references to key performance indicators in Planning. If you
production costs you need to benchmark your performance and minimize loss
within your manufacturing process.
Planned Utilisation
Calculation Scheduled Hours / Calendar Hours
Measure It is measured as a percentage (%). The higher the
percentage the better.
Report(s) Dashboard shows the planned equipment utilisation for the
selected equipment within the selected date range
Equipment Plan shows the planned equipment utilisation
for each piece of equipment. Each card can be drilled into
for further detail.
Planned Job order
Planned Job order Fulfilment
Fulfilment
Calculation Number of jobs scheduled / Number of jobs planned
Measure It is measured as a percentage (%). The higher the
percentage the better.
Reports(s) Dashboard shows the planned job order fulfilment for a
specific date range.
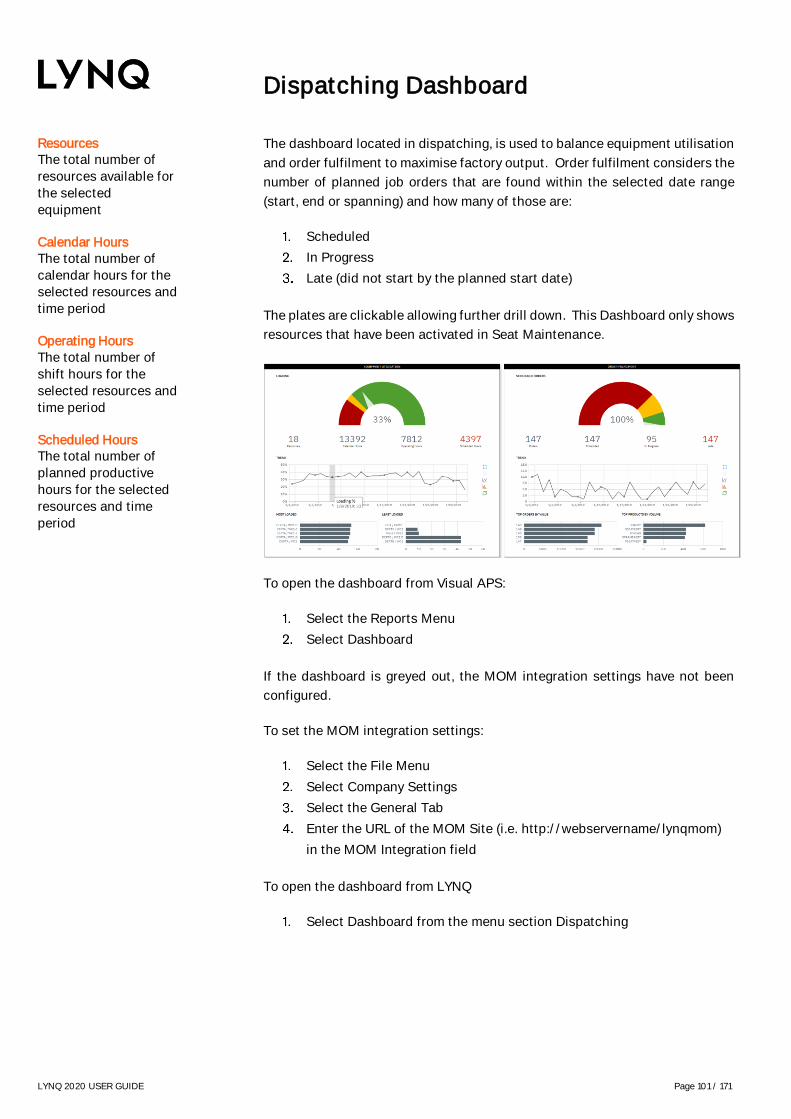
LYNQ 2020 USER GUIDE Page 101 / 171
Resources The total number of
resources available for
the selected
equipment
Calendar Hours The total number of
calendar hours for the
selected resources and
time period
Operating Hours The total number of
shift hours for the
selected resources and
time period
Scheduled Hours The total number of
planned productive
hours for the selected
resources and time
period
Dispatching Dashboard
The dashboard located in dispatching, is used to balance equipment utilisation
and order fulfilment to maximise factory output. Order fulfilment considers the
number of planned job orders that are found within the selected date range
(start, end or spanning) and how many of those are:
Scheduled
In Progress
Late (did not start by the planned start date)
The plates are clickable allowing further drill down. This Dashboard only shows
resources that have been activated in Seat Maintenance.
To open the dashboard from Visual APS:
Select the Reports Menu
Select Dashboard
If the dashboard is greyed out, the MOM integration settings have not been
configured.
To set the MOM integration settings:
Select the File Menu
Select Company Settings
Select the General Tab
Enter the URL of the MOM Site (i.e. http://webservername/lynqmom)
in the MOM Integration field
To open the dashboard from LYNQ
Select Dashboard from the menu section Dispatching

LYNQ 2020 USER GUIDE
Page 102 / 171
Online Version Click here to read
this page online.
The online version
provides additional
links to other
related information.
Gantt View A Gantt chart by
operations and tasks
of your production
schedule.
List View A list view by
operations and tasks
of your production
schedule
Active Resources This report only shows
resources that have
been activated in Seat
Maintenance.
Production plan
The production plan is an online view of orders that have been scheduled in
Visual APS, providing visibility of the plan for non APS users. The production
plan has a Gantt view for both operations and tasks and can be viewed in list
format. The print plan option provides a shop packet style report to be printed
which supports barcodes.
Progress indicators are updated in real-time, providing excellent visibility of
work in progress.
• GREEN centre labour reported
• RED centre labour hours exceeded
• BLUE bar quantity reported
• RED bar quantity exceeded
• RED vertical bar issues
Double clicking on the order on the production plan, will show the job card. To
sort the production plan by date, use the List View and sort by start
date Sorting by start date provides a simple job order list view of the entire
schedule and what should be being worked on. You can of course filter and
customise this list to get to the information you want.
To open the production plan from Visual APS:
Select the Reports Menu
Select Production Plan
If the production plan is greyed out, the MOM integration settings have not
been configured.
To set the MOM integration settings:
Select the File Menu
Select Company Settings
Select the General Tab
Enter the URL of the MOM Site (i.e. http://webservername/lynqmom)
in the MOM Integration field
To open the production plan from LYNQ
Select Production Plan from the menu section Dispatching

LYNQ 2020 USER GUIDE
Page 103 / 171
Online Version Click here to read
this page online.
The online version
provides additional
links to other
related information.
Purpose Review the impact of
the production plan on
your equipment. Drill
into each equipment
card to view loading
detail and expected
daily output
Card View Displays graphical
summary of equipment
selected. Clicking on
equipment card takes
user to extended
details of equipment
loading
List View Line by line report by
equipment. From here
users can click on the
Equipment name to
view extended details
of equipment loading
Additionally in this
view, there is a link to
view the schedule for
each piece of
equipment. Below each
column heading there
is a search/filter
box. The pin next to
the search box
provides a set of
filtering options.
Additionally, in List
view there is
functionality to export
reports, create custom
filters and customise
layouts
Equipment plan
Review the impact of the production plan on your equipment. Drill into each
equipment card to view loading detail and expected daily output.
• (Shift Time)
•
•
To open the equipment, plan from Visual APS:
Select the Reports Menu
Select Equipment Plan
If the equipment plan is greyed out, the MOM integration settings have not been
configured.
To set the MOM integration settings:
Select the File Menu
Select Company Settings
Select the General Tab
Enter the URL of the MOM Site (i.e. http://webservername/lynqmom)
in the MOM Integration field
To open the equipment, plan from LYNQ
Select Equipment Plan from the menu section Dispatching
This report only shows resources that have been activated in Seat
Maintenance.
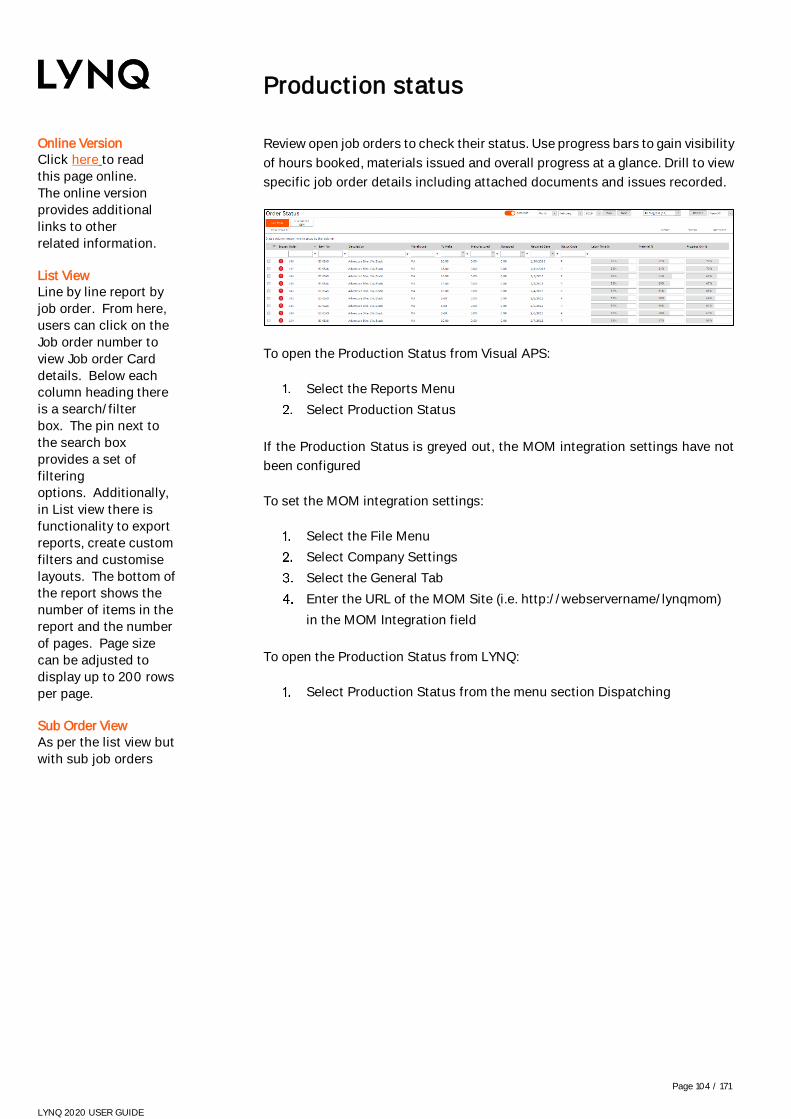
LYNQ 2020 USER GUIDE
Page 104 / 171
Online Version Click here to read
this page online.
The online version
provides additional
links to other
related information.
List View Line by line report by
job order. From here,
users can click on the
Job order number to
view Job order Card
details. Below each
column heading there
is a search/filter
box. The pin next to
the search box
provides a set of
filtering
options. Additionally,
in List view there is
functionality to export
reports, create custom
filters and customise
layouts. The bottom of
the report shows the
number of items in the
report and the number
of pages. Page size
can be adjusted to
display up to 200 rows
per page.
Sub Order View As per the list view but
with sub job orders
Production status
Review open job orders to check their status. Use progress bars to gain visibility
of hours booked, materials issued and overall progress at a glance. Drill to view
specific job order details including attached documents and issues recorded.
To open the Production Status from Visual APS:
Select the Reports Menu
Select Production Status
If the Production Status is greyed out, the MOM integration settings have not
been configured
To set the MOM integration settings:
Select the File Menu
Select Company Settings
Select the General Tab
Enter the URL of the MOM Site (i.e. http://webservername/lynqmom)
in the MOM Integration field
To open the Production Status from LYNQ:
Select Production Status from the menu section Dispatching

LYNQ 2020 USER GUIDE Page 105 / 171
Online Version Click here to read
this page online.
The online version
provides additional
links to other
related information.
List View Line by line report of
Material
requirements. Click
the arrow to the left of
a Material code to view
list of job orders
requiring that
material. From here,
users can click on the
job order number to
view Job order Card
details. Below each
column heading there
is a search/filter
box. The pin next to
the search box
provides a set of
filtering option
Material list
View specific material requirements by individual resources for today or this
week designed to support cell manufacture and for use with mobile and/or
tablet devices.
To open the Material List from LYNQ:
Select Material List from the menu section Dispatching
This report only shows resources that have been activated in Seat Maintenance.

LYNQ 2020 USER GUIDE Page 106 / 171
Online Version Click here to read
this page online.
The online version
provides additional
links to other
related information.
List View Line by line report
(grouped by
equipment) of job
orders. Click arrow to
left of Equipment name
to expand job order
list. Click on Job order
number to view Job
order Card details.
Below each column
heading there is a
search/filter box. The
pin next to the search
box provides a set of
filtering options.
Additionally, in List
view there is
functionality to export
reports, create custom
filters and customise
layouts
Production job list
View job order lists by resource groups for today or this week designed for use
with mobile and/or tablet devices.
To open the Production Job List from Visual APS:
Select the Reports Menu
Select Production Job List
If the Production Job List is greyed out, the MOM integration settings have not
been configured.
To set the MOM integration settings:
Select the File Menu
Select Company Settings
Select the General Tab
Enter the URL of the MOM Site (i.e. http://webservername/lynqmom)
in the MOM Integration field
To open the Production Job List from LYNQ:
Select Production Job List from the menu section Dispatching
This report only shows resources that have been activated in Seat Maintenance.

LYNQ 2020 USER GUIDE Page 107 / 171
Online Version Click here to read
this page online.
The online version
provides additional
links to other
related information.
List View Line by line report
(grouped by
equipment) of job
orders. Click arrow to
left of Equipment name
to expand job order
list. Click on Job order
number to view Job
order Card details.
Below each column
heading there is a
search/filter box. The
pin next to the search
box provides a set of
filtering options.
Additionally, in List
view there is
functionality to export
reports, create custom
filters and customise
layouts
Equipment job list
View of job order lists by individual resources for today or this week designed
for use with mobile and/or tablet devices.
To open the Equipment Job List from Visual APS:
Select the Reports Menu
Select Equipment Job List
If the Equipment Job List is greyed out, the MOM integration settings have not
been configured.
To set the MOM integration settings:
Select the File Menu
Select Company Settings
Select the General Tab
Enter the URL of the MOM Site (i.e. http://webservername/lynqmom)
in the MOM Integration field
To open the Equipment Job List from LYNQ:
Select Production Job List from the menu section Dispatching
This report only shows resources that have been activated in Seat Maintenance.

LYNQ 2020 USER GUIDE Page 108 / 171
Online Version Click here to read
this page online.
The online version
provides additional
links to other
related information.
List View Line by line report by
job orders. From here,
users can click to the
left of the job order
number to view
transaction details of
the job order. Notes
can be added to
transactions from here.
Below each column
heading there is a
search/filter box. The
pin next to the search
box provides a set of
filtering
options. Additionally,
in List view there is
functionality to export
reports, create custom
filters and customise
layouts.
Production history
View activity history in relation to both open and closed job orders.
To open Production History:
Select Production History from Dispatching

LYNQ 2020 USER GUIDE Page 109 / 171
Features Look out for these
features in this section
of the user guide.
Resource management
LYNQ provides resource management to support the administration of
information relating to resources required for manufacturing.
Core features include:
• Seat Maintenance
• Resource Maintenance

LYNQ 2020 USER GUIDE Page 110 / 171
Online Version Click here to read
this page online.
The online version
provides additional
links to other
related information.
Seats The license for LYNQ is
stored in a sub
directory of the LYNQ
website folder. Once
applied all users will be
able to see the new
license details.
Pre-configured roles LYNQ is shipped with
some default roles. If
these do not suit your
organisation, you can
create new ones.
Seat maintenance
LYNQ, unlike Visual APS and
LYNQ api which is accessed by a smaller group of individuals. Seats need to be
maintained in all 3 components separately.
Your license dictates the number of seats you can activate.
Built-in rights, roles and groups are shipped with the application. They provide
you with varying levels of security permissions out of the box which are
associated to a group which can be customized to suit your organizational
requirements. Groups are effectively a representation of your organizational
structure. You can add or remove users to or from any built-in group or any
groups that you create. You can also add or remove rights assignments to built-
in roles or your own roles except for the administrator role. Before a user can
access areas of the application, the user must be assigned to one or more
groups. Seats are a collective term for resources such as users, employees and
equipment. Users are managed under seats.
Administration in more detail.
Menu Sub Name Purpose
Seat
Maintenance
Seats A collective term for resources such as
users, employees and equipment.
Rights Rights are used to assign permissions
to a role. Rights cannot be amended or
deleted.
Roles Roles comprise of one or more built-in
rights. You can create your own roles
to suit the responsibilities within your
organization. Groups can be
associated with one or more roles.
Built-in roles are shipped with the
application.
Groups Groups are used to organize seats into
a hierarchical structure which models
those found in your organization.
Crews
Seats can be assigned to a crew.
Crews can be used in workbench for
data collection purposes.

LYNQ 2020 USER GUIDE Page 111 / 171
Online Version Click here to read
this page online.
The online version
provides additional
links to other
related information.
Resources It is possible to create three
different types of resource:
users, employees and
equipment.
Activate
activate your seats.
Not enough seats Users and employees can
be linked so they do not
consume two seats. This
will help to reserve seats for
other users. If you need
more seats, contact the
service team.
Users seats
To access LYNQ a user seat must be created for the user. Users are associated
to active directory accounts. Application security rights are related to the group
the user is a member of.
If the user requires access to the workbench and/or timesheet functions and/or
you want to collect OLE data for the user, you must create an associated
employee seat. Equipment seats can be created in situations where equipment
is linked to a workbench and OEE is required.
How to create a new seat in LYNQ for a user
From the Planning Menu, select Seat Maintenance
Click Seats
Click New
Click New User
In the Login field enter the domain user account name
Click Find
Click Save
Click Close
Double click on the new employee to edit the properties
In the group section, assign the user to the correct group
Click Active
Click Save
LYNQ 2020 USER GUIDE Page 112 / 171
Online Version Click here to read
this page online.
The online version
provides additional
links to other
related information.
Importing When importing an
employee, the
workbench ID will
automatically be set to
the employee number.
Once activated, the
employee can clock
into the workbench
using their employee
number.
Deactivating seats When you deactivate a
seat, you will to be able
to re-use them for data
collection purposes.
Be aware that deleting
a seat may lose the
history for the seat.
Employee seats
Resources such as employees and equipment records can be imported from
your Enterprise Resource Planning application or created locally within LYNQ.
maintenance. When importing records, employees are imported directly from
the Enterprise Resource Planning application and no further steps are required.
The steps below explain how to import employee resources from your
Enterprise Resource Planning application and also how to create resources
directly in LYNQ.
Importing employees and work centres into LYNQ from your Enterprise
Resource Planning application
Select Seat Maintenance
Select Seats
Select Import
Select Import Employee or Import Equipment
Select the required resources
Select OK
Double click on the new employee or equipment to edit properties
In the group section, assign the user to the correct group
Click Active
Click Save
How to create a new seat in LYNQ directly for an employee
Select Seat Maintenance
Click Seats
Click New
Click New Employee
Enter a value in the First Name field
Enter a value in the Last Name field
Enter a value in the Workbench ID field
Enter the related Enterprise Resource Planning employee code in the
Employee ID field
Click on Save
Click on Close
Double click on the new employee to edit properties
In the group section, assign the employee to the correct group
Click Active
Click Save
LYNQ 2020 USER GUIDE Page 113 / 171
Online Version Click here to read
this page online.
The online version
provides additional
links to other
related information.
Importing If you try to import
equipment in LYNQ
without first importing
the equipment in
Visual APS, the
equipment will not be
available for import.
Local equipment You can manually
create equipment
records in either Visual
APS or LYNQ. The
steps are the same as
creating a local
employee record
Activated When an equipment
record is active the
equipment can be used
for OEE purposes.
Additional functionality
in the workbench will
be turned on.
Equipment
transactions are
generated for active
equipment and you
have the ability to
record downtime
activity to support OEE
and TEEP calculations.
Equipment seats
Equipment must first be imported in Visual APS and then imported into LYNQ.
LYNQ maintains a relationship of equipment records between both
applications. An equipment record will be created based on where the
equipment belongs to. If the equipment is reorganised in your Enterprise
Resource Planning application, the equipment record should be deleted and re-
imported in Visual APS and LYNQ. If you try to import equipment in LYNQ
without first importing the equipment in Visual APS, the equipment will not be
available for import.
How to import equipment from Enterprise Resource Planning into Visual APS
Refresh Visual APS
Click on Home
Click on Import
Set the Resource type to Machine Machine Hours
Select the correct shift for the machine
Click on OK
Expand the site and select the correct work unit
Click on OK
Importing equipment from Visual APS into LYNQ
From the Planning Menu, select Seat Maintenance
Select Seats
Select Import
Select Import Equipment
Select the required resource
Select OK
Double click on the new equipment record to edit properties
In the group section, assign the user to the correct group
Click Active
Click Save

LYNQ 2020 USER GUIDE Page 114 / 171
Online Version Click here to read
this page online.
The online version
provides additional
links to other
related information.
Personalise Personalise your
resources by giving them
photos. It looks really
cool in the workbench
and on status pages.
No of Resources Watch out for this
setting. It can affect
what you see in some of
the dashboards and
reports that show the no
of resources.
Planned Availability Watch out for this
setting. It can affect
what you see in some of
the dashboards and
reports that show the no
of resources. If you are
using Visual APS,
equipment resources
should be set to V-APS
Factory Automation
automation feature
allows data to be
collected automatically
from a resource. Refer
to the Advanced User
guide for further details
of this powerful feature.
Resource maintenance
LYNQ allows for additional properties to be set against active resources.
Properties can be set for
• Employees
• Equipment
To edit the properties for a resource
Open LYNQ
Click on the Resource Maintenance menu
Double click on the resource
Section Field Value
General Active Seat is active/inactive
Photo Photo of resource
Crew Default crew for resource
First Name
Last Name
Display Name Resources display name
Capacity No. of Resources Default no. of resources
Planned Availability
Calculation
Clocked Time
Availability is calculated as relation
between actual Up time to actual Total time
Basic Calendar
Availability is calculated as relation
between actual up time to basic calendar
value of planned hours for a specified day.
V-APS Resource Calendar
Availability is calculated as relation
between actual Up time to Planned Up as
per V-APS schedule for specified Work
unit/Machine
Workbench ID ID for accessing the workbench
Password Password to access the workbench
Time zone offset Difference between resources time and the
LYNQ server time
Groups Group Name The group the resource belongs to. Groups
are integrated with messaging and alerts
and can also be used to restrict certain
functionality within the workbench.

LYNQ 2020 USER GUIDE Page 115 / 171
Features Look out for these
features in this section
of the user guide.
Refer to the Advanced
Uses Guide to
understand the factory
automation feature.
Data collection
Frontline managers need complete visibility and control of the shop floor to
prevent problems. Collecting data by conventional methods can be
complicated, time-consuming and expensive.
able to gather time, attendance and production data from your employees and
equipment easily from any device with a browser. Clocking terminals and
interactive job lists simplify the execution of production plans and data capture
of start and stop times, downtime, labour hours, materials issued, quantities
reported, scrap and more.
Core features include:
• Workbench
• Timesheet
• Factory Automation

LYNQ 2020 USER GUIDE Page 116 / 171
Stop Clock Approach Unlike the Timesheet,
which is used to
manually enter
transactions, the
workbench provides a
stop clock approach to
tracking time. It is an
extremely accurate
way of tracking
employee and
equipment time.
Highly Configurable The workbench is
highly configurable.
Refer to the advanced
user guide for further
information.
Workbench
The workbench feature provides real time tracking of your factor activities.
Designed to interact with manufacturing workers and equipment on the shop
floor, the workbench typically runs on portable devices such as tablets and
iPads but can still be run on computers and laptops. As LYNQ is a fully web
enabled application, users can access the workbench from any remote location.
Whether this is from a separate factory location or whilst on the move from a
mobile device, the workbench is a scalable and flexible data collection solution.
The workbench layout is divided into 3 distinct sections.
Area Purpose
Header Navigational area for switching between
employee/equipment
Lookup option to select additional equipment
Color coded live activity status
Grey Bar undefined activity
Green Bar setup activity
Yellow Bar setup, teardown, wait activity
KPI information relating to employee/equipment
Live message centre new message indictor
Quick navigation to the workbench clock-in screen
(HOME)
Body
(Job order List)
Task list filtered by period:
Active task(s) for employee
Scheduled task(s) by equipment
Footer Buttons to perform functions set by the terminal
configuration
Green Buttons functions for employee
Grey Buttons functions for equipment (data collection
enabled)
The workbench will behave differently depending on the whether the
equipment is activated for data collection. The Active Yes/No setting against
the equipment record, will determine the functionality available to the user and
the level of data that is captured for analytical and tracking purposes.
Key differences between data collection activated equipment
Active Behaviour
Yes Both employee and equipment transactions are
generated
Analytical data to support OLE/OEE/TEEP
No Only employee transactions are generated
Analytical data to support OLE

LYNQ 2020 USER GUIDE Page 117 / 171
Online Version Click here to read
this page online.
The online version
provides additional
links to other
related information.
Password Protect Terminals can be
password protected
and multiple users can
access the same
terminal from multiple
locations.
Start your day
Start day may be performed from either an entrance/clock-in terminal or a shop
floor data collection terminal. When the employee selects the function to Start
Day, the date and time is recorded as the start of their office time.
Using the example below, an employee enters the building and immediately
clocks in to the entrance terminal and progresses to Start Day. The employee
then takes 10 minutes to walk to his actual place of work. 5 minutes later, he
starts his first task of the day. During this time LYNQ has calculated his total
office time as 15 minutes.
Using the example below, an employee enters the building and takes 10
minutes to walk to his actual place of work. He clocks into the Assembly
terminal and selects the function to Start Day. 5 minutes later, he starts his first
task of the day. During this time LYNQ has calculated his total office time as 5
minutes.
Clock in to start your day using the entrance terminal
Click Workbench
Click Terminals
Click Entrance
Enter a valid employee ID that is activated
Click Login

LYNQ 2020 USER GUIDE Page 118 / 171
Online Version Click here to read
this page online.
The online version
provides additional
links to other
related information.
Clocked in Status Unless configured
otherwise, the
employee will only be
able to send and
receive messages
within the workbench
Messages
Once clocked into the workbench an employee will have instant access to
messages that have been sent and received to/from their immediate line
manager. It's advisable to review all messages prior to starting any work
activities for the day. If there are any unread messages the mail icon will appear
orange to alert the employee to check their messages.
The following steps describe how to send messages
Select Messages.
Select New.
Enter a value in the subject field.
Enter a value in the body field.
Select Send.
The message will be sent automatically to the employee's line manager. The
message centre indicator will change color on the line manager's screen to
indicate they have a new message.

LYNQ 2020 USER GUIDE Page 119 / 171
Online Version Click here to read
this page online.
The online version
provides additional
links to other
related information.
Task Colours The colours of different
task types can be
customised under
advanced settings,
definitions, diversions.
Continuous tracking You do not need to
keep the browser open
to track labour. Even
after closing the
browser, LYNQ will
continue to track
hours.
Stopping tracking To stop the tracking of
employee or equipment
hours, select stop task.
The end day function
will also stop tracking
hours for running
tasks.
Multiple Tasks If your configuration
allows you are able to
start multiple tasks.
How time is allocated
between these tasks is
determined on your
advanced settings.
Refer to the advanced
user guide for further
information.
Starting and stopping a task
The workbench splits operations into tasks. You can have more than one task
for an operation. This may be the case when your operation involves both setup
and runtime time elements. Instead of seeing just one task with both time
elements, you will see two tasks. This allows you to manage operations at a
granular level.
Tasks can be started by selecting a scheduled task from the equipment job
order list or by clicking on the add task option in either the employee
workbench or the equipment workbench. LYNQ is configured to automatically
start job orders on the planned equipment when an employee starts a task from
the employee workbench. The reverse behaviour will happen if an employee
starts a task from the equipment workbench.
Labour and equipment time will be captured from the moment the task is
started.
To start a scheduled task from the equipment job order list
Click on chosen linked equipment in the workbench.
Click Turn On
You will now see tasks scheduled for this equipment
Click on the task you want to start
Click Start
Once the task has been started you will see an indicator against the task in the
workbench showing that either the employee and/or equipment is running the
task. In addition, the employee or equipment in the header section will have a
coloured vertical line to the left of the image to indicate what type of task is
running.
Starting an un-scheduled task
Click Add Task
Click on the task you want to start
Click OK
Stopping a task
Click on the task you want to stop
Click Stop

LYNQ 2020 USER GUIDE Page 120 / 171
Online Version Click here to read
this page online.
The online version
provides additional
links to other
related information.
Report Multiple You can select multiple
job orders when
reporting a quantity.
The report screen will
move to the next job
order once reported.
Report Screen The report screen can
be customised if you
wish to see additional
fields. Refer to the
advanced user guide
for further details.
Reject Codes The reject codes that
you see in the
dropdown box should
mirror the reject codes
you have in Enterprise
Resource Planning
Report operational quantity
Quantities for an operation are entered using the report function. The task in
the workbench will show the number of remaining quantities to complete for
that particular task. Quantities can only be entered for runtime operations.
You can report good and bad quantities through the report function.
To report good quantity completed
Click on the Task
Click Report
Enter the appropriate quantity in the Quantity field
Click on Report
The Qty (Today) column is updated, and the remaining quantity column is
reduced by the good quantity reported. A transaction for the quantity will be
created and can be seen in the Transaction Review screen.
To report bad quantity completed
Click on the Task
Click Report
Enter the appropriate quantity in the Reject field
Select a reject reason code
Enter any additional comments
Click on Report
The reject (Today) today column is updated, and the remaining quantity column
is reduced by the bad quantity reported. A transaction for the quantity will be
created and can be seen in the Transaction Review screen.
LYNQ provides an option to report materials as you report quantity. When this
setting is enabled, the user is automatically directed to issue materials after
reporting a quantity if material is attached to the operation. See the section
Report Material Issues for further information.

LYNQ 2020 USER GUIDE Page 121 / 171
Online Version Click here to read
this page online.
The online version
provides additional
links to other
related information.
Re-open Operation
status can be used to
re-open a completed
operation
Report status complete
The status field on the report screen allows you to change the status of a task.
The options for changing status are
• No change
• Complete
• Re-open
When a task is processed as complete the task will disappear from the
workbench screen and a new transaction for a status change is generated.
When a task is processed as re-open the task will re-appear on the workbench
screen and a new transactions for a status change is generated.
To report a task as complete
Click on the Task
Click on Report
Select Complete from the Status lookup
Click on Report
To report re-open a task
Click on the Task
Click on Report
Select Re-open from the Status lookup
Click on Report

LYNQ 2020 USER GUIDE Page 122 / 171
Online Version Click here to read
this page online.
The online version
provides additional
links to other
related information.
Abnormal Tracking LYNQ may be
configured to
automatically prompt
you to raise a
production issue if you
are reporting slower or
faster than expected
runtime. The track
abnormal progress
setting in advanced
settings controls this
behaviour.
Report production issues
Production issues can be raised at any time through the workbench. Employees
can quickly raise issues using the pre-defined issue types. Issues are visible
form the Issue Log screen and any other relevant screens that the issue relates
to. Depending on your issue management process you may consider whether
you allow employees to raise production issues from the Workbench.
Predefined production issues include:
• Breakdowns
• Health & Safety
• Minor Stops
• Production Rejects
• Reduced Speed
• Setup & Adjustments
• Startup Rejects
To manually raise a production issue:
Click production issue
Click on a type of issue
Click on an issue
Select the appropriate task from the task lookup field
Select the specific work unit from the equipment lookup field
Select the employee from the employee lookup field
Enter a value in the hours field
Enter a comment in the comments field
Click OK
Once the production issue is raised by the employee, it will appear in the Issue
Log. Unresolved issues will be indicated by an orange circle above the issue
log menu. Once resolved the orange circle with disappear.
workbench with the alerts feature. For further information refer to the
advanced user guide.
LYNQ 2020 USER GUIDE Page 123 / 171
Online Version Click here to read
this page online.
The online version
provides additional
links to other
related information.
Bins, Serials & Lots You must specify when
reporting, any
additional attributes
for material. This is
important in cases
when the material is
lotted or serialised or
when the material is
stored in a bin
location.
Extended Details Columns will only
appear for data that is
required. You must
split the entry by
quantity if the lot
number, serial number
or bin is a unique
value.
Validation Rules Validation rules
determine whether you
are able to enter
material or kit issues
without specifying
extended details.
Refer to the advanced
user guide for further
details.
Report material issues
Material can be reported from the workbench. Materials are associated to the
job order or operation and captured when the job order is created.
There are two different functions available to issue materials
• Material Issue to issue against the select job order or operation
• Kit Issue to issue against multiple job orders and by parent qty
To perform a material issue
Click on a Task
Click Issue Materials
Click on the relevant job order in the header section
Enter a quantity in the Issue Materials field
If the material is binned, lotted or serialised click the extended details
button to the right of the quantity field
Enter the correct extended details such as serial number etc.
Click OK
To perform a kit issue
Click on a Task
Click Kit Issue
Filter the list if required
Enter the required quantity in the Enter job order qty field.
If the material is binned, lotted or serialised click the extended details
button to the right of the quantity field
Enter the correct extended details such as serial number etc.
Click OK
Transactions for both material and kit issues are created immediately after
reporting and can been viewed in the Transaction Review screen

LYNQ 2020 USER GUIDE Page 124 / 171
Online Version Click here to read
this page online.
The online version
provides additional
links to other
related information.
Integration
configure buttons on
the workbench for non-
productive time that
relate to a works job
order. This will ensure
your non-productive
time is posted to
Enterprise Resource
Planning.
Report non-productive time
There are various buttons on the workbench that allow an employee to report
non-productive time. Non-productive time may be applied when the employee
goes on a break, goes to lunch, goes into meetings or is performing training
related activities.
The workbench can be customised to support the different types of non-
productive time for your organisation. Refer to the advanced user guide for
further details on this subject.
By default, the workbench will continue to track hours against tasks when the
user selects any of the non-productive buttons.
To report non-productive time (Break)
Click on Break
Click Return to Previous (on return)
To report non-productive time (Lunch)
Click on Lunch
Click Return to Previous (on return)

LYNQ 2020 USER GUIDE Page 125 / 171
Online Version Click here to read
this page online.
The online version
provides additional
links to other
related information.
Production Reporting The report screen will
provide a visual
indicator to the user
when reporting
production will take
place.
Reporting production
Production reporting is entered using the same report function as operational
quantity. Production is reported when a quantity is entered against a job order
for the last operation of activity type Run.
Production will however only post to Enterprise Resource Planning when the
option to post this is turned on in the LYNQ api Integration settings. When
entering quantity transactions for the final run operation, additional
information will be required if the finished good item is serialized, lotted or to
be receipted into a warehouse that has bins enabled.
Additional details must be entered by clicking on the Extended Details button.
Refer to report operational quantity for further information.

LYNQ 2020 USER GUIDE Page 126 / 171
Online Version Click here to read
this page online.
The online version
provides additional
links to other
related information.
Equipment Off The equivalent end day
function for equipment
is turn off. You should
turn off your
equipment where
appropriate before
ending our day.
End your day
The end day function is used to clock the employee out of the workbench. Any
active tasks will be stopped immediately and the employee's status will change
to clocked off. The employee's office time will stop being accounted for. The
end day function can be run multiple times per day. By default, the end day
function is provided on entrance terminals and shop floor data collection
terminals.
To end your day
Click on the Employee workbench.
Select End Day.

LYNQ 2020 USER GUIDE Page 127 / 171
Online Version Click here to read
this page online.
The online version
provides additional
links to other
related information.
Default Values The layout and default
values provided in
Timesheets can be
customised by
Administrators within
Advanced Settings
Timesheet
Timesheet entries can be used by employees to enter data rather than using
the real time tracking in the workbench. Timesheet entries are manually created
by the application user and can be approved, submitted or excluded from
posting no differently than transactions generated by the workbench feature.
Timesheet entries can only be entered for resources that are activated in Seat
Maintenance.
The types of transactions supported by the timesheet include:
• Labour hours
• Quantity
• Scrap
• Status changes
To enter a transaction in the timesheet
Click Timesheet Entry
Specify the Date Range
Select an Approval Status
Select Employee
Click OK
Select Task
Click OK
Select Equipment
Click OK
Enter a value in the Hours, Quantity, Reject or Status field
Click the + symbol
Click Save
Once saved, the transaction(s) will appear in the Transaction Review screen
and data will shortly appear under reports and dashboards.

LYNQ 2020 USER GUIDE Page 128 / 171
Current Activity Dashboards and
reports are based on
actual current activity
and provide insight
into how individual
resources (employees
and equipment) are
performing today and
your actual product
output (parts count).
Tracking
LYNQ provides several features to track, summarise and evaluate information
related to resources utilised in production. Including live dashboards with
supporting metrics for Overall Labour Effectiveness (OLE) and Overall
Equipment Effectiveness (OEE).
Core features include:
• Tracking dashboard
• Employee Status
• Equipment Status
• Job Status
• Employee Performance
• Equipment Performance
• Management Reports

LYNQ 2020 USER GUIDE Page 129 / 171
Online Version Click here to read
this page online.
The online version
provides additional
links to other
related information.
Employee Availability Known as worker
efficiency, considers
the relationship
between actual work
time related to
production jobs and
the actual attendance
(clocked) time of the
employee.
Employee Performance Known as worker
effectiveness,
compares the actual
run rate produced by
the employee with the
planned run rate. To
determine the actual
run rate a production
quantity must be
reported.
Employee Quality Known as the worker
quality ratio, is the
relationship between
the good quantity and
the total quantity
produced. To
determine the quality
ratio a production
quantity must be
reported. For the ratio
to be less than 100% a
scrap (bad) quantity
must be reported.
Employee KPIs
Employee Availability
Calculation Actual Work Time / Actual Attendance Time
Measure It is measured as a percentage (%). The higher the percentage
the better.
Report(s) Dashboard shows overall worker efficiency for today
Employee Performance shows current and historical efficiency
for an individual worker
Employee Performance
Calculation Planned Run Time x Production Quantity / Actual Run Time
Measure It is measured as a percentage (%). The higher the percentage
the better.
Report(s) Dashboard shows overall worker performance for today for all
workers
Employee Performance shows current and historical
performance for an individual worker
Employee Quality
Calculation Good Quantity / Total Quantity
Measure It is measured as a percentage (%). The higher the percentage
the better.
Report(s) Dashboard (Tracking) shows overall worker quality ratio for
today for all workers
Employee Status (Tracking)
today
Employee Performance (Tracking) shows current and
historical quality ratio for an individual worker

LYNQ 2020 USER GUIDE Page 130 / 171
Online Version Click here to read
this page online.
The online version
provides additional
links to other
related information.
(OLE) Availability,
performance and
quality as a single key
performance indicator
(KPI). The average
value of OLE in a
manufacturing
company is 40%. World
class manufacturers
operate at 75% or
above depending on
their industry (KPI).
Overall labour effectiveness (OLE)
Overall Labour Effectiveness (OLE)
Calculation Availability x Performance x Quality
Measure It is measured as a percentage (%). The higher the percentage
the better.
Report(s) Dashboard shows the overall effectiveness for today for all
workers
today
Employee Performance shows current and historical overall
effectiveness for an individual worker

LYNQ 2020 USER GUIDE Page 131 / 171
Online Version Click here to read
Equipment Availability Known as equipment
efficiency, considers
the relationship
between actual
productive time and
the planned busy time
of the equipment. You
can set the planned
busy time for each
piece of equipment to
be based on the
schedule, the
start/stop time or
calendar time. See seat
maintenance to set
this value.
Equipment performance Known as equipment
effectiveness,
compares the actual
run rate produced by
the equipment with the
planned run rate. To
determine the actual
run rate a production
quantity must be
reported.
Equipment Quality Known as the
equipment quality
ratio, is the
relationship between
the good quantity and
the total quantity
produced. To
determine the quality
ratio a production
quantity must be
reported. For the ratio
to be less than 100% a
scrap (bad) quantity
must be reported
Equipment KPIs
Equipment Availability
Calculation Actual Productive Time / Planned Busy Time
Measure It is measured as a percentage (%). The higher the percentage
the better.
Location Dashboard shows overall equipment efficiency for today
Equipment Status shows equipment efficiency for today
Equipment Performance shows current and historical efficiency
for an individual piece of equipment
Equipment Performance
Calculation Good Quantity / Produced (Total) Quantity
Measure It is measured as a percentage (%). The higher the percentage
the better.
Location Dashboard shows overall quality ratio for today for all
equipment
Equipment Status shows the quality ratio for a specific piece of
equipment for today
Equipment Performance shows the current and historical
quality ratio for an individual piece of equipment
Equipment Quality
Calculation Good Quantity / Produced (Total) Quantity
Measure It is measured as a percentage (%). The higher the percentage
the better.
Location Dashboard shows overall quality ratio for today for all
equipment
Equipment Status shows the quality ratio for a specific piece
of equipment for today
Equipment Performance shows the current and historical
quality ratio for an individual piece of equipment

LYNQ 2020 USER GUIDE Page 132 / 171
Online Version Click here to read
this page online.
The online version
provides additional
links to other
related information.
(OEE) Represents equipment
availability,
performance and
quality as a single key
performance indicator
(KPI). The average
value of OEE in a
manufacturing
company is 60%. World
class manufacturers
operate 85% or above
depending on their
industry
Overall equipment effectiveness
(OEE)
Overall Equipment Effectiveness (OLE)
Calculation Availability x Performance x Quality
Measure It is measured as a percentage (%). The higher the percentage
the better.
Location Dashboard shows overall equipment efficiency for today
Equipment Status shows equipment efficiency for today
Equipment Performance shows current and historical efficiency
for an individual piece of equipment

LYNQ 2020 USER GUIDE Page 133 / 171
Online Version Click here to read
this page online.
The online version
provides additional
links to other
related information.
OLE Views showing overall
labour effectiveness.
Availability,
performance and
quality
OEE Views showing overall
equipment
effectiveness.
Availability,
performance and
quality
Products Views showing
products, parts to
produce, parts count
and % complete
Tracking dashboard
High level view of your job orders, products, employees and equipment. Select
specific employees and equipment to view status and performance for a
selected time period.
To open the Dashboard:
Select Dashboard in Tracking
This report only shows resources that have been activated in Seat Maintenance.

LYNQ 2020 USER GUIDE Page 134 / 171
Online Version Click here to read
this page online.
The online version
provides additional
links to other
related information.
Card View Displays a card
summary of the
employees selected.
Clicking on employee
card takes you to
extended details of
employee status
List View A line by line report by
employee. Click on the
employee name to view
extended details of
employee status.
Additionally, in this
view, there is a link to
view the job order
status for each job
order the employee is
involved with. Below
each column heading
there is a search/filter
box. The pin next to
the search box
provides a set of
filtering options.
Additionally, in list
view there is
functionality to export
reports, create custom
filters, customize
layouts, and apply
defined actions to
multiple records.
Employee status
Employee status provides an at a glance live view of employees, what their
current status is, what they are working on, and how they are performing during
their shift. Drill down into each employee card for a detailed view. Use status
indicators to access their workbench to help with clocking and other
management issues.
From this simple, single status screen you can get a lot of information. The
coloured plates show you their status.
• GREY Out
• GREEN Productive
• YELLOW Direct downtime (setting up machine)
• GREEN & YELLOW working productively on some job orders while
setting up others
• RED Non-
From this screen you can also see any alerts or issues that are happening,
allowing team leads and supervisors to work to resolve the problems ASAP.
If you have the permissions you can open the workbench terminal they are
working from by clicking on the green finger icon.
To open Employee Status:
Select Employee Status in Tracking
This report only shows resources that have been activated in Seat Maintenance.
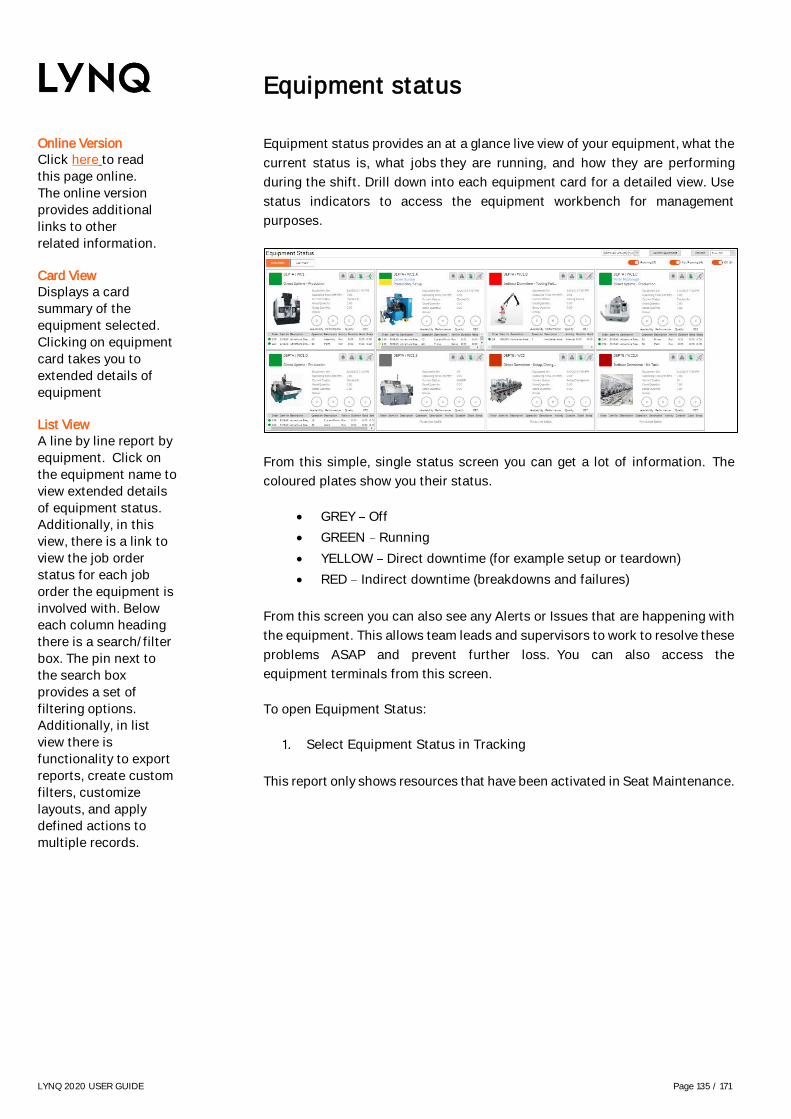
LYNQ 2020 USER GUIDE Page 135 / 171
Online Version Click here to read
this page online.
The online version
provides additional
links to other
related information.
Card View Displays a card
summary of the
equipment selected.
Clicking on equipment
card takes you to
extended details of
equipment
List View A line by line report by
equipment. Click on
the equipment name to
view extended details
of equipment status.
Additionally, in this
view, there is a link to
view the job order
status for each job
order the equipment is
involved with. Below
each column heading
there is a search/filter
box. The pin next to
the search box
provides a set of
filtering options.
Additionally, in list
view there is
functionality to export
reports, create custom
filters, customize
layouts, and apply
defined actions to
multiple records.
Equipment status
Equipment status provides an at a glance live view of your equipment, what the
current status is, what jobs they are running, and how they are performing
during the shift. Drill down into each equipment card for a detailed view. Use
status indicators to access the equipment workbench for management
purposes.
From this simple, single status screen you can get a lot of information. The
coloured plates show you their status.
• GREY Off
• GREEN Running
• YELLOW Direct downtime (for example setup or teardown)
• RED Indirect downtime (breakdowns and failures)
From this screen you can also see any Alerts or Issues that are happening with
the equipment. This allows team leads and supervisors to work to resolve these
problems ASAP and prevent further loss. You can also access the
equipment terminals from this screen.
To open Equipment Status:
Select Equipment Status in Tracking
This report only shows resources that have been activated in Seat Maintenance.
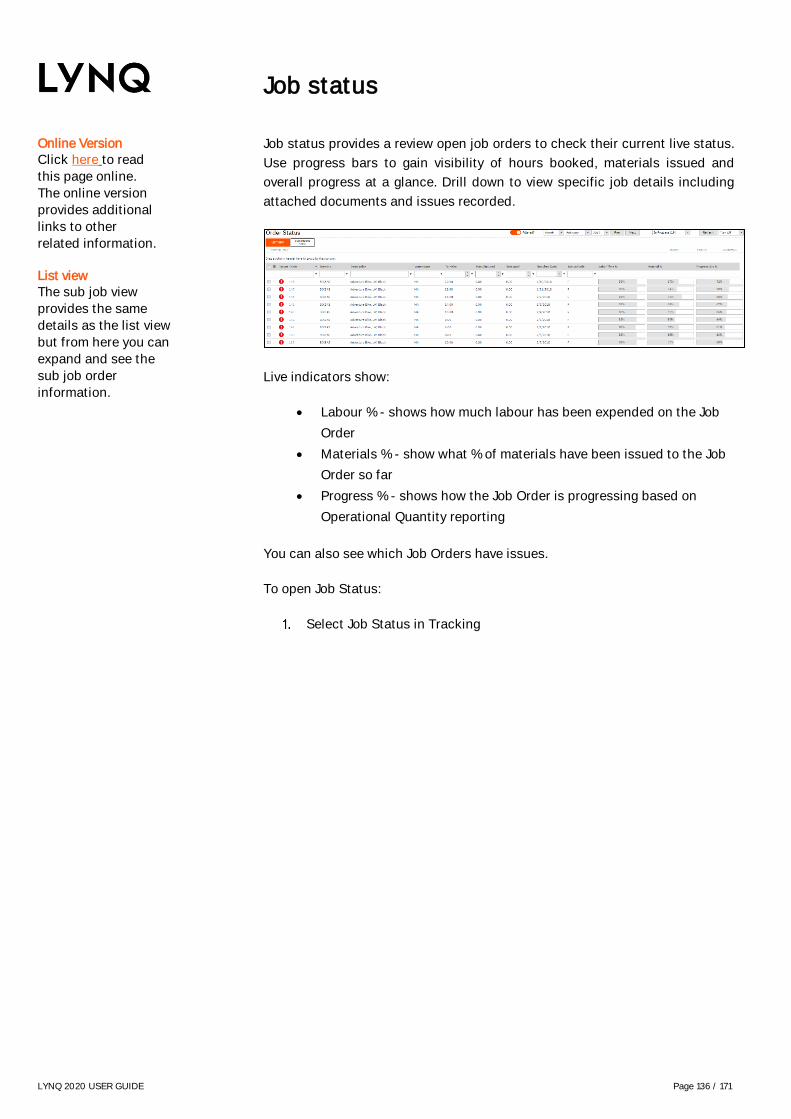
LYNQ 2020 USER GUIDE Page 136 / 171
Online Version Click here to read
this page online.
The online version
provides additional
links to other
related information.
List view The sub job view
provides the same
details as the list view
but from here you can
expand and see the
sub job order
information.
Job status
Job status provides a review open job orders to check their current live status.
Use progress bars to gain visibility of hours booked, materials issued and
overall progress at a glance. Drill down to view specific job details including
attached documents and issues recorded.
Live indicators show:
• Labour % - shows how much labour has been expended on the Job
Order
• Materials % - show what % of materials have been issued to the Job
Order so far
• Progress % - shows how the Job Order is progressing based on
Operational Quantity reporting
You can also see which Job Orders have issues.
To open Job Status:
Select Job Status in Tracking

LYNQ 2020 USER GUIDE Page 137 / 171
Online Version Click here to read
this page online.
The online version
provides additional
links to other
related information.
Dashboard Graphical presentation
of employee
performance including
at a glance Hrs/Qty
stats, Key Performance
Indicators, and Loss
percentages.
Summary Period level line by line
representation of
employee performance
with filtering functions
and export facility.
Detail Operation level line by
line representation of
employee performance
with customisation,
filtering and export
facilities.
Audit Chronological
transaction level report
for detailed analysis
with filtering and
export facilities.
Alerts & Issues Report of any alerts &
issues.
Attachments View or delete
attachments.
Employee performance
Employee Performance provides detailed analysis of an individual employee's
performance over time with audit trails and a record of the issues
encountered. This report displays the overall labour effectiveness
(OLE) results with support metrics for Availability, Performance and Quality.
To open Employee Performance:
Select Employee Performance in Tracking
This report only shows resources that have been activated in Seat Maintenance.

LYNQ 2020 USER GUIDE Page 138 / 171
Online Version Click here to read
this page online.
The online version
provides additional
links to other
related information.
Dashboard Graphical presentation
of equipment
performance including
at a glance Hrs/Qty
stats, Key Performance
Indicators, and Loss
percentages.
Summary Period level line by line
representation of
equipment
performance with
filtering functions and
export facility.
Detail Operation level line by
line representation of
equipment
performance with
customisation, filtering
and export facilities.
Audit Chronological
transaction level report
for detailed analysis
with filtering and
export facilities.
Alerts & Issues Report of any alerts &
issues.
Attachments View or delete
attachments.
Equipment performance
Equipment Performance provides detailed analysis of an individual piece of
performance over time with audit trails and a record of the issues
encountered. This report displays the overall equipment effectiveness (OEE)
results with support metrics for Availability, Performance and Quality.
To open Equipment Performance:
Select Equipment Performance in Tracking
This report only shows resources that have been activated in Seat Maintenance.

LYNQ 2020 USER GUIDE Page 139 / 171
Online Version Click here to read
this page online.
The online version
provides additional
links to other
related information.
Availability Report of availability,
with filters to display
separate values for
uptime/downtime.
Default shows total.
Adjustments Detailed reports by
operational type
(Downtime, Uptime)
with direct access to
edit clock-in/out times.
Detail Operation level line by
line representation of
performance with
customisation, filtering
and export facilities.
Pivot Facility to view, create
and edit Pivot table
reports. Customize
function displays fields
available.
Management Reports
Reports provide analytics associated with the resources availability
(uptime/downtime) for management purposes. Includes daily clock hours
reconciliation and option to create custom management reports using pivot
tables.
To open Management Reports:
Select Management Reports in Tracking
This report only shows resources that have been activated in Seat Maintenance.

LYNQ 2020 USER GUIDE Page 140 / 171
Execution Control Control which
production activities
are available to your
users with configurable
terminals
Execution management
LYNQ provides you with an ability to define and fully customise the execution
of your production activities.
Core features include:
• Terminal Maintenance
• Transaction Review
LYNQ 2020 USER GUIDE Page 141 / 171
Online Version Click here to read
this page online.
The online version
provides additional
links to other
related information.
Password Protect Terminals can be
password protected
and multiple users can
access the same
terminal from multiple
locations.
Terminal Maintenance
Terminals are a feature in LYNQ that determine the functions that are available
to a user for data collection and reporting purposes. The terminal definition
represents a collection of predefined workbench elements which can be easily
added or removed to suit the functions of your employees. Terminals are highly
customizable and a flexible feature of the application.
There are 2 types of terminal in LYNQ:
• Clock-In terminal
• Shop Floor terminal
Clock-In terminals are typically located at the entrance of the building or
production unit to track employees clock in and clock out time. This type of
terminal may be used by all employees regardless of their functional role.
Clock-In terminals are typically limited in their functionality.
Shop Floor terminals are typically located on the shop floor and situated within
the relevant production unit. These terminals can be configured by equipment,
crew or employee to display scheduled/unscheduled shop job orders or only
shop job orders within a specific time frame or within custom filter definitions.
To configure terminals by employees and/or equipment, the resource must be
active in Seat Maintenance. Additional elements can be included, (e.g. Break,
Lunch, Material Issue, Kit Issue, Production Issues) providing employees with
the ability to complete all their reporting requirements from one simple screen.
LYNQ is shipped with 8 pre-configured workbench terminal definitions ready
for immediate use. The configuration of these terminals has been designed to
service well established manufacturing models and you can start to use them
as a template with minimal further configuration.
Terminal Name Description
1 Entrance Clock in and out to start/end your data
2 Basic Basic terminal with limited options
3 Advanced Advanced terminal with extended functionality
4 Crew Advanced terminal with crew functionality
5 Time Entry Time entry terminal for employees using timesheets
6 Equipment Equipment terminal with downtime tracking
7 Materials Advanced terminal with materials issue capabilities
8 Office Office terminal for non-manufacturing personnel

LYNQ 2020 USER GUIDE Page 142 / 171
Online Version Click here to read
this page online.
The online version
provides additional
links to other
related information.
Custom Buttons LYNQ is shipped with
pre-configured buttons
for common tasks. You
can create your own
buttons and display
them on different
terminals. Refer to the
advanced user guide
for further information
Workbench buttons
Buttons on the workbench can apply to employees or equipment or to both
types of resources. The buttons on the workbench are fully customisable and
additional information can be found in the advanced user guide.
Button Purpose Employee Equipment
Start Day Clock employee in X
Start Start selected task(s) X
Stop Stop selected task(s) X
Report Report quantity, scrap, status
for selected job order(s)
X
Add Tasks Start unscheduled task(s) X X
Recent Tasks View of recent tasks that are
started/stopped
X
Barcode Entry Select task(s) by scanning a
barcode
X
Break Break diversion X
Lunch Lunch diversion X
Meeting Meeting diversion X
Training Training diversion X
Issue Materials Issue materials for active task(s) X
Kit Issue Kit issue of materials for
active/non- active tasks
X
Messages Compose, read and view
application messages
X
Production Issue Create production issue X
My Time Report time by manual
timesheet entry
X
End Day Clock Out X
Turn On Turn equipment on X
Equipment Failure Report downtime due to
equipment failure
X
Tooling Failure Report downtime due to tooling
failure
X
Unplanned
Maintenance
Report downtime due to
unplanned maintenance
X
Material Shortage Report downtime due to
material shortage
X
Operator Shortage Report downtime due to
operator shortage
X
Setup/Changeover Report downtime due to
setup/changeover
X
Turn Off Turn equipment off X

LYNQ 2020 USER GUIDE Page 143 / 171
Online Version Click here to read
this page online.
The online version
provides additional
links to other
related information.
Unique Terminals Create unique
terminals for your
different work units.
This allows you to
control how you want
different terminals to
behave
Copying terminals
Creating new terminals is easily achieved by using the copy function within
terminal maintenance. When copying terminals, the functions associated with
the terminal are also copied. Refer to the advanced user guide to better
understand how terminals can be customised in much further detail.
To copy a terminal:
Click Terminal Maintenance
Tick one of the pre-defined terminals
Click Copy
Enter a suitable value in the Name field for the new Terminal
Click on the work units the new terminal will relate to
Click OK
Click Save.
To test your new terminal:
Click Workbench
Click Terminals
Select your new terminal created earlier
Enter an employee ID
Click Login
LYNQ 2020 USER GUIDE Page 144 / 171
Online Version Click here to read
this page online.
The online version
provides additional
links to other
related information.
Transaction Generation The LYNQ Platform
Windows Service on
the Web Server is
responsible for
consolidating your
activity into actual
transactions that can
be posted to Enterprise
Resource Planning.
The workbench will
still operate with this
service not running but
you will not see new
transactions in the
Transaction Review
screen until the service
is started.
Record Security
configure LYNQ so
supervisors and line
managers can only see
their own team
records. Refer to the
Advanced User Guide
for further information.
Transaction review
All activities performed within the workbench are converted into summary
transactions so they can be reported on easily in LYNQ and posted to Enterprise
Resource Planning. Depending on your configuration, transactions may appear
immediately after performing the activity or at different stages in your day. (i.e.
when you go to break, lunch or end day). Refer to the advanced user guide for
further information on this subject.
The table below provides an overview of which different transaction types are
created based on the type of activity performed.
Activity Transaction
Type
Default
Status
Integrated
to ERP
Office Time (No Task) Labour Excluded No
Labour Labour Unposted Yes
Machine Time Machine Time Excluded Yes
Quantity
(Operation & Production Reporting)
Quantity Unposted Yes
Operation Reject Scrap Unposted Yes
Indirect (i.e. Break) Labour Excluded No
Indirect by Job order Labour Unposted Yes
Material Issue Material Issue Approved Yes
Kit Issue Material Issue Approved Yes
Production Issue Production
Issue
Excluded No
Status Status Unposted Yes
By default, indirect transactions such as break, lunch etc, machine time
transactions and production issue transactions are excluded from posting to
Enterprise Resource Planning. Transaction rules determine the default status
of transactions. Depending on your configuration, you may have different
transaction rules configured to change the default approval status.
Refer to the advanced user guide for further information on this subject.
To open Transaction Review:
Select Transaction Review in Execution Management
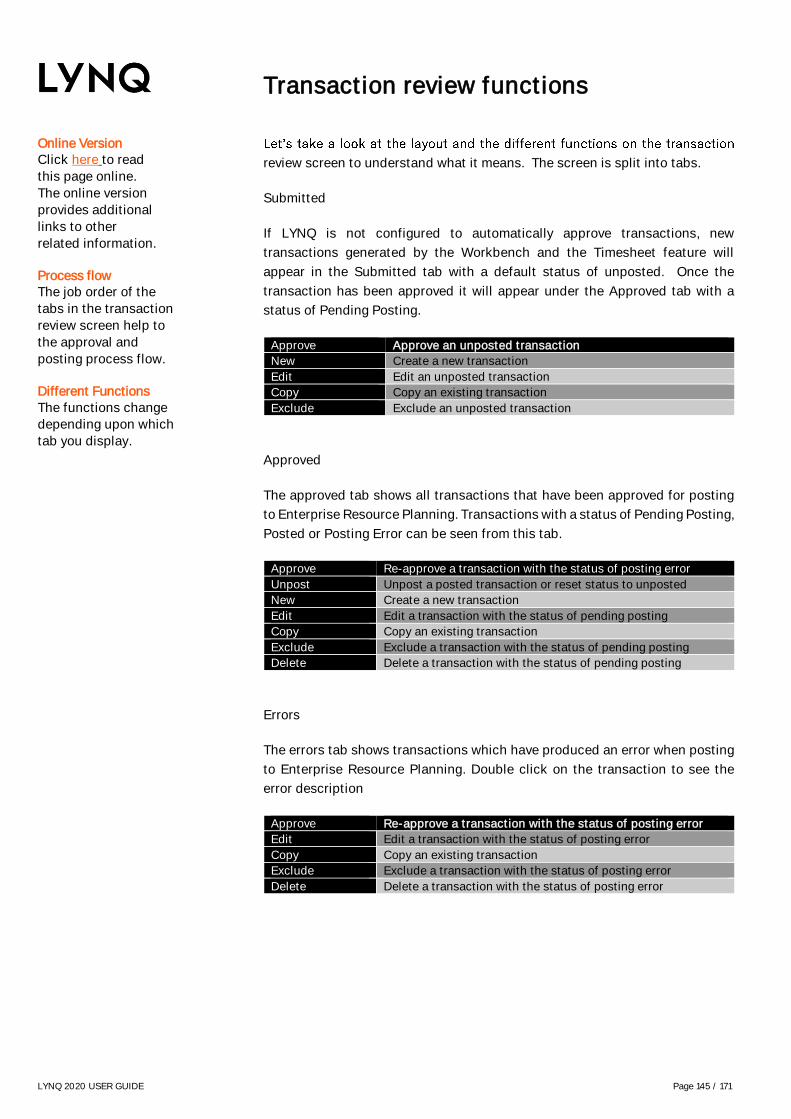
LYNQ 2020 USER GUIDE Page 145 / 171
Online Version Click here to read
this page online.
The online version
provides additional
links to other
related information.
Process flow The job order of the
tabs in the transaction
review screen help to
the approval and
posting process flow.
Different Functions The functions change
depending upon which
tab you display.
Transaction review functions
review screen to understand what it means. The screen is split into tabs.
Submitted
If LYNQ is not configured to automatically approve transactions, new
transactions generated by the Workbench and the Timesheet feature will
appear in the Submitted tab with a default status of unposted. Once the
transaction has been approved it will appear under the Approved tab with a
status of Pending Posting.
Approve Approve an unposted transaction
New Create a new transaction
Edit Edit an unposted transaction
Copy Copy an existing transaction
Exclude Exclude an unposted transaction
Approved
The approved tab shows all transactions that have been approved for posting
to Enterprise Resource Planning. Transactions with a status of Pending Posting,
Posted or Posting Error can be seen from this tab.
Approve Re-approve a transaction with the status of posting error
Unpost Unpost a posted transaction or reset status to unposted
New Create a new transaction
Edit Edit a transaction with the status of pending posting
Copy Copy an existing transaction
Exclude Exclude a transaction with the status of pending posting
Delete Delete a transaction with the status of pending posting
Errors
The errors tab shows transactions which have produced an error when posting
to Enterprise Resource Planning. Double click on the transaction to see the
error description
Approve Re-approve a transaction with the status of posting error
Edit Edit a transaction with the status of posting error
Copy Copy an existing transaction
Exclude Exclude a transaction with the status of posting error
Delete Delete a transaction with the status of posting error

LYNQ 2020 USER GUIDE Page 146 / 171
Online Version Click here to read
this page online.
The online version
provides additional
links to other
related information.
Customise Use the customise
function to add or
remove columns on the
screen. Each tab can
have different columns
showing.
Transaction types Use the transaction
types filter to show
filter different
transaction types.
Transaction review functions
All
The All tab shows all transactions regarding of their status.
Approve Approve an unposted transaction
Unpost Unpost a posted transaction
New Create a new transaction
Edit Edit an unposted transaction
Copy Copy an existing transaction
Exclude Exclude a transaction
Delete Delete an unposted/pending posting transaction
Excluded
The exclusions tab shows transactions which have been excluded from posting
to Enterprise Resource Planning. (i.e. Indirect Task Codes such as break, lunch,
training, meetings, office time)
Approve Approve a transaction with the status of excluded
New Create a new transaction
Edit Edit a transaction with the status of excluded
Copy Copy an existing transaction
Delete Delete a transaction with the status of excluded

LYNQ 2020 USER GUIDE Page 147 / 171
Online Version Click here to read
this page online.
The online version
provides additional
links to other
related information.
Grouping Grouping your
employee data can
help to speed up the
approval process. No-
one wants to review
every single
transaction generated.
Start by grouping by
employee and then by
transaction type. Look
at the totals reported
for labour. Does the
total hours look correct
for the employee? If
so, approve them from
quicker and leaves you
more time to
investigate just the
exceptions.
Exclude There may be times
where the employee
has generated a
transaction in LYNQ,
post this to Enterprise
Resource Planning.
This may be where a
user has completed the
same activity in
Enterprise Resource
Planning and posting
the transaction from
LYNQ will duplicate
the transaction. In
these cases, just
simply exclude the
transaction. Excluded
transactions are not
posted to Enterprise
Resource Planning.
Approving transactions
Approving transactions is easy to do and should be done regularly to ensure
Enterprise Resource Planning maintains accurate analysis and financial data.
Throughout the approval and posting process you will see the transaction
change its status.
Transaction Status Meaning
Excluded Transaction has been excluding from posting to Enterprise
Resource Planning
Unposted Transaction has not been approved for posting to
Enterprise Resource Planning
Pending Posting Transaction has been approved and will be posted on next
sync to Enterprise Resource Planning
Posted Transaction has been posted to Enterprise Resource
Planning
Posting Error Transaction cannot be posted to Enterprise Resource
Planning due to an error
Pending Unposting Transaction already posted to Enterprise Resource Planning
but will be reversed on next sync to Enterprise Resource
Planning
Unposting Transaction has not successfully been reversed from
Enterprise Resource Planning
Use the transaction screen if you wish to approve transactions on a periodic
basis regardless of the employee or job order which can be done in other
screens. While the transaction screen shows every detail and each and every
transaction can be reviewed, you should consider whether this is (a) an
effective use of manager/supervisor time and (b) practical to do so.
Transactions that need to be approved can be reviewed from the submitted tab.
To approve transactions
Click Transaction Review
Click on the Submitted Tab
Set the Date Filter
Filter records if required that must be approved.
Select all transactions to be approved (left of the Notes column)
Click Approve
Once approved the transactions will no longer be seen under the submitted tab
but instead will appear under the approved tab. The status of the transaction
integration schedule, the transaction will be posted to Enterprise Resource
Planning. You can however force the integration to Enterprise Resource
Planning by clicking on the sync button.

LYNQ 2020 USER GUIDE Page 148 / 171
Online Version Click here to read
this page online.
The online version
provides additional
links to other
related information.
Forget to clock out? If you are forever
adjusting employee
hours because they
have forgotten to clock
out, you can
automatically setup a
schedule to clock out
the employee. You can
clock out individual
employees or a group
of employees. You can
also do this for break
times too or in fact any
other type of diversion.
Refer to the Advanced
User Guide for further
information.
Rights to Edit/View To edit transactions,
users must have
Transaction
Management rights.
Without this right,
users will only have
view access to
Transaction Review,
Timesheet,
Management
Report/Adjustments
and Production Issues.
Adjusting transactions
There may be times where inaccurate labour time is recorded. This may be due
to the employee forgetting to stop a task or perform the end day function.
Adjusting time must be completed from the Management Reports screen for
office time and labour time.
To adjust Clock In/Out Time
Click Management Reports
Click on the Adjustments Tab
Select the relevant employee
Select the relevant day
Click Edit under the date from the left windowpane
Set the correct Clock in and Clock Out date/time
Click OK
To adjust the task hours
From the same adjustment screen
Click Show Transaction List from the right windowpane
Locate the inaccurate transaction(s)
Double click on the transaction
Enter the correct duration in the Labour (Hrs) field
Click Save
Select the transaction you have edited
Click Approve

LYNQ 2020 USER GUIDE Page 149 / 171
Online Version Click here to read
this page online.
The online version
provides additional
links to other
related information.
Correcting Mistakes Dealing with a high
volume of posting
issues is not good use
of your time. You may
want to review your
processes to ensure
that users are using
the workbench
correctly. Some
validation is performed
only on posting to
Enterprise Resource
Planning and good
discipline is required.
Reversing transactions
Transactions with a status of posted cannot be edited. To amend a posted
transaction, the transaction must be reversed using the Unpost function. When
unposting a transaction, the transaction will be reversed in Enterprise Resource
Planning and the status of the transaction in LYNQ will change from posted to
Unposted. Transactions with a status of unposted can be edited and re-
approved and posted again to Enterprise Resource Planning.
To reverse a posted transaction
Click Transaction Review
Click on the Approved Tab
Select the correct date filter to locate the posted transaction
Select the transaction to edit and click Unpost.
The status of the transaction will change to PendingUnposting
The next time LYNQ api executes the integration, the transaction will be
reversed in Enterprise Resource Planning and the status of the transaction in
LYNQ will change to Unposted. The transaction will be reversed on the original
transaction date.

LYNQ 2020 USER GUIDE Page 150 / 171
Online Version Click here to read
this page online.
The online version
provides additional
links to other
related information.
Lots of errors? Dealing with a high
volume of posting
issues is not good use
of your time. You may
want to review your
processes to ensure
that users are using
the workbench
correctly. Some
validation is performed
only on posting to
Enterprise Resource
Planning and good
discipline is required.
Additional Checkbox Additional data
relating to the
transaction can be
seen by clicking on the
additional check box.
Audit Button Use the audit button to
review detailed integration
synch messages when a
transaction has failed to
post.
Transaction errors
There may be occasions where a transaction generated by LYNQ fails to post
to Enterprise Resource Planning. Transactions that cannot post due to an error
should be corrected and re-approved for posting. Transactions that cannot
post to Enterprise Resource Planning can be viewed from the Errors tab in the
Transaction Screen. The transaction will have a status of posting error.
Double click on the transaction to view the details
In the example above the transaction cannot post due to an incorrect scrap
reason code. To correct the transaction, the scrap reason code can be edited
by clicking on [...] to the right of the scrap field and then the transaction can be
set to Retry. Selecting retry from the transaction edit screen will change the
status of the transaction to Pending Posting. The next time LYNQ api executes
the integration, the transaction will be posted.
Transactions that cannot be posted from LYNQ can be set to Accepted. This
means that any corrections will need to be made manually in Enterprise
Resource Planning.
In previous versions of LYNQ the labour value was the only field that could be
edited in the Transaction Review Screen. This made the correction of data
errors long winded to resolve with the user having to copy, delete and then edit
the copied transaction.

LYNQ 2020 USER GUIDE Page 151 / 171
Online Version Click here to read
this page online.
The online version
provides additional
links to other
related information.
Lots of errors? Dealing with a high
volume of posting
issues is not good use
of your time. You may
want to review your
processes to ensure
that users are using
the workbench
correctly. Some
validation is performed
only on posting to
Enterprise Resource
Planning and good
discipline is required.
Transaction errors
Transaction Date
Employee Code
Membership Code
Task Code
Labour Hrs
Classification Value
For a full list of errors please logon to the support portal and search based on
your error code www.support.lynqmes.com

LYNQ 2020 USER GUIDE Page 152 / 171
Dashboard Graphical presentation
of employee
performance including
at a glance Hrs/Qty
stats, Key Performance
Indicators, and Loss
percentages.
Summary Period level line by line
representation of
employee performance
with filtering functions
and export facility.
Detail Operation level line by
line representation of
employee performance
with customisation,
filtering and export
facilities.
Audit Chronological
transaction level report
for detailed analysis
with filtering and
export facilities.
Adjustments Detailed reports by
operational type
(Downtime, Uptime)
with direct access to
edit clock-in/out times.
Alerts & Issues Report of any alerts &
issues.
Continuous Improvement
LYNQ supports Six Sigma methodologies such as DMAIC (Define, Measure,
Analyse, Improve, and Control) by providing the definition of what to measure,
the measurement itself and the analysis so that loss can be targeted, reduced
and/or eliminated.
This helps to drive continuous improvement within your environment, bringing
manufacturing processes under control with greater efficiency and productivity
as a result.
Core features of Continuous Improvement:
• Loss Management

LYNQ 2020 USER GUIDE Page 153 / 171
Online Version Click here to read
this page online.
The online version
provides additional
links to other
related information.
Six Big Loss LYNQ supports
continuous
improvement by
providing Six Big Loss,
Loading and other
analysis. It not only
provides the key
performance indicators
provides the metrics
and the means of
measurement, out of
the box
Loss management
LYNQ supports Six Sigma methodologies such as DMAIC (Define, Measure,
Analyse, Improve, and Control) by providing the definition of what to measure,
the measurement itself and the analysis so that loss can be targeted, reduced
and/or eliminated. This helps to drive continuous improvement within your
environment, bringing manufacturing processes under control with greater
efficiency and productivity as a result.
The Loss Management report has been enhanced to include four financial loss
visualisations:
• %
• Hour
• Rate
• Revenue
A default system wide labour rate, employee revenue rate, overhead rate,
equipment revenue rate can be setup in Advanced Settings/General. Rates can
also be setup at the seat level in seat maintenance which will override the
system wide settings.
Financial settings in Advanced Settings:
Rate settings in Equipment Maintenance

LYNQ 2020 USER GUIDE Page 154 / 171
Online Version Click here to read
this page online.
The online version
provides additional
links to other
related information.
Six Big Loss LYNQ supports
continuous
improvement by
providing Six Big Loss,
Loading and other
analysis. It not only
provides the key
performance indicators
provides the metrics
and the means of
measurement, out of
the box
Loss management
The Loss Management Dashboard displays realisation of loss across your
manufacturing operations with every loss identified, classified (Six Big Loss)
and quantified to allow for counter measures to be applied and continuous
improvement to be made.
Different Visualisations of Loss Management
Visualisation Type Meaning
Loss Management by %
Shows the loss in percentage
of hours for your
manufacturing operation
Loss Management by
Hour
Shows the loss in hours for
your manufacturing operation
Loss Management by
Rate
Shows the loss at cost value
for your manufacturing
operation
Loss Management by
Revenue
Shows the loss at revenue
value for your manufacturing
operation

LYNQ 2020 USER GUIDE Page 155 / 171
Historical Activity Dashboards and
reports are based on
actual historical
activity and provide
insight into how
multiple resources
(employees and
equipment) have
performed over time,
what was produced
and details of any
production variances
(planned vs actual)
Performance analysis
LYNQ provides numerous Live factory dashboards including supporting metrics
for Total Effective Equipment Performance (TEEP)
Core features include
• Dashboard
• Loading
• Availability
• Performance
• Quality
• Employee Analysis
• Equipment Analysis
• Product Analysis

LYNQ 2020 USER GUIDE Page 156 / 171
Online Version Click here to read
this page online.
Factory Utilisation Known as plant loading
or utilisation, considers
the proportion of
calendar time that has
been scheduled for
production (run time).
Factory Availability Known as plant
efficiency, considers
the relationship
between actual
productive time and
the planned busy time
of the equipment.
Factory availability
shows the aggregated
availability based on
your resources.
Factory Performance Known as plant
effectiveness,
compares the actual
run rate produced by
the plant with the
planned run rate.
Factory performance
shows the aggregated
availability based on
your resources
(employee or
equipment).
Factory Quality Known as the plant
quality ratio, is the
relationship between
the good quantity and
the total quantity
produced. Factory
performance shows the
aggregated output
quality based on your
resources (employee or
equipment). To
determine the quality
ratio a production
quantity must be
reported.
Factory KPIs
Factory Utilisation
Calculation Scheduled Hours / Calendar Hours
Measure It is measured as a percentage (%). The higher the
percentage the better.
Report(s) Loading shows the planned plant utilisation with
comparisons to last month and last quarter. It also provides
insight as to why plant utilisation is not 100%.
Factory Availability
Calculation Actual Productive Time / Planned Busy Time
Measure It is measured as a percentage (%). The higher the
percentage the better.
Report(s) Availability shows the plant availability with comparisons
to last month and last quarter. It also provides insight as
to why plant availability was not 100%.
Factory Performance
Calculation Planned Run Time x Production Quantity / Actual Run Time
Measure It is measured as a percentage (%). The higher the
percentage the better.
Report(s) Performance shows the plant effectiveness with
comparisons to last month and last quarter. It also provides
insight as to why plant performance was not 100%.
Factory Quality
Calculation Good Quantity / Total Quantity
Measure It is measured as a percentage (%). The higher the
percentage the better.
Report(s) Quality shows the plant output quality with comparisons to
last month and last quarter. It also provides insight as to why
plant output quality was not 100%.

LYNQ 2020 USER GUIDE Page 157 / 171
Online Version Click here to read
this page online.
The online version
provides additional
links to other
related information.
Product Throughput Considers process
performance in terms
of the produced
quantity and the actual
uptime. Product
throughput can be
reviewed based on
employee or equipment
throughput.
Product Quality Considers the
relationship between
the good quantity and
the produced quantity.
Product quality can be
reviewed based on
employee or equipment
throughput to provide
visibility of patterns
and greater
understanding of
where
countermeasures need
to be applied for
increase product
output.
Product KPIs
Product Throughput Rate
Calculation Parts Count (based on actual uptime) / Ideal Count (based
on planned uptime)
Measure It is measured as a percentage (%). The higher the
percentage the better.
Report(s) Loading shows the planned plant utilisation with
comparisons to last month and last quarter. It also provides
insight as to why plant utilisation is not 100%.
Product Quality Ratio
Calculation Good Quantity / Produced (Total) Quantity
Measure It is measured as a percentage (%). The higher the
percentage the better.
Report(s) Product Analysis shows product quality ratio by production
process (operation)

LYNQ 2020 USER GUIDE Page 158 / 171
Online Version Click here to read
this page online.
The online version
provides additional
links to other
related information.
Total Effective Equipment Performance (TEEP), shows how well
a manufacturing unit or
plant is performing
relative to calendar
hours.
Total effective equipment
performance (TEEP)
Total Effective Equipment Performance
Calculation Loading x Availability x Performance x Quality
Measure It is measured as a percentage (%). The higher the
percentage the better.
Report(s) Dashboard shows the current & historical total effective
equipment performance for a specific manufacturing unit or
for the entire plant

LYNQ 2020 USER GUIDE Page 159 / 171
Online Version Click here to read
this page online.
The online version
provides additional
links to other
related information.
TEEP Showing both OEE and
TEEP key performance
indicators.
Available Hours The total number of
actual productive
hours for the selected
resources and time
period.
Performance Hours The calculated hours
based on the total
quantity produced
(good and bad).
Effective Hours The calculated hours
based on only the good
quantity produced.
Lost Hours The total number of
hours lost in producing
only good product
when compared with
scheduled (planned)
hours.
Factory dashboard
Performance Analysis Dashboard provides factory level analytics of equipment
showing both overall equipment effectiveness (OEE) and total effective
equipment productivity (TEEP) key performance indicators. Drilldown to
supporting metrics and measurement of Loading, Availability, Performance and
Quality.
To open Performance Analysis Dashboard:
Select Dashboard in Performance Analysis

LYNQ 2020 USER GUIDE Page 160 / 171
Online Version Click here to read
this page online.
The online version
provides additional
links to other
related information.
Operating Hours The total number of
shift hours for the
selected resources
within the time period.
Scheduled Hours The total number of
planned productive
hours for the selected
resources within the
time period.
No Shift Hours The total hours lost as
a result of having no
shift within the
selected time period.
No Shift Loss The total hours lost as
a result of having no
shift within the
selected time period
(shown as a
percentage).
Planned Downtime The total planned
downtime hours within
the selected time
period. Operating
hours - scheduled
hours where scheduled
hours are productive
(uptime) hours.
Downtime The ratio shown as a
percentage of the
planned downtime
compared with
planned operating
time.
Loading
The Loading Report provides detailed analysis of the loading position
of resources with comparisons to last month and/or quarter to understand
trends. Use this to compare your planned uptime with all the time available
(calendar time) to gain insight of asset utilisation to support capital expenditure
and other management decisions.
To open Loading:
Select Loading in Performance Analysis

LYNQ 2020 USER GUIDE Page 161 / 171
Online Version Click here to read
this page online.
Scheduled Hours The total number of
planned productive
hours for the selected
resources and time
period.
Available Hours The total number of
actual productive
hours for the selected
resources and time
period.
Availability The percentage of
actual uptime
compared with
planned uptime for the
selected resources and
time period.
Breakdown Hours Unplanned hours lost
as a result of
breakdown.
Adjustment Hours Unplanned hours lost
as a result of setup and
adjustments.
Unplanned Down The total hours lost as
a result of unplanned
issues relating to the
selected resources and
time period.
Downtime The ratio shown as a
percentage of the
unplanned downtime
compared with
schedule (planned)
hours for the selected
resources and time
period.
Availability
The Availability Report provides detailed analysis of the availability
of employees or equipment with comparisons to last month and/or quarter to
understand trends. Use this to gain insight of your actual uptime compared with
your planned uptime and see where unplanned downtime occurs in relation to
equipment breakdowns, tooling failures, operator shortages and more.
To open Availability:
Select Availability in Performance Analysis

LYNQ 2020 USER GUIDE Page 162 / 171
Online Version Click here to read
this page online.
Performance Hours The calculated hours
based on the total
quantity produced
(good and bad) for the
selected resources
within the time period.
Effective Hours The calculated hours
based on the good
quantity produced for
the selected resources
within the time period.
Quality The ratio shown as a
percentage of the
effective hours
compared with the
performance hours.
Total Units The total number of
units actually
produced (good and
bad) by the selected
resources within the
time period.
Units Scrapped The total number of
bad products produced
by the selected
resources within the
time period.
Loss hours The difference
between calculated
performance and
calculated effective
hours.
Quality Loss The ratio shown as a
percentage of hours
lost in the production
of bad product.
Quality
The Quality Report provides detailed analysis of the quality output from
employees or equipment with comparisons to last month and/or quarter to
understand trends. Use this to gain insight by resource of where product quality
issues have affected your output.
To open Quality:
Select Quality in Performance Analysis

LYNQ 2020 USER GUIDE Page 163 / 171
Online Version Click here to read
this page online.
The online version
provides additional
links to other
related information.
Dashboard Graphical presentation
performance including
at a glance Hrs/Qty
stats, Key Performance
Indicators, and Loss
percentages.
By Employee Line by Line report by
employee with facility
to customise, create
advanced filters and
export.
By Period Line by Line report by
period with facility to
create advanced filters
and export.
By Diversion Line by Line report by
employee with
Diversion information
(Production/Setup etc)
with facility to
customise, create
advanced filters and
export.
Availability Line by Line report by
employee with
Availability information
(Uptime/Downtime)
with facility to
customise, create
advanced filters and
export.
Employee analysis
The Employee Analysis report provides detailed analysis of employee
performance. Filter by individual employees or analyse performance for a
specific group of employees. Further analyse by date or diversion
To open Employee Analysis:
Select Employee Analysis in Performance Analysis

LYNQ 2020 USER GUIDE Page 164 / 171
Online Version Click here to read
this page online.
The online version
provides additional
links to other
related information.
Dashboard Graphical presentation
of equipment
performance including
at a glance Hrs/Qty
stats, Key Performance
Indicators, and Loss
percentages.
By Equipment Line by Line report by
equipment with facility
to customise, create
advanced filters and
export. Links to
Equipment
Performance report.
By Period Line by Line report by
period with facility to
create advanced filters
and export.
By Diversion Line by Line report by
equipment with
Diversion information
(Production/Setup etc)
with facility to
customise, create
advanced filters and
export.
Availability Line by Line report by
equipment with
Availability information
(Uptime/Downtime)
with facility to
customise, create
advanced filters and
export.
Equipment analysis
The Equipment Analysis report provides detailed analysis of equipment
performance. Filter by individual equipment or analyse performance for a
specific group of equipment. Further analyse by date or diversion.
To open Equipment Analysis:
Select Equipment Analysis in Performance Analysis

LYNQ 2020 USER GUIDE Page 165 / 171
Online Version Click here to read
this page online.
The online version
provides additional
links to other
related information.
Performance Combined graphical
presentation and detailed
report (by stock code), with
link to individual stock code
performance details.
Quality Combined graphical
presentation and detailed
report (by stock code), with
link to individual stock code
quality details.
Product analysis
The Product Analysis report provides output and quality analysis for products
by employee and/or equipment.
To open Product Analysis:
Select Product Analysis in Performance Analysis

LYNQ 2020 USER GUIDE Page 166 / 171
Customisable Customise your alerts
and issues to provide
better management
and control of your
manufacturing
environment.
Alerts & Issues
LYNQ provides alerts and issues which can be triggered by the data being
collected helps to ensure control.
Core features include
• Alert Maintenance
• Issue Maintenance

LYNQ 2020 USER GUIDE Page 167 / 171
Online Version Click here to read
this page online.
The online version
provides additional
links to other
related information.
Activate Alerts By default, alerts are
turned off. You can
enable alerts easily
from the alert
maintenance screen.
You must specify the
alert thresholds, which
resources are
measured, and which
resources will receive
the defined alert.
Alert maintenance
LYNQ provides your organisation with a number of pre-defined Management
Alerts which can be configured to monitor performance, quality, or availability
for either employees or equipment. Users that are assigned as a group owners
will automatically receive Management Alerts for group members (employees
or equipment) as defined in groups.
A management alert can be configured in such a way that an alert will be
triggered when certain conditions in the organization are not met. An alert can
be configured to automatically generate an issue. You may want to consider an
alert as a warning and an issue as a problem that requires root cause analysis.
The problem (issue) needs investigating and to avoid any repeat issues arising,
corrective action taken.
Alerts can be configured to:
• Generate a message (Visible in the message centre and dashboards
and reports)
• Generate an email (sent externally via SMTP)
• Generate a production issue (visible in the issue log and other
dashboards and reports)
To configure alerts for employees and/or equipment, the resource must be
active in Seat Maintenance
Default alerts available
Alert Name Threshold
Employee Availability 75-120
Employee Downtime 0-15
Employee Group Availability Hours 75-120
Employee Group Performance 75-120
Employee Group Quality 75-120
Employee Non Conformance 75-120
Employee Performance 75-120
Employee Quality 75-120
Employee Availability 75-120
Equipment Availability 75-120
Equipment Downtime 0-15
Equipment Group Availability 75-120
Equipment Group Performance 75-120
Equipment Group Quality 75-120
Equipment Non Conformance 0-15
Equipment Performance 75-120
Equipment Quality 75-120
Time Since Clock In 0-0.07

LYNQ 2020 USER GUIDE Page 168 / 171
Online Version Click here to read
this page online.
The online version
provides additional
links to other
related information.
Messaging Shop Floor
usually have their own
domain accounts or
email accounts but
with the message
centre you can share
information with these
users easily.
Message centre
The message centre allows you to send and receive messages to and from the
shop floor. Review performance and other data alerts. The messages you see
in the message centre are only related to your own user seat.
To read and send messages
From LYNQ home page click on message centre
Click New to create new message
In the To field select the recipient
Enter a subject
Enter your message in the body section
Click Send
Messages can be sent by employees from the workbench where the message
button has been added to the terminal design. Messages from the shop floor
are sent dependent upon the group security and message settings in Home,
Advanced Settings, General
Employees working in the workbench do not have the ability to select who the
message is sent to. The recipient of the message is determined by the owners
of the group(s) that the employee is a member of. Groups are associated to the
employee in seat maintenance and Group Owners are associated to Users.

LYNQ 2020 USER GUIDE Page 169 / 171
Online Version Click here to read
this page online.
The online version
provides additional
links to other
related information.
Custom Issues Refer to the Advanced
User Guide to setup
Custom Issues for
reporting and
analytical purposes.
Issue maintenance
LYNQ provides your organization with a number of pre-defined production issue
codes for reporting and analytical purposes. Additional production issue
codes can be created to meet the reporting and analytical requirements of the
organization.
Default issues include:
Type Category Classification
Availability Breakdown Breakdowns
Setup and Adjustments Setup and Adjustments
Performance
Minor Stops
Cleaning/Checking
Component Jams
Delivery Blocked
Equipment Wear
Obstructed Product Flow
Sensor Blocked
Reduced Speed Operator Inefficiency
Rough Running
Under Design Capacity Under Design Capacity
Quality Rejects Production Rejects
Start-up Rejects Start-up Rejects
Custom Health & Safety Accident
Near Miss
Loading Loading Issue
Production issues are created either:
• Manually from the Issue Log option
• By using the Track Performance Abnormality Setting which is
configured in the Workbench Onscreen Element. When turned on,
LYNQ will prompt the user to enter a reason why performance is
abnormal
• Via an alert which is configured to trigger an issue

LYNQ 2020 USER GUIDE Page 170 / 171
Online Version Click here to read
this page online.
The online version
provides additional
links to other
related information.
Issues from Alerts Check out the
Advanced User Guide
to learn how alerts can
be used to configure
powerful alerts across
your factory.
Issue log
When new Production Issues are raised by Manufacturing Employees, issues
can be assigned to any user that has been created as a full application User.
Typically, issues would be assigned to the Manufacturing Employees
Supervisor or Line Manager. Once an issue has been created, the Production
Issues Icon for the assigned application user will change to orange. The
assigned application user can either resolve the issue or assign the issue to
another user.
To assign an issue to a user
From LYNQ home page click on Issue Log
Select the issue
Click Assign
Select the user the issue will be assigned to
To resolve an issue
From LYNQ home page click on Issue Log
Select the issue
Click Resolve
The issue will now appear as resolved

LYNQ 2020 USER GUIDE Page 171 / 171
LYNQ Ltd. 8 Barnes Wallis Road,
Fareham, Hampshire, UK PO15 5TU