mac 1600 ecg analysis system - ge healthcare · ecg rhythm z x cvbnm , < esc alt stop print...
TRANSCRIPT

MAC® 1600 ECG Analysis System
Clinical SystemsClinical Education Development
Quick Reference Guide
QRG MAC 1600 D3 0408.indd 1 7/11/08 9:54:40 AM

NoticeThe materials contained in this document are intended for educational purposes only. This document does not establish specifications, operating procedures or maintenance methods for any of the products referenced. Always refer to the official written materials (labeling) provided with the product for specifications, operating procedures and maintenance requirements.
Proprietary Training Material Property of GE. Use of these materials is limited to agents and employees of GE Healthcare or other parties expressly licensed by GE. Unlicensed use is strictly prohibited.
Skin Prep and 12 Lead Placement . . . . . . . . . . . . . . . . . . . . . . . . . . . . . . . . . 1
Acquire an ECG . . . . . . . . . . . . . . . . . . . . . . . . . . . . . . . . . . . . . . . . . . . . . . . . . . . 2
Print Continuous Rhythm . . . . . . . . . . . . . . . . . . . . . . . . . . . . . . . . . . . . . . . . . 3
ECG Reanalysis . . . . . . . . . . . . . . . . . . . . . . . . . . . . . . . . . . . . . . . . . . . . . . . . . . . 5
Acquire an Arrhythmia. . . . . . . . . . . . . . . . . . . . . . . . . . . . . . . . . . . . . . . . . . . . 7
File Manager . . . . . . . . . . . . . . . . . . . . . . . . . . . . . . . . . . . . . . . . . . . . . . . . . . . . . 8
Contents
QRG MAC 1600 D3 0408.indd 2 7/11/08 9:54:40 AM

V1 V2V3
V4 V5V6
RL LL
RA LA
The quality of your ECG tracing is a direct result of skin prep and lead placement. 1. Shave hair from application site. 2. Gently rub area to remove dead skin cells. 3. Cleanse site with alcohol solution. 4. Dry skin completely.
V1 Fourth intercostal space next to the sternum on the right side.
V2 Fourth intercostal space next to the sternum on the left side.
V3 Midway between locations V2 and V4.
V4 At the mid-clavicular line in the fifth intercostal space.
V5 At the anterior axillary line on the same horizontal level as V4.
V6 At the mid-axillary line on the same horizontal level as V4 and V5.
RA and LA Place on the corresponding right and left wrist. An alternate placement to reduce muscle artifact is midway between the elbow and the shoulder.
RL and LL Place on the corresponding right and left ankle. An alternate placement to reduce muscle artifact is on the upper leg as closed to the torso as possible.
Lead Electrode Placement
Skin Prep and 12 Lead Placement
Skin
Pre
p an
d 12
Lea
d Pl
acem
ent
1
V1 V2V3
V4 V5V6
RL LL
RA LA
QRG MAC 1600 D3 0408.indd 3 7/11/08 9:54:53 AM

Acqu
ire a
n EC
G
Acquire an ECG
1. Prepare the patient.
2. Open the Resting ECG function in one of two ways:
• Power on the unit or
• From Main Menu select Resting ECG (F1).
3. Verify waveform quality by:
• Checking Hook-up Advisor. Green indicates a good quality waveform.
• Cycle through the lead groups to visually verify lead quality by pressing the Leads key on the Keyboard.
4. Use the (F) keys to make adjustments to (if necessary):
• Speed (F2)
• Gain (F3)
• Filter (F4)
5. Press F1 to open the Patient Data window. Enter the patient information.
6. Press Page Down (F4) to access other Test Information windows.
7. Select Save (F6) to save and close the Patient Data window.
8. Press the ECG key on the keyboard to record and print an ECG.
9. If you have your system set to Preview before Analysis, press Continue (F4) to proceed to analyze and print an ECG or Cancel (F3) to cancel the analysis.
10. If finished, continue with Step 11, or continue with these options:
• Press Print (F2) to print another copy
• Select Save (F3) if the unit is not set to save the ECG automatically.
• Select Next Patient (F1) to start a new patient or press the ECG key to take another ECG on the same patient.
• Select Transmit (F4) to transmit that single record to the default transmit location.
11. When finished, do one of two things:
• Proceed to File Manager to transmit records. (See Transmit Stored Records)
• Turn the unit off and plug it into AC power.
Speed +W
F1 F2 F3 F4 F5 F6
1!
2@
3#
4$
5%
6^
7&
8*
9(
0)
-_
=+
Q W E R T Y U I O P /?
\|
A S D F G H J K L ;:
‘
.>
“
Leads
ECG
Rhythm
Z X C V B N M ,<
AltEsc
Stop
2
QRG MAC 1600 D3 0408.indd 4 7/11/08 9:54:55 AM

Speed +W
F1 F2 F3 F4 F5 F6
1!
2@
3#
4$
5%
6^
7&
8*
9(
0)
-_
=+
Q W E R T Y U I O P /?
\|
A S D F G H J K L ;:
‘
.>
“
Leads
ECG
Rhythm
Z X C V B N M ,<
AltEsc
Stop
Print Continuous Rhythm
1. Prepare the Patient.
2. Open the Resting ECG function in one of two ways:
• Power on the unit or
• From Main Menu select Resting ECG (F1)
3. Verify waveform quality by:
• Checking Hook-up Advisor. Green indicates a good quality waveform.
• Cycle through the lead groups to visually verify lead quality by pressing
the Leads key on the Keypad. The lead group displayed on the screen will be the lead group that prints as the rhythm strip.
4. Use the (F) keys to make adjustments to (if necessary):
• Speed (F2)
• Gain (F3)
• Filter (F4)
5. Press F1 to open the Patient Data window.
Prin
t Con
tinuo
us R
hyth
m
6. Press Page Down (F4) to access other Test Information windows
7. Select Save (F6) to save and close the Patient Data window.
8. Press the Rhythm key on the keyboard to print a continuous rhythm.
9. Press the Stop button to stop printing.
NOTE! Rhythm reports are not stored to File Manager.
F-KeysPower
Leads
Rhythm
Stop
3
QRG MAC 1600 D3 0408.indd 5 7/11/08 9:54:57 AM

ECG Reanalysis
NOTE! Reanalysis is only functional if the option MI12 (12SL Measurement and Interpretation) is activated and the Reanalysis function is enabled in Resting ECG setup.
1. After an ECG is acquired, the Reanalyze (F5) key is used to run the Reanalyze function.
ECG
Rea
naly
sis
4
2. Once in the Reanalysis screen, press the Leads key to cycle through the different leads and their corresponding waveform.
3. Evaluate the fiducial points for accuracy.
Leads
Leads Key
QRG MAC 1600 D3 0408.indd 6 7/11/08 9:54:59 AM

4. F1 is used to cycle to the desired fiducial point. Choices include:
• P-onset,
• P-offset,
• QRS-onset,
• QRS-offset and
• T-offset.
The selected fiducial point will be in green.
ECG
Rea
naly
sis
5
5. When the desired fiducial point is selected, use the trimpad’s right and left arrows to adjust the fiducial point position. As you move the fiducial point the global measurements for that fiducial point will be updated.
Speed +W
F1 F2 F3 F4 F5 F6
1!
2@
3#
4$
5%
6^
7&
8*
9(
0)
-_
=+
Q W E R T Y U I O P /?
\|
A S D F G H J K L ;:
‘
.>
“
Leads
ECG
Rhythm
Z X C V B N M ,<
AltEsc
Stop
Trimpad
The P-off set is now marked in greenP Duration changing
QRG MAC 1600 D3 0408.indd 7 7/11/08 9:55:01 AM

6. After all the changes have been made, press Save (F5) to keep your changes or Restore (F4) to discard your changes.
7. Press Return (F6) to return to the original ECG menu options.
8. If finished, continue with Step 9, or continue with these options:
• Press Print (F2) to print another copy
• Select Next Patient (F1) to start a new patient or continue with the same patient.
• Select Save (F3) if the unit is not set to save the ECG automatically.
• Select Transmit (F4) to transmit that single record to the default transmit location.
9. When finished, do one of two things:
• Proceed to File Manager to transmit records. (See Transmit Stored Records)
10. Turn the unit off and plug it into AC power.
ECG
Rea
naly
sis
6
F1 F2 F3 F4 F5 F6
Save Changes
Restore to discard your
changesReturn to orginal
ECG menuPrintIf unit is not set
to save ECGNext Patient
QRG MAC 1600 D3 0408.indd 8 7/11/08 9:55:02 AM

Acquire an Arrhythmia
6. Verify waveform quality by:
• Checking Hook-up Advisor. Green indicates a good quality waveform.
• Cycle through the lead groups to visually verify lead quality by pressing the Leads key on the Keypad. The lead group displayed on the screen will be the lead group that prints as the rhythm strip.
7. Use the (F) keys to make adjustments to (if necessary):
• Speed (F2)
• Gain (F3)
• Filter (F4)
8. Press the Start Recording (F1).
9. Press the Stop Recording (F1).
10. Press Confirm (F2) to stop the recording or Continue Recording (F5) to continue to collect information.
11. After the recording is stopped, select the type of Arrhythmia report you wish the printout to include: Summary Report, Table Report, or Episode Report.
12. Select Main Menu (F5).
1. Prepare the Patient.
2. Open the Arrhythmia function in one of two ways:
• Power on the unit or
• From Main Menu select Arrhythmia (F2)
3. The Patient Data window automatically opens. Enter the desired information.
4. Press Page Down (F4) to access other Test Information windows.
5. Select Save (F6) to save and close the Patient Data window.
Acqu
ire a
n Ar
rhyt
hmia
7
Speed +W
F1 F2 F3 F4 F5 F6
1!
2@
3#
4$
5%
6^
7&
8*
9(
0)
-_
=+
Q W E R T Y U I O P /?
\|
A S D F G H J K L ;:
‘
.>
“
Leads
ECG
Rhythm
Z X C V B N M ,<
AltEsc
Stop
PowerStart/Stop Recording Speed Gain
Filter or
Page down Save
Recording or
Main Menu Leads
QRG MAC 1600 D3 0408.indd 9 7/11/08 9:55:03 AM

File
Man
ager
8
80/100
Speed +W
F1 F2 F3 F4 F5 F6
1!
2@
3#
4$
5%
6^
7&
8*
9(
0)
-_
=+
Q W E R T Y U I O P /?
\|
A S D F G H J K L ;:
‘
.>
“
Leads
ECG
Rhythm
Z X C V B N M ,<
AltEsc
Stop
Use arrow keys to highlight records
Highlighted records are shaded in dark blue
Use Enter key to select records
File Manager
Select Records
1. From Main Menu select the (F) key for File Manager.
2. From File Manager you can select records to:
• Transmit
• Edit
• Delete
To Select All:
1. Press Select All (F2). All records are selected.
2. Press the key (F) for the desired function, such as Transmit (F4).
To Select Individual Records:
1. Press Select (F1).
2. Use the arrow keys on the the trimpad to highlight the record. Highlighted records are shaded in blue.
QRG MAC 1600 D3 0408.indd 10 7/11/08 9:55:06 AM

3. Press Enter to select the records. Selected records are then shaded in gray.
4. If needed, continue to select other records.
5. Press the (F) key for the desired function, such as Transmit (F4).
Transmit Stored Records
1. From Main Menu press the (F) key for File Manager.
2. Press Print Directory (F4) to print a list of stored files
3. Press Select All (F2) to select all records to transmit or press Select (F1) to select individual records.
4. Press Transmit (F4) to transmit selected records.
5. One of two things will happen:
• If only one location is defined, the file(s) will be transmitted to the default location.
• If multiple locations are defined, select the desired location and press Ok (F6).
File
Man
ager
9
80/100
Selected records are shaded in gray
QRG MAC 1600 D3 0408.indd 11 7/11/08 9:55:07 AM

File
Man
ager
Print Stored ECG records
1. From Main Menu press the (F) key for File Manager.
2. Press (F1) to select individual records to print. Press (F2) to select all records.
3. Press Print (F3) to print the selected record(s).
Edit Stored ECG Records
1. From Main Menu press the (F) key for File Manager.
2. Press (F1) to select the individual record to edit. You may only select one record to edit at a time.
3. Press Edit (F1) to edit the selected record.
4. Use the arrow keys on the the Trimpad to to select the Patient Information to be edited.
5. Edit the data as required.
6. Press Page Down (F4) to access other Test Information Windows
7. Edit the data as required.
8. Press Save (F6) to save edited fields and close the data window.
9. Verify the record is still highlighted and press Print (F3) to print the edited record.
Delete Stored ECG Records
1. From Main Menu press the (F) key for File Manager.
2. Press F1 to select individual records to edit. Press F2 to select all records.
3. Press Delete (F2).
4. A message will appear verifying whether you want to delete the selected record(s).
5. Press Yes (F6) to delete the record(s). Press No (F5) to cancel the delete function.
10
Select Individual Record
Select All Records
Print the Selected Record(s)
Delete a Record
Tier 1 F Keys for File Manager
Tier 2 F Keys for File Manager
Transmit Records
Edit a Record
QRG MAC 1600 D3 0408.indd 12 7/11/08 9:55:08 AM
File
Man
ager
11
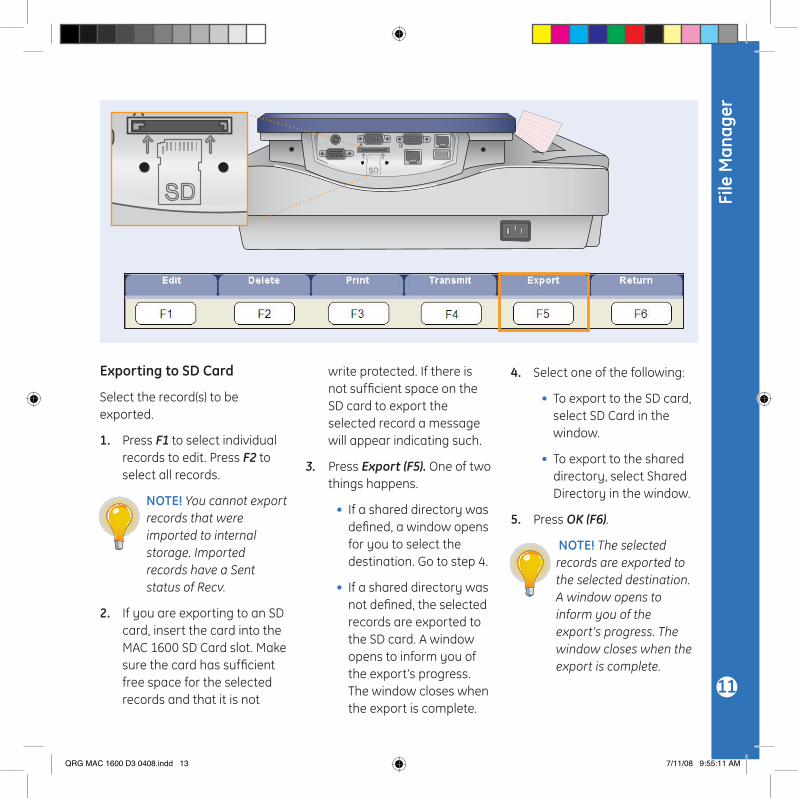
Exporting to SD Card
Select the record(s) to be exported.
1. Press F1 to select individual records to edit. Press F2 to select all records.
NOTE! You cannot export records that were imported to internal storage. Imported records have a Sent status of Recv.
2. If you are exporting to an SD card, insert the card into the MAC 1600 SD Card slot. Make sure the card has sufficient free space for the selected records and that it is not
write protected. If there is not sufficient space on the SD card to export the selected record a message will appear indicating such.
3. Press Export (F5). One of two things happens.
• If a shared directory was defined, a window opens for you to select the destination. Go to step 4.
• If a shared directory was not defined, the selected records are exported to the SD card. A window opens to inform you of the export’s progress. The window closes when the export is complete.
4. Select one of the following:
• To export to the SD card, select SD Card in the window.
• To export to the shared directory, select Shared Directory in the window.
5. Press OK (F6).
NOTE! The selected records are exported to the selected destination. A window opens to inform you of the export’s progress. The window closes when the export is complete.
QRG MAC 1600 D3 0408.indd 13 7/11/08 9:55:11 AM

© 2008 General Electric Company – All rights reserved.
General Electric Company reserves the right to make changes in specifications and features shown herein, or discontinue the product described at any time without notice or obligation.
GE, GE Monogram, Marquette, 12SL, MAC 1600 and MUSE are trademarks of General Electric Company.
GE Medical Systems Information Technology, a General Electric company, doing business as GE Healthcare.
Notice: The materials contained in this document are intended for educational purposes only. This document does not establish specifications, operating procedures or maintenance methods for any of the products referenced. Always refer to the official written materials (labeling) provided with the product for specifications, operating procedures and maintenance requirements.
Proprietary Training Material Property of GE. Use of these materials is limited to agents and employees of GE Healthcare or other parties expressly licensed by GE. Unlicensed use is strictly prohibited.
PN: 2020786-091 Rev APrinted in U.S.A.
GE HealthcareInnovation DriveWauwatosa, WI 53223USA
www.gehealthcare.com
QRG MAC 1600 D3 0408.indd 14 7/11/08 9:55:13 AM