macquarie university gipa process guide
TRANSCRIPT

1
Macquarie University
GIPA process guide

2
Contents
Document purpose . . . . . . . . . . . . . . . . . . . . . . . . . . . . . . . . 3
Compliance Actions . . . . . . . . . . . . . . . . . . . . . . . . . . . . . . . . 3
GIPA End to End Process . . . . . . . . . . . . . . . . . . . . . . . . . . . . . 4
GIPA Receipt of Access Request – Scanning capture and registration 4
GIPA Workflow – Assessment and management 5
GIPA Workflow – Decision and management 5
GIPA functional workflow . . . . . . . . . . . . . . . . . . . . . . . . . . . . 6
Step 1 GIPA Create Case 6
Step 2 GIPA Create Case – register application form 7
Step 3 GIPA Drop Box View Case 8
Step 4 GIPA Drop Box Move Case in workflow 9
Step 5 GIPA Assess application decision points assess application and notify applicant (valid) 10
Step 6 GIPA Approve case, disclosure and publish (valid) 11
Step 7 GIPA Assess application decision points and notify applicant (invalid) 11
Step 8 GIPA Update application and re-assess an invalid application 12
Step 9 GIPA Determine application – transferred 13
Step 10 GIPA Determine application – withdrawn 14
Step 11 GIPA Determine application – requires amendment 15
Contacts . . . . . . . . . . . . . . . . . . . . . . . . . . . . . . . . . . . . . . . 15

3
Document purposeAs part of the Recommendations under the Investigative Report 9 March 2011 titled ‘OFFICER OF THE UNIVERSITY’ and MACQUARIE UNIVERSITY
Complaint under s17 of the Government Information (Information Commissioner) Act 2009 (GIIC Act), concerning Macquarie University and issues arising from the exercise of its functions under the Government Information (Public Access) Act 2009 (GIPA Act)
A requirement was placed on the University to provide a written report on the processes it has put in place to promote compliance within three months of the date of this report, with a copy to be provided to the responsible Minister
Compliance actionsAs demonstration of this commitment, we have:
• completed, and published on the web (see http://disclosure mq edu au/), a publications guide
• developed and published training material, and trained staff in GIPA Act compliance
• developed and published process training material, and trained staff in GIPA application processing
• collected contractual information into a centralised database ready for publishing on the web
• aligned our internal records management policies to include the GIPA Act
• maintained a Disclosure Log as a record of information that Macquarie University has already released
• incorporated required GIPA statistics into the annual report
• received and processed GIPA applications since July 2010
• publically affirmed our commitment to GIPA

4
GIPA End to End Process
GIPA Receipt of Access Request – Scanning capture and registration
Citizen/CustomerAgencies
Receive AccessApplication
FaxEMail
Citizen/CustomerAgencies
MemoryReceive AccessApplication
Receive AccessApplicationOn-line
Via Internet
MacquarieInternet
Access Applications received via Fax/Emailare automatically converted to PDF and placedin Memory processing queue.
If received via fax/email and/or internet therequestor should receive a message to saythat the request has been received and thatthis does not form part of the 5 workingnotification until it has been through initialassessment to confirm it is a valid application.
Access Applications received via Mailwill be scanned, originals day boxedand automatically converted to PDFand placed in Memory processingqueue.
Access Applications received viaInternet form need to be converted totext search PDF and placed inMemory processing queue.
GIPA Officer
MEM
eFolder createdfor each GIPArequest as partof registration.Register AccessApplications
ECM/RM
GIPA2010/1GIPA2010/1/001GIPA2010/1/002GIPA2010/1/003GIPA2010/1/004GIPA2010/1/005GIPA2010/1/006GIPA2010/1/007GIPA2010/1/008
Title
ApplicationAssessmentDocuments GatheredThird Party ConsultationDeterminationPublic Release DocumentsReview (Internal)Review (External)
GIPA Access Request – type of request [name of requestor]
Note 2:The GIPA sub-folders 01-08 with title descriptions areautomatically created once the GIPA top level folder hasbeen created this is eFolder created at registration time.Next sequential number is generated e.g. GIPA2010/2sub-folders would be:GIPA2010/2/001GIPA 2010/2/002Etc.
Note 1:The GIPA top level folder e.g. GIPA2010/1 –GIPA is the business functional taxonomy prefix. TheGIPA prefix code applies the associated classification,which in turn applies the appropriate retention/disposaldepending on which GDA and/or business function/business rules apply.Note the year normally ends 30/12 of each year thedisposal schedule is linked to the highest level e.g.GIPA2010/1 the last document is the primer e.g. theGIPA may not be completed for say 2 years thereforethe actual sentencing would not be (if based on 7 yearsretention) 2017 it would actually be 2019. If there is anyexternal legal actions etc. then we may need to keep thefolder as a permanent folder.
Note 3:Using square brackets in titling provides forfaster searching retrieval in the future. A personcan search on the GIPA prefix and see all GIPAsreceived, narrow the search down by searchingon GIPA2010 and only see GIPAs by year and/orsearch on name of requestor and see how manyGIPAs an individual has requested.
Template registrationform will be designedbased on the eGIPA formand recordkeeping needsas part of workflow build.
Note 4:The registration templates are linked to the BusinessTaxonomy Prefix as there are different meta data needsfor different enterprise functions/activities. For GIPA thetitle is a snap shot only the registration form can collectmore metadata which is viewed from the recordsmanagers module. The meta data captured atregistration of the top level folder is the metadata thatyou would use to update your ‘register’ of applications once ‘determination’ has been completed and you select publish to web.
MEMORY-When eFolder created at top level sub-folders are automatically created.-PDF doucment is then registered into the Application folder e.g. GIPA2010/1/001-Need to be able to drag and drop direct from processing queue and/or file sendto ECM/RM system-The associated registration template is already known by the GIPA prefix-Once doucment(s) are registered the workflow escalation to GIPA Officer can bestarted, along with the time clock.-No documents can go into any TOP LEVEL containers this/these are like aunique place holder.
-All documents created in the GIPA assessment processmust be captured and/or scanned to the associated GIPAfolders. This is important as you may only wish to publishthe ‘determination’ - e.g. any information/meetings decisionsbeing made during the assessment/consultation anddocuments being gathered during the process maybe besensitive etc. therefore the publish to web would onlyassociated with the ‘determination’ folder protecting any ‘discovery processes’.- Documents can go into any of the sub-folders dependingon business rules/processes – however when a GIPArequest has reached ‘determination’ normally nothing else can go into this folder unless it is triggered by a reviewprocess at which time we would normally start the processin folder 007 and/or 008 with the request form.
Page 1 of 3 GIPA – Workflow – Step 1 – Receipt of Access Request - Scanning, capture and registration
INPUTPDF Access Request
INPUTPDF Access Request
Workflow link/notification
to GIPA OfficerNeeds to go to thetop level foldere.g. GIPA2010/1
GIPA officer to assess Access Application transferred/withdrawn/amended/
refused/approved
Manage GIPA Application Manage appeal from client Reference Decision
Manage Ombudsman’/Information Commissioner’s Request on behalf of client
Receive GIPA Access Application
Receive payment for GIPA Application Manage GIPA Application
Receive request from Ombudsman on behalf
of client
Receive appeal from Client Reference Decision
Determine if Access Application is valid Notify GIPA officer Re-assess previous decision
Prepare and scan GIPA Access application (and signed letter of receipt)
and any supporting materials and/or capture
PDF application
Re-assess previous decision
Notify GIPA officer Provide notification to Ombudsman
Create GIPA efolder and register scanned/captured
GIPA Access Application
Provide notification to client
Update (manual) register, prepare letter of receipt
for customer
Workflow notification to GIPA officer and send letter
of receipt to customer
Core process
Activities
Tasks

5
GIPA Workflow – Assessment and managementPage 2 of 3 GIPA – Workflow – Assessment and Management
GIPA Officer
Workflow link/notification
to GIPA Officer
ECM/RM
Step 2. Is the Access Application valid?
OUTPUTNotification to requestor that
MQU has receivedthe valid application.
Time clock 5 working days.Document to be filedin Assessment folder.
Yes
No
OUTPUTNotification to requestor that the application is not valid – but that theyhave the opportunity to make the application valid and resubmit..Document to be filed in Assessment folder.The flag on the form needs to be changed to ‘closed’ for retention to commence.If a new application is submitted the closed status flag and be uncheckedmaking the case folder active again and/or a new GIPA folder could becreated and linked/related to the first (business rule??)
Step 3. Will the application be transferred, amended or withdrawn?
ECM/RM GIPA Officer
No
GIPA Officer to undertakesearches for requested information.Documents gathered, emails, filenotes etc.To be scanned/captured and placedin relevant folder
Yes OUTPUT – Transferred/withdrawnNotification that application has beentransferred or withdrawn.Document to be filed inAssessment folder.The flag on the form needs to bechanged to ‘closed’ for retention to commence.
OUTPUT - AmendedNotification that application has beenamended.Document to be filed in Assessment folder.Continue with GIPA Officer to undertakesearches...
INPUTS – Documents gatheredDocuments gathered, emails, filenotes etc.To be scanned/captured and placedin relevant folder
ECM/RMUpdate/file
GIPA documents
GIPA Workflow – Decision and managementPage 3 of 3 GIPA – Workflow – Decision and Management
GIPA Officer
GIPA Officer afterundertaking searchesfor requested information.
Step 4. Is the information being requested subject to a presumptionof overriding public interest against disclosure? If so is the request to be refused?
Yes
ECM/RMUpdate/file
GIPA documentsUpdate flag as ‘refused’
OUTPUT – RefusedNotification that application has beenrefused.Document to be filed in Determination folder.GIPA Folder to be closed.
OUTPUT – Disclosure LogApplication and decision to be recorded onMQU Disclosure Log.And placed on web (??? Depending onbusiness rules for ‘refused applications’)
ECM/RMUpdate/file
GIPA documents
No
GIPA Officer
Step 5. Undertake all reasonable steps to consult with any persons whose details are included on the application / information being requested.
Consider any of the personal factors, such as the applicants motives for seeking access to information.
Apply the public interest test to the information being requested.
OUTPUT – ApprovedNotification that application has beenapproved.Document to be filed in Determinationfolder.GIPA Folder to be closed.Flag to be updated as ‘approved’.
OUTPUT – Disclosure LogApplication and decision to be recorded onMQU Disclosure Log.Publish to web?

6
GIPA functional workflow
Step 1 GIPA Create CaseThere are two screens to fill out when registering a new case The first is for registering the case itself and the second is registering the application documents for the case The second screen is re-used for all documents associated with the case
The first screen in the software allows you to create a new case for an application/applicant When you select ‘Create Case’ you are presented with the ‘Create Case Folder Details Form’
You need to enter the details of the GIPA applicant in the ‘Name’ field – this will form the GIPA case folder name
You will need to change the ‘Company’ field to the applicant company name if applicable
Pressing submit will bring up the application details form
7
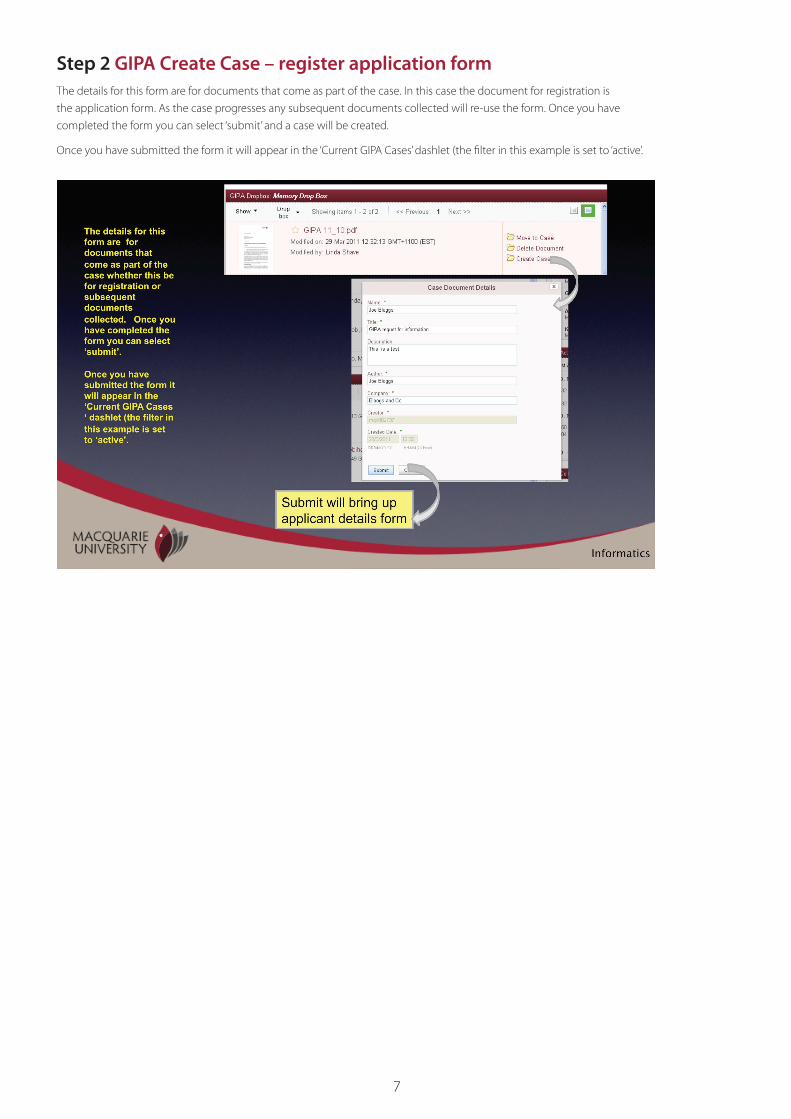
Step 2 GIPA Create Case – register application form The details for this form are for documents that come as part of the case In this case the document for registration is the application form As the case progresses any subsequent documents collected will re-use the form Once you have completed the form you can select ‘submit’ and a case will be created
Once you have submitted the form it will appear in the ‘Current GIPA Cases’ dashlet (the filter in this example is set to ‘active’
8
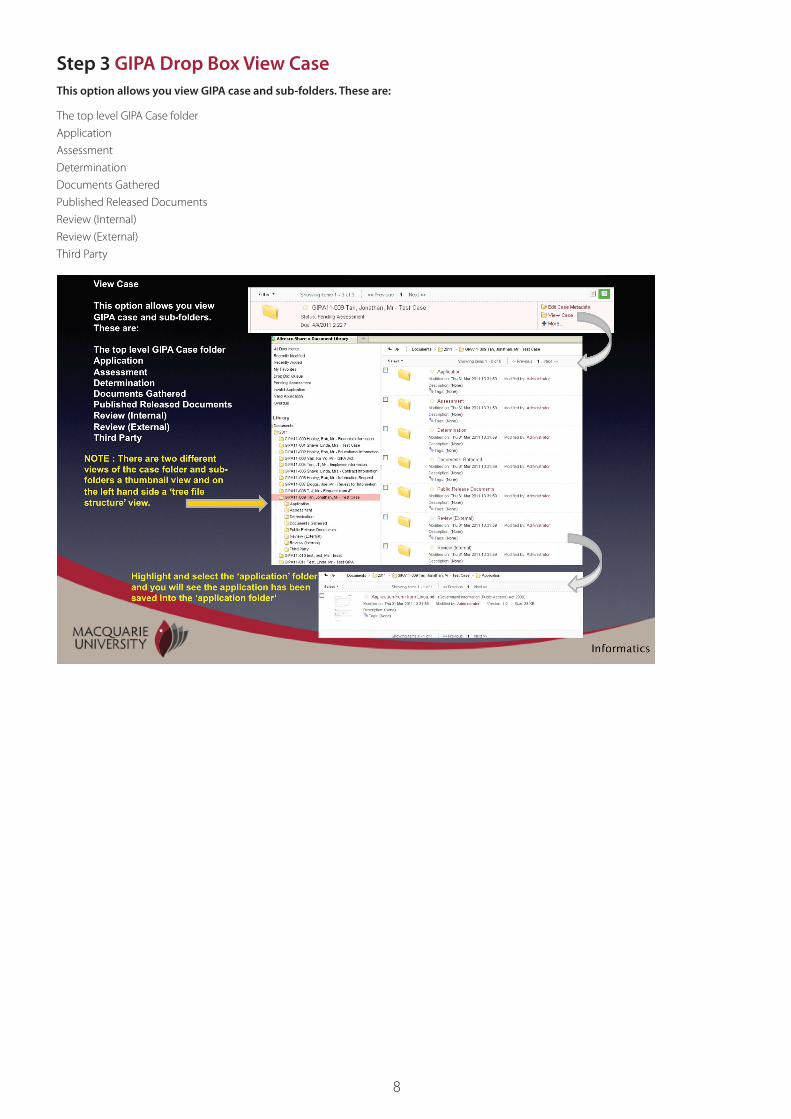
Step 3 GIPA Drop Box View CaseThis option allows you view GIPA case and sub-folders . These are:
The top level GIPA Case folder Application AssessmentDeterminationDocuments GatheredPublished Released DocumentsReview (Internal)Review (External)Third Party

9
Step 4 GIPA Drop Box Move Case in workflow This option allows you to move a document to an existing case
When you select ‘Move Case’ you are presented with the following screen
Update any details in the case document details and then type in the name and/or GIPA folder you wish
to have the document related and from the drop down list the folder to put the document in eg Assessment
Select ‘submit’ the document will go to (in this example)
GIPA11-007 and sub-folder ‘Assessment’

10
Step 5 GIPA Assess application decision points assess application and notify applicant (valid)When you have notified the application select ‘Notify Applicant’ and the decision point status will change to the next stage ‘Determine Case’
Once you have determined the case you need to update determination as being ‘Valid’ or ‘Invalid’
Select ‘Valid’ and select ‘Submit’
When you have notified the application select ‘Notify Applicant’ and the decision point status will change to the next stage ‘Determine Case’
Once you have determined the case you need to update determination as being ‘Valid’ or ‘Invalid’
Select ‘Valid’ and select ‘Submit’
11
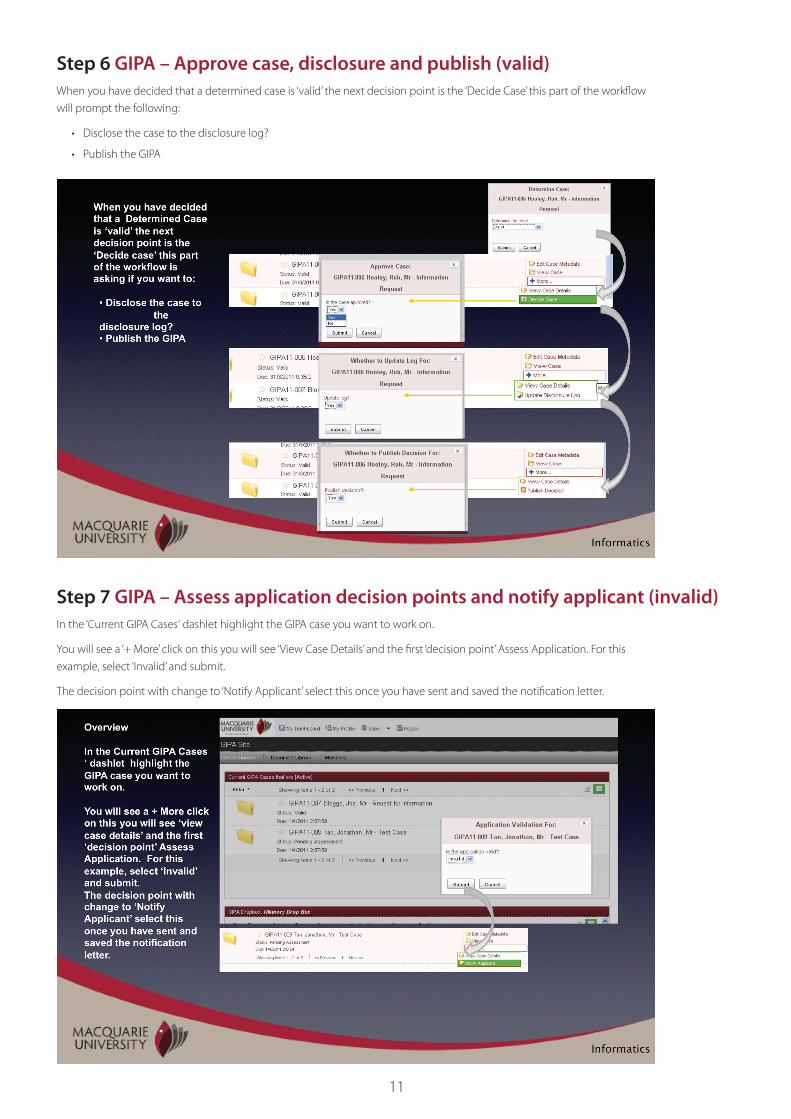
Step 6 GIPA – Approve case, disclosure and publish (valid)When you have decided that a determined case is ‘valid’ the next decision point is the ‘Decide Case’ this part of the workflow will prompt the following:
• Disclose the case to the disclosure log?
• Publish the GIPA
Step 7 GIPA – Assess application decision points and notify applicant (invalid)In the ‘Current GIPA Cases‘ dashlet highlight the GIPA case you want to work on
You will see a ‘+ More’ click on this you will see ‘View Case Details’ and the first ‘decision point’ Assess Application For this example, select ‘Invalid’ and submit
The decision point with change to ‘Notify Applicant’ select this once you have sent and saved the notification letter

12
Step 8 GIPA Update application and re-assess an invalid applicationIf an application is ‘invalid’ and the notification letter has requested further information the GIPA application will pend for 10 working days and stope the normal GIPA clock
When further information is received you go to the GIPA application and select ‘+ More’ and ‘Update Application’
If the application is now ‘valid’ select ‘valid’ on the ‘Update Application’ and then ‘+ More’ select ‘Assess Application’ and select invalid
If you had selected ‘Valid’ the process would have continued for a valid application.

13
Step 9 GIPA Determine application – transferredDuring the Determine Application Process it may be decided that the application needs to be:
• Transferred (eg Could be a complaint or corruption allegation rather than a GIPA request and transferred to complaints handling • Withdrawn (with held) • Requires amendment
You need to keep up to date with State Records s12 6 eg for withdrawn applictions the retention period is changed so always check for any changes to the Act

14
Step 10 GIPA Determine application – withdrawnGIPA BUSINESS RULE BASED ON NSW STATE RECORDS S12.6
12 .6 .2 – Records where the decision to grant or refuse access or alteration: – does not set a precent or lead to a major change in policies – retain minimum of 10 years after action completed then destroy
For case management purposes we will adopt 10 years after action as the default retention period UNLESS IT MEETS THE CRITERIA OF 12 6 1 in which case it will be manually changed TO ‘STATE ARCHIVES’ OR AS DEFINED AT THAT POINT IN TIME BY NSW STATE RECORDS
12 .6 .3 – Records where the request is not recurring or protracted and the decision to grant or refuse accesses or alteration does not set a precent or lead to a major change in policies – Retain minimum of 5 years after action completed then destroy 12 6 4 (retain 2 years), 12 6 5, 12 6 6 and 12 6 7 (retain 5 years)
12 .6 .1 Rule 1 – Records where the decision to grant or refuse access or alteration: – sets a precent or leads to a major change in policies – ALL RECORDS ARE REQUIRED AS STATE ARCHIVES

15
Step 11 GIPA Determine application – requires amendment
Contacts Right to Information Contact Officer Dr Neil Fraser Coordinator, Informatics Macquarie University, Balaclava Road, North Ryde, NSW 2109 Office hours Monday to Friday 9am – 4pm T: (02) 9850 1561 E: gipa@mq edu auhttp://disclosure .mq .edu .au
General inquiries
The University welcomes inquiries from the public The primary contact details, and postal address, are as follows: Macquarie UniversityBalaclava Road, North Ryde NSW 2109T: (02) 9850 7111 www .mq .edu .au/contact