macromedia director 8.55 shockwave studio -...
TRANSCRIPT

macromedia
™
®
macromedia®
DIRECTOR®8.55SHOCKWAVE®
STUDIOWhat’s New in Director 8.5 Shockwave Studio

ii
Trademarks
Afterburner, AppletAce, Attain, Attain Enterprise Learning System, Attain Essentials, Attain Objects for Dreamweaver, Authorware, Authorware Attain, Authorware Interactive Studio, Authorware Star, Authorware Synergy, Backstage, Backstage Designer, Backstage Desktop Studio, Backstage Enterprise Studio, Backstage Internet Studio, Design in Motion, Director, Director Multimedia Studio, Doc Around the Clock, Dreamweaver, Dreamweaver Attain, Drumbeat, Drumbeat 2000, Extreme 3D, Fireworks, Flash, Fontographer, FreeHand, FreeHand Graphics Studio, Generator, Generator Developer's Studio, Generator Dynamic Graphics Server, Knowledge Objects, Knowledge Stream, Knowledge Track, Lingo, Live Effects, Macromedia, Macromedia M Logo & Design, Macromedia Flash, Macromedia Xres, Macromind, Macromind Action, MAGIC, Mediamaker, Object Authoring, Power Applets, Priority Access, Roundtrip HTML, Scriptlets, SoundEdit, ShockRave, Shockmachine, Shockwave, Shockwave Remote, Shockwave Internet Studio, Showcase, Tools to Power Your Ideas, Universal Media, Virtuoso, Web Design 101, Whirlwind and Xtra are trademarks of Macromedia, Inc. and may be registered in the United States or in other jurisdictions including internationally. Other product names, logos, designs, titles, words or phrases mentioned within this publication may be trademarks, servicemarks, or tradenames of Macromedia, Inc. or other entities and may be registered in certain jurisdictions including internationally.
This guide contains links to third-party Web sites that are not under the control of Macromedia, and Macromedia is not responsible for the content on any linked site. If you access a third-party Web site mentioned in this guide, then you do so at your own risk. Macromedia provides these links only as a convenience, and the inclusion of the link does not imply that Macromedia endorses or accepts any responsibility for the content on those third-party sites.
Apple Disclaimer
APPLE COMPUTER, INC. MAKES NO WARRANTIES, EITHER EXPRESS OR IMPLIED, REGARDING THE ENCLOSED COMPUTER SOFTWARE PACKAGE, ITS MERCHANTABILITY OR ITS FITNESS FOR ANY PARTICULAR PURPOSE. THE EXCLUSION OF IMPLIED WARRANTIES IS NOT PERMITTED BY SOME STATES. THE ABOVE EXCLUSION MAY NOT APPLY TO YOU. THIS WARRANTY PROVIDES YOU WITH SPECIFIC LEGAL RIGHTS. THERE MAY BE OTHER RIGHTS THAT YOU MAY HAVE WHICH VARY FROM STATE TO STATE.
Copyright © 2001 Macromedia, Inc. All rights reserved. This manual may not be copied, photocopied, reproduced, translated, or converted to any electronic or machine-readable form in whole or in part without prior written approval of Macromedia, Inc. Part Number ZWD85M300
Acknowledgments
Writing: Jay Armstrong, Greg Barnett, Stephanie Gowin, Tom Higgins, Marcelle Taylor, and Frank Welsch
Editing: Rosana Francescato, Mlle. Godbois, and Anne Szabla
Production Management: John “Zippy” Lehnus
Multimedia Design and Production: Aaron Begley and Noah Zilberberg
Print and Help Design and Production: Chris Basmajian
Web Editing and Production: Jane Flint DeKoven and Jeff Harmon
Emergency helmsman: Joe Schmitz
Special thanks to David Calaprice, Grace Gellerman, Kraig Mentor, Megy Nascimento, Masayo Noda, Chris Nuuja, Roy Pardi, Jonathon Powers, Meredith Tomlin, and the Director engineering and QA teams.
First Edition: March 2001
Macromedia, Inc.600 Townsend St.San Francisco, CA 94103

CONTENTS
INTRODUCTION
Getting Started . . . . . . . . . . . . . . . . . . . . . . . . . . . . . . . . . 7
The 3D Xtra . . . . . . . . . . . . . . . . . . . . . . . . . . . . . . . . . . . . . . . . . . . . . 8Shockwave Multiuser Server . . . . . . . . . . . . . . . . . . . . . . . . . . . . . . . . . 8The Flash Asset Xtra . . . . . . . . . . . . . . . . . . . . . . . . . . . . . . . . . . . . . . . 9What this book covers . . . . . . . . . . . . . . . . . . . . . . . . . . . . . . . . . . . . . 10Software and hardware requirements . . . . . . . . . . . . . . . . . . . . . . . . . . 12Software installation . . . . . . . . . . . . . . . . . . . . . . . . . . . . . . . . . . . . . . 14Conventions used in Director Help and printed books . . . . . . . . . . . . 14
Part I
CHAPTER 1
Director 8.5 Tutorial . . . . . . . . . . . . . . . . . . . . . . . . . . . . 17
What you’ll learn. . . . . . . . . . . . . . . . . . . . . . . . . . . . . . . . . . . . . . . . . 17What you should know . . . . . . . . . . . . . . . . . . . . . . . . . . . . . . . . . . . . 17View the completed movie . . . . . . . . . . . . . . . . . . . . . . . . . . . . . . . . . 18Open the tutorial movie . . . . . . . . . . . . . . . . . . . . . . . . . . . . . . . . . . . 18Create 3D text. . . . . . . . . . . . . . . . . . . . . . . . . . . . . . . . . . . . . . . . . . . 19Modify behaviors. . . . . . . . . . . . . . . . . . . . . . . . . . . . . . . . . . . . . . . . . 25View a 3D world . . . . . . . . . . . . . . . . . . . . . . . . . . . . . . . . . . . . . . . . . 26Use the camera . . . . . . . . . . . . . . . . . . . . . . . . . . . . . . . . . . . . . . . . . . 27Set model rollover cursors . . . . . . . . . . . . . . . . . . . . . . . . . . . . . . . . . . 37Use 3D behaviors for navigation . . . . . . . . . . . . . . . . . . . . . . . . . . . . . 38Play your completed movie . . . . . . . . . . . . . . . . . . . . . . . . . . . . . . . . . 42To learn more . . . . . . . . . . . . . . . . . . . . . . . . . . . . . . . . . . . . . . . . . . . 43
1

Contents
2
CHAPTER 2
3D Basics . . . . . . . . . . . . . . . . . . . . . . . . . . . . . . . . . . . . .45
What you need to know . . . . . . . . . . . . . . . . . . . . . . . . . . . . . . . . . . . .46From 2D to 3D. . . . . . . . . . . . . . . . . . . . . . . . . . . . . . . . . . . . . . . . . . .46Using the Shockwave 3D window . . . . . . . . . . . . . . . . . . . . . . . . . . . . .49Using the Property Inspector for 3D . . . . . . . . . . . . . . . . . . . . . . . . . . .51Using rendering methods . . . . . . . . . . . . . . . . . . . . . . . . . . . . . . . . . . .523D behaviors. . . . . . . . . . . . . . . . . . . . . . . . . . . . . . . . . . . . . . . . . . . . .543D text . . . . . . . . . . . . . . . . . . . . . . . . . . . . . . . . . . . . . . . . . . . . . . . . .54The 3D world . . . . . . . . . . . . . . . . . . . . . . . . . . . . . . . . . . . . . . . . . . . .55
CHAPTER 3
Using 3D Behaviors. . . . . . . . . . . . . . . . . . . . . . . . . . . .59
Behavior types. . . . . . . . . . . . . . . . . . . . . . . . . . . . . . . . . . . . . . . . . . . .59Using the 3D Behavior Library . . . . . . . . . . . . . . . . . . . . . . . . . . . . . . .60Applying 3D behaviors . . . . . . . . . . . . . . . . . . . . . . . . . . . . . . . . . . . . .64About groups . . . . . . . . . . . . . . . . . . . . . . . . . . . . . . . . . . . . . . . . . . . .65
CHAPTER 4
Using 3D Text . . . . . . . . . . . . . . . . . . . . . . . . . . . . . . . . . 67
Creating 3D text . . . . . . . . . . . . . . . . . . . . . . . . . . . . . . . . . . . . . . . . . .67Modifying 3D text . . . . . . . . . . . . . . . . . . . . . . . . . . . . . . . . . . . . . . . .68Lingo for 3D text . . . . . . . . . . . . . . . . . . . . . . . . . . . . . . . . . . . . . . . . .71
CHAPTER 5
The 3D Cast Member . . . . . . . . . . . . . . . . . . . . . . . . . . 75
Model resources . . . . . . . . . . . . . . . . . . . . . . . . . . . . . . . . . . . . . . . . . .77Models . . . . . . . . . . . . . . . . . . . . . . . . . . . . . . . . . . . . . . . . . . . . . . . . .79Shaders . . . . . . . . . . . . . . . . . . . . . . . . . . . . . . . . . . . . . . . . . . . . . . . . .80Textures . . . . . . . . . . . . . . . . . . . . . . . . . . . . . . . . . . . . . . . . . . . . . . . .81Motions . . . . . . . . . . . . . . . . . . . . . . . . . . . . . . . . . . . . . . . . . . . . . . . .82Lights . . . . . . . . . . . . . . . . . . . . . . . . . . . . . . . . . . . . . . . . . . . . . . . . . .83Cameras . . . . . . . . . . . . . . . . . . . . . . . . . . . . . . . . . . . . . . . . . . . . . . . .84Groups . . . . . . . . . . . . . . . . . . . . . . . . . . . . . . . . . . . . . . . . . . . . . . . . .85

CHAPTER 6
Working with Models and Model Resources . . . . . 87
Model resources . . . . . . . . . . . . . . . . . . . . . . . . . . . . . . . . . . . . . . . . . .88Primitives . . . . . . . . . . . . . . . . . . . . . . . . . . . . . . . . . . . . . . . . . . . . . . .89Cast member commands. . . . . . . . . . . . . . . . . . . . . . . . . . . . . . . . . . . .98Models . . . . . . . . . . . . . . . . . . . . . . . . . . . . . . . . . . . . . . . . . . . . . . . .100Shaders . . . . . . . . . . . . . . . . . . . . . . . . . . . . . . . . . . . . . . . . . . . . . . . .107Textures . . . . . . . . . . . . . . . . . . . . . . . . . . . . . . . . . . . . . . . . . . . . . . .116Groups . . . . . . . . . . . . . . . . . . . . . . . . . . . . . . . . . . . . . . . . . . . . . . . .118Modifiers. . . . . . . . . . . . . . . . . . . . . . . . . . . . . . . . . . . . . . . . . . . . . . .122Animation modifiers . . . . . . . . . . . . . . . . . . . . . . . . . . . . . . . . . . . . . .128Motions . . . . . . . . . . . . . . . . . . . . . . . . . . . . . . . . . . . . . . . . . . . . . . .140
CHAPTER 7
Working with Lights and Cameras. . . . . . . . . . . . . . 141
Light properties. . . . . . . . . . . . . . . . . . . . . . . . . . . . . . . . . . . . . . . . . .142Light commands . . . . . . . . . . . . . . . . . . . . . . . . . . . . . . . . . . . . . . . . .144Cameras . . . . . . . . . . . . . . . . . . . . . . . . . . . . . . . . . . . . . . . . . . . . . . .146
CHAPTER 8
Controlling the 3D World . . . . . . . . . . . . . . . . . . . . . . 153
3D Lingo events . . . . . . . . . . . . . . . . . . . . . . . . . . . . . . . . . . . . . . . . .154Collisions . . . . . . . . . . . . . . . . . . . . . . . . . . . . . . . . . . . . . . . . . . . . . .155Vector math . . . . . . . . . . . . . . . . . . . . . . . . . . . . . . . . . . . . . . . . . . . .159Transforms . . . . . . . . . . . . . . . . . . . . . . . . . . . . . . . . . . . . . . . . . . . . .162Rendering functionality. . . . . . . . . . . . . . . . . . . . . . . . . . . . . . . . . . . .166
Contents 3

Contents
4
CHAPTER 9
3D Lingo by Feature . . . . . . . . . . . . . . . . . . . . . . . . . . 175
Animation. . . . . . . . . . . . . . . . . . . . . . . . . . . . . . . . . . . . . . . . . . . . . .175Backdrops and overlays . . . . . . . . . . . . . . . . . . . . . . . . . . . . . . . . . . . .176Bones player modifier . . . . . . . . . . . . . . . . . . . . . . . . . . . . . . . . . . . . .176Cameras . . . . . . . . . . . . . . . . . . . . . . . . . . . . . . . . . . . . . . . . . . . . . . .177Child and parent nodes . . . . . . . . . . . . . . . . . . . . . . . . . . . . . . . . . . . .177Collision detection . . . . . . . . . . . . . . . . . . . . . . . . . . . . . . . . . . . . . . .178Creating and removing objects . . . . . . . . . . . . . . . . . . . . . . . . . . . . . .178Fog . . . . . . . . . . . . . . . . . . . . . . . . . . . . . . . . . . . . . . . . . . . . . . . . . . .179Groups . . . . . . . . . . . . . . . . . . . . . . . . . . . . . . . . . . . . . . . . . . . . . . . .179Inker modifier . . . . . . . . . . . . . . . . . . . . . . . . . . . . . . . . . . . . . . . . . . .180Keyframe player modifier . . . . . . . . . . . . . . . . . . . . . . . . . . . . . . . . . .180Level of detail modifier . . . . . . . . . . . . . . . . . . . . . . . . . . . . . . . . . . . .180Lights . . . . . . . . . . . . . . . . . . . . . . . . . . . . . . . . . . . . . . . . . . . . . . . . .181Mesh deform modifier. . . . . . . . . . . . . . . . . . . . . . . . . . . . . . . . . . . . .181Miscellaneous . . . . . . . . . . . . . . . . . . . . . . . . . . . . . . . . . . . . . . . . . . .182Model resources . . . . . . . . . . . . . . . . . . . . . . . . . . . . . . . . . . . . . . . . .182Models . . . . . . . . . . . . . . . . . . . . . . . . . . . . . . . . . . . . . . . . . . . . . . . .183Modifiers. . . . . . . . . . . . . . . . . . . . . . . . . . . . . . . . . . . . . . . . . . . . . . .184Movie and system properties . . . . . . . . . . . . . . . . . . . . . . . . . . . . . . . .184Nodes . . . . . . . . . . . . . . . . . . . . . . . . . . . . . . . . . . . . . . . . . . . . . . . . .184Particle systems . . . . . . . . . . . . . . . . . . . . . . . . . . . . . . . . . . . . . . . . . .184Picking . . . . . . . . . . . . . . . . . . . . . . . . . . . . . . . . . . . . . . . . . . . . . . . .184Primitives . . . . . . . . . . . . . . . . . . . . . . . . . . . . . . . . . . . . . . . . . . . . . .185Selecting models . . . . . . . . . . . . . . . . . . . . . . . . . . . . . . . . . . . . . . . . .187Shaders . . . . . . . . . . . . . . . . . . . . . . . . . . . . . . . . . . . . . . . . . . . . . . . .187Sprites (3D) . . . . . . . . . . . . . . . . . . . . . . . . . . . . . . . . . . . . . . . . . . . .188Streaming . . . . . . . . . . . . . . . . . . . . . . . . . . . . . . . . . . . . . . . . . . . . . .188Subdivision surfaces modifier . . . . . . . . . . . . . . . . . . . . . . . . . . . . . . .189Text (3D) . . . . . . . . . . . . . . . . . . . . . . . . . . . . . . . . . . . . . . . . . . . . . .189Textures . . . . . . . . . . . . . . . . . . . . . . . . . . . . . . . . . . . . . . . . . . . . . . .189Toon modifier . . . . . . . . . . . . . . . . . . . . . . . . . . . . . . . . . . . . . . . . . . .190Transforms . . . . . . . . . . . . . . . . . . . . . . . . . . . . . . . . . . . . . . . . . . . . .190Vector math . . . . . . . . . . . . . . . . . . . . . . . . . . . . . . . . . . . . . . . . . . . .191
CHAPTER 10
3D Lingo Dictionary. . . . . . . . . . . . . . . . . . . . . . . . . . . 193

Part II
CHAPTER 11
Using the Shockwave Multiuser Server and Xtra . . . . . . . . . . . . . . . . . . . . . . . . . . . . . . 449
New features of the Shockwave Multiuser Server. . . . . . . . . . . . . . . . .451Creating multiuser movies. . . . . . . . . . . . . . . . . . . . . . . . . . . . . . . . . .451Using groups . . . . . . . . . . . . . . . . . . . . . . . . . . . . . . . . . . . . . . . . . . . .464Using databases . . . . . . . . . . . . . . . . . . . . . . . . . . . . . . . . . . . . . . . . . .468Making projectors . . . . . . . . . . . . . . . . . . . . . . . . . . . . . . . . . . . . . . . .472Optimizing multiuser movies . . . . . . . . . . . . . . . . . . . . . . . . . . . . . . .472Extending the server with Xtras. . . . . . . . . . . . . . . . . . . . . . . . . . . . . .474
CHAPTER 12
Multiuser Server-Side Scripting. . . . . . . . . . . . . . . 475
The Lingo core . . . . . . . . . . . . . . . . . . . . . . . . . . . . . . . . . . . . . . . . . .476About server-side scripting . . . . . . . . . . . . . . . . . . . . . . . . . . . . . . . . .478Adding server-side scripts . . . . . . . . . . . . . . . . . . . . . . . . . . . . . . . . . .479Multithreading . . . . . . . . . . . . . . . . . . . . . . . . . . . . . . . . . . . . . . . . . .486Accessing files on the server . . . . . . . . . . . . . . . . . . . . . . . . . . . . . . . . .489Server security . . . . . . . . . . . . . . . . . . . . . . . . . . . . . . . . . . . . . . . . . .490Advanced topics . . . . . . . . . . . . . . . . . . . . . . . . . . . . . . . . . . . . . . . . .490
CHAPTER 13
The Server Application . . . . . . . . . . . . . . . . . . . . . . . . 491
Running the server . . . . . . . . . . . . . . . . . . . . . . . . . . . . . . . . . . . . . . .492Viewing server information . . . . . . . . . . . . . . . . . . . . . . . . . . . . . . . . .492Configuring the server. . . . . . . . . . . . . . . . . . . . . . . . . . . . . . . . . . . . .494About administering the server . . . . . . . . . . . . . . . . . . . . . . . . . . . . . .498Extensibility . . . . . . . . . . . . . . . . . . . . . . . . . . . . . . . . . . . . . . . . . . . .498Troubleshooting . . . . . . . . . . . . . . . . . . . . . . . . . . . . . . . . . . . . . . . . .499
Contents 5
Contents
6
CHAPTER 14
Multiuser Lingo by Feature . . . . . . . . . . . . . . . . . . . . 501
Establishing and managing server connections . . . . . . . . . . . . . . . . . .502Peer-to-peer connections . . . . . . . . . . . . . . . . . . . . . . . . . . . . . . . . . . .502Server commands . . . . . . . . . . . . . . . . . . . . . . . . . . . . . . . . . . . . . . . .502Group commands . . . . . . . . . . . . . . . . . . . . . . . . . . . . . . . . . . . . . . . .503Database commands . . . . . . . . . . . . . . . . . . . . . . . . . . . . . . . . . . . . . .503Server-side multithreading. . . . . . . . . . . . . . . . . . . . . . . . . . . . . . . . . .504Server-side file access . . . . . . . . . . . . . . . . . . . . . . . . . . . . . . . . . . . . . .504Server-side debugging . . . . . . . . . . . . . . . . . . . . . . . . . . . . . . . . . . . . .505
CHAPTER 15
Multiuser Lingo Dictionary . . . . . . . . . . . . . . . . . . . . 507
APPENDIX
Working with Flash 5 . . . . . . . . . . . . . . . . . . . . . . . . . 583
call . . . . . . . . . . . . . . . . . . . . . . . . . . . . . . . . . . . . . . . . . . . . . . . . . . .583print . . . . . . . . . . . . . . . . . . . . . . . . . . . . . . . . . . . . . . . . . . . . . . . . . .584printAsBitmap . . . . . . . . . . . . . . . . . . . . . . . . . . . . . . . . . . . . . . . . . .584sendXML . . . . . . . . . . . . . . . . . . . . . . . . . . . . . . . . . . . . . . . . . . . . . .585tellTarget, endTellTarget . . . . . . . . . . . . . . . . . . . . . . . . . . . . . . . . . . .586
INDEX . . . . . . . . . . . . . . . . . . . . . . . . . . . . . . . . . . . . . . . . 587

INTRODUCTION
. . . . . . . . . . . . . . . . . . . . . . . . . . . . . . . . . . . . . . . . . . . . . . . . . . . . . . . .. . . . . . . . . . . . . . . . . . . . . . . . . . . . . . . . . . . . . . . . . . . . . . . . . . . . .Getting Started
Director 8.5 Shockwave Studio offers several new features that enhance the capabilities of Macromedia Director and Shockwave movies. The main improvements of this release are as follows:
• Support for interactive three-dimensional (3D) graphics.
• Enhancements to the Shockwave Multiuser Server and Xtra that enable server-side scripting, multithreading, and file access. Using server-side scripts can dramatically simplify your multiuser movies by placing most of the required logic on the server.
• Support for Flash 5 and additions to Lingo that provide control over the new features of Flash 5 movies.
Where to start
To use these new features, you need to understand Director basics. If you are new to Director, start by reading Using Director Shockwave Studio for Director 8 and completing the Director 8 tutorial found there.
7

The 3D XtraThe 3D Xtra lets you include 3D models in a Director movie. You can import 3D models or worlds created with a 3D modeling program and use Director to deliver them on the Web. You can also combine the abilities of Director and your 3D modeling software by building a 3D world in your modeling program and adding to it or modifying it in Director.
This book provides a complete introduction to using 3D in Director. For the latest information, such as technical updates, articles, and more examples, visit the Director Support Center at http://www.macromedia.com/support/director/.
To use 3D images and text created in third-party rendering software, you must convert the file to the W3D format, which Director supports. Typically, each rendering application requires its own specific file converter to create W3D files. For more information on converters that work with Director 8.5, see Importing 3D Files into Director 8.5 on the Director Support Center athttp://www.macromedia.com/support/director/3d models.html.
Shockwave Multiuser ServerThe Shockwave Multiuser Server facilitates real-time interaction and collaboration among users. With this component, you can create communication and entertainment applications such as the following:
• Online “whiteboard” meetings with virtual whiteboards on which each user’s written comments are collected and viewed in real time
• Multimedia presentations displayed to numerous viewers simultaneously
• Multiplayer games with real-time interaction and rich Director media content
• Custom online chat applications
• Server-side database storage
Introduction8

Version 3.0 of the Multiuser Server, which ships with Director 8.5, includes these new features:
• Server-side scripting
By placing Lingo scripts on the server computer, you can dramatically simplify the Lingo in your multiuser client movies. Server-side scripting enables you to more easily develop multiuser movies and minimize errors during testing and real-world use.
• Server-side file access
Files on the server are now accessible through Lingo. You can retrieve status information about server files, add new files, edit the content of existing files, and delete files on the server.
• Multithreading
Multithreading enables multiple server scripts to run simultaneously. One movie does not need to wait for another movie’s scripts to finish executing before its own script can run. Threads can share data and test each other’s states.
To learn the basics of Lingo, see Chapter 6, “Writing Scripts with Lingo,” in Using Director Shockwave Studio for Director 8.
The Flash Asset XtraThe Flash Asset Xtra allows Director to import and use Flash movies as cast members. In Director 8.5, this Xtra supports Flash 5, in addition to earlier versions of Flash.
Using Lingo you can control a Flash cast member’s behavior inside Director. Director 8.5 allows you to control some of the new capabilities of Flash 5 movies and print specific frames of a Flash 5 movie.
To learn the basics of using Flash movies in Director, see Chapter 15, “Using Interactive Media Types,” in Using Director Shockwave Studio for Director 8. For more information about Flash-related Lingo in Director 8.5, see the appendix of this book, “Working with Flash 5” on page 583.
Getting Started 9

What this book coversThis book is an addition to the existing Director documentation and explains features that are new in Director 8.5. For information about Director features that existed in Director 8, see Using Director and the Lingo Dictionary.
Part I of this book introduces Director 3D. Its contents are topically divided as follows:
• “Director 8.5 Tutorial” on page 17 provides a detailed tutorial that introduces the basic procedures for working with 3D cast members and behaviors.
• “3D Basics” on page 45 provides an overview of the 3D features of Director 8.5.
• “Using 3D Behaviors” on page 59 describes how to use the new 3D behaviors in Director 8.5.
• “Using 3D Text” on page 67 describes how to create and work with 3D text.
• “The 3D Cast Member” on page 75 introduces the internal structure of 3D cast members.
• “Working with Models and Model Resources” on page 87 describes in detail the relationship between models and model resources, and the use of modifiers, shaders, and textures in model construction.
• “Working with Lights and Cameras” on page 141 describes how to create and manipulate lights and cameras in 3D cast members.
• “Controlling the 3D World” on page 153 introduces the vector math operations that can be used for manipulating the locations and orientations of models and the commands and properties used to control sprites, cast members, and 3D rendering.
• “3D Lingo by Feature” on page 175 contains all the new Lingo used to work with 3D cast members, organized by category. “3D Lingo Dictionary” on page 193 presents these Lingo elements in standard dictionary format. This chapter is an addendum to the Lingo Dictionary for Director 8.
Part II describes in detail how to use the Shockwave Multiuser Server:
• “Using the Shockwave Multiuser Server and Xtra” on page 449 provides a detailed introduction to the Multiuser Server, a list of the new features in version 3.0, and practical applications and usage scenarios. This chapter also describes the Lingo scripting techniques used with the Multiuser Server.
• “Multiuser Server-Side Scripting” on page 475 explains the benefits of server-side scripting and describes how to create server-side scripts and take advantage of multithreading.
Introduction10

• “The Server Application” on page 491 describes how to administer the Multiuser Server, including system requirements, installation, viewing application information, configuration, and troubleshooting.
• “Multiuser Lingo by Feature” on page 501 introduces the multiuser scripting elements organized by category. “Multiuser Lingo Dictionary” on page 507 presents these Lingo elements alphabetically, in dictionary format. This chapter is an addendum to the Lingo Dictionary for Director 8.
The Working with Flash 5 appendix summarizes the new features of Flash-related Lingo in Director 8.5.
The Director Support Center contains additional articles and How To examples about working with Director.
• Using RealMedia Content with Director (www.macromedia.com/support/director/soundvideo/realmedia_xtra/) describes how to include RealMedia content in a Director movie.
• Creating 3D Models for Use in Shockwave (www.macromedia.com/support/director/work_3d/models_use_in_sw/) provides useful information about how to develop 3D models for use in Shockwave.
• Using the Multiuser Server Debugging API (www.macromedia.com/support director/mu_debug_api/) explains how to use Multiuser Server debugging tools.
• Using UDP with the Multiuser Server (www.macromedia.com/support/director/multiuserusing_udp/) describes how the Multiuser Server works with UDP.
Getting Started 11
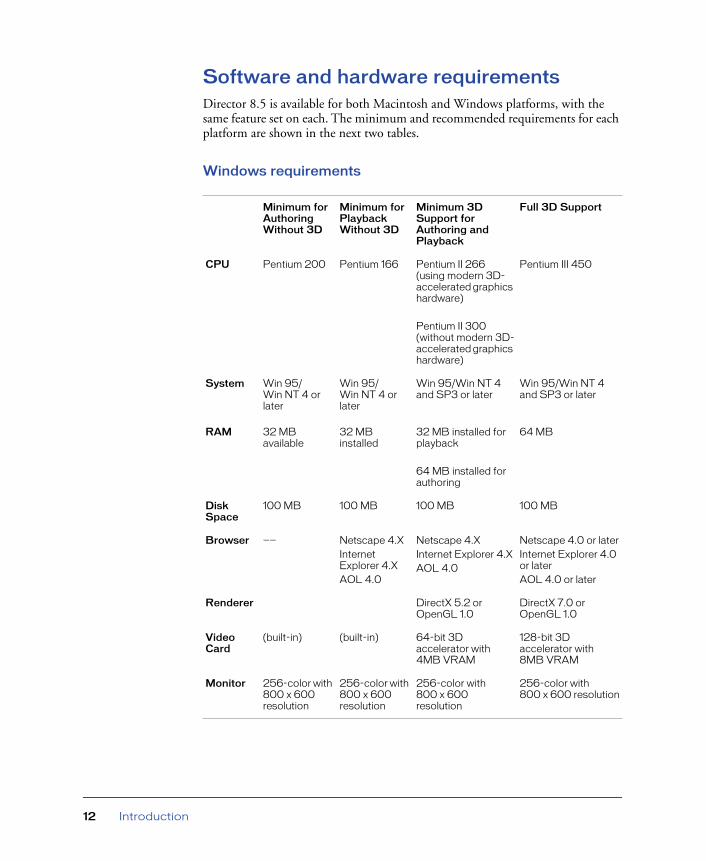
Software and hardware requirementsDirector 8.5 is available for both Macintosh and Windows platforms, with the same feature set on each. The minimum and recommended requirements for each platform are shown in the next two tables.
Windows requirements
Minimum for Authoring Without 3D
Minimum for Playback Without 3D
Minimum 3D Support for Authoring and Playback
Full 3D Support
CPU Pentium 200 Pentium 166 Pentium II 266 (using modern 3D-accelerated graphics hardware)
Pentium II 300 (without modern 3D-accelerated graphics hardware)
Pentium III 450
System Win 95/Win NT 4 or later
Win 95/Win NT 4 or later
Win 95/Win NT 4 and SP3 or later
Win 95/Win NT 4 and SP3 or later
RAM 32 MB available
32 MB installed
32 MB installed for playback
64 MB installed for authoring
64 MB
Disk Space
100 MB 100 MB 100 MB 100 MB
Browser —— Netscape 4.XInternet Explorer 4.XAOL 4.0
Netscape 4.XInternet Explorer 4.XAOL 4.0
Netscape 4.0 or laterInternet Explorer 4.0 or laterAOL 4.0 or later
Renderer DirectX 5.2 orOpenGL 1.0
DirectX 7.0 or OpenGL 1.0
Video Card
(built-in) (built-in) 64-bit 3D accelerator with 4MB VRAM
128-bit 3D accelerator with 8MB VRAM
Monitor 256-color with 800 x 600 resolution
256-color with 800 x 600 resolution
256-color with 800 x 600 resolution
256-color with 800 x 600 resolution
Introduction12

Macintosh requirements
Multiuser Server requirements
The Multiuser Server has the same software and hardware requirements as the Director authoring application, with the following exceptions:
• 6 MB RAM minimum
• 20 MB RAM for 1000 connections
Minimum for Authoring Without 3D
Minimum for Playback Without 3D
Minimum 3D Support for Authoring and Playback
Full 3D Support
CPU PPC 180 PPC 120 PPC 233 (using modern 3D-accelerated graphics hardware)
PPC G3 300 (without modern 3D-accelerated graphics hardware)
G3 333
System OS 8.1(OS X Classic mode only)
OS 8.1(OS X Classic mode only)
OS 8.1(OS X Classic mode only)
OS 8.1(OS X Classic mode only)
RAM 32 MB available
32 MB installed
32 MB installed for playback
64 MB installed for authoring
64 MB RAM
Disk Space
100 MB 100 MB 100 MB 100 MB
Browser —— Netscape 4.XInternet Explorer 4.5AOL 4.0
Netscape 4.XInternet Explorer 4.5AOL 4.0
Netscape 4.0 or laterInternet Explorer 4.5 or laterAOL 4.0 or later
Renderer OpenGL 1.1.2 OpenGL 1.1.2
Video Card
(built-in) (built-in) 64-bit 3D accelerator with 4 MB VRAM
ATI Rage or other 3D accelerator with 8 MB VRAM
Monitor 256-color with 800 x 600 resolution
256-color with 800 x 600 resolution
256-color with 800 x 600 resolution
256-color with 800 x 600 resolution
Getting Started 13

Software installationFollow these steps to install Director on either a Windows or a Macintosh computer.
To install Director 8.5:
1 Insert the Director 8.5 CD into the computer’s CD-ROM drive.
In Windows, if the installation program doesn’t start automatically, choose Run from the Windows Start menu, type d:setup.exe (where d is your CD-ROM drive letter), and click OK.
On the Macintosh, double-click the Installer icon.
2 Follow the onscreen instructions.
3 If prompted, restart your computer.
Conventions used in Director Help and printed booksThe help system and printed books use the following conventions:
• Lingo elements and actual code are shown in this font.
• A backslash (\) at the end of a line of Lingo code is a continuation symbol, indicating that the lines are actually one continuous statement. If it’s necessary to enter the statement in the Message window, enter it in one line.
• Straight quotation marks are used in Lingo statements. Curly quotation marks are used everywhere else.
• Variables representing Lingo parameters appear in italics. For example, whichCastmember indicates where you insert the actual name of a cast member.
Optional parameters in Lingo syntax appear within curly braces. The following syntax for a Lingo command provides an example:
gMultiuserInstance.checkNetMessages({numberOfMessages})
In this example, numberOfMessages is an optional parameter.
Introduction14
. . . . . . . . . . . . . . . . . . . . . . . . . . . . . . . . . . . . . . . . . . . . . . . . . . . . . . . .. . . . . . . . . . . . . . . . . . . . . . . . . . . . . . . . . . . . . . . . . . . . . . . . . . . . .Part I
15

16
1
CHAPTER 1
. . . . . . . . . . . . . . . . . . . . . . . . . . . . . . . . . . . . . . . . . . . . . . . . . . . . . . . .. . . . . . . . . . . . . . . . . . . . . . . . . . . . . . . . . . . . . . . . . . . . . . . . . . . . .Director 8.5 Tutorial
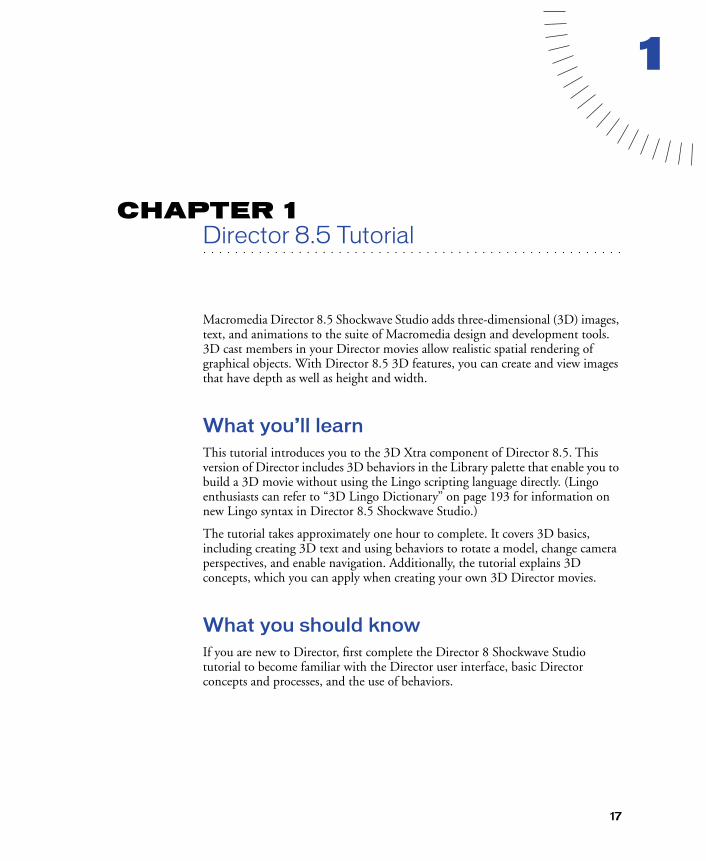
Macromedia Director 8.5 Shockwave Studio adds three-dimensional (3D) images, text, and animations to the suite of Macromedia design and development tools. 3D cast members in your Director movies allow realistic spatial rendering of graphical objects. With Director 8.5 3D features, you can create and view images that have depth as well as height and width.
What you’ll learnThis tutorial introduces you to the 3D Xtra component of Director 8.5. This version of Director includes 3D behaviors in the Library palette that enable you to build a 3D movie without using the Lingo scripting language directly. (Lingo enthusiasts can refer to “3D Lingo Dictionary” on page 193 for information on new Lingo syntax in Director 8.5 Shockwave Studio.)
The tutorial takes approximately one hour to complete. It covers 3D basics, including creating 3D text and using behaviors to rotate a model, change camera perspectives, and enable navigation. Additionally, the tutorial explains 3D concepts, which you can apply when creating your own 3D Director movies.
What you should knowIf you are new to Director, first complete the Director 8 Shockwave Studio tutorial to become familiar with the Director user interface, basic Director concepts and processes, and the use of behaviors.
17

View the completed movieYou can view a completed version of the tutorial movie to become familiar with how your finished movie will appear.
1 Launch Director, and then choose File > Open.
2 Browse to the Director 8.5 application folder and open Learning/8.5_Tutorial/Magic_finished.dir.
3 To play the movie, click the Play button on the Control Panel or choose Control > Play.
Notice that a subtle light appears to shine on the text as it rotates.
4 To get a sense of the behaviors that you’ll apply in the tutorial, do the following:
• With the pointer, click the magic objects on the tables
• Press the arrow keys
• Press the F and B keys to move forward and backward within the scene
• Press the Spacebar
5 When you finish viewing the movie, either click Stop on the Control Panel or choose Control > Stop.
Open the tutorial movieTo begin the tutorial, you’ll open a partially completed DIR file.
1 Choose File > Open.
2 Browse to the Director 8.5 application folder and open Learning/8.5_Tutorial/Magic_start.dir.
If you opened and made changes to the Magic_finished.dir file, a dialog box appears that asks if you want to save those changes. Click No.
The magic_start.dir file opens.
3 Choose File > Save As and name the file My_Magic_start.dir. Save the movie in the same Tutorial/Start folder.
Chapter 118
Create 3D textDirector 8.5 lets you import and create 3D models and text. To create 3D text, you create 2D text and then use the Property Inspector to give it depth. In this tutorial, you will use 2D text that has already been created.
1 Verify that the movie Stage and Library palette are open and visible on your screen. If they are not open, choose Window > Stage and Window > Library Palette.
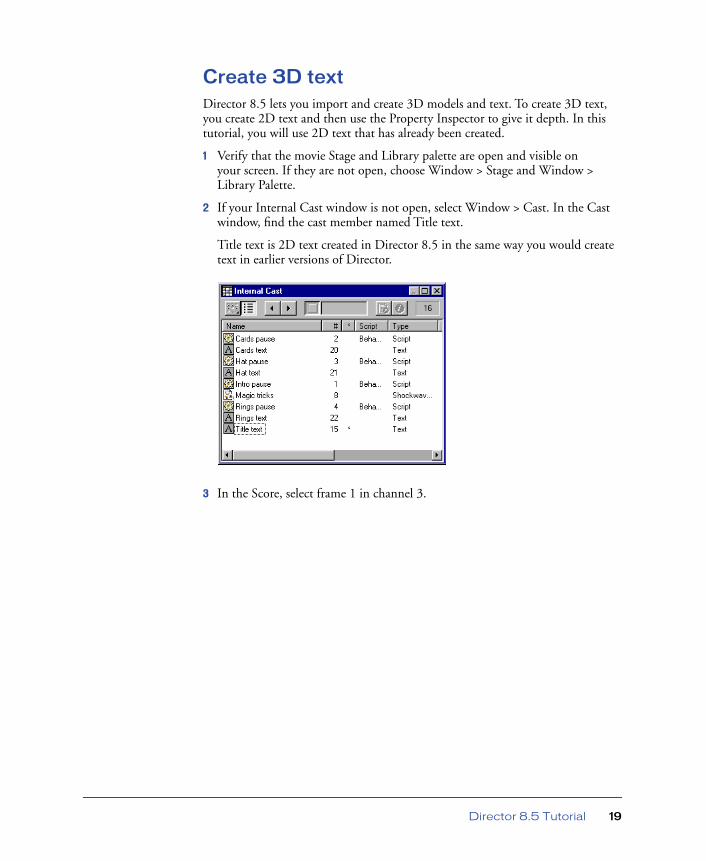
2 If your Internal Cast window is not open, select Window > Cast. In the Cast window, find the cast member named Title text.
Title text is 2D text created in Director 8.5 in the same way you would create text in earlier versions of Director.
3 In the Score, select frame 1 in channel 3.
Director 8.5 Tutorial 19

4 Drag the Title text cast member from the Internal Cast window to the upper left area of the Stage, as shown in the following illustration.
The placement doesn’t need to be precise; you will use the Property Inspector to specify placement coordinates.
5 If the Property Inspector is not open, choose Window > Inspectors > Property.
6 If the Property Inspector’s Sprite tab is not visible, click the Title text sprite on the Stage. On the Sprite tab, type 0 in the X text box and 0 in the Y text box.
You use the X and Y text boxes to place the sprite precisely.
7 Type 70 in the End frame text box and press Enter (Windows) or Return (Macintosh) to extend the Title text sprite to the end of the movie.
The Property Inspector’s Text tab lets you specify 3D properties for the text.
8 With the text still selected, click the Property Inspector’s Text tab.
Chapter 120

9 In the Display pop-up menu, select 3D Mode.
On the Stage, the text becomes 3D.
Modify the 3D text
You can alter the appearance of the 3D text by changing settings in the Property Inspector’s 3D Extruder tab.
1 Click the Property Inspector’s 3D Extruder tab.
2 Move the Tunnel Depth slider left and right to see the different effects. When you release the mouse button, the depth of the text changes.
3 When you finish experimenting with the different tunnel depths, move the slider to a value close to 20.
Director 8.5 Tutorial 21

4 In the Director Light pop-up menu, select Top Center.
Three-dimensional objects in Director can use both ambient and directional lights. By specifying Top Center as the light, you’re indicating where on the text it should appear as though a light is shining.
The Title text sprite changes to reflect the settings in the Property Inspector.
Chapter 122

Rotate the 3D text
To rotate the text, you use a behavior from the Library palette. When the 3D text rotates, the directional light that you specified in the Property Inspector appears to shine on one fixed position, lighting the text much as a spotlight would.
1 In the Library List pop-up menu, choose 3D > Actions.
The Library includes two types of 3D behaviors: actions and triggers. Actions specify what occurs in the movie, such as a camera rotating around a model. You’ll learn more about actions and triggers later in the tutorial.
2 Resize the Library palette to view all of the behaviors in the list.
3 Drag the Automatic Model Rotation to the Title text sprite either on the Stage or in the Score.
4 In the Parameters for Automatic Model Rotation dialog box, move the Rotation Speed slider to 10.
Director 8.5 Tutorial 23

5 In the “Which axis to rotate about” pop-up menu, select Y, and then click OK.
The X and Y axes are the model’s horizontal and vertical axes, respectively; the Z axis refers to depth of the model.
6 To view the 3D text rotating, play your movie.
Notice that the rotation speed seems a bit fast. To avoid making your users dizzy, you’ll modify the behavior parameters.
7 Stop and rewind the movie.
Note: As you complete the tutorial, remember to save your work frequently.
Chapter 124

Modify behaviorsOnce you’ve added a behavior to a sprite, you can use the Property Inspector to modify the behavior.
Slow the rotation speed
To slow the rotation speed setting, complete the following steps:
1 With the Title text sprite selected, click the Property Inspector’s Behavior tab.
2 With Automatic Model Rotation (Internal) selected in the Property Inspector, click the down arrow to the right of Rotation Speed and move the Rotation Speed slider from 10 to 3.
3 Play the movie to view the text rotating at a slower speed. When you finish, stop and rewind the movie.
Note: To return to the parameters dialog box for any behavior, you can double-click the behavior on the Property Inspector’s Behavior tab.
Director 8.5 Tutorial 25
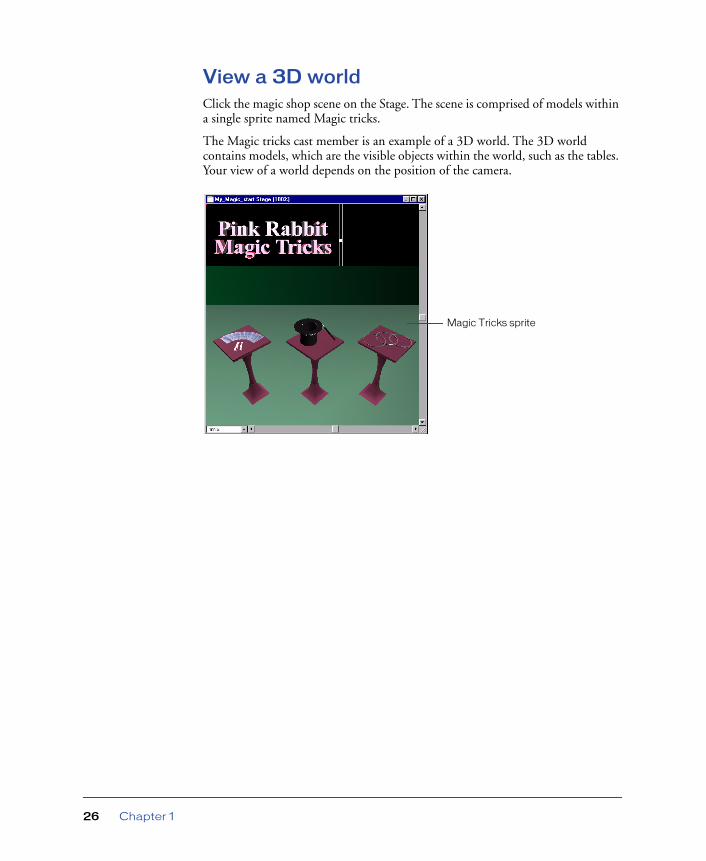
View a 3D worldClick the magic shop scene on the Stage. The scene is comprised of models within a single sprite named Magic tricks.
The Magic tricks cast member is an example of a 3D world. The 3D world contains models, which are the visible objects within the world, such as the tables. Your view of a world depends on the position of the camera.
Magic Tricks sprite
Chapter 126
Use the cameraThe camera is the lens through which you view the world. As with a film camera, you can move the Director camera to view the world at various angles and from different distances.
Apply the Pan Camera Horizontal behavior
When you pan a movie camera, you turn the camera on its own axis, such as when a camera turns from side to side on a tripod.
You use two panning behaviors in the Library palette to pan the camera up, down, left, and right. Specifying parameters for the panning behaviors gives you precise control over the camera movement.
1 Verify that 3D action behaviors are still visible in the Library.
To effectively attach most 3D behaviors to a movie, you work with action and trigger pairs. (The Automatic Model Rotation behavior that you attached to the title text is an exception; it’s an action that does not require a trigger.) Triggers are mouse and keyboard inputs that set actions into motion. A trigger-dependent action does not “act” unless the user completes the defined mouse or keyboard input.
2 Drag the Pan Camera Horizontal behavior from the Library palette to the Magic tricks sprite on the Stage.
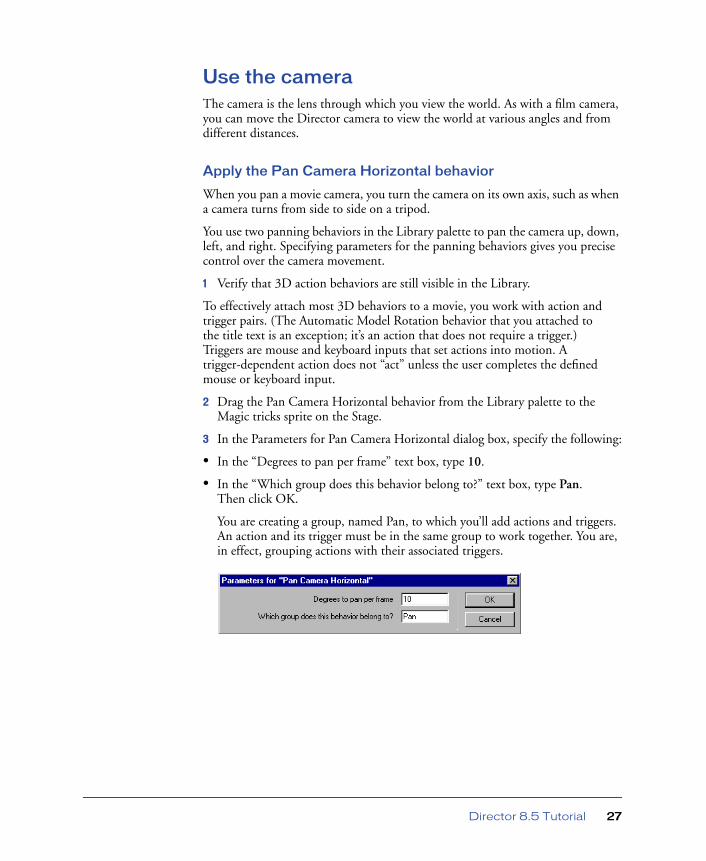
3 In the Parameters for Pan Camera Horizontal dialog box, specify the following:
• In the “Degrees to pan per frame” text box, type 10.
• In the “Which group does this behavior belong to?” text box, type Pan. Then click OK.
You are creating a group, named Pan, to which you’ll add actions and triggers. An action and its trigger must be in the same group to work together. You are, in effect, grouping actions with their associated triggers.
Director 8.5 Tutorial 27

Apply the first keyboard input trigger behavior
Although you’ve added the action for the camera to pan horizontally, you still must identify how the user activates and controls panning during movie playback. As you learned earlier, Pan Camera Horizontal is an action behavior; you apply a trigger behavior to control the action. You’ll now add a trigger behavior.
1 In the Library List pop-up menu, choose 3D > Triggers.
2 Drag the Keyboard Input behavior from the Library palette to the Magic tricks sprite on the Stage.
3 In the Parameters for Keyboard Input dialog box, specify the following:
• In the “Which key will be used?” pop-up menu, select Left Arrow.
• Verify that the second text box is blank and that “No modifier key” appears in the third text box.
• In the Select a Group and Its Action pop-up menu, confirm that Group Pan – Pan Camera Left appears. Then click OK.
Chapter 128

Specify the panning trigger for the opposite direction
Naturally, you want to give your user the ability to pan the camera to the right as well as to the left. The procedure to add a keyboard input to pan left is similar to the keyboard input procedure you just completed.
1 You’ve already used the Keyboard Input behavior once, making it part of your cast. Drag the Keyboard Input behavior from the Cast window to the Magic tricks sprite on the Stage.
2 In the Parameters for Keyboard Input dialog box, specify the following:
• In the “Which key will be used?” pop-up menu, select Right Arrow.
• Verify that the second text box is blank and that “No modifier key” appears in the third text box.
• In the Select a Group and Its Action pop-up menu, select Pan – Pan Camera Right. Then click OK.
Attached behaviors become part of the cast
Director 8.5 Tutorial 29

Pan the camera horizontally
To see the Pan Camera Horizontal behavior in action, do the following:
1 Play the movie and press the Left Arrow key repeatedly.
Each time you press the key, the camera for the 3D world moves a little to the left.
2 Press the Right Arrow key to see the camera change direction.
3 When you finish viewing the panning behaviors, stop and rewind the movie.
Chapter 130

Apply an action behavior to pan the camera vertically
Attaching the Pan Camera Vertical behavior is similar to attaching the Pan Camera Horizontal behavior.
1 In the Library palette, choose 3D > Actions from the Library List pop-up menu.
2 Drag the Pan Camera Vertical behavior from the Library palette to the Magic tricks sprite on the Stage.
3 In the Parameters for Pan Camera Vertical dialog box, specify the following:
• In the “Degrees to pan per frame” text box, type 10.
• In the “Which group does this behavior belong to?” text box, type Pan. Then click OK.
Add a trigger for the Pan Camera Vertical action
Again, you must associate triggers with the action. First, you will specify a trigger to pan the camera upward.
1 Drag the Keyboard Input behavior from the Cast window to the Magic tricks sprite on the Stage.
2 In the Parameters for Keyboard Input dialog box, specify the following:
• In the “Which key will be used?” pop-up menu, select Up Arrow.
• Verify that the second text box is blank and that “No modifier key” appears in the third text box.
• Confirm that Group Pan – Pan Camera Up appears in the Select a Group and Its Action pop-up menu. Then click OK.
Director 8.5 Tutorial 31
Add the panning trigger for the opposite direction
You can probably guess how to establish downward panning:
1 Again, drag the Keyboard Input behavior from the Cast window to the Magic tricks sprite.
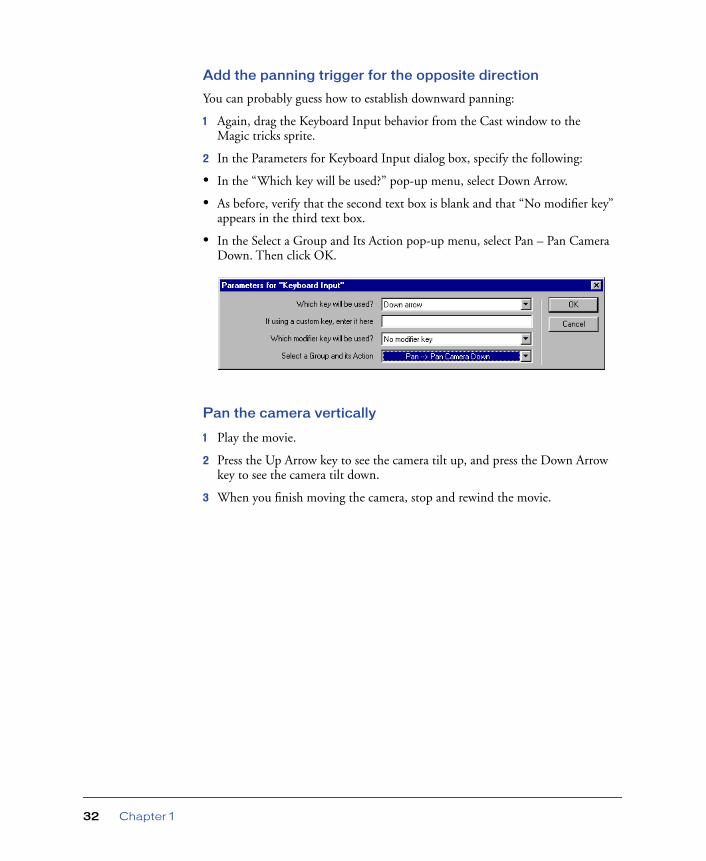
2 In the Parameters for Keyboard Input dialog box, specify the following:
• In the “Which key will be used?” pop-up menu, select Down Arrow.
• As before, verify that the second text box is blank and that “No modifier key” appears in the third text box.
• In the Select a Group and Its Action pop-up menu, select Pan – Pan Camera Down. Then click OK.
Pan the camera vertically
1 Play the movie.
2 Press the Up Arrow key to see the camera tilt up, and press the Down Arrow key to see the camera tilt down.
3 When you finish moving the camera, stop and rewind the movie.
Chapter 132

Add the Dolly Camera behavior
Another way to manipulate the view of a 3D world during movie playback is to dolly the camera. Dollying is a motion picture technique in which the camera’s position changes without changing the direction of the lens itself (as if the camera were transported forward and backward, without turning, on a tripod with wheels).
For dollying, you will drag the behavior to the Score rather than the Stage.
1 If the Score is not open, select Window > Score.
2 In the Library palette, verify that 3D > Actions is selected.
3 Drag the Dolly Camera action from the Library palette to the Magic tricks sprite in the Score. Release the mouse button when the pointer appears with a plus sign and empty rectangle.
4 In the Parameters for Dolly Camera dialog box, specify the following:
• In the “Amount to dolly per frame” text box, type 20.
The Dolly Camera action moves in world units, which are units of measurement unique to the 3D world.
• In the “Which group does this behavior belong to?” text box, type Dolly. Then click OK.
Director 8.5 Tutorial 33

Add the triggers for the Dolly Camera behavior
You have already associated triggers with all four of the arrow keys. You’ll now specify that the F and B keys trigger the forward and backward dollying action.
1 Drag the Keyboard Input behavior from the Cast window to the Magic tricks sprite either on the Stage or in the Score.
2 In the Parameters for Keyboard Input dialog box, specify the following:
• In the “Which key will be used?” pop-up menu, select “The custom key I’ve entered below.”
• In the “If using a custom key, enter it here” text box, type F.
• Verify that “No modifier key” is selected from the “Which modifier key will be used?” pop-up menu.
• Verify that Group Dolly – Move Camera In is selected from the Select a Group and Its Action text box. Then click OK.
You also want to offer the user the ability to dolly the camera out. To create the Dolly Out behavior, you’ll follow similar steps to configure the trigger behavior.
3 Drag the Keyboard Input behavior from the Cast window to the Magic tricks sprite on the Stage.
Chapter 134

4 In the Parameters for Keyboard Input dialog box, specify the following:
• In the “Which key will be used?” pop-up menu, select “The custom key I’ve entered below.”
• In the “If using a custom key, enter it here” text box, type B.
• Verify that “No modifier key” is selected from the “Which modifier key will be used?” pop-up menu.
• In the Select a Group and Its Action pop-up menu, select Dolly – Move Camera Out. Then click OK.
Note: Remember to save your work frequently.
Dolly the camera
1 Play the movie and press the F key repeatedly. This dollies the camera in closer to the Magic tricks world.
2 Press the B repeatedly to move the camera farther away from the Magic tricks world.
3 When you finish moving around the world, stop and rewind the movie.
Director 8.5 Tutorial 35

Reset the camera
Once the camera starts moving around the world, it can be tricky for the user to return to the original camera position—unless you’ve included a way to reset the camera. Fortunately, Director 8.5 has a Reset Camera behavior, which you’ll now apply.
1 In the Library palette, verify that 3D > Actions is selected. Drag the Reset Camera behavior to the Magic tricks sprite.
2 In the Parameters for Reset Camera dialog box, type Reset Camera in the “Which group does this behavior belong to?” text box. Then click OK.
Add the Reset Camera trigger
For the trigger, you will specify that the camera resets whenever the user presses the Spacebar.
1 Drag the Keyboard Input behavior from the Cast window to the Magic tricks sprite on the Stage.
2 In the Parameters for Keyboard Input dialog box, specify the following:
• In the “Which key will be used?” pop-up menu, select “The custom key I’ve entered below.”
• In the “If using custom key, enter it here” text box, press the Spacebar.
• In the “Which modifier key will be used?” pop-up menu, verify that “No modifier key” is selected.
• In the Select a Group and Its Action pop-up menu, select Group Reset Camera – Reset Camera. Then click OK.
Now, when you play the movie and move the camera around the world, you can press the Spacebar to return the camera to its original position.
Chapter 136

Set model rollover cursorsOften in interactive movies, the pointer transforms into a hand when it’s over an object the user can click, such as a link or hot spot. The Model Rollover Cursor behavior lets you select a model, then specify how the pointer will appear when it’s over that model.
A model can consist of a single object, or multiple objects collected together as one model.
You’ll now specify the three table models, which include the objects on the table, that will cause the pointer to change into a pointing finger as it rolls over the model.
1 In the Library, with 3D > Actions selected, drag the Model Rollover Cursor behavior from the Library palette to the Magic tricks sprite on the Stage.
2 In the Parameters for Model Rollover Cursor dialog box, specify the following:
• In the “Which model?” pop-up menu, select Table 1.
• In the “Which cursor?” pop-up menu, verify that Finger is selected. Then click OK.
Note: Because the Model Rollover Cursor behavior is an independent action, you do not need to assign a trigger behavior to it.
3 Again drag the Model Rollover Cursor behavior from either the Library or the Cast window to the Magic tricks sprite. In the Parameter for Model Rollover Cursor dialog box, this time select Table 2 from the “Which model?” pop-up menu.
4 In the “Which cursor?” pop-up menu, verify that Finger is selected.
5 Drag the Model Rollover cursor from the Cast window to the Magic tricks sprite for the third and final time. Select Table 3 in the “Which model?” pop-up menu and Finger in the “Which cursor?” pop-up menu.
Note: Remember to save your work frequently.
6 Play the movie and move the pointer over the tables, and the items on the tables, to see the pointer change into a pointing finger. When the pointer is not over the models to which the Model Rollover Cursor is applied, it changes back into an arrow.
Director 8.5 Tutorial 37

7 When you finish viewing this behavior, stop and rewind the movie.
Use 3D behaviors for navigationWhen a pointer changes to a pointing finger, users know that they can click and expect some sort of result. In your movie, a click of the pointing finger displays information about the merchandise on the tables.
If you look in your Score, you see that the text associated with the merchandise first appears in frame 10 of channel 1. A marker, named Cards, marks where the card text begins, just as markers indicate where the hat and rings text begin. You’ll use a behavior to add navigation to your movie so that when the user sees the pointing finger and clicks, the playback head moves to the specified marker in the Score, and the associated text appears.
The cursor changes to a pointing finger
Score markers
Chapter 138
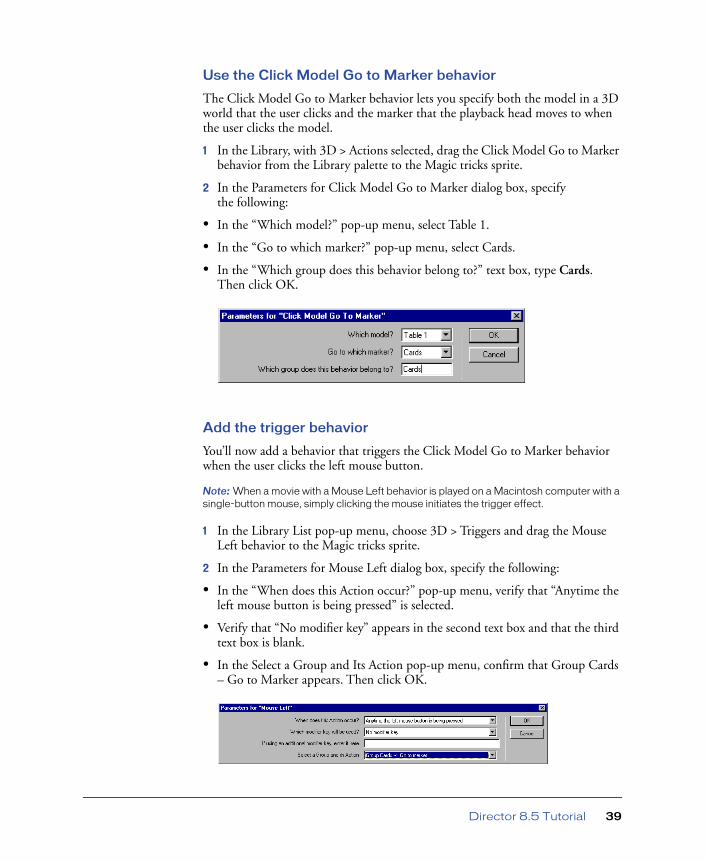
Use the Click Model Go to Marker behavior
The Click Model Go to Marker behavior lets you specify both the model in a 3D world that the user clicks and the marker that the playback head moves to when the user clicks the model.
1 In the Library, with 3D > Actions selected, drag the Click Model Go to Marker behavior from the Library palette to the Magic tricks sprite.
2 In the Parameters for Click Model Go to Marker dialog box, specify the following:
• In the “Which model?” pop-up menu, select Table 1.
• In the “Go to which marker?” pop-up menu, select Cards.
• In the “Which group does this behavior belong to?” text box, type Cards. Then click OK.
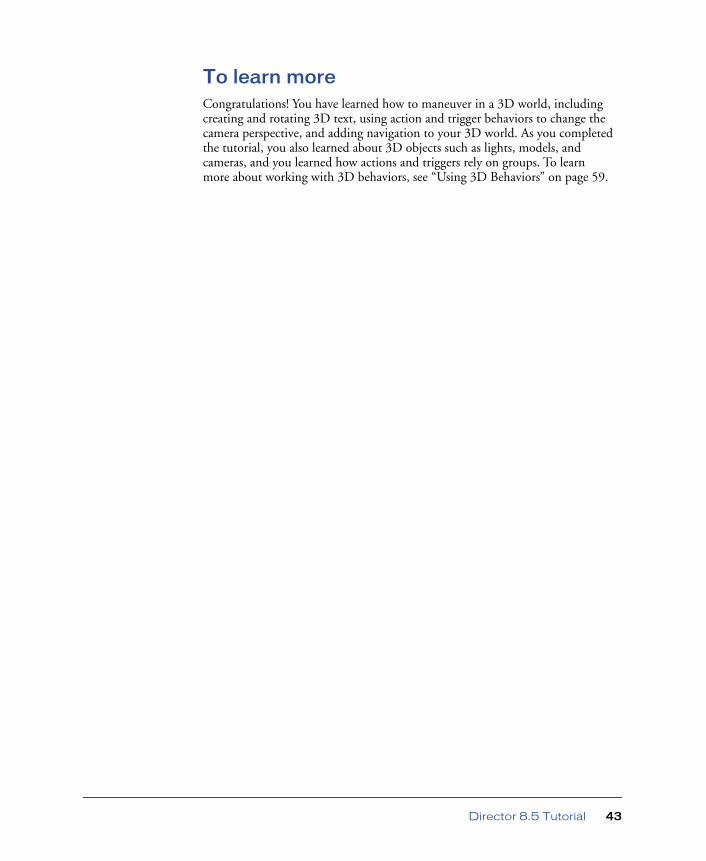
Add the trigger behavior
You’ll now add a behavior that triggers the Click Model Go to Marker behavior when the user clicks the left mouse button.
Note: When a movie with a Mouse Left behavior is played on a Macintosh computer with a single-button mouse, simply clicking the mouse initiates the trigger effect.
1 In the Library List pop-up menu, choose 3D > Triggers and drag the Mouse Left behavior to the Magic tricks sprite.
2 In the Parameters for Mouse Left dialog box, specify the following:
• In the “When does this Action occur?” pop-up menu, verify that “Anytime the left mouse button is being pressed” is selected.
• Verify that “No modifier key” appears in the second text box and that the third text box is blank.
• In the Select a Group and Its Action pop-up menu, confirm that Group Cards – Go to Marker appears. Then click OK.
Director 8.5 Tutorial 39

Select the action and trigger for the Hat marker
You’ll repeat the procedure to add the Click Model Go to Marker action behavior and trigger behavior for the middle table.
1 Drag the Click Model Go to Marker behavior from the Cast window to the Magic tricks sprite.
2 In the Parameters for Click Model Go to Marker dialog box, specify the following:
• In the “Which model?” pop-up menu, select Table 2.
• In the “Go to which marker?” pop-up menu, select Hat.
• In the “Which group does this behavior belong to?” text box, type Hat. Then click OK.
3 In Cast window, drag the Mouse Left behavior to the Magic tricks sprite.
4 In the Parameters for Mouse Left dialog box, specify the following:
• In the “When does this action occur?” pop-up menu, verify that “Anytime the left mouse button is being pressed” is selected.
• Verify that “No modifier key” appears in the second text box and that the third text box is blank.
• In the Select a Group and Its Action pop-up menu, select Group Hat – Go to Marker. Then click OK.
Chapter 140

You’ve almost finished
By now, you should be familiar with the procedure to add the Click Model Go to Marker action and its trigger. You’ll repeat the steps a final time for the remaining table.
1 Drag the Click Model Go to Marker behavior from the Cast window to the Magic tricks sprite. This time, specify Table 3 in the “Which model?” pop-up menu and Rings in the “Go to which marker?” pop-up menu. Create a new group named Rings. Then click OK.
2 Drag the Mouse Left behavior from the Cast window to the Magic tricks sprite. Repeat the steps from the two previous times you’ve applied this behavior, except this time, in the Select a Group and Its Action pop-up menu, select Group Rings – Go to Marker. Then click OK.
3 Save your movie.
Director 8.5 Tutorial 41

Play your completed movieWhen you play your movie, you’ll look at the Score to see the Click Model Go to Marker behaviors in action.
1 Arrange the Score and the Stage so that they are both visible on your screen, and play the movie.
Notice how the movie plays from frame 1 to frame 9 in the Score and then loops back to the Intro marker.
2 Move the pointer on the Stage so that it is touching the left table or the cards on top of it (the Table 1 model).
3 Use the left mouse button (Windows) to click on the Table 1 model. (Macintosh users with a single-button mouse can simply click.) Notice the following:
• The movie plays from frame 10, the frame labeled with the Cards marker, to frame 20. By clicking Table 1 during playback mode, you cause the action to jump to another marker on the Score.
• The merchandise and pricing information that appears above the 3D world comes from the text sprite in frames 10 to 20.
4 Click the other tables to see where, in the Score, the playback head jumps.
5 Use the arrow keys alone and with the Control key to move the camera around the world. Use the Spacebar to reset the camera.
6 When you finish viewing your movie, stop and rewind it.
Chapter 142
To learn moreCongratulations! You have learned how to maneuver in a 3D world, including creating and rotating 3D text, using action and trigger behaviors to change the camera perspective, and adding navigation to your 3D world. As you completed the tutorial, you also learned about 3D objects such as lights, models, and cameras, and you learned how actions and triggers rely on groups. To learn more about working with 3D behaviors, see “Using 3D Behaviors” on page 59.
Director 8.5 Tutorial 43

Chapter 144

2
CHAPTER 2
. . . . . . . . . . . . . . . . . . . . . . . . . . . . . . . . . . . . . . . . . . . . . . . . . . . . . . . .. . . . . . . . . . . . . . . . . . . . . . . . . . . . . . . . . . . . . . . . . . . . . . . . . . . . .3D Basics
Macromedia Director 8.5 Shockwave Studio brings robust, high-performance 3D to the Web. Director 8.5 allows you to develop a wide spectrum of 3D productions, ranging from simple text handling to interactive product demonstrations to complete immersive game environments. Using Macromedia’s free Shockwave Player 8.5, users can view your work on the Web with Netscape Navigator, Microsoft Internet Explorer, or other Shockwave-supported browsers.
Director 8.5 lets you detect the capabilities of the user’s system and adjust playback demands accordingly. A powerful machine with 3D hardware acceleration brings the best results, but users can successfully use Director 8.5 movies on most Macintosh or Windows hardware platforms. The faster the image processing, the better the results. The ability to adjust for client-side processing power makes Director 8.5 ideal for Web delivery.
45
What you need to knowDirector 8.5 is a major evolutionary step forward for Director. If you’re not familiar with Director, you should gain at least a basic knowledge before tackling 3D in Director 8.5. The Director 8 documentation and help files included with Director 8.5 are the place to start.
You can perform many basic 3D operations using Director 8.5’s built-in 3D behaviors. These are covered in detail in “Using 3D Behaviors” on page 59. Most complex 3D operations, however, are performed using Lingo, Director’s built-in scripting language. The 3D documentation assumes you understand Lingo. If you have not yet learned Lingo, you’ll want to start by reading Chapter 6, “Writing Scripts with Lingo,” in Using Director Shockwave Studio for Director 8. You should also familiarize yourself with the Lingo Dictionary, which lists alphabetically all the Lingo commands and properties available in Director 8. The Lingo Dictionary defines each Lingo expression, illustrates its syntax, and provides examples.
Because 3D is primarily controlled by Lingo, the new 3D commands and properties are described in detail. You’ll find them grouped by category in Chapters 4 through 9. “3D Lingo Dictionary” on page 193 presents the same commands and properties in the standard Lingo dictionary format, with syntax and coding examples.
From 2D to 3DBecause Director 8.5 is an evolutionary development, most of what you know about Director still holds true. The following are the main components common to Director 8.5 and earlier versions:
• The Stage is the authoring area in which the Director movie is assembled.
• The Score is an arrangement of channels that organize, display, and control the movie over time.
Because 3D is primarily Lingo-controlled, it involves much less direct manipulation of the Score than other Director features.
• The Cast window is where all cast members, including the 3D cast members, are stored.
Cast members are the media in your movies, such as sounds, text, graphics, and 3D scenes.
Chapter 246

• Sprites are instances of cast members that appear on the Stage with individual properties and attributes.
A sprite of a 3D cast member displays a particular camera’s view into the 3D world. The 3D cast member contains models, which are individual objects inside the 3D cast member itself. For more information about models, see “The 3D world” on page 55. Also see “The 3D Cast Member” on page 75 and “Working with Models and Model Resources” on page 87.
The Stage, Score, and Cast window in Director
• The Property Inspector is a tabbed panel that lets you view and control properties of multiple objects in your movie.
The Property Inspector has been modified to include a 3D Model tab. See “Using the Property Inspector for 3D” on page 51.
3D Basics 47
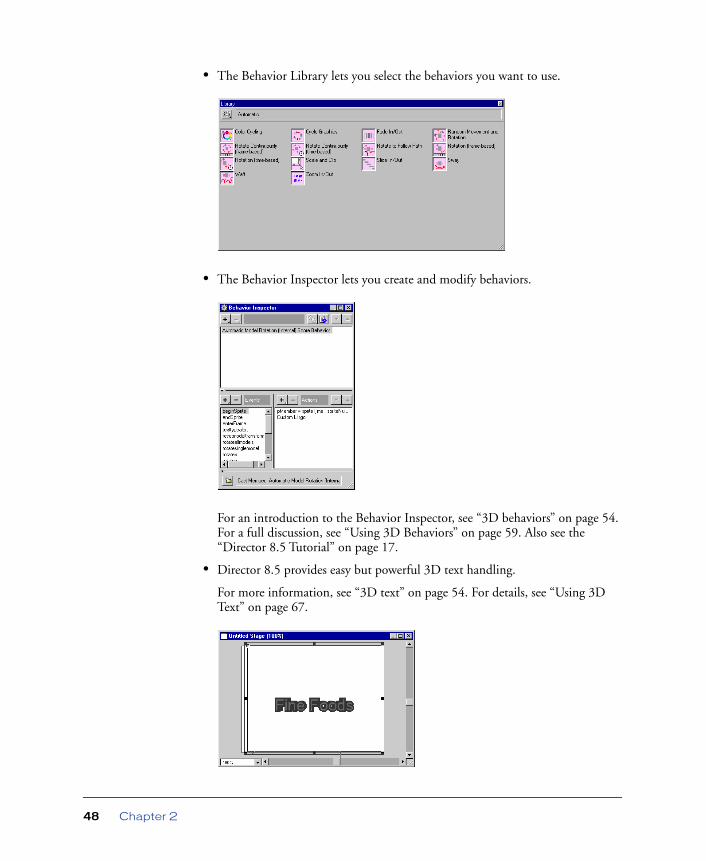
• The Behavior Library lets you select the behaviors you want to use.
• The Behavior Inspector lets you create and modify behaviors.
For an introduction to the Behavior Inspector, see “3D behaviors” on page 54. For a full discussion, see “Using 3D Behaviors” on page 59. Also see the “Director 8.5 Tutorial” on page 17.
• Director 8.5 provides easy but powerful 3D text handling.
For more information, see “3D text” on page 54. For details, see “Using 3D Text” on page 67.
Chapter 248

• Lingo is Director’s scripting language. It can be used to create movies that are more complex and interactive.
For detailed Lingo information, see “The 3D Cast Member” on page 75, “Working with Models and Model Resources” on page 87, “Working with Lights and Cameras” on page 141, and “Controlling the 3D World” on page 153.
3D Lingo commands and properties are covered according to function in each of these chapters. They are also presented in dictionary form, with syntax guidelines, definitions, and examples, in “3D Lingo Dictionary” on page 193.
Using the Shockwave 3D windowThe Shockwave 3D window provides an easy way for you to inspect a 3D cast member. Some properties of 3D cast members can be edited in this window as well.
To use the Shockwave 3D window:
1 Select a 3D cast member in the cast.
2 Click the Shockwave 3D Window button on the Director 8.5 toolbar.
The Shockwave 3D window appears, displaying the 3D cast member currently selected in the cast.
3D Basics 49

3 Use the following controls:
• The camera buttons along the side—Dolly, Rotate, and Pan—allow you to change your viewing angle by zooming in and out, moving around the models, and moving in a straight line horizontally or vertically, respectively. Hold the Shift key while using these tools to make the camera move faster.
• The two buttons below the camera buttons allow you to control whether the Y axis or the Z axis is the up axis when using the Camera Rotate tool.
• The playback buttons allow you to either play the cast member’s animation at normal speed or step through the animation, forward or backward, controlling the movement with mouse clicks.
• The Loop button lets you play animations within the 3D cast member repeatedly.
• The Set Camera Transform and Reset Camera Transform buttons let you set and undo the changes you make to camera angles. Set Camera Transform remembers the current camera position. Reset Camera Transform restores the camera to the previously remembered position.
• The Root Lock button fixes an animation in place, so that it doesn’t change its position on the Stage while playing.
• The field at the top of the Shockwave 3D window shows the name of the cast member on display. The square button to the left of the text box lets you drag that cast member to the Stage or the Score.
• The New Cast Member, Previous Cast Member, and Next Cast Member buttons at the upper left of the Shockwave 3D window allow you to add or display 3D cast members.
• The Reset World button restores the 3D scene to its original state, with all models, cameras, and so on assuming their original positions.
Chapter 250

Using the Property Inspector for 3DThe Property Inspector lets you modify the 3D cast member without using Lingo. The 3D Model tab of the Property Inspector offers a simple way to view and control numerous aspects of the 3D world.
To view the 3D Model tab:
1 Open the Cast window if it isn’t already open.
2 Click the 3D cast member you wish to select.
3 Click the Property Inspector button in the toolbar. The Property Inspector opens.
4 Click the 3D Model tab in the Property Inspector.
The Property Inspector should appear in Graphical view. If the Property Inspector is in List view, click the List View Mode icon to toggle the view to Graphical.
The Property Inspector’s 3D Model tab provides several options:
• The fields at the top of the tab show the initial position and orientation of the default camera. The default (0, 0, 0) represents a vantage point looking up the Z axis through the middle of the screen. The values you enter in these fields replace the displayed values and move the camera.
• The Direct to Stage option controls whether rendering occurs directly on the Stage (the default) or in Director’s offscreen buffer.The offscreen graphics buffer is where Director calculates which sprites are partly hidden behind other sprites.When Direct to Stage is on, Director bypasses its offscreen buffer and saves time, increasing playback speed. When Direct to Stage is on, however, you can’t use the inker modifier on 3D models or place other sprites on top of the 3D sprite.
3D Basics 51

• The Preload option controls how media that’s being downloaded to the user’s computer is displayed. The media can be held back from display until it has been completely streamed into memory, or it can be displayed progressively on the Stage as data becomes available.
• The Play Animation option controls whether any existing animation, either bones or keyframe, is played or ignored.
• The Loop option controls whether the animation loops continuously or plays once and stops.
• The Director Light area allows you to choose one of ten lighting positions to apply to a single directional light. You can also adjust the color for the ambient light. (Directional light comes from a particular, recognizable direction; ambient light is diffuse light illuminating the entire scene.) Finally, you can adjust the background color of the scene.
• The Shader Texture area allows you to work with shaders and textures. A shader determines the method used to render the surface of a model; a texture is an image applied to the shader and drawn on the surface of the model. Using the Property Inspector, you can assign a texture to a shader. You can also control its specular (highlight) color, its diffuse (overall) color, and its reflectivity. For more information, see “The 3D world” on page 55 and “Working with Models and Model Resources” on page 87.
Using rendering methodsThe rendering method refers to the specific way Director 8.5 displays 3D images on the Stage. The methods available depend on the type of hardware you have. The rendering methods include the following:
• #auto: Director chooses the best method based on the client machine’s specific hardware and drivers.
• #openGL: OpenGL drivers for a 3D hardware accelerator are used. OpenGL is available for both the Macintosh and Windows platforms.
• #directX7_0: DirectX7_0 drivers for a 3D hardware accelerator are used. This option is available for Windows only.
• #directX5_2: DirectX5_2 drivers for a 3D hardware accelerator are used. This option is available for Windows only.
• #software: Director’s built-in software renderer is used. This option is available on both the Macintosh and Windows platforms.
Chapter 252

The rendering method can have a dramatic effect on performance. If your hardware permits you to choose different methods, you can do so using the following procedure.
To choose a rendering method:
1 Select the Stage.
2 Open the Property Inspector.
3 Click the Movie tab.
4 Select a rendering method from the pop-up menu.
If you don’t choose a rendering method, Director 8.5 defaults to #auto.
Below the pop-up menu, the name of the active 3D renderer property is displayed. The value of this property indicates which rendering method is currently being used. This is especially useful when you want to know which renderer is active while you have #auto selected.
3D Basics 53

3D behaviors The Director 8.5 Behavior Library includes new 3D-specific behaviors. For more information on these behaviors, see the “Director 8.5 Tutorial” on page 17.
3D behaviors are divided into four types:
• Local behaviors are actions that accept triggers only from the sprite they’re attached to.
• Public behaviors are actions that accept triggers from any sprite.
• Triggers are behaviors that send signals to a local or public behavior to cause the behavior to execute.
For example, attaching the Create Box action and Mouse Left trigger behaviors to a sprite will cause a box to be created in the 3D world each time the sprite is clicked with the left mouse button.
• Independent behaviors are behaviors that perform their actions without a trigger.
The Toon behavior, for example, changes a model’s rendering style to the toon style.
3D textYou can easily create 3D text in Director 8.5. First you create 2D text exactly as in Director 8. Then you convert the text to 3D by choosing 3D Mode from the Display pop-up menu in the Text tab of the Property Inspector. Then use the 3D Text tab to manipulate the specific properties of the 3D text.
You can also manipulate the text cast member with Lingo or a behavior. For more information, see the “Director 8.5 Tutorial” on page 17 and “Using 3D Text” on page 67.
Chapter 254

The 3D worldThis section provides a brief overview of the contents of 3D cast members. For more detailed information, see “The 3D Cast Member” on page 75.
Each 3D cast member contains a complete 3D world. It can contain models (the objects viewers see within the world) that are illuminated by lights and viewed by cameras. A sprite of a 3D cast member represents a specific camera’s view into the world. Imagine that the 3D cast member is a room filled with furniture with cameras pointing in from several windows. A given sprite using that cast member will display the view from one of those cameras, but the room itself—the 3D cast member—remains the same regardless of which view is being used.
The key difference between 3D cast members and other cast members is that the models within the 3D world are not independent entities—they’re not sprites themselves. Instead, they are integral parts of the 3D cast member sprite.
The illustration that follows shows the relationships between the components of a 3D cast member:
Your movies can use 2D and 3D cast members simultaneously. For example, a product demonstration movie might consist of a 3D cast member representing the product and one or more 2D controls that allow users a virtual tryout of the product.
3D CastmemberA self contained 3D world: -palettes of models, lights, shaders, animations, ect. -model heirachy of all models corrently used in the world -simulation state and time
Material
Material
Material
Shader
Shader
Shader
Texture
Texture
Texture
Texture
Aniamation
Aniamation
Aniamation
World
Model
Model
Model
Light
Light
Light
Light
Material
Shader
SpriteView of the castmember's worldfrom a particular camera
SpriteView of the castmember's worldfrom a particular camera
RenderServices Object(Lingo global variable) -services of the underlying 3D renderer (and any 3rd party xtras) available to all 3D castmembers -Global properties of the 3D rendering state
3D Basics 55

Models and model resources
Models are the objects that users see within the 3D world. Model resources are elements of 3D geometry that can be used to draw 3D models. A model is a visible object that makes use of a model resource and occupies a specific position and orientation with the 3D world. The model also defines the appearance of the model resource, such as what textures and shaders are used. For more information, see “Working with Models and Model Resources” on page 87.
The relationship between a model and a model resource is similar to that between a sprite and a cast member. Model resource data can be reused, because multiple models can use the same model resource, just as cast member data can be reused by multiple sprites. Unlike sprites, however, models don’t appear in and can’t be controlled from the Score.
For example, a 3D cast member might contain two model resources. One could be the geometry for a car body, and the other could be the geometry for a car wheel. In order for a complete car to appear visibly in the 3D scene, the model resource for the car body would be used once, and the model resource for the wheel would be used four times—once for each wheel.
All models are located within a parent-child hierarchy. A model can have any number of children but only one parent. If a model doesn’t have another model as a parent, its parent is the group called “world,” which is, for all practical purposes, the 3D cast member itself.
A model’s parent and children don’t have to be models, however. Models, lights, cameras, and groups all share the same parent-child hierarchy. A light, for example, can be the child of a group and the parent of a model.
The primary benefit of these parent-child relationships is that they make it easier to move complex models around in the 3D world and to have the component parts of those models move together in the proper way. In the example of the car described earlier, if the wheels of the car are defined as children of the car model, then moving the car will cause the wheels to be moved with the car in the expected manner. If no parent-child relationship is defined between the car and the wheels, moving only the car will cause the wheels to be left behind in their original position in the world.
Lights and cameras
Lights are used to light the 3D world. Without lights, the objects within the world can’t be seen.
Whereas lights control the appearance of the 3D world, cameras control how a sprite views the 3D world. A 3D sprite displays a particular camera’s view into the world. For more information, see “Working with Lights and Cameras” on page 141.
Chapter 256

Groups
Groups are collections of models, lights, cameras, or other groups. Groups allow you to rotate or translate their contents simultaneously. A group has a name, a transform, and a parent, and it can have one or more children. It has no other properties. The highest level group is the group called “world,” which is essentially synonymous with the 3D cast member itself. For more information, see “Groups” on page 85.
Shaders and textures
A model’s surface color is determined by its shader or shaders. Images can be drawn on the surface of a model by applying one or more textures to each shader. For more information, see “Shaders” on page 107 and “Textures” on page 116.
Modifiers
Modifiers let you control many aspects of how models are rendered and how they behave. When you attach a modifier to a model, you can then set the properties for that modifier with Lingo. Depending on the type of modifier you use, setting its properties can give you fine control over the model’s appearance and behavior. Modifiers are covered in detail in “Working with Models and Model Resources” on page 87 and in “Working with Lights and Cameras” on page 141.
Animation
Director 8.5 supports complex model animations through the following means:
• The collision modifier allows models to respond appropriately to collisions.
• The Bones player modifier allows models that have a skeletal structure defined in them to play back animations of those skeletons. These animations are created in separate 3D modeling tools.
• The Keyframe player modifier allows models to play back time-based animation sequences. These can also be created in separate 3D modeling tools.
3D animations are called motions and can be initiated by 3D behaviors or Lingo. For more information, see “Animation modifiers” on page 128 and “Motions” on page 140.
3D Basics 57

Chapter 258

3
CHAPTER 3
. . . . . . . . . . . . . . . . . . . . . . . . . . . . . . . . . . . . . . . . . . . . . . . . . . . . . . . .. . . . . . . . . . . . . . . . . . . . . . . . . . . . . . . . . . . . . . . . . . . . . . . . . . . . .Using 3D Behaviors
Macromedia Director 8.5 Shockwave Studio includes a library of behaviors that allow you to build and control a 3D environment without any knowledge of Lingo. While scripting is still required for complex projects, you can build simple 3D movies with behaviors alone.
Behavior typesDirector 8.5 includes two different types of 3D behaviors: trigger and action. Action behaviors are divided into three different types: local, public, and independent. These behavior types and subtypes are detailed in the following table.
If you’re familiar with behaviors from earlier versions of Director, you’ll recognize that the trigger/action distinction is new. Formerly, the trigger instruction had to be included as a handler, such as on mouseDown, inside the behavior. The trigger behavior type makes it easier to reuse action behaviors in different ways with different triggers. These behaviors can be used with any 3D cast member.
Type Function
Trigger A behavior that sends an event, such as a mouse click, to an action behavior
Local action A behavior that is attached to a particular sprite and that will accept triggers only from that sprite
Public action A behavior that can be triggered by any sprite
Independent action A behavior that needs no trigger
59
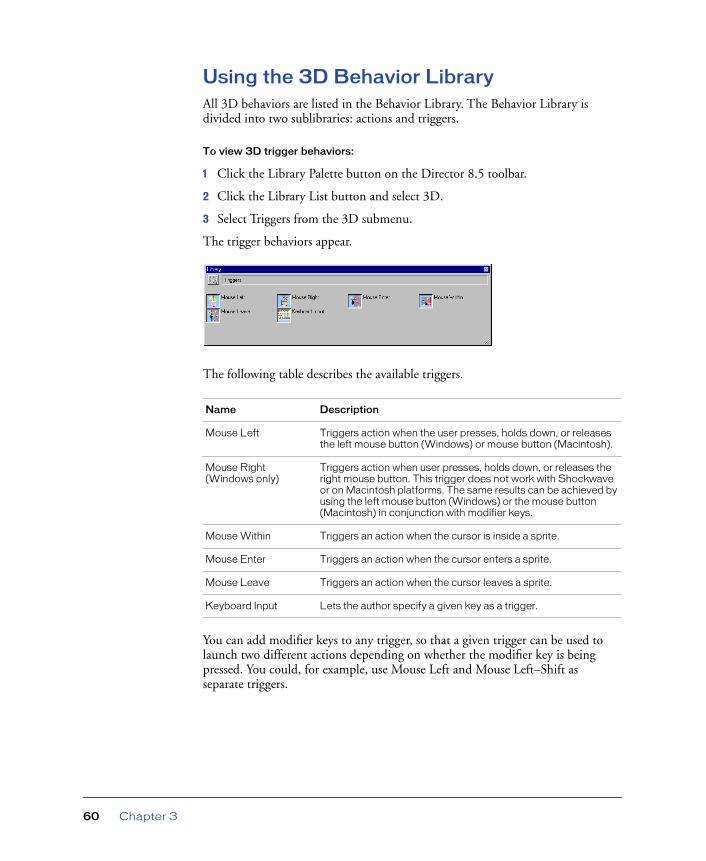
Using the 3D Behavior LibraryAll 3D behaviors are listed in the Behavior Library. The Behavior Library is divided into two sublibraries: actions and triggers.
To view 3D trigger behaviors:
1 Click the Library Palette button on the Director 8.5 toolbar.
2 Click the Library List button and select 3D.
3 Select Triggers from the 3D submenu.
The trigger behaviors appear.
The following table describes the available triggers.
You can add modifier keys to any trigger, so that a given trigger can be used to launch two different actions depending on whether the modifier key is being pressed. You could, for example, use Mouse Left and Mouse Left–Shift as separate triggers.
Name Description
Mouse Left Triggers action when the user presses, holds down, or releases the left mouse button (Windows) or mouse button (Macintosh).
Mouse Right (Windows only)
Triggers action when user presses, holds down, or releases the right mouse button. This trigger does not work with Shockwave or on Macintosh platforms. The same results can be achieved by using the left mouse button (Windows) or the mouse button (Macintosh) in conjunction with modifier keys.
Mouse Within Triggers an action when the cursor is inside a sprite.
Mouse Enter Triggers an action when the cursor enters a sprite.
Mouse Leave Triggers an action when the cursor leaves a sprite.
Keyboard Input Lets the author specify a given key as a trigger.
Chapter 360
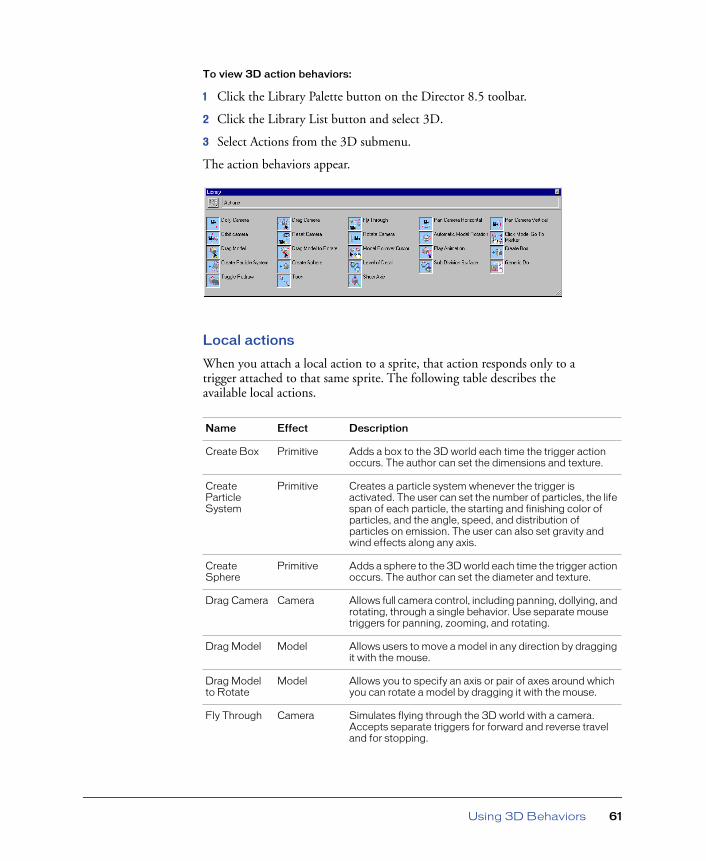
To view 3D action behaviors:
1 Click the Library Palette button on the Director 8.5 toolbar.
2 Click the Library List button and select 3D.
3 Select Actions from the 3D submenu.
The action behaviors appear.
Local actions
When you attach a local action to a sprite, that action responds only to a trigger attached to that same sprite. The following table describes the available local actions.
Name Effect Description
Create Box Primitive Adds a box to the 3D world each time the trigger action occurs. The author can set the dimensions and texture.
Create Particle System
Primitive Creates a particle system whenever the trigger is activated. The user can set the number of particles, the life span of each particle, the starting and finishing color of particles, and the angle, speed, and distribution of particles on emission. The user can also set gravity and wind effects along any axis.
Create Sphere
Primitive Adds a sphere to the 3D world each time the trigger action occurs. The author can set the diameter and texture.
Drag Camera Camera Allows full camera control, including panning, dollying, and rotating, through a single behavior. Use separate mouse triggers for panning, zooming, and rotating.
Drag Model Model Allows users to move a model in any direction by dragging it with the mouse.
Drag Model to Rotate
Model Allows you to specify an axis or pair of axes around which you can rotate a model by dragging it with the mouse.
Fly Through Camera Simulates flying through the 3D world with a camera. Accepts separate triggers for forward and reverse travel and for stopping.
Using 3D Behaviors 61

Public actions
As with local actions, you can add public actions to a movie by attaching them to any 3D sprite. Unlike local actions, public actions are triggered whether the trigger is attached to the same sprite as the action or to any other sprite. Public actions use the same triggers as local actions. The following public actions are available.
Click Model Go to Marker
Model Moves the playback head to a marker in the Score when a model is clicked.
Orbit Camera Camera Circles the camera around a model.
Play Animation
Model Plays a preexisting animation when the model is clicked. This behavior cannot be used with 3D text.
Name Effect Description
Dolly Camera Camera Dollies (moves) the camera into or out of the 3D scene by a specified amount each time its trigger is activated. Dollying in and dollying out require separate triggers.
Generic Do Custom Allows you to use the standard triggers to launch custom handlers you have written or execute specific Lingo commands. Requires knowledge of Lingo.
Pan Camera Horizontal
Camera Pans (changes the direction in which the camera is pointing) along the horizontal axis (side to side) by a specified number of degrees each time its trigger is activated. Panning left and panning right require separate triggers.
Pan Camera Vertical
Camera Pans (changes the direction in which the camera is pointing) along the vertical axis (up and down) by a specified number of degrees each time its trigger is activated. Panning up and panning down require separate triggers.
Reset Camera
Camera Resets the camera to its initial location and orientation when the trigger is activated.
Rotate Camera
Camera Rotates the camera around the Z axis by a specified number of degrees each time its trigger is activated. This makes the 3D scene appear to rotate and turn upside down.
Toggle Redraw
Drawing Toggles the redraw mode on or off. Turning redraw off produces visible trails as a model moves through space. Turning redraw on causes the trails to disappear.
Name Effect Description
Chapter 362
Independent actions
Independent actions don’t require triggers. The following independent actions are available.
Name Effect Description
Automatic Model Rotation
Motion Automatically rotates a model around a given axis and continues rotating it while the movie is playing. To rotate the model around multiple axes, attach multiple instances of the behavior to the sprite and select the desired axis for each one.
Level of Detail
Model Enables the level of detail (LOD) modifier for the model. Dynamically lowers the number of polygons used to render the model as its distance from the camera increases. Reduces demands on the CPU.
Model Rollover Cursor
Model Changes the mouse cursor to the cursor of your choice when the mouse rolls over the given model.
Show Axis Debugging Establishes red, green, and blue lines along the X, Y, and Z axes, respectively, enabling you to see them in the 3D scene.
Subdivision Surfaces
Model Enables the subdivision surfaces (SDS) modifier for the given model, which synthesizes additional detail to smooth out curves as the model’s distance from the camera decreases.
Toon Model Enables the toon modifier, which renders the model in a cartoon style, with a reduced number of colors and distinct boundaries. The user can set the toon style very precisely, choosing the number of colors, line color, brightness and darkness of highlights and shadows, and anti-aliasing.
Using 3D Behaviors 63
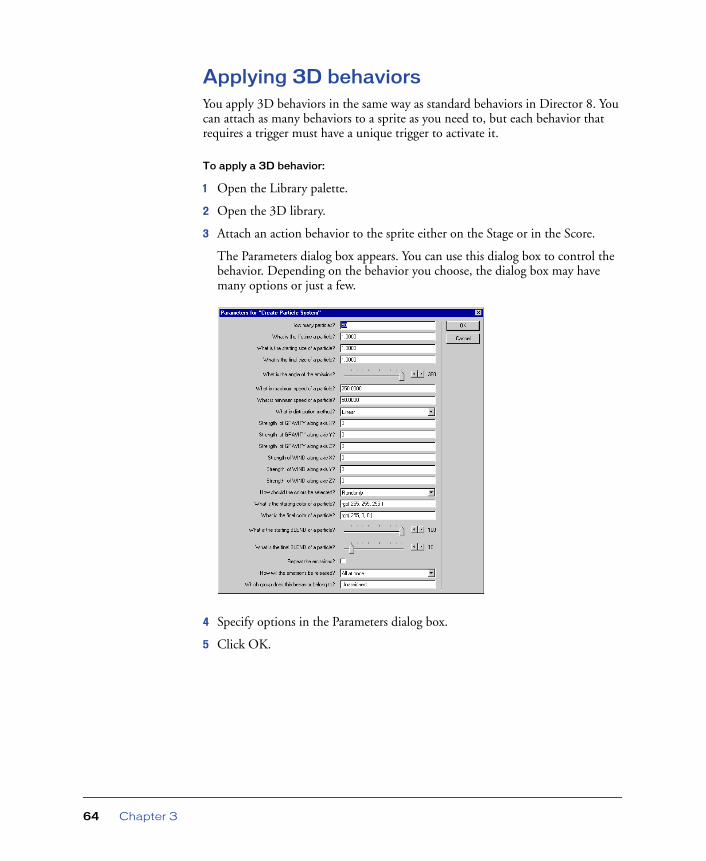
Applying 3D behaviorsYou apply 3D behaviors in the same way as standard behaviors in Director 8. You can attach as many behaviors to a sprite as you need to, but each behavior that requires a trigger must have a unique trigger to activate it.
To apply a 3D behavior:
1 Open the Library palette.
2 Open the 3D library.
3 Attach an action behavior to the sprite either on the Stage or in the Score.
The Parameters dialog box appears. You can use this dialog box to control the behavior. Depending on the behavior you choose, the dialog box may have many options or just a few.
4 Specify options in the Parameters dialog box.
5 Click OK.
Chapter 364

6 For local behaviors, attach a trigger behavior to the same sprite. For public behaviors, attach a trigger behavior to the sprite of your choice.
The Parameters dialog box appears. You can use this dialog box to control when the trigger should work; what modifier keys, if any, are associated with the trigger; and what sprite group the trigger is assigned to. (For more information about groups, see “About groups” on page 65.)
7 Specify options in the Parameters dialog box.
8 Click OK.
About groupsBoth the local and public action behaviors’ Parameters dialog boxes give you the option to assign the behavior to a group. Groups allow a single trigger to initiate actions across multiple sprites. To establish a group, simply choose a name for the group and assign that name in the Parameters dialog box of each behavior you attach to each sprite you want in the group.
Because the triggers are sent to the group name rather than to a specific sprite number, there are no reference changes to update when a sprite is moved from one Score channel to another.
Using 3D Behaviors 65

Chapter 366

4
CHAPTER 4
. . . . . . . . . . . . . . . . . . . . . . . . . . . . . . . . . . . . . . . . . . . . . . . . . . . . . . . .. . . . . . . . . . . . . . . . . . . . . . . . . . . . . . . . . . . . . . . . . . . . . . . . . . . . .Using 3D Text
Macromedia Director 8.5 Shockwave Studio allows you to convert 2D text to 3D and then work with the 3D text as you would with any other 3D cast member. You can apply behaviors to the 3D text, manipulate it with Lingo, and view and edit it in the Shockwave 3D window.
Creating 3D textTo create 3D text, you first create 2D text and then convert the text to 3D.
To create 3D text:
1 Choose Window > Text to open the text editor.
2 Choose the font, size, style, and alignment you want.
Most standard fonts work well with 3D text. You may need to experiment to get the results you want.
3 Enter the text. (You will still be able to edit the text after you’ve entered it.)
4 Drag the text cast member onto the Stage.
You can either drag the cast member from the Cast window or drag the Drag Cast Member button next to the Name field in the Text window.
5 Click the Property Inspector icon in the Director 8.5 toolbar.
6 Click the Text tab.
67

7 Choose 3D Mode from the Display pop-up menu.
8 The text on the screen changes to 3D. You can now work with it as discussed in the next section.
Modifying 3D textOnce your 2D text has been changed to 3D, you can modify it.
To modify the 3D text:
1 Click the 3D Extruder tab in the Property Inspector.
Chapter 468
2 Set the camera position and rotation.
As with the standard 3D Property Inspector pane, you control camera position and rotation with the values you enter in the fields at the top of the pane. The default camera position represents a vantage point looking up through the middle of the scene.
You may prefer to define these settings using the Shockwave 3D window instead of the Property Inspector.
3 Select from among the Front Face, Back Face, and Tunnel checkboxes.
These options control which sides of the text are displayed.
4 Set the smoothness.
This determines the number of polygons used to construct the text. The more polygons used, the smoother the text will appear.
5 Set the tunnel depth.
This is the length of the tunnel from the front face to the back face.
6 Choose a beveled edge type.
Beveling makes the edges of the 3D letters appear rounded or angled. Choose Round for rounded edges and Miter for angled edges.
7 Choose a bevel amount.
This determines the size of the bevel.
8 Set up the lighting.
You can choose a color and position for the text’s default directional light. A directional light is a point source of light and comes from a specific, recognizable direction. You can also choose a color for the ambient and background lights in the 3D world the text occupies. Ambient light is diffuse light illuminating the entire world; background light appears to come from behind the camera.
Using 3D Text 69
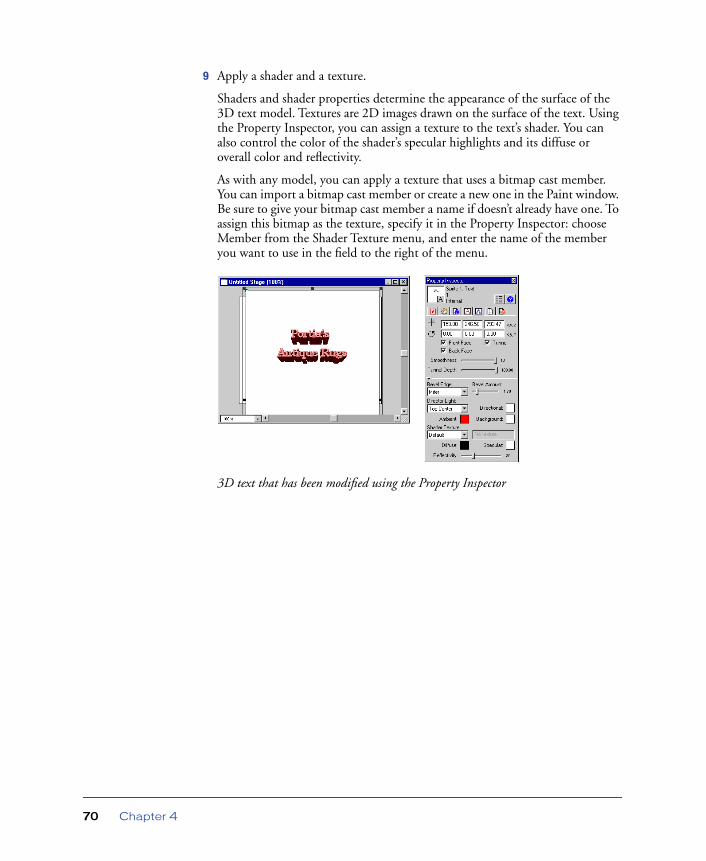
9 Apply a shader and a texture.
Shaders and shader properties determine the appearance of the surface of the 3D text model. Textures are 2D images drawn on the surface of the text. Using the Property Inspector, you can assign a texture to the text’s shader. You can also control the color of the shader’s specular highlights and its diffuse or overall color and reflectivity.
As with any model, you can apply a texture that uses a bitmap cast member. You can import a bitmap cast member or create a new one in the Paint window. Be sure to give your bitmap cast member a name if doesn’t already have one. To assign this bitmap as the texture, specify it in the Property Inspector: choose Member from the Shader Texture menu, and enter the name of the member you want to use in the field to the right of the menu.
3D text that has been modified using the Property Inspector
Chapter 470
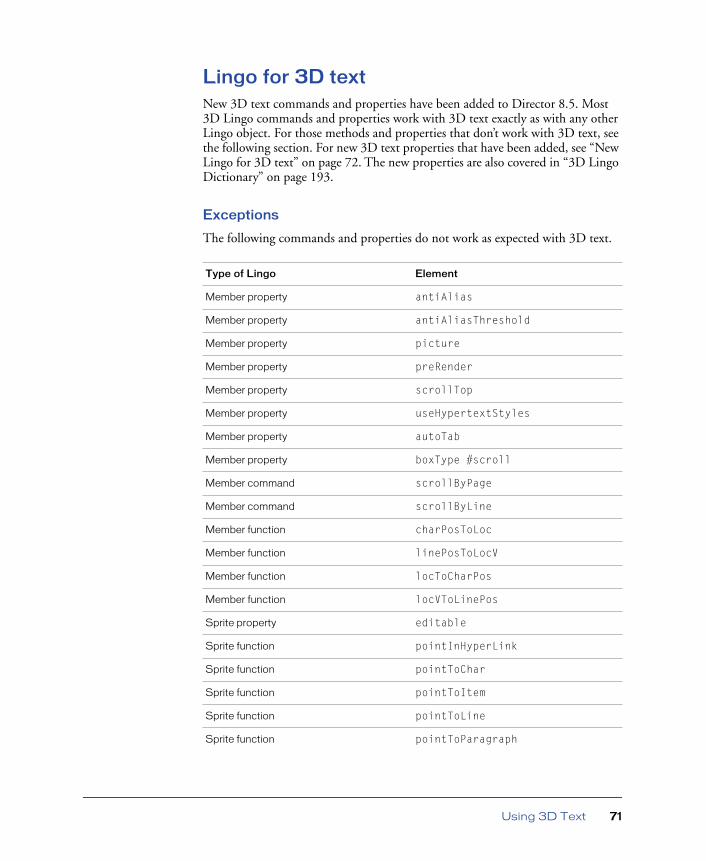
Lingo for 3D text New 3D text commands and properties have been added to Director 8.5. Most 3D Lingo commands and properties work with 3D text exactly as with any other Lingo object. For those methods and properties that don’t work with 3D text, see the following section. For new 3D text properties that have been added, see “New Lingo for 3D text” on page 72. The new properties are also covered in “3D Lingo Dictionary” on page 193.
Exceptions
The following commands and properties do not work as expected with 3D text.
Type of Lingo Element
Member property antiAlias
Member property antiAliasThreshold
Member property picture
Member property preRender
Member property scrollTop
Member property useHypertextStyles
Member property autoTab
Member property boxType #scroll
Member command scrollByPage
Member command scrollByLine
Member function charPosToLoc
Member function linePosToLocV
Member function locToCharPos
Member function locVToLinePos
Sprite property editable
Sprite function pointInHyperLink
Sprite function pointToChar
Sprite function pointToItem
Sprite function pointToLine
Sprite function pointToParagraph
Using 3D Text 71

New Lingo for 3D text
In addition to working with most existing commands and properties, 3D text also adds some Lingo properties of its own. These properties allow you a more precise way to define the characteristics of the text than is possible using the Property Inspector.
These properties can be set while the text is in 2D mode. They’ll have no visible effect until the text is displayed in 3D mode.
When you access the following properties for an extruded 3D text model that you created using the extrude3D command, you must refer to the model resource of the text. The Lingo syntax for this is as follows:
member(whichMember).model[modelIndex].resource.3DTextProperty
Sprite function pointToWord
Hypertext Lingo hyperlinkClicked
Hypertext Lingo hyperlink
Hypertext Lingo hyperlinks
Hypertext Lingo hyperlinkRange
Hypertext Lingo hyperlinkState
Type of Lingo Element
Chapter 472

For example, to set the bevelDepth property of the first model in cast member 1 to a value of 25, use the following syntax:
member(1).model[1].resource.bevelDepth = 25
Property Access Description Range orDefault
bevelDepth Get and set Degree of beveling on front or back faces.
Floating-point value from 1.0 to 100.0Default is 1.0
bevelType Get and set Type of bevel. #none#miter#roundDefault is #miter
displayFace Get and set Faces of shape to display. #front#tunnel#backDefault is to show all three faces
displayMode Get and set Specifies how the text is displayed. #modeNormal#Mode3DDefault is #modeNormal, which is 2D text
member(1).extrude3d(member(2))
Not applicable
Creates a new model resource in member 2 by extruding the text in member 1. Member 1 must be a text cast member.
Specify an existing 3D cast member
smoothness Get and set Number of subdivisions for curved outlines.
Integer from 1 to 100Default is 5
tunnelDepth Get and set Extrusion depth. Floating-point value from 1.0 to 100.0
Using 3D Text 73

Chapter 474

5
CHAPTER 5
. . . . . . . . . . . . . . . . . . . . . . . . . . . . . . . . . . . . . . . . . . . . . . . . . . . . . . . .. . . . . . . . . . . . . . . . . . . . . . . . . . . . . . . . . . . . . . . . . . . . . . . . . . . . .The 3D Cast Member
A Macromedia Director 3D cast member contains a complex internal structure that includes model resources, models, lights, and cameras. Each of these objects has its own array of properties. This chapter gives an overview of the cast member structure. The chapters that follow explain the types of objects in more detail.
Each Director 3D cast member contains an entire 3D world. Each world is a collection of one or more models and other objects. These objects include the following:
• Model resources are elements of 3D geometry used to render models. The same model resource can be used by several models in the 3D world.
• Models are visible objects in the 3D cast member that make use of a model resource geometry. For more information on models, see “Working with Models and Model Resources” on page 87.
• Shaders are methods of displaying the surface of a model. Shaders control how the surface of the model reflects light, and therefore whether the surface looks like metal, plaster, or other materials.
• Textures are simple 2D images that are drawn onto the surface of a 3D model. A model’s surface appearance is the result of the combination of its shader and any textures that have been applied to it.
• Motions are predefined animation sequences that involve the movement of models or model components. Individual motions can be set to play by themselves or in combination with other motions. A running motion could be combined with a jumping motion to simulate a person jumping over a puddle, for example.
• Lights are sources of illumination within the 3D world. Lights can be directional like a spotlight, or they can be diffuse.
75

• Cameras are views into the 3D cast member. Each sprite that uses a given cast member can display the view from a different camera if you choose. For more information on sprites, see “3D Basics” on page 45.
• Groups are clusters of models, lights, and/or cameras that have been associated with one another. This makes moving the associated items much easier: rather than moving each item separately, you can write Lingo that moves the group with a single command.
Each model, light, camera, and group within a 3D cast member is referred to as a node. Nodes can be arranged in parent-child hierarchies. When a parent moves, its children move with it. A car wheel can be a child of a car body, for example. These parent-child relationships are established in your third-party 3D modeling software or with Lingo.
The following illustration shows the relationships between cameras, lights, and models within the 3D cast member, as well as the relation of model to model resource and of model to shader, texture, and motion.
Although the elements of a 3D scene can be modified and manipulated with 3D behaviors, complex work requires Lingo scripting. For more information on behaviors, see “Using 3D Behaviors” on page 59. The following section describes in more detail the commands and properties used to manipulate each of the types of nodes in a 3D cast member. For another view of this material, with examples of the use of individual commands and properties, see “3D Lingo Dictionary” on page 193.
Lights Models Cameras
Shockwave3D Cast Member
ColorHighlightsShadows
MotionGeometrySurface
World ViewVisual Effects
World Group
Chapter 576

Model resourcesModel resources are pieces of 3D geometry that can be used to display 3D models. Model resources are visible only when they are used by a model. Model resources are reusable, and multiple models can share the same model resource.
The following commands and properties can be used to perform basic model resource operations:
Command Function Returns
modelResource.count
Returns the number of model resource objects included in the cast member.
Integer.
modelResource.(name)
Returns the model resource named name.
Returns the model resource object named name if it exists. Returns void if the object does not exist.
modelResource.[index]
Returns the model resource at the designated position in the index. The index number can change if model resources are added or deleted.
Returns the model resource object at that index number if it exists. Returns void if the object does not exist at that index number.
newMesh(name,numFaces, numVertices, numNormalsnumColors,numTextureCoordinates)
Creates a new mesh model resource.numFaces is the user-specified number of triangles.numVertices is the user-specified number of vertices. A vertex can be used by more than one face.numNormals is the user-specified number of normals. Enter 0 or omit this step to use the generateNormals() method.numColors is the user-specified number of colors. You can specify a color for each point of a triangle. numTextureCoordinates is the number of user-specified texture coordinates. Enter 0 or omit this step to get the default coordinates.
Returns a new mesh model resource with a unique name. If the name isn’t unique, returns a Lingo error.
newModelResource(name,type)
Creates a new model resource and adds it to the model resource object list. The type can be #plane, #box, #sphere, #cylinder, #extrusion, or #particle.
Returns a new model resource object with a unique name. If the name isn’t unique, returns a Lingo error.
The 3D Cast Member 77

newModelResource(name,type, facing)
Creates a new model resource with the specified facing and adds it to the model resource object list. The type can be #plane, #box, #sphere, or #cylinder. The facing can be #front, #back, or #both.
Returns a new model resource object with a unique name. If the name isn’t unique, returns a Lingo error.
deleteModelResource(name)
Deletes the model resource named name. Lingo references to this model resource persist but can do nothing.
TRUE (1) if the model resource named name exists. FALSE (0) if the model resource named name doesn’t exist.
deletemodelResource(index)
Deletes the model resource with the given index number. Lingo references to this model resource persist but can do nothing.
TRUE (1) if the model resource with this index number exists. FALSE (0) if the model resource with this index number doesn’t exist.
Command Function Returns
Chapter 578

ModelsThe models in a cast member are the actual visible objects seen in the 3D cast member. Models move according to the motions you assign to them in the 3D modeling software you use. Their movement results from repositioning and reorienting their geometries in 3D space.
The following commands and properties can be used to perform basic model operations:
Command Function Returns
model.count Returns the number of model objects included in the cast member.
Integer.
model(name) Returns the model named name. Returns the model object named name if it exists. Returns void if the object does not exist.
model[index] Returns the model at the designated position in the index. The index number can change if models lower in the list are deleted.
Returns the model object at that index number if it exists. Returns void if the object does not exist at that index number.
newModel(name, modelResource)
Creates a new model named name and adds it to the world. Fails if a model by that name already exists. The modelResource argument is optional and be set at a later time. If supplied, this second argument must be an existing model resource object.
Returns a new model with a unique name. If the name isn’t unique, returns a Lingo error.
deleteModel(name)
Deletes the model named name. Lingo references to this model persist but can do nothing. Children of the model aren’t deleted but are “reparented” to the world group.
TRUE (1) if the model named name exists. FALSE (0) if the model named name doesn’t exist.
deleteModel(index)
Deletes the model with the given index number. Lingo references to this model persist but can do nothing.
TRUE (1) if the model with this index number exists. FALSE (0) if the model with this index number doesn’t exist.
The 3D Cast Member 79

ShadersA shader defines the basic appearance of a model’s surface. You apply textures to shaders. The standard shader is photorealistic; here are some of the other available shaders:
• #painter, which looks like a painted surface
• #engraver, which looks like an engraved surface
• #newsprint, which looks like a newspaper photograph
The following commands and properties can be used to perform basic shader operations:
Command Function Returns
shader.count Returns the number of shader objects included in the cast member.
Integer.
shader(name) Returns the shader named name. Returns the shader object named name if it exists. Returns void if the object does not exist.
shader[index] Returns the shader at the designated position in the index. The index number can change if shaders are added or deleted.
Returns the shader object at that index number if it exists. Returns void if the object does not exist at that index number.
newShader(name,type)
Creates a new shader and adds it to the shader object list. The type can be #standard, #painter, #engraver, or #newsprint.
Returns a new shader object with a unique name. If the name isn’t unique, returns a Lingo error.
deleteShader(name)
Deletes the shader named name. Lingo references to this shader persist but can do nothing.
TRUE (1) if the shader named name exists. FALSE (0) if the shader named name doesn’t exist.
deleteShader(index)
Deletes the shader with the given index number. Lingo references to this shader persist but can do nothing.
TRUE (1) if the shader with this index number exists. FALSE (0) if the shader with this index number doesn’t exist.
Chapter 580

TexturesTextures are 2D images that are drawn on the surface of a 3D model. Textures can be assigned to models in your 3D modeling software, or you can use any bitmap cast member in your movie.
The following commands and properties can be used to perform basic texture operations:
Command Function Returns
texture.count Returns the number of textures in the texture object list of the cast member.
Integer.
texture(name) Returns the texture object named name. Returns the texture object named name if it exists. Returns void if the object does not exist.
texture[index] Returns the texture at the designated position in the index. The index number can change if textures are added or deleted.
Returns the texture object at that index number if it exists. Returns void if the object does not exist at that index number.
newTexture(name, type, source)
Creates a new texture named name.The type can have the following values:#fromCastmember#fromImageObjectIf type is #from Castmember, source is a cast member reference. For example, member(“concrete”) or member[2,3]If type is #from ImageObject, source is a Lingo image object.
Returns a new texture object with a unique name. If the name isn’t unique, returns a Lingo error.
deleteTexture(name)
Deletes the texture named name. Lingo references to this texture persist but can do nothing.
TRUE (1) if the texture named name exists. FALSE (0) if the texture named name doesn’t exist.
deleteTexture(index)
Deletes the texture with the given index number. Lingo references to this texture persist but can do nothing.
TRUE (1) if the texture with this index number exists. FALSE (0) if the texture with this index number doesn’t exist.
The 3D Cast Member 81

MotionsA motion is an animation of a model. Motions can be shared by multiple models. A 3D cast member contains a palette of motions that are available to any model in the world.
The following commands and properties can be used to perform basic motion operations:
Command Function Returns
motion.count Returns the number of motion objects included in the cast member.
Integer.
motion(name) Returns the motion named name. Returns the motion object named name if it exists. Returns void if the object does not exist.
motion[index] Returns the motion at the designated position in the palette of available motions.
Returns the motion object at that index number if it exists. Returns void if the object does not exist at that index number.
newMotion(name)
Creates a new motion object. Returns a new motion object with a unique name. If the name isn’t unique, returns a Lingo error.
deleteMotion(name)
Deletes the motion named name. Lingo references to this motion persist but return void.
TRUE (1) if the motion named name exists. FALSE (0) if the motion named name doesn’t exist.
deleteMotion(index)
Deletes the motion at the given index. Lingo references to this motion persist but return void.
TRUE (1) if the motion with this index number exists. FALSE (0) if the motion with this index number doesn’t exist.
Chapter 582
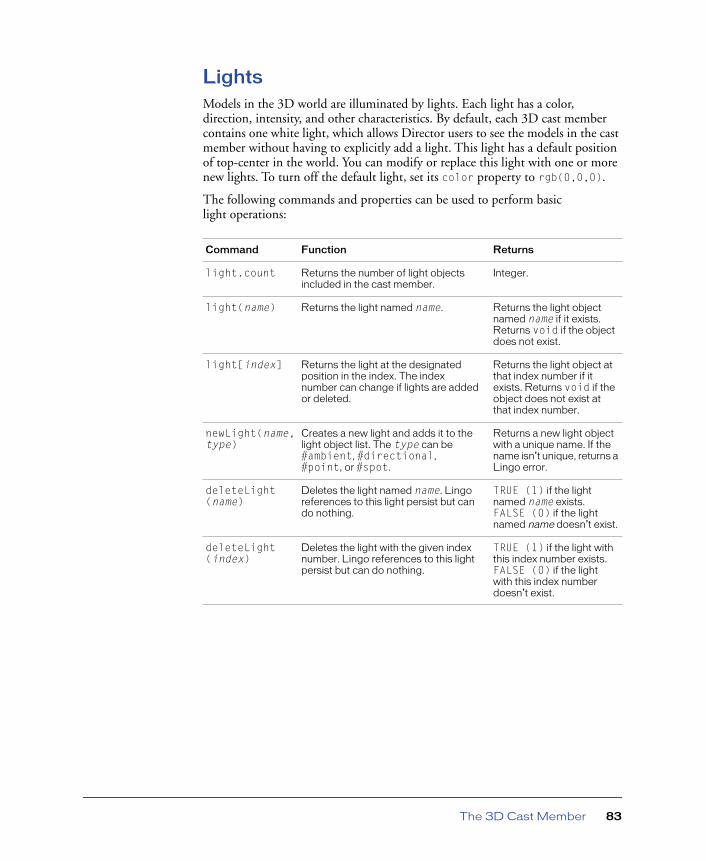
LightsModels in the 3D world are illuminated by lights. Each light has a color, direction, intensity, and other characteristics. By default, each 3D cast member contains one white light, which allows Director users to see the models in the cast member without having to explicitly add a light. This light has a default position of top-center in the world. You can modify or replace this light with one or more new lights. To turn off the default light, set its color property to rgb(0,0,0).
The following commands and properties can be used to perform basic light operations:
Command Function Returns
light.count Returns the number of light objects included in the cast member.
Integer.
light(name) Returns the light named name. Returns the light object named name if it exists. Returns void if the object does not exist.
light[index] Returns the light at the designated position in the index. The index number can change if lights are added or deleted.
Returns the light object at that index number if it exists. Returns void if the object does not exist at that index number.
newLight(name, type)
Creates a new light and adds it to the light object list. The type can be #ambient, #directional, #point, or #spot.
Returns a new light object with a unique name. If the name isn’t unique, returns a Lingo error.
deleteLight(name)
Deletes the light named name. Lingo references to this light persist but can do nothing.
TRUE (1) if the light named name exists. FALSE (0) if the light named name doesn’t exist.
deleteLight(index)
Deletes the light with the given index number. Lingo references to this light persist but can do nothing.
TRUE (1) if the light with this index number exists. FALSE (0) if the light with this index number doesn’t exist.
The 3D Cast Member 83
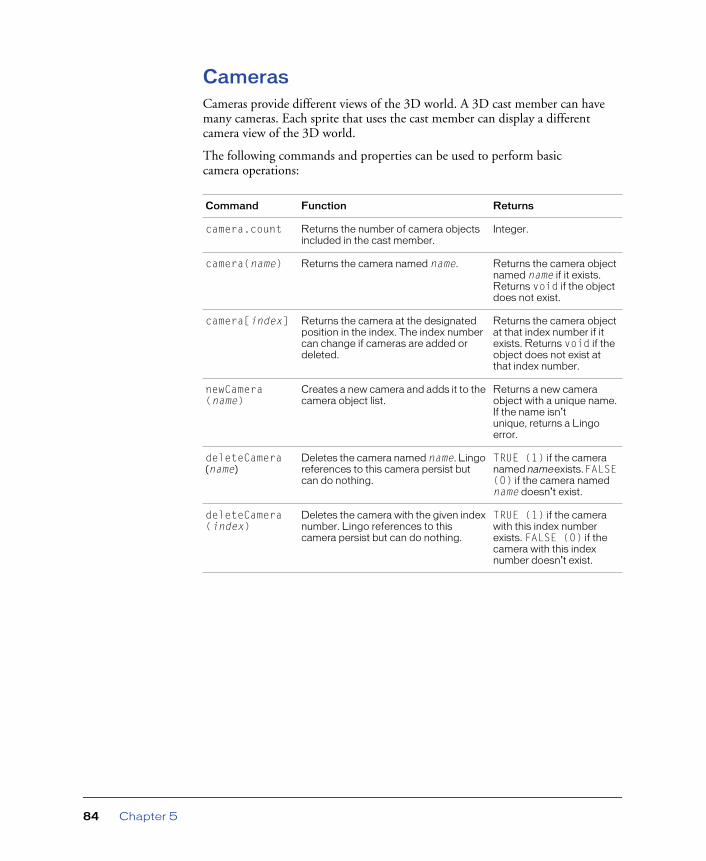
CamerasCameras provide different views of the 3D world. A 3D cast member can have many cameras. Each sprite that uses the cast member can display a different camera view of the 3D world.
The following commands and properties can be used to perform basic camera operations:
Command Function Returns
camera.count Returns the number of camera objects included in the cast member.
Integer.
camera(name) Returns the camera named name. Returns the camera object named name if it exists. Returns void if the object does not exist.
camera[index] Returns the camera at the designated position in the index. The index number can change if cameras are added or deleted.
Returns the camera object at that index number if it exists. Returns void if the object does not exist at that index number.
newCamera(name)
Creates a new camera and adds it to the camera object list.
Returns a new camera object with a unique name. If the name isn’t unique, returns a Lingo error.
deleteCamera(name)
Deletes the camera named name. Lingo references to this camera persist but can do nothing.
TRUE (1) if the camera named name exists. FALSE (0) if the camera named name doesn’t exist.
deleteCamera(index)
Deletes the camera with the given index number. Lingo references to this camera persist but can do nothing.
TRUE (1) if the camera with this index number exists. FALSE (0) if the camera with this index number doesn’t exist.
Chapter 584
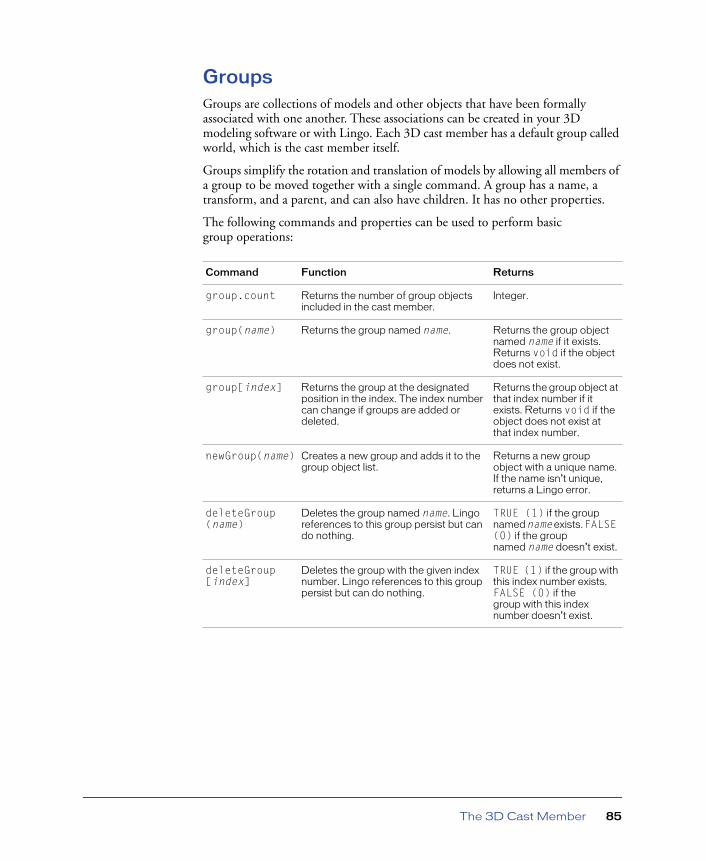
GroupsGroups are collections of models and other objects that have been formally associated with one another. These associations can be created in your 3D modeling software or with Lingo. Each 3D cast member has a default group called world, which is the cast member itself.
Groups simplify the rotation and translation of models by allowing all members of a group to be moved together with a single command. A group has a name, a transform, and a parent, and can also have children. It has no other properties.
The following commands and properties can be used to perform basic group operations:
Command Function Returns
group.count Returns the number of group objects included in the cast member.
Integer.
group(name) Returns the group named name. Returns the group object named name if it exists. Returns void if the object does not exist.
group[index] Returns the group at the designated position in the index. The index number can change if groups are added or deleted.
Returns the group object at that index number if it exists. Returns void if the object does not exist at that index number.
newGroup(name) Creates a new group and adds it to the group object list.
Returns a new group object with a unique name. If the name isn’t unique, returns a Lingo error.
deleteGroup(name)
Deletes the group named name. Lingo references to this group persist but can do nothing.
TRUE (1) if the group named name exists. FALSE (0) if the group named name doesn’t exist.
deleteGroup[index]
Deletes the group with the given index number. Lingo references to this group persist but can do nothing.
TRUE (1) if the group with this index number exists. FALSE (0) if the group with this index number doesn’t exist.
The 3D Cast Member 85
Chapter 586

6
CHAPTER 6Working with Models and
. . . . . . . . . . . . . . . . . . . . . . . . . . . . . . . . . . . . . . . . . . . . . . . . . . . . . . . .. . . . . . . . . . . . . . . . . . . . . . . . . . . . . . . . . . . . . . . . . . . . . . . . . . . . .Model Resources
This chapter covers the Lingo commands and properties used to work with models and model resources. The commands and properties given here in tabular form may also be found in alphabetical form, with accompanying syntax, definitions, and examples, in “3D Lingo Dictionary” on page 193. Because much of a model’s behavior depends on modifiers (which are attached to the model), modifiers are also discussed in this chapter. A model’s surface appearance, controlled by shaders and textures, is also discussed here.
Models are the objects you see in the 3D world. You can create models within Director 8.5 Shockwave Studio. Spheres, boxes, planes, cylinders, and particle systems can be created either with Lingo or with Director 8.5 behaviors. These simple shapes are called primitives. They are the basic shapes from which more complicated models are built. (Particle systems are different from the other primitives: instead of being shapes, they create cascades of moving particles.)
For the most part, however, you should create complex models outside of Director 8.5, using a 3D modeling application, and then imported into Director in the W3D format.
Accessing properties and commands of a model or any other node type requires that the node be on the Stage or explicitly loaded with the preLoad() or loadFile() command.
The following sections describe models, model resources, and primitives in more detail, along with the Lingo used to work with them.
87

Model resourcesModel resources are 3D geometries defined in 3D modeling software or created in Director 8.5 Shockwave Studio with Lingo. A model is an object that makes use of a model resource’s geometry and occupies a particular position and orientation within the 3D world. Model resources are viewable only when in use by a model. Several models may use the same model resource.
Common model resource properties
The following properties are shared by all model resources:
File-defined model resource properties
Model resources defined by a W3D file imported into Director 8.5 or loaded via Lingo have a type value of #fromfile. File-defined resources are automatically assigned level of detail (LOD) modifier settings that allow models using those geometries to adjust their level of detail as needed, depending on the model’s distance from the camera. See “Level of detail (LOD) modifier properties” on page 122 for more information.
PropertyName
Access Description Range orDefault
name Get Unique string naming model resource. If imported, the name of the model.If created in Lingo, the assigned name in the constructor function.
type Get Type of geometry. #plane#box#sphere#mesh#cylinder#particle#fromfile
bone.count Get Total number of bones in bones hierarchy.
Nonnegative integer.
modelResource.getBoneId("name")
Get Returns a unique ID for the bone named name in this model’s bone hierarchy. Returns FALSE (0) if no bone by that name can be found.
None.
Chapter 688

PrimitivesEach type of primitive has its own set of Lingo commands and properties used to define its appearance.
Use the newModelResource() command to create new primitives at run time.
Sphere properties
Spheres created at run time aren’t saved with the cast member’s media when the Director movie is saved. Their type is #sphere. Their surface is generated by sweeping a two-dimensional semicircle arc in the XY plane from startAngle to endAngle in the Y axis. If startAngle = 0.0 and endAngle= 360.0, a full sphere is generated. If startAngle = 180.0 and endAngle = 360.0, a half sphere is generated. These properties can be modified or animated at run time.
Property Access Description Value Range
radius Get and set Radius of the sphere. Positive floating-point value. The default is 25.0.
resolution Get and set Controls the number of polygons used in the creation of the sphere surface. The higher the value, the smoother the surface.
An integer value of 1 or greater. The default is 20.
startAngle Get and set Starting angle of the sweep. Floating-point value of from 0.0 to 360.0. The default is 0.0.
endAngle Get and set Ending angle of the sweep. Floating-point value of from 0.0 to 360.0. The default is 360.0.
Working with Models and Model Resources 89

Cylinder properties
Cylinders have a type property of #cylinder. Director generates a cylinder’s surface by sweeping a 2D line around the Z axis in the XY plane from startAngle to endAngle. If startAngle = 0.0 and endAngle = 360.0, a full cylinder is generated. If startAngle = 180.0 and endAngle = 360.0, a half cylinder is generated. These properties can be modified or animated at run time.
Property Access Description Value Range
topRadius Get and set Radius of the top of the cylinder. Setting this value to 0 produces a cone.
Positive floating-point value. The default is 25.0.
bottomRadius Get and set Radius of the bottom of the cylinder. Positive floating-point value. The default is 25.0.
numSegments Get and set Number of polygonal segments from bottom to top.
An integer value greater than 0.
resolution Get and set Number of polygonal segments around the circumference of the circle. Controls the smoothness of the cylinder’s appearance.
An integer value greater than 1.
height Get and set Height of the cylinder along the Z axis. Positive floating-point value. The default is 50.0.
topCap Get and set Value indicating whether the top of the cylinder is closed or open. TRUE = closed.
TRUE or FALSE. The default is TRUE.
bottomCap Get and set Value indicating whether the bottom of the cylinder is closed or open. TRUE = closed.
TRUE or FALSE. The default is TRUE.
Chapter 690

Box properties
Boxes have a type property of #box. Box properties can be modified or animated at run time.
Property Access Description Value Range
height Get and set Height of the box, measured along the Y axis.
Positive floating-point value. The default is 50.0.
width Get and set Width of the box, measured along the X axis.
Positive floating-point value. The default is 50.0.
length Get and set Length of the box, measured along the Z axis.
Positive floating-point value. The default is 50.0.
top Get and set Value indicating whether the top of the box is closed or open. TRUE (1) = closed.
TRUE (1) or FALSE (0). The default is TRUE (1).
bottom Get and set Value indicating whether the bottom of the box is closed or open. TRUE (1) = closed.
TRUE (1) or FALSE (0). The default is TRUE (1).
front Get and set Value indicating whether the front of the box is closed or open. TRUE (1) = closed.
TRUE (1) or FALSE (0). The default is TRUE (1).
back Get and set Value indicating whether the back of the cylinder is closed or open. TRUE (1) = closed.
TRUE (1) or FALSE (0). The default is TRUE (1).
left Get and set Value indicating whether the left end of the box is closed or open. TRUE (1) = closed.
TRUE (1) or FALSE (0). The default is TRUE (1).
right Get and set Value indicating whether the right end of the box is closed or open. TRUE (1) = closed.
TRUE (1) or FALSE (0). The default is TRUE (1).
lengthVertices
Get and set Number of vertices along the length of the box. Increasing the number of vertices improves lighting effects.
2 or more. The default is 4.
widthVertices
Get and set Number of vertices along the width of the box. Increasing the number of vertices improves lighting effects.
2 or more. The default is 4.
heightVertices
Get and set Number of vertices along the height of the box. Increasing the number of vertices improves lighting effects.
2 or more. The default is 4.
Working with Models and Model Resources 91

Plane properties
Planes are the default Director 8.5 primitive. Planes, whose type property is #plane, are generated in the XZ plane with Lingo. Plane properties can be modified or animated at run time.
Mesh generator properties
The mesh generator is the most complex model resource. It allows experienced 3D programmers to create complicated geometries at run time.
The mesh generator primitive’s type property is #mesh and is created by the member’s newMesh() command. The parameters included with that command describe how large the mesh will be.
You can use the mesh deform modifier to manipulate vertex positions at run time for #mesh or any other type of model resource. You can also use the #mesh primitive to change mesh properties directly, but this is usually not practical, because the mesh must be rebuilt mathematically after each modification.
Property Access Description Value Range
width Get and set Width of the plane Positive floating-point value. The default is 1.0.
length Get and set Length of the plane Positive floating-point value. The default is 1.0.
lengthVertices
Get and set Number of vertices along the length of the plane
2 or more. The default is 2.
widthVertices
Get and set Number of vertices along the width of the plane
2 or more. The default is 2.
Chapter 692

Use these properties to work with mesh primitives:
Property Access Description Value Range
vertexList Get and set Lingo vector values for each vertex in the mesh. Several faces may share a single vertex.
Set the value to the number of vectors specified in your newMesh call.
normalList Get and set Lingo vector values for each normal in the mesh. Several faces may share a single normal. A normalized vector is one in which all components are of unit length.You can use the generateNormals() command instead of specifying normals yourself. In that case, set 0 as the number of normals in your newMesh() call. The normals are calculated based on a clockwise vertex winding. That is to say, if you imagine the vertices being wound down a spindle, they would be wound from left to right, in a clockwise manner.
No default. Instead, set the value to the number of vectors specified in your newMesh call.
textureCoordinateList
texcoordlist
Get and set A list of sublists identifying locations in an image used for texture-mapping a triangle. Each sublist contains two values between 0.0 and 1.0 that define a location and can be arbitrarily scaled to any texture size.
No default. Instead, set the value to the number of two-element sublists specified in your newMesh call.
colorList Get and set List identifying every color in the mesh. Any color can be shared by several faces.Alternatively, specify texture coordinates for the mesh faces and apply a shader to models using this model resource.
No default. Instead, set the value to the number of colors specified in your newMesh call.
Working with Models and Model Resources 93

face.count Get Number of triangles in the mesh.
The number of faces specified in your newMesh call.
face[index].vertices
Get and set List indicating which vertices to use for faces at designated index points.
Set the value to a list of three integers specifying the indexes of the vertices in the vertexList that define this face.
face[index].normals
Get and set List indicating which normals to use for faces at designated index points.
Set the value to a list of three integers specifying the indexes of the normals in the normalList that each point of the triangle should use. Don’t set a value if you aren’t defining your own normals.
face[index].textureCoordinates
face[index].texcoords
Get and set List indicating which texture coordinates to use for faces at designated index points.
Set the value to a list of three integers specifying the indexes of the texture coordinates in the textureCoordinates List that each point of the triangle should use.Don’t set a value if you aren’t defining your own texture coordinates.
face[index].colors
Get and set List indicating which colors to use for faces at designated index points.
Set the value to a list of three integers specifying the indexes of the colors in the colorList that each point of the triangle should use.Don’t set a value if you aren’t defining your own colors.
face[index].shader
Get and set Shader used for rendering the face.
Shader defined for use with this face.
Property Access Description Value Range
Chapter 694

Mesh generator commands
Use these commands to work with mesh primitives:
Particle system properties
Particle systems are unique among model resources in that they include animation by default. Particle systems, whose type is #particle, can have an almost infinite variety of appearances, simulating fire, smoke, running water, and other streaming or bursting effects.
Use these properties to work with particle systems:
Command Description Returns
build() Builds the mesh according to the current property values. (The mesh construction properties specified in the previous table have no effect until build() is called.) Generates a Lingo error if any properties specify an invalid list.
Nothing
generateNormals(style)
Generates a new normal for every vertex in every triangle. The style parameter can be #flat, so that each triangle is clearly delineated, or #smooth. The command assumes that all triangles were specified in a clockwise order.
Nothing
Property Access Description Value Range
lifetime Get and set Lifetime of all particles emitted, in milliseconds.
Positive integer. The default is 10.000 ms.
colorRange.end
Get and set Color value of a particle at the end of its life.
Any color value. The default is rgb(255, 255, 255).
colorRange.start
Get and set Color value of a particle at the start of its life.
Any color value. The default is rgb(255, 255, 255).
tweenMode Get and set The variation of a particle’s color throughout its life. The change can be based on either velocity or age.
#velocity:Alter particle color between colorRange.start and colorRange.end based on velocity.#age:Alter particle color between colorRange.start and colorRange.end based on the particle’s lifetime.
Working with Models and Model Resources 95

sizeRange.start
Get and set The size of a particle at the start of its life.
Positive integer. The default is 1.
sizeRange.end
Get and set Size of a particle at the end of its life. The size is linearly interpolated between startSize and endSize.
Positive integer. The default is 1.
blendRange.start
Get and set Opacity of a particle at the start of its life.
Any value between 0.0 and 100.0.
blendRange.end
Get and set Opacity of a particle at the end of its life.
Any value between 0.0 and 100.0.
texture Get and set Texture to use when drawing each particle. The default is void.
Texture object.
emitter.numParticles
Get and set Number of particles in a burst or stream.
Positive integer. The default is 1000.
emitter.mode Get and set Mode in which particles are emitted.
#burst: All particles emitted at once.
#stream:X particles emitted per frame with X equallingemitter.numParticles/(lifetime*milliseconds PerFrame).
Note:milliseconds PerFrame is the time elapsed between rendered frames.
emitter.loop Get and set TRUE (1) or FALSE (0) value indicating whether particles die (FALSE) or are recycled (TRUE).
0 or 1.
emitter.direction
Get and set Vector of original emission. At 1,0,0, the default, particles are emitted randomly over a sphere.
Any vector.
emitter.region
Get and set Point, line, or region from which particles are emitted.
Possible values:single vector for point sourcetwo vectors for line segmentfour vectors for quadrilateral
Property Access Description Value Range
Chapter 696
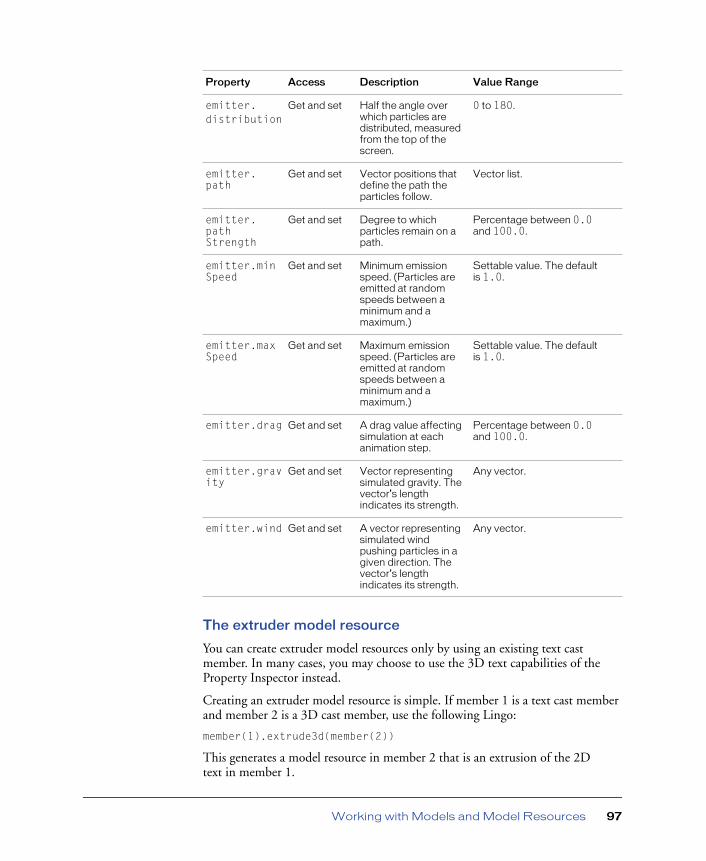
The extruder model resource
You can create extruder model resources only by using an existing text cast member. In many cases, you may choose to use the 3D text capabilities of the Property Inspector instead.
Creating an extruder model resource is simple. If member 1 is a text cast member and member 2 is a 3D cast member, use the following Lingo:
member(1).extrude3d(member(2))
This generates a model resource in member 2 that is an extrusion of the 2D text in member 1.
emitter.distribution
Get and set Half the angle over which particles are distributed, measured from the top of the screen.
0 to 180.
emitter.path
Get and set Vector positions that define the path the particles follow.
Vector list.
emitter.pathStrength
Get and set Degree to which particles remain on a path.
Percentage between 0.0 and 100.0.
emitter.minSpeed
Get and set Minimum emission speed. (Particles are emitted at random speeds between a minimum and a maximum.)
Settable value. The default is 1.0.
emitter.maxSpeed
Get and set Maximum emission speed. (Particles are emitted at random speeds between a minimum and a maximum.)
Settable value. The default is 1.0.
emitter.drag Get and set A drag value affecting simulation at each animation step.
Percentage between 0.0 and 100.0.
emitter.gravity
Get and set Vector representing simulated gravity. The vector’s length indicates its strength.
Any vector.
emitter.wind Get and set A vector representing simulated wind pushing particles in a given direction. The vector’s length indicates its strength.
Any vector.
Property Access Description Value Range
Working with Models and Model Resources 97
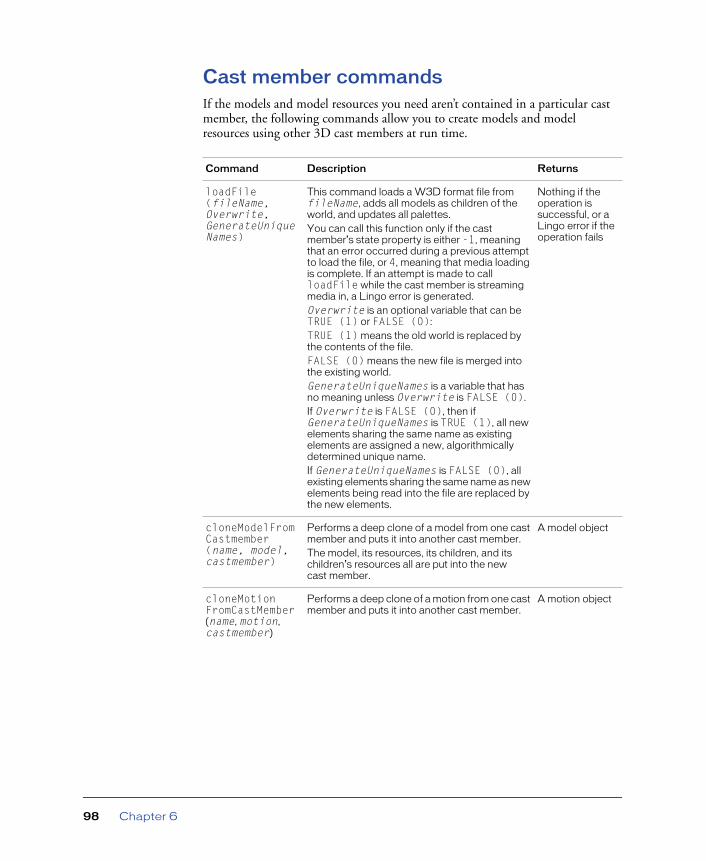
Cast member commandsIf the models and model resources you need aren’t contained in a particular cast member, the following commands allow you to create models and model resources using other 3D cast members at run time.
Command Description Returns
loadFile(fileName,Overwrite, GenerateUniqueNames)
This command loads a W3D format file from fileName, adds all models as children of the world, and updates all palettes.You can call this function only if the cast member’s state property is either -1, meaning that an error occurred during a previous attempt to load the file, or 4, meaning that media loading is complete. If an attempt is made to call loadFile while the cast member is streaming media in, a Lingo error is generated.Overwrite is an optional variable that can be TRUE (1) or FALSE (0):TRUE (1) means the old world is replaced by the contents of the file.FALSE (0) means the new file is merged into the existing world.GenerateUniqueNames is a variable that has no meaning unless Overwrite is FALSE (0).If Overwrite is FALSE (0), then ifGenerateUniqueNames is TRUE (1), all new elements sharing the same name as existing elements are assigned a new, algorithmically determined unique name.If GenerateUniqueNames is FALSE (0), all existing elements sharing the same name as new elements being read into the file are replaced by the new elements.
Nothing if the operation is successful, or a Lingo error if the operation fails
cloneModelFromCastmember(name, model,castmember)
Performs a deep clone of a model from one cast member and puts it into another cast member.The model, its resources, its children, and its children’s resources all are put into the new cast member.
A model object
cloneMotionFromCastMember(name, motion, castmember)
Performs a deep clone of a motion from one cast member and puts it into another cast member.
A motion object
Chapter 698
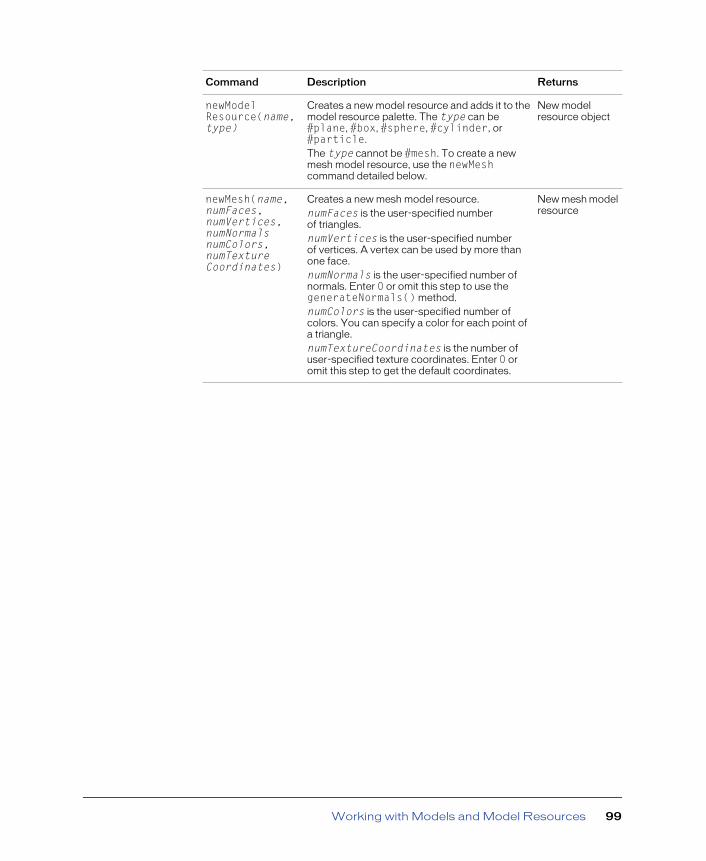
newModelResource(name,type)
Creates a new model resource and adds it to the model resource palette. The type can be #plane, #box, #sphere, #cylinder, or #particle. The type cannot be #mesh. To create a new mesh model resource, use the newMesh command detailed below.
New model resource object
newMesh(name,numFaces, numVertices, numNormalsnumColors,numTextureCoordinates)
Creates a new mesh model resource.numFaces is the user-specified number of triangles.numVertices is the user-specified number of vertices. A vertex can be used by more than one face.numNormals is the user-specified number of normals. Enter 0 or omit this step to use the generateNormals() method.numColors is the user-specified number of colors. You can specify a color for each point of a triangle.numTextureCoordinates is the number of user-specified texture coordinates. Enter 0 or omit this step to get the default coordinates.
New mesh model resource
Command Description Returns
Working with Models and Model Resources 99
ModelsModels can be referred to by name or number. Models can be added to or removed from the world at any time.
In the member’s parent-child hierarchy, each model must have one parent, but it can have an unlimited number of children. A child’s position and orientation depend on its parent’s position and orientation, and it changes when the position and orientation of the parent changes. Models that don’t have another model and a parent have the group named world as their parent. In this case, their transform property describes their position and rotation in the 3D world, and is identical to their getWorldTransform() property. All models that have models as parents have a relationship both to their immediate parent and to the world parent. You can add or remove models from the 3D world at any time by using the addToWorld() or removeFromWorld() commands.
For example, if the first child of the model named car1 is a wheel model, the following transform Lingo would refer to the position of the wheel relative to the model named car1:
car1.child(1).transform.position
To refer to the position of the wheel model relative to the world itself, use getWorldTransform():
car1.child(1).getWorldTransform().position
Node types
A model is one of four types of objects that share the same transform, parent, and child properties. The others are cameras, lights, and groups. Models, cameras, lights, and groups are generically referred to as node types or nodes. Nodes can be each other’s parents or children, so long as any one node has exactly one parent. A node can have any number of children. A model, for example, can be the child of a light and the parent of a group.
Chapter 6100

Model properties
The properties of a model determine its particular appearance and relationship to the rest of the 3D world.
Property Access Description Value
name Get Unique string name. Any string.
parent Get and set This model’s parent; either another object or the 3D cast member itself.
An object or cast member.
child.count Get Number of children (but not grandchildren) of a given model.
An integer.
transform Get and set Lingo transform object representing this model’s position and orientation relative to its parent’s position and orientation:transform.position gives the relative position.transform.rotation gives the relative rotation.
Set: a transform object.Get: reference to a transform object.
userData Get and set A property list containing all properties assigned to the model. Users can add, remove, get, and set properties on this list.
The default list includes the properties assigned in the 3D modeling tool. Additional properties may also be added.
resource Get and set Model resource object defining model’s geometry.
Model resource object.
shaderList Get and set List of all shaders used by the model. Setting this property to a single shader sets every element of the shaderList to that shader.
List.
shaderList.count
Get Number of shaders the model uses. Positive integer.
shaderList.[index]
Get and set Provides access to a particular shader used in a specific region of the model.
List.
shader Get and set Provides access to the first shader in the shader list.
Shader object.
boundingSphere
Get A list containing a vector and a floating-point value. The vector represents the world position and the value represents the radius of a bounding sphere surrounding the model and all its children.
[vector (0,0,0), 0.0]
Working with Models and Model Resources 101
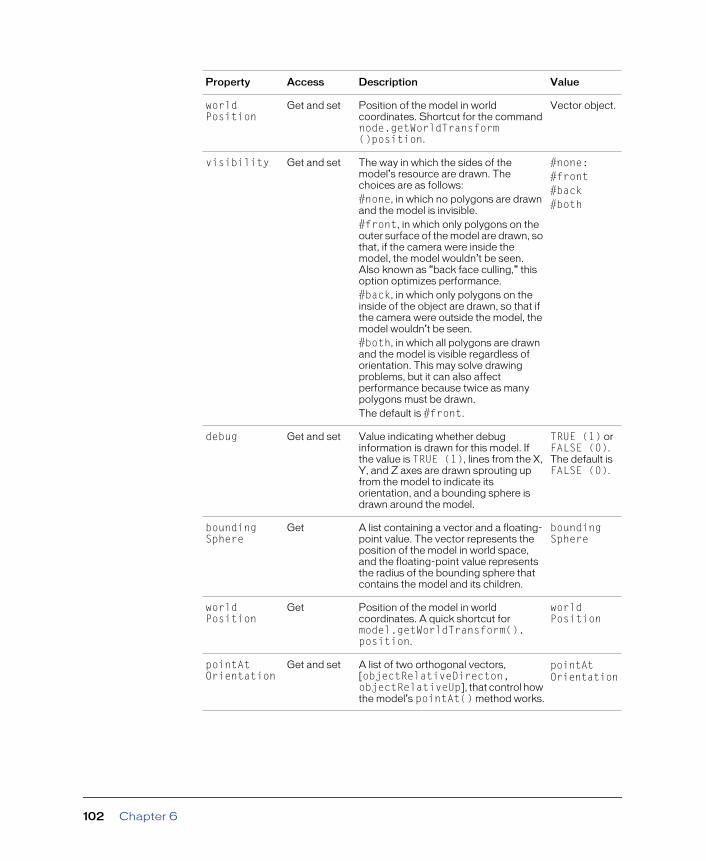
worldPosition
Get and set Position of the model in world coordinates. Shortcut for the command node.getWorldTransform()position.
Vector object.
visibility Get and set The way in which the sides of the model’s resource are drawn. The choices are as follows: #none, in which no polygons are drawn and the model is invisible.#front, in which only polygons on the outer surface of the model are drawn, so that, if the camera were inside the model, the model wouldn’t be seen. Also known as “back face culling,” this option optimizes performance.#back, in which only polygons on the inside of the object are drawn, so that if the camera were outside the model, the model wouldn’t be seen.#both, in which all polygons are drawn and the model is visible regardless of orientation. This may solve drawing problems, but it can also affect performance because twice as many polygons must be drawn.The default is #front.
#none: #front#back#both
debug Get and set Value indicating whether debug information is drawn for this model. If the value is TRUE (1), lines from the X, Y, and Z axes are drawn sprouting up from the model to indicate its orientation, and a bounding sphere is drawn around the model.
TRUE (1) or FALSE (0). The default is FALSE (0).
boundingSphere
Get A list containing a vector and a floating-point value. The vector represents the position of the model in world space, and the floating-point value represents the radius of the bounding sphere that contains the model and its children.
boundingSphere
worldPosition
Get Position of the model in world coordinates. A quick shortcut for model.getWorldTransform().position.
worldPosition
pointAtOrientation
Get and set A list of two orthogonal vectors, [objectRelativeDirecton, objectRelativeUp], that control how the model’s pointAt() method works.
pointAtOrientation
Property Access Description Value
Chapter 6102
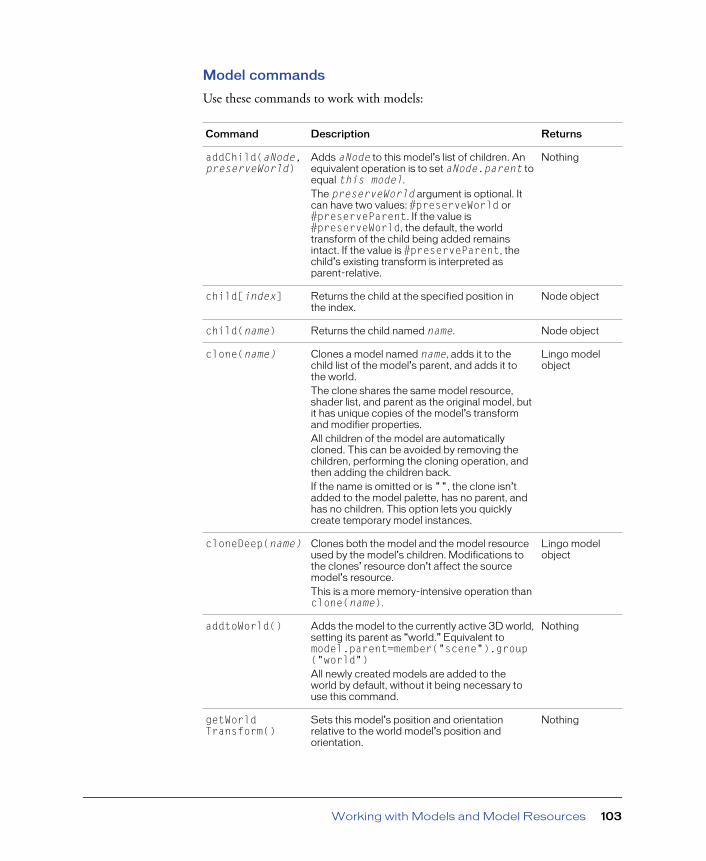
Model commands
Use these commands to work with models:
Command Description Returns
addChild(aNode, preserveWorld)
Adds aNode to this model’s list of children. An equivalent operation is to set aNode.parent to equal this model.The preserveWorld argument is optional. It can have two values: #preserveWorld or #preserveParent. If the value is #preserveWorld, the default, the world transform of the child being added remains intact. If the value is #preserveParent, the child’s existing transform is interpreted as parent-relative.
Nothing
child[index] Returns the child at the specified position in the index.
Node object
child(name) Returns the child named name. Node object
clone(name) Clones a model named name, adds it to the child list of the model’s parent, and adds it to the world.The clone shares the same model resource, shader list, and parent as the original model, but it has unique copies of the model’s transform and modifier properties.All children of the model are automatically cloned. This can be avoided by removing the children, performing the cloning operation, and then adding the children back.If the name is omitted or is "", the clone isn’t added to the model palette, has no parent, and has no children. This option lets you quickly create temporary model instances.
Lingo model object
cloneDeep(name) Clones both the model and the model resource used by the model’s children. Modifications to the clones’ resource don’t affect the source model’s resource.This is a more memory-intensive operation than clone(name).
Lingo model object
addtoWorld() Adds the model to the currently active 3D world, setting its parent as “world.” Equivalent to model.parent=member("scene").group("world")All newly created models are added to the world by default, without it being necessary to use this command.
Nothing
getWorldTransform()
Sets this model’s position and orientation relative to the world model’s position and orientation.
Nothing
Working with Models and Model Resources 103
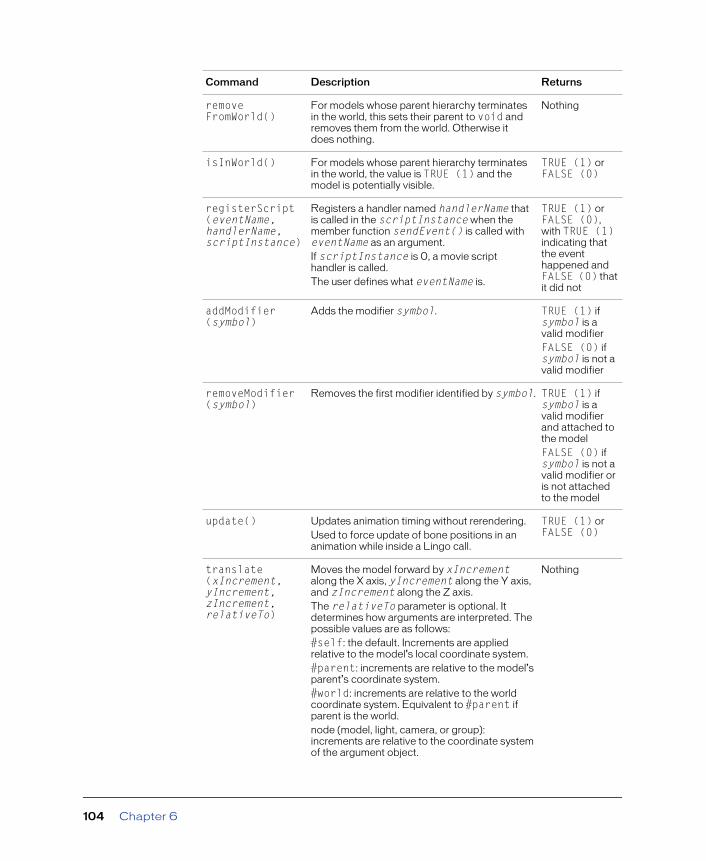
removeFromWorld()
For models whose parent hierarchy terminates in the world, this sets their parent to void and removes them from the world. Otherwise it does nothing.
Nothing
isInWorld() For models whose parent hierarchy terminates in the world, the value is TRUE (1) and the model is potentially visible.
TRUE (1) or FALSE (0)
registerScript(eventName, handlerName, scriptInstance)
Registers a handler named handlerName that is called in the scriptInstance when the member function sendEvent() is called with eventName as an argument.If scriptInstance is 0, a movie script handler is called. The user defines what eventName is.
TRUE (1) or FALSE (0), with TRUE (1) indicating that the event happened and FALSE (0) that it did not
addModifier(symbol)
Adds the modifier symbol. TRUE (1) if symbol is a valid modifierFALSE (0) if symbol is not a valid modifier
removeModifier(symbol)
Removes the first modifier identified by symbol. TRUE (1) if symbol is a valid modifier and attached to the modelFALSE (0) if symbol is not a valid modifier or is not attached to the model
update() Updates animation timing without rerendering. Used to force update of bone positions in an animation while inside a Lingo call.
TRUE (1) or FALSE (0)
translate(xIncrement,yIncrement,zIncrement,relativeTo)
Moves the model forward by xIncrement along the X axis, yIncrement along the Y axis, and zIncrement along the Z axis. The relativeTo parameter is optional. It determines how arguments are interpreted. The possible values are as follows:#self: the default. Increments are applied relative to the model’s local coordinate system.#parent: increments are relative to the model’s parent’s coordinate system.#world: increments are relative to the world coordinate system. Equivalent to #parent if parent is the world.node (model, light, camera, or group): increments are relative to the coordinate system of the argument object.
Nothing
Command Description Returns
Chapter 6104

translate(directionVector, relativeTo)
Moves the model directionVector.length() in the direction of the vector directionVector. The relativeTo argument is optional and defaults to #self.
Nothing
translate(x,y,z,relativeTo)
Moves the model distance x along the X axis, distance y along the Y axis, and distance z along the Z axis. The relativeTo argument is optional and defaults to #self. This command can also be written astranslate(vector(x,y,z) relativeTo).
Nothing
rotate(x,y,z, relativeTo)
Rotates the model by x˚ around the X axis, y˚ around the Y axis, and z˚ around the Z axis.The relativeTo argument is optional and defaults to #self. If included, it defines the coordinate space of the axes.This command can also be written asrotate(vector(x,y,z) relativeTo).
Nothing
rotate (position, axis, angle, relativeTo)
Rotates the model around the axis vector in the specified position the specified number of degrees. The relativeTo argument is optional and defaults to #self.
Nothing
scale(uniform Scale)
Scales the model the same amount in all directions.
Nothing
scale(x, y, z) Scales the model by a factor of x in the X dimension, y in the Y dimension, and z in the Z dimension. Scaling is applied in object-relative space.
Nothing
pointAt(worldPosition, worldUp)
Rotates the model until it points at the world-relative position worldPosition. The optional worldUp argument gives the general position of the model’s Up axis. The exact position can’t be determined using this method.Both the object-relative axes are defined by the pointAtOrientation property. Default values are an object-relative forward direction of vector (0, 0, -1) and an object-relative up direction of vector (0, 1, 0).
Nothing
getWorldTransform()
Calculates and returns a transform that converts object-relative positions for this model into world-relative positions.
A transform object
Command Description Returns
Working with Models and Model Resources 105

Moving models
Because the 3D world has no absolute frame of reference, moving and rotating is much more complex than in 2D, where all movement is in relation to screen position.
In 3D, everything is drawn relative to the camera’s frame of reference. If the camera is behind an object, when the object moves to the left relative to the center of the world, or world origin, it appears to move toward the right of the screen.
Each piece of position and orientation information can be expressed relative to one or more frames of reference. A model’s transform property, for instance, expresses its position and rotation relative to the model’s parent. In general, there are four frames of reference to consider: relative to the object (model, light, camera) itself, relative to the object’s parent, relative to the world, and relative to some other object.
• Object-relative: When you create a model in a 3D modeling program, you build it relative to its own frame of reference. For instance, when you create a model of a car, the front of the car may be pointed along its Z axis and the antenna may be pointed along its Y axis. To move such a car forward (along its Z axis) regardless of which direction it is pointing relative to the camera or the world, use car.translate(0,0,10). To turn the car left, use car.rotate(0,45,0).
The car model might have wheel models as children. To rotate the wheel of a car relative to itself, rather than relative to its parent (the car), use the following Lingo:
wheel.rotate(0,10,0)
or
car.child[1].rotate(0,10,0, #self)
where the fourth parameter of the rotate command is the object the rotation should be relative to.
• Parent-relative: A model’s transform property expresses its position and rotation relative to the model’s parent. If you want the wheels of the car to move outward regardless of how the wheels are turned, use car.child[1].translate(10,0,0,#parent) or car.child[1].transform.translate(10,0,0). If you want a planet model that is a child of the sun to orbit around the sun, use planet.rotate(0,5,0, #parent).
• World-relative: If you want the car to move along the world’s X axis regardless of which way it is facing, use model.translate(10,0,0,#world). If you want to rotate the car 20˚ around the world Y axis, with the rotation taking place at the world location vector (10, 10, 10), use model.rotate(vector(10,10,10), vector(0,1,0), 20, #world).
Chapter 6106
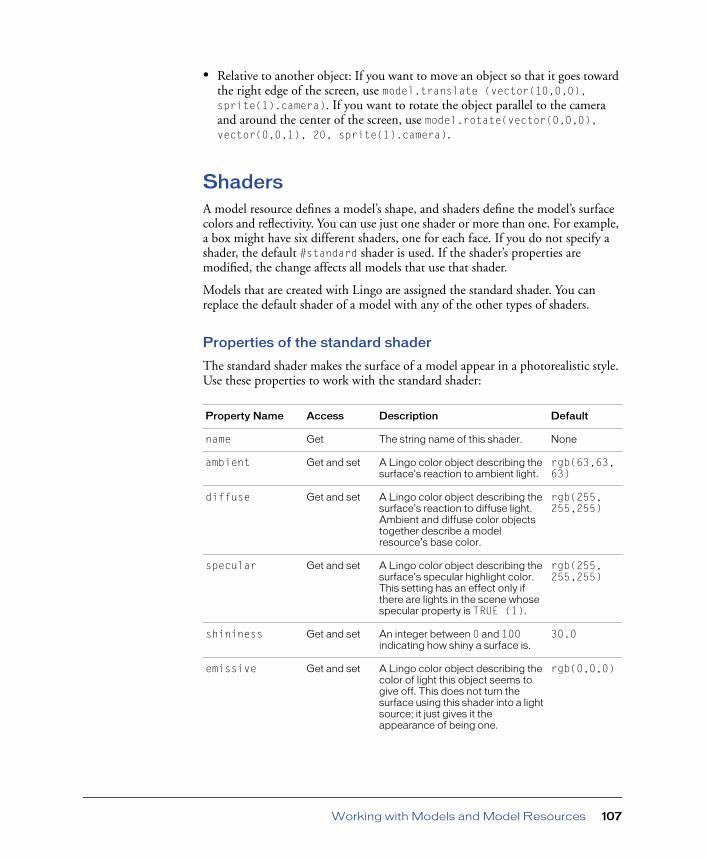
• Relative to another object: If you want to move an object so that it goes toward the right edge of the screen, use model.translate (vector(10,0,0), sprite(1).camera). If you want to rotate the object parallel to the camera and around the center of the screen, use model.rotate(vector(0,0,0), vector(0,0,1), 20, sprite(1).camera).
ShadersA model resource defines a model’s shape, and shaders define the model’s surface colors and reflectivity. You can use just one shader or more than one. For example, a box might have six different shaders, one for each face. If you do not specify a shader, the default #standard shader is used. If the shader’s properties are modified, the change affects all models that use that shader.
Models that are created with Lingo are assigned the standard shader. You can replace the default shader of a model with any of the other types of shaders.
Properties of the standard shader
The standard shader makes the surface of a model appear in a photorealistic style. Use these properties to work with the standard shader:
Property Name Access Description Default
name Get The string name of this shader. None
ambient Get and set A Lingo color object describing the surface's reaction to ambient light.
rgb(63,63,63)
diffuse Get and set A Lingo color object describing the surface's reaction to diffuse light. Ambient and diffuse color objects together describe a model resource’s base color.
rgb(255,255,255)
specular Get and set A Lingo color object describing the surface's specular highlight color. This setting has an effect only if there are lights in the scene whose specular property is TRUE (1).
rgb(255,255,255)
shininess Get and set An integer between 0 and 100 indicating how shiny a surface is.
30.0
emissive Get and set A Lingo color object describing the color of light this object seems to give off. This does not turn the surface using this shader into a light source; it just gives it the appearance of being one.
rgb(0,0,0)
Working with Models and Model Resources 107
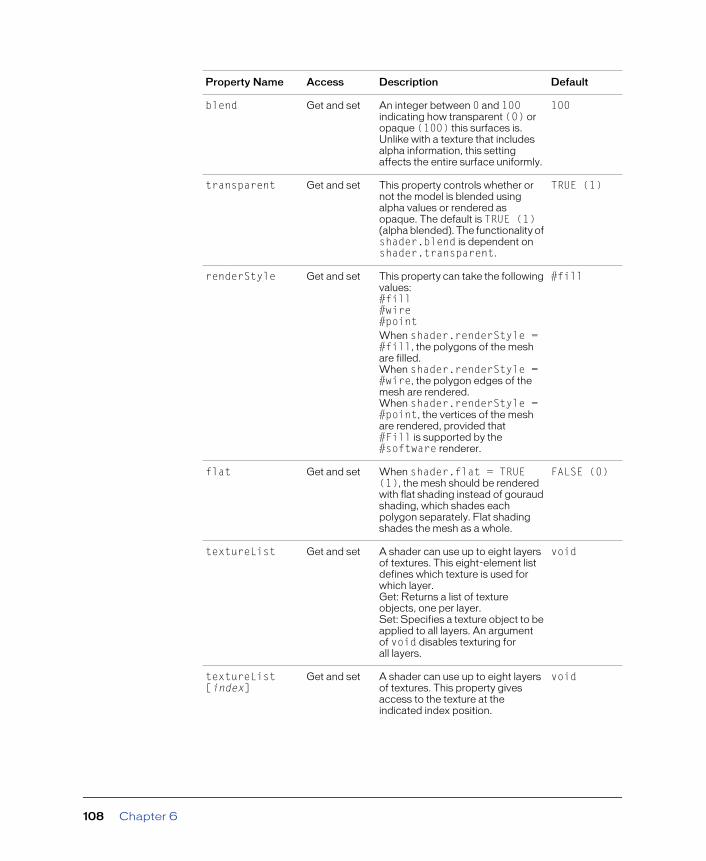
blend Get and set An integer between 0 and 100 indicating how transparent (0) or opaque (100) this surfaces is. Unlike with a texture that includes alpha information, this setting affects the entire surface uniformly.
100
transparent Get and set This property controls whether or not the model is blended using alpha values or rendered as opaque. The default is TRUE (1) (alpha blended). The functionality of shader.blend is dependent on shader.transparent.
TRUE (1)
renderStyle Get and set This property can take the following values:#fill#wire#point When shader.renderStyle = #fill, the polygons of the mesh are filled. When shader.renderStyle = #wire, the polygon edges of the mesh are rendered. When shader.renderStyle = #point, the vertices of the mesh are rendered, provided that #Fill is supported by the #software renderer.
#fill
flat Get and set When shader.flat = TRUE (1), the mesh should be rendered with flat shading instead of gouraud shading, which shades each polygon separately. Flat shading shades the mesh as a whole.
FALSE (0)
textureList Get and set A shader can use up to eight layers of textures. This eight-element list defines which texture is used for which layer. Get: Returns a list of texture objects, one per layer. Set: Specifies a texture object to be applied to all layers. An argument of void disables texturing for all layers.
void
textureList[index]
Get and set A shader can use up to eight layers of textures. This property gives access to the texture at the indicated index position.
void
Property Name Access Description Default
Chapter 6108

texture Get and set This property allows access to the texture for the first layer. It is equivalent to textureList[1].
An argument of void can be used to disable texturing for the first layer.
void
reflectionMap Get and set Get: Returns the texture associated with the third layer. Set: Specifies a texture to be used in the third layer and applies the following values: textureModeList[3] = #reflection blendFunctionList[3] = #blend blendSourceList[3] = #constant blendConstantList[3] = 50.0
void
diffuseLightMap Get and set Get: Returns the texture associated with the second layer. Set: Specifies a texture to be used in the second layer and applies the following values: textureModeList[2] = #diffuse blendFunctionList[2] = #multiply blendFunctionList[1] = #replace
void
specularLightMap
Get and set Get: Returns the texture associated with the fifth layer. Set: Specifies a texture to be used in the fifth layer and applies the following values: textureModeList[5] = #specular blendFunctionList[5] = #add blendFunctionList[1] = #replace
void
glossMap Get and set Get: Returns the texture associated with the fourth layer. Set: Specifies a texture to be used in the fourth layer and applies the following values: textureModeList[4] = #none blendFunctionList[4] = #multiply
void
Property Name Access Description Default
Working with Models and Model Resources 109
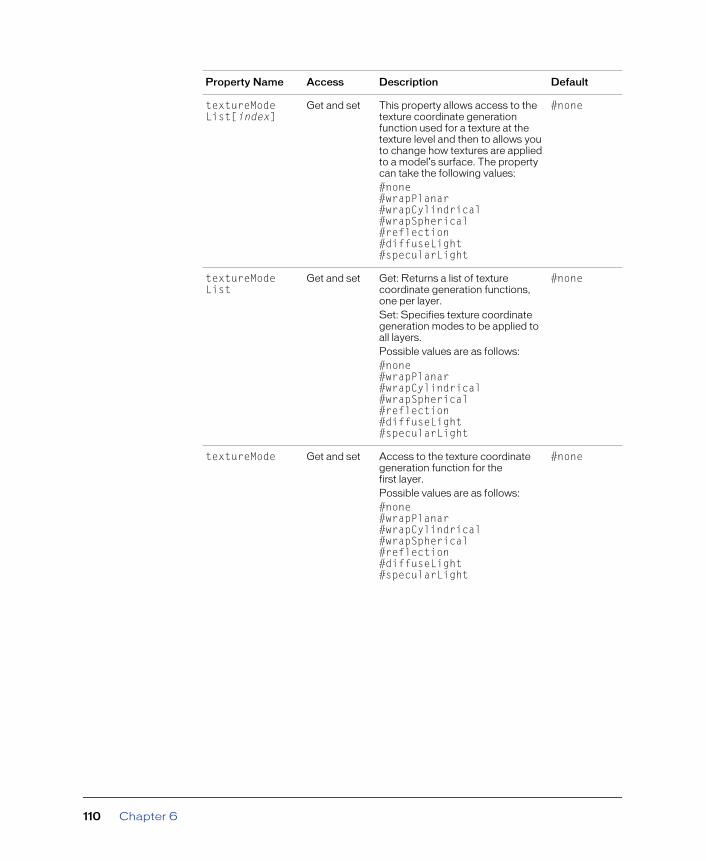
textureModeList[index]
Get and set This property allows access to the texture coordinate generation function used for a texture at the texture level and then to allows you to change how textures are applied to a model’s surface. The property can take the following values:#none#wrapPlanar#wrapCylindrical#wrapSpherical#reflection#diffuseLight#specularLight
#none
textureModeList
Get and set Get: Returns a list of texture coordinate generation functions, one per layer. Set: Specifies texture coordinate generation modes to be applied to all layers. Possible values are as follows:#none#wrapPlanar#wrapCylindrical#wrapSpherical#reflection#diffuseLight#specularLight
#none
textureMode Get and set Access to the texture coordinate generation function for the first layer. Possible values are as follows:#none#wrapPlanar#wrapCylindrical#wrapSpherical#reflection#diffuseLight#specularLight
#none
Property Name Access Description Default
Chapter 6110
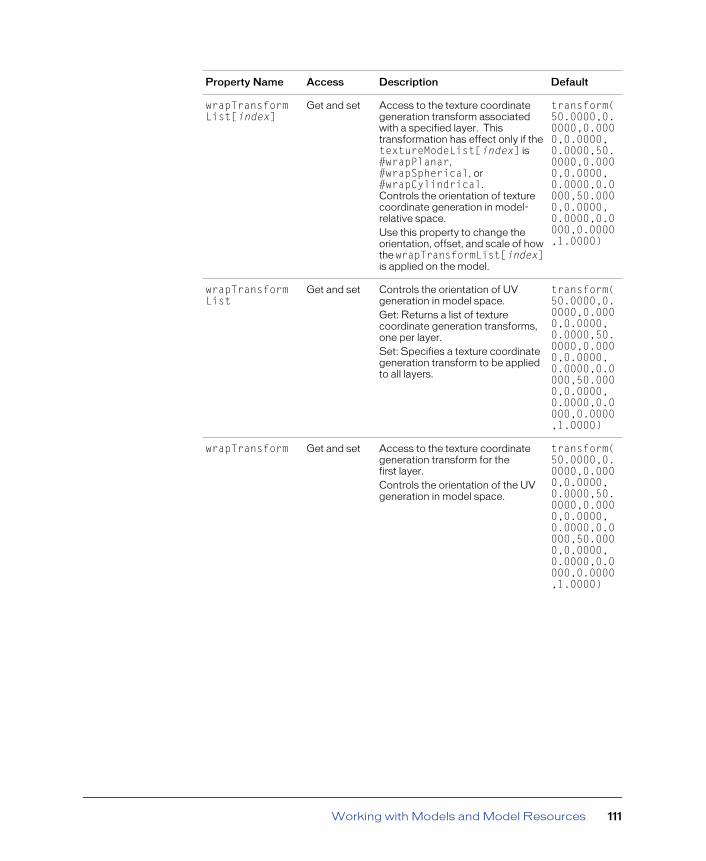
wrapTransformList[index]
Get and set Access to the texture coordinate generation transform associated with a specified layer. This transformation has effect only if the textureModeList[index] is #wrapPlanar, #wrapSpherical, or #wrapCylindrical.Controls the orientation of texture coordinate generation in model-relative space.Use this property to change the orientation, offset, and scale of how the wrapTransformList[index] is applied on the model.
transform(50.0000,0.0000,0.0000,0.0000, 0.0000,50.0000,0.0000,0.0000, 0.0000,0.0000,50.0000,0.0000, 0.0000,0.0000,0.0000,1.0000)
wrapTransformList
Get and set Controls the orientation of UV generation in model space. Get: Returns a list of texture coordinate generation transforms, one per layer. Set: Specifies a texture coordinate generation transform to be applied to all layers.
transform(50.0000,0.0000,0.0000,0.0000, 0.0000,50.0000,0.0000,0.0000, 0.0000,0.0000,50.0000,0.0000, 0.0000,0.0000,0.0000,1.0000)
wrapTransform Get and set Access to the texture coordinate generation transform for the first layer. Controls the orientation of the UV generation in model space.
transform(50.0000,0.0000,0.0000,0.0000, 0.0000,50.0000,0.0000,0.0000, 0.0000,0.0000,50.0000,0.0000, 0.0000,0.0000,0.0000,1.0000)
Property Name Access Description Default
Working with Models and Model Resources 111

textureTransformList
Get and set Access to the list of texture coordinate modifier transforms, one per texturing layer. The textureTransform is applied to all texture coordinates regardless of the textureMode property setting. This is the last modification of the texture coordinates before they are sent to the renderer. Allows you to manipulate the scale, orientation, and positional offsets of the source image before it’s wrapped. WrapTransformList changes the projection of the transformed texture.The textureTransform matrix operates on the texture in textureImage space, which is defined to exist only on the X,Y plane. Rotations about the Z axis are rotated around the (0,0) point, which maps to the upper left corner of the texture. Translating by integers when textureRepeat is TRUE (1) has no effect, because the width and height of the textures are defined to be 1.0 in textureImage space. Care must be taken not to scale any dimension (even Z) by 0.
Identity transform
textureTransformList[index]
Get and set Access to the texture coordinate modifier transform associated with a specified layer.
Identity transform
textureTransform
Get and set Access to the texture coordinate modifier transform for the first layer.
Identity transform
blendFunctionList[index]
Get and set Access to the blending function associated with a texture layer at the position indicated by index, which must be a positive integer smaller than or equal to 8. Possible values are as follows:#replace #multiply #add#blend#alpha #constant For detailed information on all of these options, see “blendFunctionList” on page 216.
#multiply
Property Name Access Description Default
Chapter 6112

blendFunction Get and set Access to the list of blending functions, #multiply, #replace, #blend, and #add, for the first layer.
#multiply
blendFunctionList
Get and set Access to the list of blending functions, #multiply, #replace, #blend, and #add, for all layers.
#multiply
blendSourceList[index]
Get and set Access to the blending source associated with a specified layer. When the blendFunction property is set to #blend for the <index>th layer, this results in the <index>th texture being combined with the result of the previous layers for the entire texture using a single blending ratio. The blending ratio, in this case, is the value of blendConstant for layer <index>. For example, if the layer at that index position’s blendConstant value is 0.9, the resultant texture will be 90% of the texture at that index position and 10% of the result of the previous texture layers Possible values are #constant and #alpha.
#constant
blendSourceList
Get and set Access to the blending sources for each layer, providing that the blend function is set to #blend. Possible values are #constant and #alpha.
#constant
blendSource Get and set Access to the blending sources for the first layer, providing that the blend function is set to #blend. Possible values are #constant and #alpha.
#constant
blendConstantList[index]
Get and set The blending ratio used for a specific layer when the blend function is set to #blend and blendSourceList[index] is set to #constant. Returns a floating-point value from 0.0 to 100.0.
50.0
blendConstantList
Get and set The blending ratio used for any layer when the blend function is set to #blend and blendSourceList[index] is set to #constant. Returns a floating-point value from 0.0 to 100.0.
50.0
Property Name Access Description Default
Working with Models and Model Resources 113

blendConstant Get and set The blending ratio used for the first layer when the blend function is set to #blend and blendSourceList[index] is set to #constant. Returns a floating-point value from 0.0 to 100.0.
50.0
textureRepeatList[index]
Get and set Allows you to get or set the texture clamping behavior associated with a specified layer. Texture clamping refers to how a texture “clamps” to its shader. If the ratio of the texture to the shader is less than 1 to 1 and textureRepeatList is set to TRUE (1), the texture tiles over the shader. If textureRepeatList is set to FALSE (0), the texture isn’t repeated but appears only once in one part of the shader. If the ratio of the texture to the shader is greater than 1 to 1 and textureRepeatList is set to FALSE (0), the border of the texture is extended past the unit UV coordinate range.
TRUE (1)
textureRepeatList
Get and set Access to the list of texture clamping behaviors, one per layer. When set to FALSE (0), the border of the texture is extended past the unit UV coordinate range. Get: Returns a list of texture clamping behaviors, one per layer. Set: Specifies a texture clamping behavior to be applied to all layers.
TRUE (1)
textureRepeat Get and set Access to the texture clamping behavior for the first layer. When set to FALSE (0), the border of the texture is extended past the unit UV coordinate range.
TRUE (1)
Property Name Access Description Default
Chapter 6114
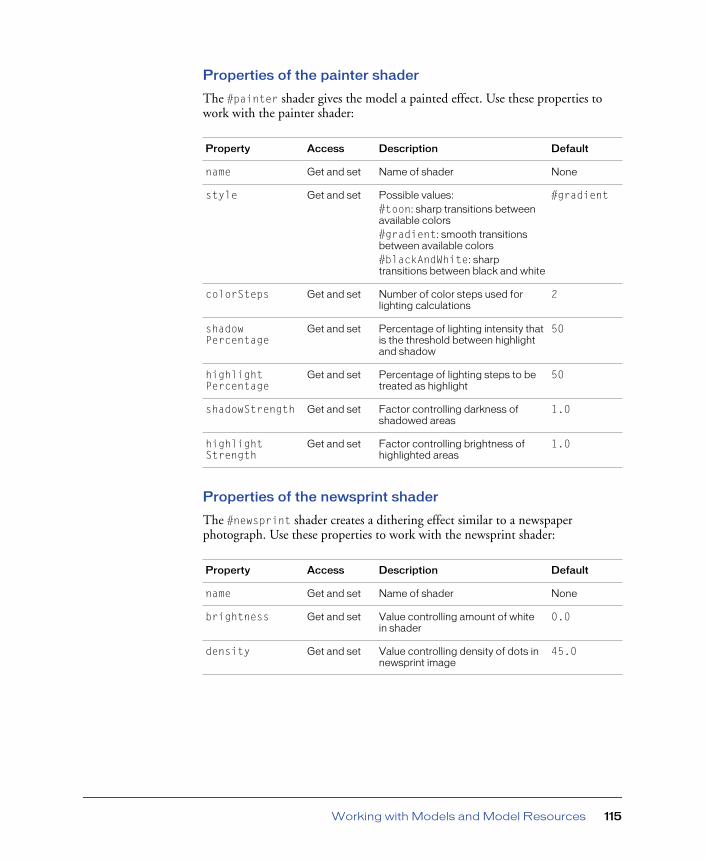
Properties of the painter shader
The #painter shader gives the model a painted effect. Use these properties to work with the painter shader:
Properties of the newsprint shader
The #newsprint shader creates a dithering effect similar to a newspaper photograph. Use these properties to work with the newsprint shader:
Property Access Description Default
name Get and set Name of shader None
style Get and set Possible values:#toon: sharp transitions between available colors#gradient: smooth transitions between available colors#blackAndWhite: sharp transitions between black and white
#gradient
colorSteps Get and set Number of color steps used for lighting calculations
2
shadowPercentage
Get and set Percentage of lighting intensity that is the threshold between highlight and shadow
50
highlightPercentage
Get and set Percentage of lighting steps to be treated as highlight
50
shadowStrength Get and set Factor controlling darkness of shadowed areas
1.0
highlightStrength
Get and set Factor controlling brightness of highlighted areas
1.0
Property Access Description Default
name Get and set Name of shader None
brightness Get and set Value controlling amount of white in shader
0.0
density Get and set Value controlling density of dots in newsprint image
45.0
Working with Models and Model Resources 115
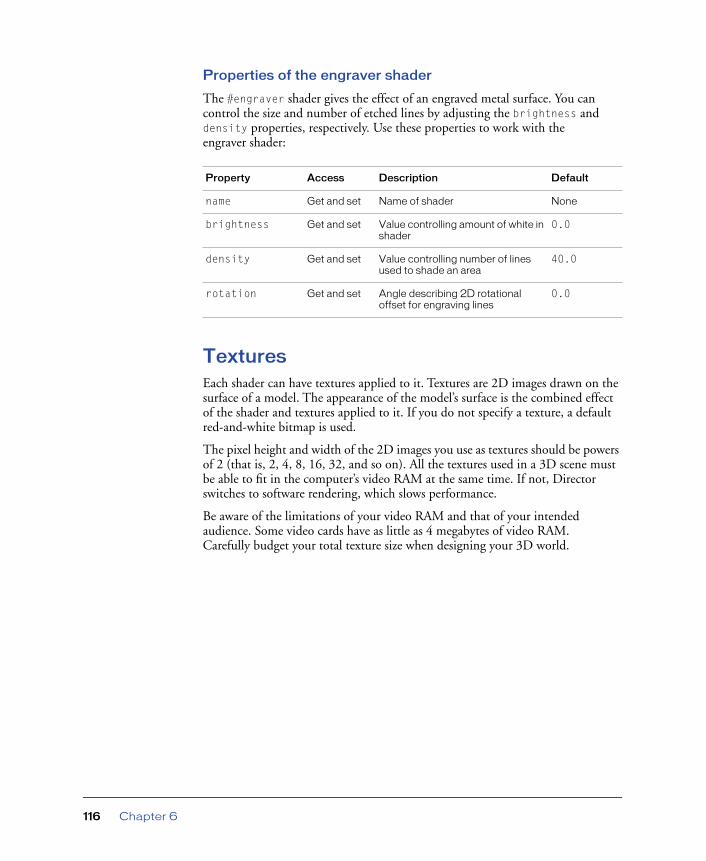
Properties of the engraver shader
The #engraver shader gives the effect of an engraved metal surface. You can control the size and number of etched lines by adjusting the brightness and density properties, respectively. Use these properties to work with the engraver shader:
TexturesEach shader can have textures applied to it. Textures are 2D images drawn on the surface of a model. The appearance of the model’s surface is the combined effect of the shader and textures applied to it. If you do not specify a texture, a default red-and-white bitmap is used.
The pixel height and width of the 2D images you use as textures should be powers of 2 (that is, 2, 4, 8, 16, 32, and so on). All the textures used in a 3D scene must be able to fit in the computer’s video RAM at the same time. If not, Director switches to software rendering, which slows performance.
Be aware of the limitations of your video RAM and that of your intended audience. Some video cards have as little as 4 megabytes of video RAM. Carefully budget your total texture size when designing your 3D world.
Property Access Description Default
name Get and set Name of shader None
brightness Get and set Value controlling amount of white in shader
0.0
density Get and set Value controlling number of lines used to shade an area
40.0
rotation Get and set Angle describing 2D rotational offset for engraving lines
0.0
Chapter 6116

Texture properties
Use these properties to work with textures:
Property Access Description Default
name Get and set Name of texture. None
type Get Possible values:#fromfile: bitmap defined as part of 3D import#castmember: bitmap derived from Director cast member
None
member Get and set If the type is #castmember, this property identifies the source of the bitmap.If the type if #fromfile, this property is void.
None
width Get Width, in pixels. None
height Get Height, in pixels. None
quality Get and set Property with the following possible values:#low: texture is not mipmapped#medium: mipmapping is at a low bilinear setting (default)#high: the mipmapping is at a high trilinear settingFor more information, see “quality” on page 360.
#medium
nearFiltered Get and set Determines whether bilinear filtering is used when rendering a projected texture map that covers more screen space than the original.For more information, see “quality” on page 360.
TRUE (1)
compressed Get and set The property can be TRUE (1) or FALSE (0):TRUE (1): the texture is compressed FALSE (0): the texture is not compressedThe value changes automatically from TRUE (1) to FALSE (0) when the texture is to be rendered.The value can be set to FALSE (0) to decompress or to TRUE (1) to remove the decompressed representation from memory.
TRUE (1)
Working with Models and Model Resources 117
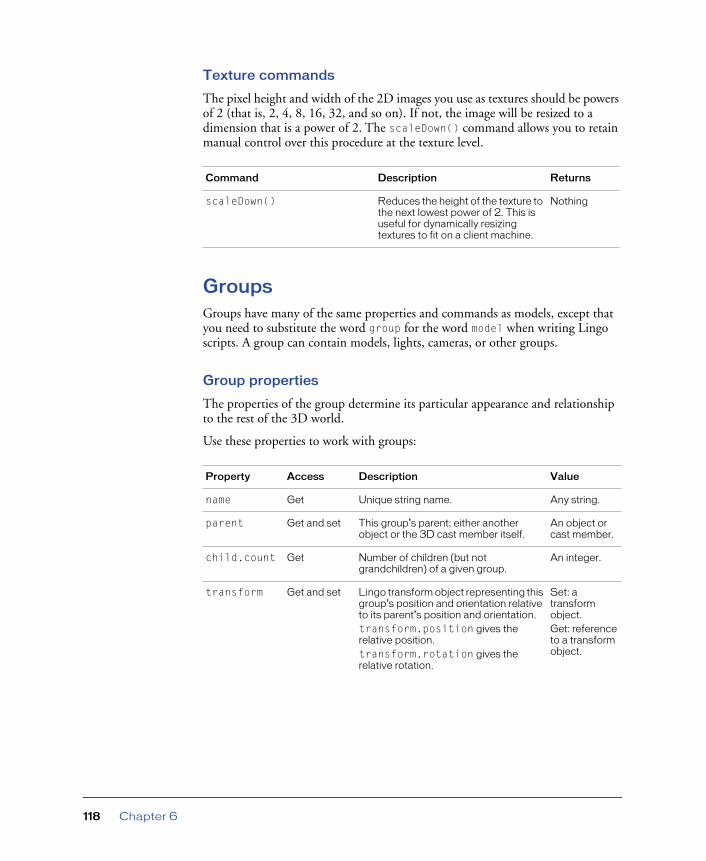
Texture commands
The pixel height and width of the 2D images you use as textures should be powers of 2 (that is, 2, 4, 8, 16, 32, and so on). If not, the image will be resized to a dimension that is a power of 2. The scaleDown() command allows you to retain manual control over this procedure at the texture level.
GroupsGroups have many of the same properties and commands as models, except that you need to substitute the word group for the word model when writing Lingo scripts. A group can contain models, lights, cameras, or other groups.
Group properties
The properties of the group determine its particular appearance and relationship to the rest of the 3D world.
Use these properties to work with groups:
Command Description Returns
scaleDown() Reduces the height of the texture to the next lowest power of 2. This is useful for dynamically resizing textures to fit on a client machine.
Nothing
Property Access Description Value
name Get Unique string name. Any string.
parent Get and set This group’s parent; either another object or the 3D cast member itself.
An object or cast member.
child.count Get Number of children (but not grandchildren) of a given group.
An integer.
transform Get and set Lingo transform object representing this group’s position and orientation relative to its parent’s position and orientation.transform.position gives the relative position.transform.rotation gives the relative rotation.
Set: a transform object.Get: reference to a transform object.
Chapter 6118

Group commands
Use these commands to work with groups:
userData Get and set A property list containing all properties assigned to the group. Users can add, remove, get, and set properties on this list.
The default list includes the properties assigned in the 3D modeling tool. User properties are then added.
boundingSphere
Get A list containing a vector and a floating-point value. The vector represents the position of the group in world space. The floating-point value represents the radius of the bounding sphere that contains the group and its children.
A list, with the default value of [vector(0,0,0), 0.0].
worldPosition
Get Position of the group in world coordinates. A quick shortcut for group.getWorldTransform(). position
A vector object.
pointAtOrientation
Get and set A list of two orthogonal vectors, [objectRelativeDirection, objectRelativeUp], that control how the groups pointAt() method works.
A vector list.
Command Description Returns
addChild(aNode, preserveWorld)
Adds aNode to this group’s list of children. An equivalent operation is to set aNode.parent to equal this group.The preserveWorld argument is optional. It can have two values: #preserveWorld or #preserveParent. If the value is #preserveWorld, the world transform of the child being added remains intact. If the value is #preserveParent, the child’s existing transform is interpreted as parent-relative.
Nothing
child[index] Returns the child at the specified position in the index.
Lingo group object
child(name) Returns the child named name. Lingo group object
Property Access Description Value
Working with Models and Model Resources 119

clone(name) Clones a group named name, adds it to group’s parent’s child list, and adds it to worldAll children of the group are automatically cloned. This can be avoided by removing the children, performing the cloning operation, and then adding the children back.If the name is omitted or is "", the clone isn’t added to the group palette, has no parent, and has no children. This option lets you quickly create temporary group instances.
Lingo group object
cloneDeep(name) Clones both the group and the parent used by the group’s children. Modifications to the clones’ resource don’t affect the parent.This is a more memory-intensive operation than clone(name).
Lingo group object
addtoWorld() Adds the group to the currently active 3D world, setting its parent as “world.”Equivalent to group.parent=member("scene").group("world").All newly created groups are added to the world by default, without it being necessary to use this command.
Nothing
getWorldTransform()
Sets this group’s position and orientation relative to the world group’s position and orientation.
Nothing
remove from world
For groups whose parent hierarchy terminates in the world, this sets their parent to void and removes them from the world. Otherwise it does nothing.
Nothing
isInWorld() For groups whose parent hierarchy terminates in the world, the value is TRUE (1).
TRUE (1) or FALSE (0)
registerScript(eventName, handlerName, scriptInstance)
Registers the handler named handlerName that is found in the script scriptInstance when the member function sendEvent() is called with eventName as an argument.If scriptInstance is 0, a movie script handler is called. The user defines what eventName is.
TRUE (1) or FALSE (0), with TRUE (1) indicating that the event happened and FALSE (0) that it did not
Command Description Returns
Chapter 6120

translate(xIncrement,yIncrement,zIncrement,relativeTo)
Moves the group forward by xIncrement along the X axis, yIncrement along the Y axis, and zIncrement along the Z axis. The relativeTo parameter is optional. It determines how arguments are interpreted. The possible values are as follows:#self: the default. Increments are applied relative to the group’s local coordinate system.#parent: increments are relative to the group’s parent’s coordinate system.#world: increments are relative to the world coordinate system. Equivalent to #parent if parent is the world.node (group, light, camera, or group): increments are relative to the coordinate system of the argument object.
Nothing
translate(directionVector, relativeTo)
Moves the group directionVector.length() in the direction of the vector directionVector. The relativeTo argument is optional and defaults to #self.
Nothing
translate(x,y,z,relativeTo)
Moves the group distance x along the X axis, distance y along the Y axis, and distance z along the Z axis. The relativeTo argument is optional and defaults to #self. This command can also be written astranslate(vector(x,y,z) relativeTo).
Nothing
rotate(x,y,z, relativeTo)
Rotates the group by x degrees around the X axis, y degrees around the Y axis, and z degrees around the Z axis.The relativeTo argument is optional and defaults to #self. If included, it defines the coordinate space of the axes.This command can also be written asrotate(vector(x,y,z) relativeTo).
Nothing
rotate (position, axis, angle, relativeTo)
Rotates the group around the axis vector in the specified position the specified number of degrees. The relativeTo argument is optional and defaults to #self.
Nothing
Command Description Returns
Working with Models and Model Resources 121

ModifiersModifiers control how a model is rendered or how it animates. They are attached to a model with the addModifier() command. Once a modifier has been attached, its properties can be manipulated with Lingo. The tables that follow detail the properties of the modifiers included with Director 8.5.
Level of detail (LOD) modifier properties
The level of detail (LOD) modifier provides per-model control over the number of polygons used to render a model, based on the model’s distance from the camera. This modifier is attached to all imported models.
pointAt(worldPosition, worldUp)
Rotates the model until it points at the world-relative position worldPosition. The optional worldUp argument gives the general position of the model’s Up axis. The exact position can’t be determined using this method.Both the object-relative axes are defined by the pointAtOrientation property. Default values are an object-relative forward direction of vector (0, 0, -1) and an object-relative up direction of vector (0, 1, 0).
Nothing
getWorldTransform()
Calculates and returns a transform that converts object-relative positions for this group into world-relative positions.
A transform object
Command Description Returns
Chapter 6122

Use these properties to work with the level of detail modifier:
Property Access Description Default
whichModel.lod.auto
Get and set TRUE (1) means that polygons are automatically reduced based on the distance from the camera. The fewer polygons that are drawn, the faster performance will be. The lod.bias property controls how aggressively this takes place.FALSE (0) means that you can control polygon reduction on a per-model basis, provided you’ve attached the level of detail modifier to the model. The level of detail modifier lets you override the default settings. To release level of detail data from memory once the model has been streamed in, set the userData property sw3D to TRUE (1).
TRUE (1).
whichModel.lod.bias
Get and set Aggressiveness with which the level of detail is reduced when in automatic mode. A value of 0.0 is most aggressive and removes all polygons. A value of 100.00 should result in no visible degradation of the geometry. A middle level can be used to remove polygons at run time that were not removed during authoring.
A value between 0.0 and 100.0. The default is 100.0.
whichModel.lod.level
Get and set The percentage of the model resource mesh resolution to use when the automatic mode is FALSE (0).
A value between 0.0 and 100.0. The default is 100.0.
Working with Models and Model Resources 123

Toon modifier properties
The toon modifier changes a model’s rendering to imitate a cartoon drawing style. Only a few colors are used, and the model’s shader, texture, and related properties are ignored.
Use these properties to work with the toon modifier:
Property Access Description Default
whichModel.toon.style
Get and set The following are the possible values:#toon: sharp transitions between available colors#gradient: smooth transitions between available colors#black and white: sharp transitions between black and white
#gradient
whichModel.toon.colorSteps
Get and set Maximum number of colors available, rounded to the nearest power of 2, with a limit of 16
2
whichModel.toon.shadowPercentage
Get and set The percentage of color steps to be used in shadows
50
whichModel.toon.highlightPercentage
Get and set The percentage of color steps to be used in highlight
50
whichModel.toon.shadowStrength
Get and set A floating-point value that determines shadow darkness
1.0
whichModel.toon.highlightStrength
Get and set A floating-point value that determines highlight brightness
1.0
whichModel.toon.lineColor
Get and set Lingo color object describing line color
Black (rgb 0,0,0)
whichModel.toon.silhouettes
Get and set TRUE (1) or FALSE (0) value indicating presence or absence of lines around silhouettes
TRUE (1)
whichModel.toon.creases
Get and set TRUE (1) or FALSE (0) value indicating whether lines are drawn when mesh boundaries meet at a crease
TRUE (1)
whichModel.toon.creaseAngle
Get and set A floating-point value controlling crease angle detection
0.01
whichModel.toon.boundary
Get and set TRUE (1) or FALSE (0) value indicating whether lines are drawn at boundary of surface
TRUE (1)
Chapter 6124

Inker modifier properties
The inker modifier adds silhouette, crease, and boundary edges to an existing model. Silhouettes are edges along the border of a model. Crease edges are created when the angle between two areas of the mesh exceeds a given threshold.
Use these properties to work with the inker modifier:
Property Access Description Default
whichModel.inker.lineColor
Get and set Lingo color object describing line color
Black (rgb 0,0,0)
whichModel.inker.silhouettes
Get and set TRUE (1) or FALSE (0) value indicating presence or absence of lines around silhouettes
TRUE (1)
whichModel.inker.creases
Get and set TRUE (1) or FALSE (0) value indicating whether lines are drawn when mesh boundaries meet at a crease
TRUE (1)
model.inker.creaseAngle
Get and set A floating-point value controlling crease angle detection
0.01
whichModel.inker.boundary
Get and set TRUE (1) or FALSE (0) value indicating whether lines are drawn at boundary of surface
TRUE (1)
Working with Models and Model Resources 125
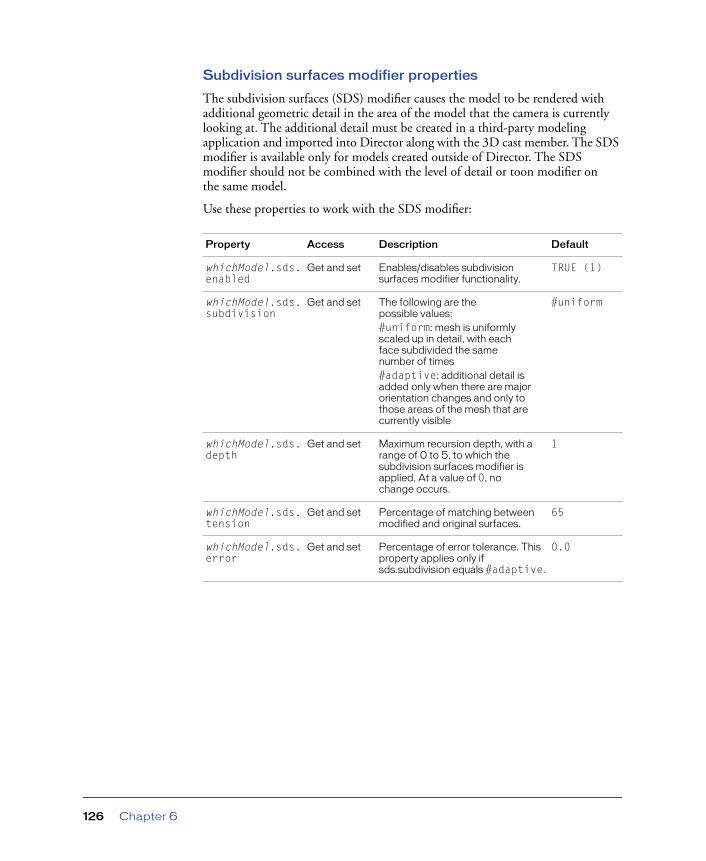
Subdivision surfaces modifier properties
The subdivision surfaces (SDS) modifier causes the model to be rendered with additional geometric detail in the area of the model that the camera is currently looking at. The additional detail must be created in a third-party modeling application and imported into Director along with the 3D cast member. The SDS modifier is available only for models created outside of Director. The SDS modifier should not be combined with the level of detail or toon modifier on the same model.
Use these properties to work with the SDS modifier:
Property Access Description Default
whichModel.sds.enabled
Get and set Enables/disables subdivision surfaces modifier functionality.
TRUE (1)
whichModel.sds.subdivision
Get and set The following are the possible values:#uniform: mesh is uniformly scaled up in detail, with each face subdivided the same number of times#adaptive: additional detail is added only when there are major orientation changes and only to those areas of the mesh that are currently visible
#uniform
whichModel.sds.depth
Get and set Maximum recursion depth, with a range of 0 to 5, to which the subdivision surfaces modifier is applied. At a value of 0, no change occurs.
1
whichModel.sds.tension
Get and set Percentage of matching between modified and original surfaces.
65
whichModel.sds.error
Get and set Percentage of error tolerance. This property applies only if sds.subdivision equals #adaptive.
0.0
Chapter 6126
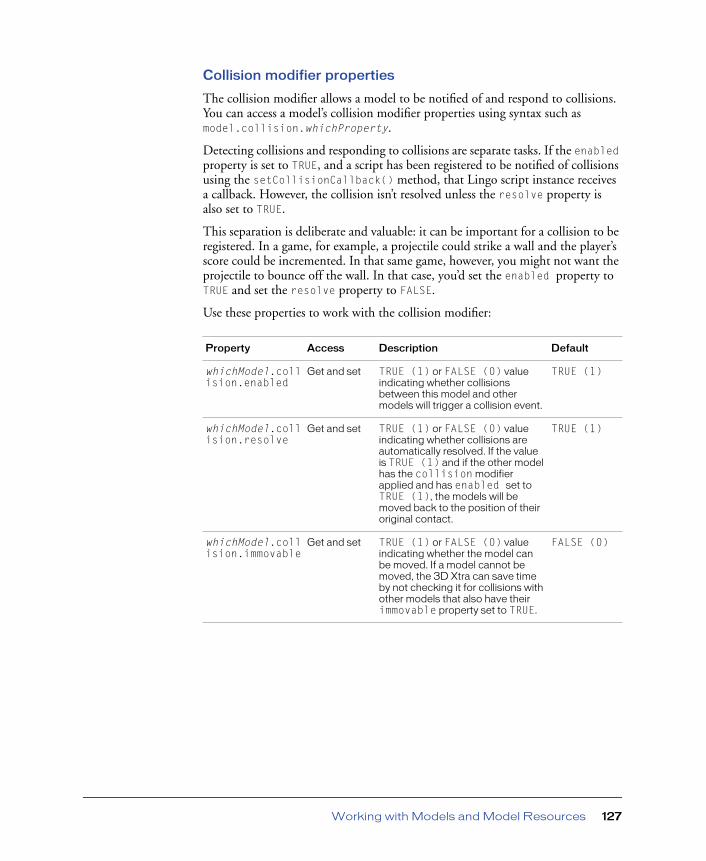
Collision modifier properties
The collision modifier allows a model to be notified of and respond to collisions. You can access a model’s collision modifier properties using syntax such as model.collision.whichProperty.
Detecting collisions and responding to collisions are separate tasks. If the enabled property is set to TRUE, and a script has been registered to be notified of collisions using the setCollisionCallback() method, that Lingo script instance receives a callback. However, the collision isn’t resolved unless the resolve property is also set to TRUE.
This separation is deliberate and valuable: it can be important for a collision to be registered. In a game, for example, a projectile could strike a wall and the player’s score could be incremented. In that same game, however, you might not want the projectile to bounce off the wall. In that case, you’d set the enabled property to TRUE and set the resolve property to FALSE.
Use these properties to work with the collision modifier:
Property Access Description Default
whichModel.collision.enabled
Get and set TRUE (1) or FALSE (0) value indicating whether collisions between this model and other models will trigger a collision event.
TRUE (1)
whichModel.collision.resolve
Get and set TRUE (1) or FALSE (0) value indicating whether collisions are automatically resolved. If the value is TRUE (1) and if the other model has the collision modifier applied and has enabled set to TRUE (1), the models will be moved back to the position of their original contact.
TRUE (1)
whichModel.collision.immovable
Get and set TRUE (1) or FALSE (0) value indicating whether the model can be moved. If a model cannot be moved, the 3D Xtra can save time by not checking it for collisions with other models that also have their immovable property set to TRUE.
FALSE (0)
Working with Models and Model Resources 127

Collision modifier commands
Use this command to work with the collision modifier:
Collision modifier events
These events are generated when collisions occur:
Animation modifiersOnce you’ve created animations in your modeling software, you apply animation modifiers to models to play them back in Director.
Director supports both model keyframe and character bone animations, and modifiers are available to enable both. Keyframe animations modify a model’s transform properties over time. Bones animations modify the model’s geometry over time. Creating bones animation in a 3D modeling application can be complex, but it results in more natural-looking movements.
The two animation types can be combined. You might, for example, combine a “run in place” bones animation with a “move around the room” keyframe animation.
Command Description Returns
whichModel.collision.setCollisionCallback(#handlerName, scriptObjectName)
If collision.enabled is set to TRUE (1), this command registers the Lingo script instance to receive an event when a collision occurs. If collision.enabled is set to FALSE (0), no event occurs. What happens when a collision occurs depends on the value assigned to the resolve property. You can override this value by using the collisionData.resolveA() or collisionData.resolveB() commands.The collisionData object will be the second argument passed to #handlerName in the specified script object scriptObjectName.
Nothing
Event Name Description
#collideAny The first event called when any collision occurs.
#collideWith The event called whenever a collision with a specified model occurs. It is implicitly registered for when setCollisionCallback() is called.
Chapter 6128

Bones animations use the Bones player modifier. Keyframe animations use the Keyframe player modifier. Most commands and properties are available to both players.
• Motions: A 3D cast member contains a set of motions authored in your 3D modeling application. For bones animation, each motion contains a list of tracks, and each track keyframes a particular bone. A bone is a segment of the skeleton of a model. For example, track 14 of the motion named Run could be named RtKneeTrack and move a bone named RtKnee. These names are defined in the 3D modeling application.
• Play list: The Bones player manages a queue of motions. The first motion in the play list is the motion that is currently playing or paused. When that motion finishes playing, it’s removed from the play list and the next motion begins. Motions can be added with bonesPlayerOrKeyframePlayer.play("run"), which adds the motion to the top of the list, or bonesPlayerOrKeyframePlayer.queue("motion"), which adds it to the end of the list. Using the play command starts the motion immediately. The motion previously at the beginning of the play list is halted unless autoBlend is turned on. When you use queue, the motion is added to the end of the play list. Motions are removed from the play list automatically when they are complete, or you can remove them explicitly using bonesPlayer.playNext().
• Motion blending: If autoblend is TRUE, an ending motion blends smoothly into the next motion using the bonesPlayerOrKeyframePlayer.blendTime property to determine how long the blend should be. You can control this manually by setting bonesPlayerOrKeyframePlayer.autoBlend to FALSE and using bonesPlayerOrKeyframePlayer.blendFactor to control the blend frame by frame.
• Motion mapping: You can create new motions by combining existing motions. For example, a walking motion could be combined with a shooting motion to produce a walk-and-shoot motion. This is available only with Bones player animations.
You can add the Keyframe player modifier at run time to a model created in Director 8.5, but you cannot add the Bones player modifier at run time. The Bones player modifier is automatically attached to models with bones animation exported from a 3D modeling application. Since the required bones information can’t be assigned in Director, it has to exist before the model is imported into Director.
Working with Models and Model Resources 129
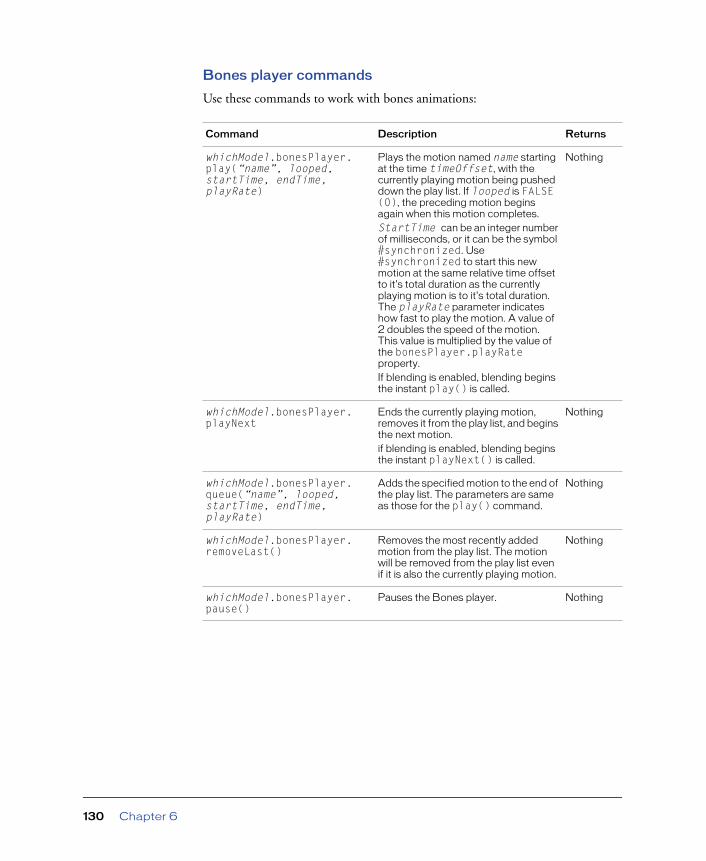
Bones player commands
Use these commands to work with bones animations:
Command Description Returns
whichModel.bonesPlayer.play(“name”, looped, startTime, endTime, playRate)
Plays the motion named name starting at the time timeOffset, with the currently playing motion being pushed down the play list. If looped is FALSE (0), the preceding motion begins again when this motion completes.StartTime can be an integer number of milliseconds, or it can be the symbol #synchronized. Use #synchronized to start this new motion at the same relative time offset to it's total duration as the currently playing motion is to it's total duration. The playRate parameter indicates how fast to play the motion. A value of 2 doubles the speed of the motion. This value is multiplied by the value of the bonesPlayer.playRate property.If blending is enabled, blending begins the instant play() is called.
Nothing
whichModel.bonesPlayer.playNext
Ends the currently playing motion, removes it from the play list, and begins the next motion. if blending is enabled, blending begins the instant playNext() is called.
Nothing
whichModel.bonesPlayer.queue(“name”, looped, startTime, endTime, playRate)
Adds the specified motion to the end of the play list. The parameters are same as those for the play() command.
Nothing
whichModel.bonesPlayer.removeLast()
Removes the most recently added motion from the play list. The motion will be removed from the play list even if it is also the currently playing motion.
Nothing
whichModel.bonesPlayer.pause()
Pauses the Bones player. Nothing
Chapter 6130
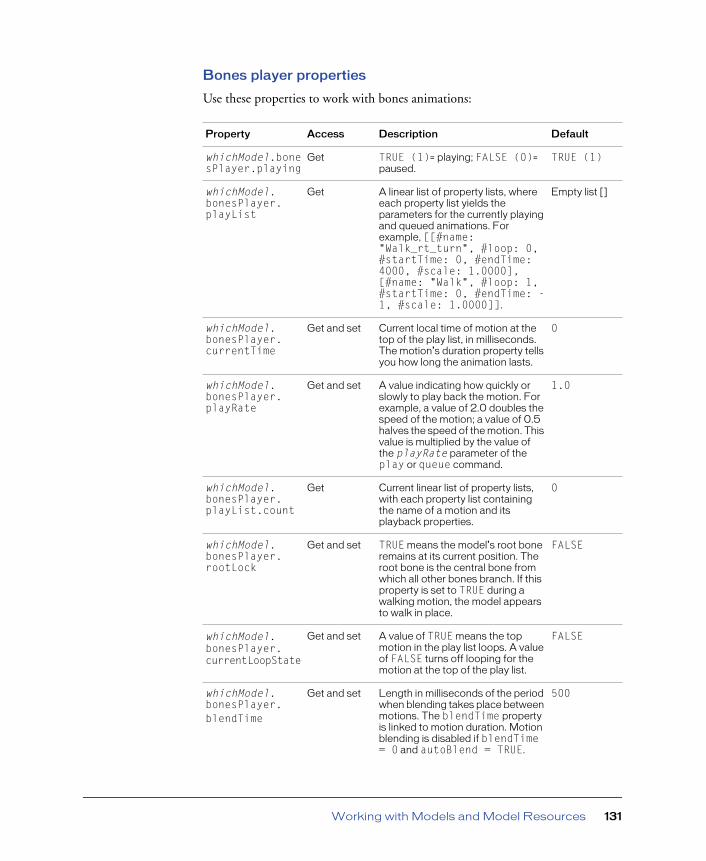
Bones player properties
Use these properties to work with bones animations:
Property Access Description Default
whichModel.bonesPlayer.playing
Get TRUE (1)= playing; FALSE (0)= paused.
TRUE (1)
whichModel.bonesPlayer.playList
Get A linear list of property lists, where each property list yields the parameters for the currently playing and queued animations. For example, [[#name: "Walk_rt_turn", #loop: 0, #startTime: 0, #endTime: 4000, #scale: 1.0000], [#name: "Walk", #loop: 1, #startTime: 0, #endTime: -1, #scale: 1.0000]].
Empty list []
whichModel.bonesPlayer.currentTime
Get and set Current local time of motion at the top of the play list, in milliseconds. The motion’s duration property tells you how long the animation lasts.
0
whichModel.bonesPlayer.playRate
Get and set A value indicating how quickly or slowly to play back the motion. For example, a value of 2.0 doubles the speed of the motion; a value of 0.5 halves the speed of the motion. This value is multiplied by the value of the playRate parameter of the play or queue command.
1.0
whichModel.bonesPlayer.playList.count
Get Current linear list of property lists, with each property list containing the name of a motion and its playback properties.
0
whichModel.bonesPlayer.rootLock
Get and set TRUE means the model’s root bone remains at its current position. The root bone is the central bone from which all other bones branch. If this property is set to TRUE during a walking motion, the model appears to walk in place.
FALSE
whichModel.bonesPlayer.currentLoopState
Get and set A value of TRUE means the top motion in the play list loops. A value of FALSE turns off looping for the motion at the top of the play list.
FALSE
whichModel.bonesPlayer.blendTime
Get and set Length in milliseconds of the period when blending takes place between motions. The blendTime property is linked to motion duration. Motion blending is disabled if blendTime = 0 and autoBlend = TRUE.
500
Working with Models and Model Resources 131

whichModel.bonesPlayer.autoBlend
Get and set If TRUE, automatic linear blending (from 0.0 to 100.0) is applied over the blend time. Otherwise, blendTime is ignored, and the amount of blending is user-determined by the blendFactor property.
TRUE (1)
whichModel.bonesPlayer.blendFactor
Get and set The degree of blending between motions, expressed as a floating-point value between 0.0 and 100.0. A value of 0.0 uses all the previous motion. A value of 100.0 uses all of the next motion in the play list.The blend factor can be changed frame by frame to create custom blending effects.
0
whichModel.bonesPlayer.bone[boneID]transform
Get and set A transform relative to the parent bone. You can get and set the entire transform, but you can’t call any methods of this property.
Depends on the bone
whichModel.bonesPlayer.bone[boneID]worldTransform
Get and set A transform relative to the world coordinates. You can get and set the entire transform to move a bone.
Depends on the bone
whichModel.bonesPlayer.positionReset
Get and set TRUE (1) = object returns to starting position at end of animation.FALSE (0) = object remains at final animation position after motion completes.
TRUE (1)
Property Access Description Default
Chapter 6132

Bones player events
These events are generated by bones animations:
whichModel.bonesPlayer.rotationReset
Get and set Normally a model snaps back to its original rotation after a motion finishes playing. This property maintains any or all of the rotational changes after playing is complete. The values are as follows:#none#x#y#z#xy#xz#all
#all
whichModel.bonesPlayer.lockTranslation
Get and set Defines the axis of translation to ignore when playing back a motion.The values are as follows:#none#x#y#z#xy#xz#allTo keep a model locked to a ground plane with the top pointing along the Z axis, set lockTranslation to #z.lockTranslation = #all is equivalent to rootLock = TRUE (1).
#none
Event name Description
#animationStarted
This is a system-defined notification event triggered when a motion begins playing. If looping is on, this event is triggered only by the first playthrough. During a blend of two animations, this event is triggered as the blend begins.
#animationEnded
This is a system-defined notification event triggered when a motion ends. If looping is on, this event is triggered only by the first playthrough. If blending is on, this event is generated for the first animation when the blend is complete. There may be some latency because of the overhead of scheduling all of Director’s other events.
Property Access Description Default
Working with Models and Model Resources 133

Keyframe player commands
Use these commands to work with keyframe animations:
Command Description Returns
whichModel.keyframePlayer.play("name", looped, startTime, endTime, playRate)
Plays the motion named name starting at the time startTime, with the currently playing motion being pushed down the play list. If looped is FALSE (0), the preceding motion begins again when this motion completes.The startTime parameter can be an integer number of milliseconds, or it can be the symbol #synchronized. Use #synchronized to start this new motion at the same relative time offset to its total duration as the currently playing motion is to its total duration. The playRate parameter indicates how fast to play the motion. A value of 2 doubles the speed of the motion. This value is multiplied by the value of the keyframePlayer.playRate property.If blending is enabled, blending begins the instant play() is called.
Nothing
whichModel.keyframePlayer.playNext
Ends the currently playing motion, removes it from the play list, and begins the next motion. If blending is enabled, blending begins the instant playNext() is called.
Nothing
whichModel.keyframePlayer.queue("name", looped, startTime, endTime, playRate)
Adds the specified motion to the end of the play list. The parameters are same as those for the play() command.
Nothing
whichModel.keyframePlayer.removeLast()
Removes the most recently added motion from the play list. The motion will be removed from the play list even if it is also the currently playing motion.
Nothing
whichModel.keyframePlayer.pause()
Pauses the Keyframe player. Nothing
Chapter 6134

Keyframe player properties
Use these properties to work with keyframe animations:
Property Access Description Returns
whichModel.keyframePlayer.playing
Get TRUE (1)= playing; FALSE (0)= paused.
TRUE (1)
whichModel.keyframePlayer.playList
Get A linear list of property lists, where each property list yields the parameters for the currently playing and queued animations. For example, [[#name: "Walk_rt_turn", #loop: 0, #startTime: 0, #endTime: 4000, #scale: 1.0000], [#name: "Walk", #loop: 1, #startTime: 0, #endTime: -1, #scale: 1.0000]].
Empty list []
whichModel.keyframePlayer.currentTime
Get and set Current local time of motion at top of play list, in milliseconds.
0
whichModel.keyframePlayer.playRate
Get and set A value indicating how quickly or slowly to play back the motion. For example, a value of 2.0 doubles the speed of the motion; a value of 0.5 halves the speed of the motion. This value is multiplied by the value of the playRate parameter of the play or queue command.
1.0
whichModel.keyframePlayer.playList.count
Get Current number of motions in the play list.
0
whichModel.keyframePlayer.rootLock
Get and set TRUE (1)= root translational component of the model remains at its referenced unanimated position (and therefore cannot disappear offstage).
FALSE (0)
whichModel.keyframePlayer.currentLoopState
Get and set TRUE (1)= animation loops; FALSE (0)= animation plays through once.
FALSE (0)
whichModel.keyframePlayer.blendTime
Get and set Length in milliseconds of the period when blending takes place between motions. The blendTime property is linked to motion duration. Motion blending is disabled if blendTime = 0 and autoBlend = TRUE.
500
Working with Models and Model Resources 135

whichModel.keyframePlayer.autoBlend
Get and set If TRUE, automatic linear blending (from 0.0 to 100.0) is applied over the blend time. Otherwise, blendTime is ignored, and the amount of blending is user-determined by the blendFactor property.
TRUE (1)
whichModel.keyframePlayer.blendFactor
Get and set The degree of blending between motions, expressed as a floating-point value between 0.0 and 100.0. A value of 0.0 uses all the previous motion. A value of 100.0 uses all of the next motion.The blendFactor can be changed frame by frame to create custom blending effects.
0
whichModel.keyframePlayer.positionReset
Get and set TRUE (1) = object returns to starting position at end of animation; FALSE (0) = object remains at final animation position, and begins again from there if looping is on.
TRUE (1)
Property Access Description Returns
Chapter 6136

Keyframe player events
These events are generated by keyframe animations:
whichModel.keyframePlayer.rotationReset
Get and set Normally a model snaps back to its original rotation after a motion finishes playing. This property maintains any or all of the rotational changes after playing is complete. The values are as follows:#none#x#y#z#xy#xz#all
#all
whichModel.keyframePlayer.lockTranslation
Get and set Defines the axis of translation to ignore when playing back a motion.The values are as follows:#none#x#y#z#xy#xz#allTo keep a model locked to a ground plane with the top pointing along the Z axis, set lockTranslation to #z.LockTranslation = #all is equivalent to rootLock = TRUE (1).
#none
Event name Description
#animationStarted
This is a system-defined notification event triggered when a motion begins playing. If looping is on, this event is triggered only by the first playthrough. During a blend of two animations, this event will be triggered as the blend begins.
#animationEnded This is a system-defined notification event triggered when a motion ends. If looping is on, this event is triggered only by the first playthrough. If blending is on, this event will be generated for the first animation when the blend is complete. There may be some latency because of the overhead of scheduling all of Director’s other events.
Property Access Description Returns
Working with Models and Model Resources 137

Mesh deform modifier properties
The mesh deform modifier lets you alter an existing model resource’s geometry at run time. You can create twist, bend, and ripple effects. Unlike other modifiers, the mesh deform modifier directly affects model resources as well as the models that use those resources. For example, if three car models share the same model resource, adding this modifier to one model and then deforming it will deform all the car models.
The mesh deform modifier is complex and is primarily useful for users with a thorough understanding of 3D geometry. However, you can take advantage of much of the modifier’s potential by using only the vertexList property.
Use these properties to work with the mesh deform modifier:
Property Access Description
whichModel.meshDeform.mesh.count
Get Returns the number of meshes in a model.
whichModel.meshDeform.mesh[index].vertexList
Get and set Returns a list of the vertices for the specified mesh. To modify the vertices in this mesh, set this property to a list of modified vertex positions, or modify individual vertices using bracket analysis.
whichModel.meshDeform.mesh[index].normalList
Get and set Returns a list of the normals for the specified mesh.
whichModel.meshDeform.mesh[index].textureCoordinateList
Get and set Returns a list of the texture coordinates for the specified mesh.
whichModel.meshDeform.mesh[index].face.count
Get Returns the number of triangular faces in a given mesh.
whichModel.meshDeform.mesh[index].face.[index]
Get Returns a list of three indexes into the vertex, normal, texture coordinate, and color lists. These indexes correspond to the corners of the face for the specified mesh.
Chapter 6138
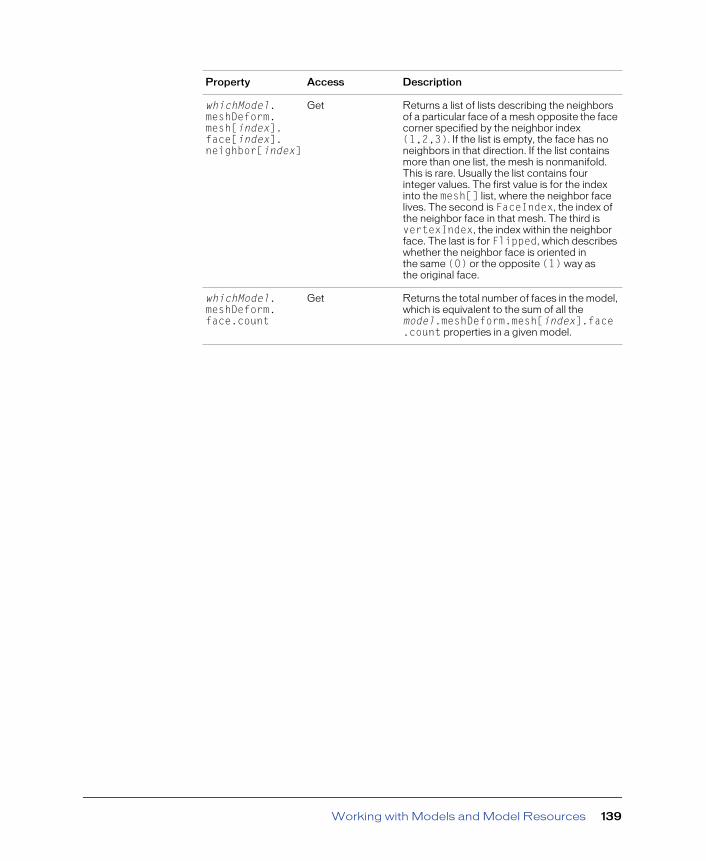
whichModel.meshDeform.mesh[index].face[index].neighbor[index]
Get Returns a list of lists describing the neighbors of a particular face of a mesh opposite the face corner specified by the neighbor index (1,2,3). If the list is empty, the face has no neighbors in that direction. If the list contains more than one list, the mesh is nonmanifold. This is rare. Usually the list contains four integer values. The first value is for the index into the mesh[] list, where the neighbor face lives. The second is FaceIndex, the index of the neighbor face in that mesh. The third is vertexIndex, the index within the neighbor face. The last is for Flipped, which describes whether the neighbor face is oriented in the same (0) or the opposite (1) way as the original face.
whichModel.meshDeform.face.count
Get Returns the total number of faces in the model, which is equivalent to the sum of all the model.meshDeform.mesh[index].face.count properties in a given model.
Property Access Description
Working with Models and Model Resources 139

MotionsMotions are simply animations that have been predefined in a 3D modeling application. They are included in the file that’s exported from the 3D application and imported into Director.
Motions can be reused on any model in the 3D cast member, as long as the motion is appropriate to the geometry of the model. The Lingo that follows can be used with either keyframe or bones motions.
Motion properties
Use these properties to work with motions:
Motion commands
Use this command to work with motions:
Property Access Returns
name Get Name of motion.
duration Get Time in milliseconds motion needs to play to completion.
type Get The type of motion with the following values:#keyFrame: suitable for use with the Keyframe player#bones: suitable for use with the Bones player#none: no mapping has been made for this motionThe default is #none.
Command Description
map(motion, "bone name") Maps the given motion into the current motion beginning at the named bone.If no bone name is specified, the mapping begins at the root bone.The map() command will replace any motion tracks mapped previously to the specified bone and all of its children. Motion mapping has no effect on motions that are already on a play list.
Chapter 6140

7
CHAPTER 7
. . . . . . . . . . . . . . . . . . . . . . . . . . . . . . . . . . . . . . . . . . . . . . . . . . . . . . . .. . . . . . . . . . . . . . . . . . . . . . . . . . . . . . . . . . . . . . . . . . . . . . . . . . . . .Working with Lights and Cameras
Lights illuminate the 3D world and the models in it. Without lights, the world exists, and actions can take place, but users see nothing. You can add lights to your 3D world in your 3D modeling application or with the Director Property Inspector. For information on the Property Inspector, see “3D Basics” on page 45. You can also add and remove lights, change their color or position, and manipulate their parent-child relationships using Lingo commands and properties. Those commands and properties are detailed here. You can find the same lighting commands and properties, with more detailed syntax and coding examples, in “3D Lingo Dictionary” on page 193.
Cameras act as windows into a 3D world. Each camera that exists in a 3D cast member offers a different view into it, and each sprite that uses a 3D cast member uses one of these cameras. A camera’s position can be moved with the Property Inspector or the Shockwave 3D window. You can also use Director’s 3D behaviors or Lingo to manipulate camera positions. For information on the Property Inspector and the Shockwave 3D window, see “3D Basics” on page 45. For information about behaviors, see “Using 3D Behaviors” on page 59. More complex manipulations require the use of Lingo commands and properties. These are detailed here and in “3D Lingo Dictionary” on page 193. Accessing the properties and commands of a light or camera requires that the light or camera be on the Stage or explicitly loaded with the preLoad() or loadFile() command.
Lights and cameras have the same transform methods and parent-child properties as models and groups. Lights and cameras can be added, deleted, cloned, moved, and rotated in the same ways as models and groups. You can access their names, parents, children, and other properties in the same way you would with models and groups. However, there are some important differences, which arise from the specific roles that lights and cameras play in the 3D world.
141
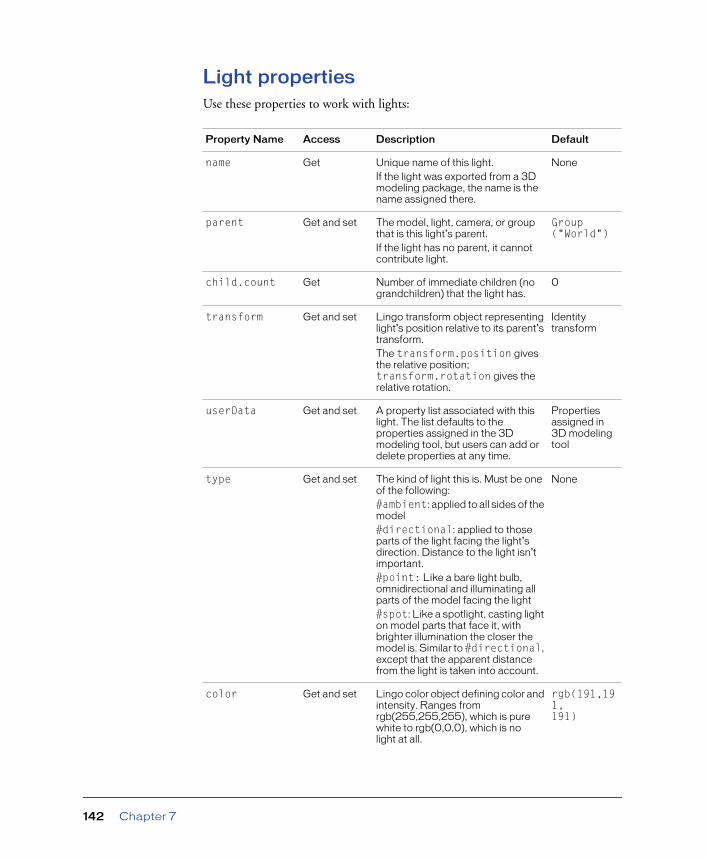
Light propertiesUse these properties to work with lights:
Property Name Access Description Default
name Get Unique name of this light.If the light was exported from a 3D modeling package, the name is the name assigned there.
None
parent Get and set The model, light, camera, or group that is this light’s parent.If the light has no parent, it cannot contribute light.
Group ("World")
child.count Get Number of immediate children (no grandchildren) that the light has.
0
transform Get and set Lingo transform object representing light’s position relative to its parent’s transform.The transform.position gives the relative position; transform.rotation gives the relative rotation.
Identity transform
userData Get and set A property list associated with this light. The list defaults to the properties assigned in the 3D modeling tool, but users can add or delete properties at any time.
Properties assigned in 3D modeling tool
type Get and set The kind of light this is. Must be one of the following:#ambient: applied to all sides of the model#directional: applied to those parts of the light facing the light’s direction. Distance to the light isn’t important.#point: Like a bare light bulb, omnidirectional and illuminating all parts of the model facing the light#spot: Like a spotlight, casting light on model parts that face it, with brighter illumination the closer the model is. Similar to #directional, except that the apparent distance from the light is taken into account.
None
color Get and set Lingo color object defining color and intensity. Ranges from rgb(255,255,255), which is pure white to rgb(0,0,0), which is no light at all.
rgb(191,191,191)
Chapter 7142

spotAngle Get and set Angle of the light’s projection cone.If type equals #spot, setting a value less than the umbra causes a Lingo “property not found” error.
90.0
attenuation Get and set A three-value vector controlling the constant, linear, and quadratic attenuation factors for spotlights.
vector(1.0,0.0,0.0)
specular Get and set TRUE (1)/FALSE (0) value that controls whether or not the light produces specular effects on surfaces. The property is ignored for ambient lights.Although TRUE (1) is the default, switching to FALSE (0) may improve performance.
TRUE (1)
spotDecay Get and set TRUE (1)/FALSE (0) value that controls whether or not spotlight intensity falls off with camera distance.
FALSE (0)
pointAtOrientation
Get and set Two orthogonal vectors (objectRelativeDirection and objectRelativeUp) controlling how the light’s pointAt command works.
None
boundingSphere Get A list containing a vector and a floating-point value, with the vector representing the position and the value the radius of a bounding sphere surrounding the light and all its children.
[vector (0,0,0), 0.0]
worldPosition Get and set Position of the light in world coordinates. Shortcut for the command node.getWorldTransform()position.
Vector object
Property Name Access Description Default
Working with Lights and Cameras 143
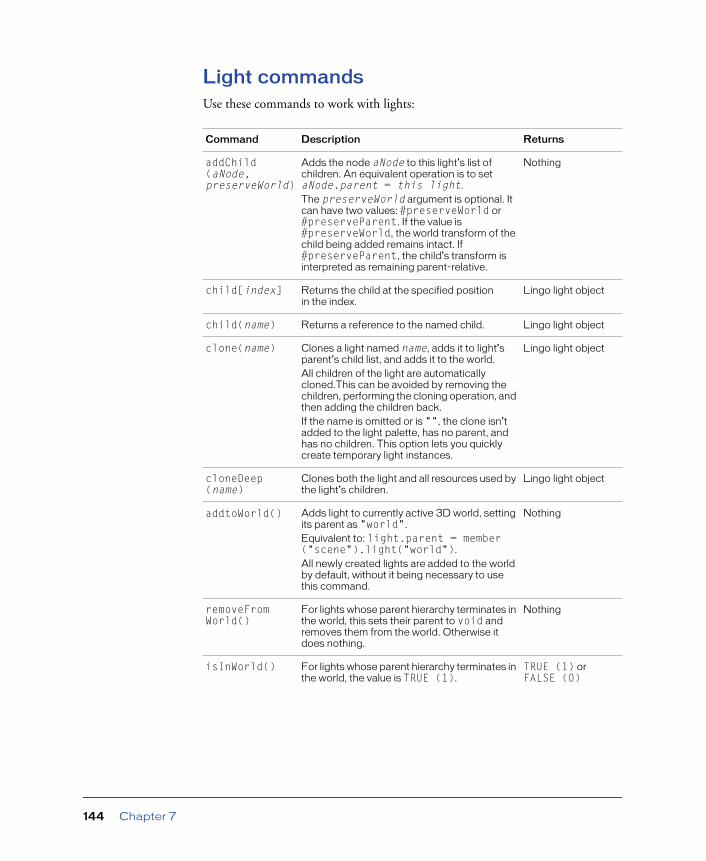
Light commandsUse these commands to work with lights:
Command Description Returns
addChild(aNode, preserveWorld)
Adds the node aNode to this light’s list of children. An equivalent operation is to set aNode.parent = this light.The preserveWorld argument is optional. It can have two values: #preserveWorld or #preserveParent. If the value is #preserveWorld, the world transform of the child being added remains intact. If #preserveParent, the child’s transform is interpreted as remaining parent-relative.
Nothing
child[index] Returns the child at the specified position in the index.
Lingo light object
child(name) Returns a reference to the named child. Lingo light object
clone(name) Clones a light named name, adds it to light’s parent’s child list, and adds it to the world.All children of the light are automatically cloned.This can be avoided by removing the children, performing the cloning operation, and then adding the children back.If the name is omitted or is "", the clone isn’t added to the light palette, has no parent, and has no children. This option lets you quickly create temporary light instances.
Lingo light object
cloneDeep(name)
Clones both the light and all resources used by the light’s children.
Lingo light object
addtoWorld() Adds light to currently active 3D world, setting its parent as "world".Equivalent to: light.parent = member ("scene").light("world").All newly created lights are added to the world by default, without it being necessary to use this command.
Nothing
removeFrom World()
For lights whose parent hierarchy terminates in the world, this sets their parent to void and removes them from the world. Otherwise it does nothing.
Nothing
isInWorld() For lights whose parent hierarchy terminates in the world, the value is TRUE (1).
TRUE (1) or FALSE (0)
Chapter 7144

registerScript(eventName, handlerName, scriptInstance)
Registers a handler named handlerName that is called in the instance scriptInstance when the event eventName occurs.If scriptInstance is 0, a movie script handler called eventName is called. The user defines what eventName is.
TRUE (1) or FALSE (0), with TRUE (1) indicating that the event happened and FALSE (0) that it did not
translate(xIncrement,yIncrement,zIncrement,relativeTo)
Moves the light forward by xIncrement along the X axis, yIncrement along the Y axis, and zIncrement along the Z axis. The relativeTo parameter is optional. It determines how arguments are interpreted. The possible values are as follows:#self: the default. Increments are applied relative to the light’s local coordinate system.#parent: increments are relative to the light’s parent’s coordinate system.#world: increments are relative to the world’s coordinate system. Equivalent to #parent if the parent is the world.node (model, light, camera, or group): increments are relative to the argument’s coordinate system.
Nothing
translate(directionVector, relativeTo)
Moves the light directionVector.length() in the direction of the vector directionVector. The relativeTo argument is optional and defaults to #self.
Nothing
translate(x,y,z,relativeTo)
Moves the light distance x along the X axis, distance y along the Y axis, and distance z along the Z axis. The relativeTo argument is optional and defaults to #self. This command can also be written astranslate (vector(x,y,z) relativeTo)
Nothing
rotate(x,y,z, relativeTo)
Rotates the light by x degrees around the X axis, y degrees around the Y axis, and z degrees around the Z axis.The relativeTo argument is optional and defaults to #self. If included, it defines the coordinate space of the axes.This command can also be written asrotate (vector(x,y,z) relativeTo)
Nothing
rotate (position, axis, angle, relativeTo)
Rotates the light around the axis vector in the specified position the specified number of degrees. The relativeTo argument is optional and defaults to #self.
Nothing
Command Description Returns
Working with Lights and Cameras 145
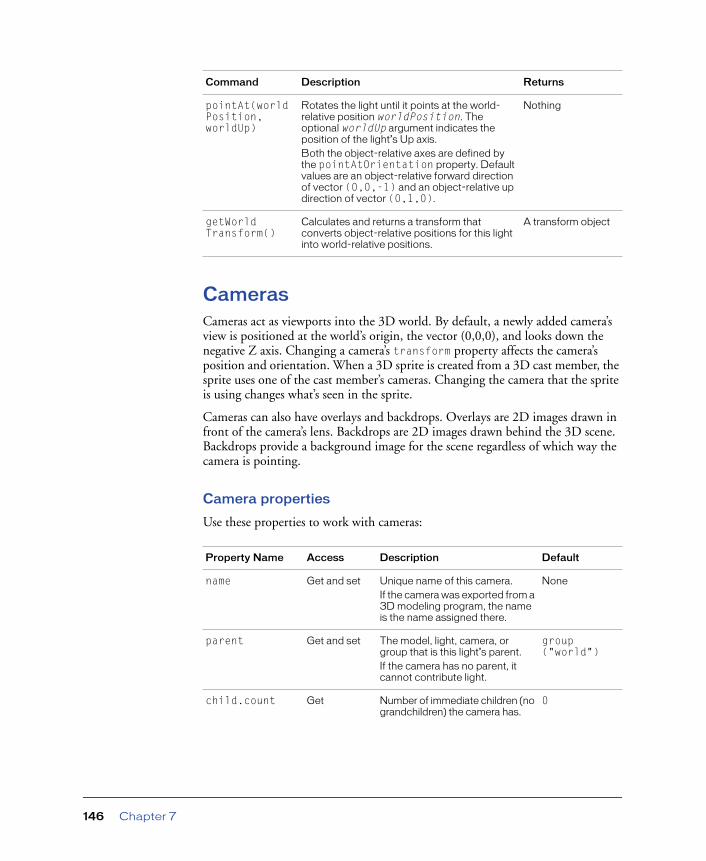
CamerasCameras act as viewports into the 3D world. By default, a newly added camera’s view is positioned at the world’s origin, the vector (0,0,0), and looks down the negative Z axis. Changing a camera’s transform property affects the camera’s position and orientation. When a 3D sprite is created from a 3D cast member, the sprite uses one of the cast member’s cameras. Changing the camera that the sprite is using changes what’s seen in the sprite.
Cameras can also have overlays and backdrops. Overlays are 2D images drawn in front of the camera’s lens. Backdrops are 2D images drawn behind the 3D scene. Backdrops provide a background image for the scene regardless of which way the camera is pointing.
Camera properties
Use these properties to work with cameras:
pointAt(worldPosition, worldUp)
Rotates the light until it points at the world-relative position worldPosition. The optional worldUp argument indicates the position of the light’s Up axis.Both the object-relative axes are defined by the pointAtOrientation property. Default values are an object-relative forward direction of vector (0,0,-1) and an object-relative up direction of vector (0,1,0).
Nothing
getWorldTransform()
Calculates and returns a transform that converts object-relative positions for this light into world-relative positions.
A transform object
Property Name Access Description Default
name Get and set Unique name of this camera.If the camera was exported from a 3D modeling program, the name is the name assigned there.
None
parent Get and set The model, light, camera, or group that is this light’s parent.If the camera has no parent, it cannot contribute light.
group ("world")
child.count Get Number of immediate children (no grandchildren) the camera has.
0
Command Description Returns
Chapter 7146

transform Get and set Lingo transform object representing camera’s position relative to its parent’s transform.The transform.position property gives the relative position; transform.rotation gives the relative rotation.
Identity transform
userData Get and set A property list associated with this camera. The list defaults to the properties assigned in the 3D modeling tool, but users can add or delete properties at any time.
Properties assigned in 3D modeling tool
hither Get and set A specified distance from the camera that defines the near Z-axis clipping of the view frustum. Objects closer than hither are not drawn.
5.0
yon Get and set A specified distance from the camera that defines the far Z-axis clipping of the view frustum. Objects farther than yon are not drawn.
3.403e38
rect Get and set The rectangle controlling the screen size and position of the camera, with the coordinates given relative to the upper left corner of the sprite.
rect(0,0,320,200)
projectionAngle
Get and set The vertical projection angle of the view frustum.
30.0
colorBuffer.clearAtRender
Get and set TRUE (1) or FALSE (0) value indicating whether color buffer is or isn’t cleared out after each frame.If value is set to TRUE (1), the effect is similar to the trails ink effect, although it’s limited to the redrawing of models within the sprite itself.
TRUE (1)
colorBuffer.clearValue
Get and set Lingo color object defining color used to clear out buffer if colorBuffer.clearAtRender is TRUE (1).
rgb(0,0,0)
fog.enabled Get and set TRUE (1) or FALSE (0) value indicating whether camera adds fog to the scene.
FALSE (0)
fog.near Get and set Distance to start of fog. 0.0
Property Name Access Description Default
Working with Lights and Cameras 147

fog.far Get and set Distance to maximum fog intensity.
1000.0
fog.color Get and set Lingo color object describing fog color.
rgb(0,0,0)
fog.decayMode Get and set How fog varies between near and far, with the following possible values:#linear: density is linearly interpolated between fog.near and fog.far.#exponential: fog.far is saturation point; fog.near is ignored.#exponential2: fog.near is saturation point; fog.far is ignored.
#exponential
projection Get and set Method of determining the vertical field of view, which must be of type #perspective or #orthographic.
#perspective
fieldOfView Get and set A floating-point value specifying the vertical projection angle in degrees.
30.0
orthoheight Get and set The number of perpendicular world units that fit vertically into the sprite.
200.0
rootNode Get and set Property controlling which objects are visible in a particular camera’s view. Its default value is the world, so all cameras you create show all nodes within the world. If, however, you change rootNode to be a particular node within the world, a sprite of the cast member will show only the root node and its children.
group("world")
overlay[index].loc
Get and set Location, in pixels, of the overlay, as measured from the upper left corner of the sprite’s rect to the overlay[index].source’s regPoint.
point(0,0)
overlay[index].source
Get and set Lingo texture object used as the source for this overlay.
None
overlay[index].scale
Get and set Scale value used by a specific overlay in the camera’s list of overlays.
1.0
Property Name Access Description Default
Chapter 7148

overlay[index].regPoint
Get and set Texture-relative rotation point, similar to a sprite’s regPoint.
point(0.0)
overlay[index].rotation
Get and set Rotation value used by a specific overlay in the camera’s list of overlays.
O, O
overlay[index].blend
Get and set Blend value used by a specific overlay in the camera’s list of overlays. 100 is fully opaque; 0 is fully transparent.
100.0
overlay.count Get and set Number of overlays in use on this sprite.
0
backdrop[index].loc
Get and set Location, in pixels, of the backdrop, as measured from the upper left corner of the sprite’s rect to the backdrop[index].source’s regpoint.
point(0,0)
backdrop[index].source
Get and set Lingo texture object used as the source for this backdrop.
None
backdrop[index].scale
Get and set Scale value used by a specific backdrop in the camera’s list of backdrops.
1.0
backdrop[index].rotation
Get and set Rotation value used by a specific backdrop in the camera’s list of backdrops.
0.0
backdrop[index].regPoint
Get and set Texture-relative rotation point, similar to a sprite’s regPoint.
point(O,O)
backdrop[index].blend
Get and set Blend value used by a specific backdrop in the camera’s list of backdrops.
100.0
backdrop.count Get Number of backdrops in use on this sprite.
0
boundingSphere Get A list containing a vector and a floating-point value, with the vector representing the position and the value the radius of a bounding sphere surrounding the camera and all its children.
[vector (0,0,0), 0.0]
worldPosition Get and set Position of the camera in world coordinates. Shortcut for the command node.getWorldTransform()position.
Vector object
Property Name Access Description Default
Working with Lights and Cameras 149

Camera commands
Use these commands to work with cameras:
Command Description Returns
addChild(aNode, preserveWorld)
Adds aNode to this camera’s list of children. An equivalent operation is to set aNode.parent to equal thisCamera.The preserveWorld argument is optional.I t can have two values: #preserveWorld or #preserveParent. If the value is #preserveWorld, the world transform of the child being added remains intact. If #preserveParent, the child’s transform is interpreted as remaining parent-relative.
Nothing
child[index] Returns the child at the specified position in the index.
Lingo camera object
child(name) Returns the child named name. Lingo camera object
clone(name) Clones a camera named name, adds it to the cameras’s parent’s child list, and adds it to the world.All children of the camera are automatically cloned.This can be avoided by removing the children, performing the cloning operation, and then adding the children back.If the name is omitted or is "", the clone isn’t added to the camera palette, has no parent, and has no children. This option lets you quickly create temporary camera instances.
Lingo camera object
cloneDeep(name) Clones both the camera and all resources used by the camera’s children.
Lingo camera object
addtoWorld() Adds a camera to the currently active 3D world, setting its parent as "world"Equivalent to camera.parent=member ("scene").camera("world").All newly created cameras are added to the world by default, without it being necessary to use this command.
Nothing
getWorldTransform()
Calculates and returns a transform that converts object-relative positions for this light into world-relative positions.
A transform object
removeFromWorld()
For cameras whose parent hierarchy terminates in the world, this sets their parent to void and removes them from the world. Otherwise it does nothing.
Nothing
isInWorld() For cameras whose parent hierarchy terminates in the world, the value is TRUE (1).
TRUE (1) or FALSE (0)
Chapter 7150

registerScript(eventName, handlerName, scriptInstance)
Registers a handler named handlerName that is called in the script scriptInstance when the event eventName occurs.If scriptInstance is 0, a movie script handler called eventName is called. The user defines what eventName is.
TRUE (1) or FALSE (0), with TRUE (1) indicating that the event happened and FALSE (0) that it did not
translate(xIncrement,yIncrement,zIncrement,relativeTo)
Moves the camera forward by xIncrement along the X axis, yIncrement along the Y axis, and zIncrement along the Z axis. The relativeTo parameter is optional. It determines how arguments are interpreted. The possible values are as follows:#self: the default. Increments are applied relative to the camera’s local coordinate system.#parent: increments are relative to the camera’s parent’s coordinate system.#world: increments are relative to the world coordinate system. Equivalent to #parent if parent is the world.node (model, light, camera, or group): increments are relative to the coordinate system of the argument.
Nothing
translate(directionVector, relativeTo)
Moves the camera directionVector.length() in the direction of the directionVector.The relativeTo argument is optional and defaults to #self.
Nothing
translate(x,y,z,relativeTo)
Moves the camera distance x along the X axis, distance y along the Y axis, and distance z along the Z axis.The relativeTo argument is optional and defaults to #self. This command can also be written astranslate(vector(x,y,z) relativeTo).
Nothing
rotate(x,y,z, relativeTo)
Rotates the camera by x degrees around the X axis, y degrees around the Y axis, and z degrees around the Z axis.The relativeTo argument is optional and defaults to #self. If included, it defines the coordinate space of the axes.This command can also be written asrotate(vector(x,y,z) relativeTo)
Nothing
rotate (position, axis, angle, relativeTo)
Rotates the camera around the axis vector in the specified position the specified number of degrees. The relativeTo argument is optional and defaults to #self.
Nothing
Command Description Returns
Working with Lights and Cameras 151

pointAt(worldPosition, worldUp)
Rotates the camera until it points at the world-relative position worldPosition. The optional worldUp argument indicates the position of the camera’s Up axis.Both the object-relative axes are defined by the pointAtOrientation property. Default values are an object-relative forward direction of vector (0,0,-1) and an object-relative up direction of vector (0,1,0).
Nothing
getWorldTransform()
Calculates and returns a transform that converts object-relative positions for this camera into world-relative positions.
A transform object
Command Description Returns
Chapter 7152

8
CHAPTER 8
. . . . . . . . . . . . . . . . . . . . . . . . . . . . . . . . . . . . . . . . . . . . . . . . . . . . . . . .. . . . . . . . . . . . . . . . . . . . . . . . . . . . . . . . . . . . . . . . . . . . . . . . . . . . .Controlling the 3D World
Macromedia Director 8.5 Shockwave Studio provides powerful methods for overall control of the 3D world, including Lingo for handling new 3D generated events, selecting models (picking), vector math operations, and transforms. In addition, the properties and methods of Director’s global renderer services object supply common rendering properties for all 3D sprites and cast members. Finally, 3D cast member and sprite properties and commands allow additional control of their content during playback.
The commands and properties given here in tabular form are also listed alphabetically, with accompanying syntax, definitions, and examples, in “3D Lingo Dictionary” on page 193.
153

3D Lingo eventsEvent handling lets you use the registerForEvent command to specify a handler to run when a particular event occurs within a specific cast member. With the registerForEvent command you specify the type of event that will trigger the handler, the handler name, and the script object that contains the handler. The script object can be a child script, an instance of a behavior attached to a sprite, or any other script. If the script object isn’t specified, the handler is called in the first movie script in which it is found.
Use these commands to set up event handling:
Command Description Returns
registerForEvent(eventName,handlerName,scriptInstance, model)
The event eventName is one of the following:#collideAny: Called when any collision occurs.#collideWith: Called when a collision with a specific model occurs and implicitly registered when setCollisionCallback(...) is called. Equivalent to callingmodel.collision.setCollisionCallback.#timeMS: Sets up a time-based simulation callback using the format registerForEvent(timeMS, handlerName, scriptInstance)begin, period, repetitions.The begin and period arguments are in milliseconds. If repetitions is set to 0, the simulation continues indefinitely.#animationStarted: Called whenever a keyFrame or bones motion begins.#animationEnded: Called whenever a keyFrame or bones motion ends.Any user-defined symbol: Registers to receive any user-defined event sent from a SendEvent call.
TRUE (1) if the operation succeeds.FALSE (0) if the operation fails.
unregisterAllEvents()_
Unregisters all events. Nothing.A Lingo error is generated if the operation fails.
sendEvent(eventName, arg1,arg2...)
Sends an event named eventName to all scripts registered to receive it.Similar to sendAllSprites() except that the event is delivered only to scripts that are registered to receive it.
Nothing.A Lingo error is generated if the operation fails.
Chapter 8154
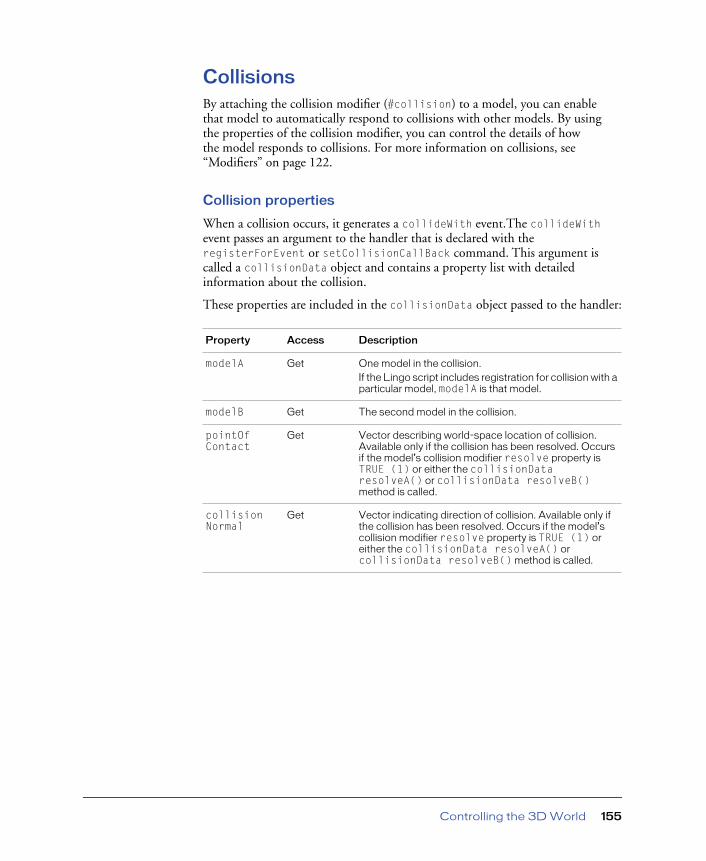
CollisionsBy attaching the collision modifier (#collision) to a model, you can enable that model to automatically respond to collisions with other models. By using the properties of the collision modifier, you can control the details of how the model responds to collisions. For more information on collisions, see “Modifiers” on page 122.
Collision properties
When a collision occurs, it generates a collideWith event.The collideWith event passes an argument to the handler that is declared with the registerForEvent or setCollisionCallBack command. This argument is called a collisionData object and contains a property list with detailed information about the collision.
These properties are included in the collisionData object passed to the handler:
Property Access Description
modelA Get One model in the collision.If the Lingo script includes registration for collision with a particular model, modelA is that model.
modelB Get The second model in the collision.
pointOfContact
Get Vector describing world-space location of collision. Available only if the collision has been resolved. Occurs if the model’s collision modifier resolve property is TRUE (1) or either the collisionData resolveA() or collisionData resolveB() method is called.
collisionNormal
Get Vector indicating direction of collision. Available only if the collision has been resolved. Occurs if the model’s collision modifier resolve property is TRUE (1) or either the collisionData resolveA() or collisionData resolveB() method is called.
Controlling the 3D World 155

Collision commands
Collision commands allow you to override certain aspects of the default behavior set for models during collisions. If neither of the models involved in the collision has resolve set to TRUE, you can manually resolve the collision using resolveA(true) for model A or resolveB(true) for model B.
Selecting models
Selecting models (picking) refers to clicking on models in a 3D cast member. Because models are objects that exist within a 3D cast member and a 3D sprite, they are not normally sensitive to mouse clicks. Normally it is only the entire sprite that is sensitive to mouse clicks.
You can use Lingo to determine specifically which models have been clicked when a user clicks within a 3D sprite. In practice, this allows for changing model positions to make it appear that an action such as a button being pushed or a door being opened has taken place. Picking can be accomplished using cast member or camera commands.
Command Description Returns
collisionData.resolveA(trueOrFalse)
Resolves collision for model A. Nothing
collisionData.resolveB(trueOrFalse)
Resolves collision for model B. If the argument is FALSE (0), the collision won’t be resolved. This overrides the collision.resolve property, if any, set for model B.
Nothing
Chapter 8156

Camera commands
These camera functions allow you to determine which models have been clicked when a user clicks the mouse within a 3D sprite. You can also translate coordinates in 3D space to coordinates in 2D sprite space and vice versa.
Function Description Returns
worldSpaceToSpriteSpace(vector)
Returns the 2D sprite-space coordinates of a point from a 3D world vector.
A point.
spriteSpaceToWorldSpace(point)
The opposite of the worldSpaceToSpriteSpace(vector), this function returns a world-space vector on the camera’s projection plane from a sprite-space point.Multiple world-space positions can map to the same sprite-space point. A round-tripy=worldSpaceToSpriteSpace(x)z=worldSpaceToSpriteSpace(y)won’t necessarily result in x=z.
A vector.
modelUnderLoc(point)
Returns the first model intersected by a ray from a location point within the rect of the sprite using this camera. The location point is relative to the upper left corner of the sprite, in pixels. The ray is cast forward in the direction the camera is looking.This function is useful for picking in conjunction with an onMouseDown handler. For accuracy, be sure to subtract the upper left corner of the sprite’s loc from the mouseLoc.
The first model intersected by the ray.A value of void means there is no model under the ray.
Controlling the 3D World 157

modelsUnderLoc(point, optionalMaxNumberOfModels)
Returns a list of all models intersected by a ray from a location point within the rect of the sprite using this camera. The location point is relative to the upper left corner of the sprite, in pixels. The ray is cast forward in the direction the camera is looking.This function is useful for picking in conjunction with an onMouseDown handler. For accuracy, be sure to subtract the upper left corner of the sprite’s loc from the mouseLoc.
The first model intersected by the ray or a list of up to the specified maximum.If no maximum is specified, the command returns all models under the ray.A value of void means there is no model under the ray.
modelsUnderRay(locationVector,directionVector,optionalMaxNumberOfModels)
Returns a list of models under the ray starting at the vector locationVector and pointing down the vector directionVector, with both vectors specified in world-relative coordinates.
The first model intersected by the ray plus a list of up to the specified maximum number of models.If the maximum number of models isn’t specified, all models the ray intersects are returned.
Function Description Returns
Chapter 8158

Vector math A 3D vector describes both direction and location in 3D space. Vector objects include floating-point values for position along each of the X, Y, and Z axes. Vectors can be node-relative or world-relative. If they are node-relative, their X, Y, and Z values are relative to the position of the node. If they are world-relative, their X, Y, and Z directions are relative to the world.
Vector math operations perform calculations using each of the X, Y, and Z values. These calculations are useful for performing intelligent movement and rotation of models.
Vector creation commands
Use these functions to create vectors:
Vector properties
Use these properties to work with vectors:
Function Description Returns
vector(x,y,z)
Creates a vector from arguments representing all axes.
A vector object
randomVector()
Creates a vector describing a randomly chosen point on the surface of a unit sphere. Differs from vector(random(10)/10.0, random(10)/10.0, random(10)/10.0) because the randomVector() method always results in a unit vector.
A unit vector
Property Access Description
magnitude Get The magnitude of the vector. Equivalent to the length of the vector.
length Get The length of the vector. Equivalent to the magnitude of the vector.
[index] Get and set Returns the value of a vector at a specified point in an index between 1 and 3.
x Get and set The x component of a vector.
y Get and set The y component of a vector.
z Get and set The z component of a vector.
Controlling the 3D World 159
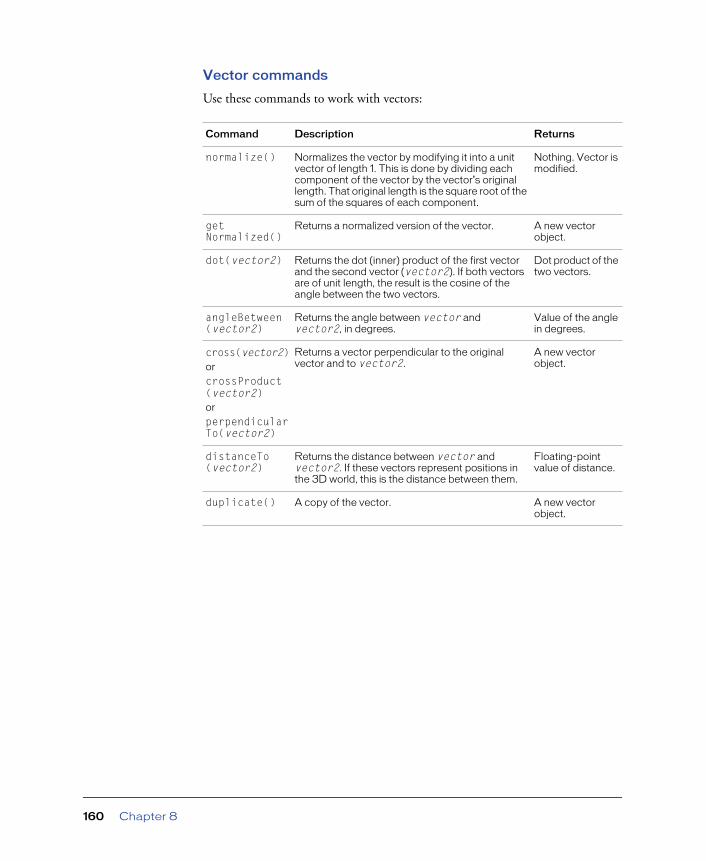
Vector commands
Use these commands to work with vectors:
Command Description Returns
normalize() Normalizes the vector by modifying it into a unit vector of length 1. This is done by dividing each component of the vector by the vector’s original length. That original length is the square root of the sum of the squares of each component.
Nothing. Vector is modified.
getNormalized()
Returns a normalized version of the vector. A new vector object.
dot(vector2) Returns the dot (inner) product of the first vector and the second vector (vector2). If both vectors are of unit length, the result is the cosine of the angle between the two vectors.
Dot product of the two vectors.
angleBetween(vector2)
Returns the angle between vector and vector2, in degrees.
Value of the angle in degrees.
cross(vector2)or
crossProduct(vector2)or
perpendicularTo(vector2)
Returns a vector perpendicular to the original vector and to vector2.
A new vector object.
distanceTo(vector2)
Returns the distance between vector and vector2. If these vectors represent positions in the 3D world, this is the distance between them.
Floating-point value of distance.
duplicate() A copy of the vector. A new vector object.
Chapter 8160
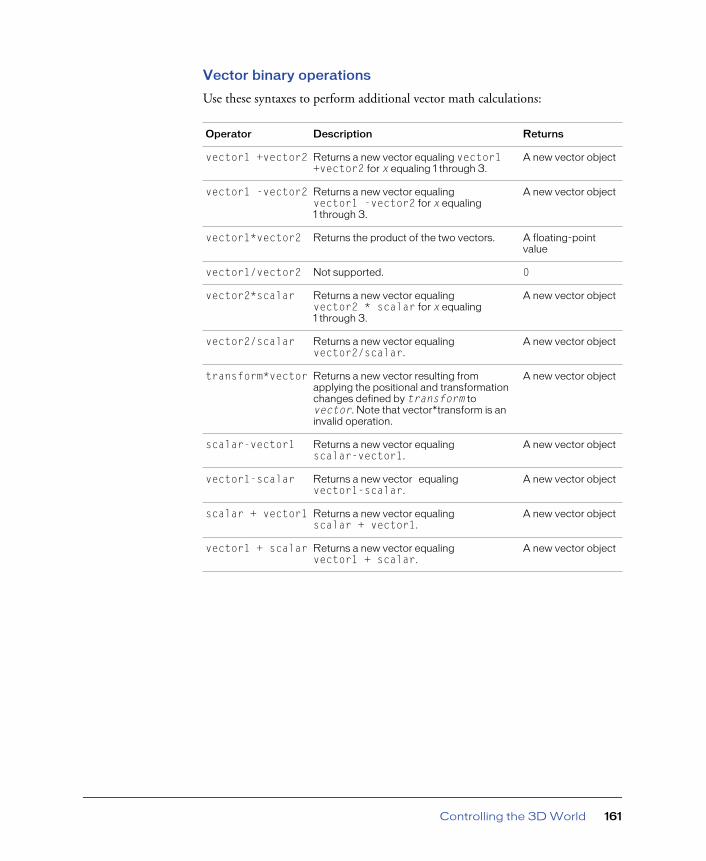
Vector binary operations
Use these syntaxes to perform additional vector math calculations:
Operator Description Returns
vector1 +vector2 Returns a new vector equaling vector1 +vector2 for x equaling 1 through 3.
A new vector object
vector1 -vector2 Returns a new vector equaling vector1 -vector2 for x equaling 1 through 3.
A new vector object
vector1*vector2 Returns the product of the two vectors. A floating-point value
vector1/vector2 Not supported. 0
vector2*scalar Returns a new vector equaling vector2 * scalar for x equaling 1 through 3.
A new vector object
vector2/scalar Returns a new vector equaling vector2/scalar.
A new vector object
transform*vector Returns a new vector resulting from applying the positional and transformation changes defined by transform to vector. Note that vector*transform is an invalid operation.
A new vector object
scalar-vector1 Returns a new vector equaling scalar-vector1.
A new vector object
vector1-scalar Returns a new vector equaling vector1-scalar.
A new vector object
scalar + vector1 Returns a new vector equaling scalar + vector1.
A new vector object
vector1 + scalar Returns a new vector equaling vector1 + scalar.
A new vector object
Controlling the 3D World 161

TransformsA transform is a data object describing a model’s position, orientation, and scale in the 3D world. Transform functions can be used to move a given vector, light, camera, or model from its current location to a new position and/or orientation.
Transform creation function
Use the transform() function to create a new transform data object:
Transform properties
Use these properties to work with transforms:
Function Description Returns
transform() Creates a new transform initialized as the identity transform. The identity transform has no rotation and a vector position of (0,0,0)
A new transform object
Property Access Description Default
position Get and set Lingo vector object describing the position of a transform with the value vector(xOffset, yOffset, zOffset). A model.transform position represents the model’s position in relation to its parent.
vector(0,0,0)
scale Get and set Lingo vector object describing the x, y, and z scale of the transform with the vector value vector(xScale, yScale, zScale).Scaling is always applied modelrelative.
vector(1,1,1)
Chapter 8162

rotation Get and set Lingo vector object describing the xRotation, yRotation, and zRotation components of the transform with the value vector(xRotation, yRotation, zRotation), with the rotation values defined in degrees.This value can vary because of the permissible types of transform operation. For example, translate followed by rotate gives a different value than rotate followed by translate, and the results can’t be differentiated after the fact from the rotational information alone. The rotate() and preRotate() commands are the preferred way to modify a transform’s orientation. Rotation is generally relative to the object’s original orientation at the start of the movie.
vector(0,0,0)
axisAngle Get and set A list including a vector and a floating-point value that describes this transform’s rotation as an axis/angle pair.The vector represents the direction, and the angle represents the rotation around the vector.
[vector(1.0000, 0.0000,0.0000)A]
x axis Get and set A vector representing the transform’s canonical X axis in transform space. Example:transform.identity()transform.rotate(0,90,0))put transform.xaxis--vector(0,0,-1)Canonical means reduced to the simplest possible mathematical expression.
vector(1,0,0)
Property Access Description Default
Controlling the 3D World 163

Transform commands
Use these commands to work with transforms:
y axis Get and set A vector representing the transform’s canonical Y axis in transform space. Example:transform.identity()transform.rotate(90,0,0)put transform.yaxis--vector(0,0,1)
vector(0,1,0)
z axis Get and set A vector representing the transform’s canonical Z axis in transform space. Example:transform.identity()transform.rotate(0,90,0)put transform.zaxis--vector(1,0,0)
vector(0,0,1)
Command Description Returns
rotate(xAngle, yAngle, ZAngle)
Applies a rotation transformation after the current transformation:model.transform.identity()model.transform.translate(100,0,0)model.transform.rotate(0,0,90)After this series of transformations, performed in this order, the model’s local origin will be at (0,100,0), assuming the model’s parent is the world.
Nothing
preRotate(xAngle, yAngle, ZAngle)
Applies a rotation transformation before the current transformation:model.transform.identity()model.transform.translate(100,0,0)model.transform.preRotate(0,0,90)After this series of transformations, performed in this order, the model’s local origin will be at (100,0,0), assuming the model’s parent is the world.
Nothing
rotate(point,vector, angle)
Similar to transform.rotate(xAngle, yAngle, zAngle), except that the arguments are two vectors specifying an axis of rotation as a point and a vector, plus an angle specifying the clockwise rotation around that axis:model.transform.identity()model.transform.translate(-50,0,0)model.transform.rotate(vector(100,0,0) vector(0,1,0))After this series of transformations, performed in this order, the model’s local origin will be at (250,0,0), assuming the model’s parent is the world.
Nothing
Property Access Description Default
Chapter 8164
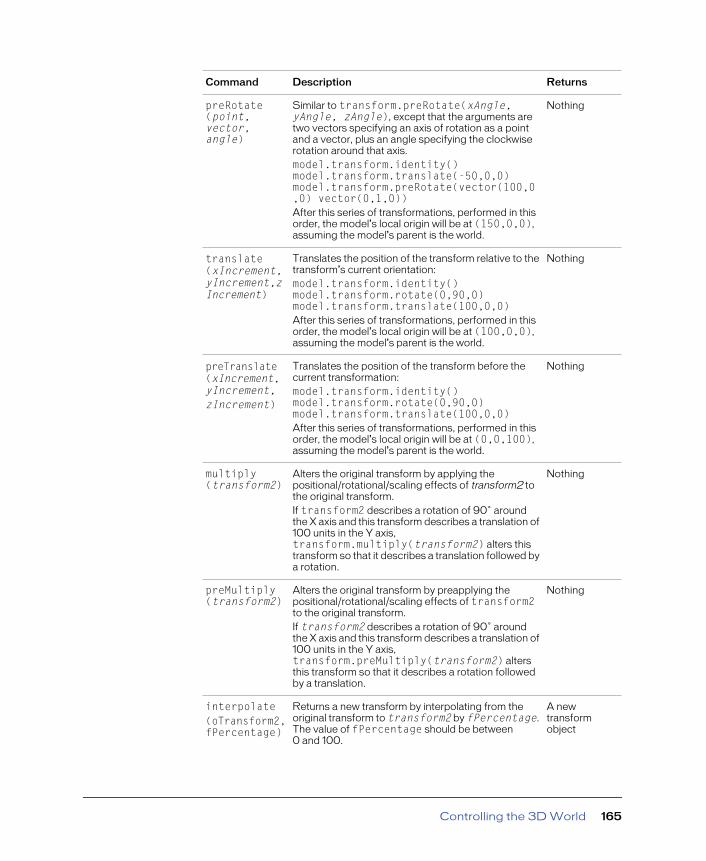
preRotate(point,vector, angle)
Similar to transform.preRotate(xAngle, yAngle, zAngle), except that the arguments are two vectors specifying an axis of rotation as a point and a vector, plus an angle specifying the clockwise rotation around that axis.model.transform.identity()model.transform.translate(-50,0,0)model.transform.preRotate(vector(100,0,0) vector(0,1,0))After this series of transformations, performed in this order, the model’s local origin will be at (150,0,0), assuming the model’s parent is the world.
Nothing
translate(xIncrement,yIncrement,zIncrement)
Translates the position of the transform relative to the transform’s current orientation:model.transform.identity()model.transform.rotate(0,90,0)model.transform.translate(100,0,0)After this series of transformations, performed in this order, the model’s local origin will be at (100,0,0), assuming the model’s parent is the world.
Nothing
preTranslate(xIncrement,yIncrement,zIncrement)
Translates the position of the transform before the current transformation:model.transform.identity()model.transform.rotate(0,90,0)model.transform.translate(100,0,0)After this series of transformations, performed in this order, the model’s local origin will be at (0,0,100), assuming the model’s parent is the world.
Nothing
multiply(transform2)
Alters the original transform by applying the positional/rotational/scaling effects of transform2 to the original transform.If transform2 describes a rotation of 90˚ around the X axis and this transform describes a translation of 100 units in the Y axis, transform.multiply(transform2) alters this transform so that it describes a translation followed by a rotation.
Nothing
preMultiply(transform2)
Alters the original transform by preapplying the positional/rotational/scaling effects of transform2 to the original transform.If transform2 describes a rotation of 90˚ around the X axis and this transform describes a translation of 100 units in the Y axis, transform.preMultiply(transform2) alters this transform so that it describes a rotation followed by a translation.
Nothing
interpolate(oTransform2,fPercentage)
Returns a new transform by interpolating from the original transform to transform2 by fPercentage. The value of fPercentage should be between 0 and 100.
A new transform object
Command Description Returns
Controlling the 3D World 165
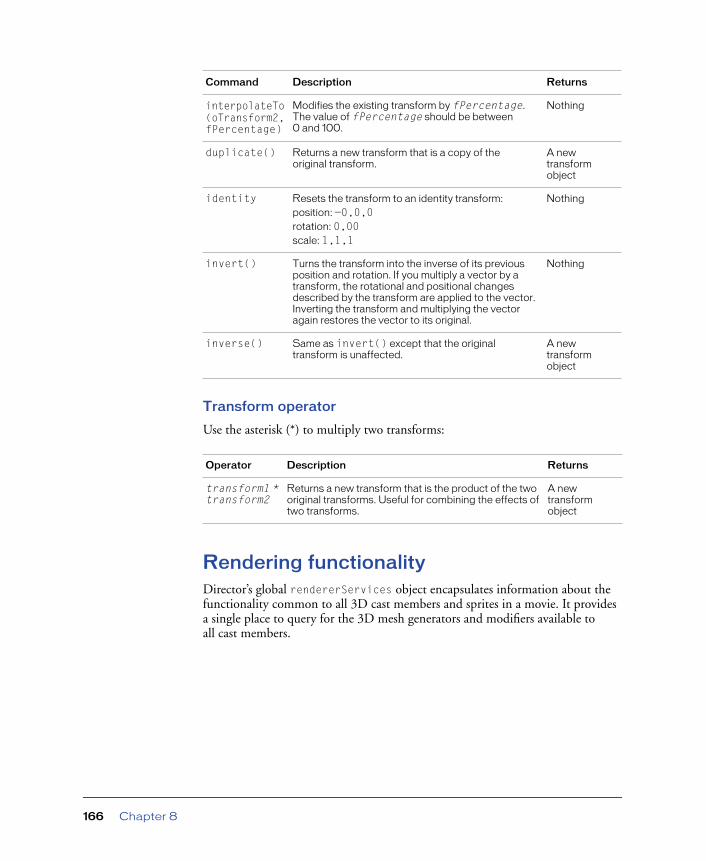
Transform operator
Use the asterisk (*) to multiply two transforms:
Rendering functionalityDirector’s global rendererServices object encapsulates information about the functionality common to all 3D cast members and sprites in a movie. It provides a single place to query for the 3D mesh generators and modifiers available to all cast members.
interpolateTo(oTransform2,fPercentage)
Modifies the existing transform by fPercentage. The value of fPercentage should be between 0 and 100.
Nothing
duplicate() Returns a new transform that is a copy of the original transform.
A new transform object
identity Resets the transform to an identity transform:position: —0,0,0rotation: 0,00scale: 1,1,1
Nothing
invert() Turns the transform into the inverse of its previous position and rotation. If you multiply a vector by a transform, the rotational and positional changes described by the transform are applied to the vector. Inverting the transform and multiplying the vector again restores the vector to its original.
Nothing
inverse() Same as invert() except that the original transform is unaffected.
A new transform object
Operator Description Returns
transform1 * transform2
Returns a new transform that is the product of the two original transforms. Useful for combining the effects of two transforms.
A new transform object
Command Description Returns
Chapter 8166
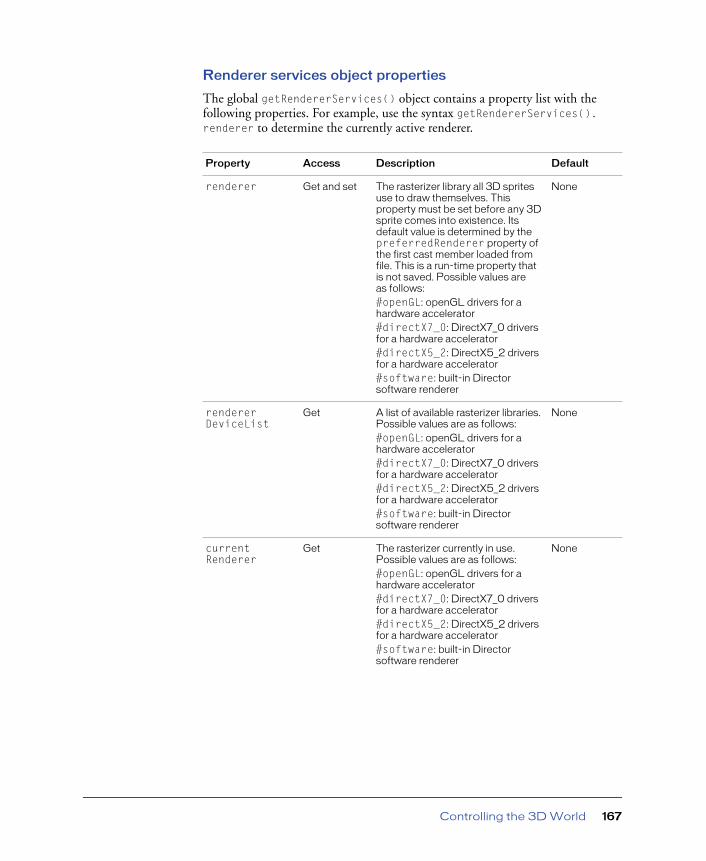
Renderer services object properties
The global getRendererServices() object contains a property list with the following properties. For example, use the syntax getRendererServices().renderer to determine the currently active renderer.
Property Access Description Default
renderer Get and set The rasterizer library all 3D sprites use to draw themselves. This property must be set before any 3D sprite comes into existence. Its default value is determined by the preferredRenderer property of the first cast member loaded from file. This is a run-time property that is not saved. Possible values are as follows:#openGL: openGL drivers for a hardware accelerator#directX7_0: DirectX7_0 drivers for a hardware accelerator#directX5_2: DirectX5_2 drivers for a hardware accelerator#software: built-in Director software renderer
None
rendererDeviceList
Get A list of available rasterizer libraries. Possible values are as follows:#openGL: openGL drivers for a hardware accelerator#directX7_0: DirectX7_0 drivers for a hardware accelerator#directX5_2: DirectX5_2 drivers for a hardware accelerator#software: built-in Director software renderer
None
currentRenderer
Get The rasterizer currently in use. Possible values are as follows:#openGL: openGL drivers for a hardware accelerator#directX7_0: DirectX7_0 drivers for a hardware accelerator#directX5_2: DirectX5_2 drivers for a hardware accelerator#software: built-in Director software renderer
None
Controlling the 3D World 167

modifiers Get A list of modifiers available for 3D cast members. Possible values are as follows:#lod#toon#sds#bonesPlayer#keyframePlayer#inker#collision#meshDeform
None
primitives Get A list of basic 3D shapes available for all 3D cast members. Possible values are as follows:#box#sphere#plane#particle#cylinder
None
textureRenderFormat
Get and set A four-digit integer identifying the pixel format used for textures on the 3D hardware accelerator card. Adjust this to improved color fidelity or to fit more textures on the card. You can fit twice as many 16-bit textures as 32-bit textures in the same space. If a movie tries to use more textures than will fit on a card at a single time, Director switches to software rendering. Possible values are as follows:#rgba8888: one byte for red, green, blue, and alpha#rgba8880: same as above, without alpha opacity#rgba5650: 16-bit color with no alpha; 5 bits for red, 6 for green, 5 for blue#rgba5550: 16-bit color with no alpha; 5 bits each for red, green, and blue#rgba5551: 5 bits each for red, green, and blue; 1 bit for alpha#rgba4444: 4 bits each for red, green, blue, and alpha
#rgba5551
depthBufferDepth
Get and set Either 16 or 24, depending on the hardware card. Controls the precision of the hardware depth buffer.
None
Property Access Description Default
Chapter 8168

colorBufferDepth
Get Either 16 or 32, depending on the hardware card. Controls the precision of the hardware output buffer.
None
getHardwareInfo()
Returns a property list of the specifics of the hardware card (if any) on the client’s machine
A property list with the following entries:#Present: TRUE (1) if the card is present; FALSE (0) if the card is absent#vendor-stringname: the vendor name, with a value of Unknown if the name can’t be determined#model-stringModel: the name of the model#maxTextureSize[maxWidth, maxHeight]: maximum height and width of textures. Textures are reduced in size if they exceed these maximums.#supportedTexturePixelFormat: texture pixel formats supported by card.#textureUnits: number of texture units the card has#depthBufferRange: list of bit-depth resolutions available #colorBufferRange: list of bit-depth resolutions
Property Access Description Default
Controlling the 3D World 169
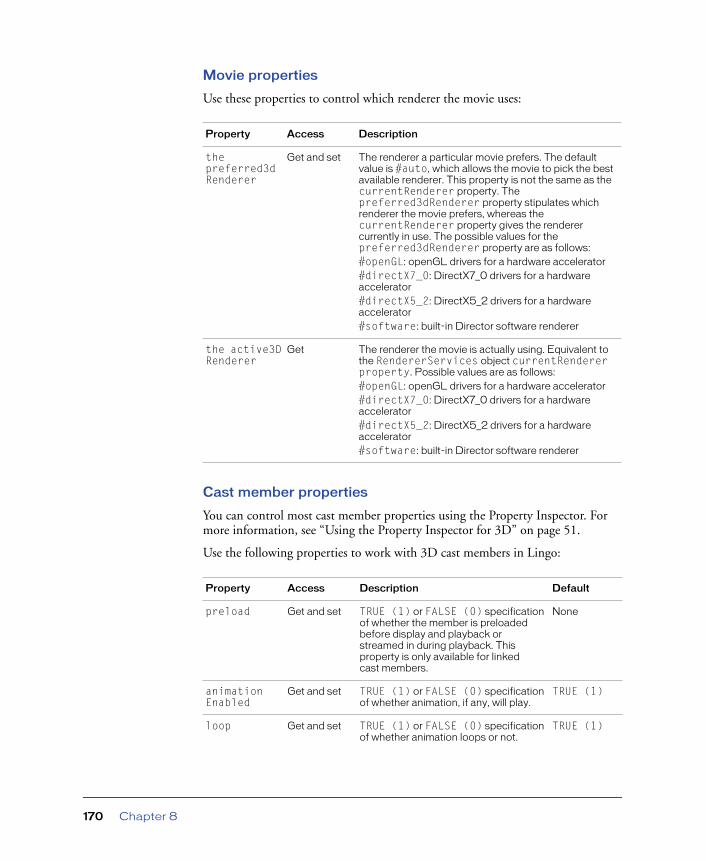
Movie properties
Use these properties to control which renderer the movie uses:
Cast member properties
You can control most cast member properties using the Property Inspector. For more information, see “Using the Property Inspector for 3D” on page 51.
Use the following properties to work with 3D cast members in Lingo:
Property Access Description
the preferred3dRenderer
Get and set The renderer a particular movie prefers. The default value is #auto, which allows the movie to pick the best available renderer. This property is not the same as the currentRenderer property. The preferred3dRenderer property stipulates which renderer the movie prefers, whereas the currentRenderer property gives the renderer currently in use. The possible values for the preferred3dRenderer property are as follows:#openGL: openGL drivers for a hardware accelerator#directX7_0: DirectX7_0 drivers for a hardware accelerator#directX5_2: DirectX5_2 drivers for a hardware accelerator#software: built-in Director software renderer
the active3DRenderer
Get The renderer the movie is actually using. Equivalent to the RendererServices object currentRenderer property. Possible values are as follows:#openGL: openGL drivers for a hardware accelerator#directX7_0: DirectX7_0 drivers for a hardware accelerator#directX5_2: DirectX5_2 drivers for a hardware accelerator#software: built-in Director software renderer
Property Access Description Default
preload Get and set TRUE (1) or FALSE (0) specification of whether the member is preloaded before display and playback or streamed in during playback. This property is only available for linked cast members.
None
animationEnabled
Get and set TRUE (1) or FALSE (0) specification of whether animation, if any, will play.
TRUE (1)
loop Get and set TRUE (1) or FALSE (0) specification of whether animation loops or not.
TRUE (1)
Chapter 8170

directToStage
Get and set TRUE (1) or FALSE (0) specification of whether rendering occurs directly to the Stage or to Director’s offscreen buffer. If TRUE (1), other sprites that intersect with this sprite may flicker. If FALSE (0), rendering layers well, but speed declines.
TRUE (1):rendering occurs directly to the Stage
cameraPosition
Get and set Independent x,y,z translation for the default camera with values ranging from Float_Min to Float_Max.
vector(0.0, 0.0, 250.0)
cameraRotation
Get and set Independent x,y,z rotation transforms for the default camera with values ranging from Float_Min to Float_Max.
vector(0.0, 0.0, 0.0)
ambientColor
Get and set Light applied to entire scene. rgb(0,0,0)
backColor Get and set Background color in all views. rgb(0,0,0)
directionalColor
Get and set Color of single “default” directional light. rgb(255, 255,255)
directionalPreset
Get and set Absolute position of the single “default” directional light:#None#TopLeft#TopCenter#TopRight#MiddleLeft#MiddleCenter#MiddleRight#BottomLeft#BottomCenter#BottomRight
#TopCenter
specularColor Get and set Specular color of first shader: the color of reflections from the shader.
rgb(255, 255,255)
reflectivity Get and set Reflectivity of first shader, with values from 0.0 to 100.0.
0.0
diffuseColor Get and set Diffuse color of first shader: the shader’s overall color.
rgb(255, 255,255)
textureType Get and set Default texture type for world. Values are as follows:#none: no texture#default: use original texture from Shader#member: use image from specified cast member
#default
Property Access Description Default
Controlling the 3D World 171

Cast member commands
The following commands allow you to reset cast member properties to original values they had at the time the cast member was imported into Director:
textureMember
Get and set Name of cast member to use as the source for the default texture when textureType is set to #member.
No texture
percentStreamed
Get Percentage of file that has been downloaded, with values from 0 to 100.
None
bytesStreamed
Get Integer number of bytes that have been downloaded, with values from 0 to the size of the file in bytes.
None
streamSize Get Total size of stream to be downloaded, with values from 0 to the size of the file in bytes.
None
state Get Current state of streaming. Values are as follows:0: unloaded1: headerLoading2: headerLoaded3: mediaLoading4: =mediaLoaded-1: errorOnce state 3 or 4 has been reached, it’s safe to execute Lingo that manipulates the 3D world. Before then, access to particular models may fail because those model definitions may not have been downloaded.Also, the loadFile() cast member method fails except at states 0 or 4.
None
Command Description Returns
resetToWorldDefault() Resets all cast member properties to the values stored in the original 3D world
Nothing
resetWorld() Resets the 3D cast member to the state it was in when the movie first loaded
Nothing
Property Access Description Default
Chapter 8172

Sprite properties
You can control most sprite properties using the Property Inspector. For more information, see “Using the Property Inspector for 3D” on page 51. Use the following properties to work with 3D sprites in Lingo.:
Property Access Description Default
directToStage
Get and set TRUE (1) or FALSE (0) specification of whether rendering occurs directly to the Stage or to Director’s offscreen buffer. If TRUE (1), other sprites that intersect with this sprite may flicker. If FALSE (0), rendering layers well but speed declines.
TRUE (1):rendering occurs directly to the Stage
backColor Get and set Background color in all views. rgb(0,0,0)
camera Get and set Determines which camera this sprite is using.
None
targetFrameRate
Get and set Controls the desired playback speed. If the useTargetFramerate property is TRUE (1), then the lod.bias property of all model resources is dynamically altered until the target frame rate is met.
30
useTargetFrameRate
Get and set If a target frame rate has been set and you want to use it, set this property to TRUE (1).
TRUE (1)
Controlling the 3D World 173

Sprite commands
Use these commands to work with 3D sprites:
Command Description Returns
camera(index) Accesses a specific camera in the sprite’s list of views.
The camera requested
addCamera(camera, index) Adds a camera named camera at the specified index number. If the index number is greater than the number of cameras in the sprite’s camera count, or if there is no index, the camera is added to the end of the list.
An error if a camera of that name can’t be found
deleteCamera(cameraOrIndex)
If cameraOrIndex is a camera, the camera by that name is deleted. If cameraOrIndex is an index number, the camera at that index number is deleted.In either case, the cameras after cameraOrIndex move forward in the list and the camera count is decreased by 1.
An error if a camera of that name or index number can’t be found
cameraCount() Returns the number of cameras in the sprite’s cameraList.
An integer
Chapter 8174

9
CHAPTER 9
. . . . . . . . . . . . . . . . . . . . . . . . . . . . . . . . . . . . . . . . . . . . . . . . . . . . . . . .. . . . . . . . . . . . . . . . . . . . . . . . . . . . . . . . . . . . . . . . . . . . . . . . . . . . .3D Lingo by Feature
This appendix lists Director’s various 3D features and the corresponding Lingo elements that you can use to implement those features.
AnimationUse these terms to work with 3D animation. See also the lists of terms for the Keyframe player and Bones player modifiers.
animationEnabled pause()
autoblend play()
blendTime playing
cloneMotionFromCastmember playlist
count playNext()
currentLoopState playRate
currentTime positionReset
deleteMotion queue()
lockTranslation removeLast()
motion rotationReset
name type (motion)
newMotion()
175

Backdrops and overlaysUse these terms to manipulate backdrops and overlays in 3D cast members:
Bones player modifierUse these terms to control the functionality of the Bones player modifier:
addBackdrop regPoint
addOverlay removeBackdrop
blend removeOverlay
count rotation (backdrop and overlay)
insertBackdrop scale (backdrop and overlay)
insertOverlay source
loc (backdrop and overlay)
autoblend play()
blendTime playing
bonesPlayer (modifier) playlist
count playNext()
currentTime playRate
getBoneID queue()
currentLoopState removeLast()
getWorldTransform() rootLock
lockTranslation rotationReset
positionReset transform (property)
pause()
Chapter 9176

CamerasUse these terms to work with cameras and camera properties:
Child and parent nodesUse these terms to control parent-child relationships between models:
addCamera orthoHeight
addToWorld pointAt
autoCameraPosition pointAtOrientation
boundingSphere position (transform)
camera projection
cameraCount() projectionAngle
cameraPosition rect
cameraRotation removeFromWorld
clone rootNode
cloneDeep rotate
count scale (transform)
deleteCamera transform (property)
fieldOfView translate
hither userData
isInWorld() worldPosition
name yon
newCamera
addChild count
child parent
3D Lingo by Feature 177

Collision detectionThese terms are useful for detecting and responding to collisions between models:
Creating and removing objectsUse these terms to create and remove objects:
collision (modifier) pointOfContact
collisionData registerForEvent()
collisionNormal registerScript()
enabled (collision) resolve
immovable resolveA
mode (emitter) resolveB
modelA setCollisionCallback()
modelB
add deleteShader
addBackdrop deleteTexture
addModifier duplicate
addOverlay insertBackdrop
addToWorld insertOverlay
camera newLight
child newMesh
clone newModel
cloneDeep newModelResource
cloneModelFromCastmember newMotion()
cloneMotionFromCastmember newShader
deleteCamera newTexture
deleteGroup removeModifier
deleteLight removeBackdrop
deleteModel removeFromWorld
Chapter 9178

FogUse these terms to work with fog:
GroupsUse these terms to work with groups:
deleteModelResource removeOverlay
deleteMotion
color (fog) far (fog)
decayMode fog
enabled (fog) near (fog)
addChild newGroup
addToWorld pointAt
boundingSphere pointAtOrientation
child position (transform)
clone removeFromWorld
cloneDeep rotate
count scale (transform)
deleteGroup transform (property)
group translate
isInWorld() userData
name worldPosition
3D Lingo by Feature 179

Inker modifierUse these terms to control the functionality of the Inker modifier:
Keyframe player modifierUse these terms to control the functionality of the keyframe player modifier:
Level of detail modifierUse these terms to control the functionality of the level of detail (LOD) modifier:
boundary lineColor
creaseAngle lineOffset
creases silhouettes
inker (modifier) useLineOffset
autoblend playing
blendFactor playlist
blendTime playNext()
count playRate
currentLoopState positionReset
currentTime queue()
keyframePlayer (modifier) removeLast()
lockTranslation rootLock
pause() rotationReset
play() update
auto level
bias lod (modifier)
Chapter 9180

LightsUse these terms to work with lights and light properties:
Mesh deform modifierUse these terms to control the functionality of the mesh deform modifier:
addToWorld pointAt
ambientColor pointAtOrientation
attenuation position (transform)
boundingSphere removeFromWorld
color (light) rotate
count scale (transform)
clone specular (light)
cloneDeep spotAngle
deleteLight spotDecay
directionalColor transform (property)
directionalPreset translate
isInWorld() type (light)
light userData
name worldPosition
newLight
add normalList
face textureCoordinateList
mesh (property) textureLayer
meshDeform (modifier) vertexList (mesh deform)
neighbor
3D Lingo by Feature 181

Miscellaneous
Model resourcesUse these terms to work with 3D model resources:
clearAtRender resetWorld
clearValue revertToWorldDefaults
directToStage sendEvent
loadFile() setCollisionCallback()
registerForEvent() unregisterAllEvents
registerScript() revertToWorldDefaults
count newModelResource
deleteModelResource resolution
modelResource resource
name type (model resource)
Chapter 9182
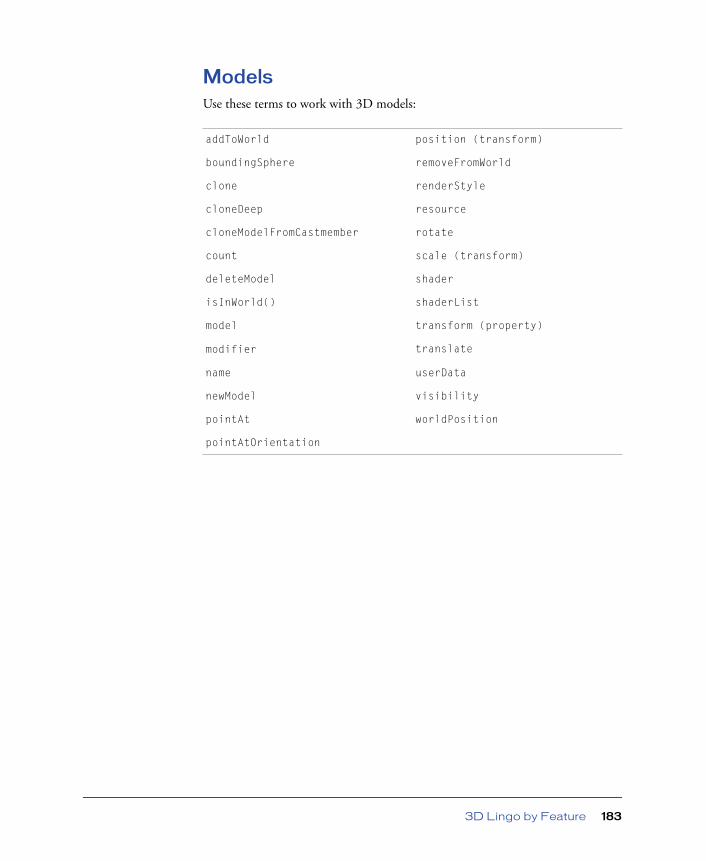
ModelsUse these terms to work with 3D models:
addToWorld position (transform)
boundingSphere removeFromWorld
clone renderStyle
cloneDeep resource
cloneModelFromCastmember rotate
count scale (transform)
deleteModel shader
isInWorld() shaderList
model transform (property)
modifier translate
name userData
newModel visibility
pointAt worldPosition
pointAtOrientation
3D Lingo by Feature 183

ModifiersThese terms are useful for applying modifiers to models and model resources. See the name of the specific modifier you are using for a list of terms that work with that modifier.
Movie and system propertiesUse these terms to determine the 3D capabilities of the playback computer:
NodesUse these terms to manage nodes. A node is any object that exists in the world, including lights, cameras, models, and groups.
Particle systemsSee Primitives.
PickingSee Selecting models.
addModifier modifiers
count removeModifier
modifier
active3dRenderer getRendererServices()
colorBufferDepth preferred3DRenderer
depthBufferDepth renderer
getHardwareInfo() rendererDeviceList
addToWorld isInWorld()
clone name
cloneDeep removeFromWorld
count userData
Chapter 9184
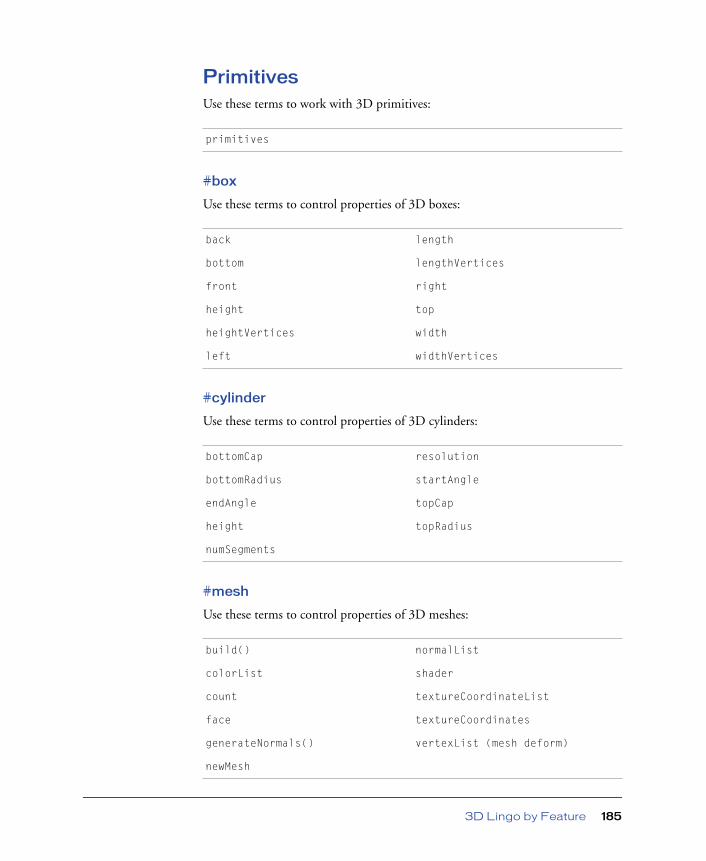
PrimitivesUse these terms to work with 3D primitives:
#box
Use these terms to control properties of 3D boxes:
#cylinder
Use these terms to control properties of 3D cylinders:
#mesh
Use these terms to control properties of 3D meshes:
primitives
back length
bottom lengthVertices
front right
height top
heightVertices width
left widthVertices
bottomCap resolution
bottomRadius startAngle
endAngle topCap
height topRadius
numSegments
build() normalList
colorList shader
count textureCoordinateList
face textureCoordinates
generateNormals() vertexList (mesh deform)
newMesh
3D Lingo by Feature 185
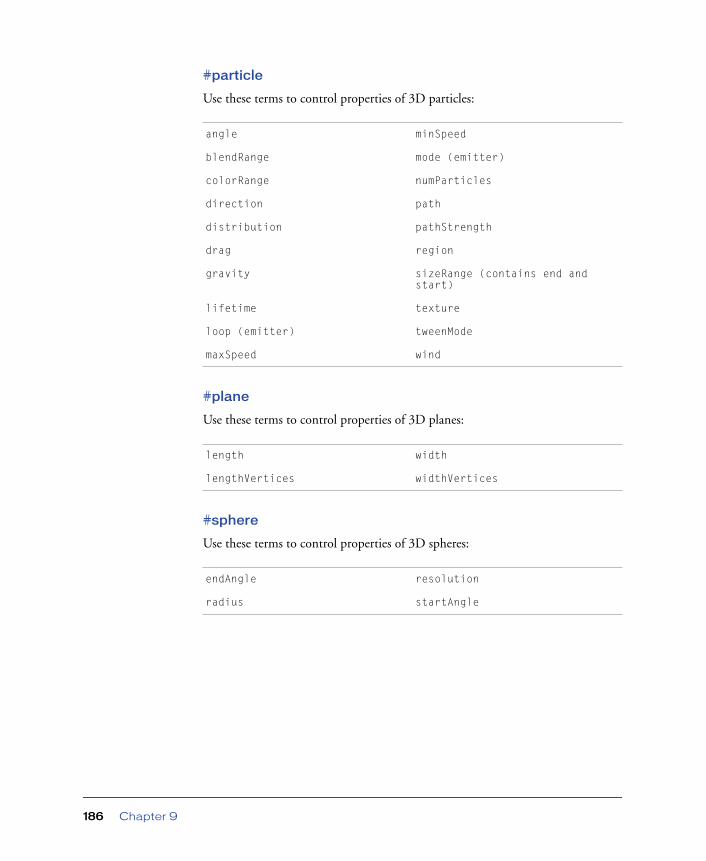
#particle
Use these terms to control properties of 3D particles:
#plane
Use these terms to control properties of 3D planes:
#sphere
Use these terms to control properties of 3D spheres:
angle minSpeed
blendRange mode (emitter)
colorRange numParticles
direction path
distribution pathStrength
drag region
gravity sizeRange (contains end and start)
lifetime texture
loop (emitter) tweenMode
maxSpeed wind
length width
lengthVertices widthVertices
endAngle resolution
radius startAngle
Chapter 9186

Selecting modelsUse these terms to enable individual models in a 3D cast member to be selected and respond to mouse clicks. This is also known as picking.
ShadersUse these terms to work with shaders:
modelsUnderLoc spriteSpaceToWorldSpace
modelsUnderRay worldSpaceToSpriteSpace
modelUnderLoc
ambient renderStyle
blend shader
blendConstant shaderList
blendConstantList shadowPercentage
blendFunction shadowStrength
blendFunctionList shininess
blendSource specular (shader)
blendSourceList specularColor
count specularLightMap
deleteShader style
diffuse textureMode
diffuseColor textureModeList
diffuseLightMap textureRepeat
emissive textureRepeatList
flat textureTransform
glossMap textureTransformList
name transparent
newShader type (shader)
renderStyle useDiffuseWithTexture
3D Lingo by Feature 187
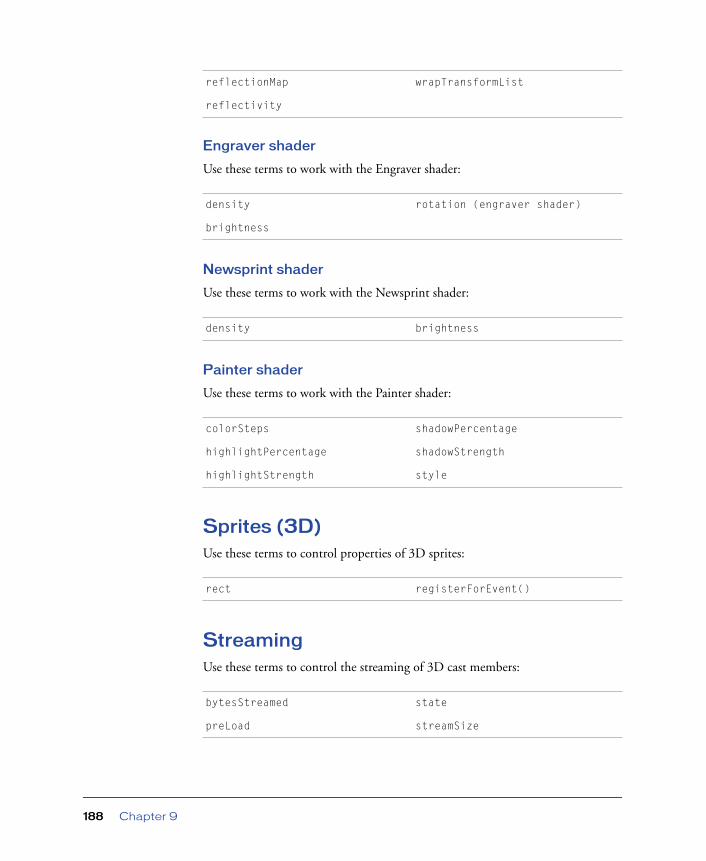
Engraver shader
Use these terms to work with the Engraver shader:
Newsprint shader
Use these terms to work with the Newsprint shader:
Painter shader
Use these terms to work with the Painter shader:
Sprites (3D)Use these terms to control properties of 3D sprites:
StreamingUse these terms to control the streaming of 3D cast members:
reflectionMap wrapTransformList
reflectivity
density rotation (engraver shader)
brightness
density brightness
colorSteps shadowPercentage
highlightPercentage shadowStrength
highlightStrength style
rect registerForEvent()
bytesStreamed state
preLoad streamSize
Chapter 9188

Subdivision surfaces modifierUse these terms to control the functionality of the subdivision surfaces (SDS) modifier:
Text (3D)Use these terms to control the appearance of 3D text:
TexturesUse these terms to work with textures:
depth sds (modifier)
enabled (sds) subdivision
error tension
bevelDepth extrude3D
bevelType smoothness
displayFace tunnelDepth
displayMode
compressed newTexture
count quality
deleteTexture renderFormat
height texture
member textureRenderFormat
name textureType
nearFiltering type (texture)
3D Lingo by Feature 189

Toon modifierUse these terms to control the functionality of the Toon modifier:
TransformsUse these terms to work with transforms:
boundary lineOffset
colorSteps shadowPercentage
creaseAngle shadowStrength
creases silhouettes
highlightPercentage style
highlightStrength toon (modifier)
lineColor useLineOffset
duplicate preRotate
getWorldTransform() preScale()
identity() preTranslate()
interpolate() rotate
interpolateTo() rotation (transform)
inverse() scale (transform)
invert() transform (property)
multiply() translate
pointAt worldPosition
pointAtOrientation xAxis
position (transform) yAxis
preMultiply zAxis
Chapter 9190

Vector mathUse these terms to perform vector math operations:
angleBetween getNormalized
axisAngle magnitude
cross normalize
crossProduct() randomVector
distanceTo() vector()
dot() x (vector property)
dotProduct() y (vector property)
duplicate z (vector property)
3D Lingo by Feature 191

Chapter 9192

0
1CHAPTER 10
. . . . . . . . . . . . . . . . . . . . . . . . . . . . . . . . . . . . . . . . . . . . . . . . . . . . . . . .. . . . . . . . . . . . . . . . . . . . . . . . . . . . . . . . . . . . . . . . . . . . . . . . . . . . .3D Lingo Dictionary
The commands and properties of the 3D Xtra are covered according to function in Chapters 5 through 8. In this chapter the same commands and properties are presented in standard Lingo dictionary format, with detailed descriptions, correct syntax, and scripting examples.
In many cases, two types of syntax examples are included: an example in the standard Director 8 format, along the lines of model(whichModel).command(argument), is accompanied by a more general example, along the lines of modelObjectReference.command(argument). The first example matches the alphabetical and categorized Lingo examples in the interface. The second example refers more specifically to the type of Lingo object being used. Both example types are correct.
The objects in the 3D world share many similarities, and in many cases the same commands work identically with each type. In particular, models, cameras, and lights share the same transform properties and the same parent-child relationships. Any one of these objects can be the parent to one or more of the others and the child of any one object of any of the three types. The same holds true for groups of models, cameras, or lights, and for groups of other groups. When objects are interchangeable, the general term node is used. When a command applies to just one type of object, that type is referred to specifically, as in modelObjectReference or cameraObjectReference.
193

+ (addition)Syntax
vector1 + vector2 vector + scalar
Description
3D vector operator; adds the components of two vectors, or adds the scalar value to each component of the vector and returns a new vector.
vector1 + vector2 adds the components of vector1 to the corresponding to components of vector2 and returns a new vector.
vector + scalar adds the scalar value to each of the components of the vector and returns a new vector.
- (subtraction)Syntax
vector1 - vector2vector - scalar
Description
3D vector operator; subtracts the components of vector2 from the corresponding components of vector1, or subtracts the scalar value from each of the components and returns a new vector.
vector1 - vector2 subtracts the values of vector2 from the corresponding components in vector1 and returns a new vector.
vector - scaler subtracts the value of the scalar from each of the components in the vector and returns a new vector.
Chapter 10194
* (multiplication)Syntax
vector1 * vector2 vector * scalar transform * vector
Description
3D vector operator; multiplies the components of vector1 by the corresponding components in vector2, and returns the dot product, or multiplies each of the components the vector by the scalar value and returns a new vector.
vector1 * vector2 returns the dot product of the two vectors, which is not a new vector. This operation is the same as vector1.dotproduct.vector2.
vector * scalar multiplies each of the components in the vector by the scalar value and returns a new vector.
transform * vector multiplies the transform by the vector and returns a new vector. The new vector is the result of applying the positional and rotational changes defined by transform to the vector. Note that vector * transform is not supported.
See also
dotProduct()
/ (division)Syntax
vector / scalar
Description
3D vector operator; divides each of the vector components by the scalar value and returns a new vector.
3D Lingo Dictionary 195

active3dRendererSyntax
the active3dRenderer
Description
3D Lingo movie property; indicates the renderer currently in use by the movie for drawing 3D sprites. This property is equivalent to the getRendererServices().renderer property.
The possible values of the active3DRenderer property are #openGL, #directX7_0, #directX5_2, and #software. The values #openGL, #directX7_0, and #directX5_2, which are video card drivers, will lead to much faster performance than #software, a software renderer used when none of the first three options are available.
The active3dRenderer property can be tested, but not set. Use getRendererServices().renderer to set this property.
Examples
These examples show the two ways to determine which renderer is currently in use.
put the active3dRenderer-- #openGLput getRendererServices().renderer-- #openGL
See also
renderer, rendererDeviceList, getRendererServices()
addSyntax
member(whichCastmember).model(whichModel).meshdeform.mesh[index].\textureLayer.add()
Description
3D meshdeform modifier command; adds an empty texture layer to the model’s mesh.
You can copy texture coordinates between layers using the following code:
modelReference.meshdeform.texturelayer[a].texturecoordinatelist = modelReference.meshdeform.texturelayer[b].texturecoordinatelist
Chapter 10196

Example
This statement creates a new texture layer for the first mesh of the model named Ear.
member("Scene").model("Ear").meshdeform.mesh[1].\textureLayer.add()
See also
meshDeform (modifier), textureLayer, textureCoordinateList
addBackdropSyntax
sprite(whichSprite).camera{(index)}.addBackdrop(texture, locWithinSprite, rotation)member(whichCastmember).camera(whichCamera).addBackdrop(texture, locWithinSprite, rotation)
Description
3D camera command; adds a backdrop to the end of the camera’s list of backdrops. The backdrop is displayed in the 3D sprite at locWithinSprite with the indicated rotation. The locWithinSprite parameter is a 2D loc measured from the upper left corner of the sprite.
Examples
The first line of this statement creates a texture named Rough from the cast member named Cedar and stores it in the variable t1. The second line applies the texture as a backdrop at the point (220, 220) within sprite 5. The texture has a rotation of 0 degrees. The last line applies the same texture as a backdrop for camera 1 of the cast member named Scene at the point (20, 20) with a rotation of 45 degrees.
t1 = member("Scene").newTexture("Rough", #fromCastMember, \member("Cedar"))sprite(5).camera.addBackdrop(t1, point(220, 220), 0)member("Scene").camera[1].addBackdrop(t1, point(20, 20), 45)
See also
removeBackdrop
3D Lingo Dictionary 197

addCamera Syntax
sprite(whichSprite).addCamera(whichCamera, index)
Description
3D command; adds the camera whichCamera, at the given index position, to the list of cameras for the sprite. If index is greater than the value of cameraCount(), the camera is added to the end of the list. The view from each camera is displayed on top of the view from cameras with lower index positions. You can set the rect property of each camera to display multiple views within the sprite.
Example
This statement inserts the camera named FlightCam at the fifth index position of the list of cameras of sprite 12:
sprite(12).addCamera(member("scene").camera("FlightCam"), 5)
See also
cameraCount(), deleteCamera
Chapter 10198

addChildSyntax
member(whichCastmember).node(whichParentNode).addChild(member\(whichCastmember).node(whichChildNode) {,#preserveWorld})
Description
3D command; adds the node whichChildNode to the list of children of the node whichParentNode, and removes it from the list of children of its former parent. Either node argument can be a model, group, camera, or light. An equivalent operation would be to set the parent property of whichChildNode to whichParentNode.
The optional #preserveWorld parameter has two possible values: #preserveWorld or #preserveParent. When the child is added with #preserveParent specified, the parent-relative transform of the child remains unchanged and the child jumps to that transform in the space of its new parent. The child’s world transform is recalculated. When the child is added with #preserveWorld specified, the world transform of the child remains unchanged and the child does not jump to its transform in the space of its new parent. Its parent-relative transform is recalculated.
Examples
This statement adds the model named Tire to the list of children of the model named Car.
member("3D").model("Car").addChild(member("3D").model("Tire"))
This statement adds the model named Bird to the list of children of the camera named MyCamera and uses the #preserveWorld argument to maintain Bird’s world position.
member("3D").camera("MyCamera").addChild(member("3D").model("Bird"), #preserveWorld)
See also
parent, addToWorld, removeFromWorld
3D Lingo Dictionary 199

addModifierSyntax
member(whichCastmember).model(whichModel).addModifier\(#modifierType)
Description
3D model command; adds the specified modifier to the model. Possible modifiers are as follows:
• #bonesPlayer
• #collision
• #inker
• #keyframePlayer
• #lod (level of detail)
• #meshDeform
• #sds
• #toon
There is no default value for this command.
For more detailed information about each modifier, see the individual modifier entries.
Example
This statement adds the toon modifier to the model named Box.
member("shapes").model("Box").addModifier(#toon)
See also
bonesPlayer (modifier), collision (modifier), inker (modifier), keyframePlayer (modifier), lod (modifier), meshDeform (modifier), sds (modifier), toon (modifier), getRendererServices(), removeModifier
addOverlaySyntax
sprite(whichSprite).camera{(index)}.addOverlay(texture, \locWithinSprite, rotation)member(whichCastmember).camera(whichCamera).addOverlay(texture, \ locWithinSprite, rotation)
Chapter 10200
Description
3D camera command; adds an overlay to the end of the camera’s list of overlays. The overlay is displayed in the 3D sprite at locWithinSprite with the indicated rotation. The locWithinSprite parameter is a 2D loc measured from the upper left corner of the sprite.
Examples
The first line of this statement creates a texture named Rough from the cast member named Cedar and stores it in the variable t1. The second line applies the texture as an overlay at the point (220, 220) within sprite 5. The texture has a rotation of 0 degrees. The last line of the statement applies the same texture as an overlay for camera 1 of the cast member named Scene at the point (20, 20). The texture has a rotation of 45 degrees.
t1 = member("Scene").newTexture("Rough", #fromCastMember,\member("Cedar"))sprite(5).camera.addOverlay(t1, point(220, 220), 0)member("Scene").camera[1].addOverlay(t1, point(20, 20), 45)
See also
removeOverlay
addToWorldSyntax
member(whichCastmember).model(whichModel).addToWorld()member(whichCastmember).group(whichGroup).addToWorld()member(whichCastmember).camera(whichCamera).addToWorld()member(whichCastmember).light(whichLight).addToWorld()
Description
3D command; inserts the model, group, camera, or light into the 3D world of the cast member as a child of the group named World.
When a model, group, camera, or light is created or cloned, it is automatically added to the world. Use the removeFromWorld command to take a model, group, camera, or light out of the 3D world without deleting it. Use the isInWorld() command to test whether a model, group, camera, or light has been added or removed from the world.
Example
This statement adds the model named gbCyl to the 3D world of the cast member named Scene.
member("Scene").model("gbCyl").addToWorld()
See also
isInWorld(), removeFromWorld
3D Lingo Dictionary 201

ambientSyntax
member(whichCastmember).shader(whichShader).ambientmember(whichCastmember).model(whichModel).shader.ambientmember(whichCastmember).model(whichModel).shaderList{[index]}.\ambient
Description
3D #standard shader property; indicates how much of each color component of the ambient light in the cast member is reflected by the shader.
For example, if the color of the ambient light is rgb(255, 255, 255) and the value of the ambient property of the shader is rgb(255, 0, 0), the shader will reflect all of the red component of the light that the shader’s colors can reflect. However, it will reflect none of the blue and green components of the light, regardless of the colors of the shader. In this case, if there are no other lights in the scene, the blue and green colors of the shader will reflect no light, and will appear black.
The default value of this property is rgb(63,63,63).
Example
This statement sets the ambient property of the model named Chair to rgb(255, 255, 0). Chair will fully reflect the red and green components of the ambient light in the scene and completely ignore its blue component.
member("Room").model("Chair").shader.ambient = rgb(255, 0, 0)
See also
ambientColor, newLight, type (light), diffuse, specular (shader)
Chapter 10202

ambientColorSyntax
member(whichCastmember).ambientColor
Description
3D cast member property; indicates the RGB color of the default ambient light of the cast member.
The default value for this property is rgb(0, 0, 0). This adds no light to the scene.
Example
This statement sets the ambientColor property of the cast member named Room to rgb(255, 0, 0). The default ambient light of the cast member will be red. This property can also be set in the Property Inspector.
member("Room").ambientColor = rgb(255, 0, 0)
See also
directionalColor, directionalPreset, ambient
angleSyntax
member(whichCastmember).modelResource(whichModelResource).\emitter.angle
Description
3D emitter property; describes the area into which the particles of a particle system are emitted. A particle system is a model resource whose type is #particle.
The primary direction of particle emission is the vector set by the emitter’s direction property. However, the direction of emission of a given particle will deviate from that vector by a random angle between 0 and the value of the emitter’s angle property.
The effective range of this property is 0.0 to 180.0. The default value is 180.0.
Example
This statement sets the angle of emission of the model resource named mrFount to 1, which causes the emitted particles to form a thin line.
member("fountain").modelResource("mrFount").emitter.angle = 1
See also
emitter, direction
3D Lingo Dictionary 203

angleBetweenSyntax
vector1.angleBetween(vector2)
Description
3D vector method; returns the angle between two vectors, in degrees.
Example
In this example, pos1 is a vector on the X axis and pos2 is a vector on the Y axis. The angle between these two vectors is 90˚. The value returned by pos1.angleBetween(pos2) is 90.0000.
pos1 = vector(100, 0, 0)pos2 = vector(0, 100, 0)put pos1.angleBetween(pos2)-- 90.0000
See also
dot(), dotProduct()
animationEnabledSyntax
member(whichCastmember).animationEnabled
Description
3D cast member property; indicates whether motions will be executed (TRUE) or ignored (FALSE). This property can also be set in the Property Inspector.
The default value for this property is TRUE.
Example
This statement disables animation for the cast member named Scene.
member("Scene").animationEnabled = FALSE
Chapter 10204

attenuationSyntax
member(whichCastMember).light(whichLight).attenuation
Description
3D light property; indicates the constant, linear, and quadratic attenuation factors for spotlights and point lights.
The default value for this property is vector(1.0, 0.0, 0.0).
Example
This statement sets the attenuation property of the light named HouseLight to the vector (.5, 0, 0), darkening it slightly.
member("3d world").light("HouseLight").attenuation = \vector(.5, 0, 0)
See also
color (light)
autoSyntax
member(whichCastmember).model(whichModel).lod.auto
Description
3D lod modifier property; allows the modifier to manage the reduction of detail in the model as the distance between the model and the camera changes.
The setting of the modifier’s bias property determines how aggressively the modifier removes detail from the model when the auto property is set to TRUE.
The modifier updates its level property as it adjusts the model’s level of detail. Setting the level property has no effect unless the auto property is set to FALSE.
The #lod modifier can only be added to models created outside of Director in 3D modeling programs. The value of the type property of the model resources used by these models is #fromFile. The modifier cannot be added to primitives created within Director.
Example
This statement sets the auto property of the lod modifier of the model named Spaceship to TRUE. The modifier will automatically set the model’s level of detail.
member("3D World").model("Spaceship").lod.auto = TRUE
See also
lod (modifier), bias, level
3D Lingo Dictionary 205

autoblendSyntax
member(whichCastmember).model(whichModel).\keyframePlayer.autoblendmember(whichCastmember).model(whichModel).bonesPlayer.autoblend
Description
3D keyframePlayer and bonesPlayer modifier property; indicates whether the modifier creates a linear transition to the currently playing motion from the motion that preceded it (TRUE) or not (FALSE). If autoBlend is TRUE, the length of the transition is set by the blendTime property of the modifier. If autoBlend is FALSE, the transition is controlled by the blendFactor property of the modifier and blendTime is ignored.
Motion blending is completely disabled when blendTime is set to 0 and autoBlend is set to TRUE.
The default value of this property is TRUE.
Example
This statement turns autoblend off for the model named Alien3. The model’s blendFactor setting will be used for blending successive motions in the playlist.
member("newaliens").model("Alien3").keyframePlayer.\autoblend = FALSE
See also
blendFactor, blendTime
autoCameraPositionSyntax
member(whichTextCastmember).autoCameraPosition
Description
3D camera property; indicates whether the camera of the 3D text cast member is automatically positioned to show all of the text (TRUE) or not (FALSE). This is useful when changing the text, font, fontsize, and other properties of the cast member.
This property is not valid with other types of 3D cast members.
Example
This statement sets the autoCameraPosition property of the cast member named Headline to FALSE. When the cast member is displayed in 3D mode, the camera will not be positioned automatically.
member("Headline").autoCameraPosition = FALSE
See also
displayMode
Chapter 10206
axisAngleSyntax
member(whichCastmember).model(whichModel).transform.axisAnglemember(whichCastmember).camera(whichCamera).transform.axisAnglemember(whichCastmember).light(whichLight).transform.axisAnglemember(whichCastmember).group(whichGroup).transform.axisAngletransformReference.axisAngle
Description
3D transform property; describes the transform’s rotation as an axis/angle pair.
The axisAngle property is a linear list containing a vector (the axis) and a float (the angle). The vector is the axis around which the transform is rotated. The float is the amount, in degrees, of rotation.
The default value of this property is [vector( 1.0000, 0.0000, 0.0000 ), 0.0000].
Examples
This statement shows the rotation of the model named Mailbox as an axisAngle. The model is rotated 145.5 degrees counterclockwise about the y axis.
put member("Yard").model("Mailbox").transform.axisAngle-- [vector( 0.0000, 1.0000, 0.0000 ), -145.5000]
See also
rotation (transform)
backSyntax
member(whichCastmember).modelResource(whichModelResource).back
Description
3D #box model resource property; indicates whether the side of the box intersected by its +Z axis is sealed (TRUE) or open (FALSE).
The default value for this property is TRUE.
Example
This statement sets the back property of the model resource named Crate to FALSE, meaning the back of this box will be open.
member("3D World").modelResource("Crate").back = FALSE
See also
bottom, front, top, left, right
3D Lingo Dictionary 207

backdropSyntax
sprite(whichSprite).camera{(index)}.backdrop[index].locmember(whichCastmember).camera(whichCamera).backdrop[index].locsprite(whichSprite).camera{(index)}.backdrop[index].sourcemember(whichCastmember).camera(whichCamera).backdrop[index].sourcesprite(whichSprite).camera{(index)}.backdrop[index].scalemember(whichCastmember).camera(whichCamera).backdrop[index].scalesprite(whichSprite).camera{(index)}.backdrop[index].rotationmember(whichCastmember).camera(whichCamera).\backdrop[index].rotationsprite(whichSprite).camera{(index)}.backdrop[index].regPointmember(whichCastmember).camera(whichCamera).\backdrop[index].regPointsprite(whichSprite).camera{(index)}.backdrop[index].blendmember(whichCastmember).camera(whichCamera).backdrop[index].blendsprite(whichSprite).camera{(index)}.backdrop.countmember(whichCastmember).camera(whichCamera).backdrop.count
Description
3D camera property; a 2D image that is rendered on the camera’s projection plane. All models in the camera’s view appear in front of the backdrop.
Backdrops have the following properties:
Note: These properties can also be used to get, set, and manipulate overlays. See the individual property entries for detailed information.
loc (backdrop and overlay) indicates the 2D location of the backdrop, as measured from the upper left corner of the sprite.
source indicates the texture used by the backdrop.
scale (backdrop and overlay) is the number by which the height and width of the texture are multiplied to determine the dimensions of the backdrop.
rotation (backdrop and overlay) is the amount by which the backdrop is rotated about its regPoint.
regPoint indicates the registration point of the backdrop.
blend indicates the opacity of the backdrop.
count indicates the number of items in the camera’s list of backdrops.
Use the following commands to create and remove backdrops:
addBackdrop creates a backdrop from a texture and adds it to the end of the camera’s list of backdrops.
Chapter 10208
insertBackdrop creates a backdrop from a texture and adds it to the camera’s list of backdrops at a specific index position.
removeBackdrop deletes the backdrop.
See also
overlay
bevelDepthSyntax
member(whichTextCastmember).bevelDepthmember(which3DCastmember).modelResource(whichModelResource).\bevelDepth
Description
3D text property; indicates the degree of beveling on the 3D text.
For text cast members, this property has no effect unless the member’s displayMode property is set to #mode3D and its bevelType property is set to #miter or #round.
For extruded text in a 3D cast member, this property has no effect unless the model resource’s bevelType property is set to #miter or #round.
The range of this property is 0.0 to 10.0, and the default setting is 10.0.
Example
In this example, the cast member named Logo is a text cast member. This statement sets the bevelDepth of logo to 5.5. When logo is displayed in 3D mode, if its bevelType property is set to #miter or #round, the edges of its letters will exhibit dramatic beveling.
member("Logo").bevelDepth = 5.5
In this example, the model resource of the model named Slogan is extruded text. This statement sets the bevelDepth of Slogan’s model resource to 5. If the bevelType property of Slogan is set to #miter or #round, the edges of its letters will exhibit dramatic beveling.
member("scene").model("Slogan").resource.bevelDepth = 5
See also
bevelType, extrude3D, displayMode
3D Lingo Dictionary 209
bevelTypeSyntax
member(whichTextCastmember).bevelTypemember(which3DCastmember).modelResource(whichModelResource).\bevelType
Description
3D text property; indicates the style of beveling applied to the 3D text.
For text cast members, this is a member property. For extruded text in a 3D cast member, this is a model resource property.
The bevelType property has the following possible values:
• #none
• #miter (the default)
• #round
Example
In this example, the cast member named Logo is a text cast member. This statement sets the bevelType of Logo to #round.
member("logo").beveltype = #round
In this example, the model resource of the model named Slogan is extruded text. This statement sets the bevelType of Slogan’s model resource to #miter.
member("scene").model("Slogan").resource.bevelType = #miter
See also
bevelDepth, extrude3D, displayMode
biasSyntax
member(whichCastmember).model(whichModel).lod.bias
Description
3D lod modifier property; indicates how aggressively the modifier removes detail from the model when its auto property is set to TRUE. This property has no effect when the modifier’s auto property is set to FALSE.
The range for this property is from 0.0 (removes all polygons) to +100.0 (removes no polygons). The default setting is 100.0.
The #lod modifier can only be added to models created outside of Director in 3D modeling programs. The value of the type property of the model resources used by these models is #fromFile. The modifier cannot be added to primitives created within Director.
Chapter 10210

Example
This statement sets the bias property of the lod modifier of the model named Spaceship to 10. If the lod modifier’s auto property is set to TRUE, the modifier will very aggressively lower the level of detail of Spaceship as it moves away from the camera.
member("3D World").model("Spaceship").lod.bias = 10
See also
lod (modifier), auto, level
blendSyntax
sprite(whichSprite).camera{(index)}.backdrop[index].blendmember(whichCastmember).camera(whichCamera).backdrop[index].blendsprite(whichSprite).camera{(index)}.overlay[index].blendmember(whichCastmember).camera(whichCamera).overlay[index].blendmember(whichCastmember).shader(whichShader).blendmember(whichCastmember).model(whichModel).shader.blendmember(whichCastmember).model(whichModel).shaderList{[index]}.blend
Description
3D backdrop, overlay, and #standard shader property; indicates the opacity of the backdrop, overlay, or shader.
Setting the blend property of a shader will have no effect unless the shader’s transparent property is set to TRUE.
The range of this property is 0 to 100, and the default value is 100.
Examples
This statement sets the blend property of the shader for the model named Window to 80. If the transparent property of Window’s shader is set to TRUE, the model will be slightly transparent.
member("House").model("Window").shader.blend = 80
See also
backdrop, overlay, shader, transparent
3D Lingo Dictionary 211

blendConstantSyntax
member(whichCastmember).shader(whichShader).blendConstantmember(whichCastmember).model(whichModel).shader.blendConstantmember(whichCastmember).model(whichModel).shaderList{[index]}.\blendConstant
Description
3D #standard shader property; indicates the blending ratio used for the first texture layer of the shader.
If the shader’s useDiffuseWithTexture property is set to TRUE, the texture blends with the color set by the shader’s diffuse property. If useDiffuseWithTexture is FALSE, white is used for blending.
Each of the other texture layers blends with the texture layer below it. Use the blendConstantList property to control blending in those texture layers.
The blendConstant property only works when the shader’s blendSource property is set to #constant. See blendSource and blendSourceList for more information.
The range of this property is 0 to 100; the default is 50.
Example
In this example, the shader list of the model named MysteryBox contains six shaders. This statement sets the blendConstant property of the second shader to 20. This property is affected by the settings of the blendFunction, blendFunctionList, blendSource, and blendSourceList properties.
member("Level2").model("MysteryBox").shaderList[2].\blendConstant = 20
See also
blendConstantList, blendFunction, blendFunctionList, blendSource, blendSourceList, useDiffuseWithTexture, diffuse, diffuseColor
Chapter 10212

blendConstantList Syntax
member(whichCastmember).shader(whichShader).blendConstantListmember(whichCastmember).model(whichModel).shader.blendConstant\List{[index]}member(whichCastmember).model(whichModel).shaderList{[index]}.\blendConstantList{[index]}
Description
3D #standard shader property; indicates the ratio used for blending a texture layer of the shader with the texture layer below it.
The shader’s texture list and the blend constant list both have eight index positions. Each index position in the blend constant list controls blending for the texture at the corresponding index position in the texture list. You can set all index positions of the list to the same value at one time by not specifying the optional index parameter. Use the index parameter to set the list one index position at a time.
The blendConstantList property only works when the blendSource property of the corresponding texture layer is set to #constant. See blendSource and blendSourceList for more information.
The range of this property is 0 to 100; the default is 50.
Example
In this example, the shader list of the model named MysteryBox contains six shaders. This statement shows the blendConstant property of each of the textures used by the second shader. This property is affected by the settings of the blendFunction, blendFunctionList, blendSource, and blendSourceList properties.
put member("Level2").model("MysteryBox").shaderList[2].\blendConstantList-- [20.0000, 50.0000, 50.0000, 50.0000, 20.0000, 50.0000, \50.0000, 50.0000]
See also
blendConstant, blendFunction, blendFunctionList, blendSource, blendSourceList, useDiffuseWithTexture, diffuse, diffuseColor
3D Lingo Dictionary 213

blendFactorSyntax
member(whichCastmember).model(whichModel).keyframePlayer.\blendFactormember(whichCastmember).model(whichModel).bonesPlayer.blendFactor
Description
3D keyframePlayer and bonesPlayer modifier property; indicates the amount by which a motion is combined with the motion that preceded it.
The range of this property is 0 to 100, and the default value is 0.
BlendFactor is used only when the autoblend property of the modifier is set to FALSE. If the value of the blendFactor property is 100, the current motion will have none of the characteristics of the motion that preceded it. If the value of blendFactor is 0, the current motion will have all of the characteristics of the motion that preceded it and none of its own. If the value of blendFactor is 50, the current motion will be a synthesis equally composed of its own characteristics and those of the motion that preceded it. The value blendFactor can be varied over time to create transitions unlike the linear transition created when the modifier’s autoblend property is set to TRUE.
Example
This statement sets the blendFactor property of model Alien3 to 50. If the modifier’s autoblend property is FALSE, each motion in the playlist of the keyframePlayer for Alien3 will be an even mixture of itself and the motion that preceded it.
member("newaliens").model("Alien3").keyframePlayer.blendFactor = 50
See also
autoblend, keyframePlayer (modifier)
Chapter 10214

blendFunctionSyntax
member(whichCastmember).shader(whichShader).blendFunctionmember(whichCastmember).model(whichModel).shader.blendFunctionmember(whichCastmember).model(whichModel).shaderList{[index]}.\blendFunction
Description
3D #standard shader property; indicates the type of blending used by the first texture layer of the shader.
If the shader’s useDiffuseWithTexture property is set to TRUE, the texture blends with the color set by the shader’s diffuse property. If useDiffuseWithTexture is FALSE, white is used for blending.
Each of the other texture layers blends with the texture layer below it. Use the blendFunctionList property to control blending in those texture layers.
The blendFunction property can have the following values:
#multiply multiplies the RGB values of the texture layer by the color being used for blending (see above).
#add adds the RGB values of the texture layer to the color being used for blending, and then clamps to 255.
#replace prevents the texture from being blended with the color set by the shader’s diffuse property.
#blend combines the colors of the texture layer with the color being used for blending in the ratio set by the blendConstant property.
The default value of this property is #multiply.
Example
In this example, the shader list of the model named MysteryBox contains six shaders. This statement sets the blendFunction property of the second shader to #blend. This enables the settings of the blendSource, blendSourceList, blendConstant, and blendConstantList properties.
member("Level2").model("MysteryBox").shaderList[2].\blendFunction = #blend
See also
blendConstant, blendConstantList, blendFunctionList, blendSource, blendSourceList, useDiffuseWithTexture, diffuse, diffuseColor
3D Lingo Dictionary 215

blendFunctionListSyntax
member(whichCastmember).shader(whichShader).\blendFunctionList{[index]}member(whichCastmember).model(whichModel).shader.\blendFunctionList{[index]}member(whichCastmember).model(whichModel).shaderList{[index]}.\blendFunctionList{[index]}
Description
3D #standard shader property; a linear list that indicates the manner in which each texture layer blends with the texture layer below it.
The shader’s texture list and blend function list both have eight index positions. Each index position in the blend function list controls blending for the texture at the corresponding index position in the texture list. You can set all index positions of the list to the same value at one time by not specifying the optional index parameter. Use the index parameter to set the list one index position at a time.
Each index position of the blend function list can have one of the following values:
#multiply multiplies the RGB values of the texture layer by the RGB values of the texture layer below it.
#add adds the RGB values of the texture layer to the RGB values of the texture layer below it, and then clamps to 255.
#replace causes the texture to cover the texture layer below it. No blending occurs.
#blend causes blending to be controlled by the value of the blendSource property, which allows alpha blending. See the entry for the blendSource property for more information.
The default value of this property is #multiply.
Example
In this example, the shaderList property of the model named MysteryBox contains six shaders. This statement shows that the value of the fourth index position of the blendFunctionList property of the second shader is set to #blend. Blending of the fourth texture layer of the second shader of the model will be controlled by the settings of the blendSource, blendSourceList, blendConstant, blendConstantList, diffuse, diffuseColor, and useDiffuseWithTexture properties.
put member("Level2").model("MysteryBox").shaderList[2].\blendFunctionList[4]-- #blend
See also
blendConstant, blendConstantList, blendFunction, blendSource, blendSourceList, diffuse, diffuseColor, useDiffuseWithTexture
Chapter 10216

blendRangeSyntax
member(whichCastmember).modelResource(whichModelResource)\.blendRange.startmodelResourceObjectReference.blendRange.endmember(whichCastmember).modelResource(whichModelResource)\.blendRange.startmodelResourceObjectReference.blendRange.end
Description
3D property; when used with a model resource whose type is #particle, allows you to get or set the start and end of the model resource’s blend range.
The opacity of particles in the system is interpolated linearly between blendRange.start and blendRange.end over the lifetime of each particle.
This property’s value must be greater than or equal to 0.0 and less than or equal to 100.0. The default value for this property is 100.0.
Example
This statement sets the blendRange properties of model resource ThermoSystem, which is of the type #particle.
The first line sets the start value to 100, and the second line sets the end value to 0. The effect of this statement is that the particles of ThermoSystem are fully opaque when they first appear, and then gradually fade to transparent during their lifetime.
member("Heater").modelResource("ThermoSystem").blendRange.\start = 100.0member("Heater").modelResource("ThermoSystem").blendRange.\end = 0.0
3D Lingo Dictionary 217

blendSourceSyntax
member(whichCastmember).shader(whichShader).blendSourcemember(whichCastmember).model(whichModel).shader.blendSourcemember(whichCastmember).model(whichModel).shaderList{[index]}.\blendSource
Description
3D #standard shader property; indicates whether blending of the first texture layer in the shader’s texture list is based on the texture’s alpha information or a constant ratio.
If the shader’s useDiffuseWithTexture property is set to TRUE, the texture blends with the color set by the shader’s diffuse property. If useDiffuseWithTexture is FALSE, white is used for blending.
Each of the other texture layers blends with the texture layer below it. Use the blendSourceList property to control blending in those texture layers.
The blendSource property only works when the shader’s blendFunction property is set to #blend. See blendFunction and blendFunctionList for more information.
The possible values of this property are as follows:
#alpha causes the alpha information in the texture to determine the blend ratio of each pixel of the texture with the color being used for blending (see above).
#constant causes the value of the shader’s blendConstant property to be used as the blend ratio for all of the pixels of the texture. See blendConstant and blendConstantList for more information.
The default value of this property is #constant.
Example
In this example, the shader list of the model named MysteryBox contains six shaders. This statement sets the blendSource property of the first texture used by the second shader to #constant. This enables the settings of the blendConstant and blendConstantList properties.
member("Level2").model("MysteryBox").shaderList[2].\blendSource = #constant
See also
blendSourceList, blendFunction, blendFunctionList, blendConstant, blendConstantList, useDiffuseWithTexture, diffuse, diffuseColor
Chapter 10218

blendSourceListSyntax
member(whichCastmember).shader(whichShader).\blendSourceList[index]member(whichCastmember).model(whichModel).shader.\blendSourceList{[index]}member(whichCastmember).model(whichModel).\shaderList{[index]}.blendSourceList{[index]}
Description
3D #standard shader property; indicates whether blending of a texture layer with the texture layers below it is based on the texture’s alpha information or a constant ratio.
The shader’s texture list and the blend source list both have eight index positions. Each index position in the blend source list controls blending for the texture at the corresponding index position in the texture list. You can set all index positions of the list to the same value at one time by not specifying the optional index parameter. Use the index parameter to set the list one index position at a time.
The blendSourceList property only works when the blendFunction property of the corresponding texture layer is set to #blend. See blendFunction and blendFunctionList for more information.
The possible values of this property are as follows:
#alpha causes the alpha information in the texture to determine the blend ratio of each pixel of the texture layer with the layer below it.
#constant causes the value of the blendConstant property of the corresponding texture layer to be used as the blend ratio for all of the pixels of the texture layer. See blendConstant and blendConstantList for more information.
The default value of this property is #constant.
Example
In this example, the shader list of the model MysteryBox contains six shaders. Each shader has a texture list that contains up to eight textures. This statement shows that the blendSource property of the fourth texture used by the second shader is set to #constant. This enables the settings of the blendConstant, blendConstantList, and useDiffuseWithTexture properties.
member("Level2").model("MysteryBox").shaderList[2].\blendSourceList[4] = #constant
See also
blendSource, blendFunction, blendFunctionList, blendConstant, blendConstantList, useDiffuseWithTexture, diffuse, diffuseColor
3D Lingo Dictionary 219

blendTimeSyntax
member(whichCastmember).model(whichModel).keyframePlayer.\blendTimemember(whichCastmember).model(whichModel).bonesPlayer.blendTime
Description
3D keyframePlayer and bonesPlayer modifier property; determines the duration, in milliseconds, of the transition between motions in the playlist of the modifier for the model.
The blendTime property works in conjunction with the modifier’s autoBlend property. When autoBlend is set to TRUE, the modifier creates a linear transition to the model’s currently playing motion from the motion that preceded it. The value of the blendTime property is the length of that transition. The blendTime property is ignored if autoBlend is set to FALSE.
The default setting of this property is 500.
Example
This statement sets the length of the transition between motions in the playlist of the modifier for the model named Alien5 to 1200 milliseconds.
member("newaliens").model("Alien5").keyframePlayer.\blendTime = 1200
See also
autoblend, blendFactor
Chapter 10220

boneSyntax
member(whichCastmember).modelResource(whichModelResource).\bone.countmember(whichCastmember).model(whichModel).bonesPlayer.\bone[index].transformmember(whichCastmember).model(whichModel).bonesPlayer.\bone[index].worldTransform
Description
3D element; a bone is structural element of a model resource authored in a 3D modeling program. Bones cannot be created, deleted, or rearranged in Director.
Bones (#bones) motions, which also must be scripted in a 3D modeling program, act upon the bone structure of a model resource, and are managed in Director by the bonesPlayer modifier.
See the entries for count, bonesPlayer (modifier), transform (property), and worldTransform for more details.
See also
count, bonesPlayer (modifier), transform (property), worldTransform
3D Lingo Dictionary 221

bonesPlayer (modifier)Syntax
member(whichCastmember).model(whichModel).bonesPlayer.whichBonesPlayerProperty
Description
3D modifier; manages the use of motions by models. The motions managed by the bonesPlayer modifier animate segments, called bones, of the model.
Motions and the models that use them must be created in a 3D modeling program, exported as W3D files, and then imported into a movie. Motions cannot be applied to model primitives created within Director.
Adding the bonesPlayer modifier to a model by using the addModifier command allows access to the following bonesPlayer modifier properties:
playing indicates whether a model is executing a motion.
playlist is a linear list of property lists containing the playback parameters of the motions that are queued for a model.
currentTime indicates the local time, in milliseconds, of the currently playing or paused motion.
playRate is a number that is multiplied by the scale parameter of the play() or queue() command to determine the playback speed of the motion.
playlist.count returns the number of motions currently queued in the playlist.
rootLock indicates whether the translational component of the motion is used or ignored.
currentLoopState indicates whether the motion plays once or repeats continuously.
blendTime indicates the length of the transition created by the modifier between motions when the modifier’s autoblend property is set to TRUE.
autoblend indicates whether the modifier creates a linear transition to the currently playing motion from the motion that preceded it.
blendFactor indicates the degree of blending between motions when the modifier’s autoBlend property is set to FALSE.
bone[boneId].transform indicates the transform of the bone relative to the parent bone. You can find the boneId value by testing the getBoneID property of the model resource. When you set the transform of a bone, it is no longer controlled by the current motion, and cannot be returned to the control of the motion. Manual control ends when the current motion ends.
bone[boneId].getWorldTransform returns the world-relative transform of the bone.
Chapter 10222

lockTranslation indicates whether the model can be displaced from the specified planes.
positionReset indicates whether the model returns to its starting position after the end of a motion or each iteration of a loop.
rotationReset indicates the rotational element of a transition from one motion to the next, or the looping of a single motion.
Note: For more detailed information about these properties, see the individual property entries.
The bonesPlayer modifier uses the following commands:
pause() halts the motion currently being executed by the model.
play() initiates or unpauses the execution of a motion.
playNext() initiates playback of the next motion in the playlist.
queue() adds a motion to the end of the playlist.
The bonesPlayer modifier generates the following events, which are used by handlers declared in the registerForEvent() and registerScript() commands. The call to the declared handler includes three arguments: the event type (either #animationStarted or #animationEnded), the name of the motion, and the current time of the motion. For detailed information about notification events, see the entry for registerForEvent().
#animationStarted is sent when a motion begins playing. If blending is used between motions, the event is sent when the transition begins.
#animationEnded is sent when a motion ends. If blending is used between motions, the event is sent when the transition ends.
See also
keyframePlayer (modifier), addModifier, modifiers, modifier
3D Lingo Dictionary 223

bottomSyntax
member(whichCastmember).modelResource(whichModelResource).bottom
Description
3D #box model resource property; indicates whether the side of the box intersected by its -Y axis is sealed (TRUE) or open (FALSE).
The default value for this property is TRUE.
Example
This statement sets the bottom property of the model resource named GiftBox to TRUE, meaning the bottom of this box will be closed.
member("3D World").modelResource("GiftBox").bottom = TRUE
See also
back, front, top, left, right, bottomCap
bottomCapSyntax
member(whichCastmember).modelResource(whichModelResource).\bottomCap
Description
3D #cylinder model resource property; indicates whether the end of the cylinder intersected by its -Y axis is sealed (TRUE) or open (FALSE).
The default value for this property is TRUE.
Example
This statement sets the bottomCap property of the model resource named Tube to FALSE, meaning the bottom of this cylinder will be open.
member("3D World").modelResource("Tube").bottomCap = FALSE
See also
topCap, bottomRadius, bottom
Chapter 10224

bottomRadiusSyntax
member(whichCastmember).modelResource(whichModelResource).\bottomRadius
Description
3D #cylinder model resource property; indicates the radius, in world units, of the end of the cylinder that is intersected by its -Y axis.
The default value for this property is 25.
Example
This statement sets the bottomRadius property of the model resource named Tube to 38.5.
member("3D World").modelResource("Tube").bottomRadius = 38.5
See also
topRadius, bottomCap
boundarySyntax
member(whichCastmember).model(whichModel).inker.boundarymember(whichCastmember).model(whichModel).toon.boundary
Description
3D inker and toon modifier property; allows you to set whether a line is drawn at the edges of a model.
The default setting for this property is TRUE.
Example
This statement sets the boundary property of the inker modifier applied to the model named Box to TRUE. Lines will be drawn at the edges of the surface of the model.
member("shapes").model("Box").inker.boundary = TRUE
See also
lineColor, lineOffset, silhouettes, creases
3D Lingo Dictionary 225

boundingSphere Syntax
member(whichCastmember).model(whichModel).boundingSpheremember(whichCastmember).group(whichGroup).boundingSpheremember(whichCastmember).light(whichLight).boundingSpheremember(whichCastmember).camera(whichCamera).boundingSphere
Description
3D model, group, light, and camera property; describes a sphere that contains the model, group, light, or camera and its children.
The value of this property is a list containing the vector position of the center of the sphere and the floating-point length of the sphere’s radius.
This property can be tested but not set.
Examples
This example displays the bounding sphere of a light in the message window.
put member("newAlien").light[5].boundingSphere-- [vector(166.8667, -549.6362, 699.5773), 1111.0039]
See also
debug
brightnessSyntax
member(whichCastmember).shader(whichShader).brightnessmember(whichCastmember).model(whichModel).shader.brightnessmember(whichCastmember).model(whichModel).shaderList{[index]}.\brightness
Description
3D #newsprint and #engraver shader property; indicates the amount of white blended into the shader.
The range of this property is 1 to 100; the default value is 0.
Example
This statement sets the brightness of the shader used by the model named gbCyl2 to half of its maximum value.
member("scene").model("gbCyl2").shader.brightness = 50
See also
newShader
Chapter 10226

build()Syntax
member(whichCastmember).modelResource(whichModelResource).build()
Description
3D mesh command; constructs a mesh. This command is only used with model resources whose type is #mesh.
You must use the build() command in the initial construction of the mesh, after changing any of the face properties of the mesh, and after using the generateNormals() command.
Example
This example creates a simple model resource whose type is #mesh, specifies its properties, and then creates a new model using the model resource. The process is outlined in the following line-by-line explanation of the example code:
Line 1 creates a mesh called Plane, which has one face, three vertices, and a maximum of three colors. The number of normals and the number of texture coordinates are not set. The normals are created by the generateNormal command.
Line 2 defines the vectors that will be used as the vertices for Plane.
Line 3 assigns the vectors to the vertices of the first face of Plane.
Line 4 defines the three colors allowed by the newMesh command.
Line 5 assigns the colors to the first face of Plane. The third color in the color list is applied to the first vertex of Plane, the second color to the second vertex, and the first color to the third vertex. The colors will spread across the first face of Plane in gradients.
Line 6 creates the normals of Plane with the generateNormals() command.
Line 7 calls the build() command to construct the mesh.
nm = member("Shapes").newMesh("Plane",1,3,0,3,0) nm.vertexList = [vector(0,0,0), vector(20,0,0), vector(20, 20, 0)] nm.face[1].vertices = [1,2,3] nm.colorList = [rgb(255,255,0), rgb(0, 255, 0), rgb(0,0,255)] nm.face[1].colors = [3,2,1] nm.generateNormals(#smooth) nm.build() nm = member("Shapes").newModel("TriModel", nm)
See also
generateNormals(), newMesh, face
3D Lingo Dictionary 227
bytesStreamedSyntax
member(whichCastMember).bytesStreamed
Description
3D cast member property; indicates how much of the initial file import or the last requested file load has loaded.
Example
This statement shows that 325,300 bytes of the cast member named Scene have been loaded.
put member("Scene").bytesStreamed-- 325300
See also
streamSize, state
cameraSyntax
member(whichCastMember).camera(whichCamera)member(whichCastMember).camera[index]member(whichCastMember).camera(whichCamera).whichCameraPropertymember(whichCastMember).camera[index].whichCameraPropertysprite(whichSprite).camera{(index)}sprite(whichSprite).camera{(index)}.whichCameraProperty
Description
3D element; an object at a vector position from which the 3D world is viewed.
Each sprite has a list of cameras. The view from each camera in the list is displayed on top of the view from camera with lower index positions. You can set the rect property of each camera to display multiple views within the sprite.
Cameras are stored in the camera palette of the cast member. Use the newCamera and deleteCamera commands to create and delete cameras in a 3D cast member.
The camera property of a sprite is the first camera in the list of cameras of the sprite. The camera referred to by sprite(whichSprite).camera is the same as sprite(whichSprite).camera(1). Use the addCamera and deleteCamera commands to build the list of cameras in a 3D sprite.
See the “3D Lingo by Feature” chapter for a complete list of camera properties and commands.
Chapter 10228
Examples
This statement sets the camera of sprite 1 to the camera named TreeCam of the cast member named Picnic.
sprite(1).camera = member("Picnic").camera("TreeCam")
This statement sets the camera of sprite 1 to camera 2 of the cast member named Picnic.
sprite(1).camera = member("Picnic").camera[2]
See also
backdrop, overlay, modelUnderLoc, spriteSpaceToWorldSpace, fog, clearAtRender
cameraCount()Syntax
sprite(whichSprite).cameraCount()
Description
3D command; returns the number items in the list of cameras of the sprite.
Example
This statement shows that sprite 5 contains three cameras.
put sprite(5).cameraCount()-- 3
See also
addCamera, deleteCamera
3D Lingo Dictionary 229
cameraPositionSyntax
member(whichCastMember).cameraPositionsprite(whichSprite).cameraPosition
Description
3D cast member and sprite property; indicates the position of the default camera.
The default value of this property is vector(0, 0, 250). This is the position of the default camera in a newly created 3D cast member.
Example
This statement shows that the position of the default camera of the cast member named Babyland is the vector (-117.5992, -78.9491, 129.0254).
member("Babyland").cameraPosition = vector(-117.5992, \-78.9491, 129.0254)
See also
cameraRotation, autoCameraPosition
cameraRotationSyntax
member(whichCastMember).cameraRotationsprite(whichSprite).cameraRotation
Description
3D cast member and sprite property; indicates the position of the default camera.
The default value of this property is vector(0, 0, 0). This is the rotation of the default camera in a newly created 3D cast member.
Example
This statement shows that the rotation of the default camera of the cast member named Babyland is the vector (82.6010, -38.8530, -2.4029).
member("babyland").cameraRotation = vector(82.6010, \-38.8530, -2.4029)
See also
cameraPosition, autoCameraPosition
Chapter 10230

childSyntax
member(whichCastmember).model(whichParentNode).\child(whichChildNodeName)member(whichCastmember).model(whichParentNode).child[index]
Description
3D model, group, light, and camera property; returns the child node named whichChildNodeName or at the specified index in the parent node’s list of children. A node is a model, group, camera, or light.
The transform of a node is parent-relative. If you change the position of the parent, its children move with it, and their positions relative to the parent are maintained. Changes to the rotation and scale properties of the parent are similarly reflected in its children.
Use the addChild method of the parent node or set the parent property of the child node to add to the parent’s list of children. A child can have only one parent, but a parent can have any number of children. A child can also have children of its own.
Example
This statement shows that the second child of the model named Car is the model named Tire.
put member("3D").model("Car").child[2]-- model("Tire")
See also
addChild, parent
3D Lingo Dictionary 231
clearAtRenderSyntax
member(whichCastmember).camera(whichCamera).colorBuffer.\clearAtRendersprite(whichSprite).camera{(index)}.colorBuffer.clearAtRender
Description
3D property; indicates whether the color buffer is cleared after each frame. Setting the value to FALSE, which means the buffer is not cleared, gives an effect similar to trails ink effect. The default value for this property is TRUE.
Example
This statement prevents Director from erasing past images of the view from the camera. Models in motion will appear to smear across the stage.
sprite(1).camera.colorBuffer.clearAtRender = 0
See also
clearValue
clearValueSyntax
member(whichCastmember).camera(whichCamera).colorBuffer\.clearValuesprite(whichSprite).camera{(index)}.colorBuffer.clearValue
Description
3D property; specifies the color used to clear out the color buffer if colorBuffer.clearAtRender is set to TRUE. The default setting for this property is rgb(0, 0, 0).
Example
This statement sets the clearValue property of the camera to rgb(255, 0, 0). Spaces in the 3d world which are not occupied by models will appear red.
sprite(1).camera.colorBuffer.clearValue= rgb(255, 0, 0)
See also
clearAtRender
Chapter 10232

cloneSyntax
member(whichCastmember).model(whichModel).clone(cloneName)member(whichCastmember).group(whichGroup).clone(cloneName)member(whichCastmember).light(whichLight).clone(cloneName)member(whichCastmember).camera(whichCamera).clone(cloneName)
Description
3D command; creates a copy of the model, group, light, or camera and all of its children. The clone is named cloneName and shares the parent of the model, group, light, or camera from which it was cloned.
A clone of a model uses the same model resource and is assigned the same shaderList as the original model.
If you do not specify the cloneName, or if you specify "", the clone will not be counted by the count method, but it will appear in the scene.
Example
This statement creates a clone named Teapot2 from the model named Teapot, and returns a reference to the new model.
teapotCopy = member("3D World").model("Teapot").clone("Teapot2")
See also
cloneDeep, cloneModelFromCastmember, cloneMotionFromCastmember, loadFile()
3D Lingo Dictionary 233

cloneDeepSyntax
member(whichCastmember).model(whichModel).cloneDeep(cloneName)member(whichCastmember).group(whichGroup).cloneDeep(cloneName)member(whichCastmember).light(whichLight).cloneDeep(cloneName)member(whichCastmember).camera(whichCamera).cloneDeep(cloneName)
Description
3D command; creates a copy of the model, group, light, or camera plus all of the following:
• The model resources, shaders, and textures used by the original model or group
• The children of the model, group, light, or camera
• The model resources, shaders, and textures used by the children
Note that cloneDeep uses more memory and takes more time than the clone command.
Example
This statement creates a copy of the model named Teapot, its children, and the model resources, shaders, and textures used by Teapot and its children. The variable teapotCopy is a reference to the cloned model.
teapotCopy = member("3D World").model("Teapot").cloneDeep("Teapot2")
See also
clone, cloneModelFromCastmember, cloneMotionFromCastmember, loadFile()
cloneModelFromCastmemberSyntax
member(whichCastmember).cloneModelFromCastmember\(newModelName, sourceModelName, sourceCastmember)
Description
3D command; copies the model named sourceModelName from the cast member sourceCastmember, renames it newModelName, and inserts it into the cast member whichCastmember as a child of its 3D world.
This command also copies the children of sourceModelName, as well as the model resources, shaders, and textures used by the model and its children.
The source cast member must be finished loading for this command to work correctly.
Chapter 10234

Example
This statement makes a copy of the model named Pluto of the cast member named Scene and inserts it into the cast member named Scene2 with the new name Planet. The children of Pluto are also imported, as are the model resources, shaders, and textures used by Pluto and its children.
member("Scene2").cloneModelFromCastmember("Planet", "Pluto", \member("Scene"))
See also
cloneMotionFromCastmember, clone, cloneDeep, loadFile()
cloneMotionFromCastmemberSyntax
member(whichCastmember).cloneMotionFromCastmember(newMotionName, \sourceMotionName, sourceCastmember)
Description
3D command; copies the motion named sourceMotionName from the cast member sourceCastmember, renames it newMotionName, and inserts it into the cast member whichCastmember.
The source cast member must be finished loading for this command to work correctly.
Example
This statement copies the motion named Walk from the cast member named ParkScene, names the copy FunnyWalk, and puts the copy in the cast member gbMember.
member("gbMember").cloneMotionFromCastmember("FunnyWalk", \"Walk", member("ParkScene"))
See also
map, cloneModelFromCastmember, clone, cloneDeep, loadFile()
3D Lingo Dictionary 235

collision (modifier)Syntax
member(whichCastmember).model(whichModel).\collision.collisionModifierProperty
Description
3D modifier; manages the detection and resolution of collisions. Adding the collision modifier to a model by using the addModifier command allows access to the following collision modifier properties:
enabled (collision) indicates whether collisions with the model are detected.
resolve indicates whether collisions with the model are resolved.
immovable indicates whether a model can be moved from frame to frame.
mode (collision) indicates the geometry used for collision detection.
Note: For more detailed information about these properties, see the individual property entries.
The collision modifier generates the following events. For more information about using collision events, see the entry for registerForEvent().
A #collideAny event is generated when a collision occurs between models to which the collision modifier has been attached.
A #collideWith event is generated when a collision occurs with a specific model to which the collision modifier has been attached.
The collisionData object is sent as an argument with the #collideAny and #collideWith events. See the collisionData entry for details of its properties.
See also
addModifier, removeModifier, modifiers
Chapter 10236

collisionDataSyntax
on myHandlerName me, collisionData
Description
3D data object; sent as an argument with the #collideWith and #collideAny events to the handler specified in the registerForEvent, registerScript, and setCollisionCallback commands. The collisionData object has these properties:
modelA is one of the models involved in the collision.
modelB is the other model involved in the collision.
pointOfContact is the world position of the collision.
collisionNormal is the direction of the collision.
Example
This example has three parts. The first part is the first line of code, which registers the #putDetails handler for the #collideAny event. The second part is the #putDetails handler. When two models in the cast member MyScene collide, the #putDetails handler is called and the collisionData argument is sent to it. This handler displays the four properties of the collisionData object in the message window. The third part of the example shows the results from the message window. The first two lines show that the model named GreenBall was model A and the model named YellowBall was model B in the collision. The third line shows the point of contact of the two models. The last line shows the direction of the collision.
member("MyScene").registerForEvent(#collideAny, #putDetails, 0)
on putDetails me, collisionData put collisionData.modelA put collisionData.modelB put collisionData.pointOfContact put collisionData.collisionNormalend
-- model("GreenBall")-- model("YellowBall")-- vector( 24.800, 0.000, 0.000 )-- vector( -1.000, 0.000, 0.000 )
See also
collisionData properties: modelA, modelB, pointOfContact, collisionNormal
collisionData methods: resolveA, resolveB
collision (modifier)
3D Lingo Dictionary 237

collisionNormalSyntax
collisionData.collisionNormal
Description
3D collisionData property; a vector indicating the direction of the collision.
The collisionData object is sent as an argument with the #collideWith and #collideAny events to the handler specified in the registerForEvent, registerScript, and setCollisionCallback commands.
The #collideWith and #collideAny events are sent when a collision occurs between models to which collision modifiers have been added. The resolve property of the models’ modifiers must be set to TRUE.
This property can be tested but not set.
Example
This example has two parts. The first part is the first line of code, which registers the #explode handler for the #collideAny event. The second part is the #explode handler. When two models in the cast member named MyScene collide, the #explode handler is called and the collisionData argument is sent to it. The first ten lines of the #explode handler create the model resource SparkSource and set its properties. This model resource is a single burst of particles. The tenth line sets the direction of the burst to collisionNormal, which is the direction of the collision. The eleventh line of the handler creates a model called SparksModel using the model resource SparkSource. The last line of the handler sets the position of SparksModel to the position where the collision occurred. The overall effect is a collision that causes a burst of sparks to fly in the direction of the collision from the point of contact.
member("MyScene").registerForEvent(#collideAny, #explode, 0)on explode me, collisionData nmr = member("MyScene").newModelResource("SparkSource", #particle) nmr.emitter.mode = #burst nmr.emitter.loop = 0 nmr.emitter.minSpeed = 30 nmr.emitter.maxSpeed = 50 nmr.emitter.angle = 45 nmr.colorRange.start = rgb(0, 0, 255) nmr.colorRange.end = rgb(255, 0, 0) nmr.lifetime = 5000 nmr.emitter.direction = collisionData.collisionNormal nm = member("MyScene").newModel("SparksModel", nmr) nm.transform.position = collisionData.pointOfContactend
See also
pointOfContact, modelA, modelB, resolveA, resolveB, collision (modifier)
Chapter 10238
color (fog)Syntax
member(whichCastmember).camera(whichCamera).fog.colorsprite(whichSprite).camera{(index)}.fog.color
Description
3D property; indicates the color introduced into the scene by the camera when the camera’s fog.enabled property is set to TRUE.
The default setting for this property is rgb(0, 0, 0).
Example
This statement sets the color of the fog of the camera named BayView to rgb(255, 0, 0). If the camera’s fog.enabled property is set to TRUE, models in the fog will take on a red hue.
member("MyYard").camera("BayView").fog.color = rgb(255, 0, 0)
See also
fog
color (light)Syntax
member(whichCastmember).light(whichLight).color
Description
3D light property; indicates the rgb value of the light.
The default value of this property is rgb(191,191,191).
Example
This statement sets the color of the light named RoomLight to rgb(255, 0, 255).
member("Room").light("RoomLight").color = rgb(255,0,255)
See also
fog
3D Lingo Dictionary 239

colorBufferDepthSyntax
getRendererServices().colorBufferDepth
Description
3D rendererServices property; indicates the color precision of the hardware output buffer of the user’s system. The value is either 16 or 32, depending on the user’s hardware settings.
This property can be tested but not set.
Example
This statement shows that the colorBufferDepth value of the user’s video card is 32.
put getRendererServices().colorBufferDepth-- 32
See also
getRendererServices(), getHardwareInfo(), depthBufferDepth
colorListSyntax
member(whichCastmember).modelResource(whichModelResource).\colorListmember(whichCastmember).modelResource(whichModelResource).\colorList[index]member(whichCastmember).model(whichModel).meshdeform.mesh\[meshIndex].colorListmember(whichCastmember).model(whichModel).meshdeform.mesh\[meshIndex].colorList[index]
Description
3D property; allows you to get or set every color used in a mesh. This command is accessible only for model resources of the type #mesh. Any single color can be shared by several vertices (faces) of the mesh. Alternately, you can specify texture coordinates for the faces of the mesh and apply a shader to models that use this model resource.
This command must be set to a list of the same number of lingo color values specified in the newMesh call.
Example
This statement shows that the third color in the colorList of the model resource Mesh2 is rgb(255, 0, 0).
put member("shapes").modelResource("mesh2").colorlist[3]-- rgb(255,0,0)
See also
face, colors
Chapter 10240

colorRangeSyntax
member(whichCastmember).modelResource(whichModelResource).\colorRange.startmember(whichCastmember).modelResource(whichModelResource).\colorRange.end
Description
3D #particle model resource properties; indicate the beginning color and ending color of the particles of a particle system.
The start property is the color of the particles when they are created. The end property is the color of particles at the end of their lives. The color of each particle gradually changes from the value of start to the value of end over the course of its life.
The start and end properties have a default value of rgb(255, 255, 255).
Examples
This statement sets the colorRange properties of the model resource named ThermoSystem. The first line sets the start value to rgb(255, 0, 0), and the second line sets the end value to rgb(0, 0, 255). The effect of this statement is that the particles of ThermoSystem are red when they first appear, and gradually change to blue during their lifetimes.
member(8,2).modelResource("ThermoSystem").colorRange.start = \rgb(255,0,0)member(8,2).modelResource("ThermoSystem").colorRange.end = \rgb(0,0,255)
See also
emitter, blendRange, sizeRange
3D Lingo Dictionary 241

colorsSyntax
member(whichCastmember).modelResource(whichModelResource).\face[faceIndex].colors
Description
3D face property; a linear list of three integers indicating which index positions of the model resource’s color list to use for the three vertices of the face. The color list is a linear list of rgb values.
The colors property is used only with model resources whose type is #mesh.
You must use the model resource’s build() command after setting this property; otherwise, the changes will not take effect.
Example
This example creates a model resource whose type is #mesh, specifies its properties, and then creates a new model with it.
Line 1 uses the newMesh() command to create a #mesh model resource named Triangle, which has one face, three vertices, and a maximum of three colors. The number of normals and the number of texture coordinates are not set.
Line 2 sets the vertexList property to a list of three vectors.
Line 3 assigns the vectors of the vertexList property to the vertices of the first face of Triangle.
Line 4 sets the color list to three rgb values.
Line 5 assigns colors to the first face of Triangle. The third color in the color list is applied to the first vertex of Triangle, the second color to the second vertex, and the first color to the third vertex. The colors will spread across the first face of Triangle in gradients.
Line 6 creates the normals of Triangle with the generateNormals() command.
Line 7 uses the build() command to construct the mesh.
Line 8 creates a new model named TriModel that uses the new mesh.
nm = member("Shapes").newMesh("Triangle",1,3,0,3,0)nm.vertexList = [vector(0,0,0), vector(20,0,0), vector(20, 20, 0)]nm.face[1].vertices = [1,2,3]nm.colorList = [rgb(255,255,0), rgb(0, 255, 0), rgb(0,0,255)]nm.face[1].colors = [3,2,1]nm.generateNormals(#smooth)nm.build()nm = member("Shapes").newModel("TriModel", nm)
See also
face, vertices, colorList, flat
Chapter 10242

colorSteps Syntax
member(whichCastmember).model(whichModel).toon.colorStepsmember(whichCastmember).model(whichModel).shader.colorStepsmember(whichCastmember).shader(whichShader).colorSteps
Description
3D toon modifier and painter shader property; the maximum number of colors available for use by the toon modifier or painter shader. The value of this property can be 2, 4, 8, or 16. If you set the value of colorSteps to any other number, it will be rounded to one of these.
The default value is 2.
Example
This statement limits the number of colors available for use by the toon modifier for the model named Teapot to 8. The teapot will be rendered with a maximum of eight colors.
member("shapes").model("Teapot").toon.colorSteps = 8
See also
highlightPercentage, shadowPercentage
compressedSyntax
member(whichCastmember).texture(whichTexture).compressed
Description
3D texture property; indicates whether the source cast member of the texture is compressed (TRUE) or not (FALSE). The value of the compressed property changes automatically from TRUE to FALSE when the texture is needed for rendering. It can be set to FALSE to decompress the texture at an earlier time. It can be set to TRUE to release the decompressed representation from memory. Cast members used for textures will not be compressed if this value is TRUE (apart from the standard compression used for bitmap cast members when a Director movie is saved). The default value for this property is TRUE.
Example
This statement sets the compressed property of the texture Plutomap to TRUE.
member("scene").texture("Plutomap").compressed = TRUE
See also
texture
3D Lingo Dictionary 243

count Syntax
member(whichCastmember).light.countmember(whichCastmember).camera.countmember(whichCastmember).modelResource(whichModelResource).\bone.countmember(whichCastmember).model.countmember(whichCastmember).group.countmember(whichCastmember).shader.countmember(whichCastmember).texture.countmember(whichCastmember).modelResource.countmember(whichCastmember).motion.countmember(whichCastmember).light.child.countmember(whichCastmember).camera.child.countmember(whichCastmember).model.child.countmember(whichCastmember).group.child.countsprite(whichSprite).camera{(index)}.backdrop.countmember(whichCastmember).camera(whichCamera).backdrop.countsprite(whichSprite).camera{(index)}.overlay.countmember(whichCastmember).camera(whichCamera).overlay.countmember(whichCastmember).model(whichModel).modifier.countmember(whichCastmember).model(whichModel).keyframePlayer.\playlist.countmember(whichCastmember).model(whichModel).bonesPlayer.\playlist.countmember(whichCastmember).modelResource(whichModelResource).\face.countmember(whichCastmember).model(whichModel).meshDeform.\mesh[index].textureLayer.countmember(whichCastmember).model(whichModel).meshDeform.mesh.countmember(whichCastmember).model(whichModel).meshDeform.\mesh[index].face.count
Description
3D property; returns the number of items in the given list that is associated with the given 3D object. Can be used with any type of object.
The face.count property allows you to get the number of triangles in the mesh for a model resource whose type is #mesh.
This property can be tested but not set.
Chapter 10244

Examples
These examples determine the number of various types of objects within a 3D cast member called 3D World.
numberOfCameras = member("3D World").camera.countput member("3D World").light.count-- 3numberOfModels = member("3D World").model.countnumberOfTextures = member("3D World").texture.countput member("3D World").modelResource("mesh2").face.count-- 4
This statement shows that the first mesh of the model named Ear is composed of 58 faces.
put member("Scene").model("Ear").meshdeform.mesh[1].face.count-- 58
This statement shows that the model named Ear is composed of three meshes.
put member("Scene").model("Ear").meshdeform.mesh.count-- 3
This statement shows that the first mesh of the model named Ear has two texture layers.
put member("Scene").model("Ear").meshdeform.mesh[1].\textureLayer.count-- 2
See also
cameraCount()
3D Lingo Dictionary 245
creaseAngleSyntax
member(whichCastmember).model(whichModel).inker.creaseAnglemember(whichCastmember).model(whichModel).toon.creaseAngle
Description
3D inker and toon modifier property; indicates the sensitivity of the line drawing function of the modifier to the presence of creases in the model’s geometry. Higher settings result in more lines (detail) drawn at creases.
The creases property of the modifier must be set to TRUE for the creaseAngle property to have an effect.
CreaseAngle has a range of -1.0 to +1.0. The default setting is 0.01.
Example
This statement sets the creaseAngle property of the inker modifier applied to the model named Teapot to 0.10. A line will be drawn at all creases in the model that exceed this threshold. This setting will only take effect if the inker modifier’s creases property is set to TRUE.
member("shapes").model("Teapot").inker.creaseAngle = 0.10
See also
creases, lineColor, lineOffset, useLineOffset
creasesSyntax
member(whichCastmember).model(whichModel).inker.creasesmember(whichCastmember).model(whichModel).toon.creases
Description
3D toon and inker modifier property; determines whether lines are drawn at creases in the surface of the model.
The default setting for this property is TRUE.
Example
This statement sets the creases property of the inker modifier for the model named Teapot to TRUE. A line will be drawn on all creases in the model that exceed the threshold set by the inker modifier’s creaseAngle property.
member("shapes").model("Teapot").inker.creases = TRUE
See also
creaseAngle, lineColor, lineOffset, useLineOffset
Chapter 10246
crossSyntax
vector1.cross(vector2)
Description
3D vector method; returns a vector which is perpendicular to both vector1 and vector2.
Example
In this example, pos1 is a vector on the x axis and pos2 is a vector on the y axis. The value returned by pos1.cross(pos2) is vector( 0.0000, 0.0000, 1.00000e4 ), which is perpendicular to both pos1 and pos2.
pos1 = vector(100, 0, 0)pos2 = vector(0, 100, 0)put pos1.cross(pos2)-- vector( 0.0000, 0.0000, 1.00000e4 )
See also
crossProduct(), perpendicularTo
crossProduct() Syntax
vector1.crossProduct(vector2)
Description
3D vector method; returns a vector which is perpendicular to both vector1 and vector2.
Example
In this example, pos1 is a vector on the x axis and pos2 is a vector on the y axis. The value returned by pos1.crossProduct(pos2) is vector( 0.0000, 0.0000, 1.00000e4 ), which is perpendicular to both pos1 and pos2.
pos1 = vector(100, 0, 0)pos2 = vector(0, 100, 0)put pos1.crossProduct(pos2)-- vector( 0.0000, 0.0000, 1.00000e4 )
See also
perpendicularTo, cross
3D Lingo Dictionary 247
currentLoopState Syntax
member(whichCastmember).model(whichModel).keyframePlayer.\currentLoopStatemember(whichCastmember).model(whichModel).bonesPlayer.\currentLoopState
Description
3D keyframePlayer and bonesPlayer modifier property; indicates whether the motion being executed by the model repeats continuously (TRUE) or plays to the end and is replaced by the next motion in the modifier’s playlist (FALSE).
The default setting for this property is the value of the looped parameter of the play() command that initiated playback of the motion or the value of the queue() command that added the motion to the modifier’s playlist. Changing the currentLoopState property also changes the value of the #looped property of the motion’s entry in the modifier’s playlist.
Example
This statement causes the motion that is being executed by the model named Monster to repeat continuously.
member("NewAlien").model("Monster").keyframePlayer.\currentLoopState = TRUE
See also
loop (cast member property), play(), queue(), playlist
currentTimeSyntax
member(whichCastmember).model(whichModel).keyframePlayer.\currentTimemember(whichCastmember).model(whichModel).bonesPlayer.\currentTime
Description
3D keyframePlayer and bonesPlayer modifier property; indicates the local time of the motion being executed by the model. The currentTime property is measured in milliseconds, but it only corresponds to real time when the motion is playing at its original speed.
Chapter 10248

Playback of a motion by a model is the result of either a play() or queue() command. The scale parameter of the play() or queue() command is multiplied by the modifier’s playRate property, and the resulting value is multiplied by the motion’s original speed to determine how fast the model will execute the motion and how fast the motion’s local time will run. So if the scale parameter has a value of 2 and the modifier’s playRate property has a value of 3, the model will execute the motion six times as fast as its original speed and local time will run six times as fast as real time.
The currentTime property resets to the value of the cropStart parameter of the play() or queue() command at the beginning of each iteration of a looped motion.
Example
This statement shows the local time of the motion being executed by the model named Alien3.
put member("newalien").model("Alien3").keyframePlayer.currentTime-- 1393.8599
See also
play(), queue(), playlist
debugSyntax
member(whichCastmember).model(whichModel).debug
Description
3D model property; indicates whether the bounding sphere and local axes of the model are displayed.
Example
This statement sets the debug property of the model Dog to TRUE.
member("ParkScene").model("Dog").debug = TRUE
See also
boundingSphere
3D Lingo Dictionary 249

decayMode Syntax
member(whichCastmember).camera(whichCamera).fog.decayModesprite(whichSprite).camera{(index)}.fog.decayMode
Description
3D property; indicates the manner in which fog density builds from minimum to maximum density when the camera’s fog.enabled property is set to TRUE.
The following are the possible values for this property:
• #linear: the fog density is linearly interpolated between fog.near and fog.far.
• #exponential: fog.far is the saturation point; fog.near is ignored.
• #exponential2: fog.near is the saturation point; fog.far is ignored.
The default setting for this property is #exponential.
Example
This statement sets the decayMode property of the fog of the camera Defaultview to #linear. If the fog’s enabled property is set to TRUE, the density of the fog will steadily increase between the distances set by the fog’s near and far properties. If the near property is set to 100 and the far property is set to 1000, the fog will begin 100 world units in front of the camera and gradually increase in density to a distance of 1000 world units in front of the camera.
member("3d world").camera("Defaultview").fog.decayMode = #linear
See also
fog, near (fog), far (fog), enabled (fog)
deleteCameraSyntax
member(whichCastmember).deleteCamera(cameraName)member(whichCastmember).deleteCamera(index)sprite(whichSprite).deleteCamera(cameraOrIndex)
Description
3D command; in a cast member, this command removes the camera from the cast member and the 3D world. Children of the camera are removed from the 3D world but not deleted.
It is not possible to delete the default camera of the cast member.
In a sprite, this command removes the camera from the sprite’s list of cameras. The camera is not deleted from the cast member.
Chapter 10250

Examples
This statement deletes two cameras from the cast member named Room: first the camera named Camera06, and then camera 1.
member("Room").deleteCamera("Camera06")member("Room").deleteCamera(1)
This statement removes two cameras from the list of cameras for sprite 5: first the second camera in the list, then the camera named Camera06
sprite(5).deleteCamera(2)sprite(5).deleteCamera(member("Room").camera("Camera06"))
See also
newCamera, addCamera, cameraCount()
deleteGroupSyntax
member(whichCastmember).deleteGroup(whichGroup)member(whichCastmember).deleteGroup(index)
Description
3D command; removes the group from the cast member and the 3D world. Children of the group are removed from the 3D world but not deleted.
It is not possible to delete the group named World, which is the default group.
Example
The first line of this example deletes the group Dummy16 from the cast member Scene. The second line deletes the third group of Scene.
member("Scene").deleteGroup("Dummy16")member("Scene").deleteGroup(3)
See also
newGroup, child, parent
3D Lingo Dictionary 251

deleteLightSyntax
member(whichCastmember).deleteLight(whichLight)member(whichCastmember).deleteLight(index)
Description
3D command; removes the light from the cast member and the 3D world. Children of the light are removed from the 3D world but not deleted.
Examples
These examples delete lights from the cast member named Room.
member("Room").deleteLight("ambientRoomLight")member("Room").deleteLight(6)
See also
newLight
deleteModelSyntax
member(whichCastmember).deleteModel(whichModel)member(whichCastmember).deleteModel(index)
Description
3D command; removes the model from the cast member and the 3D world. Children of the model are removed from the 3D world but not deleted.
Examples
The first line of this example deletes the model named Player3 from the cast member named gbWorld. The second line deletes the ninth model of gbWorld.
member("gbWorld").deleteModel("Player3")member("gbWorld").deleteModel(9)
See also
newModel
Chapter 10252

deleteModelResourceSyntax
member(whichCastmember).deleteModelResource(whichModelResource)member(whichCastmember).deleteModelResource(index)
Description
3D command; removes the model resource from the cast member and the 3D world.
Models using the deleted model resource become invisible, because they lose their geometry, but they are not deleted or removed from the world.
Example
These examples delete two model resources from the cast member named StreetScene.
member("StreetScene").deleteModelResource("HouseB")member("StreetScene").deleteModelResource(3)
See also
newModelResource, newMesh
deleteMotionSyntax
member(whichCastmember).deleteMotion(whichMotion)member(whichCastmember).deleteMotion(index)
Description
3D command; removes the motion from the cast member.
Examples
The first line of this example deletes the motion named BackFlip from the cast member named PicnicScene. The second line deletes the fifth motion in PicnicScene.
member("PicnicScene").deleteMotion("BackFlip")member("PicnicScene").deleteMotion(5)
See also
newMotion(), removeLast()
3D Lingo Dictionary 253

deleteShaderSyntax
member(whichCastmember).deleteShader(whichShader)member(whichCastmember).deleteShader(index)
Description
3D command; removes the shader from the cast member.
Example
The first line of this example deletes the shader Road from the cast member named StreetScene. The second line deletes the third shader of StreetScene.
member("StreetScene").deleteShader("Road")member("StreetScene").deleteShader(3)
See also
newShader, shaderList
deleteTextureSyntax
member(whichCastmember).deleteTexture(whichTexture)member(whichCastmember).deleteTexture(index)
Description
3D command; removes the shader from the cast member.
Example
The first line of this example deletes the texture named Sky from the cast member named PicnicScene. The second line deletes the fifth texture of PicnicScene.
member("PicnicScene).deleteTexture("Sky")member("PicnicScene").deleteTexture(5)
See also
newTexture
Chapter 10254

density Syntax
member(whichCastmember).shader(whichShader).densitymember(whichCastmember).model(whichModel).shader.densitymember(whichCastmember).model(whichModel).shaderList{[index]}.\density
Description
3D #engraver and #newsprint shader property; adjusts the number of lines or dots used to create the effects of these specialized shader types. Higher values result in more lines or dots.
For #engraver shaders, this property adjusts the number of lines used to create the image. The range is 0 to 100 and the default value is 40.
For #newsprint shaders, this property adjusts the number of dots used to create the image. The value can be from 0 to 100 and the default value is 45.
Example
This statement sets the density property of the shader named EngShader to 10. The lines used by this #engraver shader to create its stylized image will be coarse and far apart.
member("scene").shader("EngShader").density = 10
This statement sets the density property of the shader gbShader to 100. The dots used by this #newsprint shader to create its stylized image will be very fine and close together.
member("scene").shader("gbShader").density = 100
See also
newShader
3D Lingo Dictionary 255

depthSyntax
member(whichCastmember).model(whichModel).sds.depth
Description
3D subdivision surfaces (sds) modifier property; specifies the maximum number of levels of resolution that the model can display when using the sds modifier.
If the sds modifier’s error and tension settings are low, increasing the depth property will have a more pronounced effect on the model’s geometry.
The sds modifier cannot be used with the inker or toon modifiers, and you should be careful when using the sds modifier with the lod modifier. See the sds (modifier) entry for more information.
Example
This statement sets the depth property of the sds modifier for the model named Baby to 3. If the sds modifier’s error and tension settings are low, this will cause a very pronounced effect on Baby’s geometry.
member("Scene").model("Baby").sds.depth = 3
See also
sds (modifier), error, tension
depthBufferDepthSyntax
getRendererServices().depthBufferDepth
Description
3D rendererServices property; indicates the precision of the hardware depth buffer of the user’s system. The value is either 16 or 24, depending on the user’s hardware settings.
Example
This statement shows that the depthBufferDepth value of the user’s video card is 16.
put getRendererServices().depthBufferDepth-- 16
See also
getRendererServices(), getHardwareInfo(), colorBufferDepth
Chapter 10256

diffuseSyntax
member(whichCastmember).shader(whichShader).diffusemember(whichCastmember).model(whichModel).shader.diffusemember(whichCastmember).model(whichModel).shaderList{[index]}.\diffuse
Description
3D #standard shader property; indicates a color that is blended with the first texture of the shader when the following conditions are met:
• the shader’s useDiffuseWithTexture property is set to TRUE, and either
• the blendFunction property of the shader is set to #add or #multiply, or
• the blendFunction property of the shader is set to #blend, the blendSource property of the shader is set to #constant, and the value of the blendConstant property of the shader is less than 100.
The default value is of this property is rgb( 255, 255, 255 ).
Example
This statement sets the diffuse property of the shader named Globe to rgb(255, 0, 0).
member("MysteryWorld").shader("Globe").diffuse = rgb(255, 0, 0)
See also
diffuseColor, useDiffuseWithTexture, blendFunction, blendSource, blendConstant
3D Lingo Dictionary 257
diffuseColorSyntax
member(whichCastmember).diffuseColor
Description
3D cast member property; indicates a color that is blended with the first texture of the first shader of the cast member when the following conditions are met:
• the shader’s useDiffuseWithTexture property is set to TRUE AND EITHER
• the blendFunction property of the shader is set to #add or #multiply OR
• the blendFunction property of the shader is set to #blend, the blendSource property of the shader is set to #constant, and the value of the blendConstant property of the shader is less than 100.
The default value is of the diffuseColor property is rgb( 255, 255, 255 ).
Example
This statement sets the diffuseColor property of the cast member named Room to rgb(255, 0, 0).
member("Room").diffuseColor = rgb(255, 0, 0)
See also
diffuse, useDiffuseWithTexture, blendFunction, blendSource, blendConstant
diffuseLightMapSyntax
member(whichCastmember).shader(whichShader).diffuseLightMapmember(whichCastmember).model(whichModel).shader.diffuseLightMapmember(whichCastmember).model(whichModel).shaderList{[index]}.\diffuseLightMap
Description
3D #standard shader property; specifies the texture to use for diffuse light mapping.
When you set this property, the following properties are automatically set:
• The second texture layer of the shader is set to the texture you specified.
• The value of textureModeList[2] is set to #diffuse.
• The value of blendFunctionList[2] is set to #multiply.
• The value of blendFunctionList[1] is set to #replace.
Chapter 10258

Example
This statement sets the texture named Oval as the diffuseLightMap property of the shader used by the model named GlassBox.
member("3DPlanet").model("GlassBox").shader.diffuseLightMap = \member("3DPlanet").texture("Oval")
See also
blendFunctionList, textureModeList, glossMap, reflectionMap, specularLightMap
direction Syntax
member(whichCastmember).modelResource(whichModelResource).\emitter.direction
Description
3D emitter property; a vector that indicates the direction in which the particles of a particle system are emitted. A particle system is a model resource whose type is #particle.
The primary direction of particle emission is the vector set by the emitter’s direction property. However, the direction of emission of a given particle will deviate from that vector by a random angle between 0 and the value of the emitter’s angle property.
Setting direction to vector(0,0,0) causes the particles to be emitted in all directions.
The default value of this property is vector(1,0,0).
Example
In this example, ThermoSystem is a model resource whose type is #particle. This statement sets the direction property of ThermoSystem’s emitter to vector(1, 0, 0), which causes the particles of ThermoSystem to be emitted into a conical region whose axis is the X axis of the 3D world.
member("Fires").modelResource("ThermoSystem").emitter.\direction = vector(1,0,0)
See also
emitter, angle
3D Lingo Dictionary 259

directionalColorSyntax
member(whichCastmember).directionalColor
Description
3D cast member property; indicates the RGB color of the default directional light of the cast member.
The default value of this property is rgb(255, 255, 255).
Example
This statement sets the directionalColor property of the cast member named Room to rgb(0, 255, 0). The default directional light of the cast member will be green. This property can also be set in the Property Inspector.
member("Room").directionalcolor = rgb(0, 255, 0)
See also
directionalPreset
directionalPresetSyntax
member(whichCastmember).directionalPreset
Description
3D cast member property; indicates the direction from which the default directional light shines, relative to the camera of the sprite.
Changing the value of this property results in changes to the position and rotation properties of the light’s transform.
Possible values of directionalPreset include the following:
• #topLeft
• #topCenter
• #topRight
• #middleLeft
• #middleCenter
• #middleRight
• #bottomLeft
• #bottomCenter
• #bottomRight
• #None
Chapter 10260

The default value of this property is #topCenter.
Example
This statement sets the directionalPreset property of the cast member named Room to #middleCenter. This points the default light of Room so it will shine on the middle center the current view of the camera of the sprite. This property can also be set in the Property Inspector.
member("Room").directionalpreset = #middleCenter
See also
directionalColor
directToStageSyntax
member(whichCastmember).directToStagesprite(whichSprite).directToStage
Description
3D cast member and sprite property; indicates whether the sprite renders directly to the Stage (TRUE) or to the offscreen buffer (FALSE).
If this property is TRUE, the sprite displays in front of all other sprites and cannot use ink effects.
If this property is FALSE, the sprite displays according to its order in the Score and can use ink effects. This may degrade the performance of the movie, especially on slower computers.
The default value of this property is TRUE.
Example
This statement causes Director to render the cast member named PicnicScene to its offscreen buffer before it is drawn on the Stage.
member("PicnicScene").directToStage = FALSE
3D Lingo Dictionary 261

displayFaceSyntax
member(whichTextCastmember).displayFacemember(which3DCastmember).modelResource(whichModelResource).\displayFace
Description
3D text property; a linear list indicating which face or faces of the 3D text to display. Possible values include #front, #tunnel, and #back. You can show any combination of faces, and the list can be in any order.
The default value of this property is [#front, #back, #tunnel].
For text cast members, this is a member property. For extruded text in a 3D cast member, this is a model resource property.
Example
In this example, the cast member named Rugsign is a text cast member. This statement sets the displayFace property of Rugsign to [#tunnel]. When Rugsign is displayed in 3D mode, its front and back faces will not appear.
member("Rugsign").displayFace = [#tunnel]
In this example, the model resource of the model named Slogan is extruded text. This statement sets the displayFace property of Slogan's model resource to [#back, #tunnel]. The front face of Slogan will not be drawn.
member("scene").model("Slogan").resource.displayFace = \[#back, #tunnel]
See also
extrude3D, displayMode
Chapter 10262

displayModeSyntax
member(whichTextCastmember).displayMode
Description
Text cast member property; specifies whether the text will be rendered as 2D text or 3D text.
If this property is set to #Mode3D, the text is shown in 3D. You can set the 3D properties (such as displayFace and bevelDepth) of the text, as well as the usual text properties (such as text and font). The sprite containing this cast member becomes a 3D sprite.
If this property is set to #ModeNormal, the text is shown in 2D.
The default value of this property is #ModeNormal.
Example
In this example, the cast member named Logo is a text cast member. This statement causes Logo to be displayed in 3D.
member("Logo").displayMode = #mode3D
See also
extrude3D
distanceTo() Syntax
vector1.distanceTo(vector2)
Description
3D vector method; returns the distance in world units between two vectors.
Example
There are three vectors in this example. The distance from Vec1 to Vec2 is 100.0000 world units. The distance from Vec1 to Vec3 is 141.4214 world units.
Vec1 = vector(100, 0, 0)Vec2 = vector(100, 100, 0)Vec3 = vector(100, 100, 100)put Vec1.distanceTo(Vec2)-- 100.0000put Vec1.distanceTo(Vec3)-- 141.4214
See also
magnitude
3D Lingo Dictionary 263

distributionSyntax
member(whichCastmember).modelResource(whichModelResource).\emitter.distribution
Description
3D emitter property; indicates how the particles of a particle system are distributed across the emitter’s region at their creation. The possible values of this property are #gaussian or #linear. The default value is #linear.
Example
In this example, ThermoSystem is a model resource whose type is #particle. This statement sets the distribution property of ThermoSystem’s emitter to #linear, which causes the particles of ThermoSystem to be evenly distributed across their origin region at their birth.
member("Fires").modelResource("ThermoSystem").emitter.\distribution = #linear
See also
emitter, region
Chapter 10264

dot()Syntax
vector1.dot(vector2)
Description
3D vector method; returns the sum of the products of the x, y, and z components of two vectors. If both vectors are normalized, the dot is the cosine of the angle between the two vectors.
To manually arrive at the dot of two vectors, multiply the x component of vector1 by the x component of vector2, then multiply the y component of vector1 by the y component of vector2, then multiply the z component of vector1 by the z component of vector2, and finally add the three products together.
This method is identical to dotProduct().
Example
In this example, the angle between the vectors pos5 and pos6 is 45 degrees. The getNormalized function returns the normalized values of pos5 and pos6, and stores them in the variables norm1 and norm2. The dot of norm1 and norm2 is 0.7071, which is the cosine of 45 degrees.
pos5 = vector(100, 100, 0)pos6 = vector(0, 100, 0)put pos5.angleBetween(pos6)-- 45.0000norm1 = pos5.getNormalized()put norm1-- vector( 0.7071, 0.7071, 0.0000 )norm2 = pos6.getNormalized()put norm2-- vector( 0.0000, 1.0000, 0.0000 )put norm1.dot(norm2)-- 0.7071
See also
dotProduct(), getNormalized, normalize
3D Lingo Dictionary 265
dotProduct()Syntax
vector1.dotProduct(vector2)
Description
3D vector method; returns the sum of the products of the x, y, and z components of two vectors. If both vectors are normalized, the dotproduct is the cosine of the angle between the two vectors.
To manually arrive at the dot of two vectors, multiply the x component of vector1 by the x component of vector2, then multiply the y component of vector1 by the y component of vector2, then multiply the z component of vector1 by the z component of vector2, and finally add the three products together.
This method is identical to dot().
Example
In this example, the angle between the vectors pos5 and pos6 is 45˚. The getNormalized function returns the normalized values of pos5 and pos6, and stores them in the variables norm1 and norm2. The dotProduct of norm1 and norm2 is 0.7071, which is the cosine of 45˚.
pos5 = vector(100, 100, 0)pos6 = vector(0, 100, 0)put pos5.angleBetween(pos6)-- 45.0000norm1 = pos5.getNormalized()put norm1-- vector( 0.7071, 0.7071, 0.0000 )norm2 = pos6.getNormalized()put norm2-- vector( 0.0000, 1.0000, 0.0000 )put norm1.dotProduct(norm2)-- 0.7071
See also
dot(), getNormalized, normalize
Chapter 10266

dragSyntax
member(whichCastmember).modelResource(whichModelResource).drag
Description
3D #particle model resource property; indicates the percentage of each particle’s velocity that is lost in each simulation step. This property has a range of 0 (no velocity lost) to 100 (all velocity lost and the particle stops moving). The default value is 0.
Example
In this example, ThermoSystem is a model resource whose type is #particle. This statement sets the drag property of ThermoSystem to 5, applying a large resistance to the motion of the particles of ThermoSystem and preventing them from traveling very far.
member("Fires").modelResource("ThermoSystem").drag = 5
See also
wind, gravity
duplicateSyntax
vectorReference.duplicate()transformReference.duplicate()
Description
3D vector and transform method; returns a copy of the vector or transform.
Example
This statement creates a copy of the position of model 1 and stores it in the variable zz.
zz = member("MyRoom").model[1].transform.position.duplicate()
See also
clone
3D Lingo Dictionary 267

durationSyntax
member(whichCastmember).motion(whichMotion).durationmotionObjectReference.duration
Description
3D property; lets you get the time in millisecond that it takes the motion specified in the whichMotion parameter to play to completion. This property is always greater than or equal to 0.
Example
This statement shows the length in milliseconds of the motion Kick.
put member("GbMember").motion("Kick").duration-- 5100.0000
See also
motion, currentTime, play(), queue()
emissiveSyntax
member(whichCastmember).shader(whichShader).emissivemember(whichCastmember).model(whichModel).shader.emissivemember(whichCastmember).model(whichModel).shaderList{[index]}.\emissive
Description
3D #standard shader property; adds light to the shader independently of the lighting in the scene. For example, a model using a shader whose emissive property is set to rgb(255, 255, 255) will appear to be illuminated by a white light, even if there are no lights in the scene. The model will not, however, illuminate any other models or contribute any light to the scene.
The default value for this property is rgb(0, 0, 0).
Example
This statement sets the emissive property of the shader named Globe to rgb(255, 0, 0). Models using this shader will appear to be illuminated by a red light.
member("MysteryWorld").shader("Globe").emissive = rgb(255, 0, 0)
See also
shininess
Chapter 10268
emitterSyntax
member(whichCastmember).modelResource(whichModelResource).\emitter.numParticlesmember(whichCastmember).modelResource(whichModelResource).\emitter.modemember(whichCastmember).modelResource(whichModelResource).\emitter.loopmember(whichCastmember).modelResource(whichModelResource).\emitter.directionmember(whichCastmember).modelResource(whichModelResource).\emitter.regionmember(whichCastmember).modelResource(whichModelResource).\emitter.distributionmember(whichCastmember).modelResource(whichModelResource).\emitter.anglemember(whichCastmember).modelResource(whichModelResource).\emitter.pathmember(whichCastmember).modelResource(whichModelResource).\emitter.pathStrengthmember(whichCastmember).modelResource(whichModelResource).\emitter.minSpeedmember(whichCastmember).modelResource(whichModelResource).\emitter.maxSpeed
Description
3D particle system element; controls the initial propulsion of particles from a model resource whose type is #particle.
The “See also” section of this entry contains a complete list of emitter properties. See the individual property entries for more information.
See also
numParticles, mode (emitter), loop (emitter), direction, distribution, region, angle, path, pathStrength, minSpeed, maxSpeed
3D Lingo Dictionary 269
enabled (collision)Syntax
member(whichCastmember).model(whichModel).collision.enabled
Description
3D collision property; allows you to get or set whether (TRUE) or not (FALSE) collisions are detected on models. Setting this property to FALSE temporarily disables the collision modifier without removing it from the model.
The default setting for this property is TRUE.
Example
This statement activates the collision modifier for the model box.
member("3d world").model("box").collision.enabled = TRUE
See also
addModifier, collision (modifier), modifier
enabled (fog)Syntax
member(whichCastmember).camera(whichCamera).fog.enabledsprite(whichSprite).camera{(index)}.fog.enabled
Description
3D camera property; indicates whether the camera adds fog to the view from the camera. The default setting for this property is FALSE.
Example
This statement creates fog in the view from the camera named BayView.
member("MyYard").camera("BayView").fog.enabled = TRUE
See also
fog
Chapter 10270
enabled (sds)Syntax
member(whichCastmember).model(whichModel).sds.enabled
Description
3D sds modifier property; indicates whether the sds modifier attached to a model is used by the model.
The default setting for this property is TRUE.
An attempt to add the sds modifier to a model that already has the inker or toon modifier attached fails without an error message. Likewise, an attempt to add the inker or toon modifier to a model that already has the sds modifier attached also fails without an error message. Be careful when using the sds modifier with the lod modifier. See the sds (modifier) entry for more information.
Example
This statement turns on the sds modifier attached to the model Baby.
member("Scene").model("Baby").sds.enabled = TRUE
See also
sds (modifier), modifier, addModifier
3D Lingo Dictionary 271

endAngleSyntax
member(whichCastmember).modelResource(whichModelResource).\endAngle
Description
3D #cylinder or #sphere model resource property; indicates how much of the sphere or cylinder is drawn.
The surface of a sphere is generated by sweeping a 2D half circle arc around the sphere’s Y axis from startAngle to endAngle. If startAngle is set to 0 and endAngle is set to 360, the result is a complete sphere. To draw a section of a sphere, set endAngle to a value less than 360.
The surface of a cylinder is generated by sweeping a 2D line around the sphere’s Y axis from startAngle to endAngle. If startAngle is set to 0 and endAngle is set to 360, the result is a complete cylinder. To draw a section of a cylinder, set endAngle to a value less than 360.
The default setting for this property is 360.
Example
For this example, assume that the cast member named MyMember contains a model that uses the model resource named Sphere4, whose endAngle value is 310, leaving an opening of 50˚. The handler closeSphere closes that opening in a way that makes it look like it is sliding shut. The repeat loop changes the endAngle value of the sphere 1 degree at a time. The updateStage command in the repeat loop forces the Stage to redraw after every 1-degree increment.
on closeSphere MyAngle = member("MyMember").modelresource("Sphere4").endAngle repeat with r = 1 to 50 MyAngle = MyAngle + 1 member("MyMember").modelresource("Sphere4").endAngle = MyAngle updateStage end repeatend
Example
startAngle
errorSyntax
member(whichCastmember).model(whichModel).sds.error
Description
3D #sds modifier property; indicates the percentage of error tolerated by the modifier when synthesizing geometric detail in models.
Chapter 10272
This property works only when the modifier’s subdivision property is set to #adaptive. The tension and depth properties of the modifier combine with the error property to control the amount of subdivision performed by the modifier.
Example
This statement sets the error property of the #sds modifier of the model named Baby to 0. If the modifier’s tension setting is low, its depth setting is high, and its subdivision setting is #adaptive, this will cause a very pronounced effect on Baby’s geometry.
member("Scene").model("Baby").sds.error = 0
See also
sds (modifier), subdivision, depth, tension
extrude3DSyntax
member(whichTextCastmember).extrude3D(member(which3dCastmember))
Description
3D command; creates a new #extruder model resource in the 3D cast member which3DCastmember from the text in whichTextCastmember.
Note that this is not the same as using the 3D displayMode of a text cast member.
To create a model using extrude3D:
1 Create a new #extruder model resource in a 3D cast member:
textResource = member("textMember").extrude3D(member\("3DMember"))
2 Create a new model using the model resource created in step 1:
member("3DMember").newModel("myText", textResource)
Example
In this example, Logo is a text cast member and Scene is a 3D cast member. The first line creates a model resource in Scene which is a 3D version of the text in Logo. The second line uses this model resource to create a model named 3dLogo.
myTextModelResource = member("Logo").extrude3d(member("Scene"))member("Scene").newModel("3dLogo", myTextModelResource)
See also
bevelDepth, bevelType, displayFace, smoothness, tunnelDepth, displayMode
3D Lingo Dictionary 273
faceSyntax
member(whichCastmember).modelResource(whichModelResource).\face.countmember(whichCastmember).modelResource(whichModelResource).\face[index].colorsmember(whichCastmember).modelResource(whichModelResource).\face[index].normalsmember(whichCastmember).modelResource(whichModelResource).\face[index].shadermember(whichCastmember).modelResource(whichModelResource).\face[index].textureCoordinatesmember(whichCastmember).modelResource(whichModelResource).\face[index].verticesmember(whichCastmember).model(whichModel).meshdeform.\face.countmember(whichCastmember).model(whichModel).meshdeform.\mesh[index].face.countmember(whichCastmember).model(whichModel).meshdeform.\mesh[meshIndex].face[faceIndex]member(whichCastmember).model(whichModel).meshdeform.\mesh[meshIndex].face[faceIndex].neighbor{[neighborIndex]}
Description
3D #mesh model resource and meshdeform modifier property. All model resources are meshes composed of triangles. Each triangle is a face.
You can access the properties of the faces of model resources whose type is #mesh. Changes to any of these properties do not take effect until you call the build() command.
Note: For detailed information about the following properties, see the individual property entries.
count indicates the number of triangles in the mesh.
colors indicates which indices in the color list of the model resource to use for each of the vertices of the face.
normals indicates which indices in the normal list of the model resource to use for each of the vertices of the face.
shader identifies the shader used when the face is rendered.
textureCoordinates indicates which indices in the texture coordinate list of the model resource to use for each of the vertices of the face.
vertices indicates which indices in the vertex list of the model resource to use to define the face.
Chapter 10274

Please see the entry for meshDeform (modifier) for descriptions of its face properties.
See also
build(), newMesh, meshDeform (modifier)
face[ ]Syntax
member(whichCastmember).model(whichModel).meshdeform.\mesh[meshIndex].face[faceIndex]
Description
3D meshdeform modifier property; indicates which indices in the vertex list of the model resource were used to define the face.
This property can be tested but not set. You can specify the vertices of a face of the #mesh model resource by setting its vertexList (mesh deform) and vertices properties and calling the build() command.
Example
This statement shows that the first face of the first mesh of the model named Floor is defined by the first three vectors in the vertex list of the model resource used by Floor.
put member("Scene").model("Floor").meshdeform.mesh[1].face[1]-- [1, 2, 3]
See also
meshDeform (modifier), face, vertexList (mesh deform), vertices
3D Lingo Dictionary 275

far (fog)Syntax
member(whichCastmember).camera(whichCamera).fog.farsprite(whichSprite).camera{(index)}.fog.far
Description
3D camera property; indicates the distance from the camera, in world units, where the fog reaches its maximum density when the camera’s fog.enabled property is set to TRUE.
The default value for this property is 1000.
Example
This statement sets the far property of the fog of the camera named BayView to 5000. If the fog’s enabled property is set to TRUE, the fog will be densest 5000 world units in front of the camera.
member("MyYard").camera("BayView").fog.far = 5000
See also
fog, near (fog)
fieldOfViewSyntax
member(whichCastmember).camera(whichCamera).fieldOfViewsprite(whichSprite).camera{(index)}.fieldOfView
Description
3D camera property; indicates the angle formed by two rays: one drawn from the camera to the top of the projection plane, and the other drawn from the camera to the bottom of the projection plane.
The images of the models in the 3D world are mapped onto the projection plane, which is positioned in front of the camera like a screen in front of a movie projector. The projection plane is what you see in the 3D sprite. The top and bottom of the projection plane are defined by the fieldOfView property. Note, however, that the sprite is not resized as the value of the fieldOfView property changes. Instead, the image of the projection plane is scaled to fit the rect of the sprite.
The value of this property is meaningful only when the value of camera’s projection property is set to #perspective. When the projection property is set to #orthographic, use the camera’s orthoHeight property to define the top and bottom of the projection plane.
The default setting for this property is 30.0.
Chapter 10276

Example
This statement sets the fieldOfView property of camera 1 to 90.
member("3d world").camera[1].fieldOfView = 90
See also
orthoHeight
flatSyntax
member(whichCastmember).shader(whichShader).flatmember(whichCastmember).model(whichModel).shader.flatmember(whichCastmember).model(whichModel).shaderList{[index]}.flat
Description
3D #standard shader property; indicates whether the mesh should be rendered with flat shading (TRUE) or gouraud shading (FALSE).
Flat shading uses one color per face of the mesh. The color used for the face is the color of its first vertex. Flat shading is faster than gouraud shading.
Gouraud shading assigns a color to each vertex of a face and interpolates the colors across the face in a gradient. Gouraud shading requires more time and calculation, but creates a smoother surface.
The default value for this property is FALSE.
Example
This statement sets the flat property of the shader named Wall to TRUE. The mesh of a model that uses this shader will be rendered with one color per face.
member("MysteryWorld").shader("Wall").flat = TRUE
See also
mesh (property), colors, vertices, generateNormals()
3D Lingo Dictionary 277

fogSyntax
member(whichCastmember).camera(whichCamera).fog.colorsprite(whichSprite).camera{(index)}.fog.colormember(whichCastmember).camera(whichCamera).fog.decayModesprite(whichSprite).camera{(index)}.fog.decayModemember(whichCastmember).camera(whichCamera).fog.enabledsprite(whichSprite).camera{(index)}.fog.enabledmember(whichCastmember).camera(whichCamera).fog.farsprite(whichSprite).camera{(index)}.fog.farmember(whichCastmember).camera(whichCamera).fog.nearsprite(whichSprite).camera{(index)}.fog.near
Description
3D camera property; fog introduces a coloring and blurring of models that increases with distance from the camera. The effect is similar to real fog, except that it can be any color.
The “See also” section of this entry contains a complete list of fog properties. See the individual property entries for more information.
See also
color (fog), decayMode, enabled (fog), far (fog), near (fog)
frontSyntax
member(whichCastmember).modelResource(whichModelResource).front
Description
3D #box model resource property; indicates whether the side of the box intersected by its -Z axis is sealed (TRUE) or open (FALSE).
The default value for this property is TRUE.
Example
This statement sets the front property of the model resource named Crate to FALSE, meaning the front of this box will be open.
member("3D World").modelResource("Crate").front = FALSE
See also
back, bottom, top, left, right
Chapter 10278
generateNormals() Syntax
member(whichCastmember).modelResource(whichModelResource).generateNormals(style)
Description
3D #mesh model resource command; calculates the normal vectors for each vertex of the mesh.
If the style parameter is set to #flat, each vertex receives a normal for each face to which it belongs. Furthermore, all three of the vertices of a face will have the same normal. For example, if the vertices of face[1] all receive normal[1] and the vertices of face[2] all receive normal[2], and the two faces share vertex[8], then the normal of vertex[8] is normal[1] in face[1] and normal[2] in face[2]. Use of the #flat parameter results in very clear delineation of the faces of the mesh.
If the style parameter is set to #smooth, each vertex receives only one normal, regardless of the number of faces to which it belongs, and the three vertices of a face can have different normals. Each vertex normal is the average of the face normals of all of the faces that share the vertex. Use of the #smooth parameter results in a more rounded appearance of the faces of the mesh, except at the outer edges of the faces at the silhouette of the mesh, which are still sharp.
A vertex normal is a direction vector which indicates the “forward” direction of a vertex. If the vertex normal points toward the camera, the colors displayed in the area of the mesh controlled by that normal are determined by the shader. If the vertex normal points away from the camera, the area of the mesh controlled by that normal will be non-visible.
After using the generateNormals() command, you must use the build() command to rebuild the mesh.
Example
This statement calculates vertex normals for the model resource named FloorMesh. The style parameter is set to #smooth, so each vertex in the mesh will receive only one normal.
member("Room").modelResource("FloorMesh").generateNormals(#smooth)
See also
build(), face, normalList, normals, flat
3D Lingo Dictionary 279
getBoneIDSyntax
memberReference.modelResource.getBoneID("boneName")
Description
3D model resource property; returns the index number of the bone named boneName in the model resource. This property returns 0 if no bone by that name can be found.
Example
This statement returns an ID number for the bone ShinL.
put member("ParkScene").modelResource("LittleKid").getBoneId("ShinL")-- 40
See also
bone
getHardwareInfo()Syntax
getRendererServices().getHardwareInfo()
Description
3D rendererServices method; returns a property list with information about the user’s video card. The list contains the following properties:
#present is a Boolean value indicating whether the computer has hardware video acceleration.
#vendor indicates the name of the manufacturer of the video card.
#model indicates the model name of the video card.
#version indicates the version of the video driver.
#maxTextureSize is a linear list containing the maximum width and height of a texture, in pixels. Textures that exceed this size are downsampled until they do not. To avoid texture sampling artifacts, author textures of various sizes and choose the ones that do not exceed the #maxTextureSize value at run time.
#supportedTextureRenderFormats is a linear list of texture pixel formats supported by the video card. See textureRenderFormat for details.
#textureUnits indicates the number of texture units available to the card.
#depthBufferRange is a linear list of bit-depth resolutions to which the depthBufferDepth property can be set.
#colorBufferRange is a linear list of bit-depth resolutions to which the colorBufferDepth property can be set.
Chapter 10280

Example
This statement displays a detailed property list of information about the user’s hardware.
put getRendererServices().getHardwareInfo()-- [#present: 1, #vendor: "NVIDIA Corporation", #model: \"32MB DDR NVIDIA GeForce2 GTS (Dell)", #version: "4.12.01.0532", \#maxTextureSize: [2048, 2048], #supportedTextureRenderFormats: \[#rgba8888, #rgba8880, #rgba5650, #rgba5551, #rgba5550, \#rgba4444], #textureUnits: 2, #depthBufferRange: [16, 24], \#colorBufferRange: [16, 32]]
See also
getRendererServices()
getNormalizedSyntax
getNormalized(vector)vector.getNormalized()
Description
3D vector method; copies the vector and divides the x, y, and z components of the copy by the length of the original vector. The resulting vector has a length of 1 world unit.
This method returns the copy and leaves the original vector unchanged. To normalize the original vector, use the normalize command.
Example
This statement stores the normalized value of the vector MyVec in the variable Norm. The value of Norm is vector( -0.1199, 0.9928, 0.0000 ) and the magnitude of Norm is 1.
MyVec = vector(-209.9019, 1737.5126, 0.0000)Norm = MyVec.getNormalized()put Norm-- vector( -0.1199, 0.9928, 0.0000 )put Norm.magnitude-- 1.0000
See also
normalize
3D Lingo Dictionary 281

getRendererServices()Syntax
getRendererServices()getRendererServices().whichGetRendererServicesProperty
Description
3D command; returns the rendererServices object. This object contains hardware information and properties that affect all 3D sprites and cast members.
The rendererServices object has the following properties:
renderer indicates the software rasterizer used to render all 3D sprites.
rendererDeviceList returns a list of software rasterizers available on the user’s system. Possible values include #openGL, #directX5_2, #directX7_0, and #software. The value of renderer must be one of these. This property can be tested but not set.
textureRenderFormat indicates the pixel format used by the renderer. Possible values include #rgba8888, #rgba8880, #rgba5650, #rgba5550, #rgba5551, and #rgba4444. The four digits in each symbol indicate how many bits are used for each red, green, blue, and alpha component.
depthBufferDepth indicates the bit depth of the hardware output buffer.
colorBufferDepth indicates the bit depth of the color buffer. This property can be tested but not set.
modifiers is a linear list of modifiers available for use by models in 3D cast members. Possible values include #collision, #bonesPlayer, #keyframePlayer, #toon, #lod, #meshDeform, #sds, #inker, and third-party Xtra-based modifiers. This property can be tested but not set.
primitives is a linear list of primitive types available for use in the creation of new model resources. Possible values include #sphere, #box, #cylinder, #plane, #particle, and third-party Xtra-based primitive types. This property can be tested but not set.
Note: For more detailed information about these properties, see the individual property entries.
See also
renderer, preferred3DRenderer, active3dRenderer, rendererDeviceList
Chapter 10282

getWorldTransform()Syntax
member(whichCastmember).node(whichNode).getWorldTransform()member(whichCastmember).node(whichNode).getWorldTransform().\positionmember(whichCastmember).node(whichNode).getWorldTransform().\rotationmember(whichCastmember).node(whichNode).getWorldTransform().scale
Description
3D command; returns the world-relative transform of the model, group, camera, or light represented by node.
The transform property of a node is calculated relative to the transform of the node’s parent, and is therefore parent-relative. The getWorldTransform() command calculates the node’s transform relative to the origin of the 3D world, and is therefore world-relative.
Use member(whichCastmember).node(whichNode).getWorldTransform().position to find the position property of the node’s world-relative transform. You can also use worldPosition as a shortcut for getWorldTransform().position.
Use member(whichCastmember).node(whichNode).getWorldTransform().rotation to find the rotation property of the node’s world-relative transform.
Use member(whichCastmember).node(whichNode).getWorldTransform().scale to find the scale property of the node’s world-relative transform.
These properties can be tested but not set.
Example
This statement shows the world-relative transform of the model named Box, followed by its position and rotation properties.
put member("3d world").model("Box").getworldTransform()-- transform(1.000000,0.000000,0.000000,0.000000, \0.000000,1.000000,0.000000,0.000000, \0.000000,0.000000,1.000000,0.000000, - \94.144844,119.012825,0.000000,1.000000)put member("3d world").model("Box"). getworldTransform().position-- vector(-94.1448, 119.0128, 0.0000)put member("3d world").model("Box"). getworldTransform().rotation--vector(0.0000, 0.0000, 0.0000)
See also
worldPosition, transform (property)
3D Lingo Dictionary 283

glossMapSyntax
member(whichCastmember).shader(whichShader).glossMapmember(whichCastmember).model(whichModel).shader.glossMapmember(whichCastmember).model(whichModel).shaderList{[index]}.\glossMap
Description
3D #standard shader property; specifies the texture to use for gloss mapping.
When you set this property, the following properties are automatically set:
• The fourth texture layer of the shader is set to the texture you specified.
• The value of textureModeList[4] is set to #none.
• The value of blendFunctionList[4] is set to #multiply.
Example
This statement sets the texture named Oval as the glossMap value for the shader used by the model named GlassBox.
member("3DPlanet").model("GlassBox").shader.glossMap = \member("3DPlanet").texture("Oval")
See also
blendFunctionList, textureModeList, reflectionMap, specularLightMap, diffuseLightMap
Chapter 10284

gravitySyntax
member(whichCastmember).modelResource(whichModelResource).gravity
Description
3D particle model resource property; when used with a model resource whose type is #particle, allows you to get or set the gravity property of the resource as a vector.
This property defines the gravity force applied to all particles in each simulation step.
The default value for this property is vector(0,0,0).
Example
In this example, ThermoSystem is a model resource of the type #particle. This statement sets the gravity property of ThermoSystem to the vector (0, -.1, 0), which pulls the particles of thermoSystem gently down the y axis.
member("Fires").modelResource("ThermoSystem").gravity = \vector(0, -.1, 0)
See also
drag, wind
groupSyntax
member(whichCastmember).group(whichGroup)member(whichCastmember).group[index]
Description
3D element; a node in the 3D world that has a name, transform, parent, and children, but no other properties.
Every 3D cast member has a default group named World that cannot be deleted. The parent hierarchy of all models, lights, cameras, and groups that exist in the 3D world terminates in group("world").
Examples
This statement shows that the fourth group of the cast member newAlien is the group Direct01.
put member("newAlien").group[4]-- group("Direct01")
See also
newGroup, deleteGroup, child, parent
3D Lingo Dictionary 285

heightSyntax
member(whichCastmember).modelResource(whichModelResource).heightmember(whichCastmember).texture(whichTexture).height
Description
3D #box model resource, #cylinder model resource, and texture property; indicates the height of the object.
The height of a #box or #cylinder model resource is measured in world units and can be tested and set. The default value for this property is 50.
The height of a texture is measured in pixels and can be tested but not set. The height of the texture is rounded from the height of the source of the texture to the nearest power of 2.
Examples
This statement sets the height of the model resource named Tower to 225.0 world units.
member("3D World").modelResource("Tower").height = 225.0
This statement shows that the height of the texture named Marsmap is 512 pixels.
put member("scene").texture("Marsmap").height-- 512
See also
length, width
heightVerticesSyntax
member(whichCastmember).modelResource(whichModelResource).\heightVertices
Description
3D #box model resource property; indicates the number of mesh vertices along the height of the box. Increasing this value increases the number of faces, and therefore the fineness, of the mesh.
The height of a box is measured along its Y axis.
Set the renderStyle property of a model’s shader to #wire to see the faces of the mesh of the model’s resource. Set the renderStyle property to #point to see just the vertices of the mesh.
The value of this property must be greater than or equal to 2. The default value is 4.
Chapter 10286
Example
This statement sets the heightVertices property of the model resource named Tower to 10. Nine polygons will be used to define the geometry of the model resource along its Z axis; therefore, there will be ten vertices.
member("3D World").modelResource("Tower").heightVertices = 10
See also
height
highlightPercentageSyntax
member(whichCastmember).model(whichModel).toon.highlightPercentagemember(whichCastmember).model(whichModel).shader.highlight\Percentagemember(whichCastmember).shader(whichShader).highlightPercentage
Description
3D toon modifier and #painter shader property; indicates the percentage of available colors that are used in the area of the model’s surface where light creates highlights.
The range of this property is 0 to 100, and the default value is 50.
The number of colors used by the toon modifier and #painter shader for a model is determined by the colorSteps property of the model’s toon modifier or #painter shader.
Example
This statement sets the highlightPercentage property of the toon modifier for the model named Sphere to 50. Half of the colors available to the toon modifier for this model will be used for the highlight area of the model’s surface.
member("shapes").model("Sphere").toon.highlightPercentage = 50
See also
highlightStrength, brightness
3D Lingo Dictionary 287

highlightStrengthSyntax
member(whichCastmember).model(whichModel).toon.highlightStrengthmember(whichCastmember).model(whichModel).shader.highlightStrengthmember(whichCastmember).shader(whichShader).highlightStrength
Description
3D toon modifier and #painter shader property; indicates the brightness of the area of the model’s surface where light creates highlights.
The default value of this property is 1.0.
Example
This statement sets the highlightStrength property of the toon modifier for the model named Teapot to 0.5. The model’s highlights will be moderately bright.
member("shapes").model("Teapot").toon.highlightStrength = 0.5
See also
highlightPercentage, brightness
hitherSyntax
member(whichCastmember).camera(whichCamera).hithersprite(whichSprite).camera{(index)}.hither
Description
3D camera property; indicates the distance in world units from the camera beyond which models are drawn. Objects closer to the camera than hither are not drawn.
The value of this property must be greater than or equal to 1.0 and has a default value of 5.0.
Example
This statement sets the hither property of camera 1 to 1000. Models closer than 1000 world units from the camera will not be visible.
member("SolarSystem").camera[1].hither = 1000
See also
yon
Chapter 10288

identity()Syntax
member(whichCastmember).model(whichModel).transform.identity()member(whichCastmember).group(whichGroup).transform.identity()member(whichCastmember).camera(whichCamera).transform.identity()sprite(whichSprite).camera{(index)}.transform.identity()member(whichCastmember).light(whichLight).transform.identity()transformReference.identity()
Description
3D command; sets the transform to the identity transform, which is transform(1.0000,0.0000,0.0000,0.0000, 0.0000,1.0000,0.0000,0.0000, 0.0000,0.0000,1.0000,0.0000, 0.0000,0.0000,0.0000,1.0000).
The position property of the identity transform is vector(0, 0, 0).
The rotation property of the identity transform is vector(0, 0, 0).
The scale property of the identity transform is vector(1, 1, 1).
The identity transform is parent-relative.
Example
This statement sets the transform of the model named Box to the identity transform.
member("3d world").model("Box").transform.identity()
See also
transform (property), getWorldTransform()
3D Lingo Dictionary 289

ilkSyntax
ilk(object)ilk(object,type)object.ilkobject.ilk(type)
Description
Lingo function; indicates the type of an object.
• The syntax ilk(object) and object.ilk return a value indicating the type of object. If the object is a model, ilk(object) returns #model; if the object is a motion, ilk(object) returns #motion. See the following table for a complete list of values returned by 3D objects.
• The syntax ilk(object, type) and object.ilk(type) compare the object represented by the object to the specified type. If the object is of the specified type, the ilk() function returns TRUE. It the object is not of the specified type, the ilk() function returns FALSE.
The following table shows the return value for each type of 3D object recognized by ilk(). See the main Lingo Dictionary for a list of return values of non-3D objects which are not discussed in this dictionary.
Type of object ilk(object) returns ilk(object, Type) if only Type =
render services #renderer #renderer
model resource #modelresource, #plane, #box, #sphere, #cylinder, #particle, #mesh
Same as ilk(object), except for #modelresource which is the ilk of resources generated by an imported W3D file
model #model #model
motion #motion #motion or #list
shader #shader #shader or #list
texture #texture #texture or #list
group #group #group
camera #camera #camera
collision data #collisiondata #collisiondata
vector #vector #vector
transform #transform #transform
Chapter 10290

Examples
This statement shows that MyObject is a motion object.
put MyObject.ilk-- #motion
This statement tests whether MyObject is a motion object. The return value of 1 shows that it is.
put MyObject.ilk(#motion)-- 1
See also
tweenMode
immovableSyntax
member(whichCastmember).model(whichModel).collision.immovable
Description
3D #collision modifier property; indicates whether a model can be moved as a result of collisions during animations. Specifying TRUE makes the model immovable; specifying FALSE allows the model to be moved. This property is useful as a way of improving performance during animation, because models that do not move do not need to be checked for collisions by Lingo.
This property has a default value of FALSE.
Example
This statement sets the immovable property of the collision modifier attached to the first model of the cast member named Scene to TRUE.
member("Scene").model[1].collision.immovable = TRUE
See also
collision (modifier)
3D Lingo Dictionary 291

inker (modifier)Syntax
member(whichCastmember).modelResource(whichModelResource).\inker.inkerModifierPropertymodelResourceObjectReference.inker.inkerModifierProperty
Description
3D modifier; once you have added the #inker modifier to a model resource (using addModifier) you can get and set #inker modifier properties.
The #inker modifier adds silhouettes, creases, and boundary edges to an existing model; the #inker properties allow you to control the definition and emphasis of these properties.
When the #inker modifier is used in conjunction with the #toon modifier, the rendered effect is cumulative and varies depending on which modifier was first applied. Note, that the list of modifiers returned by the modifier property will list #inker or #toon (whichever was added first), but not both. The #inker modifier can not be used in conjunction with the #sds modifier.
The inker modifier has the following properties:
Note: For more detailed information about the following properties see the individual property entries.
lineColor allows you to get or set the color of lines drawn by the inker.
silhouettes allows you to get or set whether lines are drawn to define the edges along the border of a model, outlining it’s shape.
creases allows you to get or set whether lines are drawn in creases.
creaseAngle allows you to get or set the sensitivity of crease angle detection for the inker.
boundary allows you to get or set whether lines are drawn around the boundary of the surface.
lineOffset allows you to get or set where lines are drawn relative to the surface being shaded and the camera.
useLineOffset allows you to get or set whether lineOffset is on or off.
See also
addModifier, modifiers, toon (modifier), shader
Chapter 10292

insertBackdropSyntax
sprite(whichSprite).camera{(index)}.insertBackdrop(index, \texture, locWithinSprite, rotation)member(whichCastmember).camera(whichCamera).\insertBackdrop(index, texture, locWithinSprite, rotation)
Description
3D camera command; adds a backdrop to the camera’s list of backdrops at the position indicated by the index parameter. The backdrop is displayed in the 3D sprite at locWithinSprite with the indicated rotation. The locWithinSprite parameter is a 2D loc measured from the upper left corner of the sprite.
Example
The first line of this example creates a texture called Cedar. The second line inserts that texture at the first position in the list of backdrops of the camera of sprite 5. The backdrop is positioned at the point (300, 120), measured from the upper left corner of the sprite. It is rotated 45˚.
t1 = member("scene").texture("Cedar")sprite(5).camera.insertBackdrop(1, t1, point(300, 120), 45)
See also
removeBackdrop, backdrop, overlay
3D Lingo Dictionary 293

insertOverlaySyntax
sprite(whichSprite).camera{(index)}.insertOverlay(index, \texture, locWithinSprite, rotation)member(whichCastmember).camera(whichCamera).\insertOverlay(index, texture, \locWithinSprite, rotation)
Description
3D camera command; adds an overlay to the camera’s list of overlays at the position indicated by the index parameter. The overlay is displayed in the 3D sprite at locWithinSprite with the indicated rotation. The locWithinSprite parameter is a 2D loc measured from the upper left corner of the sprite.
Example
The first line of this example creates a texture named Cedar. The second line inserts that texture at the first position in the list of overlays of the camera of sprite 5. The overlay is positioned at the point (300, 120), measured from the upper left corner of the sprite. It is rotated 45˚.
t1 = member("scene").texture("Cedar")sprite(5).camera.insertOverlay(1, t1, point(300, 120), 45)
See also
removeOverlay, overlay, backdrop
interpolate()Syntax
transform1.interpolate(transform2,percentage)
Description
3D transform method; returns a copy of transform1 created by interpolating from the position and rotation of transform1 to the position and rotation of transform2 by the specified percentage. The original transform1 is not affected. To interpolate transform1, use interpolateTo().
To interpolate by hand, multiply the difference of two numbers by the percentage. For example, interpolation from 4 to 8 by 50 percent yields 6.
Chapter 10294

Example
In this example, tBox is the transform of the model named Box, and tSphere is the transform of the model named Sphere. The third line of the example interpolates a copy of the transform of Box halfway to the transform of Sphere.
tBox = member("3d world").model("Box").transformtSphere = member("3d world").model("Sphere").transformtNew = tBox.interpolate(tSphere, 50)
See also
interpolateTo()
interpolateTo()Syntax
transform1.interpolateTo(transform2, percentage)
Description
3D transform method; modifiestransform1 by interpolating from the position and rotation of transform1 to the position and rotation of transform2 by the specified percentage. The original transform1 is changed. To interpolate a copy of transform1, use interpolate().
To interpolate by hand, multiply the difference of two numbers by the percentage. For example, interpolation from 4 to 8 by 50 percent yields 6.
Example
In this example, tBox is the transform of the model named Box, and tSphere is the transform of the model named Sphere. The third line of the example interpolates the transform of Box halfway to the transform of Sphere.
tBox = member("3d world").model("Box").transformtSphere = member("3d world").model("Sphere").transformtBox.interpolateTo(tSphere, 50)
See also
interpolate()
3D Lingo Dictionary 295
inverse()Syntax
member(whichCastmember).model(whichModel).transform.inverse()member(whichCastmember).group(whichGroup).transform.inverse()member(whichCastmember).camera(whichCamera).transform.inverse()sprite(whichSprite).camera{(index)}.transform.inverse()member(whichCastmember).light(whichLight).transform.inverse()transformReference.inverse()
Description
3D transform method; returns a copy of the transform with its position and rotation properties inverted.
This method does not change the original transform. To invert the original transform, use invert().
Example
This statement inverts a copy of the transform of the model named Chair.
boxInv = member("3d world").model("Chair").transform.inverse()
See also
invert()
invert()Syntax
member(whichCastmember).model(whichModel).transform.invert()member(whichCastmember).group(whichGroup).transform.invert()member(whichCastmember).camera(whichCamera).transform.invert()sprite(whichSprite).camera{(index)}.transform.invert()member(whichCastmember).light(whichLight).transform.invert()transformReference.invert()
Description
3D transform method; inverts the position and rotation properties of the transform.
This method changes the original transform. To invert a copy of the original transform, use inverse().
Example
This statement inverts the transform of the model Box.
member("3d world").model("Box").transform.invert()
See also
inverse()
Chapter 10296

isInWorld()Syntax
member(whichCastmember).model(whichModel).isInWorld()member(whichCastmember).camera(whichCamera).isInWorld()member(whichCastmember).light(whichLight).isInWorld()member(whichCastmember).group(whichGroup).isInWorld()
Description
3D command; returns a value of TRUE if the parent hierarchy of the model, camera, light, or group terminates in the world. If the value of isInWorld is TRUE, the model, camera, light, or group functions in the 3D world of the cast member.
Models, cameras, lights, and groups can be stored in a 3D cast member but not used in the 3D world of the cast member. Use the addToWorld and removeFromWorld commands to add and remove models, cameras, lights, and groups from the 3D world of the cast member.
Example
This statement shows that the model named Teapot exists in the 3D world of the cast member named TableScene.
put member("TableScene").model("Teapot").isInWorld()-- 1
See also
addToWorld, removeFromWorld, child
3D Lingo Dictionary 297

keyframePlayer (modifier)Syntax
member(whichCastmember).model(whichModel).\keyframePlayer.keyframePlayerModifierProperty
Description
3D modifier; manages the use of motions by models. The motions managed by the keyframePlayer modifier animate the entire model at once, unlike Bones player motions, which animate segments of the model called bones.
Motions and the models that use them must be created in a 3D modeling program, exported as W3D files, and then imported into a movie. Motions cannot be applied to model primitives created within Director.
Adding the keyframePlayer modifier to a model by using the addModifier command allows access to the following keyframePlayer modifier properties:
playing indicates whether a model is executing a motion.
playlist is a linear list of property lists containing the playback parameters of the motions that are queued for a model.
currentTime indicates the local time, in milliseconds, of the currently playing or paused motion.
playRate is a number that is multiplied by the scale parameter of the play() or queue() command to determine the playback speed of the motion.
playlist.count returns the number of motions currently queued in the playlist.
rootLock indicates whether the translational component of the motion is used or ignored.
currentLoopState indicates whether the motion plays once or repeats continuously.
blendTime indicates the length of the transition created by the modifier between motions when the modifier’s autoblend property is set to TRUE.
autoblend indicates whether the modifier creates a linear transition to the currently playing motion from the motion that preceded it.
blendFactor indicates the degree of blending between motions when the modifier’s autoBlend property is set to FALSE.
lockTranslation indicates whether the model can be displaced from the specified planes.
positionReset indicates whether the model returns to its starting position after the end of a motion or each iteration of a loop.
rotationReset indicates the rotational element of a transition from one motion to the next, or the looping of a single motion.
Chapter 10298

Note: For more detailed information about these properties, see the individual property entries.
The keyframePlayer modifier uses the following commands:
pause() halts the motion currently being executed by the model.
play() initiates or unpauses the execution of a motion.
playNext() initiates playback of the next motion in the playlist.
queue() adds a motion to the end of the playlist.
The keyframePlayer modifier generates the following events, which are used by handlers declared in the registerForEvent() and registerScript() commands. The call to the declared handler includes three arguments: the event type (either #animationStarted or #animationEnded), the name of the motion, and the current time of the motion. For detailed information about notification events, see the entry for registerForEvent().
#animationStarted is sent when a motion begins playing. If blending is used between motions, the event is sent when the transition begins.
#animationEnded is sent when a motion ends. If blending is used between motions, the event is sent when the transition ends.
See also
addModifier, modifiers, bonesPlayer (modifier), motion
leftSyntax
member(whichCastmember).modelResource(whichModelResource).left
Description
3D #box model resource property; indicates whether the side of the box intersected by its -X axis is sealed (TRUE) or open (FALSE).
The default value for this property is TRUE.
Example
This statement sets the left property of the model resource named Crate to FALSE, meaning the left side of this box will be open.
member("3D World").modelResource("crate").left = FALSE
See also
back, front, bottom, top, right
3D Lingo Dictionary 299
lengthSyntax
member(whichCastmember).modelResource(whichModelResource).lengthvectorReference.length
Description
3D #box model resource, #plane model resource, and vector property; indicates the length in world units of the box or plane.
The length of a box is measured along its Z axis. The default length of a box is 50.
The length of a plane is measured along its Y axis. The default length of a plane is 1.
The length of a vector is its distance in world units from vector(0, 0, 0). This is the same as the magnitude of the vector.
Example
This statement sets the variable myBoxLength to the length of the model resource named GiftBox.
myBoxLength = member("3D World").modelResource("GiftBox").length
See also
height, width, magnitude
lengthVerticesSyntax
member(whichCastmember).modelResource(whichModelResource).\lengthVertices
Description
3D #box and #plane model resource property; indicates the number of mesh vertices along the length of the box or plane. Increasing this value increases the number of faces, and therefore the fineness, of the mesh.
The length of a box is measured along its Z axis. The length of a plane is measured along its Y axis.
Set the renderStyle property of a model’s shader to #wire to see the faces of the mesh of the model’s resource. Set the renderStyle property to #point to see just the vertices of the mesh.
The value of this property must be greater than or equal to 2. The default value is 4.
Chapter 10300

Example
This statement sets the lengthVertices property of the model resource named Tower to 10. Nine triangles will be used to define the geometry of the model resource along its Y axis; therefore, there will be ten vertices.
member("3D World").modelResource("Tower").lengthVertices = 10
See also
length
levelSyntax
member(whichCastmember).model(whichModel).lod.level
Description
3D lod modifier property; indicates the amount of detail removed by the modifier when its auto property is set to FALSE.The range of this property is 0.0 to 100.00.
When the modifier’s auto property is set to TRUE, the value of the level property is dynamically updated, but cannot be set.
The #lod modifier can only be added to models created outside of Director in 3D modeling programs. The value of the type property of the model resources used by these models is #fromFile. The modifier cannot be added to primitives created within Director.
Example
This statement sets the level property of the lod modifier of the model Spaceship to 50. If the lod modifier’s auto property is set to FALSE, Spaceship will be drawn at a medium level of detail. If the lod modifier’s auto property is set to TRUE, this code will have no effect.
member("3D World").model("Spaceship").lod.level = 50
See also
lod (modifier), auto, bias
3D Lingo Dictionary 301

lifetimeSyntax
member(whichCastmember).modelResource(modelResource).lifetime
Description
3D #particle model resource property; for all particles in a particle system, this property indicates the number of milliseconds from the creation of a particle to the end of its existence.
The default value of this property is 10,000.
Example
In this example, ThermoSystem is a model resource of the type #particle. This statement sets the lifetime property of ThermoSystem to 90.0 This means each particle of ThermoSystem will exist for 90 milliseconds.
member(8,2).modelResource("ThermoSystem").lifetime = 90.0
See also
emitter
lightSyntax
member(whichCastmember).light(whichLight)member(whichCastmember).light[index]member(whichCastmember).light(whichLight).whichLightPropertymember(whichCastmember).light[index].whichLightProperty
Description
3D element; an object at a vector position from which light emanates.
See the “3D Lingo by Feature” chapter for a complete list of light properties and commands.
Examples
This example shows the two ways of referring to a light. The first line uses a string in parentheses and the second line uses the a number in brackets. The string is the light’s name and the number is the position of the light in the cast member’s list of lights.
thisLight = member("3D World").light("spot01")thisLight = member("3D World").light[2]
See also
newLight, deleteLight
Chapter 10302

lineColorSyntax
member(whichCastmember).model(whichModel).inker.lineColormember(whichCastmember).model(whichModel).toon.lineColor
Description
3D toon and inker modifier property; indicates the color of the lines drawn on the model by the modifier. For this property to have an effect, the modifier’s creases, silhouettes, or boundary property must be set to TRUE.
The default value for this property is rgb(0, 0, 0).
Example
This statement sets the color of all lines drawn by the toon modifier on the model named Teapot to rgb(255, 0, 0), which is red.
member("shapes").model("Teapot").toon.lineColor = rgb(255, 0, 0)
See also
creases, silhouettes, boundary, lineOffset
lineOffsetSyntax
member(whichCastmember).model(whichModel).toon.lineOffsetmember(whichCastmember).model(whichModel).inker.lineOffset
Description
3D toon and inker modifier property; indicates the apparent distance from the model’s surface at which lines are drawn by the modifier. For this property to have an effect, the modifier’s useLineOffset property must be set to TRUE, and one or more of its creases, silhouettes, or boundary properties must also be set to TRUE.
This range of this property is -100.00 to +100.00. Its default setting is -2.0.
Example
This statement sets the lineOffset property of the toon modifier for the model named Teapot to 10. The lines drawn by the toon modifier on the surface of the model will stand out more than they would at the default setting of -2.
member("shapes").model("Teapot").toon.lineOffset = 10
See also
creases, silhouettes, boundary, useLineOffset, lineColor
3D Lingo Dictionary 303
loadFile()Syntax
member(whichCastmember).loadFile(fileName {, overwrite, \generateUniqueNames})
Description
3D cast member command; imports the assets of the W3D file, fileName, into the cast member.
The optional overwrite parameter indicates whether the assets of the W3D file replace the assets of the cast member (TRUE) or are added to the assets of the cast member (FALSE). The default value of overwrite is TRUE.
If the optional generateUniqueNames parameter is set to TRUE, any element in the W3D file with the same name as a corresponding element in the cast member is renamed. If generateUniqueNames is FALSE, elements in the cast member are overwritten by corresponding elements in the W3D file with the same name. The default value of generateUniqueNames is TRUE.
The cast member’s state property must be either -1 (error) or 4 (loaded) before the loadFile command is used.
Example
This statement imports the contents of the file named Truck.W3d into the cast member named Roadway. The contents of Truck.W3d will be added to the contents of Roadway. If any imported objects have the same names as objects already in Roadway, Director will create new names for them.
member("Roadway").loadFile("Truck.W3d", FALSE, TRUE)
This statement imports the contents of the file named Chevy.W3d into the cast member named Roadway. Chevy.W3d is in a folder named Models one level down from the movie. The contents of Roadway will be replaced by the contents of Chevy.W3d. The third parameter is irrelevant because the value of the second parameter is TRUE.
member("Roadway").loadFile(the moviePath & "Models\Chevy.W3d", \TRUE, TRUE)
See also
state
loc (backdrop and overlay)Syntax
sprite(whichSprite).camera{(index)}.backdrop[index].locmember(whichCastmember).camera(whichCamera).backdrop[index].locsprite(whichSprite).camera{(index)}.overlay[index].locmember(whichCastmember).camera(whichCamera).overlay[index].loc
Chapter 10304
Description
3D backdrop and overlay property; indicates the 2D location of the backdrop or overlay, as measured from the upper left corner of the sprite.
This property is initially set as a parameter of the addBackdrop, addOverlay, insertBackdrop, or insertOverlay command which creates the backdrop or overlay.
Example
This statement positions the first backdrop of the camera of sprite 2.
sprite(2).camera.backdrop[1].loc = point(120, 120)
See also
backdrop, overlay, regPoint
lockTranslationSyntax
member(whichCastmember).model(whichModel).bonesPlayer.\lockTranslationmember(whichCastmember).model(whichModel).keyframePlayer.\lockTranslation
Description
3D #bonesPlayer and #keyframePlayer modifier property; prevents displacement from the specified plane(s) except by the absolute translation of the motion data. Any additional translation introduced either manually or through cumulative error is removed. The possible values of #none, #x, #y, #z, #xy, #yz, #xz, and #all control which of the three translational components are controlled for each frame. When a lock on an axis is turned on, the current displacement along that axis is stored and used thereafter as the fixed displacement to which the animation is relative. This displacement can be reset by deactivating that axis lock, moving the object, and reactivating that axis lock.
In other words, it defines the axis of translation to ignore when playing back a motion. To keep a model locked to a ground plane with the top pointing along the Z axis, set lockTranslation to #z. The default value for this property is #none.
Example
This statement sets the lockTranslation property of the model named Walker to #z.
member("ParkScene").model("Walker").bonesPlayer.\lockTranslation = #z
See also
immovable
3D Lingo Dictionary 305

lod (modifier)Syntax
member(whichCastmember).model(whichModel).lod.lodModifierProperty
Description
3D modifier; dynamically removes detail from models as they move away from the camera.
This modifier can only be added to models created outside of Director in 3D modeling programs. The value of the type property of the model resources used by these models is #fromFile. All such models use detail reduction whether or not the lod modifier is attached. Attaching the modifier allows you to control the properties of detail reduction. The modifier cannot be added to primitives created within Director.
The lod modifier data is generated by 3D modeling programs for all models. Setting the userData property "sw3d_no_lod = true" allows you to specify that the lod modifier data and memory be released when streaming is complete.
Be careful when using the sds and lod modifiers together, because they perform opposite functions (the sds modifier adds geometric detail and the lod modifier removes geometric detail). Before adding the sds modifier, it is recommended that you disable the lod.auto modifier property and set the lod.level modifier property to maximum resolution, as follows:
member("myMember").model("myModel").lod.auto = 0 member("myMember").model("myModel").lod.level = 100 member("myMember").model("myModel").addmodifier(#sds)
The lod modifier has the following properties:
auto allows the modifier to set the level of detail reduction as the distance between the model and the camera changes. The value of the modifier’s level property is updated, but setting the level property will have no effect when the auto property is set to TRUE.
bias indicates how aggressively the modifier removes detail from the model when the modifier’s auto property is set to TRUE. The range for this property is from 0.0 (removes all polygons) to 100.0 (removes no polygons). The default setting for this property is 100.0.
level indicates the amount of detail reduction when the modifier’s auto property is set to FALSE. The range of this property is 0.0 to 100.00.
Note: For more detailed information about these properties, see the individual property entries.
See also
sds (modifier), auto, bias, level, addModifier
Chapter 10306

loop (cast member property)Syntax
member(whichCastmember).loop
Description
3D cast member property; indicates whether motions applied to the first model in the cast member repeat continuously (TRUE) or play once and stop (FALSE).
The default setting for this property is TRUE.
Example
This statement sets the loop property of the cast member named Walkers to TRUE. Motions being executed by the first model in Walker will repeat continuously.
member("Walkers").loop = TRUE
See also
motion, play(), queue(), animationEnabled
loop (emitter)Syntax
member(whichCastmember).modelResource(whichModelResource).\emitter.loop
Description
3D property; when used with a model resource whose type is #particle, this property allows you to both get and set what happens to particles at the end of their lifetime. A loop value of TRUE causes particles to be reborn at the end of their lifetime at the emitter location defined by the emitter’s region property. A value of FALSE causes the particles to die at the end of their lifetime. The default setting for this property is TRUE.
Example
In this example, ThermoSystem is a model resource of the type #particle. This statement sets the emitter.loop property of ThermoSystem to 1, which causes the particles of ThermoSystem to be continuously emitted.
member("Fires").modelResource("ThermoSystem").emitter.loop = 1
See also
emitter
3D Lingo Dictionary 307

magnitudeSyntax
whichVector.magnitude
Description
3D property; returns the magnitude of a vector. The value is a floating-point number. The magnitude is the length of a vector and is always greater than or equal to0.0. (vector (0, 0, 0) equals 0.)
Example
This statement shows that the magnitude of MyVec1 is 100.0000 and the magnitude of MyVec2 is 141.4214.
MyVec1 = vector(100, 0, 0)put MyVec1.magnitude-- 100.0000MyVec2 = vector(100, 100, 0)put MyVec2.magnitude-- 141.4214
See also
length, identity()
mapSyntax
member(whichCastmember).motion(whichMotion).\map(whichOtherMotion {, boneName})
Description
3D motion command; maps the motion specified by whichOtherMotion into the current motion (whichMotion), and applies it to the bone specified by boneName and all of the children of that bone. This command replaces any motion previously mapped to the specified bone and its children. This command does not change a model’s playlist.
The boneName parameter defaults to the root bone if not specified.
Example
This statement maps the motion named LookUp into the motion named SitDown starting from the bone named Neck. The model will sit down and look up at the same time.
member("Restaurant").motion("SitDown").map("LookUp", "Neck")
See also
motion, duration, cloneMotionFromCastmember
Chapter 10308
maxSpeed Syntax
member(whichCastmember).modelResource(whichModelResource).\emitter.maxSpeed
Description
3D property; when used with a model resource whose type is #particle, allows you to get and set the maximum speed at which particles are emitted. Each particle’s initial velocity is randomly selected between the emitter’s minSpeed and maxSpeed properties.
The value is a floating-point number and must be greater than 0.0.
Example
In this example, ThermoSystem is a model resource of the type #particle. This statement sets the maxSpeed property of ThermoSystem to 15, which causes the fastest particles of ThermoSystem to move fairly quickly. Within a given particle system, the faster a particle moves, the farther it will travel.
member("Fires").modelResource("ThermoSystem").emitter.maxSpeed=15
See also
minSpeed, emitter
3D Lingo Dictionary 309

memberSyntax
member(whichCastmember).texture(whichTexture).membermember(whichCastmember).model(whichModel).shader.texture.membermember(whichCastmember).model(whichModel).shaderList\[shaderListIndex].textureList[textureListIndex].member
Description
3D texture property; if the texture’s type is #fromCastMember, this property indicates the cast member that is used as the source for a texture.
This property can be tested and set.
If the texture’s type is #importedFromFile, this property value is void and cannot be set. If the texture’s type is #fromImageObject, this property value is void, but it can be set.
Example
This Lingo adds a new texture. The second statement shows that the cast member used to create the texture named gbTexture was member 16 of cast 1.
member("scene").newTexture("gbTexture", #fromCastmember, \member(16, 1))put member("scene").texture("gbTexture").member-- (member 16 of castLib 1)
mesh (property)Syntax
member(whichCastmember).model(whichModel).\meshdeform.mesh[index].meshProperty
Description
3D command; allows access to the mesh properties of models that have the meshDeform modifier attached. When used as mesh.count this command returns the total number of meshes within the referenced model.
The properties of each mesh that are accessible are:
colorList allows you to get or set the list of colors used by the specified mesh.
vertexList allows you to get or set the list of vertices used by the specified mesh.
normalList allows you to get or set the list of normal vectors used by the specified mesh.
textureCoordinateList allows you to get or set the texture coordinates used by the first texture layer of the specified mesh. To get or set the texture coordinates for any other texture layers in the specified mesh, use meshdeform.mesh[index].\texturelayer[index].textureCoordinateList.
Chapter 10310

textureLayer[index] allows you get and set access to the properties of the specified texture layer.
face[index] allows you to get or set the vertices, normals, texture coordinates, colors, and shaders used by the faces of the specified mesh.
face.count allows you to obtain the total number of faces found within the specified mesh.
Note: For complete information about these properties, see the individual entries (listed in the “See also” section of this entry).
Examples
The following Lingo adds the #meshDeform modifier to the model named thing1 and then displays the vertexList for the first mesh in the model named thing1.
member("newAlien").model("thing1").addModifier(#meshDeform)put member("newalien").model("thing1").meshDeform.mesh[1].vertexList-- [vector(239.0, -1000.5, 27.4), vector\(162.5, -1064.7, 29.3), vector(115.3, -1010.8, -40.6),vector(239.0, -1000.5, 27.4), vector(115.3, -1010.8, -40.6),vector(162.5, -1064.7, 29.3), vector(359.0, -828.5, -46.3),vector(309.9, -914.5, -45.3)]
The following statement displays the number of meshes found within the model named “Aircraft”.
put member(“world”).model(“Aircraft”).meshDeform.mesh.count-- 4
See also
meshDeform (modifier), colorList, textureCoordinateList, textureLayer, normalList, vertexList (mesh deform), face
3D Lingo Dictionary 311
meshDeform (modifier)Syntax
member(whichCastmember).model(whichModel).meshDeform.propertyName
Description
3D modifier; allows control over the various aspects of the referenced model’s mesh structure. Once you have added the #meshDeform modifier (using the addModifier command) to a model you have access to the following properties of the #meshDeform modifier:
Note: For more detailed information about the following properties see the individual property entries referenced in the see also section of this entry.
face.count returns the total number of faces in the referenced model.
mesh.count returns the number of meshes in the referenced model.
mesh[index] allows access to the properties of the specified mesh.
Examples
The following statement displays the number of faces in the model named gbFace.
put member("3D World").model("gbFace").meshDeform.face.count-- 432
The following statement displays the number of meshes in the model named gbFace.
put member("3D World").model("gbFace").meshDeform.mesh.count-- 2
The following statement displays the number of faces in the second mesh of the model named gbFace.
put member("3D World").model("gbFace").meshDeform.mesh[2].face.count-- 204
See also
mesh (property), addModifier
minSpeedSyntax
member(whichCastmember).modelResource(whichModelResource).emitter.minSpeed
Chapter 10312

Description
3D property; when used with a model resource whose type is #particle, allows you to get and set the minimum speed at which particles are emitted. Each particle’s initial velocity is randomly selected between the emitter’s minSpeed and maxSpeed properties.
The value is a floating-point number and must be greater than 0.0.
Example
In this example, ThermoSystem is a model resource of the type #particle. This statement sets the minSpeed property of ThermoSystem to 5, which causes the slowest particles of ThermoSystem to move somewhat slowly. Within a given particle system, the slower a particle moves, the shorter the distance it will travel.
member("Fires").modelResource("ThermoSystem").emitter.\minSpeed = 5
See also
maxSpeed, emitter
mode (emitter)Syntax
member(whichCastmember).modelResource(whichModelResource).\emitter.mode
Description
3D property; when used with a model resource whose type is #particle, allows you to both get and set the mode property of the resource’s particle emitter.
This property can have the value #burst or #stream (default). A mode value of #burst causes all particles to be emitted at the same time, while a value of #stream causes a group of particles to be emitted at each frame. The number of particles emitted in each frame is determined using the following equation:
particlesPerFrame = resourceObject.emitter.numParticles \(resourceObject.lifetime x millisecondsPerRenderedFrame)
Example
In this example, ThermoSystem is a model resource of the type #particle. This statement sets the emitter.mode property of ThermoSystem to #burst, which causes the particles of ThermoSystem to appear in bursts. To create a single burst of particles, set emitter.mode = #burst and emitter.loop = 0.
member("Fires").modelResource("ThermoSystem").emitter.mode = #burst
See also
emitter
3D Lingo Dictionary 313

mode (collision)Syntax
member(whichCastmember).model(whichModel).collision.mode
Description
3D collision modifier property; indicates the geometry to be used in the collision detection algorithm. Using simpler geometry such as the bounding sphere leads to better performance. The possible values for this property are:
#mesh uses the actual mesh geometry of the model’s resource. This gives one-triangle precision and is usually slower than #box or #sphere.
#box uses the bounding box of the model. This is useful for objects that can fit more tightly in a box than in a sphere, such as a wall.
#sphere is the fastest mode, because it uses the bounding sphere of the model. This is the default value for this property.
Example
member("3d").model("yourModel").addModifier(#collision)member("3d").model("yourModel").collision.mode = #mesh
Chapter 10314
modelSyntax
member(whichCastmember).model(whichModel)member(whichCastmember).model[index]member(whichCastmember).model.countmember(whichCastmember).model(whichModel).propertyNamemember(whichCastmember).model[index].propertyName
Description
3D command; returns the model found within the referenced cast member that has the name specified by whichModel, or is found at the index position specified by index. If no model exists for the specified parameter, the command returns void. As model.count, the command returns the number of models found within the referenced cast member. This command also allows access to the specified model’s properties.
Model name comparisons are not case-sensitive. The index position of a particular model may change when objects at lower index positions are deleted.
If no model is found that uses the specified name or no model is found at the specified index position then this command returns void.
Examples
This statement stores a reference to the model named Player Avatar in the variable thismodel.
thismodel = member("3DWorld").model("Player Avatar")
This statement stores a reference to the eighth model of the cast member named 3DWorld in the variable thismodel.
thismodel = member("3DWorld").model[8]
This statement shows that there are four models in the member of sprite 1.
put sprite(1).member.model.count-- 4
3D Lingo Dictionary 315

modelASyntax
collisionData.modelA
Description
3D collisionData property; indicates one of the models involved in a collision, the other model being modelB.
The collisionData object is sent as an argument with the #collideWith and #collideAny events to the handler specified in the registerForEvent, registerScript, and setCollisionCallback commands.
The #collideWith and #collideAny events are sent when a collision occurs between models to which collision modifiers have been added. The resolve property of the models’ modifiers must be set to TRUE.
This property can be tested but not set.
Example
This example has three parts. The first part is the first line of code, which registers the #putDetails handler for the #collideAny event. The second part is the #putDetails handler. When two models in the cast member named MyScene collide, the #putDetails handler is called and the collisionData argument is sent to it. This handler displays the modelA and modelB properties of the collisionData object in the message window. The third part of the example shows the results from the message window. These show that the model named GreenBall was modelA and the model named YellowBall was modelB in the collision.
member("MyScene").registerForEvent(#collideAny, #putDetails, 0)on putDetails me, collisionData put collisionData.modelA put collisionData.modelBend-- model("GreenBall")-- model("YellowBall")
See also
registerScript(), registerForEvent(), sendEvent, modelB, setCollisionCallback()
Chapter 10316
modelBSyntax
collisionData.modelB
Description
3D collisionData property; indicates one of the models involved in a collision, the other model being modelA.
The collisionData object is sent as an argument with the #collideWith and #collideAny events to the handler specified in the registerForEvent, registerScript, and setCollisionCallback commands.
The #collideWith and #collideAny events are sent when a collision occurs between models to which collision modifiers have been added. The resolve property of the models’ modifiers must be set to TRUE.
This property can be tested but not set.
Example
This example has three parts. The first part is the first line of code, which registers the #putDetails handler for the #collideAny event. The second part is the #putDetails handler. When two models in the cast member named MyScene collide, the #putDetails handler is called and the collisionData argument is sent to it. This handler displays the modelA and modelB properties of the collisionData object in the message window. The third part of the example shows the results from the message window. These show that the model named GreenBall was modelA and the model named YellowBall was modelB in the collision.
member("MyScene").registerForEvent(#collideAny, #putDetails, 0)on putDetails me, collisionData put collisionData.modelA put collisionData.modelBend-- model("GreenBall")-- model("YellowBall")
See also
registerScript(), registerForEvent(), sendEvent, modelA, collisionNormal, setCollisionCallback()
3D Lingo Dictionary 317

modelResourceSyntax
member(whichCastmember).modelResource(whichModelResource)member(whichCastmember).modelResource[index]member(whichCastmember).modelResource.countmember(whichCastmember).modelResource(whichModelResource).\propertyNamemember(whichCastmember).modelResource[index].propertyName
Description
3D command; returns the model resource found within the referenced cast member that has the name specified by whichModelResource, or is found at the index position specified by the index parameter. If no model resource exists for the specified parameter, the command returns void. As modelResource.count, the command returns the number of model resources found within the referenced cast member. This command also allows access to the specified model resource’s properties.
Model resource name string comparisons are not case-sensitive. The index position of a particular model resource may change when objects at lower index positions are deleted.
Examples
This statement stores a reference to the model resource named HouseA in the variable thismodelResource.
thismodelResource = member("3DWorld").modelResource("HouseA")
This statement stores a reference to the fourteenth model resource of the cast member named 3DWorld in the variable thismodelResource.
thismodelResource = member("3DWorld").modelResource[14]
This statement shows that there are ten model resources in the member of sprite 1.
put sprite(1).member.modelResource.count--10
Chapter 10318

modelsUnderLocSyntax
member(whichCastmember).camera(whichCamera).modelsUnderLoc\(pointWithinSprite {, maxNumberOfModels, levelOfDetail})
Description
3D command; returns a list of models found under the point specified by pointWithinSprite within the rect of a sprite using the referenced camera. The location pointWithinSprite is relative to the upper left corner of the sprite, in pixels.
The optional maxNumberOfModels parameter allows you to limit the length of the returned list. If this parameter isn’t specified, the command returns a list containing references for all of the models found under the specified point.
The optional levelOfDetail parameter allows you to specify the level of detail of the information returned. The levelOfDetail parameter can have the following values:
#simple returns a list containing references to the models found under the point. This is the default setting.
#detailed returns a list of property lists, each representing an intersected model. Each property list will have the following properties:
• #model is a reference to the intersected model object.
• #distance is the distance from the camera to the point of intersection with the model.
• #isectPosition is a vector representing the world space position of the point of intersection.
• #isectNormal is the world space normal vector to the mesh at the point of intersection.
• #meshID is the meshID of the intersected mesh, which can be used as in index into the mesh list of the meshDeform modifier.
• #faceID is the face ID of the intersected face, which can be used as an index into the face list of the meshDeform modifier.
• #vertices is a three-element list of vectors that represent the world space positions of the vertices of the intersected face.
• #uvCoord is a property list with properties #u and #v that represent the u and v barycentric coordinates of the face.
Within the returned list, the first model listed is the one closest to the viewer and the last model listed is the furthest from the viewer.
Only one intersection (the closest intersection) is returned per model.
The command returns an empty list if there are no models found under the specified point.
3D Lingo Dictionary 319

Example
The first line in this handler translates the location of the cursor from a point on the Stage to a point within sprite 5. The second line uses the modelsUnderLoc command to obtain the first three models found under that point. The third line displays the returned detailed information about the models in the message window.
on mouseUp pt = the mouseLoc - point(sprite(5).left, sprite(5).top) m = sprite(5).camera.modelsUnderLoc(pt, 3, #detailed) put mend
See also
modelsUnderRay, modelUnderLoc
modelsUnderRaySyntax
member(whichCastmember).modelsUnderRay(locationVector, directionVector {, maxNumberOfModels, levelOfDetail})
Description
3D command; returns a list of models found under a ray drawn from the position specified by locationVector and pointing in the direction of directionVector, with both vectors being specified in world-relative coordinates.
The optional maxNumberOfModels parameter allows you to limit the length of the returned list. If this parameter isn’t specified, the command returns a list containing references for all of the models found under the specified ray.
The optional levelOfDetail parameter allows you to specify the level of detail of the information returned. The levelOfDetail parameter can have the following values:
#simple returns a list containing references to the models found under the point. This is the default setting.
#detailed returns a list of property lists, each representing an intersected model. Each property list will have the following properties:
• #model is a reference to the intersected model object.
• #distance is the distance from the world position specified by locationVector to the point of intersection with the model.
• #isectPosition is a vector representing the world space position of the point of intersection.
• #isectNormal is the world space normal vector to the mesh at the point of intersection.
Chapter 10320

• #meshID is the meshID of the intersected mesh which can be used to index into the mesh list of the meshDeform modifier.
• #faceID is the face ID of the intersected face which can be used to index into the face list of the meshDeform modifier.
• #vertices is a 3-element list of vectors that represent the world space positions of the vertices of the intersected face.
• #uvCoord is a property list with properties #u and #v that represent the u and v barycentric coordinates of the face.
Within the returned list, the first model listed is the one closest to the position specified by locationVector and the last model listed is the furthest from that position.
Only one intersection (the closest intersection) is returned per model.
The command returns an empty list if there are no models found under the specified ray.
Example
This statement displays the detailed information for a model intersected by a ray drawn from the position vector (0, 0, 300) and pointing down the -Z axis.
put member("3d").modelsUnderRay(vector(0, 0, 300), vector(0, 0, -\1), 3, #detailed)-- [[#model: model("mSphere"), #distance: 275.0000, \#isectPosition: vector( 0.0000, 0.0000, 25.0000 ), #isectNormal: \vector( -0.0775, 0.0161, 0.9969 ), #meshID: 1, #faceID: 229, \#vertices: [vector( 0.0000, 0.0000, 25.0000 ), vector( -3.6851, \1.3097, 24.6922 ), vector( -3.9017, 0.2669, 24.6922 )], \#uvCoord: [#u: 0.0000, #v: 0.0000]]]
See also
modelsUnderLoc, modelUnderLoc
3D Lingo Dictionary 321

modelUnderLocSyntax
member(whichCastmember).camera(whichCamera).\modelUnderLoc(pointWithinSprite)
Description
3D command; returns a reference to the first model found under the point specified by pointWithinSprite within the rect of a sprite using the referenced camera. The location pointWithinSprite is relative to the upper left corner of the sprite, in pixels.
This command returns void if there is no model found under the specified point.
For a list of all of the models found under a specified point, and detailed information about them, use modelsUnderLoc.
Examples
The first line in this handler translates the location of the cursor from a point on the Stage to a point within sprite 5. The second line determines the first model under that point. The third line displays the result in the message window.
on mouseUppt = the mouseLoc - point(sprite(5).left, sprite(5).top)m = sprite(5).camera.modelUnderLoc(pt)put m
end
See also
modelsUnderLoc, modelsUnderRay
modifierSyntax
member(whichCastmember).model(whichModel).modifiermember(whichCastmember).model(whichModel).modifier.count
Description
3D model property; returns a list of modifiers that are attached to the specified model. As modifier.count, the command returns the number of modifiers attached to the model.
Note that if both the toon and inker modifiers are applied to a model, only the first one that was added to the model is returned.
This property can be tested but not set. Use the addModifier and removeModifier commands to add and remove modifiers from models.
Chapter 10322
Example
This statement shows which modifiers are attached to the model named Juggler.
put member("ParkScene").model("Juggler").modifier-- [#bonesPlayer, #lod]
See also
modifier[], modifiers, addModifier, removeModifier
modifier[]Syntax
member(whichCastmember).model(whichModel).modifier[index]
Description
3D model property; returns the type of the modifier found at the position specified by index within the model’s attached modifier list. The value returned is a symbol.
If no modifier is found at the specified position then this property’s value is void.
To obtain information about a model’s attached modifier list use the modifier property.
Direct access into an attached modifier’s properties is not supported through the use of this command.
Example
put member("3d world").model("box").modifier[1]-- #lod
See also
modifier, modifiers, addModifier, removeModifier
3D Lingo Dictionary 323
modifiersSyntax
getRendererServices().modifiers
Description
Global 3D property; returns a list of modifiers available to models within 3D cast members.
Example
This statement returns the list of all currently available modifiers.
put getRendererServices().modifiers-- [#collision, #bonesPlayer, #keyFramePlayer, #toon, #lod, \#meshDeform, #sds, #inker]
See also
getRendererServices(), addModifier
motionSyntax
member(whichCastmember).motion(whichMotion)member(whichCastmember).motion[index]member(whichCastmember).motion.count
Description
3D command; returns the motion found within the referenced cast member that has the name specified by whichMotion, or is found at the index position specified by the index. As motion.count, this property returns the total number of motions found within the cast member.
Object name string comparisons are not case-sensitive. The index position of a particular motion may change when objects at lower index positions are deleted.
If no motion is found that uses the specified name or no motion is found at the specified index position then this command returns void.
Examples
thisMotion = member("3D World").motion("Wing Flap")thisMotion = member("3D World").motion[7]put member("scene").motion.count-- 2
See also
duration, map
Chapter 10324

multiply()Syntax
transform.multiply(transform2)
Description
3D command; applies the positional, rotational, and scaling effects of transform2 after the original transform.
Example
This statement applies the positional, rotational, and scaling effects of the model Mars’ transform to the transform of the model Pluto. This has a similar effect as making Mars be Pluto's parent for a frame.
member("scene").model("Pluto").transform.multiply(member("scene")\.model("Mars").transform)
nameSyntax
member(whichCastmember).texture(whichTexture).namemember(whichCastmember).shader(whichShader).namemember(whichCastmember).motion(whichMotion).namemember(whichCastmember).modelResource(whichModelResource).namemember(whichCastmember).model(whichModel).namemember(whichCastmember).light(whichLight).namemember(whichCastmember).camera(whichCamera).namemember(whichCastmember).group(whichGroup).namenode.name
Description
3D property; when used with an object reference, allows you to get the name of the referenced object. You can only get the name; the name can’t be changed.
All names must be unique. If created through Lingo, the name returned is the name given in the constructor function. If created through a 3D-authoring program the name returned may be the name of the model.
Examples
This statement sets the name of the fifth camera in the cast member TableScene to BirdCam.
member("TableScene").camera[5].name = "BirdCam"
3D Lingo Dictionary 325
near (fog)Syntax
member(whichCastmember).camera(whichCamera).fog.nearcameraReference.fog.nearmember(whichCastmember).camera(whichCamera).fog.farcameraReference.fog.far
Description
3D properties; this property allows you to get or set the distance from the front of the camera to the point where the fogging starts if fog.enabled is TRUE.
The default value for this property is 0.0.
Example
This statement sets the near property of the fog of the camera Defaultview to 100. If the fog’s enabled property is set to TRUE and its decayMode property is set to #linear, fog will first appear 100 world units in front of the camera.
member("3d world").camera("defaultview").fog.near = 100.0
See also
fog, far (fog), enabled (fog), decayMode
nearFilteringSyntax
member(whichCastmember).texture(whichTexture).nearFilteringmember(whichCastmember).shader(whichShader).\texture(whichTexture).nearFilteringmember(whichCastmember).model(whichModel).shader.texture\(whichTexture).nearFilteringmember(whichCastmember).model(whichModel).shaderList\[shaderListIndex].texture(whichTexture).nearFiltering
Description
3D texture property; allows you to get or set whether bilinear filtering is used when rendering a projected texture map that covers more screen space than the original texture source. Bilinear filtering smooths any errors across the texture and thus improves the texture’s appearance. Bilinear filtering smooths errors in two dimensions. Trilinear filtering smooths errors in three dimensions. Filtering improves appearance at the expense of performance, with bilinear being less performance-costly than trilinear.
When the property’s value is TRUE, bilinear filtering is used. When the value is FALSE, bilinear filtering is not used. The default is TRUE.
Example
This statement turns off bilinear filtering for the texture named gbTexture in the cast member Scene:
member("Scene").texture("gbTexture").nearFiltering = FALSE
Chapter 10326

neighborSyntax
member(whichCastmember).model(whichModel).meshdeform.mesh[index].\face[index].neighbor[index]
Description
3D command; meshDeform command that returns a list of lists describing the neighbors of a particular face of a mesh opposite the face corner specified by the neighbor index (1,2,3). If the list is empty, the face has no neighbors in that direction. If the list contains more than one list, the mesh is non-manifold. Usually the list contains a single list of four integer values: [meshIndex, faceIndex, vertexIndex, flipped].
The value meshIndex is the index of the mesh containing the neighbor face. The value faceIndex is the index of the neighbor face in that mesh. The value vertexIndex is the index of the nonshared vertices of the neighbor face. The value flipped describes whether the face orientation is the same as (1) or opposite (2) that of the original face.
See also
meshDeform (modifier)
newCameraSyntax
member(whichCastmember).newCamera(newCameraName)
Description
3D command; creates a new camera, newCameraName, within the cast member. The name specified for newCameraName must be unique within the cast member.
Example
This statement creates a new camera called in-car camera.
member("3D World").newCamera("in-car camera")
3D Lingo Dictionary 327

newGroupSyntax
member(whichCastmember).newGroup(newGroupName)
Description
3D command; creates a new group, newGroupName, and adds it to the group palette. You cannot have two groups in the palette with the same name.
Example
This statement creates a group called gbGroup2 within the cast member Scene, and a reference to it is stored in the variable ng.
ng = member("Scene").newGroup("gbGroup2")
newLightSyntax
member(whichCastmember).newLight(newLightName, #typeIndicator)
Description
3D command; creates a new light named, newLightName, with the type #typeIndicator, and adds it to the light palette. You can not have two lights in the palette with the same name.
The #typeIndicator parameter has the following possible values:
• #ambient is a generalized light in the 3D world.
• #directional is a light from a specific direction.
• #point is a light source like a light bulb.
• #spot is a spotlight effect.
Example
This statement creates a new light in the cast member named 3D World. It is an ambient light called "ambient room light".
member("3D World").newLight("ambient room light", #ambient)
Chapter 10328

newMeshSyntax
member(whichCastmember).newMesh(name,numFaces, numVertices,numNormals,numColors,numTextureCoordinates)
Description
3D command; creates a new mesh model resource using the arguments supplied. Note that after creating a mesh, you must set values for at least the vertexList and face[index].vertices properties of the new mesh, followed by a call to its build() command, in order to actually generate the geometry.
The parameters of newMesh are as follows:
• numFaces is the desired total number of triangles you want in the mesh.
• numVertices is the total number of vertices used by all the (triangular) faces. A vertex may be shared by more than one face.
• numNormals is the optional total number of normals. A normal may be shared by more than one face. The normal for a corner of a triangle defines which direction is outward, affecting how that corner is illuminated by lights. Enter 0 or omit this argument if you are going to use the mesh's generateNormals() command to generate normals.
• numColors is the optional total number of colors used by all the faces. A color may be shared by more than one face. You can specify a color for each corner of each face. Specify colors for smooth color gradation effects. Enter 0 or omit this argument to get default white color per face corner.
• numTextureCoordinates is the optional number of user-specified texture coordinates used by all the faces. Enter 0 or omit this argument to get the default texture coordinates generated via a planar mapping. (See the explanation of #planar in the shader.textureWrapMode entry for more details). Specify texturecoordinates when you need precise control over how textures are mapped onto the faces of the mesh.
Example
This example creates a model resource of the type #mesh, specifies its properties, and then creates a new model from the model resource. The process is outlined in the following line-by-line explanation of the example code:
Line 1 creates a mesh containing 6 faces, composed of 5 unique vertices and 3 unique colors. The number of normals and the number of textureCoordinates are not set. The normals will be created by the generateNormals command.
Line 2 defines the five unique vertices used by the faces of the mesh.
Line 3 defines the three unique colors used by the faces of the mesh.
3D Lingo Dictionary 329

Lines 4 through 9 assign which vertices to use as the corners of each face in the Pyramid. Note the clockwise ordering of the vertices. GenerateNormals() relies on a clockwise ordering.
Lines 10 through 15 assign colors to the corners of each face. The colors will spread across the faces in gradients.
Line 16 creates the normals of Triangle by calling the generateNormals() command.
Line 17 calls the build command to construct the mesh.
nm = member("Shapes").newMesh("pyramid",6 , 5, 0, 3)nm.vertexList = [ vector(0,0,0), vector(40,0,0), \vector(40,0,40), vector(0,0,40), vector(20,50,20) ]nm.colorList = [ rgb(255,0,0), rgb(0,255,0), rgb(0,0,255) ] nm.face[1].vertices = [ 4,1,2 ] nm.face[2].vertices = [ 4,2,3 ] nm.face[3].vertices = [ 5,2,1 ] nm.face[4].vertices = [ 5,3,2 ] nm.face[5].vertices = [ 5,4,3 ] nm.face[6].vertices = [ 5,1,4 ] nm.face[1].colors = [3,2,3] nm.face[2].colors = [3,3,2] nm.face[3].colors = [1,3,2] nm.face[4].colors = [1,2,3] nm.face[5].colors = [1,3,2] nm.face[6].colors = [1,2,3] nm.generateNormals(#flat)nm.build()nm = member("Shapes").newModel("Pyramid1", nm)
See also
newModelResource
Chapter 10330

newModelSyntax
member( whichCastmember ).newModel( newModelName \{, whichModelResource } )
Description
3D command; creates a new model in the referenced cast member. The newModelName must be unique, as the command fails if a model by that name already exists. All new models have their resource property set to void by default. You can use the optional second parameter to specify a model resource to create the model from.
Examples
This statement creates a model called New House within the cast member 3D World.
member("3D World").newModel("New House")
Alternatively, the model resource for the new model can be set with the optional whichModelResource parameter.
member("3D World").newModel("New House", member("3D \World").modelResource("bigBox"))
3D Lingo Dictionary 331
newModelResourceSyntax
member(whichCastmember).newModelResource(newModelResourceName \{ ,#type, #facing })
Description
3D command; creates a new model resource, of the given #type and #facing (if specified), and adds it to the model resource palette.
The #type parameter can be one of the following primitives:
#plane#box#sphere#cylinder#particle
If you do not choose to specify the #facing parameter and specify #box, #sphere, #particle or #cylinder for the #type parameter, only the front faces are generated, if you specify #plane, both the front and back faces are generated. Model resources of the type #plane have two meshes generated (one for each side), and consequently has two shaders in the shaderList.
The #facing parameter can be one of the following:
• #front
• #back
• #both
A facing of #both creates the double amount of meshes and consequently produces double the number of shader entries in the shaderList. There will be 2 for planes and spheres (for the inside and outside of the model respectively), 12 for cubes (6 on the outside, 6 on the inside), and 6 for cylinders (top, hull and bottom outside, and another set for the inside).
Chapter 10332

Examples
This handler creates a box. The first line of the handler creates a new model resource called box10. Its type is #box, and it is set to show only its back. The next three lines set the dimensions of box10 and the last line creates a new model which uses box10 as its model resource.
on makeBox nmr = member("3D").newModelResource("box10", #box, #back) nmr.height = 50 nmr.width = 50 nmr.length = 50 aa = member("3D").newModel("gb5", nmr)end
This statement creates a box-shaped model resource called hatbox4.
member("Shelf").newModelResource("hatbox4", #box)
See also
primitives
newMotion()Syntax
member(whichCastmember).newMotion(name)
Description
3D command; creates a new motion within the referenced cast member, and returns a reference to the new motion. A new motion can be used to combine several previously existing motions from the member’s motion list via the map() command. All motions within a referenced cast member must have a unique name.
Example
This Lingo creates a new motion in member 1 called runWithWave that is used to combine the run and wave motions from the member’s motion list:
runWithWave = member(1).newMotion("runWithWave")runWithWave.map("run", "pelvisBone")runWithWave.map("wave", "shoulderBone")
3D Lingo Dictionary 333

newShaderSyntax
member(whichCastmember).newShader(newShaderName, #shaderType)
Description
3D command; creates a new shader of the specified #shaderType within the referenced cast member’s shader list and returns a reference to the new shader. All shaders in the shader list must have a unique name. The #shaderType argument determines the style in which the shader is applied and the has the following possible values:
#standard shaders are photorealistic, and have the following properties: ambient, blend, blendConstant, blendConstantList, blendFunction, blendFunctionList, blendSource, blendSourceList, diffuse, diffuseLightMap, emissive, flat, glossMap, ilk, name, reflectionMap, renderStyle, shininess, specular (shader), specularLightMap, texture, textureMode, textureModeList, textureRepeat, textureRepeatList, textureTransform, textureTransformList, transparent, useDiffuseWithTexture, wrapTransform, and wrapTransformList.
#painter shaders are smoothed out, and have the appearance of a painting, and have the following properties in addition to all of the #standard properties: colorSteps, highlightPercentage, highlightStrength, name, shadowPercentage, shadowStrength, and style.
#engraver shaders are lined, and have the appearance of an engraving, and have the following properties in addition to all of the #standard properties: brightness, density, name, and rotation (engraver shader).
#newsprint shaders are in a simulated dot style, have the appearance of a newspaper reproduction, and have the following properties in addition to all of the #standard properties: brightness, density, name.
Each type of shader has a specific group of properties that can be used with that type of shader, in addition all shader types have access to the #standard shader properties. However, although you can assign any #standard shader property to a shader of another type, the property may not have a visual effect. This happens in cases where the #standard property, if applied, would override the nature of the shader type. An example of this is the diffuseLightMap standard shader property which is ignored by #engraver, #newsprint, and #painter type shaders.
Example
This statement creates a #painter shader called newPainter.
newPainter = member("3D World").newShader("newPainter",#painter)
See also
shader
Chapter 10334

newTextureSyntax
member(whichCastmember).newTexture(newTextureName \{,#typeIndicator, sourceObjectReference})
Description
3D command; creates a new texture within the referenced member’s texture palette and returns a reference to the new texture. All textures in the member’s texture palette must have a unique name. The #typeIndicator and sourceObjectReference parameters are optional, and if not specified a new texture with no type or source is created. The only way cast member textures will work is if you specify the cast member in the newTexture constructor.
The #typeIndicator parameter can have two values, #fromCastMember (a cast member) or #fromImageObject (a lingo image object). The sourceObjectReference parameter must be a cast member reference if you specify #fromCastMember, or must be a Lingo image object if you specify #fromImageObject.
Example
The first line of this statement creates a new texture called Grass 02 from castmember 5 of castlib 1. The second line creates a blank new texture called Blank.
member("3D World").newTexture("Grass \02",#fromCastMember,member(5,1))member("3D World").newTexture("Blank")
3D Lingo Dictionary 335

normalizeSyntax
normalize(vector)vector.normalize()
Description
3D command; normalizes a vector by dividing the x, y, and z components by the vector’s magnitude. Vectors that have been normalized always have a magnitude of 1.
Example
This statement shows the value of the vector MyVec before and after being normalized.
MyVec = vector(-209.9019, 1737.5126, 0.0000)MyVec.normalize()put MyVec-- vector(-0.1199, 0.9928, 0.0000)put MyVec.magnitude-- 1.0000
This statement shows the value of the vector ThisVector before and after being normalized.
ThisVector = vector(-50.0000, 0.0000, 0.0000)normalize(ThisVector)put ThisVector-- vector(-1.0000, 0.0000, 0.0000)
See also
getNormalized, randomVector, magnitude
normalListSyntax
member(whichCastmember).modelResource(whichModelResource).\normalListmodel.meshDeform.mesh[index].normalList
Description
3D property; when used with a model resource whose type is #mesh, this property allows you to get or set the normalList property of the model resource.
The normalList property is a linear list of vectors from which you may specify vertex normals when building the faces of your mesh.
This property must be set to a list of exactly the number of vectors specified in the newMesh call.
Alternately, the normalList property may be generated for you by the generateNormals() method of mesh model resources.
Chapter 10336

In the context of the meshDeform modifier, the normalList property is similarly a linear list of vectors from which you may specify vertex normals when deforming your mesh.
See the normals entry for more information on face normals and vertex normals.
Examples
put member(5,2).modelResource("mesh square").normalList-- [vector(0,0,1)]member(2).modelResource("mesh3").normalList[2] = vector\(205.0000, -300.0000, 27.0000)
See also
face, meshDeform (modifier)
normalsSyntax
member(whichCastmember).modelResource(whichModelResource).\face[index].normals
Syntax
3D face property; for model resources whose type is #mesh (created using the newMesh command) this property allows you to get and set the list of normal vectors used by the face specified by the index parameter.
Set this property to a linear list of integers corresponding to the index position of each vertex’s normal in the model resource’s normalList property.
This property must be set to the same length as the face[index].verticies list, or it can be an empty list [ ].
Do not set any value for this property if you are going to generate normal vectors using the generateNormals() command.
If you make changes to this property, or a use the generateNormals() command, you need to call the build() command in order to rebuild the mesh.
Example
This statement sets the normals property of the fifth face of the model resource named Player to a list of integer values.
member(“3D”).modelResource(“Player”).face[5].normals = [2,32,14]
See also
face, normalList, vertices
3D Lingo Dictionary 337
numParticlesSyntax
member(whichCastmember).modelResource(whichModelResource).\emitter.numParticlesmodelResourceObjectReference.emitter.numParticles
Description
3D property; when used with a model resource whose type is #particle, allows you to get or set the numParticles property of the resource’s particle emitter. The value must be greater than 0 and no more than 100000. The default setting is 1000.
Example
In this example, ThermoSystem is a model resource of the type #particle. This statement sets the number of particles in ThermoSystem to 50000.
member("Fires").modelResource("ThermoSystem").emitter.\numParticles = 50000
See also
emitter
numSegmentsSyntax
member(whichCastmember).modelResource(whichModelResource).\numSegments
Description
3D property; when used with a model resource whose type is #cylinder, allows you to get or set the numSegments property of the model resource.
The numSegments property determines the number of segments running from the top cap of the cylinder to the bottom cap. This property must be greater than or equal to the default value of 2.
The smoothness of the cylinder’s surface depends upon the value specified for this property. The greater the property value the smoother the cylinder’s surface will appear.
Example
This statement sets the numSegments property of the model resource named Cylinder03 to 10.
member("3D World").modelResource("Cylinder03").numSegments = 10
Chapter 10338

orthoHeightSyntax
member(whichCastmember).camera(whichCamera).orthoHeightmember(whichCastmember).camera[cameraindex].orthoHeightsprite(whichSprite).camera.orthoHeight
Description
3D property; when camera.projection is set to #orthographic, the value camera.orthoHeight gives the number of perpendicular world units that fit vertically in the sprite. World units are the measuring units for the particular 3D world. They are internally consistent but arbitrarily chosen, and they can vary from one 3D world to another.
Note that you don’t need to specify the camera index (whichCamera) to access the first camera of the sprite.
The default value of this property is 200.0
Example
This statement sets the orthoHeight of the camera of sprite 5 to 200. This means 200 world units will fit vertically within the sprite.
sprite(5).camera.orthoheight = 200.0
See also
projection
3D Lingo Dictionary 339

overlaySyntax
member(whichCastmember).camera(whichCamera).\overlay[overlayIndex].propertyNamemember(whichCastmember).camera(whichCamera).overlay.count
Description
3D camera property; allows both get and set access to the properties of overlays contained in the camera’s list of overlays to be displayed. When used as overlay.count this property returns the total number of overlays contained in the camera’s list of overlays to be displayed.
Overlays are textures displayed in front of all models appearing in a given camera’s view frustum. The overlays are drawn in the order that they appear in the camera’s overlay list, the first item in the list appears behind all other overlays and the last item in the list in front of all other overlays.
Each overlay in the camera’s list of overlays list has the following properties:
loc allows you to get or set the specific position of the overlay’s regPoint, relative to the camera rect’s upper left corner.
source allows you to get or set the texture to use as the source image for the overlay.
scale allows you to get or set the scale value used by the overlay. The scale determines the magnification of the overlay, this property defaults to a value of 1.0.
rotation allows you to get or set the rotation, in degrees, of the overlay.
regPoint allows you to get or set the registration point of the overlay relative to the texture’s upper left corner.
blend allows you to get or set the blending of the overlay to an integer between 0 and 100, indicating how transparent (0) or opaque (100) the overlay is.
Example
This statement displays the scale property of the third overlay in the sprite camera’s overlay list.
put sprite(5).camera.overlay[3].scale-- 0.5000
See also
addOverlay, removeOverlay, backdrop
Chapter 10340
parentSyntax
member(whichCastmember).model(whichModel).parentmember(whichCastmember).camera(whichCamera).parentmember(whichCastmember).light(whichLight).parentmember(whichCastmember).group(whichGroup).parent
Description
3D property; when used with a model, camera, light or group reference, this property allows you to get or set the parent node of the referenced object. The parent node can be any other model, camera, light or group object.
An object’s transform property defines its scale, position and orientation relative to its parent object.
Setting an object’s parent property to VOID is the same as removing the object from the world using the removeFromWorld() command.
Setting an object’s parent property to the World group object (group("World")) is the same as adding an object to the world using the addToWorld() command.
You can also alter the value of this property by using the addChild command.
Example
This statement sets the parent property of the model named Tire. Its parent is set to the model named Car.
member("Scene").model("Tire").parent = \member("Scene").model("Car")
See also
child, addChild
3D Lingo Dictionary 341

pathSyntax
member(whichCastmember).modelResource(whichModelResource).\emitter.path
Description
3D property; when used with a model resource whose type is #particle, allows you to get or set the path property of the resource’s particle emitter.
This property is a list of vectors that define the path particles follow over their lifetime. The default value of this property is an empty list [].
Example
In this example, ThermoSystem is a model resource of the type #particle. This statement specifies that the particles of ThermoSystem will follow the path outlined by the list of vectors.
member("Fires").modelResource("ThermoSystem").emitter.path = \[vector(0,0,0), vector(15,0,0), vector(30,30,-10)]
See also
pathStrength, emitter
pathStrengthSyntax
member(whichCastmember).modelResource(whichModelResource).\emitter.pathStrength
Description
3D property; when used with a model resource whose type is #particle,
determines how closely the particles follow the path specified by the path property of the emitter. Its range starts at 0.0 (no strength - so the particles won't be attracted to the path) and continues to infinity. Its default value is 0.1. Setting pathstrength to 0.0 is useful for turning the path off temporarily.
As the value of pathstrength gets larger, the entire particle system will get more and more stiff. Large pathstrength values will tend to make the particles bounce around very quickly, unless some dampening force is also used, such as the particle drag property.
This property can be tested and set.
Chapter 10342
Example
In this example, ThermoSystem is a model resource of the type #particle. This statement sets the pathStrength property of ThermoSystem to 0.97. If a path is outlined by ThermoSystem’s emitter.path property, the particles follow that path very closely.
member("Fires").modelResource("ThermoSystem").emitter.\pathStrength = 0.97
See also
path, emitter
pause()Syntax
member(whichCastmember).model(whichModel).bonesPlayer.pause()member(whichCastmember).model(whichModel).keyframePlayer.pause()
Description
3D #keyframePlayer and #bonesPlayer modifier command; halts the motion currently being executed by the model. Use the play() command to unpause the motion.
When a model’s motion has been paused by using this command, the model’s bonesPlayer.playing property will be set to FALSE.
Example
This statement pauses the current animation of the model named Ant3.
member("PicnicScene").model("Ant3").bonesplayer.pause()
See also
play(), playing, playlist
percentStreamedSyntax
member(whichCastMember).percentStreamed
Description
3D property; allows you to get the percentage of a 3D cast member that has been streamed. This property refers to either the initial file import or to the last file load requested. The value returned is an integer and has a range from 0 to 100. There is no default value for this property.
Example
This statement shows that the cast member PartyScene has finished loading.
put member("PartyScene").percentStreamed-- 100
3D Lingo Dictionary 343

perpendicularToSyntax
vector1.perpendicularTo(vector2)
Description
3D vector command; returns a vector perpendicular to both the original vector and a second vector (vector2). This command is equivalent to the vector crossProduct command. See crossProduct().
Example
In this example, pos1 is a vector on the x axis and pos2 is a vector on the y axis. The value returned by pos1.perpendicularTo(pos2) is vector( 0.0000, 0.0000, 1.00000e4 ). The last two lines of the example show the vector which is perpendicular to both pos1 and pos2.
pos1 = vector(100, 0, 0)pos2 = vector(0, 100, 0)put pos1.perpendicularTo(pos2)-- vector( 0.0000, 0.0000, 1.00000e4 )
See also
crossProduct(), cross
play()Syntax
member(whichCastmember).model(whichModel).bonesPlayer.play()member(whichCastmember).model(whichModel).keyframePlayer.play()member(whichCastmember).model(whichModel).bonesPlayer.\play(motionName {, looped, startTime, endTime, scale, offset})member(whichCastmember).model(whichModel).keyframePlayer.\play(motionName {, looped, startTime, endTime, scale, offset})
Description
3D #keyframePlayer and #bonesPlayer command; initiates or unpauses the execution of a motion.
When a model’s motion has been initiated or resumed by using this command, the model’s bonesPlayer.playing property will be set to TRUE.
Use play() with no parameters to resume the execution of a motion that has been paused with the pause() command.
When play() is called and only the motionName parameter is specified, the motion will be executed by the model once from beginning to end at the speed set by the modifier’s playRate property.
The optional parameters of the play command are as follows:
looped specifies whether the motion plays once (FALSE) or continuously (TRUE).
Chapter 10344

startTime is measured in milliseconds from the beginning of the motion. When looped is TRUE, the first iteration of the loop begins at offset and ends at endTime with all subsequent repetitions of the motion beginning at startTime and end at endTime.
endTime is measured in milliseconds from the beginning of the motion. When looped is FALSE, the motion begins at offset and ends at endTime. When looped is TRUE, the first iteration of the loop begins at offset and ends at endTime with all subsequent repetitions beginning at startTime and end at endTime. Set endTime to -1 if you want the motion to play to the end.
playRate is multiplied by the model’s #keyframePlayer or #bonesPlayer modifier’s playRate property to determine the actual speed of the motion’s playback.
offset is measured in milliseconds from the beginning of the motion. When looped is FALSE, the motion begins at offset and ends at endTime. When looped is TRUE, the first iteration of the loop begins at offset and ends at endTime with all subsequent repetitions beginning at startTime and end at cropEnd. You can alternately specify the offset parameter with a value of #synchronized in order to start the motion at the same relative position in its duration as the currently playing animation is through its own duration.
Using the play() command to initiate a motion inserts the motion at the beginning of the modifier’s playlist. If this interrupts playback of another motion, the interrupted motion remains in the playlist in the next position after the newly initiated motion. When the newly initiated motion ends (if it is non-looping) or if the playNext() command is issued, the interrupted motion will resume playback at the point where it was interrupted.
Example
This command causes the model named Walker to begin playback of the motion named Fall. After playing this motion, the model will resume playback of any previously playing motion.
sprite(1).member.model("Walker").bonesPlayer.play("Fall", 0, \0, -1, 1, 0)
This command causes the model named Walker to begin playback of the motion named Kick. If Walker is currently executing a motion, it is interrupted by Kick and a section of Kick will play in a continuous loop. The first iteration of the loop will begin 2000 milliseconds from the motion's beginning. All subsequent iterations of the loop will begin 1000 milliseconds from Kick’s beginning and will end 5000 milliseconds from Kick’s beginning. The rate of playback will be three times the playRate property of the model’s bonesPlayer modifier.
sprite(1).member.model("Walker").bonesPlayer.play("Kick", 1, \1000, 5000, 3, 2000)
See also
queue(), playNext(), playRate, playlist, pause(), removeLast(), playing
3D Lingo Dictionary 345

playingSyntax
member(whichCastmember).model(whichModel).keyframePlayer.playingmember(whichCastmember).model(whichModel).bonesPlayer.playing
Description
3D #keyframePlayer and #bonesPlayer modifier property; indicates whether the modifier’s animation playback engine is running (TRUE) or if it’s paused (FALSE).
This property can be tested but not set.
Example
This statement shows that the #keyframePlayer animation playback engine for the model named Alien3 is currently running.
put member("newaliens").model("Alien3").keyframePlayer.playing-- 1
See also
play(), pause(), playlist, queue()
playlistSyntax
member(whichCastmember).model(whichModel).keyframePlayer.playlistmember(whichCastmember).model(whichModel).bonesPlayer.playlist
Description
3D #keyframePlayer and #bonesPlayer modifier property; returns a linear list of property lists, each representing a motion queued for playback by the modifier.
Each property list will have the following properties:
• #name is the name of the motion to be played.
• #loop indicates whether the motion’s playback should be looped.
• #startTime is the time, in milliseconds at which playback of the animation should begin.
• #endTime is the time, in milliseconds at which playback of the animation ends or when the motion should be looped. A negative value indicates that the motion should be played to the end.
• #scale is rate of play for the motion that is to be multiplied by the modifier’s playRate property to determine the actual speed of the motion’s playback.
The playlist property can be tested but not set. Use the queue(), play(), playNext(), and removeLast() commands to manipulate it.
Chapter 10346
Example
This statement displays the currently queued motions for the model Stroller in the Message window. There are two currently queued motions: Walk and Jump.
put member("ParkScene").model("Stroller").bonesPlayer.playList-- [[#name: "Walk", #loop: 1, #startTime: 1500, #endTime: 16000, \#scale:1.0000, #offset: 0], [#name: "Jump", #loop: 1, \#startTime: 0, #endTime: 1200, #scale: 1.0000, #offset: 0]]
See also
play(), playNext(), removeLast(), queue()
playNext()Syntax
member(whichMember).model(whichModel).bonesPlayer.playNext()member(whichMember).model(whichModel).keyframePlayer.playNext()
Description
3D #keyframePlayer and #bonesPlayer modifier command; initiates playback of the next motion in the playlist of the model’s #keyframePlayer or #bonesPlayer modifier. The currently playing motion, which is the first entry in the playlist, is interrupted and removed from the playlist.
If motion blending is enabled, and there are two or more motions in the playlist, blending between the current motion and the next one in the playlist will begin when playNext() is called.
Example
This statement interrupts the motion currently being executed by model 1 and initiates playback of the next motion in the playlist.
member("scene").model[1].bonesPlayer.playnext()
See also
blend, playlist
3D Lingo Dictionary 347

playRateSyntax
member(whichCastmember).model(whichModel).bonesPlayer.playRatemember(whichCastmember).model(whichModel).keyframePlayer.playRate
Description
3D #keyframePlayer and #bonesPlayer modifier property; scale multiplier for the local time of motions being played. This property only partially determines the speed at which motions are executed by the model.
The playback of a motion by a model is the result of either a play() or queue() command. The scale parameter of the play() or queue() command is multiplied by the modifier’s playRate property, and the resulting value is the speed at which the particular motion will be played back.
Example
This statement sets the playRate property of the keyframePlayer modifier for the model named GreenAlien to 3.
member("newAliens").model("GreenAlien").keyframePlayer.playRate = 3
See also
play(), queue(), playlist, currentTime
pointAtSyntax
member(whichCastmember).model(whichModel).pointAt\(vectorPosition{, vectorUp})member(whichCastmember).camera(whichCamera).pointAt\(vectorPosition{, vectorUp})member(whichCastmember).light(whichLight).pointAt\(vectorPosition{, vectorUp})member(whichCastmember).group(whichGroup).pointAt\(vectorPosition{, vectorUp})
Description
3D command; rotates the referenced object so that its forward direction vector points at the world relative position specified by vectorPosition, then it rotates the referenced object to point it’s up direction vector in the direction hinted at by the world relative vector specified by vectorUp.
The optional parameter vectorUp is a world relative vector that hints at where the object’s up vector should point. If this parameter isn’t specified, then this command defaults to using the world’s y axis as the up hinting vector. If you attempt to point the object at a position such that the object’s forward vector is parallel to the world’s y axis, then the world’s x axis is used as the up hinting vector.
Chapter 10348

The direction at which you wish to point the object’s forward direction and the direction specified by vectorUp do not need to be perpendicular to each other being as this command only uses the vectorUp parameter as a hinting vector.
The object’s front and up direction vectors are defined by the object’s pointAtOrientation property.
Example
This example points three objects at the model named Mars: the camera named MarsCam, the light named BrightSpot, and the model named BigGun.
thisWorldPosn = member(“Scene”).model(“Mars”).worldPositionmember("Scene").camera("MarsCam").pointAt(thisWorldPosn)member("Scene").light("BrightSpot").pointAt(thisWorldPosn)member("Scene").model("BigGun").pointAt(thisWorldPosn, \vector(0,0,45))
See also
pointAtOrientation
pointAtOrientationSyntax
member(whichCastmember).model(whichModel).pointAtOrientationmember(whichCastmember).group(whichGroup).pointAtOrientationmember(whichCastmember).light(whichLight).pointAtOrientationmember(whichCastmember).camera(whichCamera).pointAtOrientation
Description
3D model, light, group and camera property; allows you to get or set how the referenced object responds to the pointAt command. This property is a linear list of two object-relative vectors, the first vector in the list defines which direction is considered the object’s front direction, the second defines which direction is considered the object’s up direction.
The object’s front and up directions do not need to be perpendicular to each other, but they should not be parallel to each other.
Example
This statement displays the object-relative front direction and up direction vectors of the model named bip01:
put member("scene").model("bip01").pointAtOrientation-- [vector(0.0000, 0.0000, 1.0000), vector(0.0000, 1.0000, 0.0000)]
See also
pointAt
3D Lingo Dictionary 349

pointOfContactSyntax
collisionData.pointOfContact
Description
3D collisionData property; returns a vector describing the point of contact in a collision between two models.
The collisionData object is sent as an argument with the #collideWith and #collideAny events to the handler specified in the registerForEvent, registerScript, and setCollisionCallback commands.
The #collideWith and #collideAny events are sent when a collision occurs between models to which collision modifiers have been added. The resolve property of the models’ modifiers must be set to TRUE.
This property can be tested but not set.
Example
This example has two parts. The first part is the first line of code, which registers the #explode handler for the #collideAny event. The second part is the #explode handler. When two models in the cast member MyScene collide, the #explode handler is called and the collisionData argument is sent to it. The first nine lines of the #explode handler create the model resource named SparkSource and set its properties. This model resource is a single burst of particles. The tenth line of the handler creates a model named SparksModel using the model resource named SparkSource. The last line of the handler sets the position of SparksModel to the position where the collision occurred. The overall effect is a burst of sparks caused by a collision.
member("MyScene").registerForEvent(#collideAny, #explode, 0)
on explode me, collisionData nmr = member("MyScene").newModelResource("SparkSource", #particle) nmr.emitter.mode = #burst nmr.emitter.loop = 0 nmr.emitter.minSpeed = 30 nmr.emitter.maxSpeed = 50 nmr.emitter.direction = vector(0, 0, 1) nmr.colorRange.start = rgb(0, 0, 255) nmr.colorRange.end = rgb(255, 0, 0) nmr.lifetime = 5000 nm = member("MyScene").newModel("SparksModel", nmr) nm.transform.position = collisionData.pointOfContactend
See also
modelA, modelB
Chapter 10350

position (transform)Syntax
member(whichCastmember).node(whichNode).transform.positionmember(whichCastmember).node(whichNode).getWorldTransform().\positiontransform.position
Description
3D property; allows you to get or set the positional component of a transform. A transform defines a scale, position and rotation within a given frame of reference. The default value of this property is vector(0,0,0).
A node can be a camera, group, light or model object. Setting the position of a node’s transform defines that object’s position within the transform’s frame of reference. Setting the position property of an object’s world relative transform using getWorldTransform().position defines the object’s position relative to the world origin. Setting the position property of an object’s parent relative transform using transform.position defines the object’s position relative to its parent node.
The worldPosition property of a model, light, camera or group object is a shortcut to the getWorldTransform().position version of this property for that object.
Examples
The following statement displays the parent-relative position of the model named Tire.
put member("scene").model("Tire").transform.position-- vector(-15.000, -2.5000, 20.0000)
The following statement displays the world-relative position of the model named Tire.
put member("scene").model("Tire").getWorldTransform().position-- vector(5.0000, -2.5000, -10.0000)
The following statements first store the world transform of the model named Tire in the variable tempTransform, then they display the position component of that transform.
tempTransform = member("scene").model("Tire").getWorldTransform()put tempTransform.position-- vector(5.0000, -2.5000, -10.0000)
See also
transform (property), getWorldTransform(), rotation (transform), scale (transform)
3D Lingo Dictionary 351

positionResetSyntax
member(whichCastmember).model(whichModel).bonesPlayer.\positionResetmember(whichCastmember).model(whichModel).keyframePlayer.\positionReset
Description
3D keyframePlayer and bonesPlayer modifier property; indicates whether the model returns to its starting position after the end of a motion (TRUE) or not (FALSE).
The default value for this property is TRUE.
Example
This statement prevents the model Monster from returning to its original position when it finishes the execution of a motion.
member("NewAlien").model("Monster").keyframePlayer.\positionReset = FALSE
See also
currentLoopState
preferred3DRendererSyntax
the preferred3DRenderer
Description
3D movie property; allows you to get or set the default renderer used to draw 3D sprites within a particular movie if that renderer is available on the client machine. If the specified renderer is not available on the client machine, the movie selects the most suitable available renderer.
The possible values for this property are as follows:
#openGL specifies the openGL drivers for a hardware acceleration that work with both Macintosh and Windows platforms.
#directX7_0 specifies the DirectX 7 drivers for hardware acceleration that work only with Windows platforms.
#directX5_2 specifies the DirectX 5.2 drivers for hardware acceleration that work only with Windows platforms.
#software specifies Director’s built-in software renderer that works with both Macintosh and Windows platforms.
#auto specifies that the most suitable renderer should be chosen. This is the default value for this property.
Chapter 10352
The value set for this property is used as the default for the Renderer Services object’s renderer property.
This property differs from the getRendererServices() object’s renderer property in that the preferred3dRenderer specifies the preferred renderer to use, whereas the getRendererServices() object’s renderer property indicates what renderer is actually being used by the movie.
Shockwave users have the option of specifying the renderer of their choice using the 3D Renderer context menu in Shockwave. If the user selects the “Obey content settings” option, the renderer specified by the renderer or preferred3DRenderer property is used to draw the movie (if available on the user’s system), otherwise, the renderer selected by the user is used.
Example
This statement allows the movie to pick the best 3D renderer available on the user’s system.
the preferred3dRenderer = #auto
See also
renderer, getRendererServices(), rendererDeviceList
preLoadSyntax
member(whichCastmember).preloadmemberReference.preload
Description
3D property; allows you to get or set whether data is preloaded before playing, or is streamed while playing. This property can be used only with linked files. The default value is FALSE.
Example
This statement sets the preload property of the cast member PartyScene to FALSE, which allows externally linked media to stream into PartyScene during playback.
ember("PartyScene").preload = FALSEmember("3D world").preload
3D Lingo Dictionary 353

preMultiplySyntax
transform1.preMultiply(transform2)
Description
3D transform command; alters transform1 by pre-applying the positional, rotational, and scaling effects of transform2.
If transform2 describes a rotation of 90˚ about the X axis and transform1 describes a translation of 100 units in the Y axis, transform1.multiply\(transform2) will alter this transform so that it describes a translation followed by a rotation. The statement transform1.preMultiply(transform2) will alter this transform so that it describes a rotation followed by a translation. The effect is that the order of operations is reversed.
Example
This statement performs a calculation that applies the transform of the model Mars to the transform of the model Pluto:
member("scene").model("Pluto").transform.preMultiply\(member("scene").model("Mars").transform)
Chapter 10354

preRotateSyntax
transformReference.preRotate( xAngle, yAngle, zAngle )transformReference.preRotate( vector )transformReference.preRotate( positionVector, directionVector, \angle )member( whichCastmember ).node.transform.preRotate( xAngle, \yAngle, zAngle )member( whichCastmember ).node.transform.preRotate( vector )member( whichCastmember ).node.transform.preRotate\( positionVector, directionVector, angle )
Description
3D transform command; applies a rotation before the current positional, rotational, and scale offsets held by the referenced transform object. The rotation may be specified as a set of three angles, each of which specify an angle of rotation about the three corresponding axes. These angles may be specified explicitly in the form of xAngle, yAngle, and zAngle, or by a vector, where the x component of the vector corresponds to the rotation about the x axis, the y about the y axis, and the z about the z axis.
Alternatively, the rotation may also be specified as a rotation about an arbitrary axis. This axis is defined in space by positionVector and directionVector. The amount of rotation about this axis is specified by angle.
Node may be a reference to a model, group, light, or camera
Example
This line performs a rotation of 20 degrees about each axis. Since the model's transform property is its position, rotation, and scale offsets relative to that model's parent, and preRotate applies the change in orientation prior to any existing effects of that model's transform, this will rotate the model in place rather than orbiting around its parent.
member("scene").model("bip01").transform.preRotate(20, 20, 20)
Note that the above is equivalent to:
member("scene").model("bip01").rotate(20,20,20).
Generally preRotate() is only useful when dealing with transform variables. This line will orbit the camera about the point (100, 0, 0) in space, around the y axis, by 180 degrees.
t = transform()t.position = member("scene").camera[1].transform.positiont.preRotate(vector(100, 0, 0), vector(0, 1, 0), 180) member("scene").camera[1].transform = t
See also
rotate
3D Lingo Dictionary 355
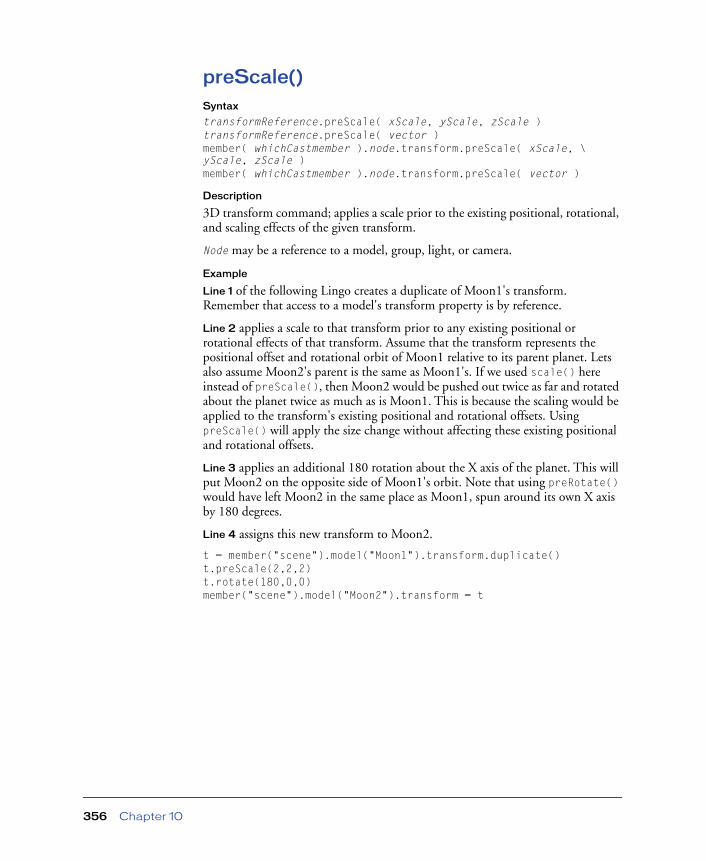
preScale()Syntax
transformReference.preScale( xScale, yScale, zScale )transformReference.preScale( vector )member( whichCastmember ).node.transform.preScale( xScale, \yScale, zScale )member( whichCastmember ).node.transform.preScale( vector )
Description
3D transform command; applies a scale prior to the existing positional, rotational, and scaling effects of the given transform.
Node may be a reference to a model, group, light, or camera.
Example
Line 1 of the following Lingo creates a duplicate of Moon1's transform. Remember that access to a model's transform property is by reference.
Line 2 applies a scale to that transform prior to any existing positional or rotational effects of that transform. Assume that the transform represents the positional offset and rotational orbit of Moon1 relative to its parent planet. Lets also assume Moon2's parent is the same as Moon1's. If we used scale() here instead of preScale(), then Moon2 would be pushed out twice as far and rotated about the planet twice as much as is Moon1. This is because the scaling would be applied to the transform's existing positional and rotational offsets. Using preScale() will apply the size change without affecting these existing positional and rotational offsets.
Line 3 applies an additional 180 rotation about the X axis of the planet. This will put Moon2 on the opposite side of Moon1's orbit. Note that using preRotate() would have left Moon2 in the same place as Moon1, spun around its own X axis by 180 degrees.
Line 4 assigns this new transform to Moon2.
t = member("scene").model("Moon1").transform.duplicate()t.preScale(2,2,2)t.rotate(180,0,0)member("scene").model("Moon2").transform = t
Chapter 10356

preTranslate()Syntax
transformReference.preTranslate( xIncrement, yIncrement, \zIncrement )transformReference.preTranslate( vector )member( whichCastmember ).node.transform.preTranslate\(xIncrement, yIncrement, zIncrement)member( whichCastmember ).node.transform.preTranslate( vector )
Description
3D transform command; applies a translation before the current positional, rotational, and scale offsets held by the referenced transform object. The translation may be specified as a set of three increments along the three corresponding axes. These increments may be specified explicitly in the form of xIncrement, yIncrement, and zIncrement, or by a vector, where the X component of the vector corresponds to the translation about the X axis, the Y about the Y axis, and the Z about the Z axis.
After a series of transformations are done, in the following order, the model’s local origin will be at (0, 0, -100), assuming the model’s parent is the world:
model.transform.identity()model.transform.rotate(0, 90, 0)model.transform.preTranslate(100, 0, 0)
Had translate() been used instead of preTranslate(), the model's local origin would be at (100, 0, 0) and the model rotated about its own Y axis by 90 degrees. Note that model.transform.pretranslate(x, y, z) is equivalent to model.translate(x, y, z). Generally, preTranslate() is only useful when dealing with transform variables rather than model.transform references.
Example
t = transform()t.transform.identity()t.transform.rotate(0, 90, 0)t.transform.preTranslate(100, 0, 0)gbModel = member("scene").model("mars")gbModel.transform = tput gbModel.transform.position-- vector(0.0000, 0.0000, -100.0000)
3D Lingo Dictionary 357

primitivesSyntax
getRendererServices().primitives
Description
3D function; returns a list of the primitive types that can be used to create new model resources.
Example
This statement display the available primitive types.
put getRendererServices().primitives-- [#sphere, #box, #cylinder, #plane, #particle]
See also
getRendererServices(), newModelResource
projectionSyntax
sprite(whichSprite).camera.projectioncamera(whichCamera).projectionmember(whichCastmember).camera(whichCamera).projection
Description
3D property; allows you to get or set the projection style of the camera. Possible values are #perspective (the default) and #orthographic.
When projection is #perspective, objects closer to the camera appear larger than objects farther from the camera, and the projectionAngle or fieldOfView properties specify the vertical projection angle (which determines how much of the world you see). The horizontal projection angle is determined by the aspect ratio of the camera's rect property.
When projection is #orthographic, the apparent size of objects does not depend on distance from the camera, and the orthoHeight property specifies how many world units fit vertically into the sprite (which determines how much of the world you see). The orthographic projection width is determined by the aspect ratio of the camera's rect property.
Example
This statement sets the projection property of the camera of sprite 5 to #orthographic.
sprite(5).camera.projection = #orthographic
See also
fieldOfView, orthoHeight, projectionAngle
Chapter 10358

projectionAngleSyntax
member(whichCastmember).camera(whichCamera).projectionAnglesprite(whichSprite).camera.projectionAnglecamera(whichCamera).projectionAngle
Description
3D camera property; allows you to get or set the vertical projection angle (or full viewing angle) of the camera’s view. The projectionAngle property is equivalent to the fieldOfView property. The default value for this property is 30.0. The maximum angle allowed is 180.0°.
Example
This statement sets the projectionAngle of camera 1 to 45˚.
member("baby_hires").camera[1].projectionAngle = 45
See also
fieldOfView
3D Lingo Dictionary 359

qualitySyntax
member(whichCastmember).texture(whichTexture).qualitymember(whichCastmember).shader(whichShader).texture\(whichTexture).qualitymember(whichCastmember).model(whichModel).shader.texture\(whichTexture).qualitymember( whichCastmember ).model( whichModel ).\shader.texturelist[TextureListIndex].qualitymember(whichCastmember).model(whichModel).shaderList\[shaderListIndex]. texture(whichTexture).qualitymember( whichCastmember ).model( whichModel ).shaderList\[ shaderListIndex ]. texturelist[ TextureListIndex ].quality
Description
3D texture property; lets you get or set the image quality of a texture by controlling the level of mipmapping applied to the texture. Mipmapping is a process by which additional versions of the texture image are created in several sizes that are smaller than the original image. The 3D Xtra then uses whichever version of the image is most appropriate to the current size of the model on the screen and changes the version of the image that is being used when needed. Trilinear mipmapping is higher in quality and uses more memory than bilinear mipmapping.
Mipmapping is not the same as filtering, although both improve texture appearance. Filtering spreads errors out across the texture’s area so that errors are less concentrated. Mipmapping resamples the image to make it the appropriate size.
This property can have the following values:
• #low is the same as off, and mipmapping is not used for the texture.
• #medium enables a low-quality (bilinear) mipmapping for the texture.
• #high enables a high-quality (trilinear) mipmapping for the texture.
The default is #low.
Example
This statement sets the quality property of the texture Marsmap to #medium.
member("scene").texture("Marsmap").quality = #medium
See also
nearFiltering
Chapter 10360

queue()Syntax
member(whichCastmember).model(whichModel).bonesPlayer.queue\(motionName {, looped, startTime, endTime, scale, offset})member(whichCastmember).model(whichModel).keyframePlayer.\queue(motionName {, looped, startTime, endTime, scale, offset})
Description
3D keyframePlayer and bonesPlayer modifier command; adds the motion specified by motionName to the end of the modifier’s playlist. The motion is executed by the model when all of the motions ahead of it in the playlist are finished playing.
The optional parameters of this command are as follows:
looped specifies whether the motion plays once (FALSE) or continuously (TRUE).
startTime is measured in milliseconds from the beginning of the motion. When looped is FALSE, the motion begins at offset and ends at endTime. When looped is TRUE, the first iteration of the loop begins at offset and ends at endTime. All subsequent repetitions begin at startTime and end at endTime.
endTime is measured in milliseconds from the beginning of the motion. When looped is FALSE, the motion begins at offset and ends at endTime. When looped is TRUE, the first iteration of the loop begins at offset and ends at endTime. All subsequent repetitions begin at cropStart and end at endTime. Set endTime to -1 if you want the motion to play to the end.
scale is multiplied by the playRate property of the model’s keyframePlayer modifier or bonesPlayer modifier to determine the actual speed of the motion’s playback.
offset is measured in milliseconds from the beginning of the motion. When looped is FALSE, the motion begins at offset and ends at endTime. When looped is TRUE, the first iteration of the loop begins at offset and ends at endTime. All subsequent repetitions begin at startTime and end at endTime.
Example
This command adds the motion named Fall to the end of the bonesPlayer playlist of the model named Walker. When all motions before Fall in the playlist have been executed, Fall will play one time from beginning to end.
sprite(1).member.model("Walker").bonesPlayer.queue\("Fall", 0, 0, -1, 1, 0)
3D Lingo Dictionary 361

This command adds the motion named Kick to the end of the bonesPlayer playlist of the model named Walker. When all motions before Kick in the playlist have been executed, a section of Kick will play in a continuous loop. The first iteration of the loop will begin 2000 milliseconds from the motion’s beginning. All subsequent iterations of the loop will begin 1000 milliseconds from Kick’s beginning and will end 5000 milliseconds from Kick’s beginning. The rate of playback will be three times the playRate property of the model’s bonesPlayer modifier.
sprite(1).member.model("Walker").bonesPlayer.queue("Kick", 1, \1000, 5000, 3, 2000)
See also
play(), playNext(), playRate
radiusSyntax
modelResourceObjectReference.radiusmember(whichCastmember).modelResource(whichModelResource).radius
Description
3D model property; when used with model resource of type #sphere or #cylinder, allows you to get or set the radius of the model.
The radius property determines the sweep radius used to generate the model resource. This property’s value must always be set to greater than 0.0, and has a default value of 25.0.
Example
This example shows that the radius of the model resource Sphere01 is 24.0.
put member("3D World").modelResource("Sphere01").radius-- 24.0
randomVectorSyntax
randomVector()
Description
3D command; returns a unit vector describing a randomly chosen point on the surface of a unit sphere. This method differs from vector( random(10)/10.0, random(10)/10.0, random(10)/10.0), in that the resulting vector is guaranteed to be a unit vector.
Chapter 10362

Examples
These statements create and display two randomly defined unit vectors in the Message window:
vec = randomVector()put vec-- vector(-0.1155, 0.9833, -0.1408)vec2 = randomVector()put vec2-- vector(0.0042, 0.8767, 0.4810)
See also
getNormalized, generateNormals(), normalize
rect Syntax
sprite(whichSprite).camera(whichCamera).rect
Description
3D camera property; allows you to get or set the rectangle that controls the size and position of the camera. This rectangle is analogous to the rectangle you see through the eyepiece of a real camera.
The default value for the rect property for all cameras rect(0,0,1,1) which makes them invisible until you change the setting. However, when sprite.camera(1) is rendered, its rect is reset to rect(0, 0, sprite(whichSprite).width, sprite(whichSprite).height) so that the camera fills the screen. All camera rect coordinates are given relative to the top left corner of the sprite.
Note that if whichCamera is greater than 1, the rect is not scaled when the sprite is scaled, so it will be necessary to manage that in Lingo if desired.
When whichCamera is greater than 1, the rect.top and rect.left properties must be greater than or equal to the rect.top and rect.left settings for sprite.camera(1).
Example
This statement sets the rect of the default camera of sprite 5 to rect(0, 0, 200, 550):
sprite(5).camera.rect = rect(0, 0, 200, 550)
See also
cameraPosition, cameraRotation
3D Lingo Dictionary 363

reflectionMapSyntax
member(whichCastmember).shader(whichShader).reflectionMap
Description
3D shader property; allows you to get and set the texture used to create reflections on the surface of a model. This texture is applied to the third texture layer of the shader. This property is ignored if the toon modifier is applied to the model resource.
This helper property provides a simple interface for setting up a common use of reflection mapping. The same effect can be achieved by setting the following properties:
shader.textureModeList[3] = #reflectionshader.blendFunctionList[3] = #blendshader.blendSourceList[3] = #constantshader.blendConstantList[3] = 50.0
When tested, this property returns the texture associated with the model’s third texture layer. The default is void.
Example
This statement causes the model named GlassSphere to appear to reflect the texture named Portrait off of its surface.
member("3DPlanet").model("GlassSphere").shader.reflectionMap = \member("3DPlanet").texture("Portrait")
See also
textureModeList, blendFunctionList, blendConstantList
reflectivitySyntax
member(whichCastmember).reflectivity
Description
3D shader property; allows you to get or set the shininess of the referenced member’s default shader. The value is a floating point value representing the percentage of light to be reflected off the surface of a model using the default shader, from 0.0 to 100.00. The default value is 0.0.
Example
This statement sets the shininess of the default shader in the cast member named Scene to 50%:
member("Scene").reflectivity = 50
Chapter 10364

region Syntax
member(whichCastmember).modelResource(whichModelResource).\emitter.regionmodelResourceObjectReference.emitter.region
Description
3D emitter property; when used with a model resource whose type is #particle, allows you to both get and set the region property of the resource’s particle emitter.
The region property defines the location from which particles are emitted. If its value is a single vector, then that vector is used to define a point in the 3D world from which particles will be emitted.
If its value is a list of two vectors, then those vectors are used to define the end points of a line segment from which particles will be emitted.
If its value is a list of four vectors, then those vectors are used to define the vertices of a quadrilateral from which the particles will be emitted.
The default value for this property is [vector(0,0,0)].
Example
In this example, ThermoSystem is a model resource of the type #particle. This statement specifies the four corners of a rectangle from which the particles of ThermoSystem originate.
member("Fires").modelResource("ThermoSystem").emitter.region = \[vector(20,90,100), vector(30,90,100), vector(30,100,100), \vector(20,100,100)]
See also
emitter
3D Lingo Dictionary 365

registerForEvent()Syntax
member(whichCastmember).registerForEvent(eventName, \handlerName, scriptObject {, begin, period, repetitions})
Description
3D command; declares the specified handler as the handler to be called when the specified event occurs within the specified cast member.
The following parameter descriptions apply to both the registerForEvent() and the registerScript() commands.
The handlerName parameter is the name of the handler that will be called; this handler is found in the script object indicated by scriptObject.
If 0 is specified for scriptObject, then the first event handler with the given name found in a movie script is called.
The eventName parameter can be any of the following predefined Lingo events, or any custom event that you define:
• #collideAny is a collision event.
• #collideWith is a collision event involving this specific model. The setCollisionCallback() command is a shortcut for using the registerScript() command for the #collideWith event.
• #animationStarted and #animationEnded are notification events that occur when a bones or keyframe animation starts or stops playing. The handler will receive three arguments: eventName, motion, and time. The eventName argument is either #animationStarted or #animationEnded. The motion argument is the name of the motion that has started or stopped playing, and time is the current time of the motion.
For looping animations, the #animationStarted event is issued only for the first loop, not for subsequent loops. During a blend of two animations, this event will be sent when the blending begins.
When a series of animations is queued for the model and the animation’s autoBlend property is set to TRUE, the #animationEnded event may occur before the apparent end of a given motion. This is because the autoBlend property may make the motion appear to continue even though the animation has completed as defined.
Chapter 10366

• #timeMS is a time event. The first #timeMS event occurs when the number of milliseconds specified in the begin parameter have elapsed after registerForEvent is called. The period parameter determines the number of milliseconds between #timeMS events when the value of repetitions is greater then 0. If repetitions is 0, the #timeMS event occurs indefinitely.
The handler you specify is sent the following arguments:
type is always 0.
delta is the elapsed time in milliseconds since the last #timeMS event.
time is the number of milliseconds since the first #timeMS event occurred. For example, if there are three iterations with a period of 500 ms, the first iteration’s time will be 0, the second iteration will be 500, and the third will be 1000.
duration is the total number of milliseconds that will elapse between the registerForEvent call and the last #timeMS event. For example, if there are five iterations with a period of 500 ms, the duration is 2500 ms. For tasks with unlimited iterations, the duration is 0.
systemTime is the absolute time in milliseconds since the Director movie started.
Note: You can associate the registration of a script with a particular node rather than a cast member by using the registerScript() command.
Examples
This statement registers the promptUser event handler found in a movie script to be called twice at an interval of 5 seconds:
member("Scene").registerForEvent(#timeMS, #promptUser, 0, \5000, 5000, 2)
This statement registers the promptUser event handler found in a movie script to be called each time a collision occurs within the cast member named Scene:
member("Scene").registerForEvent(#collideAny, #promptUser, 0)
This statement declares the on promptUser handler in the same script that contains the registerForEvent command to be called when any object collides with the model named Pluto in the cast member named Scene:
member("Scene").registerForEvent(#collideWith, #promptUser, me, \member("Scene").model("Pluto"))
See also
setCollisionCallback(), registerScript(), play(), playNext(), autoblend, blendTime, sendEvent
3D Lingo Dictionary 367
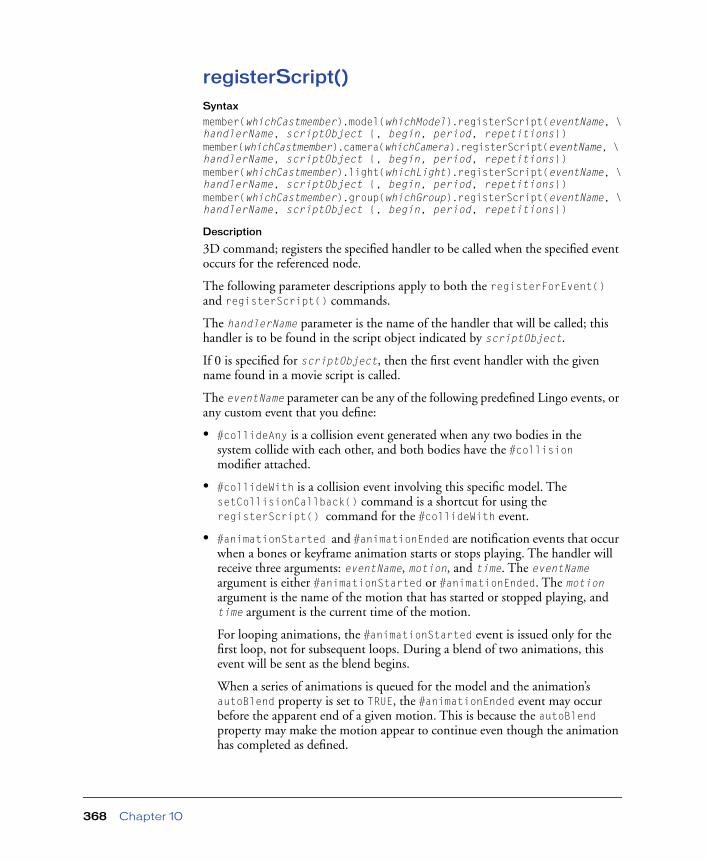
registerScript()Syntax
member(whichCastmember).model(whichModel).registerScript(eventName, \handlerName, scriptObject {, begin, period, repetitions})member(whichCastmember).camera(whichCamera).registerScript(eventName, \handlerName, scriptObject {, begin, period, repetitions})member(whichCastmember).light(whichLight).registerScript(eventName, \handlerName, scriptObject {, begin, period, repetitions})member(whichCastmember).group(whichGroup).registerScript(eventName, \handlerName, scriptObject {, begin, period, repetitions})
Description
3D command; registers the specified handler to be called when the specified event occurs for the referenced node.
The following parameter descriptions apply to both the registerForEvent() and registerScript() commands.
The handlerName parameter is the name of the handler that will be called; this handler is to be found in the script object indicated by scriptObject.
If 0 is specified for scriptObject, then the first event handler with the given name found in a movie script is called.
The eventName parameter can be any of the following predefined Lingo events, or any custom event that you define:
• #collideAny is a collision event generated when any two bodies in the system collide with each other, and both bodies have the #collision modifier attached.
• #collideWith is a collision event involving this specific model. The setCollisionCallback() command is a shortcut for using the registerScript() command for the #collideWith event.
• #animationStarted and #animationEnded are notification events that occur when a bones or keyframe animation starts or stops playing. The handler will receive three arguments: eventName, motion, and time. The eventName argument is either #animationStarted or #animationEnded. The motion argument is the name of the motion that has started or stopped playing, and time argument is the current time of the motion.
For looping animations, the #animationStarted event is issued only for the first loop, not for subsequent loops. During a blend of two animations, this event will be sent as the blend begins.
When a series of animations is queued for the model and the animation’s autoBlend property is set to TRUE, the #animationEnded event may occur before the apparent end of a given motion. This is because the autoBlend property may make the motion appear to continue even though the animation has completed as defined.
Chapter 10368

• #timeMS is a time event. The first #timeMS event occurs when the number of milliseconds specified in the begin parameter have elapsed after registerForEvent is called. The period parameter determines the number of milliseconds between #timeMS events when the value of repetitions is greater then 0. If repetitions is 0, the #timeMS event occurs indefinitely.
The handler you specify is sent the following arguments:
type is always 0.
delta is the elapsed time in milliseconds since the last #timeMS event.
time is the number of milliseconds since the first #timeMS event. For example, if there are three iterations with a period of 500 ms, the first iteration’s time will be 0, the second iteration will be 500, and the third will be 1000.
duration is the total number of milliseconds that will elapse between the registerForEvent call and the last #timeMS event. For example, if there are five iterations with a period of 500 ms, the duration is 2500 ms. For tasks with unlimited iterations, the duration is 0.
systemTime is the absolute time in milliseconds since the Director movie started.
Examples
This statement registers the messageReceived event handler found in a movie script to be called when the model named Player receives the custom user defined event named #message:
member("Scene").model("Player").registerScript(#message, \#messageReceived, 0)
This statement registers the collisionResponder event handler found in the same script as the registerScript command to be called each time a collision occurs between the model named Player and any other model using the #collision modifier:
member("Scene").model("Player").registerScript(#collideWith, \#collisionResponder, me)
See also
registerForEvent(), sendEvent, setCollisionCallback(), collisionData
3D Lingo Dictionary 369
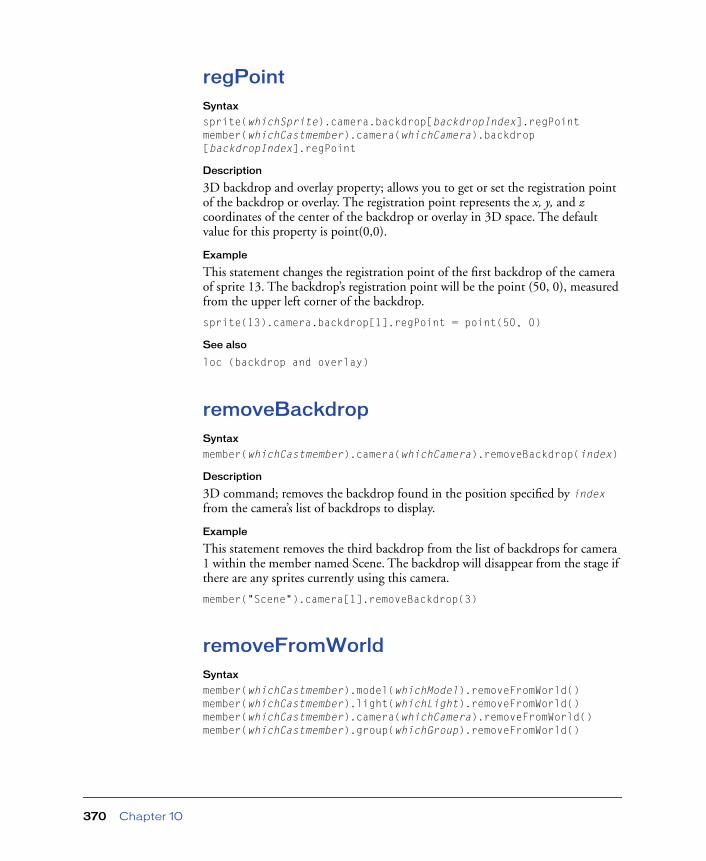
regPoint Syntax
sprite(whichSprite).camera.backdrop[backdropIndex].regPointmember(whichCastmember).camera(whichCamera).backdrop[backdropIndex].regPoint
Description
3D backdrop and overlay property; allows you to get or set the registration point of the backdrop or overlay. The registration point represents the x, y, and z coordinates of the center of the backdrop or overlay in 3D space. The default value for this property is point(0,0).
Example
This statement changes the registration point of the first backdrop of the camera of sprite 13. The backdrop’s registration point will be the point (50, 0), measured from the upper left corner of the backdrop.
sprite(13).camera.backdrop[1].regPoint = point(50, 0)
See also
loc (backdrop and overlay)
removeBackdropSyntax
member(whichCastmember).camera(whichCamera).removeBackdrop(index)
Description
3D command; removes the backdrop found in the position specified by index from the camera’s list of backdrops to display.
Example
This statement removes the third backdrop from the list of backdrops for camera 1 within the member named Scene. The backdrop will disappear from the stage if there are any sprites currently using this camera.
member("Scene").camera[1].removeBackdrop(3)
removeFromWorldSyntax
member(whichCastmember).model(whichModel).removeFromWorld()member(whichCastmember).light(whichLight).removeFromWorld()member(whichCastmember).camera(whichCamera).removeFromWorld()member(whichCastmember).group(whichGroup).removeFromWorld()
Chapter 10370

Description
3D command; for models, lights, cameras or groups whose parent hierarchy terminates in the world object, this command sets their parent to void and removes them from the world.
For objects whose parent hierarchy does not terminate in the world, this command does nothing.
Example
This command removes the model named gbCyl from the 3D world of the cast member named Scene.
member("Scene").model("gbCyl").removeFromWorld()
removeLast()member(whichCastmember).model(whichModel).bonesPlayer.removeLast()member(whichCastmember).model(whichModel).keyframePlayer.\removeLast()
Description
3D keyframePlayer and bonesPlayer modifier command; removes the last motion from the modifier’s playlist.
Example
This statement removes the last motion from the playlist of the bonesPlayer modifier for the model named Walker.
member("MyWorld").model("Walker").bonesPlayer.removelast()
removeModifierSyntax
member(whichCastmember).model(whichModel).removeModifier.\(#whichModifier)
Description
3D command; removes the modifier identified by #whichModifier from the specified model.
This command returns TRUE if it completes successfully, and FALSE if #whichModifier is not a valid modifier, or if the modifier was not attached to the model.
Example
This statement removes the #toon modifier from the model named Box.
member("shapes").model("Box").removeModifier(#toon)
3D Lingo Dictionary 371

removeOverlaySyntax
member(whichCastmember).camera(whichCamera).removeOverlay(index)
Description
3D command; removes the overlay found in the position specified by index from the camera’s list of overlays to display.
Example
This statement removes the third overlay from the list of overlays for the camera being used by sprite 5. The overlay will disappear from the stage.
sprite(5).camera.removeOverlay[1]
See also
overlay
rendererSyntax
getRendererServices().renderer
Description
3D property; allows you to get or set the current renderer in use by a movie. The range of values for this property is determined by the list of available renderers returned by the Renderer Services object’s rendererDeviceList property.
Shockwave users have the option of specifying the renderer of their choice using the 3D Renderer context menu in Shockwave. If the user selects the “Obey content settings” option, the renderer specified by the renderer or preferred3DRenderer properties is used to draw the movie (if available on the users system), otherwise the renderer selected by the user is used.
The default value for this property is determined by the preferred3DRenderer property.
This property returns the same value as returned by the movie property the active3dRenderer.
Example
This statement shows that the renderer currently being used by the user's system is #openGL.
put getRendererServices().renderer-- #openGL
See also
getRendererServices(), preferred3DRenderer, rendererDeviceList, active3dRenderer
Chapter 10372

rendererDeviceListSyntax
getRendererServices().rendererDeviceList
Description
3D renderer property; returns a list of symbols identifying the renderers that are available for use on the client machine. The contents of this list determine the range of values that can be specified for the renderer and preferred3DRenderer properties. This property can be tested but not set.
This property is a list that can contain the following possible values:
• #openGL specifies the openGL drivers for a hardware acceleration which work with both Macintosh and Windows platforms.
• #directX7_0 specifies the DirectX 7 drivers for hardware acceleration which work with Windows platforms only.
• #directX5_2 specifies the DirectX 5.2 drivers for hardware acceleration which work with Windows platforms only.
• #software specifies Director’s built-in software renderer which works with both Macintosh and Windows platforms.
Example
This statement shows the renderers available on the current system.
put getRendererServices().rendererDeviceList-- [#openGL, #software]
See also
getRendererServices(), renderer, preferred3DRenderer, active3dRenderer
3D Lingo Dictionary 373
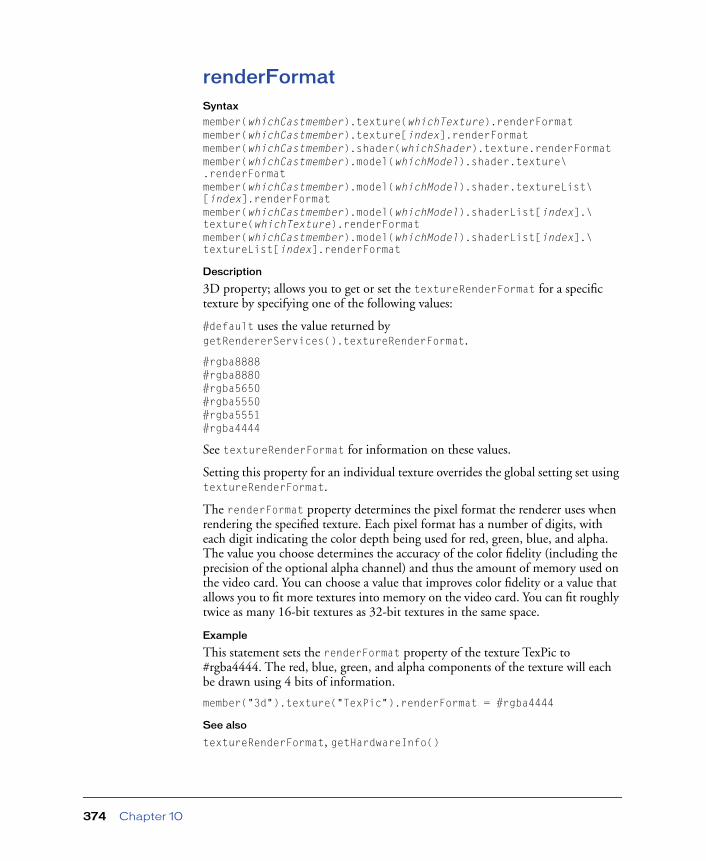
renderFormatSyntax
member(whichCastmember).texture(whichTexture).renderFormat member(whichCastmember).texture[index].renderFormatmember(whichCastmember).shader(whichShader).texture.renderFormat member(whichCastmember).model(whichModel).shader.texture\.renderFormatmember(whichCastmember).model(whichModel).shader.textureList\[index].renderFormat member(whichCastmember).model(whichModel).shaderList[index].\texture(whichTexture).renderFormat member(whichCastmember).model(whichModel).shaderList[index].\textureList[index].renderFormat
Description
3D property; allows you to get or set the textureRenderFormat for a specific texture by specifying one of the following values:
#default uses the value returned by getRendererServices().textureRenderFormat.
#rgba8888#rgba8880 #rgba5650 #rgba5550#rgba5551#rgba4444
See textureRenderFormat for information on these values.
Setting this property for an individual texture overrides the global setting set using textureRenderFormat.
The renderFormat property determines the pixel format the renderer uses when rendering the specified texture. Each pixel format has a number of digits, with each digit indicating the color depth being used for red, green, blue, and alpha. The value you choose determines the accuracy of the color fidelity (including the precision of the optional alpha channel) and thus the amount of memory used on the video card. You can choose a value that improves color fidelity or a value that allows you to fit more textures into memory on the video card. You can fit roughly twice as many 16-bit textures as 32-bit textures in the same space.
Example
This statement sets the renderFormat property of the texture TexPic to #rgba4444. The red, blue, green, and alpha components of the texture will each be drawn using 4 bits of information.
member("3d").texture("TexPic").renderFormat = #rgba4444
See also
textureRenderFormat, getHardwareInfo()
Chapter 10374

renderStyleSyntax
member(whichCastmember).shader(whichShader).renderStyle
Description
3D standard shader property; allows you to get or set the renderStyle for a shader, as determined by the geometry of the underlying model resource. This property has the following values:
#fill specifies that the shader is drawn to completely fill the surface area of the model resource.
#wire specifies that the shader is drawn only on the edges of the faces of the model resource.
#point specifies that the shader is drawn only on the vertices of the model resource.
All shaders have access to the #standard shader properties; in addition to these standard shader properties shaders of the types #engraver, #newsprint, and #painter have properties unique to their type. See the newShader for more information.
Example
This statement causes the shader WallMaterial to be rendered only where it lies on top of a vertex of the underlying model resource.
member("CityScene").shader("WallMaterial").renderStyle = #point
3D Lingo Dictionary 375

resetWorldSyntax
member(whichCastmember).resetWorld()member(whichTextCastmember).resetWorld()
Description
3D command; resets the member’s properties of the referenced 3D cast member to the values stored when the member was first loaded into memory. The member’s state property must be either 0 (unloaded), 4 (media loaded), or -1 (error) before this command can be used, otherwise a script error will occur.
This command differs from revertToWorldDefaults in that the values used are taken from the state of the member when it was first loaded into memory rather than from the state of the member when it was first created.
Example
This statement resets the properties of the cast member named Scene to the values they had when the member was first loaded into memory.
member("Scene").resetWorld()
See also
revertToWorldDefaults
resolutionSyntax
member(whichCastmember).modelResource(whichModelResource).resolution
Description
3D property; allows you to get or set the resolution property of a model resource whose type is either #sphere or #cylinder.
Resolution controls the number of polygons used to generate the geometry of the model resource. A larger value generates more polygons and thus results in a smoother surface. The default value of this property is 20.
Example
This statement sets the resolution of the model resource named sphere01 to 10.0.
member("3D World").modelResource("sphere01").resolution = 10.0
Chapter 10376

resolveSyntax
member(whichCastmember).model(whichModel).collision.resolve
Description
3D collision property; allows you to get or set whether collisions are resolved when two models collide. If this property is set to TRUE for both models involved in a collision, both models come to a stop at the point of collision. If only one of the models has the resolve property set to TRUE, that model comes to a stop, and the model with the property not set, or set to FALSE, continues to move. The default value for this property is TRUE.
Example
This statement sets the resolve property of the collision modifier applied to the model named Box to TRUE. When the model named Box collides with another model that has the #collision modifier attached, it will stop moving.
member("3d world").model("Box").collision.resolve = TRUE
See also
collisionData, collisionNormal, modelA, modelB, pointOfContact
resolveASyntax
collisionData.resolveA(bResolve)
Description
3D collision method; overrides the collision behavior set by the collision.reslove property for collisionData.modelA. If bResolve is TRUE, then the collision for the modelA is resolved, if bResolve is FALSE the collision for modelA is not resolved. Call this function only if you wish to override the behavior set for modelA using collision.resolve.
See also
collisionData, registerScript(), resolve, modelA, setCollisionCallback()
3D Lingo Dictionary 377

resolveBSyntax
collisionData.resolveB(bResolve)
Description
3D collision method; overrides the collision behavior set by the collision.resolve property for collisionData.modelB. If bResolve is TRUE, then the collision for modelB is resolved, if bResolve is FALSE the collision for the modelB is not resolved. Call this function only if you wish to override the behavior set for modelB using collision.resolve.
See also
collisionData, resolve, registerScript(), modelB, setCollisionCallback()
resourceSyntax
member(whichCastmember).model(whichModel).resource
Description
3D property; allows you to get or set the resource property that defines the geometry of the referenced model resource. This property also allows access to the referenced model’s resource object and its associated properties.
Example
This statement sets the model resource used by the model named NewBox. It will now have the same geometry as the model named box.
member("3d World").model("NewBox").resource = member\("3d World").model("box").resource
This statement displays the resolution property of the model resource used by the model named Cylinder.
put member("3d World").model("Cylinger").resource.resolution-- 20
Chapter 10378

revertToWorldDefaultsSyntax
member(whichCastmember).revertToWorldDefaults()
Description
3D command; reverts the properties of the specified 3D cast member to the values stored when the member was first created. The member’s state property must be 4 (loaded) or -1 (error) before this command can be used, otherwise a script error will occur.
This command differs from resetWorld in that the values used are taken from the state of the member when it was first created rather than from the state of the member when it was first loaded into memory.
Example
This statement reverts the properties of the cast member named Scene to the values stored when the member was first created.
member("Scene").revertToWorldDefaults()
See also
resetWorld
rightSyntax
member(whichCastmember).modelResource(whichModelResource).rightmodelResourceObjectReference.right
Description
3D property; allows you to get or set the right property of a model resource whose type is #box.
The right property determines whether the right of the box is sealed (TRUE) or open (FALSE). The default value is TRUE.
Example
This statement sets the right property of the model resource Crate to TRUE, meaning the right side of this box will be closed.
member("3D World").modelResource("crate").right = TRUE
See also
bottom, left, top
3D Lingo Dictionary 379

rootLockSyntax
member(whichCastmember).model(whichModel).keyframePlayer.rootLockmember(whichCastmember).model(whichModel).bonesPlayer.rootLock
Description
3D #keyframePlayer and #bonesPlayer modifier property; indicates whether the translational components of a motion are used (FALSE) or ignored (TRUE).
The default value of this property is FALSE.
Example
This statement forces the model named Alien3 to remain at its starting position while executing its motions, resulting in a character that will walk in place.
member("newalien").model("Alien3").keyframePlayer.rootLock = 1
rootNodeSyntax
member(whichCastmember).camera(whichCamera).rootNodesprite(whichSprite).camera.rootNode
Description
3D property; allows you to get or set which objects are visible within a sprite. When a camera is first created, it shows all nodes within the world. The rootNode property allows you to modify this by creating a different default view that limits what’s shown to a particular node and its children.
For example, light C is a child of model A., if you set the rootNode property to camera("defaultView").rootNode=model(A), the sprite will show only model A as illuminated by light C. The default is group("world"), meaning that all nodes are used.
Example
This statement sets the rootNode of the camera of sprite 5 to the model Pluto. Only Pluto and its children will be visible in sprite 5.
sprite(5).camera.rootNode = member("Scene").model("Pluto")
Chapter 10380

rotateSyntax
member(whichCastmember).node(whichNode).rotate(xAngle, yAngle, \zAngle {, relativeTo})member(whichCastmember).node(whichNode).rotate(rotationVector \{, relativeTo})member(whichCastmember).node(whichNode).rotate(position, axis, \angle {, relativeTo})transform.rotate(xAngle, yAngle, zAngle {, relativeTo})transform.rotate(rotationVector {, relativeTo})transform.rotate(position, axis, angle {, relativeTo})
Description
3D command; applies a rotation after the current positional, rotational, and scale offsets held by the node’s transform object or the directly referenced transform object. The rotation must be specified as a set of three angles, each of which specify an angle of rotation about the three corresponding axes. These angles may be specified explicitly in the form of xAngle, yAngle, and zAngle, or by a rotationVector, where the x component of the vector corresponds to the rotation about the X axis, y about Y axis, and z about Z axis. Alternatively, the rotation may also be specified as a rotation about an arbitrary axis passing through a point in space. This axis is defined in space by position, representing a position in space and axis, representing an axis passing through the specified position in space. The amount of rotation about this axis is specified by angle.
The optional relativeTo parameter determines which coordinate system axes are used to apply the desired rotational changes. The relativeTo parameter can have any of the following values:
• #self applies the increments relative to the node’s local coordinate system (the X, Y and Z axes specified for the model during authoring). This value is used as the default if you use the rotate command with a node reference and the relativeTo parameter is not specified.
• #parent applies the increments relative to the node’s parent’s coordinate system. This value is used as the default if you use the rotate command with a transform reference and the relativeTo parameter is not specified.
• #world applies the increments relative to the world coordinate system. If a model’s parent is the world, than this is equivalent to using #parent.
• nodeReference allows you to specify a node to base your rotation upon, the command applies the increments relative to the coordinate system of the specified node.
3D Lingo Dictionary 381

Examples
This example first rotates the model named Moon about its own Z axis (rotating it in place), then it rotates that same model about its parent node, the model named Earth (causing Moon to move orbitally about Earth).
member("Scene").model("Moon").rotate(0,0,15)member("Scene").model("Moon").rotate(vector(0, 0, 5), member("Scene").model("Moon"))
This example rotates the model Ball around a position in space occupied by the model named Pole. The effect is that the model Ball moves orbitally about Pole in the x-y plane.
polePos = member("3d Scene").model("Pole").worldPositionmember("3d Scene").model("Ball").rotate(polePos, vector(0,0,1), \5, #world)
See also
pointAt, preRotate, rotation (transform), rotation (engraver shader), rotation (backdrop and overlay), preScale(), transform (property)
Chapter 10382

rotation (backdrop and overlay)Syntax
sprite(whichSprite).camera.backdrop[backdropIndex].rotationmember(whichCastmember).camera(whichCamera).backdrop[backdropIndex].rotationsprite(whichSprite).camera.overlay[overlayIndex].rotationmember(whichCastmember).camera[cameraIndex].overlay[overlayIndex].rotation
Description
3D property; allows you to get or set the rotation of the backdrop or overlay toward the default camera. The default value of this property is 0.0.
Example
This statement rotates a backdrop 60˚ around its registration point.
sprite(4).camera.backdrop[1].rotation = 60.0
See also
backdrop, transform (property)
rotation (engraver shader)Syntax
member(whichCastmember).shader(whichShader).rotationmember(whichCastmember).model(whichModel).shader.rotationmember(whichCastmember).model(whichModel).shaderList[index].rotation
Description
3D shader engraver property; allows you to get or set an angle in degrees (as a floating-point number) that describes a 2D rotational offset for engraved lines. The default value for this property is 0.0.
Example
This statement rotates the lines used to draw the engraver shader for the model gbCyl3 by 1˚.
member("scene").model("gbCyl3").shader.rotation = \member("scene").model("gbCyl3").shader.rotation + 1
See also
transform (property)
3D Lingo Dictionary 383

rotation (transform)Syntax
member(whichCastmember).node(whichNode).transform.rotationmember(whichCastmember).node(whichNode).getWorldTransform().rotationtransform.rotation
Description
3D property; allows you to get or set the rotational component of a transform. A transform defines a scale, position and rotation within a given frame of reference. The default value of this property is vector(0,0,0).
A node can be a camera, group, light or model object. Setting the rotation of a node’s transform defines that object’s rotation within the transform’s frame of reference. Setting the rotation property of an object’s world relative transform using getWorldTransform().rotation defines the object’s rotation relative to the world origin. Setting the rotation property of an object’s parent relative transform using transform.rotation defines the object’s rotation relative to its parent node.
If you wish to modify the orientation of a transform it is recommended that you use the rotate and prerotate methods instead of setting this property.
Examples
This statement sets the parent-relative rotation of the first camera in the member to vector(0,0,0).
member("Space").camera[1].transform.rotation = vector(0, 0, 0)
This example displays the parent-relative rotation of the model named Moon, then it adjusts the model’s orientation using the rotate command, finally it displays the resulting world-relative rotation of the model.
put member(“SolarSys”).model(“Moon”).transform.rotation-- vector( 0.0000, 0.0000, 45.0000)member(“SolarSys”).model(“Moon”).rotate(15,15,15)put member(“SolarSys”).model(“Moon”).getWorldTransform().rotation--vector( 51.3810, 16.5191, 65.8771 )
See also
getWorldTransform(), preRotate, rotate, transform (property), position (transform), scale (transform)
Chapter 10384

rotationResetSyntax
member(whichCastmember).model(whichModel).bonesPlayer.rotationResetmember(whichCastmember).model(whichModel).keyframePlayer.\rotationReset
Description
3D keyframePlayer and bonesPlayer modifier property; indicates the axes around which rotational changes are maintained from the end of one motion to the beginning of the next, or from the end of one iteration of a looped motion to the beginning of the next iteration.
Possible values of this property include #none, #x, #y, #z, #xy, #yz, #xz, and #all. The default value is #all.
Example
This statement sets the rotationReset property of the model named Monster to the Z axis. The model will maintain rotation around it’s Z axis when the currently playing motion or loop ends.
member("NewAlien").model("Monster").bonesPlayer.rotationReset = #z
See also
positionReset, bonesPlayer (modifier)
scale (backdrop and overlay)Syntax
member(whichCastmember).camera(whichCamera).backdrop\[backdropIndex].scalemember(whichCastmember).camera(whichCamera).overlay\[overlayIndex].scale
Description
3D property; allows you to get or set the scale value used by a specific overlay or backdrop in the referenced camera’s list of overlays or backdrops to display. The width and height of the backdrop or overlay are multiplied by the scale value.The default value for this property is 1.0.
Example
This statement doubles the size of a backdrop.
sprite(25).camera.backdrop[1].scale = 2.0
See also
backdrop, overlay
3D Lingo Dictionary 385

scale (command)Syntax
member(whichCastmember).node(whichNode).scale(xScale, yScale, \zScale)member(whichCastmember).node(whichNode).scale(uniformScale)transform.scale(xScale, yScale, zScale)transform.scale(uniformScale)
Description
3D transform command; applies a scaling after the current positional, rotational, and scale offsets held by a referenced node’s transform or the directly referenced transform. The scaling must be specified as either a set of three scalings along the corresponding axes or as a single scaling to be applied uniformly along all axes. You can specify the individual scalings using the xScale, yScale and zScale parameters, otherwise you can specify the uniform scaling amount using the uniformScale parameter.
A node can be a camera, group, light or model object. Using the scale command adjusts the referenced node’s transform.scale property, but it does not have any visual effect on lights or cameras as they do not contain geometry.
The scaling values provided must be greater than zero.
Examples
This example first displays the transform.scale property for the model named Moon, then it scales the model using the scale command, finally it displays the resulting transform.scale value.
put member("Scene").model("Moon").transform.scale-- vector( 1.0000, 1.0000, 1.0000)member("Scene").model("Moon").scale(2.0,1.0,0.5)put member("Scene").model("Moon").transform.scale-- vector( 2.0000, 1.0000, 0.5000)
This statement scales the model named Pluto uniformly along all three axes by 0.5, resulting in the model displaying at half of its size.
member("Scene").model("Pluto").scale(0.5)
This statement scales the model named Oval in a nonuniform manner, scaling it along its Z axis but not its X or Y axes.
member("Scene").model("Pluto").scale(0.0, 0.0, 0.5)
See also
transform (property), preScale(), scale (transform)
Chapter 10386
scale (transform)Syntax
member(whichCastmember).node(whichNode).transform.scalemember(whichCastmember).node(whichNode).getWorldTransform().scaletransform.scale
Description
3D property; allows you to get or set the scaling component of a transform. A transform defines a scale, position and rotation within a given frame of reference. The scale property allows you to get and set the degree of scaling of the transform along each of the three axes. The default value of this property is vector(1.0,1.0,1.0).
A node can be a camera, group, light or model object. This command does not have any visual effect on lights or cameras as they do not contain geometry. Setting the scale property of a node’s transform defines that object’s scaling along the X, Y and Z axes within the transform’s frame of reference. Getting the scale property of an object’s world relative transform using getWorldTransform().scale returns the object’s scaling relative to the world origin. Setting the scale property of an object’s parent relative transform using transform.scale defines the object’s scaling relative to its parent node.
Example
This statement sets the scale property of the transform of the model named Moon to vector(2,5,3).
member("Scene").model("Moon").transform.scale = vector(2,5,3)
See also
transform (property), getWorldTransform(), position (transform), rotation (transform), scale (command)
3D Lingo Dictionary 387

sds (modifier)Syntax
member(whichCastmember).model(whichModel).sds.whichProperty
Description
3D modifier; adds geometric detail to models and synthesizes additional details to smooth out curves as the model moves closer to the camera. AFter you have added the sds modifier (using addModifier) to a model, you can set the properties of the sds modifier.
The sds modifier directly affects the model resource. Be careful when using the sds and lod modifiers together, because they perform opposite functions (the sds modifier adds geometric detail and the lod modifier removes geometric detail). Before adding the sds modifier, it is recommended that you set the lod.auto modifier property to FALSE and set the lod.level modifier property to the desired resolution, as follows:
member("myMember").model("myModel").lod.auto = 0 member("myMember").model("myModel").lod.level = 100 member("myMember").model("myModel").addmodifier(#sds)
The sds modifier cannot be used with models that already use either the inker or toon modifiers.
After you have added the sds modifier to a model resource you can get or set the following properties:
enabled (sds) indicates whether subdivision surfaces functionality is enabled (TRUE) or disabled (FALSE). The default setting for this property is TRUE.
depth specifies the maximum number of levels of resolution that the model can display when using the sds modifier.
error indicates the level of error tolerance for the subdivision surfaces functionality. This property applies only when the sds.subdivision property is set to #adaptive.
subdivision indicates the mode of operation of the subdivision surfaces modifier. Possible values are as follows:
• #uniform specifies that the mesh is uniformly scaled up in detail, with each face subdivided the same number of times.
• #adaptive specifies that additional detail is added only when there are major face orientation changes and only to those areas of the mesh that are currently visible.
Note: For more detailed information about these properties, see the individual property entries.
Chapter 10388

Example
The statement displays the sds.depth property value for the model named Terrain.
put member(“3D”).model(“Terrain”).sds.depth-- 2
See also
lod (modifier), toon (modifier), inker (modifier), depth, enabled (sds), error, subdivision, addModifier
sendEventSyntax
member(whichCastmember).sendEvent(#eventName, arg1, arg2,...)
Description
3D command; sends the event eventName, and an arbitrary number of arguments (arg1, arg2, ...) to all scripts registered to receive the event. Use registerScript(), registerForEvent(), or setCollisionCallback() to register scripts for events.
Example
The first line creates an instance of a parent script named "tester". The second line sets the handler of the script instance, jumpPluto, as the handler to be called when the #jump event is sent. The third line registers a movie script handler named jumpMars as another handler to be called when the #jump event is sent. The fourth line sends the #jump event. The handlers #jumpMars in a movie script and #jumpPluto are called, along with any other handlers registered for the #jump event. Note that a script instance value of 0 indicates that you are registering a handler of a movie script, as opposed to a handler of a behavior instance or of a child of a parent script.
t = new (script "tester")member("scene").registerForEvent(#jump, #jumpPluto, t)member("scene").registerForEvent(#jump, #jumpMars, 0)member("scene").sendEvent(#jump)
See also
registerScript(), registerForEvent(), setCollisionCallback()
3D Lingo Dictionary 389

setCollisionCallback()Syntax
member(whichCastmember).model(whichModel).collision.\setCollisionCallback (#handlerName, scriptInstance)
Description
3D collision command; registers the handler #handlerName in the given scriptInstance to be called when whichModel is involved in a collision.
This command works only if the model’s collision.enabled property is TRUE. The default behavior is determined by the value of collision.resolve, you can override it using the collision.resolveA and/or the collision.resolveB commands. Do not use the updateStage command in the specified handler.
This command is a shorter alternative to using the registerScript command for collisions, but there is no difference in the overall result. This command can be considered to perform a small subset of the registerScript command functionality.
Example
This statement causes the #bounce handler in the cast member colScript to be called when the model named Sphere collides with another model.
member("3d world").model("Sphere").collision.\setCollisionCallback\(#bounce, member("colScript"))
See also
collisionData, collision (modifier), resolve, resolveA, resolveB, registerForEvent(), registerScript(), sendEvent
shaderSyntax
member(whichCastmember).shader(whichShader)member(whichCastmember).shader[index]member(whichCastmember).model(whichModel).shadermember(whichCastmember).modelResource(whichModelResource).\face[index].shader
Description
3D element, model property, and face property; the object used to define the appearance of the surface of the model. The shader is the “skin” which is wrapped around the model resource used by the model.
The shader itself is not an image. The visible component of a shader is created with up to eight layers of texture. These eight texture layers are either created from bitmap cast members or image objects within Director or imported with models from 3D modeling programs. See texture for more information.
Chapter 10390

Every model has a linear list of shaders called the shaderList. The number of entries in this list equals the number of meshes in the model resource used by the model. Each mesh can be shaded by only one shader.
The 3D cast member has a default shader named DefaultShader which cannot be deleted. This shader is used when no shader has been assigned to a model and when a shader being used by a model is deleted.
The syntax member(whichCastmember).model(whichModel).shader gives access to the first shader in the model’s shaderList, and is equivalent to member(whichCastmember).model(whichModel).shaderList[1].
Create and delete shaders with the newShader() and deleteShader() commands.
Shaders are stored in the shader palette of the 3D cast member. They can be referenced by name (whichShader) or palette index (shaderIndex). A shader can be used by any number of models. Changes to a shader will appear in all models which use that shader.
There are four types of shaders:
#standard shaders present their textures realistically.
#painter, #engraver, and #newsprint shaders stylize their textures for painting, engraving, and newsprint effects. They have special properties in addition to the #standard shader properties.
See the “3D Lingo by Feature” chapter for a complete list of shader properties.
The shaders used by individual faces of #mesh primitives can be set with the syntax member(whichCastmember).modelResource(whichModelResource).face[index].shader. Changes to this property require a call to the build() command.
Example
This statement sets the shader property of the model named Wall to the shader named WallSurface.
member("Room").model("Wall").shader = \member("Room").shader("WallSurface")
See also
shaderList, newShader, deleteShader, face, texture
3D Lingo Dictionary 391

shaderListSyntax
member(whichCastmember).model(whichModel).shaderListmember(whichCastmember).model(whichModel).shaderList[index]
Description
3D model property; a linear list of shader applied to the model. The number of entries in this list equals the number of meshes in the model resource used by the model. Each mesh can be shaded by only one shader.
Set the shader at the specified index position in the shaderlist with this syntax: member(whichCastmember).model(whichModel).shaderList[index] = shaderReference
Set all index positions in the shaderList to the same shader with this syntax (note the absence of an index for the shaderList): member(whichCastmember).model(whichModel).shaderList = \shaderReference
Set a property of a shader in the shaderlist with this syntax: member(whichCastmember).model(whichModel).shaderList[index].\whichProperty = propValue
Set a property of all of the shaders of a model to the same value with this syntax (note the absence of an index for the shaderList):
member(whichCastmember).model(whichModel).shaderList.\whichProperty = propValue
Example
This statement sets the second shader in the shaderList of the model named Bumper to the shader named Chrome.
member("Car").model("Bumper").shaderList[2] = \member("Car").shader("Chrome")
This statement sets the all of the shaders in the shaderList of the model named Bumper to the shader named Chrome.
member("Car").model("Bumper").shaderList = \member("Car").shader("Chrome")
See also
shader
Chapter 10392

shadowPercentageSyntax
member(whichCastmember).model(whichModel).toon.shadowPercentagemember(whichCastmember).model(whichModel).shader.shadowPercentagemember(whichCastmember).shader(whichShader).shadowPercentage
Description
3D toon modifier and painter shader property; indicates the percentage of available colors that are used in the area of the model’s surface where light does not create highlights.
The range of this property is 0 to 100, and the default value is 50.
The number of colors used by the toon modifier and painter shader for a model is determined by the colorSteps property of the model’s toon modifier or painter shader.
Example
This statement sets the shadowPercentage property of the toon modifier for the model named Teapot to 50. Half of the colors available to the toon modifier for this model will be used for the shadow area of the model’s surface.
member("shapes").model("Teapot").toon.shadowPercentage = 50
See also
colorSteps, shadowStrength
shadowStrengthSyntax
member(whichCastmember).model(whichModel).toon.shadowStrengthmember(whichCastmember).model(whichModel).shader.shadowStrengthmember(whichCastmember).shader(whichShader).shadowStrength
Description
3D toon modifier and #painter shader property; indicates the brightness of the area of the model’s surface where light does not create highlights.
The default value of this property is 1.0.
Example
This statement sets the shadowStrength property of the toon modifier for the model named Sphere to 0.1. The area of the model’s surface that is not highlighted will be very dark.
member("Shapes").model("Sphere").toon.shadowStrength = 0.1
3D Lingo Dictionary 393
shininessSyntax
member(whichCastmember).shader(whichShader).shininessmember(whichCastmember).model(whichModel).shader.shininessmember(whichCastmember).model(whichModel).shaderList\[shaderListIndex].shininess
Description
3D standard shader property; allows you to get or set the shininess of a surface. Shininess is defined as the percentage of shader surface devoted to highlights. The value is an integer between 0 and 100, with a default of 30.
All shaders have access to the #standard shader properties; in addition to these standard shader properties shaders of the types #engraver, #newsprint, and #painter have properties unique to their type. See the newShader for more information.
Example
This statement sets the shininess property of the first shader in the shader list of the model gbCyl3 to 60. Sixty percent of the surface of the shader will be dedicated to highlights.
member("Scene").model("gbCyl3").shader.shininess = 60
silhouettesSyntax
member(whichCastmember).model(whichModel).inker.silhouettesmember(whichCastmember).model(whichModel).toon.silhouettes
Description
3D toon and inker modifier property; indicates the presence (TRUE) or absence (FALSE) of lines drawn by the modifier at the visible edges of the model.
Silhouette lines are drawn around the model’s 2D image on the camera’s projection plane. Their relationship to the model’s mesh is not fixed, unlike crease or boundary lines, which are drawn on features of the mesh.
Silhouette lines are similar to the lines that outline images in a child’s coloring book.
The default value for this property is TRUE.
Example
This statement sets the silhouettes property of the inker modifier for the model named Sphere to FALSE. Lines will not be drawn around the profile of the model.
member("Shapes").model("Sphere").inker.silhouettes = FALSE
Chapter 10394

sizeRangeSyntax
member(whichCastmember).modelResource(whichModelResource).sizeRange.startmodelResourceObjectReference.sizeRange.startmember(whichCastmember).modelResource(whichModelResource).sizeRange.endmodelResourceObjectReference.sizeRange.end
Description
3D property; when used with a model resource whose type is #particle, this property allows you to get or set the start and end property of the model resource’s sizeRange. Particles are measured in world units.
The size of particles in the system is interpolated linearly between sizeRange.start and sizeRange.end over the lifetime of each particle.
This property must be an integer greater than 0, and has a default value of 1.
Example
In this example, mrFount is a model resource of the type #particle. This statement sets the sizeRange properties of mrFount. The first line sets the start value to 4, and the second line sets the end value to 1. The effect of this statement is that the particles of mrFount are size 4 when they first appear, and gradually shrink to a size of 1 during their lifetime.
member("fountain").modelResource("mrFount").sizeRange.start = 4member("fountain").modelResource("mrFount").sizeRange.end = 1
3D Lingo Dictionary 395

smoothnessSyntax
member(whichTextmember).smoothnessmember(whichCastMember).modelResource(whichExtruderModelResource)\.smoothness
Description
3D extruder model resource and text property; allows you to get or set an integer controlling the number of segments used to create a 3D text cast member. The higher the number, the smoother the text appears. The range of this property is 1 to 10, and the default value is 5.
It is recommended that you see the extrude3D entry for more information about working with extruder model resources and text cast members.
Example
In this example, the cast member Logo is a text cast member. This statement sets the smoothness of Logo to 8. When Logo is displayed in 3D mode, the edges of its letters will be very smooth.
member("Logo").smoothness = 8
In this example, the model resource of the model Slogan is extruded text. This statement sets the smoothness of Slogan's model resource to 1, causing the Slogan’s letters to appear very angular.
member("Scene").model("Slogan").resource.smoothness = 1
See also
extrude3D, numSegments
Chapter 10396

sourceSyntax
sprite(whichSprite).camera.backdrop[backdropIndex].sourcemember(whichCastmember).camera(whichCamera).backdrop[backdropIndex].sourcesprite(whichSprite).camera.overlay[overlayIndex].sourcemember(whichCastmember).camera(whichCamera).overlay[overlayIndex].source
Description
3D backdrop and overlay property; allows you to get or set the texture to use as the source image for the overlay or backdrop.
Example
This statement sets the source of backdrop 1 to the texture Cedar.
sprite(3).camera.backdrop[1].source = sprite(3).member.texture("Cedar")
See also
backdrop, overlay
specular (light)Syntax
member(whichCastmember).light(whichLight).specular
Description
3D light property; allows you to get or set whether specularity is on (TRUE) or off (FALSE). Specularity refers to the ability to have a highlight appear on a model where the light hitting the model is reflected toward the camera. The shininess of the model’s shader determines how large the specular portion of the highlight is. The value for this property is ignored for ambient lights. The default value for this property is TRUE.
Note: Turning off this property may increase performance.
Example
This statement sets the specular property of the light omni2 to FALSE. This light does not cause highlights. If this is the only light currently shining in the scene, there will be no specular highlights on any of the shaders in the scene.
member("3d world").light("omni2").specular = FALSE
See also
shininess, specularLightMap
3D Lingo Dictionary 397

specular (shader)Syntax
member(whichCastmember).shader(whichShader).specular
Description
3D standard shader property; allows you get or set the specular color of a given shader. The specular color is the color of the highlight generated when specularity is turned on. There must be lights in the scene with the specular property set to TRUE, for this property to have a visible effect. The specular color is influenced by the color of the lights illuminating the object. If the specular color is white but the color of a light is red, there will be a red specular highlight appearing on the object. The default value for this property is rgb(255, 255, 255) which is white.
All shaders have access to the #standard shader properties; in addition to these standard shader properties shaders of the types #engraver, #newsprint, and #painter have properties unique to their type. See the newShader for more information.
Example
put member("scene").shader("plutomat").specular-- rgb(11, 11, 11)
See also
shininess, specular (light), specularColor, emissive
specularColorSyntax
member(whichCastmember).specularColor
Description
3D cast member property; allows you to get or set the RGB value of the specular color of the first shader in the cast member. The first shader in the cast member’s shader palette is always the default shader. This and all other 3D cast member properties are saved with the cast member and are restored the next time you open the movie. The default value for this property is rgb(255, 255, 255) which is white.
Example
This statement sets the specular color of the first shader in the cast member Scene to rgb(255, 0, 0). It is equivalent to member("Scene").shader[1].specular = rgb(255, 0, 0). Note however that the later syntax won't save the new value with the cast member when the movie is saved. Only member.specularColor will save the new color value.
member("Scene").specularColor = rgb(255, 0, 0)
See also
shininess, specular (light), specular (shader)
Chapter 10398
specularLightMapSyntax
member(whichCastmember).shader(whichShader).specularLightMapmember(whichCastmember).model(whichModel).shader.specularLightMapmember(whichCastmember).model(whichModel).shaderList\[shaderListIndex].specularLightMap
Description
3D standard shader property; allows you to get or set the fifth texture layer of a given standard shader. This property is ignored if the toon modifier is applied to the model resource.
The values that can be set are as follows:
• textureModeList[5] = #specular
• blendFunctionList[5] = #add
• blendFunctionList[1] = #replace
• default = void
This helper property provides a simple interface for setting up a common use of specular light mapping.
All shaders have access to the #standard shader properties; in addition to these standard shader properties shaders of the types #engraver, #newsprint, and #painter have properties unique to their type. See the newShader for more information.
Example
This statement sets the texture Oval as the specularLightMap of the shader used by the model GlassBox.
member("3DPlanet").model("GlassBox").shader.specularLightMap = \member("3DPlanet").texture("Oval")
See also
diffuseLightMap
3D Lingo Dictionary 399
spotAngleSyntax
member(whichCastmember).light(whichLight).spotAngle
Description
3D property; allows you to get or set the angle of the light projection cone. Light that is falls outside of the angle specified for this property, contributes no intensity. This property takes float value between 0.0 and 180.00, and has a default value of 90.0. The float value you specify corresponds to half the angle; for instance if you wish to specify a 90˚ angle you would pass a value of 45.0.
Example
This statement sets the spotAngle property of the light unidirectional to 8. The angle of the light projection cone will be 16˚.
member("3d world").light("unidirectional").spotAngle = 8
spotDecay Syntax
member(whichCastmember).light(whichLight).spotDecay
Description
3D light property; allows you get or set whether a spotlight’s intensity falls off with the distance from the camera. The default value for this property is FALSE.
Example
This statement sets the spotDecay property of light 1 to TRUE. Models that are farther away from light 1 will be less brightly lit than models that are closer to it.
member("Scene").light[1].spotDecay = TRUE
spriteSpaceToWorldSpaceSyntax
sprite(whichSprite).camera.spriteSpaceToWorldSpace(loc)sprite(whichSprite).camera(index).spriteSpaceToWorldSpace(loc)
Description
3D command; returns a world-space position that is found on the specified camera’s projection plane that corresponds to a location within the referenced sprite. The location specified by loc should be a point relative to the sprite’s upper-left corner.
The projection plane is defined by the camera's X and Y axes, and is at a distance in front of the camera such that one pixel represents one world unit of measurement. It is this projection plane that is used for the sprite display on stage.
Chapter 10400

The camera.spriteSpaceToWorldSpace() form of this command is a shortcut for using camera(1).spriteSpaceToWorldSpace().
All cameras that are used by the referenced sprite will respond to the spriteSpaceToWorldSpace command as if their display rect is the same size as the sprite.
Example
This statement shows that the point (50, 50) within sprite 5 is equivalent to the vector (-1993.6699, 52.0773, 2263.7446) on the projection plane of the camera of sprite 5.
put sprite(5).camera.spriteSpaceToWorldSpace(point(50, 50))-- vector(-1993.6699, 52.0773, 2263.7446)
See also
worldSpaceToSpriteSpace, rect, camera
startAngleSyntax
member(whichCastmember).modelResource(whichModelResource).startAnglemodelResourceObjectReference.startAngle
Description
3D property; when used with a model resource whose type is #cylinder or #sphere, this command allows you to both get and set the startAngle property of the referenced model resource, as a floating-point value from 0.0 to 360.0. The default value for this property is 0.0.
The startAngle property determines the starting sweep angle of the model resource, and works in conjunction with the endAngle property to draw spheres and cylinders. For example, if you want to make a half sphere, set startAngle to 0.0 and endAngle to 180.0.
Example
This statement sets the startAngle of the model resource Sphere01 to 0.0. If its endAngle is set to 90, then only one quarter of any model that uses this model resource will appear.
put member("3D World").modelResource("Sphere01").startAngle-- 0.0
See also
endAngle
3D Lingo Dictionary 401

stateSyntax
member(whichCastmember).state
Description
3D property; returns the current state of referenced member in the streaming and loading process. This property refers to the initial file import or the last file load requested.
The state property of the member determines what, if any, 3D Lingo can be performed on the cast member.
This property can have any of the following values:
0 indicates that the member is currently not loaded and therefore no 3D media is available. No 3D Lingo should be performed on the member.
1 indicates that the media loading has begun. No 3D Lingo should be performed on the member unless this state is the result of a loadFile operation. If this state is a result of a loadFile operation, then no 3D Lingo should be performed on the contents of the file currently being loaded.
2 indicates that the member’s initial load segment is loaded. All objects with a stream priority of zero, as set upon creation of the model file, will be loaded at this time as they are part of the initial load segment. You can perform most 3D Lingo associated with the objects having a load priority of zero. Do not use the loadFile and resetWorld commands during this state.
3 indicates that all the additional media of the member is being loaded and decompressed. Most 3D Lingo can be performed at this point. Do not use the loadFile and resetWorld commands during this state.
4 indicates that all of the member’s media has been loaded and all decompression is complete. All 3D Lingo can now be performed on the cast member.
-1 indicates that an undefined error occurred during the media streaming process. Because the error may have occurred at any point during the loading process, the state of the cast member is not reliable.
Example
This statement shows that the cast member named PartyScene has finished loading and preparing for playback, and no errors occurred during the load.
put member("PartyScene").state-- 4
Chapter 10402

streamSizeSyntax
member(whichCastmember).streamSize
Description
3D property; allows you to get the size of the data stream to be downloaded, from 0 to maxInteger. This command refers to the initial file import or the last loadFile() requested.
Example
This statement shows that the last file load associated with the cast member Scene has a total size of 325300 bytes.
put member("Scene").streamSize-- 325300
See also
bytesStreamed, percentStreamed, state, preLoad
styleSyntax
member(whichCastmember).model(whichModel).toon.stylemember(whichCastmember).model(whichModel).shader.stylemember(whichCastmember).shader(whichShader).style
Description
3D toon modifier and painter shader property; indicates the way the toon modifier and painter shader apply color to a model. Possible values are as follows:
• #toon uses sharp transitions between colors.
• #gradient uses smooth transitions between colors. This is the default value.
• #blackAndWhite uses two-color black and white.
The number of colors used by the toon modifier and painter shader is set with the colorSteps property of the modifier or shader.
Example
This statement sets the style property of the toon modifier for the model named Teapot to #blackAndWhite. The model will be rendered in two-color black and white.
member("Shapes").model("Teapot").toon.style = #blackAndWhite
3D Lingo Dictionary 403

subdivisionSyntax
member(whichCastmember).model(whichModel).sds.subdivision
Description
3D sds modifier property; allows you to get or set the subdivision surfaces mode of operation. Possible values are as follows:
• #uniform specifies that the mesh is uniformly scaled up in detail, with each face subdivided the same number of times.
• #adaptive specifies that additional detail is added only when there are large surface orientation changes and only to those areas of the mesh that are currently visible.
The sds modifier cannot be used with the inker or toon modifiers, and caution should be used when using the sds modifier with the lod modifier. See the sds modifier entry for more information.
Example
This statement sets the subdivision property of the sds modifier of the model named Baby to #adaptive. Baby’s geometry will not be modified uniformly.
member("Scene").model("Baby").sds.subdivision = #adaptive
See also
sds (modifier), error, enabled (sds), depth, tension
tensionSyntax
member(whichCastmember).model(whichModel).sds.tension
Description
3D subdivision surface property; allows you to get or set a floating-point percentage between 0.0 and 100.0 that controls how tightly the newly generated surface matches the original surface. The higher this value, the more tightly the subdivided surface matches the original surface. The default is 65.0.
Example
This statement sets the tension property of the sds modifier of the model Baby to 35. If the sds modifier’s error setting is low and its depth setting is high, this statement will have a very pronounced effect on Baby’s geometry.
member("scene").model("Baby").sds.tension = 35
See also
sds (modifier), error, depth
Chapter 10404

textureSyntax
member(whichCastmember).texture(whichTexture)member(whichCastmember).texture[index]member(whichCastmember).shader(whichShader).texturemember(whichCastmember).model(whichModel).shader.texturemember(whichCastmember).model(whichModel).shaderList.texturemember(whichCastmember).model(whichModel).shaderList[index].texturemember(whichCastmember).modelResource(whichParticleSystemModel\Resource).texture
Description
3D element and shader property; an image object used by a shader to define the appearance of the surface of a model. The image is wrapped onto the geometry of the model by the shader.
The visible component of a shader is created with up to eight layers of textures. These eight texture layers are either created from bitmap cast members or image objects within Director or imported with models from 3D modeling programs.
Create and delete textures with the newTexture() and deleteTexture() commands.
Textures are stored in the texture palette of the 3D cast member. They can be referenced by name (whichTexture) or palette index (textureIndex). A texture can be used by any number of shaders. Changes to a texture will appear in all shaders which use that texture.
There are three types of textures:
#fromCastmember; the texture is created from a bitmap cast member using the newTexture() command.
#fromImageObject; the texture is created from a lingo image object using the newTexture() command.
#importedFromFile; the texture is imported with a model from a 3D modeling program.
See the “3D Lingo by Feature” chapter for a complete list of texture properties.
The texture of a particle system is a property of the model resource, whose type is #particle.
Example
This statement sets the texture property of the shader named WallSurface to the texture named BluePaint.
member("Room").shader("WallSurface").texture = \member("Room").texture("BluePaint")
See also
newTexture, deleteTexture
3D Lingo Dictionary 405

textureCoordinateListSyntax
member(whichCastmember).modelResource(whichmodelResource).textureCoordinateListmodelResourceObjectReference.textureCoordinateList
Description
3D property; when used with a model resource whose type is #mesh, or with a meshDeform modifier attached to a model, this property allows you to get or set the textureCoordinateList property of the model resource.
The textureCoordinateList property is a list of sublists identifying locations in an image that are to be used when texture mapping a triangle. Each sublist consists of two values indicating a location in a texture map. The values must be between 0.0 and 1.0 so that they can be scaled to arbitrarily sized texture maps. The default is an empty list.
Manipulate modelResource.face[index].textureCoordinates or model.meshdeform.mesh[index].face[index] to change the mapping between textureCoordinates and the corners of a mesh face.
Example
put member(5,2).modelResource("mesh square").\textureCoordinateList--[ [0.1, 0.1], [0.2, 0.1], [0.3, 0.1], [0.1, 0.2], [0.2, 0.2], \[0.3, 0.2], [0.1, 0.3], [0.2, 0.3], [0.3, 0.3] ]
See also
face, texture, meshDeform (modifier)
textureCoordinatesSyntax
member(whichCastmember).modelResource(whichModelResource).\face[faceIndex].textureCoordinatesmodelResourceObject.face[faceIndex].textureCoordinates
Description
3D property; identifies which elements in the textureCoordinateList to use for the faceIndex’d face. This property must be a list of three integers specifying indices in the textureCoordinateList, corresponding to the textureCoordinate to use for each corner of the mesh’s face.
See also
face, textureCoordinateList
Chapter 10406

textureLayerSyntax
member(whichCastmember).model(whichModel).meshDeform.mesh[index].\textureLayer.countmember(whichCastmember).model(whichModel).meshdeform.mesh[index].\texturelayer.add()member(whichCastmember).model(whichModel).meshdeform.mesh[index].\texturelayer[index].textureCoordinateList.
Description
3D meshdeform modifier properties; using these properties you can get and set information about the texture layers of a specified mesh.
You can have up to eight texture layers for a shader, each layer can contain only one texture, but the same texture can be specified for more than one layer. Texture layers are layers of textures used by shaders.
Use the following properties to access and manipulate texture layers:
meshdeform.mesh[index].texturelayer.count returns the number of texture layers for the specified mesh.
model.meshdeform.mesh[index].texturelayer.add() adds an empty texture layer to the specified mesh.
model.meshdeform.mesh[index].texturelayer[index].texturecoordinatelist allows you to set or get a list of textureCoordinates for a particular layer of the specified mesh. You can also use this property to copy texture coordinates between texture layers as follows:
model.meshdeform.texturelayer[a].texturecoordinatelist = \model.meshdeform.texturelayer[b].texturecoordinatelist
See also
meshDeform (modifier), mesh (property), textureCoordinateList, add, count, texture, textureModeList
3D Lingo Dictionary 407

textureMemberSyntax
member(whichCastmember).textureMember
Description
3D cast member property; indicates the name of the bitmap cast member used as the source of the default texture for the 3D cast member.
The 3D cast member’s textureType property must be set to #member for the textureMember property to be effective.
Example
This statement sets the textureMember property of the cast member named YardScene to "Fence". If the textureType property of YardScene is set to #member, the cast member named Fence will be the source bitmap for the default texture in YardScene.
member("YardScene").textureMember = "Fence"
See also
textureType
textureModeSyntax
member(whichCastmember).shader(whichShader).textureModemember(whichCastmember).model(whichModel).shader.textureModemember(whichCastmember).model(whichModel).shaderList{[index]}.\textureMode
Description
3D #standard shader property; specifies how the first texture layer is mapped onto the surface of the model. Use the textureModeList property to specify textures for layers other than the first layer. This property is ignored if the #toon modifier is applied to the model resource.
The possible values of this property are #none, #wrapPlanar, #wrapCylindrical, #wrapSpherical, #reflection, #diffuseLight, and #specularLight. See the textureModeList entry for descriptions of these terms.
Example
This statement sets the value of the textureMode property of the first texture layer of the shader of the model named Ball to #wrapSpherical.
member("scene").model("Ball").shader.textureMode = #wrapSpherical
See also
textureModeList
Chapter 10408

textureModeListSyntax
member(whichCastmember).shader(whichShader).textureModeListmember(whichCastmember).shader(whichShader).textureModeList[textureLayerIndex]member(whichCastmember).model(whichModel).shader.textureModeListmember(whichCastmember).model(whichModel).shader.textureModeList[textureLayerndex]
Description
3D standard shader property; allows you to change how a textureLayer is mapped onto the surface of a model. This property is ignored if the #toon modifier is applied to the model resource. Possible values are as follows:
• #none uses the texture coordinate values originally defined for the model resource. This setting disables wrapTransform and wrapTransformList[textureLayerIndex].
• #wrapPlanar wraps the texture on the model surface as though it were being projected from an overhead projector. The shader’s wrapTransformList[textureLayerIndex] is applied to the mapping space before the texture coordinates are generated in model space. With an identity wrapTransformList[textureLayerIndex] (the default), the planar mapping is oriented such that the texture is extruded along the Z axis with the texture’s up direction along the Y axis.
• #wrapCylindrical wraps the texture around the surface as though the surface were placed in the middle of the texture and then the texture were rolled around the surface to form a cylinder. The wrapTransformList[textureLayerIndex] is applied to the mapping space before the texture coordinates are generated in model space. With an identity wrapTransformList[textureLayerIndex] (the default), the cylindrical mapping is oriented such that the texture is wrapped from the -Y axis, starting at the left edge of the texture, toward the +X axis, around the Z axis. The up direction of the texture is toward the +Z axis.
• #wrapSpherical wraps the texture around the surface as though the surface were placed in the middle of the texture and then all four corners of the texture were pulled up to meet at the top. The wrapTransformList[textureLayerIndex] is applied to the mapping space before the texture coordinates are generated in model space. With an identity wrapTransformList[textureLayerIndex], the spherical mapping is located at the model space origin and oriented such that the texture is wrapped from the -Y axis, starting at the left edge of the texture, toward the +X axis, around the Z axis. The up direction of the texture is toward the +Z axis.
3D Lingo Dictionary 409

• #reflection is similar to #wrapSpherical except that the new texture coordinates are continuously reprojected onto the surface from a fixed orientation. When the model rotates, the texture coordinates will not rotate with it. Simulates light reflected on an object by its environment. This setting disables wrapTransform.
• #diffuseLight generates diffuse light mapping texture coordinate values, one per vertex, and stores the results in the referenced mesh. This setting disables wrapTransform.
• #specularLight generates specular light mapping texture coordinate values, one per vertex, and stores the results in the referenced mesh. This setting disables wrapTransform.
Example
In this example, a shader is set up to simulate a reflective garden ball. The shader's first textureLayer is set to a spherical mapping and the third textureLayer is set to use a #refection style mapping. The shader's textureList[3] entry will appear to reflected from the environment onto all models which use this shader.
member("scene").shader("GardenBall).textureList[1] = \member("scene").texture("FlatShinyBall")member("scene").shader("GardenBall").textureModeList[1] = \#wrapSphericalmember("scene").shader("GardenBall").textureList[3] = \member("scene").texture("GardenEnvironment")member("scene").shader("GardenBall").textureModeList[3] = \#reflection
See also
textureTransformList, wrapTransform
Chapter 10410
textureRenderFormatSyntax
getRenderServices().textureRenderFormat
Description
3D rendererServices property; allows you to get or set the default bit format used by all textures in all 3d cast members. Use a texture's texture.RenderFormat property to override this setting for specific textures only. Smaller sized bit formats (i.e 16 bit variants such as #rgba5551) use less hardware accelerator video ram, allowing you to make use of more textures before being forced to switch to software rendering. Larger sized bit formats (i.e. 32 bit variants such as #rgba8888) generally look better. In order to use alpha transparency in a texture, the last bit must be nonzero. In order to get smooth transparency gradations the alpha channel must have more than 1 bit of precision.
Each pixel formats has four digits, with each digit indicating the degree of precision for red, green, blue, and alpha. The value you choose determines the accuracy of the color fidelity (precision of the alpha channel) and the amount of memory used by the hardware texture buffer. You can choose a value that improves color fidelity or a value that allows you to fit more textures on the card. You can fit twice as many 16-bit textures as 32-bit textures in the same space. If a movie uses more textures than fit on a card at a the same time, Director switches to #software rendering.
You can specify any of the following values for textureRenderFormat:
• #rgba8888: 32 bit color mode with 8 bits each for red, green, blue, and alpha
• #rgba8880: same as above, with no alpha value
• #rgba5650: 16-bit color mode with no alpha; 5 bits for red, 6 for green, 5 for blue
• #rgba5550: 16-bit color mode with no alpha; 5 bits each for red, green, and blue, with no alpha measure
• #rgba5551: 16-bit color mode with 5 bits each for red, green, and blue; 1 bit for alpha
• #rgba4444: 16-bit color mode with 4 bits each for red, green, blue, and alpha
The default value is #rgba5551.
Example
This statement sets the global textureRenderFormat for the 3D member to #rgba8888. Each texture in this movie will be rendered in 32 bit color unless its texture.renderFormat property is set to a value other than #default.
getRendererServices().textureRenderFormat = #rgba8888
See also
renderer, preferred3DRenderer, renderFormat, getRendererServices()
3D Lingo Dictionary 411
textureRepeatSyntax
member(whichCastmember).shader(whichShader).textureRepeatmember(whichCastmember).model(whichModel).shader.textureRepeatmember(whichCastmember).model(whichModel).shaderList{[index]}.\textureRepeat
Description
3D #standard shader property; controls the texture clamping behavior of the first texture layer of the shader. Use the textureRepeatList property to control this property for texture layers other than the first layer.
When textureRepeat is set to TRUE and the value of the x and/or y components of shaderReference.textureTransform.scale is less than 1, the texture is tiled (repeated) across the surface of the model.
When textureRepeat is set to FALSE, the texture will not tile. If the value of the x and/or y components of shaderReference.textureTransform.scale is less than 1, any area of the model not covered by the texture will be black. If the value of the x and/or y components of shaderReference.textureTransform.scale is greater than 1, the texture is cropped as it extends past the texture coordinate range.
The default value of this property is TRUE.
Example
This statement sets the textureRepeat property of the first shader used by the model named gbCyl3 to TRUE. The first texture in that shader will tile if the value of the x or y component of its textureTransform or textureTransformList property is less than 1.
member("scene").model("gbCyl3").shader.textureRepeat = TRUE
See also
textureTransform, textureTransformList
Chapter 10412

textureRepeatListSyntax
shaderReference.textureRepeatList[textureLayerIndex]member(whichCastmember).shader(whichShader).textureRepeatList\[textureLayerIndex]member(whichCastmember).shader[shaderListIndex].textureRepeatList\[textureLayerIndex] member(whichCastmember).model(whichModel).shader.textureRepeatList\[textureLayerIndex]member(whichCastmember).model(whichModel).shaderList\[shaderListIndex]. textureRepeatList[textureLayerIndex]
Description
3D standard shader property; allows you to get or set the texture clamping behavior of any texture layer. When TRUE, the default, the texture in textureLayerIndex can be tiled (repeated) several times across model surfaces. This can be accomplished by setting shaderReference.textureTransform[textureLayerIndex].scale to be less than 1 in x or y. When this value is set to FALSE, the texture will apply to a smaller portion of model surfaces, rather than tile across those surfaces, when the shaderReference.textureTransform[textureLayerIndex].scale is less than 1 in x or y. Think of it as shrinking the source image within the frame of the original image and filling in black around the gap. Similarly, if shaderReference.textureTransform[textureLayerIndex].scale is set to be greater than 1 in x or y, the image will be cropped as the border of the texture is extended past the texture coordinate range.
Example
The following code will textureMap a sphere entirely with a granite texture repeated 4 times across the surface, and a logo image which covers just 1/4 of the surface.
m = member(2).model("mySphere")f = member(2).newTexture("granite", #fromCastmember, \member("granite")) g = member(2).newTexture("logo", #fromCastmember, member("logo"))s = member(2).newShader("s", #standard)s.textureList[1] = g s.textureList[2] = f s.textureRepeatList[2] = falses.textureRepeatList[1] = trues.textureTransformList[1].scale(0.5,0.5,1.0)s.textureTransformList[2].scale(0.5,0.5,1.0)s.textureModeList[2] = #wrapPlanars.blendFunctionList[2] = #add m.shaderList = s
3D Lingo Dictionary 413

textureTransformSyntax
member(whichCastmember).shader(whichShader).textureTransformmember(whichCastmember).model(whichModel).shader.textureTransformmember(whichCastmember).model(whichModel).shaderList{[index]}.\textureTransform
Description
3D #standard shader property; provides access to a transform which modifies the texture coordinate mapping of the first texture layer of the shader. Manipulate this transform to tile, rotate, or translate the texture before applying it to the surface of the model. The texture itself remains unaffected; the transform merely modifies how the shader applies the texture. The textureTransform property is applied to all texture coordinates regardless of the textureMode property setting. This is the last modification of the texture coordinates before they are sent to the renderer. The textureTransform property is a matrix that operates on the texture in textureImage space. TextureImage space is defined to exist only on the X,Y plane.
To tile the image twice along its horizontal axis, use shaderReference.textureTransform.scale(0.5, 1.0, 1.0). Scaling on the Z axis is ignored.
To offset the image by point(xOffset,yOffset), use shaderReference.textureTransform.translate(xOffset,yOffset,0.0). Translating by integers when the shader’s textureRepeat property is TRUE will have no effect, because the width and height of the texture will be valued between 0.0 and 1.0 in that case.
To apply a rotation to a texture layer, use shaderReference.textureTransform.rotate(0,0,angle). Rotations around the Z axis are rotated around the (0,0) 2d image point, which maps to the upper left corner of the texture. Rotations about the X and Y axes are ignored.
Just as with a model's transform, textureTransform modifications are layerable. To rotate the texture about a point(xOffset,yOffset) instead of point(0,0), first translate to point(0 - xOffset, 0 - yOffset), then rotate, then translate to point(xOffset, yOffset). The textureTransform is similar to the shader’s wrapTransform property with the following exceptions. It is applied in 2d image space rather than 3d world space. As a result, only rotations about the Z axis and translations and scales on X and Y axes are effective. The transform is applied regardless of the shaderReference.textureMode setting. The wrapTransform, by comparison, is only effective when the textureMode is #wrapPlanar, #wrapCylindrical, or #wrapSpherical.
Chapter 10414

Example
This statement shows the textureTransform of the first texture in the first shader used by the model gbCyl3.
put member("Scene").model("gbCyl3").shader.textureTransform-- transform(1.0000, 0.0000, 0.0000,0.0000, 0.0000, 1.0000, \0.0000, 0.0000, 0.0000, 0.0000, 1.0000, 0.0000, 0.0000, 0.0000, \0.0000, 1.0000)
This statement halves the height and width of the first texture used by the shader named gbCyl3. If the textureRepeat property of gbCyl3 is set to TRUE, four copies of the texture will be tiled across the shader.
member("Scene").shader("gbCyl3").textureTransform.scale = \vector(0.5, 0.5, 1)
This statement rotates the first texture used by the shader gbCyl3 by 90˚ from vector(0, 0, 0).
member("Scene").shader("gbCyl3").textureTransform.rotation = \vector(0, 0, 90)
textureTransformListSyntax
shaderReference .textureTransformList[textureLayerIndex]member(whichCastmember).shader(ShaderName).textureTransformList\[textureLayerIndex]member(whichCastmember).shader[shaderListIndex].texture\TransformList[textureLayerIndex]member(whichCastmember).model(modelName).shader.texture\TransformList[textureLayerIndex]member(whichCastmember).model(modelName).shaderList\[shaderListIndex]. textureTransformList[textureLayerIndex]
Description
3D standard shader property; this property provides access to a transform which modifies the texture coordinate mapping of a texture layer. Manipulate this transform to tile, rotate, or translate a texture image before applying it to the surface of models. The texture itself remains unaffected, the transform merely modifies how the shader applies the texture.
To tile the image twice along its horizontal axis, use textureTransformList[whichTextureLayer].scale(0.5, 1.0, 1.0). Scales in Z will be ignored since images are 2D in nature. Care must be taken to avoid 0.0 scales (even in Z), as that will negate the effect of the entire texture.
To offset the image by point(xOffset,yOffset), use textureTransformList[whichTextureLayer].translate(xOffset,yOffset,0.0). Translating by integers when that texture layer's textureRepeat property is TRUE will have no effect, because the width and height of the texture will be valued between 0.0 and 1.0 in that case.
3D Lingo Dictionary 415

To apply a rotation to a texture layer, use textureTransformList[whichTextureLayer].rotate(0,0,angle). Rotations around the Z axis are rotated around the (0,0) 2D image point, which maps to the upper left corner of the texture. Rotations about X and Y will be ignored since images are 2D by nature.
Just as with a model's transform, textureTransform modifications are layerable. To rotate the image about a point(xOffset,yOffset) instead of point(0,0), first translate to point(0 - xOffset, 0 - yOffset), then rotate, then translate to point(xOffset, yOffset).
The textureTransformList is similar to the shader wrapTransformList property with the following exceptions.
It is applied in 2D image space rather than 3D world space. As a result, only rotations in Z, and translations and scales in X and Y, are effective.
The transform is applied regardless of the shaderReference.textureModeList[index] setting. The wrapTransform, by comparison, is only effective when the textureMode is #wrapPlanar, #wrapCylindrical, or #wrapSpherical.
Example
This statement shows the textureTransform of the third texture in the first shader used by the model gbCyl3.
put member("scene").model("gbCyl3").shader.textureTransformList[3]-- transform(1.0000, 0.0000, 0.0000, 0.0000, 0.0000, 1.0000, \0.0000, 0.0000, 0.0000, 0.0000, 1.0000, 0.0000, 0.0000, 0.0000, \0.0000, 1.0000)
This statement halves the height and width of the fifth texture used by the shader gbCyl3. If the textureRepeatList[5] value of gbCyl3 is set to TRUE, four copies of the texture will be tiled across the shader.
member("scene").shader("gbCyl3").textureTransformList[5].scale = \vector(0.5, 0.5, 1)
This statement rotates the fourth texture used by the shader gbCyl3 by 90˚ from vector(0, 0, 0).
member("scene").shader("gbCyl3").textureTransformList[4].rotation \= vector(0, 0, 90)
These statements rotate the third texture used by the shader gbCyl3 by 90∞ around its center, assuming that textureList[3] is a 128x128 sized texture.
s = member("scene").shader("gbCyl3")s.textureTransformList[3].translate(-64,-64,0)s.textureTransformList[3].rotate(0,0,90)s.textureTransformList[3].translate(64,64,0)
Chapter 10416
textureTypeSyntax
member(whichCastmember).textureType
Description
3D texture property; allows you to get or set the texture type for the default texture. Possible values are as follows:
• #none specifies that there is no texture type.
• #default uses the texture from the original shader as the texture.
• #member uses the image from the specified cast member as the texture.
The default value for this property is #default. You must specify #member for this property in order to use the textureMember property.
Example
This statement sets the textureType property of the cast member Scene to #member. This makes it possible use a bitmap cast member as the source of the default texture by setting the textureMember property.
member("Scene").textureType = #membermember("Scene").textureMember = "grass"
See also
textureMember
3D Lingo Dictionary 417
toon (modifier)Syntax
member(whichCastmember).model(whichModel).toon.toonModifierProperty
Description
3D modifier; once you have added the #toon modifier to a model you can get and set the #toon modifier properties.
The toon modifier draws a model using only a handful of colors, and resulting in a cartoon style of rendering of the model’s surface. When the #toon modifier is applied, the model's shader texture, reflectionMap, diffuseLightMap, specularLightMap, and glossMap properties are ignored.
When the #toon modifier is used in conjunction with the #inker modifier, the rendered effect is cumulative and varies depending on which modifier was first applied. Note, that the list of modifiers returned by the modifier property will list #inker or #toon (whichever was added first), but not both. The toon modifier can not be used in conjunction with the #sds modifier.
The #toon modifier has the following properties:
Note: For more detailed information about the following properties see the individual property entries.
style allows you to get or set the style applied to color transitions. Possible values include:
#toon gives sharp transitions between available colors.
#gradient gives smooth transitions between available colors.
#blackAndWhite gives sharp transition between black and white.
colorSteps allows you to get or set the number of different colors used for lighting calculations. When setting this value it is rounded down to nearest power of 2. Allowed values are 2, 4, 8, and 16. The default is 2.
shadowPercentage allows you to get or set the percentage of the colors (colorSteps) defined for lighting used to render the shadowed portion of the model’s surface. Possible values range from 0 to 100. The default is 50.
highlightPercentage allows you to get or set the percentage of the colors defined for lighting (colorSteps) used to render the highlighted portion of the model’s surface. Possible values range from 0 to 100. The default is 50.
shadowStrength allows you to get or set the level of darkness applied to the shadowed portion of the model’s surface. Possible values are any non-negative floating point number. The default value is 1.0.
highlightStrength allows you to get or set the level of brightness applied to the highlighted portion of the model’s surface. Possible values are any non-negative floating point number. The default value is 1.0.
Chapter 10418

lineColor allows you to get or set the color of lines drawn by the inker. Possible values are any valid Lingo color object. The default value is rgb (0, 0, 0), which is black.
creases allows you to get or set whether lines are drawn in creases. This is a Boolean value; the default value is True.
creaseAngle if creases is set to TRUE, this property allows you to get or set how sensitive the line drawing function of the toon modifier is to the presence of creases.
boundary allows you to get or set whether lines are drawn around the boundary of the surface. This is a Boolean value; the default value is True.
lineOffset allows you to get or set where lines are drawn relative to the shaded surface and the camera. Negative lines move lines toward the camera. Positive values move lines away from the camera. Possible values are floating point numbers from -100.0 to 100.0. The default value is -2.0.
useLineOffset allows you to get or set whether lineOffset is on or off. This is a Boolean value; the default value is False.
silhouettes allows you to get or set whether lines are drawn to define the edges along the border of a model, outlining it’s shape. This is a Boolean value; the default value is True.
See also
addModifier, modifiers, sds (modifier), inker (modifier)
topSyntax
modelResourceObjectReference.top
Description
3D command; when used with a model resource whose type is #box, allows you to both get and set the top property of the model resource.
The top property determines whether the top of the box is sealed (TRUE) or open (FALSE). The default value is TRUE.
Example
This statement sets the top property of the model resource Gift box to FALSE, meaning the top of this box will be open.
member("3D World").modelResource("Gift box").top = FALSE
See also
back, bottom, front
3D Lingo Dictionary 419
topCapSyntax
modelResourceObjectReference.topCap
Description
3D command; when used with a model resource whose type is #cylinder, allows you to both get and set the topCap property of the model resource.
The topCap property determines whether the top cap of the cylinder is sealed (TRUE) or open (FALSE). The default value for this property is FALSE.
Example
This statement sets the topCap property of the model resource Tube to FALSE, meaning the top of this cylinder will be open.
member("3D World").modelResource("Tube").topCap = FALSE
topRadiusSyntax
modelResourceObjectReference.topRadius
Description
3D command; when used with a model resource whose type is #cylinder, allows you to both get and set the topRadius property of the model resource, as a floating-point value.
The topRadius property determines the radius of the top cap of the cylinder. This property must always be 0.0 or greater. The default value is 25.0. Setting topRadius to 0.0 produces a cone.
Example
This statement sets the topRadius property of the model resource Tube to 0.0. If the bottom radius has a value greater than 0, models using Tube will be conical.
member("3D World").modelResource("Tube").topRadius = 0.0
Chapter 10420
transform (command)Syntax
transform()transform(n1,n2,n3, ... ,n14,n15,n16)
Description
3D command; this command creates a transform object. When this command is used without providing any parameters it creates a transform object equal to the identity transform. The identity transform has positional and rotational components of vector(0,0,0), and it has a scale component of vector(1,1,1). When this command is used while providing sixteen parameters in the form of n1,n2,n3, ... ,n14,n15,n16 then this command creates a transform object using those 16 entries for the transform data.
Examples
This statement creates an identity transform and stores it in the variable tTransform.
tTransform = transform()
This statement creates an identity transform by specifying all 16 of its elements, and it stores the new transform in the variable tTransform.
tTransform = transform(1.0000,0.0000,0.0000,0.0000, \0.0000,1.0000,0.0000,0.0000, 0.0000,0.0000,1.0000,0.0000, \0.0000,0.0000,0.0000,1.0000)
This statement creates a custom transform by specifying all 16 of its elements, and it stores the new transform in the variable tTransform. The transform created has a position property of vector(19.2884, 1.7649, 4.2426), a rotation property of vector(75.7007, 0.0000, -6.5847) and a scale property of vector(0.4904, 0.7297, 0.3493).
tTransform = transform(0.4872,-0.0562,0.0000,0.0000, \0.0795,0.1722,0.7071,0.0000, -0.0795,-0.1722,0.7071,0.0000, \19.2884,1.7649,4.2426,1.0000)
See also
transform (property), preRotate, preTranslate, preScale, rotate, translate, scale (command)
3D Lingo Dictionary 421

transform (property)Syntax
member(whichCastmember).node(whichNode).transformmember(whichCastmember).node(whichNode).transform.transform\Propertymember(whichCastmember).model(whichModel).bonesPlayer.\bone[boneID].transformmember(whichCastmember).model(whichModel).bonesPlayer.\bone[boneID].transform.transformProperty
Description
3D property and command; allows you to get or set the transform associated with a particular node or a specific bone within a model using the bonesPlayer modifier. As a command, transform provides access to the various commands and properties of the transform object. A node can be a camera, group, light or model object.
For node objects, this property defaults to the identity transform. A node’s transform defines the position, rotation and scale of the node relative to is parent object. If a node’s parent is the World group object, then the transform property of the node has the same value as is returned by the getWorldTransform() command.
For bones within models using the bonesPlayer modifier, this property defaults in value to the transform assigned to the bone upon creation of the model file. The transform of a bone represents the bone’s rotation relative to its parent bone and its position relative to its original joint position. The original joint position is determine upon creation of the model file.
You can use the following transform commands and properties with the transform property of node objects:
Note: This section only contains summaries, see the individual entries for more detailed information.
preScale applies scaling before the current positional, rotational, and scale offsets held by the transform.
preTranslate applies a translation before the current positional, rotational, and scale offsets held by the transform.
preRotate applies a rotation before the current positional, rotational, and scale offsets held by the transform.
scale (command) applies scaling after the current positional, rotational, and scale offsets held by the transform.
scale (transform) allows you to get or set the degree of scaling of the transform.
translate applies a translation after the current positional, rotational, and scale offsets held by the transform.
Chapter 10422

rotate applies a rotation after the current positional, rotational, and scale offsets held by the transform.
position (transform) allows you to get or set the positional offset of the transform.
rotation (transform) allows you to get or set the rotational offset of the transform.
If you want to modify the transform property of a bone within a model, then you must store a copy of the original transform of the bone, modify the stored copy using the above commands and properties, then reset the bone’s transform property so that it is equal to the modified transform. For example:
t = member(“character”).model(“biped”).bonesPlayer.bone[38].\transform.duplicate()t.translate(25,0,-3)member(“character”).model(“biped”).bonesPlayer.bone[38].\transform = t
Examples
This statement shows the transform of the model box, followed by the position and rotation properties of the transform.
put member("3d world").model("box").transform-- transform(1.000000,0.000000,0.000000,0.000000, \0.000000,1.000000,0.000000,0.000000, \0.000000,0.000000,1.000000,0.000000, -\94.144844,119.012825,0.000000,1.000000)put member("3d world").model("box").transform.position-- vector(-94.1448, 119.0128, 0.0000)put member("3d world").model("box").transform.rotation--vector(0.0000, 0.0000, 0.0000)
See also
interpolateTo(), scale (transform), rotation (transform), position (transform), bone, worldTransform, preRotate, preScale(), preTranslate()
3D Lingo Dictionary 423

translateSyntax
member(whichCastmember).node(whichNode).translate(xIncrement, \yIncrement, zIncrement {, relativeTo})member(whichCastmember).node(whichNode).translate\(translateVector {, relativeTo})transform.translate(xIncrement, yIncrement, zIncrement \{, relativeTo})transform.translate(translateVector {, relativeTo})
Description
3D command; applies a translation after the current positional, rotational, and scale offsets held by a referenced node’s transform object or the directly referenced transform object. The translation must be specified as a set of three increments along the three corresponding axes. These increments may be specified explicitly in the form of xIncrement, yIncrement, and zIncrement, or by a translateVector, where the x component of the vector corresponds to the translation along the x axis, y about y axis, and z about z axis.
A node can be a camera, model, light or group object.
The optional relativeTo parameter determines which coordinate system’s axes are used to apply the desired translational changes. The relativeTo parameter can have any of the following values:
• #self applies the increments relative to the node’s local coordinate system (the x, y and z axes specified for the model during authoring). This value is used as the default if you use the translate command with a node reference and the relativeTo parameter is not specified.
• #parent applies the increments relative to the node’s parent’s coordinate system. This value is used as the default if you use the translate command with a transform reference and the relativeTo parameter is not specified.
• #world applies the increments relative to the world coordinate system. If a model’s parent is the world, than this is equivalent to using #parent.
• nodeReference allows you to specify a node to base your translation upon, the command applies the translations relative to the coordinate system of the specified node.
Chapter 10424

Examples
This example constructs a transform using the transform command, then it initializes the transform’s position and orientation in space before assigning the transform to the model named mars. Finally this example displays the resulting position of the model.
t =transform()t.transform.identity()t.transform.rotate(0, 90, 0)t.transform.translate(100, 0, 0)gbModel = member("scene").model("mars")gbModel.transform = tput gbModel.transform.position-- vector(100.0000, 0.0000, 0.0000)
This statement moves the model Bip 20 units along the x axis of its parent node.
put member("Scene").model("Bip").position-- vector( -38.5000, 21.2500, 2.0000)member("Scene").model("Bip").translate(20, 10, -0.5)put member("Scene").model("Bip").position-- vector( -18.5000, 31.2500, 1.5000)
See also
transform (property), preTranslate(), scale (command), rotate
3D Lingo Dictionary 425

transparentSyntax
member(whichCastmember).shader(whichShader).transparentmember(whichCastmember).model(whichModel).shader.transparentmember(whichCastmember).model(whichModel).shaderList\[shaderListIndex].transparent
Description
3D standard shader property; lets you get or set whether a model is blended using alpha values (TRUE) or is rendered as opaque (FALSE). The default value for this property is TRUE (alpha-blended).
The functionality of shader.blend is dependent upon this property.
All shaders have access to the #standard shader properties; in addition to these standard shader properties shaders of the types #engraver, #newsprint, and #painter have properties unique to their type. See the newShader for more information.
Example
This statement causes the model Pluto to be rendered opaque. The setting of the blend property for the model’s shader will have no effect.
member("scene").model("Pluto").shader.transparent = FALSE
See also
blendFactor, blend
tunnelDepthSyntax
member(whichTextmember).tunnelDepthmember(whichCastMember).modelResource(whichExtruderModel\Resource).tunnelDepth
Description
A 3D extruder model resource property, as well as a text cast member property. Using this property allows you to get or set the extrusion depth (the distance between the front and back faces) of a 3D text model resource Possible values are floating point numbers between 1.0 and 100.0. The default value is 50.0.
It is recommended that you see extrudeToMember entry for more information about working with extruder model resources and text cast members.
Chapter 10426
Example
In this example, the cast member logo is a text cast member. This statement sets the tunnelDepth of logo to 5. When logo is displayed in 3D mode, its letters will be very shallow.
member("logo").tunnelDepth = 5
In this example, the model resource of the model Slogan is extruded text. This statement sets the tunnelDepth of Slogan's model resource to 1000. Slogan's letters will be extremely deep.
member("scene").model("Slogan").resource.tunnelDepth = 1000
See also
extrude3D
tweenModeSyntax
member(whichCastmember).modelResource(whichModelResource).tweenModemodelResourceObjectReference.tweenMode
Description
3D particle property; allows you to get or set whether the color of a particle varies according to it’s speed or age. The tweenMode property can have the following values:
• #velocity alters the color of the particle between colorRange.start and colorRange.end based on the velocity of the particle.
• #age alters the color of the particle by linearly interpolating the color between colorRange.start and colorRange.end over the lifetime of the particle. This is the default setting for this property.
Example
In this example, ThermoSystem is a model resource of the type #particle. This statement sets the ThermoSystem's tweenMode to #velocity, so its slower particles will not reach the color specified by colorRange.end, while its faster particles will.
member(8,2).modelResource("thermoSystem").tweenMode = \#velocitytype (light)
3D Lingo Dictionary 427

type (light)Syntax
member(whichCastmember).light(whichLight).type
Description
3D light property; the light type of the referenced light. This property’s possible values are:
• #ambient lights of this type cast their light evenly on all surfaces. The intensity of ambient lights is not affected by distance from the light source.
• #directional lights appear to shine in a particular direction, but are not as focused as lights of type #spot. The intensity of directional lights decreases with distance from the light source.
• #point lights shine in all directions from a specific location in the 3D world. The effect is similar to a bare light bulb hanging in a room. The intensity of point lights decreases with distance from the light source.
• #spot Lights of this type cast their light from a particular point and within the cone defined by the light’s forward direction and spotAngle property. The intensity of spot lights declines with distance from the light source using the values defined in the light’s attenuation property.
Example
The following statement displays the type property of the light named MainLight.
put member("3D").motion("MainLight").type-- #spot
See also
spotAngle, attenuation
Chapter 10428
type (model resource)Syntax
member(whichCastmember).modelResource(whichModelResource).type
Description
3D model resource property; the resource type of the referenced model resource. This property’s possible values are:
• #box indicates that this model resource is a primitive box resource created using the newModelResource command.
• #cylinder indicates that this model resource is a primitive cylinder resource created using the newModelResource command.
• #extruder indicates that this model resource is a primitive text extruder resource created using the extrude3d command.
• #mesh indicates that this model resource is a primitive mesh generator resource created using the newMesh command.
• #particle indicates that this model resource is a primitive particle system resource created using the newModelResource command.
• #plane indicates that this model resource is a primitive plane resource created using the newModelResource command.
• #sphere indicates that this model resource is a primitive sphere resource created using the newModelResource command.
• #fromFile indicates that this model resource was created external to Director and was loaded from an external file or a cast member.
Example
The following statement displays the type property of the model resource named Helix.
put member("helix models").modelResource("Helix").type-- #fromFile
See also
newModelResource, newMesh, extrude3D
3D Lingo Dictionary 429

type (motion)Syntax
member(whichCastmember).motion(whichMotion).type
Description
3D motion property; the motion type of the referenced motion object. This property’s possible values are:
• #bonesPlayer indicates that this motion is a bones based animation and it requires the use of the #bonesPlayer modifier for playback.
• #keyFramePlayer indicates that this motion is a keyframed animation and it requires the use of the #keyFramePlayer modifier for playback.
• #none indicates that this motion has no mapped movement and it is suitable for use by either the #bonesPlayer or the #keyFramePlayer modifier for playback. The default motion object found in every 3D cast member is of this type.
Examples
The following statement displays the type property of the motion named Run.
put member("scene").motion("Run").type-- #bonesPlayer
The following statement displays the type property of the motion named DefaultMotion.
put member("scene").motion("DefaultMotion").type-- #none
See also
bonesPlayer (modifier), keyframePlayer (modifier)
Chapter 10430
type (shader)Syntax
member(whichCastmember).shader(whichShader).type
Description
3D shader property; the shader type of the referenced shader object. This property’s possible values are:
• #standard indicates that this is a standard shader.
• #painter indicates that this is a painter shader.
• #newsprint indicates that this is a newsprint shader.
• #engraver indicates that this is an engraver shader.
Examples
This statement shows that the shader used by the model named box2 is a painter shader.
put member("Scene").model("box2").shader.type-- #painter
See also
newShader
type (texture)Syntax
member(whichCastmember).shader(whichShader).type
Description
3D texture property; the texture type of the referenced texture object. This property’s possible values are:
• #fromCastMember indicates that this is texture was created from a Director cast member supporting the image property using the newTexture command.
• #fromImageObject indicates that this is texture was created from an image object using the newTexture command.
• #importedFromFile indicates that this texture was created external to Director and created upon file import or cast member loading.
Example
This statement shows that the texture used by the shader for the model named Pluto was created from an image object.
put member("scene").model("Pluto").shader.texture.type-- #fromImageObject
See also
newTexture
3D Lingo Dictionary 431

unregisterAllEventsSyntax
member(whichMember).unregisterAllEvents()
Description
3D command; unregisters the referenced cast member for all event notifications. Therefore, all handlers that were previously registered to respond to events using the registerForEvent command will no longer be triggered when those events occur.
Example
This statement unregisters the cast member named Scene for all event notifications.
member("Scene").unregisterAllEvents()
See also
registerForEvent()
updateSyntax
member(whichCastmember).model(whichModel).update
Description
3D command; causes animations on the model to update without rendering. Use this command to find the exact position of an animating model in Lingo.
Chapter 10432
userDataSyntax
member(whichCastmember).model(whichModel).userDatamember(whichCastmember).light(whichLight).userDatamember(whichCastmember).camera(whichCamera).userDatamember(whichCastmember).group(whichCamera).userData
Description
3D property; returns the userData property list of a model, group, camera, or light. The default value of this property for an object that was created outside of Director is a list of all the properties that were assigned to the model’s userData property in the 3D modeling tool. The default value of this property for objects created inside of Director is an empty property list [:], unless the object was created using any of the clone commands. If a cloning command was used to create the object then the new object’s userData property defaults to a value equal to that of the original source object.
To modify the elements of this list you must use the addProp and deleteProp commands documented in the main Lingo Dictionary.
Examples
This statement displays the userData property of the model named New Body.
put member("Car").model("New Body").userData-- [#driver: "Bob", #damage: 34]
This statement adds the property #health with the value 100 to the userData property list for the model named Player.
member(“scene”).model(“Player”).userData.addProp(#health,100)
3D Lingo Dictionary 433

useDiffuseWithTextureSyntax
member(whichCastmember).shader(whichShader).useDiffuseWithTexture
Description
3D standard shader property; allows you to get or set whether the diffuse color is used to modulate the texture (TRUE) or not (FALSE).
When set to TRUE, this property works in conjunction with the blendFunction and blendConstant properties: when blendFunction is set to #blend, the diffuse color is weighed with the texture color to determine the final color. For example, if blendFunction is set to #blend, and blendConstant is set to 100.0, the final color is the pure texture color. If we change blendConstant to 0.0, the final color is the diffuse color. If we change blendConstant to 10.0, the final color is 10% texture color, and 90% diffuse color.
The default value for this property is FALSE.
All shaders have access to the #standard shader properties; in addition to these standard shader properties shaders of the types #engraver, #newsprint, and #painter have properties unique to their type. See the newShader for more information.
Example
In this example, the shaderList of the model MysteryBox contains six shaders. Each shader has a texture list which contains up to eight textures. The diffuseColor property of the cast member (Level2) is set to rgb(255, 0, 0). The blendFunction property of all six shaders is set to #blend, and the blendConstant property of all six shaders is set to 80. This statement sets the useDiffuseWithTexture property of all shaders used by MysteryBox to TRUE. A little bit of red will be blended into the surface of the model. This property is affected by the settings of the blendFunction, blendFunctionList, blendSource, blendSourceList, blendConstant, and blendConstantList properties.
member("Level2").model("MysteryBox").shaderlist.useDiffuseWith\Texture = TRUE
See also
blendFunction, blendConstant
useLineOffsetSyntax
member(whichCastmember).model(whichModel).toon.useLineOffsetmember(whichCastmember).model(whichModel).inker.useLineOffset
Chapter 10434
Description
3D toon and inker modifier property; indicates whether the modifier’s lineOffset property is used by the modifier when it draws lines on the surface of the model.
The default value of this property is FALSE.
Example
This statement sets the useLineOffset property of the toon modifier for the model named Teapot to FALSE. The toon modifier’s lineOffset property will have no effect.
member("tp").model("Teapot").toon.useLineOffset = FALSE
See also
lineOffset
vector()Syntax
vector (x, y, z)
Description
3D data type and function; a vector describes a point in 3D space according to the parameters x, y, and z which are the specific distances from the reference point along the X axis, Y axis, and Z axis, respectively. If the vector is in world space, the reference point is the world origin, vector(0, 0, 0). If the vector is in object space, the reference point is the object’s position and orientation. This function returns a vector object.
Vector values can be operated upon by the +, -, * and / operators. See their individual definitions for more information.
Examples
This statement creates a vector and assigns it to the variable MyVector:
MyVector = vector(10.0, -5.0, 0.0)
This statement adds two vectors and assigns the resulting value to the variable ThisVect:
ThisVect = vector(1.0, 0.0, 0.0) + vector(0.0, -12.5, 2.0)put ThisVect-- vector(1.0000, -12.5000, 2.0000)
See also
+ (addition), - (subtraction), * (multiplication), / (division)
3D Lingo Dictionary 435
vertexList (mesh generator)Syntax
member(whichCastmember).modelResource(whichModelResource).vertexList
Description
3D property; when used with a model resource whose type is #mesh, allows you to get or set the vertexList property for the model resource.
The vertexList is a linear list of each vertex used in the mesh. A single vertex may be shared by numerous faces of the mesh. You can specify a list of any size for this property, but it will only store the number of items specified when using the newMesh command to create the #mesh model resource.
Example
This statement sets the vertexList of the model resource named Triangle.
member("Shapes").modelResource("Triangle").vertexList = \[vector(0,0,0), vector(20,0,0), vector(20, 20, 0)]
See also
newMesh, face, vertices
vertexList (mesh deform)Syntax
member(whichCastmember).model(whichModel).meshDeform.mesh\[index].vertexList
Description
3D property; when used with a model with the #meshDeform modifier attached, it allows you to get or set the vertexList property for the specified mesh within the referenced model.
The vertexList is a linear list of each vertex used in the specified mesh. A single vertex may be shared by numerous faces of the mesh.
If a model makes use of the #sds or #lod modifiers in addition to the #meshDeform modifier, then it is important to know that the value of this property will change under the influence of the #sds or #lod modifiers.
Example
This statement displays the #meshDeform modifier’s vertexList for the first mesh in the model named Triangle.
put member("Shapes").model("Triangle").meshDeform.mesh[1].vertexList-- [vector(0,0,0), vector(20,0,0), vector(20, 20, 0)]
See also
face, vertices, mesh (property)
Chapter 10436

verticesSyntax
member(whichCastmember).modelResource(whichModelResource).\face[faceIndex].vertices
Description
3D face property; when used with a mode resource whose type is #mesh, this property allows you to get or set which vertices from the resource’s vertexList (mesh deform) to use for the mesh face specified by faceIndex.
This property is a linear list of three integers corresponding to the index positions of the three vertices, as found in the mesh’s vertexList property, that comprise the specified face.
The vertices must be specified in the list using counterclockwise winding in order to achieve an outward pointing surface normal.
If you make changes to this property or use the generateNormals() command, you will need to call the build() command in order to rebuild the mesh.
Example
This example displays the vertexList of the mesh model resource named SimpleSquare, then it displays the vertices property for the second face of that mesh.
put member("3D").modelResource("SimpleSquare").vertexList-- [vector( 0.0000, 0.0000, 0.0000), vector( 0.0000, 5.0000, \0.0000), vector( 5.0000, 0.0000, 0.0000), vector( 5.0000, \5.0000, 0.0000)]put member("3D").modelResource("SimpleSquare").face[1].vertices-- [3, 4, 1]
See also
face, vertexList (mesh deform), generateNormals()
3D Lingo Dictionary 437

visibilitySyntax
member(whichCastmember).model(whichModel).visibilitymodelObjectReference.visibility
Description
3D property; allows you to get or set the visibility property of the referenced model. This property determines how the model’s geometry is drawn. It can have one of the following values:
• #none specifies that no polygons are drawn and the model is invisible.
• #front specifies that only those polygons facing the camera are drawn.This method is referred to as back face culling and optimizes rendering speed. This is the default setting for the property.
• #back specifies that only those polygons facing away from the camera are drawn. Use this setting when you want to draw the inside of a model, or for models which are not drawing correctly, possibly because they were imported from a file format that used a different handiness value when computing normals.
• #both specifies that both sides of all polygons are drawn.Use this setting when you want to see the plane regardless of the viewing direction, and for models that are not drawing correctly.
Example
This statement shows that the visibility property of the model Monster02 is set to #none. The model is invisible.
put member("3D").model("Monster02").visibility-- #none
widthSyntax
member(whichCastmember).modelResource(whichModelResource).widthmodelResourceObjectReference.width
Description
3D property; allows you to get or set the width of the plane for a model resource whose type is #box or #plane. This property must be greater than 0.0, and has a default setting of 1.0. For objects whose type is #box, the default value of width is 50.0. For objects whose type is #plane, the default setting is 1.0. width is measured along the X axis.
Example
This statement sets the width of the model resource Grass plane to 250.0.
member("3D World").modelResource("Grass plane").width = 250.0
Chapter 10438

widthVerticesSyntax
member(whichCastmember).modelResource(whichModelResource).widthVerticesmodelResourceObjectReference.widthVertices
Description
3D property; allows you to get or set the number of vertices (as an integer) on the X axis of a model resource whose type is #box or #plane. This property must be greater than or equal to 2, and has a default value of 2.
Example
This statement sets the widthVertices property of the model resource Tower to 10. Eighteen polygons (2 * (10-1) triangles) will be used to define the geometry of the model resource along its x axis.
member("3D World").modelResource("Tower").widthVertices = 10
windSyntax
member(whichCastmember).modelResource(whichModelResource).windmodelResourceObjectReference.wind
Description
3D property; allows you to get or set the wind property of a model resource whose type is #particle, as a vector.
This wind property defines the direction and strength of the wind force applied to all particles during each simulation step. The default value for this property is vector(0, 0, 0), which specifies that no wind is applied.
Example
put member("3D").modelResource("fog bank").wind-- vector(10.5,0,0)
3D Lingo Dictionary 439
worldPositionSyntax
member(whichCastmember).model(whichModel).worldPositionmember(whichCastmember).light(whichLight).worldPositionmember(whichCastmember).camera(whichCamera).worldPositionmember(whichCastmember).group(whichGroup).worldPosition
Description
3D property; allows you to get and not set the position of the specified node in world coordinates. A node can be a model, group, camera, or light. This property is equivalent in result to using getWorldTransform().position command. The position of a node is represented by a vector object.
Example
This statement shows that the position of the model named Mars, in world coordinates, is the vector (-1333.2097, 0.0000, -211.0973).
put member("scene").model("Mars").worldPosition-- vector(-1333.2097, 0.0000, -211.0973)
See also
getWorldTransform(), position (transform)
worldSpaceToSpriteSpaceSyntax
member(whichCastmember).camera(whichCamera).worldSpaceToSprite\Space(vector)
Description
3D command; returns the point within the camera’s rect at which the world-relative position specified by vector would appear. The position returned by this command is relative to the upper left corner of the camera’s rect.
If the position specified is out of view of the camera, this command returns void.
Example
This statement shows that the world origin, specified by vector (0, 0, 0), appears at point (250,281) within the camera’s rect.
put sprite(5).camera.worldSpaceToSpriteSpace(vector(0, 0, 0))-- point(250, 281)
See also
spriteSpaceToWorldSpace, rect
Chapter 10440

worldTransformSyntax
member(whichMember).model(whichModel).bonesPlayer.bone[index].\worldTransform
Description
3D bonesplayer property; allows you to get the world relative transform of a specific bone, as opposed to using the transform property which returns the bone’s parent relative transform. The worldTransform property can only be used with bonesplayer modified models.
Example
This statement stores a bone’s world relative transform in the variable finalTransform:
finalTransform = member("3D").model(“biped”).bonesPlayer.bone[3].worldTransform
See also
bone, getWorldTransform(), transform (property)
wrapTransformSyntax
member( whichCastmember ).shader( ShaderName ).wrapTransformmember( whichCastmember ).shader[ ShaderIndex ].wrapTransformmember( whichCastmember ).model[modelName].shader.wrapTransformmember( whichCastmember ).model.shaderlist[ shaderListIndex ].\wrapTransform
Description
3D standard shader property; this property provides access to a transform that modifies the texture coordinate mapping for the shader's texture. Rotate this transform to alter how the texture is projected onto a model surface. The texture remains unaffected; the transform modifies only the orientation of how the shader applies the texture.
Note: Note: This command only has an effect when the shader's textureModeList is set to is #planar, #spherical, or #cylindrical.
Example
These statements set the transformMode of the shader named "shad2" to #wrapCylindrical, then rotates that cylindrical projection by 90 degrees about the x axis so that the cylindrical mapping wraps around the y axis instead of the z axis.
s = member("Scene").shader("shad2")s.textureMode= #wrapCylindricals.wrapTransform.rotate(90.0, 0.0, 0.0)
3D Lingo Dictionary 441

wrapTransformListSyntax
member( whichCastmember ).shader( ShaderName ).wrapTransformList\[ textureLayerIndex ]member( whichCastmember ).shader[ shaderListIndex ].\wrapTransformList[ textureLayerIndex ]member( whichCastmember ).model( modelName ).\shader.wrapTransformList[ textureLayerIndex ]member( whichCastmember ).model( modelName ).shaderList\[ shaderListIndex ]. wrapTransformList[ textureLayerIndex ]
Description
3D standard shader property; this property provides access to a transform that modifies the texture coordinate mapping of a specified texture layer. Rotate this transform to alter how the texture is projected onto model surfaces. The texture itself remains unaffected; the transform modifies only the orientation of how the shader applies the texture.
Note: wrapTransformList[textureLayerIndex] only has an effect when textureModeList[textureLayerIndex] is set to #planar, #spherical, or #cylindrical.
Example
Line two sets the transformMode of the third texture layer of the shader named "shad2" to #wrapCylindrical. Line three rotates that cylindrical projection by 90 degrees about the x axis so that the cylindrical mapping wraps around the y axis instead of the z axis.
s = member("Scene").shader("shad2")s.textureModeList[3] = #wrapCylindricals.wrapTransformList[3].rotate(90.0, 0.0, 0.0)
See also
newShader, textureModeList
x (vector property)Syntax
member(whichCastmember).vector.xmember(whichCastmember).vector[1]
Description
3D property; allows you to get or set the x component of a vector.
Example
This statement shows the x component of a vector.
vec = vector(20, 30, 40)put vec.x-- 20.0000
Chapter 10442

xAxisSyntax
member(whichCastmember).transform.xAxis
Description
3D transform property; allows you to get but not set the vector representing the transform’s canonical X axis in transform space.
Example
The first line of this example sets the transform of the model ModCylinder to the identity transform. The next two lines show that the X axis of ModCylinder is the vector ( 1.0000, 0.0000, 0.0000). This means that the X axis of ModCylinder is aligned with the X axis of the world. The next line rotates ModCylinder 90˚ around its Y axis. This rotates the axes of ModCylinder as well. The last two lines show that the X axis of ModCylinder is now the vector ( 0.0000, 0.0000, -1.0000 ). This means that the X axis of ModCylinder now is aligned with the negative Z axis of the world.
member("Engine").model("ModCylinder").transform.identity()put member("Engine").model("ModCylinder").transform.xAxis-- vector( 1.0000, 0.0000, 0.0000 )member("Engine").model("ModCylinder").rotate(0, 90, 0)put member("Engine").model("ModCylinder").transform.xAxis-- vector( 0.0000, 0.0000, -1.0000 )
y (vector property)Syntax
member(whichCastmember).vector.ymember(whichCastmember).vector[2]
Description
3D property; allows you to get or set the y component of a vector.
Example
This statement shows the y component of a vector.
vec = vector(20, 30, 40)put vec.y-- 30.0000
3D Lingo Dictionary 443
yAxisSyntax
member(whichCastmember).transform.yAxis
Description
3D transform property; allows you to get but not set the vector representing the transform’s canonical Y axis in transform space.
Example
The first line of this example sets the transform of the model ModCylinder to the identity transform. The next two lines show that the Y axis of ModCylinder is the vector ( 0.0000, 1.0000, 0.0000). This means that the Y axis of ModCylinder is aligned with the Y axis of the world. The next line rotates ModCylinder 90˚ around its X axis. This rotates the axes of ModCylinder as well. The last two lines show that the Y axis of ModCylinder is now the vector ( 0.0000, 0.0000, 1.0000 ). This means that the Y axis of ModCylinder now is aligned with the positive Z axis of the world.
member("Engine").model("ModCylinder").transform.identity()put member("Engine").model("ModCylinder").transform.yAxis-- vector( 0.0000, 1.0000, 0.0000 )member("Engine").model("ModCylinder").rotate(90, 0, 0)put member("Engine").model("ModCylinder").transform.yAxis-- vector( 0.0000, 0.0000, 1.0000 )
yonSyntax
member(whichCastmember).camera(whichCamera).yon
Description
3D property; allows you to get or set the distance from the camera defining where along the camera’s Z axis the view frustum is clipped. Objects at a distance greater than yon are not drawn.
The default value for this property is 3.40282346638529e38.
Example
This statement sets the yon property of camera 1 to 50000.
member("3d world").camera[1].yon = 50000
See also
hither
Chapter 10444

z (vector property)Syntax
member(whichCastmember).vector.zmember(whichCastmember).vector[3]
Description
3D property; allows you to get or set the z component of a vector.
Example
This statement shows the z component of a vector.
vec = vector(20, 30, 40)put vec.z-- 40.0000
zAxisSyntax
member(whichCastmember).transform.zAxis
Description
3D transform property; allows you to get but not set the vector representing the transform’s canonical Z axis in transform space.
Examples
The first line of this example sets the transform of the model ModCylinder to the identity transform. The next two lines show that the Z axis of ModCylinder is the vector ( 0.0000, 0.0000, 1.0000). This means that the Z axis of ModCylinder is aligned with the Z axis of the world. The next line rotates ModCylinder 90˚ around its Y axis. This rotates the axes of ModCylinder as well. The last two lines show that the Z axis of ModCylinder is now the vector ( 1.0000, 0.0000, 0.0000 ). This means that the Z axis of ModCylinder now is aligned with the X axis of the world.
member("Engine").model("ModCylinder").transform.identity()put member("Engine").model("ModCylinder").transform.zAxis-- vector( 1.0000, 0.0000, 0.0000 )member("Engine").model("ModCylinder").rotate(0, 90, 0)put member("Engine").model("ModCylinder").transform.zAxis-- vector( 0.0000, 0.0000, -1.0000 )
3D Lingo Dictionary 445

Chapter 10446

. . . . . . . . . . . . . . . . . . . . . . . . . . . . . . . . . . . . . . . . . . . . . . . . . . . . . . . .. . . . . . . . . . . . . . . . . . . . . . . . . . . . . . . . . . . . . . . . . . . . . . . . . . . . .Part II
447
448

1
1CHAPTER 11Using the Shockwave Multiuser
. . . . . . . . . . . . . . . . . . . . . . . . . . . . . . . . . . . . . . . . . . . . . . . . . . . . . . . .. . . . . . . . . . . . . . . . . . . . . . . . . . . . . . . . . . . . . . . . . . . . . . . . . . . . .Server and Xtra
The Macromedia Shockwave Multiuser Server 3 and Xtra allow Director movies running in projectors or in Shockwave and Shockmachine to exchange information with other Director movies over the Internet or smaller networks. The Xtra and a 1000-user version of the server are included with the Director 8.5 Shockwave Studio. The Xtra is also included with Shockwave 8.5.
You can use the Multiuser Server and Xtra to do the following:
• Create a custom chat movie that allows real-time conversation.
• Hold an online meeting with a shared “whiteboard” that each participant can write on.
• Provide a shared presentation, allowing a presenter and an audience to all watch the presentation at the same time.
• Run a multiplayer interactive game.
Movies that use the Multiuser Xtra can exchange information in three basic ways:
• By sending it to the Shockwave Multiuser Server, which then sends it on to the movie or movies it is intended for.
• By establishing peer-to-peer connections directly with other movies.
• By connecting to a text-based server such as a standard mail or Internet Relay Chat server. In order to communicate with a text-based server, you must be familiar with the commands the server understands. You can send these commands to the text-based server in the same way you send other messages.
449
The Shockwave Multiuser Server and Xtra are two separate components that work together to enable multiuser movies. The server is a separate application that runs on a separate computer. The server can also be run on the same computer as the Director application during development of your movies. The Multiuser Xtra checks messages for errors, prepares them for passage over the network, and then sends them to the server. The server then determines whom the message was intended for and sends it to the appropriate recipient(s). The recipient’s Xtra gets the message from the network so that it can be used by the movie.
When using the server, movies can communicate with other instances of the same movie connected to the server (such as a chess movie exchanging player-move information with other instances of the chess movie), or with different movies (such as a chess movie exchanging chat messages with a checkers movie in a virtual game room).
The types of messages your movie sends depends on what you want the movie to do. Movies can share all the types of data that Lingo supports, including strings, integers, floating-point numbers, colors, dates, points, rects, lists, 3D vectors, and 3D transforms. In addition, cast members may be exchanged by using the media or picture of member cast member properties. This enables chat movies to share pictures of the participants, or collaborators to share diagrams, for example.
As a Lingo Xtra, the Multiuser Xtra extends Lingo by adding new commands and other elements to the Lingo vocabulary. The Xtra is used by writing Lingo scripts that include these commands. The multiuser behaviors included in Director’s Behavior Library provide all of the functionality that a basic chat application requires.
In addition to simply passing information from movie to movie, the Shockwave Multiuser Server also provides functions that make it easier to create rich and complex multiuser experiences:
• You can store and retrieve information such as user names or profiles in databases.
• You can create groups in order to organize users in logical ways, such as opposing teams in an adventure game.
• You can assign attributes to those groups, such as a team’s score.
• You can send messages directly to the server to get information about the server and the other movies connected to it.
• You can access text files on the server and make use of their contents.
• You can add Lingo scripts to the server that provide server-side logic and multithreading to support your multiuser movies.
Chapter 11450

New features of the Shockwave Multiuser ServerVersion 3 of the Shockwave Multiuser Server introduces important new features for creating rich, flexible multiuser experiences on the Internet.
What’s new in version 3
Version 3 of the server includes these enhancements:
• Server-side scripting with Lingo
• Server-side multithreading with Lingo
• Server-side Lingo for reading and writing files on the server computer
• Support for debugging Lingo scripts that run on the server
• Additional support for multiple IP addresses on a client machine
• Support for extending the server’s functionality by writing server Xtras
Creating multiuser moviesTo create a multiuser experience, you must design a movie that connects to the server or directly to another movie and then sends and receives messages that contain the information needed for the movie to function. For example, you might design a chat movie that connects to the server and then allows each user to send text messages and pictures to all users of the chat movie or to specific users. Or you might design a Ping-Pong game that has two people connect to the server and then sends messages describing the location of each user’s paddle and score.
For an example of the Lingo used to connect to the server, see the example Director movies in the Director 8.5/Learning/Lingo_examples/Multiuser_examples folder.
You use Lingo to control how a movie makes connections and handles messages. For those who want to avoid writing their own Lingo, Director includes several behaviors that perform tasks such as making server connections, sending chat messages, and creating a shared whiteboard. For information on using these behaviors, see the Multiuser section of Director’s Library palette and its accompanying tooltips.
Using the Shockwave Multiuser Server and Xtra 451
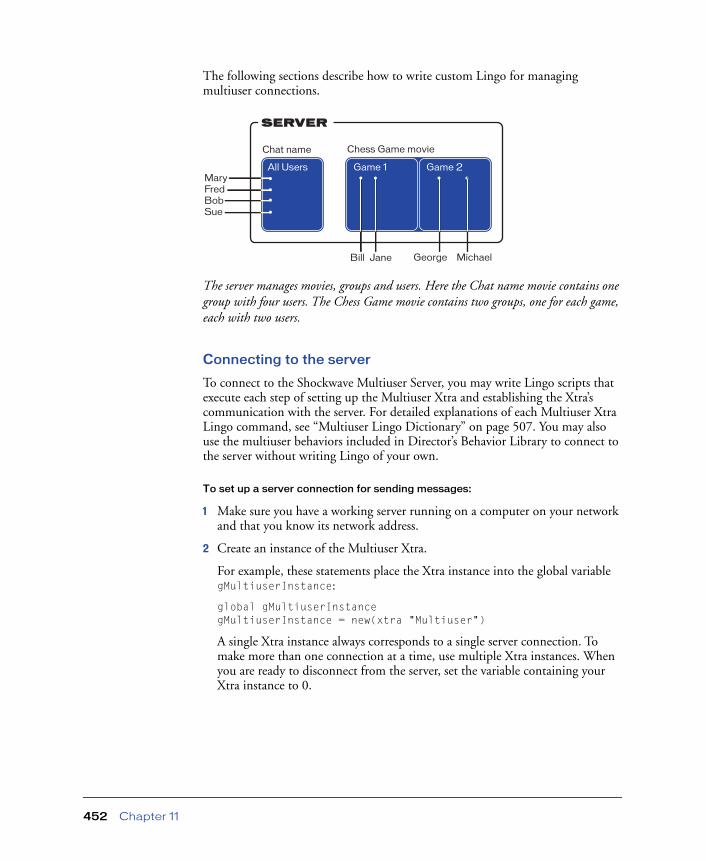
The following sections describe how to write custom Lingo for managing multiuser connections.
The server manages movies, groups and users. Here the Chat name movie contains one group with four users. The Chess Game movie contains two groups, one for each game, each with two users.
Connecting to the server
To connect to the Shockwave Multiuser Server, you may write Lingo scripts that execute each step of setting up the Multiuser Xtra and establishing the Xtra’s communication with the server. For detailed explanations of each Multiuser Xtra Lingo command, see “Multiuser Lingo Dictionary” on page 507. You may also use the multiuser behaviors included in Director’s Behavior Library to connect to the server without writing Lingo of your own.
To set up a server connection for sending messages:
1 Make sure you have a working server running on a computer on your network and that you know its network address.
2 Create an instance of the Multiuser Xtra.
For example, these statements place the Xtra instance into the global variable gMultiuserInstance:
global gMultiuserInstancegMultiuserInstance = new(xtra "Multiuser")
A single Xtra instance always corresponds to a single server connection. To make more than one connection at a time, use multiple Xtra instances. When you are ready to disconnect from the server, set the variable containing your Xtra instance to 0.
Chat name
All Users
Chess Game movie
Game 1 Game 2MaryFredBobSue
Bill Jane George Michael
SERVER
Chapter 11452

3 Set up one or more callbacks for handling incoming messages using setNetMessageHandler().
When your movie initially connects to the server, the server responds with a message confirming the connection. In order to handle this and subsequent messages, you must create callbacks. These are Lingo handlers that are run when messages arrive at a movie from the server or from peer-to-peer users. You must create at least one callback before your movie connects to the server. The arrival of a message is treated as a Lingo event in the same way that a mouse click is treated as a mouseUp event. Once the callback is declared in Lingo it will be triggered each time a message arrives from the network. A callback handler should be written to perform tasks based on the contents of the incoming message that triggers it.
For example, this statement declares that the handler defaultMessageHandler in the script cast member Connection Script is the handler to run when any incoming message is received from the server:
errCode = gMultiuserInstance.setNetMessageHandler( \#defaultMessageHandler, script "Connection Script")
The message handler would look like this:
on defaultMessageHandlerglobal gMultiuserInstancenewMessage = gMultiuserInstance.getNetMessage()member("messageOutput").text = string(newMessage)if newMessage.errorCode <> 0 then
alert "Incoming message contained an error."end if
end
The first parameter you specify with setNetMessageHandler() is a symbol for the handler you are declaring. You make it a symbol by adding a pound sign (#) to the beginning of the handler name. The second parameter is the name of the script object that contains the handler. This could be a script cast member or the name of a variable containing a behavior instance, a parent script, or a simple Lingo value to be passed to global scripts.
You can specify individual handlers to be run based on a particular message subject, a sender, or both by adding optional parameters to SetNetMessageHandler(). These individual handlers are run instead of the default message handler when the specified type of message arrives.
You can also add an optional integer parameter to the end of the setNetMessageHandler() command to tell Lingo to pass the message contents to the message handler as an argument. This prevents the handler from needing Lingo specifically to get the message out of the incoming message queue, as in the previous example. When you specify a value of TRUE (1), the message contents are passed to the handler as an argument. If you omit this parameter, it defaults to FALSE (0) and the message contents are not passed as an argument.
Using the Shockwave Multiuser Server and Xtra 453

This statement declares a handler that runs when a message containing the subject Chat Text arrives from sender Guest Speaker, and tells Lingo to pass those messages to the handler as arguments:
errCode = gMultiuserInstance.setNetMessageHandler( \#guestMessageHandler, script "Connection Script", "Chat Text",\"Guest Speaker", True)
The simplified message handler would look like this:
on guestMessageHandler me, messagemember("messageOutput").text = string(message)if message.errorCode <> 0 then
alert "Incoming message from Guest Speaker contained \an error."
end ifend
If you want to include the integer parameter without specifying a subject or a sender, use empty strings for the subject and sender.
errCode = gMultiuserInstance.setNetMessageHandler( \#guestMessageHandler, script "Connection Script", "", "", 1)
For information about message subjects, senders, and contents, see “Sending messages” on page 458.
4 Establish the server connection with connectToNetServer.
When the message handlers have been declared, you are ready to make your server connection. The Xtra connects to the server with a user name and password, along with other parameters you supply. You must know the server’s address and port number as well as the name you want your movie to use to identify itself.
Note: If you expect that your multiuser Shockwave movies will be run primarily on double-byte systems, such as Japanese and Korean, and your movies allow user names and other data to be entered in double-byte text, you should run your server on a double-byte system as well. On roman systems, user names and other properties are not case-sensitive. However, passwords are case sensitive. On Japanese and Korean systems, the server uses double-byte string comparisons. Server passwords can be as long as 250 characters on roman (single-byte) systems and 125 characters on double-byte systems.
The following Lingo connects the movie Tech Chat to a Shockwave Multiuser Server with a user ID of Bob and a password of MySecret. The example server name is chatserver.mycompany.com and the communications port number, 1626, is the default.
errCode = gMultiuserInstance.connectToNetServer( \"chatserver.mycompany.com", 1626, [#userID: "Bob", #password: \"MySecret", #movieID: "Tech Chat"])
Chapter 11454

The server uses the name you provide for the movie to associate other instances of the same movie with each other. By default, all messages sent by the movie Tech Chat will be sent only to other users of the same movie on the network.
When the server accepts the connection, it will respond with a message whose subject is ConnectToNetServer, which will trigger the defaultMessageHandler you declared earlier.
The entire Lingo script for connecting to the server looks like this:
on makeAServerConnection-- declare a global variable to hold the Xtra instanceglobal gMultiuserInstance
-- create the Xtra instancegMultiuserInstance = new(xtra "Multiuser")
-- declare message handler callback(s) to handle incoming-- messages, including the server’s initial connection responseerrCode = gMultiuserInstance.setNetMessageHandler( \#defaultMessageHandler, script "Connection Script", True)if errCode <> 0 then
alert "Problem with setNetMessageHandler"end if
-- connect to the servererrCode = gMultiuserInstance.connectToNetServer( \"chatserver.mycompany.com", 1626, [#userID: "Bob", #password: \"MySecret", #movieID: "Tech Chat"])if errCode <> 0 then
alert "Problem with connectToNetServer"end if
end
-- message handler for incoming messageson defaultMessageHandler newMessage
member("messageOutput").text = string(newMessage)if newMessage.errorCode <> 0 then
alert "Incoming message contained an error."end if
end
The connectToNetServer() command can also accept its parameters in another format that allows the server to check the Internet location of the movie that is connecting. This provides additional security when distributing movies over the Web.
Using the Shockwave Multiuser Server and Xtra 455
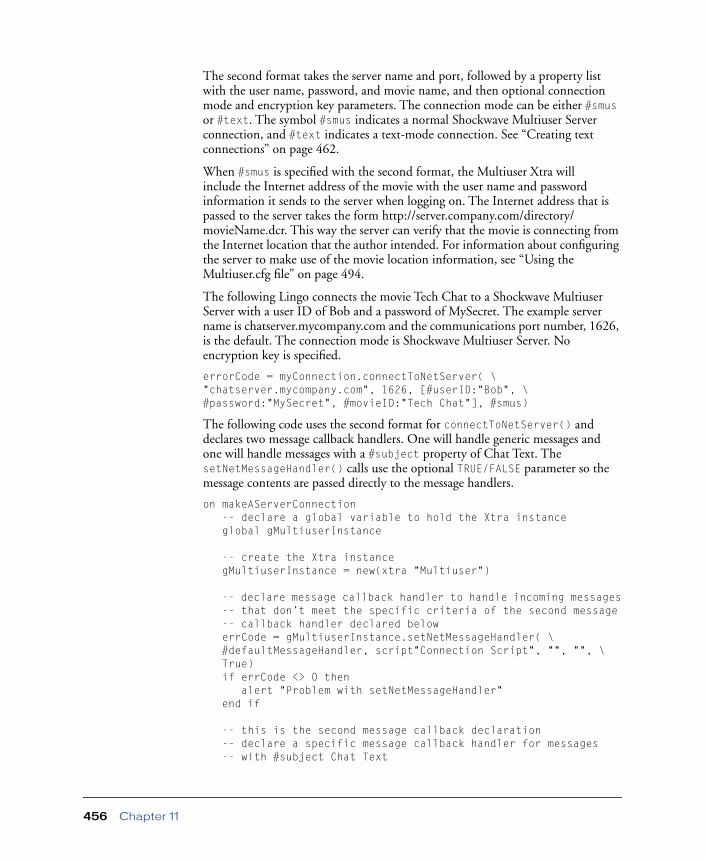
The second format takes the server name and port, followed by a property list with the user name, password, and movie name, and then optional connection mode and encryption key parameters. The connection mode can be either #smus or #text. The symbol #smus indicates a normal Shockwave Multiuser Server connection, and #text indicates a text-mode connection. See “Creating text connections” on page 462.
When #smus is specified with the second format, the Multiuser Xtra will include the Internet address of the movie with the user name and password information it sends to the server when logging on. The Internet address that is passed to the server takes the form http://server.company.com/directory/movieName.dcr. This way the server can verify that the movie is connecting from the Internet location that the author intended. For information about configuring the server to make use of the movie location information, see “Using the Multiuser.cfg file” on page 494.
The following Lingo connects the movie Tech Chat to a Shockwave Multiuser Server with a user ID of Bob and a password of MySecret. The example server name is chatserver.mycompany.com and the communications port number, 1626, is the default. The connection mode is Shockwave Multiuser Server. No encryption key is specified.
errorCode = myConnection.connectToNetServer( \"chatserver.mycompany.com", 1626, [#userID:"Bob", \#password:"MySecret", #movieID:"Tech Chat"], #smus)
The following code uses the second format for connectToNetServer() and declares two message callback handlers. One will handle generic messages and one will handle messages with a #subject property of Chat Text. The setNetMessageHandler() calls use the optional TRUE/FALSE parameter so the message contents are passed directly to the message handlers.
on makeAServerConnection-- declare a global variable to hold the Xtra instanceglobal gMultiuserInstance
-- create the Xtra instancegMultiuserInstance = new(xtra "Multiuser")
-- declare message callback handler to handle incoming messages-- that don’t meet the specific criteria of the second message-- callback handler declared belowerrCode = gMultiuserInstance.setNetMessageHandler( \#defaultMessageHandler, script"Connection Script", "", "", \True)if errCode <> 0 then
alert "Problem with setNetMessageHandler"end if
-- this is the second message callback declaration-- declare a specific message callback handler for messages-- with #subject Chat Text
Chapter 11456

errCode = gMultiuserInstance.setNetMessageHandler( \#chatMessageHandler, script "Connection Script", "Chat Text",\"", True)if errCode <> 0 then
alert "Problem with setNetMessageHandler"end if
-- connect to the servererrCode = gMultiuserInstance.connectToNetServer( \"chatserver.mycompany.com", 1626, [#userID: "Bob", #password:\"MySecret", #movieID: "Tech Chat"], #smus)if errCode <> 0 then
alert "Problem with connectToNetServer"end if
end
-- message handler for generic incoming messageson defaultMessageHandler me, message
member("messageOutput").text = string(message)if message.errorCode <> 0 then
alert "Incoming message contained an error."end if
end
-- message handler for incoming messages with #subject Chat Texton chatMessageHandler me, message
put message.content after member "chatField"if message.errorCode <> 0 then
alert "Incoming message contained an error."end if
end
Using the Shockwave Multiuser Server and Xtra 457

Sending messages
When you have successfully connected to the server, you are ready to send messages. Your messages may contain any kind of data that Lingo supports. The messages you receive will take the form of Lingo property lists, and you may choose to send your outgoing messages as property lists as well.
To send any kind of data as a message to another movie, use sendNetMessage. This function can take two forms: either a property list or the same parameters, separated by commas.
errCode = gMultiuserInstance.sendNetMessage([#recipients: \whichUsersOrGroups, #subject: "Example Subject", #content: \whatMessage])
or
errCode = gMultiuserInstance.sendNetMessage( \"whichUsersOrGroups", "Example Subject", whatMessage)
You can send messages to specific users and to named groups of users in the same movie. For example, user Guest Speaker in the movie Tech Chat could be in New York and send a message to user Bob in the same movie in San Francisco.
errCode = sendNetMessage(gMultiuserInstance, "Bob", "Chat Text", \"Hello. Welcome to our conversation.")
To send a message to all the members of a group, use the group name, in this case @MultimediaAuthors, as the recipient parameter. You must begin all group names with the @ sign. For information on creating groups, see “Using groups” on page 464.
errCode = gMultiuserInstance.sendNetMessage( \"@MultimediaAuthors","Chat Text", "How is everyone doing?")
You can also send messages to users of other movies connected to the server. A player of a chess game might send a message to a player of a checkers game:
errCode = gMultiuserInstance.sendNetMessage("Chris@Checkers", \"Question", "Who’s winning?")
To send a message to a user in any other movie on the server, use @AllMovies after the user name. You can use this to page a user to see if he or she is connected to the server at all.
errCode = gMultiuserInstance.sendNetMessage("Chris@AllMovies", \"Page", "Are you there?")
Chapter 11458

Retrieving messages
Your incoming message handlers will receive the message from the Multiuser Xtra as an argument. If you chose not to use the optional parameter that invokes this functionality, use getNetMessage() in your message callback handlers.
newMessage = gMultiuserInstance.getNetMessage()
The contents of newMessage are a property list that looks like this:
[#errorCode: 0, #recipients: ["Bob"], #senderID: "Guest Speaker", #subject: "Chat Text", #content: "Hello. Welcome to our conversation.", #timeStamp: 66114697]
You can set up individual message handlers to be triggered by specific values in the #subject or #sender properties and to perform different actions based on the values of each of the properties in the incoming message.
#errorCode contains an integer that can be translated to a usable error message with getNetErrorString.
#recipients contains a list of strings that are the names of the users the message was sent to.
#senderID contains a string that is the user name of the sender.
#subject contains a string chosen by the movie author. You can use this string to indicate what kind of data is in the message and to have the message processed by a specific message callback handler.
#content can contain whatever type of Lingo data your movie requires, including integers, floating-point numbers, strings, lists, rects, points, colors, dates, 3D vectors, 3D transforms, and the media of member and picture of member properties.
#timeStamp contains an integer that is the number of milliseconds since the server was launched. You can use this number to synchronize events in several instances of your movie or to determine how much time the server is using to process your messages.
Once you have created a simple message callback handler, you can add additional Lingo to use the contents of the message to do specific things in your movie. For instance, you can use the data to set the location of sprites, add new images to the Stage, display chat text, update catalog information, or keep a running score in a game.
The Multiuser Xtra checks the network for incoming messages during idle time. Some complex movies may not allow enough idle time to retrieve all the incoming messages that the movie is receiving. This is often the case in movies that use go to the frame Lingo. You can determine how many messages have arrived but have not yet been processed by using the getNumberWaitingNetMessages() command, which will give you the number of unprocessed messages. You can then use this number to call checkNetMessages(), which will process the number of waiting messages you specify.
Using the Shockwave Multiuser Server and Xtra 459
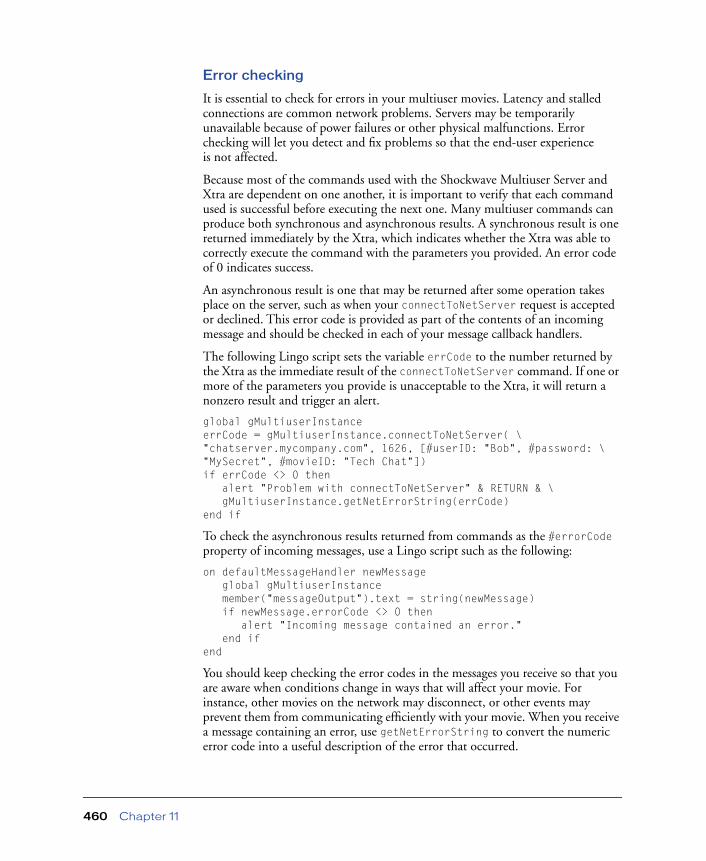
Error checking
It is essential to check for errors in your multiuser movies. Latency and stalled connections are common network problems. Servers may be temporarily unavailable because of power failures or other physical malfunctions. Error checking will let you detect and fix problems so that the end-user experience is not affected.
Because most of the commands used with the Shockwave Multiuser Server and Xtra are dependent on one another, it is important to verify that each command used is successful before executing the next one. Many multiuser commands can produce both synchronous and asynchronous results. A synchronous result is one returned immediately by the Xtra, which indicates whether the Xtra was able to correctly execute the command with the parameters you provided. An error code of 0 indicates success.
An asynchronous result is one that may be returned after some operation takes place on the server, such as when your connectToNetServer request is accepted or declined. This error code is provided as part of the contents of an incoming message and should be checked in each of your message callback handlers.
The following Lingo script sets the variable errCode to the number returned by the Xtra as the immediate result of the connectToNetServer command. If one or more of the parameters you provide is unacceptable to the Xtra, it will return a nonzero result and trigger an alert.
global gMultiuserInstanceerrCode = gMultiuserInstance.connectToNetServer( \"chatserver.mycompany.com", 1626, [#userID: "Bob", #password: \"MySecret", #movieID: "Tech Chat"])if errCode <> 0 then
alert "Problem with connectToNetServer" & RETURN & \gMultiuserInstance.getNetErrorString(errCode)
end if
To check the asynchronous results returned from commands as the #errorCode property of incoming messages, use a Lingo script such as the following:
on defaultMessageHandler newMessageglobal gMultiuserInstancemember("messageOutput").text = string(newMessage)if newMessage.errorCode <> 0 then
alert "Incoming message contained an error."end if
end
You should keep checking the error codes in the messages you receive so that you are aware when conditions change in ways that will affect your movie. For instance, other movies on the network may disconnect, or other events may prevent them from communicating efficiently with your movie. When you receive a message containing an error, use getNetErrorString to convert the numeric error code into a useful description of the error that occurred.
Chapter 11460
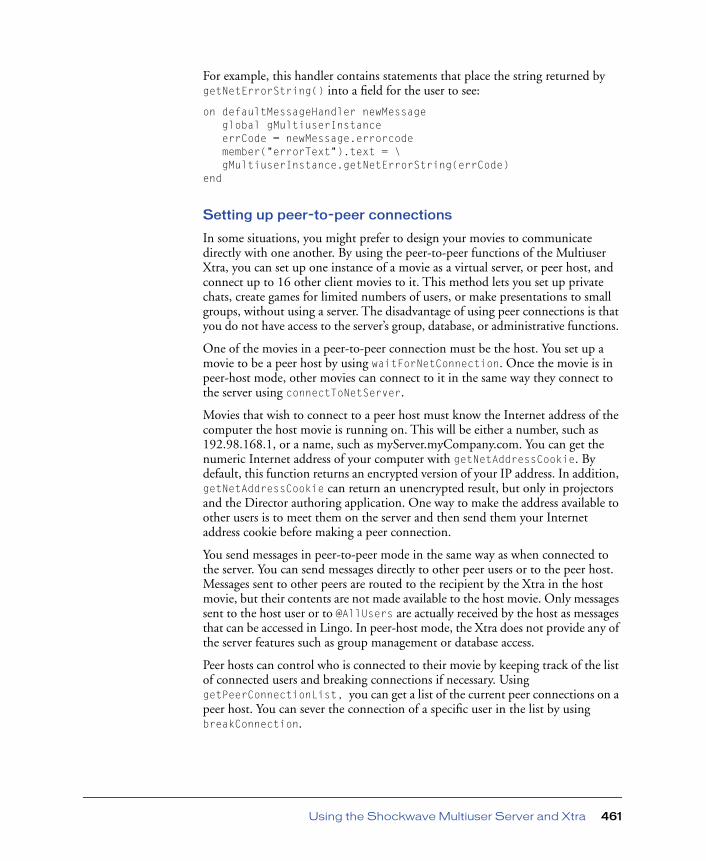
For example, this handler contains statements that place the string returned by getNetErrorString() into a field for the user to see:
on defaultMessageHandler newMessageglobal gMultiuserInstanceerrCode = newMessage.errorcodemember("errorText").text = \gMultiuserInstance.getNetErrorString(errCode)
end
Setting up peer-to-peer connections
In some situations, you might prefer to design your movies to communicate directly with one another. By using the peer-to-peer functions of the Multiuser Xtra, you can set up one instance of a movie as a virtual server, or peer host, and connect up to 16 other client movies to it. This method lets you set up private chats, create games for limited numbers of users, or make presentations to small groups, without using a server. The disadvantage of using peer connections is that you do not have access to the server’s group, database, or administrative functions.
One of the movies in a peer-to-peer connection must be the host. You set up a movie to be a peer host by using waitForNetConnection. Once the movie is in peer-host mode, other movies can connect to it in the same way they connect to the server using connectToNetServer.
Movies that wish to connect to a peer host must know the Internet address of the computer the host movie is running on. This will be either a number, such as 192.98.168.1, or a name, such as myServer.myCompany.com. You can get the numeric Internet address of your computer with getNetAddressCookie. By default, this function returns an encrypted version of your IP address. In addition, getNetAddressCookie can return an unencrypted result, but only in projectors and the Director authoring application. One way to make the address available to other users is to meet them on the server and then send them your Internet address cookie before making a peer connection.
You send messages in peer-to-peer mode in the same way as when connected to the server. You can send messages directly to other peer users or to the peer host. Messages sent to other peers are routed to the recipient by the Xtra in the host movie, but their contents are not made available to the host movie. Only messages sent to the host user or to @AllUsers are actually received by the host as messages that can be accessed in Lingo. In peer-host mode, the Xtra does not provide any of the server features such as group management or database access.
Peer hosts can control who is connected to their movie by keeping track of the list of connected users and breaking connections if necessary. Using getPeerConnectionList, you can get a list of the current peer connections on a peer host. You can sever the connection of a specific user in the list by using breakConnection.
Using the Shockwave Multiuser Server and Xtra 461

When implementing a peer-to-peer movie design, you may choose to make one Director movie that always acts as a host and another Director movie that is used for the clients. You may also choose to author your movie so that it can function as either host or client, allowing anyone who uses the movie to initiate the peer-to-peer session.
Keep in mind that because all peer messages are routed through the peer host, there will be an extra CPU burden and network throughput required on that machine. The degree of this burden will depend on the size and number of messages your movie sends and the number of peers connected to the host. For ways to minimize this load, see “Optimizing multiuser movies” on page 472.
Creating text connections
Another way the Multiuser Xtra can communicate is through text-based servers such as Internet Relay Chat, Internet mail servers, or even proprietary text-based servers. These servers are called text-based because they respond to simple text commands that are used to control them. You make a text-based server connection by adding the integer 1 or the symbol #text to the end of the connectToNetServer() command, depending on which form of connectToNetServer() you are using. This statement tells the Xtra to enter text mode:
errCode = gMultiuserInstance.connectToNetServer("Bob", \"MySecret", "mailserver.mycompany.com", 110, "Tech Chat", 1)
or
errorCode = gMultiuserInstance.connectToNetServer \("mailserver.mycompany.com", 110, [#userID: "Bob", #password: \"MySecret", #movieID: "Tech Chat"], #text)
The port number must also change to reflect the port your text-based server is using for communication. In this example the port is 110, which is commonly used with Internet mail servers. Consult the documentation for your text-based server to determine which port it uses.
In Shockwave, if a user tries to make a text-based connection to a text server that resides in a different domain name than the connecting movie, a security dialog box appears on the user’s computer.
After the connection is made, you issue commands to your server with sendNetMessage(). Use System as the recipient and place your command into the content parameter. The subject parameter will be ignored. The following example sends a command to a mail server to retrieve the first piece of mail in the mailbox.
command = "RETR 1" & RETURNerrCode = gMultiuserInstance.sendNetMessage("System", \"anySubject", command)
The server responds with whatever data is appropriate. The Xtra retrieves the data as the #content property of a typical incoming message property list.
Chapter 11462

Using server functions
You can retrieve many kinds of information from the Shockwave Multiuser Server and perform administrative functions by sending special commands to the server in the contents of sendNetMessage(). You can get a list of movies connected to the server, control users’ and movies’ access to the server, and get connected users’ IP addresses. Using these functions, you can design a movie that lets you remotely monitor and control activity on the server.
The server commands themselves are sent in the recipient parameter of a sendNetMessage(), and any additional parameters required by the command are sent as the content. To determine the version of the server you are using and the platform it is running on, use getVersion:
errCode = gMultiuserInstance.sendNetMessage \("system.server.getVersion", "anySubject")
When you use server functions, the recipient parameter uses a simple dot syntax that contains a reference to the server (since this is a server command), the object the command will be performed on, and the command itself. In this case the object is the server; in other cases, it could be a user or a movie.
The message returned from the server containing the version and platform information looks like this:
[#errorCode: 0, #recipients: ["Bob"], #senderID: "system.server.getVersion", #subject: "anySubject", #content: [#vendor: "Macromedia", #version: "3.0", #platform: "Macintosh"]]
The subjects of these command messages sent to the server are arbitrary and can be set to any string you want to use. The server’s responses will contain the same subject string. You can use the subject string to invoke specific message handlers by specifying the subjects in your setNetMessageHandler() commands. See “Connecting to the server” on page 452.
To get a list of all the movies connected to the server, use getMovies:
errCode = gMultiuserInstance.sendNetMessage\("system.server.getMovies", "anySubject")
To prevent all instances of a particular movie from connecting to the server, use movie as the object and disable as the command. Here the movie being disabled is Tech Chat:
errCode = gMultiuserInstance.sendNetMessage\("system.movie.disable", "anySubject", "Tech Chat")
To disconnect a specific user from the server, the object is user and the command is delete:
errCode = gMultiuserInstance.sendNetMessage("system.user.\delete", "anySubject", "RudePerson")
Using the Shockwave Multiuser Server and Xtra 463

Server commands, including getMovies, disable, and delete, require the sender to have a specific user level. The required user levels for each command are set in the server’s Multiuser.cfg file. For more information, see “Configuring the server” on page 494.
Some server commands can be used to return information about a movie other than the one that sends the message. If you want to get the list of groups in a movie called Chess but you are using an administrative movie called GameAdmin, you can send the command getGroups to the movie Chess:
errCode = gMultiuserInstance.sendNetMessage\("system.movie.getGroups@Chess", "anySubject")
For a complete list of the server functions that are available, see “Multiuser Lingo Dictionary” on page 507.
Using groupsAnother function that the Shockwave Multiuser Server provides is the ability to define groups of connected users. By creating groups, you can organize users in logical ways, such as into opposing teams, collaborating companies, and so on.
Using groups allows you to do the following:
• Send a single message to all the members of a group.
• Prevent users from sending messages to users outside their own group.
• Assign attributes to the groups, such as scores, team colors, or group leaders.
Defining groups
When users connect to the server, they are automatically added to the group @AllUsers for the movie they are using. This lets you easily send messages to everyone connected to the movie without having to create a new group and have everyone join it individually.
You create a new group by having one or more connected users send a message to the server specifying group as the object and join as the command in the recipient parameter of a sendNetMessage() and sending the new group name in the #content parameter. If the group does not exist when the first user joins, the server creates the group for you. Once the group has some members, you can ask the server for the number of members in the group, for a list of the members, or for any attributes that have been assigned to the group.
Chapter 11464

Once a movie has connected a user to the server, the user can join an existing group by sending a message to the server specifying group as the object and join as the command in the recipient parameter of a sendNetMessage() and sending the group name in the #content parameter. The following message joins a user to the group called @RedTeam.
errCode = gMultiuserInstance.sendNetMessage("system.group.join", ¬"anySubject", "@RedTeam")
It is important that all your group names begin with the @ symbol. The server uses this symbol to distinguish group names from user names when routing standard messages like this one:
errCode = gMultiuserInstance.sendNetMessage("@RedTeam", "Status ¬Update", "Your team is winning.")
If the recipient were simply RedTeam, the server would attempt to find the user named RedTeam instead of the group. No error message is generated when a user is not found by the server.
You can leave a group by specifying system.group.leave in the recipient parameter of a sendNetMessage() and indicating which group you want to leave in the #content parameter:
errCode = gMultiuserInstance.sendNetMessage("system.group.leave", ¬"anySubject", "@RedTeam")
You can determine how many users are in a group by using getUserCount. For example, you can keep team sizes even as more users join a game by adding users to whichever team has a smaller number of players. Or you could create a new group when an existing one exceeds a certain number of users.
errCode = gMultiuserInstance.sendNetMessage¬("system.group.getUserCount", "anySubject", "@RedTeam")
If you want to get a list of the users in a group, use getUsers:
errCode = gMultiuserInstance.sendNetMessage¬("system.group.getUsers", "anySubject", "@RedTeam")
Using the Shockwave Multiuser Server and Xtra 465

Working with group attributes
You may wish to keep track of the traits of a group or set of groups. For example, for groups of people working for two different companies that are collaborating, you might want to store the name of the leader of each group. If the groups are negotiating the price of a contract, you might store the current amount of each group’s bid. In a gaming scenario, each team might choose a mascot, a theme song, or a starting location in a virtual world. Each of these can be stored as an attribute of a group as long as the group exists. Attributes can be set to any of the Lingo values that can be sent using sendNetMessage. Group attributes persist as long as the group exists on the server. To store information that must persist indefinitely on the server, use databases instead; see “Using databases” on page 468 for more information.
You use setAttribute to add an attribute or update its value and getAttribute to determine the current value of the attribute. These commands are specified in the #recipient parameter of a sendNetMessage(), and the attributes you wish to access are specified in the #content parameter of the message.
The Lingo to define the current location and mascot of the group @RedTeam looks like this:
errCode = gMultiuserInstance.sendNetMessage("system.group.¬setAttribute", "anySubject", [#group: "@RedTeam", #attribute: ¬[#currentLocation: "New York City", #mascot: "dalmatian", ¬#lastUpdateTime: "1999/07/27 15:52:11.123456"]])
When you use setAttribute the #content parameter of your message contains a #group property and an #attribute property. The #group property indicates which group you are setting attributes for. The #attribute property indicates which attributes you are setting. The names of the attributes you set should always be symbols beginning with the # character. In the example above, the #group is @RedTeam and the #attribute is a list of two attributes, #currentLocation and #mascot.
The #lastUpdateTime property is optional and lets you determine whether some other user has updated the attributes of the group since you last checked them with getAttribute. When you use getAttribute the server responds with the values of the attributes you requested plus a #lastUpdateTime property, which indicates the moment in time when the server read the values of those attributes for the group you requested. The #lastUpdateTime property is a string containing the year, month, day, hour, minutes, seconds, and microseconds on the server. By sending this same string with your setAttribute command, you allow the server to check whether the attributes for the group have been updated since you last checked them.
If the server determines that any attributes for the group have been updated by someone else since you checked them, it responds with an #errorCode, indicating a concurrency error. If no one else has updated the attributes since you checked them, the server responds with a new #lastUpdateTime for the group, indicating that you have just updated the attributes.
Chapter 11466

This statement gets the values of the attributes #currentLocation and #mascot for the group @RedTeam:
errCode = gMultiuserInstance.sendNetMessage("system.group.¬getAttribute", "anySubject", [#group: "@RedTeam", #attribute: ¬[#currentLocation, #mascot]])
The server’s response looks like this:
[#errorCode: 0, #recipients: ["Bob"], #senderID: "system.group.¬getAttribute", #subject: "anySubject", #content: ["@RedTeam": ¬[#currentLocation: "New York City", #mascot: "dalmatian", ¬#lastUpdateTime: "1999/07/27 15:53:32.123456"]]]
You can get attributes for more than one group at a time by including multiple group names in your request:
errCode = gMultiuserInstance.sendNetMessage("system.group.¬getAttribute", "anySubject", [#group: ["@RedTeam", "@BlueTeam"], ¬#attribute: [#currentLocation, #mascot]])
When you make a request for multiple groups, it is possible that part of the request will succeed while part of it produces errors. In the example above, attributes are requested for the group @BlueTeam. If this group has not yet been created, the server response will include errors in both the #errorCode property of the response and the attributes list for @BlueTeam. If a requested attribute has not been set, no error is generated and the attribute is simply omitted from the response.
The server’s response looks something like this:
[#errorCode: -2147216173, #recipients: ["Bob"], #senderID: ¬"system.group.getAttribute", #subject: "anySubject", #content: ¬["@RedTeam": [#currentLocation: "New York City", #mascot: ¬"dalmatian", #lastUpdateTime: "1999/07/27 15:53:32.123456"], ¬"@BlueTeam": [#errorCode: [-2147216194]]]]
The first of these error codes indicates that the #content property of the message contains errors that you should check. The second error code indicates that the group @BlueTeam does not exist. (See “getNetErrorString()” on page 538 for a list of error codes and their strings.)
If you want to determine exactly what attributes have been declared for a particular group, use getAttributeNames. It returns a list of the attribute names for the group:
errCode = gMultiuserInstance.sendNetMessage ("system.group.¬getAttributeNames", "anySubject", [#group: "@RedTeam"])
To remove an attribute from the attribute list for a group, use deleteAttribute. The following example deletes the #mascot property from the group @RedTeam:
errCode = gMultiuserInstance.sendNetMessage("system.group.¬deleteAttribute", "anySubject", [#group: "@RedTeam", #attribute: ¬#mascot])
Keep in mind that the attributes you define for groups will persist only while the group exists. If you want this kind of information to be stored indefinitely so that it can be recalled from one multiuser session to the next, use database commands.
Using the Shockwave Multiuser Server and Xtra 467
Using databasesThe Multiuser Server provides extensive database functionality that allows your movies to store a wide variety of information. When you use databases, the information you store on the server will be available each time your movies connect to the server. You can use databases to do the following:
• Store information about individual users, such as their e-mail address or the type of computer they are using.
• Keep a record of a user’s high score in a particular game.
• Keep track of the status of a game or other multiuser application.
• Store environment information for an application, such as map data for an adventure game.
For an example of the Lingo used to work with databases, see the example Director movies in the Director 8.5/Learning/Lingo_examples/Multiuser_examples folder.
Using data objects
The Shockwave Multiuser Server can store information for you in four different types of data objects. A data object is simply a container that holds data that you put into it. You decide what kinds of objects to use and what data to put into them. Which kind of data object you use depends on the kind of information you want to store and what that information will be used for. You can define as many objects of each type as you need to.
The following are the four types of data objects you can use to store information:
DBUser is the type of object you should use if you are storing information about a user that is specific to the user but not to any particular movie they might use, such as an e-mail address.
DBPlayer is used to store information that is specific to both the user and a particular game they are playing, such as their high score. Since a user may use many different multiuser movies with your Multiuser Server, they might have many DBPlayer objects but just one DBUser object.
DBApplication objects are used to store information that is specific to a particular movie, such as the highest score ever achieved in a particular game.
DBApplicationData objects are appropriate for information that will be read-only, such as map data for an adventure game. Typically there will be more than one DBApplicationData object for each DBApplication. For example, in a trivia game you might use DBApplicationData objects for configuration information such as lists of trivia questions, buzzer and bell sounds, or suits the host might wear. Each of these would be stored in its own DBApplicationData object.
Chapter 11468

Storing information
Once you have decided what types of objects to use, it is time to store your data. You start by creating a new object, and then you add attributes to the object. The attributes will be whatever items of information you want to store, such as an e-mail address or a high score. As with other server functions, these operations are performed by sending commands to the server in the #recipient parameter of a sendNetMessage() and indicating which type of object you want to create or edit.
Keep in mind that you can set different combinations of attributes for different objects. You could assign user Bob #email and #favoriteFood attributes but assign user Mary #email and #favoritePlace attributes. What attributes you define and the information you put into them is up to you and what you want your movie to do. Object attributes can contain any Lingo value you wish to store.
You might want to start by storing user-specific information in a DBUser object. Since the DBUser object for the new user does not yet exist, you must tell the server to create it for you. This is one of several administrative functions you can perform on the server by specifying DBAdmin as the object of your command. To create a new DBUser object for a new user, use createUser in conjunction with DBAdmin:
errCode = gMultiuserInstance.sendNetMessage("system.¬DBAdmin.createUser", "anySubject", [#userID: "Bob", #password: ¬"MySecret", #userlevel: 20])
This creates a new DBUser object with a #userID property of Bob.
To add new information to the new user’s DBUser object, you must name the information, which becomes an attribute of the user. If you are storing e-mail addresses, you could call the attribute #email. The attribute name should be a symbol preceded by the # sign. You declare a new attribute by using declareAttribute with the DBAdmin object. Once an attribute has been declared, its name may be used with any of the database object types.
errCode = gMultiuserInstance.sendNetMessage("system.DBAdmin. ¬declareAttribute", "anySubject", [#attribute: #email])
Now the attribute named #email has been declared and may be set for any of the objects you create. To set the e-mail address in the database that was created earlier for the user Bob, use setAttribute with the DBUser object:
errCode = gMultiuserInstance.sendNetMessage("system.DBUser.¬setAttribute", "anySubject", [#userID: "Bob", #attribute: ¬[#email: "[email protected]"]])
The #content parameter of this sendNetMessage() is a nested property list containing the parameters for the setAttribute command. The #userID property tells the server which user’s information is being edited. The #attribute property indicates which attributes are being set and is followed by a list of attributes and values. In this case, only one attribute is being set.
Using the Shockwave Multiuser Server and Xtra 469

To create a DBApplication object and set its attributes, you start by creating a new object, using createApplication, and then declaring the attributes you want to use for the object. You then place information into those attributes with setAttribute. You add attributes to a DBPlayer object by supplying both #userID and #application properties with setAttribute. See “Multiuser Lingo Dictionary” on page 507 for detailed examples of these.
To construct DBApplicationData objects, you put all the data you want them to hold in the form of lists of attributes and then write them to the server as an administrator-level user with createApplicationData.
This Lingo statement creates a DBApplicationData object containing values that describe a room in an online casino:
errCode = gMultiuserInstance.sendNetMessage("system.DBAdmin. ¬createApplicationData", "anySubject", [#application: "Casino", ¬#attribute: [#roomName: "BlackJack", #dealerName: "Larry", ¬#wallArt: "Mona Lisa", #minimumBet: 50, #music: "Classical"]])
Subsequent Lingo statements might create additional DBApplicationData objects with the attributes for additional rooms in the casino.
Once you have placed the objects on the server, you retrieve them for use in the movie by using getApplicationData. This command returns the list of attributes and values for the object that matches the criteria you specify for the current application. To retrieve the DBApplicationData object you previously created, you would specify the attribute #roomName and the string BlackJack as the search criteria. You supply the string in the #text property.
errCode = gMultiuserInstance.sendNetMessage ( "system.¬DBApplication.getApplicationData", "anySubject", [#application: ¬"Casino", #attribute: "#roomName", #text: "BlackJack"] )
In addition to the attributes you define, DBUser, DBPlayer, and DBApplication objects each have their own default attributes that are assigned by the server. There are no default attributes for DBApplicationData objects.
DBUser objects include these attributes:
#userID must be unique.
#password can be accessed with getAttribute and setAttribute, but only by users with an appropriate user level.
#lastLoginTime is changed by the server each time a user logs in and can be edited by an administrator-level user. See “Configuring the server” on page 494 for more information.
#status can be written only by administrators and can be used for whatever purposes you see fit. You might use this to keep track of whether a customer’s balance is due or paid in full for a site membership subscription.
Chapter 11470

#userlevel determines privileges based on the levels you define in the server’s configuration file. See “Configuring the server” on page 494. This attribute may be changed only by administrators.
#lastUpdateTime allows you to check whether other users have changed an attribute since you last checked it. This is identical to the way this is used with group attributes. See “Working with group attributes” on page 466.
DBPlayer objects include default attributes of #creationTime and #lastUpdateTime. The #creationTime attribute indicates when the object was created on the server and will usually correspond to when the user began participating in a particular movie.
DBApplication objects include default attributes of #userID, #description, and #lastUpdateTime. The #userID attribute defaults to the name of the movie that created the object, which you supplied in the connectToNetServer() command. The #description attribute contains whatever description you choose to supply when you create the DBApplication object.
A database scenario
Suppose you want to create an online casino in which users will play various games, such as poker, blackjack, and roulette. Each game could be a separate movie you create and could contain several different rooms to play in. You could use each of the types of database objects to store information about users, players, games, and the casino environment.
You could create DBUser objects for each new person who logs in and wants to enter the casino. The attributes you store for each user might include their e-mail address, preferred games, and so on. Your DBPlayer objects might include a player’s current winnings for a particular game.
You could use DBApplication objects to store the name of the user who has won the most money in each game. You might also have an attribute in each of these DBApplication objects that is a list of the DBApplicationData objects you’ve created for different rooms in each game. You could then use this list to retrieve the data for a particular room in a particular game. The DBApplication object for the blackjack movie might contain an attribute called #roomList with room names in a linear list like this one:
["Art Deco", "Western Saloon", "Contemporary", "Egyptian"]
You could then use getApplicationData to retrieve the list of attributes for each room. The DBApplicationData object for one room might look like this:
[#roomName: "Art Deco", #dealerName: "Larry", #wallArt: "Mona Lisa", #minimumBet: 50, #music: "Classical"]
By creating DBApplicationData objects for each room, you can design your movies to display certain graphics and sounds based on which room object is chosen by the user.
Using the Shockwave Multiuser Server and Xtra 471
Controlling user access to the server
You can control who connects to the server by using DBUser objects. You can choose to allow anyone to connect to the server, or you can limit access to users who already have a DBUser object. To limit user access you would use an administrative movie to create new users’ DBUser objects before allowing them to connect on their own. You can also choose to let all users connect, but restrict certain privileges to only those users with DBUser objects. You do this by giving users with DBUser objects a higher value for their #userlevel attribute and letting other users default to a lower value. See “Configuring the server” on page 494 for more information.
Making projectorsBecause the Multiuser Xtra is a Lingo Xtra and has no cast member types associated with it, it is not added automatically to a movie’s Xtra list. Before you make a projector from a multiuser movie, you must add the Multiuser Xtra to the Xtra list in the Movie Xtras dialog box.
To add the Multiuser Xtra to a movie’s Xtra list:
1 Open the movie.
2 Choose Modify > Movie > Xtras.
3 Click Add.
4 Select the Multiuser Xtra from the list that appears.
5 Click OK, and then click OK again.
6 Save the movie.
If the Multiuser Xtra is not added to the movie’s Xtra list, the projector produces a script error when it is run.
Optimizing multiuser moviesWhen designing a multiuser experience, you should ensure that your movie responds to the information coming in from other movies in a prompt manner. You will also want your movie to send its own outgoing messages as soon as they are needed. The following guidelines will help you to create movies that are as fast and responsive as possible.
Chapter 11472

Minimizing message frequency
Design your movies to send only information that is absolutely necessary. For example, if you are tracking the position of a player’s sprite, design your movie to send position information only when the sprite’s position changes, rather than sending it at some regular interval regardless of whether the sprite has moved or not.
For some applications, it will make sense to collect a set of very small messages and send them together as one larger message. For example, you might collect several points of a whiteboard brush stroke and send them together in a list. For chat movies, send the entire chat message after the user presses Return or Enter instead of sending every character individually.
Prioritizing receiving over sending
In most cases, you will want your movies to receive incoming messages before sending messages, since the contents of incoming messages may affect the information you want to send.
One way to accomplish this is to increase the frame rate of your movie. The Multiuser Xtra checks for incoming messages during idle periods between frames, so higher frame rates will cause the Xtra to check for messages more often. If you don’t want to increase the frame rate, you can set the idleHandlerPeriod to 0 in Lingo. This will maximize the frequency of idle events and allow the Xtra to check for messages during frames as well as between them.
You can tell the Xtra to check for messages at any moment you wish by using the checkNetMessages() function. Or you can find out how many messages are waiting by using getNumberWaitingNetMessages(). This allows you to specify a number of messages to retrieve as a parameter of checkNetMessages() so any backlog of messages can be handled all at once.
Minimizing Stage updates
In general, drawing sprites on the Stage is much more time-consuming than sending, receiving, or processing messages. Therefore, you won’t necessarily want to update the screen every time you receive a message. For example, if every player in a game sends their status or position, you may want to collect that information and then update the sprites on the Stage all at once.
Sending targeted messages
If only one user needs the information in a particular message, send it to the individual user rather than to a whole group.
Using the Shockwave Multiuser Server and Xtra 473

Using setNetMessageHandler()
By assigning different subjects to the different types of messages you are sending, you can use setNetMessageHandler() to process incoming messages depending on the subject, the sender, or both. The Xtra’s message-dispatching routines are faster than similar code written in Lingo.
To change which message callback handler is triggered by a certain type of message, use setNetMessageHandler() to remove the reference to the first handler by using a zero in place of the handler symbol:
errCode = gMultiuserInstance.setNetMessageHandler(0, script ¬"Connection Script", "Chat Text", "Guest Speaker", 1)
You can then declare a new handler for the same message criteria by calling setNetMessageHandler() again and specifying the new handler symbol:
errCode = gMultiuserInstance.setNetMessageHandler¬(#newMessageHandler, script "Connection Script", "Chat Text", ¬"Guest Speaker", 1)
Extending the server with XtrasYou can extend the functionality of the server by writing server Xtras. For information about writing server Xtras, see the Multiuser Support Center on Macromedia’s Web site at http://www.macromedia.com/support/director/multiuser/.
Chapter 11474

2
1CHAPTER 12
. . . . . . . . . . . . . . . . . . . . . . . . . . . . . . . . . . . . . . . . . . . . . . . . . . . . . . . .. . . . . . . . . . . . . . . . . . . . . . . . . . . . . . . . . . . . . . . . . . . . . . . . . . . . .Multiuser Server-Side Scripting
Version 3 of the Shockwave Multiuser Server includes the ability to add Lingo scripts to the server. Because they run on the server computer itself, these scripts enable you to write simpler multiuser movies. The client movies only need to include the simple logic for sending and receiving messages and reacting to their content. The Lingo running on the server can handle the tasks of tracking the state of each client movie and broadcasting information to all of the clients. Without server-side Lingo, each client movie must include more complex Lingo that handles both of these responsibilities.
In addition to making it easier to author multiuser Lingo, server-side Lingo helps protect multiuser movies from errors. For example, because the server can run Lingo and keep track of client movie states, it is much easier to prevent client movies from getting out of sync with one another.
While server-side Lingo makes it easier to create multiuser movies, using it requires a strong fundamental knowledge of the Lingo language. See the Writing Scripts with Lingo chapter in Using Director.
Server-side Lingo is enabled by the LingoVM (Virtual Machine) Xtra, found in the server’s Xtras folder. This Xtra contains the server’s Lingo engine. When the server starts up, it loads the LingoVM Xtra, which then reads certain script files from the scripts folder.
The scripts folder is located next to the server application. It contains the two primary script files required by the server. These script files, Dispatcher.ls and Scriptmap.ls, are text files that the server reads and uses to set up the server-side scripting environment.
475
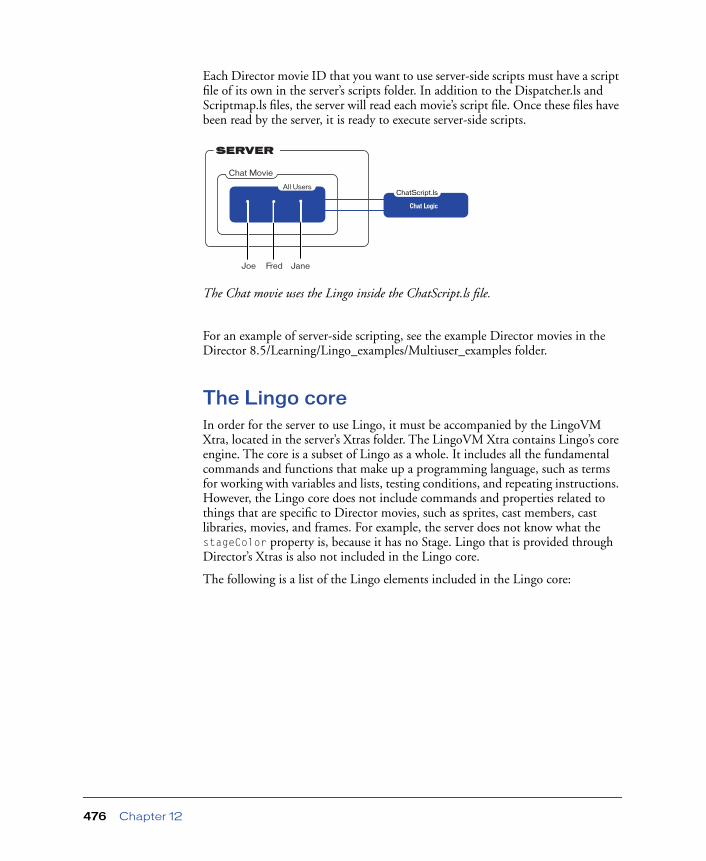
Each Director movie ID that you want to use server-side scripts must have a script file of its own in the server’s scripts folder. In addition to the Dispatcher.ls and Scriptmap.ls files, the server will read each movie’s script file. Once these files have been read by the server, it is ready to execute server-side scripts.
The Chat movie uses the Lingo inside the ChatScript.ls file.
For an example of server-side scripting, see the example Director movies in the Director 8.5/Learning/Lingo_examples/Multiuser_examples folder.
The Lingo coreIn order for the server to use Lingo, it must be accompanied by the LingoVM Xtra, located in the server’s Xtras folder. The LingoVM Xtra contains Lingo’s core engine. The core is a subset of Lingo as a whole. It includes all the fundamental commands and functions that make up a programming language, such as terms for working with variables and lists, testing conditions, and repeating instructions. However, the Lingo core does not include commands and properties related to things that are specific to Director movies, such as sprites, cast members, cast libraries, movies, and frames. For example, the server does not know what the stageColor property is, because it has no Stage. Lingo that is provided through Director’s Xtras is also not included in the Lingo core.
The following is a list of the Lingo elements included in the Lingo core:
Chat Movie
Joe Fred Jane
All UsersChatScript.ls
Chat Logic
SERVER
Chapter 12476

Keywords
Commands and functions
case if/then/else put return
delete next repeat repeat set
exit
abort exp() new() rgb()
abs() float() nothing runMode()
append floatP() numToChar() sin()
atan() ilk() objectP() sqrt()
bitAnd() inside() offset() string()
bitNot() integer() param() stringP()
bitOr() integerP() paramCount symbol()
bitXor() intersect() pictureP() symbolP()
call() length() point() systemDate
callAncestor() list() power() tan()
chars() listP() propList() text
charToNum() log() random() time
color() map rect() union()
cos() max() result value()
date maxInteger return voidP()
do min()
Multiuser Server-Side Scripting 477

Data types and objects
The server’s LingoVM Xtra includes many Lingo elements in addition to the Lingo core. These elements support features that are specific to the server, such as server-side scripting, multithreading, and server file access.
About server-side scriptingThe server uses three files to set up its server-side scripting environment: the LingoVM Xtra, found in the server’s xtras folder, and the Dispatcher.ls and Scriptmap.ls script files, found in the server’s scripts folder. In order for server-side scripting to function, these files must be present in the scripts folder when the server starts up.
During startup, the server loads the LingoVM Xtra, which in turn reads the Dispatcher.ls file and converts its contents to a running server script. This Dispatcher script then loads the Scriptmap.ls file and converts it to a running server-side script as well.
The Dispatcher script contains some handlers that are required for server-side scripting and some that are useful but not mandatory. The required handlers are on initialize, on configCommand, on serverEvent, and on incomingMessage. You may choose to edit the Dispatcher.ls file to customize its functionality, but these four handlers must be present.
child objects float the picture script objects
color integer point string
compressedMedia list property list symbol
date the media rect void
Chapter 12478

Loading the Scriptmap.ls file
After creating the Dispatcher script, the server calls the Dispatcher’s on initialize handler. This handler sets up some variables and then calls the Dispatcher.ls file’s on loadScriptMapFile handler and passes it the Scriptmap.ls file name. The on loadScriptMapFile handler uses file-access Lingo (see “Accessing files on the server” on page 489) to read the Scriptmap.ls file and assigns its contents to a string variable. This string variable is then converted to a script object with the createScript() function.
The on loadScriptMapFile handler then calls the Scriptmap.ls file’s on scriptMap handler. The default on scriptMap handler looks like this:
on scriptMaptheMap = []
--theMap.Append( [ #movieID: "BlackJack*", #scriptFileName:\"BlackJack.ls" ] )--theMap.Append( [ #movieID: "Debug", #groupID:"@DebugGroup",\#scriptFileName: "Debug.ls" ] )
return theMapend
This handler returns a list of property lists, each containing a movie ID and a script file name. Each of these property lists is used by the server to associate a specific movie ID that might log on to the server with a specific script file located in the server’s scripts folder. The two lines beginning with theMap.append are commented because they refer to example movies you may or may not want to activate on the server.
The Dispatcher script next uses file-access Lingo to read these script files and convert them to script objects with the createScript() function. Once each script object is created, it is ready to receive and handle events from its associated movie.
Adding server-side scriptsAdding server-side scripting functionality to a movie requires that you create a script file for your movie and edit the Scriptmap.ls file.
To add a script to the server for your movie:
1 Make a text file of the script, name the file and give it an “ls” extension. This script should contain handlers for each server event you want the script to react to, plus any custom events you define.
2 Place the file in the server’s scripts folder.
Multiuser Server-Side Scripting 479
3 Open the Scriptmap.ls file in a text editor and add a line to it with the following syntax:
theMap.append( [movieID: "yourMovieID", scriptFileName: \"yourScriptFileName"] )
This line should be added immediately after the last line that contains the same syntax. The string yourMovieID is the movie ID your movie will use when logging into the server with connectToNetServer(). The string yourScriptFileName is the actual file name of your movie’s script file that you placed into the server’s scripts folder.
For example, to add the file TestScript.ls to the Scriptmap.ls file and associate it with the movie ID TestMovie, you might start with a Scriptmap.ls file like this:
on scriptMaptheMap = []
theMap.append( [ #movieID: "BlackJack*", #scriptFileName: \"BlackJack.ls" ] )theMap.append( [ #movieID: "SimpleChat", #scriptFileName: \"SimpleChat.ls" ] )
return theMapend
Then you would add a line to it like the one in the following:
on scriptMaptheMap = []
theMap.append( [ #movieID: "BlackJack*", #scriptFileName: \"BlackJack.ls" ] )theMap.append( [ #movieID: "SimpleChat", #scriptFileName: \"SimpleChat.ls" ] )-- This is the new linetheMap.append( [ #movieID: "TestMovie", #scriptFileName: \"TestScript.ls" ] )
return theMapend
Note that the append commands at the beginning of each line cause the lists to be combined, resulting in a list of lists that Lingo interprets like this:
[ [ movieID: "BlackJack*", scriptFileName: "BlackJack.ls" ], \[movieID: "SimpleChat", scriptFileName: "SimpleChat.ls" ], \[movieID: "TestMovie", scriptFileName: "TestScript.ls" ] ]
If you want to associate a server-script with a specific group within a movie, add a #groupID property to the list. This will cause only messages sent from members of that group to be forwarded to the specified script.
theMap.append( [#movieID: "TestMovie", #groupID: "@chatUsers",\#scriptFileName: "TestScript.ls"] )
Chapter 12480
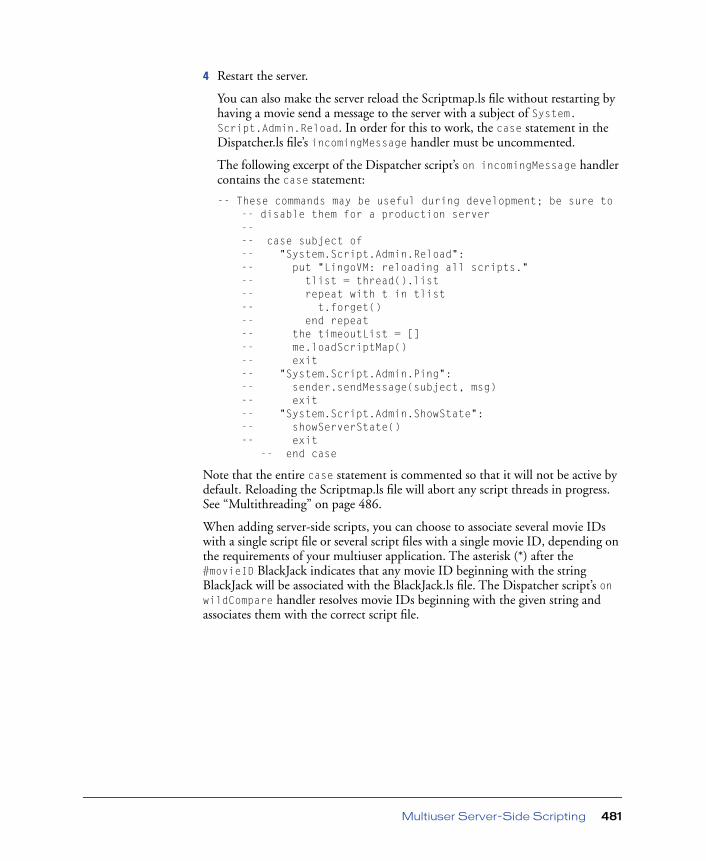
4 Restart the server.
You can also make the server reload the Scriptmap.ls file without restarting by having a movie send a message to the server with a subject of System.Script.Admin.Reload. In order for this to work, the case statement in the Dispatcher.ls file’s incomingMessage handler must be uncommented.
The following excerpt of the Dispatcher script’s on incomingMessage handler contains the case statement:
-- These commands may be useful during development; be sure to-- disable them for a production server---- case subject of -- "System.Script.Admin.Reload":-- put "LingoVM: reloading all scripts."-- tlist = thread().list-- repeat with t in tlist-- t.forget()-- end repeat-- the timeoutList = []-- me.loadScriptMap()-- exit-- "System.Script.Admin.Ping": -- sender.sendMessage(subject, msg)-- exit-- "System.Script.Admin.ShowState":-- showServerState()-- exit
-- end case
Note that the entire case statement is commented so that it will not be active by default. Reloading the Scriptmap.ls file will abort any script threads in progress. See “Multithreading” on page 486.
When adding server-side scripts, you can choose to associate several movie IDs with a single script file or several script files with a single movie ID, depending on the requirements of your multiuser application. The asterisk (*) after the #movieID BlackJack indicates that any movie ID beginning with the string BlackJack will be associated with the BlackJack.ls file. The Dispatcher script’s on wildCompare handler resolves movie IDs beginning with the given string and associates them with the correct script file.
Multiuser Server-Side Scripting 481

Standard server events
Each script file you add should contain a handler for each type of server event (user log-ons, group creation, etc.) you want your script to react to. When standard events such as users entering or leaving groups occur, the server calls the on serverEvent handler in the Dispatcher.ls file. This handler determines the type of event and the movie it came from and forwards it to that movie’s server-side script.
For example, if the event forwarded by the server is a user log-on, the script’s on userLogOn handler is called. If the event is a group creation, the script’s on groupCreate handler is called.
Each of the handlers in a movie’s script must include arguments that inform the handler about where the event came from. For example, a userLogOn handler might look like this:
on userLogOn (me, movie, group, user)put "User Log On occurred"
end
The arguments are passed by the server to the handler and indicate exactly which movie, group, and user generated the event. The me argument is required and refers to the script object containing the handler. In the preceding example, the put statement displays text in the server’s console window.
Distributing server events
When a movie sends an event to the server, the server forwards the event to that movie’s script object using the on distributeServerEvent handler in the Dispatcher script. These events include the following:
• on movieCreate: the first user of the movie logging on to the server
• on movieDelete: the last user of the movie logging off of the server
• on userLogOn: a user logging on to the movie
• on userLogOff: a user logging off of the movie
• on groupCreate: a group being created (when the first user joins the group)
• on groupDelete: a group being deleted (when the last user in a group leaves)
• on groupJoin: a user joining a group
• on groupLeave: a user leaving a group
• on incomingMessage: a message sent to the movie’s server-side script
• on serverShutDown: the server is shutting down
• custom events created by the Lingo author
Chapter 12482

Script files associated with movies may contain handlers for any of these events. These scripts may also contain custom handlers that can be called by specially formatted messages sent by the movie.
Sending custom events to server-side scripts
To call a handler in a movie’s server-script, send a message with "system.script" in the #recipients parameter and the handler name in the #subject parameter. The following statement sends a message to the server that calls the handler testHandler in the movie’s server-side script:
errCode = gMultiuserInstance.sendNetMessage([#recipients: \"system.script", #subject: "testHandler", #content: \ "This is the text to be displayed"])
The movie’s server-side script will receive this message, and its on incomingMessage handler will be called. The on incomingMessage handler should contain a case statement that tests the contents of the #subject property and calls the handler named in it.
The server-side script would look something like this:
on incomingMessage (me, movie, group, user, fullMsg)-- if the #subject of the incoming message is "testHandler",-- call that handler and pass it the #content as an argumentcase fullMsg.subject of
"testHandler":me.testHandler(fullMsg.content)
end caseend
on testHandler me, textArg-- display the #content of the message in the server’s-- console windowput textArg
end
Note that the arguments me, movie, group, user, and fullMsg are provided by the server and must be included with the incomingMessage handler. By passing these arguments to your handler, the server lets you know exactly who the message came from.
Specifying "system.script" as the recipient tells the server to send an incomingMessage event to the server-side script associated with the movie that sent the message. The #subject gets passed to the handler as part of the argument fullMsg. The put statement in the handler causes the server to display the specified text in its console window.
Multiuser Server-Side Scripting 483
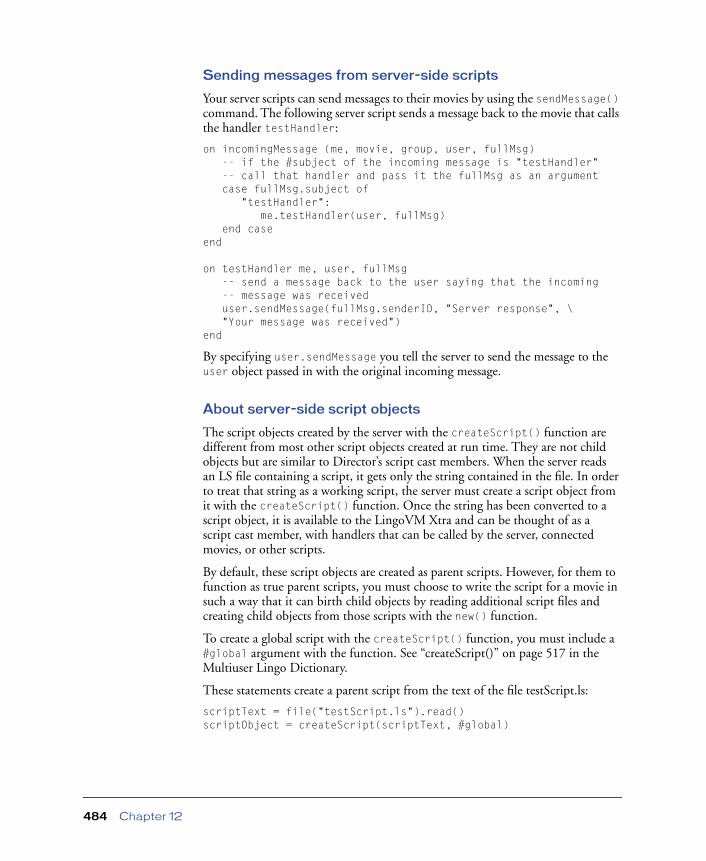
Sending messages from server-side scripts
Your server scripts can send messages to their movies by using the sendMessage() command. The following server script sends a message back to the movie that calls the handler testHandler:
on incomingMessage (me, movie, group, user, fullMsg)-- if the #subject of the incoming message is "testHandler"-- call that handler and pass it the fullMsg as an argumentcase fullMsg.subject of
"testHandler":me.testHandler(user, fullMsg)
end caseend
on testHandler me, user, fullMsg-- send a message back to the user saying that the incoming -- message was receiveduser.sendMessage(fullMsg.senderID, "Server response", \"Your message was received")
end
By specifying user.sendMessage you tell the server to send the message to the user object passed in with the original incoming message.
About server-side script objects
The script objects created by the server with the createScript() function are different from most other script objects created at run time. They are not child objects but are similar to Director’s script cast members. When the server reads an LS file containing a script, it gets only the string contained in the file. In order to treat that string as a working script, the server must create a script object from it with the createScript() function. Once the string has been converted to a script object, it is available to the LingoVM Xtra and can be thought of as a script cast member, with handlers that can be called by the server, connected movies, or other scripts.
By default, these script objects are created as parent scripts. However, for them to function as true parent scripts, you must choose to write the script for a movie in such a way that it can birth child objects by reading additional script files and creating child objects from those scripts with the new() function.
To create a global script with the createScript() function, you must include a #global argument with the function. See “createScript()” on page 517 in the Multiuser Lingo Dictionary.
These statements create a parent script from the text of the file testScript.ls:
scriptText = file("testScript.ls").read()scriptObject = createScript(scriptText, #global)
Chapter 12484

Whether true parent scripts or global scripts are appropriate for a particular situation depends on the movie and the author’s judgment.
The GameScript file contains a script that acts like a client and manages the logic required for the game.
SERVER
Movie 1
Movie 2
All Users
Chat 1
Group 2
Fred
Betty
Wilma
Barney
Game Bot
TCP Socket
Incoming / Outgoing messagesFredWilmaBettyBarney
FredBettyWilma
BarneyFredGame Bot
Fred
Betty
Wilma
Barney
GameScript.ls
Multiuser Server-Side Scripting 485

MultithreadingIn order to enhance performance in situations where large numbers of movies are executing server-side scripts simultaneously, the server supports cooperative multithreading. Cooperative multithreading allows the scripts of many movies to execute at the same time. This prevents one movie from having to wait for all the movies ahead of it to finish their script processing before being able to process its own scripts on the server.
The type of multithreading supported by the server is known as cooperative multithreading because the different threads, or script processes, take turns using the computer’s CPU in a cooperative manner. While one thread can issue a command to block another thread from executing for a period of time, the default behavior of the server’s threads is to share the CPU equally.
Threads are particularly advantageous when your server-side scripts are executing complex or repetitive tasks or during development, when your code may produce errors. By using threads, you can prevent script errors or repetitive tasks from getting in the way of tasks running in other threads. Note that the Dispatcher script runs in the main thread that starts when the server launches.
To take advantage of multithreading, a script must first create a new thread with the thread().new() command. Once the new thread is created, subsequent handlers that are called may be assigned to the thread so that they execute within it.
The following script contains two handlers. The first creates a new thread, and the second is executed in the newly created thread:
on makeNewThread metheThread = thread().new("testThread")-- get a random number by assigning the calculateRandomNumber-- handler to the newly created threadtheNumber = theThread.call(#calculateRandomNumber, me)
end
on calculateRandomNumber mea = random(999)return a
end
In this example, the calculateRandomNumber handler is assigned to the thread named testThread. It runs in that thread and allows other handlers assigned to other threads to run simultaneously. You can choose to have all the handlers in a movie’s server script run in one or more threads.
Chapter 12486

Sharing data between threads
Once one or more threads exist, they can share information with each other. To have one thread pass a value to another single thread, use the produceValue() function. The following handler runs in a thread named testThread, assigns a value to the variable testValue, and makes the value available to another thread with the produceValue() function:
on sendValuetestValue = 123456testThread.produceValue(testValue)
end
The thread testThread will stop running until another thread accesses the value by using awaitValue(). The following handler runs in its own thread and accesses the value testValue from the thread testThread:
on retrieveNumbertestThread.awaitValue()
end
The thread containing this handler will also stop running until the value is produced by the thread named testThread.
The produceValue() and awaitValue() commands are useful for a single thread sharing data with a single other thread. To have a thread send a value to more than one other thread, use the lock(), wait() and notifyAll() commands. These commands work only on lists, so you must place the data you want to share into a linear list or a property list.
Multiuser Server-Side Scripting 487
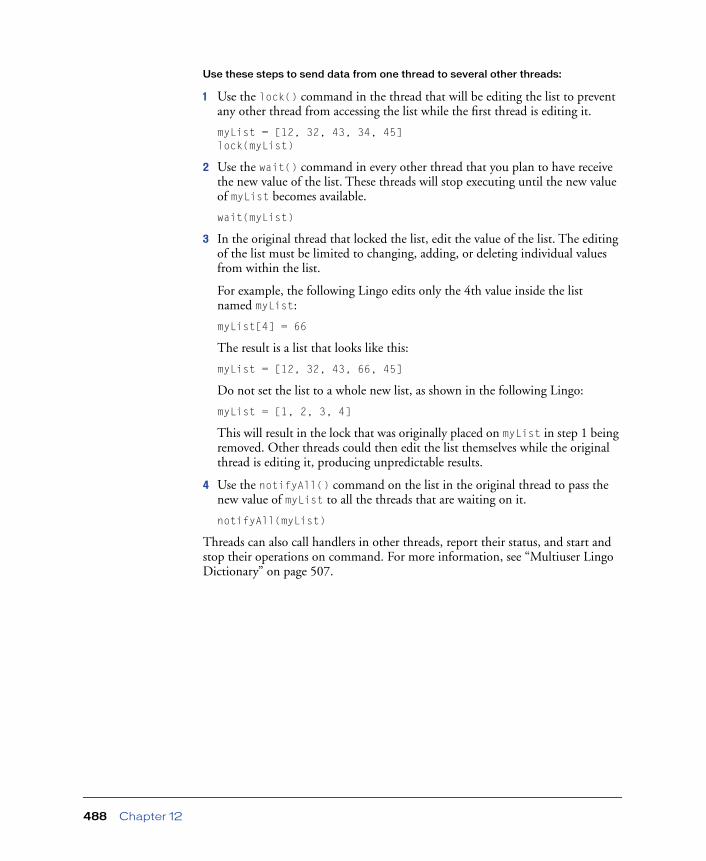
Use these steps to send data from one thread to several other threads:
1 Use the lock() command in the thread that will be editing the list to prevent any other thread from accessing the list while the first thread is editing it.
myList = [12, 32, 43, 34, 45]lock(myList)
2 Use the wait() command in every other thread that you plan to have receive the new value of the list. These threads will stop executing until the new value of myList becomes available.
wait(myList)
3 In the original thread that locked the list, edit the value of the list. The editing of the list must be limited to changing, adding, or deleting individual values from within the list.
For example, the following Lingo edits only the 4th value inside the list named myList:
myList[4] = 66
The result is a list that looks like this:
myList = [12, 32, 43, 66, 45]
Do not set the list to a whole new list, as shown in the following Lingo:
myList = [1, 2, 3, 4]
This will result in the lock that was originally placed on myList in step 1 being removed. Other threads could then edit the list themselves while the original thread is editing it, producing unpredictable results.
4 Use the notifyAll() command on the list in the original thread to pass the new value of myList to all the threads that are waiting on it.
notifyAll(myList)
Threads can also call handlers in other threads, report their status, and start and stop their operations on command. For more information, see “Multiuser Lingo Dictionary” on page 507.
Chapter 12488
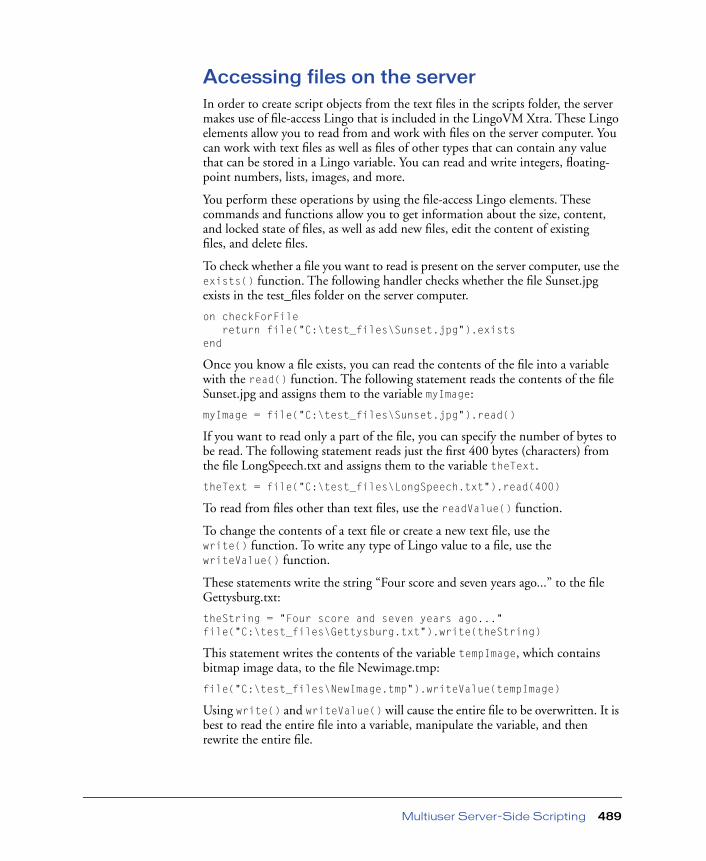
Accessing files on the serverIn order to create script objects from the text files in the scripts folder, the server makes use of file-access Lingo that is included in the LingoVM Xtra. These Lingo elements allow you to read from and work with files on the server computer. You can work with text files as well as files of other types that can contain any value that can be stored in a Lingo variable. You can read and write integers, floating-point numbers, lists, images, and more.
You perform these operations by using the file-access Lingo elements. These commands and functions allow you to get information about the size, content, and locked state of files, as well as add new files, edit the content of existing files, and delete files.
To check whether a file you want to read is present on the server computer, use the exists() function. The following handler checks whether the file Sunset.jpg exists in the test_files folder on the server computer.
on checkForFilereturn file("C:\test_files\Sunset.jpg").exists
end
Once you know a file exists, you can read the contents of the file into a variable with the read() function. The following statement reads the contents of the file Sunset.jpg and assigns them to the variable myImage:
myImage = file("C:\test_files\Sunset.jpg").read()
If you want to read only a part of the file, you can specify the number of bytes to be read. The following statement reads just the first 400 bytes (characters) from the file LongSpeech.txt and assigns them to the variable theText.
theText = file("C:\test_files\LongSpeech.txt").read(400)
To read from files other than text files, use the readValue() function.
To change the contents of a text file or create a new text file, use the write() function. To write any type of Lingo value to a file, use the writeValue() function.
These statements write the string “Four score and seven years ago...” to the file Gettysburg.txt:
theString = "Four score and seven years ago..."file("C:\test_files\Gettysburg.txt").write(theString)
This statement writes the contents of the variable tempImage, which contains bitmap image data, to the file Newimage.tmp:
file("C:\test_files\NewImage.tmp").writeValue(tempImage)
Using write() and writeValue() will cause the entire file to be overwritten. It is best to read the entire file into a variable, manipulate the variable, and then rewrite the entire file.
Multiuser Server-Side Scripting 489
You can also copy files with the copyTo() command. The following statement copies the contents of the file Gettysburg.txt into the file Longspeech.txt:
file("C:\test_files\Gettysburg.txt").copyTo \("C:\test_files\Longspeech.txt")
For more information on other kinds of file manipulation with Lingo, see “Multiuser Lingo Dictionary” on page 507.
Server security Because the server is able to run Lingo scripts and access files on the server, it is possible that a malevolent user could access and use the server in ways you don’t intend unless certain precautions are taken.
Server-side scripting is an administrator-level activity, so server scripts are always given administrator-level access to the server. Therefore any user who calls these scripts will be able to do anything that is enabled by the scripts on the server. A user who discovers the names of handlers on the server and the movie ID used by your Director movie could write their own movie to call those same handlers.
Keep in mind the following precautions:
• If you have scripts that perform administration functions on the server, consider calling those scripts from a separate Director movie that is different from the movie you will distribute to the public.
• When you are ready to deploy your multiuser movie, it is a good idea to disable or remove the adminstration functionality that appears at the beginning of the Dispatcher script’s on incomingMessage handler. These functions can be dangerous if misused.
• Use caution when calling database administration functions from within server-side scripts. For example, if you use createUser within a server-side handler you are assumed to be an administrator-level user by the server.
• Use care when using file access Lingo inside server-side handlers. These commands could be used to manipulate the server computer’s hard drive in destructive ways.
• If you edit the Dispatcher script, keep in mind the security implications of any changes you make.
Advanced topicsVisit the Multiuser section of Macromedia’s Director Support Center at http://www.macromedia.com/support/director/multiuser/ for additional articles about creating advanced multiuser applications.
Chapter 12490

3
1CHAPTER 13
. . . . . . . . . . . . . . . . . . . . . . . . . . . . . . . . . . . . . . . . . . . . . . . . . . . . . . . .. . . . . . . . . . . . . . . . . . . . . . . . . . . . . . . . . . . . . . . . . . . . . . . . . . . . .The Server Application
By default, the Shockwave Multiuser Server is included as part of the Macromedia Director 8.5 installation and can be found in the Director folder. The installation creates a folder that contains the following items:
• The server application
• A Multiuser.cfg file, which contains parameters you can set in order to control certain aspects of the server’s behavior
• An example Movie.cfg file, which can be used to set server parameters differently for specific movies
• A ReadMe file that directs you to online resources and release notes
• A folder called DBObjectFiles, which the server uses to store object databases that can be created and modified by multiuser movies at run time
• An Xtras folder containing server Xtras, separate files containing software code that extends the server’s functionality
• A scripts folder containing script files that enable server-side scripting
• Three DLLs: C4dll.dll, Iml32.dll, and Msvcrt.dll (Windows only)
• Two code libraries, called MacromediaRuntimeLib and ImlLib (Macintosh only)
491

Running the serverBefore you launch the server, you may want to increase the number of simultaneous connections allowed from the default number of 50. To increase this number to up to 1000 connections, edit the Multiuser.cfg file by removing the # character from the beginning of the ServerSerialNumber line and pasting your Director serial number into the end of the line. For more information, see “Using the Multiuser.cfg file” on page 494. On the Macintosh, you should increase the amount of RAM allocated to the server in its Get Info window before hosting large numbers of connections or using significant server-side scripts. See “Multiuser Server-Side Scripting” on page 475.
To launch the server:
Double-click the server’s application icon.
At startup, the server will read through the Multiuser.cfg file, load the three default server Xtras, and then allocate its connections. When the connections have been allocated, the server is ready to accept connections and process messages from Director movies. Note that if the server does not recognize any of the items in its Multiuser.cfg file, it will shut down. For more information, see “Using the Multiuser.cfg file” on page 494.
Viewing server informationYou can view details about the server’s activity in two ways. The View menu lets you see messages in the Server window each time certain events happen, such as when users log on to or out of the server. This is useful during testing of movies or anytime you want to see a complete log of activity. The Status menu lets you see information on demand about the total number of users on the server, movies connected, databases being used, groups created, and so on.
To view server information using the View menu:
• Choose View > Server Response Time to see how much time the server is taking to process each incoming message.
A check mark next to the menu item indicates that it is active. This command will display a message every 10 seconds that shows the number of messages processed and the average time in milliseconds used for each message. You can adjust the time interval from 10 seconds to another number by editing the Multiuser.cfg file. See “Using the Multiuser.cfg file” on page 494.
• Choose View > Users Log On and Off to see a message each time a user logs in or out of the server.
Chapter 13492

• Choose View > Movie Creation and Deletion to see a message each time the first instance of a new movie connects to the server or the last instance of a movie logs off.
This command also displays a message when the last instance of a particular movie disconnects from the server. By using the Users Join and Leave Groups and Group Creation and Deletion menu items, you can choose to see messages each time a connected user joins or leaves a group or when new groups are created or deleted.
To view general server status information using the Status menu:
Choose Status > Server. The following information will be displayed:
Server IP address: 123.45.67.89. This is the address you specify in the Multiuser.cfg file. See “Configuring the server” on page 494.
Server port: 1626. This is the communications port number assigned to the Shockwave Multiuser Server.
Number of connections: 47 available, 3 in use. In this example, three users are connected to the server. The number of connections is based on the number permitted by the server license key.
Connections waiting to be recycled: 0. These are connections that have logged out or timed out but have not yet been reset by the server to be able to accept new connections. This number will usually be 0 except on very active servers.
Number of connections awaiting logon: 0. These are connection requests that the server has received but not yet processed.
Number of movies: 3. This is the number of different movies connected to the server. These might be Chess, Pinball, and TechChat, for example, for a total of three movies.
To view specific status information using the Status menu:
• Choose Status > Movies to display a list of movies currently connected to the server as well as the number of users, groups, and databases used by each movie.
• Choose Status > Users to see the total number of users currently connected to each movie on the server. This will also display each user’s name, user level, and IP address.
• Choose Status > Groups to see a list of the groups for each movie on the server and the members in each group.
• Choose Status > Databases to see a list of the databases used by each movie.
The Server Application 493

Configuring the serverYou can change many aspects of how the server operates by editing the Multiuser.cfg file. You can specify separate settings for different movies by creating additional CFG files. By editing parameters in any of these CFG files, you can do the following:
• Change the amount of memory available for handling messages.
• Limit the number of users that can connect to the server or to a particular movie.
• Specify which types of users are allowed to connect to the server.
• Specify which movies may connect to the server.
• Set the user levels required to execute each server command.
Using the Multiuser.cfg file
There are many other settings that can also be changed by editing the Multiuser.cfg file. Examples of each of these can be found in the Multiuser.cfg file that came with your server. Comments can be added to any of the configuration files by preceding each comment line with a pound sign (#). You can also add a # character to the beginning of an optional parameter line to prevent it from being read by the server. For parameters that can take more than one value, place a space and a backslash (\) after the first value and place the next value on the next line. If the server does not recognize a particular setting name or a setting is invalid, it displays an error message in its console window and does not allocate any incoming connections. For changes to the file to take effect, the server must be restarted.
When you edit the Multiuser.cfg file, keep a copy of the original file provided with the server installation.
The following server settings can be edited:
Echo allows you to add text that is displayed in the Server window when the server reads the Multiuser.cfg file at startup.
ServerOwnerName is an optional parameter that allows you to enter your name so that it appears in the server window at startup.
ServerSerialNumber allows you to enter your Director serial number. This lets you increase the number of possible server connections from the default value (50) up to 1000. Both Macintosh and Windows serial numbers work on either platform’s version of the server.
ServerPort specifies the communications port used by the server. The Shockwave Multiuser Server is assigned port 1626 so that it will not conflict with other server applications running on the same computer. You may change this if you find it necessary to do so.
Chapter 13494

ServerIPAddress is an optional parameter that allows you to specify an IP address if your server computer uses more than one. Most computers use only one IP address. You can also use this parameter to make the server listen for messages on multiple port numbers on a single IP address.
MaxMessageSize sets the amount of memory to use for the incoming and outgoing message buffers. The total memory used is twice the number you specify. The value must be in bytes and should be a multiple of 1024 (1 kilobyte).
ConnectionLimit is an optional parameter that specifies the maximum number of users that can connect to the server. It defaults to the number indicated by the license you purchased. You can use this parameter to limit the connections to a smaller number.
LogonRejectionDelay is an optional parameter that lets you set the number of seconds to wait before sending a message informing a client whose log-on has not been accepted. The default is 10 seconds.
EncryptionKey is an optional parameter that lets you specify a string to use for encrypting user name and password information when users connect to the server. If you use this parameter, you must include an identical string when using the connectToNetServer command in a client movie.
UserLevel lets you specify required user levels for each of the database commands and server commands. You can choose any number between 0 and 100 for each command you want to control access to. By using different numbers for different commands, you can create custom privileges for users of different levels. For the default values for each command, see the original Multiuser.cfg file that came with your server.
MovieCFGPath is an optional parameter that lets you specify the directory where movie-specific configuration files are located.
LogFileName is an optional parameter that lets you specify the name and location of the text file the server generates with its status messages. This file contains all the information displayed in the server’s application window and is useful for looking back at server activity and debugging movies.
AllowMovies is an optional parameter that lets you specify the names of movies that you want to allow to connect to the server. If this parameter is not used, any movie may connect.
MoviePathName is an optional parameter that lets you specify the absolute Internet addresses of movies that you want to allow to connect to the server. The server checks a movie’s address against the MoviePathName settings only if the movie uses the property list format of connectToNetServer(). This prevents movies from connecting from any location other than the one the author intended. See “connectToNetServer()” on page 512.
The Server Application 495

IdleTimeOut is an optional parameter that lets you specify how many seconds to let movies stay connected to the server if they are not sending any messages. Movies that remain idle for longer than the time you specify are disconnected by the server. If omitted, this parameter defaults to 1 hour.
ScanTimeReportInterval lets you set the number of seconds between each Server Response Time message in the server’s application window. This takes effect only when the Server Response Time item in the server’s View menu is turned on.
You can change the default settings for which types of messages are displayed in the server’s application window by editing the following parameters. These parameters change which items in the server’s View menu are turned on and off at startup. A value of 1 turns the item on, and a value of 0 turns the item off.
ShowLogonMessages corresponds to the Users Log On and Off item in the View menu.
ShowCreateMovieMessages corresponds to the Movie Creation and Deletion item in the View menu.
ShowScantimeMessages corresponds to the Server Response Time item in the View menu.
ShowCreateGroupMessages corresponds to the Group Creation and Deletion item in the View menu.
ShowJoinGroupMessages corresponds to the Users Join and Leave Groups item in the View menu.
The following parameters specify which server Xtras the server loads at startup and which commands each Xtra provides:
ServerExtensionXtras lets you specify the names of Server Xtras to load at startup. These names are the internal names of the Xtras, and not necessarily their file names. The Xtras need to be located in the Xtras folder at the same directory level as the server.
XtraConfigCommands lets you specify which Xtra is referred to by the XtraCommands that follow it. Each series of XtraCommand entries should be preceded by an XtraConfigCommands entry.
XtraCommand lets you specify each command that a particular Xtra uses. This makes the server aware of what strings may be sent as commands for the Xtra. The default Multiuser.cfg file that comes with the server has a series of commands declared for the ObjectDB Xtra, which controls the use of database objects with the server and determines whether users without a preexisting DBUser object can log on to the server. For details on these log-on controls, see the Multiuser.cfg file that was installed with your server.
Chapter 13496

Using the MultiuserCommon.cfg file
If you have multiple servers running on multiple computers, you can use a MultiuserCommon.cfg file to make it easy to apply the same settings to all your servers. This file is read by each of the servers when they start up, before they read the Multiuser.cfg file. By using both of these files, you can give your servers the same values for some settings and different values for others.
To configure multiple servers using both a MultiuserCommon.cfg and a Multiuser.cfg file:
1 Install the server on each computer.
2 Create a single MultiuserCommon.cfg file with the settings you want to be common to all the servers.
3 Place the MultiuserCommon.cfg file in a location of your choice.
4 Enable file sharing for the file so each copy of the server can have access to it. See your operating system documentation for more information on this.
5 Create an alias or shortcut to the file and place a copy of it next to each copy of the server.
6 Edit the Multiuser.cfg file for each server with the individual settings you choose. If a parameter appears in both the MultiuserCommon.cfg file and a specific Multiuser.cfg file, the setting in the Multiuser.cfg file has precedence.
Using movie configuration files
Each different movie that connects to the server may also have its own configuration file. You can use the same parameters in this configuration file that you use in the server’s Multiuser.cfg file to give the movie its own specific settings for those parameters. The server reads the movie’s configuration file when the first instance of the movie connects to the server. Give the movie’s configuration file the same name that the movie uses to connect to the server, such as Whiteboard.cfg, and place it in the location you specify in the Multiuser.cfg file. If the server does not recognize a particular setting name or a setting is invalid, users will not be able to connect with that movie.
Movie.cfg files cannot use the serverIPAddress or serverPort tags. In addition to the other parameters used in the server’s Multiuser.cfg file, you can use the following parameters to control specific movie actions:
NotifyDisconnect lets you specify a group name for the server to send a message to each time a user of the movie disconnects from the server.
GroupSizeLimits lets you specify a maximum number of users to allow in each group you specify for the movie. You can specify a different limit for each group. When this parameter is used, the groups will exist on the server even when they have no members.
The Server Application 497
Using the MovieCommon.cfg file
The MovieCommon.cfg file allows you to give certain parameters the same value for all movies that are connecting to the server and to give other parameters different values for each movie. For example, you might want all movies to have a connection limit of 20, so you could include the tag ConnectionLimit = 20 in the MovieCommon.cfg file next to the server.
About administering the serverIn order to run the server successfully in a network environment, it is important that you or your network administrator understand how the server interacts with the rest of the network and what features of your network the server depends on.
If your server is installed behind a firewall and you want to allow users outside the firewall to connect, you must make sure your firewall is set to allow incoming traffic on the port number that the server uses. By default, this is port 1626. You can choose another port number and configure the server’s Multiuser.cfg file to use it, but you must be sure no other application on your server computer will try to use the same port number as the server. If your network uses a proxy server, it must also be configured to allow incoming traffic on the port that the Multiuser Server is using.
To ensure that your server will always be available to users in the event of a hardware or software failure, you can implement a redundant server installation by using two servers on two computers and connecting them with a third-party load-balancing solution. These include products such as Central Dispatch™ from Resonate and Local Director™, a hardware tool from Cisco Systems.
You can set up the server to start automatically after a hardware restart by adding a server alias to the Startup Items folder in the Macintosh System Folder or a server shortcut to the Startup folder in Windows. This will cause the server to restart any time there is an unplanned hardware restart, such as those caused by power failures.
ExtensibilityThe Multiuser Server uses Xtras, separate files that contain software code for specific server functions. You can choose not to load certain parts of the server’s functionality by removing Xtras from the server’s Xtras folder. For example, you can remove the Database Xtra if you are not using databases. You can also write your own Xtras to add custom functions to the server if you are a competent C or C++ programmer. A separate Xtra Developer’s Kit is available from Macromedia’s Web site (http://www.macromedia.com/support) for those who wish to learn more about writing Xtras for the server.
Chapter 13498

TroubleshootingThe following are three common issues you might encounter when configuring and using the server:
• Connection attempts are blocked. This usually means that the user is behind a firewall that is not configured to allow outgoing connections on the port that Shockwave uses. Contact your network administrator to adjust the firewall settings to allow outgoing TCP/IP connections on port 1626. Client movies running behind firewalls need to be able to make outgoing connections through the firewall in order to communicate with the server. Clients movies acting as peer hosts will need the firewall to allow incoming connections.
• Large messages are not getting through the server. This usually indicates that the client’s or server’s message buffers have not been set large enough to handle the size of the messages you are sending. You can change this setting by editing the MaxMessageSize parameter in the Multiuser.cfg file. You may also need to use setNetBufferLimits to adjust the Xtra’s buffer sizes in your movie’s Lingo scripts.
• Proxy servers can interfere with the Shockwave Multiuser Server or multiuser movies that act as peer hosts, since the host uses the clients’ IP addresses for routing messages. Director movies or servers running behind a proxy server may have difficulty making connections and sending messages because the proxy server may mask the real IP addresses of the movies.
The Server Application 499

Chapter 13500

4
1CHAPTER 14
. . . . . . . . . . . . . . . . . . . . . . . . . . . . . . . . . . . . . . . . . . . . . . . . . . . . . . . .. . . . . . . . . . . . . . . . . . . . . . . . . . . . . . . . . . . . . . . . . . . . . . . . . . . . .Multiuser Lingo by Feature
There are several categories of Lingo scripting elements for multiuser applications:
• Multiuser Lingo functions are provided by the Multiuser Xtra. They control the Director movie itself as it functions in a multiuser application, connecting to remote hosts, sending and receiving messages, checking error codes, monitoring the state of the movie, and so on.
• Server commands are instructions to the Shockwave Multiuser Server. Send them as messages with the sendNetMessage() Lingo function.
• Group commands are server commands used to manage groups of users and group attributes.
• Server database commands are server commands for interacting with database files on a remote host.
• Multithreading commands are server-side commands that allow you to create a multithreaded environment on the server so your server-side scripts run faster.
• File-access commands are server-side commands that let you open, read, and manipulate files on the server computer.
• Debugging commands are server-side commands that let you examine and isolate errors in your server-side scripts.
This chapter lists Director’s various multiuser features and the corresponding Lingo elements that you can use to implement those features.
501

Establishing and managing server connectionsThese commands are used for creating and managing server connections.
Peer-to-peer connectionsThese commands are used to establish and manage peer-to-peer connections.
Server commandsThe following commands control the Shockwave Multiuser Server. Send the commands as messages with sendNetMessage(), using a recipient containing the syntax System.object.command, a subject of your choosing, and any required parameters in the message contents.
checkNetMessages sendMessage()
getNetErrorString() sendNetMessage()
getNetMessage() setNetMessageHandler
getNetOutgoingBytes() getNetAddressCookie()
getNumberWaitingNetMessages() setNetBufferLimits
connectToNetServer()
setNetMessageHandler getPeerConnectionList()
waitForNetConnection() breakConnection
connectToNetServer() getNetAddressCookie()
getVersion getUserCount
getTime delete
getMovieCount disable
getMovies enable
Chapter 14502

Group commandsThese server commands control groups and group attributes.
Database commandsThe server supports databases that are managed entirely by the server and can be manipulated with Lingo. The following commands control these databases and use the syntax "server.databaseObjectType.commandName". They are listed according to the types of objects they can be applied to.
join getAttribute
leave getAttributeNames
getGroupCount delete
getGroups deleteAttribute
getUserCount disable
getUsers enable
setAttribute createUniqueName
DBAdmin DBUser
createUser setAttribute
deleteUser getAttribute
createApplication getAttributeNames
deleteApplication deleteAttribute
createApplicationData DBPlayer
deleteApplicationData setAttribute
declareAttribute getAttribute
deleteAttribute getAttributeNames
DBApplication deleteAttribute
setAttribute Group
getAttribute getAttribute
deleteAttribute setAttribute
getAttributeNames getAttributeNames
getApplicationData deleteAttribute
Multiuser Lingo by Feature 503

Server-side multithreadingUse these commands to run server-side scripts in multiple threads on the server computer.
Server-side file accessUse these commands to access and manipulate files on the server computer.
createScript() new (thread)
count (thread) thread()
list sweep()
call() sleep()
name (thread) status
forget (thread) awaitValue()
produceValue() lock()
unlock() wait()
notify() notifyAll()
resume() abort()
readValue() writeValue()
volumeInfo exists
type (file) creator
locked read()
write() delete() (file)
rename() exchange()
getTempPath() copyTo()
getAt() createFolder()
deleteFolder() open()
flush() close()
position size
folderChar
Chapter 14504

Server-side debuggingUse these commands to debug scripts running on the server.
setBreakPoint() breakPointList
name (script) stackSize
name (variable) type (variable)
stackLevel stepInto()
stepOver() frame() (thread)
script (thread) handler()
line() variableCount
variable() value (variable)
Multiuser Lingo by Feature 505

Chapter 14506

5
1CHAPTER 15
. . . . . . . . . . . . . . . . . . . . . . . . . . . . . . . . . . . . . . . . . . . . . . . . . . . . . . . .. . . . . . . . . . . . . . . . . . . . . . . . . . . . . . . . . . . . . . . . . . . . . . . . . . . . .Multiuser Lingo Dictionary
The Multiuser Xtra provides the following commands and functions for controlling multiuser applications.
The commands and properties of the Multiuser Xtra are organized by category in the “Multiuser Lingo by Feature” chapter. In this chapter the same commands and properties are presented in standard Lingo dictionary format, with detailed descriptions, correct syntax, and scripting examples.
abort()Syntax
whichThread.abort()
Description
Multiuser Server server-side command; stops the specified thread completely. All handler calls, including nested calls, are cleared from the thread’s execution stack.
507

addUser()Syntax
whichGroup.addUser(whichUser)
Description
Multiuser Server server-side command; adds the given user to the specified group.
Example
This handler adds the user who has just logged on to the server to the group @TestUsers:
on userLogOn (me, movie, group, user)voGroup = movie.serverGroup("@TestUsers")voGroup.addUser(user)
end
See also
removeUser()
appendRecordThis command is obsolete. Use createUser, createApplication, or createApplicationData instead.
awaitValue()Syntax
whichThread.awaitValue()
Description
Multiuser Server server-side function; returns a value in a variable from the specified thread. The current thread stops executing until the specified thread produces a value with produceValue().
This function should be used for a single thread awaiting a value for a single other thread. To send values to multiple threads, use lock(), wait(), notifyAll(), and unlock().
Example
The following handler gets a value from the thread testThread. The thread that contains the handler is blocked from running further until the value is produced by testThread.
on retrieveNumbertestThread.awaitValue()
end
See also
lock(), wait(), notifyAll(), unlock(), produceValue(), sleep()
Chapter 15508

breakConnectionSyntax
gMultiuserInstance.breakConnection(userIDString)
Description
Multiuser Server Lingo command; breaks a peer connection accepted with waitForNetconnection().
Example
This statement has the host movie break a connection with the user logged on as Spencer:
errCode = gMultiuserInstance.breakConnection("Spencer")
See also
getNetErrorString(), waitForNetConnection()
breakPointListSyntax
whichScript.breakPointList()
Description
Multiuser Server server-side debugging function; returns a list of the line numbers in the script that have breakpoints set on them.
Multiuser Lingo Dictionary 509

call()Syntax
whichThread.call(#whichHandler, targetObject, arg1, arg2 ...)
Description
Multiuser Server server-side command; calls a handler in the targetObject parameter in whichThread. The current thread continues execution while the handler whichHandler is called in the script object targetObject.
Threads may also pass values between themselves using shared objects and the lock() and unlock() commands to ensure data integrity within the shared objects.
Arguments required by the handler being called should be passed after the targetObject parameter.
When used in threads, the call() command should only be used to call the specified handler in a single target object at a time. Using lists of target objects, or using call() more than once in the same thread before the first one has completed can produce unpredictable results. It is recommended that separate simultaneous calls to handlers be done in separate threads. This is different from the call() command in the Director authoring and playback environments, where it can take a list of target objects.
Example
The following server-side statements assign the integer 55 to the variable startValue and then pass that value to the on MultiplyValue handler and run the handler in the thread testThread. The me object indicates that the handler is located in the same script object that contains these statements:
startValue = 55testThread.call(#multiplyValue, me, startValue)
See also
produceValue(), awaitValue(), lock(), unlock()
Chapter 15510

checkNetMessagesSyntax
gMultiuserInstance.checkNetMessages({numberOfMessages})
Description
Multiuser Server Lingo command; forces a check for any incoming messages and calls the callback handlers specified by setNetMessageHandler(). It is necessary only when the movie itself does not allow the normal idle time in which the Xtra would check for incoming messages automatically. The optional parameter defaults to 1 and specifies the maximum number of messages to process. Setting this number to a high value can cause performance problems, since this function does not return until the waiting messages have been processed.
This function is useful in movies that sit in one frame with a go to the frame loop, for example. It should not be called from a message handler specified by the setNetMessageHandler() command, or by any handler called by a message handler (including beginSprite, enterFrame, and so on) that can be executed as the result of a go to frame n statement.
Example
This statement tells the Multiuser Xtra to check for incoming messages, with a maximum of four messages:
errCode = gMultiuserInstance.checkNetMessages(4)
See also
setNetMessageHandler
close()Syntax
file("fileName").close()
Description
Multiuser Server server-side function; closes the specified file on the server. The file is closed automatically when the file reference object is deleted.
Example
This statement closes the file Longspeech.txt on the server:
file("C:\Longspeech.txt").close()
See also
read(), rename(), write(), writeValue()
Multiuser Lingo Dictionary 511
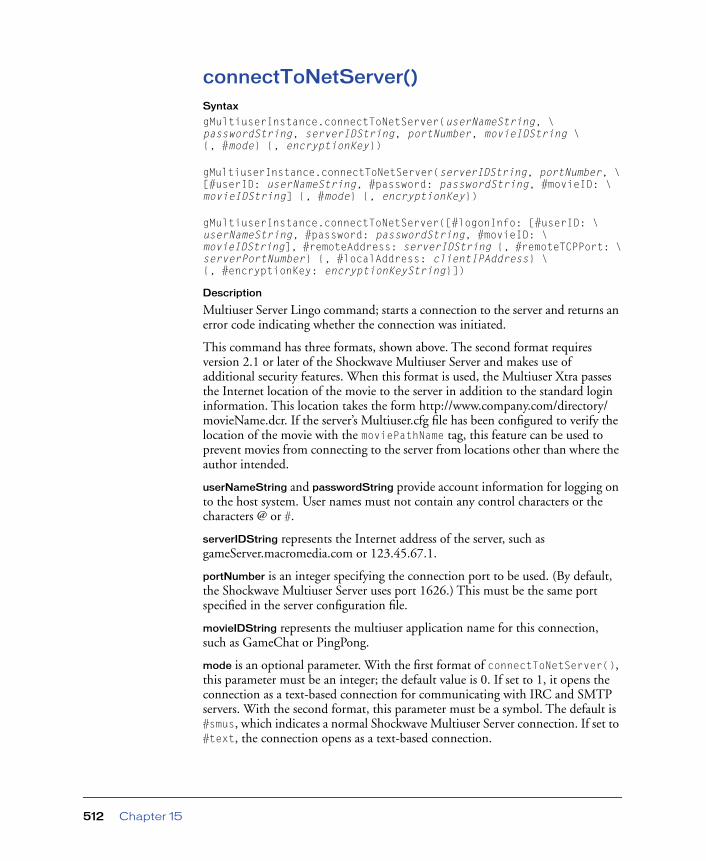
connectToNetServer()Syntax
gMultiuserInstance.connectToNetServer(userNameString, \passwordString, serverIDString, portNumber, movieIDString \{, #mode} {, encryptionKey})
gMultiuserInstance.connectToNetServer(serverIDString, portNumber, \[#userID: userNameString, #password: passwordString, #movieID: \movieIDString] {, #mode} {, encryptionKey})
gMultiuserInstance.connectToNetServer([#logonInfo: [#userID: \userNameString, #password: passwordString, #movieID: \movieIDString], #remoteAddress: serverIDString {, #remoteTCPPort: \serverPortNumber} {, #localAddress: clientIPAddress} \{, #encryptionKey: encryptionKeyString}])
Description
Multiuser Server Lingo command; starts a connection to the server and returns an error code indicating whether the connection was initiated.
This command has three formats, shown above. The second format requires version 2.1 or later of the Shockwave Multiuser Server and makes use of additional security features. When this format is used, the Multiuser Xtra passes the Internet location of the movie to the server in addition to the standard login information. This location takes the form http://www.company.com/directory/movieName.dcr. If the server’s Multiuser.cfg file has been configured to verify the location of the movie with the moviePathName tag, this feature can be used to prevent movies from connecting to the server from locations other than where the author intended.
userNameString and passwordString provide account information for logging on to the host system. User names must not contain any control characters or the characters @ or #.
serverIDString represents the Internet address of the server, such as gameServer.macromedia.com or 123.45.67.1.
portNumber is an integer specifying the connection port to be used. (By default, the Shockwave Multiuser Server uses port 1626.) This must be the same port specified in the server configuration file.
movieIDString represents the multiuser application name for this connection, such as GameChat or PingPong.
mode is an optional parameter. With the first format of connectToNetServer(), this parameter must be an integer; the default value is 0. If set to 1, it opens the connection as a text-based connection for communicating with IRC and SMTP servers. With the second format, this parameter must be a symbol. The default is #smus, which indicates a normal Shockwave Multiuser Server connection. If set to #text, the connection opens as a text-based connection.
Chapter 15512
A movie running in a browser or in Shockmachine that attempts make a text server connection invokes a security dialog box unless the text server resides in the same domain name as the Web server the movie is served from. Projectors running with the safePlayer set to TRUE also display a security dialog box when making text connections, unless the movie being played is a remote DCR file on the same server as the text server. If this command is used to connect to POP, SMTP, or IRC chat servers, none of the Multiuser Server command functionality is available. The command supports only simple text messaging.
encryptionKey is another optional parameter. This string is used to encrypt log-on information sent to the server and must match the encryption key specified in the Multiuser.cfg file for the server.
The third format of connectToNetServer() takes a property list and allows you to specify a particular local IP address to be used for messaging on clients that have multiple IP addresses. This third format also compares the client movie’s location with the address string in the moviePathName tag in the server’s Multiuser.cfg file.
The #logonInfo property list contains the user name, password and movie ID.
#remoteAddress indicates the address of the Multiuser Server you are connecting to.
#remoteTCPPort indicates the server port number to use for TCP messages. The default is 1626.
#localAddress indicates the IP address of the client machine. You can use the getNetAddressCookie() function to determine the IP address and to select a specific IP address if there is more than one address on the client machine.
Note that the third format of connectToNetServer() should be used only for connecting to the Shockwave Multiuser Server and does not contain the #mode parameter.
Use this command to connect to multiuser servers. Finding and connecting to the server can take some time. This function first returns an error message immediately from the Xtra. If the function’s parameters are valid, the returned error code is 0. The server sends a subsequent message and calls the message handler when the connection is actually made.
Before using the connectToNetServer command, you should first set up a handler to receive the message that connectToNetServer returns. To set up the connection, create an instance of the Xtra, define the message handler using a setNetMessageHandler statement, and then connect with connectToNetServer().
Multiuser Lingo Dictionary 513

The message returned from the getNetMessage function is a property list with the following information:
You disconnect from the server by setting the variable containing the Multiuser Xtra instance to 0.
Example
This statement is a typical call that initiates a connection that is not encrypted:
errCode = gMultiuserInstance.connectToNetServer( "Fred", \"secret", "serverName.company.com", 1626, "ExcitingGame")
See also
waitForNetConnection(), setNetMessageHandler, getNetAddressCookie()
copyTo()Syntax
file("fileName").copyTo("destinationFileName")
Description
Multiuser Server server-side function; copies the specified file to a new file with the name destinationFileName. This function returns a nonzero error code if it fails.
Example
This statement copies the file Longspeech.txt to the new file Shortspeech.txt:
file("C:\Longspeech.txt").copyTo(C:\Shortspeech.txt")
See also
exchange()
#errorCode Resulting error code: 0 if there is no error
#senderID System
#subject ConnectToNetServer
#content Empty string
#timeStamp Time in milliseconds on the server
Chapter 15514

count (thread)Syntax
thread().count
Description
Multiuser Server server-side function; returns the total number of threads running on the server.
Example
These server-side statements count the number of threads currently in memory and then output their names and status to the server console:
threadCount = thread().count repeat with i = 1 to threadCount
t = thread(i) put "Thread " & t.name & " status = " & t.status
end repeat
createApplicationSyntax
system.DBAdmin.createApplication [#application: "ApplicationName", #description: "DescriptionString"]
Description
Multiuser Server database command; adds a new DBApplication database object to the server. Application names may contain up to 100 characters. The description string may contain up to 255 characters.
Example
This statement creates a new DBApplication object for the movie called Checkers with a description of Two-player Checkers game:
errCode = gMultiuserInstance.sendNetMessage("system.DBAdmin. createApplication", "anySubject", [#application: "Checkers", #description: "Two-player Checkers game"])
The server’s response looks like this:
[#errorCode: 0, #recipients: ["userName"], #senderID: "system.DBAdmin.createApplication", #subject: "anySubject", #content: [#application: "Checkers", #description: "Two-player Checkers game"], #timeStamp: 186034087]
See also
connectToNetServer(), sendNetMessage()
Multiuser Lingo Dictionary 515
createApplicationDataSyntax
system.DBAdmin.createApplicationData [#application: "ApplicationName", #attribute: [#Attribute1: value1 {, #Attribute2: value2, #Attribute3: value3, #Attribute4: value4}]
Description
Multiuser Server command; adds a new DBApplicationData object to the server. Once created, DBApplicationData objects contain read-only data associated with a particular multiuser application.
Example
This statement creates a new DBApplicationData object for the movie called Poker with the attributes #dealerName, #tableColor, and #wallArt:
errCode = gMultiuserInstance.sendNetMessage("system.DBAdmin. createApplicationData", "anySubject", [#application: "Poker", #attribute: [#dealerName: "Larry", #tableColor: color(#rgb, 155, 0, 75), #wallArt: member(3).media]])
It is important that at least one of the attributes contain a string or an integer so that the object can be identified with getApplicationData or deleteApplicationData.
The server’s response looks like this:
[#errorCode: 0, #recipients: ["userName"], #senderID: "system.DBAdmin.createApplicationData", #subject: "anySubject", #content: [#application: "Poker"], #timeStamp: 189123520]
See also
sendNetMessage(), getApplicationData, deleteApplicationData
createFolder()Syntax
file("folderName").createFolder()
Description
Server-side function; creates a folder on the server volume with the name folderName. The function returns a nonzero error code if it fails.
Example
This statement creates a folder called Tempfolder on the server volume:
file("C:\Multiuser_Server\Tempfolder").createFolder()
Chapter 15516

createScript()Syntax
createScript(whichString {, #whichType })
Description
Multiuser Server server-side function; creates a script object compiled from the specified string. The string must contain Lingo code in order to become a script object.
#WhichType is an optional symbol indicating the type of script to create. Specify #parent to create a parent script. Specify #global to create a global script. Handlers in global scripts are available to all Lingo running on the server. The default type is #parent.
Example
These statements read the file Testscript.ls and create a script object on the server from the string contained in the file:
scriptText = file("Testscript.ls").read()scriptObject = createScript(scriptText)
See also
read()
createUniqueNameSyntax
system.group.createUniqueName
Description
Multiuser Server command; obtains the name of an unused group from the server. This group name is unique and not previously used in the movie.
Example
The following statement has the server respond with a message that has the same subject. An error code of 0 means that the operation was successful. The contents contain a string that can be used as a group name.
errCode = gMultiuserInstance.sendNetMessage("system.group.\createUniqueName", "anySubject")
The server’s response looks like this:
[#errorCode: 0, #recipients: ["userName"], #senderID: \"system.group.createUniqueName", #subject: "anySubject", \#content: "@RndGroup0", #timeStamp: 34653020]
See also
sendNetMessage()
Multiuser Lingo Dictionary 517

createUserSyntax
system.DBAdmin.createUser [#userID: userName, #password: \passwordString, #userlevel: integer]
Description
Multiuser Server command; adds a new DBUser database object to the server. The user ID and password must be limited to 40 characters each and may not contain # or @ symbols.
Example
This statement creates a new DBUser object for the user Bob with the password MySecret and a user level of 40:
errCode = gMultiuserInstance.sendNetMessage("system.DBAdmin.\createUser", "anySubject", [#userID: "Bob", #password: \"MySecret", #userlevel: 40])
The #userlevel attribute is optional. If omitted, it defaults to the level specified in the server’s Multiuser.cfg file.
The server’s response looks like this:
[#errorCode: 0, #recipients: ["userName"], #senderID: \"system.DBAdmin.createUser", #subject: "anySubject", #content: \[#userID: "Bob"], #timeStamp: 180885670]
creatorSyntax
file("fileName").creator
Description
Multiuser Server server-side file property; on the Macintosh, gets or sets the creator code of the file. The creator code is a 4-byte (character) string.
Example
This server-side statement gets the creator code of the Director file Testmovie.dir on the server and displays it in the server’s console window:
put file("Hard Drive:Multiuser_Server:Testmovie.dir").creator-- "MD01"
See also
type (file)
Chapter 15518

declareAttributeSyntax
system.DBAdmin.declareAttribute [#attribute: #attributeName]
Description
Multiuser Server command; declares a new attribute name that can be used by any database object. Attributes may not be set until they have been declared. Attribute names must always be symbols. Group attributes do not need to be declared with declareAttribute.
Example
This statement declares a new attribute called #email:
errCode = gMultiuserInstance.sendNetMessage("system.DBAdmin. \declareAttribute", "anySubject", [#attribute: #email])
The server’s response looks like this:
[#errorCode: 0, #recipients: ["userName"], #senderID: \"system.DBAdmin.declareAttribute", #subject: "anySubject", \#content: [#attribute: #email], #timeStamp: 184545570]
See also
sendNetMessage(), setAttribute
Multiuser Lingo Dictionary 519

deleteSyntax
system.movie.delete ["movieName"]system.movie.delete ["movieName1", "movieName2", "movieName3"]system.group.delete ["groupName"]system.group.delete ["groupName1", "groupName2", "groupName3"]system.user.delete ["userID"]system.user.delete ["userID1", "userID2", "userID3"]
Description
Multiuser Server command; when movie is specified, immediately deletes all instances of the given movie or movies from the server. New connections to that movie are still possible if the disable command has not been called.
If group is specified, the given group(s) is deleted from the server. This does not delete the users who occupied the group.
If user is specified, the given user(s) is immediately disconnected from the server. To disconnect several users, send a list of users.
The server responds with a message that has the same object and command in the #sender parameter and the same #subject and #contents.
Note: There is also a delete command in the general Lingo Dictionary that is applied to chunk expressions. It should not be confused with the Multiuser Server delete command, which is always used in the context of a sendNetMessage() command.
Examples
This statement deletes all instances of the movie TankWars on the server:
errCode = gMultiuserInstance.sendNetMessage("system.movie.\delete", "anySubject" "TankWars")
To delete more than one movie, use a list containing the movie names:
errCode = gMultiuserInstance.sendNetMessage("system.movie.\delete", "anySubject" ["TankWars", "TicTacToe", "Checkers"])
This statement deletes the group @RedTeam from the server:
errCode = gMultiuserInstance.sendNetMessage("system.group.\delete", "anySubject" "@RedTeam")
This statement disconnects the user BillyJoe from the server:
errCode = gMultiuserInstance.sendNetMessage("system.user.delete", \"anySubject", "BillyJoe")
See also
sendNetMessage(), disable
Chapter 15520

delete() (file)Syntax
file("whichFile").delete()
Description
Multiuser Server server-side function; deletes the specified file. The function returns a nonzero error code if it fails.
Example
This server-side statement deletes the file Sunset.jpg from the server computer:
file("C:\Images\sunset.jpg").delete()
See also
deleteFolder()
deleteApplicationSyntax
system.DBAdmin.deleteApplication[#application: applicationName]
Description
Multiuser Server command; deletes one or more DBApplication objects from the server. Also deletes all attributes of the DBApplication object and all DBApplicationData and DBPlayer objects associated with it.
Example
This statement deletes the DBApplication object for the movie Poker from the server.
errCode = gMultiuserInstance.sendNetMessage("system.DBAdmin. \deleteApplication", "anySubject", [#application: "Poker"])
The server’s response looks like this:
[#errorCode: 0, #recipients: ["userName"], #senderID: \"system.DBAdmin.deleteApplication", #subject: "anySubject", \#content: [#application: "Poker"], #timeStamp: 186056753]
See also
sendNetMessage(), createApplication
Multiuser Lingo Dictionary 521
deleteApplicationDataSyntax
system.DBAdmin.deleteApplicationData [#application: \"applicationName", #attribute: #attributeName, #text: "String"]
Description
Multiuser Server command; deletes one or more DBApplicationData objects from the server.
Example
This statement deletes the DBApplicationData object for the movie Poker with an attribute called #dealerName containing the string Larry:
errCode = gMultiuserInstance.sendNetMessage("system.DBAdmin. \deleteApplicationData", "anySubject", [#application: "Poker", \#attribute: #dealerName, #text: "Larry"])
The server’s response looks like this:
[#errorCode: 0, #recipients: ["userName"], #senderID: \"system.DBAdmin.deleteApplicationData", #subject: "anySubject", \#content: [#application: "Poker", #attribute: #dealerName, #text: \"Larry"], #timeStamp: 193099437]
See also
sendNetMessage(), createApplicationData
deleteAttributeSyntax
system.group.deleteAttribute [#group: "@groupName", #attribute: \#attributeName]system.group.deleteAttribute [#group: ["@groupName1", \"@groupName2", "@groupName3"], #attribute: [#attributeName1, \#attributeName2]]system.DBUser.deleteAttribute [#userID: "userName", #attribute: \#attributeName]system.DBUser.deleteAttribute [#userID: ["userName1", \"userName2"], #attribute: [#attributeName1, #attributeName2, \#attributeName3]]system.DBPlayer.deleteAttribute [#userID: "userName", #application: \"appName", #attribute: #attributeName]system.DBApplication.deleteAttribute [#application: "appName", \#attribute: #attributeName]
Description
Multiuser Server command; deletes an attribute with the given name from the given group or database object. Either a #userID or an #application parameter may be supplied. If both are supplied, the attribute is deleted from the DBPlayer object.
Chapter 15522

Example
This statement deletes the attribute #accountBalance from the DBPlayer object for the user Bob in the movie Poker:
errCode = gMultiuserInstance.sendNetMessage ( "system.DBPlayer.\deleteAttribute", "anySubject", [#userID: "Bob", #application: \"Poker", #attribute: #accountBalance] )
The server’s response looks like this:
[#errorCode: 0, #recipients: ["userName"], #senderID: \"system.DBPlayer.deleteAttribute", #subject: "anySubject", \#content: [:], #timeStamp: 7430457]
See also
sendNetMessage()
deleteFolder()Syntax
file("whichFolder").deleteFolder()
Description
Multiuser Server server-side function; deletes the specified folder. The folder must be empty before being deleted. Use the delete() (file) function to remove the contents of a folder. The function returns a nonzero error code if it fails.
Example
This server-side statement deletes the Images folder from the server computer:
file("C:\Images").deleteFolder()
See also
delete() (file)
deleteMovieThis command is obsolete. Use delete instead.
deleteRecordThis command is obsolete. Use deleteUser, deleteApplication, or deleteApplicationData instead.
Multiuser Lingo Dictionary 523
deleteUserSyntax
system.DBAdmin.deleteUser [#userID: userName]
Description
Multiuser Server command; deletes a DBUser database object from the server.
Example
This statement deletes the DBUser object for the user Bob from the server:
errCode = gMultiuserInstance.sendNetMessage ( "system.DBAdmin.\deleteUser", "anySubject", [#userID: "Bob"] )
The server’s response looks like this:
[#errorCode: 0, #recipients: ["userName"], #senderID: \"system.DBAdmin.deleteUser", #subject: "anySubject", #content: \[#userID: "Bob"], #timeStamp: 183543403]
See also
sendNetMessage(), createUser
Chapter 15524
disableSyntax
system.movie.disable ["movieName1" {,"movieName2", "movieName3"}]system.group.disable ["groupName1" {,"groupName2", "groupName3"}]
Description
Multiuser Server command; when movie is specified, disables the given movie from making any future connections. Current connections are not broken. When group is specified, the given group is disabled from accepting new members. Current members are not removed from the group.
If the server is not set up with the allowMovie command in the configuration file, by default it allows connections from all movies. The disable command blocks log-ons from specific movies, while the enable command reenables a movie disabled by disable. Never disable all movies; this prevents even an administrator movie from logging in to reenable other movies.
The server responds with a message that has the same object and command in the #sender parameter and the same #subject and #contents.
Examples
This statement disables all future connections by the movie TankWars on the server:
errCode = gMultiuserInstance.sendNetMessage("system.movie.\disable", "anySubject" "TankWars")
This statement disables more than one movie by using a list containing the movie names:
errCode = gMultiuserInstance.sendNetMessage("system.movie.\disable", "anySubject" ["TankWars", "TicTacToe", "Checkers"])
This statement disables the group @RedTeam from accepting new members:
errCode = gMultiuserInstance.sendNetMessage("system.group.\disable", "anySubject" "@RedTeam")
See also
sendNetMessage(), delete, enable
disableMovieThis command is obsolete. Use disable instead.
disconnectUserThis command is obsolete. Use delete instead.
Multiuser Lingo Dictionary 525

enableSyntax
system.movie.enable ["movieName1" {, "movieName2", "movieName3"}]system.group.enable ["groupName1" {, "groupName2", "groupName3"}]
Description
Multiuser Server command; when movie is specified, enables the given movie or movies on the server so future connections can be made. Current connections are not affected. When group is specified, the given group or groups are enabled to accept new members.
The server responds with a message that has the same object and command in the #sender parameter and the same #subject and #contents.
If the server is not set up with the allowMovie command in the configuration file, by default it allows connections from all movies. The disable command blocks log-ons from specific movies, while the enable command reenables a movie disabled by disable. Never disable all movies; this would prevent even an administrator movie from logging on to reenable other movies.
Examples
This statement enables the movie TankWars on the server:
errCode = gMultiuserInstance.sendNetMessage("system.movie.\enable", "anySubject", "TankWars")
To enable more than one movie, use a list containing the movie names:
errCode = gMultiuserInstance.sendNetMessage("system.movie.enable", \"anySubject", ["TankWars", "TicTacToe", "Checkers"])
This statement enables the group @RedTeam to allow new members to join:
errCode = gMultiuserInstance.sendNetMessage("system.group.\enable", "anySubject", "@RedTeam")
See also
sendNetMessage(), disable
enableMovieThis command is obsolete. Use enable instead.
Chapter 15526

exchange()Syntax
file("whichFile").exchange("whichFile")
Description
Multiuser Server server-side function; exchanges the file name and other information (type, creator, date, and so on) of two files. Returns a nonzero error code if it fails.
Example
This server-side statement exchanges the header information between the files Sunset.jpg and Sunrise.jpg on the server:
file("C:\Images\Sunset.jpg").exchange("C:\Images\Sunrise.jpg")
See also
copyTo()
existsSyntax
file("whichFile").exists
Description
Multiuser Server server-side function; returns 1 (TRUE) if the specified file exists or 0 (FALSE) if the file does not exist on the server computer.
Example
These server-side statements test whether the file Moon.bmp exists in the Images folder on the server computer and displays the result in the server’s console window:
if file("C:\Images\Moon.bmp").exists thenput "Moon.bmp is present"
else put "Moon.bmp is not present"
end if
Multiuser Lingo Dictionary 527

flush()Syntax
file("whichFile").flush()
Description
Multiuser Server server-side function; writes any buffered information to the file. Information becomes buffered when writing small amounts of data with the write() or writeValue() commands.This occurs automatically when the file is closed. The function returns a nonzero error code if it fails.
Example
This server-side statement writes information from the server’s buffer to the file Testfile.txt:
file("C:\Multiuser_Server\Testfile.txt).flush()
See also
write(), writeValue()
folderCharSyntax
file().folderChar
Description
Multiuser Server server-side function; returns the character used to separate folders and files in path name strings. On the Macintosh it’s a colon (:); in Windows it’s a backslash (\).
Example
This server-side statement assigns the folderChar to the variable theChar:
theChar = file().folderChar
Chapter 15528

forget (thread)Syntax
whichThread.forget()
Description
Multiuser Server server-side function; removes the given thread from the list of running threads. The thread may still be held in a variable, but it is no longer run.
Examples
These server-side statements assign the thread named testThread to the variable gThread and stop it from executing:
global gThreadgThread = thread("testThread")gThread.forget()
This server-side handler forgets all the threads in the thread list:
on forgetAllThreads methreadList = thread().listrepeat with t in threadList
t.forget()end repeat
end
See also
lock(), unlock(), new (thread)
frame() (thread)Syntax
whichThread.frame(frameNumber)
Description
Multiuser Server server-side debugging function; returns a stack frame reference. Each nested handler call (a handler called from within another handler) produces a stack frame. Frames are numbered from 1 to n, with 1 being the current stack frame, 2 being the frame corresponding to the handler that called the current handler, and so on.
The frame() function is useful for creating references to variables and line numbers.
Example
To refer to the handler two levels above the current handler (the current handler is frame 1) use a frameNumber of 3.
frameRef = testThread.frame(3)
See also
frameCount (thread), line(), variable()
Multiuser Lingo Dictionary 529

frameCount (thread)Syntax
whichThread.frameCount
Description
Multiuser Server server-side debugging function; returns the number of execution stack frames in the given thread. Each nested handler call (a handler called from within another handler) produces a stack frame.
See also
frame() (thread)
getAddressSyntax
system.user.getAddress ["userID"]
Description
Multiuser Server command; when sent to the server, returns a specific user’s IP address.
Example
This statement obtains the IP address for the user logged in as Jane:
errCode = gMultiuserInstance.sendNetMessage("system.user.\getAddress", "anySubject", "Jane")
The server responds with a message that has the same subject. The content of the message is a property list containing the requested information.
Note: The IP address may not be correct if the user is behind a firewall.
The server’s response looks like this:
[#errorCode: 0, #recipients: ["userName"], #senderID: \"system.user.getAddress", #subject: "anySubject", #content: \[#userID: "Jane", #ipAddress: "123.45.67.1"], #timeStamp: 763283481]
See also
getNetAddressCookie()
Chapter 15530
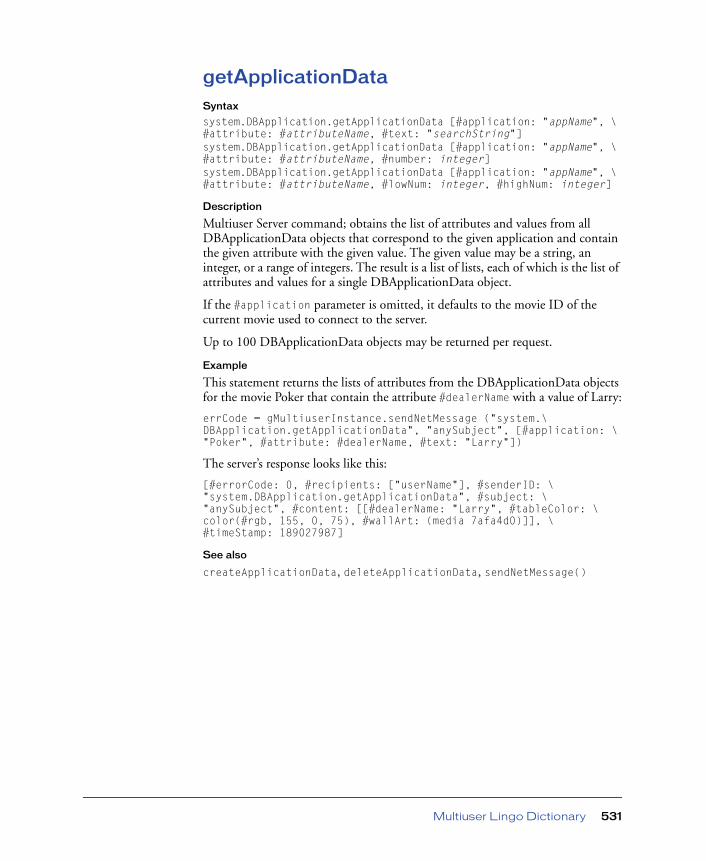
getApplicationDataSyntax
system.DBApplication.getApplicationData [#application: "appName", \#attribute: #attributeName, #text: "searchString"]system.DBApplication.getApplicationData [#application: "appName", \#attribute: #attributeName, #number: integer]system.DBApplication.getApplicationData [#application: "appName", \#attribute: #attributeName, #lowNum: integer, #highNum: integer]
Description
Multiuser Server command; obtains the list of attributes and values from all DBApplicationData objects that correspond to the given application and contain the given attribute with the given value. The given value may be a string, an integer, or a range of integers. The result is a list of lists, each of which is the list of attributes and values for a single DBApplicationData object.
If the #application parameter is omitted, it defaults to the movie ID of the current movie used to connect to the server.
Up to 100 DBApplicationData objects may be returned per request.
Example
This statement returns the lists of attributes from the DBApplicationData objects for the movie Poker that contain the attribute #dealerName with a value of Larry:
errCode = gMultiuserInstance.sendNetMessage ("system.\DBApplication.getApplicationData", "anySubject", [#application: \"Poker", #attribute: #dealerName, #text: "Larry"])
The server’s response looks like this:
[#errorCode: 0, #recipients: ["userName"], #senderID: \"system.DBApplication.getApplicationData", #subject: \"anySubject", #content: [[#dealerName: "Larry", #tableColor: \color(#rgb, 155, 0, 75), #wallArt: (media 7afa4d0)]], \#timeStamp: 189027987]
See also
createApplicationData, deleteApplicationData, sendNetMessage()
Multiuser Lingo Dictionary 531
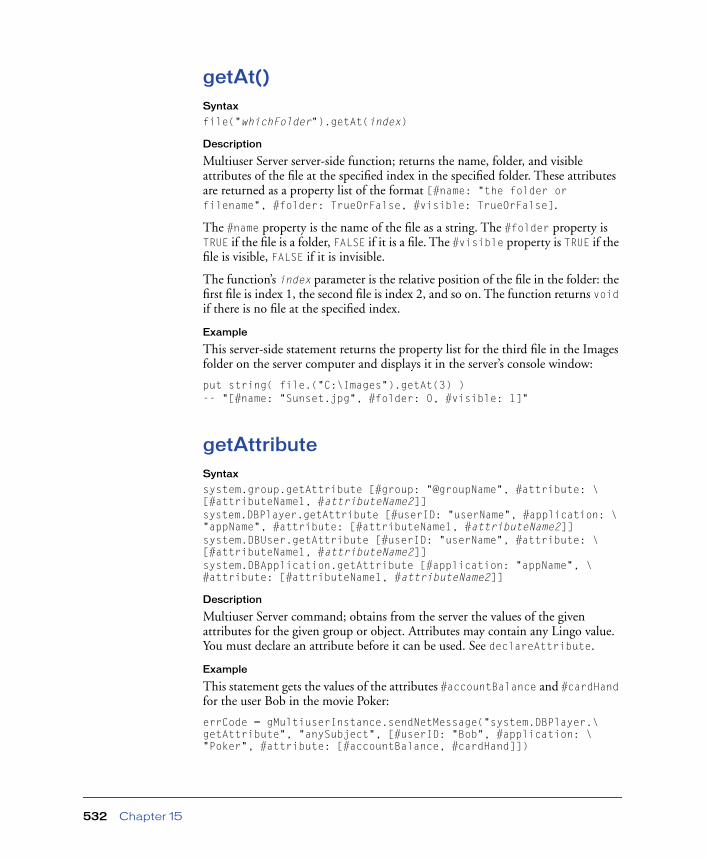
getAt()Syntax
file("whichFolder").getAt(index)
Description
Multiuser Server server-side function; returns the name, folder, and visible attributes of the file at the specified index in the specified folder. These attributes are returned as a property list of the format [#name: "the folder or filename", #folder: TrueOrFalse, #visible: TrueOrFalse].
The #name property is the name of the file as a string. The #folder property is TRUE if the file is a folder, FALSE if it is a file. The #visible property is TRUE if the file is visible, FALSE if it is invisible.
The function’s index parameter is the relative position of the file in the folder: the first file is index 1, the second file is index 2, and so on. The function returns void if there is no file at the specified index.
Example
This server-side statement returns the property list for the third file in the Images folder on the server computer and displays it in the server’s console window:
put string( file.("C:\Images").getAt(3) )-- "[#name: "Sunset.jpg", #folder: 0, #visible: 1]"
getAttributeSyntax
system.group.getAttribute [#group: "@groupName", #attribute: \[#attributeName1, #attributeName2]]system.DBPlayer.getAttribute [#userID: "userName", #application: \"appName", #attribute: [#attributeName1, #attributeName2]]system.DBUser.getAttribute [#userID: "userName", #attribute: \[#attributeName1, #attributeName2]]system.DBApplication.getAttribute [#application: "appName", \#attribute: [#attributeName1, #attributeName2]]
Description
Multiuser Server command; obtains from the server the values of the given attributes for the given group or object. Attributes may contain any Lingo value. You must declare an attribute before it can be used. See declareAttribute.
Example
This statement gets the values of the attributes #accountBalance and #cardHand for the user Bob in the movie Poker:
errCode = gMultiuserInstance.sendNetMessage("system.DBPlayer.\getAttribute", "anySubject", [#userID: "Bob", #application: \"Poker", #attribute: [#accountBalance, #cardHand]])
Chapter 15532

The server’s response looks like this:
[#errorCode: 0, #recipients: ["userName"], #senderID: \"system.DBPlayer.getAttribute", #subject: "anySubject", #content: \["Bob": [#accountBalance: 3500, #cardHand: "Royal Flush", \#lastUpdateTime: "2001/08/26 12:43:33.070364"]], #timeStamp: 7025771]
See also
setAttribute, sendNetMessage(), declareAttribute
getAttributeNamesSyntax
system.group.getAttributeNames [#group: "@groupName"]system.DBUser.getAttributeNames [#userID: "userName"]system.DBApplication.getAttributeNames [#application: "appName"]system.DBPlayer.getAttributeNames [#userID: "userName", \#application: "appName"]
Description
Multiuser Server command; gets the list of attribute names that have been set for the given group or database object. If the #userID parameter is supplied, the attribute list is returned for the user’s DBUser object. If the #application parameter is supplied, the attribute list is returned for the movie’s DBApplication object. If both are supplied, the attribute list is returned for the user’s DBPlayer object for the given movie.
Example
This statement gets the list of attributes that have been set for the DBPlayer object of the user Bob in the movie Poker:
errCode = gMultiuserInstance.sendNetMessage("system.DBPlayer.\getAttributeNames", "anySubject", [#userID: "Bob", #application: \"Poker"])
The server’s response looks like this:
[#errorCode: 0, #recipients: ["userName"], #senderID: \"system.DBPlayer.getAttributeNames", #subject: "anySubject", \#content: ["Bob": [#accountBalance, #cardHand, #lastUpdateTime]], \#timeStamp: 7326833]
See also
declareAttribute, setAttribute, sendNetMessage()
getFieldsThis command is obsolete. Use getAttribute instead.
Multiuser Lingo Dictionary 533
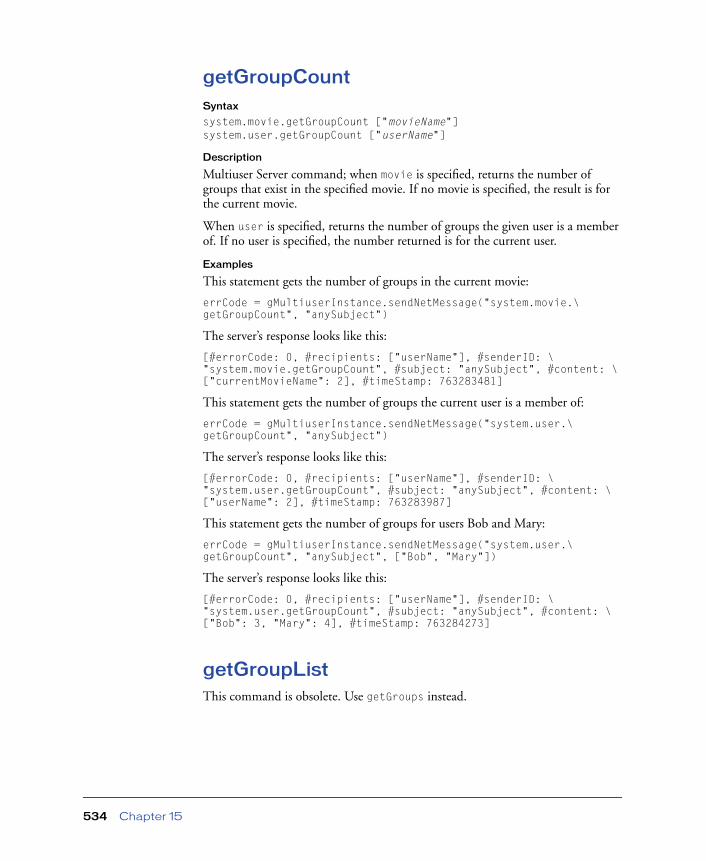
getGroupCountSyntax
system.movie.getGroupCount ["movieName"]system.user.getGroupCount ["userName"]
Description
Multiuser Server command; when movie is specified, returns the number of groups that exist in the specified movie. If no movie is specified, the result is for the current movie.
When user is specified, returns the number of groups the given user is a member of. If no user is specified, the number returned is for the current user.
Examples
This statement gets the number of groups in the current movie:
errCode = gMultiuserInstance.sendNetMessage("system.movie.\getGroupCount", "anySubject")
The server’s response looks like this:
[#errorCode: 0, #recipients: ["userName"], #senderID: \"system.movie.getGroupCount", #subject: "anySubject", #content: \["currentMovieName": 2], #timeStamp: 763283481]
This statement gets the number of groups the current user is a member of:
errCode = gMultiuserInstance.sendNetMessage("system.user.\getGroupCount", "anySubject")
The server’s response looks like this:
[#errorCode: 0, #recipients: ["userName"], #senderID: \"system.user.getGroupCount", #subject: "anySubject", #content: \["userName": 2], #timeStamp: 763283987]
This statement gets the number of groups for users Bob and Mary:
errCode = gMultiuserInstance.sendNetMessage("system.user.\getGroupCount", "anySubject", ["Bob", "Mary"])
The server’s response looks like this:
[#errorCode: 0, #recipients: ["userName"], #senderID: \"system.user.getGroupCount", #subject: "anySubject", #content: \["Bob": 3, "Mary": 4], #timeStamp: 763284273]
getGroupListThis command is obsolete. Use getGroups instead.
Chapter 15534

getGroupMembersThis command is obsolete. Use getUsers instead.
getGroupsSyntax
system.movie.getGroupssystem.user.getGroups
Description
Multiuser Server command; when movie is specified, gets the list of groups for the application in the current connection, including the predefined group @AllUsers. When user is specified, returns a list of current groups the user is a member of.
The server responds with a message that has the same object and command in the #sender parameter, and the same #subject, and #contents comprising a list of strings naming the groups.
Examples
This statement retrieves the current list of groups in this movie connection:
errCode = gMultiuserInstance.sendNetMessage("system.movie.\getGroups", "anySubject")
The server’s response looks like this:
[#errorCode: 0, #recipients: ["userName"], #senderID: \"system.movie.getGroups", #subject: "anySubject", #content: \[#movieID: "theMovieName", #groups: ["@AllUsers", "@RedTeam", \"@BlueTeam"]], #timeStamp: 79349843]
This statement returns a list of the current groups that the sender is a member of:
errCode = gMultiuserInstance.sendNetMessage("system.user.\getGroups", "anySubject")
The returned list looks like this:
[#errorCode: 0, #recipients: ["userName"], #senderID: \"system.user.getGroups", #subject: "anySubject", #content: \[#userID: "userName", #groups: ["@AllUsers", "@Photographers", \"@Designers"]], #timeStamp: 79349843]
See also
sendNetMessage()
getListOfAllMoviesThis command is obsolete. Use getMovies instead.
Multiuser Lingo Dictionary 535

getMovieCountSyntax
system.server.getMovieCount
Description
Multiuser Server command; gets the number of different applications on the server. This is the number of different movies on the server, such as Checkers and Chess, not different instances of the same movie.
Example
This statement gets the number of different applications on the server:
errCode = gMultiuserInstance.sendNetMessage("system.server.\getMovieCount", "anySubject")
The server’s response looks like this:
[#errorCode: 0, #recipients: ["userName"], #senderID: \"system.server.getMovieCount", #subject: "anySubject", #content: \3, #timeStamp: 30214905]
getMoviesSyntax
system.server.getMovies
Description
Multiuser Server command; gets a list of the current movies connected to the server.
Example
This statement returns a list of all the movies currently connected to the server:
errCode = gMultiuserInstance.sendNetMessage("system.server.\getMovies", "anySubject")
The server’s response looks like this:
[#errorCode: 0, #recipients: ["userName"], #senderID: \"system.server.getMovies", #subject: "anySubject", #content: \["TankWars", "TicTacToe", "TechChat"], #timeStamp: 61726385]
See also
sendNetMessage()
Chapter 15536

getNetAddressCookie()Syntax
gMultiuserInstance.getNetAddressCookie({encryptFlag} {, whichIPAddress})
Description
Multiuser Server Lingo function; returns a network address cookie for the current machine. By default, the returned string is an encrypted string containing the local computer’s IP address.
The getNetAddressCookie() function lets Lingo work with the local IP address without knowing the actual address. This is a security precaution to prevent movies being run by an end user behind a firewall from determining the address of the end user’s computer.
The cookie’s contents are “MacromediaSecretIPAddressCookie <encrypted IP address>”. This value can be passed over the network to another computer, which can then use it as the server address for connectToNetServer().
This is a typical scenario when you meet another user or users on a server and want to create a peer-to-peer connection without revealing your IP address. You can send an encrypted address to the other users and then wait for the other users by using waitForNetConnection.
If the optional encryptFlag parameter is set to 0, the returned string looks like a regular IP address, such as 123.45.67.1. This unencrypted address information is not available when movies are playing in Shockwave or if the safePlayer movie property is set to TRUE.
The second optional parameter lets you specify which IP address you want to return when the client machine is using multiple IP addresses. If you specify an index of 2, the second IP address on the machine will be returned.
Example
This statement sets the variable myLocalAddress to the third IP address on the client machine in unencrypted format:
myLocalAddress = gMultiuserInstance.getNetAddressCookie(0, 3)
See also
connectToNetServer(), waitForNetConnection(), getUserIPAddress
Multiuser Lingo Dictionary 537

getNetErrorString()Syntax
gMultiuserInstance.getNetErrorString(errorCodeNumber)
Description
Multiuser Server Lingo command; returns a string explaining the error code that is provided in place of errorCodeNumber. If the error code is invalid, this command returns a string representing an unknown error. Error codes are negative integers; 0 indicates that no error occurred.
Possible error codes and their strings are as follows:
Error code Translated error string
0 No error
-2147216223 Unknown error
-2147216222 Invalid movie ID
-2147216221 Invalid user ID
-2147216220 Invalid password
-2147216219 Incoming data has been lost
-2147216218 Invalid server name
-2147216217 Server or movie is full; no connections are available
-2147216216 Bad parameter
-2147216215 No socket manager present
-2147216214 No current connection
-2147216213 No waiting message
-2147216212 Bad connection ID
-2147216211 Wrong number of parameters
-2147216210 Unknown internal error
-2147216209 Connection was refused
-2147216208 Message is too large or message buffer is full
-2147216207 Invalid message format
-2147216206 Invalid message length
-2147216205 Message is missing
-2147216204 Server initialization failed
Chapter 15538

-2147216203 Server send failed
-2147216202 Server close failed
-2147216201 Connection is a duplicate
-2147216200 Invalid number of message recipients
-2147216199 Invalid message recipient
-2147216198 Invalid message
-2147216197 Server internal error
-2147216196 Error joining group
-2147216195 Error leaving group
-2147216194 Invalid group name
-2147216193 Invalid server command
-2147216192 Not permitted with this user level
-2147216191 Error with database
-2147216190 Invalid server initialization file
-2147216189 Error writing database
-2147216188 Error reading database
-2147216187 User ID not found in database
-2147216186 Error adding new user
-2147216185 Database is locked
-2147216184 Data record is not unique
-2147216183 No current record
-2147216182 Record does not exist
-2147216181 Moved past beginning or end of database
-2147216180 Data not found
-2147216179 No current tag selected
-2147216178 No current database
-2147216177 Can't find configuration file
-2147216176 Current database record is not locked
Error code Translated error string
Multiuser Lingo Dictionary 539

Example
These statements attempt to connect to a multiuser server and display the error string in an alert if the attempt fails:
errCode = gMultiuserInstance.connectToNetServer([#logonInfo: \ [#userID: "Howard", #password: "mySecret", #movieID: \ "chatMovie"], #remoteAddress: "chatServer.myCompany.com", \ #remoteTCPPort: 1626, #localAddress: 123.23.45.678])if errCode <> 0 then
alert "Connection attempt failed!" & RETURN & \gMultiuserInstance.getNetErrorString(errCode)
end if
getNetMessage()Syntax
gMultiuserInstance.getNetMessage()
Description
Multiuser Server Lingo function; returns the oldest waiting network message in the Xtra’s message queue. The message is then deleted from the Xtra’s memory space. These messages queue up internally for each connection, waiting for this function to be called. If no messages are waiting, this function returns an empty message. This function does not check the connection to the server; it only returns messages that are stored in the Xtra’s message queue. It should be called from a network message handler.
If the connection has been opened as a text connection, the sender is set to System and the subject is String. The content is a string containing the data from the server. The Xtra returns all the data available, which might not terminate with the end of a text line. The Xtra includes and does not alter end-of-line characters sent by the server (CR or CRLF). If the server sends a zero byte, the Xtra drops the byte and does not pass it to Lingo.
-2147216175 Operation not allowed at current security level
-2147216174 Requested data or object was not found
-2147216173 Message content contains error information
-2147216172 Data concurrency error
Error code Translated error string
Chapter 15540

The function’s results are in the form of a property list with the following information. Symbols are used to access the list, retrieving an error code, the sender’s ID, the subject, and the message contents.
Example
These statements retrieve a message from the queue:
netMsg = gMultiuserInstance.getNetMessage()errCode = netMsg.errorCodeif (errCode = 0) then
senderID = netMsg.senderIDsubject = netMsg.subjectmessageList = netMsg.content--handle the message
else--do error processingalert gMultiuserInstance.getNetErrorString(errCode)
end if
The contents of the retrieved message look like this:
[#errorCode: 0, #recipients: ["@AllUsers"], #senderID: "Fred", \#subject: "ExampleSubject", #content: "ExampleContent", \#timeStamp: 36437632]
See also
getNetErrorString()
#errorCode Resulting error code: 0 if there is no error
#recipients Users or groups the message was sent to
#senderID String such as "Fred"
#subject String subject of the message
#content List of values, depending on the subject
#timeStamp Server’s time code stamp at the point of handling the message
Multiuser Lingo Dictionary 541

getNetOutgoingBytes()Syntax
gMultiuserInstance.getNetOutgoingBytes({userIDString})
Description
Multiuser Server Lingo function; returns the number of bytes currently in the outgoing message buffer, which is data waiting to be sent. This command is useful for determining if all data has been sent or if the client’s outgoing buffer has room for large data chunks the user may want to send.
The total number of outgoing bytes possible is set by the maxMessageSize parameter of the setNetBufferLimits command. The default value of maxMessageSize is 16K.
The optional userIDString parameter is used to specify a particular user’s buffer when hosting peer connections.
Example
The following code determines how much data is currently in the buffer for the current movie and sends a new message containing a large chunk of data (such as a cast member image) only if there is less than 500K in the buffer. The statements allow for sending pictures of up to 100K:
gMultiuserInstance.setNetBufferLimits(16 * 1024, 600 * 1024, 100)totalWaiting = gMultiuserInstance.getNetOutgoingBytesif totalWaiting < (500 * 1024) then
gMultiuserInstance.sendNetMessage("@AllUsers", "New image", \member("Latest snapshot").picture)
end if
See also
sendNetMessage(), setNetBufferLimits
getNewGroupNameThis command is obsolete. Use createUniqueName instead.
getNumberOfMembersThis command is obsolete. Use getUserCount instead.
Chapter 15542
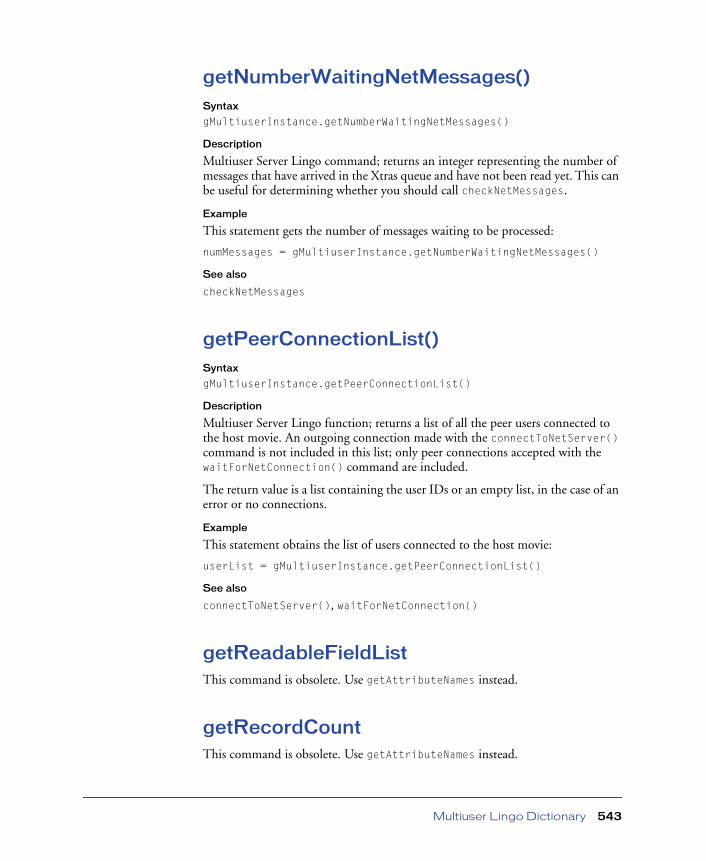
getNumberWaitingNetMessages()Syntax
gMultiuserInstance.getNumberWaitingNetMessages()
Description
Multiuser Server Lingo command; returns an integer representing the number of messages that have arrived in the Xtras queue and have not been read yet. This can be useful for determining whether you should call checkNetMessages.
Example
This statement gets the number of messages waiting to be processed:
numMessages = gMultiuserInstance.getNumberWaitingNetMessages()
See also
checkNetMessages
getPeerConnectionList()Syntax
gMultiuserInstance.getPeerConnectionList()
Description
Multiuser Server Lingo function; returns a list of all the peer users connected to the host movie. An outgoing connection made with the connectToNetServer() command is not included in this list; only peer connections accepted with the waitForNetConnection() command are included.
The return value is a list containing the user IDs or an empty list, in the case of an error or no connections.
Example
This statement obtains the list of users connected to the host movie:
userList = gMultiuserInstance.getPeerConnectionList()
See also
connectToNetServer(), waitForNetConnection()
getReadableFieldListThis command is obsolete. Use getAttributeNames instead.
getRecordCountThis command is obsolete. Use getAttributeNames instead.
Multiuser Lingo Dictionary 543

getRecordsThis command is obsolete. Use getAttribute instead.
getServerTimeThis command is obsolete. Use getTime instead.
getServerVersionThis command is obsolete. Use getVersion instead.
getTempPath()Syntax
file("folderPathName").getTempPath( {[#extension: ".aaa", \#create: TrueOrFalse]} )
Description
Multiuser Server server-side function; returns a file name that is unique in the specified folder. To create a file with the name, pass the optional parameters as a property list. The #extension property is the three-character string to be used as the file name extension. Always include a dot (.) with the file extension. Set the #create property to TRUE to create a file with the name.
The folderPathName can be an absolute path name or it may be relative to the server application. An error code of 1 is returned if the specified folderPathName is invalid.
Example
This server-side statement creates a file on the server computer with the name Tempimage.bmp:
file("C:\Images\Tempimage").getTempPath([#extension: ".bmp", \ #create: 1])
Chapter 15544

getTimeSyntax
system.server.getTime
Description
Multiuser Server command; returns the current time from the server. The server responds with a message containing a string representing the time.
For synchronization between movies, it is better to examine the #timeStamp property returned in a message from the server. To get the current server #timeStamp value, just send a message to yourself.
Example
This statement shows a request for the server to send back the current time:
errCode = gMultiuserInstance.sendNetMessage("system.server.\getTime", "anySubject")
The server’s response looks like this:
[#errorCode: 0, #recipients: ["userName"], #senderID: "system.\server.getTime", #subject: "anySubject", #content: "2001/03/25 \18:22:27", #timeStamp: 30203034]
See also
sendNetMessage()
Multiuser Lingo Dictionary 545

getUserCountSyntax
system.movie.getUserCount [movieName]system.group.getUserCount [groupName]system.DBAdmin.getUserCount
Description
Multiuser Server function; returns the number of users logged in to the given movie or group, or the number of DBUser objects in the server database. When movie is specified, the result is the same as calling getUsers for the group @AllUsers. If no movie is specified, the result is for the current movie. When group is specified, the result is for the given group. The reply message consists of a property list.
Examples
This statement returns the number of users logged into the current movie ID on the server:
errCode = gMultiuserInstance.sendNetMessage("system.movie.\getUserCount", "anySubject")
The server’s response looks like this:
[#errorCode: 0, #recipients: ["userName"], #senderID: "system.\movie.getUserCount", #subject: "anySubject", #content: 17, #timeStamp: 30231031]
This statement has the server report the number of members in the group @RedTeam:
errCode = gMultiuserInstance.sendNetMessage("system.group.\getUserCount", "anySubject", "@RedTeam")
The server’s response looks like this:
[#errorCode: 0, #recipients: ["userName"], #senderID: "system.\group.getUserCount", #subject: "anySubject", #content: \[#groupName: "@RedTeam", #numberMembers: 6], #timeStamp: 30234705]
To find the number of members in more than one group at a time, put the group names in a list in a statement similar to this:
errCode = gMultiuserInstance.sendNetMessage("system.group.\getUserCount", "anySubject", ["@RedTeam", "@BlueTeam", \"@GreenTeam"])
The server responds with a separate message for each group.
See also
sendNetMessage()
Chapter 15546

getUserGroupsThis command is obsolete. Use getGroups instead.
getUserIPAddressThis command is obsolete. Use getAddress instead.
getUserNamesSyntax
System.DBAdmin.GetUserNames {[#lowNum: firstNumber {, #highNum: \lastNumber} ]}
Description
Multiuser server database function; returns a list of the user IDs in the server database.
The two optional parameters #lowNum and #highNum indicate the first and last userID records to get, respectively. This is useful when getting names out of a large database that would be unwieldy to list all at once. If #highNum isn't included, the first 100 users after #lowNum will be returned.
Example
This statement returns the list of user IDs in the server database between records 57 and 89:
errCode = gMultiuserInstance.sendNetMessage("system.DBAdmin.\getUserNames", "anySubject", [#lowNum: 57, #highNum: 89])
Multiuser Lingo Dictionary 547

getUsersSyntax
system.group.getUsers ["@groupName"]
Description
Multiuser Server command; gets the list of members for a particular group or groups.
If there is more than one group, the server responds with a separate message for each of the groups requested. Each response has the same subject as the original request. The reply message’s contents are in the form of a property list with two properties, the first for the group name and the second for the members.
For large groups, the return message may be fairly long. Be certain that the server and Xtra message buffers are large enough to contain the list of all group members. See setNetBufferLimits and The Server Application.
Example
This statement has the server return a list of members in the @RedTeam group:
errCode = gMultiuserInstance.sendNetMessage("system.group.\getUsers", "anySubject", "@RedTeam")
The server’s response looks like this:
[#errorCode: 0, #recipients: ["userName"], #senderID: "system.\group.getUsers", #subject: "anySubject", #content: [#groupName: \"@RedTeam", #groupMembers: ["Mark", "Jane", "Chris"]], #timeStamp: \98324982]
See also
sendNetMessage()
getVersionSyntax
system.server.getVersion
Description
Multiuser Server command; this function requires no content. The server returns a message with the same subject and content containing information regarding the server application itself.
Possible values for #platform are currently Macintosh and Windows.
Example
The following statement shows the request for server information:
errCode = gMultiuserInstance.sendNetMessage("system.server.\getVersion", "anySubject")
Chapter 15548
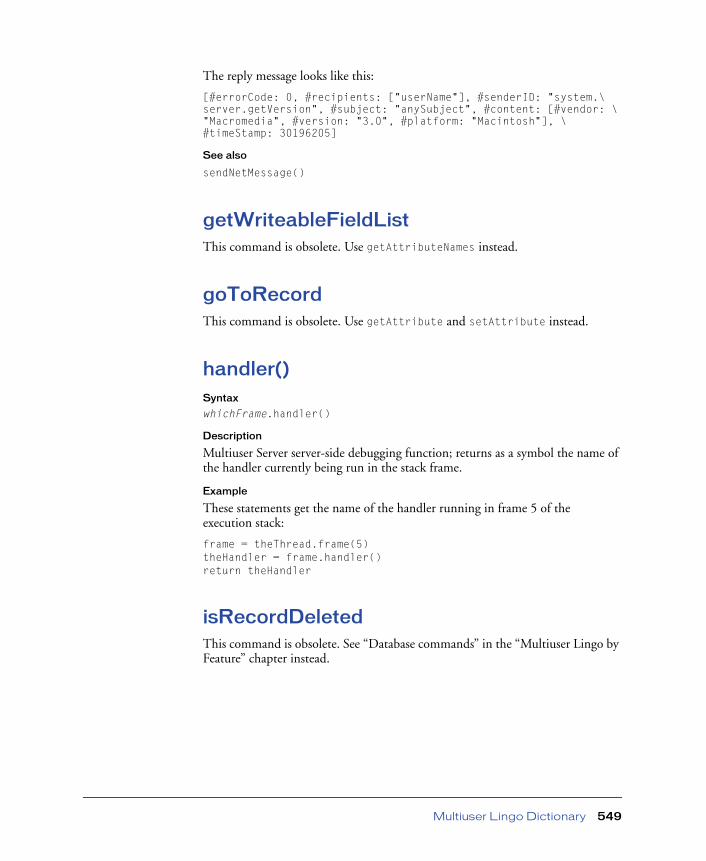
The reply message looks like this:
[#errorCode: 0, #recipients: ["userName"], #senderID: "system.\server.getVersion", #subject: "anySubject", #content: [#vendor: \"Macromedia", #version: "3.0", #platform: "Macintosh"], \#timeStamp: 30196205]
See also
sendNetMessage()
getWriteableFieldListThis command is obsolete. Use getAttributeNames instead.
goToRecordThis command is obsolete. Use getAttribute and setAttribute instead.
handler()Syntax
whichFrame.handler()
Description
Multiuser Server server-side debugging function; returns as a symbol the name of the handler currently being run in the stack frame.
Example
These statements get the name of the handler running in frame 5 of the execution stack:
frame = theThread.frame(5)theHandler = frame.handler()return theHandler
isRecordDeletedThis command is obsolete. See “Database commands” in the “Multiuser Lingo by Feature” chapter instead.
Multiuser Lingo Dictionary 549

joinSyntax
system.group.join ["@groupName"]
Description
Multiuser Server command; adds the sender to a group. If the group doesn’t exist, it is automatically created. If the user already belongs to the group, no error occurs.
The server responds with a message for each group joined, matching the subject of the request message and containing the name of the group successfully joined.
Example
This statement adds the sender to the group @BeatleLovers:
errCode = gMultiuserInstance.sendNetMessage("system.group.join", \"anySubject", "@BeatleLovers")
The server’s response looks like this:
[#errorCode: 0, #recipients: ["userName"], #senderID: \"system.group.join", #subject: "anySubject", #content: \"@BeatleLovers", #timeStamp: 21765127]
This statement adds the sender to more than one group at the same time by putting the names of the groups in a list:
errCode = gMultiuserInstance.sendNetMessage("system.group.join", \"anySubject", ["@BeatleLovers", "@Photographers", "@Designers"])
The server sends a separate response for each group.
See also
sendNetMessage()
joinGroupThis command is obsolete. Use join instead.
Chapter 15550
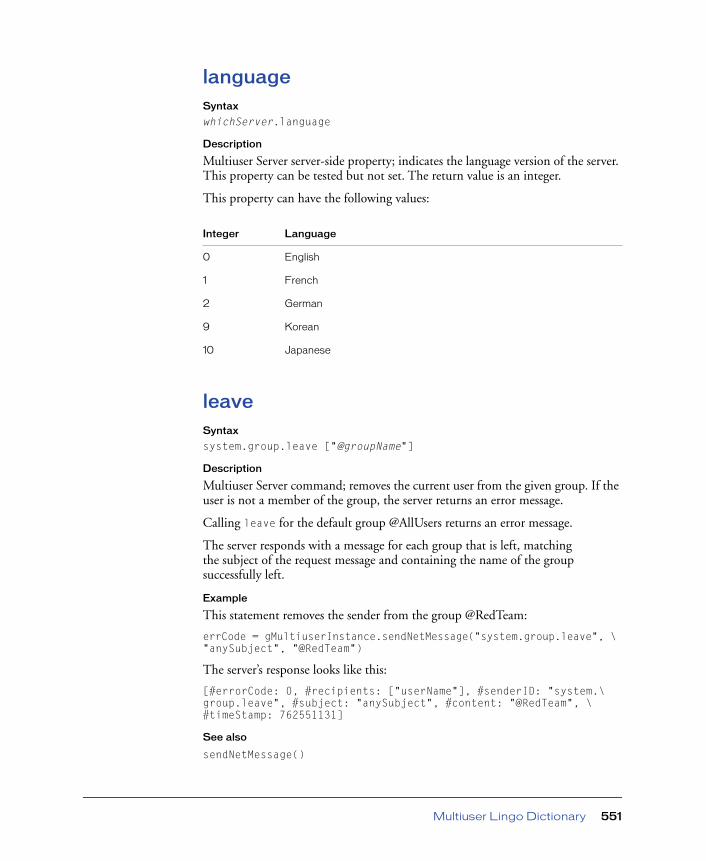
languageSyntax
whichServer.language
Description
Multiuser Server server-side property; indicates the language version of the server. This property can be tested but not set. The return value is an integer.
This property can have the following values:
leaveSyntax
system.group.leave ["@groupName"]
Description
Multiuser Server command; removes the current user from the given group. If the user is not a member of the group, the server returns an error message.
Calling leave for the default group @AllUsers returns an error message.
The server responds with a message for each group that is left, matching the subject of the request message and containing the name of the group successfully left.
Example
This statement removes the sender from the group @RedTeam:
errCode = gMultiuserInstance.sendNetMessage("system.group.leave", \"anySubject", "@RedTeam")
The server’s response looks like this:
[#errorCode: 0, #recipients: ["userName"], #senderID: "system.\group.leave", #subject: "anySubject", #content: "@RedTeam", \#timeStamp: 762551131]
See also
sendNetMessage()
Integer Language
0 English
1 French
2 German
9 Korean
10 Japanese
Multiuser Lingo Dictionary 551

leaveGroupThis command is obsolete. Use leave instead.
line()Syntax
whichFrame.line()
Description
Multiuser Server server-side debugging function; returns the script line number of the Lingo code executing in the given stack frame.
Example
These statements return the line number of the Lingo running in frame 17 of the execution stack:
whichFrame = 17theLine = frame(whichFrame).line()return theLine
listSyntax
thread().list
Description
Multiuser Server server-side function; creates a list of the objects that exist in the current thread. This list reflects the threads in existence at the moment the list is tested. Thread objects are not automatically added to or deleted from this list as they come into and go out of existence. To update the list, test it again.
Example
These server-side statements put the thread object list into the variable currentObjects and return the value to the handler that called them:
currentObjects = thread().listreturn currentObjects
Chapter 15552
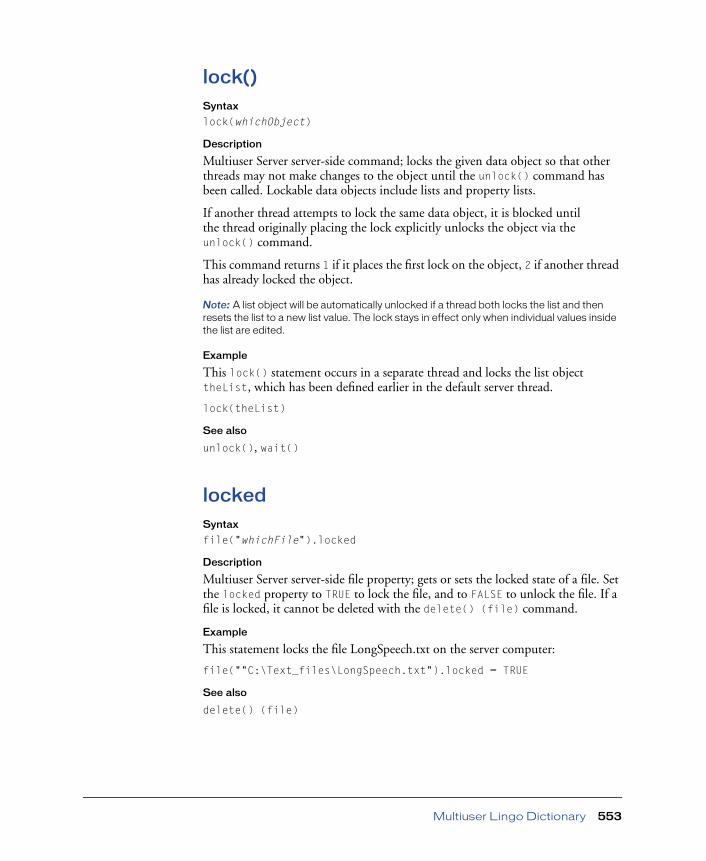
lock()Syntax
lock(whichObject)
Description
Multiuser Server server-side command; locks the given data object so that other threads may not make changes to the object until the unlock() command has been called. Lockable data objects include lists and property lists.
If another thread attempts to lock the same data object, it is blocked until the thread originally placing the lock explicitly unlocks the object via the unlock() command.
This command returns 1 if it places the first lock on the object, 2 if another thread has already locked the object.
Note: A list object will be automatically unlocked if a thread both locks the list and then resets the list to a new list value. The lock stays in effect only when individual values inside the list are edited.
Example
This lock() statement occurs in a separate thread and locks the list object theList, which has been defined earlier in the default server thread.
lock(theList)
See also
unlock(), wait()
lockedSyntax
file("whichFile").locked
Description
Multiuser Server server-side file property; gets or sets the locked state of a file. Set the locked property to TRUE to lock the file, and to FALSE to unlock the file. If a file is locked, it cannot be deleted with the delete() (file) command.
Example
This statement locks the file LongSpeech.txt on the server computer:
file(""C:\Text_files\LongSpeech.txt").locked = TRUE
See also
delete() (file)
Multiuser Lingo Dictionary 553

lockRecordThis command is obsolete. See “Database commands” in the “Multiuser Lingo by Feature” chapter instead.
name (script)Syntax
scriptObjectReference.name
Description
Multiuser Server server-side script property; indicates the name of the given script. This property can be tested and set.
Example
These statements call a custom handler added to the Dispatcher script that returns a script object reference and then return the name of the referenced script:
aScript = gDispatcher.findScriptByName( scriptName )theName = aScript.namereturn theName
name (thread)Syntax
whichThread.name
Description
Multiuser Server server-side thread property; indicates the name of the given thread. This property can be tested and set.
Example
These statements return the name of the fourth thread in the thread list:
whichThread = 4theThread = thread(whichThread)return theThread.name
name (variable)Syntax
whichVariable.name
Description
Multiuser Server server-side debugging property; returns the name of the given variable as a symbol.
Chapter 15554

Example
These statements return the name of the 12th variable in the variable list:
varNum = 12variable = frame.variable(varNum)variableName = variable.namereturn variableName
new (thread)Syntax
thread().new(newThreadName {, stackSize})
Description
Multiuser Server server-side command; creates a new thread with the name newThreadName. To specify a stack size, include the optional stackSize parameter. The stack size grows dynamically while Lingo instructions execute, as needed. For simple tasks, use a small stack size. For complex tasks, do not specify a stack size.
Example
This statement creates a new thread called thread7 with a stack size of 128 bytes:
myThread = thread().new("thread7", 128)
notify()Syntax
notify(whichObject)
Description
Multiuser Server server-side command; unblocks one thread that has been set to wait on the given object with the wait() command.
Example
This statement tells the thread that is waiting for the object theList to continue executing with the new value of theList:
notify(theList)
See also
notifyAll()
Multiuser Lingo Dictionary 555

notifyAll()Syntax
notifyAll(whichObject)
Description
Multiuser Server server-side command; unblocks all threads waiting on the given object.
Example
This statement tells all threads waiting for the object theList to continue executing with the new value of theList:
notifyAll(theList)
See also
notifyAll()
open()Syntax
file("whichFile").open( {[#read: TrueOrFalse, #write: TrueOrFalse, #create: TrueOrFalse]} )
Description
Multiuser Server server-side command; opens the specified file. The optional parameters are formatted as a property list. Set #read to TRUE (the default) to enable reading from the file. Set #write to TRUE to enable writing to the file. The default value for #write is FALSE. Set #create to TRUE to create the file if it does not yet exist. The default value for #create is FALSE.
Example
This server-side statement opens the file LongSpeech.txt with reading and writing enabled:
file("C:\Text_files\LongSpeech.txt").open([#read: 1, #write: 1, \ #create: 0])
packThis command is obsolete. See “Database commands” in the “Multiuser Lingo by Feature” chapter instead.
Chapter 15556

positionSyntax
file("whichFile").position
Description
Multiuser Server server-side property; indicates the relative position in the file of the next byte to be read or written. The first byte in a file is at position 0. This property can be tested and set.
Use this property to write data to specific locations within the file.
Example
This server-side statement sets the next write operation to occur at the 445th byte in the file Longspeech.txt:
file("C:\Text_files\Longspeech.txt").position = 445
produceValue()Syntax
produceValue(whichValue)
Description
Multiuser Server server-side function; produces a value in a variable in the current thread for transfer to another thread. This function blocks the current thread until some other thread picks up the value using the awaitValue() function.
This function should be used for a single thread producing a value for a single other thread. To send values to multiple threads, use lock(), wait(), notifyAll(), and unlock().
Example
These server-side statements set the variable theValue to the integer 96 and the pass the value to another thread with produceValue():
theValue = 96produceValue(theValue)
See also
awaitValue(), lock(), wait(), notifyAll(), unlock()
Multiuser Lingo Dictionary 557
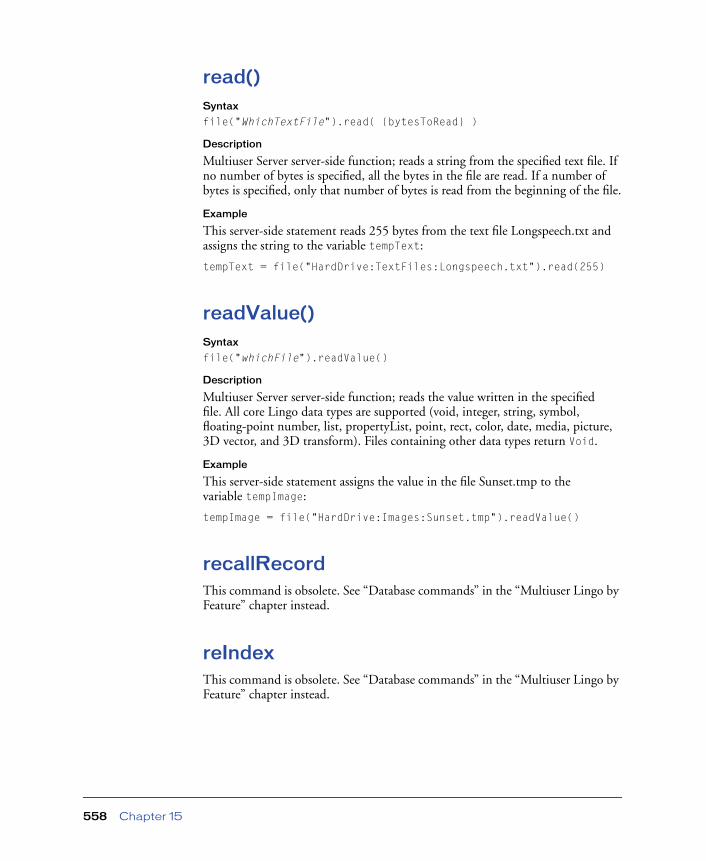
read()Syntax
file("WhichTextFile").read( {bytesToRead} )
Description
Multiuser Server server-side function; reads a string from the specified text file. If no number of bytes is specified, all the bytes in the file are read. If a number of bytes is specified, only that number of bytes is read from the beginning of the file.
Example
This server-side statement reads 255 bytes from the text file Longspeech.txt and assigns the string to the variable tempText:
tempText = file("HardDrive:TextFiles:Longspeech.txt").read(255)
readValue()Syntax
file("whichFile").readValue()
Description
Multiuser Server server-side function; reads the value written in the specified file. All core Lingo data types are supported (void, integer, string, symbol, floating-point number, list, propertyList, point, rect, color, date, media, picture, 3D vector, and 3D transform). Files containing other data types return Void.
Example
This server-side statement assigns the value in the file Sunset.tmp to the variable tempImage:
tempImage = file("HardDrive:Images:Sunset.tmp").readValue()
recallRecordThis command is obsolete. See “Database commands” in the “Multiuser Lingo by Feature” chapter instead.
reIndexThis command is obsolete. See “Database commands” in the “Multiuser Lingo by Feature” chapter instead.
Chapter 15558
removeUser()Syntax
whichGroup.removeUser(whichUser)
Description
Multiuser Server server-side command; removes the given user from the specified group.
Example
This handler removes the user who has just logged on to the server from the group @AllUsers:
on userLogOn (me, movie, group, user)voGroup = movie.serverGroup("@AllUsers")voGroup.removeUser(user)
end
See also
addUser()
rename()Syntax
file("whichfile").rename("newName")
Description
Multiuser Server server-side function; renames the specified file to newName. The function returns a nonzero error code if it fails.
Example
This server-side statement renames the file Sunset.bmp to Horizon.bmp:
file("HardDrive:Images:Sunset.bmp").rename("Horizon.bmp"
Multiuser Lingo Dictionary 559

resume()Syntax
whichThread.resume()
Description
Multiuser Server server-side command; resumes normal execution of a thread that has been paused with a breakpoint.
Example
This statement resumes execution of the thread thread7:
thread("thread7").resume()
See also
setBreakPoint()
script (thread)Syntax
whichFrame.script
Description
Multiuser Server server-side debugging function; returns a reference to the script object for the given stack frame.
Example
These statements return the script object reference for the script running in stack frame 4 of the thread testThread:
theThread = thread(testThread)frameNum = 4frame = theThread.frame(frameNum)script = frame.script
See also
variable(), variableCount, line(), frame() (thread), frameCount (thread)
seekThis command is obsolete. See “Database commands” in the “Multiuser Lingo by Feature” chapter instead.
Chapter 15560
selectDatabaseThis command is obsolete. See “Database commands” in the “Multiuser Lingo by Feature” chapter instead.
selectTagThis command is obsolete. See “Database commands” in the “Multiuser Lingo by Feature” chapter instead.
sendMessage()Syntax
whichServerMovie.sendMessage( string/listRecipient, \"system.script.subject", messageContents {, errorCode \{, protocolFlag {, stringSenderID}}} )
whichServerGroup.sendMessage( string/listRecipient, \"system.script.subject", messageContents {, errorCode \{, protocolFlag {, stringSenderID}}} )
whichServerUser.sendMessage( "system.script.subject", \messageContents {, errorCode {, protocolFlag {, stringSenderID}}})
Description
Multiuser Server server-side command; sends a message from within a server-side script to the specified movie, group, or user.
When sending messages to a movie, the protocolFlag, errorCode, and stringSenderID are optional, but when used must be appear together and in the correct order. The protocolFlag is intended for future enhancements to the server and should be set to FALSE.
When sending a message to a user with the third syntax shown, the recipient parameter is omitted, since the specified user is the recipient.
The subject must begin with "system.script." to ensure that responses to the message are sent back to the server-side script.
This command is similar to sendNetMessage(), which is used in client movies.
Multiuser Lingo Dictionary 561

Example
The following statement sends a message from the server-side script to the user Bob in the movie ChessMovie informing him that his opponent’s rook has moved three squares forward. The error code is 0, the protocolFlag is FALSE and the senderID is the opponent whose name is John.
errCode = ChessMovie.sendMessage("Bob", "system.script.\movePiece", ["Rook", 3, 0], 0, FALSE, "John")
See also
sendNetMessage()
sendNetMessage()Syntax
gMultiuserInstance.sendNetMessage(string/ListRecipient, \stringSubject, string/ListMessage)
gMultiuserInstance.sendNetMessage(propertyListMessage)
Description
Multiuser Server Lingo command; sends a message to one or more recipients in the current movie or a specified movie on the same server. The recipient may be a specific user, such as Sarah, a group, such as @TicTacToePlayers, or a list of strings containing individual user names or groups. To send a message to all users connected to the same movie, set the recipient to the default group @AllUsers. To send a message to a user in a different movie on the server, add the movie name, preceded by the @ symbol, to the end of the user name: for example, Jane@TechChat.
The message recipient can be a single string or a list of strings, in the case of multiple recipients. The subject must be a valid string. The contents may be a single Lingo value, such as a string, integer, floating-point number, point, rect, property, list, property list, color, date, 3D vector, 3D transform, or data such as the media of member property or the picture of member property.
If you are sending large data, such as a picture or the media of a cast member, make sure the buffer limits are large enough for both the client and the server. See setNetBufferLimits and Configuring the server.
The second possible syntax accepts a property list containing all the information for the message. The property list contains values for the symbols #errorCode, #recipient, #subject, and #content. (The #errorCode and #content values are optional.) This format is similar to the format for messages received by getNetMessage().
If you send a message to a group of which you are a member, you receive the message as well. If the server has problems sending the message to any recipients in a group or list, no error message is returned.
Chapter 15562

To send requests to the server, you must use a special syntax for the recipient, containing System, an object name, and the server command name. If the operation is successful, the server responds with a message that has the same subject, with an error code of 0.
To execute script handlers on the server, address the message to system.script and include the name of the handler to be executed as the subject of the message. The server-side script must have an on incomingMessage handler that parses the subject and then calls the handler named in the subject of the message.
If the connection is opened as a text connection, the recipient and subject are ignored. The message contents should all be simple Lingo values that will be converted to strings. Any carriage-return-line-feed (CRLF) combinations, such as those required by a POP server, must be explicitly added to the text sent by the Director movie.
Examples
These statements are some possible variations that can be used to send messages:
errCode = gMultiuserInstance.sendNetMessage("@AllUsers", \"ChatMsg", gChatText) errCode = gMultiuserInstance.sendNetMessage("BlackBeard", \"MoveShipTo", point(shipX, shipY)) errCode = gMultiuserInstance.sendNetMessage("@groupRedTeam", \"Help", "I am lost")errCode = gMultiuserInstance.sendNetMessage(["Bill", "Joe", \"Sue"] "JoinMe", "")
This statement provides its parameters in the form of a property list:
errCode = gMultiuserInstance.sendNetMessage([#recipients: "Bob", \#subject: "Hello", #content: "How are you?"])
This statement sends a message to user Jane in a separate movie called TechChat:
errCode = gMultiuserInstance.sendNetMessage("Jane@TechChat", \"ChatMsg", "What are you talking about?")
This statement sends the command getUsers to the server:
errCode = gMultiuserInstance.sendNetMessage("system.group.\getUsers", "anySubject", "@RedTeam")
This statement sends the command getGroupCount to the server as a request for information about a separate movie on the server called AdventureGame:
errCode = gMultiuserInstance.sendNetMessage ("system.movie.\getGroupCount@AdventureGame", "anySubject")
This statement sends a message to the on incomingMessage handler in the movie’s server-side script, which will parse the subject and call the on updatePlayers handler in the server-side script:
errCode = gMultiuserInstance.sendNetMessage ("system.script", \"updatePlayers")
Multiuser Lingo Dictionary 563

The following statement sends a message to the on incomingMessage handler in the server’s Dispatcher script and causes it to immediately send the same message back to the client. The case section of the Dispatcher’s on incomingMessage handler must be uncommented for the ping command to work.
errCode = gMultiuserInstance.sendNetMessage ("system.script", \"System.Script.Admin.Ping")
This statement sends the RETR command to a text-based mail server to retrieve one piece of mail:
errCode = gMultiuserInstance.sendNetMessage("system", \"anySubject", "RETR 1")
setAttributeSyntax
system.group.setAttribute [#group: "@groupName", #attribute: \[#attribute1: value1 {, #attribute2: value2} {, #lastUpdateTime: \"timeString"}]]system.DBUser.setAttribute [#userID: "userName", #attribute: \[#attribute1: value1 {, #attribute2: value2} {, #lastUpdateTime: \"timeString"}]]system.DBPlayer.setAttribute [#userID: "userName", #application: \"appName", #attribute: [#attribute1: value1 {, #attribute2: \value2} {, #lastUpdateTime: "timeString"}]]system.DBApplication.setAttribute [#application: "appName", \#attribute: [#attribute1: value1 {, #attribute2: value2} {, \#lastUpdateTime: "timeString"}]]
Description
Multiuser Server command; sets the value of an attribute for a group or a database object. To set a group attribute, supply the group name. To set a database object attribute, supply the #userID attribute, the #application attribute, or both. If both are supplied, the attribute is set for the DBPlayer object for the given user in the given application.
The #lastUpdateTime property is optional and lets you determine whether some other user has updated the attributes of the group since you last checked them with getAttribute. When you use getAttribute, the server responds with the values of the attributes you requested plus a #lastUpdateTime property, which indicates the moment in time when the server read the values of those attributes for the group you requested. The #lastUpdateTime property is a string containing the year, month, day, hour, minutes, seconds, and microseconds on the server. By sending this same string with your setAttribute command, you allow the server to check whether the attributes for the group have been updated since you last checked them.
Chapter 15564

If the server determines that the attributes for the group have been updated by someone else since you checked them, it responds with a value in the #errorCode property indicating a concurrency error. If no one else has updated the attributes since you checked them, the server responds with a new value in the #lastUpdateTime property for the group or database object, indicating that you have just updated the attributes.
Examples
This statement sets the attributes #teamLeader and #location for the group @RedTeam:
errCode = gMultiuserInstance.sendNetMessage("system.group.\setAttribute", "anySubject", [#group: "@RedTeam", #attribute: \[#teamLeader: "Mary", #location: "New York", #lastUpdateTime: \"2001/07/26 15:26:33:123456"]])
The server’s response looks like this:
[#errorCode: 0, #recipients: ["userName"], #senderID: \"system.group.setAttribute", #subject: "anySubject", #content: \["@RedTeam": [#lastUpdateTime: "2001/08/25 18:55:33.132456"]], \#timeStamp: 32189685]
This statement sets the attribute #favoriteColor for the DBUser object Bob:
errCode = gMultiuserInstance.sendNetMessage("system.DBUser.\setAttribute", "anySubject", [#userID: "Bob", #attribute: \[#favoriteColor: "Blue", #lastUpdateTime: "2001/07/26 \15:26:33:123456"]])
The server’s response looks like this:
[#errorCode: 0, #recipients: ["userName"], #senderID: \"system.DBUser.setAttribute", #subject: "anySubject", #content: \["Bob": [#lastUpdateTime: "2001/08/25 13:28:22.123456"]], \#timeStamp: 184472070]
The following statement sets the attributes #accountBalance and #cardHand for the DBPlayer object of the user Bob in the movie Poker. The #accountBalance and #cardHand attributes have already been declared with declareAttribute.
errCode = gMultiuserInstance.sendNetMessage("system.DBPlayer.\setAttribute", "anySubject", [#userID: "Bob", #application: \"Poker", #attribute: [#accountBalance: 3500, #cardHand: "Royal \Flush", #lastUpdateTime: "2001/07/26 15:26:33:123456"]])
The server’s response looks like this:
[#errorCode: 0, #recipients: ["userName"], #senderID: "system.\DBPlayer.setAttribute", #subject: "anySubject", #content: ["Bob": \[#lastUpdateTime: "2001/08/26 12:43:33.647483"]], #timeStamp: \6461476]
Multiuser Lingo Dictionary 565

The following statement sets the attribute #highScore for the DBApplication object Basketball. The #highScore attribute has already been declared with declareAttribute.
errCode = gMultiuserInstance.sendNetMessage("system.DBApplication.\setAttribute", "anySubject", [#application: "Basketball", \#attribute: [#highScore: 1352, #lastUpdateTime: "2001/07/26 \15:26:33:123456"]])
The server’s response looks like this:
[#errorCode: 0, #recipients: ["userName"], #senderID: \"system.DBApplication.setAttribute", #subject: "anySubject", \#content: ["Basketball": [#lastUpdateTime: "2001/08/25 \14:16:14.852673"]], #timeStamp: 187351603]
See also
getAttribute, sendNetMessage()
setBreakPoint()Syntax
scriptObject.setBreakPoint(#handlerName, whichLineNumberInHandler, enableTrueOrFalse)
Description
Multiuser Server server-side debugging command; enables or disables a breakpoint at the given line number in the given handler in the specified script object. Replace enableTrueOrFalse with TRUE (1) to turn on the breakpoint, or with FALSE (0) to turn it off.
In order for a breakpoint to be triggered, it must be it must be set in a handler that is running within a thread created with the new (thread) command. Breakpoints cannot be set in the server’s default thread.
See also
new (thread)
setFieldsThis command is obsolete. Use setAttribute instead.
Chapter 15566
setNetBufferLimitsSyntax
gMultiuserInstance.setNetBufferLimits(tcpipReadSize, \maxMessageSize, maxIncomingUnreadMessages)
Description
Multiuser Server Lingo command; sets the size of internal buffers and sets limits on the number of messages that the Xtra can queue in memory. The command is not normally needed, but it can be used to fine-tune memory management. If a movie sends or receives particularly large messages, such as picture data, these values should be set to accommodate them. Specify all the values in bytes.
In order to take effect, this command must be issued immediately after a Multiuser Xtra instance is created. It will not take effect once a server connection has been established.
tcpipReadSize controls the maximum amount of data read each time the Xtra takes data from the low-level TCP/IP data stream. This may be altered to tweak performance, particularly when receiving large messages. The default is 16K bytes.
maxMessageSize controls the buffers used to store parts of messages sent and received from another system. The default value is 16K bytes. This must be larger than the largest message sent or received.
maxIncomingUnreadMsgs sets a limit on the number of unread incoming messages that can be accumulated. The default is 100.
Example
This statement sets the maxMessageSize to 350K bytes to accommodate sending image data back and forth:
errCode = gMultiuserInstance.setNetBufferLimits(16 * 1024, \350 * 1024, 100)
Multiuser Lingo Dictionary 567
setNetMessageHandlerSyntax
gMultiuserInstance.setNetMessageHandler(#handlerSymbol, \handlerObject, {subject, {sender}} {, integerPassMessage})
Description
Multiuser Server Lingo command; sets the callback handler that is invoked when messages arrive. This should be set before connecting with connectToNetServer() in order to capture the response message.
You can set as many callbacks as you need. It is much more efficient to have multiple callbacks that react to specific types of incoming messages than to have one callback that filters messages and then calls another handler.
This ability is key for creating flexible and effective experiences. You might have a scenario that uses avatar objects to represent other users, and set a callback to each specific object. In that way, any message related to that user is routed automatically when dealing with the object. The avatar object itself may even have multiple callbacks for messages with different subjects.
#handlerSymbol is a symbol that represents the handler.
handlerObject represents the object where the handler is located. This may be a behavior instance, a parent script, or any Lingo value. If it is a script or behavior instance, the handler associated with it is called. If it is a Lingo value, the handler must be in a global script and the Lingo value is passed as the first parameter to that script.
subject and sender are optional parameters that route messages with particular subjects, senders, or both to a handler. This lets avatar scripts receive all the messages from a sender. To route all messages from one sender to a handler, set the subject to 0 and specify the sender’s ID.
IntegerPassMessage is an optional parameter that indicates whether Lingo should pass the contents of the incoming message directly to the specified handler as an argument. This allows your message handlers to be simpler because they can omit Lingo that serves the purpose of getting the message out of the message queue.
To disable message notification for a given type of message, call setNetMessageHandler() again and set the handler information to 0.
Examples
This statement sets the handler on MyNetMessageHandler located in the script cast member CallBackScript as the generic message callback handler (no specific subject or sender is specified):
errCode = gMultiuserInstance.setNetMessageHandler\(#MyNetMessageHandler, script "CallBackScript")
Chapter 15568
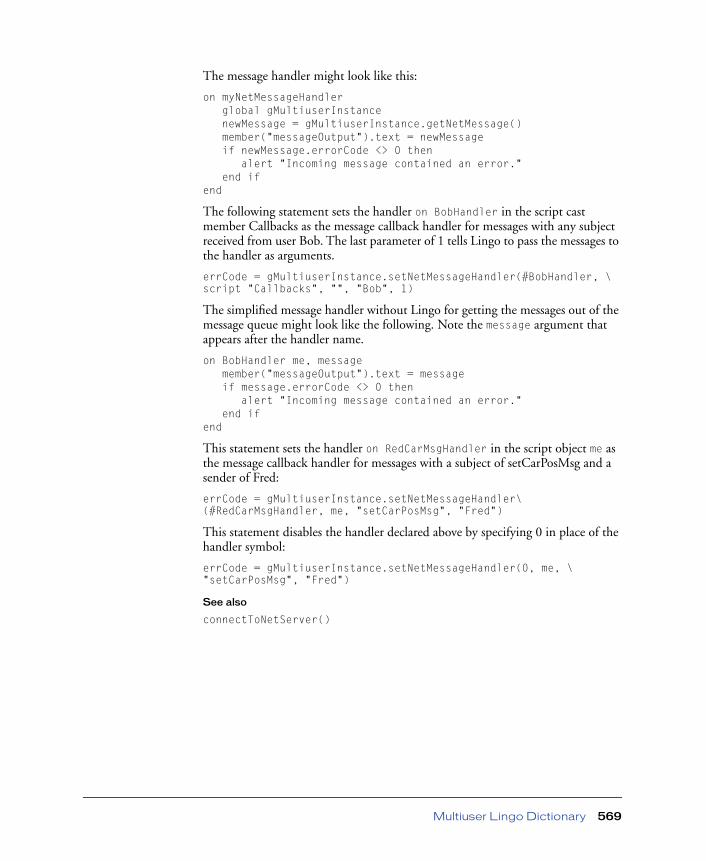
The message handler might look like this:
on myNetMessageHandlerglobal gMultiuserInstancenewMessage = gMultiuserInstance.getNetMessage()member("messageOutput").text = newMessageif newMessage.errorCode <> 0 then
alert "Incoming message contained an error."end if
end
The following statement sets the handler on BobHandler in the script cast member Callbacks as the message callback handler for messages with any subject received from user Bob. The last parameter of 1 tells Lingo to pass the messages to the handler as arguments.
errCode = gMultiuserInstance.setNetMessageHandler(#BobHandler, \script "Callbacks", "", "Bob", 1)
The simplified message handler without Lingo for getting the messages out of the message queue might look like the following. Note the message argument that appears after the handler name.
on BobHandler me, messagemember("messageOutput").text = messageif message.errorCode <> 0 then
alert "Incoming message contained an error."end if
end
This statement sets the handler on RedCarMsgHandler in the script object me as the message callback handler for messages with a subject of setCarPosMsg and a sender of Fred:
errCode = gMultiuserInstance.setNetMessageHandler\(#RedCarMsgHandler, me, "setCarPosMsg", "Fred")
This statement disables the handler declared above by specifying 0 in place of the handler symbol:
errCode = gMultiuserInstance.setNetMessageHandler(0, me, \"setCarPosMsg", "Fred")
See also
connectToNetServer()
Multiuser Lingo Dictionary 569
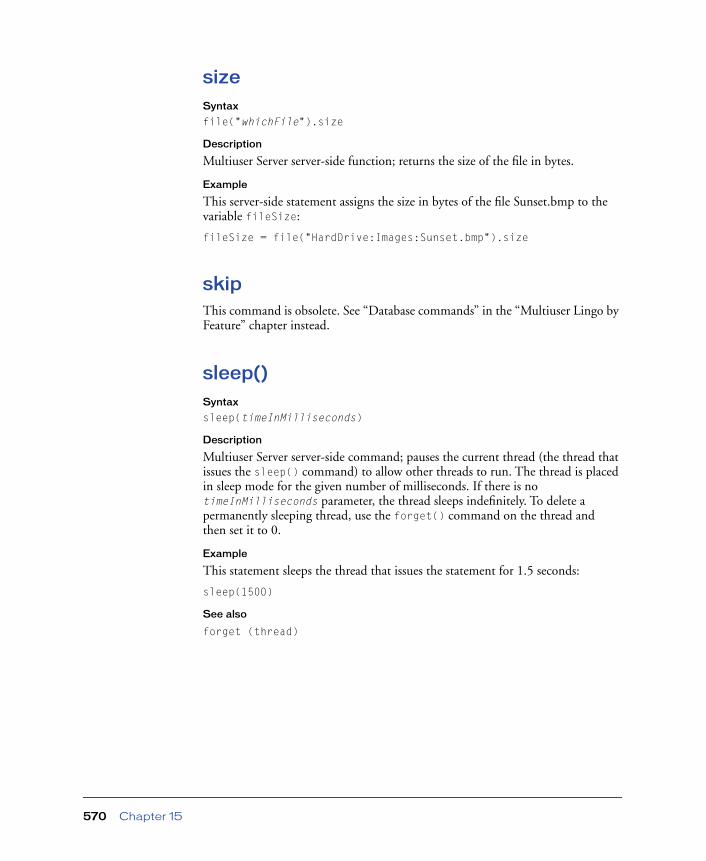
sizeSyntax
file("whichFile").size
Description
Multiuser Server server-side function; returns the size of the file in bytes.
Example
This server-side statement assigns the size in bytes of the file Sunset.bmp to the variable fileSize:
fileSize = file("HardDrive:Images:Sunset.bmp").size
skipThis command is obsolete. See “Database commands” in the “Multiuser Lingo by Feature” chapter instead.
sleep()Syntax
sleep(timeInMilliseconds)
Description
Multiuser Server server-side command; pauses the current thread (the thread that issues the sleep() command) to allow other threads to run. The thread is placed in sleep mode for the given number of milliseconds. If there is no timeInMilliseconds parameter, the thread sleeps indefinitely. To delete a permanently sleeping thread, use the forget() command on the thread and then set it to 0.
Example
This statement sleeps the thread that issues the statement for 1.5 seconds:
sleep(1500)
See also
forget (thread)
Chapter 15570
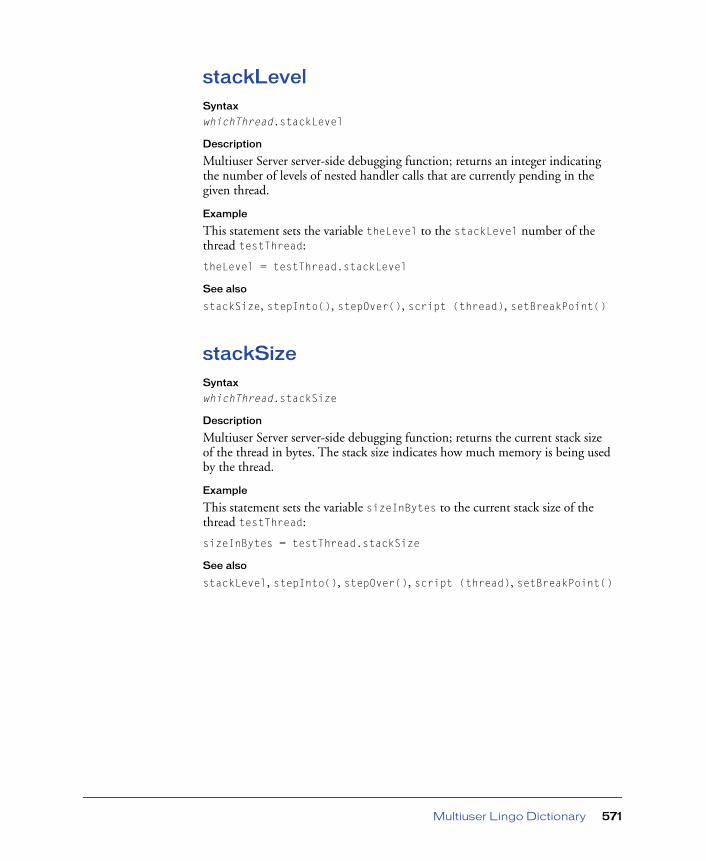
stackLevelSyntax
whichThread.stackLevel
Description
Multiuser Server server-side debugging function; returns an integer indicating the number of levels of nested handler calls that are currently pending in the given thread.
Example
This statement sets the variable theLevel to the stackLevel number of the thread testThread:
theLevel = testThread.stackLevel
See also
stackSize, stepInto(), stepOver(), script (thread), setBreakPoint()
stackSizeSyntax
whichThread.stackSize
Description
Multiuser Server server-side debugging function; returns the current stack size of the thread in bytes. The stack size indicates how much memory is being used by the thread.
Example
This statement sets the variable sizeInBytes to the current stack size of the thread testThread:
sizeInBytes = testThread.stackSize
See also
stackLevel, stepInto(), stepOver(), script (thread), setBreakPoint()
Multiuser Lingo Dictionary 571

statusSyntax
whichThread.status
Description
Multiuser Server server-side function; returns a symbol indicating the current status of the given thread. The possible status values are as follows:
Example
This statement sets the variable theStatus to the current status of the thread testThread:
theStatus = testThread.status
See also
sleep(), resume(), lock(), call(), produceValue(), setBreakPoint(), stepInto(), stepOver()
Symbol Definition
#awaitValue Thread is awaiting a value from another thread. See produceValue().
#breakPoint Thread is stopped at a breakpoint. See setBreakPoint().
#call Thread has executed a call() command. See call().
#error An error has occurred in the thread.
#lock Thread is locked. See lock().
#produceValue Thread has produced a value and no other thread has called awaitValue(). See awaitValue() and produceValue().
#resume Thread has resumed from waiting. See resume().
#run Thread is running.
#sleep Thread is sleeping. See sleep().
#stepInto Thread is stepping through script instructions, including handler calls. See stepInto().
#stepOver Thread is stepping through script instructions, excluding handler calls. See stepOver().
Chapter 15572

stepInto()Syntax
whichThread.stepInto()
Description
Multiuser Server server-side debugging command; executes the next Lingo instruction in the given thread. StepInto() branches into nested handler calls that occur in the current script.
Example
This statement steps into the script running in the thread testThread, including nested handler calls:
testThread.stepInto()
See also
stepOver(), setBreakPoint()
stepOver()Syntax
whichThread.stepOver()
Description
Multiuser Server server-side debugging command; executes the next Lingo instruction in the given thread. StepOver() jumps over nested handler calls in the current script instead of branching into them.
Example
This statement steps into the script running in the thread testThread, excluding nested handler calls:
testThread.stepOver()
See also
stepInto(), setBreakPoint()
Multiuser Lingo Dictionary 573

sweep()Syntax
sweep().free()sweep().status()
Description
Multiuser Server server-side command; deletes orphaned objects. Objects such as lists, script objects, and so on. can become orphaned if they contain mutual references to one another. If list A contains a reference to list B and list B contains a reference to list A, simply deleting list A will not work, since a reference to it still exists in list B.
Sweep().status() returns a list of all objects in the current thread that are currently orphans. It is a good idea during debugging to check whether your code is creating orphans unintentionally. Call sweep().status() during idle time only every few seconds, since visiting every object and checking its status is CPU intensive.
Sweep().free() deletes these orphaned objects and free the memory they were consuming.
Example
These statements test for the presence of orphaned objects in the current thread and deletes any that are found:
if sweep().status() <> [] thensweep().free()
end if
See also
stackSize
Chapter 15574

thread()Syntax
thread(threadNameOrNumber)
Description
Multiuser Server server-side keyword; references a thread by its name or relative number in the thread list.
Example
These server-side statements display the name and status of each thread in the thread list in the server’s console window:
repeat with i = 1 to n theThread = thread(i) put "Thread " & theThread.name & " status =" & theThread.status
end repeat
See also
status
type (variable)Syntax
whichVariable.type
Description
Multiuser Server server-side debugging function; returns a symbol indicating the variable’s type. Variables can be of type #param, #local, #global, or #property.
Example
These statements set the variable variableType to the type symbol of the third variable in the variable list of frame 17 of thread testThread:
thread = thread(testThread)frameNum = 17frame = thread.frame(frameNum)varNum = 3variable = frame.variable(varNum)variableType = variable.type
Multiuser Lingo Dictionary 575
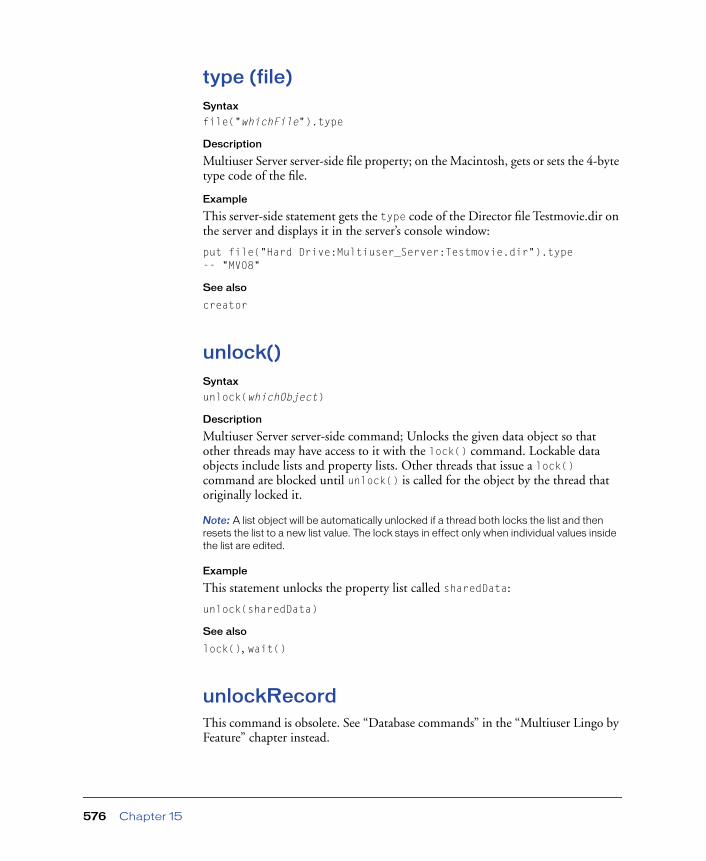
type (file)Syntax
file("whichFile").type
Description
Multiuser Server server-side file property; on the Macintosh, gets or sets the 4-byte type code of the file.
Example
This server-side statement gets the type code of the Director file Testmovie.dir on the server and displays it in the server’s console window:
put file("Hard Drive:Multiuser_Server:Testmovie.dir").type-- "MV08"
See also
creator
unlock()Syntax
unlock(whichObject)
Description
Multiuser Server server-side command; Unlocks the given data object so that other threads may have access to it with the lock() command. Lockable data objects include lists and property lists. Other threads that issue a lock() command are blocked until unlock() is called for the object by the thread that originally locked it.
Note: A list object will be automatically unlocked if a thread both locks the list and then resets the list to a new list value. The lock stays in effect only when individual values inside the list are edited.
Example
This statement unlocks the property list called sharedData:
unlock(sharedData)
See also
lock(), wait()
unlockRecordThis command is obsolete. See “Database commands” in the “Multiuser Lingo by Feature” chapter instead.
Chapter 15576

value (variable)Syntax
whichVariable.value
Description
Multiuser Server server-side debugging property; indicates the current value of the given variable. This property can be tested and set.
Example
These statements set the variable variableValue to the value of the seventh variable in the variable list of frame 25 of thread testThread:
thread = thread(testThread)frameNum = 25frame = thread.frame(frameNum)varNum = 7variable = frame.variable(varNum)variableValue = variable.value
variable()Syntax
whichFrame.variable(variableNumber)
Description
Multiuser Server server-side debugging function; returns a reference to the variable at the given number in the variable list.
Example
This statement makes the variable whichVariable a reference to the seventh variable in the variable list of frame 23 of the thread testThread:
thread = thread(testThread)frameNum = 23frame = thread.frame(frameNum)variableNum = 7whichVariable = frame.variable(variableNum)
Multiuser Lingo Dictionary 577
variableCountSyntax
whichFrame.variableCount
Description
Multiuser Server server-side debugging function; returns the number of variables in the current stack frame. This number includes variables of all types: #local, #global, #property and #param.
Example
This statement sets the variable numVariables to the number of variables in the variable list of frame 23 of the thread testThread:
thread = thread(testThread)frameNum = 23frame = thread.frame(frameNum)numVariables = frame.variableCount
volumeInfoSyntax
file("fileName").volumeInfo
Description
Multiuser Server server-side function; returns information about the volume containing the specified file as a property list with the format [#blockSize: n, #freeBlocks: m ]. The #blockSize property is the size of the minimum disk space allocation. The #freeBlocks property indicates the number of free blocks on the volume.
Example
This server-side statement displays the volumeInfo of the volume HardDrive in the server’s console window:
put file("HardDrive:Images:Sunset.bmp").volumeInfo
Chapter 15578

wait()Syntax
wait(whichObject)
Description
Multiuser Server server-side command; blocks the current thread from executing until another thread issues the notify() command for the given data object. Wait() and notify() are used to share data between threads while preventing more than one thread from reading or writing to the object at the same time.
Example
This statement causes the current thread to stop executing until another thread issues a notify command on the list variable sharedList:
wait(sharedList)
See also
notify(), notifyAll(), lock(), unlock()
waitForNetConnection()Syntax
gMultiuserInstance.waitForNetConnection(userIDString, \localTCPPortNumber {, maxNumberOfConnections, \{encryptionKeyString}})
gMultiuserInstance.waitForNetConnection([#userID: userIDString \{, #maxConnections; maxNumberOfConnections {, #localAddress: \localIPAddress} {, #localTCPPort: TCPPortNumber} \{, #encryptionKey: encryptionKeyString}]
Description
Multiuser Server Lingo function; listens for incoming peer-to-peer connections from other computers.
This function takes arguments in two formats. The first format contains the following parameters:
userIDString represents the log-on name of the user acting as the host and waiting for connections.
portNumber represents the Internet port the connecting system will contact. Multiuser servers should use port 1626 by default. Generic inbound TCP connection requests are not supported.
maxNumberOfConnections represents an optional parameter for the maximum number of possible connections to the host. Up to 16 peer connections are allowed.
Multiuser Lingo Dictionary 579
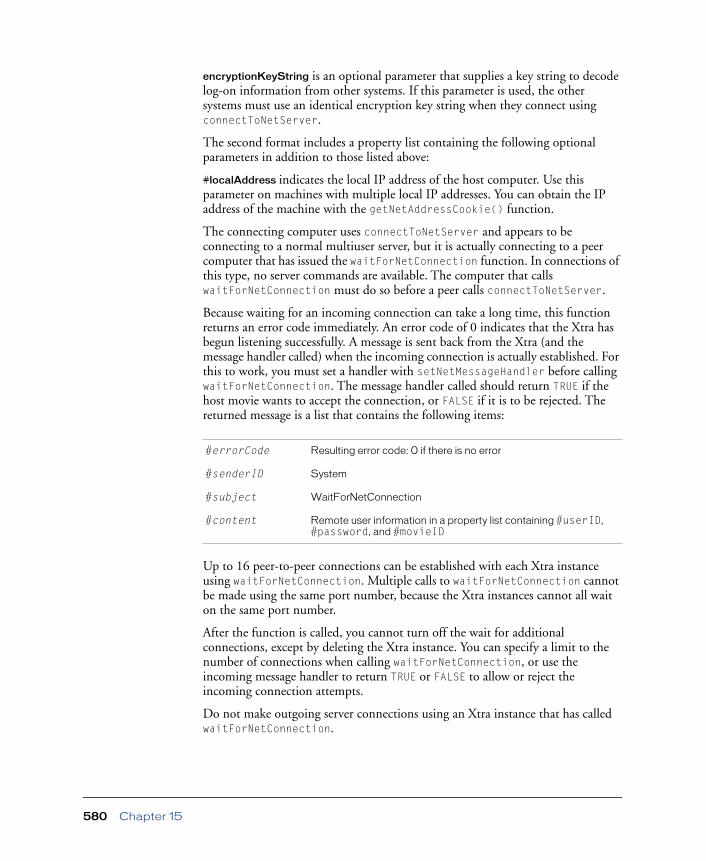
encryptionKeyString is an optional parameter that supplies a key string to decode log-on information from other systems. If this parameter is used, the other systems must use an identical encryption key string when they connect using connectToNetServer.
The second format includes a property list containing the following optional parameters in addition to those listed above:
#localAddress indicates the local IP address of the host computer. Use this parameter on machines with multiple local IP addresses. You can obtain the IP address of the machine with the getNetAddressCookie() function.
The connecting computer uses connectToNetServer and appears to be connecting to a normal multiuser server, but it is actually connecting to a peer computer that has issued the waitForNetConnection function. In connections of this type, no server commands are available. The computer that calls waitForNetConnection must do so before a peer calls connectToNetServer.
Because waiting for an incoming connection can take a long time, this function returns an error code immediately. An error code of 0 indicates that the Xtra has begun listening successfully. A message is sent back from the Xtra (and the message handler called) when the incoming connection is actually established. For this to work, you must set a handler with setNetMessageHandler before calling waitForNetConnection. The message handler called should return TRUE if the host movie wants to accept the connection, or FALSE if it is to be rejected. The returned message is a list that contains the following items:
Up to 16 peer-to-peer connections can be established with each Xtra instance using waitForNetConnection. Multiple calls to waitForNetConnection cannot be made using the same port number, because the Xtra instances cannot all wait on the same port number.
After the function is called, you cannot turn off the wait for additional connections, except by deleting the Xtra instance. You can specify a limit to the number of connections when calling waitForNetConnection, or use the incoming message handler to return TRUE or FALSE to allow or reject the incoming connection attempts.
Do not make outgoing server connections using an Xtra instance that has called waitForNetConnection.
#errorCode Resulting error code: 0 if there is no error
#senderID System
#subject WaitForNetConnection
#content Remote user information in a property list containing #userID, #password, and #movieID
Chapter 15580
Examples
These statements show a range of typical calls to set the movie to receive connections:
errCode = gMultiuserInstance.waitForNetConnection("Fred", 1626)errCode = gMultiuserInstance.waitForNetConnection("Mark", 1626, \16, "Queen3ToRook2")errCode = gMultiuserInstance.waitForNetConnection("Joe", 1626, \2, "RogerWilco")
See also
setNetMessageHandler, getNetAddressCookie(), connectToNetServer()
write()Syntax
file("whichFile").write(stringValue)
Description
Multiuser Server server-side function; Writes the specified string to the given file. The file is created if necessary. This function returns a nonzero error code if it fails.
Example
This server-side statement writes the string “This is some new text” to the file Shortspeech.txt:
file("HardDrive:Shortspeech.txt").write("This is some new text")
See also
writeValue()
Multiuser Lingo Dictionary 581

writeValue()Syntax
file("whichFile").writeValue(whatValue)
Description
Multiuser Server server-side function; writes a Lingo value to a file. All core lingo types are supported (void, integer, string, symbol, floating-point number, list, propertyList, point, rect, color, date, media, picture, 3D vector, and 3D transform). All other values are written as VOID. This function returns 0 if the operation succeeded, 1 if it failed. The file will be created if it does not yet exist.
Example
These server-side statements write an image value to the file Tempimage.tmp:
-- get the image data from the content of a message sent by -- the movietheImage = fullMsg.content
-- write value to the filefile("HardDrive:Images:Tempimage.tmp").writeValue(theImage)
See also
write()
Chapter 15582

APPENDIX
. . . . . . . . . . . . . . . . . . . . . . . . . . . . . . . . . . . . . . . . . . . . . . . . . . . . . . . .. . . . . . . . . . . . . . . . . . . . . . . . . . . . . . . . . . . . . . . . . . . . . . . . . . . . .Working with Flash 5
The Flash Asset Xtra in Director 8.5 supports the player features of Flash 5, the latest version released prior to Director 8.5. While working in Director, you can import and link to all Flash 5 files, as well as files created in earlier versions of Flash.
In addition, advanced Director users can take further advantage of the Flash Asset Xtra to manipulate Flash sprites and cast members incorporated into Director movies. You can make many of these modifications by entering commands through the Lingo interface. These commands often, but not always, call ActionScript, Flash’s scripting language. Director 8.5 supports several new Flash Asset Xtra Lingo commands.
This appendix lists the new Lingo commands and their functionality for users who have already worked with the Flash Asset Xtra. For more information about the Flash Asset Xtra, see Chapter 15 of Using Director Shockwave Studio for Director 8.
call Syntax
sprite(whichSprite).call(frame)
Definition
Command; encompasses the functions of the call(frame) and call(label) methods in Flash ActionScript. The call(frame) method allows you to encapsulate a series of actions in one frame of a Flash movie and then call those actions from other scripts in the same movie.
You can specify which frame to call using a number or a label from your Flash movie. The call(frame) method then executes the actions attached to that particular frame in your Flash movie.
583

printSyntax
sprite(whichSprite).print({"targetName", #printingBounds})
Description
Command; calls the corresponding print ActionScript command, which is new to Flash 5. All frames in the Flash movie that have been labeled #p are printed. If no individual frames have been labeled, the whole movie prints.
Both arguments to this function are optional. The target movie is the movie or movie clip to be printed. If you do not specify a target (or if the target is 0), then the main Flash movie is printed.
The two options for the printing bounds are #bframe and #bmax. If #bmax is specified, then the printing bounds become a large enough virtual rectangle to fit all frames to be printed. If #bframe is specified, then the printing bounds for each page are changed to match each frame that is being printed. If no printing bounds are specified, the bounds of the target movie are used.
Because printing of Flash movies is rather complicated, you may benefit from reviewing the section about printing in the Flash 5 documentation before using this sprite function.
printAsBitmapSyntax
sprite(whichSprite).printAsBitmap({"targetName", #printingBounds})
Description
Command; functions much like the print command. However, printAsBitmap can be used to print objects containing alpha channel information.
Appendix584

sendXMLSyntax
sendXML "sendxmlstring", "window", "postdata"
Description
Command; functions much like the getURL scripting method, which is also available in the Flash Asset Xtra component of Director. The sendXML handler is called when the sendXML ActionScript method is executed in a Flash movie. As a result, the Flash sprite sends its XML data to Lingo. In essence, sendXML calls up information in a Flash sprite, which you can then use to further develop the XML capabilities of your Director movie.
You use the sendXML command in Director when you apply this behavior to a Flash sprite. If there is a sendXML handler in a behavior attached to the Flash sprite, the Flash Asset Xtra calls this handler. The information in the handler consists of the three parameters previously established for the sendXML ActionScript method: the receiving URL, the target window, and the XML data to send. The data are then passed to the sendXML handler in Lingo.
Flash sprites can also load external XML data or parse internal XML data. The Flash Asset Xtra handles these functions in the same way as a Flash 5 movie in your browser.
Example
This Lingo command gets the sendXML method information from the Flash sprite and then transmits the XML data to the URL:
on sendXML me, theURL, targetWindow, xmlDatapostNetText(theURL, xmlData)
end
Working with Flash 5 585
tellTarget, endTellTargetSyntax
sprite(whichSprite).tellTarget("targetName"), sprite(whichSprite).endTellTarget()
Definition
Commands; equivalent to Flash’s beginTellTarget and endTellTarget methods. The tellTarget command allows the user to set a target Timeline on which subsequent sprite commands will act. When the target is set to a Flash movie clip or a level containing a loaded Flash movie, certain commands act on the targeted components, rather than on the main Timeline. To switch focus back to the main Timeline, call endTellTarget().
The only valid argument for tellTarget is the target name. There is no valid argument for endTellTarget.
The Flash sprite functions that are affected by tellTarget are stop, play, getProperty, setProperty, gotoFrame, call(frame), and find(label). In addition, the sprite property frame (which returns the current frame) is affected by tellTarget.
Examples
This command sets the movie clip as the target:
sprite(1).tellTarget("\myMovieClip")
This command stops the movie clip:
sprite(1).stop()
This command causes the movie clip to play:
sprite(1).play()
This command sets the focus back to the main Timeline:
sprite(1).endTellTarget()
This command stops the main movie:
sprite(1).stop()
Appendix586

INDEX
Symbols
# (pound) sign 453, 494@ sign 458\ (backslash) 14{ } (braces) 14
Numerics
2D text, converting to 3D text 673D capabilities, determining with Lingo 1843D cast member 753D cast members. See cast members, 3D3D Extruder tab (Property Inspector) 683D Model tab, in Property Inspector 513D text 54, 67
creating 19, 67Lingo exceptions 71modifying 21, 68new Lingo for 71, 189rotating 23
3D window, using 493D world
and cast members 75collision properties and commands 155controlling 153event handling 154overview 55
3D Xtra, defined 8
A
action behaviorsindependent 59, 63local 59, 61public 59, 62viewing 60
ActionScript 583administration 498
and Multiuser Server 463and server security 490
AllowMovies parameter 495ambient light 52angle, starting and ending (sphere) 89animation
launching 62Lingo for 175looping 52motions, about 57playback 50, 52
animation modifiers See Bones player, Keyframe player, mesh deform modifier 128
anti-aliasing 63append command 480asynchronous result 460attributes
and data objects 469groups (of users) 466
awaitValue() function 487axis
and camera movement 50and model generation 89and model movement 104, 105, 106, 121camera movement 62colors 63in animation 112, 133, 137
587
B
backdrops 197, 201, 293backdrops, manipulating with Lingo 176background color (lighting) 52backslash (\) 14Behavior Inspector 48Behavior Library, 3D 48Behavior Library, 3D (Library palette) 60behaviors, 3D 59
applying 64for camera movement 27for navigation 38types 59
bevel 69bilinear filtering 326binary operations, vectors 161bitmaps, and texture 70blend range, end and start 217blending, window 131, 135blocked connections 499bones motions 129, 140Bones player 57, 129
commands 130events 133properties 131
bonesPlayer modifier 129, 176boundary edges (of model) 125boxes 61, 91
Lingo for 185properties 91
braces ({ }) 14
C
call() function 486callback functions and server connection 453cameras
adding 198commands 150, 157defined 56, 146Lingo for 177manipulating 27, 50, 51, 61, 62overview 141position and rotation 62, 69properties 146resetting 36, 62
canonical X axis 163, 443canonical Y axis 164, 444, 445
canonical Z axis 164, 445case sensitivity 454case statement, in dispatcher script 481cast members, streaming, Lingo for 188cast members, 3D 46
commands and properties. See individual object names
commands for creating models and model resources 98
manipulating 50modifying through Property Inspector 51overview 55rendering commands 172rendering properties 170
Cast window 46chat, online 8. See also messages, Multiuser ServercheckNetMessages() function 459child nodes, Lingo for 177clockwise winding 93collideWith event 155collision modifier 57collisionData object 155collisions
detection, and Lingo 178properties 155
collisions, resolving 377color
and text 70diffuse 52specular 52
comments, in Multiuser.cfg file 494compression 243configuration files, Multiuser Server 491, 494ConnectionLimit parameter 495connections
allowing by name 495and DBUser object 472and idle time 496blocked 499limiting by location 495managing, Lingo for 502number allowed 492peer-to-peer 461, 502text-based 462to Multiuser Server 452viewing 492, 493
connectToNetServer command 454, 462
Index588

converting 2D text to 3D text 67cooperative multithreading. See multithreadingcopyTo() function 490core engine, Lingo 476createApplication command 470createApplicationData command 470createScript() function 479, 484createUser command 469cursor, Model Rollover Cursor behavior 37cursor position, and trigger behaviors 60custom events 482, 483cylinders 90
Lingo for 185open and sealed 420
D
data objects (Multiuser Server) 468data types, server-side 478data, storing 469databases
administration security 490and data storage 469and DBUser 472and server access 472createApplication 470createApplicationData 470createUser 469data objects 468DBAdmin 469DBApplication 468, 470, 471DBApplicationData 468, 470, 471DBPlayer 468, 470, 471DBUser 468, 469, 470, 471example scenario 471getApplicationData 470, 471Lingo for 503overview 468setAttribute 469uses 8viewing list of 493
Databases command 493DBAdmin object 469
Lingo for 503DBApplication object 468, 471
attributes 470DBApplicationData object 468, 470, 471
DBPlayer object 468, 471attributes 470
DBUser object 468, 469, 470, 471and server access 472attributes 469Lingo for 503
debugging, server-side 505declareAttribute command 469delete command 463density, engraver shader property 255depth
bevel 69, 73tunnel (extrusion) 21, 69, 73
diffuse color 52, 70Direct to Stage option, in Property Inspector 51directional light 52Director 8, similarities to 46Director Light menu (Property Inspector) 22disable command 463Dispatcher script 478, 490Dispatcher.ls file 478dithering. See newsprint shaderDLLs 491Dolly button 50dollying 33, 62double-byte languages 454downloading media 52drivers 52
E
Echo setting 494EncryptionKey parameter 495endTellTarget command for Flash Asset Xtra 586engraver shader 116
Lingo for 188error checking 460events
custom 482, 483server 482
events, server 482exists() function 489extruder model resource 97extrusion depth. See tunnel depth
Index 589

F
facets, text 69file access 9, 504firewall, and server administration 498, 499Flash
Flash Asset Xtra 9importing and linking movies 9version 5, Lingo for 583
flipped integer value 327fog, Lingo for 179fog (3D property) 239fonts
in 3D text 67italic 14
G
games, multiplayer 8getApplicationData command 470, 471getAttribute command 466getGroups command 464getMovies command 463getNetAddressCookie() function 461getNetMessage() function 459getNumberWaitingMessages() function 459getPeerConnectionList() function 461getVersion command 463gMultiuserInstance global variable 452gouraud shading 108Graphical view, in Property Inspector 51groupCreate 482groupDelete 482#groupID property 480groupJoin 482groupLeave 482groups (3D) 57
commands 85Lingo for 179overview 65
groups (of users)and disconnect messages 497attributes 466defining 464joining and leaving 465Lingo for 503overview 464specifying size 497viewing list of 493viewing status of 492
Groups command 493GroupSizeLimits parameter 497
H
half cylinder. See cylindershalf spheres. See sphereshandlers 154
calling in server script 483event 482message 453, 456, 459
hardware accelerators 52hardware information, getting 280horizontal panning 27, 62host, peer 461, 499
I
identity transform 289idle time 459, 473, 496IdleTimeOut parameter 496incomingMessage 482independent actions 63independent behaviors 59inker, colors of 243inker modifier 125, 180installation, Director 8.5 14Internet address
obtaining 461of movies 495
Internet Relay Chat. See text connections, creatingIP address 493
obtaining 463specifying multiple 495viewing 493
italic font 14
Index590

J
Japanese 454
K
keyframe motions 140Keyframe player 57, 129
commands 134events 137properties 135
keyframePlayer modifier 129keyframeplayer modifier 180keywords, server-side 477Korean 454
L
level of detail (LOD)and model resources 88modifier 63, 180modifier properties 306
level of detail (LOD) modifierautomatic assignment of settings 88properties 88
Library palette (Behavior Library) 60lights 141, 205
ambient light 257and text 69commands 83defined 56directional light 260Lingo for 181manipulating through Property Inspector 52overview 141properties 142
Lingo 493D elements, by category 1753D methods and properties 49and 3D text 71commands and functions, server-side 477data types and objects, server-side 478file access 489, 490for Flash 5 583keywords, server-side 477learning 46multiuser elements, alphabetical listing 507Multiuser elements, by category 501new features 9server-side core 476
LingoVM Xtra 476, 478List view, in Property Inspector 51load balancing 498loadScriptMapFile 479local actions 61local behaviors 59LOD. See level of detailLogFileName parameter 495LogonRejectionDelay parameter 495Loop button 50looping animation 52
M
mail servers, Internet. See text connections, creatingmarkers, and playback head 62math, vector. See vectors.MaxMessageSize setting 495media, downloading 52meetings, whiteboard 8Member option (Property Inspector) 70memory, amount for messages 495mesh
boundaries 125Lingo for 185
mesh deform modifier 92, 138, 181mesh generator 92
commands 95properties 92
mesh model resource 77mesh, colors of 240message handling
and server connection 453and setNetMessageHandler 474and setNetMessageHandler command 453
messagesdisconnecting by group 497in peer-to-peer mode 461in Server window 494memory size 495minimizing frequency 473not reaching server 499prioritizing 473processing time 492retrieving 459sending 458, 484status, file for 495targeted 473
Index 591

mipmapping 360Miter option (for text) 69model resource (3D function) 318model resources 88
commands 77defined 56, 77extruder 97Lingo for 182mesh 77overview 87
Model Rollover Cursor behavior 63models
automatic rotation 63commands 79, 103interaction with cameras and lights 76Lingo for 183manipulating with transform functions 162moving 61overview 47, 56, 100positioning (picking) 156selecting, Lingo for 187
modifier keys 60modifiers 87, 200
animation 128bonesPlayer 176defined 57, 122inker 180keyframe player 180level of detail (LOD) 63, 122, 180, 306Lingo for applying 184mesh deform 138, 181subdivision surfaces 388subdivision surfaces (SDS) 126subdivision surfaces(SDS) 189toon 63, 124, 190
modifiers, inker 125motion 324
commands 140playback 344properties 140timing 248
motion object, defined 140motions
commands 82keyframe and bones 129, 140
mouse button, and trigger behaviors 60Movie Creation and Deletion command 493
Movie.cfg file 491, 497MovieCFGPath parameter 495MovieCommon.cfg file 498movieCreate 482movieDelete 482MoviePathName parameter 495movies
allowing by name 495and idle time 459, 496configuration files 495, 497multiple, specifying values for 498number connected 493properties for rendering 170properties, Lingo for 184
Movies command 493multiplayer games 8multithreading 9, 486
creating threads 486defined 486Lingo for 504locking threads 488sharing data 487
multiuser applications, advanced 490multiuser movies
about 451and databases 468and projectors 472and text connections 462connecting to server 452error checking 460groups 464optimizing 472, 473peer-to-peer connections 461retrieving messages 459sending messages 458server functions 463
Multiuser Serveradministration 498and databases 468and projectors 472application overview 491automatic restart 498configuration 494, 497, 498connecting to 452connections waiting to be recycled 493connections, number of 495controlling with Lingo commands 502
Index592

Multiuser Server (continued)creating multiuser movies 451debugging 505error checking 460extending 474, 498groups 464, 466Lingo elements, alphabetical listing 507Lingo scripting elements 476multithreading 486new features 9, 451number of connections 493number of connections awaiting logon 493number of movies 493optimizing 472, 473, 474overview 449peer-to-peer connections 461retrieving messages 459running 492security 454, 472, 490, 498sending messages 458server functions 463server IP address 493server port 493server response time 492server-side scripting 478. See also server-side
scriptingsettings, in configuration files 494, 497Status menu 493text connections 462troubleshooting 499viewing server information 492
Multiuser Xtraand message checking 459and projectors 472and text connections 462instance of 452overview 449peer-to-peer connections 461
Multiuser.cfg file 491, 493, 494MultiuserCommon.cfg file 497
N
New Cast Member button, in 3D window 50new command 486newsprint shader 115
Lingo for 188Next Cast Member button, in 3D window 50node-relative vectors 159nodes 193
defined 76, 100deleting 250managing, with Lingo 184parent/child, Lingo for 177
normal vectors 93normals 279, 310, 336
in mesh 93, 94, 95list of 336
NotifyDisconnect parameter 497numSegments (3D property) 338
O
ObjectDB Xtra 496object-relative model movement 106objects
creating and removing with Lingo 178deleting 254removing 370server-side 478server-side scripts 484
on scriptMap handler 479opacity of particles 96optimizing movies 472overlays, inserting 294overlays, manipulating with Lingo 176overriding default collision behavior 156
P
painter shader 115Lingo for 188
Pan button 50panning 27, 32, 62Parameters dialog box (actions) 64parent nodes, Lingo for 177parent scripts 484parent-child hierarchy 56parent-relative model movement 106parents 341
Index 593

particle systemscreating 61defined 95distribution 264gravity 285Lingo for 185properties 95
particles, Lingo for 186passwords, server 454path (3D property) 342path name, of movie 495peer host 461, 499peer-to-peer connections 461
Lingo commands 502picking 157
Lingo for 187planes 92
Lingo for 186Play Animation option, in Property Inspector 52playback buttons, in 3D window 50playback capabilities, determining with Lingo 184playback head and markers 62playlist 129pointer. See cursorport, server 493, 494position, of camera 69position. See also transforms
of modelpound (#) sign 453, 494Preload option, in Property Inspector 52presentations 8Previous Cast Member button, in 3D window 50primitives 87
Lingo for 185privileges. See user levelsproduceValue() function 487projectors, and Multiuser Xtra 472Property Inspector 47, 51
3D Extruder tab 68Member option 70Text tab 67
property lists 458, 459proxy server 498, 499public actions 62public behaviors 59
R
radiusof cylinder 90of sphere 89
read() function 489readValue() function 489rect 363recycled connections 493reflectivity 52, 70, 364region (3D property) 365registering 366registration point 370renderer services object 166
properties 167rendering 51, 166, 352, 372
and Stage 261cast member commands 172cast member properties 170determining renderer 196methods, choosing 52movie properties 170sprite commands 174sprite properties 173
requirements, systemfor Director 8.5 12for Multiuser Server 13
Reset Camera Transform button 50Reset World button 50resolution 376, 377restarting the server 498rollovers 37, 63root bone 131Root Lock button 50Rotate button 50rotation 384
of camera 62, 69of models 63
Round option (for text) 69
Index594

S
scale (3D command) 386ScanTimeReportInterval setting 496Score 46screen, updating 473script objects, server-side 484scripting for Flash 5 583scripting, multiuser. See server-side scriptingScriptmap.ls file 478, 479scripts 9
adding to the server 479objects 154server, for group 480
SDS. See subdivision surfacessecurity 455
server 462, 490, 495sendMessage command 484sendNetMessage() function 462, 463serial number, setting 494server administration 498Server command 493server connection
and DBUser object 472setting up 452
server eventsdistributing 482standard 482
server files, accessing 489, 490server functions 463server information, viewing 492Server Response Time command 492Server Response Time message 496server security 490server. See also Multiuser ServerServer window
displaying text in 494status messages 495
server Xtrasloading 496writing your own 474
ServerExtensionXtras parameter 496ServerIPAddress setting 495ServerIPAddress tag 497ServerOwnerName parameter 494ServerPort setting 494serverPort tag 497servers, multiple 497
ServerSerialNumber setting 494serverShutDown 482server-side script objects 484server-side scripting
accessing files 9, 489, 490, 504adding a script 479administration 481advanced topics 490and custom events 482, 483and server event distribution 482commands and functions 477controlling groups, Lingo for 503controlling server, Lingo for 502createScript() 479, 484data types and objects 478databases, Lingo for 503debugging, Lingo for 505Dispatcher.ls 478keywords 477loadScriptMapFile 479multithreading 486, 504peer-to-peer connections, Lingo for 502script objects 484Scriptmap.ls 478security 481, 490sending messages 484server events 482startup process 478
Set Camera Transform button 50setAttribute command 466, 469setNetMessageHandler command 456, 474shaders 87, 390
and text 70commands 80defined 57, 80engraver. See engraver shaderLingo for 187newsprint. See newsprint shaderpainter. See painter shaderstandard. See standard shader
shininess 394Shockwave 3D window 49Shockwave Multiuser Server. See Multiuser ServerShockwave Multiuser Xtra. See Multiuser XtraShowCreateGroupMessages setting 496ShowCreateMovieMessages setting 496ShowJoinGroupMessages setting 496
Index 595

ShowLogonMessages setting 496ShowScantimeMessages setting 496silhouette 125smoothness 396
of curves 63of text 69
software requirementsfor Director 8.5 12for Multiuser Server 13
specular (3D property)light property 397shader property 398
specular color 52, 70specularity 397speed of particles 97spheres 61, 89
Lingo for 186properties 89
sprites 473D, Lingo for 188of 3D cast members 55rendering commands 174rendering properties 173
Stage 46updating 473
Status menu, in Multiuser Server 492, 493status messages, file for 495streaming 52, 343
Lingo for 188subdivision surfaces
modifier 388properties 388
subdivision surfaces (SDS) 63modifier 126, 189
sweep 89synchronous result 460syntax, Lingo 193system properties, Lingo for 184system requirements
for Director 8.5 12for Multiuser Server 13
system.script 483
T
targeted messages 473text connections, creating 462text editor 67text. See 3D textText tab (Property Inspector) 67texture
and text 70clamping 114commands 81, 118coordinates 93defined 57, 116Lingo for 189properties 117
texture mapping 93texture object, and shader layers 108textures 405
coordinates 310threads
creating 486locking 488
3D capabilities, determining with Lingo 1843D cast member 753D cast members. See cast members, 3D3D Extruder tab (Property Inspector) 683D Model tab, in Property Inspector 513D text 54, 67
creating 19, 67Lingo exceptions 71modifying 21, 68new Lingo for 71, 189rotating 23
3D window, using 493D world
and cast members 75controlling 153collision properties and commands 155event handling 154overview 55
3D Xtra, defined 8toon
colors of 243modifier 63, 190
toon properties 124trails (visual effect) 62transform (3D property) 106, 421, 422transform operator 166
Index596

transforms 106angles 207commands 164defined 162functions for creating 162inverting or reversing 296Lingo for 190properties 162
translations 424triangles, in mesh 93trigger behaviors
adding 28controlling 65defined 59viewing 60
troubleshooting Multiuser Server 499tunnel depth 21, 69, 73tutorial 17tween mode 4272D text, converting to 3D text 67type (3D property) 427, 428, 429, 430, 431typographic conventions 14
U
units, world 33updating the Stage 473user data 433user levels 493, 495UserLevel setting 495userLogOff 482userLogOn 482Users command 493Users Log On and Off command 492users, number connected 493
V
vectors 159, 435binary operations 161commands 160functions for creating 159Lingo for 191manipulating with transform functions 162properties 159
vertexList (3D property) 436vertical panning 31vertices
in mesh 93, 94of box 91of plane 92
View menu, in Multiuser Server 492
W
W3D format 8"whiteboard" meetings 8wind (3D property) 439world units 33, 148, 339world, 3D. See 3D worldworld-relative model movement 106world-relative vectors 159write() function 489writeValue() function 489
X
XtraCommand setting 496XtraConfigCommands setting 496Xtras
extending or removing 498Flash Asset 9, 583LingoVM 476, 478Multiuser. See Multiuser XtraObjectDB 496Server 4963D 8writing your own 474
Z
Z axisand camera movement 62and model movement 104
Index 597